#7.1 ceiling speaker placement
Explore tagged Tumblr posts
Visit Tumblr Blog
Explore Tumblr blogs with no restrictions, modern design and the best experience.
Last Seen Tumblr Blogs


Fun Fact
Tumblr Inc. is using 66 technologies for its website.
Text
😫 Struggling with poor sound from ceiling speakers? #AVsoundwoes 😣 Not thinking about room dimensions, seating, acoustics? #AVdesignflaws
🤦♂️ Bad speaker placement kills sound quality fast. Do it right!
🎶 Follow these simple tips for ceiling speaker placement:
🔊 Focus on sound coverage, not aesthetics #AVpriority 📏 Mind room size, ceiling height, seating #AVenvironment 🧑🤝🧑 Consider standing vs sitting listening height #AVexperience 📐 Angled speakers for elongated rooms #AVbalance 🤝 Cluster speakers above gathering areas #AVsocialspaces 🌀 Avoid placing speakers near vents! #AVnoise
🎧 Nail ceiling speaker placement for top notch sound now! #ceilingspeaker#speakerplacement#ceilingspeakerlayout
#ceiling speaker placement#atmos ceiling speaker placement#ceiling speaker placement calculator#in ceiling speaker placement#in-ceiling surround sound speaker placement#in ceiling 7.1 speaker placement#5.1.2 ceiling speaker placement#7.1 ceiling speaker placement#ceiling speaker calculator#ceiling speaker calculator online#ceiling speaker coverage calculator#ceiling speaker layout#ceiling speaker layout design#ceiling speaker spacing calculator#extron ceiling speaker calculator#home theater ceiling speaker placement#in ceiling speaker layout#rear ceiling speaker placement#home audio speaker placement#speaker coverage calculator#speaker placement calculator#speaker distance calculator#speaker room size calculator#speaker design calculator#speaker design online#ceiling speakers#speaker placement
0 notes
Text
Transform Your Space with Professional Home Theatre Services
A home theatre system brings the cinematic experience directly into your living space, offering superior audio and visual quality, comfort, and convenience. Whether you're looking to upgrade your current setup or planning a new installation, professional home theatre services can significantly enhance your viewing experience.
In this article, we explore the essential components of home theatre services, what to consider before installation, and the benefits of working with experienced professionals.
Understanding Home Theatre Services
Home theatre services encompass the design, installation, and configuration of audio-visual equipment to create a high-performance entertainment environment. These services are tailored to individual preferences, space requirements, and budget.

Common elements of a home theatre system include:
High-definition or 4K/8K television or projector
Surround sound audio system (5.1, 7.1, or advanced formats)
AV receiver and amplifiers
Custom seating and acoustic treatment
Media players or streaming devices
Lighting control and automation
Benefits of a Professional Home Theatre Setup
Hiring professionals for home theatre services ensures a seamless experience from concept to completion. A well-designed system offers more than just visual appeal—it provides performance, comfort, and reliability.
Key benefits include:
Optimized Sound and Picture Quality: Precision calibration of audio and video components ensures an immersive experience tailored to your room’s acoustics and lighting.
Customized Design: The layout, speaker placement, and seating arrangement are designed to suit your space and preferences.
Reliable Integration: Seamless integration with existing smart home systems, including lighting, climate, and security.
Clean Installation: Proper cable management and hardware mounting ensure a professional and clutter-free appearance.
Technical Support: Continued assistance for troubleshooting, upgrades, and system expansions.
Planning Your Home Theatre
Effective planning is essential to achieve the best results. From room size to equipment selection, every detail contributes to the final outcome.
Consider the following planning elements:
Room Size and Layout: Dimensions, shape, and ceiling height impact audio dispersion and viewing angles.
Lighting Conditions: Natural and artificial light sources affect screen visibility and ambiance.
Viewing Distance and Angles: Proper placement of the screen and seating ensures an optimal field of view.
Acoustic Treatment: Managing sound reflections and insulation enhances audio clarity and depth.
Power and Wiring Requirements: Adequate electrical capacity and safe cabling are necessary for efficient operation.
Choosing the Right Audio-Visual Components
The quality of your home theatre experience depends significantly on the components you select. Working with knowledgeable technicians can help identify the best equipment based on performance, compatibility, and budget.
Essential equipment considerations include:
Display Type: Choose between flat-panel TVs, OLEDs, or projection systems depending on room size and ambient light.
Speaker Configuration: Decide between soundbars, bookshelf speakers, in-wall systems, or full surround sound setups.
AV Receiver: Acts as the central hub for audio and video signal processing, with options for multiple input/output formats.
Subwoofers: Add depth to low-frequency sound for a fuller, more cinematic audio experience.
Media Sources: Include Blu-ray players, streaming devices, gaming consoles, and network media servers.
Installation Process
The installation of a home theatre system involves several steps, all aimed at ensuring peak performance and longevity.
The process typically includes:
Site Evaluation: A pre-installation assessment of the room to determine layout, acoustics, and technical requirements.
System Design: Creating a customized blueprint for equipment placement, wiring, and seating.
Wiring and Cabling: Concealing and organizing all connections to maintain a clean and safe environment.
Mounting and Placement: Secure installation of screens, speakers, and control panels.
Calibration and Testing: Fine-tuning audio and video settings to suit room characteristics.
User Training: Instruction on operating the system and adjusting settings based on user preferences.
Integration with Smart Home Features
Home theatre systems can be integrated into broader home automation platforms, allowing centralized control of various functions.
Integration options include:
Lighting Control: Automate ambient lighting for different viewing scenarios.
Voice Control: Use voice commands to operate AV equipment through smart assistants.
Remote Access: Manage and monitor your system remotely through mobile apps.
Scene Setting: Pre-set configurations for movies, gaming, or music listening.
Maintenance and Support
Regular maintenance and support are essential to keep your home theatre system running smoothly. Over time, software updates, hardware adjustments, and component upgrades may be necessary.

Ongoing support services can include:
System diagnostics and troubleshooting
Firmware updates and software patches
Re-calibration for improved performance
Replacements or upgrades for outdated components
Assistance with adding new devices or features
Conclusion
Investing in professional home theatre services provides a comprehensive solution for those who want to enjoy high-quality entertainment without the complexity of handling technical installations. From design to support, each step is executed with precision to deliver an exceptional audio-visual experience tailored to your space and preferences.
With careful planning, expert installation, and the right equipment, a home theatre system can become the centerpiece of your living space—offering comfort, functionality, and entertainment for years to come.
0 notes
Text
The Ultimate Guide to Surround Sound Installation in Your Home
If you’ve ever watched a movie and wished the action felt more immersive or listened to music and thought it could sound clearer, then it might be time to consider upgrading to a surround sound system. Whether you’re a movie buff, music lover, or gamer, having the right sound system can completely transform your entertainment experience. But how do you go about installing a surround sound system in your home? This guide will walk you through the basics, and we’ll even highlight a top-tier service, Scotty AV, to help you bring your vision to life.
What is Surround Sound?
Surround sound refers to the technique of using multiple audio channels (speakers) to create an immersive sound experience. Instead of hearing audio only from the front, surround sound systems distribute sound around you, making you feel like you’re right in the middle of the action. The system typically includes a combination of front, side, and rear speakers, as well as a subwoofer to enhance bass.
Types of Surround Sound Systems
When thinking about setting up a surround sound system, there are a few different types to consider:
5.1 Surround Sound: This is the most common setup, consisting of five speakers and one subwoofer. You’ll have a center speaker for dialogue, two front speakers for sound effects and music, and two rear speakers for ambient noises and directionality.
7.1 Surround Sound: Similar to the 5.1 system, but with two additional rear speakers for even more detailed sound placement. It’s a great choice if you have a larger room or want to fine-tune your sound experience.
Dolby Atmos: This next-level system adds overhead speakers or upward-firing speakers, providing an even more immersive experience with sounds coming from above. Perfect for those who want to fully replicate a cinema-quality sound experience.
Why Surround Sound?
Investing in surround sound means upgrading the entire way you experience entertainment. Instead of just listening to sound, you’ll feel enveloped in it. Whether you’re watching a thrilling action movie with explosions, listening to your favorite album, or playing the latest video game, surround sound brings depth and clarity that stereo speakers simply can’t match.
For example, imagine hearing rain falling from the back of your room or the roar of an engine coming from your left side as it speeds past you in a racing game. It’s like the difference between watching a movie and living it.
Key Considerations Before Installation
Before diving into your surround sound installation, there are a few factors to consider:
Room Size: The size of your room will impact the number of speakers you’ll need. A larger room might require more speakers or a more advanced system to fill the space with sound.
Speaker Placement: The positioning of your speakers is crucial for achieving optimal sound. Typically, the front speakers are placed near your TV, while the rear speakers should be at ear level or slightly above. The subwoofer, which handles low frequencies, is often placed near the front or side.
Wiring: Some systems require running wires through walls, ceilings, or floors, which can be tricky. If you’re not comfortable with this, hiring a professional might be the best option.
Receiver Compatibility: Your surround sound system will need a receiver to power and manage the speakers. Make sure the receiver you choose is compatible with the number of channels in your surround sound system.
Why Choose Scotty AV for Your Surround Sound Installation?
While setting up a surround sound system might seem like a DIY project, getting it right requires expertise—especially when it comes to wiring and speaker placement. That’s where Scotty AV comes in. Located in Maryland, Scotty AV is a trusted company specializing in home entertainment and AV solutions. Their team of experts can help you design and install a custom surround sound system tailored to your specific needs and space.
Scotty AV offers a range of services, from helping you select the right system to ensuring that everything is installed and configured for maximum performance. They even take care of running cables discreetly, ensuring a clean, professional look without compromising on sound quality.
Final Thoughts
Surround sound installation isn’t just about adding speakers to your home—it’s about creating an experience that elevates how you enjoy your media. By choosing the right system and ensuring proper installation, you’ll feel like you’ve brought the theater experience right into your living room. For a smooth, seamless installation, Scotty AV in Maryland offers the best expertise and service in making your surround sound dreams come true. Get in touch with them today, and get ready to immerse yourself in a whole new level of sound!
0 notes
Text
DESIGNING A HOME THEATER
A home theater concept refers to a high-quality audio and visual entertainment system that replicates the experience of watching a movie in a commercial movie theater. A home theater typically includes a large-screen television or video projection system, surround sound speakers, and comfortable seating arrangements.
When designing a home theater, an interior designer should consider several factors to create an immersive and enjoyable viewing experience for the homeowners such as the room size, layout, acoustics, seating arrangement, etc. Here are some things an interior designer should consider
1. Determine the purpose and budget:
The first step in designing a home theater is to determine the purpose of the room and the budget you have. The purpose of the room will help you decide the type of equipment you need, the size of the screen, and the number of seats. The budget will help you determine the quality and quantity of equipment you can afford.
2. Room size and shape:
The size and shape of the room will influence the layout, furniture placement, and acoustics. The designer should determine the best location for the screen, speakers, and seating based on the room dimensions.
3. A room that is too small can feel cramped, while a room that is too large can be difficult to fill with sound. Ideally, the room should be rectangular in shape, with a ceiling height of at least 8 feet. The size of the room should be large enough to accommodate the desired number of viewers and the equipment needed for the theater.
4. Seating arrangement:
The seating arrangement should be comfortable and optimized for viewing. The designer should consider the number of seats required and the optimal viewing distance. The seating should also be arranged in a way that does not obstruct the view of the screen. Comfortable seating arrangements are essential to ensure a great movie-watching experience. You can opt for traditional theater seating or choose a comfortable sofa or sectional. The seats should be arranged in a way that provides a clear view of the screen from every angle. The seats should have adequate legroom and armrests. Consider using tiered seating to provide a better view for everyone in the room.
5. Lighting:
Lighting plays a significant role in setting the mood for a home theater. The designer should consider the type and placement of the lighting fixtures to create a cinematic atmosphere. They should also ensure that the lighting does not create glare on the screen.
6. Acoustics:
The acoustics of the room are critical to creating a high-quality viewing experience. The designer should consider sound-absorbing materials, such as acoustic panels, to reduce echoes and enhance sound quality.
7. Screen and projector:
The screen and projector are the focal points of the home theater. The designer should choose a screen size that complements the room size and a projector that delivers high-quality images. You will need a large-screen television or a video projector and screen to create an immersive viewing experience. A 4K or even 8K TV with HDR capabilities will provide stunning picture quality.
8. Sound system:
The sound system is a crucial component of the home theater. The designer should consider the number of speakers required and their placement to create an immersive surround sound experience. A high-quality audio system is crucial for a home theater. You will need a surround sound system with a receiver, speakers, and a subwoofer. The number of speakers depends on the size of your room, but a 5.1 or 7.1-channel system is usually sufficient.
9. Room decor:
The decor of the room should complement the home theater experience. The designer should consider themes and color schemes that enhance the viewing experience without distracting it.
10. Accessibility:
The designer should consider accessibility when designing the home theater. They should ensure that the space is accessible to people with disabilities and that the equipment is easy to operate.
Calibrate the system:
Finally, you should calibrate your audio and video system to ensure that everything is working correctly. You can use test tones and a sound meter to set up the audio system, and a calibration disc to optimize the video settings.
By considering these factors, an interior designer can create a home theater that provides an immersive and enjoyable viewing experience for homeowners.
0 notes
Text
Integrating Audio-Visual Design in Smart Homes
With the advancing technology, smart homes have become popular in recent times. These homes allow automation and remote access and control of various home appliances and functions using devices and internet connectivity. An important aspect in designing a smart home is integrating audio-visual solutions which enhance the lifestyle and experience of living in these homes. This blog discusses how audio-visual design can be incorporated in smart homes effectively.
Audio visual service contract template is a legal document used for maintaining audio-visual equipment installed in homes, offices or other establishments. Integrating quality audio-visual systems in smart homes requires proper service and maintenance which a contract ensures.
Components of an Audio-Visual Design
Home Theater
One of the primary considerations for audio-visual design in smart homes is the home theater system. It includes equipment like LCD/LED TV, surround sound system, Blu-ray/DVD player, set-top box and streaming devices. Quality screens ranging from 55-75 inches along with 7.1 channel surround setup with dedicated speakers and subwoofers create an immersive theater-like experience. Popular brands for theater components include Samsung, LG, Sony, Bose, Polk Audio etc.
Home Automation
The whole idea of a smart home is to automate various functions using voice commands or mobile devices. Audio solutions need to be integrated with smart devices and virtual assistants like Google Home and Amazon Alexa for remote control. Speakers placed in various rooms can be linked to play the same or different audio depending on the zone. Automation simplifies entertainment and enhances user experience.
Whole Home Audio
Instead of limiting audio to just the home theater area, a whole home audio system distributes music to different rooms. In-ceiling and in-wall speakers are installed throughout the house along with streaming modems/decoders to play the same or independent audio sources zone-wise. Brands like Sonos and Bose offer modular wireless solutions ideal for whole home setup.
Outdoor Audio
Smart homes make the most of indoor as well as outdoor spaces. Weatherproof speakers are placed in patios, gardens, pools or decks for uninterrupted music. These can be part of the indoor system through additional amps/receivers or operated separately. Brands like JBL, Klipsch, Polk offer outdoor speakers suitable for smart homes.
Home Automation Technologies in Audio-Visual Design
Smart Speakers and Virtual Assistants
Intelligent speakers from companies like Google, Amazon, Apple and Samsung act as control hubs for audio systems and other smart devices. Commands for playing music, switching inputs or changing volume are given through voice. Notifications, reminders and queries can also be handled using virtual assistants like Alexa, Siri or Google Assistant.
WiFi Streaming and Multi-Room Audio
Streaming audio wirelessly using network or Bluetooth offers flexibility to play the same or independent sources all over the house. Sonos, Bose and other brands have solutions allowing multi-room synchronous or asynchronous playback using a mobile app or voice. Sources can be locally stored music or audio from online streaming services.
Home Automation Protocols
Popular protocols like Crestron, Control4, RTI and Savant allow integrating audio, lighting, security, HVAC and other systems on a single platform. Scenes and activities can be programmed through interfaces to automate complex functions as desired. For example, dimming lights and playing romantic music with a single command. These are ideal for high-end luxury smart homes.
Installing an Audio-Visual System in Smart Homes
System Design and Layout
The first step is consulting an AV professional to understand owner's requirements, do a site survey and come up with the best design. Important factors like speaker locations, sizes of screens, placement of equipment racks and streaming devices are determined based on the home layout and budget. Installation feasibility is also assessed at this stage.
Equipment Selection
After finalizing the design, specific products are selected based on criteria like features, reliability, reputation, pricing and aesthetics. While big brands are preferred, lower cost or niche options are considered if they meet audio quality standards. Equipment for core components like TVs, projectors, receivers and networking gear are purchased.
Installation and Configuration
Professional installation ensures neat wiring hiding cables and optimal mounting of speakers and screens. Equipment is set up, wired together as per schematic and configured through on-screen menus or dedicated apps. Sources are linked, streaming accounts configured, control integrated with smart home system through programming.
Configuration and Calibration
An AV professional fine tunes the system for optimal performance. Screen sizes and projector placement is optimized through calibration. Speaker levels, positioning, distances and crossovers are set for accurate soundstage. Bass management and room correction through Audyssey, AccuEQ etc is done for clarity and fidelity.
Maintenance and Service Agreement
Though smart home AV systems have evolved to require minimum maintenance, critical annual checks need to be performed to ensure longevity and reliable performance. A service contract signed with the installation vendor looks after maintenance tasks like cleaning, firmware updates, testing cables/connectors, and addressing minor/major issues if any come up. Replacement of obsolete components down the line is also planned through such agreements.
Integrating Audio-Visual Systems with Other Smart Home Features Audio can be integrated with various smart capabilities through home automation platforms:
Control lights, motorized shades or sprinklers through scenes triggered on audio activity
Get notified on mobile if alarms or door/windows are opened when music is playing
Automatically lower volume or pause when Ring or Nest doorbell is pressed
Sync audio with activities like starting workout videos on a TV or mirror
Use voice commands to play music, check weather or latest news throughout the house
Remotely access security cameras, doorbells and baby monitors on TVs using streaming devices
Benefits of Incorporating Audio-Visual Systems in Smart Homes
Creates a true connected home entertainment experience for residents
Enhances lifestyle with flexibility to enjoy music or movies anywhere Automation using voice assistants saves physical effort of controlling via remotes
Multi-room audio offers intimate listening zones tailored as per activity
Adds a luxury aesthetic appeal to modern smart homes Future-proofs the property, maintaining resale value through latest technology
Safety features like voice activation in risky environments like kitchens or workshops
Whole home audio helps keep families connected across floors
Conclusion
Incorporating well-designed audio-visual systems tailored for smart home capabilities greatly elevates the lifestyle and user experience in modern residences. Right from the project planning to maintenance stages, an expert integration ensures seamless control and enjoyment of multimedia all over the living spaces. As technology evolves with trends like personalized audio, immersive experiences and AI assistants, AV design too will adapt to deliver superior connected lifestyle solutions. Installing such solutions at the construction phase future-proofs homes for many years through upgradable components and ongoing service agreements. Overall, integrating pro-standard audio-visual design in smart homes completely transforms the way residents experience music, movies and connectedness through technology
0 notes
Text
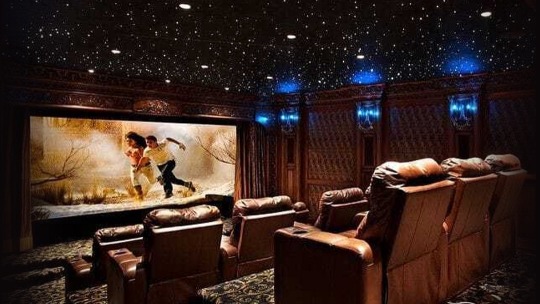
Selecting the Perfect Spot for Your Home Theater Room


When you decide to set up a home theater at your home, the first question that pops in to your head is which room should be utilized for the theater? When choosing a room, there are different room characteristics you must consider: size, shape and location. All these characteristics will have an influence on the overall performance of your theater. Many homeowners tend to just select any room for their home theater without much consideration. Most of them opt for the living room. Nothing against living rooms��you do need to ensure that whichever room you select has the following characteristics which will allow for optimal performance from a home theater.

Ample Space
The space required for your home theater is solely dependent on you. Mostly dependent on how many people you plan to accommodate in your theater at a time. Think about it, if you plan on having two to three rows of the Nitro XL750 then you need quite a lot of space in the room. You also need to make sure there the seating starts at least 10-12 feet away, screen size of 60” or more, from the screen to ensure the best view. We recommend going with a larger room for your home theater anywhere from 13’ to 16’ wide, 27’ to 30’ long, and 8’ to 9’ feet high if you are looking to accommodate at least 10 – 12 people at a time. If you want a smaller set up to accommodate less people then you can do with a smaller room. Do not forget to take speakers and their placement into consideration when selecting a room. If you go with a 5.1 or 7.1 surround channel, then you will need to make sure you have enough room behind the seating and to the side to fit the speakers. Which means that the seats cannot be all the way against the back or side walls. To save yourself the trouble of worrying about speaker space, you can opt for in-ceiling or in-wall speakers. When selecting a room, you need to ensure that the ceiling of the room is not that high. Make sure the ceiling does not exceed 9’. If it does then, there is a good chance the sound of your home theater will not perform at its optimal level. Since, sound will have to travel a lot further to surround the entire room, sound gets lost in rooms with higher ceiling which shows in its result.

Has Limited or No Windows
Windows are considered the kryptonite of home theater. They actually have a negative impact on its performance in terms of picture and sound. The light from the window will be a huge distraction as it will reflect from the screen. Not only that, sound easily reflects from windows making it unnatural. So if you want your home theater to perform well, get select a room with no windows. If there is no room without a window then select the one with the least amount of them and purchase good quality blackout curtains.

Is Isolated
Imagine you are fully engrossed in a movie and your door bell rings. It’s your neighbors complaining about the noise and asking you to keep it down. After spending tons of money on your home theater, the last thing you want is to be told to keep it down. You want to ensure that the location of your home theater doesn’t bother your neighbors or anyone else in the house so you can watch and enjoy your favorite action movies. The basement is usually a safe option or a room far out in the house. The good thing about an isolated location is that is also ensures you do not get a lot of noise disturbance from other rooms. It works both ways in keeping others away from noise while also keeping you away from noise to watch your movies in peace. If you can’t find an isolated room, then you can consider using noise cancellation techniques to ensure that less sound travels outside the room.

The Right Flooring and Wall Color
The good thing about both the walls and flooring is that they can be modified to ensure optimal performance for your theater. In terms of walls, you want to have them painted a darker shade, if they aren’t already. Glossy and lighter shades allow light to reflect which can be a huge distraction as you watch a movie. When it comes to flooring, you want to select a room with a carpet. Any type of hard floor can cause acoustic reflections, which disturb the overall sound. If you do not have a carpeted room then you can get a rug for the floor. Selecting a room for your home theater is not an easy job. If you keep our tips in mind you should have no problem maximizing the performance of your home theater. Whether your living room is suitable or not for a home theater depends on if it checks all the above boxes. Ideally, if you have a basement we would recommend you set up your home theater in it. The basement tends to be a good size, isolated for the most part, and has limited to no windows. Related: 3 Reasons Why Carpet is Still the King of Basement Flooring Katie Porter is an aspiring writer, movie lover, and part of the team at Seatup. In her free time, she enjoys exploring her home state Colorado and plays in women's amateur rugby league. Read the full article
1 note
·
View note
Text
Dolby 5.1.2 Speaker Placement

Best 5.1.2 Atmos Speaker Placement
5.2.2 Dolby Atmos Setup
9.2 Surround Sound
The LG SJ9 is a 5.1.2 channel soundbar that is compatible with Dolby Atmos. Instead of being confined to a certain number of channels, Dolby Atmos creates an atmosphere of sound that blankets you for a more realistic and immersive experience. Got a tech question for Sound & Vision? Email us at [email protected] Q I have a 7.1-channel surround system with four dipole surround speakers. My plan is to move the back surround speakers to the ceiling in my home theater and use them for down-firing height speakers in a Dolby Atmos 5.1.2 setup.

Both DTS:X and Dolby Atmos are relatively new audio formats that utilize objects instead of classical channel layouts. The metadata for the objects and their position in three dimensional space tag along either DTS HD/MA or Dolby TrueHD/Dolby Digital Plus. An Atmos or DTS:X processor then uses this metadata to position the sound across the available channels. The idea behind this is that regardless of the theater or home theaters setup the processor can accurately present the location of a sound regardless of both the number of channels and the configuration of those channels. In theory it shouldn’t matter if you are using 5.1.2, 5.1.4, 7.1.4 or 24.1.10, you should get the same relative imaging across the sound field. In the cinema, Atmos offers support for up to 64 individual channels, and up to 34 in a home theater. My guess is the majority of HT enthusiasts will be pushing both budget and space constraints with a 7.1 channel or 9.1 channel system, let alone a 34 channel system, but, it’s always nice to have the option (assuming AVRs and processors support that many channels). DTS:X supports a maximum of 30.2 channels in the cinema, and 11.2 in the home.
One of the things that’s supposed to set DTS:X apart from Atmos is their claim that it can support any channel layout. In theory, you should be set up your system however you want (within the limits of your AVR’s configurations) and it should work regardless, Unlike Atmos’ prescribed layouts. One benefit of this is that it should be compatible with the Auro 3D 10.1 layout, which Atmos is not. Atmos does not support the Voice of God channel (a single overhead speaker) nor does it support Side Heights or Front Top Center. DTS:X should be able to. Dolby doesn’t come right out and say their system supports many different speaker layouts, but it clearly does, considering it can be scaled from 8 channels to 34 in the home. In addition to height/overhead channels, front wides, rear wides, rear centers, and everything in between is supported outside of placing height channels above the surrounds. Atmos requires height channels, while DTS:X does not. This is good, considering not everybody has the ability or desire to add overhead speakers (and dolby enabled speakers really suck in my experience), and object based audio definitely sounds much more precise than a simple 7.1 mix utilizing panning/phase manipulation.

The biggest question I have is does it actually work the way DTS:X claims, and how does the ability to scale to different layouts compare between Atmos and DTS:X? That’s what I set out to discover. Currently I have an Onkyo TX NR-656. It’s a 7.2 receiver with both DTS:X decoding and Atmos decoding capabilities. Obviously, it only allows me to use one pair of height speakers, either Top Front, Top Middle, Top Rear, Rear Height, and Top Height. Dolby recommends using Top Middle speakers for a 5.1.2 config, and that’s what I had originally set my system up with, similar to this:
Before we delve into whether or not DTS:X really works with any layout, let’s look at what DTS:X classical layouts look like.
DTS has no recommendations on how to configure your system on their site for DTS:X, obviously, if it’s supposed to be compatible with any layout, you shouldn’t need to follow any prescribed setup. But what about the studios who mix in DTS:X? What setup are they using? I managed to find a few pictures of a studio setup here.
Looks to me like classic 11.1 with 7 bed channels and 4 height (not top) channels.
How will this translate to my 5.1.2 setup with a single pair of Top Middle speakers? To find out, I first used the DTS:X Object Emulator. It’s basically a floating ball that moves around different channel layouts, the sound follows the ball. You can see a preview of it here (in stereo obviously). The demo file can be downloaded from The Digital Theater.
Best 5.1.2 Atmos Speaker Placement
The first thing I noticed, DTS:X does a really good job of making 5.1 sound more like 7.1, Atmos does this too. In Dolby Atmos’ guidelines for home theater, 5.1.x setups specify that the surrounds are placed at 110 degrees vs 90 degrees, and directly at ear level. Originally it was recommended that the surrounds be placed about 2 feet above ear level for traditional 5.1 and 7.1, however, now that overhead speakers have been added, this is no longer necessary and actually detrimental to getting good separation between overhead sounds and floor sounds. With traditional 5.1, a 7.1 track is downmixed to 5.1 by simply folding the rear channels into the surrounds, In DTS:X and in Atmos, things passing through the rear channels are phantomed between the surrounds and the appropriate phase delay is added, so it does sound like it’s coming from behind, similar to how a phantom center channel appears in classic stereo. Off to a good start, we’re getting rear channel/surround channel seperation with two surrounds.
What about overhead sounds though? How does that translate to my Top Middle Atmos configuration? As you can see from the Object Emulator Demo, there is no Top Middle speakers, only Rear Height, and Front Height.
Right off the bat I’m assuming that the DTS:X software is going to create a Phantom image for the front and rear heights by mixing it between the fronts/surrounds and top middle speakers. Turns out that wasn’t the case. As the ball passes by the front and rear heights, the top middle speakers remain silent, and the sound is mixed exclusively in the front and surround bed channels. The only time I hear anything coming from overhead is when the ball is directly in the middle above. Not good. Quite a bit of height information is lost this way. What if a helicopter in a movie is approaching from the front or rear? Unless it passes overhead, you’re not going to hear it from the heights at all. With Atmos, I’ve not had any trouble like this. All height information is mixed into the top middle speakers and then phantomed between those and either the front or surrounds, the way that it should be.
This got me thinking, perhaps DTS:X simply doesn’t jive well with a top middle configuration. To see if this was the case, I simply changed my configuration via the setup menu in my receiver to front height and repeated the demo. I immediately noticed a whole lot more sound coming from the height speakers, not just when it passed through the front heights, but also the rear heights. As the ball approached the rear heights, the sound was mixed between the rear speakers and heights, with the heights changing phase as the ball approached the rear. The same thing happened when I reconfigured the heights to rear heights. What about top front and top rear? Same thing, it works.
I set the config back to top middle and decided to try a movie mixed in DTS:X. For this, I picked The Girl on the Train. I watched the entire movie with the top middle configuration, and not once did I ever hear anything come from the height speakers. Changing them to front or rear heights again, solved this problem, with plenty of height information coming from the top.
From this, we can conclude that DTS:X certainly doesn’t just work with all configurations. Perhaps with a greater number of speakers, a top middle pair would work well as an addon, but only with front and rear heights as well. In all configurations, I have yet to see top middle speakers in any studio configuration for DTS:X, and it’s obvious DTS had height speakers, rather than top speakers, in mind when designing the format. This is certainly something to keep in mind when setting up a 5.1.2 system.

5.2.2 Dolby Atmos Setup
It worth noting that Atmos seems to work well no matter what setup I choose, Top front/middle/rear, or Front height/rear. Pinochle app for windows 10. Sounds come from the appropriate location. With this in mind, I would suggest designing an Atmos/DTS:X system that includes only a single pair of height speakers with either Top fronts, or Front heights for maximum compatibility.
Duet display free. Aside from the top middle problem, there is no discernable difference between the way the two work when it comes to panning sounds across a 3D sound stage.
9.2 Surround Sound
In part II, we will look at the differences and compare between the two Upmixing modes, Dolby Surround and DTS: Neural X.
0 notes
Text
How to Set Up Surround Sound On Computer?

📷
How to Set Up Surround Sound On Computer? Surround sound provides an audio revel in like no different. It converts your home to a domestic theater via a multi-channel speaker machine. Compared to standard fashions, the 5.1, 7.1, and 9.1 models are best for surround sound at domestic. You can binge your favourite indicates, films, and video games from the consolation of your home. Research shows that the COVID-19 pandemic is leading to a tremendous boom inside the domestic theater marketplace size. Therefore, increasingly more humans need to learn how to installation surround sound actual short. Read Full Article ‘How to Set Up Surround Sound On Computer?’ So what are those domestic theater speakers or what’s a surround sound machine, and the way need to you place them up to get the nice revel in? What does surround sound suggest and the way does it range from the older machine? Let’s study in detail about a way to set up surround sound at home and convert your property right into a mini-theater.
Table of Contents What is Surround Sound? What are the Elements of a Surround Sound System? Subwoofer Central Speaker Satellite Speakers Mixer/Equalizers What is Dolby Surround Sound? PCM vs. Dolby Digital Dolby Atmos Speaker Placement What is a 7 Channel Receiver? What is a 5 Channel Receiver? What is an AV Receiver? Stereo Receiver vs. AV Receiver How to Set Up Surround Sound On Computer? Fine-Tune the Surround Speakers Consider the Acoustics of the Room Create a Clear Path Work Things Out 7.1 Surround Sound Setup Diagram How to Setup Surround Sound System? Ideal Home Theater Speaker Placement in five.1 Surround Sound System How do I join my Surround Sound to my TV with HDMI? Is a Center Channel Speaker of a Home Theater System Necessary for Surround Sound? How to Install Ceiling Speakers for Surround Sound? What Does a Soundbar Do? How to Connect a Soundbar to TV? How to Connect Soundbar to TV? How to get Surround Sound on PC? Conclusion What is Surround Sound? A sound recording commenced as a monaural in which all tracks were recorded in a single audio channel. Then emerged two-channel structures, binaural recordings where it feels like you’re taking note of a live performance. Taking this one step further, surround sound structures enter the scene with multi-channel recordings.
Do you realize that surround sound is a multi-channel sound gadget released by means of Dolby Laboratories? It have become so famous that it’s now used extra as a established term encompassing specific sorts of multi-channel sound structures inside the marketplace.
This system consists of multiple surround sound speaker to offer a realistic audio revel in. The audio tracks are performed in man or woman audio system. If a tune (or the voice) is lacking whilst you play an audio file, it means the connection needs to be checked.
What are the Elements of a Surround Sound System? The five.1 channel, 7.1 channel, and 9.1 channel are referred to as surround sound structures. The 5, 7, and 9 denote the range of audio system. The digit after the decimal denotes the range of subwoofers. The following are the elements of a surround sound device.
Subwoofer This is the largest a part of the sound device. It produces low tones and bass and is a effective unit that makes use of air pressure to release the low thumping and drumming sounds within the room. When you increase the extent, you could feel the thumps reverberating around you. Placing the subwoofer at the floor will increase its impact.
Central Speaker This is a important a part of the speaker machine. This speaker produces the voice and different sound effects. High-give up surround sound systems have a bigger significant speaker to decorate the effect.
Satellite Speakers Satellite speakers are located at the left and right sides of the speaker. You placed them inside the front and rear. For instance, there are 4 satellite speakers in a 5.1 surround channel. Two on the left (front and rear) and at the proper (back and front)!
Mixer/Equalizers Mixers or equalizers are built into the computer systems in most instances. You also can locate mixer software for devices. But if you need extra power to make bigger the sounds, you need to connect a separate equalizer.
What is Dolby Surround Sound? Dolby Laboratories were pioneer within the speaker world for many years. The first Dolby surround sound changed into delivered in 1982. It encodes 4 analog audio channels into channels. This is performed for audio storage and transmission. When Dolby surround is played on a regular stereo, the sound comes via channels. But whilst you play it on a Dolby surround-enabled tool, it plays thru all four channels.
The left, right, and middle channels are in full range (20 Hz to 20 kHz) whilst the rear is confined to a certain bandwidth within the frequency variety of the audio being performed.
PCM vs. Dolby Digital There are two ways to manipulate and present audio recordings. One is the PCM (Pulse Code Modulation) that converts analog audio into virtual audio. PCM audio on a DVD is a two-channel stereo tune.
Dolby Digital® uses left and proper audio system, front and back audio system, and a primary channel to play the audio tracks in person speakers.
While PCM works with preferred DVD gamers, Dolby Digital supplies super sound while used with HD TV. Using Dolby Digital with an everyday sound machine setup will reduce the audio readability and dim your experience.
You can pick out the settings when you connect the input and output devices to your tv. Apart from PCM and Dolby Digital, you might also see options like Dolby Digital Plus, DTS, or Dolby Atmos®. For Atmos output, you need to go with the automated TV placing.
Dolby Atmos Speaker Placement Before you set up the house theater machine for Dolby Atmos, you’ll first need to understand the position and role of each speaker. This will fetch you the satisfactory sound enjoy.
Let’s recall Dolby Atmos 5.1 surround sound to recollect the location of the audio system.
Align the important speaker with the seating role. It need to sit in a straight line from the center of the sofa. There should be around a 30-diploma attitude between the left and right speakers on the couch.
The lower back speakers need to be round one hundred twenty tiers from the sofa on the opposite facet of the room, dealing with the front audio system. The subwoofer sits beside the left/ proper front speakers and at the floor for optimum effect. The speakers will surround you, resulting in a surround sound experience in your home.
What is a 7 Channel Receiver? We’ve talked pretty a piece about the 5.1 device. Let’s see what a 7 channel receiver is. The 7 channel receiver is either a 7.1 surround sound or a 7.2 surround sound. The best distinction between those two is the number of subwoofers within the device. The 7.2 gadget has subwoofers in place of one.
A 7 channel surround sound system has the front audio system, two again speakers, and a further set of rear/aspect speakers, together with the important speaker and a subwoofer. Blu-ray discs are like minded with 7.1 speaker systems. The first 7.1 theatrical soundtracks turned into launched in 2010 for the film Toy Story 3. Post this, numerous famous films like Thor, Captain America: The First Avenger, and many others. Used Dolby Surround 7.1.
What is a 5 Channel Receiver? We’ve been speakme lots approximately channels and audio tracks. But what precisely is a channel? It’s not anything however the sound gambling from a unmarried point. For example, whilst a singer sings into a microphone, it’s miles taken into consideration as one audio channel. The music from different instruments is segregated into other channels and mixed to provide a complete track. Each speaker in the sound device can play on the channel of audio.
A 5 channel receiver accepts those soundtracks and plays each of them through the person speakers. The central speaker is used for the voice, at the same time as the subwoofer handles the bass. It is taken into consideration a fundamental format and is used in theaters, DVDs, or gaming consoles. It offers a first-rate musical revel in.
What is an AV Receiver? An AV receiver is an audio/video receiver and is part of the house theater setup. It receives indicators (of both audio and video) from extraordinary sources and amplifies them to ship the audio sounds via the speakers and the video music thru the TV, monitor, projector, and many others.
The AV receiver is controlled using a far off to adjust the sound and photo settings. The AV receiver is nothing but an amplifier and has as a minimum a two-channel sound gadget with an inbuilt mixer. An AV receiver can be given records from radio, DVD, Blue-ray, VCR, gaming consoles, and so on.
The 5.1 surround sound gadget became taken into consideration a popular AV setup till the 7.1 system turned into delivered and acquired greater repute. Today, we find each models within the marketplace, at the side of the nine.1 surround sound machine (with nine speakers).
You May Also Like: 7 Most Expensive Headphones in 2021
Stereo Receiver vs. AV Receiver Though both are a part of the house enjoyment machine, a stereo receiver isn’t the same as an AV receiver. One can’t absolutely replace the opposite.
The key distinction among the 2: the stereo receiver amplifies sounds. It can be related to a CD participant or a musical instrument to channel the audio via the receiver and into the speakers. It can’t receive video.
The AV receiver accepts both audio and video. It can play tracks from a CD, DVD, Blu-ray, and lots of other input assets. The AV receiver is both a hyperlink and controller that connects the inputs and output resources.
If we speak about the satisfactory of audio brought by means of both the receivers, the stereo receiver gains extra points. It has been built for amplifying tune.
That stated, the AV receivers in recent times have HDMI connectivity. Some come with 4K and HDR video transmissions. These make certain a better sound first-class, along side top notch video excellent. Another advantage of the AV receivers is that they’re built for 5.1 channel sound. The stereo has most effective a -channel machine. If the authentic tune turned into made for a 5.1 machine, AV receivers supply the surround sound flawlessly.
How to Set Up Surround Sound On Computer? To get the nice outcomes from the surround sound setup, you first need to optimize the setup to fit the room.
Fine-Tune the Surround Speakers Arranging the speakers is nearly usually a trial and errors job. You’ll need to transport them round till you get the level of clarity you want. The remaining you’d like is to hear the outside noise while taking part in your favourite movie or show. Check the speaker connections once the setup is whole.
Consider the Acoustics of the Room Excess furnishings and décor can swallow the sound. Yeah, bare partitions and minimal fixtures will enlarge the audio. This doesn’t suggest you have to empty the room. Just get rid of factors that aren’t wanted within the room. Think of it as spring cleaning.
Create a Clear Path You want to see the audio system. Yes, even the rear audio system should be visible. Don’t cover them at the back of vases or flowerpots. The the front three audio system should stand and supply audio, and the waves have to attain you directly and align with the ear degree.
Work Things Out The installation can take time and you ought to be prepared for it. You also can test a bit by using angling the audio system inwards or outwards. You can then strive exceptional combinations of these until you find the one that works first-rate for you.
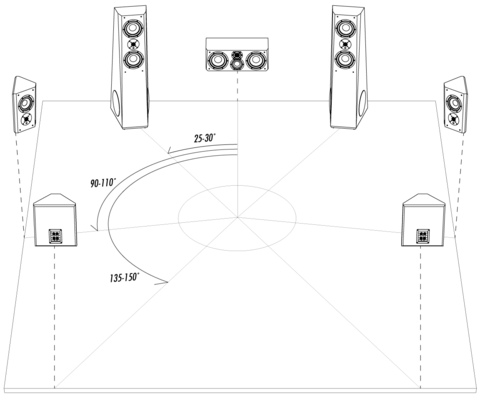
7.1 Surround Sound Setup Diagram There’s no factor in buying an luxurious home theater sound device if you just sell off the audio system at random places. The placement of the speakers is as crucial as the equipment, specially if you’ve offered the first-rate floor standing audio system or first-class bookshelf speakers. The front speakers and the significant speaker are the critical ones. But don’t depart the again speakers everywhere both. Here’s a brief diagram of a 7.1 surround sound setup.
Diagram of a 7.1 Surround Sound System Let’s start with the seating vicinity first. You want to put the couch without delay in front of the TV at a safe distance for the eyes. Now, degree from the middle of the sofa. The significant speaker must be at 180 levels from the center of the sofa. Ensure the crucial speaker sits in the middle of the TV stand wherein you also are putting the principle unit of the home theater device. Place the the front left and the front proper surround audio system on either aspect of the television. Maintain a bit space at the facet and region the front audio system diagonally. Next, select up the surround left and surround right audio system. These can be beside the sofa (on both facet) at an perspective of 90 levels from the center and 180 stages from each different. Now, you’ll need to area the again left and again right audio system behind the couch on the opposite side of the room. These speakers have to be at a hundred thirty-one hundred fifty ranges from the middle of the couch. The lower back audio system will be towards each other and near the couch as compared to the the front speakers. The subwoofer is remaining. Place it both close to the front audio system or a bit behind this pair. Your 7.1 surround sound setup is ready to apply. We desire you understand the 7.1 surround sound setup now. Did you already know that you could even purchase 7.1 surround sound headphones? Check out the first-class surround sound headphones now.
How to Setup Surround Sound System? Ideal Home Theater Speaker Placement in five.1 Surround Sound System The 5.1 surround sound device has 5 surround audio system and one subwoofer. Place the subwoofer on the ground and arrange the surround audio system round your seating. Here’s a short diagram of a five.1 surround sound machine speaker.
Diagram of a five.1 Surround Sound System The middle channel speaker, the sofa, and the TV should be in a single straight line. The front speakers ought to be a foot faraway from the TV sideways. Place them diagonally, turning the speakers inwards. The audio system behind the couch (rear surround) must be in the direction of the couch and consistent with the front speakers. The left back and front need to form a immediately line and the right back and front speakers have to also form a directly line. Turn the back speakers inward, diagonally facing the backside of the couch. Place the subwoofer at the back of the left or proper front speakers.
7.1 vs 5.1 Surround Sound System How do I connect my Surround Sound to my TV with HDMI? There are approaches to attach the surround sound to the TV, and one in every of them uses the HDMI cable.
To use the HDMI cable, your speaker machine and TV should have the ARC (Audio Return Channel) function. This characteristic removes the need for every other audio cable to attach the two devices. Mark the HDMI ports with ARC to spotlight which port you need to use for the connection. If either device doesn’t have the ARC feature, you’ll have to use the audio cable, optical digital cable, or coaxial digital cable. Take the HDMI cable and connect the sound device to the TV thru the ARC port. Then, turn on the Control for HDMI settings on the TV and the device (receiver). You will want to read the associated articles and the person guide to realize how to turn on the manage for HDMI as it depends on the gadgets you personal. Is a Center Channel Speaker of a Home Theater System Necessary for Surround Sound? The three-channel audio system in the the front are important for surround sound. Of route, the rear surround channel audio system are simply as vital. Some people don’t like to use the principal speaker out of all of the surround speakers. However, it is simple to tell whilst the imperative channel speaker have to be used and whilst it shouldn’t, in a surround sound machine.
Since the important speaker is separated from the the front left and right audio system, you can modify the extent without demanding the relaxation of the audio system. Also, the audio will be calmly dispensed if there’s a middle channel speaker right inside the center. Without this anchor within the center, you would possibly enjoy extra fluctuations in sound, mainly whilst you pass across the room.
How to Install Ceiling Speakers for Surround Sound? To get the fine surround sound revel in, ceiling speakers are a fantastic alternative. They assist in flippantly dispensing the sound to supply a rich audio impact for the duration of the room.
You need a few gear and a few abilties to put in the ceiling audio system for surround sound. A ladder, drywall noticed, blue painter tape, measuring tape, screwdriver, cord stripper, and a pencil are some gadgets you want to accumulate first.
Then choose in which you need to install the ceiling speakers. The placement should be just like how you set up them on the floor. Also, make sure other fixtures just like the mild and fan don’t get disturbed inside the procedure. Use the blue tape and pencil to mark the speaker positions. Measure the circumference of the speaker and cut cardboard of the equal size. Mark the center in it. Place this cardboard on the ceiling and draw a circle. Then saw off the false ceiling and make the hollow. Now, run the wires returned to the receiver. Follow the coaching manual to attach the in-ceiling audio system to the wires. Ensure the wires are not loose and cowl the copper elements. Fix the speaker inside the hollow and tighten the screws. Don’t overdo this component. It’ll harm the speaker. Fix the magnetic grill on pinnacle, and that’s it. What Does a Soundbar Do? How to Connect a Soundbar to TV? Soundbars came into lifestyles to make up for the shortage of audio results produced through the flat monitors. TV audio isn’t effective enough to provide the type of sound experience you count on from them. A soundbar offers sonic sound that matches the photograph fine of the high-cease television.
But what’s a soundbar? It’s not anything however an all-in-one speaker device introduced in a single skinny and long tube-like unit. Instead of putting in place the entire surround sound gadget, you purchase a unmarried soundbar and location it at the TV stand. Most soundbars are energetic and include integrated amplifiers. Just join one to your TV, and you’re desirable to go.
How to Connect Soundbar to TV? There are distinct approaches to attach the soundbar to the TV.
One is to use the HDMI cable. Follow the same manner we’ve referred to in one of the preceding sections. Check if both gadgets have the ARC function and plug inside the HDMI cable. The 2nd method is to use a virtual optical cable. However, it is able to transfer best up to five.1 channel sound. The third approach is to use a 3. 3.5mm line out. Remember that it’ll deliver best the primary sound, and meaning making an investment in a soundbar is of little use. Or, ultimately, you may attempt the headphone jack to plug it in. But again, the sound nice is compromised. How to get Surround Sound on PC? To get surround sound on your PC, first, check in case your computer has a legitimate card. Go to the Device Manager and then get to Sound, Video, and Game Controllers.
If the pc doesn’t have a legitimate card, it’s less complicated to apply an outside one. Before you buy one, select whether you connect the five.1 or the 7.1 channel.
The set up instructions will exchange based at the sound gadget. Ensure you place the speakers as default when you play an audio/video document at the laptop. Run the configure choice on the laptop to make sure that all the audio system are running.
Conclusion Go ahead, buy your favourite surround sound gadget, and set it up with your TV or Blu-Ray for a terrific audio-visual revel in right in your house. Don’t overlook to seize a few popcorn. Enjoy!
We hope you observed our manual on a way to set up surround sound useful. If you have any questions or pointers, please sense loose to submit them within the comment phase underneath.
1 note
·
View note
Text
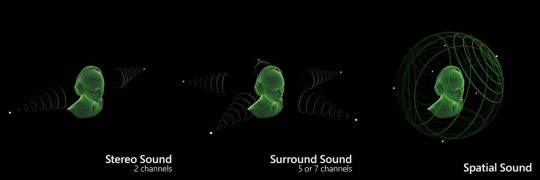
THE POSITIVE FUTURE OF SPATIAL AUDIO FOR GAMES
Rob Bridgett
Dolby Atmos (for Home Theatre, and for Headphones) and a whole slew of other emerging ‘spatial’ or ‘3D’ audio technologies are offering a “new” dimension into which game sound designers can now work in terms of bringing depth and immersion to players. Now that the technical hurdles of getting these formats into game development pipelines and into people’s homes has been overcome, we are only left with the question of what exactly can we do with it?
Of course, in reality, surround sound formats, and 3D sound have been around almost as long as games consoles and PCs themselves (Sega Q-Sound et al), and that these newer immersive formats offer something revolutionary is easy to dismiss. However, having mixed a game in Atmos very recently (see this earlier post), I have some positive thoughts about how this heightened focus on sound, and sound placement in the 3D space, is going to lead to greater emphasis on sound in games and therefore lead to a deeper appreciation of all aspects of sound, music and voice, from players.
VISCERAL SOUND IN THE SHARED FICTIONAL SPACE
Traditionally, surround sound (in cinema at least) has always been about SPECTACLE, particularly in a theatrical setting, from innovative 5.1 surround movies like ‘Apocalypse Now’, to full Atmos mixes like ‘Gravity’, all have celebrated the VISCERAL qualities, effects and impact of sound on an audience. And, by moving sounds through space around the audience, enveloping them inside the world of the film. With surround, the audiences seemingly share the same acoustic space as the characters in the film, hear the same things they do, and react in a similar visceral way to how the characters react (A loud gunshot offscreen, or a T-Rex roar). The physical nature of sound, is emphasized and felt on an audience. By physically moving the air around them, most notably in the case of sub and low frequency effects, but also through positioning or moving sound around the audience, sound brings something physical and real (that has spatial dimensionality) to a cinematic experience that is simply not possible through the screen (light) alone – the more physical, impactful and convincing that sound ‘image’ is, the greater the potential emotional reaction.
“sound brings something physical and real (that has spatial dimensionality) to a cinematic experience that is simply not possible through the screen (light) alone“
SPATIAL SPECTACLE
With Atmos, the biggest innovation is, arguably, the inclusion of height, or ‘overhead’ speakers into the playback array, which creates a much more immersive ‘dome’ or ‘sphere of sound’ effect around the listener. So, now the audience no longer hears a flat disc of sound (7.1) around them, they hear positional sounds in a full 3D arc above them too.
This allows for the audience to hear what is above the characters onscreen in this shared fictional space. However, height brings a lot more to the table as it completes the sphere around the viewer, so we really feel like we are missing nothing. If a sound comes from above us, this is a specific hot zone in which we have some very hard-wired instincts – we REALLY want to ‘look up’ – exactly the same is the case for a sound behind us, we want to ‘look behind us’ – and this is the fundamental difference between video games and cinema - as a gamer, you hear a sound behind or from above, you CAN move the camera and look up or behind you. In cinema, you cannot. (You can, of course, but all you see is a cinema ceiling, or the exit sign, or someone eating popcorn).
In games, once you’ve established that sounds are above the player, and that they can look up at them, the ‘novelty’ effect falls away and eventually the new 3D spatial reality becomes quite normal, until you hear something that doesn't belong or attracts your attention to a specific PLACE in the game space.
In this sense, games are far more free to go really far with adding sounds with gameplay, story, or exploration meaning to the overheads above the player, as well as surrounds, in order for the player to be encouraged to investigate the space itself, and also if a louder more threatening sound is heard, that sound can be more accurately pinpointed by the player and neutralized or safeguarded against (Yes, spatial audio actually has gameplay value!).
“In games, spatial sound has deep meaning, it serves gameplay, story, and encourages exploration.”
CINEMATIC CHALLENGES
We can certainly see some challenges to this kind of spatial sound approach when done in cinema, here is a small extract of Randy Thom’s notes on Alfonso Cuaron’s Roma mix…

(above: Roma)
“I assume that Cuaron was going for a certain kind of “immersive realism” by using this aggressive approach to surrounds, but for me it sometimes backfires, and actually makes scenes less “immersive” by yanking the listener out of the water every few minutes so that an unseen and unmotivated cat can yeowl, car horn can honk, or a dialog line can come from the surrounds.” – Randy Thom Wordpress Blog 12th March 2019
Now, Cuaron, is almost synonymous with the Atmos format in that his earlier movie Gravity, was such an exceptional showcase for what the spectacle of the medium could be. I certainly agree that by having this new playground for sound available in film, it is easy to go a little too far in a focused storytelling moment, or try some things out that maybe later feel distracting. Though a distracting loud sound in Atmos, would still be a distracting loud sound in a stereo fold-down of that Atmos track (if loyal to the director’s vision), and therefore would still be a loud distracting sound – regardless of the format. The question is - would that sound still have been placed at that level in just a stereo or mono mix? (As perhaps the majority of the audience will currently experience it on Netflix) Did the availability of a spatial audio format, encourage this decision to paint with sound in that space outside the screen? Certainly. I feel Roma is such a completely different film, and vision, from most Hollywood cinema, that this kind of experimentation with sound should be applauded and celebrated as a break from the safe norms. While maybe not bringing more ‘immersion’ to the movie, that may not have been the goal. Spatial audio may bring more ‘ambiguity’ and even change how people remember the film. Because of the sound, I almost think of Roma as a truly 3D film, something it technically isn't, but the experience, certainly is.
“I see video games as a major driver of this new aesthetic of vertical, immersive and spatial spectacle.”
In this sense then, games are so much freer to explore the creative spectacle of spatialization, given that the player can move the camera around to look at the cause of that sound behind or above you. And though this is something I think most audio designers working in surround have known for some time, with these newer more immersive formats, the point becomes even more vivid.
Emphasizing what is above and behind and around the player at specific moments, or in specific environments, unlocks a lot of new storytelling tools. Being able to collapse a mix from full Atmos 7.1.4 down to a mono centre-channel mix and back again, in a specific moment of a game, to exaggerate the feeling of claustrophobia, for instance, is something that is extremely effective and, now, fully achievable.
“It is precisely through this notion of the SPECTACULAR and the IMMERSIVE, that video games continue to market themselves, and through sound, we can now play perhaps one of the most important roles in truly DELIVERING those promises to our audiences.”
FOR GAMES, THE FUTURE IS SPATIAL
I see video games as a major driver of this new aesthetic of vertical, immersive and spatial spectacle. And in cinema, I think there is an audience who, perhaps being more used to video game mixes along these lines, are already open to film mixes placing things around the space, even if initially a little more distracting from the story or the character POV than ‘traditional audiences’ may be used to. Once the aesthetic is established, the ‘novelty’ will soon settle down.

(Shadow of the Tomb Raider’s Spatial mix was all about celebrating Vertical Spectacle)
Importantly, I believe that, as these various spatial audio formats gain traction (and fidelity) and become more widely embedded, the audience for games, gamers themselves, will usher in a new era of appreciation for the artistic and technical achievements of sound.
It is precisely through this notion of the SPECTACULAR and the IMMERSIVE, that video games continue to market themselves, and through sound, we can now play perhaps one of the most important roles in truly DELIVERING those promises to our audiences.
This is why I believe that spatial audio will find its strongest aesthetic expression of spectacle and immersion through video game sound.
0 notes
Text
How to Create The Best Surround Sound System For Your Home Theater
When building your dream home theater, there’s one aspect you can’t leave off your list of must-haves; an amazing surround sound system.
The problem is, setting up a sound system can be difficult. But it doesn’t have to be!
Read on to get a complete guide of how to create the best surround sound system for the home theater experience of a lifetime.
The Basics of Surround Sound Systems
The first step in setting up a sound system is decoding the product numbers. When shopping for systems, you’ll come across numbers like 2.0, 5.1, 6.1, etc. While it may seem like you’re shopping in a math class, it’s quite easy to decode.
The first number refers to the number of channels or speakers. For example, 2.0 gives you two speakers. The second number speaks to the low-frequency effects channel, better known as a subwoofer.
The most common set-up is 5.1. The traditional set up includes three front channels, two surround channels, and a subwoofer. It’s used most because 5.1 system fits a wide variety of home theaters.
Channels and Speakers
Each of the five speakers in a 5.1 set-up has a particular purpose that maximizes your theater experience.
Front Center Channel- Responsible most for reproducing dialogue. It’s position best represents the voices coming at you, as it would in real life. Most commonly this speaker is wider than the other, providing a broader sound.
Front Left/Right Channels-These two speakers produce the majority of sound effects and music.
Rear (or Back) Left/Right Channels- The rear channels are also mainly for music and sound effects but less so than the front ones.
Subwoofer- Responsible for the low-frequency bass.
Receivers
The last component of a great surround sound system is a quality receiver. The receiver is essentially the “brain” any system. Receivers come in a large range and pair with a variety of channel setups.
Moreover, receivers are paired with evolving technology, so there’s a different format for basic theaters and ones equipped for 3-D. When deciding on a system, take your needs and target technologies in mind.
Placement
One of the most important aspects of planning your surround sound system is the location of the speakers. The placement changes slightly as you add channels, but the concept is generally the same.
The front center channel should always be placed directly across from the listening point (couch, chairs, etc.) You can choose to place this channel either above or below your screen. Most center channels are both flatter and wider than other speakers and aesthetically fit into most theater designs.
Front left, and right channels are some of the most important of all the channels. They should be placed on either side of the viewing screen, at equidistant lengths. Additionally, they should be angled in towards the listening point at approximately 30-degree angle.
Rear channels are where you find the biggest range of systems. On a traditional 5.1 set-up, the speakers should be placed on both sides of the listening point and slightly behind. These channels are traditionally smaller and can be placed at seating height, wall mounted, or even set from the ceiling.
Systems with more channels (example, 7.1) will have another set of rear channels that go behind the listening point. These systems are less common as many theaters have the seating area or couches against a wall, making placement behind near impossible.
The subwoofer is the most flexible of all the components. Since it’s most responsible for the “booming” bass sounds and not other types of directed sounds, your subwoofer can be placed anywhere in the front of the set-up
The Theater Space
There’s much to take into consideration when creating your dream home theaters’ sound system. Let’s break down the main concerns now.
Indoor or Outdoor
The equipment needs of an outdoor home theater and an indoor one vary, especially when it comes to sound systems. The set-ups listed above are best used in indoor home theaters.
Where 5.1 is the traditional system for many indoor home theaters, outdoor theaters may do best with a simple 2.1 set-up. Placement of these speakers should, as above, be angled in towards the listeners.
Other installment concerns, such as the height of the speakers, will be dictated by the type of speaker you use. Outdoor sound systems do well to have speaker set either at each top corner of the screen or half-way down.
The Room
Size should be a determining factor when deciding on a surround sound system.
Larger rooms (anything over 3,000 square feet) can better accommodate moving furniture around, leaving you open to utilize systems such as 7.1 and up.
Home theaters in smaller rooms can quickly overwhelm listeners by using larger than life sound set-up, so be sure to look into smaller speaker options.
Classic bookshelf speakers fare well in smaller settings (1,500-3,000 square feet.) It’s recommended to stay away from small, cube speakers as they have to struggle a bit more to fill even a small space, leading to distortion.
Flooring
Flooring can effect the sound in even the best home theater sound system. Carpeting is best, where at all possible. If your space has hardwood or linoleum, putting down a rug should help the acoustics.
The idea is the carpeting or rugs will help muffle bouncing sounds. (Think of a school band playing in the gymnasium.)
Tile floors are known to distort the sound even further as it bounces around, making it the least desired flooring for a home theater.
Special Considerations
Along with the topics above, there are other considerations to take into account when building your surround sound system at home.
First and foremost, your budget should be a deciding factor. If you don’t do research, you can easily spend thousands of dollars on a home theater, including the sound system. Go with what best fits your bottom line and remember, quality is way more important than quantity.
The type of speakers you purchase will depend on the size of the room as well as safety concerns. For example, if you have young children or pets in the home, a free-standing tower may not be your best option.
Be sure to take aesthetics into your decision-making process as well. If you have a minimalist theme, wall mounted channels may be the way to go.
There! A complete guide to the best sound system for your home theater. Putting together your system doesn’t have to be hard, as long as you think it through and consider your needs.
A well-planned surround sound system puts the finishing touches on any home theater. Get your home theater started today!
The post How to Create The Best Surround Sound System For Your Home Theater appeared first on HTP Reviews.
from HTP Reviews http://ift.tt/2q1vs1H via IFTTT
1 note
·
View note
Text
#ceiling speaker placement#atmos ceiling speaker placement#ceiling speaker placement calculator#in ceiling speaker placement#in-ceiling surround sound speaker placement#in ceiling 7.1 speaker placement#5.1.2 ceiling speaker placement#7.1 ceiling speaker placement#ceiling speaker calculator#ceiling speaker calculator online#ceiling speaker coverage calculator#ceiling speaker layout#ceiling speaker layout design#ceiling speaker spacing calculator#extron ceiling speaker calculator#home theater ceiling speaker placement#in ceiling speaker layout#rear ceiling speaker placement#home audio speaker placement#speaker coverage calculator#speaker placement calculator#speaker distance calculator#speaker room size calculator#speaker design calculator#speaker design online#ceiling speaker#speaker
0 notes
Text
DIY Surround Sound Audio System
DIY Surround Sound Audio System http://bit.ly/2MaQ5cp
DIY Surround Sound System
The idea of whether or not to install your surround sound audio system yourself has come to your mind and maybe against all common sense advice it has landed on deaf ears or maybe you have stubbornly decided to address this DIY home installation project by yourself.
Good for you! you go! You start by watching a DIY speaker calibration video on Youtube. Then decide to explore your sizzling home attic just to find out that it looks like more like an alien planet with all the structured cabling that you do not know what it does.
It Is Not Rocket Science but It Is Hard to Professionally Install a Home Theater System
Then, the horrible picture of your lower part of your body hanging from the ceiling crosses your mind and you maybe realize that it is going to take a lot more than what you originally thought to properly install the home theater system.
You re-evaluate the idea of hiring a home theater professional installer but still push ahead and tell yourself this is not rocket science, anyone can do it, it is just cables, an audio and video receiver and some speakers and a subwoofer.
A Home Theater Installation Company Can Install The Speakers, Cables and Audio Receiver for You
Where to really start this home theater project clouds your mind. Then once again, a second thought about the idea of maybe the smart decision is to reconsider all the hard work needed, all the tools necessary to get it done right, all the technical aspects to evaluate when installing the speakers and the receiver so maybe then you search online for reliable and professional home theater installation service by a reputable company that can install you speakers, speaker cabling and your audio and video receiver.
Then at that moment, you are realize that the sales guy at the home theater store possibly made you purchase a home theater audio system that may be too advanced, technologically speaking, than what you initially thought and it may be an impossible task to install it.
Do It Yourself
Protect the furniture
Then you finally make up your mind and decide you can do it. You start by actually pre-ing the work area to protect your furniture from any accidents and moving all the heavy furniture out of the way before beginning the actual installation process.
Read The User’s Manual
Then you open the user’s manual for more specific clues that likely came along with the home theater audio system package you purchased and 200 pages later after trying to read the instructions in Spanish, French, Japanese, Portuguese and Korean you finally land on the pages that are in English.
Speaker Installation
Place The Speakers Correctly
We highly advise when installing a audio system is to keep in mind that with a surround sound audio system or a surround system installation nothing at all is going to work if the folks seating in the room do not get that immersive feeling an audio system delivers by locating the speakers correctly which varies depending of the room layout.
Install The Speaker Cables Inside The Wall
After several hours stuck in the attic breathing in all that insulation (and wondering if you are scratching more than your pooch since the fiberglass is all over your neck and arms). You manage to safely install all the speaker cables inside the wall without breaking a water pipe, burning the house, or cutting the romex cables (power cables) and or the alarm cables for the alarm system. Now are ready to to connect the audio and video receiver. But wait there’s more! how do I install my in-ceiling in-wall speakers you ask yourself.
In-wall and On-wall Speaker Installation
You proceed to make several more trips to the attic, then you realize the speakers need to be perfectly aligned and symmetry is important for optimal audio performance. You start by measuring the room and then continue by measuring the ceiling from some reference points that you think may work. Then, after a little prayer, you end up with a ceiling that now has a few extra speaker holes that make it look more like swiss cheese as you tell yourself “Everything is okay because you finally installed the speakers” (as you now you realized you now are gonna have to call a painter who is gonna have to fix the holes, re-texture and repaint the entire ceiling. Now you finally move to connect the audio and video receiver while you clean all that drywall dust and insulation from your eyes.
AV Receiver Installation
Placement of The AV receiver
You may start by placing the audio and video receiver in the entertainment center or in the AV rack. Then you realize that somehow now you need to run the oxygen free speaker cables inside the wall.
The Back of The AV Receiver
You start by quickly visually inspecting the back of the audio video receiver. You tell yourself “what happened to the IN and OUT inputs” You proceed by wondering “What’s with RS232, ARC, HDMI, Assignable, Monitor and all these colorful RCA ports?” then you say “Where are my connections for my white, red and yellow cables?” “Was I supposed to run an internet line to this receiver? should I call my internet service provider since this needs to be connected to the internet?”
Where Do I Connect the Speakers?
Then you try to connect your speaker cables to the speaker ports but you are not sure which cable goes where and why you have more speaker posts than the number of speaker lines.
5.1 Surround Sound Receiver?
Once you have the amplifier connected you begin connecting the speakers. If you went with the standard 5.1 home theater stereo system the receiver should have 6 speaker ports consisting of 2 front speakers, 2 rear speakers, 1 center speaker and 1 subwoofer.
Positioning 5.1 Speaker System
A 5.1 receiver is a decent entry level audio receiver. You begin searching for all the guidelines for the positioning of the 6 speakers for a 5.1 sound system as well as possibly those instructions to expand the secondary zone later.
5.1 Speakers and The Space Between the Rear and Front Speakers?
It is important to keep in mind that with a 5.1 AV receiver you want to have enough separation between the rear speakers as well as front speakers to let the audio waves expand. And remember that the front speaker go where the screen is and the rear speakers or surround speakers go in the back of the room.
7.1 Audio System?
If the receiver you bought allows you to install additional speaker and you are at that point. Think about upgrading from a 5.1 to a 7.1 surround sound system or maybe use the audio and video receiver as a 5.1.2 Atmos system. If you decide to go for a 7.1 system then you will need to additionally install the 2 middle speakers in the middle of the room to obtain that extra layer of audio delivered by those to additional channels of audio.
Zone 2?
Guess what! maybe the sales person at the home theater store sold you a receiver that had an additional zone since you mentioned you may add an extra audio zone when you where you done mastering installing your home audio system and he simply could not pass the extra commision and the pat on the back from the store manager by up-selling you the most expensive receiver in the store.
AVR with All The Whistles?
Particularly since you are a rookie, you thought you were saving money by installing it yourself and specially since this is your very first audio system. You went ahead and purchased a super advanced AV receiver that comes with Atmos and Bluetooth capabilities, WiFi, online apps to connect to Spotify, Pandora and XM Internet radio plus all the whistles.
The Audio and Video Receiver Comes with a Several Ports
Then you realize that the AVR has a lot of ports! yes a lot! and now wonder if you are using the correct slots. Fortunately, a lot of devices have the ‘slots’ properly tagged depending of the different functions they provide.
TV Installed On The Wall or Projection System with My Audio System?
Positioning of the speakers is crucial and depends of the room layout, placement of the projection screen is important when installing an audio system and applicable if the audio system will be integrated with a video system. Do not what a video system is? basic installation of a video system can be a projection screen or a television. One of our main specialities is providing the best TV installation service all over Houston. While these really are not excessively complex installations you will be blown away by the amount of people who do not know if they want to have their sound system integrated with a television mounted on a wall using a low profile tv mount or a projector screen with a projector.
Spending Money in an Audio System
If you are making the investment in an audio system and then think a DIY surround sound audio system is for you and a DIY project for the weekend is suitable for you. Then, please put in the time read the user’s manual, protect your furniture, place the speakers correctly, install the speaker cables inside the wall, learn how to connect the av components that need to be connected to the audio and video receiver, understand the basic differences between a 5.1 or a 7.1 system, know if you would like to integrate a video system with your audio system and try to spend the money wisely to get your money’s worth from your investment. Now you can kick back, relax and appreciate your brand new surround sound system.
We Are Your Local AV Company in Houston Texas:
Inside The 610 near Downtown Houston:
Downtown Houston
Sam Houston Park
Theatre District
Hermann Square
Alley Theatre
Jones Hall of Performing Arts
JW Marriott Houston Houston Downtown
Wells Fargo Plaza
Skyline District Houston
Toyota Center
Hilton Americas Houston
Discovery Green
Minute Maid Park
George R Brown Convention Center
University of Houston-Downtown
610 West Loop:
Midtown
Montrose
Rice Military
River Oaks
Greenway
Upper Kirby
Uptown
The Galleria
Hyde Park
Highland Village
iPic Theatre
River Oaks District
Washington Ave
University of Saint Thomas
River Oaks Country Club
Spotts Park
Eleanor Tinsley Park
Fourth Ward
The Galleria Mall
Memorial Park
Southwest 610 Loop
Texas Medical Center
TMC
West University Place
Braeswood Place
Southside Place
Bellaire
Boulevard Oaks
NRG Stadium
The Houston Zoo
Rice University
Museum District
Museum of Fine Arts
The Houston Museum of Natural Science
Children’s Museum of Houston
Hermann Park
Northwest 610 Loop
Woodland Heights
Greater Heights
The Heights
Lazybrook
Timbergrove
Houston Heights
South 610 Loop
Greater Third Ward
McGregor
South Central Houston
OST
South Union
Texas Southern University
University of Houston
East 610 Loop
East Downtown
Second Ward
Lawn Dale
Wayside
Magnolia Park
Harrisburg
Manchester
Pleasantville Area
Greater Fifth Ward
Kashmere Gardens
Denver Harbor
Port of Houston
Warehouse District
BBVA Compass Stadium
West Houston – Between 610 and Highway 6:
Hunters Village
Piney Point
Hedwig Village
Woodlake
Briar Meadows
Westchase District
Westchase
Tanglewood
City Center
Memorial
Energy Corridor
Briar Forest
Royal Oaks
Sweet Lakes
Hilshire Village
Spring Branch East
Brighton Place
Spring Valley Village
Spring Branch West
Spring Branch Shadows
Terry Hershey Park
Royal Oaks Country Club
Bear Creek Pioneers Park
Addicks Reservoir
Northwest Houston – Between 610 and FM 1960:
Fairbanks
Cypress Fair
Carverdale
Northwest Crossing
Fairbanks Heights
Greater Inwood
North Houston Gardens
Acres Homes
Sam Houston Race Park
North Houston – Between 610 and FM 1960:
Northside
Northline
Eastex
Jensen
Aldine
Greater Greenspoint
George Bush Intercontinental Airport
(IAH)
Greenspoint Mall
Northeast Houston – Between 610 and FM 1960:
Atascocita
Trinity
Houston Gardens
East Houston
Eagle Creek
Sunrise Pines
Golf Club of Houston
Tour 18 Golf Course
East Houston :
Channelview
Lynchburg
Northshore
CloverLeaf
Galena Park
San Jacinto Monument
Southeast Houston:
Pasadena
South Houston
Deer Park
Edge Brook
Friendswood
Clear Lake
League City
Seabrook
La Porte
Ellington Airport
Baybrook Mall
Bay Oaks Country Club
University of Houston Clear Lake
Space Center Houston
Johnson Space Center
Kemah Boardwalk
South Houston:
Southeast Side
Sunny Side
South Acres
Crestmont Park
Southwest Central
Pearland
Fresno
Brookshire Village
Shadow Creek Ranch
Fort Bend Houston
William P Hobby Airport
(HOU)
Pearland Town Center
Wildcat Golf Club
Southwest Houston: Between 610 and Hwy 6
Gulfton
Meyerland
Bellaire
Sharpstown
Chinatown
Braeburn
Greater Fondren Southwest
Southwest Houston
Westwood
Alief
Meadow Place
Greenbriar West
Houston Baptist University
Installation Available Around The Following Cities:
Houston
Katy
The Woodlands
Cypress
Bellaire
Spring
Tomball
Sugar Land
Richmond
Friendswood
Clear Lake
Atascocita
Kingwood
Humble
West University Place
Cinco Ranch
Jersey Village
Bunker Hill Village
Greatwood
Pecan Grove
Fulshear
Brookshire
Missouri City
Stafford, Alief
Alvin
Bay City
Baytown
Dickinson
Manvel
Freeport
Fresno
Galena Park
Texas City
Seabrook
Bacliff
Rosenberg
Galveston
Kemah
Lake Jackson
Hempstead
La Porte
League City
Magnolia
La Marque
Huntsville
Montgomery
Pasadena
Pearland
Pinehurst
Crosby
Channelview
Beaumont
San Jacinto City
Santa Fe
Mission Bend
Webster
Conroe
New Territory
Houston Heights
Sienna Plantation
Hitchcock
Piney Point Village
Hockley
Waller
Rose Hill
Hufsmith
Egypt
Sealy
Wallis
Sienna Plantation
Angleton
Galveston Island
Jamaica Beach
Beach City
Anahuac
Dayton
Lake Houston
New Caney
Porter Heights
Lake Conroe
Houston Premium Outlets
Katy Mills Mall
West Houston Airport
George Bush Park
Installation Available Around The Following Counties:
Harris County
Fort Bend County
Waller County
Montgomery County
Liberty County
Chambers County
Galveston County
Installation Services Available For The Following Cities and Zip Codes around:
Alief , Texas Zip Code Service Coverage Map (TX) Zip Code 77411
Alvin, Texas Zip Code Service Coverage Map (TX) Zip Code 77511 77512
Angleton, Texas Zip Code Service Coverage Map (TX) Zip Code 77515 77516
Atascocita, Texas Zip Code Service Coverage Map (TX) Zip Code 77346
Bacliff, Texas Zip Code Service Coverage Map (TX) Zip Code 77518
Baytown, Texas Zip Code Service Coverage Map (TX) Zip Code 77520 77521 77522
Bayview, Texas Zip Code Service Coverage Map (TX) Zip Code 77530 77015 77049 77562
Beach City, Texas Zip Code Service Coverage Map (TX) Zip Code 77520
Beaumont, Texas Zip Code Service Coverage Map (TX) Zip Code 77706 77707 77708 77710 77713 77720 77725 777026
Beillare, Texas Zip Code Service Coverage Map (TX) Zip Code 77401 77081 77096 77005 77027
Brookshire, Texas Zip Code Service Coverage Map (TX) Zip Code 77423
Channelview, Texas Zip Code Service Coverage Map (TX) Zip Code 77530
Cinco Ranch, Texas Zip Code Service Coverage Map (TX) 77494
Clear Lake, Texas Zip Code Service Coverage Map (TX) Zip Code 77058 77059 77062 77258 77505 77507 77565 77573 77586 77598
Conroe, Texas Zip Code Service Coverage Map (TX) Zip Code 77301 77302 77303 77304 77305 77306 77384 77385
Crosby, Texas Zip Code Service Coverage Map (TX) Zip Code 77532
Cypress, Texas Zip Code Service Coverage Map (TX) Zip Code 77410 77429 77433
Deer Park, Texas Zip Code Service Coverage Map (TX) Code 77536
Dickinson, Texas Zip Code Service Coverage Map (TX) Zip Code 77539
Friendswood, Texas Zip Code Service Coverage Map (TX) Zip Code 77546 77549
Fulshear, Texas Zip Code Service Coverage Map (TX) Zip Code 77441
Galena Park, Texas Zip Code Service Coverage Map (TX) Zip Code 77547
Galleria Houston, Texas Zip Code Service Coverage Map (TX) Zip Code 77056
Galveston, Texas Zip Code Service Coverage Map (TX) Zip Code 77550, 77551, 77552, 77553, 77554, 77555
Houston, Texas Zip Code Service Coverage Map (TX) Zip Code 77001 77002 77003 77004 77005 77006 77007 77008 77009 77010 77011 77012 77014 77016 77017 77018 77019 77020 77021 77022 77023 77024 77025 77026 77027 77028 77029 77030 77031 77032 77033 77035 77036 77037 77038 77039 77040 77041 77042 77043 77045 77046 77047 77048 77050 77051 77052 77054 77055 77056 77057 77060 77061 77063 77064 77065 77066 77067 77068 77069 77070 77071 77072 77073 77074 77076 77077 77078 77079 77080 77081 77082 77083 77084 77085 77086 77087 77088 77090 77091 77092 77093 77094 77095 77096 77097 77098 77099 77201 77202 77203 77204 77205 77206 77207 77208 77210 77212 77213 77215 77217 77218 77219 77220 77221 77222 77223 77224 77225 77226 77227 77228 77229 77230 77231 77233 77235 77236 77237 77238 77240 77241 77242 77243 77244 77245 77246 77247 77248 77249 77250 77251 77252 77253 77254 77255 77256 77257 77260 77261 77262 77263 77265 77266 77267 77268 77269 77270 77271 77272 77273 77274 77275 77276 77277 77278 77279 77280 77282 77284 77285 77286 77287 77288 77290 77291 77292 77293 77294 77296 77297 77299
Houston Heights, Texas Zip Code Service Coverage Map (TX) Zip Code 77008 77007
Humble, Texas Zip Code Service Coverage Map (TX) Zip Code 77373 77379 77380 77381 77382 77383 77386 77387 77388 77389 77391 77393
Katy, Texas Zip Code Service Coverage Map (TX) Zip Code 77449 77450 77491 77492 77493 77494
Kingwood, Texas Zip Code Service Coverage Map (TX) Zip Code 77235 77339 77345 77346
La Porte, Texas Zip Code Service Coverage Map (TX) Zip Code 77571 77572
Lake Jackson, Texas Zip Code Service Coverage Map (TX) Zip Code 77566
League City, Texas Zip Code Service Coverage Map (TX) Zip Code 77573 77574
Magnolia, Texas Zip Code Service Coverage Map (TX) Zip Code 77353 77354 77355
Memorial Houston, Texas Zip Code Service Coverage Map (TX) Zip Code 77024
Mission Bend, Texas Zip Code Service Coverage Map (TX) Zip Code 77083, 77407
Missouri City, Texas Zip Code Service Coverage Map (TX) Zip Code 77459, 77489
Pasadena, Texas Zip Code Service Coverage Map (TX) Zip Code 77058 77059 77582 77503 77504 77505 77506 77507 77536 77571 77586
Pearland, Texas Zip Code Service Coverage Map (TX) Zip Code 77584 77581 77588
Richmond, Texas Zip Code Service Coverage Map (TX) Zip Code 77406 77407 77469
River Oaks, Texas Zip Code Service Coverage Map (TX) Zip Code 77027
Rosenberg, Texas Zip Code Service Coverage Map (TX) Zip Code 77471
South Houston, Texas Zip Code Service Coverage Map (TX) Zip Code 77587
Spring, Texas Zip Code Service Coverage Map (TX) Zip Code 77373 77379 77380 77381 77382 77383 77386 77387 77388 77389 77391 77393
Sugar Land, Texas Zip Code Service Coverage Map (TX) Zip Code 77459 77469 77477 77478 77479 77498
The Woodlands, Texas Zip Code Service Coverage Map (TX) Zip Code 77380 77381 77382 77384 77385 77354 77375 77389
Tomball, Texas Zip Code Service Coverage Map (TX) Zip Code 77573 77377
West University Place, Texas Zip Code Service Coverage Map (TX) Zip Code 77005 77030 77025 77027 77098
Installation Services Available For The Following Cities in Texas
Houston TX
Katy TX
The Woodlands TX
Cypress TX
Bellaire TX
Spring TX
Tomball TX
Sugar Land TX
Richmond TX
Friendswood TX
Clear Lake TX
Atascocita TX
Kingwood TX
Humble TX
West University Place TX
Cinco Ranch TX
Jersey Village TX
Bunker Hill Village TX
Greatwood TX
Pecan Grove TX
Fulshear TX
Brookshire TX
Missouri City TX
Stafford, Alief TX
Alvin TX
Bay City TX
Baytown TX
Dickinson TX
Manvel TX
Freeport TX
Fresno TX
Galena Park TX
Texas City TX
Seabrook TX
Bacliff TX
Rosenberg TX
Galveston TX
Kemah TX
Lake Jackson TX
Hempstead TX
La Porte TX
League City TX
Magnolia TX
La Marque TX
Huntsville TX
Montgomery TX
Pasadena TX
Pearland TX
Pinehurst TX
Crosby TX
Channelview TX
Beaumont TX
San Jacinto City TX
Santa Fe TX
Mission Bend TX
Webster TX
Conroe TX
New Territory TX
Houston Heights TX
Sienna Plantation TX
Hitchcock TX
Piney Point Village TX
Hockley TX
Waller TX
Rose Hill TX
Hufsmith TX
Egypt TX
Sealy TX
Wallis TX
Sienna Plantation TX
Angleton TX
Galveston Island TX
Jamaica Beach TX
Beach City TX
Anahuac TX
Dayton TX
Lake Houston TX
New Caney TX
Porter Heights TX
Lake Conroe TX
Houston Premium Outlets TX
Katy Mills Mall TX
West Houston Airport TX
George Bush Park TX
Installation Available Near The Following Heliports & Airports
Astrodome Airport – Houston, TX ICAO Code (JMA)
Houston Executive Airport – Houston, TX ICAO Code (KTME)
David Wayne Hooks Memorial Airport – Houston, TX ICAO Code (DWH)
West Houston Airport – Houston, TX ICAO Code (IWS)
Ellington Airport – Houston, TX ICAO Code (EFD)
Weiser Air Park Airport – Houston, TX ICAO Code (EYQ)
Houston Executive Airport – Houston, TX ICAO Code (TME)
North Houston Airport – Houston, TX ICAO Code (9X1)
Dan Jones International Airport – Houston, TX ICAO Code (T51)
Houston Fort Bend Airport – Houston, TX ICAO Code (2H5)
Flyin’ B Airport – Houston, TX ICAO Code (39R)
Aldine Heliport – Houston, TX ICAO Code (67TS)
Allied Northborough Heliport- Houston, TX ICAO Code (84TA)
B & S Warehouse Heliport – Houston, TX ICAO Code (6TA6)
Ball Park Heliport – Houston, TX ICAO Code (83XS)
Bear Creek Heliport – Houston, TX ICAO Code (10TA)
Cathexis Heliport – Houston, TX ICAO Code (TS93)
Channel Two Heliport – Houston, TX ICAO Code (12TA)
Charter Bank Building Heliport – Houston, TX ICAO Code (27TX)
Clear Lake Metroport – Clear Lake, TX ICAO Code (CLC)
Conoco Heliport – Houston, TX ICAO Code (11TA)
Cypress Fairbanks Medical Center Heliport – Houston, TX ICAO Code (21TA)
Dailey Inc Heliport – Houston, TX ICAO Code (3TS8)
Delta Mechanical Inc Heliport – Houston, TX ICAO Code (9TA9)
Drv Downtown Houston Aquarium Heliport – Houston, TX ICAO Code (XA19)
Eckels Heliport – Houston, TX ICAO Code (TA45)
First Bank Plaza Garage Heliport – Houston, TX ICAO Code (TS17)
First City Financial Center Heliport – Houston, TX ICAO Code (4TS0)
Gateway Helistop Heliport – Houston, TX ICAO Code (62TS)
Gellhorn Pad Heliport – Houston, TX ICAO Code (82TA)
General Plumbing Contractors Heliport – Houston, TX ICAO Code (22XA)
George Bush Intercontinental Airport – Houston, TX ICAO Code (IAH / KIAH)
Goodson Honda Heliport – Houston, TX ICAO Code (9XS8)
Graco Mechanical Inc Heliport – Houston, TX ICAO Code (XS26)
Gray Steel Heliport – Houston, TX ICAO Code (22TS)
Greenway Plaza Heliport – Houston, TX ICAO Code (JGP)
Gulf Tower Heliport – Houston, TX ICAO Code (TS82)
Gws Inc Construction Heliport – Houston, TX ICAO Code (TS19)
Harris County Clay Road Courthouse Heliport – Houston, TX ICAO Code (TS37)
Harris County Courthouse Heliport – Houston, TX ICAO Code (0TS6)
Hearthstone Heliport – Houston, TX ICAO Code (39TS)
Hickory Hollow Heliport – Houston, TX ICAO Code (97TA)
Hl&p South Houston Helistop Heliport – Houston, TX ICAO Code (5TX3)
Houston Heliport – Houston, TX ICAO Code (0TS3)
Houston Metropolitan Area – Houston, TX ICAO Code(QHO)
Houston Police Command Station Heliport – Houston, TX ICAO Code (9TX0)
John S Dunn Heliport – Houston, TX ICAO Code(38TE)
Johnson Space Center Heliport (72TX)
Kemah Waterfront Heliport – Houston, TX ICAO Code (7TX6)
Khou-Tv Heliport – Houston, TX ICAO Code (66TS)
Kriv Fox 26 Television Heliport – Houston, TX ICAO Code (XA76)
Ktrk Tv Station Heliport – Houston, TX ICAO Code (1TA9)
Kurio Heliport – Houston, TX ICAO Code (38TA)
Landry’s Seafood House Heliport – Houston, TX ICAO Code (XA13)
Landry’s Warehouse Heliport – Houston, TX ICAO Code (XA20)
Lewis Electric Apparatus Repair Inc Heliport – Houston, TX ICAO Code (TS16)
Life Flight North Fuel Heliport – Houston, TX ICAO Code(1XA9)
Life Flight/Refuel Heliport – Houston, TX ICAO Code (TE11)
Lift Crane Heliport – Houston, TX ICAO Code (7XS8)
Lone Star Heliport – Houston, TX ICAO Code (40XA)
Marine Consultants Inc Heliport – Houston, TX ICAO Code (85XS)
Memorial City General Hospital Heliport – Houston, TX ICAO Code (8TS4)
Methodist Hospital Alkek Heliport – Houston, TX ICAO Code (TX86)
Metro Heli-Pad Heliport – Houston, TX ICAO Code (0TA5)
Ne Police Station Nr 2 Heliport – Houston, TX ICAO Code (35TE)
Nw Police Station Nr 5 Heliport – Houston, TX ICAO Code (36TE)
Palm Petroleum Corporation Heliport – Houston, TX ICAO Code (4TS4)
Papa Heliport – Houston, TX ICAO Code (42TS)
Parkview Center Hospital Heliport – Houston, TX ICAO Code (26TE)
Pin Oak Stables Heliport – Houston, TX ICAO Code (4TS1)
Police Headquarters Heliport – Houston, TX ICAO Code (43TE)
Police Helicopter Patrol Heliport – Houston, TX ICAO Code (24TE)
Porta-Kamp 12th Street Heliport – Houston, TX ICAO Code (80TA)
Post Oak Central Heliport – Houston, TX ICAO Code (81XS)
Post Oak Manor Airport – Houston, TX ICAO Code (QPO)
Guest Qtrs – Houston, TX ICAO Code (JGQ)
Shell I C Heliport – Houston, TX ICAO Code (TS83)
Spl Heliport – Houston, TX ICAO Code (45TA)
Spring Branch Medical Center Heliport – Houston, TX ICAO Code (TE53)
St Joseph Medical Center Heliport – Houston, TX ICAO Code (XA67)
St Luke’s Episcopal Hospital Heliport – Houston, TX ICAO Code (64TS)
St Luke’s Hospital At The Vintage Heliport – Houston, TX ICAO Code (20XA)
Star Houston Heliport – Houston, TX ICAO Code (87TS)
Steeplechase Heliport – Houston, TX ICAO Code (38TS)
Southeast Texas Regional Airport – Houston, TX ICAO Code(BPT / KBPT)
Sugar Land Regional Airport – Houston, TX ICAO Code (SGR / KSGR)
Sw Police Station Nr 4 Heliport – Houston, TX ICAO Code (33TE)
Tenneco Lab Helistop Heliport – Houston, TX ICAO Code (31TE)
Tex-Star Heliport – Houston, TX ICAO Code (TS33)
Texas Children’s Hospital West Campus Heliport – Houston, TX ICAO Code (0TA1)
Texas Commerce Bank Building Heliport – Houston, TX ICAO Code (3TE2)
The America Tower Heliport – Houston, TX ICAO Code (63TS)
The Huntingdon Heliport – Houston, TX ICAO Code (TS26)
Town & Country Heliport – Houston, TX ICAO Code (TS81)
Transco Tower Garage Heliport – Houston, TX ICAO Code (TS31)
Tsj Heliport – Houston, TX ICAO Code (33TX)
Uscg Port Safety Station Heliport – Houston, TX ICAO Code (6XS6)
Veterans Affairs Medical Center Heliport – Houston, TX ICAO Code (04TE)
West Houston Airport – Houston, TX ICAO Code (IWS / KIWS)
West Houston Medical Center Heliport – Houston, TX ICAO Code (29TS)
Westchase Heliport – Houston, TX ICAO Code (TS24)
Westchase – Houston, TX ICAO Code (JWH)
William P. Hobby Airport – Houston, TX ICAO Code (HOU / KHOU)
Wilshire Place Heliport – Houston, TX ICAO Code (4TS2)
Woodcreek-Shell Heliport – Houston, TX ICAO Code (TS34)
All Our Services and Installation:
3D TV Installation
4k TV Installation
OLED TV Installation
Audio Video Installation
Articulating Wall Bracket
Articulating Wall Mount
Bose Home Theater
Bose Cinemate Home Theater Speaker
Conference Room TV Installation
Custom Home Theatre
Custom Home Theatre Design
Custom Home Theater Install
Custom Home Theater Installation
Custom Home Theater Photos
Custom Home Theater System
Home Theater Design
Home Theater Installation
Home Theatre Installations
Home Theater Installer
Home Theatre Installers
Custom Made Home Theater Furniture
Design Home Theater System
Digital Home Theater Systems
HDTV Installation
CCTV Installers
Custom Audio Video Installer
Custom Home Theater Seating
Custom Home Theater Rooms
Custom Home Theaters
Best Home Theater System
Flat Panel Installation
Flat Panel Installers
Flat Panel TV Installation
Flat Screen Installation
Flat Screen Wall Mount Installation
Full Motion Wall Bracket
Full Motion Wall Mount
HDTV
HDTV Installation
Home Automation
Home Automation Installation
Home Automation Design
Home Theater Bargains
Home Theater Cable
Home Theater Cable Management
Home Theater Components
Home Theater Controls
Home Theatre Custom
Home Theater Custom Design
Home Theater Designers
Home Theater Gadgets
Home Theater Installation
Home Theater Installation Tools
Home Theater Installation TV Plasma Video And Audio Sale
Home Theater Installers
Home Theater Showroom
Home Theater System
Home Theater LCD
Home Theater Loudspeakers
Home Theater Speaker System
Home Theatre System Installation
Home Theater Wood Cabinets
Home Theater Set
Installation LCD
LCD Installation Houston
LCD Installation Services
LCD Tilting Wall Bracket
LCD Tilting Wall Mount
LCD TV Installers
LCD TV Installation Guide
LCD Wall Bracket
LCD Wall Mount
LED Installers
LED Installation
LED Sign Installation
Lighting Control
Low Voltage Wiring
Plasma Installation
Plasma TV Installation
Plasma Installation Houston
Plasma Tilting Wall Bracket
Plasma Tilting Wall Mount
Plasma Wall Bracket
Plasma Wall Mount
Office TV Installers
On-Wall Tv Installation
Over Fireplace TV Installation
Projector Installation
Remote Control Programming
Restaurant Bar TV Installation
Satellite Television Installation
Set Up Home Theatre System
Sports Bar Tv Installation
Surround Sound
Surround Sound Installation
Sound System Home Theater
Surveillance Camera Installation
Speaker Wiring
Speaker Installation
Structured Wiring
TV Flat Screen Installation
TV Home Theater
TV Install
TV Installs
TV Installers
TV Installation
TV Installations
Video System Surveillance
Wall Mount TV Install
Whole House Audio
Whole Home Audio Video
Nothing Better Than a TV Installation Done The Same Day:
TV Installation Anahuac
TV Installation Angleton
TV Installation Alief
TV Installation Alvin
TV Installation Atascocita
TV Installation Bacliff
TV Installation Bay City
TV Installation Baytown
TV Installation Beach City
TV Installation Bellaire
TV Installation Brenham
TV Installation Brookshire
TV Installation Bunker Hill Village
TV Installation Channelview
TV Installation Clear Lake
TV Installation Cinco Ranch
TV Installation Conroe
TV Installation Crosby
TV Installation Cypress
TV Installation Deer Park
TV Installation Dickinson
TV Installation Galena Park
TV Installation Dayton
TV Installation Downtown Houston
TV Installation Galveston
TV Installation Galveston Island
TV Installation Galleria
TV Installation Greatwood
TV Installation Egypt
TV Installation Fulshear
TV Installation Freeport
TV Installation Fresno
TV Installation Friendswood
TV Installation Heights
TV Installation Hempstead
TV Installation Hitchcock
TV Installation Hockley
TV Installation Houston
TV Installation Houston Heights
TV Installation Hufsmith
TV Installation Humble
TV Installation Jamaica Beach
TV Installation Jersey Village
TV Installation Katy
TV Installation Kemah
TV Installation Kingwood
TV Installation La Marque
TV Installation La Porte
TV Installation Lake Houston
TV Installation Lake Jackson
TV Installation League City
TV Installation League City
TV Installation Magnolia
TV Installation Manvel
TV Installation Memorial
TV Installation Mission Bend
TV Installation Missouri City
TV Installation Montgomery
TV Installation New Caney
TV Installation New Territory
TV Installation Pasadena
TV Installation Pearland
TV Installation Pecan Grove
TV Installation Pinehurst
TV Installation Piney Point Village
TV Installation Porter Heights
TV Installation Richmond
TV Installation Rose Hill
TV Installation Rosenberg
TV Installation Santa Fe
TV Installation San Jacinto City
TV Installation Seabrook
TV Installation Sealy
TV Installation Sienna Plantation
TV Installation Spring
TV Installation Stafford
TV Installation Sugar Land
TV Installation Texas City
TV Installation The Woodlands
TV Installation Tomball
TV Installation Waller
TV Installation Wallis
TV Installation Webster
TV Installation West University Place
TV Installation Woodlands
The post DIY Surround Sound Audio System appeared first on Multimedia Tech.
via Multimedia Tech http://bit.ly/2i3C0e9 May 25, 2019 at 04:00AM
0 notes
Text
Seven Frequent Home Theater Missteps
A while back we covered some troubleshooting solutions to speaker problems that we hear about all the time. For this article, we’re going to focus on home theater issues that are the result of folks not always making the best choices. If some of these examples look a bit familiar, fear not, they will all be easily remedied by following our recommendations. Let’s dive in and start tackling the obstacles and finding fixes!
1. Placing Tower Speakers Too Close to a Wall
Take a look at this Verus II Grand set up, it looks amazing right? Indeed it does, but there’s one minor issue that can be quickly addressed to improve its performance, which is the placement of the left tower. It’s nearly touching that sidewall and because of that, the bass is probably reverberating too much and the speaker likely sounds muddy. Basically when a tower speaker, or any speaker with a good amount of bass, is too close to a wall, you start to hear the room vibrate instead of the sweet, sweet music coming from the speaker. For a rear ported tower speaker like the Verus II Grand, you really want to give it at least a foot on all sides from any walls and if you can, two feet is even better. For front ported speakers like the Intimus 4T and 5T, you still want to give them at least a foot, because sound will still wrap around the cabinet from the front. The absolute worst thing you can do is to place your front speakers in a corner or alcove. People get tempted to place their TVs in a corner in open floor plans, but it’s a recipe for your front speakers to be too close together. When front speakers aren’t properly spaced apart, you lose stereo imaging and the 3D spaciousness that a correctly set up stereo system can provide. Instead of a realistic soundstage with each instrument having space to breathe, things can sound compressed and undefined. On top of that, the corner walls will really increase the dB level of the bass frequencies. In fact a corner can increase the bass response of a speaker by up to 16 times! So you can see how placing your fronts in a corner is a bad idea that can easily result in a very unbalanced sound.
2. Other Non-Ideal Speaker Placement
Beside placing a tower speaker away from a wall, there are some other rules of thumb to follow when you are positioning speakers in your room. An extremely common impulse we see is for folks to place their center channel pushed back on a shelf. Whether they are concerned with knocking the speaker off the shelf or just like the way it looks with the speaker pushed back, people often times don’t place their speaker on the edge of the shelf initially. But you don’t want to leave any empty shelf in front of a center channel because the reflections off the hard surface in front of the speaker will cause a peak in the midrange and de-emphasize the other frequencies.
Another common placement people attempt when they have difficult rooms is to put their surrounds in front of their seating position. Now you can place the surrounds ever so slightly in front of you, a few inches if you have to, but anything more than that and you will start to lose the surround effect of the speakers. Once the surrounds are a couple feet in front of you, the sound fields between them and the fronts begin to merge and you only perceive two speakers instead of four. Sure sounds coming from the surrounds may be a bit louder because they are closer, but you will not hear sounds as they are moving between the speakers any longer.
3. The Battle Between TV and Center Channel
It’s the age old conundrum, the ideal placement for your TV is eye level and the best placement for your center channel is ear level. Well, bad news, it turns out that your ear and eyes, at least for most of us humans, are roughly at the same level. Because of this, you either see TVs placed way too high, which is frequent when it is placed over a fireplace, or you see center channels that are either too high or too low. Bearing in mind that there will need to be some compromise between the two, the best placement option is to have the TV at eye level and the speaker just below it or conversely the center channel at ear level and the TV just above eye level. No matter what you do though, don’t place everything several feet off the ground as you’ll end up with not only a sore neck from looking up, but also subpar dialog intelligibility. Or hey, maybe go for this placement if your goal is to stop watching so much TV and to go outside once in a while. Just kidding, we would never recommend that!
4. Buying Speakers Without an In-Home Audition
We hear about it all the time from people we talk to, the speakers they purchased sounded absolutely incredible when they listened to them at the store, but not once they were installed in their home theater. It sounds obvious, but the demo rooms in stores have been specifically designed and treated to make speakers perform optimally. By contrast, if you are just listening on the floor of a big box store, there’s so much background noise that who can say how the speaker really sounds? In both instances, the listening environment is going to be nothing like your home. Without a doubt, home speakers that you hear at a store will sound drastically different once you get them in your own home due to the size of your room, placement, furniture, electronics, floor material and ceiling height, just to name a few factors. In fact, your room is a larger part in affecting your speakers sound than the receiver or amp you use! We do it too, here at the Aperion Audio showroom, we’ve spent a large amount of time placing and calibrating our speakers and electronics, as well as adding room treatments to quiet the space in order make sure our speakers sound their absolute best. But the difference with our business model is that getting the speakers home and setting them up is just the beginning of the audition process. With our 60 day in-home audition, you’ve got plenty to time to listen and make any adjustments needed in placement or even try out different receivers and amplifiers if you’re a real gearhead with more than one laying around. It can’t just be us with “spare” receivers waiting in the wings, right?
5. Buying an Underpowered Receiver
This is an easy trap to fall into because so many manufacturers play games with the specs. In fact, we recently even dedicated an entire blog to sorting out how much power a receiver will provide in the real world. Also, many of the reviews out there focus on video processing and features, but don’t really provide much evaluation in terms of sound quality. These reviews may lead you to buy a receiver with all kinds of bells and whistles while lacking a quality amplifier section. But a lot of times folks just don’t set aside enough budget for the receiver. Considering that your receiver controls how everything looks and sounds in your setup, it definitely doesn’t pay to skimp on this link of the chain. Put it this way, if you’re thinking of buying a 5.1 or 7.1 system in the $2K-$4K range as many of our systems are, a $400 receiver is not going to allow the true quality of the speakers to shine through. A good rule of thumb is that most of the receivers that can really power a system a well will start in the $700-$800 range and to really get a beefy receiver that will provide all the juice your speakers crave, you should consider spending $1000-$1500.
Another route you can take is to buy a receiver with pre-outs and then power your fronts and possibly center with an external power amp. While a separate power amp will get much more power to your speakers, keep in mind that you’ll be spending north of $2500 for a setup like this.
6. Not Calibrating Your Receiver and TV
You’ve come this far, you did your research and got the perfect speakers, receiver and TV, but make sure you don’t skip the last step, calibrating your system to get the most out of it! As far as the receiver goes, almost all of them include some form of auto setup software. Now sometimes you can get better results from a manual set up, but the auto set up is definitely a little quicker and can also do a very good job. If you do use the auto set up feature of your receiver, make sure you follow the instructions for the microphone placement, as this is critical. Placing the mic on the back of the couch isn’t the best option as any obstructions can affect the quality of the test tones it needs for setup. Use a tripod if possible and place the tip of the microphone exactly where the listener’s head will be when sitting down. Use as many mic positions throughout the room as you can so that the software can accurately measure the acoustic properties of your room. One last tip, when using the auto set up, turn the level of your subwoofer down to maybe 1/3 or 1/2 volume and always double check your channel level when the calibration is done. If you see large variances in volume level, especially from the surrounds or subwoofer, chances are you didn’t get a clean reading and should try again. If you do go for a manual set up, you can find some tips for adjusting the settings here.
As for the TV, these days some calibration is something you simply must do. At the very least you’ll want to turn down the brightness that they use for in-store demonstrations and turn off the dreaded “soap opera” effect aka motion smoothing. Beyond that, it’s a good idea to go through each of the settings in your TV and to adjust them to your viewing conditions and preferences. If you want something a bit more technical, but also more generic, you can search for your model’s ISF settings and use those recommendations to dial in everything. Spend a little time making either your own adjustments or use the ones from ISF and you’ll be amazed at just how much better your display will look.
7. Listening to or Watching Low Quality Source Material
Finally, once you’ve calibrated your system and everything is ready to rock, pay attention to what you are going to be running through it! We hear about people that are having issues with audio and video quality all the time and it turns out they are either listening to low quality mp3s or just watching broadcast TV. Especially if you are watching standard definition TV on an HDTV or 4K display, it’s going to look pretty terrible. Remember, your system is only as good as its weakest link and that goes for the material you watch and listen to as well. You’ve spent the time and money on your gear, make sure that the sources are high quality too! Stick to HDTV and Blu Ray for your TV and CDs, SACD or lossless audio downloads for music.
Now that you now what not to do, go forth and enjoy the best that your system has to offer and as always, happy listening!
Seven Frequent Home Theater Missteps published first on https://medium.com/@123movieshub
0 notes
Photo

Home Theater System Planning - What You Need To Know
by Robert Silva April 28, 2017
A home theater system is an exciting entertainment option that provides the consumer with an immersive viewing and listening experience. Your home theater system can be something as simple as 32-inch LCD TV and a home-theater-in-a-box system, or a sophisticated custom-built system with a video projector and in-wall speakers. However, there is a lot to consider in-between.
Here are the 10 things that you need to keep in mind.
1. The Room
The first place to start is the room you intend to place your home theater system in. The size of the room will determine the size and type of video display device (TV or projector) that would be best to use. However, whether your room is large or small, additional questions to consider include:
How much ambient light is present? For TVs, ambient light can result in screen glare or screen surface reflection. For video projectors, ambient light can result in a washed out image.
Is the room carpeted or not carpeted? This will affect how sound, especially bass, is distributed throughout the listening area. Hard floors will be more reflective, which can result in unwanted sound echoes and uneven bass. Carpeted floors will help in the absorption of unwanted audio artifacts.
What type of wall construction do you have? Wall construction can contribute to the acoustic properties of the room.
Will you be placing your home theater system components in free space, or will you be housing your components in a cabinet or closet and installing your speakers in the wall or ceiling? Depending on how you want the room to look will determine where and how you place your components. Also, whether ceiling or in-wall speakers (and speaker placement in general) are best depends on what surround sound formats you will be most commonly using.
Where will you be sitting in relation to the screen image? This will determine the optimal screen size for the best visual experience.
Before embarking on buying your actual home theater system components, especially for a medium-to-high end system, it might be a good idea to consult with a home theater installer to come onsite and assess your room and address the above questions. The installer can make useful suggestions on components or installation concepts that will work best in your room environment, keeping in mind your own specific home theater system budgetary considerations.
2. The Video Display Device:
This is the first actual component to consider for your home theater system. After all, the idea of home theater is to bring the movie theater experience home. The most important element of this experience is the visual experience of viewing a large image on a screen. This is where you have a choice of:
A Flat Panel LCD, OLED or Plasma TV (Note: Plasma TVs are now discontinued, but you may still find one used, refurbished, or on clearance). Also, you have a choice of TVs that can display 720p, 1080p, or 4K Ultra HD resolution images.
A Video Projector/Screen Combination.
The actual size of the room will help determine the size of the screen that can be accommodated.
From there, you need to decide what type of video display device would be most appropriate.
You also have the option of incorporating 3D viewing into your home theater system. However, you will need a 3D-enabled TV or video projector and other supporting components to do this. For more details, read my Guide to Watching 3D at Home.
If you're using a 4k video projector, get more details about how those work.
3. Audio Reproduction - Home Theater Receiver or Preamp/Amp Combination:
The next essential element of the movie theater experience is sound. The way this is implemented in a home theater system is either a home theater receiver or Preamplifier/Amplifier combination.
A Home Theater Receiver usually combines the functions of three components:
A radio tuner for AM/FM and, in some cases, HD (High Definition Radio), Internet Radio, or XM and/or Sirius Satellite Radio.
A Preamplifier that switches and controls which audio and video source is selected (such as a Blu-ray/DVD player, VCR, CD player, etc...) and processes the incoming stereo or surround sound signals and distributes them to the correct amplifier channels and the subwoofer output. The preamp in an AV receiver can also route video signals coming from source components (such as a DVD player) and direct the video signal to the TV.
A built-in Multi-channel amplifier (5.1, 6.1, 7.1, or more, channels) that sends the surround sound signals and power to the speaker system.
4. A Home Theater, AV, Surround Sound Receiver or Separate Preamp and Amplifier
The Home Theater/AV Surround Sound receiver is the heart of a home theater system and provides most, if not all, the inputs and outputs that you connect everything, including your television, into. A Receiver provides an easy and cost-effective way of centralizing your home theater system.
However, in many higher-end home theater system installations, the functions of a Receiver are often provided by separate components: Preamp/Processor, Tuner, and either a single multi-channel power amplifier or even separate amplifiers for each channel.
Such a setup provides more flexibility in switching out and/or upgrading the separate aspects of the home theater system as well as isolating any interference that is caused by having all these functions combined in a signal chassis and sharing the same power supply.
For the average consumer, however, a good receiver will function just fine.
To dig deeper into home theater receivers, including a lot of product choices, check out my Guide To Home Theater Receivers and Surround Sound
5. Loudspeakers
The next components to consider for your home theater system are the loudspeakers. Just as the size and type of room dictate the type of video display device you need, the same factors also affect the speakers you need for your home theater - Key points to remember:
Before you buy, listen to several types of speakers and setups.
Consider buying the same brand and related model speakers for your home theater. This will ensure that you will have a better acoustical match between both the speakers and the room. Check out more on Loudspeakers: Best Surround Sound Speakers.
You Need A Subwoofer - The advent of home theater has introduced the Subwoofer to many consumers. A subwoofer is a specialized speaker that only reproduces the extreme low frequencies present in movies or music. There are several types of subwoofers you can use in a home theater system, and, once again, the size and type of room, and issues such as whether the room is carpeted or not will help you determine which subwoofer is right for you. Once again, you need to perform listening tests. Check out some top subwoofer brands and products
Once you have your speakers and subwoofer, check out some tips on how to set them up in 5.1 and 7.1 channel configurations.
Bonus Tip: Speaker setup information for Dolby Atmos immersive surround sound.
6. Source Components
DVD Player - At a minimum, you need some type of DVD player for your home theater system. Two things to consider in a DVD player: Progressive Scan and Upscaling capability. This will ensure you get the best possible image from your DVDs, especially if you are viewing them on an HDTV. List of Best DVD Players
Blu-ray Disc Player - Also, if you decide to get a Blu-ray Disc player to access true high definition source content, instead, or in addition to, a DVD player, you can also use it to play standard DVDs and, in most cases, audio CDs as well. For more on the Blu-ray Disc player option, check out my articles Before You Buy a Blu-ray Disc Player, and Blu-ray Disc and Blu-ray Disc Player FAQs and Best Blu-ray Disc Players
Ultra HD Blu-ray Disc Player - If you have a 4K Ultra HD TV, another source component option that you should consider is an Ultra HD Blu-ray Disc player. When playing Ultra HD Blu-ray Discs, these players provide a true-4K resolution for display on an Ultra HD TV, providing the best possible visual experience. It is also important to note that all Ultra HD Blu-ray Disc players will play standard Blu-rays and DVDs, and will provide 4K upscaling so that they look their best, as well playback of audio CDs. Check out Ultra HD Blu-ray Disc Players and Discs
CD Player - Since all DVD, Blu-ray, and Ultra HD Blu-ray players can play CDs, you may not need a CD-only player. However, having a separate CD-only player in a home theater system is quite common, especially if it is a high-end unit providing better CD audio performance. Check out my suggestions
DVD Recorder - In addition, you may also want to include a DVD recorder or DVD recorder/VCR combination in lieu of your old VCR, while you still can.
If you still have a VCR, you can also connect it your home theater system (especially if it is a HiFi Stereo unit) - but keep in mind VHS delivers very poor image quality in comparison to DVD, and although DVD is much better than VHS, Blu-ray actually delivers a true high definition image, and of course, for 4K TVs Ultra HD Blu-ray takes it up a notch further. The differences between formats such as VHS and DVD vs Blu-ray and Ultra HD Blu-ray become especially more noticeable as screen sizes get larger. For those that that are still clinging onto VHS, take note that new VCRs and DVD/VCR combos are being discontinued.
Antenna/Cable/Satellite - Also, you need to decide how you will receive your primary television programming: Antenna, Cable, or Satellite. If you opt to subscribe to a Cable or Satellite Service, you might also consider combining that service with a DVR. DVRs provide a way to record your TV programs on a Hard Drive, rather than disc or tape.
Internet - Finally, another home theater source option is the Internet. If you have high-speed internet access, you can stream both music and movies, without having to buy a DVD or Blu-ray Disc. An increasing number of Blu-ray Disc players and TVs have the ability to connect the internet for this purpose, but there are also external boxes, referred to as Media Streamers that provide this option as well, and they are very affordable.
7. Surge Protector or Line Conditioner
Surge protectors are the unsung heroes of a home theater system. Although they are not foolproof, providing your system with some sort of surge protection is a good idea. You never know when you might have a sudden power outage, or even a brown out that may affect your system.
Also, if you want a more comprehensive way of protecting against power surges, as well as being able to monitor your power, and, in some cases, regulate your power, you might consider a Line Conditioner.
8. Connection Cables and Speaker Wire:
You can't have a home theater system unless everything is connected; whether you buy basic connection cables and speaker wire or the really high-end stuff. The main things to consider is to use the right type, right length, and to connect everything correctly. Some connections are color coded - make sure the colors on the cable ends match the connections on your components - this makes life a lot easier.
In terms of speaker cable, the gauge of the cable can be a factor, depending on the distance the speakers are from the amplifier or AV receiver. I use 16 or 14 gauge speaker wire myself. 18 gauge is very thin and should not be used for longer distances.
9. Control Options
One of the most confusing parts of a home theater system is not all components and the connections, but actually managing and controlling it. Each component in a home theater system comes with its own remote, leading to a collection that can number half-a-dozen or more.
One solution is to opt for a sophisticated, but easy to use, universal remote that can control most of the functions of each of your components. After the initial hurdle of programming the remote for your system, such a device will enable everyone in the family to use the home theater system without frustration.
An alternative to a universal remote that is becoming very practical, is to take advantage of the capabilities of most Android and iPhones to control your home theater system via downloadable apps. Some apps work with several product brands and models, while others are tied to specific brands. For examples, check out my list of Remote Control Systems and Apps.
10. Furniture
You have a fancy home theater system, now you need a place put your components, such as stands and racks, as well as some comfortable seating that will make you want to spend your time with your home theater. Check out some home theater seating options.
Final Take - Actually, This Is Just The Beginning!
There you have it, the basic elements of a home theater system. There is no home theater system that is exactly like another, everyone has different rooms, budgets, brand preferences, and decorative tastes when it comes to home theater. The key thing is to keep the basic elements of a well-balanced home theater in mind while assembling it according to your own needs and tastes.
Although putting together a basic home theater system is not a complicated as it seems on the surface and be a nice weekend project for most consumers, if installing a high-end custom home theater, make sure you enlist the aid of the professional home theater installer.
https://www.lifewire.com/essential-elements-of-home-theater-system-1846784
0 notes
Text
The Impact of Audio Visual Layout on Learning Environments
The layout of audio visual technologies in learning spaces can have a significant impact on the overall learning experience and outcomes for students. Elements like speaker placement, display positioning, and acoustic treatments all influence how effectively students are able to see, hear and engage with educational content. In this blog, we will examine some of the key considerations of an effective AV layout with a focus on 7.1 speaker placement ceiling and how it can enhance comprehension and participation in the classroom.

Speaker Placement and Acoustics
The placement of speakers throughout a learning space is important to distribute sound evenly and prevent echoing or distortion. Some best practices for speaker positioning include:
Ceiling Speakers
As mentioned earlier, 7.1 speaker placement ceiling distributed sound in a surround sound format allows for immersive audio that doesn't disrupt the classroom. Ceiling speakers help prevent echoes and provide consistent volume throughout the room. They also free up wall and desk space below. Proper spacing and calibration is needed to distribute sound correctly.
Wall Speakers
Alternatively, wall mounted speakers can also be effective if ceiling installation is not possible. They should be evenly spaced along the sides and rear of the room, roughly 5-7 feet above floor level. Bass managed speakers and acoustic treatments help control echoing off hard surfaces.
Subwoofers
Subwoofers, whether installed in-wall, in-ceiling or discrete units, add low frequency effects and rumble to create a more cinematic experience. Their placement depends on room size, with one subwoofer typically sufficient per 100-200 sq ft.
Acoustic Treatments
To reduce reverberation from hard surfaces like concrete walls, acoustic wall panels, absorption materials, and sound-blocking furniture can optimize the listening environment. This improves speech clarity and prevents voices from overlapping.
Display Placement
How video content is shown also influences the classroom experience. Some display placement best practices include:
Interactive Whiteboards
These touch-enabled displays mounted at the front of the room put interactive learning tools and annotations within easy reach of students and teachers. Screens 70-80 inches are suitable for classrooms seating 15-30 people.
Projector Screens
Front projection with a lowered ceiling mount allows for a bigger image size at a lower cost than large displays. Screens should be recessed or have a matte white finish to avoid glare. 120-150 inch diagonal screens work well for most classroom needs.
Monitor Placement
Flat panel LCD or LED monitors can supplement projectors orwhiteboards when additional screens are required. They should be at eye level when seated to reduce neck strain.
Display Configuration
Dual display setups with a projector/whiteboard and additional monitor(s) provide flexibility for both whole-class and small group instruction. Displays can also be configured in an L-shape or U-shape to optimize viewing from all seats.
The Role of Video and Audio Layout in Engagement and Comprehension
With the proper layout of video and audio technologies, learning environments can be transformed into engaging spaces that enhance comprehension and participation. Some ways this occurs include:
Immersive Environments Boost Focus
Surround sound through ceiling speakers helps immerse students in content like films, creating a more compelling learning experience that holds attention. This boosts engagement and inhibits distractions.
Clear Presentations Improve Understanding
Even speaker placement and display positioning ensures all students have equal access to high-quality audio and clear visuals necessary to follow lessons. This supports diverse learning styles and prevents information gaps.
Interactive Displays Encourage Participation
Large, front-of-room interactive displays promote collaboration as students and teachers can easily annotate, share, vote and provide feedback on content together in real-time. This makes lessons more dynamic and keeps students involved.
Flexible Layouts Support Varied Activities
The ability to easily reconfigure screens and share different sources on multiple displays gives teachers freedom to quickly switch between whole-class instruction, group work, and presentations. Students stay focused through changes in pace and format.
Immerse Learning Through Innovative AV
As new forms of audio visual technology continue emerging, innovative classrooms will look quite different in the years ahead. From VR and AR to new interaction tools, the opportunities to enhance engagement and boost understanding through immersive learning experiences are endless. With an effective foundational AV layout in place, educators can readily adopt new innovations to optimize each learning space.
Conclusion
In summary, the thoughtful design of a classroom's audio visual system layout has wide-reaching impacts on the overall experience and outcomes for students. Factors like speaker placement, display positioning, acoustic treatments and configuration all play a role in helping students see, hear and interact with educational content as clearly and seamlessly as possible. A properly executed AV design following best practice guidance creates an ideal environment for cultivating engagement, participation and ultimately enhancing comprehension across diverse learners. With continuous improvements, learning spaces of the future will become even more powerful platforms for inspiring students through innovative technologies.
0 notes
Text
Exploring the Latest Technologies for Audio Visual Layouts
In today's world of home cinema and home theaters, audio visual layouts play a crucial role in delivering an immersive experience for viewers and listeners. Technologies in speakers, projectors and other AV equipment are constantly evolving to enhance the user experience. In this blog, we will explore some of the latest innovations in audio visual technologies and layouts. And also 7.1 ceiling speaker placement .

7.1 Ceiling Speaker Placement
One of the leading audio technologies that has emerged in recent years for home theaters is 7.1 surround sound. The 7.1 layout involves placing surround sound speakers and a subwoofer around and within the viewing space to provide lifelike surround effects. For the two height or ceiling channels in a 7.1 setup, determining the optimal speaker placement is important. Experts recommend mounting front height or top middle speakers on the ceiling, directly above and slightly in front of the primary listening position. Rear height or top rear speakers should be positioned on the ceiling directly above and slightly behind the listening position. Proper ceiling speaker placement helps deliver an immersive 3D surround experience with overhead sound effects moving smoothly across channels.
Object-Based Audio Formats
While traditional surround sound formats like 5.1 and 7.1 are channel-based, representing audio as separate channels, newer object-based formats deliver a more flexible and next-level experience. Formats like Dolby Atmos and DTS:X apply audio processing techniques to place and move individual sounds anywhere in the room, including above the listener. This overcomes the limitations of discrete channels. Content in these formats contains audio objects that can be precisely positioned and independent movement of sounds is supported. Atmos and DTS:X have led to new speaker configurations beyond 5.1 and 7.1 like moving coil speakers, in-ceiling speakers and Dolby Atmos enabled speakers which reflect audio pinpoints.
Upward Firing vs In-Ceiling Speakers
When upgrading to an object-based audio format, users need to choose between upward firing speakers and in-ceiling speakers for overhead channels. Upward firing speakers like Dolby Atmos enabled or DTS:X speakers have integrated drivers that bounce sound off the ceiling. They provide an affordable option but may not be as accurate as true overhead speakers. While more expensive, in-ceiling speakers mounted in the ceiling deliver the most discrete and coherent overhead experience from a fixed position. They localize sounds precisely but require ceiling cut-outs for installation. Both options are suited for Atmos and DTS:X but in-ceiling speakers are preferable for maximum fidelity, especially in larger rooms.
4K and HDR Projectors
Along with advances in audio, projector technologies have also progressed significantly. 4K Ultra HD resolution projectors with 4 times the pixels of Full HD are now mainstream. Combined with high dynamic range or HDR, they deliver stunning bright and colorful images. 4K HDR projectors analyze scene by scene and customize brightness, contrast and color to closely match how the human eye perceives images. This makes highlights appear brighter and emphasizes details in shadows for an immersive big-screen viewing experience. Short throw 4K projectors also allow large projections even in small spaces. Automated lens memories remember different display ratios for an optimal picture.
Multi-Screen Synchronization
With multiple screens becoming common in luxury homes, synchronizing video playback across displays is important. Solutions like Crestron, Control4 and RTI make it possible to deliver perfectly timed playback of the same content across different screens, using technologies like HDMI video wall processoring. For example, a movie can play on the main projector screen as well as connected LED TVs in other rooms. Audio follows video intelligently, moving between speakers as the video switches between displays. Multi-screen synchronization enables new types of immersive video experiences spanning living spaces.
Smart Home Integration
Modern AV systems leverage the connectivity of smart home platforms, adding a new dimension of control and flexibility. Through solutions like Control4, Crestron, RTI and Savant, components can be managed from one intuitive touchscreen interface or smartphone app. Advanced programming allows scenes and activities to automate multiple functions with a single command. "Watch Movie" could dim lights, close shades, turn on projector/TVs and select audio/video sources in one go. Voice assistants offer convenient hands-free controls via voice commands. Connectivity also facilitates features like internet radio, streaming services and smart home security camera feeds on projector screens. Integrated systems combine entertainment, lifestyle and security seamlessly.
Multi-Room Audio
While traditional multi-room audio involved separate audio zones and systems, newer whole home audio solutions synchronize playback effortlessly across rooms. Sonos, Bluesound and other platforms leverage WiFi to stream the same or different music to numerous speakers simultaneously with perfect timing. Users can control playback, volume and playlists from any room or mobile device. Music follows as listeners move between spaces, maintaining an enveloping soundtrack that isn’t interrupted. The wireless multi-room approach obviates wiring and installation complexity. Voice assistants, streaming services and smartphone apps deliver even more control capabilities to multi-room audio platforms.
Modular Mounting Systems
Installing whole home AV systems requires professional planning and installation. Modular mounting systems designed for projectors, screens, speakers and other components help achieve clean, invisible installations tailored to the project. Mounting products like Chief offer mounting plates and wall/ceiling brackets that combine to construct versatile mount structures for projected and ambient lighting solutions. Pre-wired mounting brackets with hidden cable management solutions create neatly run wiring invisible to viewers. Flexible modular mounting and professional installation tools streamline the configuration and integration of AV in commercial or home applications. Combined with acoustic treatments and centralized equipment racks, modular systems deliver high-end calibrated installations.
Lighting Techniques
Lighting plays a critical role in home theaters by supplementing display light sources and maximizing viewing experiences. Indirect lighting schemes place accent lighting strategically to illuminate walkways, art or room features without causing glare or washes on screens. Different lighting scenes integrate task, accent and ambience lighting throughout the house to set moods in synchrony with AV systems. For example, warmer lighting may kick in during movies while brighter warm-white tones suit gaming. Lighting controls allow gradual, smooth adjustments or programmed lighting scenes. Combining automated lighting with AV creates immersive multi-sensory experiences that enhance movies, gameplay and more.
Conclusion
Technologies across audio, video, mounting, lighting and connectivity are elevating home theater and multi-room audio-visual experiences. Breakthroughs in surround sound formats, projector capabilities, smart integration and installation expertise are delivering cinema-like entertainment that previously required dedicated HT rooms. Looking ahead, emerging 8K resolution, microLED displays, AI upscaling and Virtual/Augmented Reality interfaces promise to take immersion to even greater heights. Advanced home automation continues simplifying access and ambient control of synchronized multi-sensory home entertainment for every space and activity.
0 notes