#ASP.NET boilerplate framework
Explore tagged Tumblr posts
Visit Tumblr Blog
Explore Tumblr blogs with no restrictions, modern design and the best experience.
Last Seen Tumblr Blogs


Fun Fact
Tumblr’s reach among the 26-to-35-year-olds in the US is 11%.
Text
Master Angular 18 and ASP.NET 8.0: Your Gateway to Modern Web Development
Web development continues to evolve at an astonishing pace, with frameworks and technologies constantly being updated. If you’re keen on mastering two of the most in-demand skills, Angular 18 and ASP.NET 8.0, you’re on the right track. Together, these tools form a powerhouse duo for creating efficient, scalable, and dynamic web applications. In this article, we’ll explore why these technologies are vital, how they work together, and how you can leverage them to boost your career in web development.
What Makes Angular 18 and ASP.NET 8.0 Stand Out?
Angular 18: A Frontend Marvel
Angular 18, the latest version of Google’s popular TypeScript-based framework, comes packed with features that make frontend development smoother and more efficient. Its ability to handle complex Single Page Applications (SPAs) with ease makes it a go-to for developers. Key highlights include:
Enhanced Performance: Faster rendering and improved change detection.
Streamlined Tooling: Debugging and testing have become easier.
Modular Architecture: Encourages better organization and scalability.
ASP.NET 8.0: Backend Brilliance
ASP.NET 8.0 is a robust framework for building web APIs and dynamic server-side applications. Microsoft has added cutting-edge features in this version, such as:
Minimal APIs: Simplified development for RESTful services.
Better Integration with Blazor: Enhances full-stack development capabilities.
Improved Performance: Faster execution and resource management.
Why Combine Angular and ASP.NET?
Pairing Angular 18 with ASP.NET 8.0 creates a synergy that benefits both developers and end-users. Angular handles the frontend, providing a seamless user interface (UI), while ASP.NET manages the backend, ensuring secure data processing and storage. Together, they deliver high-performing applications that are user-friendly and robust.
Top Features of Angular 18
1. Signals for State Management
Angular 18 introduces Signals, a reactive system for managing state updates. This feature simplifies how data flows within an application.
2. Enhanced Dependency Injection (DI)
Angular’s improved DI makes it easier to manage services and reusable components, ensuring cleaner code.
3. Standalone Components
With standalone components, developers can now build and use components without having to include them in Angular modules, reducing overhead.
Top Features of ASP.NET 8.0
1. Minimal APIs for Simplified Development
Creating web APIs is now faster with minimal boilerplate code.
2. gRPC Performance Enhancements
Efficient communication between services using gRPC ensures better data handling and faster response times.
3. Cross-Platform Compatibility
Run your applications seamlessly across different operating systems.
How to Get Started with Angular 18 and ASP.NET 8.0
1. Setting Up the Development Environment
To begin, ensure you have the following installed:
Node.js and npm: For Angular development.
Visual Studio 2022: Ideal for ASP.NET projects.
.NET 8 SDK: Required for ASP.NET 8.0.
2. Building a Simple Angular Application
Start with a basic Angular project:
bash
Copy code
ng new my-angular-app
cd my-angular-app
ng serve
This command sets up a new Angular project and runs it locally.
3. Creating a Web API with ASP.NET 8.0
In Visual Studio, create a new project and select ASP.NET Core Web API. Add minimal API code like this:
csharp
Copy code
var builder = WebApplication.CreateBuilder(args);
var app = builder.Build();
app.MapGet("/", () => "Hello, World!");
app.Run();
Best Practices for Combining Angular and ASP.NET
1. Use RESTful APIs
Ensure your backend provides RESTful endpoints that your Angular frontend can consume effortlessly.
2. Leverage Dependency Injection
Both Angular and ASP.NET use DI to promote reusable and testable code.
3. Optimize for Performance
Minimize unnecessary API calls and use tools like Angular’s Ahead-of-Time (AOT) compilation to speed up your app.
Building a Real-World Project
Imagine creating an e-commerce platform with Angular 18 as the frontend and ASP.NET 8.0 as the backend. Here’s a high-level breakdown:
Frontend: Angular handles product pages, shopping carts, and user interactions.
Backend: ASP.NET manages user authentication, payment processing, and database operations.
Career Opportunities with Angular 18 and ASP.NET 8.0
1. High Demand in the Job Market
Skills in Angular and ASP.NET are highly sought after, making you a valuable asset to any company.
2. Diverse Roles
From full-stack developer to frontend specialist, mastering these tools opens up numerous career paths.
3. Freelancing and Entrepreneurship
Build your own apps or take up freelance projects, leveraging these technologies.
Learning Resources for Angular 18 and ASP.NET 8.0
1. Online Courses
Look for courses that focus on Master Angular 18 and ASP.NET 8.0 to get hands-on experience.
2. Official Documentation
Both Angular and ASP.NET have detailed guides to help you understand their features and implementation.
3. Community Support
Join forums and developer communities to share knowledge and solve issues.
Common Challenges and How to Overcome Them
1. Steep Learning Curve
Both Angular and ASP.NET have rich ecosystems, which can be overwhelming. Start small and focus on mastering core concepts first.
2. Integration Issues
Ensure your frontend and backend are well-synced by using tools like Postman for testing APIs.
3. Debugging Complex Applications
Utilize debugging tools like Chrome DevTools for Angular and Visual Studio’s debugger for ASP.NET.
Future Trends in Angular and ASP.NET Development
1. Enhanced AI Integration
Expect more AI-powered tools and libraries to integrate seamlessly with these frameworks.
2. Serverless Architectures
ASP.NET is already paving the way for serverless development.
3. Progressive Web Apps (PWAs)
Angular continues to be a preferred framework for building PWAs, ensuring better user experiences.
Conclusion
Mastering Angular 18 and ASP.NET 8.0 is a smart move for anyone looking to excel in modern web development. Together, they offer the perfect combination of power, flexibility, and efficiency, enabling you to build everything from dynamic SPAs to scalable web APIs. Whether you’re a beginner or an experienced developer, these technologies are worth your investment.
0 notes
Text
Why Choose ASP.NET for Web Application Development in 2024?
ASP.NET is still a top technology framework for web application development, with a rich ecosystem for building strong, scalable, and secure applications. The most recent improvements in 2024 have increased its capabilities, making it a top choice for businesses globally.
Top Benefits of Using ASP.NET for Web Development in 2024
Improved Performance and Scalability
The most recent ASP.NET upgrades for 2024 provide performance optimization improvements that improve application speed and reduce memory consumption. The framework's built-in caching, asynchronous programming, and support for microservices make it ideal for applications that demand scalability.
Cross-Platform Development with.NET Core.
ASP.NET Core enables developers to create applications that run on a variety of platforms, including Windows, macOS, and Linux. This flexibility enables enterprises to reach a larger audience while also ensuring that their applications are future-proof.
Security Features:
With an increase in cybersecurity threats, ASP.NET includes built-in security capabilities like as request validation, authentication, authorization, and data encryption. The 2024 improvements enhance security by integrating identity and access management technologies.
MVC Architecture
ASP.NET The MVC architecture separates application functionality and UI layers, allowing developers to write clear, maintainable code. This also improves the application's scalability because individual components can be updated or modified without affecting the entire application.
Support for cloud and microservices.
ASP.NET works well with cloud services such as Azure, allowing developers to create scalable, cloud-native apps. Businesses can use microservices architecture to construct complex applications that are simple to deploy and manage.
What's New in ASP.NET 2024: Key Features and Updates
Improved Blazor IntegrationBlazor, the front-end framework for building interactive web UIs using C#, has seen enhancements in 2024. Developers can now build even more dynamic, real-time applications with enhanced WebAssembly capabilities.
Minimal APIs The latest ASP.NET updates introduce minimal APIs that allow developers to quickly build lightweight, fast web services with reduced boilerplate code. This feature is perfect for startups and businesses needing rapid API development.
Containerization and Kubernetes Integration ASP.NET 2024 comes with better support for containerization, allowing seamless integration with Kubernetes for deploying, managing, and scaling applications. This update enables businesses to adopt modern DevOps practices with ease.
gRPC SupportASP.NET now fully supports gRPC, a high-performance, open-source framework for remote procedure calls. This is particularly useful for building real-time applications that require low-latency communication between services.
Why Hire a Dedicated ASP.NET Developer?
Expertise in ASP.NET EcosystemA dedicated ASP.NET developer brings in-depth knowledge of the framework, ensuring the development process is smooth and efficient. They are skilled in leveraging the latest features and updates to build high-performing web applications.
Cost-Effective DevelopmentHiring a dedicated ASP.NET developer or team ensures cost-effective development. Outsourcing or remote hiring allows you to access top talent without the overhead costs associated with full-time, in-house staff.
Customization and ScalabilityA dedicated ASP.NET developer can tailor your application to meet your unique business needs and ensure scalability as your business grows. They can also provide ongoing support and maintenance.
Faster Time to MarketExperienced ASP.NET developers can accelerate the development process, allowing you to launch your application faster and gain a competitive edge.
Techcronus – Your Trusted ASP.NET Development Partner
At Techcronus, we specialize in building high-performance web applications using ASP.NET. Our team of certified ASP.NET developers delivers customized solutions to meet your business goals. Whether you're looking to build a new application or optimize an existing one, Techcronus can help you at every step.
Contact us today! Contact No: +91 79-40399641 / +1 (415) 234-7510 Email: [email protected]
For more information, visit our official website to explore our services and case studies.
#ASPNetDevelopment#WebDevelopment#ASPNetCore#DotNetDevelopment#WebAppDevelopment#DotNetCore#ASPNetMVC#CustomWebSolutions#TechSolutions#BusinessApplications#ScalableWebApps#SecureWebApplications#WebDevelopmentServices#DigitalTransformation#BusinessGrowth#InnovativeTech#EnterpriseWebApps#OpenSourceDevelopment#CrossPlatformDevelopment#RapidAppDevelopment#EasyCodeManagement#HighSecuritySolutions#ScalableSolutions
0 notes
Text
A Comprehensive Exploration of 10 .NET 8.0 Enhancements Transforming the Blazor Ecosystem

Dive into the future of web development with our in-depth analysis of 10 .NET 8.0, dissecting the groundbreaking improvements that have revolutionized the Blazor framework, propelling it to new heights of performance and functionality.
The latest release of .NET 8 brings significant additions and changes to ASP.NET Core. The most notable enhancements for this release of ASP.NET Core are related to the Performance and Blazor alongside the updates regarding the AOT, Identity, SignalR, Metrics and many more features.
Microsoft announced that ASP.NET Core in .NET 8 is the most performant released version so far, and as stated, when compared to .NET 7, ASP.NET Core in .NET 8 is 18% faster on the Techempower JSON benchmark and 24% faster on the Fortunes benchmark. Brennan Conroy wrote a blog post about Performance Improvements in ASP.NET Core 8 and readers are recommended to take a look into this.
1. Enhanced Navigation & Form Handling
Say goodbye to clunky page reloads! Blazor now intelligently updates the DOM with server-rendered content, resulting in seamless navigation and form interactions that feel like a native single-page application.
2. Choose Your Render Mode at Runtime
Need more flexibility? .NET 8.0 lets you dynamically switch between server-side and interactive render modes for individual components, giving you granular control over your app's behavior.
3. Streaming Rendering Preserves DOM
Blazor now paints components progressively, preserving existing DOM elements and avoiding unnecessary refreshes. This translates to blazing-fast performance and a more responsive user experience.
4. QuickGrid
Say Hello to Data Tables Made Easy: Forget about writing tons of boilerplate code for data grids. QuickGrid is a new built-in component that handles sorting, filtering, and pagination out of the box, making your life easier and your tables prettier.
5. Improved Authentication
Integrate authentication into your Blazor apps with greater ease thanks to built-in support for OpenID Connect and improved integration with Microsoft Identity Platform.
6. Razor Component Result
Generate static HTML content with your Blazor components! This opens up new possibilities for pre-rendering content and improving SEO.
7. Sections
Modular Layouts Made Simple: Define flexible content areas in your app layout with "Sections" and dynamically fill them with components. This promotes code reuse and keeps your layouts organized.
8. Jiterpreter for Blazor WebAssembly
Get ready for faster Blazor WebAssembly apps! The new Jiterpreter improves component execution speed, making your WebAssembly apps feel native and responsive.
9. Enhanced Routing with Named Elements
Route to specific elements within your Blazor pages using URL fragments, providing finer-grained control over navigation and deep linking.
10. Cascade Query String Values
Pass query string values directly to your Blazor components, simplifying data transmission and making your development workflow more streamlined. Bonus: Blazor Server Interactivity in Web Apps: While still in preview, this feature opens exciting possibilities for running interactive logic on the server for Blazor WebAssembly apps, potentially bridging the gap between the two models.
Ready to get blazing? These are just some of the amazing improvements that await you in .NET 8.0. So, upgrade your projects, explore these new features, and build the next generation of web applications that are fast, dynamic, and simply delightful to use.
#saas development company#saas development services#outsourcing saas development#saas development agency#saas development companies#saas application development service#saas app development services#saas application development solutions
0 notes
Link
Reasons to Choose ASP.NET Boilerplate for Web Development
Is your next web development project in need of a strong and effective framework? ASP.NET Boilerplate is the only place to look. With its many features and advantages, this all-inclusive framework may improve the quality of your apps and expedite your development process. With code samples to demonstrate the ASP.NET Boilerplate’s strength and adaptability, we’ll go over six strong arguments in this article for why it should be your go-to framework...
Learn more here:
https://www.nilebits.com/blog/2024/04/reasons-choose-aspnet-boilerplate/
0 notes
Text
Powering the Future: Top Backend Frameworks for Developers in 2024

The backend, the unseen engine that drives web applications, is undergoing constant evolution. Backend frameworks provide developers with essential tools and structures to build robust, scalable, and secure web applications. In 2024, several established frameworks continue to dominate the landscape, while new contenders emerge with exciting features. This guide explores the top backend frameworks developers should consider for their 2024 projects.
Established Powerhouses:
Django (Python):
A mature and versatile framework known for its "batteries included" philosophy, providing a wide range of built-in features for rapid development.
Ideal for complex web applications, e-commerce platforms, and content management systems (CMS) due to its robust security features and scalability.
Python's popularity and extensive libraries further enhance Django's appeal.
Spring Boot (Java):
A popular choice for enterprise-level applications, known for its modular design and focus on developer productivity.
Simplifies development by auto-configuration and dependency injection, reducing boilerplate code.
Spring Boot's vast ecosystem of libraries and tools caters to diverse project needs.
Laravel (PHP):
A feature-rich framework offering a clean and expressive syntax for PHP development.
Laravel excels at building APIs and web applications with robust security features and a thriving community.
Its focus on rapid development and MVC (Model-View-Controller) architecture makes it popular for building complex web projects.
ASP.NET Core (C#):
Microsoft's open-source framework for building modern web applications.
Offers cross-platform compatibility, allowing development for Windows, Linux, and macOS.
Strong integration with other Microsoft technologies like Azure cloud platform makes it attractive for enterprise development.
Rising Stars:
FastAPI (Python):
Gaining rapid traction for its focus on high performance and developer experience.
Leverages Python's type hints for static type checking, enhancing code reliability.
Ideal for building modern APIs requiring speed, efficiency, and a clean development workflow.
NestJS (JavaScript/TypeScript):
A server-side framework for building scalable Node.js applications with a strong focus on architecture and testability.
Employs TypeScript for static typing and leverages design patterns like dependency injection for better code organization.
Ideal for large-scale, complex web applications requiring a structured and maintainable codebase.
Choosing the Right Framework:
Selecting the best backend framework depends on your project's specific needs and your team's skillset. Here are some key factors to consider:
Project Requirements: Evaluate the complexity, scale, and performance needs of your project.
Programming Language Expertise: Choose a framework built on a language your team is comfortable with.
Development Speed and Maintainability: Consider the framework's features and structure to optimize development efficiency and code maintainability.
Security: Prioritize frameworks with a strong focus on security best practices.
Community and Support: A large and active community allows for easier access to support and learning resources.
Beyond the Framework: The Importance of Skills
While frameworks provide valuable tools, developer skillset remains paramount. A strong understanding of programming languages, object-oriented programming (OOP) principles, database management, and security best practices is essential for building robust backend applications.
The Future of Backend Frameworks
The future of backend frameworks lies in:
Microservices Architecture: Breaking down applications into smaller, independent services for increased scalability and maintainability.
Cloud-Native Development: Optimizing frameworks for deployment and management on cloud platforms like AWS, Azure, and Google Cloud Platform (GCP).
Artificial Intelligence (AI) Integration: Leveraging AI for tasks like code generation, testing, and performance optimization.
Conclusion:
Backend frameworks empower developers to build the backbone of the digital world. In 2024, the established powerhouses continue to deliver, while rising stars like FastAPI and NestJS offer exciting possibilities for modern web application development. By understanding your project needs, considering these factors, and fostering strong developer skills, you can choose the framework that helps you build successful and future-proof applications.
0 notes
Text
Ruby on Rails vs. Other Web Development Frameworks: A Comparison

Ruby on Rails (RoR) has long been a stalwart in the world of web development, known for its elegant syntax, convention over configuration philosophy, and rapid development capabilities. As businesses seek the most suitable web development framework for their projects, a comparison of Ruby on Rails against other frameworks becomes imperative. In this exploration, we analyze the strengths, weaknesses, and unique features of Ruby on Rails in contrast to other popular web development frameworks. Leading ruby on rails website development company usa are navigating this landscape, utilizing the framework's potential to craft robust and scalable web applications.
Ruby on Rails Web Development Company USA: Setting the Standard
In the United States, where the demand for dynamic and efficient web applications is ever-growing, Ruby on Rails continues to set the standard for web development. With a focus on developer happiness and productivity, RoR empowers Ruby on Rails web development companies in the USA to create feature-rich applications swiftly. Its convention over configuration approach streamlines development processes, allowing developers to focus on application logic rather than spending time on boilerplate code.
RoR Website Development Company USA: Harnessing Convention Over Configuration
One of the defining features of Ruby on Rails is its convention over configuration principle. This philosophy minimizes the need for developers to specify configuration details, as the framework makes assumptions based on conventions. For RoR website development companies USA, this translates to accelerated development cycles and a standardized structure that enhances code readability and maintainability.
Comparison with Other Web Development Frameworks
Ruby on Rails vs. Django (Python): The Battle of High-Level Frameworks
Ruby on Rails and Django, a high-level web framework for Python, share similarities in their approach to rapid development. Both frameworks prioritize developer convenience, offering pre-built modules and conventions. However, Ruby on Rails is renowned for its emphasis on elegant syntax, favoring convention over configuration, while Django follows the "explicit is better than implicit" philosophy.
Ruby on Rails vs. Laravel (PHP): PHP's Modern Counterpart
In the PHP realm, Laravel emerges as a modern counterpart to Ruby on Rails. Both frameworks prioritize developer-friendly syntax, offer robust features, and follow the Model-View-Controller (MVC) architectural pattern. Laravel, inspired by the simplicity and elegance of Ruby on Rails, brings similar conventions to PHP developers. However, the choice between the two often depends on the language preference and specific project requirements.
Ruby on Rails vs. Express.js (Node.js): JavaScript in the Mix
Express.js, a minimalist web framework for Node.js, stands as a JavaScript alternative to Ruby on Rails. While Ruby on Rails adopts a comprehensive approach to web development, including conventions and a full-stack framework, Express.js is minimalistic and allows developers greater flexibility in choosing components. The decision between the two often hinges on the developer's preference for the Ruby or JavaScript ecosystem.
Ruby on Rails vs. ASP.NET (C#): The Microsoft Framework
ASP.NET, powered by C#, is a robust web development framework from Microsoft. While Ruby on Rails is known for its agility and simplicity, ASP.NET offers a comprehensive ecosystem and integration with Microsoft technologies. The choice between the two often depends on factors such as project scale, existing infrastructure, and the development team's familiarity with the respective languages.
ROR Web Development Company in USA: Adapting to Changing Trends
As technology evolves, so does the landscape of web development. Leading RoR web development companies in the USA are not only adept at harnessing the core features of Ruby on Rails but are also adaptable to changing trends. The ecosystem surrounding RoR, including its vibrant community and extensive library of gems (Ruby packages), ensures that developers can seamlessly integrate new technologies and best practices into their projects.
Conclusion: Deciding on the Right Framework
In conclusion, the choice between Ruby on Rails and other web development frameworks ultimately depends on various factors such as project requirements, developer expertise, and language preferences. As businesses in the USA seek to build dynamic and scalable web applications, collaborating with a reputable ruby on rails web development company usa becomes pivotal. Whether it's leveraging the convention over configuration philosophy, harnessing the elegance of Ruby, or adapting to changing technological landscapes, Ruby on Rails remains a formidable choice in the ever-evolving world of web development.
#ruby on rails web development company usa#ruby on rails website development company usa#ror website development company usa#ror web development company in USA
0 notes
Text
0 notes
Link
Just connect to iFour Technolab Pvt. Ltd., a leading .Net web development company which provides extra-ordinary services to its clientele all over the world. It also has Microsoft certified software experts that work in all disciplines of .Net and fulfills all your necessities to provide lead-edging pace over the competitors.
#.net#.net framework#Asp.Net Development#asp.net software#boilerplate entity framework#asp.net web application
0 notes
Link

0 notes
Text
Automatically generateboilerplate text clipboard

#AUTOMATICALLY GENERATEBOILERPLATE TEXT CLIPBOARD PORTABLE#
#AUTOMATICALLY GENERATEBOILERPLATE TEXT CLIPBOARD CODE#
Go to Type of Symbol navigates to interface implementations in debug mode. Improved performance of fix in scope, as it now uses the results of solution-wide analysis to skip skip irrelevant code. New inspections and quick-fixes that help to deal with static local/anonymous functions with closures, simplify string interpolation, transform object initializers to constructors with parameters, find inconsistent locks on fields, and more. Improvements for nullable reference types support. Updated formatting for the C++20 requires-expressions and a new Line feed at the end of file option.Ĭ# 10 support including dedicated features for file-scoped namespaces, CallerArgumentExpression attribute, and global using directives.
#AUTOMATICALLY GENERATEBOILERPLATE TEXT CLIPBOARD CODE#
Improvements for the multiline generation of boilerplate code for aggregate initialization using C++20 designated initializers. Static_cast and c-style cast expressions. Smart pointer creation via both standard and Unreal-specific functions, ReSharper C++ is now better at handling implicit constructor calls, thereby improving the search and navigation features for the following cases: Updates for Catch2 v3 and the latest versions of GoogleTest, Boost.Test, and doctest. Support for the Unreal Engine testing framework. The improved code generation for delegate functions substitutes the parameter names from the signature. The Rename refactoring now updates both the U and I interface classes. Quick Documentation now includes a link to the Unreal Engine documentation. InspectCode Command-Line Tool can produce inspection results in the Static Analysis Results Interchange Format (sarif).
#AUTOMATICALLY GENERATEBOILERPLATE TEXT CLIPBOARD PORTABLE#
Improved PDB navigation (sources from symbol files) for types without sequence points such as interfaces and enums.Ībility to explore metadata of assemblies and portable PDBs. XML documentation in decompiled / metadata view file header.įorwarded types in the Assembly Explorer window XML Doc comments for platform assemblies, including assemblies with names that differ from the names of the XML documentation files (for example ). Improved support of nullable reference types. and annotations are now supported in projects that do not use nullable reference types Move Type to Another File refactoring.Ĭonvention-based routing support for ASP.NET Core.ĭetection and automatic configuration of syntax styles. Support for moving preprocessor directives along with the moved type in the. The bundled Clang-Tidy binary has been updated to Clang 14, adding new checks.Įxtract Global Using/ Inline Global Using refactorings. Support for the "Public Include Directories" and "All Header Files are Public" project properties. Updated Boost.Test support and fixed issues with data-driven test cases.īetter handling of emplace- and make-like function calls, including Unreal Engine Emplace calls.Ĭreating a documentation stub by pressing Enter inside a /**/ comment before the entity you wish to document. Improved error rendering: syntax highlighting in tooltips and more precise error highlighting range. Widget metadata specifiers in the code completion list. Performance boost for Unreal Engine indexing.īlueprints support: new inlay hints and inspections. To enable them, select JavaScript and TypeScript on the Environment | Products & Features page of ReSharper options ( Alt+R, O). Some solution-wide refactorings are available from the action list ( Alt+Enter): Extract Method over selected statements Change Signature, Transform Parameters, Convert Property To Method on member signatures Convert Static to Extension Method on signatures and on the first parameter.ĭedicated presentation features for ReadyToRun and NGen assemblies in Assembly Explorer window.Īctive development of productivity features for JavaScript, TypeScript, and JSON is suspended and these features are disabled by default. Improvements in the INotifyPropert圜hanged support. Structural Search and Replace patterns and replacement templates based on the attribute can be applied in the desired scope (file, project, or solution). C# 11 Preview support: checked operators, list patterns, required members, raw strings, checked operators, unsigned right shift, span pattern matching, auto-default structs
0 notes
Text
Accelerate Your Learning: Master Angular 18 and ASP.NET 8.0

In today's fast-paced tech industry, developers need to stay ahead of the curve by mastering cutting-edge technologies. One of the best ways to ensure you’re on top of your game is to focus on Angular 18 and ASP NET 8.0. Whether you're looking to enhance your career or build the next generation of web applications, these two powerful tools can help you achieve that goal.
Both Angular 18 and ASP NET 8.0 are celebrated for their ability to create responsive, scalable, and efficient web applications. As web development continues to evolve, these platforms have proven to be game-changers, making it essential for developers to get familiar with their features, advantages, and how they can be seamlessly integrated.
Why You Should Master Angular 18 and ASP NET 8.0
Angular and ASP NET have become go-to technologies for web developers for a variety of reasons. Angular 18 allows developers to create dynamic, single-page applications that perform well on any device. With a strong focus on TypeScript, dependency injection, and a component-based architecture, Angular provides the structure needed for building modern web apps.
ASP NET 8.0, on the other hand, is the latest version of Microsoft's popular web development framework. Known for its robustness, flexibility, and support for RESTful services, ASP NET 8.0 is a comprehensive tool for building web applications and APIs. With improved performance, new features like minimal APIs, and better integration with cloud-based solutions, this framework is more powerful than ever.
Key Features of Angular 18
As one of the most popular front-end frameworks, Angular 18 offers some standout features that make it a must-learn for developers:
Enhanced Component-Based Architecture: Angular 18 emphasizes reusable components, making your code cleaner and easier to maintain.
Improved Performance: Thanks to features like lazy loading and ahead-of-time (AOT) compilation, Angular 18 helps you build lightning-fast applications.
TypeScript Support: As a statically typed language, TypeScript helps catch errors early, ensuring more reliable and stable codebases.
Reactive Forms and Directives: These are essential for handling complex user inputs and making the UI more interactive and responsive.
New Router Enhancements: With improved routing capabilities, Angular 18 simplifies navigation and ensures that users have a smooth experience.
By mastering Angular 18, you'll not only build beautiful, high-performing applications, but you'll also simplify your development process. Whether you're building e-commerce websites, social media platforms, or corporate portals, Angular 18 ensures that your application runs seamlessly across devices and browsers.
Core Features of ASP NET 8.0
ASP NET 8.0 has introduced several improvements that are crucial for web developers aiming to build high-performance, scalable applications. Some of its top features include:
Minimal APIs: These allow developers to create fast and efficient APIs with minimal configuration, reducing boilerplate code.
Cross-Platform Support: With ASP NET 8.0, you can develop applications that run on Windows, Linux, and macOS, giving you flexibility when it comes to deployment.
Integrated Cloud Support: Seamlessly integrate with cloud platforms like Azure, allowing you to leverage cloud-based services, storage, and scalability.
Blazor Integration: With Blazor, you can build interactive web UIs using C# instead of JavaScript, bridging the gap between client-side and server-side development.
Improved Security Features: ASP NET 8.0 focuses on security, providing built-in protection against cross-site scripting (XSS), cross-site request forgery (CSRF), and SQL injection.
By learning ASP NET 8.0, you position yourself to build reliable, secure, and efficient web applications. Its tight integration with Microsoft Azure also makes it ideal for developers looking to deploy cloud-based applications.
How Angular 18 and ASP NET 8.0 Work Together
One of the most exciting aspects of learning Angular 18 and ASP NET 8.0 is the potential for integrating these two powerful tools. By combining Angular 18 on the front end with ASP NET 8.0 on the back end, developers can create full-stack applications that are both high-performing and scalable.
For example, Angular 18 can be used to build the client-facing portion of your application, handling everything from data binding to UI rendering. Meanwhile, ASP NET 8.0 can manage the back-end logic, database operations, and API connections. This combination gives you the best of both worlds: a responsive user interface powered by Angular 18 and a robust, secure server powered by ASP NET 8.0.
The ability to integrate these technologies is especially valuable for developers working in enterprise environments, where performance, scalability, and maintainability are key. Mastering both Angular 18 and ASP NET 8.0 enables you to build applications that can handle large-scale traffic, complex business logic, and multiple user interactions with ease.
Advantages of Learning Angular 18
If you're on the fence about whether or not to invest time in Angular 18, here are a few key reasons why it should be on your radar:
High Demand: As more companies transition to web applications, there's an increasing demand for Angular developers.
Large Community Support: With an active community of developers, finding resources, tutorials, and help for Angular 18 is easier than ever.
Flexible and Modular: Angular's component-based architecture makes it easy to break down large applications into manageable pieces, improving maintainability.
End-to-End Framework: From routing to forms, Angular 18 offers a comprehensive solution for front-end development, meaning you won't need to juggle multiple libraries or frameworks.
Mobile-First Focus: As the world moves toward mobile-first development, Angular 18 ensures that your applications are optimized for performance across all devices.
Why You Shouldn't Miss Out on ASP NET 8.0
Learning ASP NET 8.0 is an investment in your future as a developer. Here are a few compelling reasons to add this framework to your skillset:
Cross-Platform Capabilities: Develop applications that run on any operating system, expanding your deployment options.
Cloud Integration: With ASP NET 8.0, deploying applications to the cloud is straightforward and efficient, particularly with services like Azure.
Security-First Approach: Built-in security features make it easy to protect your application from common web vulnerabilities.
Highly Scalable: If you’re working on applications that need to scale—either due to traffic or data size—ASP NET 8.0 is designed to handle it without sacrificing performance.
Developer-Friendly Tools: Visual Studio, Azure DevOps, and other Microsoft tools integrate seamlessly with ASP NET 8.0, making development, testing, and deployment easier.
How to Get Started
Whether you're new to web development or an experienced programmer, diving into Angular 18 and ASP NET 8.0 is easier than you think. There are numerous online resources, tutorials, and courses designed to help you master these technologies.
For Angular, the best place to start is by exploring TypeScript and understanding the component-based architecture. Once you're comfortable with those, dive into topics like routing, forms, and directives.
For ASP NET, begin by familiarizing yourself with the basics of C# and .NET Core. From there, you can start building simple applications, gradually incorporating advanced features like minimal APIs, Blazor, and cloud integration.
Conclusion
By mastering both Angular 18 and ASP NET 8.0, you'll become a full-stack developer capable of building modern, responsive, and scalable web applications. These technologies are in high demand, and by learning them, you're setting yourself up for long-term success in the development world. Whether you're looking to accelerate your learning or future-proof your career, the combination of Angular 18 and ASP NET 8.0 will provide you with the tools you need to build powerful, cutting-edge applications.
So, what are you waiting for? It’s time to Accelerate Your Learning: Master Angular 18 and ASP NET 8.0 and take your web development skills to the next level!
0 notes
Text
Microsoft webmatrix boilerplate

#MICROSOFT WEBMATRIX BOILERPLATE FULL VERSION#
#MICROSOFT WEBMATRIX BOILERPLATE FULL VERSION#
You can freeload Microsoft WebMatrix and safe install the latest trial or new full version for Windows 10 (x32, 64 bit, 86) from the official site. works with many open source CMS packages including Joomla, WordPress and Acquia Drupal,.develop websites, publish and maintain open source applications,.WebMatrix enables developers to build websites using built-in templates or popular open-source applications, with full support for ASP.NET, PHP, Node.js and HTML5. Microsoft WebMatrix has the following characteristics: Microsoft WebMatrix is a discontinued cloud-connected website builder and HTML editor for Windows, geared towards web development. Microsoft WebMatrix will automatically adjust the settings so that you website both locally and on a web server can run. The platform can be used to open source applications like WordPress, Umbraco CMS, Joomla, nopCommerce and Moodle to install.You can also view the site from a server to your computer download. Microsoft WebMatrix is a free development platform to help you get easy an own website can create, publish and maintain. With Microsoft WebMatrix you do these settings do not adjust to the application on a server or locally can run. Of course i could just buy or pay someone to make the new site.When you use an open source application in a server room to install it you must delve into the configuration of the server and the database. all the time knowing that what i do is compatible. i dont need to mess around i can play with something that works and grow it. i am only interested in IE and Google.įor example. and i can test my pages and use input from those sources. webdesigner and web matrix offer me the means to use two fundamental and supported methods by global companies. since this is a stand alone web based function just like krpano using things like this to add music links.and a visualization intrigues me. I am interested in things that folks do with html5. In the past i have done it myself using just microsoft word. i need a good base to explore the possibilities of html5, and a good well supported architecture like webmatrix or webdesigner gives me the means to create new pages and experiment with the results before i put them online. Thanks for the quick reply, virtual pete. I actually got this blog looking nice on mobile devices back in 2006 when nobody was mobile except doctors and, well, all of us techies here on the blogs. since right now i am paying for a web site that dont work and is pretty much scrap. I really enjoy working on and thinking about mobile websites.Theres something about making an experience great on a pocket supercomputer phone that is so much more satisfying than a desktop. I just post today to see what knowledgeable folks can advise. So i am interested in the templates here that show tours and map linking. when i create a source page with krpano i can use it in webmatrix. that krpano will at least work with microsoft web matrix. so maybe the entry and return pano is a map. with ones finger or mouse - i want the pages of my web site to be the panorama. just like one scans on a tablet to find apps. In effect what i want to create is a flat panorama for the start page. Ive been put off using google chromes Web designer because it would not load any existing pages i have. since many of my panoramas are linked by exact place or location or time. It includes IIS Developer Express (a development Web server), ASP.NET (a Web framework), and SQL Server Compact (an embedded database). WebMatrix is everything you need to build Web sites using Windows. In effect i think i want to create a tour. ASP.NET Web Pages with Razor Syntax is a web framework and part of WebMatrix. and all my panoramas now sitting on flickr. and that i can use with microsoft webmatrix or google webdesign to create a new website from the old. wont be denied access on security for most users. looking at what i can use with html5 that is IE and Chrome compatible. The panoramic pics cant be viewed now because IE denies Ptviewer operation. In the family tree section i use a very big picture with hyperlinks. I have a website in dire need of refurbishment.
0 notes
Text
3 Reasons Why use Laravel over PHP
A crucial requirement for any programmer is a thorough knowledge of web frameworks and the best way to use these when creating apps. These are the tools by which modern mobile and web applications are constructed, and they can save you time. They're tested for bugs, and they keep your code tidy and easy to access. Hire Laravel developer for your new project. Now it's time to use the latest technologies and frameworks for PHP.
If you're a PHP developer, the chances are you've used Laravel; it's a relatively new framework that's simple to understand yet with exciting features. Laravel has become a household name in the last 10 years; according to a survey conducted by JetBrains, 50% of PHP developers claim to employ Laravel frequently, compared to 25% in the second most popular framework Symfony. The data obtained from Google patterns also reveals how Laravel has risen above Symfony or other frameworks when searching various PHP frameworks. It powers the web pages of several large international brands, including the significant pharmaceuticals Pfizer and Pfizer, the British Broadcasting Company (BBC), which rely on mobile and web applications to reach enormous global viewers.
What makes Laravel so popular for web development currently? Before we tackle this question, it's worth noting the continuing importance of PHP. As we've discussed in this blog before, PHP is a popular server-side programming language that was first introduced in the mid-1990s and has continued to defy the notion that PHP is disappearing'. In reality, W3Techs has calculated that around 79% of websites are using PHP. The language, a percentage that has remained pretty steady in the past year. In perspective, PHP's closest competitor in terms of use is ASP.NET; however, it's only utilized in 9.1 per cent of websites. The more modern alternatives to PHP like Python receive the spotlight in the present - with a reasonable justification and in many ways. However, they're still only found in a tiny proportion of websites. Hire Laravel developer to transform your website and grow your business.
3 Reasons Why use Laravel over PHP
1 - Simplicity
A big part of the appeal for any language of programming is its user-friendliness. Developers don't want to be stuck in complicated codes that are messy, and companies don't need to wait for their next web-based application. Laravel is a slick and elegant syntax that's easy for novice programmers to understand and develop projects speedily. The framework is based on the model-view-controller (MVC) architectural pattern that facilitates the management of complex and large-scale projects. It also provides various libraries, tools and templates that allow developers to create sophisticated and reliable web applications more efficiently while still allowing flexibility.
2 - Advanced Integrated Features
Alongside simple code, Laravel can address other problems with simple, pre-programmed systems that are easily integrated into applications with just a few lines of code. These "packages" can be specific to Laravel or be used with other PHP frameworks; however, they are simple to install with Composer. For instance, take the Laravel Cashier as an example, which has a built-in subscription billing function that handles all boilerplate code and Socialite, a simple authentication method for social networks like Facebook or Google. An extensible framework and a wide range of tools allow developers to quickly and quickly add features to web-based applications.
3 - Security
This is among the most important considerations of any web framework. Although it isn't 100% secure, Laravel has strong credentials. The in-built CSRF token can deal with any online threat that protects the web application against the most severe security threats (e.g. the SQL Injection). The framework's security ecosystem includes robust community support and tutorials for developers to develop a water-tight app.
0 notes
Text
Exploring a minimal Web API with ASP.NET Core 6
I write about minimal Web APIs in 2016 and my goal has always been for "dotnet server.cs" to allow for a single file simple Web API. Fast forward to 2021 and there's some great work happening again in the minimal API space!
Let's do a 'dotnet new web' with the current .NET 6 preview. I'm on .NET 6 preview 7. As mentioned in the blog:
We updated .NET SDK templates to use the latest C# language features and patterns. We hadn’t revisited the templates in terms of new language features in a while. It was time to do that and we’ll ensure that the templates use new and modern features going forward.
The following language features are used in the new templates:
Top-level statements
async Main
Global using directives (via SDK driven defaults)
File-scoped namespaces
Target-typed new expressions
Nullable reference types
This is pretty cool. Perhaps initially a bit of a shock, but this a major version and a lot of work is being done to make C# and .NET more welcoming. All your favorite things are still there and will still work but we want to explore what can be done in this new space.
Richard puts the reasoning very well:
The templates are a much lower risk pivot point, where we’re able to set what the new “good default model” is for new code without nearly as much downstream consequence. By enabling these features via project templates, we’re getting the best of both worlds: new code starts with these features enabled but existing code isn’t impacted when you upgrade.
This means you'll see new things when you make something totally new from scratch but your existing stuff will mostly work just fine. I haven't had any trouble with my sites.
Let's look at a super basic hello world that returns text/plain:
var builder = WebApplication.CreateBuilder(args); var app = builder.Build(); if (app.Environment.IsDevelopment()){ app.UseDeveloperExceptionPage(); } app.MapGet("/", () => "Hello World!"); app.Run();
Slick. Note that I made line 3 (which is optional) just be one line to be terse. Not needed, just trying on these new shoes.
If we make this do more and support MVC, it's just a little larger. I could add in app.MapRazorPages() if I wanted instead of MapControllerRoute, which is what I use on my podcast site.
var builder = WebApplication.CreateBuilder(args); // Add services to the container. builder.Services.AddControllersWithViews(); var app = builder.Build(); // Configure the HTTP request pipeline. if (app.Environment.IsDevelopment()) { app.UseDeveloperExceptionPage(); } else { app.UseExceptionHandler("/Home/Error"); // The default HSTS value is 30 days. You may want to change this for production scenarios, see https://aka.ms/aspnetcore-hsts. app.UseHsts(); } app.UseHttpsRedirection(); app.UseStaticFiles(); app.UseRouting(); app.UseAuthorization(); app.MapControllerRoute( name: "default", pattern: "{controller=Home}/{action=Index}/{id?}"); app.Run();
Back to the original Web API one. I can add Open API support by adding a reference to Swashbuckle.AspNetCore and then adding just a few lines:
var builder = WebApplication.CreateBuilder(args); builder.Services.AddEndpointsApiExplorer(); builder.Services.AddSwaggerGen(); var app = builder.Build(); if (app.Environment.IsDevelopment()) { app.UseDeveloperExceptionPage(); } app.UseSwagger(); app.MapGet("/", () => "Hello World!"); app.UseSwaggerUI(); app.Run();
Then I hit https://localhost:5001/swagger and I get the SwaggerUI and a little WebAPI Tester:
Anuraj has a great blog where he goes deeper and pokes around David Fowlers GitHub and creates a minimal WebAPI with Entity Framework and an in-memory database with full OpenAPI support. He put the source at at https://github.com/anuraj/MinimalApi so check that out.
Bipin Joshi did a post also earlier in June and explored in a bit more detail how to hook up to real data and noted how easy it was to return entities with JSON output as the default. For example:
app.UseEndpoints(endpoints => { endpoints.MapGet("/api/employees",([FromServices] AppDbContext db) => { return db.Employees.ToList(); }); ...snip... }
That's it! Very clean.
Dave Brock did a tour as well and did Hello World in just three lines, but of course, you'll note he used WebApplication.Create while you'll want to use a Builder as seen above for real work.
var app = WebApplication.Create(args); app.MapGet("/", () => "Hello World!"); await app.RunAsync();
Dave does point out how nice it is to work with simple models using the C# record keyword which removes a LOT of boilerplate cruft.
Check this out!
var app = WebApplication.Create(args); app.MapGet("/person", () => new Person("Scott", "Hanselman")); await app.RunAsync(); public record Person(string FirstName, string LastName);
That's it, and if you hit /person you'll get back a nice JSON WebAPI with this result:
{ firstName: "Scott", lastName: "Hanselman" }
Dig even deeper by checking out Maria Naggaga's presentation in June that's on YouTube where she talks about the thinking and research behind Minimal APIs and shows off more complex apps. Maria also did another great talk in the same vein for the Microsoft Reactor so check that out as well.
Is this just about number of lines of code? Have we moved your cheese? Will these scale to production? This is about enabling the creation of APIs that encapsulate best practices but can give you the "middleware-like" performance with the clarity and flexibility that was previous available with all the ceremony of MVC.
Here's some more resources:
David Fowler's GitHub demo https://github.com/davidfowl/dotnet6minimalapi/tree/main/Dotnet6_Minimal_API
A ToDo API as a Minimal API https://github.com/davidfowl/CommunityStandUpMinimalAPI
Exploring what Integration Testing looks like in a .NET 6 world by Martin Costello https://github.com/martincostello/dotnet-minimal-api-integration-testing I'll be exploring Martin's codebase next!
Have fun! Lots of cool things happening this year, even in the middle of the panini. Stay safe, friends.
Sponsor: Pluralsight helps teams build better tech skills through expert-led, hands-on practice and clear development paths. For a limited time, get 50% off your first month and start building stronger skills.
© 2021 Scott Hanselman. All rights reserved.


Exploring a minimal Web API with ASP.NET Core 6 published first on https://deskbysnafu.tumblr.com/
0 notes
Text
Exploring a minimal Web API with ASP.NET Core 6
I write about minimal Web APIs in 2016 and my goal has always been for "dotnet server.cs" to allow for a single file simple Web API. Fast forward to 2021 and there's some great work happening again in the minimal API space!
Let's do a 'dotnet new web' with the current .NET 6 preview. I'm on .NET 6 preview 7. As mentioned in the blog:
We updated .NET SDK templates to use the latest C# language features and patterns. We hadn’t revisited the templates in terms of new language features in a while. It was time to do that and we’ll ensure that the templates use new and modern features going forward.
The following language features are used in the new templates:
Top-level statements
async Main
Global using directives (via SDK driven defaults)
File-scoped namespaces
Target-typed new expressions
Nullable reference types
This is pretty cool. Perhaps initially a bit of a shock, but this a major version and a lot of work is being done to make C# and .NET more welcoming. All your favorite things are still there and will still work but we want to explore what can be done in this new space.
Richard puts the reasoning very well:
The templates are a much lower risk pivot point, where we’re able to set what the new “good default model” is for new code without nearly as much downstream consequence. By enabling these features via project templates, we’re getting the best of both worlds: new code starts with these features enabled but existing code isn’t impacted when you upgrade.
This means you'll see new things when you make something totally new from scratch but your existing stuff will mostly work just fine. I haven't had any trouble with my sites.
Let's look at a super basic hello world that returns text/plain:
var builder = WebApplication.CreateBuilder(args); var app = builder.Build(); if (app.Environment.IsDevelopment()){ app.UseDeveloperExceptionPage(); } app.MapGet("/", () => "Hello World!"); app.Run();
Slick. Note that I made line 3 (which is optional) just be one line to be terse. Not needed, just trying on these new shoes.
If we make this do more and support MVC, it's just a little larger. I could add in app.MapRazorPages() if I wanted instead of MapControllerRoute, which is what I use on my podcast site.
var builder = WebApplication.CreateBuilder(args); // Add services to the container. builder.Services.AddControllersWithViews(); var app = builder.Build(); // Configure the HTTP request pipeline. if (app.Environment.IsDevelopment()) { app.UseDeveloperExceptionPage(); } else { app.UseExceptionHandler("/Home/Error"); // The default HSTS value is 30 days. You may want to change this for production scenarios, see https://aka.ms/aspnetcore-hsts. app.UseHsts(); } app.UseHttpsRedirection(); app.UseStaticFiles(); app.UseRouting(); app.UseAuthorization(); app.MapControllerRoute( name: "default", pattern: "{controller=Home}/{action=Index}/{id?}"); app.Run();
Back to the original Web API one. I can add Open API support by adding a reference to Swashbuckle.AspNetCore and then adding just a few lines:
var builder = WebApplication.CreateBuilder(args); builder.Services.AddEndpointsApiExplorer(); builder.Services.AddSwaggerGen(); var app = builder.Build(); if (app.Environment.IsDevelopment()) { app.UseDeveloperExceptionPage(); } app.UseSwagger(); app.MapGet("/", () => "Hello World!"); app.UseSwaggerUI(); app.Run();
Then I hit https://localhost:5001/swagger and I get the SwaggerUI and a little WebAPI Tester:
Anuraj has a great blog where he goes deeper and pokes around David Fowlers GitHub and creates a minimal WebAPI with Entity Framework and an in-memory database with full OpenAPI support. He put the source at at https://github.com/anuraj/MinimalApi so check that out.
Bipin Joshi did a post also earlier in June and explored in a bit more detail how to hook up to real data and noted how easy it was to return entities with JSON output as the default. For example:
app.UseEndpoints(endpoints => { endpoints.MapGet("/api/employees",([FromServices] AppDbContext db) => { return db.Employees.ToList(); }); ...snip... }
That's it! Very clean.
Dave Brock did a tour as well and did Hello World in just three lines, but of course, you'll note he used WebApplication.Create while you'll want to use a Builder as seen above for real work.
var app = WebApplication.Create(args); app.MapGet("/", () => "Hello World!"); await app.RunAsync();
Dave does point out how nice it is to work with simple models using the C# record keyword which removes a LOT of boilerplate cruft.
Check this out!
var app = WebApplication.Create(args); app.MapGet("/person", () => new Person("Scott", "Hanselman")); await app.RunAsync(); public record Person(string FirstName, string LastName);
That's it, and if you hit /person you'll get back a nice JSON WebAPI with this result:
{ firstName: "Scott", lastName: "Hanselman" }
Dig even deeper by checking out Maria Naggaga's presentation in June that's on YouTube where she talks about the thinking and research behind Minimal APIs and shows off more complex apps. Maria also did another great talk in the same vein for the Microsoft Reactor so check that out as well.
Is this just about number of lines of code? Have we moved your cheese? Will these scale to production? This is about enabling the creation of APIs that encapsulate best practices but can give you the "middleware-like" performance with the clarity and flexibility that was previous available with all the ceremony of MVC.
Here's some more resources:
David Fowler's GitHub demo https://github.com/davidfowl/dotnet6minimalapi/tree/main/Dotnet6_Minimal_API
A ToDo API as a Minimal API https://github.com/davidfowl/CommunityStandUpMinimalAPI
Exploring what Integration Testing looks like in a .NET 6 world by Martin Costello https://github.com/martincostello/dotnet-minimal-api-integration-testing I'll be exploring Martin's codebase next!
Have fun! Lots of cool things happening this year, even in the middle of the panini. Stay safe, friends.
Sponsor: Pluralsight helps teams build better tech skills through expert-led, hands-on practice and clear development paths. For a limited time, get 50% off your first month and start building stronger skills.
© 2021 Scott Hanselman. All rights reserved.


Exploring a minimal Web API with ASP.NET Core 6 published first on http://7elementswd.tumblr.com/
0 notes
Text
Setting up a Blazor WebAssembly application
Welcome to “Setting up a Blazor WebAssembly application” post! In this new post I’ll build a simple project in Blazor and explain the basic Blazor components and interactions. The source code of the project I’m going to create in this post is available on GitHub.
Here the posts I wrote about Blazor that help you to learn this new technology better and faster:
Getting Started With C# And Blazor
Blazor is a framework for building interactive client-side web UI with .NET:
Create rich interactive UIs using C# instead of JavaScript.
Share server-side and client-side app logic written in .NET.
Render the UI as HTML and CSS for wide browser support, including mobile browsers.
Integrate with modern hosting platforms, such as Docker.
Using .NET for client-side web development offers the following advantages:
Write code in C# instead of JavaScript.
Leverage the existing .NET ecosystem of .NET libraries.
Share app logic across server and client.
Benefit from .NET’s performance, reliability, and security.
Stay productive with Visual Studio on Windows, Linux, and macOS.
Build on a common set of languages, frameworks, and tools that are stable, feature-rich, and easy to use.
So, here we’re going to start off by looking at the available templates provided by Microsoft to create a new application. Templates are a great way to get started quickly and provide all of the primary building blocks we need for a working an application. Once we have an understanding of the options, we’ll then choose a template as the base for our Blazor Trails app. We’ll build and run the template so we can get a feel for how it behaves, then we’ll strip out all of the unnecessary parts leaving us with only the key components.
As a result, this is a screenshot of the web application I’m going to explain.
Blazor Trails home page: final
Table of contents
Setting up the application
Blazor WebAssembly template configurations
Standalone mode
Hosted mode
Creating the application
Building and running the application
Local SSL certificate
Key components of a Blazor application
Index.html
More details about Index.html
Base tag
Program.cs
More details about Program.cs
Dependency injection
App.razor
Router component
wwwroot folder & _imports.razor
Writing your first components
Organizing files using feature folders
Routable component
Defining the layout
Main layout
The Blazor Trails home page
Prepare the data
The first injection
Read the data
JsonAsync methods
Waiting for the data
Refactor
Conclusion
Setting up the application
So, in other frameworks setting up a new application involves creating everything manually, from scratch. Generally speaking, .NET applications aren’t created this way. Many, if not all, start life being generated from a template. Using a template has many advantages:
Developers can have a working application in seconds
Boilerplate code is taken care of and doesn’t need to be written for every new application
The template serves as a working example of using the framework
The process is repeatable, using a template will give you the same starting point time and time again
Blazor comes with two templates which can be used to create new applications. When choosing a template, we’re essentially making the choice of which hosting model we want to use, either Blazor Server or Blazor WebAssembly. In fact, the two available templates are named Blazor Server and Blazor WebAssembly which makes knowing the hosting model they use pretty straightforward. However, we’re going to be using Blazor WebAssembly to build our Blazor Trails application so that is the template type we’re going to focus on in this post.
Blazor WebAssembly template configurations
Before we actually create the application, I want to talk about the configuration options available for the Blazor WebAssembly template. This template is the more complex of the two available because you can configure it in two modes: hosted or standalone.
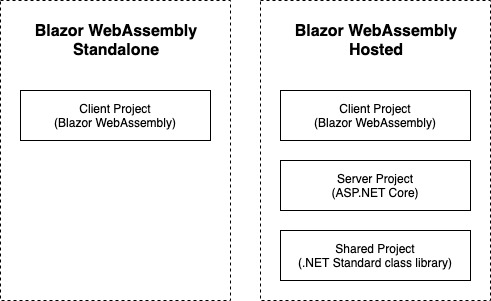
The left side shows the projects created when configuring the template in hosted mode. The right shows the project created when configuring the template in standalone mode.
Standalone mode
In the standalone mode, which is the default configuration, you will end up with a single Blazor WebAssembly project in the solution. This template is great if you’re looking to build an application which doesn’t need any kind of backend or server element to it, or perhaps you already have an existing API.
Hosted mode
Hosted mode is a little bit more complex. If you enable the ASP.NET Core Hosted option when creating the template, you will end up with three projects in the solution:
Blazor WebAssembly project
ASP.NET Core WebAPI project
.NET Standard class library
In this configuration you are getting a full stack .NET application. A fully functioning backend (ASP.NET Core WebAPI), a place to put code which is shared between the frontend and backend project (.NET Standard class library), and the frontend application (Blazor WebAssembly).
So, I want to highlight that using this configuration does require a .NET runtime to be installed on the host server. You may remember in my previous post I mentioned an advantage of using Blazor WebAssembly was it didn’t require a .NET runtime on the server, that benefit doesn’t apply when you’re using the hosted configuration. This is because there is a full ASP.NET Core WebAPI project in the solution which does need a .NET runtime on the server to function.
Creating the application
So, I want to create a Standalone mode application. There are two way to create a new application using a template, the dotnet CLI (Command Line Interface) or via an IDE (Integrated Development Environment) such as Visual Studio. To create the application, open Visual Studio and follow these steps (there may be slight differences in wording or order of screen on other IDEs):
File > New Project.
From the project templates list select Blazor WebAssembly App.
The next screen allows us to set the name of the project and the solution as well as where the files will be saved on disc. Enter the details and then click Next to move to the next step.
Select .NET5 as Target Framework
Create a new Blazor WebAssebly app
Configure your new Blazor project
Additional information
Be sure, ASP.NET Core hosted and Progressive Web Application are not checked.
This will create a new application with the same configuration and folder structure we setup using Visual Studio. At this point you’ve created your first Blazor application, congratulations! Now we have our shiny new application we’re going to look at how we can build and run it.
Building and running the application
When it comes to running .NET applications there are 3 steps that need to happen:
Restore any packages (also referred to as dependencies)
Compile or build the application
Fire up a web server and serve the application
In previous versions of .NET Core these steps needed to be performed manually so you would need to first restore any packages, then build the code, and finally run the app. However, this is no longer the case, we can now jump straight to running the application and either Visual Studio or the .NET CLI will take care of performing the first two steps, if they’re required.
However, it’s always good to understand how to perform these steps yourself manually if the need arises. When using Visual Studio, you can restore packages by right clicking on the solution and selecting Restore NuGet Packages from the context menu. If you’re using the .NET CLI then you can execute the dotnet restore command.
To perform a build from Visual Studio, select Build > Build Solution from the top menu. You can also use a keyboard shortcut to perform the same task, Ctrl+Shift+B. From the .NET CLI you can use the dotnet build command. Performing a build will also perform a package restore, if it’s required, both when using Visual Studio or the CLI. So, having to manually restore packages shouldn’t be an issue.
All that’s left is to run the application. From Visual Studio this can be done in several ways. First, you can press the play button found in the main toolbar. You can also use a keyboard shortcut which is F5. Finally, you can select Debug > Start Debugging from the top menu. Any of the above will run the application and Visual Studio will fire up a browser and load the application automatically.
Local SSL certificate
Depending on what types of application you’ve created and run before, you could see an extra step which asks if you want to trust the development SSL certificate. Answering yes to this will install the development certificate on your machine and this allows the application to be run over https rather than http. I would recommend trusting and installing the development SSL certificate as running sites over https is best practice, even in development as it mimics the live environment.
First run of a boilerplate Blazor app
Key components of a Blazor application
While the template has generated a fair few files, some of these files are more important to know and understand than others. In this section, we’re going to look at each of those key files to understand what they do and why they’re important. Then we’re going to remove all of the other files from our project to give us a clean base ready to start building Blazor Trails.
Index.html
This is one of the most important components of a Blazor WebAssembly application. It can be found in the wwwroot directory of the project and it’s the host page for the Blazor application.
<!DOCTYPE html> <html> <head> <meta charset="utf-8" /> <meta name="viewport" content="width=device-width, initial-scale=1.0, maximum-scale=1.0, user-scalable=no" /> <title>BlazorTrailsWA</title> <base href="/" /> <link href="css/bootstrap/bootstrap.min.css" rel="stylesheet" /> <link href="css/app.css" rel="stylesheet" /> <link href="BlazorTrailsWA.styles.css" rel="stylesheet" /> </head> <body> <div id="app">Loading...</div> <div id="blazor-error-ui"> An unhandled error has occurred. <a href="" class="reload">Reload</a> <a class="dismiss">🗙</a> </div> <script src="_framework/blazor.webassembly.js"></script> </body> </html>
8: the tag base is used by Blazors router to understand which routes it should handle
15: the app tag is where the Blazor application will load
19: this div is displayed automatically by Blazor when an unhandled exception occurs
22: Blazors JavaScript runtime which downloads and initializes the application
More details about Index.html
The key element in the index.html file is the link to the Blazor JavaScript runtime, found near the bottom of the page. As we saw previously, this is the file which downloads the .NET WebAssembly based runtime as well as the application and any of its dependencies. Once this is complete it also initializes the runtime which loads and runs the application.
When the application runs its content needs to be outputted somewhere on the page and, by default, this is outputted to the app tag. This is configurable and is setup in the Program.cs file which we will look at in a second. Any default content which exists in the tag will be replaced at runtime with the output from the application. This has a useful benefit; initial content can be used as a placeholder which will be displayed to the user until the application is ready.
If there is ever an unhandled exception caused inside the application, then Blazor will display a special UI which signals to the user that something has gone wrong. This is defined here in the index.html. This can be customized however you would like but the containing element much have an id attribute with the value blazor-error-ui. The default message states there has been a problem and offers the user a button which will cause a full page reload. This is the only safe option at this point as the application will be in an unknown state.
Exception bar in a Blazor application
Base tag
The final key piece to the index.html file is the base tag. This is an important tag when it comes to client-side routing. The reason this tag is important is that is tells Blazors router what URLs, or routes, are in scope for it to handle.
If this tag is missing or configured incorrectly then you may see some unexpected or unpredictable behavior when navigating your application. By default, the tag is configured with a value of /. This means that the application is running at the root of the domain (for example www.puresourcecode.com). The router should handle all navigation requests within that domain.
However, if the application was running as a sub-application for example https://www.puresourcecode.com/blazortrails, then the base tag would need to reflect this with a value of /blazortrails/. This would mean the router will only handle navigation requests which start with /blazortrails/.
Program.cs
Just like other ASP.NET Core applications, Blazor apps start off as .NET console apps. What makes them a Blazor application is the type of host they run. In the case of Blazor WebAssembly it runs a WebAssemblyHost. The purpose of the code contained in this file is to configure and create that host, figure 2.9 shows the default configuration of the Program class.
public class Program { public static async Task Main(string[] args) { var builder = WebAssemblyHostBuilder.CreateDefault(args); builder.RootComponents.Add<App>("#app"); builder.Services.AddScoped(sp => new HttpClient { BaseAddress = new Uri(builder.HostEnvironment.BaseAddress) }); await builder.Build().RunAsync(); } }
17: create an instance of WebAsseblyHostBlazor
18: define the root component for the application
20: configure and register services with the IServiceCollection
24: build and run an instance of WebAssemblyHost using the configuration defined with the WebAssemblyHostBuilder
More details about Program.cs
There are two critical pieces of configuration happening, the root component for the application is defined and any services are configured and added to the IServiceCollection.
When defining the root components – there can be more than one although that is usually not the case in most applications – we are actually giving the builder two pieces of information.
The first is the type of the root component for the application. By default, this is the App component (which we will look at next). However, you can configure this to be any component you wish.
The second is the place in the host page where we want to inject the application. The standard setup has the application being injected into the app element we looked at previously on the index.html page. But again, you can configure this to be injected anywhere you wish. The argument the builder.RootComponents.Add method takes is a CSS selector which is used to identify the target element where the component will be injected. Specific elements can be targeted such as app or elements with a specific ID, for example, #root-component, or any other valid CSS selector.
Dependency injection
The next line shows the HttpClient being configured and registered with the IServiceCollection making it available to classes and components via dependency injection (DI). Blazor uses the same DI container as other ASP.NET Core apps and allows registering of services using one of 3 lifetimes:
Transient – A new instance is provided each time it’s requested from the service container. Given a single request, if two objects needed an instance of a transient service, they would each receive a different instance.
Scoped – A new instance is created once per request. Within a request you will always get the same instance of the service across the application.
Singleton – An instance is created the first time it’s requested from the service container, or when the Program.Main method is run, and an instance is specified with the registration. The same instance is used to fulfil every request for the lifetime of the application.
The last thing that the Main method does is to take all of the configuration specified with the WebAssemblyHostBuilder and call its Build method. This will create an instance of a WebAssemblyHost which is the heart of your Blazor app. It contains all of the application configuration and services needed to run your app.
App.razor
This is the root component for a Blazor application, and we saw how this was configured in the Program.Main method in the previous section. This doesn’t have to be the case however; you can configure a different component to be the root component if you wish, or even have multiple root components, you just need to update the configuration in the Program.Main method.
Router component
The App component contains a vital component for building multi-page applications, the Router component. The Router component is responsible for managing all aspects of client-side routing. When an application first starts up, the router will use reflection to scan the applications assemblies for any routable components. Then, it stores information about them in a routing table and whenever a link is click or navigation is triggered programmatically, the router will look at the route which has been requested and try and find a routable component which handles that route. If a match is found, then it will load that component, otherwise it will load a not found template which is specified inside the Router component.
wwwroot folder & _imports.razor
Now, I’m going to cover both of these files in this section as there is not a huge amount to say about them. In fact the _imports.razor file is the one component on this list which is not required to run a Blazor application, but it makes things a lot easier if you do use it.
By convention all ASP.NET Core applications have a wwwroot folder which is used to store public static assets. This is the place where you can put things such as images, CSS files, JavaScript files or any other static files you need. Anything you put in this folder will be published with your application and available at runtime. As I mentioned earlier, this is also where the index.html file is kept.
The _imports.razor file is optional and not required when building a Blazor application, however, it’s really useful to have at least one of these files. The _imports.razor file has a simple job, it contains using statements. What is really great about the way this file works is that it makes those using statements available to all of the components in that directory and any sub-directories. This saves you having to add common using statements to every component in your application.
As I alluded to, you can also have multiple version of this file at different points in your folder structure. So, if you had a structure of BlazorTrails > Features > Home, and you only wanted specific using statements to be applied to components in the Home folder. Then you could add a _Imports.razor file in the Home folder with those using statements and they would only apply there but would still inherit any using statements from _Imports.razor files higher in the structure.
Writing your first components
We’ve had a look at the app created by the template, and we’ve covered each of the key files and, at a high level, what they do. Now it’s time to write some code of our own. As I said at the start of the chapter, we’re going to be building the foundations of the Blazor Trails application.
List of trails
The first thing we’ll do is take about how the application files are going to be organized. Next, we’ll remove all of the unneeded files which were generated by the template. This will give us a clean base to start building from. We’ll then define several new components to create what you see, a layout component, a page component and a couple of regular components.
Organizing files using feature folders
Before we start adding our own code, we need to remove all of the unnecessary files generated by the template. By default, the app structure used by the template divides files by responsibility. There’s a Pages folder for routable components. There is a Shared folder for anything which is used in multiple places or is a global concern.
This kind of separation doesn’t scale well and makes adding or changing functionality much more difficult as files end up being spread out all over the place. Instead we’re going to use a system called feature folders to organize our application.
When using feature folders all of the files relating to that feature are all stored in the same place. The has two major benefits, first, when you go to work on a particular feature all of the files you need are in the same place making everything easier to understand and more discoverable.
The second is that it will scale well, every time you add a new feature to the app you just add a new folder, and everything goes in there. You can also arrange each feature with sub-features if they contain a lot of files.
Routable component
The other little thing I like to do when using this organization system with Blazor is to append any routable component with the word Page. The reason is when a feature has several components in it it’s almost impossible, at a glance, to see which one is the routable component. The only real way to know is to open the file and check for the @page directive at the top.
So, start by deleting the Pages and Shared folders along with their contents, then delete the sample-data folder from the wwwroot folder. Also delete most of the contents of the app.css, just leave the import statement for the open iconic styles and the class called #blazor-error-ui and #blazor-error-ui .dismiss.
We also need to delete the last using statement from the _Imports.razor file, @using BlazorTrailsWA.Shared.
Add a new folder at the root of the project called Features, then inside that add a folder called Layout and another called Home. Inside Layout, add a new Razor Component called MainLayout.razor. Inside Home add a new Razor Component called HomePage.razor. Once you’ve done that head back over to the _Imports.razor and add the following using statements.
@using BlazingTrails.Web.Features.Home @using BlazingTrails.Web.Features.Layout
Defining the layout
Blazor borrows the concept of a layout from other parts of ASP.NET Core and essentially it allows us to define common UI which is required by multiple pages. Things such as the header, footer and navigation menu are all examples of things you might put in your layout. We also add a reference to a parameter called Body where we want page content to be rendered. This comes from a special base class which all layouts in Blazor must inherit from called LayoutComponentBase. The following image shows an example of what might be defined in a layout along with where the rendered page content would be displayed.
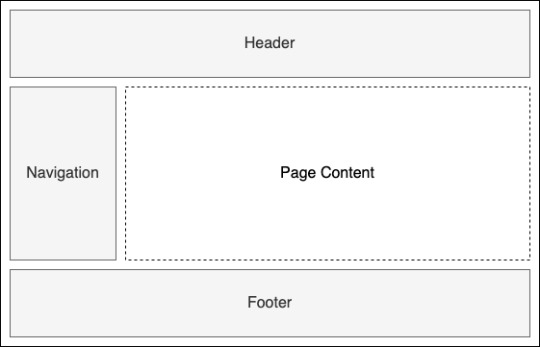
An example layout defining shared UI
You don’t have to stick with a single layout for your whole application either, you can have multiple layouts for different parts of your app. So, if you wanted a particular layout for the public facing pages but a different one for the admin pages, you can do that. In Blazor the default layout is defined on the Router component. This will automatically be applied to all pages in the application.
<Router AppAssembly="@typeof(Program).Assembly" PreferExactMatches="@true"> <Found Context="routeData"> <RouteView RouteData="@routeData" DefaultLayout="@typeof(MainLayout)" /> </Found> <NotFound> <LayoutView Layout="@typeof(MainLayout)"> <p>Sorry, there's nothing at this address.</p> </LayoutView> </NotFound> </Router>
In line 3 and 6 you see the default layout is defined by passing the type of the component you wish to use. If you want to use a different layout on certain pages, you can specify an alternative by applying the @layout directive. This goes at the top of the page and you pass the type of the component you wish to use. For example, if we had an alternative layout called AdminLayout, our layout directive would look like this: @layout AdminLayout.
Main layout
We’re going to be updating the MainLayout component. To start with we are going to do two things; First, we’re going to use the @inherits directive to inherit from the LayoutComponentBase class. This will mark this component as a layout component and will give us access to the Body parameter. Second, we’re going to define where our page content is rendered using the Body parameter.
@inherits LayoutComponentBase <main class="container"> @Body </main>
The only thing we’re missing from our layout now is the header. We’re going to define this as a separate component and as it’s part of the overall Layout feature it will go in the Layout feature folder next to the MainLayout component. As we did before, add a new Razor Component called Header.razor. Then, we’re going to add the markup shown which adds a Bootstrap navbar displaying the text.
<nav class="navbar navbar-light bg-light border-bottom mb-4"> <span class="navbar-brand mb-0 h1">Blazing Trails</span> </nav>
That’s all we need in the Header component at the moment; we can now add that to the MainLayout by declaring it as we would any normal HTML element.
@inherits LayoutComponentBase <Header /> <main class="container"> @Body </main>
That’s it for the layout, if you try and run the application at this point you will be able to see the header we’ve just created but there will be a message saying “Sorry, there’s nothing at this address”. That’s because we haven’t defined any routable components (pages) yet.
The Blazor Trails home page
We already created the HomePage component. It still has the boilerplate code which comes with a new component. We need to update this code to make the component routable. Once we have that done, we’re going to define a class which represents a trail. We can then define some test data to use to build out the rest of the UI. Finally, we’re going to load the test data into the HomePage and loop over it to display the various trails via a reusable TrailCard component that we’ll create.
As we talked about earlier, to make a component into a routable component we need to use the @page directive and a route template which specifies the route it will be responsible for. At the top of the HomePage.razor file, add the directive along with a route template of “/”, which tells the Router that this page is the root page of the application. You can run the application at this point, if you wish, to check that the HomePage’s content is being displayed.
We need a way of representing a trail in our code, to do that we’re going to add a new class called Trail to the Home feature folder. Inside this class we need to add a few properties which represent the various data about a trail.
public class Trail { public string Name { get; set; } public string Image { get; set; } public string Location { get; set; } public string Time { get; set; } public int Length { get; set; } }
Prepare the data
Now, we have a definition for a trail we’re going to define some test data to use. At the moment our app doesn’t have a backend, there is no API we can call to retrieve or save data from and to, but later on there might be. In order to simulate making an HTTP call to load data from an API we’re going to define our test data in a json file. So, this is a great way to develop frontend applications which don’t currently have a useable server element. We can still use a HttpClient to load the data from the JSON file in the same way we’d load data from an API. Then once the server element is established, the HTTP call just needs to be updated to point at the API endpoint instead of the JSON file.
Now, in the wwwroot folder create a directory called trails. Inside that folder add a new json file called trail-data.json. You have the full json on GitHub.
Then, with our test data in place we’ll return to the HomePage where we need to load it. We’re going to load the data using the HttpClient, but in order to use it we need to get an instance of it using dependency injection. Blazor makes this really easy by providing an inject directive that has the following format, @inject [TYPE] [NAME], where [Type] is the type of the object we want and [Name] is the name we’ll use to work with that instance in our component.
The first injection
So, under the page directive add the following code which will give us an instance of the HttpClient to work with: @inject HttpClient Http.
Before we can use the HttpClient, we need somewhere to store the results the call will return. Our JSON tests data is an array of trails and as we’re not going to be modifying what’s returned, just listing it out, we can create a private field of type IEnumerable<Trail>.
@page "/" @inject HttpClient Http <h3>HomePage</h3> @code { private IEnumerable<Trail> _trails; }
Read the data
Now, we have somewhere to store our test data we can make the call to retrieve it. A great place to do this kind of thing is the OnInitialized life-cycle method. This method is provided by ComponentBase, which all Blazor components inherit from, and it one of three primary lifecycle methods; The other two are OnParametersSet and OnAfterRender, they all have async versions as well. OnInitialized is only run once in the component’s lifetime making it perfect for loading initial data like we need to.
In order to retrieve the data from the JSON file, we can make a GET request just like we would if we were reaching out to an API. Except, instead of passing the address of the API in the call, we pass the relative location of the JSON file. As the file is in the wwwroot folder it will be available as a static asset at runtime just like the CSS file, this means the path we need to pass in the GET request is simply, “trails/trail-data.json”.
JsonAsync methods
So, a great productivity enhancement which ships with Blazor is the addition of some extension methods for the HttpClient:
GetFromJsonAsync
PostAsJsonAsync
PutAsJsonAsync
Under the hood, these methods are using the new System.Text.Json library. The first method will deserialize a successful response containing a JSON payload to a type we specify. The second and third will serialize an object to JSON to be sent to the server. All three of these methods do this in a single line. No more having to manually serialized and deserialize objects or check for success codes, making everything much cleaner and removing a lot of boilerplate.
Also, one thing to be aware of when using these new methods is that when a non-success code is returned from the server, they’ll throw an exception of type HttpRequestException. This means that it’s generally a good practice to wrap these calls in a try catch statement so non-success codes can be handled gracefully.
@code { private IEnumerable<Trail> _trails; protected override async Task OnInitializedAsync() { try { _trails = await Http.GetFromJsonAsync<IEnumerable<Trail>>("trails/trail-data.json"); } catch (HttpRequestException ex). { Console.WriteLine($"There was a problem loading trail data: {ex.Message}"); } } }
Great! We now have our data being loaded into our component, but we need to do something with it. It would be nice to have a message displayed to the user to let them know that when we’re loading the data, just in case it takes a while.
Waiting for the data
We can use a simple if statement in our markup to check the value of the _trails field. If it’s null then we can surmise that the data is still being loaded, excluding an error scenario of course. If the value is not null, then we have some data and we can go ahead and display it.
@if (_trails == null) { <p>Loading trails...</p> } else { <div class="row row-cols-1 row-cols-md-2"> @foreach (var trail in _trails) { <div class="col mb-4"> <div class="card" style="width: 18rem;"> <img src="@trail.Image" class="card-img-top" alt="@trail.Name"> <div class="card-body"> <h5 class="card-title">@trail.Name</h5> <h6 class="card-subtitle mb-3 text-muted"><span class="oi oi-map-marker"></span> @trail.Location</h6> <div class="d-flex justify-content-between"> <span><span class="oi oi-clock mr-2"></span> @trail.Time</span> <span><span class="oi oi-infinity mr-2"></span> @trail.Length km</span> </div> </div> </div> </div> } </div> }
At the point you should be able to build the app and run it, if all has gone to plan you should see the trails displayed. Now, we could finish here but there’s one little refactor I think we should do first.
Refactor
While it’s all perfectly valid as is, wouldn’t it be nice to encapsulate it all in a component instead? This would make the code in the HomePage component much easier to read.
So, create a new component called TrailCard.razor in the Home feature folder. Then replace the boilerplate code with the markup for the card from the HomePage, be careful not to copy the outer div with the class’s col mb-4. That was pretty painless, but now we have a problem. How do we get access to the current trail data? The answer is parameters.
Now, we can pass data into components via parameters, you can think of these as the public API for a component and they work one way, from parent to child. We can define them in the code block by creating a public property and decorating it with the Parameter attribute. Then, we pass data into them from the parent using attributes on the component tag.
For our TrailCard component we’re going to create a parameter which will allow us to pass in the current trail from the parent. We can then update the razor code to use this parameter.
<div class="card" style="width: 18rem;"> <img src="@Trail.Image" class="card-img-top" alt="@Trail.Name"> <div class="card-body"> <h5 class="card-title">@Trail.Name</h5> <h6 class="card-subtitle mb-3 text-muted"><span class="oi oi-map-marker"></span> @Trail.Location</h6> <div class="d-flex justify-content-between"> <span><span class="oi oi-clock mr-2"></span> @Trail.Time</span> <span><span class="oi oi-infinity mr-2"></span> @Trail.Length km</span> </div> </div> </div> @code { [Parameter] public Trail Trail { get; set; } }
All that’s left now is to update the HomePage component to use the new TrailCard component.
@page "/" @inject HttpClient Http @if (_trails == null) { <p>Loading trails...</p> } else { <div class="row row-cols-1 row-cols-md-2"> @foreach (var trail in _trails) { <div class="col mb-4"> <TrailCard Trail="trail" /> </div> } </div> } @code { private IEnumerable<Trail> _trails; protected override async Task OnInitializedAsync() { try { _trails = await Http.GetFromJsonAsync<IEnumerable<Trail>>("trails/trail-data.json"); } catch (HttpRequestException ex) { Console.WriteLine($"There was a problem loading trail data: {ex.Message}"); } } }
Conclusion
Finally, we did it! We finished setting up a Blazor WebAssembly application and it works. If you have any problem, you have the source code on GitHub. If you have any question, please use the forum.
Happy coding!
The post Setting up a Blazor WebAssembly application appeared first on PureSourceCode.
from WordPress https://www.puresourcecode.com/dotnet/blazor/setting-up-a-blazor-webassembly-application/
0 notes