#boilerplate entity framework
Explore tagged Tumblr posts
Visit Tumblr Blog
Explore Tumblr blogs with no restrictions, modern design and the best experience.
Last Seen Tumblr Blogs


Fun Fact
Mobile Tumblr US users spend an average of 4.04 minutes per session on the app.
Text
🛠 Modular .NET Core Architecture Explained: Why EasyLaunchpad Scales with You

Launching a SaaS product is hard. Scaling it without rewriting the codebase from scratch is even harder.
That’s why EasyLaunchpad was built with modular .NET Core architecture — giving you a powerful, clean, and extensible foundation designed to get your MVP out the door and support the long-term growth without compromising flexibility.
“Whether you’re a solo developer, a startup founder, or managing a small dev team, understanding the architecture under the hood matters. “ In this article, we’ll walk through how EasyLaunchpad’s modular architecture works, why it’s different from typical “template kits,” and how it’s designed to scale with your business.
💡 Why Architecture Matters
Most boilerplates get you started quickly but fall apart as your app grows. They’re rigid, tangled, and built with shortcuts that save time in the short term — while becoming a burden in the long run.
EasyLaunchpad was developed with one mission:
Build once, scale forever.
It follows clean, layered, and service-oriented architecture using .NET Core 8.0, optimized for SaaS and admin-based web applications.
🔧 Key Principles Behind EasyLaunchpad Architecture
Before diving into file structures or code, let’s review the principles that guide the architecture:
Principle and Explanation
Separation of Concerns — Presentation, logic, and data access layers are clearly separated
Modularity — Each major feature is isolated as a self-contained service/module
Extensibility — Easy to replace, override, or extend any part of the application
Dependency Injection- Managed using Autofac for flexibility and testability
Environment Awareness- Clean handling of app settings per environment (dev, staging, production)
📁 Folder & Layered Structure
Here’s how the core architecture is structured:
/Controllers
/Services
/Repositories
/Models
/Views
/Modules
/Jobs
/Helpers
/Configs
✔️ Controllers
Responsible for routing HTTP requests and invoking service logic. Kept minimal to adhere to the thin controller, fat service approach.
✔️ Services
All core business logic lives here. This makes testing easier and ensures modularity.
✔️ Repositories
All database-related queries and persistence logic are encapsulated in repository classes using Entity Framework Core.
✔️ Modules
Each major feature (auth, email, payment, etc.) is organized as a self-contained module. This allows plug-and-play or custom replacements.
🧩 What Makes EasyLaunchpad a Modular Boilerplate?
The magic of EasyLaunchpad lies in how it isolates and organizes functionality into feature-driven modules. Each module is independent, uses clean interfaces, and communicates through services — not tightly coupled logic.
✅ Modular Features
Modules and Their Functionality
Authentication- Login, password reset, Google login, Captcha
Admin Panel — User & role management, email settings, packages
Email System- DotLiquid templating, SMTP integration
Payment System- Stripe & Paddle modules, plan assignment
Job Scheduler- Hangfire setup for background tasks
Logging- Serilog for structured application logs
Package Management- Admin-defined SaaS plans & package logic
Each module uses interfaces and is injected via Autofac, which means you can:
Replace the Email service with SendGrid or MailKit
Swap out Stripe for PayPal
Extend authentication to include multi-tenancy or SSO
You’re not locked in — you’re empowered to scale.
🔄 Real-World Benefits of Modular Design
🛠 Maintainability
Code is easier to read, test, and update. You won’t dread revisiting it 6 months later.
🧪 Testability
Service and repository layers can be unit tested in isolation, which is perfect for CI/CD pipelines.
🔌 Plug-in/Plug-out Flexibility
Need to add analytics, invoicing, or multi-language support? Just drop a new module in /Modules and wire it up.
🧠 Developer Onboarding
New developers can understand and work on just one module without needing to grok the entire codebase.
🧱 Vertical Scaling
Whether you’re adding new features, scaling your user base, or serving enterprise clients, the codebase stays manageable.
🧠 Example: Adding a Chat Module
Let’s say you want to add real-time chat to your SaaS app.
In a modular structure, you’d:
Create a /Modules/Chat folder
Add models, services, and controllers related to messaging
Inject dependencies using interfaces and Autofac
Use Razor or integrate SignalR for real-time interaction
The existing app remains untouched. No spaghetti code. No conflicts.
⚙️ Supporting Technologies That Make It All Work
The architecture is powered by a solid tech stack:
Tool and the Purpose
.NET Core 8.0- Fast, stable, and LTS-supported
Entity Framework Core- ORM for SQL Server (or other DBs)
Razor Pages + MVC- Clean separation of views and logic
Autofac- Dependency injection across services
Serilog- Logging with structured output
Hangfire- Background jobs & task scheduling
Tailwind CSS + DaisyUI- Modern, responsive UI framework
DotLiquid- Flexible email templating engine
🚀 A Boilerplate That Grows with You
Most boilerplates force you to rewrite or rebuild when your app evolves.
EasyLaunchpad doesn’t.
Instead, it’s:
Startup-ready for quick MVPs
Production-ready for scaling
Enterprise-friendly with structure and discipline built in
💬 What Other Devs Are Saying
“I used EasyLaunchpad to go from idea to MVP in under a week. The modular codebase made it easy to add new features without breaking anything.” – A .NET SaaS Founder
🧠 Conclusion: Why Architecture Is Your Competitive Edge
As your product grows, the quality of your architecture becomes a bottleneck — or a launchpad.
With EasyLaunchpad, you get:
A clean foundation
Production-tested modules
Flexibility to scale
All without wasting weeks on repetitive setup.
It’s not just a .NET boilerplate. It’s a scalable SaaS starter kit built for serious developers who want to launch fast and grow with confidence.
👉 Ready to scale smart from day one? Explore the architecture in action at https://easylaunchpad.com
1 note
·
View note
Text
Navigating Nashville’s Business Legal Landscape: A Comprehensive Guide for Entrepreneurs
Nashville’s skyline isn’t the only thing rising; its entrepreneurial spirit has surged in recent years, transforming the city into a magnet for startups, established enterprises, and creative ventures of every kind. Yet amid the excitement of launching a new product, hiring talent, or scaling operations, many founders overlook one critical component—robust legal guidance. Whether you’re opening a boutique in East Nashville or building a tech firm in the Gulch, partnering with a business attorney nashville tn can mean the difference between smooth growth and costly missteps. In this blog, we’ll explore why legal counsel is essential at every stage, what to expect when working with a lawyer, and how to find the right fit for your unique goals.
The Power of Planning: Legal Foundations for Startups
Every great company begins with an idea, but successful companies turn that idea into reality through careful planning. A knowledgeable small business attorney nashville tn does more than file paperwork; they help you choose the optimal entity structure, draft founder agreements, and set up sound corporate governance frameworks. By clarifying ownership percentages, voting rights, and exit strategies in advance, you avoid disputes that might otherwise derail your venture during critical growth phases. Moreover, with Nashville’s blend of creative and tech-driven industries, intellectual property protection—from trademarks to software licensing—often deserves immediate attention. A well-rounded legal plan becomes your first competitive advantage.
Navigating Regulations in a Booming City
Tennessee offers a favorable tax climate for entrepreneurs, yet municipal regulations vary widely across Davidson County. Zoning laws, historic district guidelines, and sector-specific licensing can be a maze for newcomers. Seasoned nashville business law attorneys stay abreast of local ordinances, ensuring your dream location doesn’t violate zoning statutes or signage rules. They also maintain relationships with city officials and planning commissions, allowing them to spot red flags early and expedite approvals. In an environment where time-to-market can dictate success, streamlined compliance saves both money and momentum.
Contracts: The Backbone of Trust
From supplier agreements to influencer partnerships, contracts are the currency of modern commerce. Unfortunately, boilerplate templates downloaded from the internet rarely address Nashville-specific considerations such as sales-tax nuances, music-licensing clauses, or right-to-cure provisions mandated in certain real-estate deals. A skilled business lawyer nashville tailors language to your industry, negotiates favorable terms, and flags ambiguous clauses that could expose you to litigation. They also draft clear dispute-resolution mechanisms—think mediation or arbitration—to keep conflicts out of court whenever possible, minimizing reputational damage and preserving valuable relationships.
Growth, Funding, and Investor Relations
Securing outside capital is often the catalyst for rapid expansion, yet each funding round introduces new ownership dynamics and regulatory hurdles. Venture-capital term sheets, SAFEs, and convertible notes all carry hidden complexities. Choose a nashville business lawyer who has shepherded startups from seed to Series C and can translate legal jargon into actionable insights. They will assess liquidation preferences, anti-dilution protections, and board-seat allocations so you understand exactly what you’re giving up—and gaining—when you accept investment. Clear documentation and transparent communication foster investor confidence and pave the way for future rounds.
Employment Law: Building a Compliant Culture
Talent is Nashville’s secret sauce. However, rapid hiring can trigger compliance pitfalls related to wage-and-hour rules, non-compete agreements, and anti-discrimination statutes. By partnering with counsel well-versed in federal and Tennessee employment law, you can design offer letters, employee handbooks, and remote-work policies that attract top talent while safeguarding your organization. In today’s hybrid work era, multistate compliance is especially critical; your in-house HR team may need guidance as employees relocate or work cross-border. An experienced attorney mitigates risk and fosters a culture where both employer and employee thrive.
Litigation: Preparing for the Unexpected
Even with the best precautions, disputes sometimes land in court. Whether it’s breach of contract, shareholder oppression, or intellectual-property infringement, litigation can drain finances and focus. A proactive relationship with a business attorney nashville tn ensures your documentation is airtight long before any complaint is filed. Should litigation arise, your attorney’s familiarity with your operations speeds discovery, sharpens defense strategies, and can often facilitate settlement on favorable terms. Remember, the most cost-effective lawsuit is the one avoided through strategic foresight.
The Role of Local Insight and Specialized Expertise
Nashville’s eclectic economy—ranging from healthcare giants to indie record labels—demands tailored expertise. While some firms offer broad transactional services, others specialize in music law, health-tech compliance, or real estate development. Knowing when to consult niche counsel versus a full-service shop is crucial. Firms such as moorefirm combine deep local roots with diverse practice groups, aligning their advice to industry nuances without sacrificing big-picture strategy.
Cultivating a Long-Term Partnership
Legal needs evolve. Today’s startup becomes tomorrow’s franchise, IPO candidate, or acquisition target. Treat your relationship with counsel as a partnership, not a one-off transaction. Regular check-ins allow your lawyer to anticipate challenges—new privacy regulations, ESG reporting, or international expansion—before they impact your balance sheet. A dynamic firm like moorefirm grows with you, adjusting its support as milestones and market conditions change.
Conclusion: Investing in Peace of Mind
Entrepreneurship is exhilarating, yet the road to success is lined with legal complexities unique to each city. By engaging an expert small business attorney nashville tn early, you empower your venture with foresight, flexibility, and protection. Whether you’re drafting your first contract, negotiating investor terms, or scaling across state lines, the right legal advisor transforms obstacles into opportunities. Nashville’s business scene is vibrant and welcoming; arm yourself with knowledgeable counsel, and you’ll be poised to thrive in Music City’s fast-paced, ever-evolving marketplace.
0 notes
Text
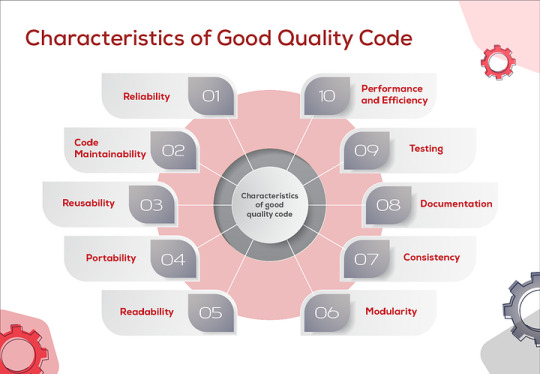
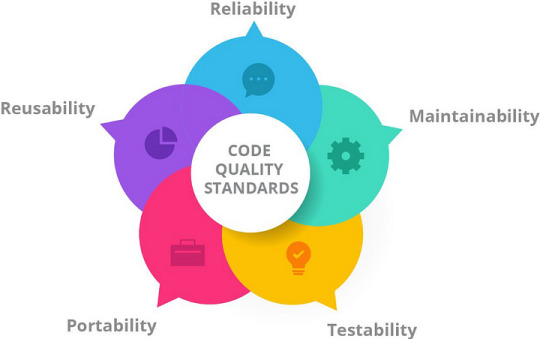
Share tips for improving code quality and maintainability.
1. Follow Java Naming Conventions
Classes: Use PascalCase for class names (e.g., EmployeeDetails).
Methods/Variables: Use camelCase for method and variable names (e.g., calculateSalary).
Constants: Use uppercase letters with underscores for constants (e.g., MAX_LENGTH).
2. Use Proper Object-Oriented Principles
Encapsulation: Make fields private and provide public getters and setters to access them.
Inheritance: Reuse code via inheritance but avoid deep inheritance hierarchies that can create tightly coupled systems.
Polymorphism: Use polymorphism to extend functionalities without changing existing code.
3. Write Clean and Readable Code
Keep Methods Small: Each method should do one thing and do it well. If a method is too long or does too much, break it down into smaller methods.
Avoid Nested Loops/Conditionals: Too many nested loops or conditionals can make code hard to read. Extract logic into separate methods or use design patterns like the Strategy or State pattern.
4. Use Design Patterns
Leverage proven design patterns like Singleton, Factory, Observer, and Strategy to solve common problems in a standardized, maintainable way.
Avoid overcomplicating things; use patterns only when they add clarity and solve a specific problem.
5. Implement Proper Error Handling
Use exceptions appropriately. Don’t overuse them, and catch only the exceptions you can handle.
Ensure that exceptions are logged for better debugging and auditing.
Use custom exceptions to represent domain-specific issues, so they are easier to debug.
6. Utilize Java’s Stream API
The Stream API (introduced in Java 8) helps reduce boilerplate code when performing collection operations like filtering, mapping, and reducing.
It makes code more concise and expressive, which helps with readability and maintainability.
7. Write Unit Tests
Use JUnit and Mockito for unit testing and mocking dependencies.
Write test cases for all critical methods and components to ensure the behavior is as expected.
Use Test-Driven Development (TDD) to ensure code correctness from the start.
8. Use Dependency Injection
Prefer Dependency Injection (DI) for managing object creation and dependencies. This decouples components and makes testing easier (using tools like Spring Framework or Guice).
DI helps to make your classes more modular and improves maintainability.
9. Avoid Code Duplication
Use methods or utility classes to avoid repeating code.
If the same logic is used in multiple places, refactor it into a single reusable method.
10. Use Annotations
Use Java annotations (like @Override, @NotNull, @Entity, etc.) to improve code clarity and reduce boilerplate code.
Annotations help to enforce business logic and constraints without having to manually check them.
11. Leverage IDE Features
Use tools like IntelliJ IDEA or Eclipse to automatically format code and identify potential issues.
Many IDEs have integrated tools for running tests, refactoring code, and applying coding standards, so make full use of these features.
12. Optimize for Performance Without Sacrificing Readability
Only optimize performance when necessary. Premature optimization can lead to complex code that’s difficult to maintain.
Profile your code to identify bottlenecks, but prioritize clarity and maintainability over micro-optimizations.
13. Implement Proper Logging
Use a logging framework like SLF4J with Logback or Log4j2 for logging. This provides a consistent logging mechanism across the application.
Ensure that logs are meaningful, providing information about the application’s state, errors, and flow, but avoid excessive logging that clutters output.
14. Document Your Code
Use JavaDocs to generate documentation for public methods and classes.
Document not just the what but also the why behind critical decisions in the codebase.
15. Keep Your Codebase Modular
Break your project into smaller, well-defined modules, and avoid large monolithic classes.
Use packages to group related classes, ensuring that each class or module has a single responsibility.
16. Use Static Analysis Tools
Integrate tools like Checkstyle, PMD, and SonarQube to enforce coding standards, detect bugs, and ensure code quality.
These tools help you identify code smells and areas where quality can be improved.
0 notes
Text
How to Build a RESTful API with Java Spring Boot: A Guide for Full Stack Developers

In the world of Java full-stack development, building robust and efficient RESTful APIs is a crucial skill. APIs are the backbone of modern web applications, enabling seamless communication between the front-end and back-end. For full-stack developers, having a strong understanding of how to build RESTful APIs with Java Spring Boot is a key component of their skill set.
Java, paired with Spring Boot, provides developers with powerful tools to create secure, scalable, and high-performing REST APIs. This blog explores the significance of RESTful APIs in full-stack development and walks you through the essential concepts and steps involved in building an API using Spring Boot.
What is a RESTful API?
A RESTful API (Representational State Transfer) is an architectural style for building web services that communicate over HTTP. REST APIs are stateless, meaning each request from the client must contain all the information needed to process it. These APIs are designed to be lightweight, fast, and easy to use.
Key features of RESTful APIs include:
Statelessness: Each request is independent and contains all the data required for processing.
Client-Server Architecture: The front-end (client) and back-end (server) are separate entities that interact through HTTP requests and responses.
Uniform Interface: REST APIs follow standardized conventions for communication, making them easier to understand and work with.
Cacheability: Responses can be explicitly marked as cacheable, improving performance for repeated requests.
As a full-stack developer, understanding these principles will help you design and build efficient, scalable APIs that power modern web and mobile applications.
Why Use Spring Boot for Building RESTful APIs?
Spring Boot is an open-source Java framework that simplifies the development of web applications and APIs. It’s particularly well-suited for building RESTful services thanks to its simplicity, ease of use, and powerful features.
Advantages of Using Spring Boot for RESTful APIs:
Quick Setup: Spring Boot takes care of much of the configuration and setup, allowing you to get started quickly. It minimizes boilerplate code, so you can focus on developing the functionality.
Embedded Servers: Spring Boot comes with embedded servers like Tomcat, Jetty, and Undertow, meaning there’s no need to install or configure a separate web server.
Spring Ecosystem Integration: Spring Boot integrates seamlessly with other Spring projects like Spring Data JPA for database access and Spring Security for authentication and authorization, providing a complete solution for building robust web applications.
Scalability and Maintainability: With Spring Boot, you can build scalable applications that are easy to maintain and extend as your needs grow.
The Role of RESTful APIs in Full Stack Development
In full-stack development, APIs play a critical role in connecting the front-end (user interface) and the back-end (server-side logic and database). A Java full-stack development is responsible for both the client-side and server-side development, and knowing how to build a RESTful API is essential for creating seamless and efficient communication between the two layers.
When building an API in a full-stack application:
The front-end (e.g., React, Angular, or Vue.js) interacts with the API by sending HTTP requests to the back-end.
The back-end (built with Spring Boot) processes these requests, retrieves data from the database, performs any necessary business logic, and returns the appropriate responses to the front-end.
Understanding the entire process of creating and consuming APIs ensures that you can develop applications where the front-end and back-end work together seamlessly, resulting in a smooth user experience.
Steps to Building a RESTful API with Spring Boot
Although Spring Boot simplifies many aspects of API development, a full-stack developer needs to know the key steps involved in building a RESTful API. Here’s a high-level overview:
1. Project Setup
You begin by creating a Spring Boot project. Tools like Spring Initializr (https://start.spring.io/) allow you to quickly generate a new Spring Boot application with the necessary dependencies, such as Spring Web for building RESTful services.
2. Define the Data Model
Your application will interact with data (such as users, products, or orders). Defining your data models helps you understand the structure of the data that your API will manage.
3. Create API Endpoints
The controller is responsible for handling HTTP requests and returning responses. As a full-stack developer, you’ll define various API endpoints (e.g., GET, POST, PUT, DELETE) that allow the front-end to interact with the server.
4. Implement Database Integration
Spring Boot works well with various databases, whether you prefer relational (e.g., MySQL, PostgreSQL) or NoSQL (e.g., MongoDB). You can use Spring Data JPA to easily interact with a relational database or integrate with NoSQL databases for more flexible data storage.
5. Add Authentication and Authorization
In modern applications, security is crucial. Implementing authentication (e.g., JWT tokens) and authorization (e.g., role-based access control) using Spring Security ensures that only authorized users can access specific API endpoints.
6. Test the API
As a full-stack developer, testing the API is an important part of the process. Using tools like Postman or Swagger helps you test each endpoint and ensure it behaves as expected.
7. Deployment
Once your API is developed and tested, it can be deployed to various environments, such as local servers, cloud platforms (AWS, Google Cloud, Azure), or containers like Docker for portability and scalability.
Best Practices for Building RESTful APIs in Full Stack Development
As a full-stack developer, following best practices when building your RESTful API ensures that your application is reliable, maintainable, and scalable. Here are a few important best practices:
Versioning: Version your API from the start (e.g., /api/v1/users) to ensure future changes don’t break existing client applications.
Clear Documentation: Use tools like Swagger to auto-generate comprehensive API documentation, helping other developers understand how to interact with your API.
Meaningful HTTP Status Codes: Use standard HTTP status codes (e.g., 200 OK, 201 Created, 404 Not Found) to indicate the result of API requests.
Error Handling: Implement consistent error messages and codes to inform the client of any issues with their request.
Pagination and Filtering: For APIs returning large datasets, consider implementing pagination, filtering, and sorting to improve performance and user experience.
Conclusion
Building RESTful APIs with Java Spring Boot is an essential skill for Java full-stack development. Spring Boot’s ease of use, integration with the larger Spring ecosystem, and ability to scale make it an ideal choice for API development. As a full-stack developer, mastering the creation of RESTful APIs will empower you to build seamless, high-performance applications that connect front-end interfaces with back-end systems.
By following the steps outlined above and adhering to best practices, you’ll be able to design and develop APIs that are secure, efficient, and maintainable—ensuring the success of your full-stack applications.
This concludes the blog on "How to Build a RESTful API with Java Spring Boot" from the perspective of a Java full-stack development Let me know if you'd like to move on to the next topic!
0 notes
Text

ORM, or Object-Relational Mapping, is a programming technique that helps developers interact with relational databases using an object-oriented programming approach. ORM tools provide a layer of abstraction between the application code and the database, simplifying data manipulation and retrieval. Here are several ways in which ORM tools can be beneficial:
Simplified Database Interactions: ORM tools eliminate the need for complex SQL queries, allowing developers to interact with the database using familiar object-oriented programming concepts. This simplifies database operations and reduces the amount of boilerplate code. Cross-Database Compatibility:
ORM tools provide a level of abstraction that makes it easier to switch between different database systems. This can be beneficial if your application needs to support multiple database management systems without extensive code changes.
Code Reusability: ORM promotes code reusability by encapsulating database-related logic into reusable components. This helps in maintaining a clean and modular codebase, reducing redundancy and promoting a more efficient development process.
Object-Oriented Paradigm: Developers can work with database entities as objects, mirroring the object-oriented paradigm used in programming languages like Java, Python, or C#. This makes it more intuitive and easier to work with data in an application.
Automatic Query Generation: ORM tools often generate SQL queries automatically based on the object-oriented code. This reduces the need for developers to write complex SQL queries manually, saving time and reducing the chance of errors.
Database Abstraction: ORM abstracts away the intricacies of the underlying database structure. Developers can work with high-level entities and relationships, without having to be deeply concerned with the specific details of the database schema.
Improved Readability and Maintainability: ORM tools enhance code readability by using a more natural, object-oriented syntax for database operations. This makes it easier for developers to understand and maintain the codebase, especially when dealing with complex data models.
Transaction Management: ORM tools often provide built-in support for transaction management. This ensures that database transactions are handled consistently and reliably, preventing data inconsistencies and errors.
Performance Optimization: Many ORM tools include features for optimizing database queries and performance. They may provide caching mechanisms, lazy loading, and other optimizations to enhance the efficiency of database interactions.
Rapid Development: ORM tools accelerate the development process by providing a higher level of abstraction. This allows developers to focus more on application logic rather than getting bogged down with low-level database operations. While ORM tools offer numerous advantages, it's essential to choose the right tool for the specific requirements of your project. Different ORM frameworks may have distinct features and performance characteristics, so selecting the one that aligns with your project goals is crucial.
0 notes
Text
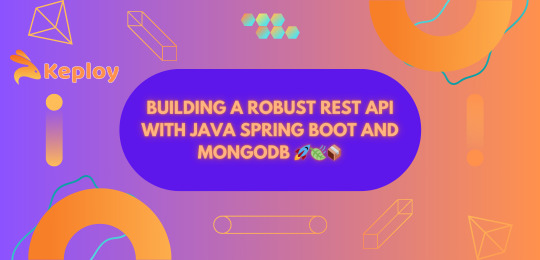
Building a Robust REST API with Java Spring Boot and MongoDB 🚀🍃📦
In the ever-evolving world of web development, creating a robust and scalable RESTful API is a fundamental skill. rest api java spring boot and mongodb is a powerful combination that allows developers to build efficient APIs quickly. In this article, we'll walk you through the process of creating a REST API using these technologies, so grab your coding gloves and let's get started! 🧤👨💻
What is Spring Boot and MongoDB?
Spring Boot 🍃
Spring Boot is a Java-based framework that simplifies the development of web applications and microservices. It provides an environment for building production-ready applications with minimal configuration and boilerplate code. Spring Boot's convention-over-configuration approach allows you to focus on the business logic of your application rather than dealing with infrastructure concerns.
MongoDB 🍃
MongoDB is a popular NoSQL database that stores data in a flexible, JSON-like format called BSON. It is known for its scalability and ability to handle large volumes of data. MongoDB is a great choice for building APIs as it can adapt to the changing data structures typically found in modern applications.
Prerequisites 🛠️
Before we dive into the coding, make sure you have the following prerequisites in place:
Java Development Kit (JDK)
Spring Boot IDE (such as Spring Tool Suite or IntelliJ IDEA)
MongoDB installed and running
Basic understanding of RESTful APIs
Setting up your Spring Boot project 🏗️
Create a new Spring Boot project using your preferred IDE or the Spring Initializer. You can use Maven or Gradle as the build tool.
Add the necessary dependencies, including spring-boot-starter-web and spring-boot-starter-data-mongodb, to your pom.xml or build.gradle file.
Configure your MongoDB connection in application.properties or application.yml. You can specify the connection URL, database name, and authentication details.
Creating a Model 📦
Next, you need to define the data model that your API will work with. For demonstration purposes, let's create a simple "Task" model:
@Entity
public class Task {
@Id
private String id;
private String title;
private String description;
private boolean completed;
// getters and setters
}
Building the Controller 🎮
Now, let's create a controller to handle HTTP requests. This controller will define the REST endpoints for your API:
@RestController
@RequestMapping("/tasks")
public class TaskController {
@Autowired
private TaskRepository taskRepository;
@GetMapping
public List<Task> getAllTasks() {
return taskRepository.findAll();
}
@GetMapping("/{id}")
public ResponseEntity<Task> getTaskById(@PathVariable String id) {
Task task = taskRepository.findById(id).orElse(null);
if (task == null) {
return ResponseEntity.notFound().build();
}
return ResponseEntity.ok(task);
}
@PostMapping
public Task createTask(@RequestBody Task task) {
return taskRepository.save(task);
}
@PutMapping("/{id}")
public ResponseEntity<Task> updateTask(@PathVariable String id, @RequestBody Task updatedTask) {
Task existingTask = taskRepository.findById(id).orElse(null);
if (existingTask == null) {
return ResponseEntity.notFound().build();
}
existingTask.setTitle(updatedTask.getTitle());
existingTask.setDescription(updatedTask.getDescription());
existingTask.setCompleted(updatedTask.isCompleted());
taskRepository.save(existingTask);
return ResponseEntity.ok(existingTask);
}
@DeleteMapping("/{id}")
public ResponseEntity<Void> deleteTask(@PathVariable String id) {
taskRepository.deleteById(id);
return ResponseEntity.noContent().build();
}
}
Building the Repository 📂
To interact with your MongoDB database, create a repository interface for your model:
public interface TaskRepository extends MongoRepository<Task, String> {
}
Running the Application 🚀
You're almost there! Run your Spring Boot application and ensure that MongoDB is up and running. You can now start making HTTP requests to your API endpoints using tools like Postman or by creating a front-end application.
Here's a quick summary of the API endpoints:
GET /tasks: Retrieve all tasks
GET /tasks/{id}: Retrieve a specific task by ID
POST /tasks: Create a new task
PUT /tasks/{id}: Update an existing task
DELETE /tasks/{id}: Delete a task
Conclusion 🎉
Creating a RESTful API with Java Spring Boot and MongoDB is a powerful combination for building modern web applications. You've just scratched the surface of what you can achieve with these technologies. As you continue your development journey, you can explore additional features such as authentication, validation, and pagination to make your API even more robust.
So, go ahead, experiment, and build your REST API with Spring Boot and MongoDB! Happy coding! 🚀🌍🛠️
0 notes
Link
Just connect to iFour Technolab Pvt. Ltd., a leading .Net web development company which provides extra-ordinary services to its clientele all over the world. It also has Microsoft certified software experts that work in all disciplines of .Net and fulfills all your necessities to provide lead-edging pace over the competitors.
#.net#.net framework#Asp.Net Development#asp.net software#boilerplate entity framework#asp.net web application
0 notes
Text
Spring Boot Training: Enhance Your Skills and Boost Your Career
Introduction: Embrace the Power of Spring Boot

Are you looking to level up your programming skills and take your career to new heights? Look no further than Spring Boot training. With its seamless integration, simplified configuration, and robust features, Spring Boot is a powerful framework that has revolutionized the world of Java development.
Why Spring Boot Training?
Unleash Your Potential: Spring Boot training equips you with the knowledge and skills to leverage the full potential of Spring Boot. From building efficient web applications to developing microservices, this training empowers you to create cutting-edge solutions.
Streamline Development: By mastering Spring Boot, you can streamline your development process. Its opinionated approach eliminates boilerplate code and provides a well-defined structure, allowing you to focus on implementing business logic and delivering value to your clients.
Rapid Prototyping: With Spring Boot's auto-configuration and starter dependencies, you can quickly prototype and validate your ideas. This agility accelerates your development cycle, enabling you to bring innovative products to market faster than ever before.
What You'll Learn in Spring Boot Training
Getting Started: The training begins with an introduction to Spring Boot, covering its core concepts and architecture. You'll learn how to set up a development environment, configure your project, and create your first Spring Boot application.
Building Web Applications: Dive into the world of web development using Spring Boot. Discover how to handle HTTP requests, create RESTful APIs, and implement features such as authentication and authorization. You'll also explore frontend integration and discover how to build dynamic user interfaces.
Working with Databases: Master the art of data persistence with Spring Boot. Learn how to integrate popular databases like MySQL, PostgreSQL, or MongoDB into your application. You'll explore techniques for mapping entities, executing queries, and ensuring data integrity.
Microservices Development: Unlock the power of microservices architecture using Spring Boot. Gain insights into designing scalable and resilient microservices, implementing communication between services, and managing their configuration. You'll also delve into advanced topics like service discovery and fault tolerance.
Testing and Deployment: Ensure the quality and reliability of your Spring Boot applications through comprehensive testing. Learn how to write unit tests, integration tests, and end-to-end tests to validate your code. Discover deployment strategies using containerization platforms like Docker and cloud services like AWS or Azure.
Benefits of SpringBoot Training
Career Advancement: Acquiring Spring Boot skills positions you as a sought-after professional in the competitive job market. Companies across various industries are actively seeking developers with expertise in Spring Boot to drive innovation and deliver robust applications.
Productivity and Efficiency: Spring Boot's developer-friendly features enable you to write clean, concise code and reduce development time. This increased productivity translates into efficient project delivery, making you a valuable asset to any development team.
Continuous Learning: Spring Boot is constantly evolving, with regular updates and new releases. By undergoing Spring Boot training, you gain the ability to adapt to the latest trends and stay ahead of the curve in the ever-changing landscape of software development.
Conclusion: Unlock Your Potential with Spring Boot Training
In conclusion, Spring Boot training offers a gateway to expanding your programming prowess and achieving professional growth. From empowering you with in-demand skills to streamlining your development process, Spring Boot is a game-changer in the world of Java programming.
Don't miss out on the opportunity
0 notes
Text
Spring: a summary
You know life must be grim when you wake up in the middle of the night with visions of your undergraduate compiler textbook at top of mind. I suppose it was inevitable. I've been re-reading The Dragon Book and what a pleasing surprise to find the entire presentation so readily comprehensible. These hidden gems from Yale more than once now have reared up their heads into my life. I pick them up in wonder. What was once so arcane, seen now through the lens of 30 years of professional life, is eminently clear. How did I ever get through this stuff as a young, unseasoned undergraduate?
Spring
Spring and Java are older technologies relative to some of the newer languages and frameworks that have emerged in recent years. Nevertheless, I selected Spring and Java for a web service I needed to scratch up recently. The service runs 24x7 and as they say: "It just works." I sum up below some of the pros and cons of using the Spring framework.
Project Setup
I am convinced that one of the biggest deterrents to Spring/Java adoption is the difficulty in setting up new projects. Perhaps that is why Spring Boot is so popular -- which is to say that Boot provides an opinionated implementation of Spring. As well, there are starter projects that address the setup issue -- but I didn't want to use any of those. I literally started from line 1. And here are some of the setup issues I had to contend with:
Configure logging. This is tricky, as the Java ecosystem supports different logging mechanisms, and doing this in a general way means using slf4j to shield your application from nuances of whatever logger you decide to use.
Configure the webapp. In the modern setup, you no longer need web.xml; instead, you can encode all of the setup in Java. I actually enjoyed doing this, but it was tricky sorting through the relevant logic. As well, you have to acquaint yourself with numerous annotations that configure certain software features into your webapp.
Setting up the pom.xml file, with dependencies and compiler versioning that work in harmony.
With all these pain points so prominent early on the dev effort, you might ask yourself: then why choose Spring at all? Read on.
Easy API implementation
With Spring MVC, controllers (with API endpoint handlers) are straightforward. And plus, there is a lot of support baked into Spring that facilitates better APIs: support for (un)marshalling POJOs into (from) JSON; endpoint handler validations; convenient access to HTTP headers; and clean definitions and access mechanisms for URL query and path parameters.
No doubt, there is a lot of boilerplate to sift through with Spring MVC, but once you get stuff working, you end up with a reliable, robust platform to build on.
JPA repositories
Spring provides CRUD methods for entities (ie, data store tables) out-of-the-box with JPA repositories. This really helps erecting a new webapp in which you don't initially want to be bogged down with query issues. On the other hand, I have found that for significant business-related scenarios, you can't really avoid native data store queries.
XML versus configuration through Java annotations
A lot of the Spring software modules can be configured into your application either through XML declarations or Java annotations. This dual approach to feature configuration can be confusing at first. Each approach has its virtues. With XML, often you can configure into your app quite powerful features -- and this with relatively little extra code. By contrast, Java annotations, along with relevant bean instantiations, give you full programming controls over the components in question. In theory, XML would let you do whatever you might want to do in Java; in practice, that's not generally true.
I lean both ways -- relying on XML configuration here, and adopting Java annotations there. So far, this has worked out.
By the way, if you rely on XML configurations to bring up your Spring app, note that you will at some point have to find and parse through the relevant DTDs that characterize the XML for some particular feature of interest. The DTDs often are not that easy to parse, so often you need to locate solid documentation for whatever Spring feature you are onboarding, and then try to reconcile those docs with the DTD specification. Suffice it to say that XML configuration -- despite its convenience -- does have its pitfalls.
Conclusion
Spring / Java remains a solid if somewhat challenging platform for evolving webapps. If your team goes down this road, make sure you know what you're getting into. Spring / Java is a beast, but once you tame it, you'll be rewarded with a robust, reliable system to build on.
December 16, 2022
0 notes
Text
What Comes Prebuilt in EasyLaunchpad: A Deep Dive into Features & Architecture

If you’re a .NET developer or startup founder, you’ve likely spent countless hours just getting the basics of your web app in place: login, admin dashboards, email systems, user roles, payments — the list goes on.
Now imagine you didn’t have to.
EasyLaunchpad is a complete .NET boilerplate designed to help you skip the time-consuming setup phase and go straight to building your core application logic. But unlike generic templates, it’s not just a UI skin or a half-done framework. It’s a full production-grade starter kit with everything you need seamlessly working together.
In this blog, we’ll break down what actually comes prebuilt in EasyLaunchpad and how the architecture helps you launch scalable, maintainable apps faster than ever before.
🔧 Why Boilerplate? Why Now?
Before diving into the tech, let’s align on the problem EasyLaunchpad solves:
Every time you start a new project, you repeat:
Configuring authentication
Setting up admin panels
Managing users and roles
Handling emails and templates
Integrating payments
Adding job scheduling and logs
EasyLaunchpad does all of this for you — so you don’t have to start from scratch again.
⚙️ Core Technologies Behind the Boilerplate
EasyLaunchpad is built with a modern and stable tech stack designed for production:
Layer and Techbology used:
Backend Framework — .NET Core 8.0 (latest LTS)
Language — C#
UI — Razor Pages + Tailwind CSS + DaisyUI
ORM — Entity Framework Core
Dependency Injection — Autofac
Background Tasks — Hangfire
Logging — Serilog
Templating Engine — DotLiquid (for email templates)
This foundation ensures that your app is fast, secure, scalable, and easy to maintain.
Let’s explore what comes ready-to-use as soon as you start your EasyLaunchpad project.
✅ Authentication (Email + Google + Captcha)
EasyLaunchpad includes secure login flows with:
Email-password authentication
Google OAuth integration
CAPTCHA validation during login/registration
You don’t need to spend days integrating Identity manually — just plug and play.
✅ Admin Panel (Built with Tailwind CSS + DaisyUI)
The admin panel is clean, responsive, and fully functional. It’s built using Razor views and styled with TailwindCSS and DaisyUI, giving you a modern UI that’s easy to extend.
Pre-integrated modules in the admin panel include:
User Management: View, add, deactivate users
Role Management: Basic role assignment and user filtering
Package Plans: Define product plans for sale
SMTP & Email Settings: Easily configure mail servers
Feature Settings: Enable or disable system options without touching code
✅ Email System with Templates (DotLiquid)
Forget the hassle of writing email logic from scratch. EasyLaunchpad includes:
Prebuilt transactional email templates (e.g., registration, password reset)
SMTP integration
Templating via DotLiquid, making it easy to insert variables and personalize content
All email dispatches are logged and tracked, so you never lose sight of what’s been sent.
✅ Queued Emails & Background Tasks (Hangfire)
Want to schedule tasks like email reminders or data syncs?
EasyLaunchpad uses Hangfire for:
Background job processing
Scheduled cron jobs
Retry logic for email dispatch and failed tasks
You can manage jobs through the Hangfire dashboard or extend it into your app logic.
✅ Logging with Serilog
Every serious app needs structured, searchable logs. EasyLaunchpad integrates Serilog for:
Real-time activity tracking
Error logging
Request/response data logging
This gives you full visibility into what’s happening in your app, both during development and in production.
✅ Stripe & Paddle Payment Integration
Monetizing your app? EasyLaunchpad includes out-of-the-box integration for:
Stripe
Paddle
You can configure:
Payment plans
One-time purchases
Trial periods
And manage all of it through the admin panel without coding custom APIs.
✅ Packages & Licensing Management
You can create, manage, and connect subscription packages via the admin dashboard.
Each package can be tied to payment providers and synced to your external website or product gateway, making EasyLaunchpad ideal for:
SaaS products
License-based tools
Tiered services
✅ Notifications System
Built-in support for system alerts and user notifications includes:
Inline admin messages
Success/failure alerts on actions
Extendable for real-time or email notifications
🧱 Architectural Design That Supports Growth
Beyond just features, the architecture of EasyLaunchpad is designed for maintainability, extensibility, and scalability.
🧩 Modular Structure
Each module (e.g., Auth, Payments, Email, Jobs) is built to be independently extendable or replaceable. This lets you:
Swap Stripe for PayPal
Replace DotLiquid with Razor templates
Add new modules like CRM or Analytics
📁 Clean Codebase Layout
plaintext
CopyEdit
/Controllers
/Services
/Repositories
/Views
/Models
The code is separated by responsibility, making it easy to onboard new developers or modify any layer.
🔌 Plug-and-Play Capabilities
Need to build your own modules? The boilerplate is interface-driven and uses Autofac for dependency injection, so you can override or extend any logic without rewriting core code.
🌐 Real Use Cases
Here are a few real-world examples of how EasyLaunchpad can be used:
🧠 AI Tools: Launch OpenAI-based chat tools with user plans & payments
💼 B2B SaaS: Create dashboards with multi-user access, logs, and subscriptions
🛠 Admin Systems: Quickly build portals for internal staff or clients
💸 Subscription Services: Monetize features via built-in plans & licensing
🧠 Final Thoughts
Most boilerplates are either too basic or too bloated. EasyLaunchpad hits the sweet spot — it’s production-ready, focused, and elegant.
Everything you’d normally spend 3–4 weeks building? Already done.
With the structure and flexibility of a custom-built project — but without the hassle — you’re free to build what really matters: your product, your logic, your innovation.
👉 Ready to dive in? Get your copy of EasyLaunchpad and start building today:🔗 https://easylaunchpad.com
0 notes
Text
How to Use MapStruct with Lombok’s Builder
Are you still leaving your office late at night or stuck on an existing project by spending valuable time writing boilerplate codes for bean mapping in your powerful multi-layered architecture application? Now, it is time for you to master a new magic spell, which can help you reduce the time that is being wasted by writing many boilerplate codes for bean mapping.
Let me introduce MapStruct, A powerful annotation processor provided by Java. Which helps you to reduce the amount of extra boilerplate code for bean mapping. As of now, MapStruct version 1.5.2 final is the very latest version, which was released on June 18, 2022. It is possible to integrate it with the Lombok Builder pattern for better performance.
Generator Libraries Required
Lombok is Automatic Resource Management, automatic generation of getters, setters, equals, hash Code and to String, and more.
MapStruct is a code generator that greatly simplifies the implementation of mappings between Java bean types based on a convention over configuration approach.
These simple snippets of code will make you aware of how these two libraries work hand in hand in the way MapStruct implements Lombok’s builder methods. Implementing the Lombok builder which will help us to make our code bug-free and maintenance-free. And which will increase the overall quality of the code by reducing unwanted lines of code.
Working
To Achieve MapStruct functionality, we need to create an Interface, which will act as a bridge between the POJOs consisting of @mapper annotation. (@mapper: this annotation tells the MapStruct to generate an implementation class for the given interface).
Consider an example, where we create an entity named as ProductDetails and a ProductResponseDTO and we want to map the fields between them. Compared to other mapping frameworks, MapStruct provides us with the following benefits.
Instead of reflection MapStruct provides fast execution by using plain method invocations.
This provides compile-time type safety. The objects and attributes which share mapping can only be mapped using a MapStruct.
MapStruct provides clear build-time reports if any occurred while the time of compiling.
ProductDetails.java
ProductResponseDTO.java
To achieve mapping between the fields in both java classes we need to create an interface that has been mentioned above that consists of @mapper annotation. And we specify the input and the output.
ProductMapper
After doing these many steps we need to compile the maven.
ProductMapperImpl
For Mapping, the list of entities
After configuring the mapper interface compile the maven as we did before. And follow the previous steps.
For Mapping Entities Of Different Fields, Names
Consider two new entities ProductDetails and ProductResponseDTO
ProductDetails
ProductResponseDTO
After successfully creating these two entities as we did in the previous case, configure the mapper interface with an extra annotation called @Mapping.
If we need to define the field which differs in both entities.
Source: source contains the name we have given inside the input entity.
Target: target contains the name we have given inside the output entity.
ProductMapper
In this world, everyone is in hurry and we need some new measures to complete our tasks in the prescribed time without making any further lag in the projects which we are handling. If you are an IT professional or student who cares more about an IT career, I would surely recommend mastering the MapStruct which will make your way faster and better.
Thanks for reading! In this blog, we tried to convey a basic introduction to MapStruct and we expect all of you to understand what we tried to convey. If you run into any trouble or need assistance with MapStruct, get in touch with us.
0 notes
Text
Automatically generateboilerplate text clipboard

#AUTOMATICALLY GENERATEBOILERPLATE TEXT CLIPBOARD PORTABLE#
#AUTOMATICALLY GENERATEBOILERPLATE TEXT CLIPBOARD CODE#
Go to Type of Symbol navigates to interface implementations in debug mode. Improved performance of fix in scope, as it now uses the results of solution-wide analysis to skip skip irrelevant code. New inspections and quick-fixes that help to deal with static local/anonymous functions with closures, simplify string interpolation, transform object initializers to constructors with parameters, find inconsistent locks on fields, and more. Improvements for nullable reference types support. Updated formatting for the C++20 requires-expressions and a new Line feed at the end of file option.Ĭ# 10 support including dedicated features for file-scoped namespaces, CallerArgumentExpression attribute, and global using directives.
#AUTOMATICALLY GENERATEBOILERPLATE TEXT CLIPBOARD CODE#
Improvements for the multiline generation of boilerplate code for aggregate initialization using C++20 designated initializers. Static_cast and c-style cast expressions. Smart pointer creation via both standard and Unreal-specific functions, ReSharper C++ is now better at handling implicit constructor calls, thereby improving the search and navigation features for the following cases: Updates for Catch2 v3 and the latest versions of GoogleTest, Boost.Test, and doctest. Support for the Unreal Engine testing framework. The improved code generation for delegate functions substitutes the parameter names from the signature. The Rename refactoring now updates both the U and I interface classes. Quick Documentation now includes a link to the Unreal Engine documentation. InspectCode Command-Line Tool can produce inspection results in the Static Analysis Results Interchange Format (sarif).
#AUTOMATICALLY GENERATEBOILERPLATE TEXT CLIPBOARD PORTABLE#
Improved PDB navigation (sources from symbol files) for types without sequence points such as interfaces and enums.Ībility to explore metadata of assemblies and portable PDBs. XML documentation in decompiled / metadata view file header.įorwarded types in the Assembly Explorer window XML Doc comments for platform assemblies, including assemblies with names that differ from the names of the XML documentation files (for example ). Improved support of nullable reference types. and annotations are now supported in projects that do not use nullable reference types Move Type to Another File refactoring.Ĭonvention-based routing support for ASP.NET Core.ĭetection and automatic configuration of syntax styles. Support for moving preprocessor directives along with the moved type in the. The bundled Clang-Tidy binary has been updated to Clang 14, adding new checks.Įxtract Global Using/ Inline Global Using refactorings. Support for the "Public Include Directories" and "All Header Files are Public" project properties. Updated Boost.Test support and fixed issues with data-driven test cases.īetter handling of emplace- and make-like function calls, including Unreal Engine Emplace calls.Ĭreating a documentation stub by pressing Enter inside a /**/ comment before the entity you wish to document. Improved error rendering: syntax highlighting in tooltips and more precise error highlighting range. Widget metadata specifiers in the code completion list. Performance boost for Unreal Engine indexing.īlueprints support: new inlay hints and inspections. To enable them, select JavaScript and TypeScript on the Environment | Products & Features page of ReSharper options ( Alt+R, O). Some solution-wide refactorings are available from the action list ( Alt+Enter): Extract Method over selected statements Change Signature, Transform Parameters, Convert Property To Method on member signatures Convert Static to Extension Method on signatures and on the first parameter.ĭedicated presentation features for ReadyToRun and NGen assemblies in Assembly Explorer window.Īctive development of productivity features for JavaScript, TypeScript, and JSON is suspended and these features are disabled by default. Improvements in the INotifyPropert圜hanged support. Structural Search and Replace patterns and replacement templates based on the attribute can be applied in the desired scope (file, project, or solution). C# 11 Preview support: checked operators, list patterns, required members, raw strings, checked operators, unsigned right shift, span pattern matching, auto-default structs
0 notes
Text
How to install spring into eclipse on mac

HOW TO INSTALL SPRING INTO ECLIPSE ON MAC ZIP FILE
HOW TO INSTALL SPRING INTO ECLIPSE ON MAC CODE
HOW TO INSTALL SPRING INTO ECLIPSE ON MAC ZIP
HOW TO INSTALL SPRING INTO ECLIPSE ON MAC DOWNLOAD
HOW TO INSTALL SPRING INTO ECLIPSE ON MAC FREE
The application.properties file under the resource folder contains the properties your Spring Boot will use to configure the application.
The src/main/java/com/example/employee subdirectory consists of all the Java classes for the tutorial.
You’ll see the following folders in file explorer: Click on Finish to import your project into your Eclipse IDE.
HOW TO INSTALL SPRING INTO ECLIPSE ON MAC ZIP
Click on Next.īrowse the directory where you extracted the zip file, select the root folder where the pom.xml file is present. Under Maven, choose Existing Maven Projects. Open Eclipse IDE and go to File and select Import.
HOW TO INSTALL SPRING INTO ECLIPSE ON MAC ZIP FILE
Extract the zip file to your preferred folder location.
HOW TO INSTALL SPRING INTO ECLIPSE ON MAC DOWNLOAD
This will download a zip file containing your project boilerplate. Your Spring Boot application should look similar to the image below:Ĭlick the Generate button at the bottom of the screen.
MySQL Driver: required to connect with MySQL database.
It eliminates the need of writing queries as you do with JDBC. The Spring Data JPA is an abstraction over JPA that provides utility methods for various operations on databases such as creating, deleting, and updating a record. JPA (Java Persistence API) is a Java Specification that maps Java objects to database entities, also known as ORM (Object Relational Mapping).
Spring Data JPA: required to access the data from the database.
Spring Web: required for building RESTful web applications.
Hence, you can choose the same Java version to follow along.Īdd the following Dependencies to the project:
Description - provide a description about the project.Ĭhoose “Jar” as the Packaging type as the application will run in the embedded Tomcat server provided by Spring Boot.
You can keep it the same as the artifact name, "employee".
Name - this is the display name for your application which Spring Boot will use when creating the entry point for the project.
Since you are creating an application for accessing and manipulating employee details, you can provide “employee”.
Artifact - this is the name of your project.
This follows the Java package naming convention.
Group - this is the base package name indicating the organization or group that is creating the project.
Include the following identifiers under Project Metadata for your project: Note that this tutorial is built with Spring Boot version 2.5.6, so select the same version in Spring Initializr. Under Project, choose “Maven” and then “Java” as the language. This tool provides the basic structure of a Spring Boot project for you to get started quickly. To create the Spring Boot application, you’ll use a tool called Spring Intializr.
HOW TO INSTALL SPRING INTO ECLIPSE ON MAC CODE
Overall, Spring Boot makes a great choice for devs to build their applications because it provides boilerplate code with all the necessary configurations to start with the coding right away. You don't have to create and configure the beans as Spring Boot will do it for you. Beans in Spring are objects that are instantiated and managed by Spring through Spring IoC containers. If the dependency is available in your classpath, Spring Boot will auto-create the beans for it. An auto-configuration feature by Spring Boot that configures your application automatically for certain dependencies.Embedded Tomcat server to run Spring Boot applications.No requirement for complex XML configurations.A few benefits of using Spring Boot for your REST APIs include: It allows you to create REST APIs with minimal configurations. Spring Boot is a Java framework, built on top of the Spring, used for developing web applications.
HOW TO INSTALL SPRING INTO ECLIPSE ON MAC FREE
During installation, create a free account when prompted.
Postman desktop application to test the APIs.
Make sure to configure Maven in Eclipse IDE. When running the installer, it will ask for the specific package to install, choose “Eclipse IDE for Java EE Developers”. You can follow the guide for detailed steps to setup MySQL with Workbench.
MySQL is the database service you’ll use to store the employee data and access in your application through REST APIs.
Java Development Kit (JDK) version 8 or newer.
Some prior knowledge of Java or a willingness to learn.
In this tutorial, you will develop REST APIs in Spring Boot to perform CRUD operations on an employee database. After developing several REST APIs using Spring Boot, I decided to write this tutorial to help beginners get started with Spring Boot. This led me to explore various frameworks such as Spring Boot. I always wanted to know how these APIs are developed so that I can create APIs myself. The server then performs the whole business logic and returns the result. I was always amazed to see how REST APIs are used in establishing communication between client and server over HTTP. I’ve been using Twilio’s REST APIs for quite some time now.
0 notes
Text
Highlight popular frameworks like Spring, Hibernate, and Apache Kafka.

Database Design Best Practices for Full-Stack Developers: Leveraging Popular Frameworks Database design is the backbone of scalable and efficient web applications.
While understanding best practices is essential, the right frameworks can simplify and enhance implementation.
For full-stack developers, frameworks like Spring, Hibernate, and Apache Kafka offer powerful tools to build robust, performant, and maintainable database systems. This article explores how these frameworks align with database design principles and why they’re widely used in the industry.
Spring: Streamlining Database Operations Spring Framework is a popular Java-based framework that provides a comprehensive programming model for enterprise applications.
It excels in simplifying database interactions and transaction management.
Key Features:
Spring Data JPA:
Spring Data JPA abstracts data access, enabling developers to interact with databases without writing complex SQL queries.
It supports CRUD operations and complex queries through method naming conventions.
Transaction Management: Spring offers declarative transaction management, ensuring database operations adhere to ACID (Atomicity, Consistency, Isolation, Durability) properties.
Scalability: With Spring Boot, developers can build microservices that connect to databases, ensuring scalability and high performance.
Alignment with Database Design Best Practices:
Data Integrity: Spring ensures data consistency through robust transaction management, preventing partial updates during failures.
Scalability: Spring Boot’s lightweight and modular architecture makes it easy to scale database-connected applications.
Ease of Maintenance: Spring’s repository pattern reduces boilerplate code, making applications more maintainable.
Hibernate:
Simplifying
Object-Relational Mapping Hibernate is a powerful ORM (Object-Relational Mapping) framework that bridges the gap between object-oriented programming and relational databases.
By automating the mapping of objects to database tables, Hibernate eliminates the need for manual SQL queries.
Key Features:
Entity Mapping: Hibernate maps Java objects to relational database tables, reducing the complexity of working with relational data.
Lazy and Eager Loading:
Hibernate provides control over how data is fetched, allowing developers to optimize queries based on use cases.
Caching:
Hibernate supports first-level (session-level) and second-level (application-wide) caching to improve performance.
HQL (Hibernate Query Language):
Hibernate offers a query language similar to SQL but designed for object-oriented data retrieval.
Alignment with Database Design Best Practices:
Normalization: Hibernate supports relationships like One-to-Many and Many-to-Many, ensuring normalized schema designs.
Query Optimization:
With HQL and caching, Hibernate optimizes query performance and reduces database load.
Data Integrity: By managing relationships and constraints, Hibernate helps maintain referential integrity between tables.
Apache Kafka:
Enabling Scalability and Real-Time Data Processing Apache Kafka is a distributed event-streaming platform that is often used in applications requiring high scalability and real-time processing.
Unlike Spring and Hibernate, Kafka is not directly tied to database interactions but complements them by enabling asynchronous data processing and scalability.
Key Features:
Event Streaming: Kafka allows systems to publish and subscribe to event streams in real time.
Scalability: Kafka’s distributed architecture makes it ideal for scaling data processing workloads across multiple servers.
Decoupling Services: Kafka acts as a messaging intermediary, allowing microservices to interact asynchronously without being tightly coupled.
Event Replay:
Kafka retains event logs, enabling replay of past events for recovery or debugging purposes.
Alignment with Database Design Best Practices:
Scalability:
Kafka handles high-volume data streams, distributing workload across multiple servers and reducing bottlenecks.
Data Backup and Recovery:
Kafka’s event logs provide a mechanism for disaster recovery and fault tolerance.
Real-Time Processing: By decoupling services, Kafka ensures that database operations don’t slow down other parts of the system.
How These Frameworks Complement Each Other These frameworks can be used together to build comprehensive systems that adhere to database design
best practices:
Spring and Hibernate:
While Spring manages transactional consistency and database interactions, Hibernate simplifies the mapping of object-oriented code to relational databases.
Spring and Kafka: Spring Boot integrates seamlessly with Kafka, enabling event-driven architectures and asynchronous data flows.
Hibernate and Kafka: Kafka can act as an intermediary between services, while Hibernate ensures normalized and optimized relational data storage.
Practical Examples of Framework Usage Spring and Hibernate: In a shopping cart application, Spring Data JPA can handle data access while Hibernate manages relationships between entities like User, Order, and Product.
Spring and Kafka:
In a real-time stock trading platform, Kafka can stream stock price updates to microservices, and Spring Boot applications can persist these updates to the database.
Kafka for Event-Driven Systems: In an e-commerce system, Kafka can capture events like order placement, stock updates, and payment processing, ensuring that the database remains consistent while handling high traffic.
Conclusion
Frameworks like Spring, Hibernate, and Apache Kafka empower developers to implement database design best practices with ease.
Whether it’s ensuring data integrity, optimizing performance, or enabling scalability, these tools simplify complex tasks and enhance application robustness.
By leveraging these frameworks, full-stack developers can focus on building innovative solutions without compromising on the quality of their database designs.

0 notes
Text
Exploring a minimal Web API with ASP.NET Core 6
I write about minimal Web APIs in 2016 and my goal has always been for "dotnet server.cs" to allow for a single file simple Web API. Fast forward to 2021 and there's some great work happening again in the minimal API space!
Let's do a 'dotnet new web' with the current .NET 6 preview. I'm on .NET 6 preview 7. As mentioned in the blog:
We updated .NET SDK templates to use the latest C# language features and patterns. We hadn’t revisited the templates in terms of new language features in a while. It was time to do that and we’ll ensure that the templates use new and modern features going forward.
The following language features are used in the new templates:
Top-level statements
async Main
Global using directives (via SDK driven defaults)
File-scoped namespaces
Target-typed new expressions
Nullable reference types
This is pretty cool. Perhaps initially a bit of a shock, but this a major version and a lot of work is being done to make C# and .NET more welcoming. All your favorite things are still there and will still work but we want to explore what can be done in this new space.
Richard puts the reasoning very well:
The templates are a much lower risk pivot point, where we’re able to set what the new “good default model” is for new code without nearly as much downstream consequence. By enabling these features via project templates, we’re getting the best of both worlds: new code starts with these features enabled but existing code isn’t impacted when you upgrade.
This means you'll see new things when you make something totally new from scratch but your existing stuff will mostly work just fine. I haven't had any trouble with my sites.
Let's look at a super basic hello world that returns text/plain:
var builder = WebApplication.CreateBuilder(args); var app = builder.Build(); if (app.Environment.IsDevelopment()){ app.UseDeveloperExceptionPage(); } app.MapGet("/", () => "Hello World!"); app.Run();
Slick. Note that I made line 3 (which is optional) just be one line to be terse. Not needed, just trying on these new shoes.
If we make this do more and support MVC, it's just a little larger. I could add in app.MapRazorPages() if I wanted instead of MapControllerRoute, which is what I use on my podcast site.
var builder = WebApplication.CreateBuilder(args); // Add services to the container. builder.Services.AddControllersWithViews(); var app = builder.Build(); // Configure the HTTP request pipeline. if (app.Environment.IsDevelopment()) { app.UseDeveloperExceptionPage(); } else { app.UseExceptionHandler("/Home/Error"); // The default HSTS value is 30 days. You may want to change this for production scenarios, see https://aka.ms/aspnetcore-hsts. app.UseHsts(); } app.UseHttpsRedirection(); app.UseStaticFiles(); app.UseRouting(); app.UseAuthorization(); app.MapControllerRoute( name: "default", pattern: "{controller=Home}/{action=Index}/{id?}"); app.Run();
Back to the original Web API one. I can add Open API support by adding a reference to Swashbuckle.AspNetCore and then adding just a few lines:
var builder = WebApplication.CreateBuilder(args); builder.Services.AddEndpointsApiExplorer(); builder.Services.AddSwaggerGen(); var app = builder.Build(); if (app.Environment.IsDevelopment()) { app.UseDeveloperExceptionPage(); } app.UseSwagger(); app.MapGet("/", () => "Hello World!"); app.UseSwaggerUI(); app.Run();
Then I hit https://localhost:5001/swagger and I get the SwaggerUI and a little WebAPI Tester:
Anuraj has a great blog where he goes deeper and pokes around David Fowlers GitHub and creates a minimal WebAPI with Entity Framework and an in-memory database with full OpenAPI support. He put the source at at https://github.com/anuraj/MinimalApi so check that out.
Bipin Joshi did a post also earlier in June and explored in a bit more detail how to hook up to real data and noted how easy it was to return entities with JSON output as the default. For example:
app.UseEndpoints(endpoints => { endpoints.MapGet("/api/employees",([FromServices] AppDbContext db) => { return db.Employees.ToList(); }); ...snip... }
That's it! Very clean.
Dave Brock did a tour as well and did Hello World in just three lines, but of course, you'll note he used WebApplication.Create while you'll want to use a Builder as seen above for real work.
var app = WebApplication.Create(args); app.MapGet("/", () => "Hello World!"); await app.RunAsync();
Dave does point out how nice it is to work with simple models using the C# record keyword which removes a LOT of boilerplate cruft.
Check this out!
var app = WebApplication.Create(args); app.MapGet("/person", () => new Person("Scott", "Hanselman")); await app.RunAsync(); public record Person(string FirstName, string LastName);
That's it, and if you hit /person you'll get back a nice JSON WebAPI with this result:
{ firstName: "Scott", lastName: "Hanselman" }
Dig even deeper by checking out Maria Naggaga's presentation in June that's on YouTube where she talks about the thinking and research behind Minimal APIs and shows off more complex apps. Maria also did another great talk in the same vein for the Microsoft Reactor so check that out as well.
Is this just about number of lines of code? Have we moved your cheese? Will these scale to production? This is about enabling the creation of APIs that encapsulate best practices but can give you the "middleware-like" performance with the clarity and flexibility that was previous available with all the ceremony of MVC.
Here's some more resources:
David Fowler's GitHub demo https://github.com/davidfowl/dotnet6minimalapi/tree/main/Dotnet6_Minimal_API
A ToDo API as a Minimal API https://github.com/davidfowl/CommunityStandUpMinimalAPI
Exploring what Integration Testing looks like in a .NET 6 world by Martin Costello https://github.com/martincostello/dotnet-minimal-api-integration-testing I'll be exploring Martin's codebase next!
Have fun! Lots of cool things happening this year, even in the middle of the panini. Stay safe, friends.
Sponsor: Pluralsight helps teams build better tech skills through expert-led, hands-on practice and clear development paths. For a limited time, get 50% off your first month and start building stronger skills.
© 2021 Scott Hanselman. All rights reserved.


Exploring a minimal Web API with ASP.NET Core 6 published first on https://deskbysnafu.tumblr.com/
0 notes
Text
Exploring a minimal Web API with ASP.NET Core 6
I write about minimal Web APIs in 2016 and my goal has always been for "dotnet server.cs" to allow for a single file simple Web API. Fast forward to 2021 and there's some great work happening again in the minimal API space!
Let's do a 'dotnet new web' with the current .NET 6 preview. I'm on .NET 6 preview 7. As mentioned in the blog:
We updated .NET SDK templates to use the latest C# language features and patterns. We hadn’t revisited the templates in terms of new language features in a while. It was time to do that and we’ll ensure that the templates use new and modern features going forward.
The following language features are used in the new templates:
Top-level statements
async Main
Global using directives (via SDK driven defaults)
File-scoped namespaces
Target-typed new expressions
Nullable reference types
This is pretty cool. Perhaps initially a bit of a shock, but this a major version and a lot of work is being done to make C# and .NET more welcoming. All your favorite things are still there and will still work but we want to explore what can be done in this new space.
Richard puts the reasoning very well:
The templates are a much lower risk pivot point, where we’re able to set what the new “good default model” is for new code without nearly as much downstream consequence. By enabling these features via project templates, we’re getting the best of both worlds: new code starts with these features enabled but existing code isn’t impacted when you upgrade.
This means you'll see new things when you make something totally new from scratch but your existing stuff will mostly work just fine. I haven't had any trouble with my sites.
Let's look at a super basic hello world that returns text/plain:
var builder = WebApplication.CreateBuilder(args); var app = builder.Build(); if (app.Environment.IsDevelopment()){ app.UseDeveloperExceptionPage(); } app.MapGet("/", () => "Hello World!"); app.Run();
Slick. Note that I made line 3 (which is optional) just be one line to be terse. Not needed, just trying on these new shoes.
If we make this do more and support MVC, it's just a little larger. I could add in app.MapRazorPages() if I wanted instead of MapControllerRoute, which is what I use on my podcast site.
var builder = WebApplication.CreateBuilder(args); // Add services to the container. builder.Services.AddControllersWithViews(); var app = builder.Build(); // Configure the HTTP request pipeline. if (app.Environment.IsDevelopment()) { app.UseDeveloperExceptionPage(); } else { app.UseExceptionHandler("/Home/Error"); // The default HSTS value is 30 days. You may want to change this for production scenarios, see https://aka.ms/aspnetcore-hsts. app.UseHsts(); } app.UseHttpsRedirection(); app.UseStaticFiles(); app.UseRouting(); app.UseAuthorization(); app.MapControllerRoute( name: "default", pattern: "{controller=Home}/{action=Index}/{id?}"); app.Run();
Back to the original Web API one. I can add Open API support by adding a reference to Swashbuckle.AspNetCore and then adding just a few lines:
var builder = WebApplication.CreateBuilder(args); builder.Services.AddEndpointsApiExplorer(); builder.Services.AddSwaggerGen(); var app = builder.Build(); if (app.Environment.IsDevelopment()) { app.UseDeveloperExceptionPage(); } app.UseSwagger(); app.MapGet("/", () => "Hello World!"); app.UseSwaggerUI(); app.Run();
Then I hit https://localhost:5001/swagger and I get the SwaggerUI and a little WebAPI Tester:
Anuraj has a great blog where he goes deeper and pokes around David Fowlers GitHub and creates a minimal WebAPI with Entity Framework and an in-memory database with full OpenAPI support. He put the source at at https://github.com/anuraj/MinimalApi so check that out.
Bipin Joshi did a post also earlier in June and explored in a bit more detail how to hook up to real data and noted how easy it was to return entities with JSON output as the default. For example:
app.UseEndpoints(endpoints => { endpoints.MapGet("/api/employees",([FromServices] AppDbContext db) => { return db.Employees.ToList(); }); ...snip... }
That's it! Very clean.
Dave Brock did a tour as well and did Hello World in just three lines, but of course, you'll note he used WebApplication.Create while you'll want to use a Builder as seen above for real work.
var app = WebApplication.Create(args); app.MapGet("/", () => "Hello World!"); await app.RunAsync();
Dave does point out how nice it is to work with simple models using the C# record keyword which removes a LOT of boilerplate cruft.
Check this out!
var app = WebApplication.Create(args); app.MapGet("/person", () => new Person("Scott", "Hanselman")); await app.RunAsync(); public record Person(string FirstName, string LastName);
That's it, and if you hit /person you'll get back a nice JSON WebAPI with this result:
{ firstName: "Scott", lastName: "Hanselman" }
Dig even deeper by checking out Maria Naggaga's presentation in June that's on YouTube where she talks about the thinking and research behind Minimal APIs and shows off more complex apps. Maria also did another great talk in the same vein for the Microsoft Reactor so check that out as well.
Is this just about number of lines of code? Have we moved your cheese? Will these scale to production? This is about enabling the creation of APIs that encapsulate best practices but can give you the "middleware-like" performance with the clarity and flexibility that was previous available with all the ceremony of MVC.
Here's some more resources:
David Fowler's GitHub demo https://github.com/davidfowl/dotnet6minimalapi/tree/main/Dotnet6_Minimal_API
A ToDo API as a Minimal API https://github.com/davidfowl/CommunityStandUpMinimalAPI
Exploring what Integration Testing looks like in a .NET 6 world by Martin Costello https://github.com/martincostello/dotnet-minimal-api-integration-testing I'll be exploring Martin's codebase next!
Have fun! Lots of cool things happening this year, even in the middle of the panini. Stay safe, friends.
Sponsor: Pluralsight helps teams build better tech skills through expert-led, hands-on practice and clear development paths. For a limited time, get 50% off your first month and start building stronger skills.
© 2021 Scott Hanselman. All rights reserved.


Exploring a minimal Web API with ASP.NET Core 6 published first on http://7elementswd.tumblr.com/
0 notes