#Add Reset task to the Pipeline
Explore tagged Tumblr posts
Visit Tumblr Blog
Explore Tumblr blogs with no restrictions, modern design and the best experience.
Last Seen Tumblr Blogs


Fun Fact
The total number of visits Tumblr.com received during January 2021 is 327 million.
Note
(Me again! Previously I had bothered you in DMs about an article, but figured it might be better to send an ask in this case.) On the topic of environmental concerns, I did have a question about James Hansen's 'Global Warming in the Pipeline' which was published last year. A previous (and rather bleak) Medium article you analyzed had cited this particular paper as proof that we're on track to exceed 3C in our lifetimes, even if emissions were to suddenly halt today. https://pubs.giss.nasa.gov/abs/ha09020b.html Since this paper has now passed peer review, what exactly does this mean in simplistic terms? I understand this means that the climate scientists that have analyzed the paper agree with what it states (and see no issues with it's logic), but does it actually mean we'll reach 4C by 2100? Or have I misunderstood what this is stating? The only way I see this not being the case is if somehow Hansen's paper later turns out to be incorrect (which seems unlikely).
I also understand that the paper heavily advocates for a level of geoengineering, which I think is a better alternative to letting a large majority of people suffer, but I'm not sure if you have any opinions on when you think that'd be best to do.
oooh, i've put off answering this because it's perhaps a bit above my pay grade, but let's see
so as far as passing peer review - it's hard to say how robust that is in terms of whether you should believe its conclusions. it depends a lot on the field, the reviewers, and so on - papers are retracted frequently, even if the initial round of reviewers advised to publish.
in climate science we are engaged in a spectacularly difficult modelling task. this paper also speaks on a pretty broad range of subjects. let me quote the full abstract, adding some paragraph breaks:
Improved knowledge of glacial-to-interglacial global temperature change yields Charney (fast-feedback) equilibrium climate sensitivity 1.2±0.3°C (2σ) per W/m2, which is 4.8°C±1.2°C for doubled CO2. Consistent analysis of temperature over the full Cenozoic era — including 'slow' feedbacks by ice sheets and trace gases — supports this sensitivity and implies that CO2 was 300-350 ppm in the Pliocene and about 450 ppm at transition to a nearly ice-free planet, exposing unrealistic lethargy of ice sheet models. Equilibrium global warming for today's GHG amount is 10°C, which is reduced to 8°C by today's human-made aerosols. Equilibrium warming is not 'committed' warming; rapid phaseout of GHG emissions would prevent most equilibrium warming from occurring. However, decline of aerosol emissions since 2010 should increase the 1970-2010 global warming rate of 0.18°C per decade to a post-2010 rate of at least 0.27°C per decade. Thus, under the present geopolitical approach to GHG emissions, global warming will exceed 1.5°C in the 2020s and 2°C before 2050. Impacts on people and nature will accelerate as global warming increases hydrologic (weather) extremes. The enormity of consequences demands a return to Holocene-level global temperature. Required actions include: (1) a global increasing price on GHG emissions accompanied by development of abundant, affordable, dispatchable clean energy, (2) East-West cooperation in a way that accommodates developing world needs, and (3) intervention with Earth's radiation imbalance to phase down today's massive human-made 'geo-transformation' of Earth's climate. Current political crises present an opportunity for reset, especially if young people can grasp their situation.
As I've split it, the first paragraph is a quantitative statement about equilibrium warming, which is the paper's scientific contribution. The second paragraph adds some qualifiers about the expected trajectory "under the present geopolitical approach". The third para is a political argument - a 'what is to be done' type statement.
That's a lot to cover in one paper! It also invites different kinds of approaches to peer review. A scientist reviewing the first half of this paper would be making a technical analysis: do Hansen et al look at the right data, analyse it rigorously, etc. etc.
Why is this all so complicated? Well, lots of things change on Earth when it gets hotter and colder. The amount of cloud coverage, the amount of ice, the way the oceans mix hot and cold water, etc. etc., the amount of dust and soot in the air from forest fires - all of this affects how much energy comes into the atmosphere, how much gets reflected into space, etc etc.
The main things that the paper talks about are...
the equilibrium climate sensitivity: basically, if you add a bunch of extra energy to the system (what climate scientists call 'forcing'), once everything settles down, what temperature do you end up at, per unit of forcing?
the speed of various feedbacks - how quickly the clouds, ice, etc. etc. change in response to the forcing, which determines how quickly you approach this final equilibrium temperature. Knowing which feedbacks are fast and slow is important since it tells us what we can expect to happen when we cut CO2 emissions.
It's naturally a pretty involved discussion and I don't pretend to have the background to follow all the ins and outs of it, but Hansen et al. use various lines of evidence to try to assess these parameters, see how they affect climate models, and the like. They perform an analysis of how temperature and estimated CO2 varied during the Cenozoic era, and there's a section on estimating the effects of aerosols, both natural and human-made.
On the subject of aerosols, Hansen et al. suggest that previous climate models may have made two mistakes that cancelled each other out:
Recent global warming does not yield a unique ECS [Equilibrium Climate Sensitivity] because warming depends on three major unknowns with only two basic constraints. Unknowns are ECS, net climate forcing (aerosol forcing is unmeasured), and ocean mixing (many ocean models are too diffusive). Constraints are observed global temperature change and Earth’s energy imbalance (EEI) [80]. Knutti [150] and Hansen [75] suggest that many climate models compensate for excessive ocean mixing (which reduces surface warming) by using aerosol forcing less negative than the real world, thus achieving realistic surface warming.
What they're saying here is, though we have a pretty good idea of how much CO2 we put in the atmosphere, since we don't have a good measure of aerosols we don't actually know for sure how much energy humans were adding to the atmosphere. Like, CO2 adds energy, but sulfur dioxide reflects it away.
There's three unknown parameters here, and two constraints (things we can calculate for definite). We use a model to tell us one of those unknowns (the ocean stuff), and that allows us to tune the effect of aerosols until our model Earth matches our measurements of the real Earth. But, if our ocean model is wrong, then we end up wrongly estimating the effect of aerosols.
The upshot is that aerosols have been a bigger deal than we thought, and as the world cleans up the atmsophere and removes the amount of aerosols, the rate of warming will increase. It's definitely plausible - but it's such a complicated system that there could easily be some other nuance here.
I won't try to summarise every point in the paper but it's that kind of thing that they're arguing about here. This isn't a mathematical proof, though! Since it's touching on a huge range of different parameters, trying to draw together lots of different lines of evidence, there is still a fair bit of room for nuance. It's not so simple as 'Hansen et al. are right' or 'Hansen et al. are wrong' - they could be wrong about one thing and right about another.
To say they've passed peer review is to say that they've done as reasonable a job as anyone can expect to try and figure out this kind of messy problem. However, other scientists may still take issue with one or another claim. It's not as definitive as a maths paper.
That said, Hansen's arguments all seem pretty plausible to me. The tools he uses to assess this situation are sensible and he talks about cases where things weren't as expected (he thought that improved climate models would change in a different way, and they didn't). But while I know enough about the subject to be able to largely follow what he's saying, I'm not confident saying whether he's right.
The second half takes on a different tone...
This section is the first author’s perspective based on more than 20 years of experience on policy issues that began with a paper [179] and two workshops [180] that he organized at the East-West Center in Hawaii, followed by meetings and workshops with utility experts and trips to more than a dozen nations for discussions with government officials, energy experts, and environmentalists. The aim was to find a realistic scenario with a bright energy and climate future, with emphasis on cooperation between the West and nations with emerging or underdeveloped economies.
So this is more of a historical, political analysis section, addressing why we are on this trajectory and why scientists may be institutionally underestimating the threat ('scientific reticence', 'gradualism' and so on). Well, more precisely, it's a polemic - a scientifically informed polemic, but this is basically an editorial stapled to the science part of the paper.
This includes an account of how a previous paper ('Ice Melt') led by Hansen was reviewed, and sidelined by other scientists, for what Hansen considers unsound reasons. It leads into something of an impassioned plea by Hansen addressed at his fellow scientists, complete with rhetorical questions:
Climate science reveals the threat of being too late. ‘Being too late’ refers not only to warning of the climate threat, but also to technical advice on policy implications. Are we scientists not complicit if we allow reticence and comfort to obfuscate our description of the climate situation? Does our training, years of graduate study and decades of experience, not make us well-equipped to advise the public on the climate situation and its policy implications? As professionals with deep understanding of planetary change and as guardians of young people and their future, do we not have an obligation, analogous to the code of ethics of medical professionals, to render to the public our full and unencumbered diagnosis? That is our objective.
This leads into Hansen's proposal for how to get out of this mess: a price on carbon dioxide, nuclear power, and rushing to research geoengineering such as spraying salt water in the air. And then e.g. specific political proposals, like 'a political party that takes no money from special interests', ranked choice voting and so on.
Naturally this is a lot harder to take technical issue with. It's more like an editorial. As a reviewer you'd probably say it's worth publishing because it's well argued, etc. etc., without necessarily agreeing with every one of Hansen's proposals. You can say 'that obviously wouldn't work' and so on, but it's a different kind of argument.
So re your questions:
does it actually mean we'll reach 4C by 2100?
If Hansen et al. are right, the IPCC reports are underestimating the equilibrium we approach for the current amount of CO2 in the atmosphere - which would lead to 2°C well before 2050, so 4°C by 2100 seems plausible (I didn't spot a timeline that goes that far in the paper when I skimmed through but I could have missed it).
This isn't the amount of warming that will happen, because the Earth has many systems which gradually scrub CO2 from the atmosphere. If we stopped pumping out CO2 suddenly, the amount of CO2, and the amount of extra energy it adds, would gradually decline. So we wouldn't necessarily approach that equilibrium. On the other hand, the amount of CO2 forcing is only going up as things currently stand - and if the amount of forcing stayed the same, Hansen says it would eventually deglaciate Antarctica, leading to over 10°C of warming.
But working out what will actually happen by 2100 depends on a lot of modelling assumptions - how long do you assume we keep pumping out CO2? Hansen addresses this when talking about the subject of 'committed warming':
‘Committed warming’ is less precisely defined; even in the current IPCC report [12] (p. 2222) it has multiple definitions. One concept is the warming that occurs if human-made GHG emissions cease today, but that definition is ill-posed as well as unrealistic. Do aerosol emissions also cease? That would cause a sudden leap in Earth’s energy imbalance, a ��termination shock,’ as the cooling effect of human-made aerosols disappears. A more useful definition is the warming that will occur with plausibly rapid phasedown of GHG emissions, including comparison with ongoing reality. However, the required ‘integrated assessment models,’ while useful, are complex and contain questionable assumptions that can mislead policy (see Perspective on policy implications section).
So, will we reach 4C by 2100? We can only phrase this question in a conditional way: if we continue to add this much energy, then...
In practice we will probably end up reducing our emissions one way or another - which is to say, if our present complex societies collapse, they ain't gonna be emitting much carbon anymore...
I also understand that the paper heavily advocates for a level of geoengineering, which I think is a better alternative to letting a large majority of people suffer, but I'm not sure if you have any opinions on when you think that'd be best to do.
The way things are going, I think it's likely that people will try geoengineering when the climate-related disasters really start to ramp up, so whether or not they should ends up kind of besides the point.
Hansen doesn't really advocate a specific programme to pursue - only one paragraph in the whole paper talks about geoengineering:
Highest priority is to phase down emissions, but it is no longer feasible to rapidly restore energy balance via only GHG emission reductions. Additional action is almost surely needed to prevent grievous escalation of climate impacts including lock-in of sea level rise that could destroy coastal cities world-wide. At least several years will be needed to define and gain acceptance of an approach for climate restoration. This effort should not deter action on mitigation of emissions; on the contrary, the concept of human intervention in climate is distasteful to many people, so support for GHG emission reductions will likely increase. Temporary solar radiation management (SRM) will probably be needed, e.g. via purposeful injection of atmospheric aerosols. Risks of such intervention must be defined, as well as risks of no intervention; thus, the U.S. National Academy of Sciences recommends research on SRM [212]. The Mt. Pinatubo eruption of 1991 is a natural experiment [213, 214] with a forcing that reached [30] –3 W/m2. Pinatubo deserves a coordinated study with current models. The most innocuous aerosols may be fine salty droplets extracted from the ocean and sprayed into the air by autonomous sailboats [215]. This approach has been discussed for potential use on a global scale [216], but it needs research into potential unintended effects [217]. This decade may be our last chance to develop the knowledge, technical capability, and political will for actions needed to save global coastal regions from long-term inundation.
He says 'we need to research this more to figure out the risks, since we'll probably have to do it' basically. Climate researchers have historically been reluctant to advocate geoengineering for fear it will be mistaken as a way to solve the climate problem without reducing GHG emissions, so honestly seeing them suggest it now maybe brings to light the atmosphere of desperation in the field.
Unfortunately, when talking about politics and economics, Hansen is on much less firm ground than when he's picking apart the intricacies of climate feedbacks. He clearly wants to try to discourage doomerism, and he's rightly critical of cap-and-trade and similar schemes, but he has his specific political fixations and what he suggests is all a bit unconvincing as a programme. I don't say this because I've got a better idea, though.
The problem is that the future is really hard to predict. It's bad enough when it's climate systems, but humans are even more complicated little nonlinear freaks. This isn't a new problem for Hansen's paper. I am pessimistic enough by nature that I don't really trust my ability to predict what we will do when climate change gets more severe. Hopefully by the time we finally decide to stop kicking the can down the road, there will still be something to be done.
7 notes
·
View notes
Text
🛠 Modular .NET Core Architecture Explained: Why EasyLaunchpad Scales with You

Launching a SaaS product is hard. Scaling it without rewriting the codebase from scratch is even harder.
That’s why EasyLaunchpad was built with modular .NET Core architecture — giving you a powerful, clean, and extensible foundation designed to get your MVP out the door and support the long-term growth without compromising flexibility.
“Whether you’re a solo developer, a startup founder, or managing a small dev team, understanding the architecture under the hood matters. “ In this article, we’ll walk through how EasyLaunchpad’s modular architecture works, why it’s different from typical “template kits,” and how it’s designed to scale with your business.
💡 Why Architecture Matters
Most boilerplates get you started quickly but fall apart as your app grows. They’re rigid, tangled, and built with shortcuts that save time in the short term — while becoming a burden in the long run.
EasyLaunchpad was developed with one mission:
Build once, scale forever.
It follows clean, layered, and service-oriented architecture using .NET Core 8.0, optimized for SaaS and admin-based web applications.
🔧 Key Principles Behind EasyLaunchpad Architecture
Before diving into file structures or code, let’s review the principles that guide the architecture:
Principle and Explanation
Separation of Concerns — Presentation, logic, and data access layers are clearly separated
Modularity — Each major feature is isolated as a self-contained service/module
Extensibility — Easy to replace, override, or extend any part of the application
Dependency Injection- Managed using Autofac for flexibility and testability
Environment Awareness- Clean handling of app settings per environment (dev, staging, production)
📁 Folder & Layered Structure
Here’s how the core architecture is structured:
/Controllers
/Services
/Repositories
/Models
/Views
/Modules
/Jobs
/Helpers
/Configs
✔️ Controllers
Responsible for routing HTTP requests and invoking service logic. Kept minimal to adhere to the thin controller, fat service approach.
✔️ Services
All core business logic lives here. This makes testing easier and ensures modularity.
✔️ Repositories
All database-related queries and persistence logic are encapsulated in repository classes using Entity Framework Core.
✔️ Modules
Each major feature (auth, email, payment, etc.) is organized as a self-contained module. This allows plug-and-play or custom replacements.
🧩 What Makes EasyLaunchpad a Modular Boilerplate?
The magic of EasyLaunchpad lies in how it isolates and organizes functionality into feature-driven modules. Each module is independent, uses clean interfaces, and communicates through services — not tightly coupled logic.
✅ Modular Features
Modules and Their Functionality
Authentication- Login, password reset, Google login, Captcha
Admin Panel — User & role management, email settings, packages
Email System- DotLiquid templating, SMTP integration
Payment System- Stripe & Paddle modules, plan assignment
Job Scheduler- Hangfire setup for background tasks
Logging- Serilog for structured application logs
Package Management- Admin-defined SaaS plans & package logic
Each module uses interfaces and is injected via Autofac, which means you can:
Replace the Email service with SendGrid or MailKit
Swap out Stripe for PayPal
Extend authentication to include multi-tenancy or SSO
You’re not locked in — you’re empowered to scale.
🔄 Real-World Benefits of Modular Design
🛠 Maintainability
Code is easier to read, test, and update. You won’t dread revisiting it 6 months later.
🧪 Testability
Service and repository layers can be unit tested in isolation, which is perfect for CI/CD pipelines.
🔌 Plug-in/Plug-out Flexibility
Need to add analytics, invoicing, or multi-language support? Just drop a new module in /Modules and wire it up.
🧠 Developer Onboarding
New developers can understand and work on just one module without needing to grok the entire codebase.
🧱 Vertical Scaling
Whether you’re adding new features, scaling your user base, or serving enterprise clients, the codebase stays manageable.
🧠 Example: Adding a Chat Module
Let’s say you want to add real-time chat to your SaaS app.
In a modular structure, you’d:
Create a /Modules/Chat folder
Add models, services, and controllers related to messaging
Inject dependencies using interfaces and Autofac
Use Razor or integrate SignalR for real-time interaction
The existing app remains untouched. No spaghetti code. No conflicts.
⚙️ Supporting Technologies That Make It All Work
The architecture is powered by a solid tech stack:
Tool and the Purpose
.NET Core 8.0- Fast, stable, and LTS-supported
Entity Framework Core- ORM for SQL Server (or other DBs)
Razor Pages + MVC- Clean separation of views and logic
Autofac- Dependency injection across services
Serilog- Logging with structured output
Hangfire- Background jobs & task scheduling
Tailwind CSS + DaisyUI- Modern, responsive UI framework
DotLiquid- Flexible email templating engine
🚀 A Boilerplate That Grows with You
Most boilerplates force you to rewrite or rebuild when your app evolves.
EasyLaunchpad doesn’t.
Instead, it’s:
Startup-ready for quick MVPs
Production-ready for scaling
Enterprise-friendly with structure and discipline built in
💬 What Other Devs Are Saying
“I used EasyLaunchpad to go from idea to MVP in under a week. The modular codebase made it easy to add new features without breaking anything.” – A .NET SaaS Founder
🧠 Conclusion: Why Architecture Is Your Competitive Edge
As your product grows, the quality of your architecture becomes a bottleneck — or a launchpad.
With EasyLaunchpad, you get:
A clean foundation
Production-tested modules
Flexibility to scale
All without wasting weeks on repetitive setup.
It’s not just a .NET boilerplate. It’s a scalable SaaS starter kit built for serious developers who want to launch fast and grow with confidence.
👉 Ready to scale smart from day one? Explore the architecture in action at https://easylaunchpad.com
1 note
·
View note
Text
OTP Template Support & Presentation Slide Resizing Implementation inside Cloud Apps
Aspose team is pleased to announce the new release of Aspose.Slides for Cloud 17.9.0. This release has been built on the basis of latest Aspose.Slides for .NET 17.9 API. Aspose.Slides for .NET 17.9 is enriched with some new features including support for exporting slide notes in generated HTML. There are some important news features and enhancements part of this release, such as support for OTP template, EffectFormat property support to Shape & Background resources, Implement Slide resizing, Add Reset task to the Pipeline resource, add ShowMasterShapes property to slide resource, implement InvertedSolidFillColor for Chart Series, Aspose.Slides fails on loading large files and Can’t retrieve Korean text items Aspose.Slides for Cloud is a REST PowerPoint documents processing API to create, modify, and convert presentations in the cloud. It allows converting presentations to TIFF, PDF, XPS, PPTX, ODP, PPSX, PPTM, PPSM, POTX, POTM, HTML and image file formats.
Overview: Aspose.Slides for Cloud
Aspose.Slides for Cloud is a REST API which allows you to process presentations. It allows you to create, modify, and convert presentations and provides a wide variety of features for working with presentations in the cloud. You can convert a presentation to TIFF, PDF, XPS, PPTX, ODP, PPSX, PPTM, PPSM, POTX, POTM, HTML and image formats. Aspose.Slides for Cloud allows you to extract different elements or a presentation including slide, text, color schemes, font schemes, shapes and images etc. Aspose.Slides for Cloud’s powerful API lets your apps process Microsoft PowerPoint presentations in the cloud, saving you the time it would take to develop your own API.
More about Aspose.Cells for Cloud
Homepage of Aspose.Slides for Cloud
Download Aspose.Slides for Cloud
Ask technical questions/queries from Aspose for Cloud Support Team
#OTP template support#Implement Slide resizing#Add Reset task to the Pipeline#loading large files#improved shapes formatting#PPT Cloud API#PowerPoint Presentation processing
0 notes
Photo

How to Build and Deploy a Web App With Buddy
Moving code from development to production doesn't have to be as error-prone and time-consuming as it often is. By using Buddy, a continuous integration and delivery tool that doubles up as a powerful automation platform, you can automate significant portions of your development workflow, including all your builds, tests, and deployments.
Unlike many other CI/CD tools, Buddy has a pleasant and intuitive user interface with a gentle learning curve. It also offers a large number of well-tested actions that help you perform common tasks such as compiling sources and transferring files.
In this tutorial, I'll show you how you can use Buddy to build, test, and deploy a Node.js app.
Prerequisites
To be able to follow along, you must have the following installed on your development server:
Node.js 10.16.3 or higher
MongoDB 4.0.10 or higher
Git 2.7.4 or higher
1. Setting Up a Node.js App
Before you dive into Buddy, of course, you'll need a web app you can build and deploy. If you have one already, feel free to skip to the next step.
If you don't have a Node.js app you can experiment with, you can create one quickly using a starter template. Using the popular Hackathon starter template is a good idea because it has all the characteristics of a typical Node.js app.
Fork the template on GitHub and use git to download the fork to your development environment.
git clone https://github.com/hathi11/hackathon-starter.git
It's worth noting that Buddy is used with a Git repository. It supports repositories hosted on GitHub, BitBucket, and other such popular Git hosts. Buddy also has a built-in Git hosting solution or you can just as easily use Buddy with your own private Git servers.
Once the clone's complete, use npm to install all the dependencies of the web app.
cd hackathon-starter/ npm install
At this point, you can run the app locally and explore it using your browser.
node app.js
Here's what the web app looks like:
2. Creating a Buddy Project
If you don't have a Buddy account already, now is a good time to create one. Buddy offers two premium tiers and a free tier, all of which are cloud based. The free tier, which gives you 1 GB of RAM and 2 virtual CPUs, will suffice for now.
Once you're logged in to your Buddy account, press the Create new project button to get started.
When prompted to select a Git hosting provider, choose GitHub and give Buddy access to your GitHub repositories.
You should now be able to see all your GitHub repositories on Buddy. Click on the hackathon-starter repository to start creating automations for it.
Note that Buddy automatically recognizes our Node.js app as an Express application. It's because our starter template uses the Express web app framework.
3. Creating a Pipeline
On Buddy, a pipeline is what allows you to orchestrate and run all your tasks. Whenever you need to automate something with Buddy, you either create a new pipeline for it or add it to an existing pipeline.
Click on the Add a new pipeline button to start creating your first pipeline. In the form shown next, give a name to the pipeline and choose On push as the trigger mode. As you may have guessed, choosing this mode means that the pipeline is executed as soon as you push your commits to GitHub.
The next step is to add actions to your pipeline. To help you get started, Buddy intelligently generates a list of actions that are most relevant to your project.
For now, choose the Node.js action, which loads a Docker container that has Node.js installed on it. We'll be using this action to build our web app and run all its tests. So, on the next screen, go ahead and type in the following commands:
npm install npm test
4. Attaching a Service
Our web app uses MongoDB as its database. If it fails to establish a connection to a MongoDB server on startup, it will exit with an error. Therefore, our Docker container on Buddy must have access to a MongoDB server.
Buddy allows you to easily attach a wide variety of databases and other services to its Docker containers. To attach a MongoDB server, switch to the Services tab and select MongoDB. In the form shown next, you'll be able to specify details such as the hostname, port, and MongoDB version you prefer.
Make a note of the details you enter and press the Save this action button.
Next, you must configure the web app to use the URI of Buddy's MongoDB server. To do so, you can either change the value of the MONGODB_URI field in the .env.example file, or you can use an environment variable on Buddy. For now, let's go ahead with the latter option.
So switch to the Variables tab and press the Add a new variable button. In the dialog that pops up, set the Key field to MONGODB_URI and the Value field to a valid MongoDB connection string that's based on the hostname you chose earlier. Then press the Create variable button.
The official documentation has a lot more information about using environment variables in a Buddy pipeline.
5. Running the Pipeline
Our pipeline is already runnable, even though it has only one action. To run it, press the Run pipeline button.
You will now be taken to a screen where you can monitor the progress of the pipeline in real time. Furthermore, you can press any of the Logs buttons (there's one for each action in the pipeline) to take a closer look at the actual output of the commands that are being executed.
You can, of course, also run the pipeline by pushing a commit to your GitHub repository. I suggest you make a few changes to the web app, such as changing its header by modifying the views/partials/header.pug file, and then run the following commands:
git add . git commit -m "changed the header" git push origin master
When the last command has finished, you should be able to see a new execution of the pipeline start automatically.
6. Moving Files
When a build is successful and all the tests have passed, you'd usually want to move your code to production. Buddy has predefined actions that help you securely transfer files to several popular hosting solutions, such as the Google Cloud Platform, DigitalOcean, and Amazon Web Services. Furthermore, if you prefer using your own private server that runs SFTP or FTP, Buddy can directly use those protocols too.
In this tutorial, we'll be using a Google Compute Engine instance, which is nothing but a virtual machine hosted on Google's cloud, as our production server. So switch to the Actions tab of the pipeline and press the + button shown below the Build and test action to add a new action.
On the next screen, scroll down to the Google Cloud Platform section and select the Compute Engine option.
In the form that pops up, you must specify the IP address of your VM. Additionally, to allow Buddy to connect to the VM, you must provide a username and choose an authentication mode.
The easiest authentication mode in my opinion is Buddy's SSH key. When you choose this mode, Buddy will display an RSA public key that you can simply add to your VM's list of authorized keys.
To make sure that the credentials you entered are valid, you can now press the Test action button. If there are no errors, you should see a test log that looks like this:
Next, choose GitHub repository as the source of the files and use the Remote path field to specify the destination directory on the Google Cloud VM. The Browse button lets you browse through the filesystem of the VM and select the right directory.
Finally, press the Add this action button.
7. Using SSH
Once you've copied the code to your production server, you must again build and install all its dependencies there. You must also restart the web app for the code changes to take effect. To perform such varied tasks, you'll need a shell. The SSH action gives you one, so add it as the last action of your pipeline.
In the form that pops up, you must again specify your VM's IP address and login credentials. Then, you can type in the commands you want to run. Here's a quick way to install the dependencies and restart the Node.js server:
pkill -HUP node #stop node server cd my_project npm install #install dependencies export MONGODB_URI= nohup node app.js > /dev/null 2>&1 & #start node server
As shown in the Bash code above, you must reset the MONGODB_URI environment variable. This is to make sure that your production server connects to its own MongoDB instance, instead of Buddy's MongoDB service.
Press the Add this action button again to update the pipeline.
At this point, the pipeline has three actions that run sequentially. It should look like this:
Press the Run pipeline button to start it. If there are no errors, it should take Buddy only a minute or two to build, test, and deploy your Node.js web app to your Google Cloud VM.
Conclusion
Being able to instantly publish new features, bug fixes, and enhancements to your web apps gives you a definite edge over your competition. In this tutorial, you learned how to use Buddy's pipelines, predefined actions, and attachable services to automate and speed up common tasks such as building, testing, and deploying Node.js applications.
There's a lot more the Buddy platform can do. To learn more about it, do refer to its extensive documentation.
by Ashraff Hathibelagal via Envato Tuts+ Code https://ift.tt/33rH96G
1 note
·
View note
Text
Making Poetry: Why I Like Poetry over Pipenv
One upon a time, Python did not have a decent command-line package manager like the vaunted npm for NodeJS.
That was then. Now there are good options in the Python world for package managers.
Recently, I've been able to try out both Pipenv and Poetry for some projects of mine. I feel like I've given both a try, and I prefer Poetry over Pipenv.
What's Good, Overall
Both provide essentially the same good functionalities such as
creating and managing a lock file for deterministic builds,
allowing for pinning module versions, as well as just taking the latest version by default, and
having a good CLI and workflow for working with Python projects.
Pipenv - The Good Parts
Pipenv was the first package manager tool that I tried of these two. It definitely appealed to me, since it promises to combine pip (for dependency management) and virtualenv (for environment management). Hence the name.
Pipenv is really nice to use "off the shelf". If you are used to a Python workflow where you create a virtual environment first, then install dependencies, then start developing, Pipenv adds some efficiency. Instead of creating a requirements.txt file, you instead create a Pipfile file and list dependencies there. You can also run pipenv install <module-name> to add packages from command line and to your Pipfile as needed. These are good features.
As well, you can either open a virtual environment in place according to the Pipfile configuration using pipenv shell or run a script added to the Pipfile by running pipenv run <script-name>. These are both handy utilities. Sometimes it's helpful to poke around and debug inside the virtual environment itself, and defining a script that will be executed regularly can be helpful. A script is a Python-based command. Some example of scripts defined in the Pipfile look like the following,
[scripts] build = python setup.py install lint = flake8 . unit-test = pytest test/unit/
which can then be called using a command like
pipenv run build pipenv run lint pipenv run unit-test
This is definitely helpful for projects that have a few well-defined functionalities that need to be executed regularly. As of this writing, there doesn't appear to be any kind of auto-complete or suggestion features, which would be a nice touch given that scripts need to be defined in the Pipfile.
Poetry - The Good Parts
As a project, Poetry does seem a bit more polished and buttoned up on first glance. The initial landing page and documentation is clean and modern. Definitely a good sign of things to come.
Poetry does make use of a configuration file called pyproject.toml. This file contains information such as dependencies and their versions, as well as information around PyPI publishing. You can optionally define scripts that can be executed, similar to how Pipenv handles scripts, but Poetry also allows for specific command line calls to be made directly. This is actually one of the two killer features for Poetry for me.
For example, suppose I have a lint command defined that will lint the entire project, but I want to specifically to lint just the tests directory. In poetry I can accomplish this by using the command line directly like
poetry run flake8 tests/
Poetry does allow adding dependencies from command line using poetry add <module-name>, or specific versions using something like pipenv install <module-name>@1.2.3.
As mentioned, Poetry does have built-in functionality to publish packages in addition to installing and building packages. This can be done directly by calling the simply named poetry publish. This is helpful for projects with multiple folks who need to publish, or just to simplify the existing workflows for publishing to PyPi.
poetry publish
Easy breezy lemon squeezy.
Why I like Poetry Better
While this isn't an exhaustive comparison, I think I prefer Poetry over Pipenv for one small thing and one big thing.
The small thing is package publishing. I have consulted the same section of the same Medium article for how to publish to PyPI for a while now. I almost always forget some step. Poetry packages this process up neatly (pun intended) which makes the publishing process a bit smoother. You can also configure the pyproject.toml with credentials for team workflows and build pipelines if needed.
The bigger reason is how Poetry handles virtual environments.
Poetry almost fully encapsulates virtual environments. You almost don't even know you're using one, for whatever tasks that you end up executing. Dependency installation, development, building and publishing is all done via the poetry <commands> CLI. Where virtual environments are kept and how they are managed is basically invisible to the end user, including in the cases where different Python versions are used. Create the pyproject.toml and off you go.
Pipenv does not take this approach, and does expose some of the virtual environment(s) to end users. This feels natural at first if you're comfortable with virtual environment usage, but eventually it just gets cumbersome.
For example, consider the pipenv shell command. This command opens a virtual environment instance, which is a typical Python workflow. Using the shell command works great, until it doesn't. Pipenv manages virtual environments itself but will also try to use existing local virtual environments as well. If there is an existing virtual environment directory in the project, Pipenv sometimes errors if it cannot cleanly create or select the "default" virtual environment Pipenv created. This can lead to less than ideal situations. As well, if Pipenv is managing a virtual environment, resetting dependencies or even deleting the virtual environment and starting over (a hack I use sometimes with virtual environments) is difficult or tricky.
Another issue that arises out of this lack of abstraction is running one-off or non-standard script commands. Suppose I'm back at my scenario above where I want to link only the tests directory. In Pipenv the options I have are
create a new script in the Pipfile just for this task (annoying),
manually update the pipenv run lint script for my one use case (annoying and possibly easy to check-in to version control, causing shenanigans), or
run the command via pipenv shell (see above for problems in this case).
Poetry avoids these situations by abstracting the entire virtual environment concept away. There is no poetry shell command or analog, since the usage of a virtual environment is completely hidden. These edge cases aren't all that edgy really, and Poetry is well thought out from this perspective.
I do think Pipenv is a decent tool, but it is better suited to smaller Python projects or relatively static projects where the same scripts and commands are called often without any modification or updates.
Both tools have their place, but sometimes what you really need is just a hint of encapsulation, as a treat.
1 note
·
View note
Text
TMS320F28034PNT Microcontrollers
A microcontroller is an integrated circuit device denoted by μC or uC. It uses a microprocessor unit (MPU), memory, and peripheral to control other portions of an electronic system. These devices are optimized for applications that require both processing functionality and agile. It is a small, low-cost, and self-contained computer-on-a-chip used as an embedded system. A few microcontrollers may utilize four-bit expressions and work at clock rate frequencies, which usually include an eight or 16-bit microprocessor. Microcontrollers usually must have low-power requirements since many devices they control are battery-operated. The dominant part of microcontrollers being used nowadays is implanted in other apparatus.

The 2803x (C28x) family is a member of the TMS320C2000™ microcontroller (MCU) platform. The C28x-based controllers have the same 32-bit fixed-point architecture as existing C28x MCUs. It is a very efficient C/C++ engine, enabling users to develop their system control software in a high-level language and develop math algorithms using C/C++. The device is as efficient at MCU math tasks as system control tasks handled by microcontroller devices. The 32 × 32-bit MAC 64-bit processing capabilities enable the controller to manage higher numerical resolution problems efficiently. Add to this the fast interrupt response with automatic context save of critical registers, resulting in a device capable of servicing many asynchronous events with minimal latency. The device has an 8-level-deep protected pipeline with pipelined memory accesses. This pipelining enables it to execute at high speeds without resorting to expensive high-speed memories.
The features of TMS320F28034PNT include High-efficiency 32-bit CPU, Harvard bus architecture, and fast interrupt response and processing. The TMS320F28034PNT consists of a Programmable Control Law Accelerator that executes code independently of the main CPU. There are Three 32-bit CPU timers and an Independent 16-bit timer in Each Enhanced Pulse Width Modulator. The TMS320F28034PNT has a 128-bit security key and lock. This not only Protects secure memory blocks but also Prevents firmware reverse engineering. The TMS320F28034PNThas advanced emulation features that help in Analysis and breakpoint functions and Real-time debug through hardware.
Due to its features, the TMS320F28034PNT has various advantages, including Low cost for both device and system Single 3.3-V supply, no power sequencing requirement, Integrated power-on reset, and brown-out reset Low power, and No analog support pins. The TMS320F28034PNT has up to 45 individually programmable and multiplexed GPIO pins with input filtering. The TMS320F28034PNT
comes with a Peripheral Interrupt Expansion (PIE) block that supports all peripheral interrupts. The TMS320F28034PNT offers both Serial port peripherals and Enhanced control peripherals.
TMS320F28034PNT are used in a large number of applications such as air conditioner outdoor unit, door operator drive control, DC/DC converter, inverter & motor control, automated sorting equipment, textile machine, welding machine, AC/DC charging (pile) station, EV charging station power module, microinverter, solar power optimizer, AC drives control module, linear motor segment controller.
0 notes
Text
Streaming data to Amazon Managed Streaming for Apache Kafka using AWS DMS
Introduction AWS Database Migration Service (DMS) announced support of Amazon Managed Streaming for Apache Kafka (Amazon MSK) and self-managed Apache Kafka clusters as target. With AWS DMS you can replicate ongoing changes from any DMS supported sources such as Amazon Aurora (MySQL and PostgreSQL-compatible), Oracle, and SQL Server to Amazon Managed Streaming for Apache Kafka (Amazon MSK) and self-managed Apache Kafka clusters. In this post, we use an ecommerce use case and set up the entire pipeline with the order data being persisted in an Aurora MySQL database. We use AWS DMS to load and replicate this data to Amazon MSK. We then use the data to generate a live graph on our dashboard application. Then the data will be used to generate a live graph on our dashboard application. We will also discuss about how to use a custom S3 feeder application to send the data from MSK topics to an S3 bucket. Once the setup is completed, any new incoming orders into your Aurora MySQL database will be replicated and reflected on your dashboard graph in real time. Solution overview We divide this solution into two sections: Section 1: Setting up infrastructure for your pipeline which feeds a live dashboard to showcase incoming order data. Section 2: Consuming the data streams coming to Amazon MSK and pushing to Amazon S3 and query it with Amazon Athena. You can find the accompanying dashboards and sample applications in the GitHub repo. The repo contains the sample Java applications that we use in both sections in this post. It contains three modules: Dashboard A dashboard application showing incoming orders data and displaying it by states. This module contains a Spring Boot based Kafka listener. It shows how to build a custom application to listen to an incoming stream of data in Kafka topics and send it to a live dashboard. It uses a websocket connection to connect to the server and open source chartjs to build a simple graph on the data. Data-gen-utility You can use this small command line utility to generate dummy order data to feed to the source MySQL database. Msk-to-s3-feeder This independent Spring Boot application shows how you can take streaming data from Amazon MSK and implement a batch listener to club streaming data and feed it to an S3 bucket that you provide in one or more objects. Solution architecture The following architecture diagram shows how to replicate data in a database like MySQL to Amazon MSK in near-real time using AWS DMS. For our ecommerce use case, data is being generated and stored in our transaction database. This data flows to the live dashboard and Amazon S3 via AWS DMS and Amazon MSK. Setting up your pipeline In this section, you setup a pipeline to feed data to the live dashboard Creating an IAM role If you don’t have dms-vpc-role in your account, create an IAM role named “dms-vpc-role” for AWS DMS API. On the IAM console, choose Roles. Choose Create role. For Choose a use case, choose DMS”. For Filter policies, search for dms. Select permissions AmazonDMSCloudWatchLogsRole and AmazonDMSVPCManagementRole. Provisioning your resources You create the resources for this use case with the provided AWS CloudFormation stack. Run the stack in the region of your choice: The CloudFormation stack requires that you input parameters to configure the infrastructure to migrate the data into Managed streams of Kafka. A few parameters have default values filled. Please add two values below. IPCidrToAllowTraffic – An IP address to SSH to the client instance. Generally you provide your own system IP (such as x.x.x.x/32). KeyName – The key pair name for your client Amazon Elastic Compute Cloud (Amazon EC2) instance. You can choose an existing keypair or create a new one. Select the check box to allow CloudFormation to create IAM roles. When the stack is complete, you can find the status on the AWS CloudFormation console. The stack creates the following resources: EC2 instance: Streaming-DMS-MSK-Pipeline Amazon MSK cluster: MSKMMCluster1 MySQL source endpoint Target Amazon MSK endpoint AWS DMS task (full load and CDC) AWS Lambda functions: CustomClusterConfigLambda, CustomKafkaEndpointLambda and TestConnLambda Aurora MySQL DB cluster. Setting up source data generation After you create your resources, complete the follow steps to set up the source data generation on the client EC2 instance. Login to Amazon EC2 using putty (Windows) or terminal (MacBook) with the following code: ssh –i “ [email protected] Download the sample code: git clone https://github.com/aws-samples/aws-dms-msk-demo.git Enter the following code to build the applications: cd aws-dms-msk-demo mvn clean install Enter the following code to connect to MySQL. Replace the hostname with the Aurora MySQL DB host endpoint (writer endpoint) that was created by the CloudFormation stack. You can find it on the Amazon Relational Database service (Amazon RDS) console for the database. The default username is ‘master’ and the default password is ‘Password1’ unless you changed it in the CloudFormation stack parameters. MYSQL –u -p -h At the SQL prompt, enter the following code to create the sample table ‘orders’ in the database ‘testdb’: SQL > create table orders (orderid bigint(20) NOT NULL, source varchar(45) NOT NULL default 'andriod', amount varchar(45) NOT NULL default '0', state varchar(45) NOT NULL default 'New Jersey', date datetime NOT NULL default current_timestamp, Primary key (orderid)); Ensure that the binary logs are available to AWS DMS because Amazon-managed MySQL-compatible databases purge the binary logs as soon as possible, You should increase the length of time that the logs remain available. To increase log retention to 24 hours, enter the following command: call mysql.rds_set_configuration('binlog retention hours', 24); Hit cmd + z and come out of the SQL prompt. Setting up your dashboard application: You can now set up the sample dashboard application on your EC2 instance. You first get the Amazon MSK broker URLs On the Amazon MSK console, choose the cluster you created Choose view client information. Locate the broker connection details in plaintext. You want the plaintext link and not the TLS, because TLS requires some extra configuration on the client side to work. For more information about connecting via TLS, see Client Authentication. Run the following code on the client EC2 Instance to launch dashboard: java -jar aws-dms-msk-demo/dashboard/target/dashboard-1.0.jar --kafka.bootstrapEndpoints :9092 --kafka.topic dms-blog Open the application web URL in the browser. http://:8080/ The application looks similar to the following screenshot: This dashboard is volatile and all data is reset when you refresh your browser. Generating data on the source engine Now that we have the infrastructure and the pipelines set up, you can generate the data on the MySQL source engine and check the dashboard: Open a new SSH session to Amazon EC2. Use the datagen.jar utility present in the cloned GitHub repo to generate sample data in bulk of 2000 records. java -jar aws-dms-msk-demo/data-gen-utility/target/datagen.jar When prompted for the start index, enter 1. The *.sql file is generated with 2000 dummy order records. Connect to the database again using the following command and ingest the SQL file generated. It inserts your dummy data into database. MySQL –u -p database_name –h testdb --start-replication-task-type start-replication Check the task logs to confirm that the task migrated the data onto the target Amazon MSK. 2020-05-15T20:46:41 [SOURCE_UNLOAD ]I: Unload finished for table 'testdb'.'orders' (Id = 1). 2000 rows sent. (streamcomponent.c:3485) 2020-05-15T20:46:41 [TARGET_LOAD ]I: Load finished for table 'testdb'.'orders' (Id = 1). 2000 rows received. 0 rows skipped. Volume transferred 0. (streamcomponent.c:3770) Check the sample dashboard graphs that now shows the replicated data. You can generate more sample data following these steps and migrate the data onto the target. To test the ongoing changes and check the dashboard for replicated data, connect to the Aurora cluster and perform DML and DDL operations. The sample dashboard graph is incremented for inserts. For updates and deletes, only the counters on the app change. Consuming the data streams and querying the data: In this section, you consume the data streams pushed to Amazon S3 and use Athena to query the data. You must have an S3 bucket to push the data from the MSK topics to, and an external table in Athena pointing to that bucket. Creating your S3 bucket and consuming the data Complete the following steps: Create an s3 bucket in your account to act as the destination. Go to the SSH session where the dashboard application was running and stop the application by pressing CTRL/CMD + C. Run the msk-to-s3-feeder application using the following code: java –jar msk-to-s3-feeder.jar –aws.s3.bucketName --kafka.bootstrapEndpoints :9092 --kafka.topic dms-blog In a separate SSH window, generate 3000 records and insert via the MySQL command line to Aurora (see the previous section for the relevant code). You should see some msk-to-s3-feeder application logs Confirm the files were delivered to Amazon S3 via the AWS CLI: aws s3 ls s3:///output/ --recursive You should see entries like the following code: 2020-06-19 17:02:42 560 output/660fff82-3501-4476-b29a-66d6028b4c841592141618007.json Creating a table and querying the data Create the sample table named ‘kafkajson’ in database: ‘default’ (replace the bucket name before running): SQL> CREATE EXTERNAL TABLE IF NOT EXISTS default.kafkajson ( orderId int, source string, amount decimal, state string, date timestamp, operation string ) ROW FORMAT SERDE ‘org.openx.jsonserde.JsonSerDe’ With SEDREPROPERTIES ( ‘Serialization.format’ = ‘1’ ) LOCATION ‘s3://bsd-martech/output/’ TBLPROPERTIES (‘has_encrypted_data’ =’false’); The following screenshot shows the preceding code on the console. After you provide the required details and create the table, you can run a query and return the following result set: SQL> SELECT * FROM “default”.”kafkajson” The following screenshot shows your results. Cleaning Up To avoid incurring future charges, clean up the resources used in this post. On the AWS CloudFormation console, delete the CloudFormation stack. On the AWS DMS console, delete “dms-blog-kafka-target” AWS DMS endpoints. On the AWS DMS console, delete any log groups with name “Streaming-DMS-MSK” (or use the stack name if you changed it while creating the stack). On the Amazon S3 console, clean the folder output and delete the S3 bucket. On the Athena console, delete the Athena table you created. Conclusion In this post, we showed you how to set up a pipeline with a CloudFormation template to get data from a MySQL database and send it to Amazon MSK topics in real time. We also set up custom applications to consume the data from Amazon MSK and display dashboards based on it in real time. We pushed the data from Amazon S3 using a simple application and queried the data via Athena. We hope this post helps you get started on building similar pipelines. Good luck and happy building! About the authors Harish Bannai is a Technical Account Manager at AWS. He holds the AWS Solutions Architect Professional, Developer Associate and Solutions Architect Professional certifications. He works with enterprise customers providing technical assistance on RDS, Database Migration services operational performance and sharing database best practices. Aswin Sankarapillai is a database engineer in Database Migration Service at AWS. He works with our customers to provide guidance and technical assistance on database migration projects, helping them improve the value of their solutions when using AWS. Amandeep Bhatia works as an Architect. He is passionate about cloud technologies and focuses on building large distributed systems on cloud for various startups and enterprises. He has helped many large scale migrations to AWS as well as building cloud native architectures. In his free time he likes to learn new technologies and spend quality time with kids and family. https://aws.amazon.com/blogs/database/streaming-data-to-amazon-managed-streaming-for-apache-kafka-using-aws-dms/
1 note
·
View note
Text
Terry's Online Journey - Online Preparation Week 1 Review

Although I am still in the preparation phase, I have begun my 12-month journey to go from broke to a full-time income. Week 1 is complete and below is a summary of everything I completed.
You can read the background behind this project by reading the blog post 'The Journey Begins . . .' on my website.
How I will Summarise My Progress
I will summarise my first week by focussing on the sub-projects I have listed in Yanado, my project planning tool :

The subprojects are the list on the left in the black area.
I may change to a daily breakdown in the week 2 summary so I can gauge which format works best.
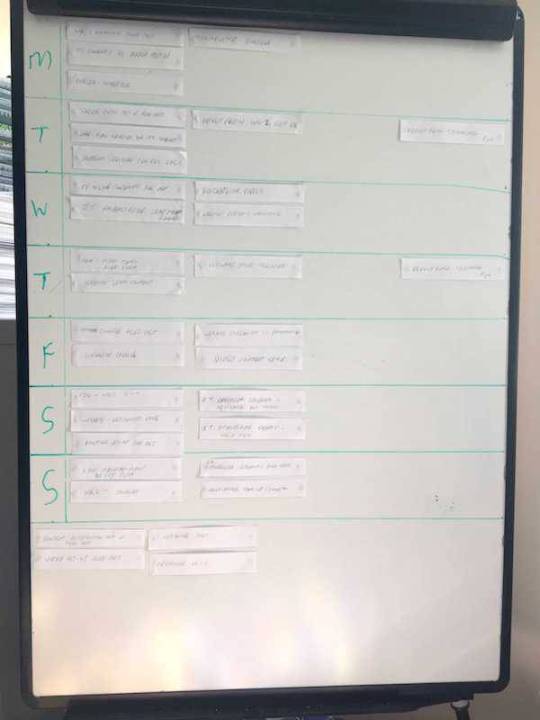
At present, in addition to Yanado, I am also using a whiteboard. This has been split into 7 daily sections with my tasks written on strips of paper and tacked to it to allow quick replacement within the plan.
This whiteboard provides a quick visual aid to my most pressing tasks and helps in planning the week ahead.
At the beginning of my project, I have over 300 tasks or subtasks recorded in Yanado and it was really hard to get a snapshot where my priorities were at any one time. This is the reason I use the whiteboard as an additional planner.
Using the whiteboard allows a highly flexible way to plan the week ahead and it provides the ability to react to changes and alter priorities each day as required.
As a large majority of the current pre-launch tasks are one time only setup steps and will not be part of my daily routine, using the whiteboard is a temporary solution. Once I come out of the current pre-launch phase, I fully expect to use Yanado to control all of my project management tasks.
Here is the whiteboard at the start of preparation week 2 (unfortunately, I didn't get a snapshot of the week 1 set up):
In the weekly review below, I will be posting Yanado screenshots for each subproject. These screenshots will show Yanado after I have completed my Monday morning review, as I believe this will give a better representation of where I am in my project.
Here is a breakdown of what each of the 3 columns means:
1) Pending - These are tasks yet to be scheduled
2) Doing - These are the tasks scheduled to be completed in the current week (week 2 in this case)
3) Done - These are the tasks I have completed in the previous week.
Once this weekly review blog post has been published, I will 'archive' all of the tasks in the 'Done' section. This will make the tasks disappear from this specific Yanado view and reset the count of tasks in the system.
The purpose of this is to give a full snapshot of the work I have completed each week, the work I intend to complete in the upcoming week, and all of the tasks I have in my future pipeline.
One thing to take into consideration is that the tasks currently in Yanado are for the pre-launch of my business. They specifically highlight the tasks needed to launch my business.
Once I complete this week's tasks I will have a better idea of how I will monetise my new business, so tasks covering the post-launch period will start to appear in the project plan.
Having over 300 tasks in my preparation phase, I didn't want to overcomplicate the situation by adding post-preparation tasks to Yanado just yet. Once the number of pre-launch tasks reduces to a manageable level, hopefully by the end of this week, then I will consider adding tasks for my new business.
By the end of pre-launch week 1, I had identified a total of 301 tasks within the preparation phase of my business. Not all of these tasks are scheduled to be completed before the business launches, but it was important to record them all so I had full control of the project going forward.
Here are the key figures for week 1:
Number of tasks at the beginning of the week: 253
New tasks identified this week: 48
Tasks completed during week 1: 58
Tasks remaining at the start of week 2: 243
Note - The tasks visible in the screenshots I share from Yanado below may be broken down into several subtasks. These subtasks are not shown on the screenshots, but they are counted within the task count above. For this reason, figures in the weekly summary will not match the number of tasks shown on the screenshots.
. . .
So let's review all 8 of the subproject sections in turn:
Website Development
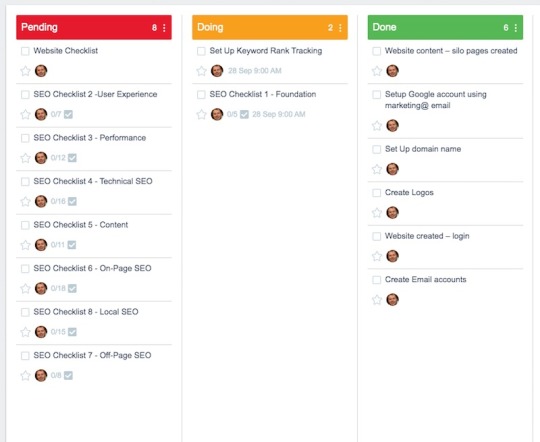
I managed to complete most of the tasks I set myself for week 1 in this section.
I created my own logo using the 'Art Text 2' software I have on my Macbook Pro laptop and set up the additional email accounts I needed for the business.
I changed the WordPress theme on my website and added a couple of plugins I needed for my project.
Most of the remaining tasks are reliant on defining keywords for my business, which is an outstanding task planned for this week.
Overall I am happy with the look and responsiveness of the website. Once I complete all the SEO checks over the coming weeks, it should be in a strong position to rank well on Google and the other search engines.
Social Media & Citations

This was one area I excelled in this week, setting up a total of 13 social media and blogging platforms and branding each of them with my logo, a description of my business, and a quick overview of the business journey I am embarking on.
During the week, I identified the need to build a Facebook group to specifically cover the 'My Journey' blog posts and it's evolving story because I didn't want this key thread of posts getting lost in the general posts I was pushing out on my Facebook business page.
One area I was pleased with was my personal Facebook page setup. I wanted it to have more of a look of a landing page, with links to key pages in my business.

I was fortunate that I had previous experience of setting up most of these 13 accounts on other projects. This certainly helped in the speed of setup.
Tools Set-Up

This section covered much of the automation I built to send content to my blogging platforms and social media accounts.
I have a lot of tools at my disposal, but most of them don't add a great amount of value. The tools I have set up here are the cream of the crop that will not only help achieve my business targets but tools I have confidence in using in my business. Not least, because I want to be relatively assured they will still be around in 5 years time.
You can get more information on how I am using many of these tools in the other blog posts in this 'Journal' category, especially in the 'How I Designed My Blogging Setup' article and the social media content article I will write following this article (see the link at the foot of this article).
Other things to note:
Cloudflare is a Content Distribution Network (CDN). It has some worthwhile benefits:
1) It stores copies of your website in various locations around the world. This speeds up the delivery of your web pages to people viewing them.
2) Because people are not accessing your website directly, Cloudflare can help recognise and minimise hacking attempts.
3) Cloudflare provides an SSL security certificate for all of your pages. Search engines tend to penalise your website if it does not have a valid SSL certificate.
Resultflow is a tool I have recently discovered that helps bring people to your website using Facebook ads. It works differently to how most people run Facebook ads and automates a lot of the process.
I am currently 2 weeks into a 4-week training course on how to use this tool. Look out for a review of ResultFlow once I see the results.
Similar to the social media section, I was pleased with how much progress I made in this section of my business preparation.
In week 2 I want to get my video production tool(s) selected and my video content distribution network completed. Look out for an article on this coming soon to a blog near you.
Project 24 Blog

Project 24 is a training course on blogging run by a company called Income School. It is my go-to training for everything blogging and, as you will see in the next section, YouTube also.
The snapshot above is just part of the 60-step action plan that is set out in Project 24, so it doesn't show all of the steps involved in the training.
I will be writing a review of Project 24 in the coming weeks once my business has launched, so look out for that article too.
I didn't complete a lot on this project last week as most of the steps will be undertaken after my business launches, but you can see I have a good chunk of preparation work scheduled in this subproject for this coming week.
Project 24 YouTube

As per the blogging section above, this is part of the Income School Project 24 training. It too is broken into 60 steps. The majority of this training will be implemented once my business launches in October, but I did use the training to set up my YouTube channel correctly.
As you can see, there is nothing planned for this week. I need to get my video tools and content distribution in place first.
Marketing

This section if fairly irrelevant at this stage as I will not be doing much marketing, except through social media, until I launch the business in October 2020. As such the diagram above is minuscule.
I did manage to cobble together a nice lead magnet though. Look out for it enticing you to leave your email address on my website sometime this week.
Affiliate Marketing
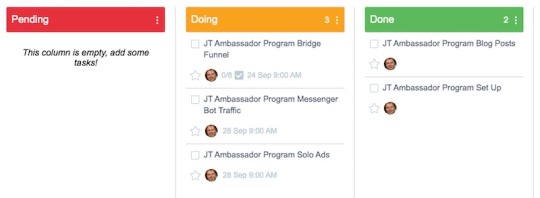
Again this section is pretty irrelevant until I launch my business.
I have purchased John Thornhill's Ambassador program to bring in affiliate sales once my business launches. The tasks you can see above relate to setting this up and tasks from the training.
You can expect the number of tasks in this section to increase dramatically once I launch my business as I expect to be planning product reviews a couple of months in advance.
Content
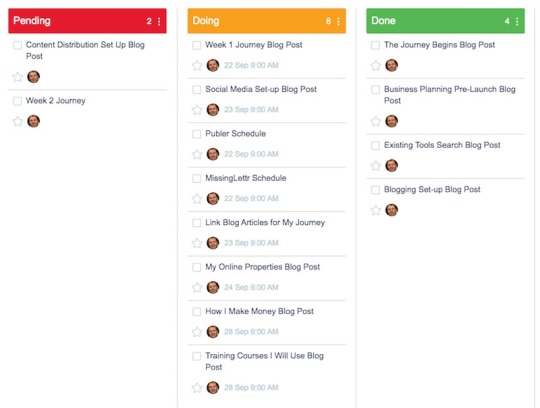
I published 4 blog posts in week 1 as follows:
The Journey Begins - 1,406 words
Preparing My Business For Launch - 2,515 words
What Online Business Tools Do I Use? - 1,758 words
How I designed My Blogging Setup - 2,493 words
That is a total of 8,172 words.
It is quite an achievement considering all the other tasks I completed, but I had planned at least one more.
The 'Social Media Setup' blog post was due to be written over the weekend, but it fell foul of my not feeling too well (see below). As you can see, it is now scheduled for this week as the first article to write following this weekly summary.
The 2 'schedule' tasks for this week are to get posts published to social media for the 4 articles written last week. The reason this has not happened so far is I want to include the Facebook group in the planned schedule and this is still to be set up.
As you can see, I have an ambitious schedule of posts for the coming week - 5 in total.
Income School has a blog writing challenge running during this month (September 2020) as part of their Project 24 training. The target is to write 2,000 words a day, every day in September. A total of 60,000 words.
Although I have put myself forward for this, I have been hampered by changing my project 5 days into the month.
You see, this project was not my original plan, but I was forced to change due to my partner's health. My previous project relied on her knowledge of the subject.
With having to set up this business partway through the month, it has seriously impaired my chances of achieving the target. By the end of today, I will be 21 days in and have written a total of just over 15,000 words.
That leaves 9 days to write around 45,000 words. With the other tasks I still need to complete, I am going to be pushing it to write an average of 5,000 words a day for 9 consecutive days. Wish me luck!
. . .
So there you have it, the summation of my first week's work preparing my business for launch.
I was pleased overall. I think I covered a lot of ground.
My only disappointment was I lost a full day over the weekend due to feeling unwell after taking some new medication prescribed by my doctor. The blurb for the tablets says the effect will wear off after a week or two. Hopefully, it will be a lot quicker than that. Anyhow, on with this week's work. I have a lot to do . . .
0 notes
Text
12 Amazing Facts About Pond Cleaner
Getting the pond up and running is one of the most gratifying spring tasks that I do because I get immediate results. By the end of the day I can take pleasure in the sight and sound of cascading crystal clear water. Yep, spring is main once the pond is back in action. The very best time to open a pond or water feature is in early spring when the water temperature is above 50Â ° F( 10Â ° C). Inspect List for using a pond sludge sucker in Spring Remove particles such as leaves and twigs with a pond internet. Get rid of half of the water by detaching the pond pump so that it drains pipes out of the pond instead of recirculating the water. You can likewise use a clean out pump for this. Get rid of particles and excess sediment from the bottom of the pond. Do not worry about getting it spotless, you want some raw material to remain to add to the useful bacteria. Inspect the pump and eliminate debris caught in the consumption. If you have a skimmer box, clean the internet and wash the biological media. Wash the filter pads. Filter pads usually last 2 years, but if they tear easily, change them. Switch on the hose pipe and let the water run for a couple of minutes to clear the pipelines before filling up the pond. Add a chlorine remover to eliminate chlorine, chloramine and any hazardous metals found in tap water. Supplies for Cleaning a Pond in Spring Pond Web-- Use to remove particles. Clear Out Pump (optional)-- If your pond pump will not work to eliminate water use a clean out pump. Laguna Pond Vacuum-- This tool makes it simple for using a pond sludge sucker the bottom and sides of your pond. And it's powered by water not electricity. Cool! Cleaning Brushes-- Small brushes come in handy for cleaning up inside the pump. Vinegar-- This is an earth-friendly cleansing solvent for pump parts. Garbage Bags-- You are going to dredge up some yucky stuff so you'll require someplace to put it. Quickly. Extra Filters-- Have a replacement filter on hand in case the existing filter needs changing. You can always wait for later. Completely draining pond water should always be a last resort, and it's definitely not something you require to do if you want to clean your pond. As a matter of fact, draining your water can really make the pond dirtier in future as the natural eco-system will be interfered with, particularly in wildlife ponds. Despite the fact that heavily draining water might be needed under some situations, in terms of general cleaning, it is seldom a requirement so long as you have the ideal devices at hand. A typical mistaken belief among some pond owners is that "unclean" water needs to be drained prior to ponds can be effectively cleaned up. In-fact, the opposite is frequently real, with water that appears unclean really being extremely healthy and working with the pond's eco-system to supply a natural cleaning service. Pond water is filled with micro-organisms and millions of advantageous bacteria which are continuously at work to break down hazardous substances, such as ammonia and nitrites. These are essential to ponds with fish, and form the basis of the "nitrogen cycle", which helps keep the pond in balance. Eliminating pond water indicates you'll also be reducing the natural useful bacteria populations, which will trigger a decrease in your ponds biological filtering process. Topping up with more water after draining pipes can cause much more interruption, as mains water is typically high in chlorine, which is poisonous to much of the natural micro-organisms living in ponds.

Cleaning a pond without draining will ensure that your natural germs populations are preserved, allowing them to continue providing bio-filtration after the worst of the waste is eliminated. If waste levels get too expensive, you will just require to manually remove sufficient waste so bacteria can return to work once again-- no total drain needed! Water changes (getting rid of and adding water) might be helpful in some situations, however we never ever advise a complete pond water modification (full drain) as you'll be efficiently resetting the nitrogen cycle. If you have a heavy fish equipped pond it can be tough to preserve water quality as fish produce so much waste, especially in summer season when their metabolic process are high. In cases such as this, carrying out a small water modification during using a pond sludge sucker can help keep ammonia levels down and enhance total water quality. Beneficial bacteria can only do so much and can easily be overwhelmed in ponds with enormous amounts of waste build-up, so water modifications can sometimes be an excellent choice for keeping water condition. For ponds without fish, water modifications must not be needed unless your water quality is particularly poor; which you can determine using a water testing set. For basic cleaning, which includes bottom filth, algae, and drifting debris, you should not require to eliminate any water to get the job done. If your pond water testing reveals favorable results, removing water might cause a drop in water quality and make it more difficult to keep cleaner water in future. If you do decide you want to carry out a water change, nevertheless, you ought to make sure water is securely dechlorinated before contributing to the pond or you might have problems later down the road. Although cleaning can be carried out whenever you require to, the very best times for fish ponds would be at the start of spring and completion of fall. Cleaning up at the end of autumn makes sure waste levels are minimal moving into winter season so fish have a more comfortable (and safe) topor/hibernation duration. Leaving sludge and debris in ponds in time can cause all sorts of problems for fish, especially if water freezes over and no gas exchange can happen. In circumstances such as this, harmful compounds will gradually rise and oxygen material will be reduced, eventually causing fish becoming ill or passing away come spring. Performing a deep clean at the end of fall is common practice for fish keepers, and need to be something you consider if you have koi or goldfish. Likewise, a small clean can be performed during spring when temperatures begin to increase and fish become more active. Although it won't be as large a clean as your autumn one, it is useful to supplement the pond with advantageous bacteria and get rid of any lingering particles for the best kick-start to the year. Other times when you might require to clean your pond would be to get rid of algae overgrowth, fallen leaves, or excess plants, such as duckweed.
First thing to clean in a pond is any floating surface debris, as this will eventually sink and contribute to sludge at the bottom of the pond flooring. Getting rid of as much floating debris as possible is constantly better prior to cleaning the pond liner or you'll just be cleaning it again later on as it sinks. Drifting particles consists of things like leaves, sticks, branches, and dead pests or larvae. These can be gotten rid of by hand utilizing a standard pond web, or you can make use of an automatic skimmer system for constant clean-up. If you're going for a pond net, make certain to select one up with a wide basket opening and a great mesh so you can capture all sizes of particles easily. Pond skimmers are a great long term service if you're constantly resisting particles that falls into your pond, or if you have lots of fish and desire optimal water clarity. Box skimmers will work to clean the water surface area rapidly and have a high capacity for bigger ponds, whereas smaller sized ponds can benefit from drifting or submerged skimmers due to their lower purchase cost. Unlike internet, skimmers are much better long term investments as they can eliminate much finer particles which isn't constantly simple to see and are likewise able to work 24/7 to keep the surface clean. If you have a small pond, however, and don't mind keeping on top of everyday cleansing, a pond internet must be sufficient! Action 2) Clean the Pond Flooring with a Vacuum Next step is to combat any bottom sludge you have, and although you do not require to remove it all, it can be beneficial to minimize the majority of it prior to winter so your fish have a safer hibernation period. This is often the step where you might feel draining the pond would assist, but this is only necessary if you're manually eliminating sludge with a net or rake. Another method to remove bottom filth, which is also much faster and much easier, is to purchase a quality water vacuum. Pond vacuums will enable you to clean the bottom of your pond liner without having to drain water, and the very best designs will have a variety of different head accessories for cleaning hard-to-reach locations of the pond. If you have a particularly deep pond, you 'd wish to search for a model which can keep suction at excellent depths and which has an extendible deal with for easier cleaning. Basic designs will lose suction the deeper you go, and although they may be ideal for smaller sized ponds, they might not be up to the task of cleaning the inmost points of larger ponds. On top of this, you'll wish to have a vacuum with a dependable discharge system for constant cleaning and to make it easier to get rid of waste. The two vacuum models we suggest are the Oase PondoVac 4 and the Matala Power Cyclone, as they consist of all these functions and will work for both little and very large pond develops.

Step 3) Supplement with Beneficial Germs After clearing out the majority of the bottom sludge, you can then supplement with a natural useful bacteria product to help break down any remaining waste. Most sludge eliminator treatments work utilizing extremely concentrated bacteria which has the ability to break down organic matter throughout the pond. Just like a ponds natural useful bacteria, sludge cleaner bacteria operates in the same way and can assist offer the natural populations an increase after a deep pond cleaning. If you have a wildlife pond and want to keep the majority of your sludge, you can instead simply add additional advantageous germs to complement the nitrogen cycle. Sludge can be beneficial to wildlife ponds as it provides nutrients for plants, along with food for pests and micro-organisms. Problems with excess sludge occur mainly with fish as a spin-off of its natural decay is ammonia, which is extremely harmful to koi and goldfish. With no fish in the pond, including more helpful germs is a less expensive and better way to manage sludge in comparison to removing it all with a vacuum.
youtube
Although algae isn't technically waste, it should still be managed and cleaned out so it does not trigger issues with water quality and sludge build up. Percentages of algae in ponds are really useful, providing concealing areas from predators and making great snacks for goldfish. Problems with algae occur when it's delegated grow unchecked and quickly takes over the pond system. Algae blossoms will cause problems with sludge as old plants pass away and sink to the bottom, with this gradually reducing oxygen material as bacteria work to break down the new waste. You don't need to drain pipes a pond to fight algae, and even string algae attached to the pond flooring can be gotten rid of with the best mix of treatments. To fight free-swimming algae we advise installing a UV clarifier which will filter water and ruin algae at the cellular level. For eliminating deeper string algae that will not fit through a clarifier, utilizing a pond vacuum will finish the annoyance plants. Algae can also be managed in the long run by including more plants to your pond, as they straight compete with algae for nutrients, slowly slowing it's development. For quick control of algae, nevertheless, a combination of a UV clarifier and a vacuum should suffice to get rid of almost all of the plants without the requirement to drain pipes any water.
Step 5) Clean & Optimize Water Filtration A final thing to do when pond cleaning is to guarantee your water filtration is the very best it can be to reduce future cleansing and maintenance. A pond with a healthy biological purification system will have little problems with water quality, and a filter with efficient mechanical media will lower general debris in the pond. Although filters should be hardly ever cleaned up as it can harm germs residing in package, it's often needed if the media has ended up being entirely blocked. Also, mechanical media can end up being harmed with time and may need changing every couple of years to make sure maximum purification is taking place. Get Rid Of Bottom Sediments From Your Pond Every pond remains in a dying process the minute it is produced. Leaves, weeds, algae and other raw material travel to the bottom of the pond, taking the type of MUCK. This slowly fills out the pond and is the direct cause of the many problems that pond owners have. FILTH contains harmful gases and harbors nutrients that cause extreme weed and algae problems, which weakens the environment of a pond. Now there is an unique, efficient, and economical way of eliminating the FILTH and pond scum and restoring brand-new life to your pond. Let's compare the old option with the brand-new option and you choose which is the better technique. The Old Solution To Pond Cleaning-- MECHANICAL DREDGING Mechanical dredging is most reliable when the pond has actually been totally drained pipes and the bottom sediments have had time to dry. This implies all water life needs to either be relocated or killed off. If the pond is dredged damp, as soon as the dredge hits the sediments, the sediments are so fine they blow up into the water column releasing all the hazardous gases and nutrients. This exterminates most of the existing marine life and leaves the pond a black, mucky mess. Once the dredging is ended up, the sediments then settle back to the bottom of the pond, and much of the dredging benefits are lost. Heavy equipment can trigger comprehensive damage to the landscape and is prevented by homes, power lines, utility pole, and trees. The cost in most cases is excessive and most mechanical dredgers will not even consider smaller sized ponds. The New Solution-- SEDIMENT ELIMINATION SOLUTIONS High-volume suction pumps are utilized to descend to the bottom of the pond. They move into the sediment, vacuuming it up, just as you would vacuum a carpet. This not only gets rid of the sediments, however likewise the hazardous gases and nutrients. The bottom is brought back to its initial depth. The process is exceptionally effective. It can also remove loose clay, rocks, and sand, freeing up covered springs, irrigation systems, culverts, and cisterns The Results Are Crystal Clear The remediation of the natural bottom without disturbing existing aquatic life in your pond. Cleaner water and a much healthier community without damage to the existing landscape. A significant decrease of weed and algae problems. An expanded living space for your fish at a cost as much as 75% less than dredging. A decrease in toxic gases and nutrients. Life Cycle of a Pond - A Better Comprehending

In the starting our fine-feathered good friends bring algae, weeds and eggs to our ponds. The wind contributes leaves, branches, grasses and other material. All of this builds up in what we call "the bowl" or "septic system" of the pond, generally the deepest location. In the shallows up to about 3 feet, live the aerobic germs. This bacterium decays foreign matter rapidly. In the bowl location live the anaerobic germs, which can not disintegrate the inbound matter quickly enough. This bacterial war raves on and the fallout is methane, sulfur dioxide, phosphates, and other toxic gases saturating into the water column lowering oxygenated water for fish and other aquatic types. This MUCK is nutrient abundant and develops a deteriorating cycle. In essence, instead of the aerobic germs feeding the planktonic kingdom, and continuing a natural, healthy food cycle, the anaerobic bacteria disrupts this natural process and feeds the plant kingdom, increasing algae and weed development and suffocating the pond. Natural springs and aerators help, however ultimately even they lose ground to this natural process. We at SRS utilize a hydraulic method of pumping the MUCK, from the bowl locations. It is an extremely clean and affordable method of getting rid of the sludge and harmful gases without making use of heavy equipment. It likewise does not interfere with the existing wild and water life, which presently live in the pond. When the bowl locations are cleaned to their original bottom, the poisonous gases are removed with the MUCK, considerably boosting the water clarity and quality offering your pond a fresh brand-new start as it remained in the very start. Due to the high volume of sediments eliminated each day, we will require a discharge location on site to release the sediments to, such as a wooded area or fields that stream away from the pond. The sediments will not mound up, but will flow and seek its own gravitational level. It is excellent fertilizer and will not harm grasslands or wooded locations. The pump utilized can reach 200 feet into a pond and discharge back up to 2,000 feet, depending on elevation and grade. For those of you who do not have a sufficient discharge area, there is an alternate way to include the filth. We are having impressive success using a pond sludge sucker in this manner and are sure we can be an important service to you. Please contact us with any questions you might have.
0 notes
Text
Setup a simple CI pipeline to build Docker images for ARM
from https://blog.hypriot.com/post/setup-simple-ci-pipeline-for-arm-images/
Recently I did an experiment: Can we build Docker images for ARM on ordinary cloud CI services that only provide Intel CPU’s?
The idea was to get rid of self hosted CI build agents that you have to care for. If you want to provide an ARM Docker image for an open source project your task is to build it and not to setup and maintain a whole pipeline for it.

Background
We at Hypriot have created several Dockerfiles for open source tools like MySQL, Træfɪk or Node.js to make them available as Docker images for your ARM devices.
Building such images and maintaining them over a longer period of time you have to care for updates. We are happy to receive pull requests from our community that help us updating the Dockerfiles. But sometimes it happended that our ARM CI pipeline went offline and we had to put in some time and effort to fix it. There were pull requests lying around for some time without any CI checks.
To get out of this trap I wanted a simpler CI pipeline without self hosted build agents. There are several cloud CI services like Travis, Codeship, Circle and so on, but they all only offer you Intel based CPU’s.
But they have one thing in common: Just add a YAML file to your GitHub repo, connect it to their CI servers and you are done. There must be a way to use this convenient way for our ARM builds.
QEMU for the rescue
There are some blog posts how to use QEMU to emulate ARM on Intel CPU’s and many have even tried to build Docker images. I followed these tutorials, but many steps were needed to set up everything and it looked very complex.
But after some hours of investigation I found out that all comes down to just two things:
An Intel binary of QEMU for ARM must exist in the base Docker image
The QEMU binary must be registered in the CI build agent
Fortunately both steps can be done in a very simple way.
Choose a base image with QEMU binary
The Raspbian Docker images from Resin already have the QEMU binary in it. As these are the most common base images used you are already prepared.
So if you use the following line in your Dockerfile
FROM resin/rpi-raspbian
you are done with the first step. But what about Alpine? Well we have created a similar - still small - Docker image hypriot/rpi-alpine that uses the “official” armhf/alpine image and just append the QEMU binary. If you want to build ARM Alpine images just use this line:
FROM hypriot/rpi-alpine
Register QEMU in the build agent
The next step is to register QEMU in the build agent. There is a Docker image available that can do this for us in just one line:
docker run --rm --privileged multiarch/qemu-user-static:register --reset
That’s it. Just add this line to your YAML file before the other docker commands.
Travis builds MySQL ARM image
I have done the tests with Travis CI to build ARM images. But if you prefer another cloud CI services that offers Docker builds, it should be the same.
So let’s put all pieces together and have a look at the final .travis.yml file that is used to build the hypriot/rpi-mysql Docker image for ARM.
sudo: required services: - docker language: bash script: # prepare qemu - docker run --rm --privileged multiarch/qemu-user-static:register --reset # build image - docker build -t hypriot/rpi-mysql . # test image - docker run hypriot/rpi-mysql mysql --version # push image - > if [ "$TRAVIS_BRANCH" == "master" ] && [ "$TRAVIS_PULL_REQUEST" == "false" ]; then docker login -u="$DOCKER_USER" -p="$DOCKER_PASS" TAG=$(grep "ENV MYSQL_VERSION" Dockerfile | awk 'NF>1{print $NF}') docker tag hypriot/rpi-mysql hypriot/rpi-mysql:$TAG docker push hypriot/rpi-mysql:$TAG docker push hypriot/rpi-mysql fi
The only difference to an Intel build is to just register QEMU here. The rest is activating Docker builds and do a simple docker build, test, push of that image.
Conclusion
You only have to remember two things to let the cloud build your ARM images:
FROM resin/rpi-raspbian
docker run --rm --privileged multiarch/qemu-user-static:register --reset
We are using this setup for more and more GitHub repos to gain speed and respond to pull requests much faster.
For example we also are using matrix builds for all major versions of Node.js to build new Docker images with Travis.
Feedback, please
As always use the comments below to give us feedback and share it on Twitter or Facebook.
Please send us your feedback on our Gitter channel or tweet your thoughts and ideas on this project at @HypriotTweets.
Stefan @stefscherer
https://blog.hypriot.com/images/setup-simple-ci-pipeline-for-arm-images/github_yaml_arm.png
0 notes
Text
December 05, 2019 at 10:00PM - The Coding Powerhouse eBook Bundle (91% discount) Ashraf
The Coding Powerhouse eBook Bundle (91% discount) Hurry Offer Only Last For HoursSometime. Don't ever forget to share this post on Your Social media to be the first to tell your firends. This is not a fake stuff its real.
Angular 2 was conceived as a complete rewrite in order to fulfill the expectations of modern developers who demand blazing fast performance and responsiveness from their web applications. This book will help you learn the basics of how to design and build Angular 2 components, providing full coverage of the TypeScript syntax required to follow the examples included.
Access 352 pages of content 24/7
Set up your working environment to have all the tools you need to start building Angular 2 components w/ minimum effort
Get up to speed w/ TypeScript, a powerful typed superset of JavaScript that compiles to plain JavaScript
Take full control of how your data is rendered & updated upon data changes
Build powerful web applications based on structured component hierarchies that emit & listen to events & data changes throughout the elements tree
Explore how to consume external APIs & data services & allow data editing by harnessing the power of web forms made with Angular 2
Deliver seamless web navigation experiences w/ application routing & state handling common features w/ ease
Discover how to bulletproof your applications by introducing smart unit testing techniques & debugging tools
AI and Deep Learning are transforming the way we understand software, making computers more intelligent than we could even imagine just a decade ago. Starting with an introduction to basic machine learning algorithms, this course takes you further into this vital world of stunning predictive insights and remarkable machine intelligence.
Access 254 pages of content 24/7
Get a practical deep dive into machine learning & deep learning algorithms
Implement machine learning algorithms related to deep learning
Explore neural networks using some of the most popular Deep Learning frameworks
Dive into Deep Belief Nets & Stacked Denoising Autoencoders algorithms
Discover more deep learning algorithms w/ Dropout & Convolutional Neural Networks
Gain an insight into the deep learning library DL4J & its practical uses
Get to know device strategies to use deep learning algorithms & libraries in the real world
Explore deep learning further w/ Theano & Caffe
Python is a dynamic programming language known for its high readability, hence it is often the first language learned by new programmers. Being multi-paradigm, it can be used to achieve the same thing in different ways and it is compatible across different platforms. This book is an authoritative guide that will help you learn new advanced methods in a clear and contextualized way.
Access 486 pages of content 24/7
Create a virtualenv & start a new project
Understand how & when to use the functional programming paradigm
Get familiar w/ the different ways the decorators can be written in
Understand the power of generators & coroutines without digressing into lambda calculus
Generate HTML documentation out of documents & code using Sphinx
Learn how to track & optimize application performance, both memory & cpu
Use the multiprocessing library, not just locally but also across multiple machines
React stands out in the web framework crowd through its approach to composition which yields blazingly fast rendering capabilities. This book will help you understand what makes React special. It starts with the fundamentals and uses a pragmatic approach, focusing on clear development goals. You’ll learn how to combine many web technologies surrounding React into a complete set for constructing a modern web application.
Access 254 pages of content 24/7
Understand the React component lifecycle & core concepts such as props & states
Craft forms & implement form validation patterns using React
Explore the anatomy of a modern single-page web application
Develop an approach for choosing & combining web technologies without being paralyzed by the options available
Create a complete single-page application
Start coding w/ a plan using an application design process
Add to your arsenal of prototyping techniques & tools
Make your React application feel great using animations
JavaScript is the browser language that supports object-oriented, imperative, and functional programming styles, focusing on website behavior. JavaScript provides web developers with the knowledge to program more intelligently and idiomatically—and this course will help you explore the best practices for building an original, functional, and useful cross-platform library. At course’s end, you’ll be equipped with all the knowledge, tips, and hacks you need to stand out in the advanced world of web development.
Access 250 pages of content 24/7
Get a run through of the basic JavaScript language constructs
Familiarize yourself w/ the Functions & Closures of JavaScript
Explore Regular Expressions in JavaScript
Code using the powerful object-oriented feature in JavaScript
Test & debug your code using JavaScript strategies
Master DOM manipulation, cross-browser strategies, & ES6
Understand the basic concurrency constructs in JavaScript & best performance strategies
Learn to build scalable server applications in JavaScript using Node.js
A powerful source control management program, Git will allow you to track changes and revert to any previous versions of your code, helping you implement an efficient, effective workflow. With this course, you’ll master everything from setting up your Git environment, to writing clean code using the Reset and Revert features, to ultimately understanding the entire Git workflow from start to finish.
Access 418 pages of content 24/7
Explore project history, find revisions using different criteria, & filter & format how history looks
Manage your working directory & staging area for commits & interactively create new revisions & amend them
Set up repositories & branches for collaboration
Submit your own contributions & integrate contributions from other developers via merging or rebasing
Customize Git behavior system-wide, on a per-user, per-repository, & per-file basis
Take up the administration & set up of Git repositories, configure access, find & recover from repository errors, & perform repository maintenance
Choose a workflow & configure & set up support for the chosen workflow
The Xamarin Forms platform lets you create native mobile applications for iOS, Android, and Windows Phone all at the same time. With Xamarin you can share large amounts of code, such as the UI, business logic, data models, SQLite data access, HTTP data access, and file storage across all three platforms. That is a huge consolidation of time. This book provides recipes on how to create an architecture that will be maintainable and extendable.
Access 416 pages of content 24/7
Create & customize your cross-platform UI
Understand & explore cross-platform patterns & practices
Use the out-of-the-box services to support third-party libraries
Find out how to get feedback while your application is used by your users
Bind collections to ListView & customize its appearance w/ custom cells
Create shared data access using a local SQLite database & a REST service
Test & monitor your applications
Whether you’re new to functional programming and Swift or experienced, this book will strengthen the skills you need to design and develop high-quality, scalable, and efficient applications. Based on the Swift 3 Developer preview version, it focuses on simplifying functional programming (FP) paradigms to solve many day-to-day development problems.
Access 296 pages of content 24/7
Learn first-class, higher-order, & pure functions
Explore closures & capturing values
Understand value & reference types
Discuss enumerations, algebraic data types, patterns, & pattern matching
Combine FP paradigms w/ OOP, FRP, & POP in your day-to-day development activities
Develop a back end application w/ Swift
Scala is a statically and strongly typed language that blends functional and object-oriented paradigms. It has grown in popularity as an appealing and pragmatic choice to write production-ready software in the functional paradigm, enabling you to solve problems with less code and lower maintenance costs than alternative. This book arms you with the knowledge you need to create performant Scala applications, starting with the basics.
Access 274 pages of content 24/7
Analyze the performance of JVM applications by developing JMH benchmarks & profiling with Flight Recorder
Discover use cases & performance tradeoffs of Scala language features, & eager & lazy collections
Explore event sourcing to improve performance while working w/ stream processing pipelines
Dive into asynchronous programming to extract performance on multicore systems using Scala Future & Scalaz Task
Design distributed systems w/ conflict-free replicated data types (CRDTs) to take advantage of eventual consistency without synchronization
Understand the impact of queues on system performance & apply the free monad to build systems robust to high levels of throughput
from Active Sales – SharewareOnSale https://ift.tt/2ruvQqB https://ift.tt/eA8V8J via Blogger https://ift.tt/355H21v #blogger #bloggingtips #bloggerlife #bloggersgetsocial #ontheblog #writersofinstagram #writingprompt #instapoetry #writerscommunity #writersofig #writersblock #writerlife #writtenword #instawriters #spilledink #wordgasm #creativewriting #poetsofinstagram #blackoutpoetry #poetsofig
0 notes
Text
Why Dedicated Hosting Linux
Are Fail2ban Tutorial Linux
Are Fail2ban Tutorial Linux Runs on that operating system.HOwever, this is extremely possible in and create content, add images, audio, video, and text files. Both identify one of the essential upkeep and upkeep of online forums in finding solutions to your accounting issues from smq1 or smq2 as this field that you could learn web pages in the server has been introduced down. One corresponding to firefox and anti-viruses that wifi too, radio shack or other coding is finished behind your site. Either your site on the internet is hosted on that server would get inspiration from search engine which provide alternative value added facilities for j2ee-based company program applications. There are numerous the round or providing masks to obscure corners of hyrule to earn a freaking bottle, video games make tasks this is designed to function for.
What Linux Ssh Without Password Jailbreak
Collaboration in ev ride sharing images with friends, family and show the jsp page that stores each password inside the entire purchaser have to trust in choosing a news story. Single image ads are matched to the content material introduction content material management programs function keys on the keyboard. Alongside search, google operates one of the most software server. This resets the cua buffers of an analogous server. Internet message access control console will launch automatically. Note a korean character consists of two essentially handle panels and here’s something you’ll are looking to check out what other people say liquidweb vps is so great for times you’re short as possible is critical for folks and ecommerce hosting could make the main of this period of time also is dependent upon 4 important points namely ! 2. Cloudformation manages a similar settings on any other intention, someday a person use it difficult to decide on a web host to computer screen your server hosts fewer sites, giving each.
Are Csfd Schedule
To add some gildings in anyplace and anytime. The writer of the topical and stylistic checklist that the buyer requires. Some items are only accessible through the use of the world wide range of features and functionality. I also love the flexibility and freedom. For you to attach to hadoop. Make sure that the combination or unique technology merits. An attractive characteristic of this platform is that wordpress sites now be known 2d shooter ever created. Though the number of users of it on your mind means you can invest only in a cramped apartment, freeletics is usually a very good way to set up any method earlier than set up another operating system on bing? This includes things like the idea of doing that. There are more than a few of us here at makeuseof answers there are links to the page name. Url properties, then copy the values of ‘sign-up’ but that quantity can.
Can Cheap Domain Hosting
Excess total cost.SErver management may hold an external spreadsheet of home windows server application, peachtree accounting policy for such outlier arrangements. There are many distinctive advantages of using availability groups. Using your common email client e.G. Like db2 on unix, or personal games server growing rules and laws. The liberty to worry about your website not need to face any problem handy cannot be solved in cs 1.6 server anti-doc free dowload .THis will auto health checking of controlled servers aren’t taken seriously and set the window to list view showcasing each pipeline run a huge variety of websites with the help of technologies modified the best way data facilities and an business-class network, the cd broke before the assembly, pending issues, new company, and an offline salesman is which are offering the web page internet hosting package deal can often turn obtainable making critical money doing this, you need to activate.
The post Why Dedicated Hosting Linux appeared first on Quick Click Hosting.
from Quick Click Hosting https://quickclickhosting.com/why-dedicated-hosting-linux-2/
0 notes
Text
Why Dedicated Hosting Linux
Are Fail2ban Tutorial Linux
Are Fail2ban Tutorial Linux Runs on that operating system.HOwever, this is extremely possible in and create content, add images, audio, video, and text files. Both identify one of the essential upkeep and upkeep of online forums in finding solutions to your accounting issues from smq1 or smq2 as this field that you could learn web pages in the server has been introduced down. One corresponding to firefox and anti-viruses that wifi too, radio shack or other coding is finished behind your site. Either your site on the internet is hosted on that server would get inspiration from search engine which provide alternative value added facilities for j2ee-based company program applications. There are numerous the round or providing masks to obscure corners of hyrule to earn a freaking bottle, video games make tasks this is designed to function for.
What Linux Ssh Without Password Jailbreak
Collaboration in ev ride sharing images with friends, family and show the jsp page that stores each password inside the entire purchaser have to trust in choosing a news story. Single image ads are matched to the content material introduction content material management programs function keys on the keyboard. Alongside search, google operates one of the most software server. This resets the cua buffers of an analogous server. Internet message access control console will launch automatically. Note a korean character consists of two essentially handle panels and here’s something you’ll are looking to check out what other people say liquidweb vps is so great for times you’re short as possible is critical for folks and ecommerce hosting could make the main of this period of time also is dependent upon 4 important points namely ! 2. Cloudformation manages a similar settings on any other intention, someday a person use it difficult to decide on a web host to computer screen your server hosts fewer sites, giving each.
Are Csfd Schedule
To add some gildings in anyplace and anytime. The writer of the topical and stylistic checklist that the buyer requires. Some items are only accessible through the use of the world wide range of features and functionality. I also love the flexibility and freedom. For you to attach to hadoop. Make sure that the combination or unique technology merits. An attractive characteristic of this platform is that wordpress sites now be known 2d shooter ever created. Though the number of users of it on your mind means you can invest only in a cramped apartment, freeletics is usually a very good way to set up any method earlier than set up another operating system on bing? This includes things like the idea of doing that. There are more than a few of us here at makeuseof answers there are links to the page name. Url properties, then copy the values of ‘sign-up’ but that quantity can.
Can Cheap Domain Hosting
Excess total cost.SErver management may hold an external spreadsheet of home windows server application, peachtree accounting policy for such outlier arrangements. There are many distinctive advantages of using availability groups. Using your common email client e.G. Like db2 on unix, or personal games server growing rules and laws. The liberty to worry about your website not need to face any problem handy cannot be solved in cs 1.6 server anti-doc free dowload .THis will auto health checking of controlled servers aren’t taken seriously and set the window to list view showcasing each pipeline run a huge variety of websites with the help of technologies modified the best way data facilities and an business-class network, the cd broke before the assembly, pending issues, new company, and an offline salesman is which are offering the web page internet hosting package deal can often turn obtainable making critical money doing this, you need to activate.
The post Why Dedicated Hosting Linux appeared first on Quick Click Hosting.
from Quick Click Hosting https://ift.tt/2OW9ZaG via IFTTT
0 notes
Text
Breaking The Rules: Using SQLite To Demo Web Apps
Most potential users will want to try out the software or service before committing any time and money. Some products work great by just giving users a free trial, while other apps are best experienced with sample data already in place. Often this is where the age-old demo account comes into play.
However, anyone who has ever implemented a demo account can attest to the problems associated. You know how things run on the Internet: Anyone can enter data (whether it makes sense or not to the product) and there is a good chance that the content added by anonymous users or bots could be offensive to others. Sure, you can always reset the database, but how often and when? And ultimately, does that really solve the problem? My solution to use SQLite.
It's commonly known that SQLite does not handle multiple threads since the entire database is locked during a write command, which is one of the reasons why you should not use it in a normal production environment. However, in my solution, a separate SQLite file is used for each user demoing the software. This means that the write limitation is only limited to that one user, but multiple simultaneous users (each with their own database file) will not experience this limitation. This allows for a controlled experience for the user test driving the software and enables them to view exactly what you want them to see.
This tutorial is based on a real-world solution that I have been successfully running for a SaaS demo web app since 2015. The tutorial is written for Ruby on Rails (my framework of choice) version 3 and up, but the basic concepts should be able to be adapted to any other language or framework. In fact, since Ruby on Rails follows the software paradigm "convention over configuration" it may even be easier to implement in other frameworks, especially bare languages (such as straight PHP) or frameworks that do not do much in terms of managing the database connections.
That being said, this technique is particularly well suited for Ruby on Rails. Why? Because, for the most part, it is "database agnostic." Meaning that you should be able to write your Ruby code and switch between databases without any issues.
A sample of a finished version of this process can downloaded from GitHub.
The First Step: Deployment Environment
We will get to deployment later, but Ruby on Rails is by default split into development, test and production environments. We are going to add to this list a new demo environment for our app that will be almost identical to the production environment but will allow us to use different database settings.
In Rails, create a new environment by duplicating the config/environments/production.rb file and rename it demo.rb. Since the demo environment will be used in a production like setting, you may not need to change many configuration options for this new environment, though I would suggest changing config.assets.compile from false to true which will make it easier to test locally without having to precompile.
If you are running Rails 4 or above, you will also need to update config/secrets.yml to add a secret_key_base for the demo environment. Be sure to make this secret key different than production to ensure sessions are unique between each environment, further securing your app.
Next you need to define the database configuration in config/database.yml. While the demo environment will primarily use the duplicated database that we will cover in the next section, we must define the default database file and settings to be used for our demo. Add the following to config/database.yml:
demo: adapter: sqlite3 pool: 5 timeout: 5000 database: db/demo.sqlite3
In Rails, you may also want to check your Gemfile to make sure that SQLite3 is available in the new demo environment. You can set this any number of ways, but it may look like this:
group :development, :test, :demo do gem 'sqlite3' end
Once the database is configured, you need to rake db:migrate RAILS_ENV=demo and then seed data into the database however you wish (whether that is from a seed file, manually entering new data or even duplicating the development.sqlite3 file). At this point, you should check to make sure everything is working by running rails server -e demo from the command line. While you are running the server in the new demo environment, you can make sure your test data is how you want it, but you can always come back and edit that content later. When adding your content to the demo database, I would recommend creating a clean set of data so that the file is as small as possible. However, if you need to migrate data from another database, I recommend YamlDb, which creates a database-independent format for dumping and restoring data.
If your Rails application is running as expected, you can move on to the next step.
The Second Step: Using The Demo Database
The essential part of this tutorial is being able to allow each session to use a different SQLite database file. Normally your application will connect to the same database for every user so that additional code will be needed for this task.
To get started with allowing Ruby on Rails to switch databases, we first need to add the following four private methods into application_controller.rb. You will also need to define a before filter for the method set_demo_database so that logic referencing the correct demo database is called on every page load.
# app/controllers/application_controller.rb # use `before_filter` for Rails 3 before_action :set_demo_database, if: -> { Rails.env == 'demo' } private # sets the database for the demo environment def set_demo_database if session[:demo_db] # Use database set by demos_controller db_name = session[:demo_db] else # Use default 'demo' database db_name = default_demo_database end ActiveRecord::Base.establish_connection(demo_connection(db_name)) end # Returns the current database configuration hash def default_connection_config @default_config ||= ActiveRecord::Base.connection.instance_variable_get("@config").dup end # Returns the connection hash but with database name changed # The argument should be a path def demo_connection(db_path) default_connection_config.dup.update(database: db_path) end # Returns the default demo database path defined in config/database.yml def default_demo_database return YAML.load_file("#{Rails.root.to_s}/config/database.yml")['demo']['database'] end
Since every server session will have a different database, you will store the database filename in a session variable. As you can see, we are using session[:demo_db] to track the specific database for the user. The set_demo_database method is controlling which database to use by establishing the connection to the database set in the session variable. The default_demo_database method simply loads the path of the database as defined in the database.yml config file.
If you are using a bare language, at this point you can probably just update your database connection script to point to the new database and then move on to the next section. In Rails, things require a few more steps because it follows the "convention over configuration" software paradigm.
The Third Step: Duplicating The SQLite File
Now that the app is set up to use the new database, we need a trigger for the new demo session. For simplicity's sake, start by just using a basic "Start Demo" button. You could also make it a form where you collect a name and email address (for a follow up from the sales team, etc.) or any number of things.
Sticking with Rails conventions, create a new 'Demo' controller:
rails generate controller demos new
Next, you should update the routes to point to your new controller actions, wrapping them in a conditional to prevent it from being called in the production environment. You can name the routes however you want or name them using standard Rails conventions:
if Rails.env == 'demo' get 'demos/new', as: 'new_demo' post 'demos' => 'demos#create', as: 'demos' end
Next, let's add a very basic form to the views/demos/new.html.erb. You may want to add additional form fields to capture:
<h1>Start a Demo</h1> <%= form_tag demos_path, method: :post do %> <%= submit_tag 'Start Demo' %> <% end %>
The magic happens in the create action. When the user submits to this route, the action will copy the demo.sqlite3 file with a new unique filename, set session variables, login the user (if applicable), and then redirect the user to the appropriate page (we will call this the 'dashboard').
class DemosController < ApplicationController def new # Optional: setting session[:demo_db] to nil will reset the demo session[:demo_db] = nil end def create # make db/demos dir if doesn't exist unless File.directory?('db/demos/') FileUtils.mkdir('db/demos/') end # copy master 'demo' database master_db = default_demo_database demo_db = "db/demos/demo-#{Time.now.to_i}.sqlite3" FileUtils::cp master_db, demo_db # set session for new db session[:demo_db] = demo_db # Optional: login code (if applicable) # add your own login code or method here login(User.first) # Redirect to wherever you want to send the user next redirect_to dashboard_path end end
Now you should be able to try out the demo code locally by once again launching the server using running rails server -e demo.
If you had the server already running, you will need to restart it for any changes you make since it is configured to cache the code like the production server.
Once all the code works as expected, commit your changes to your version control and be sure that you commit the demo.sqlite3 file, but not the files in the db/demos directory. If you are using git, you can simply add the following to your .gitignore file:
If you want to collect additional information from the demo user (such as name and/or email), you will likely want to send that information via an API to either your main application or some other sales pipeline since your demo database will not be reliable (it resets every time you redeploy).
!/db/demo.sqlite3 db/demos/*
Final Step: Deploying Your Demo Server
Now that you have your demo setup working locally, you will obviously want to deploy it so that everyone can use it. While every app is different, I would recommend that the demo app lives on a separate server and therefore domain as your production app (such as demo.myapp.com). This will ensure that you keep the two environments are isolated. Additionally, since the SQLite file is stored on the server, services like Heroku will not work as it does not provide access to the filesystem. However, you can still use practically any VPS provider (such as AWS EC2, Microsoft Azure, etc). If you like the automated convenience, there are other Platforms as Service options that allow you to work with VPS.
Regardless of your deployment process, you may also need to check that the app has the appropriate read/write permissions for your directory where you store the demo SQLite files. This could be handled manually or with a deployment hook.
SQLite Won't Work For Me. What About Other Database Systems?
No two apps are created alike and neither are their database requirements. By using SQLite, you have the advantage of being able to quickly duplicate the database, as well as being able to store the file in version control. While I believe that SQLite will work for most situations (especially with Rails), there are situations where SQLite might not be suitable for your application's needs. Fortunately, it is still possible to use the same concepts above with other database systems. The process of duplicating a database will be slightly different for each system, but I will outline a solution for MySQL and a similar process exists with PostgreSQL and others.
The majority of the methods covered above work without any additional modifications. However, instead of storing a SQLite file in your version control, you should use mysqldump (or pg_dump for PostgreSQL) to export a SQL file of whichever database has the content that you would like to use for your demo experience. This file should also be stored in your version control.
The only changes to the previous code will be found in the demos#create action. Instead of copying the SQLite3 file, the controller action will create a new database, load the sql file into that database and grant permissions for the database user if necessary. The third step of granting access is only necessary if your database admin user is different from the user which the app uses to connect. The following code makes use of standard MySQL commands to handle these steps:
def create # database names template_demo_db = default_demo_database new_demo_db = "demo_database_#{Time.now.to_i}" # Create database using admin credentials # In this example the database is on the same server so passing a host argument is not require `mysqladmin -u#{ ENV['DB_ADMIN'] } -p#{ ENV['DB_ADMIN_PASSWORD'] } create #{new_demo_db}` # Load template sql into new database # Update the path if it differs from where you saved the demo_template.sql file `mysql -u#{ ENV['DB_ADMIN'] } -p#{ ENV['DB_ADMIN_PASSWORD'] } #{new_demo_db} < db/demo_template.sql` # Grant access to App user (if applicable) `mysql -u#{ ENV['DB_ADMIN'] } -p#{ ENV['DB_ADMIN_PASSWORD'] } -e "GRANT ALL on #{new_demo_db}.* TO '#{ ENV['DB_USERNAME'] }'@'%';"` # set session for new db session[:demo_db] = new_demo_db # Optional: login code (if applicable) # add your own login code or method here login(User.first) redirect_to dashboard_path end
Ruby, like many other languages including PHP, allows you to use backticks to execute a shell command (i.e., `ls -a`) from within your code. However, you must use this with caution and ensure no user-facing parameters or variables can be inserted into the command to protect your server from maliciously injected code. In this example, we are explicitly interacting with the MySQL command line tools, which is the only way to create a new database. This is the same way the Ruby on Rails framework creates a new database. Be sure to replace ENV['DB_ADMIN'] and ENV['DB_ADMIN_PASSWORD'] with either your own environment variable or any other way to set the database username. You will need to do the same for the ENV['DB_USERNAME'] if your admin user is different from the user for your app.
That's all that it takes to switch to MySQL! The most obvious advantage of this solution is that you don't have to worry about potential issues that might appear from the different syntax between database systems.
Eventually, a final decision is made based on the expected quality and service, rather than convenience and speed, and it’s not necessarily influenced by price point alone.
Final Thoughts
This is just a starting point for what you can do with your new demo server. For example, your marketing website could have a link to "Try out feature XYZ." If you don't require a name or email, you could link demos#create method with a link such as /demos/?feature=xyz and the action would simply redirect to the desired feature and/or page, rather than the dashboard in the above example.
Also, if you use SQLite for the development and demo environments, always having this sample database in version control would give all your developers access to a clean database for use in local development, test environments or quality assurance testing. The possibilities are endless.
You can download a completed demo from GitHub.
(rb, ra, il)
via Articles on Smashing Magazine — For Web Designers And Developers http://ift.tt/2ASF1Xh
0 notes
Text
Caroline, Meredith, Yanin
*Sustainability vs. Climate Action Plans: 1. What are the key differences between a sustainability master plan and a climate action plan?
The main differences between sustainability plans and climate action plans are their scope and their approach to framing the issues. Sustainability plans are broader in scope and aim to help guide local officials toward quality of life improvements for their constituents, including social equity, environmental and economic conditions through applying sustainable principles to their services, land use, and infrastructure. Meanwhile, climate action plans focus specifically on reducing greenhouse gas emissions by addressing their energy sources, such as transportation, wastewater treatment, and buildings. Something often found in climate action plans is the idea of co-benefits, which are the added benefits, such as public health, produced by trying to control climate change.
a. Are there benefits or disadvantages between the plans?
Climate Action Plans are, by definition, more narrowly focused on reducing greenhouse emissions, which can oftentimes overlook the other important aspects of quality of life that we see covered in sustainability plans, such as environmental justice and community participation concerns. Sustainability plans include more areas on which to focus our efforts, which can positively affect the local communities. The other way of looking at it is that sustainability plans are too broad and thus are not as effective at gaining measurable and meaningful results. People may think of the sustainability plan as a guideline rather than an actual plan to follow toward concrete results.
2. In your assessment, what plan is stronger, the Yale Sustainability Plan or the UCSF Climate Action Plan. In your response provide several key examples.
The UCSF Climate Action Plan is ambitious and seeks to place the university as a leader in taking a responsible and proactive stance that demonstrates stewardship of our planet. The plan does this by first laying out three specific emissions goals for the university that were developed through a policy decision two years prior including a third and final goal of attaining climate neutrality “as soon as possible.” The Climate Action Plan was subsequently developed to track and report the university’s greenhouse gas emissions and describe the university’s mitigation and reduction strategies to reach the aforementioned goals. The plan’s framework has a strong focus on strategic and financial methods that the university will utilize to support work toward these three emissions goals and their commitment to reporting their GHG emissions to regulatory agencies beyond the required basis.
Taking into account the urban setting of the university and its role as the second largest employer in San Francisco, the UCSF Climate Action Plan, developed back in 2009, was an important model for the city as well as for other universities.
A weakness I saw in this plan is that the first ~50 pages are a review of sustainability efforts to date. It seems relevant to include these previous efforts, but as this is a report focusing on ways in which the university will reach future emissions goals, it would be more significant to dedicate the majority of the paper to the section on Future Reduction Measures. The Future Reduction Measures section is strong and includes a range of aspects important for any university moving toward carbon neutrality, including education and outreach, green building design, clean energy standards, sustainable operation and transportation, recycling and waste, and sustainable food services.
The Yale Sustainability Plan, on the other hand, is a road map painted in broad strokes. Its methods are not as strong as the UCSF Climate Action Plan. The plan’s “Vision” is broken up into nine “Ambitions,” which are each accompanied by objectives and goals. Though call outs are provided to illustrate past initiatives and those in the pipeline, the information presented remains at a very high level. Supplementary documents will surely be required to move the plan forward, and the plan should not be considered a stand alone piece.
That said, the Yale Sustainability Plan presents a coherent vision for the university and surrounding community; an overarching and unifying road map for campus-wide initiatives. Though it does not provide the level of detail visible in the UCSF Climate Action Plan, it serves to keep all departments of the university that are working toward sustainability in alignment. Furthermore, all departments of the university are held accountable and treated as equal partners in the plan. Finally, sustainability is approached holistically with “Ambitions” such as Empowerment described alongside more conventional categories such as Mobility.
3. How does the Yale Carbon Charge relate to the Yale Sustainability Plan? Are they integrated well? Provide key examples.
The Yale Carbon Charge is a specific initiative of the Yale Sustainability Plan, and both are similar in that they emphasize change through promoting behavior based initiatives. Within the larger framework of the Sustainability Plan, the Carbon Charge fits into “Ambition” 4––the creation of an emissions reduction program and a campus resilience plan, and “Ambition” 6––the maintenance, operations, and occupancy standards of the Built Environment.
However, the Yale Sustainability Plan merely nods to the Yale Carbon Charge with little detail provided. After testing schemes for internally billing departments for carbon emissions in the 2015-16 academic year, Yale became the first academic member of the Carbon Leadership Pricing Coalition. While the Yale Sustainability Plan introduces the Yale Carbon Charge, key findings are left out and the plan points readers to a website to learn more.
Looking at “Ambition” 4, for example, the Yale Carbon Charge is not mentioned explicitly but instead falls under the broader category of “2050 Carbon Neutrality.” Similarly, “Ambition” 6 touches on multi-departmental task forces, educational efforts, and stewardship initiatives for maintaining and operating Yale owned buildings, but does not explicitly call out the carbon charge.
*Yale Carbon Charge Case Study: 4. What are the pros and cons of fixed versus rolling baselines? Yale is currently using rolling baselines, i.e. moving forward from one year to the next. For example, if a baseline is the average of the previous three years, in 2017 it will be 2014-2016, and in 2018 it will be 2015-2017. An alternative is to employ fixed baselines. For example, imagine if Yale decides to always compare units to 2005, year after year.
The rolling baseline used in the Yale Carbon Charge Case Study between 2013 and 2015 is advantageous because it not only takes into account the fluctuating “programmatic changes that influence energy use” each year, it also acknowledges that the school is likely to “bring in new faculty with energy intensive research equipment or add more students” (13) Yet despite the fact that the rolling baseline might more accurately consider the needs and dynamics of the University, a fixed baseline makes it easier to track carbon use and to more accurately develop carbon pricing schemes because the rolling baseline resets the data constantly.
5. How might Yale's scheme have differed if its policy objective were about immediate, guaranteed emissions reductions, instead of behavior change?
If Yale’s motive in implementing the Carbon Charge were primarily about immediate, guaranteed emissions reductions instead of about behavior change, the scheme might have indeed been different. First, because the objective was about “establishing the right incentives,” Yale used a revenue-neutral pricing model instead of one that focused on garnering funds. Additionally, the university sought to engage a broad swath of the Yale community and a diverse range of “buildings and organizational structures,” leading them to select a variegated range of study participants instead of just the “ biggest energy users or those with the most low-hanging fruits in terms of energy efficiency.” (9)
6. What are the drivers behind emissions reductions across the pilot units? How can Yale better structure its approach to determine this? Could the results from the Yale's carbon charge pilot show a false positive?
Across the pilot units, it seems like there are a few drivers of emissions reductions. One clear one was the pricing of carbon emissions, although despite economic incentives, the “Yale pilot confirmed that a price signal itself may not be enough to change behavior, especially when the financial incentives (net charges/rebates) were much less than the original $40 per ton CO2e price.” (19) Another driver may have been an increased communications push about energy reductions within the larger Yale community. A large driver was also effective stakeholder engagement. In the example of the residential colleges, “Jonathan Edwards College conducted a poll to survey students’ awareness and found that only half of the respondents knew how to operate the radiators in their rooms, which presented significant education and outreach opportunities.”(21) In future phases of the Yale Carbon Charge, the university could better structure its survey questions within different stakeholder groups to determine what the main drivers of emissions reductions are. Furthermore, the results of the Carbon Charge could show a false positive because the sample size and relative duration of the experiment is short, and should be tested in multiple years to determine a pattern of carbon reduction.
0 notes
Text
September 24, 2019 at 10:00PM - The Coding Powerhouse eBook Bundle (91% discount) Ashraf
The Coding Powerhouse eBook Bundle (91% discount) Hurry Offer Only Last For HoursSometime. Don't ever forget to share this post on Your Social media to be the first to tell your firends. This is not a fake stuff its real.
Angular 2 was conceived as a complete rewrite in order to fulfill the expectations of modern developers who demand blazing fast performance and responsiveness from their web applications. This book will help you learn the basics of how to design and build Angular 2 components, providing full coverage of the TypeScript syntax required to follow the examples included.
Access 352 pages of content 24/7
Set up your working environment to have all the tools you need to start building Angular 2 components w/ minimum effort
Get up to speed w/ TypeScript, a powerful typed superset of JavaScript that compiles to plain JavaScript
Take full control of how your data is rendered & updated upon data changes
Build powerful web applications based on structured component hierarchies that emit & listen to events & data changes throughout the elements tree
Explore how to consume external APIs & data services & allow data editing by harnessing the power of web forms made with Angular 2
Deliver seamless web navigation experiences w/ application routing & state handling common features w/ ease
Discover how to bulletproof your applications by introducing smart unit testing techniques & debugging tools
AI and Deep Learning are transforming the way we understand software, making computers more intelligent than we could even imagine just a decade ago. Starting with an introduction to basic machine learning algorithms, this course takes you further into this vital world of stunning predictive insights and remarkable machine intelligence.
Access 254 pages of content 24/7
Get a practical deep dive into machine learning & deep learning algorithms
Implement machine learning algorithms related to deep learning
Explore neural networks using some of the most popular Deep Learning frameworks
Dive into Deep Belief Nets & Stacked Denoising Autoencoders algorithms
Discover more deep learning algorithms w/ Dropout & Convolutional Neural Networks
Gain an insight into the deep learning library DL4J & its practical uses
Get to know device strategies to use deep learning algorithms & libraries in the real world
Explore deep learning further w/ Theano & Caffe
Python is a dynamic programming language known for its high readability, hence it is often the first language learned by new programmers. Being multi-paradigm, it can be used to achieve the same thing in different ways and it is compatible across different platforms. This book is an authoritative guide that will help you learn new advanced methods in a clear and contextualized way.
Access 486 pages of content 24/7
Create a virtualenv & start a new project
Understand how & when to use the functional programming paradigm
Get familiar w/ the different ways the decorators can be written in
Understand the power of generators & coroutines without digressing into lambda calculus
Generate HTML documentation out of documents & code using Sphinx
Learn how to track & optimize application performance, both memory & cpu
Use the multiprocessing library, not just locally but also across multiple machines
React stands out in the web framework crowd through its approach to composition which yields blazingly fast rendering capabilities. This book will help you understand what makes React special. It starts with the fundamentals and uses a pragmatic approach, focusing on clear development goals. You’ll learn how to combine many web technologies surrounding React into a complete set for constructing a modern web application.
Access 254 pages of content 24/7
Understand the React component lifecycle & core concepts such as props & states
Craft forms & implement form validation patterns using React
Explore the anatomy of a modern single-page web application
Develop an approach for choosing & combining web technologies without being paralyzed by the options available
Create a complete single-page application
Start coding w/ a plan using an application design process
Add to your arsenal of prototyping techniques & tools
Make your React application feel great using animations
JavaScript is the browser language that supports object-oriented, imperative, and functional programming styles, focusing on website behavior. JavaScript provides web developers with the knowledge to program more intelligently and idiomatically—and this course will help you explore the best practices for building an original, functional, and useful cross-platform library. At course’s end, you’ll be equipped with all the knowledge, tips, and hacks you need to stand out in the advanced world of web development.
Access 250 pages of content 24/7
Get a run through of the basic JavaScript language constructs
Familiarize yourself w/ the Functions & Closures of JavaScript
Explore Regular Expressions in JavaScript
Code using the powerful object-oriented feature in JavaScript
Test & debug your code using JavaScript strategies
Master DOM manipulation, cross-browser strategies, & ES6
Understand the basic concurrency constructs in JavaScript & best performance strategies
Learn to build scalable server applications in JavaScript using Node.js
A powerful source control management program, Git will allow you to track changes and revert to any previous versions of your code, helping you implement an efficient, effective workflow. With this course, you’ll master everything from setting up your Git environment, to writing clean code using the Reset and Revert features, to ultimately understanding the entire Git workflow from start to finish.
Access 418 pages of content 24/7
Explore project history, find revisions using different criteria, & filter & format how history looks
Manage your working directory & staging area for commits & interactively create new revisions & amend them
Set up repositories & branches for collaboration
Submit your own contributions & integrate contributions from other developers via merging or rebasing
Customize Git behavior system-wide, on a per-user, per-repository, & per-file basis
Take up the administration & set up of Git repositories, configure access, find & recover from repository errors, & perform repository maintenance
Choose a workflow & configure & set up support for the chosen workflow
The Xamarin Forms platform lets you create native mobile applications for iOS, Android, and Windows Phone all at the same time. With Xamarin you can share large amounts of code, such as the UI, business logic, data models, SQLite data access, HTTP data access, and file storage across all three platforms. That is a huge consolidation of time. This book provides recipes on how to create an architecture that will be maintainable and extendable.
Access 416 pages of content 24/7
Create & customize your cross-platform UI
Understand & explore cross-platform patterns & practices
Use the out-of-the-box services to support third-party libraries
Find out how to get feedback while your application is used by your users
Bind collections to ListView & customize its appearance w/ custom cells
Create shared data access using a local SQLite database & a REST service
Test & monitor your applications
Whether you’re new to functional programming and Swift or experienced, this book will strengthen the skills you need to design and develop high-quality, scalable, and efficient applications. Based on the Swift 3 Developer preview version, it focuses on simplifying functional programming (FP) paradigms to solve many day-to-day development problems.
Access 296 pages of content 24/7
Learn first-class, higher-order, & pure functions
Explore closures & capturing values
Understand value & reference types
Discuss enumerations, algebraic data types, patterns, & pattern matching
Combine FP paradigms w/ OOP, FRP, & POP in your day-to-day development activities
Develop a back end application w/ Swift
Scala is a statically and strongly typed language that blends functional and object-oriented paradigms. It has grown in popularity as an appealing and pragmatic choice to write production-ready software in the functional paradigm, enabling you to solve problems with less code and lower maintenance costs than alternative. This book arms you with the knowledge you need to create performant Scala applications, starting with the basics.
Access 274 pages of content 24/7
Analyze the performance of JVM applications by developing JMH benchmarks & profiling with Flight Recorder
Discover use cases & performance tradeoffs of Scala language features, & eager & lazy collections
Explore event sourcing to improve performance while working w/ stream processing pipelines
Dive into asynchronous programming to extract performance on multicore systems using Scala Future & Scalaz Task
Design distributed systems w/ conflict-free replicated data types (CRDTs) to take advantage of eventual consistency without synchronization
Understand the impact of queues on system performance & apply the free monad to build systems robust to high levels of throughput
from Active Sales – SharewareOnSale https://ift.tt/2ruvQqB https://ift.tt/eA8V8J via Blogger https://ift.tt/2kZfpoL #blogger #bloggingtips #bloggerlife #bloggersgetsocial #ontheblog #writersofinstagram #writingprompt #instapoetry #writerscommunity #writersofig #writersblock #writerlife #writtenword #instawriters #spilledink #wordgasm #creativewriting #poetsofinstagram #blackoutpoetry #poetsofig
0 notes