#AddLocation
Explore tagged Tumblr posts
Visit Tumblr Blog
Explore Tumblr blogs with no restrictions, modern design and the best experience.
Last Seen Tumblr Blogs


Fun Fact
Tumblr was attacked by a cross-site scripting worm deployed by the Internet troll group GNAA on Dec 3, 2012.
Text
How to add Location in Google Maps | YMA PRO TECH
Open Google Maps, find the location, right-click (tap and hold on mobile) to drop a pin. Click the pin, select "Add a missing place," enter the name, category, address, and details. Adjust pin placement if needed. Add photos/videos. Review and submit. Wait for Google's verification process.
youtube
#GoogleMaps#AddLocation#NewPlaceOnMaps#MapUpdates#LocalBusiness#PlacesNearMe#MapContributions#MapEditing#UserGeneratedContent#CrowdsourcedMaps#LocalGuides#MapMaking#MapData#OpenStreetMap#CitizenCartography#DigitalMapping#GeoSpatialData#LocationBasedServices#MapYourWorld#MappingCommunity#MapEverything#GeoTags#PlaceMarkers#PinDropping#MapCollaborations#LocationSharing#CrowdsourcedPlaces#MapYourCity#Youtube
0 notes
Text
গুগল ম্যাপে বাড়ি, দোকান বা নতুন লোকেশনের নাম যোগ করার সহজ উপায় | How to Add a House, Shop, or New Location Name on Google Maps

সম্পুর্ণ ভিডিও পেতে নিচে লিংক কে ভিজিট বা ক্লিক করুন:
Youtube: https://youtu.be/kAJSe0hB2yk
Facebook: https://www.facebook.com/BasicUnlimited/videos/918594250026720/
ভিডিওটি ভালো লাগলে লাইক, কমেন্ট এবং সাবস্ক্রাইব করতে ভুলবেন না. Share it with your friends and help them learn too🙏
অন্যান্য স্যোসাল মিডিয়ার লিংক:
YT: https://www.youtube.com/@basicunlimited
FB: https://www.facebook.com/BasicUnlimited
IG: https://www.instagram.com/basicunlimited
Twitter: https://x.com/BasicUnlimited
Tiktok: https://www.tiktok.com/@basicunlimited
Pinterest: https://www.pinterest.com/basicunlimited
#গুগলম্যাপেবাড়িদোকানবানতুনলোকেশনেরনামযোগকরারসহজউপায় #HowtoAddAHouseShopOrNewLocationNameOnGoogleMaps #GoogleMaps #AddLocation #GoogleMapsTutorial #HowToAddHouseOnGoogleMaps #GoogleMapsTips #LocationUpdate #GoogleMapsGuide #গুগলম্যাপলোকেশনযোগকরা #গুগলম্যাপেবাড়িযোগকরা #গুগলম্যাপেদোকানযোগকরা #নতুনলোকেশনগুগলম্যাপে
#technews#diy tech#tech solutions#technology#google maps#Google map add new location#Google Maps tips and tricks
1 note
·
View note
Photo

Tickets for #CowayRun2019 are selling fast! Grab them now before they're sold out and secure your slot to #BeatTheHeat with us! #cowaysungaipetani#coway#air#bersih#kualalumpur#malaysiaonlineshop#sayajual#makan#lebah5ml#lari#teamlari#run#cowayrun2019#addlocation#tagpeople#bangi#week#power#iphoneonly#penat#21km#hsn2019#milorun2018#milo#cuckoo#alhadadmarketing https://www.instagram.com/p/BwlJKg4gC0U/?utm_source=ig_tumblr_share&igshid=hwr4l4wyk5wx
#cowayrun2019#beattheheat#cowaysungaipetani#coway#air#bersih#kualalumpur#malaysiaonlineshop#sayajual#makan#lebah5ml#lari#teamlari#run#addlocation#tagpeople#bangi#week#power#iphoneonly#penat#21km#hsn2019#milorun2018#milo#cuckoo#alhadadmarketing
0 notes
Photo

Beer doesn’t get better than this. A rare Disco Pig “Scooby Snacks” from @blackhogbeer bottle 269 of 518. Thanks @brian_moles #investlocally #drinklocally #brewlocally #dinelocally #locallyowned #ownedlocally #addlocally https://www.instagram.com/p/Bu4o-b6DT6Z/?utm_source=ig_tumblr_share&igshid=198co6wqc27jc
0 notes
Photo

Great 📷 !!! Regram from @brothersbonded - KICKPUSH LUPO #vansshopriot #vansoffthewall #van #rockcityskatepark #rockcity #hull #moretocome #sneakin #addlocation #skateboaring #uk #vansevent @rockcityskatepark (at Rockcity Skatepark)
#vansshopriot#rockcityskatepark#skateboaring#vansoffthewall#uk#van#hull#sneakin#moretocome#rockcity#vansevent#addlocation
0 notes
Text
p2p - How do I make Bitcoin Core listen on IPV6?
p2p – How do I make Bitcoin Core listen on IPV6?
Normally it should autodetect. Check for lines like these in debug.log: AddLocal([2a02:91a:f3:21aa::1]:8333,1) If that’s the case, Bitcoin Core is listening to it, and if another service can’t reach it, it may be a network configuration problem or a problem with that service. If it isn’t, you can manually bind to an IP address (IPv4 or IPv6) using the -bind option. Source link
View On WordPress
0 notes
Text
Microsoft Expression Studio 4 Ultimate
Microsoft Expression Studio 4 Ultimate
Microsoft Expression Studio 4 Ultimate Serial
Microsoft Expression Studio 4 Ultimate Fully Activated
Buy Microsoft Expression Studio 4 Ultimate with fast shipping and top-rated customer service. Newegg shopping upgraded ™. I've been using Microsoft Expression Studio for the past year and upgraded to Expression Studio 4 Ultimate this summer. Expression Studio is the best thing Microsoft has put out in a long time and hardly anyone knows about it. Expression Studio is a package that includes Expression Blend, Expression Web, Expression Design, and Expression Encoder.
Microsoft Expression Studio 4 Ultimate requires Product Key. Microsoft Expression Studio 4 Ultimate includes. Expression Blend 4 + SketchFlow; Expression Studio 4 Web Professional.
Install: setup.exe /q --------------------------- Usage: <manifest:filename> (options) (-?) Show this usage information. <-manifest:filename> Cabed XSetup XML manifest file name. Example: -manifest:XSetup.cab. (-q) Run in quiet mode. (-d) Ignore dependent products on uninstall. (-l(i|w|e|a|r|u|c|m|o|p|v|x|*)(:LogFileName) Logging options. See msiexec.exe options. (-x) Uninstall (default is Install). Cannot be used with -r (-r) Repair (default is Install). Cannot be used with -x (-source:SourceFilePath1(;SourceFilePath2...(;SourceFilePathN))) Source file location. (-reboot) Display the Reboot button at the end of setup. (-AppLangId:LCID) Default application language to install. Example: 'AppLangId=1033' installs English packages. (property=value) ... (property=value) Global properties for setup session. Example: ADDLOCAL=ALL Example: REMOVE=ALL (same as -x) Example: ADDLOCAL=FooFeature Example: ADDLOCAL=FooFeature,BarFeature ((Product:)property=value) ... ((Product:)property=value) Product-specific properties for MSI installation session. Example: Foo:ADDLOCAL=ALL Example: Foo:REMOVE=ALL (removes Foo product features) Example: Foo:ADDLOCAL=FooFeature Example: Foo:ADDLOCAL=FooFeature,BarFeature ------------------------ Silent Uninstall: REM Microsoft Expression Blend SDK for Silverlight 4 MsiExec.exe /X(1C997E1C-5CE9-4AF3-AAA9-DC65E6090827) /q REM Microsoft Expression Blend 3 SDK MsiExec.exe /X(256E7DAC-9BE8-494E-8DE7-7857BF96B774) /q REM Microsoft Expression Blend 4 MsiExec.exe /X(4C6D5779-A766-45DF-9938-D6F595A66F2B) /q REM Microsoft Expression Web 4 MsiExec.exe /X(5F8D931D-B230-47F3-A9C0-0C8CA459A332) /q REM Microsoft Expression Blend SDK for .NET 4 MsiExec.exe /X(9B3A1C97-A361-463E-8817-444F9F88CDFE) /q REM Microsoft Expression Studio 4 MsiExec.exe /X(A06FE62B-CEBC-4E94-AED8-92DCC33BC8EA) /q REM Microsoft Silverlight 3 SDK MsiExec.exe /X(2012098D-EEE9-4769-8DD3-B038050854D4) /q REM Microsoft Silverlight 4 SDK MsiExec.exe /X(801B0DA3-A3FF-46CC-B97F-D76D510AF5AE) /q REM Microsoft Expression Design 4 MsiExec.exe /X(08D605B4-DCD1-451F-ABD7-52E6BB868E4E) /q REM Microsoft Expression Encoder 4 Pro MsiExec.exe /X(07EF3970-F8E5-4A27-A5A3-230484D35026) /q 'C:Program Files (x86)Microsoft ExpressionEncoder 4XSetup.exe' -x -q -AppLangId:1033 '-manifest:EncoderManifest.cab' '-source:C:Program Files (x86)Microsoft ExpressionEncoder 4Setup;C:Usersdxr5354aDesktopSW_DVD5_Expression_Studio_Ult_4.0_English_-2_Core_MLF_X17-02903Setup' REM Microsoft Expression Encoder 4 Screen Capture Codec MsiExec.exe /X(BF127B80-CFD5-4379-9752-E8AF1A5D0141) /q REM Windows Media Format 11 SDK MsiExec.exe /X(009435FA-9011-4C36-AE7C-CCC9669E7875) /q REM WPF Toolkit February 2010 (Version 3.5.50211.1) MsiExec.exe /X(5EE6E987-1B79-4A93-832B-27472C7D1579) /q REM Microsoft .NET Framework 4 Multi-Targeting Pack MsiExec.exe /X(CFEF48A8-BFB8-3EAC-8BA5-DE4F8AA267CE) /q
Microsoft Expression Studio 4 Ultimate Portable from adobe photoshop to after effects. Here we enlist the adobe product so you can easily download. All adobe product with crack and use them for education purpose and for practice. For commercial use of Adobe product you should buy them from Adobe official website. Microsoft Expression Studio 4 Ultimate Crack Or Serial of integrations with your favorite apps. Connect Trainual to the ecosystem of apps you use every day to boost productivity across the board and automate time-consuming processes while onboarding Microsoft Expression Studio 4 Ultimate Crack Or Serial and training.
Setup Type: unspecified
Deployment Difficulty: unspecified
01/30/2012
Show Comments ( 0 )
Create powerful web content by designing your prototypes, creating artwork and graphics, encoding videos for online use, and building the actual web page
IMPORTANT NOTICE
What's new in Microsoft Expression Studio Ultimate 4.0.20525.0:
Expression Encoder 4 Pro Release Notes :
Opening a .mov file results in an error :
Attempting to open a .mov file in Expression Encoder will result in an error due to the fact that Apple QuickTime, versions 7.6.4 and later, adds a new DLL dependency to their SDK which causes the failure of .MOV files to load. However, you can work around this issue by doing the following:
On the Start menu, right-click Computer and, in the context menu, click Properties.
Read the full changelog
Most activities are nowadays performed online, and it’s no longer a complex task to create your own web space. In this regard, Microsoft Expression Studio Ultimate comes with a set of tools with which to create standard-based websites and various types of content, design prototypes for your ideas, and process content to make it suitable for online use.
Deploys a suite of web-development tools
Microsoft Expression Studio 4 Ultimate
One first note is that Microsoft Expression Studio Ultimate isn’t really a stand-alone application, but rather a suite of tools dedicated to management and creation of web content and websites. As such, by the end of the setup process you benefit from the features of Expression Blend, Expression Web + SuperPreview, Expression Encoder Pro, and Expression Design.
These tools can be individually used, while most of the project files are supported across the entire working project. Sadly, there’s no main menu to quickly access them.
Create prototypes, design pages, encode videos, and draw artworks
In order to get an idea of what you want to deliver to the end-user, you need a prototype. This is accomplished in Expression Blend. Multiple projects can be processed at a time. You can work with different types of elements, adjust properties, handle appearance, and more. Projects can be created as Silverlight applications and websites, or WPF applications.
Expression Web is the component for the actual creation and management of the web page, as the name suggests. Little to no programming knowledge is required, especially because of the options to work with snippets. Emphasis is placed on visual creation, but items can thoroughly be managed in terms of appearance, attributes, parameters, and even scripts.
In case you want to include multimedia content in your website, then Expression Encoder Pro helps you load, edit, and process any video file you want to use so that it’s perfectly encoded for online playback. The program includes a timeline editor and provides comprehensive video editing and tweaking capabilities.
Last but not least, Expression Design is where your imagination can run wild. It comes with a variety of creation and editing tools for objects of all types. Thorough editing allows fine-tuning of visuals. In the end, you can spice up your website with neat artworks, drawings, textures, and other visual elements.
A few last words
To sum it up, Microsoft Expression Studio Ultimate bundles a variety of tools which makes web design fun. Dedicated tools properly handle prototype building, video processing and enhancing for online playback, artwork and graphic designer, as well as web building capabilities with little to no code writing.
Filed under
Microsoft Expression Studio Ultimate

was reviewed by Mircea Dragomir
4.5/5
LIMITATIONS IN THE UNREGISTERED VERSION
60 days trial
SYSTEM REQUIREMENTS
PC with 1 GHz or faster processor
1 GB of RAM or more
2 GB or more of available hard-disk space
Support for Microsoft DirectX 9.0 graphics with Windows Vista Display Driver Model (WDDM) Driver, 128 MB of graphics RAM or more, Pixel Shader 3.0 in hardware, 32-bits per pixel
DVD compatible drive
1024 x 768 or higher resolution monitor with 24-bit color
Actual requirements and product functionality may vary based on your system configuration and operating system
Load comments
This enables Disqus, Inc. to process some of your data. Disqus privacy policy
Microsoft Expression Studio 4 Ultimate Serial
Microsoft Expression Studio Ultimate 4.0.20525.0
add to watchlistsend us an update
Microsoft Expression Studio 4 Ultimate Fully Activated
runs on:
Windows 10 32/64 bit Windows 2008 Windows 8 32/64 bit Windows 7 32/64 bit Windows Vista Windows XP
file size:
265 MB
filename:
ExpressionStudio_UltimateTrial_en.exe
main category:
Multimedia
developer:
visit homepage
top alternatives FREE

top alternatives PAID
0 notes
Text
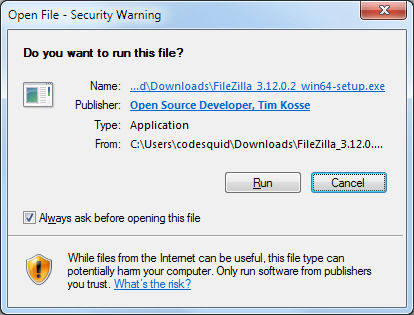
Filezilla Msi Silent Install


Similar experience with FileZilla – install was downloaded through their website. Saw a brief popup for a different product. Tried backing up, but was not able to get to that view of the popup to disable install. Immediately exited/cancelled the install w/o installing, but noticed activity on the machine. After a few moments you should see the FileZilla shortcut in the Start Menu, Installation Directory, and Programs and Features in the Control Panel. The information above provides a quick overview of the software title, vendor, silent install, and silent uninstall switches. The download link provided take you directly to the vendors website. Run the following command to complete installation via command line: msiexec /i /qn /l.xv msi.log NOTE On Windows Server 2008 SP2 and Windows Server 2008 R2 SP1 the Network protection feature will not be installed. Silent Installation (must be capital S) /D=%ApplicationDir% sets the installation directory (without quotes) /user=all or /user=current sets the installer to install for all users or the current user only in conjection with the /S option.
Filezilla Silent Install
For version 3.x.x.x of FileZilla to install silent easy by command: %~dp0FileZilla_3.2.2.1_win32-setup.exe /S Harder to disable updates and set language and not show the Welcome popup first time, I solved it by pushing in a filezilla.xml in EACH users profile (even Default User) by this script *.cmd): REM set customized settings for all users who doesn't have any settings defined in FileZilla.xml @echo off setLocal EnableDelayedExpansion REM check if it is Vista machine IF EXIST 'c:users' goto Vista REM Check if it is a XP machine IF EXIST 'C:Documents and Settings' goto XP goto End :XP pushd 'c:documents and settings' for /f 'tokens=* delims= ' %%a in ('dir /b/ad') do ( IF NOT EXIST '%%aapplication dataFileZilla' ( mkdir '%%aapplication dataFileZilla' copy %~dp0FileZilla.xml '%%aapplication dataFileZilla' ) ) rmdir /s /q 'c:documents and settingsall usersapplication dataFileZilla' goto END :Vista pushd 'c:users' for /f 'tokens=* delims= ' %%a in ('dir /b/ad') do ( IF NOT EXIST '%%aAppDataRoamingFileZilla' ( mkdir '%%aAppDataRoamingFileZilla' copy %~dp0FileZilla.xml '%%aAppDataRoamingFileZilla' ) ) goto End :End It checks if it is Vista or XP, then go into each profile and copy in modified filezilla.xml to each profile. You need to create a filezilla.xml first, you do it easy by starting FileZilla and set those settings you want and then copy the filezilla.xml and use that with this script. More details at: http://john.bryntze.net/jbkb/index.php?title=OpenSource-kb6_Silent_installation_and_configuration_of_FileZilla_client
Setup Type: unspecified
Deployment Difficulty: unspecified
06/09/2009
Show Comments ( 0 )
Msi Install Silent
˄
˅
Run the following command to complete installation via command line: msiexec /i <packagename> /qn /l*xv msi.log
Digital reggae blogspot download. NOTE
On Windows Server 2008 SP2 and Windows Server 2008 R2 SP1 the Network protection feature will not be installed.
To make sure the installation was successful or in case of any issues with the installation, use Windows Event Viewer to check the Application Log (look for records from Source: MsiInstaller).
EXAMPLE
Full installation on a 64-bit system:
msiexec /i efsw_nt64.msi /qn /l*xv msi.log ADDLOCAL=NetworkProtection,RealtimeProtection,^ DeviceControl,DocumentProtection,Cluster,GraphicUserInterface,SysInspector,SysRescue,Rmm,eula
When the installation finishes, ESET GUI starts and tray icon is displayed in the notification area (system tray).
EXAMPLE
Installation of the product in specified language (German):
msiexec /i efsw_nt64.msi /qn ADDLOCAL=NetworkProtection,RealtimeProtection,^ DeviceControl,DocumentProtection,Cluster,GraphicUserInterface,^ SysInspector,SysRescue,Rmm,eula PRODUCT_LANG=1031 PRODUCT_LANG_CODE=de-de
See Language parameters in Command line installation for further details and the list of language codes.
How to download project m for wii. IMPORTANT
When specifying values for REINSTALL parameter, you must list the rest of the features that are not used as values for ADDLOCAL or REMOVE parameter. It is necessary for the command line installation to run properly that you list all the features as values for REINSTALL, ADDLOCAL and REMOVE parameters. Adding or removing may not be successful if you do not use the REINSTALL parameter.
See Command line installation section for the complete list of features.
EXAMPLE
Complete removal (uninstallation) from a 64-bit system:
msiexec /x efsw_nt64.msi /qn /l*xv msi.log
Filezilla Msi Silent Installer
NOTE
Swf decompiler crack free download. Download Sothink SWF Decompiler - Easily have SWF files split into multiple chunks of various formats and extracted with the help of this easy to use and powerful application. Sothink SWF Decompiler 7.4.5263 Full Crack dapat mengekstrak bentuk flash seperti gambar, suara (mp3, wav), video (flv), teks, sprite, ActionScript, dll Editan SWF dengan mengganti image / bentuk / teks / suara. Sothink SWF Decompiler 7.4.5263 Full Crack Mendukung Flash dan ActionScript CS3/CS4/CS5 2.0/3.0. Semoga Bermanfaat, ^^ Link Download. SWF Decompiler Trial Version FREE Download.Enjoy 30-Day free experience with almost all functions enabled.
Your sever will reboot automatically after a successful uninstallation.
0 notes
Photo

Warehouse Storage Solutions
Addverb offers the best warehouse storage solution for the the warehouses.We also indroduced Addloc and AddSys which will make your work in a systematic manner and you will also get the single interface to manage the whole operation.To know more kindly visit - https://www.addverb.in/Software-Solution-For-Warehouse-Distribution_Centre-Factory-Automation.html
0 notes
Text
SCCM Console install failed because another program is installing (1618)

SCCM Console install failed because another program is installing (1618). First of all you must open the ConfigMgrAdminUISetup.log in case of console install errors. Open the log file with Configuration Manager Trace log tool. Examine the log file and you should see error(s) that will help you identify the reason for installation. As you see the screenshot below in my case it was Installation failed because another program is installing (1618).

Below lines are from ConfigMgrAdminUISetup.log and look at the last line – Installation failed because another program is installing (1618). In addition to that I also saw the below two lines. Cannot find MSPsCannot find ReportViewerLP_*s ==================== 7/25/2019 1:58:01 PM 0 (0x0000) UI Setup invoked with args - "C:\Program Files (x86)\ConfigMgr10\AdminconsoleSetup\469A3000-14DA-425E-B288-4B0E16DB87C4\ConsoleSetup.exe" /qb Created temp - C:\Program Files (x86)\ConfigMgr10 Created temp - C:\Program Files (x86)\ConfigMgr10\AdminconsoleSetup\ Created temp - C:\Program Files (x86)\ConfigMgr10\AdminconsoleSetup\{E7F3840F-C637-4AB4-8E0E-30DB1CBE2235}\ Copying Adminconsole.msi to C:\Program Files (x86)\ConfigMgr10\AdminconsoleSetup\{E7F3840F-C637-4AB4-8E0E-30DB1CBE2235}\\Adminconsole.msi Copying Completed Default UI lang code 1033 Language code found 1033 Language Locale found 1033 Setting LangPackDir to C:\Program Files (x86)\ConfigMgr10\AdminconsoleSetup\469A3000-14DA-425E-B288-4B0E16DB87C4\LanguagePack Scaning for MSPs under C:\Program Files (x86)\ConfigMgr10\AdminconsoleSetup\469A3000-14DA-425E-B288-4B0E16DB87C4\LanguagePack Scanning for ReportViewerLP_*s under C:\Program Files (x86)\ConfigMgr10\AdminconsoleSetup\469A3000-14DA-425E-B288-4B0E16DB87C4\LanguagePack Cannot find MSPs Cannot find ReportViewerLP_*s New console product version is 5.1906.1096.1000 Installed console product version is 5.1902.1085.1000 MSI PROPERTIES are INSTALL=ALL ALLUSERS=1 TARGETDIR="C:\Program Files (x86)\Microsoft Configuration Manager\AdminConsole\" DEFAULTSITESERVERNAME=CORPSCCM.PRAJWAL.ORG ADDLOCAL="AdminConsole,SCUIFramework" Running installation package Package: C:\Program Files (x86)\ConfigMgr10\AdminconsoleSetup\{E7F3840F-C637-4AB4-8E0E-30DB1CBE2235}\\Adminconsole.msi Log: C:\ConfigMgrAdminUISetupVerbose.log Properties: INSTALL=ALL ALLUSERS=1 TARGETDIR="C:\Program Files (x86)\Microsoft Configuration Manager\AdminConsole\" DEFAULTSITESERVERNAME=CORPSCCM.PRAJWAL.ORG ADDLOCAL="AdminConsole,SCUIFramework" Installation failed because another program is installing (1618) This error is caused by multiple client .msi installation running at the same time. To sort this, you must stop all related MSI install process. Read the full article
0 notes
Text
Install Mac Virtualbox

Table of Contents
Install Virtualbox On Windows 10
Can't Install Virtualbox On Mac
Virtualbox Install Mac Os X
Install Macos Virtualbox Amd
Virtualbox On Mac
2.1. Installing on Windows Hosts
2.1.1. Prerequisites
2.1.2. Performing the Installation
2.1.3. Uninstallation
2.1.4. Unattended Installation
2.1.5. Public Properties
2.2. Installing on Mac OS X Hosts
2.2.1. Performing the Installation
2.2.2. Uninstallation
2.2.3. Unattended Installation
2.3. Installing on Linux Hosts
2.3.1. Prerequisites
2.3.2. The Oracle VM VirtualBox Kernel Modules
2.3.3. Performing the Installation
2.3.4. The vboxusers Group
2.3.5. Starting Oracle VM VirtualBox on Linux
2.4. Installing on Oracle Solaris Hosts
2.4.1. Performing the Installation
2.4.2. The vboxuser Group
2.4.3. Starting Oracle VM VirtualBox on Oracle Solaris
2.4.4. Uninstallation
2.4.5. Unattended Installation
2.4.6. Configuring a Zone for Running Oracle VM VirtualBox
For Mac OS X hosts, Oracle VirtualBox ships in a disk image ( dmg ) file. Perform the following steps: Double-click on that file to have its contents mounted. VirtualBox allows you to install an alternative operating system on your Mac such as Windows, Linux, Solaris and just about any other OS you can think of. VirtualBox is considerably lighter than more well known packages such as Parallels and setting up a new OS is very simple and straightforward. In the Guest OS (Mac OS X), open System Preferences Sharing, then activate Remote Login; note the ip address specified in the Remote Login instructions, e.g. Ssh [email protected]; In VirtualBox, open Devices Network Network Settings Advanced Port Forwarding and specify Host IP = 127.0.0.1, Host Port 2222, Guest IP 10.0.2.15, Guest Port 22.
As installation of Oracle VM VirtualBox varies depending on your host operating system, the following sections provide installation instructions for Windows, Mac OS X, Linux, and Oracle Solaris.
For the various versions of Windows that are supported as host operating systems, please refer to Section 1.4, “Supported Host Operating Systems”.
VirtualBox prior to version 4.3.30 must not be installed as it is not compatible with Docker Desktop. Mac with Apple silicon. Install and run Docker Desktop on Mac.
In addition, Windows Installer must be present on your system. This should be the case for all supported Windows platforms.
The Oracle VM VirtualBox installation can be started in either of the following ways: Install windows on mac using virtualbox.
By double-clicking on the executable file.
By entering the following command:
This will extract the installer into a temporary directory, along with the .MSI file. Run the following command to perform the installation:
Using either way displays the installation Welcome dialog and enables you to choose where to install Oracle VM VirtualBox, and which components to install. In addition to the Oracle VM VirtualBox application, the following components are available:
USB support. This package contains special drivers for your Windows host that Oracle VM VirtualBox requires to fully support USB devices inside your virtual machines.
Networking. This package contains extra networking drivers for your Windows host that Oracle VM VirtualBox needs to support Bridged Networking. This enables your VM's virtual network cards to be accessed from other machines on your physical network.
Python support. This package contains Python scripting support for the Oracle VM VirtualBox API, see Chapter 11, Oracle VM VirtualBox Programming Interfaces. For this to work, an already working Windows Python installation on the system is required.
See, for example: http://www.python.org/download/windows/.
Note
Python version at least 2.6 is required. Python 3 is also supported.
Depending on your Windows configuration, you may see warnings about unsigned drivers, or similar. Click Continue for these warnings, as otherwise Oracle VM VirtualBox might not function correctly after installation.
The installer will create an Oracle VM VirtualBox group in the Windows Start menu, which enables you to launch the application and access its documentation.
With standard settings, Oracle VM VirtualBox will be installed for all users on the local system. If this is not wanted, you must invoke the installer by first extracting as follows:
Then, run either of the following commands on the extracted .MSI file. This will install Oracle VM VirtualBox only for the current user.
If you do not want to install all features of Oracle VM VirtualBox, you can set the optional ADDLOCAL parameter to explicitly name the features to be installed. The following features are available:
VBoxApplication
Main binaries of Oracle VM VirtualBox.
Note
This feature must not be absent, since it contains the minimum set of files to have working Oracle VM VirtualBox installation.
VBoxUSB
USB support.
VBoxNetwork
All networking support. This includes the VBoxNetworkFlt and VBoxNetworkAdp features.
VBoxNetworkFlt
Bridged networking support.
VBoxNetworkAdp
Host-only networking support
VBoxPython
Python support
For example, to only install USB support along with the main binaries, run either of the following commands:
The user is able to choose between NDIS5 and NDIS6 host network filter drivers during the installation. This is done using a command line parameter, NETWORKTYPE. The NDIS6 driver is the default for most supported Windows hosts. For some legacy Windows versions, the installer will automatically select the NDIS5 driver and this cannot be changed.
You can force an install of the legacy NDIS5 host network filter driver by specifying NETWORKTYPE=NDIS5. For example, to install the NDIS5 driver on Windows 7 use either of the following commands:
As Oracle VM VirtualBox uses the standard Microsoft Windows installer, Oracle VM VirtualBox can be safely uninstalled at any time. Click the program entry in the Add/Remove Programs list in the Windows Control Panel.
Unattended installations can be performed using the standard MSI support.
Public properties can be specified with the MSI API, to control additional behavior and features of the Windows host installer. Use either of the following commands:
The following public properties are available.
VBOX_INSTALLDESKTOPSHORTCUT
Specifies whether or not an Oracle VM VirtualBox icon on the desktop should be created.
Set to 1 to enable, 0 to disable. Default is 1.
VBOX_INSTALLQUICKLAUNCHSHORTCUT
Specifies whether or not an Oracle VM VirtualBox icon in the Quick Launch Bar should be created.
Set to 1 to enable, 0 to disable. Default is 1.
VBOX_REGISTERFILEEXTENSIONS
Specifies whether or not the file extensions .vbox, .vbox-extpack, .ovf, .ova, .vdi, .vmdk, .vhd and .vdd should be associated with Oracle VM VirtualBox. Files of these types then will be opened with Oracle VM VirtualBox.
Set to 1 to enable, 0 to disable. Default is 1.
VBOX_START
Specifies whether to start Oracle VM VirtualBox right after successful installation.
Set to 1 to enable, 0 to disable. Default is 1.
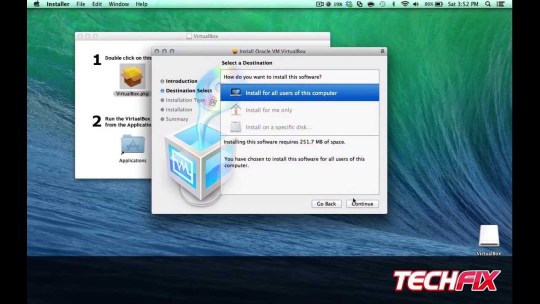
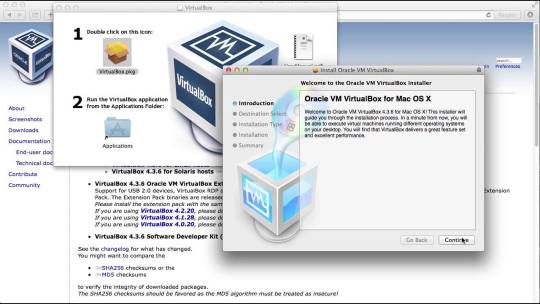
For Mac OS X hosts, Oracle VM VirtualBox ships in a dmg disk image file. Perform the following steps to install on a Mac OS X host:
Double-click on the dmg file, to mount the contents.
A window opens, prompting you to double-click on the VirtualBox.pkg installer file displayed in that window.
This starts the installer, which enables you to select where to install Oracle VM VirtualBox.
An Oracle VM VirtualBox icon is added to the Applications folder in the Finder.
To uninstall Oracle VM VirtualBox, open the disk image dmg file and double-click on the uninstall icon shown.
To perform a non-interactive installation of Oracle VM VirtualBox you can use the command line version of the installer application.
Mount the dmg disk image file, as described in the installation procedure, or use the following command line:
Open a terminal session and run the following command:
For the various versions of Linux that are supported as host operating systems, see Section 1.4, “Supported Host Operating Systems”.
You may need to install the following packages on your Linux system before starting the installation. Some systems will do this for you automatically when you install Oracle VM VirtualBox.
Qt 5.3.2 or later. Qt 5.6.2 or later is recommended.
SDL 1.2.7 or later. This graphics library is typically called libsdl or similar.
Note
These packages are only required if you want to run the Oracle VM VirtualBox graphical user interfaces. In particular, VirtualBox, the graphical VirtualBox Manager, requires both Qt and SDL. If you only want to run VBoxHeadless, neither Qt nor SDL are required.
In order to run other operating systems in virtual machines alongside your main operating system, Oracle VM VirtualBox needs to integrate very tightly with your system. To do this it installs a driver module called vboxdrv into the system kernel. The kernel is the part of the operating system which controls your processor and physical hardware. Without this kernel module, you can still use the VirtualBox Manager to configure virtual machines, but they will not start.
Network drivers called vboxnetflt and vboxnetadp are also installed. They enable virtual machines to make more use of your computer's network capabilities and are needed for any virtual machine networking beyond the basic NAT mode.
Since distributing driver modules separately from the kernel is not something which Linux supports well, the Oracle VM VirtualBox install process creates the modules on the system where they will be used. This means that you may need to install some software packages from the distribution which are needed for the build process. Required packages may include the following:
GNU compiler (GCC)
GNU Make (make)
Kernel header files
Also ensure that all system updates have been installed and that your system is running the most up-to-date kernel for the distribution.
Note
The running kernel and the kernel header files must be updated to matching versions.
The following list includes some details of the required files for some common distributions. Start by finding the version name of your kernel, using the command uname -r in a terminal. The list assumes that you have not changed too much from the original installation, in particular that you have not installed a different kernel type.
With Debian and Ubuntu-based distributions, you must install the correct version of the linux-headers, usually whichever of linux-headers-generic, linux-headers-amd64, linux-headers-i686 or linux-headers-i686-pae best matches the kernel version name. Also, the linux-kbuild package if it exists. Basic Ubuntu releases should have the correct packages installed by default.
On Fedora, Red Hat, Oracle Linux and many other RPM-based systems, the kernel version sometimes has a code of letters or a word close to the end of the version name. For example 'uek' for the Oracle Unbreakable Enterprise Kernel or 'default' or 'desktop' for the standard kernels. In this case, the package name is kernel-uek-devel or equivalent. If there is no such code, it is usually kernel-devel.
On some SUSE and openSUSE Linux versions, you may need to install the kernel-source and kernel-syms packages.
If you suspect that something has gone wrong with module installation, check that your system is set up as described above and try running the following command, as root:
If you are running on a system using UEFI (Unified Extensible Firmware Interface) Secure Boot, you may need to sign the following kernel modules before you can load them:
vboxdrv
vboxnetadp
vboxnetflt
vboxpci
See your system documentation for details of the kernel module signing process.
Oracle VM VirtualBox is available in a number of package formats native to various common Linux distributions. See Section 1.4, “Supported Host Operating Systems”. In addition, there is an alternative generic installer (.run) which you can use on supported Linux distributions.
2.3.3.1. Installing Oracle VM VirtualBox from a Debian or Ubuntu Package
Download the appropriate package for your distribution. The following example assumes that you are installing to a 64-bit Ubuntu Xenial system. Use dpkg to install the Debian package,as follows:
The installer will also try to build kernel modules suitable for the current running kernel. If the build process is not successful you will be shown a warning and the package will be left unconfigured. Look at /var/log/vbox-install.log to find out why the compilation failed. You may have to install the appropriate Linux kernel headers, see Section 2.3.2, “The Oracle VM VirtualBox Kernel Modules”. After correcting any problems, run the following command:
This will start a second attempt to build the module.
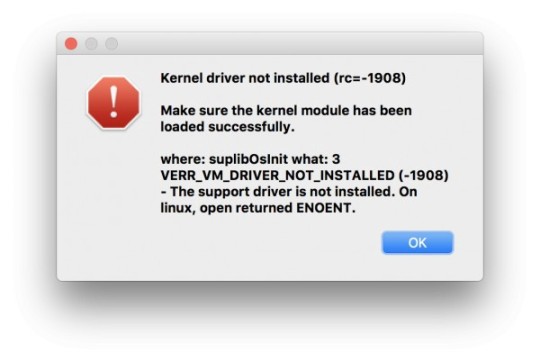
If a suitable kernel module was found in the package or the module was successfully built, the installation script will attempt to load that module. If this fails, please see Section 12.7.1, “Linux Kernel Module Refuses to Load” for further information.
Once Oracle VM VirtualBox has been successfully installed and configured, you can start it by clicking VirtualBox in your Start menu or from the command line. See Section 2.3.5, “Starting Oracle VM VirtualBox on Linux”.
2.3.3.2. Using the Alternative Generic Installer (VirtualBox.run)
The alternative generic installer performs the following steps:
Unpacks the application files to the target directory /opt/VirtualBox/, which cannot be changed.
Builds and installs the Oracle VM VirtualBox kernel modules: vboxdrv, vboxnetflt, and vboxnetadp.
Creates /sbin/rcvboxdrv, an init script to start the Oracle VM VirtualBox kernel module.
Creates a new system group called vboxusers.
Creates symbolic links in /usr/bin to a shell script /opt/VirtualBox/VBox which does some sanity checks and dispatches to the actual executables: VirtualBox, VBoxVRDP, VBoxHeadless and VBoxManage.
Creates /etc/udev/rules.d/60-vboxdrv.rules, a description file for udev, if that is present, which makes the USB devices accessible to all users in the vboxusers group.
Writes the installation directory to /etc/vbox/vbox.cfg.
The installer must be executed as root with either install or uninstall as the first parameter. For example:
Or if you do not have the sudo command available, run the following as root instead:
Add every user who needs to access USB devices from a VirtualBox guests to the group vboxusers. Either use the OS user management tools or run the following command as root:
Note
The usermod command of some older Linux distributions does not support the -a option, which adds the user to the given group without affecting membership of other groups. In this case, find out the current group memberships with the groups command and add all these groups in a comma-separated list to the command line after the -G option. For example: usermod -G group1,group2,vboxusers username.
If you cannot use the shell script installer described in Section 2.3.3.2, “Using the Alternative Generic Installer (VirtualBox.run)”, you can perform a manual installation. Run the installer as follows:
This will unpack all the files needed for installation in the directory install under the current directory. The Oracle VM VirtualBox application files are contained in VirtualBox.tar.bz2 which you can unpack to any directory on your system. For example:
To run the same example as root, use the following commands:
The sources for Oracle VM VirtualBox's kernel module are provided in the src directory. To build the module, change to the directory and use the following command:
If everything builds correctly, run the following command to install the module to the appropriate module directory:
In case you do not have sudo, switch the user account to root and run the following command:
The Oracle VM VirtualBox kernel module needs a device node to operate. The above make command will tell you how to create the device node, depending on your Linux system. The procedure is slightly different for a classical Linux setup with a /dev directory, a system with the now deprecated devfs and a modern Linux system with udev.
On certain Linux distributions, you might experience difficulties building the module. You will have to analyze the error messages from the build system to diagnose the cause of the problems. In general, make sure that the correct Linux kernel sources are used for the build process.
Note that the /dev/vboxdrv kernel module device node must be owned by root:root and must be read/writable only for the user.
Next, you install the system initialization script for the kernel module and activate the initialization script using the right method for your distribution, as follows:
This example assumes you installed Oracle VM VirtualBox to the /opt/VirtualBox directory.
Create a configuration file for Oracle VM VirtualBox, as follows:
Create the following symbolic links:
2.3.3.4. Updating and Uninstalling Oracle VM VirtualBox
Before updating or uninstalling Oracle VM VirtualBox, you must terminate any virtual machines which are currently running and exit the Oracle VM VirtualBox or VBoxSVC applications. To update Oracle VM VirtualBox, simply run the installer of the updated version. To uninstall Oracle VM VirtualBox, run the installer as follows:
As root, you can use the following command:
Josh dawsey twitter. You can uninstall the .run package as follows:
To manually uninstall Oracle VM VirtualBox, perform the manual installation steps in reverse order.
2.3.3.5. Automatic Installation of Debian Packages
The Debian packages will request some user feedback when installed for the first time. The debconf system is used to perform this task. To prevent any user interaction during installation, default values can be defined. A file vboxconf can contain the following debconf settings:
The first line enables compilation of the vboxdrv kernel module if no module was found for the current kernel. The second line enables the package to delete any old vboxdrv kernel modules compiled by previous installations.
These default settings can be applied prior to the installation of the Oracle VM VirtualBox Debian package, as follows:
In addition there are some common configuration options that can be set prior to the installation. See Section 2.3.3.7, “Automatic Installation Options”.
The RPM format does not provide a configuration system comparable to the debconf system. See Section 2.3.3.7, “Automatic Installation Options” for how to set some common installation options provided by Oracle VM VirtualBox.
To configure the installation process for .deb and .rpm packages, you can create a response file named /etc/default/virtualbox. The automatic generation of the udev rule can be prevented with the following setting:
The creation of the group vboxusers can be prevented as follows:
If the following line is specified, the package installer will not try to build the vboxdrv kernel module if no module fitting the current kernel was found.
The Linux installers create the system user group vboxusers during installation. Any system user who is going to use USB devices from Oracle VM VirtualBox guests must be a member of that group. A user can be made a member of the group vboxusers either by using the desktop user and group tools, or with the following command:
The easiest way to start an Oracle VM VirtualBox program is by running the program of your choice (VirtualBox, VBoxManage, or VBoxHeadless) from a terminal. These are symbolic links to VBox.sh that start the required program for you.
The following detailed instructions should only be of interest if you wish to execute Oracle VM VirtualBox without installing it first. You should start by compiling the vboxdrv kernel module and inserting it into the Linux kernel. Oracle VM VirtualBox consists of a service daemon, VBoxSVC, and several application programs. The daemon is automatically started if necessary. All Oracle VM VirtualBox applications will communicate with the daemon through UNIX local domain sockets. There can be multiple daemon instances under different user accounts and applications can only communicate with the daemon running under the user account as the application. The local domain socket resides in a subdirectory of your system's directory for temporary files called .vbox-<username>-ipc. In case of communication problems or server startup problems, you may try to remove this directory.
All Oracle VM VirtualBox applications (VirtualBox, VBoxManage, and VBoxHeadless) require the Oracle VM VirtualBox directory to be in the library path, as follows:
For the specific versions of Oracle Solaris that are supported as host operating systems, see Section 1.4, “Supported Host Operating Systems”.
If you have a previously installed instance of Oracle VM VirtualBox on your Oracle Solaris host, please uninstall it first before installing a new instance. See Section 2.4.4, “Uninstallation” for uninstall instructions.
Oracle VM VirtualBox is available as a standard Oracle Solaris package. Download the Oracle VM VirtualBox SunOS package, which includes the 64-bit version of Oracle VM VirtualBox. The installation must be performed as root and from the global zone. This is because the Oracle VM VirtualBox installer loads kernel drivers, which cannot be done from non-global zones. To verify which zone you are currently in, execute the zonename command.
Install Virtualbox On Windows 10
To start installation, run the following commands:
The Oracle VM VirtualBox kernel package is integrated into the main package. Install the Oracle VM VirtualBox package as follows:
The installer will then prompt you to enter the package you wish to install. Choose 1 or all and proceed. Next the installer will ask you if you want to allow the postinstall script to be executed. Choose y and proceed, as it is essential to execute this script which installs the Oracle VM VirtualBox kernel module. Following this confirmation the installer will install Oracle VM VirtualBox and execute the postinstall setup script.
Once the postinstall script has been executed your installation is now complete. You may now safely delete the uncompressed package and autoresponse files from your system. Oracle VM VirtualBox is installed in /opt/VirtualBox.
Note
Can't Install Virtualbox On Mac
If you need to use Oracle VM VirtualBox from non-global zones, see Section 2.4.6, “Configuring a Zone for Running Oracle VM VirtualBox”.
The installer creates the system user group vboxuser during installation for Oracle Solaris hosts that support the USB features required by Oracle VM VirtualBox. Any system user who is going to use USB devices from Oracle VM VirtualBox guests must be a member of this group. A user can be made a member of this group either by using the desktop user and group tools or by running the following command as root:
Note that adding an active user to the vboxuser group will require the user to log out and then log in again. This should be done manually after successful installation of the package.
2.4.3. Starting Oracle VM VirtualBox on Oracle Solaris
The easiest way to start an Oracle VM VirtualBox program is by running the program of your choice (VirtualBox, VBoxManage, or VBoxHeadless) from a terminal. These are symbolic links to VBox.sh that start the required program for you.
Alternatively, you can directly invoke the required programs from /opt/VirtualBox. Using the links provided is easier as you do not have to enter the full path.
You can configure some elements of the VirtualBox Qt GUI, such as fonts and colours, by running VBoxQtconfig from the terminal.
Uninstallation of Oracle VM VirtualBox on Oracle Solaris requires root permissions. To perform the uninstallation, start a root terminal session and run the following command:
After confirmation, this will remove Oracle VM VirtualBox from your system.
To perform a non-interactive installation of Oracle VM VirtualBox there is a response file named autoresponse. The installer uses this for responses to inputs, rather than prompting the user.
Extract the tar.gz package as described in Section 2.4.1, “Performing the Installation”. Then open a root terminal session and run the following command:
To perform a non-interactive uninstallation, open a root terminal session and run the following command:
2.4.6. Configuring a Zone for Running Oracle VM VirtualBox
Assuming that Oracle VM VirtualBox has already been installed into your zone, you need to give the zone access to Oracle VM VirtualBox's device node. This is done by performing the following steps. Start a root terminal and run the following command:
Replace vboxzone with the name of the zone where you intend to run Oracle VM VirtualBox.
Use zonecfg to add the device resource and match properties to the zone, as follows:
On Oracle Solaris 11 or later, you may also add a device for /dev/vboxusbmon, similar to that shown above.
If you are not using sparse root zones, you will need to loopback mount /opt/VirtualBox from the global zone into the non-global zone at the same path. This is specified below using the dir attribute and the special attribute. For example:
Virtualbox Install Mac Os X
Reboot the zone using zoneadm and you should be able to run Oracle VM VirtualBox from within the configured zone.
Estimated reading time: 4 minutes
Welcome to Docker Desktop for Mac. This page contains information about Docker Desktop for Mac system requirements, download URLs, installation instructions, and automatic updates.
Download Docker Desktop for Mac:
By downloading Docker Desktop, you agree to the terms of the Docker Software End User License Agreement and the Docker Data Processing Agreement.
System requirements
Your Mac must meet the following requirements to successfully install Docker Desktop.
Mac with Intel chip
macOS must be version 10.14 or newer. That is, Mojave, Catalina, or Big Sur. We recommend upgrading to the latest version of macOS.
If you experience any issues after upgrading your macOS to version 10.15, you must install the latest version of Docker Desktop to be compatible with this version of macOS.
Note
Docker supports Docker Desktop on the most recent versions of macOS. That is, the current release of macOS and the previous two releases. As new major versions of macOS are made generally available, Docker stops supporting the oldest version and supports the newest version of macOS (in addition to the previous two releases). Docker Desktop currently supports macOS Mojave, macOS Catalina, and macOS Big Sur.
At least 4 GB of RAM.
VirtualBox prior to version 4.3.30 must not be installed as it is not compatible with Docker Desktop.
Install Macos Virtualbox Amd
Mac with Apple silicon
You must install Rosetta 2 as some binaries are still Darwin/AMD64. To install Rosetta 2 manually from the command line, run the following command:
For more information, see Docker Desktop for Apple silicon.
What’s included in the installer
The Docker Desktop installation includes Docker Engine, Docker CLI client, Docker Compose, Notary, Kubernetes, and Credential Helper.
Install and run Docker Desktop on Mac
Double-click Docker.dmg to open the installer, then drag the Docker icon to the Applications folder.
Double-click Docker.app in the Applications folder to start Docker. (In the example below, the Applications folder is in “grid” view mode.)
The Docker menu in the top status bar indicates that Docker Desktop is running, and accessible from a terminal.
If you’ve just installed the app, Docker Desktop launches the onboarding tutorial. The tutorial includes a simple exercise to build an example Docker image, run it as a container, push and save the image to Docker Hub.
Click the Docker menu () to seePreferences and other options.
Select About Docker to verify that you have the latest version.
Congratulations! You are now successfully running Docker Desktop.
If you would like to rerun the tutorial, go to the Docker Desktop menu and select Learn.
Automatic updates
Starting with Docker Desktop 3.0.0, updates to Docker Desktop will be available automatically as delta updates from the previous version.
When an update is available, Docker Desktop displays an icon to indicate the availability of a newer version. You can start downloading the update in the background whenever it is convenient for you.
After downloading the update, all you need to do is to click Update and restart from the Docker menu. This installs the latest update and restarts Docker Desktop for the changes to take effect.
Virtualbox On Mac
Uninstall Docker Desktop
To uninstall Docker Desktop from your Mac:
From the Docker menu, select Troubleshoot and then select Uninstall.
Click Uninstall to confirm your selection.
Important
Uninstalling Docker Desktop destroys Docker containers, images, volumes, andother Docker related data local to the machine, and removes the files generatedby the application. Refer to the back up and restore datasection to learn how to preserve important data before uninstalling.
Where to go next
Getting started provides an overview of Docker Desktop on Mac, basic Docker command examples, how to get help or give feedback, and links to other topics about Docker Desktop on Mac.
Docker Desktop for Apple silicon for detailed information about Docker Desktop for Apple silicon.
Troubleshooting describes common problems, workarounds, howto run and submit diagnostics, and submit issues.
FAQs provide answers to frequently asked questions.
Release notes lists component updates, new features, and improvements associated with Docker Desktop releases.
Get started with Docker provides a general Docker tutorial.
Back up and restore data provides instructionson backing up and restoring data related to Docker.
mac, install, download, run, docker, local
0 notes
Photo

As you can see, dry February for me is going really really well. @spottedhorsect #dryfebruary #addlocally #artistslife #wearelocal #herenoonetellsmewhattodo https://www.instagram.com/p/Btq_cBBhHOF/?utm_source=ig_tumblr_share&igshid=fmo52fa4xvy3
0 notes
Photo

#duoseries #day511 #plasticchair #addlocation _ Backoffice https://www.instagram.com/p/BwVIwR1nF2X/?utm_source=ig_tumblr_share&igshid=92ftvwdbhpkk
1 note
·
View note
Photo

No rib-eyes, pork chops, butchers block and knives. Just web site design, social media strategy, a lap top, iPad and a view of the trees from the studio. Playing now: “Liars” - @gregoryalanisakov #artistslife #socialmediamarketing #keepmovingforward #multimediaartist #addlocally #herenoonetellsmewhattodo https://www.instagram.com/p/BtlihHoBwlS/?utm_source=ig_tumblr_share&igshid=10i2ocvk1lnne
#artistslife#socialmediamarketing#keepmovingforward#multimediaartist#addlocally#herenoonetellsmewhattodo
0 notes