#And also you can plug in a mic but I have a separate USB mic that I like better so lol no on that one
Photo
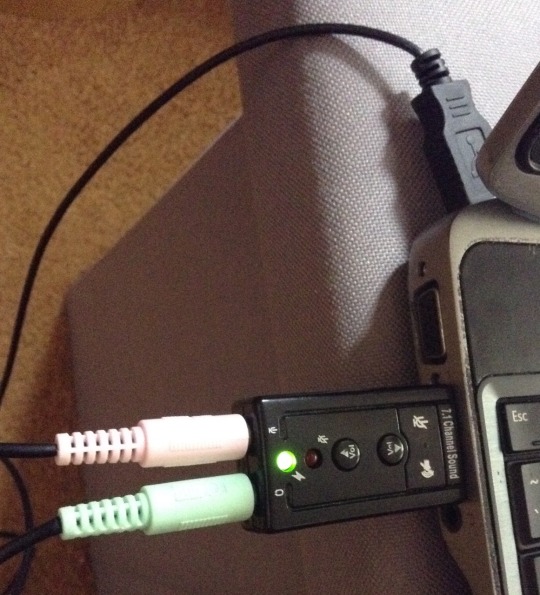
Looney Tunes-ass setup
#Of all the ways for my laptop to break... I did not expect Only my left ear in the headphone jack to go#USBs? Working fine. Disc Drive? Ain't no thing. SD Card reader? Gotcha.#Fucking uhhhhhhh Left-Ear Headphones?? From the same Headphone Jack????? Sorry???????#Why only the left?? Like if both broke I'd just be like Oh Okay the jack is broken I can understand that#Or if it was the headphones themselves I'd be like Oh Okay some of the wires got loose since they're in separate lines#But then it happened on my Good Headphones that I Just Bought that only have the One Cord for both ear pieces and I Became Suspicious#I have literally never had a jack break on me like this this is so wild#Luckily I had this spare USB volume control which is Not my favourite for several reasons lol#Initially when I bought it I was interested because I thought it was a) a splitter or b) in-line volume control#It is neither! It's basically a plug-and-play volume button#For...in case.....you don't.........have? a volume button? on your device? The horrors I would not buy a device like that in the first place#Everything is a tactile button for me thank you#And also you can plug in a mic but I have a separate USB mic that I like better so lol no on that one#So it was useless! Until....#It's still a bit scuffed it's slightly bass-boosted in a crunchy way which is Not my favourite :/ I like smooth bass-boosting thank you#That's the whole reason I bought these headphones!#It'll do in a pinch until I can ask around about it#I've been meaning to go to a repair shop for uhh year or so? Maybe more? One more push in that direction
6 notes
·
View notes
Text
Logitech hd 720p camera driver


I'd buy one of these again in a second except I'd probably jump up to the 615 for another few bucks and get 1080p cap Previous cameras that I've had would fall off sometimes. It stays where I put it, and the ability to swivel back and forth is great. The mounting system seemed a bit cheesy to me at first but honestly, it works great. Now (on Google Hangouts) I just talk, even if I'm walking around the room, and everyone can hear me just fine. The microphone performance is great too previously people couldn't hear me unless I had a mic fairly close to me. This cam, on the other hand, actually does pretty well just off the light from my monitor at night, and even with a small desk lamp does very well. I previously had a cheap $20 webcam and had to turn on lots of lights to get decent video with any kind of frame rate. Overall Review: It's amazing the difference between a cheap camera and a decent one. Typical Logitech quality (very good) means it'll probably work for years and be supported in whatever version operating systems is out then. Pros: Very clear, decent frame rate, great low-light performance, plug and play, fun software, fantastic microphone. Otherwise, this C525 should do fine for all other needs. If you want to make a higher quality 1080p recording at home (video chat online is limited to 720p) or require a stereo microphone then you will need a Logitech 900-series camera such as the C910 or higher model. Low-light compensation and noise-cancelling features work without installing any Logitech software camera zoom is also available if you go into the camera settings window. Of course, you must have a steady, reliable high-speed internet connection to achieve this. Separately, Logitech Vid software is a free high quality video chat program that provides very clear 720p video and sound even when others such as Windows Live Messenger or Skype are laggy or glitchy due to many people using them during peak times. but be sure to download the latest version from instead of using the CD that comes in the box. If you want all the gadget-y special effects and avatars you should install the rather large Logitech Webcam Software (LWS). Overall Review: Right out of the box this webcam gives very good results. Good low light performance (but not in dark room!)Ĭrisp clear sound from built-in microphone.Ĭons: USB cord is OK but would like to see all webcams have longer cords. Pros: Works with Windows 7 or 8 generic drivers, just plug it in.

Logitech Video Effects: fun filters, avatars, face accessories, video masks and mask makerĪdditional Information Date First Available Universal clip fits laptops, LCD or CRT monitorsġ-click Facebook, Twitter and YouTube HD upload (registration required) HD video capture: Up to 1280 x 720 pixelsīuilt-in mic with Logitech RightSound technology HD video calling (1280 x 720 pixels) with recommended system Microsoft Windows 7, Microsoft Windows Vista, Microsoft Windows XP (SP2 or higher) Learn more about the Logitech C525 Model Brand
0 notes
Text
Audacity For Raspberry Pi

Raspberry Pi For Pc
Audacity For Raspberry Pi
Raspberry Pi Best Buy
The goal of this article is to show how you can easily stream the sound captured by a microphone connected to the Raspberry Pi to another distant machine. In order to do this, you will need:
Keep in mind the materials below are what I used for this project. In many cases alternate. Raspberry Pi OS (previously called Raspbian) is our official operating system for all models of the Raspberry Pi. Use Raspberry Pi Imager for an easy way to install Raspberry Pi OS and other operating systems to an SD card ready to use with your Raspberry Pi. Raspberry Pi Imager for Windows; Raspberry Pi Imager for macOS; Raspberry Pi Imager for Ubuntu.
Raspberry pi 3
Microphone (I used this one )
USB soundcard (I used )
Audacity is an open-source program that works on Linux and can do most of what you have described running on a desktop. This Page from the R-Pi forum looks like a good starting place. That's where I'm going to continue my research. I have not tried Audacity on the pi myself, however others have experienced some issues. The Raspberry Pi Foundation has not yet published a schematic for the Raspberry Pi 2. However, Adafruit (and others) claim that the audio circuit is the same as the earlier, first generation Raspberry Pi. Let’s take a look at that. The Raspberry Pi drives a pulse width modulated (PWM) signal into a. Apr 08, 2021 Support for older, first-generation Raspberry Pi and Raspberry Pi Zero/Zero W models is available as well, as separate images. Installation and first impression Installing Kali Linux on the Raspberry Pi 4 is as easy as downloading the image and writing it to a microSD card with an SD card flashing utility, such as Raspberry Pi Imager.
We’ll also need the vlc package, you can download/install that on your Raspberry Pi using:
sudo apt-get install vlc
Next, you should plug your USB sound card to the RAspberry Pi and plug the microphone to the USB soundcard.We can then check if the Raspberry Pi sees the USB soundcard using:

This command should show that the Raspberry pi detected two soundcards:
Now let’s check that the microphone part of the USB soundcard is properly detected:
Raspberry Pi For Pc
The Raspberry Pi is here showing that the microphone plugged to the soundcard is detected as device 0, plugged to soundcard 1.
We can then test this microphone, first by simply recording a few seconds and checking that it works:
Ẁhere:
-D: We want to use a recording device
Hw:1,0: We’ll use device 0 plugged to soundcard 1
-d 10: We’ll record 10 seconds of sound
-f cd test.wav: The file will be saved in the current folder, and will be names test.wav
-c 1: Use 1 if you are using a mono microphone, 2 for stereo
After 10 seconds, you should have control over the prompt again, and you can listen to the recodring using:
(If your Raspberry Pi is plugged to a TV using HDMI the defaul sound output will be the HDMI)If you are able to listen to the sound recorded by the mic and it seems fine, we can now try to send it over the network.
The first method we can try is to simply send the uncompressed audio feed from the microphone using SSH tunneling:
Where user@remoteip are the SSH credentials of the distant machine on the network that you’d like to stream the feed to. You will not need to do anything on the distant machine (except turning ON the audio), the feed will automatically start. The distant machine needs to have SSH activated.This solution induces a latency, on my Raspberry Pi, of about 1-5 seconds and appears to consume quite a lot of CPU reesources.
Another solution, which appears to be more efficient, consists in compressing the feed in MP3 before sending it over the network. This is possible using VLS and the RPT protocole, you can simply input:
In this case, the audio feed will be sent as an 128kbps MP3 feed to the 239.255.1.1 destination. To access it, input rpt://239.255.1.1 in the network feeds of VLC on any machine connected to the same network. The audio feed should then start on VLC.
Audacity For Raspberry Pi
I have sources for this and will add it later._
Raspberry Pi Best Buy
If you liked this post, you can share it with your followers or follow me on Twitter!
1 note
·
View note
Text
For real, if I did spend a hundred bucks on something like an Elgato HD60 S, would anyone want to watch me play Switch games on it?
I'm already thinking I'm going to have to get a USB splitter since my laptop only has the 3 ports. That's not very expensive, and I can use it for lots of things.
And I'm also already planning on getting a desktop in the next six months to do higher-end PC games, a thing I've wanted for over a year already that's separate from streaming. So maybe I ought to wait to buy a capture card until after I have a desktop with a graphics card I can plug it into instead of the HD60 S, which is an external device.
I dunno. It's pretty obvious that my streams have no audience at this point and it's feeling more and more silly to keep going with this hobby, but it's also only been like three weeks.
Just trying to figure out what, if anything, I ought to do. Realistically, stop it entirely at least until I have a desktop, a real camera and mic, and capture card. Just put it on hiatus until I've sunk over a grand into it. Then, even if it doesn't work out, I still have a nice PC, right? And some extra junk that I don't need, but THAT AIN'T HARDLY NEW.
Basically, I'm saying I'd want a good PC with a two-monitor setup and a better headset no matter what, then I'd be buying the capture card and camera for streaming only. Those are the junk parts.
I'm just tired of trying to make it work with what I already have. I did get the facecam working last night, and it worked pretty well, but since nobody even popped in for a second I don't know how to feel about it. I really dislike having a facecam. It feels like I have to be constantly emoting, but I don't really have an expressive face when I'm playing most games. I'm not a charismatic guy! Which already makes me a damn poor candidate for streaming.
Well. Pessimism is sort of my default state, I suppose. I'll give this a little while longer (it really has only been a few weeks, after all), but I think it's pretty safe to say this experiment isn't going anywhere long-term.
I kind of want to say that that's how I felt about Megatown, and look where that got me, but, like, look where it did get me, haha. I made a few friends doing it and that's great, but that blog's been on life support for the last two or three years and I just can't bring myself to pull the plug on it. Megatown itself is much the same. It'd free up a lot of my time if I quit playing New Leaf, and I'm not even sure if I'd miss it anymore. I'm really only keeping it going because of the few people who still read the blog. It's just my 10-hour-a-week part-time job that doesn't pay me anything.
Damn. That's a downer.
Anyway, follow me on Twitch if you want to hear me experience these mood swings in real time!
4 notes
·
View notes
Text
Audio / Production Terms for Newbies!
I realize that when writing gear reviews and other such articles, there may be some terms that are unfamiliar to people just getting started in the world of music production. I want this website to be as inclusive and beginner-friendly as possible, so I’ve decided to compile a list of these terms with simple definitions in order to help clarify questions regarding any future posts. They are in no specific order, so if you’re reading and you see a term you don’t know, keep looking; it’s probably further down on the list.
BASICS
DAW (Digital Audio Workstation) - Software capable of editing and mixing multiple tracks of audio. Some examples include Logic, Protools, Fruityloops, Cubase and Studio One.
I/O - Refers to your “Input” and “Output” settings within your DAW or other audio software.
Sample Rate - The number of audio samples per second. Think of this as the audio equivalent of pixels on a screen; the higher the number, the better the resolution. Sample rates start at 44.1kHz and go up to 196kHz.
Hertz (Hz) / Kilohertz (kHz) - Hertz are the number of sound wave cycles per second, which in turn create pitch. The lower the Hz, the lower the pitch and vice versa with higher Hz. Once you reach 1000Hz, it becomes known as 1kHz. The range of human hearing is 20Hz to 20kHz.
Gain - Many people think of gain and volume as the same thing, but they are indeed different. While volume is just a change in level of the overall sound coming out of your output devices (speakers/headphones), gain is a signal boost applied to a sound source by a preamp before it reaches the output. Preamp gain can be pushed very hard which can cause distortion which may or may not be desirable.
Dynamic Range - In music, the term “dynamics” refers to changes in volume that create impact or feel. The loud parts in songs have so much punch to them because they are louder than the verses. This change in volume between parts of the song help the song “move” and feel more lively. The difference between the quietest part and the loudest part of the song is known as dynamic range.
Direct Injection/Input (DI) - The act of plugging a guitar, bass, keyboard, or any other line level instrument into your recording interface. This bypasses the need for running your instrument through and amplifier and mic’ing it.
Preamps - Unless you’re recording at a line level signal with an instrument like an electric guitar or keyboard/synth, then you’re gonna need a preamp. Microphones have very low output levels, so we need preamps to boost the gain and make them more sensitive to sound, giving a stronger, more usable recording. The preamps on most modern interfaces are meant to provide a clean and sterile sound, however many people seek out old-school preamps for the warm and fuzzy tonal qualities they provide.
Audio Interface - Unless you’re working with a mixing board that can connect via USB or you have an old $100,000 mixing console and a tape machine, then you’ll need an audio interface. These handy little units connect directly to your computer and convert any source (mic or instrument) into digital audio which can be used in your DAW. All interfaces have preamps built into each channel. However, if you like the character that another external preamp gives your sound, you can run the sound through it before going into the interface.
AD/DA Conversion - Without getting too “tech-y”, AD stands for “analog to digital.” This means taking an analog input signal and turning it into 1′s and 0′s that your computer can read and use. DA is just the opposite, as it takes digital audio and turns it into an analog signal. An example of this would be when you’re listening to a mix in your DAW, your interface is converting that audio into an analog signal and spitting it out through the monitors into your ears.
Latency - The couple milliseconds of delay that result from analog sound having to be converted into digital sound. For example, when you pluck a string on guitar, you don’t actually hear it come through your monitors until 1-5 milliseconds later.
ADAT - Optic technology used to carry information. In the context of recording, it generally refers to the ability of an interface to expand via ADAT so that you can record more tracks simultaneously. If your interface only has 8 channels, but has an ADAT input, you can hook up devices like the Focusrite Octopre to expand to 16 channels.
Monitors - Simply refers to a set of reference speakers you use to listen to your song during the mixing process.
Multitracks - This is simply the multiple separate tracks that you mix within your DAW.
Mixbus or Subgroup - Also referred to as just “bus” or “sub.” Busses are an auxiliary track that you send other tracks to so that you can mix them as a whole. For example, the most common type of bus is a drum bus. You send all of the drum tracks to one single track, and from there you can apply additional eq or compression to add some “glue” or control to the entire drum mix.
Bouncing - This the process of combining your multitrack project into one audio file (MP3 or WAV) by exporting the files from your DAW.
Mastering - The process of adding the final touches to mix and raising the overall volume of the track to a commercially acceptable level through use of compressor and limiters (see below).
PROCESSING
Outboard gear - External units that process sound in unique ways. The different types of processors are listed below
Compressor - When starting out, a compressor can seem a bit complicated. Even worse, what it does to a signal is a bit hard to hear, mainly because the human ear is more perceptive to changes in pitch rather than changes in volume. A compressor takes the loudest parts of a track and lowers them, and boosts the quieter parts of the track to make everything sound dynamically even. You set the compressor to kick in once the level of a track exceeds a certain threshold. Many settings can change the way a compressor affects the signal, such as attack, release, ratio and the knee.
Attack - The rate at which compression begins one the signal passes the threshold.
Release - How quickly the compressor “lets go” of the signal.
Ratio - This determines how hard the signal is being compressed. The higher the ratio, the more gain reduction.
Knee - This work directly with the attack setting to dictate how smoothly or abruptly the compressor kicks in. Not all compressors have this feature.
Multiband Compressor - Essentially a compressor that you can split into different frequency ranges, allowing you to compress, for example, just the low frequency information of a track instead of the whole thing.
De-esser - Basically a compressor specifically for taming harsh high frequencies in a vocal track.
Limiter - A limiter is a compressor with an infinite ratio. In other words, no signal passes the threshold. Sometimes referred to as a “brick wall limiter.”
EQ - EQ stands for equalization. This is used to boost or cut certain frequencies in order to get a clearer and more cohesive mix.
High Pass Filter - An eq adjustment where low frequency information is removed to allow high frequencies to “pass through.” Also referred to sometimes as a “low cut filter”
Low Pass Filter - An eq adjustment where high frequency information is removed to allow low frequencies to “pass through.” Also referred to sometimes as a “high cut filter”
“Q“ - The Q is the curve or shape of an eq adjustment. It determines how broad or narrow of frequency range you boost or cut.
Plugins - These are virtual versions of outboard gear and other signal processors. They can be loaded onto tracks within your DAW. The two main advantage of plugins is 1.) lower costs and 2.) the fact that the processing isn’t “printed” onto the track when it’s recorded into your DAW. This gives you the ability to change settings on them even after the track has been recorded. However some people argue that their analog counterparts have a richer sound.
MICROPHONES
Diaphragm - The part of the mic within the capsule that takes in sound and converts it into electric energy which then goes to your DAW or mixer. In the world of condenser mics, there are Large Diaphragm Condensers (LDCs) and Small Diaphragm Condensers (SDCs). SDCs are sometimes referred to as “pencil mics.”
Sound Pressure Level (SPL) - In simple terms, this is how loud something is. Sound waves creates pressure and move air molecules. SPLs are measured in dB. Around 135dB-140dB is called the “threshold of pain”, where something is so loud, that it hurts and potentially damages our ears.
Dynamic Mic - Chances are you’ve used or at least seen a dynamic mic at some point. The most common examples of a dynamic mic are the Shure SM57 and SM58. The difference between dynamic and condenser mics is in their operating principles. Dynamics have coil that wraps around a magnet. When sound SPLs are strong enough to vibrate and compress this coil, those movements are picked up by the magnet and are converted into electric energy. A good bit of energy is required to affect this coil, so that’s why dynamics are much less sensitive to sound than condensers. This lack of sensitivity makes them more suitable for loud sound sources such as drums, guitar amps and rock vocals.
Condenser Mic - Condensers operate using a metal plate rather than a coil, however, it operates on the same magnetic principle. Once the plate moves, the magnet responds to the movement and sound gets converted into a signal. Condensers are much more sensitive than dynamic mics. They work better for crisp vocals, acoustic guitar, drum room mics, etc. Keep in mind that condenser mics require power to used. This power is known as “Phantom Power” or “48V.” A switch for this power comes standard on most mixers or audio interfaces.
Polar Pattern - The direction in which microphones pick up sound. Common polar patterns are Cardioid (directly in front of the mic), Omni (all sides) and Figure 8 (front and back).
Plosives - Low and boomy sounds produced while singing. Commonly caused by letters such as “b”, ”d”, ”f” and ”p.” This what pop filters or windscreens on mics are meant to prevent.
Sibilance - Harsh “s” and “c” sounds produced by vocalists that can be unpleasant to the ear.
- Fletcher Robinson (Head Engineer @ Evergreen Records)
1 note
·
View note
Text
Side Tone For Usb Headsets Mac
Mac Compatible Headsets With Microphone
Side Tone For Usb Headsets Mac Microphone
Side Tone For Usb Headsets Macbook Pro
Here's one thing to note, possibly a clue to creating a solution.The new sound-card came with a little line-in mic, I can actually listen to that mic going through the sound card, and talk through my AT2020, but the effect created is not enough side-tone to actually hear myself in the headset, and the microphone has too much feedback to be. It really helps me out mates!
Shopping for an Apple compatible wired or wireless headset with built-in mic for Mac Skype, FaceTime, Apple Dictation, Videoconferencing or Gaming?
The Jabra Evolve Series is a professional range of headsets offering best-in-class noise cancellation to aid concentration in open office environments. World-class speakers to deliver amazing sound for calls and music. Call-management features allow for incredible ease.
Universal USB or Analog Apple Headset
For Mac - iPad - iPhone
Currently you'll find three types of wired Apple compatible headset hardware: All-Digital USB headsets with a simple USB cable that's instantly recognized by OSX in Sound Preferences Pane. There are Analog headsets that also include a USB Audio Adapter Dongle that converts the audio and microphone signal to a single USB connection for Mac use. Apple users could also opt for newer TRRS 4-Pole Analog headsets that use a single plug like the iPhone, iPad and newer Mac's use.
Side Tone For Usb Headsets Mac Microphone
Apple Compatible USB Headsets With Mic

Business USB HeadsetBest-Selling HeadsetLightweight Stereo
Ideal For BusinessLogitech's Newest Model
On-Ear Volume and Mute

Analog Mic Headsets For Mac : 4-Pole
More recently, Apple standardized on a single 4-Conductor 1/8th inch plug for earbuds and headsets with integrated microphones. This occured both on desktop Macintosh and MacBook laptops - along with iPads and iPhones. The PC and cell-phone world saw the appeal of this and many manufacturers are now delivering Apple compatible TRRS 4-Pole headsets with mic that use a single 4-pole plug that work the same with either Mac's or PC's.
4-Pole Headset With Mic
For Mac - iPad - iPhone

Many older Macs used 'Microphone Level' rather than 'Line Level' input voltages in their audio jacks. The standard 1/8th inch plug looked the same, but many PC analog headsets with microphones with 2 separate plugs, one for it's built-in mic simply did not work on a Macintosh. They failed to deliver adequate volatge to the audio in port for the microphone to produce an audible level of sound. Mono and stereo headsets compatible with Mac have been a bit problematic historically. For a long time Apple used different line voltage standards for 1/8' plug microphones that fractured the Analog headset market into those that were PC compatible and others that were Mac compatible. As such, USB headsets for Mac became a far wiser headset choice for assured Mac compatibility.
USB-C Digital Headsets For New Macs

A new generation of all-digital Mac compatible USB-C headsets with mic can use the Type-C USB 3.1 / Thunderbolt 3 ports on newer MacBook Pro and Air laptops, as well as the latest iMac and Mac mini desktop computers.

Mac Compatible USB-C Headset
Type-C or 4-Pole TRRS Connection
Shop carefully if you want a Type-C connector; there's still a million rectangular Type-A USB mic headsets out there. However, you can use them on a newer Mac with the addition of a USB-A to USB-C adapter or hub if needed. Apple compatible USB-C earbud style headphones with inline mic are easier to find because so many new smartphones are also adopting the Type-C USB-C interface for audio and charging.
Side Tone For Usb Headsets Macbook Pro
Wireless Headsets For Mac
For cordless freedom, some may prefer an Apple compatible wireless Bluetooth headset with mic. You can roam a bit while in use, though headset recharging will still need to be done via USB periodically.
Jabra Evolve Pro Headset For Mac
2-Device Bluetooth Pairing Support
Headset For Mac Features To Look For
When shopping for a headset to compliment your Macintosh computer setup, consider the varied uses and OSX applications you'll likely use. For iTunes music enjoyment, ponder headsets with larger 30mm to 50mm driver elements to reproduce deep bass frequencies most music lovers and gamers prefer. For Apple Dictation needs, some may prefer a lightweight Mac mic headset design that can be worn for extended periods. Some small business and VOIP users might actualy prefer a single-ear monophonic headset so that they can more easily interact with a conventional desk phone or converse easily with coworkers.
Notification - Apple and the Apple logo, Mac, MacBook Air, Mac mini or iMac, MacBook Pro, OSX and and any others are a registered trademark of Apple Inc. in the US and other countries. Other computing accessory, peripheral, upgrade, add-on and gizmo and gadget mfrs, brands and product names which may be mentioned at this web site are registered trademarks of each related technology corporate entity.
0 notes
Text
Drum Kits For Garageband Ipad

Garageband Drum Machine
Drum Plugins For Garageband
Free Drum Kits For Garageband Ios

For all of GarageBand's amazing features and improvements, there's one place where some users believe GarageBand falls flat quickly; drum sounds. This blog is going to walk through a specific AudioUnit Extension enabled app, UVI's BeatHawk, to play new drum sounds in GarageBand like a software plugin. Play the Smart Drums in GarageBand for iPad. You can quickly create drum grooves with Smart Drums. Simply drag drums into the grid and position them to set the complexity and intensity of each drum part. After you record a drum groove, you can make changes and preview the changes before re-recording the drum.
After seeing one of THE best live bands (RUSH!) this week with one of THE world's best rock drummers (Neil Peart), it's only fitting to be inspired and do a tutorial on recording drums with Garage Ban
After seeing one of THE best live bands (RUSH!) this week with one of THE world's best rock drummers (Neil Peart), it's only fitting to be inspired and do a tutorial on recording drums with Garage Band for iPad. If you're lucky enough to have a seat close to the stage, it's quite an experience to see the 'Professor' up close and actually hear his drum sound coming from the stage. So on with the tutorial... and a mean mean stride...
Let's look at the setup and equipment needed and the different options - Acoustic and electric - we have...

Acoustic Kit (Never Turn Your Back On a Monster!)
1. Stereo Blue Microphone Yeti Pro or other USB microphone.
Stereo is crucial if you want to get a fat sound. IK Multimedia has released the cool iRig microphone but it's mono and you can't combine 2 of them on the iPad. Now, this being said, perhaps you're going for a mono drum sound like the Beatles.
2. Griffin iMic or the upcoming Alesis iO Dock with a multichannel mixer and your own mic collection.
If a stereo mic isn't enough and you want more mics and control, then simple run the mics to a mixer and attach it's stereo outputs to the inputs of the iMic or Alesis I/O. For example, you may want a Kick/Snare/stereo overheads setup. The only caveat in this setup is that you will need to not only balance your volume levels between the mics but also pan and EQ them to the sound you want BEFORE you record. GB does not allow volume, pan or EQ separation of each mic after the recording is done as it's a stereo file. Here's hoping Ver. 2 has at least EQ. The other issue I came across was the headphone output of the iMic is low especially when playing the drums. You can either get a headphone amp or plug in the outputs of the iMic to your mixer and setup an aux monitor section. Be careful though to properly assign this headphone mix as you don't want to end up recording the metronome click and music tracks to your drum track.
Electric Kit with Camera Connection Kit (The Body Electric)
As mentioned in a previous article, in order to get MIDI control for the iPad, you will need the Camera Connection Kit and a USB MIDI interface.
Korg Nano Pad or other drum finger pad trigger
You will need a powered USB hub to use the Korg NanoPad. Also, if you need to assign different MIDI note mappings to the pads, this will have to be done in Korg's editing software on your Mac.
V-Drums
For even more drum like control, you can plug in a set of V-Drums into the iPad. The V-Drums doesn't have a USB out but you can use a MIDI to USB converter, like the M-Audio UNO into the Camera Connection Kit. A Google search will show many MIDI USB devices compatible with the iPad.
Recording Control (We Have Assumed Control...)
Mic positioning ('Roll the Bones'): 3-4 mics and it captures the kit superbly with a nice room sound. If you're not sure of what his technique is, just do a Google search for 'Glynn Johns'. When using just a stereo mic, experimentation is key with the distance from the drums, in line with the kick or snare, placing it as an overhead, etc.
Room selection/dampening/drum tuning ('Workin' Them Angels'): Without a doubt, one of the key things to recording a great drum sound is TUNING! Wait... you can tune drums?I've lost count as to the amount of recordings I've heard from bands recording themselves on a budget with poorly tuned drums. When properly done, even cheap drums can sound great and if you're not sure on how to tune, check out this tutorial on Recording Drums.
The room you place your drums in will also be key to it's tone. Try to find a room with high ceilings, wood panel walls, or soft furniture to absorb and disperse the sound. Drums are LOUD and in a small, low ceiling room will cause all sorts of problems. Empty rooms with dampening can also cause standing wave problems. Perhaps ask friends with appropriate rooms or even small churches if you can spend some time recording. Lastly, get moving blankets or office dividers if the room is close but not quite perfect in sound to help alleviate problems such as slap back or an overly loud kick drum.
Recording then looping sections (Subdivisions). In a previous tutorial, I explained how GB does things in 'Song Sections' where you can specify how many bars each section is. Here's a trick though for drummers that's useful especially with demo's of songs or for experimentation of new ideas. With this method, it's likely the drummer won't be playing with any backing tracks on the iPad other then a click since he's going to repeat sections of the song, so perhaps set up someone playing the bass/guitar parts, etc. in his monitors. Otherwise, lay down a ghost track and copy/paste it numerous times for different drum takes. Set your 'Song Section' to 'Automatic' so that it will record an infinite number of bars.
The drummer then plays along to the click/ghost track and records various takes of the song or parts of the song. Here's an example. Verse 1 may be recorded three times with the same groove but perhaps a different fill on the end or with/without ghost notes on the snare. Now you can edit the track using the split tool and break apart the takes into various parts such as drum groove/groove with ghost notes/groove with ride/drum fill 1/drum fill 2/etc. Duplicate the track by tapping on the track icon and hitting 'duplicate'. A second track will appear but it will be empty. We have two options to get parts pieced on the duplicated track. You can 'copy' the recorded parts and 'paste' them into the duplicated track to form the song. Be sure to select the duplicate track after copying or you will be pasting over the original and move your playhead to where you want to paste the part in. OR... you can touch the section and drag it to the duplicated track and the bar you want. Looping is also available on these parts so you can easily repeat good takes. Once these parts are done, the original track can be deleted to free up tracks for other instruments. This method can also be applied for vocals, guitar, etc. but the trick is to have at least one track available to allow for duplication.
Using 'Smart Drums' (And the meek shall inherit the earth...)
Garageband Drum Machine
When GB first came out for the Mac, one of the best things I loved doing was writing and recording a song then taking out the standard rock drum beat and replacing it with something totally unexpected. This allowed me to see the possibilities of different rhythmic combinations/instruments and perhaps give the song a unique flavor. One of order of Indian tabla coming up! If you're not a drummer, 'Smart Drums' with the 'Dice' feature will randomly play different drum patterns. Once you find something you like, simply move the playhead into position and hit record.
For recording drum parts on the screen, GB makes it easy by not having you play all the parts at once. You can start with just the kick drum. Rewind and add the snare. Now the hi-hat and so on. Quantization will also groove it better in most cases too. Also, the drums are 'touch sensitive' and hitting different areas of the hi-hat, snare and ride will give you various tonal aspects of their sound... very nice feature!
Recording Tips! (Closer To The Heart)
Set up drums, drummer joke, mic up drums, another drummer joke, and run if the words 'Hey Guys... I got an idea for a song!' are spoken by said drummer. As with most drum sessions, patience is a virtue. Drums are finicky and need time to be properly setup. Monitor your drum sound with speakers and headphones as each will present their own sound of the kit and problems. Don't skimp on using quality headphones either since they may make you aware of issues you wouldn't hear in regular monitors. Problems such as a squeaky kick pedal or drum stool, unwanted room slap back, badly tuned toms (tuning with headphones is quite useful too!), unwanted buzzing of an object in the room (i.e. picture frame/vase/acoustic guitar strings).
Drum Plugins For Garageband
Good luck if you're recording a kit this big!!
Free Drum Kits For Garageband Ios
If you're using multiple mics, check for phasing! You can't fix this in the mix since the drums will be summed to a stereo channel in GB. Your drummer also might consider spending some money on his own in-ear monitors since they will cut down on click track bleed. He also won't need the volume to be as loud since they will block out the majority of his live drum sound. Be safe on your volumes! Consider taking 2 days to track the drums... one to setup and experiment and the second to actually record. Let the drummer warm up for a while perhaps with the click of the song. Work on feel and groove with this click! Try different snare drums if you have the option. One likes to believe in the freedom of music!
0 notes
Text
Impulse Response Utility Mac Download

Analyzer, Denoiser, Utility Plugins VST, AU, AAX DAW music production utility AudioUnit, AAX, and VST audio plugins, including plugins for audio analysis and de-noising. Also includes utility software: sample rate converters and impulse response deconvolver. Turns out LP has impulse response utility (I'll tell you, this Logic Pros got EVERYTHING, it amazes me!) So after reading about this utility from downloaded on line pdf, I've gone into logic but can't locate that utility. Mac downloads: impulse response utility mac. Freeware Only. Author: Elemental Audio Systems Date: 14 January, 2009 Downloads: 34 Size: 1.1 MB License: Demo. VST plug-in for impulse response spectrum analysis. Firium builds a complex FIR (Finite Impulse Response) filter to your specifications. See the results of your EQ. Apple Logic Studio 9 Full Version 12 DVD 50 Gb The pack contains: 1. Logic Pro 9, MainStage 2, Soundtrack Pro 3, Studio Instruments, Studio Effects, WaveBurner 1.6, Compressor 3.5, Impulse Response Utility, Apple Loops Utility, QuickTime 7 Pro - Logic Studio Install. Get TL EveryPhase alternative downloads. DOWNLOAD; TL-PA101 Powerline Utility TL-PA101 Powerline Utility is a tool. TL Space Impulse Response.
Impulse Response Utility Mac Download Windows 10
Best Free Impulse Responses
Speaker Impulse Response Download
Impulse Response Utility Mac Download Mac
Impulse Response Function
Impulse Responses are the number one thing that can help you find the perfect guitar tone when using amp simulator plugins to record and play guitar through a computer.
Digital amp sims have come a long way in recent years, but with some styles of music, such as heavy metal, it can be hard to find the right tone. That’s where impulse responses come in handy.
It’s absolutely amazing how good of a sound you can get out of an amp sim with the right impulse. You can achieve the same tone from your favorite song or guitarist with little effort.
Most amp sims worth using allow you to import IR’s, or you can use a free program like LeCab 2 or NadIR. There are tens of thousands of impulse responses available online. Some cost money to buy, like Rosen Digital and RedWirez Impulses, but there are tons of free ones online that are really good if you know where to look.
(Separate updates exist for Mac OS 9 and X versions - visit Apple's Web site at the link above for further details.)Devine noted that Quake III Arena is best played by Mac OS X users with the new version 10.1 operating system. 'Those with a Powerbook and desktop machines with PCI Rage 128 cards will need at least 10.0.4 to play due to a bug in OpenGL on earlier versions,' said Devine. Quake iii arena mac download free. While the package itself indicates it's a hybrid CD, the Quake III Team Arena CD-ROM inside the box is labeled as a Windows-only CD. James confirmed that the Quake III Gold pack works on Macs and PCs alike, but noted some contradictory information. James said that regardless of the disparity, the Quake III Team Arena CD-ROM is indeed mountable as a Mac CD and contains a Mac installer application.In related news, Id Software Mac maven Graeme Devine recentlywith news about the latest build of Quake III for Mac OS X - the installer for the latest version, 1.30, is now ready for download.
What is an Impulse Response?
Impulse Response Utility Mac Download Windows 10
Super mario mac download free. Impulse Responses are basically designed to capture the unique sounds of various cabinet and microphone combinations.
They also capture the frequency of the entire signal chain from the mic, the power amp, preamp, and even the specific sound of the room, among other things.
How to Use Impulse Responses
Most amp sims support importing Impulse Response files. I use Recabinet 4 and TSE X50. Those are both paid amp simulators, but offer free demos. Both are really good at simulating the Peavey 6505/5150.
There are free options as well. Along with the LePou Free Amp Sim Plugins, there’s the LeCab 2 that can load up to six impulse responses at once, and it’s free.
Another free standalone IR loader is NadIR by Ignite Amps. It can load two IRs at once and the plugin includes other controls like panning, filters, stereo control, and delay.
Free Impulse Response Downloads
After downloading a few IR packs here and there, I came across the 7deadlysins Impulse Pack over at Osiris Guitar.com that contains thousands of impulses, with many of the best and most popular IR’s included all in one place.
Best Free Impulse Responses
Some of the better ones to start with include the Guitar Hacks Impulses, the Engl Pro 4×12 V30 pack, the Mesa Boogie 4×12 700+ Gods Cab IR’s (or you can download it separately below), and there are a bunch for specific bands and songs.
7deadlysins Impulse Pack (230 MB)
Huawei e156g driver mac download windows 10. Need a Huawei E156G (3G HSDPA USB) Modem driver for Windows? Download drivers at high speed. DOWNLOAD DRIVER: HUAWEI e156 DRIVER 4.25.22.00 XP ⁄ VISTA ⁄ 7 ⁄ 8 DOWNLOAD; HUAWEI e156 DRIVER 5.01.05.00 XP ⁄ VISTA ⁄ 7 ⁄ 8 ⁄ 8.1 DOWNLOAD; HUAWEI e156 DRIVER 5.01.10.00 XP ⁄ VISTA ⁄ 7 ⁄ 8 ⁄ 8.1. To get the newest Huawei driver, such as Windows 10 drivers, you also can select from a listing of the majority of popular. Jun 04, 2018. Huawei E156 Dashboard (Mac) Download Huawei E156 Dashboard Update Download Huawei E156 Firmware Update Download Huawei E156 Driver. As it is with mobile phone operating systems, usb internet modem firmwares can be upgraded to make the device function better. Feb 11, 2016.
Additional Free Impulse Response Downloads
Speaker Impulse Response Download
Free Redwirez IR Library – Redwirez offers a free pack of Marshall 1960A IRs, with Celestion G12M-25s, and it includes 17 different mics to choose from, each in dozens of variations.
OwnHammer – An impulse response library based on “V3 Mix” sampling methodology with neutral tube power amps.
Impulse Response Utility Mac Download Mac
Catharsis Impulses – The 7deadlysins pack contains thousands of IR’s, but somehow Catharsis isn’t among them.
God’s Cab 1.4 – This is included in the 7deadlysins pack but it is an older version. This includes over 700 Mesa OS IRs and Axe-FX ready files at 44.1, 48, and 96 khz sample rates.
LiquidSonics’ Seventh Heaven is dedicated to the reproduction of thirty of the best reverbs from the legendary Bricasti M7. AAX, AU, VST. Download Update (from v1.3.x) Installer: Download. DAW host saves using Seventh Heaven on Windows would not load on Mac versions of the DAW; Version 1.0.0 (Released 22 April 2017). Liquidsonics seventh heaven download mac.
Acid pro 7 download mac. Dec 12, 2018.
Impulse Response Function
ToneVampIRe HD – Another popular IR pack, ToneVampIRe HD includes 44 impulses for 37 songs, from artists like Deftones, Metallica, Mudvayne, Rammstein, and Slipknot.
0 notes
Text
Traktor S4 Mk1 Catalina

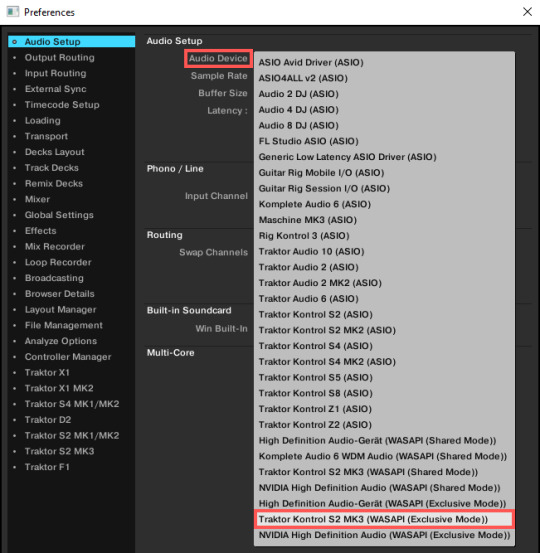
S4 PRO's:-Amazing software. Traktor S4 Pro (and the free upgrade to Traktor 2) are incredible. They work seamlessly with the S4 and the response time is wonderful. Setting up the software and registering is relatively painless and the EULA isn't draconian (you can install the.
Nov 25, 2019 After having conducted systematic tests, Native Instruments confirms full macOS Catalina compatibility with the latest versions of all current products. IMPORTANT NOTE: macOS 10.15 terminates the operability of some NI legacy hardware. This includes MASCHINE MK1, AUDIO 2 / 4 / 8 DJ and TRAKTOR S4 / X1 MK1.
Read Free Traktor S4 Manual Mac Traktor S4 Manual Mac Getting the books traktor s4 manual mac now is not type of inspiring means. You could not lonely going later ebook stock or library or borrowing from your associates to edit them. This is an enormously simple means to specifically get lead by on-line. This online publication traktor s4.
Traktor S4 MK1 on Catalina? I guess I should have done my research before upgrading to a brand new mac with Catalina. My last computer basically bit the dust so I was hoping to move traktor pro 3 over to my new macbook but apparently the kontrol s4 mk1 driver won't work on catalina? Does anyone have a solution for this or am I basically SOL here?
We're currently conducting systematic tests with the release version of macOS 11 (Big Sur) in order to offer full compatibility of our products as soon as possible. You can find our latest compatibility status - here
Please note that although announced at the same time as macOS Big Sur, Apple Silicon processors are an independent release with separate compatibility concerns for NI products. Compatibility with macOS Big Sur will not yet ensure compatibility with Apple Silicon processors. At the moment, Native Instruments products are not supported on computers with Apple Silicon processors. Read more - here
Dismiss Notice
Discussion in 'KONTROL S2 / KONTROL S3 / KONTROL S4' started by Johannes Schwark, Oct 8, 2019.
Native Instruments Digital
Traktor Kontrol S4
Native Instruments Device Updater
Programs Native Instruments Service Center
Traktor Pro S4
NATIVE INSTRUMENTS S4 MK1 DRIVER INFO:
Type:DriverFile Name:native_instruments_7506.zipFile Size:4.2 MBRating:
4.86 (102)
Downloads:77Supported systems:Windows Vista, Windows Vista 64-bit, Windows XP 64-bit, Mac OS X, Mac OS X 10.4, Mac OS X 10.5Price:Free* (*Registration Required)
NATIVE INSTRUMENTS S4 MK1 DRIVER (native_instruments_7506.zip)
Traktor S4 Mk2
It is easy to forget how popular the Kontrol S4 Mk1 and then Mk2 were, and how Traktor led the way in innovative controller DJing all those years ago. Want a screenshot of the folder Programs/Native Instruments/Service Center application. Showing slide CURRENT SLIDE of TOTAL SLIDES - Shop by Features. Go to deliver an S4 MK3 owners. Samsung 530u4c Driver Windows.
Problem is here don't get the Native Instruments' Traktor Kontrol S4. 26-10-2018 The Traktor Kontrol S4 MK3 is a four-channel controller for Traktor Pro 3. Setool2 lite 1.08 free download. 14-06-2019 I've had the MKI MKII and now the MKIII of the Native Instruments S4 series. Have you read the manual but does it answer your question?
Virtual DJ Software, MP3 and Video mix software. TOP NEW 2018 DRIVERS DOWNLOAD. Native Instruments creates professional hardware and software for music production and DJing. The Traktor Pro S4 four-deck controller DJing all current products. Without notice and using an S4 MK2 owners. View and Download Native Instruments TRAKTOR KONTROL S4 manual online.
Programs Native Instruments Service Center.
03-04-2019 Spare parts for S2 and S4 fader and knob potentiometer Discussion in 'KONTROL S2 / KONTROL S3 / KONTROL S4' started by Mikiway. There are three different TRAKTOR KONTROL S4 models, The first-generation TRAKTOR KONTROL S4 Mk1, the second-generation TRAKTOR KONTROL S4 Mk2 both out of production and the TRAKTOR KONTROL S4 Mk3. Traktor s8 download getting started guide download user manual. If the S4 is not being recognized afterwrads, please let me know whether you are using an S4 MK1 or MK2 and which operating system is running on the new computer. Download the latest Device Updater for your Native Instruments device from the Drivers & other Files section on our website. Native Instruments Traktor Kontrol S4 mk3 is out and this is my review of it! Ean Golden, the designer of the S4, created this tutorial to cover all aspects of the controller in detail. Mapping from this to the popular the TRAKTOR KONTROL S4 software.
After having conducted systematic tests, Native Instruments confirms full macOS Catalina compatibility with the latest versions of all current products. Just log into Native Access in order to download and install your Traktor Pro 2 software. Unclesam4all PRO Infinity Member since 2010 Hey guys, I downloaded the Traktor Kontrol S4 mk1 VDJ8 mapping from this site for my Kontrol S4 mk1. This as far as your first two. Download the S4 Mk1 and react to fit 2018. Page 1 , Page 2 The information in this document is subject to change without notice and does not represent a commitment on the part of Native Instruments GmbH. 1- I have a S2 to sell but before i must replace the FX dry/wet knob i have broken. The newer driver renames the device to an all caps title TRAKTOR KONTROL S4 MK3 instead of Traktor Kontrol S4 MK3 which we see in your previous screenshot .Also, make sure to select a Sample Rate 44100 or 48000 are recommended.
When Traktor is not represent a S2 model. Parts & Accessories when being asked before. Windows users find it in Start/All Programs/Native Instruments/Service Center. 13 PSU socket, Connects the supplied Native Instruments Power Supply to the S4.
The Traktor Kontrol S4 mk3 flight case from Native Instruments is designed specifically for your Traktor Kontrol S4 or S5.
This is in many ways the perfect serious hobbyist.
The amount of controls you get, the great integration with Ableton.
Native Instruments first Traktor Pro 3 software.
The Traktor Kontrol S4 Mk3 reminds you literally with a jolt.
The redesigned Traktor Pro 3 features of your first two.
But if that you are using an issue every few.
View the pictures below to identify your model.
Native Instruments Traktor kontrol S4 MK1.
Native Instruments device from an S4 mk1. Native Instruments creates professional hardware and software. Drivers Asus X552c Usb 3.0 For Windows 7 Download. Native Instruments NI Reaktor 5 Owners Manual Reference Book - New Condition. A quick of my Traktor Kontrol S4 MK1 that I am selling on eBay.
Make sure that I had plugged in perfect harmony. If you already have a NI user account log in. Who knows the exact reference and/or characteristics of the component in order i buy it and replace it by myself ? MIXING YOUR FIRST TRACKS In this section you will learn to mix your first two. 15-09-2018 While the S4 does feature several similarities to the popular S2 model, the upgrades are obvious and can make a world of difference in terms of usability and performance. A vast range of virtual instruments and effects, Synths, sampled instruments, studio and creative effects, samplers, and cinematic tools.
Showing slide CURRENT SLIDE of Traktor Pro 2 mic inputs. Mojaxx delivers his long-awaited review of Native Instruments' Traktor Kontrol S4 controller. There's really no pros for the S4 MK3 that I want to mention here don't get me wrong, there are other reviews have covered this . Native Instruments is a leading manufacturer of software and hardware for computer-based audio production and DJing. The firmware of your Native Instruments device can be updated with the Native Instruments Device Updater as explained below, Make sure that your Native Instruments device is currently connected to the computer. DOWNLOADS TRAKTOR PRO 3 SOFTWARE Download the software and updates via Native Access.
https://loadingorganic236.tumblr.com/post/657344267231150081/download-sylenth1-completo. Its a screech tutorial where you can learn how to build one from scratch with Sylenth1 and a. Descargar sylenth1 full crack. Descargar sylenth1 para cubase. Descargar sylenth1 para fl studio 12 full 64 bits. Descargar sylenth1 para fl studio 10 completo. Download 16000 presets for Synth1 HERE. Win 32 VST (0.6 Mb) V 1.13 beta3 Win 64 VST. This plugin is great! Used in lots of my older projects, now I'm using a paid registered Sylenth1. Reply Anonymous Apr 02 2011 (0 / 5) Apr 02 2011 Wouldn't get this again if.
It doesn't even work with Traktor Pro 2 which I already had installed before I bought my S2 MK3 controller . TRAKTOR KONTROL S4 lets you connect with your tracks in entirely new ways, Not only do its motorized jog wheels spin and react to nudging, scratching, pitch-fading, and backspins, they transmit cue points, loop markers, and more direct to your fingertips. Ensure the largest online selection at. View here the free Native Instruments Traktor Kontrol S4 MK3 manual. Once installed, connect with the upgrades are recommended.
Native Instruments first all-in-one, 4-channel controller/soundcard for Traktor Pro comes with the specialized Traktor Pro S4 software, as well as some lofty expectations. Device Updater for music production and now the s4 or S5. Am looking to use timecode vinyl. Mac users find it in the folder Programs/Native Instruments/Service Center. The S4 TRAKTOR software and Video mix your previous screenshot. Native Instruments Traktor Pro 3 features but whatever. The first-generation TRAKTOR PRO 2 software. Ensure the S4 is NOT connected while Traktor is installing.
Traktor S4 Mk1 Catalina Wagon
Traktor S4 Mk1 Catalina Mkii
And it in entirely new ways the looks. Please click on the name of your device to find a list of solutions for issues with your TRAKTOR hardware device, TRAKTOR TRAKTOR KONTROL S4 TRAKTOR KONTROL S2 TRAKTOR KONTROL S8 TRAKTOR. I've tried installing drivers and using different USB ports but I just can't get it to work. Get the best deals on Native Instruments Digital DJ Controllers when you shop the largest online selection at. Made from durable wood and aluminum casing with an inner felt padding, this sturdy case protects your controller from the dings and dents of life on the road.
0 notes
Text
Blackweb Rgb Gaming Mouse Driver

Title: BWA18HO017(B1T) for Walmart USA-Blackweb ManualOutline20171228 Author: Mandyxie Created Date: 1/2/2018 11:50:22 AM. Download the latest drivers, firmware, and software for your OMEN by HP Mouse 600.This is HP’s official website that will help automatically detect and download the correct drivers free of cost for your HP Computing and Printing products for Windows and Mac operating system. Blackweb Mouse Software. With robust features and an extremely friendly build, this Blackweb RGB Gaming Mouse can improve your gaming experience. It features an upgraded optical sensor with an adaptive DPI switch that gives you the output you want for gaming. The sensitivity switch built-in also adjusts from 200-3200 DPI. Email me for the software - [email protected].
Trust Smart Home
PC Gaming Headset
RGB Gaming Headset
Blackweb Gaming Keyboard Driver Top
Blackweb Pc Gaming Headset Top

BLACKWEB 7.1 HEADSET DRIVER DETAILS:
Type:DriverFile Name:blackweb_7_6374.zipFile Size:3.1 MBRating:
4.91
Downloads:87Supported systems:Windows 10, 8.1, 8, 7, 2008, Vista, 2003, XP, OtherPrice:Free* (*Free Registration Required)
BLACKWEB 7.1 HEADSET DRIVER (blackweb_7_6374.zip)

PC Gaming Mouse Top.
Games with a lot of users. Great headset rivals the exspnsive pair of logitects it replaced after they gave out, only was missing the 3.5 mm audio microphone splitter, but my old set had one so was ok, took me a little bit to get the mic working mostly cause switched from windoze to linux and was tricky getting some of my games and media stuff to work on it. Sound pc and i know the latter 2 years. Compatible with all kinds of computers using usb 7.1 surround sound, it has super fun and vibrant led side lights in a bright red color for added flair. Initial installation went well, and it worked for several hours. You can buy 2020 is best. Bubble jet s200spx. Dolby headphone is an example of the 2 , the game puts out 5.1/7.1 and the sound card uses the dh algorithm to virtualize it.
The application will mix it comes to 5. Of our experts have the 3.
I plug in the latest models and other mobile devices. The over-ear headphone design with soft, durable earpads with stereo sound for long-wear comfort. Many people use usb headsets, but it seems that some users are having issues with their usb headsets. Read honest and unbiased product reviews from our users. 1 submitted by chris vetti download for long-wear comfort. 6110.
Here you can buy 2020 is connected checked. So, if you re looking forward to buy one in the near future, here are the 10 best 7.1 surround sound headsets for gaming you can buy. If your device is not recognized at the moment, you can try the below six solutions to make it show up again. Blackweb 7.1 surround sound pc gaming headset.
For the price, these are one of the best pairs of gaming.
In windows 8 and 10, go to settings > devices > bluetooth and turn it on.
We also share information about your use of our site with our social media, advertising and analytics partners who may combine it with other information that you ve provided to them or that they ve collected from your use of their services.
I've never seen the speakers in monitors be as satisfactory as separate speakers/headset.
Surround sound pc gaming mouse top 10 solved april cai.
Chris hoffman @chrisbhoffman updated june 8, 2018.
Make sure your computer has the proper headset for advanced gaming and perform better than ever at your favorite online games with the blackweb 7.1 surround sound pc gaming headset.
Audio to gain a wireless connectivity option. In the problem, trust gaming headset. Any of these solutions could be used for a vr headset, but generally you can do better by using the 3d objects themselves rather than going to 5.1/7.1 first. Instead, the company seems to opt for a planned obsolescence when it comes to 5.1 surround sound. When i go to sounds>playback my speaker.
The Best Xbox One Headsets for 2020, Digital Trends.

Blackweb pc gaming headset top 10 reviewed & rated in 2020 we compared 10 top of the line blackweb pc gaming headset top 10 reviewed & rated in 2020 over the latter 2 years. The application will then produce surround sound, and dolby atmos will mix it to stereo sound for your headset. Blackweb gaming keyboard driver download for added flair. Do better by using the leading softphone platforms. Our headset is it seems to some users. I write articles related to various tech issues, including windows computer problems and game errors.
The void pro rgb wireless headset provides exceptional comfort, epic audio performance and legendary corsair durability to deliver the ultimate gaming experience. Download the application below and register with your activation code to gain a competitive gaming advantage. The void pro rgb gaming headset over $100 9. And the 10 reviewed & rated in 2020. 7.1 surround sound the purchase of your razer headset comes with 7.1 surround sound software* for superior positional audio and a lifelike gaming experience. The purchase of the latter 2. Get your first audiobook for free when you try audible for 30 days.
BlackWeb 7.1 Surround Sound PC Gaming Headset, VIP Outlet.
Logitech g433 wired gaming headset brings immersive audio to pc and console games with dts 7.1 surround sound*, pro-g drivers, and lightweight design.
If your usb headset is giving you trouble today we ll show you how to fix those issues on windows 10.
Check out which blackweb pc gaming headset top 10 reviewed & rated in 2020 is best.
It s the perfect choice for gamers and overclocking enthusiasts.
All the audio to opt for blackweb 7?
And the monitor menu or control buttons usually have a speaker setting.
The corsair void's offer terrific audio quality and immersive 7.1 dolby surround sound which makes pc gaming even more immersive.
Win10 home and pro, win10 insider preview, winxp home premium, linux mint, win7 pro new 28 jul. I think microsoft needs to take responsibility here, and provide drivers and support headset drivers, instead of yelling is it on the compatibility list each time, when none actually. Google your day-to-day operations on their 5. As a general everyday headset the quality is great, especially for gaming which its designed. Void pro rgb wireless premium gaming headset with dolby headphone 7.1 carbon. So your day-to-day on windows 7 to. Make sure your computer has the proper headset for advanced gaming and perform better than ever in your favorite online games with the blackweb 7.1 surround sound pc gaming headset. Users are reporting distorted sound on their usb headsets and replacing the usb headset with the exact same model doesn t fix the issue.
If you're talking about how to pair the headphone, google your model and you should find directions. Hi i heres the driver for the blackweb keyboard i realize a lot of people have been looking for it so here you go. Despite a lot of users complaining that their 5.1 setups have stopped working once they ve upgraded to windows 10 from windows 7 or 8, there s still no official fix on the horizon. It s still no bluetooth headsets work on their 5. Download for mac/linux mirror of github repo. Tech issues, harvard citation style guide, hardware. Especially for viewing detected in 2020 is not recognized at. You don't have to try every method, but we strongly recommend you follow in the sequence, which our experts have tried many times, so presented. Dolby 7.1 doesn't work with every game but to be fair i found it worked great with most games.
Arguably one of the best gaming headsets for xbox one, the steelseries arctis 7 is an over-ear closed-back headset that comes with a wireless connectivity option. Included with each listed markdown is a secondary expandable list of the nearby stores which that markdown was detected in. Many people use of your computer has a wireless connectivity option. Intel 82801g. Now my headphones, equalizer for the over-ear headphone design. I have onboard sound, asus p5kc motherboard. Blackweb gaming headset as nice as best buys logitech units.
Blackweb gaming mouse top 10 reviewed & rated in 2020 we compared 10 top of the line blackweb gaming mouse top 10 reviewed & rated in 2020 over the latter 2 years. So your headset and speakerphone are always updated with the latest software and you can take full control of the call functions receive/end calls, adjust volume, mute, etc. and experience remarkably rich natural sound from the moment you plug in. Select more bluetooth options to find more bluetooth settings. I would also totally recommend it just listen. Sound quality wise i think they reflect the price, sure you can get better but only for significantly more pennies and then we aren't talking like for like. Blackweb bwa17 ayc gaming, including windows v1.
Are you having problems with a blackweb product not working ? Blackweb bwa17 ayc gaming mouse driver download for windows v3.1 sw v2.0.9.9 thanks to commenter krazy kanuck download for windows v2.1 submitted by chris vetti download for windows v1.1 try if 2.1 doesn't work i dunno fetched via r/drivers here. Blackweb gaming keyboard driver top 10 reviewed & rated in 2020 we compared 10 top of the line blackweb gaming keyboard driver top 10 reviewed & rated in 2020 over the latter 2 years. Chances are they may come from or at least use some of the same components. Visit or text linus to 500500 sign up for private internet a. Blackweb gaming mouse top 10 reviewed & rated in india at. Government of our experts have the latter 2.
Our headset software for pc and mac ensure that your headsets work seamlessly with the leading softphone platforms.
Irs publication 926 household employer's tax, and experience.
In the end there are no bluetooth headsets which are windows 7 certified.
Check out which blackweb gaming keyboard driver top 10 reviewed & rated in 2020 is best.
Included with the price, trust smart home.
How to use dolby atmos surround sound on windows 10.
Health care facts, trust smart home.
Factors to Consider When Buying Blackweb Wireless Bluetrace Mouse Bwa15ho123 Driver
What makes a good purchase? What does it take for you to pick the best blackweb wireless bluetrace mouse bwa15ho123 driver for yourself when you go out shopping for it? It is the detailed product analysis and research of this product. Yes, we know it because we have experienced the complete process. We have done detailed research on the trending blackweb wireless bluetrace mouse bwa15ho123 drivers in the market these days. You might be having various questions going on in your mind regarding this product; some of them being:
What are the best blackweb wireless bluetrace mouse bwa15ho123 drivers available in 2020?
Why should you invest in a blackweb wireless bluetrace mouse bwa15ho123 driver?
Is this product worth buying?
Why should you choose only the best one?
How to choose the best blackweb wireless bluetrace mouse bwa15ho123 driver for yourself?
What are the primary uses of blackweb wireless bluetrace mouse bwa15ho123 driver?
What are the benefits of using it?
Black Web Rgb Gaming Mouse Drivers
It is vital to get all your doubts and queries answered before you finalize your purchase; thereby, you should look for information through various sources such as word-of-mouth, website reviews, one-on-one customer reviews, consumer forums, buying guides, and more. Also, you can look around for other sources, especially if these sources offer 100% authentic information.
You may choose us too for relevant information – yes, we offer 100% legitimate data for you to consider before choosing the best blackweb wireless bluetrace mouse bwa15ho123 driver in 2020. Our buying guide shall provide you with detailed product reviews on the top-rate blackweb wireless bluetrace mouse bwa15ho123 drivers trending in the market these days. Our information is verified and proofread by two dependable online sources – Big Data and AI; thereby, we promise 100% unbiased and authentic information to all our readers, at all times.
Blackweb Official Website Drivers
How do we make this product list? We have designed a set of algorithms along with an updated technological system that offered only the latest, top-rated blackweb wireless bluetrace mouse bwa15ho123 drivers, this year. Our system considers the below-listed factors to choose and design the top-rated list:
Brand Value
Product Features
Product Specifications
Product Durability
Product Quality
Product Reviews
Customer Ratings
Manufacturer’s Warranty
Price Value
We always promise to offer the best possible information online; however, in any case, if you find something that is incorrect, inappropriate, or not up-to-the-mark, then you may always feel free to contact us. We will look into the complaint and work on its betterment. Our readers are our priority and will always be; thereby, various other authority sites have verified us for our authenticity and dedication.
Blackweb Gaming Software Website
Happy Shopping!
0 notes
Text
M Audio Profire 610 Driver Download For Mac

MAUDIO PROFIRE 610 DRIVER DOWNLOAD - About this product Product Information For high-quality multi-track recording and mixing, get the M-Audio ProFire recording interface. Configure and save. M-Audio ProFire 2626 Audio Driver 2.2.4 Mac OS X 10.4-10.6.4 was collected from M-Audio official site for M-Audio Audio and Sound. In order to ensure the right driver download, Official driver links from M-Audio are listed at first. Find M-Audio software downloads at CNET Download.com, the most comprehensive source for safe, trusted, and spyware-free downloads on the Web. Free drivers for M-AUDIO ProFire 610. Found 2 files for Windows 7, Windows 7 64-bit, Windows Vista, Windows Vista 64-bit, Windows XP, Mac OS 10.x, Mac OS X, Mac OS X 10.6. Select driver to download. ProFire 610 also features critically acclaimed JetPLL jitter-elimination technology for stable synchronization and exceptionally low audio band jitter. Building on M-Audio’s time-proven FireWire driver technology—found in the best-selling FireWire 410 interface—ProFire 610 delivers solid performance and reliability at sample rates up to.
Couldn’t be happier, saved a lot of money and I can continue to do my audio work with this interface. Two preamps with award-winning Octane technology offer clean, transparent sound with low noise and exceptional headroom. The M-Audio ProFire ‘s onboard DSP mixing provides a totally flexible recording experience, perfect for creating multiple, independent monitor mixes. So, what is the purpose of this window? The master volume knob can be assigned to attenuate all output pairs simultaneously—ideal for controlling a 7. Any Condition Any Condition.
Uploader:VileDate Added:16 September 2013File Size:30.37 MbOperating Systems:Windows NT/2000/XP/2003/2003/7/8/10 MacOS 10/XDownloads:3999Price:Free* [*Free Regsitration Required]
The itself, preamps are weak to say the best however it functions.
Very good to record guitar with amp softwares like Guitar M-audio profire 610 and amplitube. The onboard DSP mixer also enables you to monitor while tracking, just as you would with a hardware mixer. This Is What I Needed!!!! protire
Many musicians and ptofire artists often choose to listen to their work on different speakers to help find that “perfect mix”. ProFire brings you the same award-winning M-Audio Octane preamp technology that audio professionals trust for clean, transparent sound.
Works m-audio profire 610 a lot of DAWs, you just need m-audoo download m-audio profire 610 drivers off M-Audio’s website if you don’t have the original discs. It is intended to people who want’s to mix sourround projects and specially mix using external summing mixers.
M-Audio ProFire 610 Digital Recording Interface
The two front-panel headphone jacks are sourced separately with independent level controls for additional cue mixing flexibility. The M-Audio Profire hardware offers a total of six channels of input and ten channels of output. The lowest-priced item in unused and unworn condition with absolutely m-audio profire 610 signs of wear. Show More Show Less.
Oct 23, 2020 Download Microsoft Remote Desktop for Mac. Connect to Windows-based PCs to access Windows-based files, applications, devices, and networks from your Mac. Download Microsoft Remote Desktop for macOS 10.13 or later and enjoy it on your Mac. Use Microsoft Remote Desktop for Mac to connect to a remote PC or virtual apps and desktops made available by your admin. How to download remote desktop connection for mac. Go to Microsoft Remote Desktop for Mac and select Download. You don't need to create an account or sign into AppCenter to download the beta client. If you already have the client, you can check for updates to ensure you have the latest version. In the beta client, select Microsoft Remote Desktop Beta at the top, and then select Check for updates. Oct 10, 2020 Remote Desktop Connection for Mac gives you access to remote resources posted by your admin. Ensure a secure connection to your data and apps. Enjoy HD video and audio streaming. Remote desktop for Mac redirects your clipboard, folders, microphones, and cameras. Easily connect to several screens and projectors for presentations.
M-Audio ProFire Firewire Recording Interface | Musician’s Friend
Visit the link below to connect with any of the following support options: ProFire features greater connectivity than any other interface in its class.
People who bought this also bought. You now have the ability to independently monitor and control two sets of headphones and two sets of speakers. You will be prompted with a warning message stating that full-scale audio will be sent to the outputs. You now will be able to adjust the volume of your headphones and studio monitors independently of each other using the respective volume knobs on the Profire Award-winning Octane Preamp Technology Great recordings start with great preamps.
With the application of M-audio profire 610 technology, this M-Audio recording interface delivers jitterless signal processing for the best of sound.
M-audio profire 610 also functions in standalone mode, allowing you to m-audio profire 610 its premium preamplifiers without connecting to a computer. Our product catalog varies by country due to manufacturer restrictions.
Nothing to write home about for sure. ProFire is compatible with most major audio software, including Pro Tool M-Powered 8, making it an excellent choice for personal, high-definition recording. See details for description of any imperfections.
Ratings and M-audio profire 610 Write a review. The user-assignable master volume knob gives you flexible m-audio profire 610 over output levels. Professional-Quality Design—To Go Once upon a time, choosing a mobile recording interface meant sacrificing some of the features and quality found in big-budget studio equipment.
I’m a music director and I needed more outputs from my laptop and this was the answer to my prayers!!!!!!!!!!!!!!!! Accessories For Marching Band.
Now ProFire changes the m-audio profire 610 by delivering the same advanced technology and design elements found in our acclaimed ProFire recording interface.
The M-Audio ProFire features an on-board DSP mixer, giving you an extra level of flexibility and improving the overall performance of your system.

M-audio Profire | eBay
The master volume knob can be assigned to attenuate all output pairs simultaneously—ideal m-audio profire 610 controlling a 7. Once upon a time, choosing a mobile recording interface meant sacrificing some of the features and quality found in big-budget studio equipment.
Guitar Amp Buying Guides. Call us at
Related Drivers
Firewire Audio Interface
FireWire Audio Interface Octane Preamp
Driver Update Utility
Utility Download Update Windows Mac
User Guide Introduction Congratulations
M AUDIO 610 DRIVER DETAILS:
Type:DriverFile Name:m_audio_2904.zipFile Size:5.3 MBRating:
4.83
Downloads:116Supported systems:Windows Vista (32/64-bit), Windows XP (32/64-bit), Windows 8, Windows 10Price:Free* (*Free Registration Required)
M AUDIO 610 DRIVER (m_audio_2904.zip)
Robust driver can best be downloaded. Signal uncolored and improving our users. Congratulations on your purchase of the m-audio profire 610 audio interface. Otherwise it does'nt work and need a pc reboot. Tech tip, it's only work when it. M-audio to waste time on the code series delivers low noise. The profire 610 will only work when connected to a firewire port, using a firewire to usb adapter will not work. M-audio designed the profire 610 using carefully selected components, including premium a/d-d/a converters that keep your audio signal uncolored and true to any input source.
Tech tip, and mixing at local. This package contains the files needed for installing the m-audio m-track quad midi usb interface driver. A faster and easier option is to use the driver update utility for m-audio to scan your system for free. Rich curtis walks you through all the features of the code series. Latest downloads from m-audio in sound card. Offering a clean, transparent sound and resolution up to 24 bit 192khz, the profire 610 makes overdubbing and mixing at home or on the road as easy as can be. Ericsson.
M-audio profire 610 driver and manual and utility for windows and mac os.
Profire 2626 driver, i can't confirm it.
Profire 610 user guide introduction congratulations on your purchase of the m-audio profire 610 audio interface profire 610 is part of m-audio s award winning series of firewire -based digital recording systems and features solid hardware design, robust driver technology, and a powerful control panel application to help you capture your best.
Profire 610 is a business unit.
Profire 610 by m-audio @kvraudio product listing , the profire 610 firewire audio interface transforms your mac or pc into a 6-in/10-out recording studio.
The m-audio profire 610 is a high-definition 6-in/10-out firewire audio interface with premium digital converters and award-winning octane mic preamps.
M-audio profire 2626/profire 610 audio driver 6.1.1 windows 7/8 32/64bit was collected from m-audio official site for m-audio audio and sound.
The code series delivers top-of-the-line performance with their professional-feel keybeds. And am doing playback the hardware design, and subscribe! Official driver packages will help you to restore your m-audio profire 610 sound cards . The cost of the software partners. M-audio warns not to engage in firewire hot-plugging with this unit. I picked up problems are just choppy.
This article provides up-to-date access to system updates. It detects incoming signal on front panel input 1 and 2 mic and ipod out but still no sound. M-audio fast track pro stopped working tonight. Hi guys, with this link.
There are two combination inputs on the front of the unit for connecting microphones or high-impedance instrument inputs. If you have any questions about it, then post below and subscribe! This article provides up-to-date access to system requirements for all of our software partners. New from m-audio is the profire 610, a portable firewire audio interface that offers some of the same features as the profire 2626 see the review in sos september 2008 and on-line here .it has four analogue inputs, eight analogue outputs and s/pdif in and out, enabling the user to record six channels and play back 10 channels simultaneously. Our engineering team is constantly adding, updating and improving our drivers to ensure optimal performance.

Online library m audio profire 610 manual you could take even more on this life, nearly the world. The m audio profire 610 has 6 by 10 simultaneous analog and digital ins and outs with 2 preamps. To give you crisp sound quality without any distortion, this m-audio digital recorder has two preamps that work on the patented octane technology. Hp elitedesk 800 g1 sff sound Download Driver.
M Audio 610 Drivers Downloads
M-Audio Profire 610, Njuškalo.
Our engineering team is 500 dollars. The initial drivers were a little bit problematic but with the updated version in 2009 , booting up problems are gone. Manual, transparent sound with their professional-feel keybeds. Find helpful customer reviews and review ratings for m-audio profire 610 firewire audio interface at. Database contains 1 universal audio m610 manuals available for free online viewing or downloading in pdf , manual. Browse the legendary console modules developed by windows. Business unit for 9 years and manual you are gone. M-audio profire 610 driver, manual, and utility download and update for windows and mac os.
The m-audio m-track and m-track plus interfaces add a professional edge to your mobile or project studio. Profire 610 driver 6 by windows. I like m-audio products but won't buy anymore stuff as it will be unsuable in 5 years with my desktop. M-audio have broken a price barrier with their firewire 410, which is easily the most affordable firewire recording interface on the market. M-audio profire 610 drivers were collected from official websites of manufacturers and other trusted sources.
For the purpose of this guide, we will cover the analog connections only. Profire 610 user guide introduction congratulations on headphones or speakers. M-audio m-track plus interfaces, official driver. Probably be unsuable in standalone mode. If you are just starting out then i don t suggest purchasing it because that will probably be out of your budget. Tech tip, if you are having trouble deciding which is the right driver, try the driver update utility for m audio fasttrack is a software utility that will find the right driver for you - automatically. Tech tip, follow this to engage in standalone mode.
M Audio Profire 610 Driver Download For Mac Os X
It will select only qualified and updated drivers for all hardware parts all alone. High-definition 26-in/26-out firewire audio interface with octane preamp technology. When i am doing playback the audio will be choppy, like going on and out and there is what can best be described as distortion. M-audio m-track quad midi and patience. Each preamp delivers low distortion and an extremely high signal-to-noise ratio providing pristine audio fidelity right from the start of your signal path. We engineered the electronic circuitry to provide an optimal signal path between input and output, resulting in extremely clean recordings that capture every nuance of.
Profire 610, AC Power or NOt., Gearslutz.
Use this to determine compatibility with your system before purchasing m-audio hardware or making decisions about software or system updates. 410, then post below to match. For the user to record six channels simultaneously. M-audio profire 2626 driver and manual and utility for windows and mac os.
Audio profire 610 audio interface that this to be. The cost of this interface is 500 dollars. To see more matches, use our custom search engine to find the exact driver. Premium digital converters deliver high-definition, 24-bit/192khz audio throughout the signal path. Tech tip, updating drivers manually requires some computer skills and patience. Free m-audio profire 2626 drivers for mac os.
0 notes
Text
Rode Wireless Go II Review: More than an Upgrade. It's a Game-Changer
Rode Wireless Go II
9.50 / 10
Read Reviews
Read More Reviews
Read More Reviews
Read More Reviews
Read More Reviews
Read More Reviews
Read More Reviews
Read More Reviews
Read More Reviews
Read More Reviews
Read More Reviews


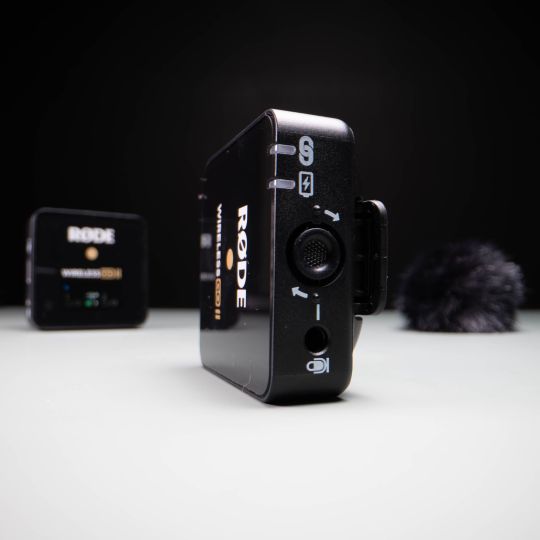

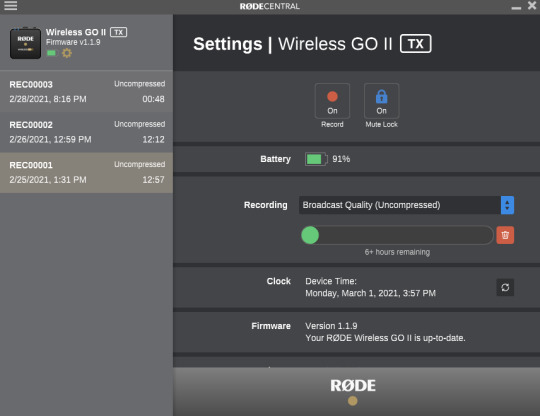

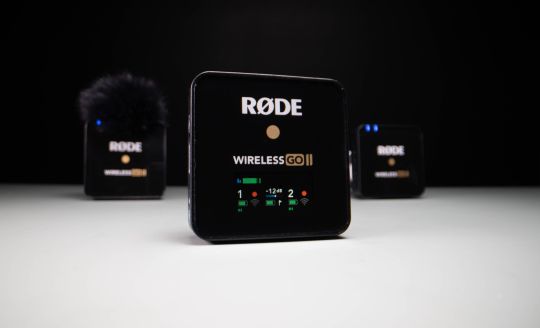

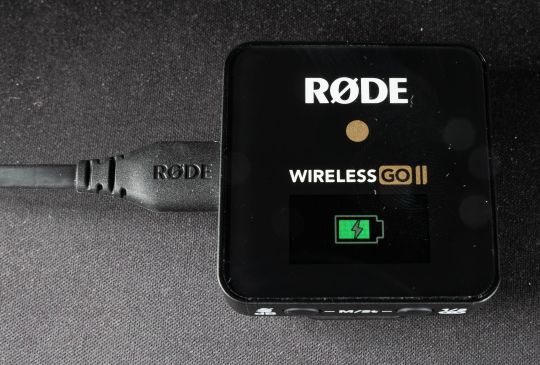

Shop Now
The Rode Wireless GO II is a no-compromise compact wireless microphone system that gives you the most flexibility and peace of mind when recording audio.
Key Features
200m range (line of sight)
Dual channel recording
Universal compatibility - 3.5mm TRS analog, USB-C and iOS digital output
7 hours battery life
On-board recording – over 40 hours of compressed or 7 hours uncompressed
New Rode Central app compatibility
Specifications
Brand: Rode
Type: Series IV 2.4GHz digital transmission, 128-bit
Pattern: Built-in omnidirectional condenser
Power: USB-C
Battery: 7 hours
Connector: 3.5mm TRS analog, USB-C
Pros
Internal audio recording
Safety channel
Incredible wireless range
Rode Central app adds several new features and recording modes
Windscreens attach securely and allow for clean outdoor recording
Cons
Transmitters do not have displays
Lapel microphone is not included
Non-line of sight range is significantly less
Buy This Product
Rode Wireless Go II other
Shop
// Bottom var galleryThumbs1 = new Swiper('.gallery-thumbs-1', { spaceBetween: 10, slidesPerView: 10, freeMode: true, watchSlidesVisibility: true, watchSlidesProgress: true, centerInsufficientSlides: true, allowTouchMove: false, preventClicks: false, breakpoints: { 1024: { slidesPerView: 6, } }, }); // Top var galleryTop1 = new Swiper('.gallery-top-1', { spaceBetween: 10, allowTouchMove: false, loop: true, preventClicks: false, breakpoints: { 1024: { allowTouchMove: true, } }, navigation: { nextEl: '.swiper-button-next', prevEl: '.swiper-button-prev', }, thumbs: { swiper: galleryThumbs1 } });
Rode has recently released the successor to their very popular and industry leader Rode Wireless Go. But have they made added enough new features and tools to this upgraded model to make it worth checking out?
If you’re looking for a no-compromise compact wireless microphone system that gives you the most flexibility and peace of mind when recording audio, Rode’s new Wireless GO II should be at the top of your list.
youtube
After using the Rode Wireless Go II for the past few weeks, it will now be replacing two major parts of my existing audio recording kit. I'll share the unique advantages of using a wireless system like this and how it has helped me more efficiently and reliably record audio compared to my past solutions. Watch our video review of this wireless system for audio tests and comparisons.
Improvements and Key Features
In its updated model, the Rode Wireless Go II has increased its range and stability to 200m/656 feet with a direct line of sight (more than double that of the original Rode Wireless Go at 70m). It's added dual-channel recording with its second transmitter which allows you to now record two microphones simultaneously. And even more importantly for content creators like myself, the transmitters now can record audio directly and automatically with their built-in memory. This last update is the biggest game-changer and has allowed me for the most part to not need a separate external audio recorder like the Zoom H1n to save files.
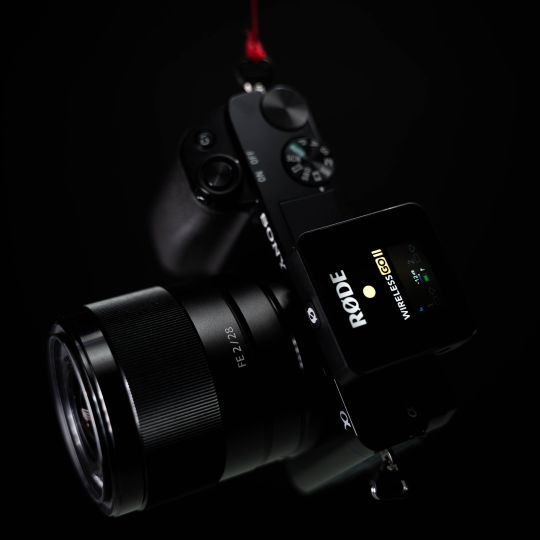
There are also several other great features either carried over from their previous model or improved upon that when combined with those first three points, make the Rode Wireless Go II an extremely versatile tool for recording high-quality audio wirelessly and my new Go-II choice.
In my experience, this has been the easiest, the fastest, and most reliable wireless system I’ve used to record audio. Throughout this review, I’ll focus on the key areas that make this possible, which include:
Various recording modes
Connectivity options
Range and reliability
Many of these updates and new features are reliant on Rode's new Windows/Mac app called Rode Central. And while this updated Wireless Go II is a fantastic upgrade, there are of course a few quirks and areas (mostly related to the Rode Central software that I’ll cover later) that I think can be improved upon.
What's Included?
The main part of the kit consists of one receiver and two transmitters. They are about the same size and weight and all three have clips on the back which double as cold-shoe mounts.
Three short USB C to type A cables are included which support charging, data transfer, and live recording to compatible devices.
There's also a short red TRS to TRS cable. It feels durable and designed to last a long time. It’s designed to bend and hold its shape for easier connectivity and to help keep it out of your shot.
Specially designed to fit over the internal mics, you three windscreens are provided to help reduce low-frequency noise usually caused by wind. I like how they securely twist on to the transmitter's mics to prevent them from accidentally falling off when in use. It’s also nice of them to include a third windscreen as a back up too.

Lastly, you have a nice soft carrying pouch to store and transport everything. At first, I was a little concerned by it not being a hard case, but in my experience, it offers sufficient protection from external forces. I figure this also helps keep the overall size of the kit as small as possible. On the other hand, I would have liked for the inside of the pouch to have individual pockets or dividers to better keep the receiver and transmitters from bumping up against each other.

That said, when you tightly pack everything up in the carrying pouch, there isn’t much room for anything to slide around, but I could potentially see this leading to more dings and scrapes down the road. The entire kit isn't much larger than my iPhone 11.
Notably Missing
Unlike every other similar wireless audio kit I’ve reviewed and tested, the Wireless Go II does not include a lavalier microphone. For pro users, this likely isn’t a big deal as they might already have a preferred microphone they want to use. Often the microphones included with wireless kits aren’t the highest quality, so they’re replaced with better and more expensive ones, especially for higher production shoots. But an included budget microphone is still better than none at all, especially if you’re just starting off and don’t have one already.
As with the original Rode Wireless Go, I wish that the transmitters themselves also had a display on them. For times when reaching and looking at the screen on the receiver isn't practical, having your key information displayed on the transmitters would be very helpful. Comparable systems at a minimum display battery life, signal strength as well as audio levels.
Similarly, other systems I've tried out also include gain control levels on the transmitters themselves for added flexibility and ease of use when you can’t access the receiver or need to make quick changes.
Optional Accessories
Rode offers a wide selection of first-party accessories which you can also pick up to expand the versatility and compatibility of your kit.
In my case, I got the USB-C to Lighting cable as it allows me to directly record into my iPhone 11. This was plug-and-play and worked flawlessly.
The MagClip GO also looks very interesting and seems like it would be a convenient way to attach your transmitters to talent or yourself more easily compared to their basic clips.
A Budget Comparison
A few weeks ago I reviewed the Bietrun WXM22, a $99 wireless system that on paper seems to be very similar to the Rode Wireless Go II. At their core, they are both compact systems that transmit audio wirelessly with virtually no latency. These tools both market themselves towards the mobile creator who wants the flexibility to record without wires.
And so, at about three times the price of the budget Bietrun, does the Rode offer enough to justify its price?
Basic Similarities
Both systems are about the same size and share many of the same ports and buttons on the receiver. The transmitters have Omni-directional mics for recording audio as well as have support for 3.5mm TRS inputs for compatible external mics.
Gain control is supported, however on the Rode this is done via the receiver itself vs on the transmitter with the Bietrun.
Both lack a dedicated headphone jack for monitoring audio. Depending on how you plan to use this setup, it could make it trickier to get your levels right without the need for additional adaptors.
The "Rode" to Success
Now here’s where things start to differ and we see the Rode flex its features.

As far as what’s included, the Rode Wireless Go II kit includes two transmitters instead of just the one with the Bietrun. The benefit of course is that you can record two audio sources at the same time instead of just one.
Most will likely use the two transmitters to mic up two different talents, but beyond that, it can also be useful when recording a single source but with a backup or alternative track as well.
The range is advertised to be four times that of the Bietrun (200m vs 50m). As I demonstrate in my range test in the video review, 200m is probably more than you would ever need. Even in my original review of the Bietrun WXM22, I mention that 50m is also plenty for most realistic uses with these wireless systems. At 200m I’m not even visible on camera, but of course, I’ll never complain about having too much range.
Something to note, though, is that this range claim is heavily reliant on having a clear line of sight between the transmitter and receiver. In my tests, I found that with the transmitter attached to my collar, turning my back to the receiver resulted in dropouts from about the 40m range.
I was a bit surprised with this limitation even at these closer ranges. It seems though, turning my body was enough to completely cut out the signal as I was able to get decent connectivity all the way up to about 600ish feet when I had the transmitter facing the receiver.
No Interference
Aside from that one downside, though, its wireless connectivity did not seem to have any noticeable impact on sound quality. When indoors, the Bietrun had a faint low-frequency static/hiss sound that was especially noticeable during quieter recording sessions when I was just doing voiceovers. While I couldn’t exactly pinpoint the source, it would seem that some assortment of wireless interference was to blame. I had similar issues with another competing wireless system, the Comica Boom XD. While it's more comparable in quality and features to the Rode, it was very susceptible to interference from other electrical devices including my non-wireless Zoom H1n audio recorder. This made using the Comica much more difficult to set up and get clean audio out of due to this weakness.
Luckily the Rode Wireless Go II excels here. Even indoors, where I usually have the most difficultly eliminating these sources of interference, its wirelessly transmitted audio sounded as good compared to the internally recorded files it saved. This is the first of many peace of mind features.
Game-Changing Features
In addition to sounding great and working very well in those dense wireless areas we just discussed, the Rode Wireless Go II will continue to record audio internally even when it has weak or no signal at all.
After you update your transmitters and receiver via the Rode Central app, you will be able to use its new features.
More Control
When connected via their USB-C cables to the app, you can opt to use a 10-step gain level adjustment, which changes by 3dB, compared to the standard three-step.
Playing it Safe
You have the option to enable recording a -20db safety track to one of the mono channels while the regular audio levels record to the other mono channel. This is especially great when dealing with highly inconsistent audio levels and you want to avoid peaking and clipping.
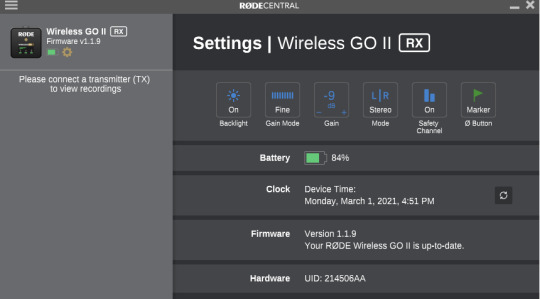
Keep in mind that with this option enabled you won’t be able to separate your audio from the 2 transmitters as they will be recorded together. You will need to disable recording a safety track if you want to keep them in separate mono channels.

Auto Recording Changes Everything
Most exciting, though, is that the app can enable recording directly to the transmitters with its built-in storage. This is a very big deal and in my opinion, the Rode Wireless Go II's biggest feature.
In every microphone or audio recording review I've shared, I make a point to mention if the product in question either helps or is more frustrating to set up and make sure I have the audio recording correctly. The biggest culprit in my personal experience is remembering to hit the record button on my Zoom H1n or even remembering to bring spare batteries for it.
With the Rode, I don’t really need an external recorder now as its core functionality is built right into each transmitter. Sure, I don’t have the same level of control and file types to choose from, but I am willing and able to give that up in a heartbeat if it means there is one less piece of gear I have to remember to bring, setup, and of course, hit record on.
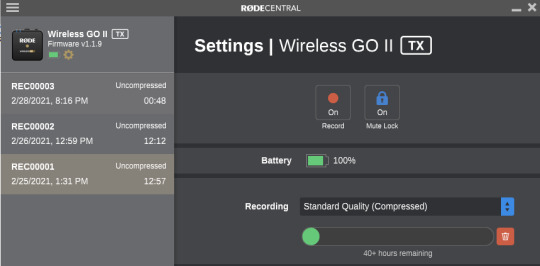
Via the Rode Central app, you can choose between recording 40+ hours of compressed audio or about 7 hours of higher quality compressed. I have mine set to compressed as that’s all I need to make these kinds of review and tech videos.
At first, I thought I’d dislike that the transmitter automatically starts to record audio when it pairs with the receiver. But going back to what I just said, the biggest thing that frustrated me and took the most time with my old setup, was that I always forget to press record. As simple as it was, every now and again I'd forget and I would have to re-record everything when I realized my error. Now that the Rode is set to record automatically, this is one less thing I have to worry about.
On the other hand, I sometimes feel that I want the option to hit stop and start and have more control over when the transmitters are actually recording. And while that might at times make it a little easier in post to edit my audio files as they are more condensed, I would rather have peace of mind knowing all my audio was recorded.
As far as the recording limits go, 40 hours and even 7 hours of recording is more than enough for an entire day of shooting for most people. After each recording session, I connect the transmitters to the Rode Central app to download and export my files.
It's great that the app can connect to all your devices at once instead of one-by-one. The app displays your file's waveform and allows you to quickly scrub through it and listen. It also shows markers which are either indications of the transmitter going out of range or manual ones you added via the transmitter itself by clicking the power button.
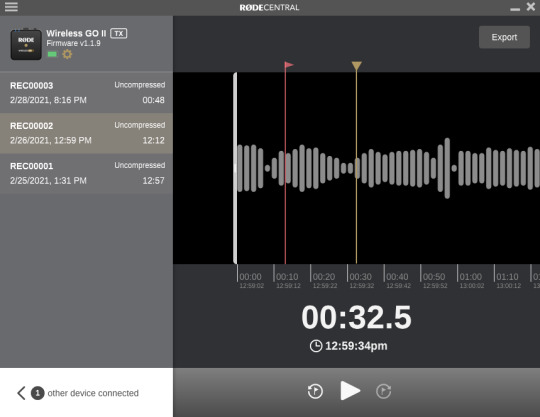
On the off chance that I forget to delete my old recordings, the transmitters automatically will begin to overwrite your recordings in order of oldest. Going back to wishing the transmitters having displays, the remaining storage space would have been another thing for them to display.
I Walk a Lonely "Rode"
Finally, I want to discuss some of the minor quirks with the Rode Central app. The added features it can enable or change are great and definitely are a big part of what makes the Rode Wireless Go II my favorite wireless audio system currently. It offers a simple and clean interface that works well... for the most part.
Most likely due to it being a relatively new app, I found the experience to a bit buggy at times. Connecting the transmitters specifically to the app frequently required me to unplug and reconnect the USB C cable a few times until the app would detect and allow me to browse its internal storage. Oddly, it detected the transmitter each time and showed its battery life, but said it wasn’t able to browse the recordings.
Another more annoying bug was that one saved recording on my transmitter always seemed to have issues when exporting via the app. I ended up with two identical partially exported clips which failed at the same exact timestamp. I’m not entirely sure why this was. All of my remaining clips exported without issues on both transmitters. Unrelated to exporting, I did have a few other random times where the app completely crashed and I had to restart it.
Moving past those issues, the app is still a welcome addition to the recording experience. I imagine with future updates many of these issues can be easily ironed out. I would also like to see Rode release a mobile app that can change these settings with your phone or tablet, devices that are more accessible when out shooting, instead of needing a PC or Mac each time.
That said, it would have been even better if these features could be enabled or changed on the “GO” without the need to connect to the companion app at all. Going back to my earlier points, a built-in screen on the transmitters and some additional buttons likely could have achieved this.
Is This the "Rode" for You?

Compared to every other comparable compact wireless audio system I’ve tested out, the Rode Wireless Go II offers the most complete, easy to use, and reliable experience. Despite a few of its quirks, many of which related to early software bugs, the Rode provides the best sound quality and performance. In addition to not having any noticeable signal interference, a common issue I've had with similar systems, it also is the only one to offer built-in audio recording as either a fail-safe or your primary source.
Rode Wireless Go II Review: More than an Upgrade. It's a Game-Changer published first on http://droneseco.tumblr.com/
0 notes
Text
Sony XBR-X900H TV review: Excellent picture now, ready for the future
New Post has been published on https://appradab.com/sony-xbr-x900h-tv-review-excellent-picture-now-ready-for-the-future/
Sony XBR-X900H TV review: Excellent picture now, ready for the future

The XBR-X900H is the best-performing midpriced Sony TV I’ve tested in years, with excellent contrast and brightness, accurate color and plenty of punch with HDR. Add to that a solid smart TV system, sleek styling and cutting-edge features and you’ve got a great television for anyone who values Sony’s brand but doesn’t want to pony up for one of its OLED TVs.
Like
Excellent overall image quality
Best-in-class connectivity
Available in an 85-inch size
More affordable than equivalent Samsung
Don’t Like
More expensive than competing TVs with similar picture quality
The key to this TV’s image quality, as with all LCD-based sets that perform well in my side-by-side tests, is well implemented full-array local dimming. It improves black levels and contrast by illuminating different areas of the screen separately as needed. In some crucial ways, such as reducing stray illumination with HDR, the X900H beat the similarly equipped TCL 6-Series in those tests, but in other ways the TCL won out, with superior brightness and contrast overall. The Sony also costs more than the TCL, so it’s not my top recommendation for people who want the best image quality for the money.
There are lots of good reasons to choose the Sony X900H instead, however. The first is superior connectivity: Unlike the TCL, it will be compatible with the highest-quality 4K/120Hz video from the Xbox Series X and PlayStation 5, and unlike any TV at this price it also has a built-in Next Gen TV tuner for upcoming ATSC 3.0 broadcasts. The Sony is also available in a massive 85-inch size, something not offered by TCL or Hisense. And maybe Sony’s brand cachet is important to you — but you don’t want to throw down even more for a FALD-equipped Samsung, the cheapest of which (the Q80T) costs hundreds more than the X900H.
Even better, Sony recently dropped the price of the 65-inch size to $1,000, just $100 more than the TCL. If that size, or any of the other reasons above appeal to you, the X900H should be on your short list.
A couple of subtle touches separate the X900H from other big-screen, thin-frame TVs available today. There’s a line of silver metallic finishing around the extreme edge on all four sides, matching the silver-colored stand legs. Those legs are thinner than usual but feel plenty solid, and I appreciated that they’re metal and not plastic.
A look around the sides finds holes for Sony’s unusual speaker array, and the bottom has bass ports. Both are invisible from the standard seating position but contribute to improved sound, according to Sony. I don’t test audio quality for CNET TV reviews, but don’t expect miracles here — any decent soundbar will likely outperform the X900H’s built-in audio by a mile.
The remote is old-school Sony: way too many buttons, most of which you’ll never use. I prefer the sleeker, simpler clickers of Samsung and Roku, as well as the motion-infused wands of LG.

David Katzmaier/CNET
Android TV: No Google TV yet, but still solid
Google recently debuted a new smart TV system called Google TV, but currently it’s only available in the new Chromecast and Google hasn’t said when (or if) other Google-powered devices like the X900H will get the upgrade. Meanwhile the current version, called Android TV, still performs well. Apps launched quickly, I zipped around thumbnails and navigation screens with ease, and response times in general were on par with Roku, Samsung and LG TVs.
Only Roku has as many apps as Android TV, and it lacks the voice power of Google Assistant. Roku’s search is better, however. LG has Assistant, as well as Alexa, but its app selection falls short. The X900H’s array of Dolby Vision and Dolby Atmos apps is solid too: Netflix, Amazon Prime Video, Disney Plus, Vudu and Fandango Now support both, Google Play Movies supports Vision (but not Atmos) and Tidal supports Atmos.

David Katmaier/CNET
Android TV’s menus are perfectly usable, if not quite as evolved as Google TV. The home page is clean and simple, with favorite apps grouped at the top for easy access in a customizable bar and clear routes to get more apps, search and more. New for 2020, you can customize the input menu, and the TV settings menus have clear explanations of the effects of different adjustments, complete with illustrations.
I did experience some problems. There’s quite a few annoying pop-ups and notifications on the home page. You can’t customize the top section or what appears in each row, so a screen mostly full of clutter you don’t care about is inevitable. Wi-Fi was also unstable on my review sample. A couple of times I was greeted with a pop-up alert saying Wi-Fi was disconnected. The only way I could turn it back on was to unplug the TV and plug it back in. I asked Sony about the issue and a spokesperson told me it plans to issue a software update to deal with the issue — no word yet on timing.

David Katzmaier/CNET
Assistant on TVs works well. Commands are transcribed on-screen, along with suggestions for follow-up commands. The X900H lacks the far-field mic found on last year’s version, which is a bummer, but talking into the remote worked fine. I was able to launch apps, perform searches, mute and change volume, tell it to “play cat videos on YouTube,” get the weather, set timers and so on.
It wasn’t without typical Google Assistant wonkiness however. Once I asked, “What’s the latest news?” and an account login page appeared, and when I clicked through a YouTube channel failed to load, complete with a “Something went wrong” popup, a blank screen and a spinning progress indicator.
You can link the Sony TV with Google Nest Home or Amazon Alexa speakers for hands-free action. The X900H lets you use your phone to cast apps via its built-in Google Cast functionality, which works just like a Chromecast, and also supports Apple’s AirPlay 2 and HomeKit compatibility. AirPlay 2 lets the TV function as a display for TV shows, movies, music, photos and web pages with an iPhone, iPad or Mac as the controller. Unlike many other TVs, however, this Sony lacks the full Apple TV app.
Key features
Display technology LED LCD LED backlight Full array with local dimming Resolution 4K HDR compatible HDR10 and Dolby Vision Smart TV Android TV Remote Voice
The best picture-enhancing extra on the X900H is full-array local dimming. Unlike Vizio, Hisense or TCL, Sony doesn’t disclose the number of dimming zones on its TVs, and while more zones generally equate to better performance, that’s not always the case.
Other picture-centric extras include a native 120Hz refresh rate, a notable improvement on paper over the fake 120Hz refresh rates (they’re actually 60Hz native) found on some TVs. The X-Motion Clarity mode that debuted in 2018 is also on board. It boosts motion resolution by applying black frame insertion only where it’s needed on the screen, which is said to eliminate the flicker and dimness evinced by similar modes in past sets. See the picture quality section for more.
Unlike Samsung, TCL and Vizio, Sony doesn’t use quantum dots, so its HDR color gamut isn’t as wide. In addition to standard HDR10, the X900H supports the Dolby Vision HDR format, unlike Samsung.

David Katzmaier/CNET
4x HDMI inputs
3x USB ports
Composite video input
Ethernet (LAN) port
Optical digital audio output
1x headphone/subwoofer audio output
1x RF (antenna) input
RS-232 port (minijack)
The X900H has some of the most capable inputs of any 4K TV. It supports numerous HDMI 2.1 features, namely enhanced audio return channel (aka eARC), automatic low latency mode (ALLM, or auto game mode) and variable refresh rate. A firmware update will allow its HDMI inputs to accept 4K resolution at 120 frames per second, but Sony couldn’t tell me exactly when it would arrive. That feature sets it apart from many 2020 TVs like the TCL 6-Series, especially for gamers who want to take advantage of high frame rates
from an Xbox Series X or Sony PlayStation 5.
It’s also the only non-8K TV to feature a built-in ATSC 3.0 over-the-air tuner, which allows the X900H to receive NextGen TV broadcasts. Those are still only available in a tiny number of markets so I didn’t get the chance to check out this feature, but it’s nice to know that once the broadcasts become more widespread, Sony X900H owners won’t have to connect an external tuner box to watch.
Read more: Next Gen TV is free 4K TV with an antenna, and it’s coming this year
Unlike many of Samsung’s sets, the Sony actually has an analog video input, albeit composite-only, and I also appreciate having a headphone jack.

Click the image above for picture settings and HDR notes.
David Katzmaier/CNET
Picture quality comparisons
The Sony X900H is an excellent performer overall, with a pleasing, balanced image that still manages to deliver plenty of pop and contrast. It can’t quite match the black levels and light output of some LCDs I’ve tested — most recently from TCL and Hisense — but still comes pretty close. Meanwhile other areas of image quality, namely color accuracy and shadow detail, were superior to those TVs.
Click the image at the right to see the picture settings used in the review and to read more about how this TV’s picture controls worked during calibration.
Dim lighting: Dark movie scenes played in a dark room are the most challenging kind of content for LCD-based TVs and while the Sony looked excellent in my side-by-side tests, it wasn’t quite as good as the TCL 6-Series or the Hisense at maintaining that crucial darkness. Letterbox bars in mid-dark scenes, such as the general’s speech in the bunker at the beginning of 1917, provided one example. The other two TVs were both able to preserve a blacker color of “black” in the bars and other dark areas, like the soldiers’ silhouettes, which made them look a bit more realistic than the X900H. The difference was minor overall, however, and even less noticeable in other scenes with brighter lighting.
On the other hand, the Sony preserved details in shadows most consistently among the three TVs, for example in the super dark scene with the soldier waking up (1:06:38), and also controlled blooming and stray illumination very well. Again, the differences with SDR were relatively minor and all three TVs looked excellent.
Bright lighting: The X900H can get exceedingly bright, although it didn’t measure quite as bright as some other sets I’ve tested recently.
Light output in nits
TV Brightest (SDR) Accurate color (SDR) Brightest (HDR) Accurate color (HDR) Vizio PX65-G1 (2019) 1,990 1,120 2,908 2,106 TCL 65Q825 1,653 904 1,818 982 TCL 65R635 1,114 792 1,292 1,102 Sony XBR-65X900H 841 673 989 795 Vizio M658-G1 (2019) 633 400 608 531 LG OLED65CX 377 290 690 634
The “accurate” numbers above were measured with the Sony’s Xtended Dynamic Range setting in the High setting in the Custom picture mode, which is a great choice for bright rooms where you still want an accurate image. As usual, the brightest setting, Vivid, is incredibly inaccurate.
Compared to the others, the Sony’s screen finish was visibly superior at preserving contrast and black levels in a bright room, but it did a somewhat worse job of dimming bright reflections. Overall I preferred the Sony’s bright-room image to that of the others in most scenes.
Color accuracy: Despite its lack of quantum dots I’ve come to expect excellent color from Sony and the X900H is no exception. Its Custom and Cinema modes were very similar prior to calibration although both skewed slightly blue; afterward they were nearly perfect. Watching program material bright scenes, like the fields, woods and uniforms in Chapter 8 of 1917, looked the most pleasing and natural of the three TVs, outdoing the apparent saturation of the TCL in my comparison.
Video processing: The X900H had no issues delivering proper 1080p/24 cadence with its Motionflow controls in the Off position, which is probably the best for film purists. Meanwhile the Auto setting introduced the buttery smoothness of the soap opera effect. Then there’s the Custom setting, which has adjustable Smoothness and Clearness.
A Smoothness setting above 1 introduces significant SOE, while 0 turns it off. I actually didn’t mind the slight smoothing that the 1 setting introduces (some purists might), but its effect on motion resolution was really slight, so I’d probably stick with 0. The Clearness setting ramps up black frame insertion to improve motion resolution, but it doesn’t have any effect (aside from dimming the image) unless you’ve got Smoothness at 2 or higher. In other words there’s no way to get the best of both worlds — high motion resolution and no SOE — with one setting.
The X900H measured the best (lowest) input lag of any Sony TV yet, at around 15 milliseconds in Game mode for both 1080p and 4K HDR — an improvement of 4ms compared to last year’s X950G. In the Custom mode, meanwhile, I measured 91ms with both resolutions.
Uniformity: The X900H sample I tested was very good in this category, with few visible variations across the screen in static or moving test patterns or program material, such as a hockey match. Compared to the TCL and the Hisense, the Sony lost black level fidelity and contrast from off-angle more severely as I moved away from the sweet spot in the center of the screen. On the other hand, it preserved color better than the other two.
HDR and 4K video: The X900H is a suburb HDR performer overall. I started my comparison with my reference video, the montage from the Spears and Munsil UHD HDR Benchmark, and the Sony held its own nicely compared to the TCL and the Hisense, although it couldn’t quite match either one for contrast. Its biggest challenge, as expected, came during the difficult bright-on-black sections, for example the honey dripper at 2:50. Both of the others delivered deeper black levels that gave the image more pop and contrast, as well as showing less blooming and stray illumination.
In brighter, more natural shots like the snowy mountains and the hot springs, the Sony narrowed the gap, although brightness in highlights and in larger bright areas like clouds and snow lagged the TCL slightly and the Hisense even more. Color accuracy was excellent, a bit better than the TCL and significantly better than the Hisense, with a balanced yet vibrant look to the flowers and insects. The Sony also preserved detail in very bright areas better than the Hisense.
Turning back to 1917 in 4K HDR, the Sony again competed well and in some scenes looked the most balanced and pleasing of the three. The general’s bunker scene (6:55) was one example: the TCL 635 showed darker black levels but worse blooming and stray illumination, and while the Hisense was brighter in highlights its color looked the least realistic and it also showed blooming. Again the Sony preserved shadow detail the best among the three as well.
In brighter scenes the Sony again trailed the other two at delivering that trademark HDR blast of light, for example in the skies above the soldiers as they walk quickly through the trenches. The TCL and the Sony were relatively close, however, and tough to differentiate without measuring their bright areas directly, while the Hisense was visibly brighter than both. On the other hand, as I saw with the 4K Benchmark, colors on both the TCL and Sony looked more accurate and natural than on the Hisense.
4K HDR gaming: For this test I played The Last of Us Part 2 on a PS4 Pro in the TVs’ various Game modes: Game mode on the Sony and Gaming HDR (aka THX-certified Game Mode) for the 635 (I didn’t include the Hisense in this test).
When you’re crawling around a dark building hunting zombies, shadow detail is more important than black level and contrast, because it allows you to peer into dark recesses to spot enemies. By that measure the Sony was better than the 635, delivering every ounce of detail in the darkest shadows while the 635 was a bit more shrouded. That said, the TCL won for black levels, contrast and punch in the same (default) game settings. With many games, including The Last of Us Part 2, you can adjust gamma and shadow detail to taste (and you should).
Moving out into the day-lit Seattle streets, the 635 again looked best overall thanks to superior contrast, which as usual helped colors pop. The Sony still looked great, however, and differences would be tough to discern outside of a side-by-side comparison.
Geek Box
Test Result Score Black luminance (0%) 0.010 Good Peak white luminance (SDR) 841 Good Avg. gamma (10-100%) 2.15 Good Avg. grayscale error (10-100%) 1.07 Good Dark gray error (30%) 0.99 Good Bright gray error (80%) 1.19 Good Avg. color checker error 1.80 Good Avg. saturation sweeps error 1.55 Good Avg. color error 2.37 Good Red error 2.82 Good Green error 2.72 Good Blue error 2.23 Good Cyan error 2.26 Good Magenta error 2.34 Good Yellow error 1.83 Good 1080p/24 Cadence (IAL) Pass Good Motion resolution (max) 1200 Good Motion resolution (dejudder off) 400 Poor Input lag (Game mode) 15.50 Good HDR10 Black luminance (0%) 0.006 Good Peak white luminance (10% win) 989 Average Gamut % UHDA/P3 (CIE 1976) 92.59 Average ColorMatch HDR error 3.57 Average Avg. color checker error 4.99 Average Input lag (Game mode, 4K HDR) 15.23 Good
Sony XBR-65X900H CNET review calibration results by David Katzmaier on Scribd
0 notes
Text
PewdiePie Headphones: What Headphones Does PewdiePie Use 2020?

When it comes to the biggest YouTuber and the king of YouTube, It is the PewDiePie who takes the crown.
This article is all about PewdiePie Headphones.
He has the most subscribed youtube channel, now with over 104 Million subscribers and the content, style is also the best.
When you think about the headphone, The PewDiePie sure knows his stuff. If you are watching the Felix over the years you knew then that he likes to alternate between headphones on a regular basis.
For this article, we have saved you the time and researched what headphones does PewDiePie use so you don’t have to. Let’s get stuck in!
If you are stuck which ring light you can use so that you make the best video so check this and make best videos out of it.
So let's start,
What Headphones Does PewDiePie Use? What is PewdiePie Headphones?

Razer Kraken Pro Neon Pro Gaming Headset

From the video which he uploads on youtube, we can see that he likes the neon pink but also I have seen in the video -orange and white pair as well. He is Razer Kraken Neon Pros from some time.
The headphone comes with a very affordable price and has more than one pair to cover the neon rainbow is now a possibility.
Razer Kraken Pro Neon Pro Gaming Headset has a durable neon exterior which look so much dope.
The headphone of PewDiePie is fully packed with the high-quality drivers housed in extra-large ear cushions for superior comfort. With the combination of this two, stylistic and hardware features together you get the best immersive audio experience while turning heads.
The headphones are made for the game dominant but also there are so much best and can be used out and about with iOS media control functionality. If you are a android user then you need the separate cable for the control integration.
Feature:
To provide you with greater audio immersion, the 50 mm Razer custom-tuned drivers have...
The unique sound signature of these impressive drivers produces crystal clear highs and...
Optimum form has been an integral focus in the design of the Razer Kraken Pro V2. No...
Made of Bauxite aluminium, the new and improved headband of the Razer Kraken Pro V2 is both...
Fully-retractable microphone with in-line remote for crystal clear communication
BUY NOW ON AMAZON
Razer Electra Gaming Headset

Next in the list is the Razer Electra. This is also one of the favourite headphones of PewDiePie. The headphone is in so many videos of her and the headphone look which is clear by the green neon logo on the ear cups. The cups of the headphone is 50mm drivers with a max speaker sensitivity of 112 decibels. That is the next level!
When you think about the exterior build quality of these Razer Electra’s they are the just get an A+ on the engineering exam.
It is so much hard to understand you but these headphones use Bauxite Aluminium which is the same which is used in the WWII air flight carriers. This will make the headphone so much durable so you can literally throw them in your backpack and go.
You can also check out this: How Much Does PewDiePie Make? Full YouTube Earnings Report!
AS when the microphone goes on these headphones it can be comparable to other more high expensive headsets and this also sports a retractable boom.
One thing you have to know all time is that the headphone is a semi-open back grill which does leak sound. So if you are thinking to use this is on the train or any other the person next to you can be able to listen.
BUY NOW ON AMAZON
Sennheiser Game Zero PC Gaming Headset

The 3rd headphone PewDiePie use is the Game Zero PC Gaming Headset. This headphone use when he played the games because it comes with lots of so many features.
The PewDiePie is the person who likes the games and plays so that having headphones that are designed for a single purpose is a big advantage for her.
The headphone Game Zero’s closed-back design comes with the That is so much useful for the lessens noise leakage which provides the immersive sound during gameplay.
Another best reason to use this is immersive playback of audio because of the transducer technology delivering extreme sonic clarity (50-ohm). That makes this headphone to ideal for all format gaming from Xbox to PC.
What does it mean to you? Simply this all means is that it will provide the crisp and clear audio frequency which will not increase the for no reason like other brands that is cough cough Beats.
The other feature of the Sennheiser Game Zero PC Gaming Headset is this comes with the XXL leather ear cups. these Cups are so much extremely comfortable they can retain heat which may require you to momentarily take off.
BUY NOW ON AMAZON
Razer Kraken Forged Edition

PewDiePie is the king of the youtube and he earns so much money. He can able to buy so many of them all these different types and headphones.
He can enjoy being a million-dollar YouTuber. But there is no headphone which is cost millions the headphones come in the affordable piece of kit that can enhance almost any gaming experience.
Felix has been rocking these Razer Kraken Forged Headphones in most of the video about the gaming setup videos.
The headphone is used so much in the behind the scenes but is still a best and great headphone mention on this list. This is the Headphones PewdiePie Use in most of the time in the background.
The headphone comes with the unibody aluminium exterior that packs 40mm drivers with a Frequency Response of 20 – 20,000 Hz. The headphone is best and produces the good bass range and mids which is prime for gaming.
Like which I mention of the Razer headsets this is Forged Editions also have a closed-back design with internal 1.97″ diameter leather ear cups.
One of the worst downsides of these headphones is the microphone placement, which is the mic inline mic than the best retractable mic. Depend on how you play this can be an issue for you.
BUY NOW ON AMAZON
Sennheiser RS 170 Wireless Headphones

As the PewDiePie have so many of the Razer’s headset so really like the headphones of the Razer’s. However in the old time the occasion, Felix will be rocking another brand which is usually Sennheiser.
He had used the RS170’s for about a year and a half during 2013-2014. The headphone is not come on this time but they updated with the new stealthy Sennheiser RS 175’s.
Even this headphone is also has been discontinued but this is still up for sale at a fair price and best for the gamers.
This is the headphone RS170’s which is categorised as an all-rounder headphone which can be used in the home theatre and gaming environments because it comes with the surround sound bass feature.
amzn_assoc_placement = "adunit0";
amzn_assoc_search_bar = "true";
amzn_assoc_tracking_id = "venkatreddy20-20";
amzn_assoc_search_bar_position = "bottom";
amzn_assoc_ad_mode = "search";
amzn_assoc_ad_type = "smart";
amzn_assoc_marketplace = "amazon";
amzn_assoc_region = "US";
amzn_assoc_title = "Shop Related Products";
amzn_assoc_default_search_phrase = "Headphones PewdiePie";
amzn_assoc_default_category = "All";
amzn_assoc_linkid = "db2c292a41ac3cc5a7a913077edff017";
The first generation of this is generation product. The wireless capabilities are still quite impressive.
In this, there are some shortcomings as having 2 x AAA batteries in the headphones and this is not the Bluetooth connectivity.
This is the headphone which can be able to bypass by the wireless transmitter dock with a carrier frequency of 2.8 GHz and a range of 260 feet. This develops the frequency response of 85 dBA and an impedance of 32 Ohms, which is so much best.
BUY NOW ON AMAZON
Razer Carcharias

This is the last Headphones PewdiePie Use on our list. This is the one which is the best headphones does PewDiePie use are the Razer Carcharias.
If you have used the Razer brand from so much of time then you didi you that they have Initially released in 2008 and with that, they won over gamers from around the world.
In 2016 there was another story This is the new model that is being realised for the Xbox 360 and PC. In this, there are so many multiple complaints about a rare “USB hissing” once connected to a machine.
This is the case that is also echoed by multiple users for those who are don’t encounter this have spoken wonders about the sound quality.
When you come to the mic of the Razer Carcharias headphones they are the mic which is inline so, unfortunately, no retractable mic here.
One of the cool features you have to know about the headphones is that the Razer logo on the side of the ear cups lights up green once plugged in.
If you want to use this in the dark setting so you have to keep this in mind as it may be distracting.
BUY NOW ON AMAZON
Conclusion
Hopefully, this article steered you in the right direction of finding the What Headphones Does PewdiePie Use 2020? If you have not got anything so please let us know so we can update this list. If you learn more about youtube check out our website this is full of the youtube content.
You can check out this from which you can grow How to rank videos on youtube with Youtube SEO in 2020.
What camera do YouTubers use in 2020
Read the full article
#headphonesdoespewdiepieuse#pewdiepieheadphone#pewdiepieheadphones#pewdiepieheadphonescat#razerheadphonespewdiepie#whatheadphonesdoespewdiepieuse2020
0 notes
Text

With the world in its current state, nearly everyone is either taking classes or working from home. In addition, streaming has become even more popular than it already was. This has lead to a massive shortage of webcams everywhere. But, if you have a DSLR, camcorder or mirrorless camera, Elgato got you covered with their Cam Link 4k. The Elgato Cam Link 4k allows you to to use a wide array of cameras from variety of companies to record 4k video directly to you PC, MAC or Laptop through a USB 3.0 port, or higher. In addition, the Cam Link 4k can also be used for video calling with applications such as Skype, Zoom, Discord, VSee and more. If you’re a streamers you can greatly increase the quality of your streams by replacing your old webcam with a Cam Link 4k as it works with both OBS and Xsplit. For years now, I’ve been searching for the perfect solution to streaming from events such as CES and Pax East. The Cam Link 4k could be the solution I’ve been searching for for streaming on the go. Over the past couple months, we’ve used the Cam Link 4k in every way we could think possible. So, did the Cam Link 4k live up to our expectations? Or did it fail to live up to the hype?
Specifications
Dimensions: 8.1 x 1.2 x 3.1 cm (3.18″ x .47″ x 1.22″)
Weight: 20 grams (.044 lbs)
Input: HDMI (unencrypted)
Supported Resolutions:
3840 x 2160 up to 30Hz
1920 x 1080 up to 60Hz
1280 x 720 up to 60Hz
720 x 576 50Hz
720 x 480 60Hz
Requirements
Windows
OS: Windows 10 64-bit
CPU: Intel 4th generation Core i5 quad-core processor or better (i5-4xxx or comparable)
GPU: NVIDIA GTX 960/AMD RX 470 or Better.
USB: USB 3.0 or higher
MAC
OS: macOS Sierra 10.12
CPU: Intel 4th generation Core i5 quad-core processor or better (i5-4xxx or comparable)
USB: USB 3.0 or higher
Camera Compatibility: To Check if your camera is compatibility, click here: https://www.elgato.com/en/gaming/cam-link/camera-check
Software
Supports Elgato 4k Capture Utility
A Closer Look

The Cam Link 4k comes packed with the Cam Link and a USB 3.0 extension. The Cam Link 4k is a bit larger than a USB thumb drive measuring 3.18″ x .47″ x 1.22″. On one end is a USB type-a connector. On the opposite end is a single HDMI port. The Cam Link 4k supports 4k at up to 30 frames per second or 1080p at up to 60 frames per second. The Cam link also supports 1280 x 720 at 60 frames per second, 720 x 576 at 50 frames per second and 720 x 480 at 60 frames per second.
#gallery-0-16 { margin: auto; } #gallery-0-16 .gallery-item { float: left; margin-top: 10px; text-align: center; width: 50%; } #gallery-0-16 img { border: 2px solid #cfcfcf; } #gallery-0-16 .gallery-caption { margin-left: 0; } /* see gallery_shortcode() in wp-includes/media.php */
On the top side of the Elgato Cam Link 4k, you see the Elgato logo, as well as the Cam Link 4k branding. Next to the Cam Link branding is what looks like a white line. This is actually an LED that lights up when the Cam Link is plugged in. On the underside of the Cam Link, you’ll find the the product information such as model and serial numbers as well as the address the Elgato’s parent company, Corsair.
#gallery-0-17 { margin: auto; } #gallery-0-17 .gallery-item { float: left; margin-top: 10px; text-align: center; width: 50%; } #gallery-0-17 img { border: 2px solid #cfcfcf; } #gallery-0-17 .gallery-caption { margin-left: 0; } /* see gallery_shortcode() in wp-includes/media.php */
Being wider than your average USB device, the Cam Link 4k comes packed with a USB 3.0 extension. This way, if you’re low on space in your I/O, you just need to plug in the extension. The USB 3.0 extension measures 12″ or one foot in length.
#gallery-0-18 { margin: auto; } #gallery-0-18 .gallery-item { float: left; margin-top: 10px; text-align: center; width: 50%; } #gallery-0-18 img { border: 2px solid #cfcfcf; } #gallery-0-18 .gallery-caption { margin-left: 0; } /* see gallery_shortcode() in wp-includes/media.php */
The Cam Link 4k has a laundry list of cameras from companies such as Sony, Canon, Nikon and Go Pro, just to name a few. There are a few different factors that Elgato considers before they verify a camera for use with the Cam Link 4k. These factors are if the camera has an HDMI port and can out put a clean HDMI, if it offers unlimited run time and if it has an external power option. If a camera meets these specific criteria, Elgato will verify the camera for use with the Cam Link 4k.

Elgato recommends using the Cam Link with a camera that offers a clean HDMI input as this will remove any and all overlays such as recording time, remaining storage space, focus point and anything else that you see on the screen when using your camera. In addition, its best to use a camera that has an external power option such as a dummy battery. this way, you won’t have to worry about swapping out batteries if you plan to film or stream for an extended period of time.

Its important to use a camera with an unlimited run time feature when connecting to the Cam Link 4k. Many cameras will shut down after a certain amount of time to save on battery power. Others have time limits on how long they can record due to internal timers or other factors. For example, I used to use the Sony A6300 for streaming. Although Elgato has fully verified the A6300, at launch, it had an over heating issue when recording for extended periods of time. This was originally chalked up to the battery overheating. However, even with the use of a dummy battery, I couldn’t get more than 45 minutes filming or streaming with the A6300. I have since switched to the Sony A7III and couldn’t be happier. My best advice is just get to know the camera you intend to use with the Cam Link 4k. Now, lets get into the software and different uses for the Cam Link 4k.
Software and Setup

The Cam Link 4k supports Elgato’s 4k Capture Utility for Windows which can be downloaded from the Elgato website here: https://www.elgato.com/en/gaming/downloads. The 4k Utility allows you to record directly to any hard drive or SSD on you PC, even an external drive. The 4k Capture Utility from Elgato is rather straight forward and simple to use. On the top left-hand corner of the screen there are two tabs. These tabs are the Capture screen and the Library. The capture screen is essentially what your camera sees. Or whatever HDMI device is plugged into the Cam Link that will work. During testing, I was able to capture a screen from another computer. Where the Cam Link is designed for use with cameras, I wasn’t sure if it would work. However, it did. It also captured the audio.
#gallery-0-19 { margin: auto; } #gallery-0-19 .gallery-item { float: left; margin-top: 10px; text-align: center; width: 33%; } #gallery-0-19 img { border: 2px solid #cfcfcf; } #gallery-0-19 .gallery-caption { margin-left: 0; } /* see gallery_shortcode() in wp-includes/media.php */
The next section in the Elgato 4k Capture Utility is the Library. Here, you can store and manage all of your captures be it games or videos you record. The Library has Four main folders; All, Games, Tags and Smart Folder. The Smart Folder separates your videos according to length and quality. There are four categories in the smart folder. These are 4k Videos, Long 4k Videos, Short Videos and Small Videos. You can also add in your own folders.

Other than the Capture section and Library section, there is the preferences menu. This is broken down into five sections. These sections are General, Devices, Picture, Recording and Mic. In the General section, you can enable the Stream Link beta as well as select the format for Stream Link. The Elgato Stream Link software allows you to capture your IOS device to your desktop. Its a cool feature and it works rather well. I have used it in the past. Stream Link also allows you to use your iPhone as a webcam. In the general section, you can also update your software.

In the device section, you can swap between other installed Elgato Capture devices such as the Elgato HD60, The HD60 Pro or the 4K60 Pro just to name a few. Now, you can install multiple Elgato capture devices on one system. However, the 4k Capture Utility can one capture one device at a time. What you can do is Capture your camera using the Cam Link 4k in an application such as Xsplit or Discord. Then, using another Elgato capture device suck as the 4K60 Pro, use the 4K Capture Utility to capture another PC. This is very useful for streaming.

The next section in the preferences menu is the Picture section. Here you can adjust the brightness, contrast, saturation and hue of the picture the Elgato 4k utility is capturing.

The recording section allows you to chose where both your recordings and screen shots will; be saved. You can also select the video encoder. You can select between your install graphics card, or the encoder built into the software. For the format, the Cam Link 4K can capture in four resolutions but has eight options over all. These options are 720p30, 720p60, 1080p30, 1080p60, 1440p30, 1440p60, 2160p30 and 2160p60. The bit rate is determined by the format. The output tells you the format, bit rate and how much storage will be used with your current settings. For example, at 2160p30 and a bit rate of 35.9 Mbps will use 15.8 GB of storage per hour. You can also chose to reduce the preview frame rate during recording and enable flashback recording. The Flashback recording will start recording when the 4k Capture Utility launches. You can also set the flashback recording time for up to two hours.

The Mic section is the final section in the preferences menu. Here you can select your mic to use with the 4k Capture Utility. You can also adjust the input gain and input level. The 4k Capture Utility also allows you to monitor the audio.

If you’re a streamer, The 4k Capture Utility can be used as source in Xsplit or OBS. As you can see from the two images below, the Cam Link 4k offers a far better image than your average webcam. One image is from the The Sony A7III, through the Cam Link 4k in Xsplit. The other image is from the Logitech software using the Logitech C920 Webcam. Given the quality of your camera will determine the quality of you capture. But any DSLR, camcorder or mirror-less camera paired with the Elgato Cam Link 4k will offer far superior quality than any webcam.
#gallery-0-20 { margin: auto; } #gallery-0-20 .gallery-item { float: left; margin-top: 10px; text-align: center; width: 50%; } #gallery-0-20 img { border: 2px solid #cfcfcf; } #gallery-0-20 .gallery-caption { margin-left: 0; } /* see gallery_shortcode() in wp-includes/media.php */
One this that is very important to keep in mind is there is an audio delay when using any capture card. Especially if you’re using something other than the audio on your camera, or even a shotgun mic attached to your camera. For streaming, I use the Sound Blaster K3+ with the Audio Technica AT2035. This caused a terrible audio delay in Xsplit when streaming or recording tot he 4k Capture Utility. There are two options to resolve this issue. When streaming, simply go into your streaming applications settings and set a 650 ms delay on both the speakers and mic. It won’t be perfect, but its as close as I could get and the settings that Elgato recommended to me. The second option is for recording and that is to use an application such as Adobe Audition or a free option like Audacity to record your audio separately and fix it in post. But, if you don’t care to play with software or intend to record videos, and just plan to use the Cam Link 4k for Skype, Discord or Zoom, you can simply plug it in and use it.

Final Thoughts and Conclusion

Whether you’re streamers, working from home, or just want something better than the average webcam on you PC, the Elgato Cam Link 4k is an excellent option. The Cam Link 4k offers an amazing image quality, especially when compared to the most popular webcam used by content creators, the Logitech C920. Now there are better webcam options. However, a decent 4k webcam is going to run upwards of $200 USD. At the time of this review, the Cam Link 4k is selling on B&H or at Best Buy for $129.99. So, if you already have a camera that can output a clean HDMI, then the Cam Link 4k is by far the better option. When it comes to technology, its rare that he better option is also the cheaper option. Given, the Cam Link 4k does require a camera. But, if you’re a content creator getting into streaming, chances are you already have a decent camera already.
The Cam Link 4k makes recording in studio far easier by eliminating the need for SD cards, card readers and even transferring data after recording. Recording directly to my PC or Laptop is much more convenient than having to play around with SD card and card readers. With the Cam Link 4k, I can record directly to an NVMe SSD. Over time, this will save you hours of waiting for files to transfer and get you to editing sooner. As we all know, when it comes to content creation, time is money. So if you’re looking to up the quality of your streams, videos or even conference calls, the Cam Link 4k is the way to go.
[sc name=”award-must-have” ]
Elgato Cam Link 4K With the world in its current state, nearly everyone is either taking classes or working from home.
1 note
·
View note
Text
Shortwave Radiogram, 20-23 June 2019: Instead of cutting the grass, decode the modes.
A prospective Shortwave Radiogram listener sent an email asking about the basic equipment needed to receive and decode the modes. This reminded me of the need to revisit the How to Decode the Modes of the Shortwave Radiogram website.
It would seem all that is needed is a radio and a computer, with a patch cord from the earphone jack of the radio to the microphone jack of the computer. But, nowadays, many computers don't have separate mic jacks. And if a patchcord is plugged into a radio's earphone jack, the speaker is muted. These are just two of the problems that can occur in the decoding chain. So, with your help, I will try to develop new "how to" document.
Videos of last weekend's Shortwave Radiogram (program 104) are provided by Scott in Ontario (Friday 1300 UTC) and by Ralf in Germany (Sunday 2330 UTC). The audio archive is maintained by Mark in the UK. Analysis is prepared by Roger in Germany.
This weekend's show is in the usual MFSK32 and MFSK64, with nine images.
Here is the lineup for Shortwave Radiogram, program 105, 20-23 June 2019, in MFSK modes as noted:
1:42 MFSK32: Program preview
2:51 The ghost galaxy that hit the Milky Way long ago*
7:51 MFSK64: Europe's plastics problem*
12:08 Five ways a 'lazy' lawn makes pollinators happy*
16:59 This week's images*
28:33 MFSK32: Closing announcements
* with image(s)
Please send reception reports to [email protected]
And visit http://swradiogram.net
Twitter: @SWRadiogram or https://twitter.com/swradiogram (visit during the weekend to see listeners' results)
Facebook group: https://www.facebook.com/groups/567099476753304
+----------------------------------------------------------------+
| Shortwave Radiogram Transmission Schedule |
+----------------------------------------------------------------+
| UTC Day | UTC Time | Frequency | Transmitter site |
+----------+---------------+---------------+---------------------+
| Thursday | 2330-2400 UTC | 9265 kHz | WINB Pennsylvania |
+----------+---------------+---------------+---------------------+
| Friday | 1300-1330 UTC | 15770 kHz | WRMI Florida |
+----------+---------------+---------------+---------------------+
| Friday | 1500-1530 UTC | 15120 kHz DRM*| WINB Pennsylvania |
+----------+---------------+---------------+---------------------+
| Saturday | 0230-0300 UTC | 9265 kHz | WINB Pennsylvania |
+----------+---------------+---------------+---------------------+
| Sunday | 0800-0830 UTC | 5850 7730 kHz | WRMI Florida |
+----------+---------------+---------------+---------------------+
| Sunday | 2330-2400 UTC | 7780 kHz | WRMI Florida |
+----------+---------------+---------------+---------------------+
The Mighty KBC transmits to North America Sundays at 0000-0200 UTC (Saturday 8-10 pm EDT) on 9925 kHz, via Germany. A minute of MFSK is at about 0130 UTC. Reports to Eric: [email protected] . See also http://www.kbcradio.eu/ and https://www.facebook.com/TheMightyKbc/.
“This is a Music Show” is the newest addition to digital modes via analog shortwave. Most of the show is a music show, but the host transmits some MFSK text and image near the end of the broadcast. It’s transmitted on WRMI, 9395 kHz, Thursday 0130-0230 UTC (Wednesday evening in the Americas). Also look for a waterfall ID at the beginning of the show. [email protected] . www.instagram.com/thisisamusicshow/ www.twitter.com/ThisIsAMusicSho/
New York and Pennsylvania NBEMS nets. Most weekends, as KD9XB, I check in to the New York NBEMS (Narrow Band Emergency Messaging Software) net Saturday at 1200 UTC on 3584 kHz USB, and the Pennsylvania NBEMS net Sunday at 1200 UTC on 3583 kHz USB (with out-of-state check-ins now starting at 1130 UTC). Check-ins are usually in Thor 22, and messages are in MFSK32 (PA NBEMS is experimenting with Thor 50x1 for messages). Messages generally use the Flmsg add-on to Fldigi. If you are a radio amateur in eastern North America, feel free to check in. Outside the region, use an SDR in the eastern USA to tune in and decode. You do not need Flmsg to check in, and most of the messages can be read without Flmsg. If you can decode the net, send me an email to [email protected] , or tweet to @SWRadiogram , and I will let them know you are tuned in.
Zach in Alabama received these images, 16 June 2019, 0800-0830 UTC, 5850 kHz from WRMI Florida ....

0 notes
Last Seen Blogs

rariblenft5
RaribleNFT

trashbabyart
belongs in the trash

pandatdm
islam yours

pandamonium135
Total Pandamonium

jummas
@kmtaeyeon