#Apache port error solution
Explore tagged Tumblr posts
Visit Tumblr Blog
Explore Tumblr blogs with no restrictions, modern design and the best experience.
Last Seen Tumblr Blogs


Fun Fact
130K people were victims of a chain letter scam that affected Tumblr in May 2011.
Text
Fix the Port used for the Virtualhost is not an Apache Listen Port
In this short blogpost, we shall discuss how to Fix the Port used for the Virtualhost is not an Apache Listen Port. In Apache, the Listen directive in the configuration file (httpd.conf or apache2.conf, depending on the system) specifies the port number on which Apache will listen for incoming connections. Please see Setup VirtualHost with SSL on WAMP Server, how to Configure SQL Server Instance…
#Apache listen port error#Apache port and VirtualHost issue#Apache port error solution#Apache port setup#Apache server troubleshooting#Apache VirtualHost configuration error#configure Apache listen port#fix Apache VirtualHost port issue#how to fix Apache port not listening#resolve Apache port conflict#VirtualHost listen port fix#VirtualHost not listening on port#VirtualHost not responding on port#VirtualHost port not working#Windows#Windows Server#Windows Server 2012#Windows Server 2016#Windows Server 2019
0 notes
Text
Discuss ADF’s role in the evolving data landscape.

The Evolving Role of Azure Data Factory in Modern Data Engineering
The data landscape is evolving rapidly, driven by the exponential growth of data, the rise of cloud computing, and the increasing need for real-time analytics. Organizations are shifting from traditional ETL (Extract, Transform, Load) pipelines to more agile, cloud-native, and scalable data integration solutions. In this transformation, Azure Data Factory (ADF) has emerged as a key player, enabling businesses to streamline their data workflows while embracing new trends like serverless computing, hybrid data integration, and AI-driven automation.
Why Azure Data Factory is Critical in the Evolving Data Landscape
1. The Shift to Cloud and Hybrid Data Integration
With businesses leveraging multiple cloud providers and on-premises systems, seamless data movement is crucial. ADF simplifies hybrid data integration by connecting on-premises databases, cloud storage, SaaS applications, and big data platforms like Azure Synapse, Snowflake, and AWS S3. The Self-hosted Integration Runtime (SHIR) allows organizations to securely transfer on-premises data to the cloud without opening firewall ports, making cloud adoption smoother.
2. Serverless and Scalable Data Pipelines
The demand for serverless computing is growing, as enterprises look for cost-effective, auto-scalable solutions. ADF offers serverless data orchestration, eliminating the need for infrastructure management. It efficiently handles both batch processing and real-time data ingestion, automatically scaling resources based on demand, ensuring performance and cost efficiency.
3. Unified ETL and ELT Capabilities
ADF supports both traditional ETL (Extract, Transform, Load) and modern ELT (Extract, Load, Transform) approaches. With data flows powered by Apache Spark, users can process large datasets without managing clusters. For ELT workflows, ADF integrates seamlessly with Azure Synapse Analytics and SQL Data Warehouse, pushing transformation logic to the database layer for optimized performance.
4. Real-Time and Streaming Data Integration
Real-time analytics is becoming a business necessity. ADF works with Azure Event Hubs, Azure Stream Analytics, and Apache Kafka to process streaming data from IoT devices, web applications, and business intelligence tools. This enables organizations to make data-driven decisions instantly, enhancing customer experiences and operational efficiencies.
5. Low-Code and No-Code Data Integration
The demand for self-service data engineering is growing, allowing non-technical users to build pipelines without deep coding expertise. ADF’s drag-and-drop UI and Data Flow activities enable users to create data transformation workflows visually, reducing development time and lowering the barrier to entry for data integration.
6. AI and Automation in Data Orchestration
Automation is at the core of modern data workflows. ADF leverages Azure Machine Learning and AI-powered monitoring to optimize pipeline execution. Features like data-driven triggers, parameterized pipelines, and error-handling mechanisms ensure automated and resilient data workflows.
7. Security, Compliance, and Governance
With data privacy regulations like GDPR, CCPA, and HIPAA, enterprises must prioritize data security and compliance. ADF provides end-to-end encryption, managed identity authentication, role-based access control (RBAC), and data masking to protect sensitive information. Integration with Azure Purview also ensures robust data lineage tracking and governance.
Conclusion:
ADF’s Future in the Data-Driven World
As enterprises continue to modernize their data ecosystems, Azure Data Factory will remain a cornerstone for data integration and orchestration. Its ability to adapt to cloud-first architectures, support real-time analytics, and integrate AI-driven automation makes it an indispensable tool for modern data engineering.
With Microsoft continuously enhancing ADF with new features, its role in the evolving data landscape will only grow stronger. Whether for batch processing, real-time analytics, or AI-driven workflows, ADF provides the flexibility and scalability that today’s businesses need to turn data into actionable insights.
WEBSITE: https://www.ficusoft.in/azure-data-factory-training-in-chennai/
0 notes
Text
How-to Optimize Website Speed with Varnish Cache
Guidelines to speed up your website with Varnish Cache
The page load time is one of the most important factors for today’s online business.
Walmart found a 2% increase in conversions for every 1-second of improvement of website speed. Amazon found a 1% increase in revenue for every 100 milliseconds improvement to their website speed. Akamai found that:
47% of people expect a web page to load in two seconds or less.
40% will abandon a web page if it takes more than three seconds to load.
52% of online shoppers say quick page loads are important for their loyalty to a website.
Not sure yet? Then think again; a 1-second delay in page load time yields:
11% fewer page views.
16% decrease in customer satisfaction.
7% loss in conversions.
Still not sure? Okay, then there's another one:
By using the techniques described below in this article, you can save your hosting costs. You can have a website that works on a cheap $15 hosting to serve as many numbers of users as several hundred dollars hosting.
In this article, we'll describe how you can achieve this by using the Varnish Cache.
What is Varnish Cache?
According to the official documentation, Varnish Cache is a web application accelerator also known as a caching HTTP reverse proxy. It can speed up the delivery of your website with a factor of 300 - 1000x, depending on your architecture. Varnish comes with its own configuration language called VCL. Varnish is used in such large CDN providers as Fastly and KeyCDN.
Varnish serves data from virtual memory, a response is returned without needing to access the application and database servers. Each Varnish server can handle thousands of requests per second, much faster than a ‘usual’ website's framework alone.
How does it work?
The secret of acceleration is to install Varnish before your application server (Apache, Nginx, IIS). In this case, each HTTP request from the browser will first go to the Varnish server. If the current request was not found in the cache, Varnish will request your application server, cache the response and send the response back to the browser. All subsequent requests for similar URLs will be served from the Varnish cache thus unloading your application server.
Another advantage of this approach is that Varnish will improve the availability of your website. For example, if a PHP fatal error breaks your website, the pages still will be served from the Varnish cache and end-users will not realize that anything went wrong.
Of course, each approach has its downside. If you change the content for some of your pages, your users will not be able to immediately see these changes as they will receive the old version of the page from the Varnish cache. But this problem can be easily fixed by forcing Varnish to invalidate specific resources by sending so-called 'PURGE' requests to it, to notify that there is a fresh content available for the specified URLs. Varnish will delete the cached content for these URLs and request them again from your server. You can also reduce the time for storing a copy of a page in the cache by specifying the time-to-live (TTL) ratio for example to 2 minutes. This will force Varnish to update the data in its cache more frequently.
Another downside relates to security reasons, Varnish can serve only anonymous users and will remove all session-specific cookies from HTTP headers (this can be managed via VCL). Requests from registered users won’t be cached and will go directly to your application server.
Installing Varnish Cache
There are a lot of good articles about how to install and configure Varnish and we will not elaborate on this in our article. For example, you can check this article (you can skip all steps not related to the installation of Varnish).
Testing Varnish Cache
Using Varnish requires changing the DNS settings for your domain name provider. This is OK for the production server, but how to test it on your development environment?
Let's say our production website is hosted on 140.45.129.179 IP address and we deployed our Varnish server on 165.227.10.154. One approach is to force the browser to visit 165.227.10.154 instead of 140.45.129.179 by changing the domain IP address in the host's file (%WINDIR%\System32\drivers\etc\hosts). But this requires you to restart your computer every time you change the host's file.
If you have the HTTP Debugger application installed on your computer, you can do this without changing the hosts' file and without restarting the computer. To do this, just add TCP / IP Redirection Rule to HTTP Debugger as shown on the image:
The positive side of this solution is that in this case Varnish can be configured on any port and not only to 80, and you can quickly enable/disable redirection without restarting the computer.
Conclusion
As we see, using Varnish you can really boost your website speed for dozens of times, increase its reliability and save on hosting costs at the same time. It sounds fantastic, but as we've seen it really works.
Useful Links
https://varnish-cache.org
https://loader.io
https://www.httpdebugger.com
https://www.crazyegg.com/blog/speed-up-your-website
https://www.digitalocean.com/community/tutorials/how-to-configure-varnish-cache-4-0-with-ssl-termination-on-ubuntu-14-04
https://github.com/mattiasgeniar/varnish-4.0-configuration-templates/blob/master/default.vcl
1 note
·
View note
Text
Optimize Website Speed with Varnish Cache
Guidelines to speed up your website with Varnish Cache
The page load time is one of the most important factors for today’s online business.
Walmart found a 2% increase in conversions for every 1-second of improvement of website speed. Amazon found 1% increase of revenue for every 100 milliseconds improvement to their website speed. Akamai found that:
47% of people expect a web page to load in two seconds or less.
40% will abandon a web page if it takes more than three seconds to load.
52% of online shoppers say quick page loads are important for their loyalty to a website.
Not sure yet? Then think again; a 1-second delay in page load time yields:
11% fewer page views.
16% decrease in customer satisfaction.
7% loss in conversions.
Still not sure? Okay, then there's another one:
By using the techniques described below in this article, you can save your hosting costs. You can have a website that works on a cheap $15 hosting to serve as many numbers of users as several hundred dollars hosting.
In this article, we'll describe how you can achieve this by using the Varnish Cache.
What is Varnish Cache?According to the official documentation,
Varnish Cache
is a web application accelerator also known as a caching HTTP reverse proxy. It can speed up delivery of your website with a factor of 300 - 1000x, depending on your architecture. Varnish comes with its own configuration language called VCL. Varnish is used in such large CDN providers as Fastly and KeyCDN.
Varnish serves data from virtual memory, a response is returned without needing to access the application and database servers. Each Varnish server can handle thousands of requests per second, much faster than a ‘usual’ website's framework alone.How does it work?
The secret of acceleration is to install Varnish before your application server (Apache, Nginx, IIS). In this case, each HTTP request from browser will first go to the Varnish server. If the current request was not found in the cache, Varnish will request your application server, cache the response and send the response back to the browser. All subsequent requests for similar URLs will be served from the Varnish cache thus unloading your application server.
Another advantage of this approach is that Varnish will improve the availability of your website. For example, if a PHP fatal error breaks your website, the pages still will be served from the Varnish cache and end-users will not realize that anything went wrong.
Of course, each approach has its downside. If you change the content for some of your pages, your users will not be able to immediately see these changes as they will receive the old version of the page from the Varnish cache. But this problem can be easily fixed by forcing Varnish to invalidate specific resources by sending so called 'PURGE' requests to it, to notify that there is a fresh content available for the specified URLs. Varnish will delete the cached content for these URLs and request them again from your server. You can also reduce the time for storing a copy of page in the cache by specifying the time-to-live (ttl) ratio for example to 2 minutes. This will force Varnish to update the data in its cache more frequently.
Another downside relates to security reasons, Varnish can serve only anonymous users and will remove all session-specific cookies from HTTP headers (this can be managed via VCL). Requests from registered users won’t be cached and will go directly to your application server.
Installing Varnish CacheThere are a lot of good articles about how to install and configure Varnish and we will not elaborate on this in our article. For example you can check this
article
(you can skip all steps not related to the installation of Varnish).
Testing Varnish CacheUsing Varnish requires changing the DNS settings for your domain name provider. This is OK for production server, but how to test it on your development environment?
Let's say our production website is hosted on 140.45.129.179 IP address and we deployed our Varnish server on 165.227.10.154. One approach is to force browser to visit 165.227.10.154 instead of 140.45.129.179 by changing the domain IP address in the hosts file (%WINDIR%\System32\drivers\etc\hosts). But this requires you to restart your computer every time you change the hosts file.
If you have the
HTTP Debugger
application installed on your computer, you can do this without changing the hosts file and without restarting the computer. To do this, just add TCP / IP Redirection Rule to HTTP Debugger as shown on the image:
The positive side of this solution is that in this case Varnish can be configured on any port and not only to 80, and you can quickly enable / disable redirection without restarting the computer.
Below is the same response from a web server without and with Varnish cache enabled. As you can see on the right image, the page was served from the cache and Varnish added/removed some HTTP headers (this can be managed via VCL).
Load testingNow let's check how in fact the Varnish can speed up the website by doing a load testing using the
loader.io
service.
For our test, we chose the free package that allows generating 10,000 requests in 15 seconds. The testing website is a simple ASP.NET website hosted on Microsoft Azure (IIS) for about $ 100/m and does not use MS SQL. The Varnish Cache is hosted on DigitalOcean droplet for $10/m.
Below are test results for without and with using the Varnish Cache. Quite impressive, isn’t it?
ConclusionAs we see, using Varnish you can really boost your website speed for dozens of times, increase its reliability and save on hosting costs at the same time. It sounds fantastic, but as we've seen it really works.
Useful Links
https://varnish-cache.org
https://loader.io
https://www.httpdebugger.com
https://www.crazyegg.com/blog/speed-up-your-website
https://www.digitalocean.com/community/tutorials/how-to-configure-varnish-cache-4-0-with-ssl-termination-on-ubuntu-14-04
https://github.com/mattiasgeniar/varnish-4.0-configuration-templates/blob/master/default.vcl
Copyright Notice: Please don't copy or translate this article without prior written permission from the HTTPDebugger.com
HTTP Debugger is a proxy-less http analyzer for developers that provide the ability to capture and analyze HTTP headers, cookies, POST params, HTTP content and CORS headers from any browser or desktop application. Very easy to use, with clean UI, and short ramp-up time. Download FREE 7-Day Trial
1 note
·
View note
Text
Big blue button vs jitsi

Big blue button vs jitsi how to#
Big blue button vs jitsi install#
Having enough disk space is essential if you have number of sessions been done since recordings would take up the space.
500GB of free disk space (Recommended for production).
TCP ports 7443 (to configure SSL) and 5066 open.
Ubuntu 16.04 64-bit OS running Linux kernel 4.x.
The minimum requirement would be a c5.xlarge instance which posses 4 cores and 8GB of RAM.
It is adviced to use a fresh server for the installation of BigBlueButton.
Big blue button vs jitsi install#
Add Public Key to server’s key chain and get bigbluebutton packagesīigBlueButton provides a script to install BigBlueButton with single command but it is always better to go through each step, so that you know what is really being done and makes it easy to do any modification or debug any error.
Install necessary packages and security updates.
How to Install Kurento Media Server on AWS Creating an OpenCV Filter for Kurento Media Server How to setup local recordings on jitsi meet How to enable Translation from the Jitsi meet front end to work with Jigassi and Google Translate API Setting up a Gitlab CI/CD pipeline to deploy Jitsi meet front end 2022 Terraform based infrastructure as code for Jitsi deployment AWS Zoom Enterprise plan vs Jitsi Meet Enterprise by Meetrix Jitsi Meet enterprise architecture by meetrix for 100-235 concurrent users : largest ever concurrent Jitsi conferences (2022) How recording and streaming videos with Jibri works on Jitsi meet Setting up Jibri for Jitsi Meet meeting recording and streaming on Ubuntu 18, Ubuntu 20.04 for Nginx or Apache Authenticating windows active directory users with jitsi meet securely
Big blue button vs jitsi how to#
Tutorial on how to setup Jitsi meet from AWS marketplace using the Jitsi meet auto deployment scripts for AWS by Meetrix Jitsi meet infrastructure with meeting management system for telecoms and software services as a CPAAS A tutorial on how to customize the Jitsi meet front end Benefits of using JWT for authenticating users into a Jitsi Meet meeting Cost savings on Jitsi meet by scheduling unused server off times - save upto 40% How to authenticate users to Jitsi meet using JWT tokens How to setup Jitsi Meet and JVB on Ubuntu 20.04 How to Enable Screen Sharing in Jitsi Meet (Deprecated) Jitsi, the ground breaking opensource video conferencing solution How to Install Jitsi Meet on Ubuntu 16.04 Access device media for WebRTC Applications
1 note
·
View note
Text
Apache Web Server Stopped Xampp Mac

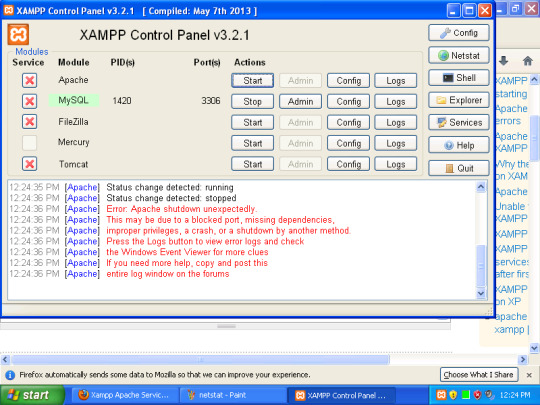
Apache Web Server Stopped I have followed directions found on youtube and elswhere to update the Port #. I did this process manually with httpd.conf file, for the Port and httpd-ssl.conf local host. Then, restarted the manager-osx. In my Web Browser When I type 'localhost' in the web browser, the screen returns 'It works!'
Oct 10 20:01:42 lee-Desktop apache21562:. Starting Apache httpd web server apache2 Oct 10 20:01:43 lee-Desktop apache21562: AH00558: apache2: Could not reliably determine the server's fully qualified domain name, using 127.0.1.1.
I installed XAMPP on my mac months ago and was working great. Now i get 'Test Page For Apache Installation' when i try to browse /localhost. And /localhost/xampp is not found. But when i browse /127.0.0.1 it just works as localhost used to be. I double checked my /etc/hosts file that i have 127.0.0.1 localhost and not commented.
To solve Apache Server Running ProblemOpen the terminal and write the commandsudo apachectl stopand click start button again.To Solve MYSQL Database Running.
I install XAMPP server on MAC OS 10.6 it was working fine. After a lot of days I checked it, but not working this time, localhost not opening this time. After some R&D I reinstall XAMPP server.
Unable to start XAMPP Apache server on MacOS-Sierra
xampp apache is not starting mac xampp mysql not starting mac /system/library/launchdaemons/org.apache.httpd.plist: could not find specified service brew install xampp how to start xampp in mac terminal sudo /applications/xampp/xamppfiles/bin/mysql server start error open xampp control panel mac error starting 'xampp' stack
Whenever I'm trying to start my Apache server from XAMPP on my Macbook (MacOS-Sierra) . I'm getting following application log :
And status remains Stopped. I re-install XAMPP and restarted my laptop multiple times, but I'm still having same issue. Couldn't find anything help to resolve this issue.
I found the solution:
Make sure port 80 is not being used (Use Network Utility and scan for port 80. If you found any application using port 80, then kill it)
Open terminal and execute
(ignore, if you get any error)
On the same terminal window execute
Open XAMPP control panel, your apache server might have started by now, if not then you can start manually by clicking start button.
This worked for me!!
XAMPP Apache Webserver localhost not working on MAC OS , This allowed XAMPP to start on 80, while POW runs on 20559. What had failed: I reconfigured /etc/apache2/httpd.conf to listen on an alternate Go to a web browser and type localhost:8080/phpmyadmin/. (8080 is your change port number). Now your XAMPP server is ready for your use. In this process, you can easily use many software like XAMPP, Skype, Team viewer etc. at a time. If you will face any problem with XAMPP Apache server.
Another related issue, which I faced caused Apache sever failure. And failure logs is :
To solve this :
Executed following command
Then, changed following entries
to
Apache Web Server Stopped Xampp Mac
XAMPP won't start Apache on Mac OS X 10.10.3 Yosemite, After months of trying, I finally got it working. I found the solution here: disable OSX's built-in Apache server. sudo launchctl unload -w deepak.201525 Posts: 1 Joined: 11. July 2017 15:18 XAMPP version: XAMPP-VM-7.1.6-0-preview Operating System: MacOS Sierra
I had the same Problem and fixed it by deleting the lib folder in Applications/XAMPP/xamppfiles/ and installing XAMPP again. It's probably due to old lib files from previous versions not being updated properly.
Solve XAMPP problems when Apache doesn't start, What is the meaning of the error messages I see when starting XAMPP? You may get several error messages while starting XAMPP: LAMPP-Apache is already apache will not start without the configured ports free! port 443 in use by 'unable to open process' with pid 4! 13:47:10 (Apache) Problem detected! 13:47:10 (Apache) Port 80 in use by 'Unable to
Jiffy lube oil change cost synthetic. I had the same issue when I update my XAMPP app, if you have to do this, you first have to uninstall your XAMPP (save your HTDOCS files in another folder, NOT in XAMPP folder, or you will lose it), and after that you can install the newest version of XAMPP. It worked for me, hope for you too.

xampp mac not working (how to install xampp on mac) solved , If you are getting error 'Can't connect to local MySQL server through socket '/Applications/XAMPP/xamppfiles/var/mysql/mysql.sock' (61. PHP; MySQL; Apache (61 'Connection refused')' when starting XAMPP on MACOS - here is the solution. How to update PHP version on your MacBook - macOS Sierra. The configuration file I’m going to create will start XAMPP’s Apache server as a service at system startup. In Terminal I’d type /Applications/XAMPP/xamppfiles/xampp startapache to start XAMPP’s Apache server, so this is the command I’ll include in my configuration file.
Simply goto your terminal and type:
It'll ask for password. Enter your system password.
Go back to XAMPP control panel and start Apache. It should get started now.
War thunder m41a1. XAMPP FAQs for Mac OS X, Before installing XAMPP, you should turn off any other web servers and instances of MySQL you have running on your Mac. XAMPP is a You should see the start page of XAMPP: XAMPP Start Page for OSX You should be able to get in. I also noted that my folder was named C:/Xampp1 while the server root in httpd.config was C:/Xampp/Apache so removed the 1 in my folder so it matches the http.config file I then started Xampp as administrator Shocked to see that it worked like a charm (Win firewall asked to allow access and now I am good to go)
Xampp Web Server
Can not start XAMPP on MACOS Catalina, Set up localhost on macOS High Sierra (Apache, MySQL, and PHP 7) with SSL/HTTPS Open Terminal and type sudo nano /etc/apache2/httpd.conf and press on MySQL and you'll see that it's turned off; Press Start MySQL Server to turn it XAMPP Apache Webserver localhost not working on MAC OS Solutions 1: Stop Conflicting Program And Start XAMPP Apache Server If you carefully read this XAMPP message, you’ll see they give a solution – to uninstall/disable or reconfigure the blocking program. For example most common programs for Apache not starting is Skype. If that is the case quit/stop Skype and run Apache and see.
How to install, start and test XAMPP on Mac OSX, XAMPP is a free distribution package that makes it easy to install Apache Web Server, PHP, PEAR, and MySQL. Before installing XAMPP, you should turn off any other web servers and instances of MySQL you have running on your Mac. Installing XAMPP on a Mac. Download XAMPP for Mac OSX - Be sure to select the proper version of PHP. For Webucator
Set up localhost on macOS High Sierra (Apache, MySQL, and PHP , Unable to START the Apache in the XAMPP server. Thread starter Rajashekar; (pid 3404:tid 652) AH00456: Apache Lounge VC15 Server built: Aug 11 2019 12:20:04

Apache Web Server Tutorial
Comments
Xampp Apache
ahh. thank you for saving my sanity. I am getting real drunk tonight.
just to add, to check which process is using port 80 on mac you can use $sudo lsof -i ':80'
Apache Web Server Stopped Xampp Machine
Hot Questions
0 notes
Text
Get Moving with AEM and Grabbit

In this era of digital transformation, organizations tend to be buried under a humongous amount of data or content. Websites form an integral part of any organization and encapsulate multiple formats of data, ranging from simple text to huge media asset files.
We see many business requirements to regroup/reorganize content, consolidate multiple sources of data, or convert legacy forms of data into new solutions. All these requirements involve content migration at its own scale, depending on the amount of data being migrated.
A common use case in any content management solution is how to move heavy content between the instances. AEM involves various methods, such as vlt process, recap, and package manager. Each option has its own pros and cons, but all of them have a common disadvantage: content migration takes a lot of time.
To overcome this, the latest versions of AEM have started supporting Grabbit as one of the quickest ways to transfer content between Sling environments. As per the AEM 6.4 documentation, there are two tools recommended for moving assets from one AEM instance to another.
Vault Remote Copy, or vlt rcp, allows you to use vlt across a network. You can specify a source and destination directory and vlt downloads all repository data from one instance and loads it into the other. Vlt rcp is documented at http://jackrabbit.apache.org/filevault/rcp.html.
Grabbit is an open source content synchronization tool developed by Time Warner Cable (TWC) for their AEM implementation. Because Grabbit uses continuous data streams, it has a lower latency compared to vlt rcp and claims a speed improvement of two to ten times faster than vlt rcp. Grabbit also supports synchronization of delta content only, which allows it to sync changes after an initial migration pass has been completed.
AEM 6.4 and Grabbit – possible?
We see a lot of questions in Adobe forums and TWC Grabbit forums asking if AEM 6.4 really supports Grabbit content transfer. The answer is yes!
Let’s look at the steps that needs to be followed to use Grabbit in an AEM 6.4 instance to make it work across environments.
STEP 1: Install the following packages. Ensure the Grabbit package is installed at the end.
1. Sun-Misc-Fragment-Bundle-1.0.0
2. Grabbit-Apache-Sling-Login-Whitelist-1.0
3. Grabbit-Deserialization-Firewall-Configuration-1.0
4. Grabbit-7.1.5
STEP 2: Add the twcable Grabbit package to the Sling login admin whitelist – com.twcable.grabbit
STEP 3: Adjust the Deserialization firewall configuration in the OSGi console.
Ensure the following items are removed from the blacklist:
org.springframework.beans.factory.ObjectFactory org.springframework.core.SerializableTypeWrapper$MethodInvokeTypeProvider
Ensure to add this in the whitelist
org.springframework.
Debugging
To ensure Grabbit is successfully installed, try hitting the Grabbit URL to fetch the list of transactions or jobs (http://<host>:<port>/grabbit/transaction/all). If this returns an empty list [], Grabbit is successfully installed and ready to be used to send or receive data.
While running Grabbit.sh in Windows, to initiate the Grabbit job, if anything goes wrong, it is difficult to get the error details, as the command window closes immediately. One cannot see the error code returned from the job. To get the error code/message in the command prompt window, comment out the Clear command inside the Else block of the newGrabbitRequest() function in grabbit.sh.
This will help you review the errors and resolve them effectively.
We have been successful in migrating content between AEM 6.2 and 6.4 instances and between 6.4 AEM instances using Grabbit.
Try these steps to install and use Grabbit without any hiccups, and make your content migration quick and smooth.
Enjoy your content migration!
About Author
Saraswathy Kalyani is an experienced AEM and Portal consultant at Relevance Lab.
0 notes
Text
Fun with Java Deserialization
Down the Rabbit Hole
I’ve just been scrambling down the rabbit hole to patch an app that Qualys is complaining has a deserialization vulnerability. What should have been a simple effort has turned into a mystery because, while we appear to have the correct libraries already in place, Qualys is still complaining about the error. A report that should be clean, to indicate compliance with GDPR, is instead “yellow”, or “orange”, or “red”, so fingers point, tempers flare, e-mails fly about, cc’ing higher and higher ups, so now we have assumptions, and based on those assumptions, tersely written orders, involvement by 3rd party vendors. Time to panic? Shall we be careful and tip-toe through the eggs?[0]
Well, it turns out to be a rather interesting mystery.
What is Java serialization?
First, some definitions are in order. What is Java serialization and why is it important? Perhaps Wikipedia[1] defines it the simplest:
A method for transferring data through the wires
Java serialization is a mechanism to store an object in a non-object form, i.e. a flat, serial stream rather than an object, so that it can be easily sent somewhere, such as to a filesystem, for example. It is also known as “marshaling”, “pickling”, “freezing” or “flattening”. Java programmers should be familiar with the concept, and with the Serializable interface, since it is required in various situations. For example, this technique is used for Oracle Coherence’s “Portable Object Format” to improve performance and support language independence.
Early Days of Java Serialization
Amazing to think that, back in the day, we used all the various tools required for distributed communication, whether simple like RMI and JMX, or more involved specs like CORBA and EJB, and we never thought much about the security aspects. I’m sure if I peruse my copy Henning and Vinoski’s definitive work on C++ and CORBA, I’ll find a chapter or so focusing on security[1], but I’m figuring, we, like everyone else, focused on the business details, getting the apps to communicate reliably, adding features, improving stability, etc, and not on whether there were any security holes, such as tricking a server into running cryptocurrency mining malware[2]. Yes, Bitcoin and the like did not even exist then.
The Biggest Wave of Remote Execution Bugs in History
Well, times change, and the twenty-year-old Java deserialization capability is the source of “nearly half of the vulnerabilities that have been patched in the JDK in the last 2 years” [3], so Oracle has plans in the works to completely revamp object serialization. Further note that this is not solely Oracle’s issue, nor is it limited to Java. Many other software vendors, and open source projects, whether tools or languages, have this weakness, such as Apache Commons Collections, Google Guava, Groovy, Jackson, and Spring.
It seems all the excitement, at least in the Java world, started when Chris Frohoff and Garbriel Lawrence presented their research on Java serialization “ultimately resulting in what can be readily described as the biggest wave of remote code execution bugs in Java history.” [6] However, it is important to note that this flaw is not limited to Java. While Frohoff and Lawrence focused on Java deserialization, Moritz Bechler wrote a paper that focuses on various Java open-source marshalling libraries:
Research into that matter indicated that these vulnerabilities are not exclusive to mechanisms as expressive as Java serialization or XStream, but some could possibly be applied to other mechanisms as well.
I think Moritz describes the heart of the issue the best:
Giving an attacker the opportunity to specify an arbitrary type to unmarshal into enables him to invoke a certain set of methods on an object of that type. Clearly the expectation is that these will be well-behaved – what could possibly go wrong?
Java deserialization
For our purposes, we focused on Java serialization and Apache Commons Collections. From the bug report COLLECTIONS-580[4]:
With InvokerTransformer serializable collections can be build that execute arbitrary Java code. sun.reflect.annotation.AnnotationInvocationHandler#readObject invokes #entrySet and #get on a deserialized collection.
If you have an endpoint that accepts serialized Java objects (JMX, RMI, remote EJB, …) you can combine the two to create arbitrary remote code execution vulnerability.
The Qualys report didn’t have much in the way of details, other than a port and the commons-collections payloads that illustrated the vulnerability, but I guessed from that info that the scanner simply uses the work done by the original folks (Frohoff and Lawrence) [5] that discovered the flaw available as the ysoserial project below.
https://www.youtube.com/watch?v=KSA7vUkXGSg
Source code here: https://github.com/frohoff/ysoserial
Now, in the flurry of trying to fix this error, given the annoyingly vague details from Qualys, I had looked at all sorts of issues, after noticing a few extra JVM arguments in the Tomcat configuration that happened to be set for the instances that were failing with this error, but were not set on other instances. Apparently someone had decided to add these, without informing our team. Interesting.
Now, remember that according to the original bug report, this exploit requires (1) untrusted deserialization, it (2) some way to send a payload, i.e. something listening on a port, such as a JMX service. In fact, These extra JVM args were for supporting remote access via JMX, so unraveling the thread, I researched Tomcat 8 vulnerabilities especially related to JMX. While it turns out that JMX is a weak point (JBoss in particular had quite a well-known major JMX flaw), I did have any luck convincing the customer that they should shut down the port. It is used to gather monitoring metrics useful in determining application performance such as CPU load, memory, and even cache information. Ok, easy but drastic solutions were off the table. I was back to the drawing board.
Next, I tried to see why it was flagging Apache collections in the first place. Going back to the ysoserial project, was it incorrectly flagging Apache Commons Collections 3.2.2, or Collections4-4.1, despite the fact that the libs were fixed? Further looking at the specific payloads, Qualys/Ysoserial was complaining about Collections 3.2.1, which limited the test scenarios to try to get working
Now here’s the interesting part: with ysoserial, I was unable to get the exploit to work, as depicted in the Marshalling Pickles video. It was failing with a strange error I hadn’t seen before, something about filter setting a “rejected” status. Now, this led me to finding info about Oracle’s critical patch update (_121). I was running with latest & greatest JDK, release _192, however our production servers were running a very out-of-date version - surprise surprise.
Apparently, with Oracle JDK at release 121 or later, Oracle has started to address this vulnerability in an official way, rather than what exists currently which is a bunch of ad-hoc solutions, mainly whitelisting/blacklisting, which is a difficult without library support. Some would call this ‘whack-a-mole’, but I think this illustrates quite well the idea of a “patch”, i.e. there’s a leak, so run over and put some tape over it, but we aren’t solving the fundamental issue. In other words, the current defense against this attach is limited because we can’t possibly know what libraries customers will use, so the library maintainer has to scramble to plug the holes whenever they are discovered. Note that even the best of libraries like Groovy, Apache and Spring have had to fix this flaw.
So kudos to Oracle for taking some much needed steps in solving this problem. Here’s a little detail on the new feature that works to make the deserialization process more secure:
The core mechanism of deserialization filtering is based on an ObjectInputFilter interface which provides a configuration capability so that incoming data streams can be validated during the deserialization process. The status check on the incoming stream is determined by Status.ALLOWED, Status.REJECTED, or Status.UNDECIDED arguments of an enum type within ObjectInputFilter interface.
https://access.redhat.com/blogs/766093/posts/3135411
While it is the “official” way to deal with the deserialization issue, it remains to be seen how well this strategy will work. As a further research project, I’m curious whether this model might be used beyond Java serialization, i.e. in projects like Jackson. Does it add anything more than Jackson already has, or does it simplify it, etc.
This feature is targeted for Java 9, but was backported to 8, though it looks like it doesn’t have all the functionality that Java 9 supports.
So you are probably wondering what happened? Did we fix all of the above, and even throw in an upgrade Tomcat, like the Monty Python “Meaning of Life” movie “everything, with a cherry on top!” Well, finally, given a little guidance on where to look, the 3rd party developers - turned out that not only had they added the JVM args, they had also added in some extra code to handle the authentication. Which used - you guessed it - the _old_ 3.2.1 version of commons-collections. This code was also manually maintained, so while the app our team maintained received the updated commons jar in an automated fashion along with all the other updates, this little bit of code, tucked away on the server, was never updated.
Lessons learned? Off-the-wall custom authentication? Don’t do this. But if you do, don’t leave manually updated chunks of code lying around, and further, keep up with the patches!
[0] Yes, I’m reading William Finnegan’s “Barbarian Days: The Surfing Life”, Finnegan’s hilarious and fascinating account of being a surfer in the early days of the sport. At one point, he complains to his friend and fellow surfer, who is getting on his nerves, that he is tired of walking on eggs around him. Of course, in his anger, he mixed up the quote, and meant “walking on eggshells”.
[1] https://en.wikipedia.org/wiki/Serialization
[2] A quick look at the omniORB doc shows it has a feature called the “Dynamic Invocation Interface…Thus using the DII applications may invoke operations on any CORBA object, possibly determining the object’s interface dynamically by using an Interface Repository.” Sounds like reflection doesn’t it? I’m not aware of any specific vulnerabilities, but it does seem we’ve traded a bit of the security that invoking statically-compiled objects brings for convenience.
https://www.cl.cam.ac.uk/research/dtg/attarchive/omniORB/doc/3.0/omniORB/omniORB011.html
[3] https://www.siliconrepublic.com/enterprise/cryptocurrency-malware-monero-secureworks
The Java Object Serialization Specification for Java references a good set of guidelines on how to mitigate the vulnerability:
https://www.oracle.com/technetwork/java/seccodeguide-139067.html#8
[4] https://www.securityinfowatch.com/cybersecurity/information-security/article/12420169/oracle-plans-to-end-java-serialization-but-thats-not-the-end-of-the-story
[5] https://issues.apache.org/jira/browse/COLLECTIONS-580
[6]Which seems to be a pretty standard strategy these days, i.e. proprietary companies like Qualys leveraging open source and adding it to their toolset. AWS does this to great effect, and we, as the consumer, benefit by getting simple interfaces. However, we should not forget that much of the code we use today is Open-source software, in some way or another.
Stratechery, as usual, has a very thoughtful post about this very idea:
It’s hard to not be sympathetic to MongoDB Inc. and Redis Labs: both spent a lot of money and effort building their products, and now Amazon is making money off of them. But that’s the thing: Amazon isn’t making money by selling software, they are making money by providing a service that enterprises value, and both MongoDB and Redis are popular in large part because they were open source to begin with.
[snip]
That, though, should give pause to AWS, Microsoft, and Google. It is hard to imagine them ever paying for open source software, but at the same time, writing (public-facing) software isn’t necessarily the core competency of their cloud businesses. They too have benefited from open-source companies: they provide the means by which their performance, scalability, and availability are realized. Right now everyone is winning: simply following economic realities could, in the long run, mean everyone is worse off.
https://stratechery.com/2019/aws-mongodb-and-the-economic-realities-of-open-source/
[7] https://www.github.com/mbechler/marshalsec/blob/master/marshalsec.pdf?raw=true
[8] https://medium.com/@cowtowncoder/on-jackson-cves-dont-panic-here-is-what-you-need-to-know-54cd0d6e8062
0 notes
Text
How To Install Webmin, nginx on Ubuntu 16.04 or 18.04
Webmin is a web-based control panel for any Linux machine which lets you manage your server through a modern web-based interface. With Webmin, you can change settings for common packages on the fly, including web servers and databases, as well as manage users, groups, and software packages.
In this tutorial, you’ll install and configure Webmin on your server and secure access to the interface with a valid certificate using Let’s Encrypt and Apache. You’ll then use Webmin to add new user accounts, and update all packages on your server from the dashboard.
Prerequisites To complete this tutorial, you will need:
– One fresh Ubuntu 16.04 or 18.04 server , including a sudo non-root user and a firewall. – A Fully-Qualified Domain Name (FQDN), with a DNS A record pointing to the IP address of your server. – Certbot installed by following Step 1 of How To Secure Apache with Let’s Encrypt on Ubuntu 16.04 or 18.04. You’ll use Certbot to generate the TLS/SSL certificate for Webmin.
Step 1 — Installing Webmin First, we need to add the Webmin repository so that we can easily install and update Webmin using our package manager. We do this by adding the repository to the /etc/apt/sources.list file.
Open the file in your editor:
sudo nano /etc/apt/sources.list
Then add this line to the bottom of the file to add the new repository:
/etc/apt/sources.list
deb http://download.webmin.com/download/repository sarge contrib Save the file and exit the editor.
Next, add the Webmin PGP key so that your system will trust the new repository:
wget http://www.webmin.com/jcameron-key.asc sudo apt-key add jcameron-key.asc
Next, update the list of packages to include the Webmin repository:
sudo apt update
if server ask for dependencies, just run this command: add-apt-repository universe Then install Webmin:
sudo apt install webmin
Once the installation finishes, you’ll be presented with the following output:
Webmin install complete. You can now login to https://your_server_ip:10000 as root with your root password, or as any user who can use `sudo`.
Now, let’s secure access to Webmin by putting it behind the Apache web server and adding a valid TLS/SSL certificate.
Step 2: Accessing Webmin Now that Webmin is installed, you can access the interface by opening your web browser and browsing the the server hostname or IP address followed by port 10000. ex. https://localhost:10000 If you’re coming from a remote location, you must add the IP address to the allowed list… you can do that by running the commands below to open Webmin default configuration file. sudo nano /etc/webmin/miniserv.conf Then adding a new line to allow a specific IP or subnet. allow=192.168.X.X Save the file… you should be able to access Webmin
Step 3: Installing Virtualmin Virtualmin only supports Ubuntu LTS versions. If you don’t have those versions of Ubuntu, Virtualmin will fail to install… If you do, then continue below. Now that Webmin is installed, go and install Virtualmin.. Virtualmin allows you to manage nginx virtual hosts and DNS, just like you have with cPanel and other hosted packages. I’m going to assume that you already have a VPS with root access. If you don’t, you can get one from a unmanaged VPS provider I recommend. Logged in to Ubuntu 16.04 server as root user, run following command to check your server’s hostname. hostname -f If the output is anything other than your domain name or a sub-domain, you should change it before you install Virtualmin with nginx. Refer to change Ubuntu 16.04 hostname from command line tutorial and change it now. Let’s start by updating apt cache, apt update This part is similar on all Linux distributions. Download the Virtualmin installation script to your server, wget http://software.virtualmin.com/gpl/scripts/install.sh Then make the script executable sudo chmod +x install.sh Finally, run the commands below to install Virtualmin sh install.sh -b LEMP or sh install.sh --bundle LEMP in case, you want to uninstall: sh install.sh --uninstall Accept the default setting and install. When that’s done, you should have Virtualmin module enabled for Webmin and begin configuring your systems. For ubuntu 16, in case, this error appears: The repository ‘cdrom://Ubuntu-Server 16.04.5 LTS _Xenial Xerus_ – Release amd64 (20180731) xenial Release’ does not have a Release file. just edit : sudo nano /etc/apt/sources.list and comment or remove lines that include cdrom. eg: deb cdrom:[Ubuntu-Server 16.04 LTS _Xenial Xerus_ - Release amd64 (20160420.3)]/ xenial main restricted
INSTALLING MULTIPLE PHP VERSIONS There are few major PHP versions out there such as PHP 5.6, PHP 7.0, PHP 7.1 and PHP 7.2. We should always try to use latest version of the software, sometimes we have to stick with an older version due to compatibility issues with the application we are running. If you’re in a such situation, this post will show you how to use multiple PHP versions with Virtualmin and Nginx server. Why use multiple PHP versions with Virtualmin and Nginx? I was in a such situation recently. I wanted to have WordPress and CPVLab installed on the same VPS. WordPress is compatible with PHP 7.2 but CPVLab isn’t. Only version of PHP CPVLab supported was PHP 5.6. While I could have both WordPress and CPVLab installed with PHP 5.6, that isn’t optimal solution. So I decided to install PHP 7.2 for WordPress and PHP 5.6 for CPVLab. While my reason to use multiple PHP versions with Virtualmin and Nginx only involves PHP 5.6 and PHP 7.2, I’ll list instructions for all four major PHP versions mentioned earlier. These are the PHP versions with ongoing support at the moment of writing. And before we begin, I’m going to assume you have built your Ubuntu 16.04 server with Virtualmin and Nginx and have created at least one virtual server to host a website. Adding Ondřej Surý Repo to the server: Ubuntu 16.04 doesn’t offer newer versions of PHP than PHP v7.0.30 yet. We can get around this by adding ondrej/php PPA to the server. No matter which PHP version you’re planning to install, you should start by adding ondrej/php PPA to be able to use multiple PHP versions with Virtualmin and Nginx. add-apt-repository ppa:ondrej/php Update apt cache apt update Server is now ready to have multiple versions of PHP running at the same time. Let’s start with PHP 5.6. Note that Virtualmin, by default use latest version of PHP available on the server for new virtual servers. This can be changed within the virtual server settings itself after creation or you can specify a default PHP version for new servers from Virtualmin settings. More on that later on this tutorial. Install PHP 5.6 and PHP 7.0 with Virtualmin and Nginx We already have PHP 7.0 running on the server. Let’s install PHP 5.6. Following command will install PHP 5.6 and all essential PHP 5.6 modules. apt install php5.6-cgi php5.6-mysql php5.6-curl php5.6-gd php5.6-imap php5.6-mcrypt php5.6-tidy php5.6-xmlrpc php5.6-xsl php5.6-mbstring php5.6-zip php5.6-cli Install PHP 7.1 and PHP 7.0 with Virtualmin and Nginx If the version of PHP you want is PHP 7.1, following command should take care of it. apt install php7.1-cgi php7.1-mysql php7.1-curl php7.1-gd php7.1-imap php7.1-mcrypt php7.1-tidy php7.1-xmlrpc php7.1-xsl php7.1-mbstring php7.1-zip php7.1-cli Install PHP 7.2 and PHP 7.0 with Virtualmin and Nginx And if you want latest version (PHP 7.2) on your server, following command will do the magic. apt install php7.2-cgi php7.2-mysql php7.2-curl php7.2-gd php7.2-imap php7.2-tidy php7.2-xmlrpc php7.2-xsl php7.2-mbstring php7.2-zip php7.2-cli You can run one or more of above commands and have one or more extra PHP versions running on your server. If you run all three commands above, you’ll have all four version of PHP available to you on the server. Configure Virtualmin to use a Specific PHP Version Virtualmin will use latest available version of PHP for new virtual servers. Old virtual servers will not be affected by above commands. If you need a different version of PHP for existing virtual server, you can go to Virtualmin > Domain Name > Server Configuration > PHP Version and select the PHP version you want from the list. use multiple PHP versions with Virtualmin and Nginx And if you want to change default PHP version for new virtual servers to other than the latest version available on the server, you can change it from Virtualmin > System Settings > Server Templates > Default Settings > PHP Options. A drop down list of available PHP versions will be shown to you. virtualmin-change-php-version Select the version you want and click save. Selected PHP version will be used for all newly created servers. Option to change PHP version from virtual server settings will also be available to all newly created servers. Set Default PHP Version for Command Line When you have multiple php versions on your server, system will use latest version to process PHP commands. Although you can change this on Virtualmin as shown above, it doesn’t change default PHP version for command line. phpinfo page on your browser might say PHP 5.6 but PHP -v command on Putty might say PHP 7.2. This can lead to conflicts in some cases. Especially if your application need to run cronjobs. Solution will be to change default PHP version for command line to match what your application is running. This command will display PHP versions available to you with paths, update-alternatives --list php Following command should change default php version to PHP 7.1. update-alternatives --set php /usr/bin/php7.1 Change the path to PHP as your needs. For configuring with nginx. go to: sudo nano /etc/php/7.2/fpm/php.ini edit the next file: cgi.fix_pathinfo=0 finally, restart php service sudo systemctl restart php7.2-fpm For getting php.ini file dir: php -i | grep 'php.ini' INSTALLLING CLOUDMIN this ony worked on ubuntu 16.04 and it is only for managing cloud virtual server inside your server. In order to install it, just follow the next: wget http://cloudmin.virtualmin.com/gpl/scripts/cloudmin-kvm-debian-install.sh Then make the script executable sudo chmod +x cloudmin-kvm-debian-install.sh Finally, run the commands below to install Virtualmin sh cloudmin-kvm-debian-install.sh Useful commands Just run this command from the command line and it will bring the webmin service up again fresh. # /etc/init.d/webmin restart file configuration for webmin sudo nano /etc/webmin/config sudo nano /etc/webmin/miniserv.conf For adding allow Ip, just edit: sudo nano /etc/webmin/miniserv.conf and edit: allow = localhost 192.168.0.197 # /etc/init.d/webmin restart some virtual configurations here: https://github.com/webmin/webmin/issues/420 installing FPM support Currently, there is no official PHP-FPM support in Virtualmin, so you need to download and install a third-party Virtualmin plugin to create Nginx and PHP-FPM powered websites for domains.Currently, there is no official PHP-FPM support in Virtualmin, so you need to download and install a third-party Virtualmin plugin to create Nginx and PHP-FPM powered websites for domains. cd /opt git clone https://github.com/Real-Gecko/virtualmin-nginx-fpm.git tar -zcf virtualmin-nginx-fpm.tar.gz virtualmin-nginx-fpm Open https://your_server_IP:10000 , click on the Webmin icon >> select ‘Webmin configuration’ from the Webmin menu >> Mebmin module >> Install Module >> From local file >> enter /opt/virtualmin-nginx-fpm.tar.gz >> click ‘Install Module’. Then, click on the Virtualmin icon >> go to ‘System Settings’ >> Features and Plugins >> click configure next to ‘Nginx PHP-FPM website’ feature and set:
Full path to php-fpm command /usr/sbin/php-fpm7.2 Command to start PHP-FPM service php7.2-fpm start Command to stop PHP-FPM service php7.2-fpm stop Command to reload PHP-FPM service php7.2-fpm restart Path to pools configuration directory /etc/php/7.2/fpm/pool.d
Then, click on the Virtualmin icon >> go to >> System Settings >> Features and Plugins >> check ‘Nginx PHP-FPM website’ feature, and disable the ‘Apache website’ , ‘SSL website’, ‘AWstats reporting’ and ‘DAV Login’ and features. That is it. Virtualmin with Nginx and PHP-FPM support has been successfully installed on your server. Add swap Disabling unnecesary services from webmin In my case, I have another email provider so I will disabled some services related with email:
sudo /etc/init.d/clamav-daemon stop systemctl disable clamav-daemon ADDING SWAP MEMORY Before we begin, we can check if the system already has some swap space available. It is possible to have multiple swap files or swap partitions, but generally one should be enough. We can see if the system has any configured swap by typing: sudo swapon --show If you don’t get back any output, this means your system does not have swap space available currently. You can verify that there is no active swap using the free utility: free -h Output total used free shared buff/cache available Mem: 985M 84M 222M 680K 678M 721M Swap: 0B 0B 0B As you can see in the Swap row of the output, no swap is active on the system. Step 2 – Checking Available Space on the Hard Drive Partition Before we create our swap file, we’ll check our current disk usage to make sure we have enough space. Do this by entering: df -h Output Filesystem Size Used Avail Use% Mounted on udev 481M 0 481M 0% /dev tmpfs 99M 656K 98M 1% /run /dev/vda1 25G 1.4G 23G 6% / tmpfs 493M 0 493M 0% /dev/shm tmpfs 5.0M 0 5.0M 0% /run/lock tmpfs 493M 0 493M 0% /sys/fs/cgroup /dev/vda15 105M 3.4M 102M 4% /boot/efi tmpfs 99M 0 99M 0% /run/user/1000 The device with / in the Mounted on column is our disk in this case. We have plenty of space available in this example (only 1.4G used). Your usage will probably be different. Although there are many opinions about the appropriate size of a swap space, it really depends on your personal preferences and your application requirements. Generally, an amount equal to or double the amount of RAM on your system is a good starting point. Another good rule of thumb is that anything over 4G of swap is probably unnecessary if you are just using it as a RAM fallback. Step 3 – Creating a Swap File Now that we know our available hard drive space, we can create a swap file on our filesystem. We will allocate a file of the swap size that we want called swapfile in our root (/) directory. The best way of creating a swap file is with the fallocate program. This command instantly creates a file of the specified size. Since the server in our example has 1G of RAM, we will create a 1G file in this guide. Adjust this to meet the needs of your own server: sudo fallocate -l 1G /swapfile2 We can verify that the correct amount of space was reserved by typing: ls -lh /swapfile2 -rw-r–r– 1 root root 1.0G Apr 25 11:14 /swapfile2 Our file has been created with the correct amount of space set aside. Step 4 – Enabling the Swap File Now that we have a file of the correct size available, we need to actually turn this into swap space. First, we need to lock down the permissions of the file so that only the users with root privileges can read the contents. This prevents normal users from being able to access the file, which would have significant security implications. Make the file only accessible to root by typing: sudo chmod 600 /swapfile2 Verify the permissions change by typing: ls -lh /swapfile2 Output -rw——- 1 root root 1.0G Apr 25 11:14 /swapfile As you can see, only the root user has the read and write flags enabled. We can now mark the file as swap space by typing: sudo mkswap /swapfile2 Output Setting up swapspace version 1, size = 1024 MiB (1073737728 bytes) no label, UUID=6e965805-2ab9-450f-aed6-577e74089dbf After marking the file, we can enable the swap file, allowing our system to start utilizing it: sudo swapon /swapfile2 Verify that the swap is available by typing: sudo swapon --show Output NAME TYPE SIZE USED PRIO /swapfile2 file 1024M 0B -2 We can check the output of the free utility again to corroborate our findings: free -h Output total used free shared buff/cache available Mem: 985M 84M 220M 680K 680M 722M Swap: 1.0G 0B 1.0G Our swap has been set up successfully and our operating system will begin to use it as necessary. Step 5 – Making the Swap File Permanent Our recent changes have enabled the swap file for the current session. However, if we reboot, the server will not retain the swap settings automatically. We can change this by adding the swap file to our /etc/fstab file. Back up the /etc/fstab file in case anything goes wrong: sudo cp /etc/fstab /etc/fstab.bak Add the swap file information to the end of your /etc/fstab file by typing: echo '/swapfile2 none swap sw 0 0' | sudo tee -a /etc/fstab Next we’ll review some settings we can update to tune our swap space. Step 6 – Tuning your Swap Settings There are a few options that you can configure that will have an impact on your system’s performance when dealing with swap. Adjusting the Swappiness Property The swappiness parameter configures how often your system swaps data out of RAM to the swap space. This is a value between 0 and 100 that represents a percentage. With values close to zero, the kernel will not swap data to the disk unless absolutely necessary. Remember, interactions with the swap file are “expensive” in that they take a lot longer than interactions with RAM and they can cause a significant reduction in performance. Telling the system not to rely on the swap much will generally make your system faster. Values that are closer to 100 will try to put more data into swap in an effort to keep more RAM space free. Depending on your applications’ memory profile or what you are using your server for, this might be better in some cases. We can see the current swappiness value by typing: cat /proc/sys/vm/swappiness Output 60 For a Desktop, a swappiness setting of 60 is not a bad value. For a server, you might want to move it closer to 0. We can set the swappiness to a different value by using the sysctl command. For instance, to set the swappiness to 10, we could type: sudo sysctl vm.swappiness=10 Output vm.swappiness = 10 This setting will persist until the next reboot. We can set this value automatically at restart by adding the line to our /etc/sysctl.conf file: sudo nano /etc/sysctl.conf At the bottom, you can add: vm.swappiness=10 Save and close the file when you are finished. Adjusting the Cache Pressure Setting Another related value that you might want to modify is the vfs_cache_pressure. This setting configures how much the system will choose to cache inode and dentry information over other data. Basically, this is access data about the filesystem. This is generally very costly to look up and very frequently requested, so it’s an excellent thing for your system to cache. You can see the current value by querying the proc filesystem again: cat /proc/sys/vm/vfs_cache_pressure Output 100 As it is currently configured, our system removes inode information from the cache too quickly. We can set this to a more conservative setting like 50 by typing: sudo sysctl vm.vfs_cache_pressure=50 Output vm.vfs_cache_pressure = 50 Again, this is only valid for our current session. We can change that by adding it to our configuration file like we did with our swappiness setting: sudo nano /etc/sysctl.conf At the bottom, add the line that specifies your new value: vm.vfs_cache_pressure=50 Save and close the file when you are finished. Some tweaks to mysql add the next lines to mysql configuration:
sudo nano /etc/mysql/mysql.cnf
[mysqld] max_allowed_packet=500M sql_mode = STRICT_TRANS_TABLES,NO_ZERO_IN_DATE,NO_ZERO_DATE,ERROR_FOR_DIVISION_BY_ZERO,NO_AUTO_CREATE_USER,NO_ENGINE_SUBSTITUTION it will allow to import large file sql files.
then restart mysql service mysql restart Tweaking nginx file: sudo nano /etc/nginx/nginx.conf
user www-data; worker_processes auto; pid /run/nginx.pid; include /etc/nginx/modules-enabled/*.conf; events { worker_connections 768; # multi_accept on; } http { ## # Basic Settings ## sendfile on; tcp_nopush on; tcp_nodelay on; keepalive_timeout 65; types_hash_max_size 2048; # server_tokens off; server_names_hash_bucket_size 128; # server_name_in_redirect off; include /etc/nginx/mime.types; default_type application/octet-stream; ## # SSL Settings ## ssl_protocols TLSv1 TLSv1.1 TLSv1.2; # Dropping SSLv3, ref: POODLE ssl_prefer_server_ciphers on; ## # Logging Settings ## access_log /var/log/nginx/access.log; error_log /var/log/nginx/error.log; # Log format set_real_ip_from 127.0.0.1; real_ip_header X-Forwarded-For; log_format main '$remote_addr - $remote_user [$time_local] $status ' '"$request" $body_bytes_sent "$http_referer" ' '"$http_user_agent" "$http_x_forwarded_for"'; # Hide the Nginx version number server_tokens off; # Timeouts client_body_timeout 30; client_header_timeout 30; send_timeout 30; client_max_body_size 20M; reset_timedout_connection on; ## # Gzip Settings ## # Gzip module configuration gzip on; gzip_disable "MSIE [1-6].(?!.*SV1)"; gzip_vary on; gzip_comp_level 3; gzip_proxied any; gzip_buffers 16 8k; # gzip_vary on; # gzip_proxied any; # gzip_comp_level 6; # gzip_buffers 16 8k; # gzip_http_version 1.1; # gzip_types text/plain text/css application/json application/javascript text/xml application/xml application/xml+rss text/javascript; ## # Virtual Host Configs ## include /etc/nginx/conf.d/*.conf; include /etc/nginx/sites-enabled/*; }
save changes and restart service: service nginx restart
0 notes
Link
Patterns & Best PracticesConnecting Heroku data services to MuleSoft Last updated 11 September 2020 This article is about accessing Heroku Data Services through MuleSoft. To use MuleSoft as an integration layer that connects external services to a Heroku App, see Integrating Heroku and the Salesforce Platform. MuleSoft is an Integration Platform as a Service (IPaaS) for connecting multiple systems and services together so they can be accessed and managed from one central interface. This article describes how to connect Heroku Data Services (Heroku Postgres, Heroku Kafka, and Heroku Redis) to the MuleSoft platform. Heroku Enterprise customers can request in-depth guidance on this topic from the Customer Solutions Architecture team. Common integration use cases There are many reasons you might want to connect your Heroku data to MuleSoft, but the most common use case is users who are using Heroku Connect and Heroku Postgres to store and manage customer data from Salesforce. By connecting these Heroku data services to MuleSoft, you can access this data and integrate it with other services also connected to the MuleSoft platform. By using Heroku and MuleSoft together, you can take advantage of the data management flexibility on Heroku while still using any external services your app requires. Configuring MuleSoft connectors for the Common Runtime Heroku data services like Redis, Apache Kafka, and Postgres can be integrated into MuleSoft using specific Connectors. This section highlights the three connectors necessary for connecting to Heroku data services running on the Common Runtime. If you are running Heroku Postgres in a private space, first read the next section: “Configuring MuleSoft connectors for Private and Shield Heroku services”. Database Connector The Database Connector allows you to connect to any JDBC-compliant database, which includes Heroku Postgres. To set up a Database Connector on the MuleSoft side, follow the instructions found in this MuleSoft article, “How to connect to Heroku Postgres using the MuleSoft Database Connector”. Redis Connector The Redis Connector allows you to connect to any Remote Dictionary Server, including Heroku Redis. To set up a Redis Connector on the MuleSoft side, follow the instructions found in the Redis Connector documentation. The following information will be necessary to configure the connector: Connection: From the drop-down menu, select “NonClustered” Host, Port, Password: These three fields are all located in the REDIS_URL configuration variable for your application. The value for REDIS_URL is in the following format: . Use these values when configuring the Redis Connector in MuleSoft. This connector will only work if you’re using Heroku Redis in the Common Runtime — if you’re running Redis in a Private Space, see Configuring MuleSoft connectors for Private and Shield Heroku services. Apache Kafka Connector The Kafka Connector allows you to connect your Heroku Kafka cluster to the MuleSoft platform. To set up the Kafka Connector on the MuleSoft side, follow the instructions found in this MuleSoft article, “How to connect to Apache Kafka on Heroku using the MuleSoft Kafka Connector”. This connector will only work if you’re using Heroku Kafka in the Common Runtime — if you’re running Kafka in a Private Space, see see Configuring MuleSoft connectors for Private and Shield Heroku services. Configuring MuleSoft connectors for Private and Shield Heroku services If you are running Heroku Postgres, Heroku Redis, or Heroku Kafka in a Private or Shield Private space, there is additional configuration required to set up a secure and mutually-authenticated channel between MuleSoft and Heroku. This section provides the additional information necessary to connect Heroku data services to MuleSoft when running in Private or Shield Private spaces. Database Connector Take these steps first, then configure the database connector as described above Whitelist static external IPs In order for Heroku Postgres to connect successfully to your MuleSoft application, you must add the MuleSoft application’s static external IP address to the allowlist in Heroku mTLS configuration. Adding this IP to the allowlist will enable MuleSoft access to connect to your Private Heroku Postgres database. Using the instructions from MuleSoft’s documentation, allocate a static IP for your application. Add the generated static IP to your mTLS allowlist following the instructions in this article, Connecting to a Private or Shield Heroku Postgres Database from an External Resource You can use your local machine’s public IP while developing locally in Anypoint Studio. Download client-side certificates Use the Heroku CLI to download client-side certificates that will authorize a connection between MuleSoft and Heroku. This process is described in Connecting to a Private or Shield Heroku Postgres Database from an External Resource. Convert client private key to Java-understandable format If you followed the commands in the previous step, you should now have a directory in your project called folder. One of the files in that folder is the client private key, which MuleSoft needs to know about in order to connect. In order for MuleSoft to be able to read that key, you need to convert it to a Java-like format that MuleSoft will be able to use. To convert the key to its required format, you can run the following command from within your project directory. Before you run the command: Make sure openssl is installed on your command line, otherwise this command will error. Change to the name of the *.key file in your folder directory, usually something like PREFIX_postgresql.key -outform DER -nocrypt -out postgresql.key.der Import certificates to your MuleSoft application In order for MuleSoft to access the certificates for the Heroku connection, it is best to embed them within your MuleSoft application. Move all three files that were downloaded in folder into the src/main/resources directory of your MuleSoft application. Configure database connection URL Once you’ve completed the steps above, you can create a connection URL to use with the MuleSoft database connector. The URL can be constructed using the following format. ?sslmode=verify-ca&sslcert=${mule.home}/apps/${app.name}/PREFIX_postgresql.crt&sslkey=${mule.home}/apps/${app.name}/postgresql.key.der&sslrootcert=${mule.home}/apps/${app.name}/PREFIX_root.crt Replace , , and with values from your Heroku Postgres dashboard. Leave ${mule.home} and ${app.name} as-is to be replaced at runtime by the Connector The Database Connector will also ask for a Username and Password, which can both also be found in the Heroku Postgres dashboard. Redis Connector and Kafka Connector Heroku Redis and Heroku Kafka running in a Private Space will only support trusted connections from resources using AWS PrivateLink, which is not supported by MuleSoft. If you wish to connect your Heroku Redis and Heroku Kafka services running on Private Spaces with MuleSoft, you must add the external static IP of the Mule application to the allowlist of your Private Space before following the instructions above for configuring connectors for the common runtime. For more information on this service, see Trusted IP ranges for data services.
0 notes
Text
One year using Kubernetes in production: Lessons learned
Starting out with containers and container orchestration tools
I now believe containers are the deployment format of the future. They make it much easier to package an application with its required infrastructure. While tools such as Docker provide the actual containers, we also need tools to take care of things such as replication and failovers, as well as APIs to automate deployments to multiple machines.
The state of clustering tools such as Kubernetes and Docker Swarm was very immature in early 2015, with only early alpha versions available. We still tried using them and started with Docker Swarm.
At first we used it to handle networking on our own with the ambassador pattern and a bunch of scripts to automate the deployments. How hard could it possibly be? That was our first hard lesson: Container clustering, networking, and deployment automation are actually very hard problems to solve.
We realized this quickly enough and decided to bet on another one of the available tools. Kubernetes seemed to be the best choice, since it was being backed by Google, Red Hat, Core OS, and other groups that clearly know about running large-scale deployments.
Load balancing with Kubernetes
When working with Kubernetes, you have to become familiar with concepts such as pods, services, and replication controllers. If you're not already familiar with these concepts, there are some excellent resources available to get up to speed. The Kubernetes documentation is a great place to start, since it has several guides for beginners.
Once we had a Kubernetes cluster up and running, we could deploy an application using kubectl, the Kubernetes CLI, but we quickly found that kubectl wasn't sufficient when we wanted to automate deployments. But first, we had another problem to solve: How to access the deployed application from the Internet?
The service in front of the deployment has an IP address, but this address only exists within the Kubernetes cluster. This means the service isn’t available to the Internet at all! When running on Google Cloud Engine, Kubernetes can automatically configure a load balancer to access the application. If you’re not on GCE (like us), you need to do a little extra legwork to get load balancing working.
It’s possible to expose a service directly on a host machine port—and this is how a lot of people get started—but we found that it voids a lot of Kubernetes' benefits. If we rely on ports in our host machines, we will get into port conflicts when deploying multiple applications. It also makes it much harder to scale the cluster or replace host machines.
A two-step load-balancer setup
We found that a much better approach is to configure a load balancer such as HAProxy or NGINX in front of the Kubernetes cluster. We started running our Kubernetes clusters inside a VPN on AWS and using an AWS Elastic Load Balancer to route external web traffic to an internal HAProxy cluster. HAProxy is configured with a “back end” for each Kubernetes service, which proxies traffic to individual pods.
This two-step load-balancer setup is mostly in response AWS ELB's fairly limited configuration options. One of the limitations is that it can’t handle multiple vhosts. This is the reason we’re using HAProxy as well. Just using HAProxy (without an ELB) could also work, but you would have to work around dynamic AWS IP addresses on the DNS level.
In any case, we needed a mechanism to dynamically reconfigure the load balancer (HAProxy, in our case) when new Kubernetes services are created.
The Kubernetes community is currently working on a feature called ingress. It will make it possible to configure an external load balancer directly from Kubernetes. Currently, this feature isn’t really usable yet because it’s simply not finished. Last year, we used the API and a small open-source tool to configure load balancing instead.
Configuring load balancing
First, we needed a place to store load-balancer configurations. They could be stored anywhere, but because we already had etcd available, we decided to store the load-balancer configurations there. We use a tool called confd to watch configuration changes in etcd and generate a new HAProxy configuration file based on a template. When a new service is added to Kubernetes, we add a new configuration to etcd, which results in a new configuration file for HAProxy.
Kubernetes: Maturing the right way
There are still plenty of unsolved problems in Kubernetes, just as there are in load balancing generally. Many of these issues are recognized by the community, and there are design documents that discuss new features that can solve some of them. But coming up with solutions that work for everyone requires time, which means some of these features can take quite a while before they land in a release. This is a good thing, because it would be harmful in the long term to take shortcuts when designing new functionality.
This doesn’t mean Kubernetes is limited today. Using the API, it’s possible to make Kubernetes do pretty much everything you need it to if you want to start using it today. Once more features land in Kubernetes itself, we can replace custom solutions with standard ones.
After we developed our custom solution for load balancing, our next challenge was implementing an essential deployment technique for us: Blue-green deployments.
Blue-green deployments in Kubernetes
A blue-green deployment is one without any downtime. In contrast to rolling updates, a blue-green deployment works by starting a cluster of replicas running the new version while all the old replicas are still serving all the live requests. Only when the new set of replicas is completely up and running is the load-balancer configuration changed to switch the load to the new version. A benefit of this approach is that there’s always only one version of the application running, reducing the complexity of handling multiple concurrent versions. Blue-green deployments also work better when the number of replicas is fairly small.
Figure 2 shows a component “Deployer” that orchestrates the deployment. This component can easily be created by your own team because we open-sourced our implementation under the Apache License as part of the Amdatu umbrella project. It also comes with a web UI to configure deployments.
An important aspect of this mechanism is the health checking it performs on the pods before reconfiguring the load balancer. We wanted each component that was deployed to provide a health check. Now we typically add a health check that's available on HTTP to each application component.
Making the deployments automatic
With the Deployer in place, we were able to hook up deployments to a build pipeline. Our build server can, after a successful build, push a new Docker image to a registry such as Docker Hub. Then the build server can invoke the Deployer to automatically deploy the new version to a test environment. The same image can be promoted to production by triggering the Deployer on the production environment.
Know your resource constraints
Knowing our resource constraints was critical when we started using Kubernetes. You can configure resource requests and CPU/memory limits on each pod. You can also control resource guarantees and bursting limits.
These settings are extremely important for running multiple containers together efficiently. If we didn't set these settings correctly, containers would often crash because they couldn't allocate enough memory.
Start early with setting and testing constraints. Without constraints, everything will still run fine, but you'll get a big, unpleasant surprise when you put any serious load on one of the containers.
How we monitored Kubernetes
When we had Kubernetes mostly set up, we quickly realized that monitoring and logging would be crucial in this new dynamic environment. Logging into a server to look a log files just doesn’t work anymore when you're dealing with a large number of replicas and nodes. As soon as you start using Kubernetes, you should also have a plan to build centralized logging and monitoring.
Logging
There are plenty of open-source tools available for logging. We decided to use Graylog—an excellent tool for logging—and Apache Kafka, a messaging system to collect and digest logs from our containers. The containers send logs to Kafka, and Kafka hands them off to Graylog for indexing. We chose to make the application components send logs to Kafka themselves so that we could stream logs in an easy-to-index format. Alternatively, there are tools that retrieve logs from outside the container and forward them to a logging solution.
Monitoring
Kubernetes does an excellent job of recovering when there's an error. When pods crash for any reason, Kubernetes will restart them. When Kubernetes is running replicated, end users probably won't even notice a problem. Kubernetes recovery works so well that we have had situations where our containers would crash multiple times a day because of a memory leak, without anyone (including ourselves) noticing it.
Although this is great from the perspective of Kubernetes, you probably still want to know whenever there’s a problem. We use a custom health-check dashboard that monitors the Kubernetes nodes, individual pods—using application-specific health checks—and other services such as data stores. To implement a dashboard such as this, the Kubernetes API proves to be extremely valuable again.
We also thought it was important to measure load, throughput, application errors, and other stats. Again, the open-source space has a lot to offer. Our application components post metrics to an InfluxDB time-series store. We also use Heapster to gather Kubernetes metrics. The metrics stored in InfluxDB are visualized in Grafana, an open-source dashboard tool. There are a lot of alternatives to the InfluxDB/Grafana stack, and any one of them will provide a lot of value toward keeping track of how things are running.
Data stores and Kubernetes
A question that many new Kubernetes users ask is “How should I handle my data stores with Kubernetes?”
When running a data store such as MongoDB or MySQL, you most likely want the data to be persistent. Out of the box, containers lose their data when they restart. This is fine for stateless components, but not for a persistent data store. Kubernetes has the concept of volumes to work with persistent data.
A volume can be backed by a variety of implementations, including files on the host machines, AWS Elastic Block Store (EBS), and nfs. When we were researching the question of persistent data, this provided a good answer, but it wasn't an answer for our running data stores yet.
Replication issues
In most deployments, the data stores also run replicated. Mongo typically runs in a Replica Set, and MySQL could be running in primary/replica mode. This introduces a few problems. First of all, it’s important that each node in the data store’s cluster is backed by a different volume. Writing to the same volume will lead to data corruption. Another issue is that most data stores require precise configuration to get the clustering up and running; auto discovery and configuration of nodes is not common.
At the same time, a machine that runs a data store is often specifically tuned for that type of workload. Higher IOPS could be one example. Scaling (adding/removing nodes) is an expensive operation for most data stores as well. All these things don’t match very well with the dynamic nature of Kubernetes deployments.
The decision not to use Kubernetes for running data stores in production
This brings us to a situation where we found that the benefits of running a data store inside Kubernetes are limited. The dynamics that Kubernetes give us can’t really be used. The setup is also much more complex than most Kubernetes deployments.
Because of this, we are not running our production data stores inside Kubernetes. Instead, we set up these clusters manually on different hosts, with all the tuning necessary to optimize the data store in question. Our applications running inside Kubernetes just connect to the data store cluster like normal. The important lesson is that you don’t have to run everything in Kubernetes once you have Kubernetes. Besides data stores and our HAProxy servers, everything else does run in Kubernetes, though, including our monitoring and logging solutions.
Why we're excited about our next year with Kubernetes
Looking at our deployments today, Kubernetes is absolutely fantastic. The Kubernetes API is a great tool when it comes to automating a deployment pipeline. Deployments are not only more reliable, but also much faster, because we’re no longer dealing with VMs. Our builds and deployments have become more reliable because it’s easier to test and ship containers.
We see now that this new way of deployment was necessary to keep up with other development teams around the industry that are pushing out deployments much more often and lowering their overhead for doing so.
Cost calculation
Looking at costs, there are two sides to the story. To run Kubernetes, an etcd cluster is required, as well as a master node. While these are not necessarily expensive components to run, this overhead can be relatively expensive when it comes to very small deployments. For these types of deployments, it’s probably best to use a hosted solution such as Google's Container Service.
For larger deployments, it’s easy to save a lot on server costs. The overhead of running etcd and a master node aren’t significant in these deployments. Kubernetes makes it very easy to run many containers on the same hosts, making maximum use of the available resources. This reduces the number of required servers, which directly saves you money. When running Kubernetes sounds great, but the ops side of running such a cluster seems less attractive, there are a number of hosted services to look at, including Cloud RTI, which is what my team is working on.
A bright future for Kubernetes
Running Kubernetes in a pre-released version was challenging, and keeping up with (breaking) new releases was almost impossible at times. Development of Kubernetes has been happening at light-speed in the past year, and the community has grown into a legitimate powerhouse of dev talent. It’s hard to believe how much progress has been made in just over a year.[Source]-https://techbeacon.com/devops/one-year-using-kubernetes-production-lessons-learned
Basic & Advanced Kubernetes Course using cloud computing, AWS, Docker etc. in Mumbai. Advanced Containers Domain is used for 25 hours Kubernetes Training.
0 notes
Text
Top 15 AWS Interview Questions & Answers
1) Explain what is AWS?
AWS stands for Amazon Web Service; it is a collection of remote computing services also known as cloud computing platform. This new realm of cloud computing is also known as IaaS or Infrastructure as a Service.
2) Mention what are the key components of AWS?
The key components of AWS are
Route 53: A DNS web service
Simple E-mail Service: It allows sending e-mail using RESTFUL API call or via regular SMTP Identity and Access Management: It provides enhanced security and identity management for your AWS account
Simple Storage Device or (S3): It is a storage device and the most widely used AWS service Elastic Compute Cloud (EC2): It provides on-demand computing resources for hosting applications. It is very useful in case of unpredictable workloads
Elastic Block Store (EBS): It provides persistent storage volumes that attach to EC2 to allow you to persist data past the lifespan of a single EC2
CloudWatch: To monitor AWS resources, It allows administrators to view and collect key Also, one can set a notification alarm in case of trouble.
3) Explain what is S3?
S3 stands for Simple Storage Service. You can use S3 interface to store and retrieve any amount of data, at any time and from anywhere on the web. For S3, the payment model is “pay as you go”.
4) Explain what is AMI?
AMI stands for Amazon Machine Image. It’s a template that provides the information (an operating system, an application server and applications) required to launch an instance, which is a copy of the AMI running as a virtual server in the cloud. You can launch instances from as many different AMIs as you need.
5) Mention what is the relation between an instance and AMI?
From a single AMI, you can launch multiple types of instances. An instance type defines the hardware of the host computer used for your instance. Each instance type provides different compute and memory capabilities. Once you launch an instance, it looks like a traditional host, and we can interact with it as we would with any computer.
6) What does an AMI include?
An AMI includes the following things
A template for the root volume for the instance
Launch permissions decide which AWS accounts can avail the AMI to launch instances A block device mapping that determines the volumes to attach to the instance when it is launched
7) How can you send request to Amazon S3?
Amazon S3 is a REST service, you can send request by using the REST API or the AWS SDK wrapper libraries that wrap the underlying Amazon S3 REST API.
8) Mention what is the difference between Amazon S3 and EC2?
The difference between EC2 and Amazon S3 is that
EC2 S3
• It is a cloud web service used for hosting your application
• It is like a huge computer machine which can run either Linux or Windows and can handle application like PHP, Python, Apache or any databases
• It is a data storage system where any amount of data can be stored
• It has a REST interface and uses secure HMAC-SHA1 authentication keys
9) How many buckets can you create in AWS by default?
By default, you can create upto 100 buckets in each of your AWS accounts.
10) Explain can you vertically scale an Amazon instance? How?
Yes, you can vertically scale on Amazon instance. For that
Spin up a new larger instance than the one you are currently running
Pause that instance and detach the root webs volume from the server and discard Then stop your live instance and detach its root volume
Note the unique device ID and attach that root volume to your new server And start it again
11) Explain what is T2 instances?
T2 instances are designed to provide moderate baseline performance and the capability to burst to higher performance as required by workload.
12) In VPC with private and public subnets, database servers should ideally be launched into which subnet?
With private and public subnets in VPC, database servers should ideally launch into private subnets.
13) Mention what are the security best practices for Amazon EC2?
For secure Amazon EC2 best practices, follow the following steps
Use AWS identity and access management to control access to your AWS resources Restrict access by allowing only trusted hosts or networks to access ports on your instance Review the rules in your security groups regularly
Only open up permissions that your require
Disable password-based login, for instance, launched from your AMI
14) Explain how the buffer is used in Amazon web services?
The buffer is used to make the system more robust to manage traffic or load by synchronizing different component. Usually, components receive and process the requests in an unbalanced way, With the help of buffer, the components will be balanced and will work at the same speed to provide faster services.
15) While connecting to your instance what are the possible connection issues one might face?
The possible connection errors one might encounter while connecting instances are
Connection timed out
User key not recognized by the server Host key not found, permission denied Unprotected private key file
Server refused our key or No supported authentication method available Error using MindTerm on Safari Browser
Error using Mac OS X RDP Client
Become Aws Certified With Ievision It Services
Aws training in Pune
9/10 Passing Rate | 100% Placement Guaranty
https://ievision.org/products/course/AWS-Solution-Architect-Associate-pune
0 notes
Text
New Post has been published on João Clérigo - Photography
New Post has been published on http://fotografia.clerigo.pt/how-to-install-freetds-unixodbc-on-centos-7-with-php-5-6-to-access-sql-server-databases/
How to Install FreeTDS + UnixODBC on CentOS 7 with PHP 5.6 to access SQL Server Databases
Predetermined requisites: That you have at least Apache and PHP installed. First, update your machine OS, like this:
yum -y update
Next, check if you have the right repo for PHP enabled in /etc/yum.repos.d/remi.repo It should look like this:
[remi-php56] name=Remi's PHP 5.6 RPM repository for Enterprise Linux 7 - $basearch #baseurl=http://rpms.remirepo.net/enterprise/7/php56/$basearch/ mirrorlist=http://rpms.remirepo.net/enterprise/7/php56/mirror # NOTICE: common dependencies are in "remi-safe" enabled=1 gpgcheck=1 gpgkey=file:///etc/pki/rpm-gpg/RPM-GPG-KEY-remi
Next install these required packages:
yum -y install php-odbc php-pdo unixODBC unixODBC-devel
FreeTDS is an open source implementation of the TDS (Tabular Data Stream) protocol used by SQL Server, and allows unix / linux hosts to connect to these databases.
CentOS does not have a package ready for the installation of FreeTDS, but in the EPEL repository (Extra Packages for Enterprise Linux) there is a ready-to-use package. Configure CentOS to use the EPEL repository and install FreeTDS.
yum install epel-release yum check-update yum install freetds freetds-devel
The next steps are very important. We need to configure FreeTDS. The FreeTDS configuration file is located at /etc/freetds.conf. Edit this file, and add following, changing the parameter for your needs:
[nome_banco_sqlserver] host = server_IP port = server_port tds version = 7.4
One very important parameter is the “tds version” you have to match it to you SQL Server version, or you won’t be able to connect. You can check in this table the right one for you.
If everything went OK, you are now able to test your connection. But before anything else, lets try and communicate only with telnet:
telnet server_IP server_PORT
If you have an error like:
telnet: connect to address server_IP: Connection timed out
Something is wrong, the server IP is incorrect or the port. You must check this out until you have a connection like:
Trying server_IP… Connected to server_IP. Escape character is '^]'.
You can exit now by typing “quit”.
Now you can test if the connection to SQL Server, via FreeTDS, is working properly. For this you can use the FreeTDS tsql utility, like this:
tsql -H server_IP -L -p server_PORT -U sql_USERNAME -P sql_PASSWORD
You should get a result, with a list of the SQL Instances. If the connection was not successful, you will have to look for a solution before continuing to the next step. If you were not able to complete the last step, it’s no use to go ahead: try to see the documentation of FreeTDS, because you need it to connect to the database correctly because UnixODBC will have to use it.
Then, if you are here, happy days, you’re almost done. So far you have already have FreeTDS installed, configured and accessing the SQL Server.
Now it’s time to set up UnixODBC.
You have to edit the /etc/odbcinst.ini file and add the following content to the bottom of the file:
[ODBC] Trace = No TraceFile = /tmp/sql.log ForceTrace = No [FreeTDS] Driver = /usr/lib64/libtdsodbc.so.0 FileUsage = 1
In the above we are instructing that UnixODBC should use the FreeTDS driver (/usr/lib64/libtdsodbc.so.0) for it’s connections. If we want, to debug problematic connections, we can enable the trace file by changing from No to Yes (in production systems, leave as No).
Now we have to create or edit the /etc/odbc.ini file and leave it with the following content:
# Data Source Name (DSN) para o MS SQL-Server: [alias] Description = Conexão ao SQL Server 2008 R2 Driver = FreeTDS Trace = No Server = server_IP Database = SQLSERVER_database_name Port = server_PORT
Explaining the above:
alias = is an arbitrary alias, the name of the DSN. Can be anything and it will be used in connection calls to the SQL Server Server = SQL Server IP Database = name of the database to which you want to connect Port = SQL Server port to receive connections
Now you can test the connections to the databases via UnixODBC, through the isix utility of UnixODBC.
Test connection to SQL Server using DSN alias, like this:
isql alias sql_USERNAME sql_PASSWORD -v
Response should look like this:
+---------------------------------------+ | Connected! | | | | sql-statement | | help [tablename] | | quit | | | +---------------------------------------+ SQL>
This is a SQL console, now you’re connected and you can run commands in the database, like this:
SQL> select count(*) from your_TABLENAME; +------------+ | | +------------+ | 2048 | +------------+ SQLRowCount returns 1 1 rows fetched SQL> quit
CentOS 7 features SELinux (Security Enhanced Linux) and it’s enabled by default and because of these security, Apache can not access network resources or databases.
To configure SELinux with the correct permissions, by releasing Apache to access network and database resources, we have to set two boolean properties in SELinux with the following commands:
setsebool -P httpd_can_network_connect on setsebool -P httpd_can_network_connect_db on
If you have SELinux disabled, this will not be needed.
Finally, using PHP, and it’s fairly simple. You can create a file “test.php” to test the connection to the SQL Server via PDO, something like this:
$server_IP = "server_IP"; $server_PORT = "server_PORT"; $server_DB = "server_DB"; $sql_USERNAME = "sql_USERNAME"; $sql_PASSWORD = "sql_PASSWORD"; $pdo = new PDO("odbc:Driver=FreeTDS; Server=$server_IP; Port=$server_PORT; Database=$server_DB; UID=$sql_USERNAME; PWD=$sql_PASSWORD;"); if (!$pdo) print '<h3>Could not connect to MS SQL Server.</h3>'; else print '<h3>Connection to MS SQL Server, via PDO, completed successfully!</h3>'; try $query = "SELECT * FROM your_TABLENAME"; $result = $pdo->prepare($a); $result->execute(); catch (PDOException $err) var_dump($err); $results = $result->fetchAll(PDO::FETCH_ASSOC); var_dump($results);
Run the file. If all went well your browser is now showing a successful connection message and a dump of the contents of one of your tables.
If you have run into any problem that you can’t solve, seek more help. Try these links:
FreeTDS User Guide
UnixODBC Documentation
Linux/Unix ODBC
0 notes
Text
Original Post from Trend Micro Author: Trend Micro
By: Santosh Subramanya (Vulnerability Researcher)
Security researcher Michael Stepankin reported a vulnerability found in the popular, open-source enterprise search platform Apache Solr: CVE-2019-0192. It’s a critical vulnerability related to deserialization of untrusted data. To have a better understanding of how the vulnerability works, we replicated how it could be exploited in a potential attack by using a publicly available proof of concept (PoC).
Successfully exploiting this security flaw can let hackers execute arbitrary code in the context of the server application. For example, an unauthenticated hacker can exploit CVE-2019-0192 by sending a specially crafted Hypertext Transfer Protocol (HTTP) request to the Config API, which allows Apache Solr’s users to set up various elements of Apache Solr (via solrconfig.xml). Affected versions include Apache Solr 5.0.0 to 5.5.5 and 6.0.0 to 6.6.5.
What is Apache Solr? Apache Solr is an open-source enterprise search platform built on Apache Lucene, a Java-based library. It reportedly has a 35-percent market share among enterprise search platforms and is used by various multinational organizations.
Designed to be scalable, Apache Solr can index, query, and map sites, documents, and data from a variety of sources, and then return recommendations for related content. It supports text search, hit highlighting, database integration, and document handling (e.g., Word and PDF files) among others. It also supports JavaScript object notation (JSON) representational state transfer (REST) application programming interfaces (APIs). This means Apache Solr can be integrated with compatible systems or programming languages that support them. Apache Solr runs on port 8983.
What is CVE-2019-0192? The vulnerability is caused by an insufficient validation of request to the Config API, which lets Apache Solr’s users configure solrconfig.xml. This solrconfig.xml, in turn, controls how Apache Solr behaves in the installed system by mapping requests to different handlers. Parameters in solrconfig.xml, for instance, define how search requests and data are processed, managed, or retrieved.
Apache Solr is built on Java, which allows objects to be serialized, that is, converting and representing objects into a compact byte stream. This makes it a convenient way for the objects to be transferred over network. It can then be deserialized for use by a Java virtual machine (JVM) receiving the byte stream.
Config API allows Solr’s Java management extensions (JMX) server to be configured via HTTP POST request. An attacker could point the JMX server to a malicious remote method invocation (RMI) server and take advantage of the vulnerability to trigger remote code execution (RCE) on the Solr server.
How does CVE-2019-0192 work? An attacker can start a malicious RMI server by running a command, as seen in our example in Figure 1 (top). The ysoserial payload with class JRMPListener can be used to embed the command touch /tmp/pwn.txt, which can then get executed on a vulnerable Apache Solr. A POST request (Figure 1, bottom) can then be sent to Solr to remotely set the JMX server.
Figure 1. Snapshots of code showing how a malicious RMI server is started (top), and how a POST request is sent (bottom)
JMX enables remote clients to connect to a JVM and monitor the applications running in that JVM. The applications can be managed via managed beans (MBeans), which represents a resource. Through MBeans, developers, programmers, and Apache Solr users can access and control the inner workings of the running application. MBeans can be accessed over a different protocol via Java RMI. Apache Solr users who want to use JMX/RMI interface on a server can accordingly create a JMXService URL (service:jmx:rmi:///jndi/rmi://:/jmxrmi).
In the example showed in Figure 2, the attacker, exploiting CVE-2019-0192, could use a POST request and set the JMXService URL (jmx.serviceUrl) remotely via Config API using the ‘set-property’ JSON object.
As shown in Figure 3, it would return a 500 error, including the string “undeclared checked exception; nested exception is” in the response body.
Figure 2. Code snapshot showing how the JMXService could be set remotely
Figure 3. Snapshot of code showing the error 500
Due to improper validation, this jmx.serviceUrl can be pointed to an attacker-controlled JMRP listener (which is typically used to notify about events or conditions that occur). This causes the vulnerable Apache Solr to initiate an RMI connection to a malicious JMRP Listener. A three-way handshake will then be initiated with the malicious RMI server to set up a connection with the malicious RMI server.
An attacker can then take advantage of this to carry out RCE on the vulnerable Apache Solr. As shown in Figure 4, an attacker, for instance, can send a maliciously crafted serialized object.
Figure 4. Snapshot showing data transmission after exploiting CVE-2019-0192
How to address this vulnerability Apache Solr recommends patching or upgrading to 7.0 (or later) versions. It’s also advised to disable or restrict Config API when not in use. The network should also be proactively configured and monitored for any anomalous traffic that may be running on hosts that has Apache Solr installed.
Developers, programmers, and system administrators using and managing Apache Solr should also practice security by design as well as enforce the principle of least privilege and defense in depth to protect against threats that may exploit this vulnerability.
The Trend Micro Deep Security and Vulnerability Protection solutions protect user systems from threats that may exploit CVE-2019-0192 via this Deep Packet Inspection (DPI) rule:
1009601 – Apache Solr Remote Code Execution Vulnerability (CVE-2019-0192)
Trend Micro TippingPoint customers are protected from attacks that exploit CVE-2019-0192 this MainlineDV filter:
313798 – HTTP: Apache Solr Java Unserialized Remote Code Execution Vulnerability
The post CVE-2019-0192: Mitigating Unsecure Deserialization in Apache Solr appeared first on .
#gallery-0-5 { margin: auto; } #gallery-0-5 .gallery-item { float: left; margin-top: 10px; text-align: center; width: 33%; } #gallery-0-5 img { border: 2px solid #cfcfcf; } #gallery-0-5 .gallery-caption { margin-left: 0; } /* see gallery_shortcode() in wp-includes/media.php */
Go to Source Author: Trend Micro CVE-2019-0192: Mitigating Unsecure Deserialization in Apache Solr Original Post from Trend Micro Author: Trend Micro By: Santosh Subramanya (Vulnerability Researcher) Security researcher Michael Stepankin…
0 notes
Text
How To Fix Common HTTP Error Codes 500
Introduction
When accessing a web server or application, every HTTP request that is received by a server is responded to with an HTTP status code. HTTP status codes are three-digit codes, and are grouped into five different classes. The class of a status code can be quickly identified by its first digit:
1xx: Informational
2xx: Success
3xx: Redirection
4xx: Client Error
5xx: Server Error
This guide focuses on identifying and troubleshooting the most commonly encountered HTTP error code 500, i.e. 4xx and 5xx status codes, from a system administrator's perspective. There are many situations that could cause a web server to respond to a request with a particular error code--we will cover common potential causes and solutions.
Client And Server Error Overview
Client errors, or HTTP status codes from 400 to 499, are the result of HTTP requests sent by a user client (i.e. a web browser or other HTTP client). Even though these types of errors are client-related, it is often useful to know which error code a user is encountering to determine if the potential issue can be fixed by server configuration.
Server errors, or HTTP status codes from 500 to 599, are returned by a web server when it is aware that an error has occurred or is otherwise not able to process the request.
General Troubleshooting Tips
When using a web browser to test a web server, refresh the browser after making server changes
Check server logs for more details about how the server is handling the requests. For example, web servers such as Apache or Nginx produce two files called access.log and error.log that can be scanned for relevant information
Keep in mind that HTTP status code definitions are part of a standard that is implemented by the application that is serving requests. This means that the actual status code that is returned depends on how the server software handles a particular error--this guide should generally point you in the right direction
Now that you have a high-level understanding of HTTP status codes, we will look at the commonly encountered errors.
400 Bad Request
The 400 status code, or Bad Request error, means the HTTP request that was sent to the server has invalid syntax.
Here are a few examples of when a 400 Bad Request error might occur:
The user's cookie that is associated with the site is corrupt. Clearing the browser's cache and cookies could solve this issue
Malformed request due to a faulty browser
Malformed request due to human error when manually forming HTTP requests (e.g. using curlincorrectly)
401 Unauthorized
The 401 status code, or an Unauthorized error, means that the user trying to access the resource has not been authenticated or has not been authenticated correctly. This means that the user must provide credentials to be able to view the protected resource.
An example scenario where a 401 Unauthorized error would be returned is if a user tries to access a resource that is protected by HTTP authentication, as in this Nginx tutorial. In this case, the user will receive a 401 response code until they provide a valid username and password (one that exists in the .htpasswd file) to the web server.
403 Forbidden
The 403 status code, or a Forbidden error, means that the user made a valid request but the server is refusing to serve the request, due to a lack of permission to access the requested resource. If you are encountering a 403 error unexpectedly, there are a few typical causes that are explained here.
File Permissions
403 errors commonly occur when the user that is running the web server process does not have sufficient permissions to read the file that is being accessed.
To give an example of troubleshooting a 403 error, assume the following situation:
The user is trying to access the web server's index file, from http://example.com/index.html
The web server worker process is owned by the www-data user
On the server, the index file is located at /usr/share/nginx/html/index.html
If the user is getting a 403 Forbidden error, ensure that the www-data user has sufficient permissions to read the file. Typically, this means that the other permissions of the file should be set to read. There are several ways to ensure this, but the following command will work in this case:
sudo chmod o=r /usr/share/nginx/html/index.html
.Htaccess
Another potential cause of 403 errors, often intentinally, is the use of an .htaccess file. The .htaccessfile can be used to deny access of certain resources to specific IP addresses or ranges, for example.
If the user is unexpectedly getting a 403 Forbidden error, ensure that it is not being caused by your .htaccess settings.
Index File Does Not Exist
If the user is trying to access a directory that does not have a default index file, and directory listings are not enabled, the web server will return a 403 Forbidden error. For example, if the user is trying to access http://example.com/emptydir/, and there is no index file in the emptydir directory on the server, a 403 status will be returned.
If you want directory listings to be enabled, you may do so in your web server configuration.
404 Not Found
The 404 status code, or a Not Found error, means that the user is able to communicate with the server but it is unable to locate the requested file or resource.
404 errors can occur in a large variety of situations. If the user is unexpectedly receiving a 404 Not Found error, here are some questions to ask while troubleshooting:
Does the link that directed the user to your server resource have a typographical error in it?
Did the user type in the wrong URL?
Does the file exist in the correct location on the server? Was the resource was moved or deleted on the server?
Does the server configuration have the correct document root location?
Does the user that owns the web server worker process have privileges to traverse to the directory that the requested file is in? (Hint: directories require read and execute permissions to be accessed)
Is the resource being accessed a symbolic link? If so, ensure the web server is configured to follow symbolic links
500 Internal Server Error
The 500 status code, or Internal Server Error, means that server cannot process the request for an unknown reason. Sometimes this code will appear when more specific 5xx errors are more appropriate.
This most common cause for this error is server misconfiguration (e.g. a malformed .htaccess file) or missing packages (e.g. trying to execute a PHP file without PHP installed properly).
502 Bad Gateway
The 502 status code, or Bad Gateway error, means that the server is a gateway or proxy server, and it is not receiving a valid response from the backend servers that should actually fulfill the request.
If the server in question is a reverse proxy server, such as a load balancer, here are a few things to check:
The backend servers (where the HTTP requests are being forwarded to) are healthy
The reverse proxy is configured properly, with the proper backends specified
The network connection between the backend servers and reverse proxy server is healthy. If the servers can communicate on other ports, make sure that the firewall is allowing the traffic between them
If your web application is configured to listen on a socket, ensure that the socket exists in the correct location and that it has the proper permissions
503 Service Unavailable
The 503 status code, or Service Unavailable error, means that the server is overloaded or under maintenance. This error implies that the service should become available at some point.
If the server is not under maintenance, this can indicate that the server does not have enough CPU or memory resources to handle all of the incoming requests, or that the web server needs to be configured to allow more users, threads, or processes.
504 Gateway Timeout
The 504 status code, or Gateway Timeout error, means that the server is a gateway or proxy server, and it is not receiving a response from the backend servers within the allowed time period.
This typically occurs in the following situations:
The network connection between the servers is poor
The backend server that is fulfilling the request is too slow, due to poor performance
The gateway or proxy server's timeout duration is too short
Conclusion
Now that you are familiar with the most common HTTP error codes, and common solutions to those codes, you should have a good basis for troubleshooting issues with your web servers or applications.
If you encounter any error codes that were not mentioned in this guide, or if you know of other likely solutions to the ones that were described, feel free to discuss them in the comments!
Call On Our Technical Support Phone Number for fix HTTP Error Codes 500 by Errorcode Expert USA +1 (800) 848-5295 Right Now to Get Instant Help
0 notes
Text
App Development is transforming gradually from Native to Hybrid Technology
Mobile application development is a process or an act that allows the application software to develop for devices such as mobile phones, enterprise digital assistants, and personal digital assistants. The user is often the focus of interaction with their device, and the interface entails components of both hardware and software. As mobile technology is becoming more adaptable, the trend of using smart devices is growing like wildfire, and there is in fact no stoppage. Today's smartphones are more powerful, smaller and practically useful devices. Mobile application development is similar to Web application development and has its roots in more traditional software development.
A native application is a software program that is developed for use on a particular platform or device. Because a native app is built for use on a particular device and its OS, it has the ability to use device-specific hardware and software. A native app means it has been coded in a language that is natively provided by the two platforms. On iOS, this would be coded with Objective C or Swift and on Android, Java. We use the native components where speed and responsiveness is most important. The major programming languages that are largely used for mobile app development are –
• C++ forms the simplistic base for most programming languages and possesses the power to create dynamic apps. It’s became a versatile tool with the approach of simple and effective compiler base. C++ was used before to develop Apple systems. The new technology in mobile application development like Appcelebrator and Mosync is the extended form of primary languages.
• Java is one of the most widely object-oriented programming language is the official language for Android development. It is easy to learn, easy to read; it reduces errors and gives clear explanations and suggestions. Java provides open source libraries to manage user’s choice from it very easily.
• Swift is designed to work with Apple's Cocoa and Cocoa Touch frameworks and the large body of existing Objective-C (ObjC) code written for Apple products. If you are building something specific for Apple products, Swift is the language to seek. It is a general-purpose, multi-paradigm, compiled programming language developed by Apple Inc. for iOS, macOS, watchOS, tvOS, and Linux. It has advanced features with minimal coding that can be easily maintained.
• HTML5 is the worthiest choice for web-frontend applications for mobile devices. HTML5 has introduced markup and Application Programming Interface (API). HTML5 is the development of the standard HTML to meet the growing essential presented by today’s cross-platform and rich media necessities.
• PHP is an object-oriented language which is easy to learn. It is a three-layered model to help create dynamic mobile apps. It works excellent for apps that require database integration.
• iOS (formerly iPhone OS) is a mobile operating system created and developed by Apple Inc. exclusively for its hardware. There are millions of mobile apps available across both Apple iOS and Play Android stores and most of these are aimed at the consumer market. At ERS IT Solutions, we design mobile apps for both personal and business customers, with a special emphasis on the business environment. This is where we specialize in developing applications that add value to the customer.
• Kotlin is a high-level language for Android as Google announced that it was adopting development. This open source language is based on Java Virtual Machine and can also be compiled to JavaScript source code. Basically, Kotlin made software developers enter a New Era in Android App Development. Kotlin allows software developers to use its features and ease of operation without switching to a new project or changing the codes for the present project.
• CSS (Cascading Style Sheets) is a style sheet language used for describing the presentation of a document written in a markup language like HTML. CSS is a cornerstone technology of the World Wide Web, alongside HTML and JavaScript.
• Android is a mobile operating system developed by Google, based on a modified version of the Linux kernel and other open source software and designed primarily for touchscreen mobile devices such as smartphones and tablets. In addition, Google has further developed Android TV for televisions, Android Auto for cars and Wear OS for wrist watches, each with a specialized user interface. Variants of Android are also used on game consoles, digital cameras, PCs and other electronics.
For many it is surprising to learn that some of the world’s most popular mobile apps turn out to be…hybrid! This includes: Amazon (for iOS and Android), Evernote (for iOS and Android), Netflix (for iOS and Android). A hybrid application is technically a web app packed in a native app container. Like the web app, it is written in HTML, CSS and JavaScript. Another difference is that the hybrid app is reliant on the Web View and not the mobile browser. You can check out both versions of these apps to make sure that the user experience offered is on a high level, in most cases indistinguishable from the native applications.
Hybrid mobile applications are built in a similar manner as websites. Both use a combination of technologies like HTML, CSS, and JavaScript. Nowadays, hybrid mobile app development uses Apache Cordova. Apache Cordova offers a consistent platform along with a set of JavaScript APIs that allows a developer to access device capabilities with the help of plugins. And all these plugins can be easily found and are accessible from Apache Cordova Plugins Registry. There are many professional developers who are developing hybrid applications to provide support for all the mobile devices. Hybrid mobile app development is the best way to reach end users.
The top tools that can help you get started are –
• Ionic Framework is a complete open-source SDK for hybrid mobile app development. Built on top of Angular. Ionic provides tools and services for developing hybrid mobile apps using Web technologies like CSS, HTML5, and Sass. Apps can be built with these Web technologies and then distributed through native app stores to be installed on devices by leveraging Cordova.
• RhoMobile Get a powerful open-source framework that is based on Ruby using this platform. It allows users to develop native apps for multiple platforms easily. . Fewer efforts are required by developers while making a mobile app using RhoMobile Suite because it consists of library of all the technologies like CSS3, JavaScript, Ruby and HTML5. The behavior of application varies in different devices. This framework has a functionality to reset the format according to any device varying from laptop to mobile.
• MoSync is an open source SDK, which is a rich cross-platform mobile application development environment that makes it easy to develop apps for all major mobile platforms from a single code base. It supports Eclipse-based IDE for C/ C++ programming and will feature support for other programming languages such as JavaScript, PHP, Ruby, and Python, or a combination of both to create hybrid apps.
• PhoneGap – This Adobe’s tool is available for multiple platforms such as Android, Windows, and iOS. These are full-fledged mobile apps that can do everything from interact with device hardware such as the accelerometer, camera and geo-location tools to interacting with (iOS or Android) operating system to make phone calls or use Bluetooth. This course gets practical very quickly as you'll be working with the phone hardware and interacting with the same real-world API's that professional developer’s use every day such as Google Places and Google Maps. Mobile App Development is the single Fastest Growing Segment of Development Get in on the Action with Mobile App Development with PhoneGap today!
• Appcelerator is the mobile development platform of choice for thousands of enterprises including eBay, Merck, Mitsubishi Electric, NBC, PayPal and Ray-Ban, as they become mobile-first organizations. This amazing platform allows the development of native apps for mobiles, tablets, and desktops using HTML, PHP, and JavaScript. Customers who standardize on Appcelerator’s solutions get to market 70 percent faster and achieve a significant competitive advantage. If you are looking at developing a hardware-based app, this development technology is the way to go.
• WidgetPad is one of the best places to visit for open-source environment developments for mobile apps. Upcoming versions of WidgetPad will enable developers to seamlessly port these applications to other smartphone devices such as the Palm Pre and Blackberry. The online WidgetPad development environment uses a hosted SaaS model and is completely free. This particular platform offers a collaborative approach and uses web technologies such as JavaScript and HTML5. The current set of tools for iPhone developers allows them to create fully interactive, media-rich mobile apps that take advantage of the iPhone’s advanced hardware capabilities (GPS, accelerometer, compass, etc.).
If you are interested in availing in any of our Web Designing and Web Development services please do not hesitate to get in touch and we can arrange a sit down or phone call at your convenience. We will promptly respond to all queries.
Please contact us by the below specified way:
Office Phone:
(+91)033-2484-1165 (11am to 8pm IST)
Technical Support:
Mob: +91-9830504642/ +91-9163452454
Contact Email:
Skype: webhawks
Website: www.webhawksindia.com
0 notes