#Apache port setup
Explore tagged Tumblr posts
Visit Tumblr Blog
Explore Tumblr blogs with no restrictions, modern design and the best experience.
Last Seen Tumblr Blogs


Fun Fact
Tumblr has a low social media market share in South America.
Text
Fix the Port used for the Virtualhost is not an Apache Listen Port
In this short blogpost, we shall discuss how to Fix the Port used for the Virtualhost is not an Apache Listen Port. In Apache, the Listen directive in the configuration file (httpd.conf or apache2.conf, depending on the system) specifies the port number on which Apache will listen for incoming connections. Please see Setup VirtualHost with SSL on WAMP Server, how to Configure SQL Server Instance…
#Apache listen port error#Apache port and VirtualHost issue#Apache port error solution#Apache port setup#Apache server troubleshooting#Apache VirtualHost configuration error#configure Apache listen port#fix Apache VirtualHost port issue#how to fix Apache port not listening#resolve Apache port conflict#VirtualHost listen port fix#VirtualHost not listening on port#VirtualHost not responding on port#VirtualHost port not working#Windows#Windows Server#Windows Server 2012#Windows Server 2016#Windows Server 2019
0 notes
Text
How To Setup Elasticsearch 6.4 On RHEL/CentOS 6/7?

What is Elasticsearch? Elasticsearch is a search engine based on Lucene. It is useful in a distributed environment and helps in a multitenant-capable full-text search engine. While you query something from Elasticsearch it will provide you with an HTTP web interface and schema-free JSON documents. it provides the ability for full-text search. Elasticsearch is developed in Java and is released as open-source under the terms of the Apache 2 license. Scenario: 1. Server IP: 192.168.56.101 2. Elasticsearch: Version 6.4 3. OS: CentOS 7.5 4. RAM: 4 GB Note: If you are a SUDO user then prefix every command with sudo, like #sudo ifconfig With the help of this guide, you will be able to set up Elasticsearch single-node clusters on CentOS, Red Hat, and Fedora systems. Step 1: Install and Verify Java Java is the primary requirement for installing Elasticsearch. So, make sure you have Java installed on your system. # java -version openjdk version "1.8.0_181" OpenJDK Runtime Environment (build 1.8.0_181-b13) OpenJDK 64-Bit Server VM (build 25.181-b13, mixed mode) If you don’t have Java installed on your system, then run the below command # yum install java-1.8.0-openjdk Step 2: Setup Elasticsearch For this guide, I am downloading the latest Elasticsearch tar from its official website so follow the below step # wget https://artifacts.elastic.co/downloads/elasticsearch/elasticsearch-6.4.2.tar.gz # tar -xzf elasticsearch-6.4.2.tar.gz # tar -xzf elasticsearch-6.4.2.tar.gz # mv elasticsearch-6.4.2 /usr/local/elasticsearch Step 5: Permission and User We need a user for running elasticsearch (root is not recommended). # useradd elasticsearch # chown -R elasticsearch.elasticsearch /usr/local/elasticsearch/ Step 6: Setup Ulimits Now to get a Running system we need to make some changes of ulimits else we will get an error like “max number of threads for user is too low, increase to at least ” so to overcome this issue make below changes you should run. # ulimit -n 65536 # ulimit -u 2048 Or you may edit the file to make changes permanent # vim /etc/security/limits.conf elasticsearch - nofile 65536 elasticsearch soft nofile 64000 elasticsearch hard nofile 64000 elasticsearch hard nproc 4096 elasticsearch soft nproc 4096 Save files using :wq Step 7: Configure Elasticsearch Now make some configuration changes like cluster name or node name to make our single node cluster live. # cd /usr/local/elasticsearch/ Now, look for the below keywords in the file and change according to you need # vim conf/elasticsearch.yml cluster.name: kapendra-cluster-1 node.name: kapendra-node-1 http.port: 9200 to set this value to your IP or make it 0.0.0.0 ID needs to be accessible from anywhere from the network. Else put your IP of localhost network.host: 0.0.0.0 There is one more thing if you have any dedicated mount pint for data then change the value for #path.data: /path/to/data to your mount point.
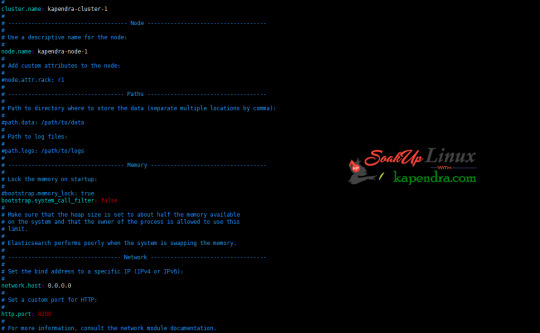
Your configuration should look like the above. Step 8: Starting Elasticsearch Cluster As the Elasticsearch setup is completed. Let the start Elasticsearch cluster with elastic search user so first switch to elastic search user and then run the cluster # su - elasticsearch $ /usr/local/elasticsearch/bin/elasticsearch 22278 Step 9: Verify Setup You have all done it, just need to verify the setup. Elasticsearch works on port default port 9200, open your browser to point your server on port 9200, You will find something like the below output http://localhost:9200 or http://192.168.56.101:9200 at the end of this article, you have successfully set up Elasticsearch single node cluster. In the next few articles, we will try to cover a few commands and their setup in the docker container for development environments on local machines. Read the full article
2 notes
·
View notes
Text
Unlock Powerful Hosting with cPanel Server Management by CloudMinister Technologies
In a digital environment where speed, security, and uptime determine the success of websites and online platforms, effective server management is critical. cPanel Server Management provides a robust foundation for web hosting, but it's the experience and expertise of a professional team that elevates server performance to enterprise-grade reliability.
This is where CloudMinister Technologies steps in—a company known for its dedicated focus on Linux server management, particularly for environments using cPanel and WHM (Web Host Manager). Let’s explore how CloudMinister helps organizations gain maximum value from their cPanel servers.
What is cPanel Server Management?
cPanel is a web hosting control panel that provides a graphical user interface (GUI) and automation tools designed to simplify the process of hosting a website. It allows users to manage files, databases, email accounts, domains, backups, and more—all from a central dashboard.
cPanel Server Management, however, goes far beyond what the software provides out of the box. It involves the continuous monitoring, configuration, optimization, securing, and troubleshooting of servers running cPanel. This ensures the hosting environment remains stable, secure, and high-performing at all times.
About CloudMinister Technologies
CloudMinister Technologies is an India-based IT services company specializing in server management, hosting solutions, and cloud infrastructure. With deep expertise in Linux environments, their team provides managed cPanel services to businesses of all sizes, ranging from solo web developers to enterprise-level organizations.
CloudMinister is recognized for combining technical excellence with responsive customer support, making it a preferred partner for businesses seeking reliable server management.
Key Features of CloudMinister’s cPanel Server Management Services
1. Advanced Security Implementation
Security is a top concern for any server exposed to the internet.CloudMinister applies multiple layers of protection to prevent unauthorized access, malware infections, and denial-of-service attacks.
Their security setup typically includes:
Configuring firewalls like CSF (ConfigServer Security & Firewall)
Installing and tuning ModSecurity (a web application firewall)
Enabling brute-force attack detection via tools like cPHulk
Scanning the server regularly for malware or rootkits
Disabling unused ports and services
Keeping software and kernel versions up to date with patches
This approach significantly reduces vulnerability and helps maintain compliance with security best practices.
2. Server Optimization and Speed Tuning
Out-of-the-box server configurations often aren't optimized for specific workloads or traffic levels. CloudMinister evaluates your server environment and implements performance enhancements tailored to your needs.
This may include:
Tuning Apache, NGINX, or LiteSpeed web servers for faster content delivery
Adjusting MySQL settings for better database response times
Implementing caching mechanisms like Memcached, Redis, or OPcache
Managing PHP versions and optimizing handlers like PHP-FPM
Monitoring resource consumption and load balancing, where necessary
These efforts ensure faster website load times, improved user experience, and better search engine performance.
3. Continuous Monitoring and Alerts
Downtime and service interruptions can affect user trust and business revenue. CloudMinister deploys monitoring tools that check the health of your server and its key services 24/7.
Their monitoring system tracks:
Server uptime and load averages
Web and database service availability
Disk usage and memory consumption
Suspicious activity or spikes in traffic
If any issue is detected, alerts are automatically generated, and their support team takes immediate action, often resolving problems before clients are even aware of them.
4. Automated and Manual Backups
Reliable data backup strategies are essential for disaster recovery and business continuity. CloudMinister sets up both automated and manual backups to safeguard your critical data.
Backup services include:
Daily, weekly, or monthly automated backups to local or remote locations
Snapshot-based backups for entire file systems or virtual machines
Backup integrity checks to confirm recoverability
Disaster recovery support for fast data restoration in case of failure
Clients can request custom backup schedules based on their operational needs.
5. 24/7 Technical Support
CloudMinister offers round-the-clock technical support, including holidays and weekends. Whether the issue is routine or critical, their support team responds promptly to resolve it.
Support includes:
Assistance with DNS, email, FTP, and database issues
Troubleshooting site errors, load problems, and misconfigurations
Help with third-party application installation or integration
Guidance on cPanel and WHM usage for non-technical users
Their support system is designed for fast response and resolution, helping minimize downtime and stress for business owners.
6. Software Installation and Upgrades
In many cases, users need to add new tools or features to their servers. CloudMinister handles software installations, compatibility checks, and upgrades as part of its managed service offerings.
Common installations include:
Content management systems like WordPress, Joomla, and Drupal
E-commerce platforms such as Magento or PrestaShop
Server-side enhancements like ImageMagick, FFmpeg, or GIT
Secure protocol support, including Let’s Encrypt SSL and SSH hardening
Upgrading PHP, MySQL, cPanel, or the operating system when necessary
Each installation is tested to ensure compatibility and optimal performance.
Who Benefits from CloudMinister’s cPanel Server Management?
CloudMinister’s services are suitable for a wide range of users and industries:
Web Hosting Providers benefit from white-label server management and reduced support workload.
Digital Agencies can offer hosting to clients without hiring in-house server administrators.
E-commerce companies enjoy improved performance and secure transactions during peak times.
Startups and Developers get technical expertise without the need for full-time staff.
Large Enterprises can ensure compliance, uptime, and scalable infrastructure with proactive support.
Why Choose CloudMinister Technologies?
The advantages of working with CloudMinister Technologies include:
Certified Expertise: Their team consists of Linux and cPanel-certified professionals with years of experience.
Cost Efficiency: Competitive pricing makes enterprise-grade support accessible to small businesses.
Scalability: Their solutions grow with your business, from shared servers to dedicated infrastructure.
Client-Centric Approach: Support plans are tailored to your actual needs—nothing more, nothing less.
Transparent Reporting: Regular performance and security reports give you insight and peace of mind.
Conclusion
Managing a cPanel server is more than just setting up hosting—it’s about ensuring consistent performance, hardened security, regular updates, and quick support when issues arise. With CloudMinister Technologies, your server is not just managed—it’s optimized, protected, and monitored by experts.
If you're looking for a trusted partner to handle your cPanel Server Management, CloudMinister offers a proven solution that allows you to focus on your business while they handle the backend.
Get in touch with CloudMinister Technologies today and experience professional, worry-free server management.
For More Visit:- www.cloudminister.com
#cloudminister technologies#servers#technology#hosting#information technology#cPanel Server Management
0 notes
Text
COMP 370 Homework 2 – Unix server and command-line exercises
The goal of this assignment is for you to get more familiar with your Unix EC2 – both as a data science machine and as a server (as a data scientist, you’ll need it as both). Task 1: Setting up a webserver The objective of this task is to setup your EC2 instance to run an Apache webserver on port 8008. Your goal is to have it serving up the file comp370_hw2.txt at the www root. In other words,…
0 notes
Text
How to Install XAMPP for Windows 10 - XAMPP WordPress For Beginners
To install XAMPP on Windows 10 and set it up for WordPress, follow these steps:
Step 1: Download XAMPP
Go to the official XAMPP website.
Click on the "XAMPP for Windows" button.
Once the installer is downloaded, locate the .exe file (usually in the Downloads folder).
Step 2: Install XAMPP
Double-click the .exe file to start the installation process.
Choose the components you want to install. For WordPress, you need at least Apache, MySQL, and PHP. These are selected by default, so you can leave them as is.
Choose the installation folder (default is usually fine).
Click "Next" and follow the prompts.
During installation, the installer may ask if you want to start the XAMPP Control Panel. Leave it checked and click "Finish."
Step 3: Start Apache and MySQL
Open the XAMPP Control Panel (it should have opened automatically, or you can search for it in the Start menu).
Click the "Start" button next to Apache (this will run the web server).
Click the "Start" button next to MySQL (this will start the database server).
Make sure both Apache and MySQL show "Running" in green.
Step 4: Install WordPress
Download the latest version of WordPress from the official WordPress website.
Extract the WordPress ZIP file.
Move the extracted folder (the WordPress folder) into the htdocs folder of your XAMPP installation (usually located at C:\xampp\htdocs).
Step 5: Create a Database for WordPress
Open your browser and go to http://localhost/phpmyadmin/.
In the phpMyAdmin dashboard, click on "Databases."
Create a new database for WordPress. Give it a name (e.g., wordpress_db) and click "Create."
Step 6: Configure WordPress
Open your browser and go to http://localhost/wordpress (or the folder name you chose).
The WordPress installation screen should appear.
Select your language and click "Continue."
On the next screen, enter your database details:
Database Name: The name you created (e.g., wordpress_db).
Username: root (default for XAMPP).
Password: Leave this blank (default for XAMPP).
Database Host: localhost (default).
Table Prefix: Leave as wp_ unless you want to change it.
Click Submit and then Run the Install.
Step 7: Complete the WordPress Setup
Fill in the site details (site title, admin username, password, and email).
Click "Install WordPress."
Once the installation is complete, you’ll see a success message. You can now log in to your WordPress dashboard at http://localhost/wordpress/wp-admin.
Final Notes
To stop your server, go to the XAMPP Control Panel and click "Stop" for Apache and MySQL.
If you need to make your local WordPress site public, you'll have to configure port forwarding or use a tool like Local by Flywheel or XAMPP for public access.
#installxampp#xamppforbeginners#xamppwindows10#wordpressinstallation#localserversetup#runwordpresslocally#xamppwordpress#webdevelopment#phpdevelopment#wordpressforbeginners#tutorial2025#localwordpress#xamppsetup#installingwordpress#wordpresssetup#beginnerfriendly#xamppguide#developmenttutorial#learnwordpress#wordpresslocally
0 notes
Text
127.0.0.1:49342 Localhost IP Address Explained: The Ultimate Guide

127.0.0.1 is the typical loopback IP address; accessing this IP connects you to your system, not the Internet. There are a lot of complicated words and terms used in computers. Each one is important and makes a difference. Not every user, nevertheless, is aware of them. One of the typical terms usually shown on a computer screen when working on some programs is 127.0.0.1:49342. Most people are unaware of it, so it seems to be the leading cause of problems. We must first have a fundamental knowledge of IP addresses, sometimes known as internet protocol, to solve this problem. Knowing how it operates will help us to fix this mistake effectively. Below, we have clarified what an IP address is and why it is significant. Keep sliding down the post underneath to find further specifics regarding this 127.0.0.1:49342. What is 127.0.0.1? The loopback address, 127.0.0.1, is a special-purpose IPv4 address. It creates an IP link to the same machine or computer the end-user is running. This lets the computer interact with itself since any network demand issued to 127.0.0.1 is replayed back. Debugging network programs and testing depend on this loopback mechanism. Port 49342: Its Importance In networking, a port is a logical endpoint that designates a particular process or service. Port numbers run from 0 to 65535 and have different uses. Specifically, Port 49342 is private or dynamic. Often used for bespoke or temporary needs, the IANA does not reserve these ports (49152–65535), Internet Assessed Numbers Authority. Benefits of 127.0.0.1:49342 Employing this specific IP address has several benefits, including: Testing and Development: connection and may test apps without compromising the network or any other system. Making sure the traffic stays within your local machine—that is, the computer—allows no outside access, mitigating possible security hazards. Because communication between the same machine is far faster than any external network, this Loopback address lets the machine operate far faster. It lessens the demand for extra resources, including a network, which improves test performance. Developers can rapidly and effortlessly test modifications and identify environmental problems free from constant network assistance. Applications can operate concurrently on the same machine without issues using the address and several ports, including the 49342. Setting Up The Address These guidelines will help you to arrange the 127.0.0.1:49342 address following: Install any program on your computer, such as Ngnix, Apache, or IIS. This program will enable your machine to serve local web content. Open the configurable options on the selected program and arrange the server to port 49342. Ensure the program has permission to read from and write to the required folders you will have to create where your web will be kept. Restart your program to implement the fresh settings you just changed; next, open a browser and visit your site or application using the address "127.0.0.1:49342" to verify and guarantee everything is operating as intended. You set up the address this way; if necessary, utilize virtualization tools like VirtualBox or Docker to build and oversee virtual environments. Common Problems: Troubleshooting Should you run across any difficulties, Use these troubleshooting guides to correct the IP address setup: Ensure the server settings are mistakes-free, and verify that port 49342 is free. Confirm that the server can access necessary files and that the firewall lets port 49342. Comfin if you did not miss anything and are utilizing the "127.0.0.1:49342". Changes Not Applicable: Researt following your adjustments and search logs for any error notes. Should the pages not be located, confirm whether the files are in the correct location and whether the names exactly match.404 Error Ensure you have enough CPU and memory, and check any logs for fault specifics. The Key Function of Port 49342 Network Resources and Uses Dynamic port 49342 is not linked to any one service or protocol. This adaptability makes it the perfect alternative for system managers and developers needing a port for temporary or custom services. Using a dynamic port such as 49342 helps developers avoid problems with well-known ports set aside for conventional services (e.g., HTTP on port 80 and HTTPS on port 443). Testing and Correcting Problems Debugging and testing constitute one of the main applications of 127.0.0.1:49342. Testing a network application in a controlled environment is crucial when designing one. Developers can replicate network communication without compromising other network activity by tying the application to 127.0.0.1:49342. Before putting the program into use in a production setting, this approach guarantees accurate operation, helps to spot problems, and maximizes performance. Processing Localhost Operations First, you must start setting or installing any currently used server or program on your computer, such as Nlinux, Apache, or IIS. You can run your applications on localhost once the program is effectively implemented. Moreover, you must develop server software coupled with port 49342 to arrange communication between services and apps. This will cause the gadget to start picking up the incoming connections. Furthermore, you may also implement the necessary changes in the service's configuration file. Establish the field paths afterward and get your server access to the right. To complete the assignment, you must build the correct folders to save your site and apps. Visit your website at 127.0.0.1:49342 to confirm your server setup next-wise. It should all be in order, and your computer should show your website or application running without problems. Finally, you could want to build and oversee virtualized machines using the Docker or Virtual Box tools. Conclusion You have it right now! Although, at first look, 127.0.0.1:49342 seems mysterious, it is a valuable tool for developers and anybody wishing to play about with their computer's network. Understanding its elements and possible applications will help you to maximize it while considering security. FAQs While talking about networking, how crucial is crypto code 127.0.0.1:49342? Although we are talking about networking, local communication depends on this crypto code; therefore, it is essential to address this issue. It lets programs on one device interact safely without outside network connections. In what ways might port 49342 enhance communication? Port 49342 improves device inter-app contact. It fixing technological problems. Tools for debugging can also be helpful if issues continue even after port change. For testing and development, is 127.0.0.1:49342 safe? It is indeed safe for testing and development. It offers correct security mechanisms to stop illegal access. Read the full article
0 notes
Text
Installing Hadoop

Installing Apache Hadoop involves steps and considerations to ensure a successful setup. Here’s a general guide on how to install Hadoop:
Prerequisites
Java Installation: Hadoop requires Java to be installed on your system. You can check your Java version by running the JavaJava version on your terminal.
SSH: Hadoop requires SSH access to manage its nodes. It would help if you had SSH installed and configured on your system.
Installation Steps
Download Hadoop: Go to the Apache Hadoop official website and download the latest stable release.
Extract Files: Extract the downloaded tar file to a directory of your choice, typically under /usr/local/Hadoop.
Configuration: Configure Hadoop by editing the following files:
hadoop-env.sh: Set the Java Home variable.
core-site.xml: Set the Hadoop temporary directory and the default file system name.
hdfs-site.xml: Configure settings for HDFS, like replication factor and block size.
mapred-site.xml: Configure settings for MapReduce.
yarn-site.xml: Configure settings for YARN.
Setup SSH: If not already done, generate SSH keys and enable password-less SSH access to your local machine.
Format the Namenode: Before starting Hadoop for the first time, format the HDFS filesystem via hdfs namenode -format.
Starting Hadoop: Start the Hadoop daemons — the NameNode, DataNode, ResourceManager, and NodeManager. This can be done using the start. Sh and start-yarn.sh scripts.
Verification: After starting Hadoop, you can use the JPS command to check if the Hadoop daemons are running. You should see processes like NameNode, DataNode, ResourceManager, and NodeManager.
Web Interfaces: Hadoop provides web UIs for HDFS and YARN, which can be accessed to monitor the cluster’s status and jobs.
Post-Installation
Testing the Installation: Run some basic Hadoop commands or a sample MapReduce job to ensure everything works correctly.
Cluster Setup: If you’re setting up a multi-node cluster, you must replicate the configuration process on each node and modify settings for proper network communication.
Firewall Settings: Ensure that any firewalls on your system are configured to allow traffic on the necessary ports used by Hadoop.
Regular Maintenance: Regularly check and maintain your Hadoop cluster for optimal performance.
Remember, each step might require specific commands or configurations based on your operating system and the version of Hadoop you’re installing. Also, always check the official Hadoop documentation for accurate and detailed instructions.
For bulk email communication regarding this process, ensure the email is clear, concise, and contains all the necessary links and instructions. Avoid using overly complex language or large attachments to reduce the risk of being marked as spam. Using a trusted email service provider and following best practices for bulk email sending is also beneficial.
Hadoop Training Demo Day 1 Video:
youtube
You can find more information about Hadoop Training in this Hadoop Docs Link
Conclusion:
Unogeeks is the №1 IT Training Institute for Hadoop Training. Anyone Disagree? Please drop in a comment
You can check out our other latest blogs on Hadoop Training here — Hadoop Blogs
Please check out our Best In Class Hadoop Training Details here — Hadoop Training
S.W.ORG
— — — — — — — — — — — -
For Training inquiries:
Call/Whatsapp: +91 73960 33555
Mail us at: [email protected]
Our Website ➜ https://unogeeks.com
Follow us:
Instagram: https://www.instagram.com/unogeeks
Facebook: https://www.facebook.com/UnogeeksSoftwareTrainingInstitute
Twitter: https://twitter.com/unogeeks
#unogeeks #training #ittraining #unogeekstraining
0 notes
Text
How to deploy an application and make it publicly available to the Internet on AWS
Your application must run on a server, which listens to traffic on an Internal port. Expose it to the Internet with a Reverse Proxy (something that catches traffic from outside through a certain port, say 443 or 80, and directs it to something listening inside your server, on a local port such as 3000).
Apache can be used as a reverse proxy, but there are myriad other ways to do it. NGINX is a very good one. Traefik also works as a reverse proxy if you're into golang.
Then, you would have to make sure that your server is not behind a firewall that blocks traffic on ports 80 or 443. In AWS the equivalent of this is to enable certain security groups on your VPC.
If you control your Network Gateway (router), you'd need to port forward traffic from the Internet, on ports 80/443/etc. onto your reverse proxy server.
At this point you should be able to access your content by sending HTTP requests to :80 or :443 from anywhere on the internet (WARNING: EC2 instances have internal and public (external) IP addresses. Do not confuse the EC2-specific internal address with your public address).
You don't control the "Network Gateway" so to say in AWS, so you may want to do the following: fall back onto their managed services to procure ingress.
Your mileage may vary but simply setting up an ELB is the recommended course of action in AWS. Yes, I know that AWS ELB is intended for scalability scenarios, but you can effectively set an ELB with just one sole entry.
You can create a Classic (L6) or Application (L7) Elastic Load Balancer, which will allow you to configure rules to port forward. You can also setup redundancy and high availability through this, but that's advanced territory. Which level you need, is usually up to you because balancing at different levels of the OSI level allows you to do certain tricks or not. For example, you can balance depending on the contents of the HTTP request headers if you use an L7 (Application) load balancer; L6 usually implies that the load balancing is performed at the router (DNS) level.
The LB will produce a generic "URL" that you will use to access your server.
Another AWS managed service, "API gateway" can also do this for you so you don't have to. You can create either a REST API or HTTP API on AWS API Gateway, which basically handles Ingress to your infrastructure with a few extra niceties baked in on top.
Finally, you probably want to configure things so you can access your application using a domain name of your choice. This is achieved through configuring the A and C records for your domain with an internet-wide DNS provider. AWS has this, with Route 53 --you can use a different DNS provider too, most domain name registrars provide this service too.
0 notes
Text
How to Configure and Set up a Proxy Server

Introduction:
A proxy server acts as an intermediary between a user and the internet. It allows users to route their internet traffic through a different server, providing benefits such as enhanced security, privacy, and access to geographically restricted content. If you’re looking to configure and set up a proxy server, this article will guide you through the process, from understanding the types of proxy servers to implementing them effectively.
Understanding Proxy Servers:
What is a Proxy Server? – A definition and overview of how a proxy server functions, acting as a middleman between a user and the internet.
Types of Proxy Servers – An explanation of the different types of proxy servers, including HTTP, HTTPS, SOCKS, and reverse proxies, highlighting their specific use cases and functionalities.
Choosing a Proxy Server:
Identifying Your Needs – Determine the specific requirements for setting up a proxy server, such as enhanced security, privacy, or accessing geo-restricted content.
Evaluating Proxy Server Options – Research and compare available proxy server solutions, considering factors such as compatibility, performance, and ease of configuration.
Setting up a Proxy Server:
Selecting a Hosting Option – Choose between self-hosted or third-party hosting options based on your technical expertise and infrastructure requirements.
Installing Proxy Server Software – Step-by-step instructions on installing the chosen proxy server software on your server or computer, including popular options like Squid, Nginx, and Apache.
Configuring the Proxy Server:
Proxy Server Settings – Understand the configuration options available, such as port numbers, proxy protocols, and authentication methods, and adjust them to suit your needs.
IP Whitelisting and Blacklisting – Learn how to set up IP whitelisting and blacklisting to control access to your proxy server and protect it from unauthorized usage.
Securing the Proxy Server:
Enabling Encryption – Configure SSL/TLS certificates to encrypt communication between the user and the proxy server, safeguarding sensitive information from interception.
Setting Access Controls – Implement access control policies to restrict access to the proxy server, ensuring only authorized users can utilize its services.
Testing and Troubleshooting:
Verifying Proxy Server Functionality – Perform tests to ensure that the proxy server is correctly configured and functioning as expected, checking for any potential issues.
Troubleshooting Common Problems – Identify and resolve common issues that may arise during the setup and configuration process, including network connectivity, port conflicts, and misconfigurations.
Optimizing Proxy Server Performance:
Caching – Configure caching mechanisms on the proxy server to improve performance by storing frequently accessed content locally, reducing the need for repeated requests to the internet.
Bandwidth Management – Adjust bandwidth allocation settings to optimize network resources and ensure a smooth browsing experience for users of the proxy server.
Monitoring and Maintenance:
Monitoring Proxy Server Performance – Employ monitoring tools to track the performance and usage of the proxy server, identifying potential bottlenecks or security concerns.
Regular Updates and Patches – Keep the proxy server software up to date by installing patches and updates released by the software provider, ensuring security vulnerabilities are addressed.
Conclusion:
Configuring and setting up a proxy server can provide numerous benefits, including enhanced security, privacy, and access to geographically restricted content. By understanding the different types of proxy servers, selecting the appropriate solution, and following the step-by-step process of installation, configuration, and optimization, you can successfully deploy a proxy server that meets your specific needs. Remember to prioritize security, monitor performance, and perform regular maintenance to ensure the proxy server continues to function optimally. With a properly configured proxy server in place, you can enjoy a safer and more versatile internet browsing experience.
0 notes
Photo

Apache tomcat server directory structure, trouble shoot, change port number. This is second video out of 3 in the short playlist on Apache tomcat server tutorial. This video covering 1. Process to change PORT number 2. Troubleshooting ways 3. Directory structure Released Date: Sep 13, 2020 YouTube Channel Name: aducators #aducators #apache #tomcat #server #directory #structure #change #port #console #playlist #exe #setup #webserver #applicationserver #javadeveloper #advancejava #java #javatutorial #jsp #servlet #beginner #tutorial #troubleshooting #installation #guide #subscribe #youtube #follow (at Delhi, India) https://www.instagram.com/p/CHV4TIgH5i9/?igshid=1u6mnrno419yd
#aducators#apache#tomcat#server#directory#structure#change#port#console#playlist#exe#setup#webserver#applicationserver#javadeveloper#advancejava#java#javatutorial#jsp#servlet#beginner#tutorial#troubleshooting#installation#guide#subscribe#youtube#follow
0 notes
Text
5 Points To Do Immediately About Cinema Hd Apk Download
Android Central.
#IMakeApps
Android comes preinstalled on a few laptops (a comparable functionality of running Android applications is likewise offered in Google's Chrome OS) and can also be installed on computers by end customers. On those platforms Android offers extra functionality for physical key-boards and mice, together with the "Alt-Tab" key mix for changing applications rapidly with a keyboard.
Securing Android is necessary


In May 2012, the court in this situation located that Google did not infringe on Oracle's patents, and the trial judge ruled that the framework of the Java APIs used by Google was not copyrightable. The celebrations consented to zero bucks in statutory damages for a small amount of replicated code.
After examining these permissions, the user can pick to accept or reject them, installing the application only if they accept. In Android 6.0 "Marshmallow", the approvals system was altered; apps are no more immediately given all of their specified consents at installation time.
Android System Codelab
Android is a Linux distribution according to the Linux Foundation, Google's open-source chief Chris DiBona, and also a number of journalists. Others, such as Google designer Patrick Brady, claim that Android is not Linux in the traditional Unix-like Linux circulation sense; Android does not consist of the GNU C Collection (it utilizes Bionic as an alternate C collection) and also several of other components usually located in Linux circulations. Android's kernel is based upon the Linux kernel's lasting support (LTS). branches. As of 2020 [update], Android utilizes variations 4.4, 4.9 or 4.14 of the Linux bit.
Duo Mobile's dark theme relies on your Android system setups. Duo Mobile immediately switches to dark style if your device has the system-wide dark setup made it possible for. Finger Print VerificationDuo Mobile 3.10 and up additionally sustains finger print verification for Duo Push-based logins as an added layer of safety and security to verify your customer identification.
In July 2012, "mobile subscribers aged 13+" in the United States utilizing Android depended on 52%, and increased to 90% in China. Throughout the third quarter of 2012, Android's globally smart device delivery market share was 75%, with 750 million tools triggered in total amount. In April 2013 Android had 1.5 million activations each day. As of May 2013 [update], 48 billion applications (" apps") have actually been mounted from the Google Play store, and by September 2013, one billion Android devices have actually been turned on.
Every little thing we understand concerning Google's upcoming Pixel 4aThe mid-range image is starting to come with each other.
The use share of Android on tablets differs a whole lot by country; still, Lollipop 5.1 is the solitary version with the best use share in the United States (as well as e.g. India) at 39.83%, while a current Oreo 8.1 version is most widespread in e.g. Australia, all Nordic as well as many other European countries, after that in China, and also Egypt. In Australia, Android Pie 9.0 is the most prominent at 18.83%. Android is an extremely distant 2nd at 11.93% in Oceania too, mainly as a result of Australia (10.71%) as well as New Zealand (16.9%), while in some countries such as Nauru over 80% of tablets are thought to make use of Android. Also, Android is typically made use of by the minority of web customers in Antarctica, which has no long-term population.
Patches to insects discovered in the core operating system frequently do not reach customers of older and lower-priced devices. Nonetheless, the open-source nature of Android allows safety contractors to take existing tools as well as adapt them for extremely safe and secure uses. For instance, Samsung has worked with General Dynamics via their Open Bit Labs acquisition to reconstruct Jelly Bean in addition to their solidified microvisor for the "Knox" task.
In January 2014, Google revealed a structure based upon Apache Cordova for porting Chrome HTML 5 internet applications to Android, wrapped in an indigenous application covering. Applications (" apps"), which extend the performance of gadgets, are written making use of the Android software application development kit (SDK) and also, often, the Java programs language. Java may be incorporated with C/C++, together with a selection of non-default runtimes that enable better C++ assistance. The Go programming language is likewise supported, although with a minimal set of application programming interfaces (API). In Might 2017, Google announced assistance for Android application development in the Kotlin programming language.
Xooloo
The primary hardware system for Android is ARM (the ARMv7 as well as ARMv8-A designs), with x86 and x86-64 architectures also officially sustained in later variations of Android. The informal Android-x86 project offered support for x86 architectures ahead of the main support. The ARMv5TE and MIPS32/64 designs were likewise traditionally sustained but gotten rid of in later Android releases. Given that 2012, Android devices with Intel processors started to appear, consisting of tablets and phones. While obtaining assistance for 64-bit systems, Android was first made to work on 64-bit x86 and after that on ARM64.
This has actually enabled variations of Android to be established on a range of other electronic devices, such as video game consoles, electronic cameras, PCs as well as others, each with a specialized interface. Some well known by-products consist of Android TELEVISION for televisions and also Wear OS for wearables, both created by Google. Google Play Protect, normal protection updates as well as control over how your data is shared. We're dedicated to securing Android's 2.5 billion+ energetic gadgets on a daily Cinema HD APK Download basis as well as maintaining details exclusive. HMD Global is the supplier behind the Nokia brand rebirth and also has actually developed a wide variety of popular Android smart devices ever since that Windows Phone bet really did not exercise.
1 note
·
View note
Text
How to set up command-line access to Amazon Keyspaces (for Apache Cassandra) by using the new developer toolkit Docker image
Amazon Keyspaces (for Apache Cassandra) is a scalable, highly available, and fully managed Cassandra-compatible database service. Amazon Keyspaces helps you run your Cassandra workloads more easily by using a serverless database that can scale up and down automatically in response to your actual application traffic. Because Amazon Keyspaces is serverless, there are no clusters or nodes to provision and manage. You can get started with Amazon Keyspaces with a few clicks in the console or a few changes to your existing Cassandra driver configuration. In this post, I show you how to set up command-line access to Amazon Keyspaces by using the keyspaces-toolkit Docker image. The keyspaces-toolkit Docker image contains commonly used Cassandra developer tooling. The toolkit comes with the Cassandra Query Language Shell (cqlsh) and is configured with best practices for Amazon Keyspaces. The container image is open source and also compatible with Apache Cassandra 3.x clusters. A command line interface (CLI) such as cqlsh can be useful when automating database activities. You can use cqlsh to run one-time queries and perform administrative tasks, such as modifying schemas or bulk-loading flat files. You also can use cqlsh to enable Amazon Keyspaces features, such as point-in-time recovery (PITR) backups and assign resource tags to keyspaces and tables. The following screenshot shows a cqlsh session connected to Amazon Keyspaces and the code to run a CQL create table statement. Build a Docker image To get started, download and build the Docker image so that you can run the keyspaces-toolkit in a container. A Docker image is the template for the complete and executable version of an application. It’s a way to package applications and preconfigured tools with all their dependencies. To build and run the image for this post, install the latest Docker engine and Git on the host or local environment. The following command builds the image from the source. docker build --tag amazon/keyspaces-toolkit --build-arg CLI_VERSION=latest https://github.com/aws-samples/amazon-keyspaces-toolkit.git The preceding command includes the following parameters: –tag – The name of the image in the name:tag Leaving out the tag results in latest. –build-arg CLI_VERSION – This allows you to specify the version of the base container. Docker images are composed of layers. If you’re using the AWS CLI Docker image, aligning versions significantly reduces the size and build times of the keyspaces-toolkit image. Connect to Amazon Keyspaces Now that you have a container image built and available in your local repository, you can use it to connect to Amazon Keyspaces. To use cqlsh with Amazon Keyspaces, create service-specific credentials for an existing AWS Identity and Access Management (IAM) user. The service-specific credentials enable IAM users to access Amazon Keyspaces, but not access other AWS services. The following command starts a new container running the cqlsh process. docker run --rm -ti amazon/keyspaces-toolkit cassandra.us-east-1.amazonaws.com 9142 --ssl -u "SERVICEUSERNAME" -p "SERVICEPASSWORD" The preceding command includes the following parameters: run – The Docker command to start the container from an image. It’s the equivalent to running create and start. –rm –Automatically removes the container when it exits and creates a container per session or run. -ti – Allocates a pseudo TTY (t) and keeps STDIN open (i) even if not attached (remove i when user input is not required). amazon/keyspaces-toolkit – The image name of the keyspaces-toolkit. us-east-1.amazonaws.com – The Amazon Keyspaces endpoint. 9142 – The default SSL port for Amazon Keyspaces. After connecting to Amazon Keyspaces, exit the cqlsh session and terminate the process by using the QUIT or EXIT command. Drop-in replacement Now, simplify the setup by assigning an alias (or DOSKEY for Windows) to the Docker command. The alias acts as a shortcut, enabling you to use the alias keyword instead of typing the entire command. You will use cqlsh as the alias keyword so that you can use the alias as a drop-in replacement for your existing Cassandra scripts. The alias contains the parameter –v "$(pwd)":/source, which mounts the current directory of the host. This is useful for importing and exporting data with COPY or using the cqlsh --file command to load external cqlsh scripts. alias cqlsh='docker run --rm -ti -v "$(pwd)":/source amazon/keyspaces-toolkit cassandra.us-east-1.amazonaws.com 9142 --ssl' For security reasons, don’t store the user name and password in the alias. After setting up the alias, you can create a new cqlsh session with Amazon Keyspaces by calling the alias and passing in the service-specific credentials. cqlsh -u "SERVICEUSERNAME" -p "SERVICEPASSWORD" Later in this post, I show how to use AWS Secrets Manager to avoid using plaintext credentials with cqlsh. You can use Secrets Manager to store, manage, and retrieve secrets. Create a keyspace Now that you have the container and alias set up, you can use the keyspaces-toolkit to create a keyspace by using cqlsh to run CQL statements. In Cassandra, a keyspace is the highest-order structure in the CQL schema, which represents a grouping of tables. A keyspace is commonly used to define the domain of a microservice or isolate clients in a multi-tenant strategy. Amazon Keyspaces is serverless, so you don’t have to configure clusters, hosts, or Java virtual machines to create a keyspace or table. When you create a new keyspace or table, it is associated with an AWS Account and Region. Though a traditional Cassandra cluster is limited to 200 to 500 tables, with Amazon Keyspaces the number of keyspaces and tables for an account and Region is virtually unlimited. The following command creates a new keyspace by using SingleRegionStrategy, which replicates data three times across multiple Availability Zones in a single AWS Region. Storage is billed by the raw size of a single replica, and there is no network transfer cost when replicating data across Availability Zones. Using keyspaces-toolkit, connect to Amazon Keyspaces and run the following command from within the cqlsh session. CREATE KEYSPACE amazon WITH REPLICATION = {'class': 'SingleRegionStrategy'} AND TAGS = {'domain' : 'shoppingcart' , 'app' : 'acme-commerce'}; The preceding command includes the following parameters: REPLICATION – SingleRegionStrategy replicates data three times across multiple Availability Zones. TAGS – A label that you assign to an AWS resource. For more information about using tags for access control, microservices, cost allocation, and risk management, see Tagging Best Practices. Create a table Previously, you created a keyspace without needing to define clusters or infrastructure. Now, you will add a table to your keyspace in a similar way. A Cassandra table definition looks like a traditional SQL create table statement with an additional requirement for a partition key and clustering keys. These keys determine how data in CQL rows are distributed, sorted, and uniquely accessed. Tables in Amazon Keyspaces have the following unique characteristics: Virtually no limit to table size or throughput – In Amazon Keyspaces, a table’s capacity scales up and down automatically in response to traffic. You don’t have to manage nodes or consider node density. Performance stays consistent as your tables scale up or down. Support for “wide” partitions – CQL partitions can contain a virtually unbounded number of rows without the need for additional bucketing and sharding partition keys for size. This allows you to scale partitions “wider” than the traditional Cassandra best practice of 100 MB. No compaction strategies to consider – Amazon Keyspaces doesn’t require defined compaction strategies. Because you don’t have to manage compaction strategies, you can build powerful data models without having to consider the internals of the compaction process. Performance stays consistent even as write, read, update, and delete requirements change. No repair process to manage – Amazon Keyspaces doesn’t require you to manage a background repair process for data consistency and quality. No tombstones to manage – With Amazon Keyspaces, you can delete data without the challenge of managing tombstone removal, table-level grace periods, or zombie data problems. 1 MB row quota – Amazon Keyspaces supports the Cassandra blob type, but storing large blob data greater than 1 MB results in an exception. It’s a best practice to store larger blobs across multiple rows or in Amazon Simple Storage Service (Amazon S3) object storage. Fully managed backups – PITR helps protect your Amazon Keyspaces tables from accidental write or delete operations by providing continuous backups of your table data. The following command creates a table in Amazon Keyspaces by using a cqlsh statement with customer properties specifying on-demand capacity mode, PITR enabled, and AWS resource tags. Using keyspaces-toolkit to connect to Amazon Keyspaces, run this command from within the cqlsh session. CREATE TABLE amazon.eventstore( id text, time timeuuid, event text, PRIMARY KEY(id, time)) WITH CUSTOM_PROPERTIES = { 'capacity_mode':{'throughput_mode':'PAY_PER_REQUEST'}, 'point_in_time_recovery':{'status':'enabled'} } AND TAGS = {'domain' : 'shoppingcart' , 'app' : 'acme-commerce' , 'pii': 'true'}; The preceding command includes the following parameters: capacity_mode – Amazon Keyspaces has two read/write capacity modes for processing reads and writes on your tables. The default for new tables is on-demand capacity mode (the PAY_PER_REQUEST flag). point_in_time_recovery – When you enable this parameter, you can restore an Amazon Keyspaces table to a point in time within the preceding 35 days. There is no overhead or performance impact by enabling PITR. TAGS – Allows you to organize resources, define domains, specify environments, allocate cost centers, and label security requirements. Insert rows Before inserting data, check if your table was created successfully. Amazon Keyspaces performs data definition language (DDL) operations asynchronously, such as creating and deleting tables. You also can monitor the creation status of a new resource programmatically by querying the system schema table. Also, you can use a toolkit helper for exponential backoff. Check for table creation status Cassandra provides information about the running cluster in its system tables. With Amazon Keyspaces, there are no clusters to manage, but it still provides system tables for the Amazon Keyspaces resources in an account and Region. You can use the system tables to understand the creation status of a table. The system_schema_mcs keyspace is a new system keyspace with additional content related to serverless functionality. Using keyspaces-toolkit, run the following SELECT statement from within the cqlsh session to retrieve the status of the newly created table. SELECT keyspace_name, table_name, status FROM system_schema_mcs.tables WHERE keyspace_name = 'amazon' AND table_name = 'eventstore'; The following screenshot shows an example of output for the preceding CQL SELECT statement. Insert sample data Now that you have created your table, you can use CQL statements to insert and read sample data. Amazon Keyspaces requires all write operations (insert, update, and delete) to use the LOCAL_QUORUM consistency level for durability. With reads, an application can choose between eventual consistency and strong consistency by using LOCAL_ONE or LOCAL_QUORUM consistency levels. The benefits of eventual consistency in Amazon Keyspaces are higher availability and reduced cost. See the following code. CONSISTENCY LOCAL_QUORUM; INSERT INTO amazon.eventstore(id, time, event) VALUES ('1', now(), '{eventtype:"click-cart"}'); INSERT INTO amazon.eventstore(id, time, event) VALUES ('2', now(), '{eventtype:"showcart"}'); INSERT INTO amazon.eventstore(id, time, event) VALUES ('3', now(), '{eventtype:"clickitem"}') IF NOT EXISTS; SELECT * FROM amazon.eventstore; The preceding code uses IF NOT EXISTS or lightweight transactions to perform a conditional write. With Amazon Keyspaces, there is no heavy performance penalty for using lightweight transactions. You get similar performance characteristics of standard insert, update, and delete operations. The following screenshot shows the output from running the preceding statements in a cqlsh session. The three INSERT statements added three unique rows to the table, and the SELECT statement returned all the data within the table. Export table data to your local host You now can export the data you just inserted by using the cqlsh COPY TO command. This command exports the data to the source directory, which you mounted earlier to the working directory of the Docker run when creating the alias. The following cqlsh statement exports your table data to the export.csv file located on the host machine. CONSISTENCY LOCAL_ONE; COPY amazon.eventstore(id, time, event) TO '/source/export.csv' WITH HEADER=false; The following screenshot shows the output of the preceding command from the cqlsh session. After the COPY TO command finishes, you should be able to view the export.csv from the current working directory of the host machine. For more information about tuning export and import processes when using cqlsh COPY TO, see Loading data into Amazon Keyspaces with cqlsh. Use credentials stored in Secrets Manager Previously, you used service-specific credentials to connect to Amazon Keyspaces. In the following example, I show how to use the keyspaces-toolkit helpers to store and access service-specific credentials in Secrets Manager. The helpers are a collection of scripts bundled with keyspaces-toolkit to assist with common tasks. By overriding the default entry point cqlsh, you can call the aws-sm-cqlsh.sh script, a wrapper around the cqlsh process that retrieves the Amazon Keyspaces service-specific credentials from Secrets Manager and passes them to the cqlsh process. This script allows you to avoid hard-coding the credentials in your scripts. The following diagram illustrates this architecture. Configure the container to use the host’s AWS CLI credentials The keyspaces-toolkit extends the AWS CLI Docker image, making keyspaces-toolkit extremely lightweight. Because you may already have the AWS CLI Docker image in your local repository, keyspaces-toolkit adds only an additional 10 MB layer extension to the AWS CLI. This is approximately 15 times smaller than using cqlsh from the full Apache Cassandra 3.11 distribution. The AWS CLI runs in a container and doesn’t have access to the AWS credentials stored on the container’s host. You can share credentials with the container by mounting the ~/.aws directory. Mount the host directory to the container by using the -v parameter. To validate a proper setup, the following command lists current AWS CLI named profiles. docker run --rm -ti -v ~/.aws:/root/.aws --entrypoint aws amazon/keyspaces-toolkit configure list-profiles The ~/.aws directory is a common location for the AWS CLI credentials file. If you configured the container correctly, you should see a list of profiles from the host credentials. For instructions about setting up the AWS CLI, see Step 2: Set Up the AWS CLI and AWS SDKs. Store credentials in Secrets Manager Now that you have configured the container to access the host’s AWS CLI credentials, you can use the Secrets Manager API to store the Amazon Keyspaces service-specific credentials in Secrets Manager. The secret name keyspaces-credentials in the following command is also used in subsequent steps. docker run --rm -ti -v ~/.aws:/root/.aws --entrypoint aws amazon/keyspaces-toolkit secretsmanager create-secret --name keyspaces-credentials --description "Store Amazon Keyspaces Generated Service Credentials" --secret-string "{"username":"SERVICEUSERNAME","password":"SERVICEPASSWORD","engine":"cassandra","host":"SERVICEENDPOINT","port":"9142"}" The preceding command includes the following parameters: –entrypoint – The default entry point is cqlsh, but this command uses this flag to access the AWS CLI. –name – The name used to identify the key to retrieve the secret in the future. –secret-string – Stores the service-specific credentials. Replace SERVICEUSERNAME and SERVICEPASSWORD with your credentials. Replace SERVICEENDPOINT with the service endpoint for the AWS Region. Creating and storing secrets requires CreateSecret and GetSecretValue permissions in your IAM policy. As a best practice, rotate secrets periodically when storing database credentials. Use the Secrets Manager helper script Use the Secrets Manager helper script to sign in to Amazon Keyspaces by replacing the user and password fields with the secret key from the preceding keyspaces-credentials command. docker run --rm -ti -v ~/.aws:/root/.aws --entrypoint aws-sm-cqlsh.sh amazon/keyspaces-toolkit keyspaces-credentials --ssl --execute "DESCRIBE Keyspaces" The preceding command includes the following parameters: -v – Used to mount the directory containing the host’s AWS CLI credentials file. –entrypoint – Use the helper by overriding the default entry point of cqlsh to access the Secrets Manager helper script, aws-sm-cqlsh.sh. keyspaces-credentials – The key to access the credentials stored in Secrets Manager. –execute – Runs a CQL statement. Update the alias You now can update the alias so that your scripts don’t contain plaintext passwords. You also can manage users and roles through Secrets Manager. The following code sets up a new alias by using the keyspaces-toolkit Secrets Manager helper for passing the service-specific credentials to Secrets Manager. alias cqlsh='docker run --rm -ti -v ~/.aws:/root/.aws -v "$(pwd)":/source --entrypoint aws-sm-cqlsh.sh amazon/keyspaces-toolkit keyspaces-credentials --ssl' To have the alias available in every new terminal session, add the alias definition to your .bashrc file, which is executed on every new terminal window. You can usually find this file in $HOME/.bashrc or $HOME/bash_aliases (loaded by $HOME/.bashrc). Validate the alias Now that you have updated the alias with the Secrets Manager helper, you can use cqlsh without the Docker details or credentials, as shown in the following code. cqlsh --execute "DESCRIBE TABLE amazon.eventstore;" The following screenshot shows the running of the cqlsh DESCRIBE TABLE statement by using the alias created in the previous section. In the output, you should see the table definition of the amazon.eventstore table you created in the previous step. Conclusion In this post, I showed how to get started with Amazon Keyspaces and the keyspaces-toolkit Docker image. I used Docker to build an image and run a container for a consistent and reproducible experience. I also used an alias to create a drop-in replacement for existing scripts, and used built-in helpers to integrate cqlsh with Secrets Manager to store service-specific credentials. Now you can use the keyspaces-toolkit with your Cassandra workloads. As a next step, you can store the image in Amazon Elastic Container Registry, which allows you to access the keyspaces-toolkit from CI/CD pipelines and other AWS services such as AWS Batch. Additionally, you can control the image lifecycle of the container across your organization. You can even attach policies to expiring images based on age or download count. For more information, see Pushing an image. Cheat sheet of useful commands I did not cover the following commands in this blog post, but they will be helpful when you work with cqlsh, AWS CLI, and Docker. --- Docker --- #To view the logs from the container. Helpful when debugging docker logs CONTAINERID #Exit code of the container. Helpful when debugging docker inspect createtablec --format='{{.State.ExitCode}}' --- CQL --- #Describe keyspace to view keyspace definition DESCRIBE KEYSPACE keyspace_name; #Describe table to view table definition DESCRIBE TABLE keyspace_name.table_name; #Select samples with limit to minimize output SELECT * FROM keyspace_name.table_name LIMIT 10; --- Amazon Keyspaces CQL --- #Change provisioned capacity for tables ALTER TABLE keyspace_name.table_name WITH custom_properties={'capacity_mode':{'throughput_mode': 'PROVISIONED', 'read_capacity_units': 4000, 'write_capacity_units': 3000}} ; #Describe current capacity mode for tables SELECT keyspace_name, table_name, custom_properties FROM system_schema_mcs.tables where keyspace_name = 'amazon' and table_name='eventstore'; --- Linux --- #Line count of multiple/all files in the current directory find . -type f | wc -l #Remove header from csv sed -i '1d' myData.csv About the Author Michael Raney is a Solutions Architect with Amazon Web Services. https://aws.amazon.com/blogs/database/how-to-set-up-command-line-access-to-amazon-keyspaces-for-apache-cassandra-by-using-the-new-developer-toolkit-docker-image/
1 note
·
View note
Text
Solved COMP 370 Homework 2 – Unix server and command-line exercises
The goal of this assignment is for you to get more familiar with your Unix EC2 – both as a data science machine and as a server (as a data scientist, you’ll need it as both). Task 1: Setting up a webserver The objective of this task is to setup your EC2 instance to run an Apache webserver on port 8008. Your goal is to have it serving up the file comp370_hw2.txt at the www root. In other words,…
0 notes
Text
Apache Storm 2.0 Improvements
By Kishor Patil, Principal Software Systems Engineer at Verizon Media, and PMC member of Apache Storm & Bobby Evans, Apache Member and PMC member of Apache Hadoop, Spark, Storm, and Tez
We are excited to be part of the new release of Apache Storm 2.0.0. The open source community has been working on this major release, Storm 2.0, for quite some time. At Yahoo we had a long time and strong commitment to using and contributing to Storm; a commitment we continue as part of Verizon Media. Together with the Apache community, we’ve added more than 1000 fixes and improvements to this new release. These improvements include sending real-time infrastructure alerts to the DevOps folks running Storm and the ability to augment ingested content with related content, thereby giving the users a deeper understanding of any one piece of content.
Performance
Performance and utilization are very important to us, so we developed a benchmark to evaluate various stream processing platforms and the initial results showed Storm to be among the best. We expect to release new numbers by the end of June 2019, but in the interim, we ran some smaller Storm specific tests that we’d like to share.
Storm 2.0 has a built-in load generation tool under examples/storm-loadgen. It comes with the requisite word count test, which we used here, but also has the ability to capture a statistical representation of the bolts and spouts in a running production topology and replay that load on another topology, or another version of Storm. For this test, we backported that code to Storm 1.2.2. We then ran the ThroughputVsLatency test on both code bases at various throughputs and different numbers of workers to see what impact Storm 2.0 would have. These were run out of the box with no tuning to the default parameters, except to set max.spout.pending in the topologies to be 1000 sentences, as in the past that has proven to be a good balance between throughput and latency while providing flow control in the 1.2.2 version that lacks backpressure.
In general, for a WordCount topology, we noticed 50% - 80% improvements in latency for processing a full sentence. Moreover, 99 percentile latency in most cases, is lower than the mean latency in the 1.2.2 version. We also saw the maximum throughput on the same hardware more than double.

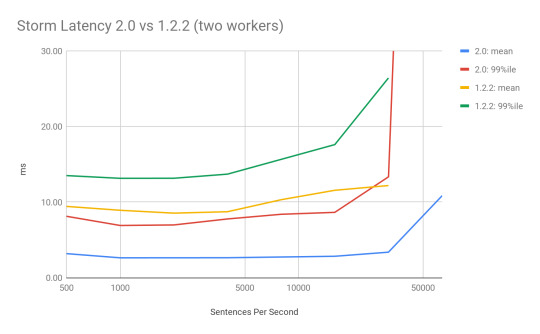
Why did this happen? STORM-2306 redesigned the threading model in the workers, replaced disruptor queues with JCTools queues, added in a new true backpressure mechanism, and optimized a lot of code paths to reduce the overhead of the system. The impact on system resources is very promising. Memory usage was untouched, but CPU usage was a bit more nuanced.


At low throughput (< 8000 sentences per second) the new system uses more CPU than before. This can be tuned as the system does not auto-tune itself yet. At higher rates, the slope of the line is much lower which means Storm has less overhead than before resulting in being able to process more data with the same hardware. This also means that we were able to max out each of these configurations at > 100,000 sentences per second on 2.0.0 which is over 2x the maximum 45,000 sentences per second that 1.2.2 could do with the same setup. Note that we did nothing to tune these topologies on either setup. With true backpressure, a WordCount Topology could consistently process 230,000 sentences per second by disabling the event tracking feature. Due to true backpressure, when we disabled it entirely, then we were able to achieve over 230,000 sentences per second in a stable way, which equates to over 2 million messages per second being processed on a single node.
Scalability
In 2.0, we have laid the groundwork to make Storm even more scalable. Workers and supervisors can now heartbeat directly into Nimbus instead of going through ZooKeeper, resulting in the ability to run much larger clusters out of the box.
Developer Friendly
Prior to 2.0, Storm was primarily written in Clojure. Clojure is a wonderful language with many advantages over pure Java, but its prevalence in Storm became a hindrance for many developers who weren’t very familiar with it and didn’t have the time to learn it. Due to this, the community decided to port all of the daemon processes over to pure Java. We still maintain a backward compatible storm-clojure package for those that want to continue using Clojure for topologies.
Split Classpath
In older versions, Storm was a single jar, that included code for the daemons as well as the user code. We have now split this up and storm-client provides everything needed for your topology to run. Storm-core can still be used as a dependency for tests that want to run a local mode cluster, but it will pull in more dependencies than you might expect.
To upgrade your topology to 2.0, you’ll just need to switch your dependency from storm-core-1.2.2 to storm-client-2.0.0 and recompile.
Backward Compatible
Even though Storm 2.0 is API compatible with older versions, it can be difficult when running a hosted multi-tenant cluster. Coordinating upgrading the cluster with recompiling all of the topologies can be a massive task. Starting in 2.0.0, Storm has the option to run workers for topologies submitted with an older version with a classpath for a compatible older version of Storm. This important feature which was developed by our team, allows you to upgrade your cluster to 2.0 while still allowing for upgrading your topologies whenever they’re recompiled to use newer dependencies.
Generic Resource Aware Scheduling
With the newer generic resource aware scheduling strategy, it is now possible to specify generic resources along with CPU and memory such as Network, GPU, and any other generic cluster level resource. This allows topologies to specify such generic resource requirements for components resulting in better scheduling and stability.
More To Come
Storm is a secure enterprise-ready stream but there is always room for improvement, which is why we’re adding in support to run workers in isolated, locked down, containers so there is less chance of malicious code using a zero-day exploit in the OS to steal data.
We are working on redesigning metrics and heartbeats to be able to scale even better and more importantly automatically adjust your topology so it can run optimally on the available hardware. We are also exploring running Storm on other systems, to provide a clean base to run not just on Mesos but also on YARN and Kubernetes.
If you have any questions or suggestions, please feel free to reach out via email.
P.S. We’re hiring! Explore the Big Data Open Source Distributed System Developer opportunity here.
3 notes
·
View notes
Text
AEM Dispatcher
What is AEM Dispatcher?
Get In Touch
AEM Dispatcher is a web server module (provided by Adobe) that sits in front of an AEM instance and caches and delivers content to users. It acts as a proxy server that intercepts requests to AEM and serves cached content whenever possible. AEM Dispatcher can be used to cache both static and dynamic content, and it uses a set of rules and configurations to determine when to serve cached content and when to forward requests to AEM.
Key benefits of using AEM Dispatcher:
Improved performance: AEM Dispatcher reduces the load on the AEM instance by caching and serving content from the cache.
Reduced server load: By serving content from the cache, AEM Dispatcher reduces the load on the AEM server, allowing it to handle more requests and users.
Better security: AEM Dispatcher can be configured to provide an additional layer of security for AEM by blocking harmful requests and limiting access to certain resources.
Scalability: AEM Dispatcher can be used to distribute content across multiple servers, making it easier to scale AEM for large-scale deployments.
How AEM Dispatcher works:
AEM Dispatcher works by intercepting requests to AEM and checking whether the requested content is in the cache. If the content is in the cache, AEM Dispatcher serves it directly to the user.
If the content is not in the cache, AEM Dispatcher forwards the request to AEM, which generates the content and sends it back to AEM Dispatcher.
AEM Dispatcher then caches the content and serves it to the user. AEM Dispatcher uses a set of rules and configurations to determine when to serve cached content and when to forward requests to AEM.
Dispatcher setup for AEM as a cloud service in linux/mac using docker
Prerequisites for Dispatcher Setup
Apache 2.2 web server
Dispatcher Module
Docker setup in local
Installation Instructions
Install Apache web server
Run this command to install the apache package on ubuntu
sudo apt install apache2 -y
Install Docker
Run this command to install the latest docker package on ubuntu
sudo apt-get install docker-ce docker-ce-cli containerd.io docker-buildx-plugin docker-compose-plugin
For Verify docker was installed correctly, Run this comman
docker --version
Execute
aem-sdk-dispatcher-tools-<version>-unix.sh
Run this command to execute script
chmod +x <fileName>
sudo ./<fileName>
Validate the Dispatcher configuration contained in this SDK
$ sudo ./bin/validator full -d out src
This validates the configuration and generates deployment information in out
Validate the deployment information by the Dispatcher in a docker image
$ sudo ./bin/docker_run.sh out localhost:4503 test
This will start the container, run Apache in configuration test mode (httpd -t), dump processed dispatcher. any config (-D DUMP_ANY) and exit.
Confirm that no immutable config file was changed against a docker image ones
$ sudo ./bin/docker_immutability_check.sh src
With your AEM publish server running on your computer, listening on port 4503, you can start the dispatcher in front of that server as follows:
$ sudo ./bin/docker_run.sh out host.docker.internal:4503 8888
Sometimes, You may encounter this error “Waiting until host.docker.internal is available”, to resolve this use your host ip
bin/docker_run.sh src <HOST IP>:4503 8888
Read more!!
0 notes
Text
TVS bikes: All Features with Price Range Explained
TVS bikes are one of the most popular two-wheeler brands in India. The company offers a wide range of bikes that cater to the needs of a variety of riders. TVS bikes are known for their reliability, affordability, and performance.

The price range of TVS bikes varies from INR 45,241 to INR 2.65 Lakh. The entry-level bike from TVS is the XL100 Comfort, which is priced at INR 45,241. The mid-range TVS bikes include the Apache RTR 160, Apache RTR 180, and Apache RTR 200, which are priced between INR 79,000 to INR 1.46 Lakhs. The top-end TVS bikes include the Apache RR 310 and Ntorq 125, which are priced at INR 2.45 lakhs and INR 79,700 respectively.
TVS bikes come with a variety of features that make them attractive to riders. Some of the features include a digital instrument cluster, LED headlamps, a single-channel ABS system, an anti-lock braking system (ABS), and a rear monoshock suspension system. The bikes also come with fuel-injected engines that offer better fuel efficiency and lower emissions. Additionally, the bikes feature a side stand indicator, an engine kill switch, and a USB charging port.
TVS bikes are designed to offer great performance, comfort, and convenience. The bikes come with a wide range of power outputs, ranging from 8.2 bhp to 33.5 bhp. The suspension setup of the bikes ensures a comfortable ride, and the brakes offer great stopping power. Additionally, the bikes come with advanced features such as automatic headlamps, an adjustable windscreen, and an adjustable rear shock absorber.
0 notes