#Arduino Leonardo
Explore tagged Tumblr posts
Visit Tumblr Blog
Explore Tumblr blogs with no restrictions, modern design and the best experience.
Last Seen Tumblr Blogs


Fun Fact
Mobile Tumblr US users spend an average of 4.04 minutes per session on the app.
Text
Holidays 3.21
Holidays
Afghanistan Day (US)
Agony of Defeat Anniversary Day
Aizu Higan Shishi (a.k.a. Sanbiki Shishimai; End of Winter Lion Dance; Japan)
American Immigration Lawyers Association Day of Action
Anal Cancer Awareness Day
Arduino Day
Back Badge Day (Gloucestershire, UK)
Bampflugnax Day (Guyana)
Big Bang Day
The Big Walk and Whee (UK)
Birkebeinerrennet (Norway)
Border Guard Day (Georgia)
Children's Poetry Day
Cluster Headache Awareness Day
Common Courtesy Day
Credit Card Reduction Day
Day of Marine Reconnaissance
Discovery Day (Guam)
Early Music Day
Education Freedom Day
End of the World Day [Predicted by Leonardo Da Vinci for 4006]
Global Surveyors’ Day
Global Understanding Day
Harmony Day (Australia)
Hogithum (Elder Scrolls)
Human Rights Day (South Africa)
International Colour Day
International Day for the Elimination of Racial Discrimination (UN)
Memory Day
Mother's Day (Arab nations)
Music Day
National Anaemia Day (India)
National Beyblade Day
National Countdown Day
National Day of Action on Syringe Exchange
National Fragrance Day
National Indigenous Water Operator Day (Canada)
National Memory Day
National Propane Day (Canada)
National Renewable Energy Day
National Residency Day
National Rosie the Riveter Day
National Single Parent Day
National Teenager Day
No Strings Attached Day
Nyepi Day (Day of Silence; Bali, Indonesia)
Oltenia Day (Romania)
Ougadi (Mauritius)
Panic! At The Disco Day
Paper Dress Day
Primrose Day (French Republic)
The Purge Day (in “The Purge”)
Race Relations Day (New Zealand)
Save Soil Day
Sharpeville Massacre Anniversary Day (South Africa)
Single Parent Day (UK)
Slytherin Pride Day
Spring Fairy Fun Day
Tea and Telphi Day (Ireland)
Telugu New Year (India)
321 Day
Truant's Day (Faroe Islands, Poland)
Twitter Day
We Day
World Computer Engineers Day (Turkey)
World Day of Casi Angeles (Argentina)
World Down Syndrome Day
World Freedom of Thought Day
World Glacier Day
World Home Economics Day
World Office Storage Day
World Planting Day
World Poetry Day
World Puppetry Day
World Sustainable Procurement Day
World Tattoo Day
Yngismannadagur (Young Men’s Day; Iceland)
Youth Day (Tunisia)
Food & Drink Celebrations
California Strawberry Day
French Bread Day
Gallo Wine Day
International Tiramisu Day
National Crunchy Taco Day
National Healthy Fats Day
Pão Francês Day (Brazil)
World Vermouth Day
Nature Celebrations
Arbor Day (Belgium, Lesotho, Portugal)
Bird Day (Iowa)
Honey Plant Day (Beginning of Life, Empathy; Korean Birth Flowers)
International Day of Forests (UN)
National Flower Day
National Tree Planting Day (Lesotho)
World Forestry Day
World Wood Day
Independence, Flag & Related Days
Calapan City Foundation Day (Philippines)
Namibia (from South Africa, 1990)
Pacific States of America (Declared; 2023) [unrecognized]
San Fabian Day (Philippines)
New Year’s Days
Ancient Babylonian New Year
Nowruz (New Year) [Day 2, Around Spring Equinox] (a.k.a. ...
International Day of Nowruz (UN)
Narooz (Persian New Year; Iran, Kyrgyzstan)
Nauroz (India)
Nauruz (Afghan New Year; Afghanistan)
Nauryz Meyramy (Kazakhstan)
Navro’z Bayrami (Uzbekistan)
Navruz (Tajikistan, Uzbekistan)
Naw-Rúz (Baha’i)
Nevruz (Albania)
Newroz (Iran, Kurdistan, Mesopotamia)
Norooz (Iran, Kyrgyzstan, Zoroastrian)
Novruz (Azerbaijan, Tajikistan)
Nowruz (Spring Day; Iraq)
3rd Friday in March
Comfort Food Friday [Every Friday]
Five For Friday [Every Friday]
Flashback Friday [Every Friday]
Fondue Friday [3rd Friday of Each Month]
Friday Finds [Every Friday]
Friendly Friday [3rd Friday of Each Month]
Fry Day (Pastafarian; Fritism) [Every Friday]
I Know I Exist Day [3rd Friday]
National Day of Action Against Bullying & Violence (Australia) [3rd Friday]
National Future Generations Day [3rd Friday]
National Preschool Teachers Appreciation Day [3rd Friday]
National Residency Match Day [3rd Friday]
Quadwitch Day [3rd Friday]
Red Nose Day (UK) [3rd Friday]
TGIF (Thank God It's Friday) [Every Friday]
World Sleep Day [Friday of 2nd Full Week]
Weekly Holidays beginning March 21 (3rd Week of March)
National Agriculture Week (thru 3.27) [Week with 3.21]
Week of Solidarity with the Peoples Struggling Against Racism and Racial Discrimination [begins 3.21; thru 3.27]_
Festivals On or Beginning March 21, 2025
Bluebonnet Brew-Off (Dallas, Texas) [thru 3.22]
California Artisan Cheese Festival (Santa Rosa, California) [thru 3.23]
Furnal Equinox (Toronto, Canada) [thru 3.23]
Hermann Wurstfest (Hermann, Missouri) [thru 3.23]
International Cherry Blossom Festival (Macon, Georgia) [thru 3.30]
National Spring Festival (Turkmenistan)_
NCAA WOmen’s Ice Hockey Championship,, a.k.a. Frozen Four (Minneapolis, Minnesota) [thru 3.23]
Oak Mountain State Fair (Pelham, Alabama) [thru 4.6]
Razor Clam & Seafood Festival (Ocean Shores, Washington) [thru 3.23]
Feast Days
Akitu (Mesopotamian spring festival, "cutting of the barley," celebrating Marduk's victory over Tiamat)
Alban Eilir (a.k.a. The Light of the Earth; Celtic Book of Days)
Aries zodiac sign begins (Astrology)
Benedetta Cambiagio Frassinello (Christian; Saint)
Benedict, Passing of (Order of Saint Benedict, pre-1970 Calendar; Christian)
Birillus (Christian; Saint)
Dionysia (Ancient Greek Festival to Dionysus, God of Intoxication)
Egyptian Harvest Festival
Enda of Aran (a.k.a. Enna of Ireland; Christian; Saint)
Fanchea (Christian; Saint & Virgin)
Festival of Salii (Jumping Priests; Ancient Rome)
French Bread Day (Pastafarian)
Jack Slade Day (Church of the SubGenius; Saint)
John the Evangelist (Positivist; Saint)
Music Day (Pagan)
Nicholas of Flüe (Christian; Saint)
Philosophical Day (Pastafarian)
Purification of the Trumpets (Ancient Rome)
Quinquatria, Day 3: Music Day (Pagan)
Raya & Ala (Muppetism)
Seraphim of Vyritsa (Orthodox)
Serapion of Thmuis (a.k.a. The Sindonite; Christian; Saint))
Shunki-Korei-Sai (Ancestral Spirits Rite; Shinto)
Tea and Tephi Day (Holy Day; Ireland)
Thomas Cranmer (Anglicanism)
Lunar Calendar Holidays
Chinese: Month 2 (Ji-Mao), Day 22 (Ji-Chou)
Day Pillar: Earth Ox
12-Day Officers/12 Gods: Open Day (開 Kai) [Auspicious]
Holidays: None Known
Secular Saints Days
Johan Sebastian Bach (Music)
Clarice Beckett (Art)
Matthew Broderick (Entertainment)
Solomon Burke (Music)
Timothy Dalton (Entertainment)
Julio Gallo (Viticulture)
Hans Hofmann (Art)
Roger Hodgson (Music)
Son House (Music)
Benito Juarez (Politics)
Lajos Kassák (Art)
Phyllis McGinley (Literature)
Russ Meyer (Entertainment)
Modest Mussorgsky (Music)
Gary Oldman (Entertainment)
Éric Rohmer (Entertainment)
Ronaldinho (Sports)
Aryton Senna (Sports)
Bartolomaus Spranger (Art)
Vivian Stanshall (Entertainment)
Al Williamson (Art)
Lucky & Unlucky Days
Taian (大安 Japan) [Lucky all day.]
Umu Limnu (Evil Day; Babylonian Calendar; 14 of 60)
Premieres
The Adventures of Mr. Common Peepul (Hearst-Pathe News Pictorial Cartoon; 1917)
The African Queen (Film; 1952)
Alice in the Alps (Disney Cartoon; 1927)
All of Me, recorded by Billie Holiday (Song; 1941)
American Woman, by the Guess Who (Song; 1970)
Beyond Beyond (Animated Film; 2014)
The Bottom of the Sea (Vincent Whitman Cartoon; 1914)
Day, by Elie Wiesel (Novel; 1961)
Deadwood (TV Series; 2004)
Dinky Doodle in the Arctic (Bray Cartoon; 1926)
Divergent (Film; 2014)
Escape to Witch Mountain (Film; 1975)
Felix Weathers the Weather (Felix the Cat Cartoon; 1926)
The Final Cut, by Pink Floyd (Album; 1983)
First Step, by Faces (Album; 1970)
Gabby’s Swing Cleaning (Gabby Fleischer Cartoon; 1941)
GoBots: Battle of the Rock Lords (Hanna-Barbera Animated Film; 1986)
God Bless America, recorded by Kate Smith (Song; 1939)
Handy Mandy’s Goat (Paramount Magazine Cartoon; 1920)
A High Wind in Jamaica, by Richard Hughes (Novel; 1929)
Inband the Sailor (Powers Cartoon; 1917)
In My Merry Oldsmobile (Fleischer Olds Motor Works Cartoon; 1931)
Jodorowsky’s Dune (Documentary Film; 2014)
Johann Mouse (Tom & Jerry Cartoon; 1953)
Junkyard Run: Part 3 (WB Cartoon; 2002)
L’enfant et les Sortilèges, by Maurice Ravel (Opera; 1925)
Les Miserobots (The Inspector Cartoon; 1968)
Liar Liar (Film; 1997)
Like a Prayer, by Madonna (Album; 1989)
Little Darlings (Film; 1980)
Living After Midnight, by Judas Priest (Song; 1980)
Mad Max (Film; 1980)
Makers of Modern Strategy from Machiavelli to the Nuclear Age, by Peter Paret (History Essays; 1943)
Man’s Best Friend (Goofy Disney Cartoon; 1952)
Mission to Mars (Disneyland Ride; 1975)
Mother Goose Land (Fleischer Out of the Inkwell Cartoon; 1925)
Muppets Most Wanted (Film; 2014)
No Strings Attached, by ’N Sync (Album; 2000)
Old Dog Tray, featuring Farmer Al Falfa (Terrytoons Cartoon; 1935)
The One and Only, Genuine, Original Family Band (Film; 1968)
The Origins of Totalitarianism, by Hannah Arendt (Political Theory; 1951)
Party Central (Pixar Cartoon; 2014)
The Pie Man (Aesop’s Film Fable Cartoon; 1925)
Piglet’s Big Movie (Animated Film; 2003)
Rebecca (Film; 1940)
Rescue Dog (Pluto Disney Cartoon; 1947)
Rock Around the Clock (Film; 1956)
Scaling the Alps (Aesop’s Film Fable Cartoon; 1928)
Selena (Film; 1997)
Sloop John B, by The Beach Boys (Song; 1966)
Somebody Stole My Gal (Fleischer Screen Songs Cartoon; 1931)
Sorosis (1st Women’s Professional Club; 1868)
The Spectator Bird, by Wallace Stegner (Novel; 1976)
The Storm (Fleischer Out of the Inkwell Cartoon; 1925)
Stuck On You, by Elvis Presley (Song; 1960)
Sweet Bird of Youth (Film; 1962)
Sydney (TV Series; 1990)
Symphonia Domestic, by Richard Strauss (Tone Poem for Orchestra; 1904)
Symphony No. 9, The Great Symphony in C Major, by Franz Schubert (Symphony; 1839)
Topper Returns (Film; 1941)
Trick or Tweet (WB MM Cartoon; 1959)
Two Chips and a Miss (Disney Cartoon; 1952)
View from the Top (Film; 2003)
When Knights Were Bold (Terrytoons Cartoon; 1941)
Today’s Name Days
Alexandra, Axel, Christian, Emilia (Austria)
Kristijan, Serapion, Vesna, Vlasta (Croatia)
Radek (Czech Republic)
Benedictus (Denmark)
Küllo, Külvo, Pendo, Pent (Estonia)
Pentti (Finland)
Axelle, Clémence (France)
Axel, Christian, Emilia (Germany)
Iakovos (Greece)
Benedek (Hungary)
Benedetto, Filemone (Italy)
Benedikts, Boleslavs, Dzelme, Glezna, Una (Latvia)
Benas, Benediktas, Lingailė, Nortautas, Reda, Saulius (Lithuania)
Bendik, Bengt, Bent (Norway)
Benedykt, Filemon, Lubomira, Mikołaj (Poland)
Iacob (Romania
Blahoslav (Slovakia)
Nicolás (Spain)
Bengt (Sweden)
Arvin, Arwin, Bendix, Benedict, Benedicta, Bennett (USA)
Today’s National Name Days
National Beverly Day
National Peter Day
Today is Also…
Day of Year: Day 80 of 2025; 285 days remaining in the year
ISO Week: Day 5 of Week 12 of 2025
Celtic Tree Calendar: Fearn (Alder) [Day 24 of 28]
Chinese: Month 2 (Ji-Mao), Day 22 (Ji-Chou)
Chinese Year of the: Snake 4723 (until February 17, 2026) [Ding-Chou]
Coptic: 12 Baramhat 1741
Druid Tree Calendar: Hazel (Mar 21-31) [Day 1 of 11]
Hebrew: 21 Adar 5785
Islamic: 21 Ramadan 1446
Julian: 8 March 2025
Moon: 58%: Waning Gibbous
Positivist: 24 Aristotle (3rd Month) [St. John the Evangelist]
Runic Half Month: Beore (Birch Tree) [Day 14 of 15]
Season: Spring (Day 2 of 92)
SUn Calendar: 20 Green; Sixthday [20 of 30]
Week: 3rd Week of March
Zodiac:
Tropical (Typical) Zodiac: Aries (Day 1 of 30)
Sidereal Zodiac: Pisces (Day 7 of 30)
Schmidt Zodiac: Pisces (Day 1 of 26)
IAU Boundaries (Current) Zodiac: Pisces (Day 10 of 38)
IAU Boundaries (1977) Zodiac: Pisces (Day 10 of 38)
Calendar Changes
Aries (The Ram) begins [Tropical (Typical) Zodiac Sign 4 of 12; thru 4.19]
Pisces (The Fish) begins [Schmidt Equal Zodiac Sign 4 of 14; thru 4.15]
Hazel (March 11-20) [Druid Tree Calendar] (Month 9 of 41)
2 notes
·
View notes
Text

You can purchase the Arduino Leonardo R3 board for just Rs. 652.00 exclusively on quartzcomponents.com. This offer provides an affordable opportunity to acquire this versatile microcontroller board for your electronics and programming projects. Don't miss out on this budget-friendly deal!
#arduinoleonardo#leonardo#microcontroller#makerspace#electronicsprojects#programminglife#diyelectronics#embeddedsystems#hardwarehacking#stem#digitalprototyping#techinnovation#circuitdesign#opensourcehardware#creativecoding#electronicaccessories
4 notes
·
View notes
Text
Arduino is essentially a language designed for interacting with and operating interactive objects and digital devices. Arduino has immense potential, since it’s being increasing used for controlling remote controlled objects such as drones. If you are looking for a book on Arduino, this article will serve as the base for taking a decision and choosing the right book that will help you sharpen your skill in Arduino. This article will give you information about seven best Arduino books that are regarded as featured books. Arduino is open source software (IDE) which makes it a breeze to write as well as upload codes to a board. Moreover, Arduino runs on Mac OS X, Linux as well as Windows. The environment of Arduino is written in Java language; also it’s based on open-source software and processing. Take help of the information furnished in the books and explore the horizon of Arduino programming. Programming Arduino Getting Started with Sketches (By: Simon Monk ) Learn Arduino programming with ease with the easy-to-follow and clear examples featured in the book. The book contains the software side of Arduino and describes the way of writing the program using the well-crafted sketches using modified C programming language meant for Arduino. The book features downloadable sample programs that can be modified as per your requirement. The easy explanation and details crafted in the book make is one of the best books to learn Arduino. You can structure your data by using strings and arrays. The book also helps you learn how to use digital and analog inputs and outputs of Arduino in the programs. Programming Arduino Next Steps: Going Further with Sketches (By: Simon Monk ) This is the second book of the series that makes you understand the next step of the beginner’s guide. You can take your Arduino understanding and skills to the next level with this easy-to-study book. This book on Arduino basically is a practical guide and the secret of the professional Arduino programming is revealed by electronics guru Simon Monk taking every possible aspect under the hood. The book features the coverage of Arduino Uno, Due Boards and Leonardo. This book is all-in-one repository and features more than 75 examples and sketches. Exploring Arduino: Tools and Techniques for Engineering Wizardry (By: Jeremy Blum ) This book is the best book as far as the third step is concerned – understanding the tools and techniques of Arduino. This book is all about that and helps you learning to build robots, gizmos and gadgets using Arduino. This book is written by Jeremy Blum – the Arduino expert – and is a unique book that uses the popular Arduino microcontroller platform, which is an instrument that teaches you about programming, electrical engineering and also human-computer interaction. Beginning C for Arduino: Learn C Programming for the Arduino (Technology in Action) (By: Jack Purdum ) This is the Arduino best book for those who do not have prior experience in programming of microcontrollers. This book is written so well and in easy-to-understand way that it helps the readers to understand the aspects of Arduino and help them learn as well and experiment. This book starts with an introduction to C language and reinforces every programming structure using simple demonstrations. Author Jack Purdum has used a very engaging style of writing in order to teach good and efficient techniques of programming. Arduino Workshop: A Hands-On Introduction with 65 Projects (By: John Boxall ) This book offers hands-on experience on Arduino programming with 65 projects. With the help of this book, you can learn the basics of Arduino programming, build a project after learning and finally create your own Arduino program. Arduino is basically an easy, flexible, cheap and open source microcontroller programming platform that offers students to learn and create their own homemade projects and this book is the best one in this category. This book
gives you an opportunity to learn and create devices using almost unlimited range of input and output sensors, displays, indicators or add-ons. Arduino For Dummies (By: John Nussey ) Arduino is not just an ordinary circuit board and corresponding software. It does not matter whether you are a designer, artist, hobbyist or a programmer, Arduino enables you to play with electronics. This book helps you learn building a variety of circuits that can control or sense things in the real world. If you have loads of ideas that you want to bring to the real world or you have curiosity to know and learn the possibilities, this book is perfect for you to read. The best part about this book is that it enables you to learn by writing the programs in real time. Arduino Cookbook (By: Michael Margolis ) Do you want to build devices that can interact with the real world? This cookbook is the perfect answer to that question. This is book is an all-in-one cookbook for you if you want to experiment with popular Arduino programming or microcontroller environment. The book offers more than 200 techniques and tips in order to build a variety of objects and prototypes like robots, detectors and toys along with interactive clothing, which sense and respond to light, heat, position, sound and touch.
0 notes
Text
Holidays 3.21
Holidays
AfghanistanDay (US)
Agony of Defeat Anniversary Day
Aizu Higan Shishi (a.k.a. Sanbiki Shishimai; End of Winter Lion Dance; Japan)
American Immigration Lawyers Association Day of Action
Anal Cancer Awareness Day
Arduino Day
Back Badge Day (Gloucestershire, UK)
Bampflugnax Day (Guyana)
Big Bang Day
The Big Walk and Whee (UK)
Birkebeinerrennet (Norway)
Border Guard Day (Georgia)
Children's Poetry Day
Cluster Headache Awareness Day
Common Courtesy Day
Credit Card Reduction Day
Day of Marine Reconnaissance
Discovery Day (Guam)
Early Music Day
Education Freedom Day
End of the World Day [Predicted by Leonardo Da Vinci for 4006]
Global Surveyors’ Day
Global Understanding Day
Harmony Day (Australia)
Hogithum (Elder Scrolls)
Human Rights Day (South Africa)
International Colour Day
International Day for the Elimination of Racial Discrimination (UN)
Memory Day
Mother's Day (Arab nations)
Music Day
National Anaemia Day (India)
National Beyblade Day
National Countdown Day
National Day of Action on Syringe Exchange
National Fragrance Day
National Indigenous Water Operator Day (Canada)
National Memory Day
National Propane Day (Canada)
National Renewable Energy Day
National Residency Day
National Rosie the Riveter Day
National Single Parent Day
National Teenager Day
No Strings Attached Day
Nyepi Day (Day of Silence; Bali, Indonesia)
Oltenia Day (Romania)
Ougadi (Mauritius)
Panic! At The Disco Day
Paper Dress Day
Primrose Day (French Republic)
The Purge Day (in “The Purge”)
Race Relations Day (New Zealand)
Save Soil Day
Sharpeville Massacre Anniversary Day (South Africa)
Single Parent Day (UK)
Slytherin Pride Day
Spring Fairy Fun Day
Tea and Telphi Day (Ireland)
Telugu New Year (India)
321 Day
Truant's Day (Faroe Islands, Poland)
Twitter Day
We Day
World Computer Engineers Day (Turkey)
World Day of Casi Angeles (Argentina)
World Down Syndrome Day
World Freedom of Thought Day
World Glacier Day
World Home Economics Day
World Office Storage Day
World Planting Day
World Poetry Day
World Puppetry Day
World Sustainable Procurement Day
World Tattoo Day
Yngismannadagur (Young Men’s Day; Iceland)
Youth Day (Tunisia)
Food & Drink Celebrations
California Strawberry Day
French Bread Day
Gallo Wine Day
International Tiramisu Day
National Crunchy Taco Day
National Healthy Fats Day
Pão Francês Day (Brazil)
World Vermouth Day
Nature Celebrations
Arbor Day (Belgium, Lesotho, Portugal)
Bird Day (Iowa)
Honey Plant Day (Beginning of Life, Empathy; Korean Birth Flowers)
International Day of Forests (UN)
National Flower Day
National Tree Planting Day (Lesotho)
World Forestry Day
World Wood Day
Independence, Flag & Related Days
Calapan City Foundation Day (Philippines)
Namibia (from South Africa, 1990)
Pacific States of America (Declared; 2023) [unrecognized]
San Fabian Day (Philippines)
New Year’s Days
Ancient Babylonian New Year
Nowruz (New Year) [Day 2, Around Spring Equinox] (a.k.a. ...
International Day of Nowruz (UN)
Narooz (Persian New Year; Iran, Kyrgyzstan)
Nauroz (India)
Nauruz (Afghan New Year; Afghanistan)
Nauryz Meyramy (Kazakhstan)
Navro’z Bayrami (Uzbekistan)
Navruz (Tajikistan, Uzbekistan)
Naw-Rúz (Baha’i)
Nevruz (Albania)
Newroz (Iran, Kurdistan, Mesopotamia)
Norooz (Iran, Kyrgyzstan, Zoroastrian)
Novruz (Azerbaijan, Tajikistan)
Nowruz (Spring Day; Iraq)
3rd Friday in March
Comfort Food Friday [Every Friday]
Five For Friday [Every Friday]
Flashback Friday [Every Friday]
Fondue Friday [3rd Friday of Each Month]
Friday Finds [Every Friday]
Friendly Friday [3rd Friday of Each Month]
Fry Day (Pastafarian; Fritism) [Every Friday]
I Know I Exist Day [3rd Friday]
National Day of Action Against Bullying & Violence (Australia) [3rd Friday]
National Future Generations Day [3rd Friday]
National Preschool Teachers Appreciation Day [3rd Friday]
National Residency Match Day [3rd Friday]
Quadwitch Day [3rd Friday]
Red Nose Day (UK) [3rd Friday]
TGIF (Thank God It's Friday) [Every Friday]
World Sleep Day [Friday of 2nd Full Week]
Weekly Holidays beginning March 21 (3rd Week of March)
National Agriculture Week (thru 3.27) [Week with 3.21]
Week of Solidarity with the Peoples Struggling Against Racism and Racial Discrimination [begins 3.21; thru 3.27]_
Festivals On or Beginning March 21, 2025
Bluebonnet Brew-Off (Dallas, Texas) [thru 3.22]
California Artisan Cheese Festival (Santa Rosa, California) [thru 3.23]
Furnal Equinox (Toronto, Canada) [thru 3.23]
Hermann Wurstfest (Hermann, Missouri) [thru 3.23]
International Cherry Blossom Festival (Macon, Georgia) [thru 3.30]
National Spring Festival (Turkmenistan)_
NCAA WOmen’s Ice Hockey Championship,, a.k.a. Frozen Four (Minneapolis, Minnesota) [thru 3.23]
Oak Mountain State Fair (Pelham, Alabama) [thru 4.6]
Razor Clam & Seafood Festival (Ocean Shores, Washington) [thru 3.23]
Feast Days
Akitu (Mesopotamian spring festival, "cutting of the barley," celebrating Marduk's victory over Tiamat)
Alban Eilir (a.k.a. The Light of the Earth; Celtic Book of Days)
Aries zodiac sign begins (Astrology)
Benedetta Cambiagio Frassinello (Christian; Saint)
Benedict, Passing of (Order of Saint Benedict, pre-1970 Calendar; Christian)
Birillus (Christian; Saint)
Dionysia (Ancient Greek Festival to Dionysus, God of Intoxication)
Egyptian Harvest Festival
Enda of Aran (a.k.a. Enna of Ireland; Christian; Saint)
Fanchea (Christian; Saint & Virgin)
Festival of Salii (Jumping Priests; Ancient Rome)
French Bread Day (Pastafarian)
Jack Slade Day (Church of the SubGenius; Saint)
John the Evangelist (Positivist; Saint)
Music Day (Pagan)
Nicholas of Flüe (Christian; Saint)
Philosophical Day (Pastafarian)
Purification of the Trumpets (Ancient Rome)
Quinquatria, Day 3: Music Day (Pagan)
Raya & Ala (Muppetism)
Seraphim of Vyritsa (Orthodox)
Serapion of Thmuis (a.k.a. The Sindonite; Christian; Saint))
Shunki-Korei-Sai (Ancestral Spirits Rite; Shinto)
Tea and Tephi Day (Holy Day; Ireland)
Thomas Cranmer (Anglicanism)
Lunar Calendar Holidays
Chinese: Month 2 (Ji-Mao), Day 22 (Ji-Chou)
Day Pillar: Earth Ox
12-Day Officers/12 Gods: Open Day (開 Kai) [Auspicious]
Holidays: None Known
Secular Saints Days
Johan Sebastian Bach (Music)
Clarice Beckett (Art)
Matthew Broderick (Entertainment)
Solomon Burke (Music)
Timothy Dalton (Entertainment)
Julio Gallo (Viticulture)
Hans Hofmann (Art)
Roger Hodgson (Music)
Son House (Music)
Benito Juarez (Politics)
Lajos Kassák (Art)
Phyllis McGinley (Literature)
Russ Meyer (Entertainment)
Modest Mussorgsky (Music)
Gary Oldman (Entertainment)
Éric Rohmer (Entertainment)
Ronaldinho (Sports)
Aryton Senna (Sports)
Bartolomaus Spranger (Art)
Vivian Stanshall (Entertainment)
Al Williamson (Art)
Lucky & Unlucky Days
Taian (大安 Japan) [Lucky all day.]
Umu Limnu (Evil Day; Babylonian Calendar; 14 of 60)
Premieres
The Adventures of Mr. Common Peepul (Hearst-Pathe News Pictorial Cartoon; 1917)
The African Queen (Film; 1952)
Alice in the Alps (Disney Cartoon; 1927)
All of Me, recorded by Billie Holiday (Song; 1941)
American Woman, by the Guess Who (Song; 1970)
Beyond Beyond (Animated Film; 2014)
The Bottom of the Sea (Vincent Whitman Cartoon; 1914)
Day, by Elie Wiesel (Novel; 1961)
Deadwood (TV Series; 2004)
Dinky Doodle in the Arctic (Bray Cartoon; 1926)
Divergent (Film; 2014)
Escape to Witch Mountain (Film; 1975)
Felix Weathers the Weather (Felix the Cat Cartoon; 1926)
The Final Cut, by Pink Floyd (Album; 1983)
First Step, by Faces (Album; 1970)
Gabby’s Swing Cleaning (Gabby Fleischer Cartoon; 1941)
GoBots: Battle of the Rock Lords (Hanna-Barbera Animated Film; 1986)
God Bless America, recorded by Kate Smith (Song; 1939)
Handy Mandy’s Goat (Paramount Magazine Cartoon; 1920)
A High Wind in Jamaica, by Richard Hughes (Novel; 1929)
Inband the Sailor (Powers Cartoon; 1917)
In My Merry Oldsmobile (Fleischer Olds Motor Works Cartoon; 1931)
Jodorowsky’s Dune (Documentary Film; 2014)
Johann Mouse (Tom & Jerry Cartoon; 1953)
Junkyard Run: Part 3 (WB Cartoon; 2002)
L’enfant et les Sortilèges, by Maurice Ravel (Opera; 1925)
Les Miserobots (The Inspector Cartoon; 1968)
Liar Liar (Film; 1997)
Like a Prayer, by Madonna (Album; 1989)
Little Darlings (Film; 1980)
Living After Midnight, by Judas Priest (Song; 1980)
Mad Max (Film; 1980)
Makers of Modern Strategy from Machiavelli to the Nuclear Age, by Peter Paret (History Essays; 1943)
Man’s Best Friend (Goofy Disney Cartoon; 1952)
Mission to Mars (Disneyland Ride; 1975)
Mother Goose Land (Fleischer Out of the Inkwell Cartoon; 1925)
Muppets Most Wanted (Film; 2014)
No Strings Attached, by ’N Sync (Album; 2000)
Old Dog Tray, featuring Farmer Al Falfa (Terrytoons Cartoon; 1935)
The One and Only, Genuine, Original Family Band (Film; 1968)
The Origins of Totalitarianism, by Hannah Arendt (Political Theory; 1951)
Party Central (Pixar Cartoon; 2014)
The Pie Man (Aesop’s Film Fable Cartoon; 1925)
Piglet’s Big Movie (Animated Film; 2003)
Rebecca (Film; 1940)
Rescue Dog (Pluto Disney Cartoon; 1947)
Rock Around the Clock (Film; 1956)
Scaling the Alps (Aesop’s Film Fable Cartoon; 1928)
Selena (Film; 1997)
Sloop John B, by The Beach Boys (Song; 1966)
Somebody Stole My Gal (Fleischer Screen Songs Cartoon; 1931)
Sorosis (1st Women’s Professional Club; 1868)
The Spectator Bird, by Wallace Stegner (Novel; 1976)
The Storm (Fleischer Out of the Inkwell Cartoon; 1925)
Stuck On You, by Elvis Presley (Song; 1960)
Sweet Bird of Youth (Film; 1962)
Sydney (TV Series; 1990)
Symphonia Domestic, by Richard Strauss (Tone Poem for Orchestra; 1904)
Symphony No. 9, The Great Symphony in C Major, by Franz Schubert (Symphony; 1839)
Topper Returns (Film; 1941)
Trick or Tweet (WB MM Cartoon; 1959)
Two Chips and a Miss (Disney Cartoon; 1952)
View from the Top (Film; 2003)
When Knights Were Bold (Terrytoons Cartoon; 1941)
Today’s Name Days
Alexandra, Axel, Christian, Emilia (Austria)
Kristijan, Serapion, Vesna, Vlasta (Croatia)
Radek (Czech Republic)
Benedictus (Denmark)
Küllo, Külvo, Pendo, Pent (Estonia)
Pentti (Finland)
Axelle, Clémence (France)
Axel, Christian, Emilia (Germany)
Iakovos (Greece)
Benedek (Hungary)
Benedetto, Filemone (Italy)
Benedikts, Boleslavs, Dzelme, Glezna, Una (Latvia)
Benas, Benediktas, Lingailė, Nortautas, Reda, Saulius (Lithuania)
Bendik, Bengt, Bent (Norway)
Benedykt, Filemon, Lubomira, Mikołaj (Poland)
Iacob (Romania
Blahoslav (Slovakia)
Nicolás (Spain)
Bengt (Sweden)
Arvin, Arwin, Bendix, Benedict, Benedicta, Bennett (USA)
Today’s National Name Days
National Beverly Day
National Peter Day
Today is Also…
Day of Year: Day 80 of 2025; 285 days remaining in the year
ISO Week: Day 5 of Week 12 of 2025
Celtic Tree Calendar: Fearn (Alder) [Day 24 of 28]
Chinese: Month 2 (Ji-Mao), Day 22 (Ji-Chou)
Chinese Year of the: Snake 4723 (until February 17, 2026) [Ding-Chou]
Coptic: 12 Baramhat 1741
Druid Tree Calendar: Hazel (Mar 21-31) [Day 1 of 11]
Hebrew: 21 Adar 5785
Islamic: 21 Ramadan 1446
Julian: 8 March 2025
Moon: 58%: Waning Gibbous
Positivist: 24 Aristotle (3rd Month) [St. John the Evangelist]
Runic Half Month: Beore (Birch Tree) [Day 14 of 15]
Season: Spring (Day 2 of 92)
SUn Calendar: 20 Green; Sixthday [20 of 30]
Week: 3rd Week of March
Zodiac:
Tropical (Typical) Zodiac: Aries (Day 1 of 30)
Sidereal Zodiac: Pisces (Day 7 of 30)
Schmidt Zodiac: Pisces (Day 1 of 26)
IAU Boundaries (Current) Zodiac: Pisces (Day 10 of 38)
IAU Boundaries (1977) Zodiac: Pisces (Day 10 of 38)
Calendar Changes
Aries (The Ram) begins [Tropical (Typical) Zodiac Sign 4 of 12; thru 4.19]
Pisces (The Fish) begins [Schmidt Equal Zodiac Sign 4 of 14; thru 4.15]
Hazel (March 11-20) [Druid Tree Calendar] (Month 9 of 41)
0 notes
Text
„Color Memory“ mit Arduino: Programmieren und Spaß haben

Auf Instagram bin ich auf das interessante Projekt „Color Memory“ von Sunflower gestoßen. Dieses kleine Spiel überzeugt durch seinen einfachen Aufbau und eignet sich hervorragend für Einsteiger, die grundlegende Programmierkonzepte und den Umgang mit dem Arduino kennenlernen möchten. Es bietet eine praktische Möglichkeit, Abläufe im Code zu verstehen und eine Schaltung mit LEDs und einem Piezo-Buzzer zu erstellen. Dabei lernst du, wie du if-Bedingungen verwendest, Arrays einsetzt und die Steuerung von Hardwarekomponenten wie LEDs und Buzzern programmierst. Zusätzlich ermöglicht das Projekt, erste Erfahrungen in der Strukturierung und Erweiterung von Code zu sammeln – perfekt, um die Grundlagen der Mikrocontroller-Programmierung zu vertiefen. https://youtu.be/SV_pxPFMMFA Disclaimer: Die Idee für das Projekt „Color Memory“ stammt vom Instagram-Account Sunflower. Ich habe mich von diesem Beitrag inspirieren lassen und das Spiel für meinen Technikblog aufgegriffen. Die Umsetzung und Beschreibung basieren auf meinen eigenen Anpassungen und Interpretationen des ursprünglichen Konzepts. Ein herzliches Dankeschön an Sunflower für die kreative Idee und die Inspiration!

Ablauf des Spieles - Color Memory
Das Spiel beginnt mit dem zufälligen Aufleuchten einer Sequenz von LEDs, die vom Mikrocontroller vorgegeben wird. Sobald die Sequenz beendet ist, ertönt ein Signalton vom Piezo-Buzzer, der den Spieler auffordert, die Reihenfolge der LEDs korrekt nachzubilden. Der Spieler gibt die Sequenz ein, indem er beispielsweise Tasten drückt, die den jeweiligen LEDs zugeordnet sind. Wird die Reihenfolge korrekt wiederholt, erhält der Spieler einen Punkt, und die Sequenz wird in der nächsten Runde um eine LED erweitert. Mit jedem Level steigt die Schwierigkeit, da die Reihenfolge länger und komplexer wird. Ein Fehler in der Eingabe beendet das Spiel. Ziel ist es, so viele Runden wie möglich zu meistern!
Was lernt man bei der Programmierung?
Du lernst, wie du Zufallszahlen erzeugst, um die Reihenfolge der LEDs zu bestimmen, Arrays anlegst und dynamisch befüllst, um die Sequenz zu speichern, sowie digitale Pins programmierst, um LEDs und einen Piezo-Buzzer anzusteuern. Dieses Projekt kombiniert spielerischen Spaß mit praktischen Lernerfahrungen in der Mikrocontroller-Programmierung und eignet sich hervorragend, um deine Fähigkeiten gezielt auszubauen.
Was wird für den Aufbau der Schaltung benötigt?
In meinem Fall verwende ich für die Schaltung: - einen Arduino UNO R3*, oder - einen Arduino Nano V3 - vier, 5 mm LEDs* inkl. 220 Ohm Vorwiderstand* - vier Taster mit farbigen Tastknöpfen* - eine I2C, 4fach 14 Segmentanzeige* - diverse Breadboardkabel* - ein 830 Pin Breadboard*

Statt einem Arduino UNO R3 kannst du ebenso ein Arduino Nano oder ESP32 verwenden. Der UNO R3 hat sich in diesen Schaltungen etabliert, da dieser bei diversen Kits enthalten ist. Hinweis von mir: Die mit einem Sternchen (*) markierten Links sind Affiliate-Links. Wenn du über diese Links einkaufst, erhalte ich eine kleine Provision, die dazu beiträgt, diesen Blog zu unterstützen. Der Preis für dich bleibt dabei unverändert. Vielen Dank für deine Unterstützung!
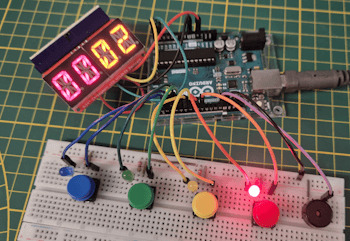
Aufbau der Schaltung
Wie erwähnt kannst du die Schaltung am Arduino UNO und Nano aufbauen (selbstverständlich auch am Leonardo sowie Mega 2560 R3).

Schaltung - Color Memory am Arduino UNO R3
Programmieren des Spieles - Color Memory in der Arduino IDE
Wie eingangs erwähnt, bietet dir die Programmierung dieses Spiels eine wertvolle Grundlage für viele weitere Spiele und Projekte. Im Laufe der Entwicklung wirst du wichtige Techniken und Konzepte kennenlernen, die dir auch bei zukünftigen Vorhaben nützlich sein werden. In den folgenden Abschnitten zeige ich dir Schritt für Schritt, wie du dieses kleine, aber spannende Spiel selbst programmieren kannst. Schritt 1 - Abfragen von Taster & aufleuchten von LEDs Im ersten Schritt fragen wir die Taster ab und lassen die LEDs aufleuchten. Die Taster müssen entprellt werden, dazu kannst du entweder nach jedem Tastendruck eine Zeit x warten (Funktion delay) oder du nutzt die Bibliothek Bounce2. Der Weg über die Bibliothek ist deutlich komfortabler, da du hier zusätzlich abfragen kannst, ob der Taster gedrückt gehalten wird oder losgelassen wurde. #include #define tasterBlauPin 3 #define tasterGruenPin 5 #define tasterGelbPin 7 #define tasterRotPin 9 Bounce tasterBlau = Bounce(); Bounce tasterGruen = Bounce(); Bounce tasterGelb = Bounce(); Bounce tasterRot = Bounce(); const int BOUNCE_INTERVAL = 5; void setup() { Serial.begin(9600); tasterBlau.attach(tasterBlauPin, INPUT_PULLUP); tasterBlau.interval(BOUNCE_INTERVAL); tasterGruen.attach(tasterGruenPin, INPUT_PULLUP); tasterGruen.interval(BOUNCE_INTERVAL); tasterGelb.attach(tasterGelbPin, INPUT_PULLUP); tasterGelb.interval(BOUNCE_INTERVAL); tasterRot.attach(tasterRotPin, INPUT_PULLUP); tasterRot.interval(BOUNCE_INTERVAL); } void loop() { tasterBlau.update(); tasterGruen.update(); tasterGelb.update(); tasterRot.update(); if (tasterBlau.rose()) { Serial.println("Taster BLAU betätigt!"); } if (tasterGruen.rose()) { Serial.println("Taster GRUEN betätigt!"); } if (tasterGelb.rose()) { Serial.println("Taster GELB betätigt!"); } if (tasterRot.rose()) { Serial.println("Taster ROT betätigt!"); } } Auf der seriellen Schnittstelle wird beim betätigen eines der Taster jeweils der entsprechende Text "Taster betätigt!" ausgegeben.

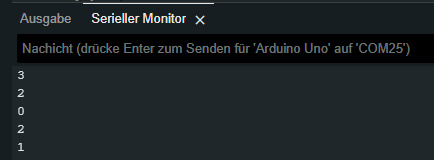
Die LEDs sollen jeweils nur kurz aufleuchten, dazu erstellen wir eine Funktion, welcher wir den Pin der LED übergeben und dort einfach diese aktiviert, eine Pause eingelegt und anschließend deaktiviert wird. #include #define ledBlau 2 #define ledGruen 4 #define ledGelb 6 #define ledRot 8 void setup() { Serial.begin(9600); pinMode(ledBlau, OUTPUT); pinMode(ledGruen, OUTPUT); pinMode(ledGelb, OUTPUT); pinMode(ledRot, OUTPUT); } void blinkLed(int ledPin) { digitalWrite(ledPin, HIGH); delay(500); digitalWrite(ledPin, LOW); } void loop() { blinkLed(ledBlau); blinkLed(ledGruen); blinkLed(ledGelb); blinkLed(ledRot); } Schritt 2 - Erzeugen von Zufallszahlen Die Erzeugung echter Zufallszahlen ist für Computer eine komplexe Aufgabe, da sie dazu neigen, wiederkehrende Muster zu erzeugen oder Werte auf Basis mathematischer Funktionen zu berechnen. Diese Werte sind somit oft vorhersagbar und nicht wirklich zufällig. Mikrocontroller wie der Arduino bieten jedoch eine clevere Lösung für dieses Problem: Durch das Abgreifen eines Startwertes (Seed) von einem ungenutzten analogen Pin – zum Beispiel A0 – können wir eine unvorhersehbare Datenquelle nutzen. Der analoge Pin liefert durch elektrische Rauscheffekte stets leicht variierende Werte, die wir als Grundlage für echte Zufallszahlen in einer definierten Range (Bereich) verwenden können. Auf diese Weise wird das Verhalten des Spiels jedes Mal einzigartig und authentisch zufällig. Da wir in diesem Spiel lediglich eine Range von 0 bis 4 verwenden (entsprechend der Farben Blau, Grün, Gelb und Rot), besteht die Möglichkeit, dass eine Zahl mehrfach hintereinander generiert wird. Um dies zu verhindern, habe ich die Funktion generateUniqueRandomNumber erstellt. Diese überprüft, ob die neu generierte Zahl bereits zuvor verwendet wurde. Falls dies der Fall ist, ruft sich die Funktion selbst erneut auf, bis eine eindeutige, noch nicht genutzte Zahl gefunden wird. So bleibt die Sequenz abwechslungsreich und die Herausforderung für den Spieler erhalten. int lastRandomNumber = -1; void setup() { Serial.begin(9600); randomSeed(analogRead(0)); } int generateUniqueRandomNumber() { int randNumber = random(0, 4); if (randNumber != lastRandomNumber) { lastRandomNumber = randNumber; return randNumber; } return generateUniqueRandomNumber(); } void loop() { Serial.println(generateUniqueRandomNumber()); delay(500); } Die ermittelten Zufallszahlen werden in diesem kleinen Sketch im seriellen Monitor der Arduino IDE ausgegeben.
Schritt 3 - Abspeichern von Zufallszahlen in Arrays In Arrays kannst du gleichartige Daten speichern, die Größe des Arrays ist am Mikrocontroller nur durch den vorhandenen Speicher begrenzt. In meinem Fall lege ich eine größe von 10 fest. Damit kann der Spieler bist maximal Level 10 spielen. Derzeit belegt das gesamte Spiel auf einem Arduino UNO R3 31% des Speicherplatzes für Globale Variablen du kannst also diesen Wert von 10 auf 60 erhöhen! (Angenommen der Benutzer schafft es dann auch 60 folgen von LEDs sich zu merken :) ) Der Sketch verwendet 9382 Bytes (29%) des Programmspeicherplatzes. Das Maximum sind 32256 Bytes. Globale Variablen verwenden 640 Bytes (31%) des dynamischen Speichers, 1408 Bytes für lokale Variablen verbleiben. Das Maximum sind 2048 Bytes. Das derzeitige Level wird über eine 4fach 14 Segmentanzeige visualisiert. Für diese Anzeige verwende ich die Bibliothek Adafruit LED Backpack welche ich bereits im Beitrag Arduino Lektion #108: 14 Segmentanzeige verwendet habe. #include #include "Adafruit_LEDBackpack.h" #define ledBlau 2 #define ledGruen 4 #define ledGelb 6 #define ledRot 8 int lastRandomNumber = -1; int leds = { ledBlau, ledGruen, ledGelb, ledRot }; int level = 1; int sequenz = {}; Adafruit_AlphaNum4 alpha4 = Adafruit_AlphaNum4(); void setup() { Serial.begin(9600); randomSeed(analogRead(0)); pinMode(ledBlau, OUTPUT); pinMode(ledGruen, OUTPUT); pinMode(ledGelb, OUTPUT); pinMode(ledRot, OUTPUT); alpha4.begin(0x70); alpha4.setBrightness(15); } void generateSequenz() { Serial.println("generateSequenz"); for (int index = 0; index sequenz = leds; } } void playSequenz() { Serial.println("playSequenz"); for (int index = 0; index int ledPin = sequenz; blinkLed(ledPin); } } void blinkLed(int ledPin) { digitalWrite(ledPin, HIGH); delay(150); digitalWrite(ledPin, LOW); } int generateUniqueRandomNumber() { int randNumber = random(0, 4); if (randNumber != lastRandomNumber) { lastRandomNumber = randNumber; return randNumber; } return generateUniqueRandomNumber(); } void displayLevel() { String msg = (level alpha4.writeDigitAscii(0, msg.charAt(0)); alpha4.writeDigitAscii(1, msg.charAt(1)); alpha4.writeDigitAscii(2, msg.charAt(2)); alpha4.writeDigitAscii(3, msg.charAt(3)); alpha4.writeDisplay(); } void loop() { displayLevel(); generateSequenz(); playSequenz(); delay(150); level++; if (level > 10) { level = 1; } } Schritt 4 - Erzeugen von Tönen mit einem Piezo Buzzer Über den Piezo Buzzer kannst du nicht nur einfache Töne sondern auch kleine Lieder abspielen (siehe Weihnachtsevent 2019 im JFZ Schöningen – “Löten eines Weihnachtsbaums mit Sound”). In diesem Spiel nutzen wir diesen als Startsignal für den Spieler damit dieser die zuvor abgespielte Sequenz wiederholt. #define piezoBuzzerPin 13 void setup() { pinMode(piezoBuzzerPin, OUTPUT); } void loop() { tone(piezoBuzzerPin, 1400, 75); delay(500); tone(piezoBuzzerPin, 500, 75); delay(500); } Das kleine Beispiel spielt auf dem Piezo Buzzer zwei Töne ab, einer mit der Frequenz von 1400 Herz und ein anderer mit 500 Herz. (Je höher die Herz desto höher ist der Ton.) Zwischen diesen beiden Tönen wird eine Pause von 500 Millisekunden eingelegt. Das fertige Spiel Nachfolgend findest du das fertige kleine Spiel als ZIP-Datei zum download. Spiel: Color Memory am Arduino UNOHerunterladen Hier der komplette Quellcode #include #include #include "Adafruit_LEDBackpack.h" #define ledBlau 2 #define tasterBlauPin 3 #define ledGruen 4 #define tasterGruenPin 5 #define ledGelb 6 #define tasterGelbPin 7 #define ledRot 8 #define tasterRotPin 9 #define piezoBuzzerPin 13 Bounce tasterBlau = Bounce(); Bounce tasterGruen = Bounce(); Bounce tasterGelb = Bounce(); Bounce tasterRot = Bounce(); const int BOUNCE_INTERVAL = 5; int leds = { ledBlau, ledGruen, ledGelb, ledRot }; int level = 1; bool generateRandomSequenz = false; int sequenz = {}; int userValues = {}; int btnCounter = 0; Adafruit_AlphaNum4 alpha4 = Adafruit_AlphaNum4(); void setup() { Serial.begin(9600); pinMode(ledBlau, OUTPUT); pinMode(ledGruen, OUTPUT); pinMode(ledGelb, OUTPUT); pinMode(ledRot, OUTPUT); tasterBlau.attach(tasterBlauPin, INPUT_PULLUP); tasterBlau.interval(BOUNCE_INTERVAL); tasterGruen.attach(tasterGruenPin, INPUT_PULLUP); tasterGruen.interval(BOUNCE_INTERVAL); tasterGelb.attach(tasterGelbPin, INPUT_PULLUP); tasterGelb.interval(BOUNCE_INTERVAL); tasterRot.attach(tasterRotPin, INPUT_PULLUP); tasterRot.interval(BOUNCE_INTERVAL); pinMode(piezoBuzzerPin, OUTPUT); randomSeed(analogRead(0)); alpha4.begin(0x70); alpha4.setBrightness(15); generateRandomSequenz = true; } int lastRandomNumber = -1; int generateUnqueRandomNumber() { int randNumber = random(0, 4); if (randNumber != lastRandomNumber) { lastRandomNumber = randNumber; return randNumber; } return generateUnqueRandomNumber(); } void generateSequenz() { Serial.println("generateSequenz"); for (int index = 0; index sequenz = leds; } } void playSequenz() { Serial.println("playSequenz"); for (int index = 0; index int ledPin = sequenz; blinkLed(ledPin); tone(piezoBuzzerPin, 1400, 75); } } void blinkLed(int ledPin) { digitalWrite(ledPin, HIGH); delay(500); digitalWrite(ledPin, LOW); } void recordUserSequenz() { tasterBlau.update(); tasterGruen.update(); tasterGelb.update(); tasterRot.update(); if (tasterBlau.rose()) { blinkLed(ledBlau); userValues = ledBlau; btnCounter++; } if (tasterGruen.rose()) { blinkLed(ledGruen); userValues = ledGruen; btnCounter++; } if (tasterGelb.rose()) { blinkLed(ledGelb); userValues = ledGelb; btnCounter++; } if (tasterRot.rose()) { blinkLed(ledRot); userValues = ledRot; btnCounter++; } } void blinkAll() { for (int index = 0; index digitalWrite(ledBlau, HIGH); digitalWrite(ledGruen, HIGH); digitalWrite(ledGelb, HIGH); digitalWrite(ledRot, HIGH); delay(175); digitalWrite(ledBlau, LOW); digitalWrite(ledGruen, LOW); digitalWrite(ledGelb, LOW); digitalWrite(ledRot, LOW); delay(175); } } void displayLevel() { String msg = "000" + String(level, DEC); alpha4.writeDigitAscii(0, msg.charAt(0)); alpha4.writeDigitAscii(1, msg.charAt(1)); alpha4.writeDigitAscii(2, msg.charAt(2)); alpha4.writeDigitAscii(3, msg.charAt(3)); alpha4.writeDisplay(); } void loop() { displayLevel(); if (generateRandomSequenz) { if (level == 10) { level = 0; } generateSequenz(); playSequenz(); generateRandomSequenz = false; } else { recordUserSequenz(); } if (btnCounter == level) { btnCounter = 0; generateRandomSequenz = true; for (int index = 0; index int seqValue = sequenz; int userValue = userValues; if (seqValue != userValue) { level = 1; blinkAll(); tone(piezoBuzzerPin, 500, 125); Serial.println("Verloren!"); return; } } Serial.println("Gewonnen!"); level++; } }
Abschluss & Fazit
Das Spiel „Color Memory“ und der Weg über seine Programmierung bieten eine hervorragende Möglichkeit, die Grundlagen der Arduino-Programmierung anschaulich und praxisnah zu erlernen. Es zeigt nicht nur, wie man verschiedene Hardwarekomponenten wie LEDs und Piezo-Buzzer effizient steuert, sondern verdeutlicht auch die Anwendung von zentralen Programmierkonzepten wie if-Bedingungen, Arrays und die Erzeugung von Zufallszahlen. Die schrittweise Entwicklung des Spiels schult sowohl das Verständnis für logische Abläufe als auch die Fähigkeit, Code strukturiert und funktional zu schreiben. Dadurch eignet sich dieses Projekt nicht nur für Anfänger, sondern auch für alle, die ihre Kenntnisse in der Mikrocontroller-Programmierung erweitern möchten. Es beweist, wie viel Spaß man haben kann, während man etwas Neues lernt und dabei ein funktionierendes Ergebnis in den Händen hält. Ich hoffe, dieser Beitrag hat dir geholfen, einen spannenden Einstieg in die Welt des Arduino zu finden, und inspiriert dich, weitere kreative Projekte umzusetzen. Viel Spaß beim Programmieren! Read the full article
0 notes
Text
Arduino Projects
The open-source electronics platform Arduino is built on user-friendly hardware and software. Using the Arduino Integrated Development Environment (IDE), microcontroller boards can be programmed. Users can connect with a variety of sensors, actuators, and other electrical components thanks to the digital and analog input/output (I/O) pins on these boards.
Popular Arduino boards include:
Arduino Uno
Arduino Nano
Arduino Mega
Arduino Leonardo
Arduino MKR series
Why Choose Arduino for Your Projects?
User-Friendly: Arduino is a great option for novices due to its simplicity.
Reasonably priced: The hardware is readily accessible and reasonably priced.
Community Support: A sizable user base offers a wealth of information, forums, and tutorials.
Versatile: Works with many different types of sensors, modules, and parts.
Cross-Platform: Linux, macOS, and Windows can all use the Arduino IDE.
Tips for Successful Arduino Projects
Start Small: Take on easier tasks at first, then work your way up to more difficult ones.
Record Your Work: Make notes about your code, wiring, and troubleshooting procedures.
Learn from the Community: Seek advice and inspiration by participating in forums and online tutorials.
Try new things: Don't be scared to adjust and change projects to fit your demands.
Arduino projects are a great way to learn about programming and electronics. Your creativity is the only restriction on the range of options available, from basic LED blinkers to complex home automation systems. Arduino enables creators to realize their ideas through its user-friendly platform and extensive community support. Get an Arduino board, look through the available information, and begin creating your next fascinating project right now!
To know more, click here.
0 notes
Text
Arduino Kategorisinde Ucuz ürünler Robocombo'da
Robocombo.com'daki Arduino Kategorileri
Robocombo.com, Arduino ile ilgili çeşitli ürün ve kitler sunmaktadır. Aşağıda, sitedeki bazı önemli kategorileri ve ürünleri özetledim:
1. Arduino Kitleri
Robocombo Arduino Super Combo 4WD Car Kit: Bu kit, 4 tekerlekli bir araç oluşturmak için gerekli tüm parçaları içerir. Bluetooth bağlantısı ile uzaktan kontrol edilebilir.
Yüzlerce robot kitleri: Farklı robot projeleri için çeşitli kitler mevcuttur. Bu kitler, STEM eğitimine yönelik olarak tasarlanmıştır.
2. Arduino Bileşenleri
Arduino Çeşitleri:
Arduino Uno
Arduino Nano
Arduino Leonardo
Arduino 101
Arduino Micro
Arduino Nano Every
Arduino MKR2UNO
Arduino MKR Zero
Bu çeşitler, farklı projeler için uygun olan çeşitli özelliklere sahiptir.
3. Ekran ve Giriş Aletleri
3.5'' TFT LCD Touch Screen: Arduino Mega ile uyumlu olan bu dokunmatik ekran, projelerde görsel arayüz oluşturmak için kullanılabilir.
4. Elektrik ve Güç Kaynağı
Güç Kaynağı Sorunları: Kullanıcılar, projelerinde karşılaştıkları güç kaynağı sorunları hakkında bilgi paylaşmaktadır. Örneğin, 9V pil kullanımı ve alternatif güç kaynakları hakkında tartışmalar mevcuttur.
5. Eğitim ve Proje Rehberleri
İlk Proje Rehberleri: Arduino ile ilk projelerinizi nasıl başlatacağınız hakkında bilgiler ve örnekler sunulmaktadır.
Gelişmiş Kod Projeleri: Daha karmaşık projeler için kod örnekleri ve açıklamalar bulunmaktadır.
6. Sıkça Sorulan Sorular
Kullanıcılar, projelerinde karşılaştıkları sorunlar hakkında sıkça sorulan sorulara yanıt aramaktadır. Örneğin, motorların çalışmaması veya sensörlerin doğru çalışmaması gibi konular üzerinde durulmaktadır.
7. Direnç ve Diğer Bileşenler
Direnç Setleri: Arduino projelerinde kullanılabilecek çeşitli dirençler ve diğer bileşenler mevcuttur.
Sonuç
Robocombo.com, Arduino ile ilgili geniş bir ürün yelpazesi sunarak, hem yeni başlayanlar hem de deneyimli kullanıcılar için çeşitli kaynaklar sağlamaktadır. Kullanıcılar, projeleri için gerekli olan kitleri ve bileşenleri kolayca bulabilir ve eğitim materyallerine erişebilirler. Daha fazla bilgi için siteyi ziyaret edebilirsiniz.
1 note
·
View note
Text
Arduino is essentially a language designed for interacting with and operating interactive objects and digital devices. Arduino has immense potential, since it’s being increasing used for controlling remote controlled objects such as drones. If you are looking for a book on Arduino, this article will serve as the base for taking a decision and choosing the right book that will help you sharpen your skill in Arduino. This article will give you information about seven best Arduino books that are regarded as featured books. Arduino is open source software (IDE) which makes it a breeze to write as well as upload codes to a board. Moreover, Arduino runs on Mac OS X, Linux as well as Windows. The environment of Arduino is written in Java language; also it’s based on open-source software and processing. Take help of the information furnished in the books and explore the horizon of Arduino programming. Programming Arduino Getting Started with Sketches (By: Simon Monk ) Learn Arduino programming with ease with the easy-to-follow and clear examples featured in the book. The book contains the software side of Arduino and describes the way of writing the program using the well-crafted sketches using modified C programming language meant for Arduino. The book features downloadable sample programs that can be modified as per your requirement. The easy explanation and details crafted in the book make is one of the best books to learn Arduino. You can structure your data by using strings and arrays. The book also helps you learn how to use digital and analog inputs and outputs of Arduino in the programs. Programming Arduino Next Steps: Going Further with Sketches (By: Simon Monk ) This is the second book of the series that makes you understand the next step of the beginner’s guide. You can take your Arduino understanding and skills to the next level with this easy-to-study book. This book on Arduino basically is a practical guide and the secret of the professional Arduino programming is revealed by electronics guru Simon Monk taking every possible aspect under the hood. The book features the coverage of Arduino Uno, Due Boards and Leonardo. This book is all-in-one repository and features more than 75 examples and sketches. Exploring Arduino: Tools and Techniques for Engineering Wizardry (By: Jeremy Blum ) This book is the best book as far as the third step is concerned – understanding the tools and techniques of Arduino. This book is all about that and helps you learning to build robots, gizmos and gadgets using Arduino. This book is written by Jeremy Blum – the Arduino expert – and is a unique book that uses the popular Arduino microcontroller platform, which is an instrument that teaches you about programming, electrical engineering and also human-computer interaction. Beginning C for Arduino: Learn C Programming for the Arduino (Technology in Action) (By: Jack Purdum ) This is the Arduino best book for those who do not have prior experience in programming of microcontrollers. This book is written so well and in easy-to-understand way that it helps the readers to understand the aspects of Arduino and help them learn as well and experiment. This book starts with an introduction to C language and reinforces every programming structure using simple demonstrations. Author Jack Purdum has used a very engaging style of writing in order to teach good and efficient techniques of programming. Arduino Workshop: A Hands-On Introduction with 65 Projects (By: John Boxall ) This book offers hands-on experience on Arduino programming with 65 projects. With the help of this book, you can learn the basics of Arduino programming, build a project after learning and finally create your own Arduino program. Arduino is basically an easy, flexible, cheap and open source microcontroller programming platform that offers students to learn and create their own homemade projects and this book is the best one in this category. This book
gives you an opportunity to learn and create devices using almost unlimited range of input and output sensors, displays, indicators or add-ons. Arduino For Dummies (By: John Nussey ) Arduino is not just an ordinary circuit board and corresponding software. It does not matter whether you are a designer, artist, hobbyist or a programmer, Arduino enables you to play with electronics. This book helps you learn building a variety of circuits that can control or sense things in the real world. If you have loads of ideas that you want to bring to the real world or you have curiosity to know and learn the possibilities, this book is perfect for you to read. The best part about this book is that it enables you to learn by writing the programs in real time. Arduino Cookbook (By: Michael Margolis ) Do you want to build devices that can interact with the real world? This cookbook is the perfect answer to that question. This is book is an all-in-one cookbook for you if you want to experiment with popular Arduino programming or microcontroller environment. The book offers more than 200 techniques and tips in order to build a variety of objects and prototypes like robots, detectors and toys along with interactive clothing, which sense and respond to light, heat, position, sound and touch.
1 note
·
View note
Text
Esplora Arduino game controller

The ESPLORA Arduino game controller Board is an Arduino-compatible microcontroller board based on the Arduino Leonardo. Unlike previous models, it comes equipped with a variety of built-in sensors for immediate use in interactions.
This guide is perfect for individuals interested in using Arduino, but who don’t want to dive into electronics right away. To learn how to use the ESPLORA Arduino game controller Board in a simple and clear manner, be sure to read the Getting Started with Esplora guide.
The ESPLORA Arduino game controller Board boasts onboard sound and light outputs, as well as multiple input sensors such as a joystick, slider, temperature sensor, accelerometer, microphone, and light sensor. Additionally, it offers the option to enhance its functions through two Tinker-kit input and output connectors and a socket for a color TFT LCD screen.
Similar to the Leonardo board, the ESPLORA Arduino game controller Board also utilizes an Atmega32U4 AVR microcontroller with a 16 MHz crystal oscillator. It features a micro USB connection that can function as a USB client device, such as a mouse or keyboard. Additionally, there is a reset push button located in the upper left corner of the board for restarting purposes.
There exist four indicators, each displaying a different status.
The green indicator shows if the board is currently being powered.
The L [yellow] connects directly to pin 13 on the micro-controller for easy accessibility.
The [yellow] LED indicates data being transmitted or received through the USB connection.
Within the board lies all the necessary components to support the microcontroller. To begin, just connect it to a computer using a USB cable. The ESPLORA Arduino game controller Board is also equipped with built-in USB communication, allowing it to function as a mouse or keyboard when connected to a computer. It also offers a virtual serial/COM port (CDC). This alters the behavior of the board, which is further explained on our getting started page. On this page, you can find all the instructions for configuring your board and utilizing the Arduino Software (IDE) for coding and electronics experimentation.
The transfer of data, both in and out.
The ESPLORA Arduino game controller Board features a classic gamepad design, including an analog joystick on the left and four push buttons on the right. It also comes equipped with several onboard inputs and outputs:
The analog joystick features a center push-button and two axes, designated as X and Y. There is also a central pushbutton for added functionality.
Arranged in a diamond formation are 4 push-buttons.
The slider for the linear potentiometer is located towards the bottom of the board.
A tool to capture the volume (amplitude) of the surrounding environment.
A sensor that detects light to measure brightness.
The temperature sensor measures the surrounding temperature.
A three-axis accelerometer detects the orientation of the board with respect to gravity, along the X, Y, and Z axes.
The buzzer has the ability to generate square-wave tones.
The RGB LED features Red, Green, and Blue elements that allow for color mixing and a bright display.
The TinkerKit Inputs allow for easy connection between the sensor modules and 3-pin connectors.
The TinkerKit Outputs allow for easy connection of the TinkerKit actuator modules via the 3-pin connectors.
The TFT display connector can be used for a color LCD screen, SD card, or any other devices utilizing the SPI protocol.
To fully utilize all available sensors, the board employs an analog multiplexer. This way, multiple input channels (excluding the 3-axis accelerometer) can share a single analog input of the microcontroller. Selecting which channel to read is done through four additional pins on the microcontroller.
Communication is essential in any relationship, whether it be personal or professional. It plays a crucial role in maintaining strong connections and fostering understanding between individuals. Effective communication allows for open and honest dialogue, facilitating problem-solving and building trust. Without good communication, misunderstandings can occur, leading to conflicts and strained relationships. Therefore, it is important to prioritize effective communication in every aspect of our lives.
The ESPLORA Arduino game controller Board for the Leonardo offers various features for connecting with a computer, another Arduino, or different micro-controllers. The ATmega32U4 enables serial (CDC) communication through USB and is recognized as a virtual com port on the computer. It also functions as a full speed USB 2.0 device and can be used with standard USB COM drivers. A .inf file is needed for Windows.
The Arduino software comes equipped with a serial monitor for easy transmission of text data to and from the board. Whenever data is being sent via the USB connection to the computer, the RX and TX LEDs will light up on the board. Additionally, the ATmega32U4 has SPI capability accessible through the SPI library. In addition, the Esplora can act as a standard keyboard and mouse, allowing you to use programming to manage these input devices via the Keyboard and Mouse libraries.
The act of creating computer software, also known as programming, involves writing code using various languages and tools. This process requires a combination of problem-solving skills, critical thinking and creativity. Programmers must constantly learn new techniques and adapt to ever-changing technology in order to produce high-quality programs.
To start using the Esplora with your Arduino software (download), simply choose “Esplora” from the Tools > Board menu. For more information, refer to the getting started page. The ATmega32U4 on the Esplora comes pre-loaded with a boot-loader, enabling you to upload new code without an external hardware programmer.
The AVR109 protocol is the chosen method of communication. To avoid using the bootloader, you can program the microcontroller through the ICSP header. Additional instructions are available for reference.
A dedicated library for the Esplora simplifies writing sketches, with methods available for reading sensors and controlling onboard outputs. These high-level methods also perform pre-processing of data, such as converting temperature readings to degrees Fahrenheit or Celsius. Additionally, the library allows easy access to outputs like the RGB LED. For further information and examples, please refer to the Esplora library reference page.
The automatic reset and bootloader activation are key components in the software’s functioning.
Rather than relying on the physical reset button, the Esplora utilizes a software-based reset triggered by opening and then closing the virtual serial/COM port (CDC) at 1200 baud. This initiates a processor reset, temporarily cutting off the USB connection to the computer and causing the virtual port to disappear. The boot-loader remains active for approximately 8 seconds before it can also be activated by pressing the reset button on the Esplora.
Please be aware that upon initial power up, the board will launch the user sketch instead of the boot-loader, if available. Due to the specific reset process of the Esplora, it is most effective to allow the Arduino software to attempt a reset before uploading, especially if you typically press the reset button before uploading on other boards. However, in the event that the software is unable to reset the board, you can manually initiate the boot-loader by pressing the reset button on the board.
The USB port is equipped with overcurrent protection to prevent any potential damage.
The ESPLORA Arduino game controller Board comes equipped with a re-settable poly-fuse to safeguard your computer’s USB ports against shorts and over-current. While most computers have built-in protection, the fuse adds an additional level of security. In the case of a short or overload exceeding 500 mA, the fuse will disconnect the connection until the issue is resolved.
Regarding the appearance of this object, its external features will be discussed.
The ESPLORA Arduino game controller Board PCB has a maximum size of 6.5 inches in length and 2.4 inches in width. The USB and TinkerKit connectors extend beyond the width dimension. Additionally, there are four screw holes that allow for attachment to a surface or case.
1 note
·
View note
Text
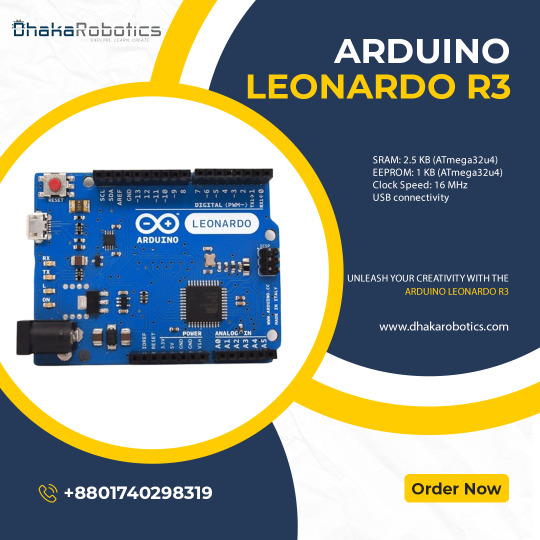
Introducing the Arduino Leonardo R3 – Your Gateway to Innovation!
Looking for a microcontroller that can do more? The Arduino Leonardo R3 is here to elevate your projects with its unique features and versatility.
Key Features:
Built-in USB Connection: Seamlessly turn your Leonardo R3 into a keyboard, mouse, or any other USB device. Perfect for creative coding and interactive projects.
More I/O Pins: With 20 digital I/O pins and 12 analog inputs, the possibilities for your inventions are endless.
Easy to Program: Whether you’re a beginner or a pro, the Leonardo R3 is user-friendly and compatible with the Arduino IDE.
Endless Possibilities: From custom game controllers to home automation, the Arduino Leonardo R3 is the perfect choice for your next big idea. Dive into the world of interactive electronics and let your imagination run wild.
Get Yours Today: Start creating with the Arduino Leonardo R3 and join a global community of innovators!
Click here to purchase the product: https://dhakarobotics.com/product/1012-arduino-leonardo-r3/
Contact Us: +8801740298319
visit our website: https://dhakarobotics.com/
0 notes
Video
youtube
This week I experimented with amplifying signals using transistors. Unfortunately, I didn’t buy an Arduino Leonardo yet, which is why the Keypress library did not work. As an alternative, I used Serial Communication (p5.serialcontrol) to connect the Arduino to my game.
Julia Daser
0 notes

Text
Arduino is essentially a language designed for interacting with and operating interactive objects and digital devices. Arduino has immense potential, since it’s being increasing used for controlling remote controlled objects such as drones. If you are looking for a book on Arduino, this article will serve as the base for taking a decision and choosing the right book that will help you sharpen your skill in Arduino. This article will give you information about seven best Arduino books that are regarded as featured books. Arduino is open source software (IDE) which makes it a breeze to write as well as upload codes to a board. Moreover, Arduino runs on Mac OS X, Linux as well as Windows. The environment of Arduino is written in Java language; also it’s based on open-source software and processing. Take help of the information furnished in the books and explore the horizon of Arduino programming. Programming Arduino Getting Started with Sketches (By: Simon Monk ) Learn Arduino programming with ease with the easy-to-follow and clear examples featured in the book. The book contains the software side of Arduino and describes the way of writing the program using the well-crafted sketches using modified C programming language meant for Arduino. The book features downloadable sample programs that can be modified as per your requirement. The easy explanation and details crafted in the book make is one of the best books to learn Arduino. You can structure your data by using strings and arrays. The book also helps you learn how to use digital and analog inputs and outputs of Arduino in the programs. Programming Arduino Next Steps: Going Further with Sketches (By: Simon Monk ) This is the second book of the series that makes you understand the next step of the beginner’s guide. You can take your Arduino understanding and skills to the next level with this easy-to-study book. This book on Arduino basically is a practical guide and the secret of the professional Arduino programming is revealed by electronics guru Simon Monk taking every possible aspect under the hood. The book features the coverage of Arduino Uno, Due Boards and Leonardo. This book is all-in-one repository and features more than 75 examples and sketches. Exploring Arduino: Tools and Techniques for Engineering Wizardry (By: Jeremy Blum ) This book is the best book as far as the third step is concerned – understanding the tools and techniques of Arduino. This book is all about that and helps you learning to build robots, gizmos and gadgets using Arduino. This book is written by Jeremy Blum – the Arduino expert – and is a unique book that uses the popular Arduino microcontroller platform, which is an instrument that teaches you about programming, electrical engineering and also human-computer interaction. Beginning C for Arduino: Learn C Programming for the Arduino (Technology in Action) (By: Jack Purdum ) This is the Arduino best book for those who do not have prior experience in programming of microcontrollers. This book is written so well and in easy-to-understand way that it helps the readers to understand the aspects of Arduino and help them learn as well and experiment. This book starts with an introduction to C language and reinforces every programming structure using simple demonstrations. Author Jack Purdum has used a very engaging style of writing in order to teach good and efficient techniques of programming. Arduino Workshop: A Hands-On Introduction with 65 Projects (By: John Boxall ) This book offers hands-on experience on Arduino programming with 65 projects. With the help of this book, you can learn the basics of Arduino programming, build a project after learning and finally create your own Arduino program. Arduino is basically an easy, flexible, cheap and open source microcontroller programming platform that offers students to learn and create their own homemade projects and this book is the best one in this category. This book
gives you an opportunity to learn and create devices using almost unlimited range of input and output sensors, displays, indicators or add-ons. Arduino For Dummies (By: John Nussey ) Arduino is not just an ordinary circuit board and corresponding software. It does not matter whether you are a designer, artist, hobbyist or a programmer, Arduino enables you to play with electronics. This book helps you learn building a variety of circuits that can control or sense things in the real world. If you have loads of ideas that you want to bring to the real world or you have curiosity to know and learn the possibilities, this book is perfect for you to read. The best part about this book is that it enables you to learn by writing the programs in real time. Arduino Cookbook (By: Michael Margolis ) Do you want to build devices that can interact with the real world? This cookbook is the perfect answer to that question. This is book is an all-in-one cookbook for you if you want to experiment with popular Arduino programming or microcontroller environment. The book offers more than 200 techniques and tips in order to build a variety of objects and prototypes like robots, detectors and toys along with interactive clothing, which sense and respond to light, heat, position, sound and touch.
0 notes
Note
I ended up gutting mine and putting an Arduino due or Leonardo in there (one that can handle mouse and keyboard output, can't remember which board exactly) and got it to work the way I wanted. The board itself didn't even fit so it became a weird Frankenstein of nodes connected together.
It uses a membrane keyboard that I ended up manually mapping to hard coded macros on the Arduino, and the keyboard quality honestly is kind of trash, it's just a really cool form factor.
It was tricky as hell to figure out the mapping on the joystick because despite having an x and y axis, I think it was rotated at a weird angle to fit in the case? It's been years so I can't recall exactly how I handled it, but the long and short of it is that I dropped the proprietary software because it was too limiting.
I'll post pictures later if I can find it.
no idea if this is the format for this, I'm new here I swear I'm not a bot, I feel like you posted a while ago about using a Logitech G13 as a hip mounted keyboard. If that's not right I'll fuck right off but if you did did you get the joystick to work? If so: how? I got one independent of seeing that and I'm trying to get games to recognize that the joystick and joystick and it's driving me up a wall
It wasn't a G13, it was a Belkin N52 Nostromo because its primary construction features a gap for a belt-loop.
Can you send me a photograph of the serial number of your device, or tell me which version of the G13 you have, and we'll troubleshoot it?
I've been thinking of buying a G13 to take it apart and study it so I'm going to look at this as a learning experience.
20 notes
·
View notes
Text

Buy Quality Arduino Boards Online
The best collection high quality Arduino board including Arduino UNO, Mega, Micro, Pro mini, Leonardo, Due, and LilyPad. These boards are available at Tomson Electronics at the best price. Pan India delivery within 7 working days. Hyper delivery is available in Kochi, Ernakulam. Fast shipping to all places in Kerala and South India.
#wholesale electronics distributor tamilnadu#Top Electronics Components Distributors#Buy IT & Electronic Items Online at Best Price in India#Buy IT & Electronic Items Online at Best Price#LED lights bulk purchase India#Consumer electronics distributor India#Wholesale electronics marketplace
0 notes
Text
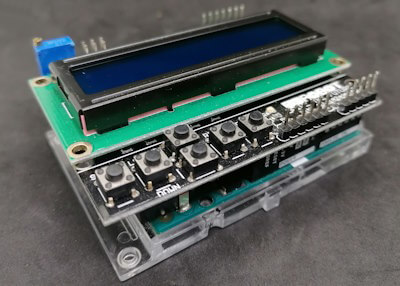
LCD Keypad Shield für Arduino: Einsteigerfreundliches Display mit Tastensteuerung

Das coole LCD Keypad Shield gibt es schon sehr lange auf dem Markt und wurde auch auf anderen Seiten schon beschrieben. Dieser Beitrag soll jedoch etwas tiefer gehen und ich möchte dir, nachdem ich den Aufbau und die Programmierung erläutert habe, ein cooles nützliches Projekt mit diesem zeigen. https://youtu.be/4eqaoDKCIZU Ich möchte meinem ehemaligen Abteilungsleiter im Elektroniklabor herzlich danken. Durch die großzügige Möglichkeit, sich bei der Auflösung des Labors zu bedienen, konnte ich unter anderem das LCD Keypad Shield für Arduino erhalten.

Technische Daten
Zunächst zu den technischen Daten des LCD Keypad Shield: HerstellerDF-RobotBetriebsspannung5VAbmessungen80 mm x 58 mmFeatures2x16 Zeilen LCD-Display, 1x Potentiometer zur Regulierung der Hintergrundbeleuchtung, 6 Taster (davon 1 Taster für RESET),
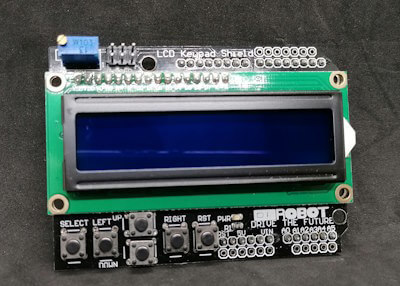
Aufbau des LCD Keypad Shield
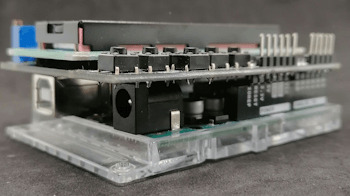
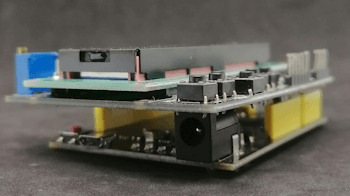
Das Shield verfügt über ein 2x16 Zeichen LCD-Display und sechs Tasten, welche mit SELECT, LEFT, UP, DOWN, RIGHT und RST (Reset) beschriftet sind. Zusätzlich hast du ein Drehpotentiometer zum Regulieren der Hintergrundbeleuchtung.

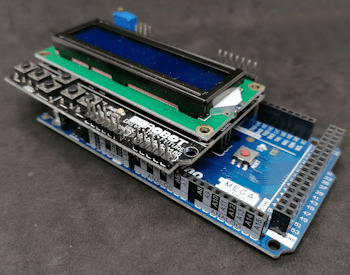
Aufbau des LCD Keypad Shield von DF Robot Das Shield ist fertig aufgebaut auf einer Platine, welche du direkt auf einen Arduino UNO R3 / R4, Leonardo oder Mega 2560 R3 stecken kannst. Du kannst mit zusätzlichen Stiftleisten noch die freien Pins des Mikrocontrollers nach oben führen und so an diese Pins weitere Komponenten (Sensoren, Aktoren) anschließen.
Der Mega 2560 R3 hat deutlich mehr digitale & analoge Pins und somit verbleiben noch weitere für ein eventuelles Projekt mit dem LCD Keypad Shield.
Pinout des LCD Keypad Shield
Bevor wir dieses Shield programmieren können, müssen wir zunächst prüfen, an welche Pins die Taster und das LCD-Display angeschlossen ist. KomponenteArduino UNO R3LCD-DisplayRSD8EnableD9D4D4D5D5D6D6D7D7TasterA0 Analoge Werte der Tasten am LCD Keypad Shield Die Taster sind alle am analogen Pin A0 angeschlossen und liefern beim Betätigen jeweils unterschiedliche Werte. Über diese Werte kann man die betätigte Taste im Code quasi recht einfach erkennen. Tasteranaloger WertSELECT640LEFT409RIGHT0UP99DOWN256 Unterschiede bei Mikrocontrollern Für die Schaltung in diesem Beitrag verwende ich den originalen Arduino UNO R3, dieser ist deutlich wertiger aufgebaut als die einfachen China Klone. Durch die andere Verarbeitung sind auch die Werte, welche die Tasten beim Betätigen liefern etwas anders als wie bei besagten Mikrocontrollern auch China. Getestet habe ich die Werte mit: - dem originalem Arduino UNO R3, - dem Funduino UNO R3, - einem Noname China Klone, - dem Funduino Mega 2560 R3,
Programmieren des LCD Keypad Shield in der Arduino IDE
Die Programmierung erfolgt in der Arduino IDE wobei ich hier die aktuelle Version 2.0.x verwende. Du kannst die nachfolgenden Programme aber auch in der klassischen Version 1.8.x programmieren (welche unter Umständen etwas schneller ist). Schritt 1 - auslesen der Taster Mit nachfolgendem Code lesen wir zunächst die Werte der Tasten aus und geben diese auf der seriellen Schnittstelle aus. #define taster A0 void setup() { Serial.begin(9600); pinMode(taster, INPUT); } void loop() { Serial.println(analogRead(taster)); delay(250); } Das Shield habe ich hier an einen Funduino Mega 2560 angeschlossen und dieser liefert ein paar unterschiedliche Werte für die Tasten (um genau zu sagen, um eins versetzt).
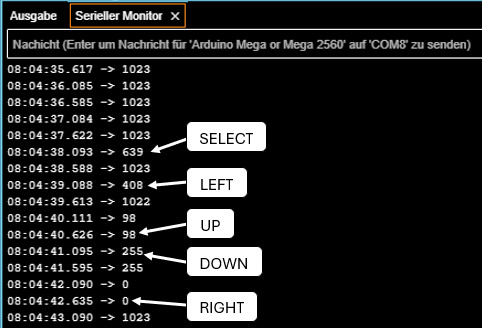
analoge Werte der Tasten am LCD Keyad Shield
Schritt 2 - Programmieren des 2x16 LCD-Display
Wie du ein LCD-Display programmierst, habe ich dir bereits im Beitrag Arduino Lektion 7: LCD Display ansteuern erläutert, hier greife ich zunächst das Beispiel auf und zeige den Text "Hallo Welt!" auf der ersten Zeile und auf der zweiten Zeile die Buchstaben A bis P. #include //Das Display ist wiefolgt mit dem Shield / Mikrocontroller verbunden /** * rs > D8 * enabled > D9 * D4 > D4 * D5 > D5 * D6 > D6 * D7 > D7 **/ LiquidCrystal lcd(8, 9, 4, 5, 6, 7); void setup() { //Das LCD-Display mit 16 Zeichen und 2 Zeilen initialisieren //Die Bibliothek LiquidCrystal kann für viele LCD-Displays verwendet werden! lcd.begin(16, 2); //Erste Zeile mit dem Text "Hallo Welt!" belegen. lcd.print("Hallo Welt!"); //Die zweite Zeile soll mit den Buchstaben A bis P belegt werden. //Dafür legen wir uns eine Variable zeichen an und weisen dieser den Wert //65 zu dieser repräsentiert den ASCII Wert A siehe (https://draeger-it.blog/ascii-tabelle/) int zeichen = 65; for (int i = 0; i < 16; i++) { //Cursor an die Position i (aus der Schleife) und Zeile 1 setzen //die erste Zeile hat den Wert 0 und die zweite 1 lcd.setCursor(i, 1); //die Zahl in ein Charakter umwandeln lcd.print(char(zeichen)); //Die Zahl um eins erhöhen. zeichen++; //eine kleine Pause von 350ms delay(350); } } void loop() { //bleibt leer } Der obige Quellcode erzeugt die Ausgabe von "Hallo Welt!" in der ersten Zeile und die Buchstabenfolge von A bis P in der zweiten Zeile.
Beispiele für das LCD Keypad Shield am Arduino UNO R3
Nachdem ich dir jetzt gezeigt habe wie dieses Shield programmiert wird, möchte ich dir nun ein paar Beispiele aufzeigen welche du damit nachprogrammieren kannst. Beispiel 1- navigieren durch ein Array Mit den Navigationstasten kannst du recht einfach über ein Array navigieren und mit der Taste SELECT die Auswahl bestätigen. Im ersten Beispiel möchte ich dir gerne zeigen wie du durch die Werte eines Arrays navigieren kannst. #include //initialisieren des Displays LiquidCrystal lcd(8, 9, 4, 5, 6, 7); //die Taster sind gemeinsam über den //analogen Pin A0 angeschlossen #define taster A0 //analoge Werte der Taster const int SELECT = 640; const int LEFT = 409; const int RIGHT = 0; const int UP = 99; const int DOWN = 256; //Aufbau des Menüs //maximale Anzahl der Einträge im Array const int NUM_MENU_ITEMS = 4; //aktueller Index int index = -1; //das Menü String menu = { "Eintrag 1", "Eintrag 2", "Eintrag 3", "Eintrag 4" }; //Feld für den Wert des Tasters welcher betätigt wurde. int tasterValue = -1; void setup() { //das LCD-Display hat 2 Zeilen mit maximal 16 Zeichen pro Zeile lcd.begin(16, 2); //der Index ist initial auf -1 gesetzt, //die Funktion displayMenuItem prüft anhand des Indexes und der gegebenen //Richtung welche Einträge angezeigt werden sollen displayMenuItem(true); } void loop() { //auslesen des analogen Wertes, dieser ändert sich je nach Taster tasterValue = analogRead(taster); //prüfen welcher Taster betätigt wurde switch (tasterValue) { case UP: displayMenuItem(false); break; case DOWN: displayMenuItem(true); break; case SELECT: doSomething(); break; } } //Diese Funktion zeigt zwei Daten auf dem LCD-Display an, abhängig //von dem Index und der Richtung welche navigiert werden soll. void displayMenuItem(bool directionDown) { //leeren des Displays lcd.clear(); //Zeile 2 soll den Inhalt "-ENDE-" haben wenn das Ende des Menüs erreicht wurde. String line2 = "-ENDE-"; //Wenn der Wert des Parameters //directionDown Wahr/True ist UND //der Wert vom index kleiner als die maximale Anzahl der Menüeinträge -1 ist, dann... if (directionDown && index < NUM_MENU_ITEMS - 1) { index++; } else if (!directionDown && index > 0) { index--; } //Die erste Zeile enthält den Text aus dem Menü mit dem Wert index. //Der erste Eintrag im Array hat den Eintrag 0! String line1 = menu; //prüfen ob das Ende des Menüs / Arrays erreicht wurde if (index < NUM_MENU_ITEMS - 1) { line2 = menu; } //Anzeigen der Daten auf dem Display lcd.setCursor(0, 0); lcd.print(">" + line1); lcd.setCursor(0, 1); lcd.print(" " + line2); //eine kleine Pause von 250ms um die Taster zu entprellen delay(250); } void doSomething() { //eine kleine Pause von 250ms um die Taster zu entprellen delay(250); } Mit den beiden Tasten UP & DOWN können wir nun durch das Menü navigieren. Die Taste SELECT wurde im Code bereits eingebunden, hat jedoch derzeit noch keine Funktion. Beispiel 2 - Aktivieren / Deaktivieren von LEDs über ein Menü Ein einfaches Beispiel ist das Schalten von LEDs. Im nachfolgenden Beispiel möchte ich vier LEDs über das Menü Aktivieren bzw. Deaktivieren. Statt einer LED kannst du auch ein Relais schalten und somit andere Verbraucher steuern.
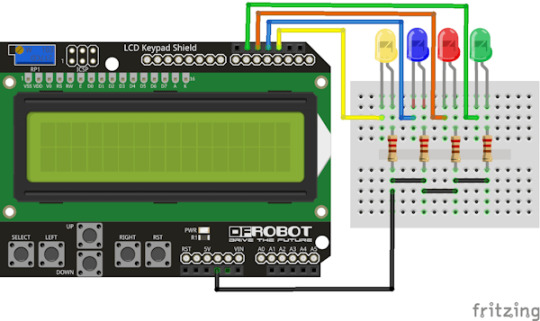
LEDLCD Keypad ShieldGelbD2BlauD3RotD11GrünD12Kathode / GNDGND Der Quellcode ist etwas länger geworden da ich hier eine Struktur für die LEDs implementiert habe welche die Daten für die Pins, den aktuellen Status sowie den Menüeintrag beinhalten. struct MenuItem { int ledPin; bool ledStatus; String caption; }; Damit können wir nun über einen sprechenden Namen auf die jeweilige LED zugreifen aber auch unser Menü aufbauen. MenuItem mILedGelb = { 2, false, "LED Gelb" }; MenuItem mILedBlau = { 3, false, "LED Blau" }; MenuItem mILedRot = { 11, false, "LED Rot" }; MenuItem mILedGruen = { 12, false, "LED Gruen" }; //maximale Anzahl der Einträge im Array const int NUM_MENU_ITEMS = 4; //das Menü MenuItem menu = { mILedGelb, mILedBlau, mILedRot, mILedGruen }; Der komplette Quellcode zum steuern von LEDs über ein Menü am LCD Keypad Shield: #include //initialisieren des Displays LiquidCrystal lcd(8, 9, 4, 5, 6, 7); //die Taster sind gemeinsam über den //analogen Pin A0 angeschlossen #define taster A0 //analoge Werte der Taster const int SELECT = 640; const int LEFT = 409; const int RIGHT = 0; const int UP = 99; const int DOWN = 256; //Feld für den Wert des Tasters welcher betätigt wurde. int tasterValue = -1; //Aufbau des Menüs //aktueller Index int index = -1; //Struktur für ein Menüeintrag struct MenuItem { int ledPin; //der Pin der LED bool ledStatus; //der Status String caption; //Text für das Menü }; //initialisieren der Menüeinträge MenuItem mILedGelb = { 2, false, "LED Gelb" }; MenuItem mILedBlau = { 3, false, "LED Blau" }; MenuItem mILedRot = { 11, false, "LED Rot" }; MenuItem mILedGruen = { 12, false, "LED Gruen" }; //maximale Anzahl der Einträge im Array const int NUM_MENU_ITEMS = 4; //das Menü MenuItem menu = { mILedGelb, mILedBlau, mILedRot, mILedGruen }; void setup() { //Pins der LEDs als Ausgang definieren pinMode(mILedGelb.ledPin, OUTPUT); pinMode(mILedBlau.ledPin, OUTPUT); pinMode(mILedRot.ledPin, OUTPUT); pinMode(mILedGruen.ledPin, OUTPUT); //das LCD-Display hat 2 Zeilen mit maximal 16 Zeichen pro Zeile lcd.begin(16, 2); //der Index ist initial auf -1 gesetzt, //die Funktion displayMenuItem prüft anhand des Indexes und der gegebenen //Richtung welche Einträge angezeigt werden sollen displayMenuItem(true, false); } void loop() { //auslesen des analogen Wertes, dieser ändert sich je nach Taster tasterValue = analogRead(taster); //prüfen welcher Taster betätigt wurde switch (tasterValue) { case UP: displayMenuItem(false, false); break; case DOWN: displayMenuItem(true, false); break; case SELECT: doSomething(); break; } } //Diese Funktion zeigt zwei Daten auf dem LCD-Display an, abhängig //von dem Index und der Richtung welche navigiert werden soll. //Parameter updateOnly steuert ob der Index erhöht oder verringert werden soll, //bei true wird der Abschnitt übersprungen void displayMenuItem(bool directionDown, bool updateOnly) { //leeren des Displays lcd.clear(); //Zeile 2 soll den Inhalt "-ENDE-" haben wenn das Ende des Menüs erreicht wurde. String line2 = "-ENDE-"; if (!updateOnly) { //Wenn der Wert des Parameters //directionDown Wahr/True ist UND //der Wert vom index kleiner als die maximale Anzahl der Menüeinträge -1 ist, dann... if (directionDown && index < NUM_MENU_ITEMS - 1) { index++; } else if (!directionDown && index > 0) { index--; } } //Die erste Zeile enthält den Text aus dem Menü mit dem Wert index. //Der erste Eintrag im Array hat den Eintrag 0! MenuItem& itemLine1 = menu; //prüfen ob das Ende des Menüs / Arrays erreicht wurde lcd.setCursor(0, 1); if (index < NUM_MENU_ITEMS - 1) { MenuItem itemLine2 = menu; lcd.print(" " + itemLine2.caption + getLEDStatus(itemLine2.ledStatus)); } else { lcd.print("-ENDE-"); } //Anzeigen der Daten auf dem Display lcd.setCursor(0, 0); lcd.print(">" + itemLine1.caption + getLEDStatus(itemLine1.ledStatus)); Serial.println(itemLine1.ledStatus); //eine kleine Pause von 250ms um die Taster zu entprellen delay(250); } //Liefert anhand des boolschen Wertes einen Text //bei true wird " AN", //bei false wird " AUS" geliefert String getLEDStatus(bool status) { String result = " "; if (status == true) { result += "AN"; } else { result += "AUS"; } return result; } //Führt eine Aktion aus void doSomething() { //Wichtig ist das wir das MenuItem aus dem Array mit //einem & entnehmen, damit holen wir uns keine Kopie //sondern eine Referenz. Dieses wird benötigt, da wir //den Status der LED togglen und speichern wollen. MenuItem& item = menu; //umkehren des Status der LED item.ledStatus = !item.ledStatus; //schreiben des aktuellen Status an die LED digitalWrite(item.ledPin, item.ledStatus); //aktualisieren des Displays displayMenuItem(true, true); //eine kleine Pause von 250ms um die Taster zu entprellen delay(250); } Über das Menü können wir nun jede LED einzeln ansteuern und Aktivieren bzw. Deaktiviern. Beispiel 3 - schalten von Relais über ein Menü Ich kann quasi schon den Kommentar erahnen "Wie mache ich das mit Relais?". Daher gleich als nächstes das Beispiel mit einem Relaisshield. Zunächst passen wir die Struktur des MenuItems für eine allgemeingültige Form an. //Struktur für ein Menüeintrag struct MenuItem { int pin; //der Pin bool status; //der Status String caption; //Text für das Menü }; In meinem Fall erstelle ich zwei Menüeinträge, zum einen für eine Gartenpumpe und für eine Lampe. //initialisieren der Menüeinträge MenuItem mI1 = { 2, true, "Gartenpumpe" }; MenuItem mI2 = { 3, true, "Lampe" }; //maximale Anzahl der Einträge im Array const int NUM_MENU_ITEMS = 2; //das Menü MenuItem menu = { mI1, mI2 }; Relais haben eine besonderheit diese sind bei einem aktiven Pin deaktiviert und bei einem deaktivierten Pin aktiviert. Dazu lege ich mir eine Variable an mit welcher man dieses übersteuern kann und somit der Code wiederverwendet werden kann. bool defaultDeactive = true; Das macht es nun möglich den Code im grunde zu belassen und wir brauchen lediglich unser Menü aufbauen. #include //initialisieren des Displays LiquidCrystal lcd(8, 9, 4, 5, 6, 7); //die Taster sind gemeinsam über den //analogen Pin A0 angeschlossen #define taster A0 //analoge Werte der Taster const int SELECT = 640; const int LEFT = 409; const int RIGHT = 0; const int UP = 99; const int DOWN = 256; //Feld für den Wert des Tasters welcher betätigt wurde. Read the full article
0 notes