#Automatic Batch Printing Machine Only For Labels
Explore tagged Tumblr posts
Visit Tumblr Blog
Explore Tumblr blogs with no restrictions, modern design and the best experience.
Last Seen Tumblr Blogs


Fun Fact
Total funding amounts to $125.3M.
Text
Top Benefits of Using Automated CD DVD Blu-ray Disc Publishers

Businesses and individuals alike often need to distribute large amounts of data quickly and efficiently. For those who rely on physical media like CDs, DVDs, and Blu-ray discs, automated disc publishing systems are an essential tool. These systems not only simplify the process of creating multiple copies of discs but also enhance the speed, accuracy, and reliability of distribution. In this blog, we’ll explore the top benefits of using automated CD, DVD, and Blu-ray disc publishers.
1. Increased Efficiency and Speed
One of the primary advantages of using an automated disc publisher is the increase in efficiency and speed. Manually burning discs one by one is time-consuming and labour-intensive. Automated disc publishers streamline the entire process by handling multiple discs simultaneously without any human intervention. Once the system is set up, it can automatically burn, print, and label dozens or even hundreds of discs in a short amount of time.
This not only saves time but also reduces the need for manual labour, which can free up employees to focus on other critical tasks.
2. High Volume Production
Automated disc publishers are designed to handle high-volume production, making them ideal for businesses that need to create multiple copies of discs quickly. Whether it’s for marketing materials, software distribution, or archival purposes, these machines can produce large batches of discs without compromising on quality.
With the ability to produce hundreds or even thousands of discs in a single run, businesses can meet tight deadlines and ensure that their products are distributed on time.
3. Consistency and Accuracy
When creating large batches of discs manually, there’s always the risk of human error. Whether it’s incorrect labelling, burning the wrong content, or other mistakes, these errors can lead to costly rework and delays. Automated CD, DVD, and Blu-ray disc publishers ensure consistency and accuracy at every step of the process.
From the burning of data to the printing of labels, these systems are designed to follow the exact instructions provided, ensuring that each disc is an identical, high-quality copy.
4. Professional-Quality Printing
Automated disc publishers come equipped with advanced printing capabilities, allowing users to print high-quality, professional labels directly onto the disc. This eliminates the need for adhesive labels, which can peel off over time, and provides a more durable, polished look.
Whether you’re producing discs for internal use or distributing them to customers, professional-quality printing can enhance your brand’s image and make your products stand out.
5. Cost-Effective Solution
While the initial investment in an automated disc publisher may seem high, it can be a cost-effective solution in the long run. By automating the disc production process, businesses can reduce labour costs and minimize the risk of errors, both of which can save money over time.
Additionally, these systems often use bulk ink or toner for printing, which can further reduce the cost per disc when compared to manual methods.
6. Customizable Features
Automated disc publishers offer a wide range of customizable features to meet the specific needs of different businesses. From the type of discs you use (CD, DVD, Blu-ray) to the type of data you burn (audio, video, software), these systems can be tailored to handle various tasks efficiently.
Many automated disc publishers also come with advanced software that allows you to manage and customize the disc creation process. You can easily create unique labels, select the data to be burned, and set up specific production runs to meet your business requirements.
7. Increased Data Security
When dealing with sensitive data, ensuring its security during distribution is crucial. Automated disc publishers can be used to burn encrypted discs, offering an extra layer of protection against unauthorized access. This is especially important for industries like healthcare, legal services, and financial institutions where data security is a top priority.
By using automated disc publishers, businesses can ensure that their data remains safe and secure throughout the distribution process.
8. Scalability
Another significant advantage of automated CD, DVD, and Blu-ray disc publishers is their scalability. Whether you need to produce 10 discs or 1,000, these systems can be scaled up or down to meet your production needs. This flexibility is essential for businesses that experience fluctuating demand or have seasonal spikes in production.
Being able to quickly scale your disc production ensures that you can meet customer demands without any delays.
9. Easy to Use
Despite their advanced capabilities, automated disc publishers are designed to be user-friendly. With an intuitive interface and simple setup procedures, businesses can begin producing discs with minimal training. This ease of use allows employees to quickly become proficient with the system, further increasing efficiency.
Many systems also come with remote management capabilities, allowing users to monitor and control the disc production process from any location.
10. Environmentally Friendly
Automatic disc publishers often come with environmentally friendly features, such as the ability to use energy-efficient printing methods and recyclable materials. By automating the process, businesses can reduce waste from manual errors, reprints, and excessive use of resources.
Additionally, many systems are designed to minimize power consumption, making them a green option for companies looking to reduce their environmental impact.
11. Improved Branding and Marketing
For businesses that rely on physical media for marketing purposes, automated disc publishers can enhance branding efforts. With high-quality printing and custom label designs, companies can create branded discs that leave a lasting impression on their clients and customers.
Whether it’s promotional materials, software or multimedia content, professionally produced discs can help improve brand perception and increase the effectiveness of marketing campaigns.
12. Reliable Technical Support
Many manufacturers of automated CD, DVD and Blu-ray Disc publishers offer reliable technical support, ensuring that any problems with the system are resolved promptly. This reduces downtime and ensures that businesses can continue their production without interruption.
Additionally, many systems come with warranties and regular software updates, which help maintain the performance of the system and extend its lifespan.
Conclusion
It’s important to have an efficient and reliable way to produce and distribute data. Automated CD, DVD and Blu-ray Disc publishers offer numerous benefits, from production speed and accuracy to cost savings and enhanced data security. These systems not only improve operational efficiency but also ensure that businesses can meet the demands of their customers while maintaining high-quality standards.
For businesses that want to streamline their disc production process and improve their overall productivity, investing in an automated disc publisher is a smart choice.
0 notes
Text
Electronic batch records enable pharmaceutical automation and paper elimination
In the intricate kingdom of pharmaceutical manufacturing, careful documentation is imperative at every stage. However, the reliance on paper records can be both time-consuming and susceptible to human errors. The pharmaceutical industry has included Electronic Batch Record (EBR) systems to streamline workflows and enhance accuracy. This article delves into how the innovative Process-XE system is transforming document creation across the pharmaceutical sector, from bulk processing to packaging.
Understanding Electronic Batch Records
Pharmaceutical companies opting for production solutions prioritize not only the digitization of forms but also seek to expedite form filling by automating data collection directly from machines. The comprehensive EBR solution covers a spectrum of processes, including product weighing, mixing, granulation, tableting, coating, packaging, and quality control. The system gathers data from various equipment such as scales and meters, minimizing the chances of errors and allowing real-time tracking of deviations from the norm during production. ProcessXE ensures compliance with Good Manufacturing Practice (GMP) standards.
The implementation of ProcessXE goes beyond digitizing documentation; it guides operators through the entire production process, including changeovers, quality control, logistics, and maintenance processes.
ProcessXE: An Advantage for Pharma
ProcessXE offers a complete system encompassing machine data acquisition, hardware, ERP integration, and infrastructure. Especially, it includes Master Batch Record (MBR) template creation, allowing clients to configure activities in the right sequence with defined roles and responsibilities. Each activity is customizable with reporting data types, such as numbers, text, and data read from automation, validated against preset quality limits.
Fields in the forms cover a range of parameters, including task completion status, production values, task duration, electronic signatures, and remarks by responsible personnel. The system equips every work center with an operator panel, facilitating actions like selecting production orders, confirming actions, electronic signatures, step-by-step instructions, documentation display, production progress monitoring, traceability, and Overall Equipment Effectiveness (OEE) analysis.
Integration with SAP is seamlessly achieved through web services, and additional production process details can be configured in the ProcessXE Master Data module.
The Paperless Pharma Process
A paperless approach involves digitally guiding operators through production stages, displaying activity to-do lists, changeover information, and dedicated documentation for each step. ProcessXE Forms automates the filling of sheets, tables, and reports with real-time shift data, issuing timely task completion notifications and monitoring changes and deviations with an audit trail.
Mobile barcode scanners ensure validation and traceability of materials, with the system supporting label printing for boxes or containers. During sample testing, the system prompts the creation of new samples, generates labels for scanning in the laboratory, and automatically compares test results against set quality tolerances.
The batch approval process in ProcessXE mandates electronic signatures at each step, providing a transparent workflow. Notifications alert relevant roles, enabling personnel with the right permissions to monitor progress and KPIs for batch releases.
Benefits for Pharma Businesses
Implementing EBR with ProcessXE brings substantial benefits to pharmaceutical businesses. A 35% reduction in batch release time is achieved through workflow optimization and automated data gathering. Material validation, periodic quality checks, and digital instructions contribute to a 15% reduction in errors and waste. Additionally, On-Time-In-Full performance sees a 7% improvement.
EBR implementation fosters faster communication between departments, eliminates paper from production processes, and provides continuous monitoring of batch release statuses. ProcessXE emerges as a solution that not only enhances operational efficiency but also aligns with environmental sustainability goals.
For more details on batch records feel free to reach out to a member of the ProcessXE team.
#electronic batch manufacturing records#batch records#electronic batch records#electronic batch record software#batch record
1 note
·
View note
Link

Automatic Batch Printing Machine Only For Labels specially designed with Printing Speed. High Speed Automatic Batch Printing Machine, Automatic Batch Coding machines, Coding Machine, Code Printer Machine, Batch Printing Machines Manufacturers in India. Batch coder machine for the production requirement of approximately pieces per day to print help with special batch coding Machine and Ink Activator for reducer ink viscosity it stronger than permanent marker ink on most shiny surfaces, including shiny papers, most plastics. Automatic Labels, Cartons & Pouches Coding Machine.
#Automatic Batch Printing Machine#Automatic Batch Printing Machine Only For Labels#Code Printer Machine#Batch Printing Machine#Batch Printing Machine Manufacturer#Batch Coding Machine#Batch Coding Machine Manufacturer#Batch coder machine#Automatic Batch Coding machines#Automatic Batch Printing Machiners
3 notes
·
View notes
Text
The Application Of Automated Optical Visual Inspection Machine In Label Inspection
The basic working aim of label automatic Optical Inspection Systems is to identify the printing words on the products or packaging. For example, identify function of machine vision is often used in the catering industry. It uses ink-jet printer to indicate the code of production date, production batch and the expiration time. Because this printer has very quick speed and the printing quality will be declined when it is continuously used, in the end, there will be inconsistent codes or no code at all. In this case, if wrong printing occurs, it will have great impacts on the big batch production. The machine vision system can inspect the code completeness to ensure there is not missing printing, wrong printing, fuzzy or other poor printing on the production line.
Match label and products by optical inspection system
One of the common reasons for product recall is label faults which not only affect the products sales, but also cause customer to doubt the products quality.
Optical inspection device can be used to verify the goods to print accurate labels inside the labeling system. Typically, while the products are packaged, aoi system will document product specification information into the optical automated gadget, then use the sony excessive precision inspection camera to investigate the product label. If there is more than one string or wrong printing at the packaging, an automatic inspection device will use the air price to place the unqualified products out to the recycle container.
Machine vision automated can avoid the errors which cause by exhaustion and distraction and guarantee accuracy and productivity.
The packaging enterprise broadly uses optical sorting technology to manipulate and entire the labeling system manipulate, to prevent unqualified merchandise from getting into the market and make sure clients protection. Besides that, the visible machine can correct the label, check out the filling degree, readd bar code or dr bar code and different extra. The manufacturer apprehends that gadget vision system now not handiest improve the performance and production, but also improve the product's high-quality and emblem cognition.
Sipotek Technology is located in Shenzhen in China. The company designs and manufactures visual inspection systems with its avant-garde R&D department and a great experience in artificial vision technologies. Sipotek is a professional machine vision inspection system manufacturer from china.The Sipotek Technology staff supports customers 360 degrees automated optical inspection(AOI), from listening to their requests to the development of ambitious machines for quality control.
For more info about Industrial Applications, Visit Link: https://www.sipotek.net/applications/
1 note
·
View note
Text
Comparison of Medicinal cartoners and other cartoners
The pharmaceutical cartoning machine is an important mechanical equipment in the pharmaceutical production process. It not only ensures the sanitation of pharmaceutical packaging, but also speeds up the efficiency of pharmaceutical packaging. So, what are the advantages of the medicinal cartoning machine compared with other cartoning machines?
According to the structure of the machine, the cartoning machine can be divided into: vertical cartoning machine and horizontal cartoning machine. Generally speaking, the vertical cartoning machine packs faster, but the packaging range is relatively small. It is only for a single product such as medicine board, while the horizontal cartoning machine can pack a variety of products, such as soap, medicine, food, hardware, auto parts, etc.
Comparison of pharmaceutical cartoners with other cartoners
Other cartoners:
1. Need to insert the drug insert;
2. The production date, product batch number, expiration date, etc. should be randomly printed on the carton (such as the supervision code of special drugs);
3. Counting statistics of boxes (should meet the requirements of counting and issuing in Article 4703 of "Drug GMP Certification Inspection and Evaluation Standards";
4. Quality inspection of inner packaged drugs;
5. Can adapt to the requirements of changing batches/times. For other purpose cartoners, these special points do not have to be met.
Medicinal cartoning machine:
1. According to the way the packaged items enter the carton, it can be divided into horizontal and vertical. Among them, the model in which the packaged object is pushed into the carton in the horizontal direction is called the horizontal type, and the model in which the packaged object enters the carton in the vertical direction is called the vertical type.
2. According to the final carton sealing form, it can be divided into tongue type, adhesive type, hybrid type, labeling type, unfolding type, self-locking type, etc.
3. According to the shape of the packaged object, it can be divided into plate shape (such as blister packaging), bottle shape, tube shape, special shape, etc.
4. According to the specifications of the packaged items, it can be divided into single piece, double piece, multiple pieces, combined pieces (such as 1 antibiotic bottle powder injection + 1 ampoule water injection) and so on.
Shanghai Coolyoung Intelligent Technology Co., Ltd. is committed to the research and development, design, production, sales and service of automatic intelligent packing machines and their consumables. Provide customers with professional and customized packing solutions. If you are interested in our products, please contact us as soon as possible.
0 notes
Photo

Label Printing: Five Common Label Mistakes
Label design isn’t easy. There’s no question about it, some projects are more complex than others, but every project is complex and requires attention to detail. A reliable and experienced printer like Asset Print will definitely reduce the likelihood of making a mistake, but even the best label printer can’t spot every mistake. We’ve compiled a list of five common label printing mistakes, what causes them, and how they can be prevented. Hopefully this makes your life a little easier.
1. Colours are Off
Cause: There is almost no end to reasons that the colour of your finished label could be different than the colour of the artwork on your screen. Things like bad colour configuration on the designer’s monitor, files that are built with the wrong colour makeup, a press that wasn’t calibrated properly, or a laminate, varnish, or substrate that distorts the colour. Needless to say, getting colour right is a big deal. From brands with signature PMS colours, to simply matching one batch of products to the next, colour uniformity is crucial to consistent branding.
Remedy: Most printers have a colour control process. This usually involves calibrating presses to match PMS colours, using spectrophotometers to match printing to existing samples, and having experienced operators that watch for variation. But good colour management relies on good communication, which means that you have to be clear about what colours need to be matched, what gradients need to be monitored, and if there are any spot colours to hit. If you are using a laminate or substrate that could affect colour, make sure to get a press proof to see what it looks like before ordering a production run. In the age of digital printing, there are plenty of mechanisms to make sure colour is spot on, but it still requires you to be clear about your colour quality expectations.
2. Image is Blurry
Cause: There are a number of things that can cause blurry images, but most likely it’s one of two things: a print error or a file error. Print errors can happen due to faulty plates or errors in how the PDF was saved. File errors, on the other hand, are largely a result of using photographic images that are not high enough resolution (JPEG, TIFF, or PNG). Since they are not vector images, they might have been enlarged beyond their maximum resolution, resulting in blurry, pixelated images.
Remedy: Ensure file resolution and use vector images wherever possible. Vector images are a designer’s best friend. Since the image has been reduced to curves instead of dots, it can be resized at will and the resolution will still be crisp. Of course, Photoshop will still need to be used, and as long as the resolution is above 300 dpi it should be fine. If you can, use a dpi over 600, which should ensure the image is crisp and clean. If you’re not sure about the quality of an image, send it to a printer and ask, they will be able to tell in short order if the file is printable or not
3. Doesn’t Perform
Cause: Your label might look great when you get it, but not hold up to use very well. Whether it’s falling off when wet, getting scratched during shipping, or turning colours in the sun, no one likes to be stuck with boxes full of faulty labels. This can sometimes be a result of a material defect or failure, like a bad batch of adhesive or varnish. Most often, however, it is a result of poor communication with your label printer.
Remedy: Some material defects can’t be avoided, but most printers have processes in place to catch bad product before it goes out the door. The second and more common cause of poorly performing labels can be solved fairly easily, with a little patience. Make sure you explain, in as much detail as possible, the application of your label and what people do with your product. Will it be refrigerated? Is it shipped around? Does it come packed with other products, or by itself? Is it used indoors or outdoors? Exposed to heat? You don’t have to think of the questions, just explain the use and application of your product and your label printing service provider should be able to help select the substrate and adhesive appropriate for your project.
4. UPC Isn’t Right
Cause: UPC codes have become a common feature on retail products in the last few decades. It is a good business practice to make sure that your UPC is contributing to your product. The most common causes we see for poor UPC scans relate to the sizes of barcodes and the print contrast.
Remedy: In order to ensure the quality of barcodes, we verify them throughout the printing process. A verifier is designed to see barcode symbols in a manner similar to scanners and allows to predict successful scans on a variety of scanners. Verifiers evaluate multiple attributes of barcodes in a single scan. The nominal size of a UPC code is 1.469” wide x 1.02” high. The minimum recommended size is 80% of this or 1.175” wide x .816” and the maximum recommended size is 200% of the nominal size or 2.938” wide x 2.04” high. If you are reducing the size of your UPC, make sure you maintain the aspect ratio by reducing the width and height proportionally. An element included in this size is the quiet zones on both the left and right sides of the UPC. Quiet zones measure .125” and should be clear of any stray marks or graphics.
5. Application Problems
Cause: The most common issues with the automatic application of labels is that the unwind direction is incorrect (the labels are coming off the roll the wrong way) or the rolls that you are using are not the correct size for your applicator. These details are often overlooked when planning your job because the customer is so focused on getting their artwork finished and getting their labels produced. Luckily, both of these issues can easily be avoided.
Remedy: Communicate with your printer and packager. Try to visualize the entire process when starting your project, how you get your labels on your product is very important. If you know how this is going to be done, either in your facility or at a co-packer, let your printer know how your rolls need to be delivered to you. Left side off first, top off first, etc, this is a simple adjustment that can be made before your order is printed. Also if you are using your own equipment, make sure you know what size rolls your equipment can handle. Most semi-automatic machines can only take an 8” outside roll diameter. Your printer most likely will produce your job the most efficient way, if you do not specify and that will mean larger rolls in most cases. If you are working with a co-packer, make sure that you have their specifications and pass them along to your printer. These issues can normally be fixed, but not without taking the time to ship them back to the printer to be rewound, which is costly in both time and money.
.
.
Article from https://stickerit.co/
0 notes
Link
Automatic Batch Printing Machine Only for Carton’s manufacturer high-quality equipment for printing on labels, Pouches, etc. Also, we are a manufacturer, exporter, and, supplier of for widest printing industries. Main features of the machine are Automatic feeding, quick & easy adjustment, easy controls, accurate registering, uniform impression, and high speed. Automatic Batch Coding Machine, Semi-Automatic Batch Coding Machine Price, Semi-Automatic Batch Coding Machine, Automatic Batch Printing Machine, Automatic Batch Printing Machine Manufacturer, Automatic Batch Printing Machine Price, Automatic Batch Printing Machine Seller, Printing Machine For Cartoons, Automatic Batch Printing Machine For Cartons, Manufacturer Of Automatic Batch Printing Machine For Cartons
#Automatic Batch Coding Machine#Semi-Automatic Batch Coding Machine Price#Semi-Automatic Batch Coding Machine#Automatic Batch Printing Machine#Automatic Batch Printing Machine Manufacturer#Automatic Batch Printing Machine Price
0 notes
Text
HEALTHY GROWTH WITH GHEE PACKING MACHINE MANUFACTURER, NICHROME.

Ghee is widely used in Indian cooking, and is the second largest consumed dairy product in India. The ghee market is growing due to various forces: population growth, rising disposable incomes, easy availability, and greater awareness about the health benefits of ghee. No wonder the ghee market is growing at a CAGR of around 15% during 2019-2024.
Currently, Uttar Pradesh represents the largest market, accounting for majority of the total ghee market in the country. It is followed by Rajasthan and Madhya Pradesh. Some of the prominent players operating in the market include GCMMF, RCDF, Mother Dairy, Patanjali, SMC Foods, etc. (ref: https://www.researchandmarkets.com/reports/4763046/ghee-market-in-india-industry-trends-share)
Ghee packaging materials with Nichrome
Although ghee has long keeping quality and can be stored for 6 to 12 months under the right conditions, proper filling and packaging plays a crucial role. Exposure to heat, light, air, water vapour and certain metals can cause deterioration, making ghee rancid.
Nichrome offers technology to package ghee in all the most commonly used packaging materials:
Tin Cans: These are generally used for bulk packs of 5L and 15L, and coated to ensure rusting does not occur.
Glass bottles: These provide excellent protection to the ghee quality. Glass bottles are generally used for retail packs of 100g to 500g.
Semi-rigid containers: These are generally made from HDPE and offer the advantages of being light weight, economical and transport-worthy. These come in different types: blow moulded HDPE bottles, jars & jerry cans; and PET bottles which are odour free and offer gas barrier properties.
Flexible pouches: These are the most economical for ghee packaging. Materials used for pouches are chosen to fulfil the following criteria:
- should not react with ghee
- should be easily available at low cost
- should be nontoxic
- should not allow printing ink to penetrate into the ghee
- should have good barrier properties against spoilage
- should withstand transportation
Nichrome’s ghee packaging solutions
Nichrome offers many solutions for ghee packaging to match your space, packaging format and budget requirements. Following are the 3 most popular ones:
VFFS ghee pouch packaging machine
Nichrome’s most popular ghee packing machine is the FILPACK SERVO SMD, a durable, heavy-duty performer, with touch screen HMI panel and PLC that controls operations. It occupies less floor space and has an enclosed SS cabinet for hygienic operation.
For packaging ghee and other viscous products such as oil, ketchup, fruit pulp, mayonnaise, curry pastes, and even grease, paint, adhesives, etc., FILPACK SERVO SMD operates at a speed of 70 to 85 pouches per minute, depending on the size of the package.
It packs in 3 side seal pouches in quantities ranging from 50 ml to 1000 ml.
FILPACK SERVO SMD comes with twin head construction with independent head operation so you can pack two different products and quantities simultaneously.
Bottle Filling Line
Nichrome offers an efficient integrated system for bottle filling and packaging that covers a turntable, UV sterilisation chamber, automatic liquid filling machine, cap feeding elevator, rotary capping machine, induction sealer, labelling machine, date & batch coding system, and packing table.
It is a PLC controlled system for viscous products such as ghee, ketchup, chocolate sauce and more. Other applications include a wide range of food & beverage liquids such as flavoured milk, soft drinks, energy drinks, water & buttermilk; non-food liquids such as perfumes, oil, shampoo, handwash.
SKUs range from 100 ml to 20 ltrs.
Tin Filling Line
Nichrome's Tin Filling Line is a sturdy, low-maintenance system made for accurate and efficient performance. The PLC-controlled line has a digital LCD touch screen displaying settings, and safety enclosures with interlocks for rotary parts.
This is a tin/composite tin friendly line with auto lid feeding, placing and lid seaming. Machine construction is available in SS3014, SS316 and MS painted material. Various tin sterilisation and cleaning options are available.
Conclusion
The rising demand for ghee and the cost-effectiveness of flexible packaging are good reasons for ghee manufacturers to consider Nichrome's ghee packaging solutions. Nichrome not only offers the latest technology for ghee packaging, it offers the expertise to customise and manufacture solutions for enterprises big and small.
Four decades ago, Nichrome started operations as a pioneer in milk pouch packaging machines for India’s White Revolution. Today, Nichrome’s know-how and capabilities cover packaging of diverse dairy products. Nichrome is well known as a leading integrated packaging solutions provider, trusted for its top-notch technology, manufacturing capabilities, nation-wide support & service – and above all, its problem-solving skills. Nichrome loves to partner with customers through the complete life cycle, delivering the optimal application-specific solution.
Nichrome is based in Pune, India, with a sales & service network that spans India and the world. Nichrome has presence in 45 countries and more than 7000 successful installations worldwide.
#ghee pouch packaging machine#ghee packing machine#ghee packaging solutions#ghee packaging#milk pouch packaging machines#integrated packaging solutions#Tin Filling Line#Bottle Filling Line#FILPACK SERVO SMD#VFFS ghee pouch packaging machine#nichrome packaging#packaging machine manufacture#packaging machine
0 notes
Link
One of the Leading Manufacture, Trader, Supplier and Exporter, We offer best automatic Batch Printing Machine for Cartons, Main features of the machine are automatic feeding, quick & easy adjustment, easy controls, accurate registering, uniform impression and high speed., We are also Manufacturing Automatic Batch Printing Machine for Only Labels, Hand Operated batch Printing Machine, Semi-automatic Batch printing Machine printing machine, Automatic batch printing machine, batch printing machine
#Automatic Batch Printing Machine#Batch Printing Machine#Printing Machine#Printing Machine for Cartons#Automatic Printing Machine#Carton Coding Machine#Batch Coder Machine
0 notes
Text
How Pharmaceutical industries benefited by Packaging Machinery
Pharmaceutical packaging machines play a very vital role in the Pharma industries. Packaging machines are mainly used for the packing of the medicine and the main goal is to keep the goods or raw material safe and secure and no damage occurs physically or chemical to the products. The advanced level of pharmaceutical packaging machinery not only does the perfect packaging but also does, sealing hard filling wrapping and labeling.
Advantages of packaging machine in Pharma industries
Pharmaceutical Packaging machinery provides an efficient solution for preparing pharmaceutical products. The new pharmaceutical machinery includes all the processes of sealing, labeling, and hand packing in one machine.
Various Packaging Machine and its uses:
1) Automatic Blister packaging machine
A compact and multi functional for packaging industrial-grade blisters of solid products for medium-sized production batches, where flexibility and simplicity of the format changes are required.
2) Semi-Automatic Blister packaging machine
All the operation needed for blister packaging are carried out simply and quickly on the same machine, by changing and replacing the format-related parts and with no need to resort to wrenches or specialized personnel. It is also equipped with the printer to print all the parameters.
3) Tablet- feeding System
One a single machine that is suitable for all width and it also provides greater flexibility of use between blister lines. It increases productivity by 100%.
4) Track and Trace
Product in the pharmaceutical industries needs distinctive drug labeling and proof for drug identification where the roles come of track and trace machine comes. It is a very useful and essential machine for the Pharma industries.
5) X-ray and optical inspection machine
X-ray and an optical inspection machine is used for removing the impurities from the product. For the accurate and uniform appearance of the product X-ray and optical inspection is very necessary. Here in the product when the high performance of X-ray scanner is passed then it will remove the defective pieces from the production.
For more details visit us at Inos Technologies.
0 notes
Text
FashionTIY TIPS: Use Shopify To Open An Online Clothing Retail Store? You Need To Know These!
What is Shopify?
Shopify started running as early as 2006, with its headquarters in Canada. Their goal is simple: to provide a simpler operating platform for cross-border e-commerce. Shopify is a one-stop service e-commerce system that provides basic construction and management services for e-commerce websites, so clothing retailers don't have to worry about all technical issues.
Once you are familiar with the basic operations, clothing retailers only need to focus on the core business-how to promote and get orders for your online clothing retail store. Shopify can provide clothing retailers with complete e-commerce solutions, help users quickly build their own online clothing retail stores, and provide a full range of services including website security, page design, sales data statistics and more. Clothing retailers do not need to spend energy on software and network programming. Shopify will provide the infrastructure conditions and software maintenance management services needed to build and operate independent websites. Clothing retailers only need to focus on the core business of online sales.
At present, users of Shopify accounts exceed 1000,000+. But you need to know that Shopify is not a free platform, so many clothing retailers choose it is enough to explain the status of Shopify in e-commerce platforms.

How Shopify Works?
Charging Method
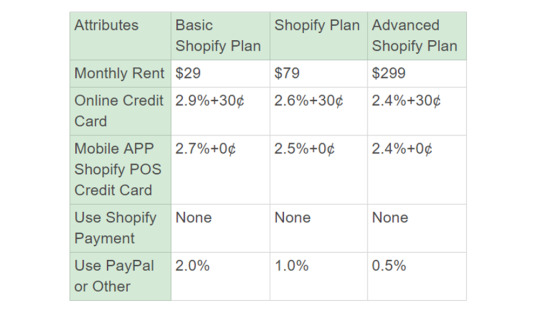
For newly registered users, there is a 14 days trial period. If clothing retailers want to continue to open a clothing store after the trial period, they have to pay to continue. Shopify charges a certain service fee on monthly, and there are 3 different plans to choose like Basic Shopify Plan, Shopify Plan, Advanced Shopify Plan.
For example: If using Paypal Express Checkout to collect a payment, the total cost calculation formula is:
Transaction Fee 2% + Paypal rate (4.4% + 0.3) + withdrawal fee 1.2% or $ 35.
For a women dress with a selling price of $ 100, the overall collection fee is
100 * 2% + (100 * 4.4% + 0.3) * (1-1.2%) = $ 6.65.
If you get $ 100, you only get close to $ 93! (Remember that the monthly rent of Shopify is not counted here, and the monthly cost of plugins)
Let's interpret the fee of the shop opening on Shopify:
Monthly Rent: It is the basic cost used to maintain the operation of the website, which is equivalent to the rent. Shopify will deduct this fee from your credit card every month. If you can't deduct money, your online clothing retail store will be suspended.
Credit Card Fee: This is the processing fee charged by the credit card company, and has nothing to do with the platform.
Transaction Fees: If clothing retailers use Shopify payment, you do not need to pay this fee, but if clothing retailers use other payment methods, then you must pay the transaction fee in accordance with the corresponding plan for each transaction.

Which Shopify Plan is Best?
You may have a question: Which of the 3 Shopify Plans is better? In fact, it depends on your retail market segment, type of clothing store, and business scale.
If you are a novice clothing retailer, it is recommended that you choose "Basic" (Basic Shopify Plan) which has all the necessary functions, and the price is not expensive. You may consider expanding to the Advanced Plan as your business grows later.
Remember to spend time on blades, such as product selection, website optimization and promotion which is more important than spending money.
Is Shopify Safety?
I just introduced some of the fees involved in Shopify. Many clothing retailers may ask: "Is Shopify safe? I have to bind various payment accounts and credit cards, will my information be stolen?". What I want to say is rest assured!
Just like other e-commerce platforms, not only clothing retailers but also there are so many other users in Shopify and no one has ever worried about such problems. Now Shopify also has 1000,000+ users. As a well-known e-commerce platform, security is the most basic guarantee, so don’t worry about it at all.
What are the Characteristics of Shopify?
Clothing retailers who using Shopify have to pay a sum of money to the platform every month, which must be worth the money. The main characteristics of Shopify are introduced below according to its various functions.

Sales Model
Shopify offers a variety of sales models with the following 5 types:
Online-Store: Each user can create their own online clothing retail store, which is easy to operate and convenient to manage.
Physical Sales: If clothing retailers want to open a physical clothing store, you can also choose Shopify. Shopify's POS system software and hardware combine to make payment more convenient. Shopify's special POS machine adopts high technology to ensure safe and easy to carry.
Integration with e-commerce Platforms: Can be combined with other e-commerce platforms to sell, such as Amazon, eBay.
Bind Social Media Accounts: Clothing retailers can bind various social accounts like Facebook, Instagram, Messenger as your marketing channels on Shopify. In order to maximize the use of social networks, Shopify integrates information platforms such as Facebook and Twitter, allowing clothing retailers to directly contact customers through these social applications on mobile apps. For example, Shopify internalized Twitter's "Buy" button, allowing clothing retailers to use Twitter to send links to recommended products based on consumers' interests. At this time, a "Buy" button will be automatically generated in the dialogue to facilitate consumers to complete the purchase. The clothing retailers can also directly contact customers through Facebook.
Embed on any Website: Clothing retailers can embed product information and purchase buttons on any website to make your sales everywhere.
In addition, you can also install the Shopify APP to manage stores and orders on your mobile phone anytime and anywhere.
Shopify Theme
A good theme is very important for online clothing retail stores, the Shopify has more advantages than other platforms. Shopify has a fully functional theme store-Shopify Theme store. The theme price is between $150 and $180. (one-time)
There are a large number of both free and paid Shopify themes here. And these Shopify themes are all customizable, clothing retailers can build the online store according to your preferences.

Payment Method
Language Setting: 50 different languages can be set on the customer payment method page, and other languages can also be added.
Automatic Calculation of Freight: Automatic calculation of freight according to different freight forwarders, including UPS, USPS, FedEx, etc. Clothing retailers can also buy and print shipping labels directly from online.
Shopping Cart Conversion Order Tool: If the customer adds the product to the shopping cart but does not place an order, you can send an email (provide discounts, etc.) to the customer to prompt the completion of the order later.
Automatic Calculation of Taxes and Fees: Automatic calculation of taxes and fees according to different regions, and then you can add this to the price.
Complete The Payment on The Current Page: Without an additional payment interface, the operation is safe and more convenient.
Diversity of Payment Identities: Clothing retailers can choose different identities for payment, and they are not required to pay by login account.

Marketing & SEO
Provide the best Solution for SEO: Shopify follows the best solution for SEO. There are many features that are conducive to the SEO of the website. You can set product tags to describe the title and content.
Discount: Clothing retailers can customize the discount rules and coupons. In the more advanced version, gift cards can also be set.
Mail Templates: Shopify provides special mail templates to replace users for email marketing.
Product Reviews: Your online clothing retail store can display various customer feedback on your products and services.
Analysis Tools: Shopify has built-in analysis tools, you can see all the information about your clothing retail store including which product sells best and analyze the activity level of the release.
Binding Social Media Accounts: It is convenient to bind various social accounts, such as Facebook, Twitter, Instagram, and then combine these platforms for product promotion. For example, the picture you post on Instagram with a link to Shopify's product will take you to your product page if you click on it. This is the most direct way to use Instagram for marketing.
Product Management
Upload Unlimited Products: There is no limit to the number of products, and clothing retailers can use Shopify's inventory management software to manage.
Product Diversity: Different colors or sizes of the same dress can be displayed as different products.
Virtual Electronic Products: In addition to physical products, virtual electronic products can also be sold, such as software, games, and apps.
Batch Import/Export: Manage all products in batches to improve work efficiency.
After-Sales Service and Technical Support
Shopify's after-sales service and technical support are also very powerful, with a variety of service channels:
The phone
Live chat
E-mail
Questions can be consulted at any time, these are online 24/7. In addition, there are other channels to help you solve problems encountered:
Support Template for Shopify Homepage
Help Center
Forum
Audio and Video
Shopify Expert
Shopify Related Articles and Guides

What are the Cons of Shopify?
Shopify's enhanced features need to be implemented through plugins, but too much plugin will affect the operation of the website.
With the increase in traffic, Shopify requires more functions, and the expandability of Shopify is relatively poor.
In addition to PayPal's transaction fees, Shopify also charges 1~2% transaction fees.
Product pictures cannot be displayed in equal proportions. Before uploading product pictures, you must crop the picture size
Exporting a blog from Shopify is troublesome.
In general, there is no perfect e-commerce platform, each e-commerce platform has its own pros and cons, the key is to know which one is more suit your online clothing retail store. I Want To Start My Online Retail Clothing Business. Should I Use Magento, Opencart, PrestaShop, or Shopify?But if you want to find a one-stop service e-commerce platform that is simple to operate and easy to manage to start your own online clothing retail store, then Shopify is for you. Hope the above introduction about Shopify can better help your clothing retail business.
FashionTIY is not only an online wholesale market but also a retail expert around you! We always strive to be the best online wholesale market for wholesalers and retailers. For more information about products and wholesale, please feel free to visit www.fashiontiy.com
0 notes
Text
FashionTIY TIPS: Use Shopify To Open An Online Clothing Retail Store? You Need To Know These!
What is Shopify?
Shopify started running as early as 2006, with its headquarters in Canada. Their goal is simple: to provide a simpler operating platform for cross-border e-commerce. Shopify is a one-stop service e-commerce system that provides basic construction and management services for e-commerce websites, so clothing retailers don't have to worry about all technical issues.
Once you are familiar with the basic operations, clothing retailers only need to focus on the core business-how to promote and get orders for your online clothing retail store. Shopify can provide clothing retailers with complete e-commerce solutions, help users quickly build their own online clothing retail stores, and provide a full range of services including website security, page design, sales data statistics and more. Clothing retailers do not need to spend energy on software and network programming. Shopify will provide the infrastructure conditions and software maintenance management services needed to build and operate independent websites. Clothing retailers only need to focus on the core business of online sales.
At present, users of Shopify accounts exceed 1000,000+. But you need to know that Shopify is not a free platform, so many clothing retailers choose it is enough to explain the status of Shopify in e-commerce platforms.

How Shopify Works?
Charging Method
For newly registered users, there is a 14 days trial period. If clothing retailers want to continue to open a clothing store after the trial period, they have to pay to continue. Shopify charges a certain service fee on monthly, and there are 3 different plans to choose like Basic Shopify Plan, Shopify Plan, Advanced Shopify Plan.
For example: If using Paypal Express Checkout to collect a payment, the total cost calculation formula is:
Transaction Fee 2% + Paypal rate (4.4% + 0.3) + withdrawal fee 1.2% or $ 35.
For a women dress with a selling price of $ 100, the overall collection fee is
100 * 2% + (100 * 4.4% + 0.3) * (1-1.2%) = $ 6.65.
If you get $ 100, you only get close to $ 93! (Remember that the monthly rent of Shopify is not counted here, and the monthly cost of plugins)
Let's interpret the fee of the shop opening on Shopify:
Monthly Rent: It is the basic cost used to maintain the operation of the website, which is equivalent to the rent. Shopify will deduct this fee from your credit card every month. If you can't deduct money, your online clothing retail store will be suspended.
Credit Card Fee: This is the processing fee charged by the credit card company, and has nothing to do with the platform.
Transaction Fees: If clothing retailers use Shopify payment, you do not need to pay this fee, but if clothing retailers use other payment methods, then you must pay the transaction fee in accordance with the corresponding plan for each transaction.

Which Shopify Plan is Best?
You may have a question: Which of the 3 Shopify Plans is better? In fact, it depends on your retail market segment, type of clothing store, and business scale.
If you are a novice clothing retailer, it is recommended that you choose "Basic" (Basic Shopify Plan) which has all the necessary functions, and the price is not expensive. You may consider expanding to the Advanced Plan as your business grows later.
Remember to spend time on blades, such as product selection, website optimization and promotion which is more important than spending money.
Is Shopify Safety?
I just introduced some of the fees involved in Shopify. Many clothing retailers may ask: "Is Shopify safe? I have to bind various payment accounts and credit cards, will my information be stolen?". What I want to say is rest assured!
Just like other e-commerce platforms, not only clothing retailers but also there are so many other users in Shopify and no one has ever worried about such problems. Now Shopify also has 1000,000+ users. As a well-known e-commerce platform, security is the most basic guarantee, so don’t worry about it at all.
What are the Characteristics of Shopify?
Clothing retailers who using Shopify have to pay a sum of money to the platform every month, which must be worth the money. The main characteristics of Shopify are introduced below according to its various functions.

Sales Model
Shopify offers a variety of sales models with the following 5 types:
Online-Store: Each user can create their own online clothing retail store, which is easy to operate and convenient to manage.
Physical Sales: If clothing retailers want to open a physical clothing store, you can also choose Shopify. Shopify's POS system software and hardware combine to make payment more convenient. Shopify's special POS machine adopts high technology to ensure safe and easy to carry.
Integration with e-commerce Platforms: Can be combined with other e-commerce platforms to sell, such as Amazon, eBay.
Bind Social Media Accounts: Clothing retailers can bind various social accounts like Facebook, Instagram, Messenger as your marketing channels on Shopify. In order to maximize the use of social networks, Shopify integrates information platforms such as Facebook and Twitter, allowing clothing retailers to directly contact customers through these social applications on mobile apps. For example, Shopify internalized Twitter's "Buy" button, allowing clothing retailers to use Twitter to send links to recommended products based on consumers' interests. At this time, a "Buy" button will be automatically generated in the dialogue to facilitate consumers to complete the purchase. The clothing retailers can also directly contact customers through Facebook.
Embed on any Website: Clothing retailers can embed product information and purchase buttons on any website to make your sales everywhere.
In addition, you can also install the Shopify APP to manage stores and orders on your mobile phone anytime and anywhere.
Shopify Theme
A good theme is very important for online clothing retail stores, the Shopify has more advantages than other platforms. Shopify has a fully functional theme store-Shopify Theme store. The theme price is between $150 and $180. (one-time)
There are a large number of both free and paid Shopify themes here. And these Shopify themes are all customizable, clothing retailers can build the online store according to your preferences.

Payment Method
Language Setting: 50 different languages can be set on the customer payment method page, and other languages can also be added.
Automatic Calculation of Freight: Automatic calculation of freight according to different freight forwarders, including UPS, USPS, FedEx, etc. Clothing retailers can also buy and print shipping labels directly from online.
Shopping Cart Conversion Order Tool: If the customer adds the product to the shopping cart but does not place an order, you can send an email (provide discounts, etc.) to the customer to prompt the completion of the order later.
Automatic Calculation of Taxes and Fees: Automatic calculation of taxes and fees according to different regions, and then you can add this to the price.
Complete The Payment on The Current Page: Without an additional payment interface, the operation is safe and more convenient.
Diversity of Payment Identities: Clothing retailers can choose different identities for payment, and they are not required to pay by login account.

Marketing & SEO
Provide the best Solution for SEO: Shopify follows the best solution for SEO. There are many features that are conducive to the SEO of the website. You can set product tags to describe the title and content.
Discount: Clothing retailers can customize the discount rules and coupons. In the more advanced version, gift cards can also be set.
Mail Templates: Shopify provides special mail templates to replace users for email marketing.
Product Reviews: Your online clothing retail store can display various customer feedback on your products and services.
Analysis Tools: Shopify has built-in analysis tools, you can see all the information about your clothing retail store including which product sells best and analyze the activity level of the release.
Binding Social Media Accounts: It is convenient to bind various social accounts, such as Facebook, Twitter, Instagram, and then combine these platforms for product promotion. For example, the picture you post on Instagram with a link to Shopify's product will take you to your product page if you click on it. This is the most direct way to use Instagram for marketing.
Product Management
Upload Unlimited Products: There is no limit to the number of products, and clothing retailers can use Shopify's inventory management software to manage.
Product Diversity: Different colors or sizes of the same dress can be displayed as different products.
Virtual Electronic Products: In addition to physical products, virtual electronic products can also be sold, such as software, games, and apps.
Batch Import/Export: Manage all products in batches to improve work efficiency.
After-Sales Service and Technical Support
Shopify's after-sales service and technical support are also very powerful, with a variety of service channels:
The phone
Live chat
E-mail
Questions can be consulted at any time, these are online 24/7. In addition, there are other channels to help you solve problems encountered:
Support Template for Shopify Homepage
Help Center
Forum
Audio and Video
Shopify Expert
Shopify Related Articles and Guides

What are the Cons of Shopify?
Shopify's enhanced features need to be implemented through plugins, but too much plugin will affect the operation of the website.
With the increase in traffic, Shopify requires more functions, and the expandability of Shopify is relatively poor.
In addition to PayPal's transaction fees, Shopify also charges 1~2% transaction fees.
Product pictures cannot be displayed in equal proportions. Before uploading product pictures, you must crop the picture size
Exporting a blog from Shopify is troublesome.
In general, there is no perfect e-commerce platform, each e-commerce platform has its own pros and cons, the key is to know which one is more suit your online clothing retail store. I Want To Start My Online Retail Clothing Business. Should I Use Magento, Opencart, PrestaShop, or Shopify?(插入046文章链接https://shimo.im/docs/erAdPg56XGiBepAG)But if you want to find a one-stop service e-commerce platform that is simple to operate and easy to manage to start your own online clothing retail store, then Shopify is for you. Hope the above introduction about Shopify can better help your clothing retail business.
FashionTIY is not only an online wholesale market but also a retail expert around you! We always strive to be the best online wholesale market for wholesalers and retailers. For more information about products and wholesale, please feel free to visit www.fashiontiy.com
0 notes
Text
The automatic cartoning machine market is promising
When you open a box of snacks, you look at the box with just the right packaging, and you must have felt: It is so exquisitely folded and the size is just right. Whose skill is it? In fact, these are all masterpieces of automatic cartoning machines.
As a new generation of mechanical products that replace manual boxing, the automatic cartoning machine is widely used in food, medicine and cosmetics industries. It can automatically load the product into the folding carton and complete the lidding action. At present, on the basis of automatic cartoning, some automatic cartoning machines have added additional functions such as sealing labels or heat shrink wrapping.
In my country, the automatic cartoning machine was first used in the pharmaceutical industry. However, because the processing and production of packaging cartons and the quality of packaging materials in our country did not meet the requirements at that time, the machine packaging could not be carried out well, so the automatic cartoning machine at that time basically belonged to Furnishings. In the 1980s, especially after the reform and opening up, my country's packaging technology has been greatly improved, and the packaging production field has also begun to embark on a road of rapid development. Since then, automatic cartoning machines have been fully applied, and some packaging equipment companies have also begun to emerge in the packaging market. Today, the automatic cartoning machine has experienced more than 30 years of development. Not only has the technology improved significantly, but the types have also increased a lot, which can basically fully meet the needs of packaging production in all walks of life in China.
According to different structures, automatic cartoning machines can be divided into vertical cartoning machines and horizontal cartoning machines. The vertical cartoning machines can be divided into automatic and semi-automatic. The packaging speed of the vertical cartoning machine is generally faster, but the scope of the packaging is small, so the targeted products are relatively single. The horizontal cartoning machine is aimed at a wide range of products, such as medicines, food, hardware and cosmetics, etc. It can be used, and its characteristic is to be more intelligent than the vertical cartoning machine, and it can complete the folding of the manual and print the batch number. Wait for more demanding work.
Regardless of the type of automatic cartoning machine, its work flow can be roughly divided into: unloading the box, opening, filling, printing batch number, closing the lid, etc. In general, the suction cup sucks the carton from the carton inlet Go down to the main line of the box, then open the carton and move it forward to the filling area for product filling. Finally, the relevant device pushes the box into the left and right guide rails to cover the box. Although the box cover action is the last step, it is also a very critical step. The completion of the box cover action is directly related to the final packaged product.
The rise of automatic cartoning machines not only saves labor costs for enterprises, but also has a higher degree of beauty in cartoning, and the error rate is much lower than that of manual labor. In the future, it will be applied to the higher-end packaging market.
Shanghai Coolyoung Intelligent Technology Co., Ltd. is committed to the research and development, design, production, sales and service of fully automatic intelligent packaging machines and their consumables. We have advanced technology and excellent product quality. If you are interested in our products, please contact us as soon as possible.
0 notes
Text
FashionTIY TIPS: Use Shopify To Open An Online Clothing Retail Store? You Need To Know These!
Use Shopify To Open An Online Clothing Retail Store? You Need To Know The Following:
What is Shopify?
Charging Method and the Fee of the shop opening on Shopify;
Shopify Plan & Shopify Safety;
Sales Model & Store Theme;
Payment Method;
Marketing SEO & Product Management;
After-Sales Service and Technical Support;
The Cons of Shopify;
What is Shopify?
Shopify started running as early as 2006, with its headquarters in Canada. Their goal is simple: to provide a simpler operating platform for cross-border e-commerce. Shopify is a one-stop service e-commerce system that provides basic construction and management services for e-commerce websites, so clothing retailers don't have to worry about all technical issues.
Once you are familiar with the basic operations, clothing retailers only need to focus on the core business-how to promote and get orders for your online clothing retail store. Shopify can provide clothing retailers with complete e-commerce solutions, help users quickly build their own online clothing retail stores, and provide a full range of services including website security, page design, sales data statistics and more. Clothing retailers do not need to spend energy on software and network programming. Shopify will provide the infrastructure conditions and software maintenance management services needed to build and operate independent websites. Clothing retailers only need to focus on the core business of online sales.
At present, users of Shopify accounts exceed 1000,000+. But you need to know that Shopify is not a free platform, so many clothing retailers choose it is enough to explain the status of Shopify in e-commerce platforms.
How Shopify Works?
Charging Method
For newly registered users, there is a 14 days trial period. If clothing retailers want to continue to open a clothing store after the trial period, they have to pay to continue. Shopify charges a certain service fee on monthly, and there are 3 different plans to choose like Basic Shopify Plan, Shopify Plan, Advanced Shopify Plan.
For example: If using Paypal Express Checkout to collect a payment, the total cost calculation formula is:
Transaction Fee 2% + Paypal rate (4.4% + 0.3) + withdrawal fee 1.2% or $ 35.
For a women dress with a selling price of $ 100, the overall collection fee is
100 * 2% + (100 * 4.4% + 0.3) * (1-1.2%) = $ 6.65.
If you get $ 100, you only get close to $ 93! (Remember that the monthly rent of Shopify is not counted here, and the monthly cost of plugins)
Let's interpret the fee of the shop opening on Shopify:
Monthly Rent: It is the basic cost used to maintain the operation of the website, which is equivalent to the rent. Shopify will deduct this fee from your credit card every month. If you can't deduct money, your online clothing retail store will be suspended.
Credit Card Fee: This is the processing fee charged by the credit card company, and has nothing to do with the platform.
Transaction Fees: If clothing retailers use Shopify payment, you do not need to pay this fee, but if clothing retailers use other payment methods, then you must pay the transaction fee in accordance with the corresponding plan for each transaction.
Which Shopify Plan is Best?
You may have a question: Which of the 3 Shopify Plans is better? In fact, it depends on your retail market segment, type of clothing store, and business scale.
If you are a novice clothing retailer, it is recommended that you choose "Basic" (Basic Shopify Plan) which has all the necessary functions, and the price is not expensive. You may consider expanding to the Advanced Plan as your business grows later.
Remember to spend time on blades, such as product selection, website optimization and promotion which is more important than spending money.
Is Shopify Safety?
I just introduced some of the fees involved in Shopify. Many clothing retailers may ask: "Is Shopify safe? I have to bind various payment accounts and credit cards, will my information be stolen?". What I want to say is rest assured!
Just like other e-commerce platforms, not only clothing retailers but also there are so many other users in Shopify and no one has ever worried about such problems. Now Shopify also has 1000,000+ users. As a well-known e-commerce platform, security is the most basic guarantee, so don’t worry about it at all.
What are the Characteristics of Shopify?
Clothing retailers who using Shopify have to pay a sum of money to the platform every month, which must be worth the money. The main characteristics of Shopify are introduced below according to its various functions.

Sales Model
Shopify offers a variety of sales models with the following 5 types:
Online-Store: Each user can create their own online clothing retail store, which is easy to operate and convenient to manage.
Physical Sales: If clothing retailers want to open a physical clothing store, you can also choose Shopify. Shopify's POS system software and hardware combine to make payment more convenient. Shopify's special POS machine adopts high technology to ensure safe and easy to carry.
Integration with e-commerce Platforms: Can be combined with other e-commerce platforms to sell, such as Amazon, eBay.
Bind Social Media Accounts: Clothing retailers can bind various social accounts like Facebook, Instagram, Messenger as your marketing channels on Shopify. In order to maximize the use of social networks, Shopify integrates information platforms such as Facebook and Twitter, allowing clothing retailers to directly contact customers through these social applications on mobile apps. For example, Shopify internalized Twitter's "Buy" button, allowing clothing retailers to use Twitter to send links to recommended products based on consumers' interests. At this time, a "Buy" button will be automatically generated in the dialogue to facilitate consumers to complete the purchase. The clothing retailers can also directly contact customers through Facebook.
Embed on any Website: Clothing retailers can embed product information and purchase buttons on any website to make your sales everywhere.
In addition, you can also install the Shopify APP to manage stores and orders on your mobile phone anytime and anywhere.
Shopify Theme
A good theme is very important for online clothing retail stores, the Shopify has more advantages than other platforms. Shopify has a fully functional theme store-Shopify Theme store. The theme price is between $150 and $180. (one-time)
There are a large number of both free and paid Shopify themes here. And these Shopify themes are all customizable, clothing retailers can build the online store according to your preferences.

Payment Method
Language Setting: 50 different languages can be set on the customer payment method page, and other languages can also be added.
Automatic Calculation of Freight: Automatic calculation of freight according to different freight forwarders, including UPS, USPS, FedEx, etc. Clothing retailers can also buy and print shipping labels directly from online.
Shopping Cart Conversion Order Tool: If the customer adds the product to the shopping cart but does not place an order, you can send an email (provide discounts, etc.) to the customer to prompt the completion of the order later.
Automatic Calculation of Taxes and Fees: Automatic calculation of taxes and fees according to different regions, and then you can add this to the price.
Complete The Payment on The Current Page: Without an additional payment interface, the operation is safe and more convenient.
Diversity of Payment Identities: Clothing retailers can choose different identities for payment, and they are not required to pay by login account.
Marketing & SEO
Provide the best Solution for SEO: Shopify follows the best solution for SEO. There are many features that are conducive to the SEO of the website. You can set product tags to describe the title and content.
Discount: Clothing retailers can customize the discount rules and coupons. In the more advanced version, gift cards can also be set.
Mail Templates: Shopify provides special mail templates to replace users for email marketing.
Product Reviews: Your online clothing retail store can display various customer feedback on your products and services.
Analysis Tools: Shopify has built-in analysis tools, you can see all the information about your clothing retail store including which product sells best and analyze the activity level of the release.
Binding Social Media Accounts: It is convenient to bind various social accounts, such as Facebook, Twitter, Instagram, and then combine these platforms for product promotion. For example, the picture you post on Instagram with a link to Shopify's product will take you to your product page if you click on it. This is the most direct way to use Instagram for marketing.
Product Management
Upload Unlimited Products: There is no limit to the number of products, and clothing retailers can use Shopify's inventory management software to manage.
Product Diversity: Different colors or sizes of the same dress can be displayed as different products.
Virtual Electronic Products: In addition to physical products, virtual electronic products can also be sold, such as software, games, and apps.
Batch Import/Export: Manage all products in batches to improve work efficiency.
After-Sales Service and Technical Support
Shopify's after-sales service and technical support are also very powerful, with a variety of service channels:
The phone
Live chat
E-mail
Questions can be consulted at any time, these are online 24/7. In addition, there are other channels to help you solve problems encountered:
Support Template for Shopify Homepage
Help Center
Forum
Audio and Video
Shopify Expert
Shopify Related Articles and Guides

What are the Cons of Shopify?
Shopify's enhanced features need to be implemented through plugins, but too much plugin will affect the operation of the website.
With the increase in traffic, Shopify requires more functions, and the expandability of Shopify is relatively poor.
In addition to PayPal's transaction fees, Shopify also charges 1~2% transaction fees.
Product pictures cannot be displayed in equal proportions. Before uploading product pictures, you must crop the picture size
Exporting a blog from Shopify is troublesome.
In general, there is no perfect e-commerce platform, each e-commerce platform has its own pros and cons, the key is to know which one is more suit your online clothing retail store. I Want To Start My Online Retail Clothing Business. Should I Use Magento, Opencart, PrestaShop, or Shopify? But if you want to find a one-stop service e-commerce platform that is simple to operate and easy to manage to start your own online clothing retail store, then Shopify is for you. Hope the above introduction about Shopify can better help your clothing retail business.
FashionTIY is not only an online wholesale market but also a retail expert around you! We always strive to be the best online wholesale market for wholesalers and retailers. For more information about products and wholesale, please feel free to visit www.fashiontiy.com
0 notes
Link
Python is an excellent programming language for creating data visualizations. However, working with a raw programming languages like Python (instead of more sophisticated software like, say, Tableau) presents some challenges. Developers creating visualizations accept more technical complexity in exchange for vastly more input into how their visualizations look. In this tutorial, I will teach you how to create automatically-updating Python visualizations using data from IEX Cloud using the matplotlib library and some simple Amazon Web Services product offerings.
Step 1: Gather Your Data
Automatically updating charts sound appealing, but before you invest the time in building them it is important to understand whether or not you need your charts to be automatically updated. To be more specific, there is no need for your visualizations to update automatically if the data they are presenting does not change over time. Writing a Python script that automatically updates a chart of Michael Jordan's annual points-per-game would be useless - his career is over, and that data set is never going to change. The best data set candidates for auto-updating visualizations are time series data where new observations are being added on a regular basis (say, each day). In this tutorial, we are going to be using stock market data from the IEX Cloud API. Specifically, we will be visualizing historical stock prices for a few of the largest banks in the US:
JPMorgan Chase (JPM)
Bank of America (BAC)
Citigroup (C)
Wells Fargo (WFC)
Goldman Sachs (GS)
The first thing that you'll need to do is create an IEX Cloud account and generate an API token. For obvious reasons, I'm not going to be publishing my API key in this article. Storing your own personalized API key in a variable called IEX API Key will be enough for you to follow along. Next, we're going to store our list of tickers in a Python list:
tickers = [ 'JPM', 'BAC', 'C', 'WFC', 'GS', ]
The IEX Cloud API accepts tickers separated by commas. We need to serialize our ticker list into a separated string of tickers. Here is the code we will use to do this:
#Create an empty string called `ticker_string` that we'll add tickers and commas to ticker_string = '' #Loop through every element of `tickers` and add them and a comma to ticker_string for ticker in tickers: ticker_string += ticker ticker_string += ',' #Drop the last comma from `ticker_string` ticker_string = ticker_string[:-1]
The next task that we need to handle is to select which endpoint of the IEX Cloud API that we need to ping. A quick review of IEX Cloud's documentation reveals that they have a Historical Prices endpoint, which we can send an HTTP request to using the charts keyword. We will also need to specify the amount of data that we're requesting (measured in years). To target this endpoint for the specified data range, I have stored the charts endpoint and the amount of time in separate variables. These endpoints are then interpolated into the serialized URL that we'll use to send our HTTP request. Here is the code:
#Create the endpoint and years strings endpoints = 'charts' years = '10' #Interpolate the endpoint strings into the HTTP_request string HTTP_request = f'https://cloud.iexapis.com/stable/stock/market/batch?symbols={ticker_string}&types={endpoints}&range={years}y&token={IEX_API_Key}'
This interpolated string is important because it allows us to easily change our string's value at a later date without changing each occurrence of the string in our codebase. Now it's time to actually make our HTTP request and store the data in a data structure on our local machine. To do this, I am going to use the pandas library for Python. Specifically, the data will be stored in a pandas DataFrame. We will first need to import the pandas library. By convention, pandas is typically imported under the alias pd. Add the following code to the start of your script to import pandas under the desired alias:
import pandas as pd
Once we have imported pandas into our Python script, we can use its read_json method to store the data from IEX Cloud into a pandas DataFrame:
bank_data = pd.read_json(HTTP_request)
Printing this DataFrame inside of a Jupyter Notebook generates the following output:

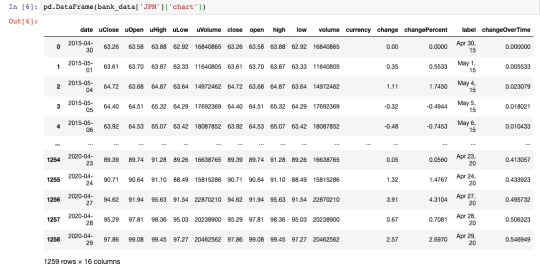
It is clear that this is not what we want. We will need to parse this data to generate a DataFrame that's worth plotting. To start, let's examine a specific column of bank_data - say, bank_data['JPM']:

It's clear that the next parsing layer will need to be the chart endpoint:
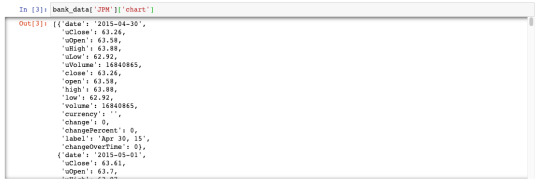
Now we have a JSON-like data structure where each cell is a date along with various data points about JPM's stock price on that date. We can wrap this JSON-like structure in a pandas DataFrame to make it much more readable:
This is something we can work with! Let's write a small loop that uses similar logic to pull out the closing price time series for each stock as a pandas Series (which is equivalent to a column of a pandas DataFrame). We will store these pandas Series in a dictionary (with the key being the ticker name) for easy access later.
for ticker in tickers: series_dict.update( {ticker : pd.DataFrame(bank_data[ticker]['chart'])['close']} )
Now we can create our finalized pandas DataFrame that has the date as its index and a column for the closing price of every major bank stock over the last 5 years:
series_list = [] for ticker in tickers: series_list.append(pd.DataFrame(bank_data[ticker]['chart'])['close']) series_list.append(pd.DataFrame(bank_data['JPM']['chart'])['date']) column_names = tickers.copy() column_names.append('Date') bank_data = pd.concat(series_list, axis=1) bank_data.columns = column_names bank_data.set_index('Date', inplace = True)
After all this is done, our bank_data DataFrame will look like this:
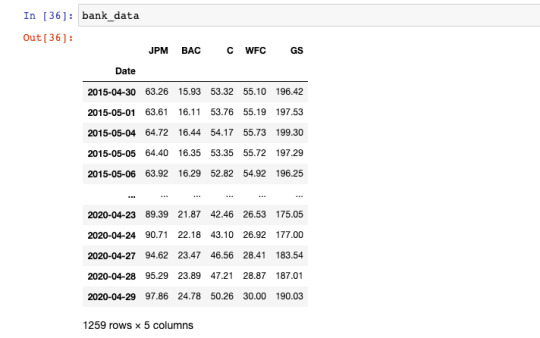
Our data collection is complete. We are now ready to begin creating visualization with this data set of stock prices for publicly-traded banks. As a quick recap, here's the script we have built so far:
import pandas as pd import matplotlib.pyplot as plt IEX_API_Key = '' tickers = [ 'JPM', 'BAC', 'C', 'WFC', 'GS', ] #Create an empty string called `ticker_string` that we'll add tickers and commas to ticker_string = '' #Loop through every element of `tickers` and add them and a comma to ticker_string for ticker in tickers: ticker_string += ticker ticker_string += ',' #Drop the last comma from `ticker_string` ticker_string = ticker_string[:-1] #Create the endpoint and years strings endpoints = 'chart' years = '5' #Interpolate the endpoint strings into the HTTP_request string HTTP_request = f'https://cloud.iexapis.com/stable/stock/market/batch?symbols={ticker_string}&types={endpoints}&range={years}y&cache=true&token={IEX_API_Key}' #Send the HTTP request to the IEX Cloud API and store the response in a pandas DataFrame bank_data = pd.read_json(HTTP_request) #Create an empty list that we will append pandas Series of stock price data into series_list = [] #Loop through each of our tickers and parse a pandas Series of their closing prices over the last 5 years for ticker in tickers: series_list.append(pd.DataFrame(bank_data[ticker]['chart'])['close']) #Add in a column of dates series_list.append(pd.DataFrame(bank_data['JPM']['chart'])['date']) #Copy the 'tickers' list from earlier in the script, and add a new element called 'Date'. #These elements will be the column names of our pandas DataFrame later on. column_names = tickers.copy() column_names.append('Date') #Concatenate the pandas Series together into a single DataFrame bank_data = pd.concat(series_list, axis=1) #Name the columns of the DataFrame and set the 'Date' column as the index bank_data.columns = column_names bank_data.set_index('Date', inplace = True)
Step 2: Create the Chart You'd Like to Update
In this tutorial, we'll be working with the matplotlib visualization library for Python. Matplotlib is a tremendously sophisticated library and people spend years mastering it to their fullest extent. Accordingly, please keep in mind that we are only scratching the surface of matplotlib's capabilities in this tutorial. We will start by importing the matplotlib library.
How to Import Matplotlib
By convention, data scientists generally import the pyplot library of matplotlib under the alias plt. Here's the full import statement:
import matplotlib.pyplot as plt
You will need to include this at the beginning of any Python file that uses matplotlib to generate data visualizations. There are also other arguments that you can add with your matplotlib library import to make your visualizations easier to work with. If you're working through this tutorial in a Jupyter Notebook, you may want to include the following statement, which will cause your visualizations to appear without needing to write a plt.show() statement:
%matplotlib inline
If you're working in a Jupyter Notebook on a MacBook with a retina display, you can use the following statements to improve the resolution of your matplotlib visualizations in the notebook:
from IPython.display import set_matplotlib_formats set_matplotlib_formats('retina')
With that out of the way, let's begin creating our first data visualizations using Python and matplotlib!
Matplotlib Formatting Fundamentals
In this tutorial, you will learn how to create boxplots, scatterplots, and histograms in Python using matplotlib. I want to go through a few basics of formatting in matplotlib before we begin creating real data visualizations. First, almost everything you do in matplotlib will involve invoking methods on the plt object, which is the alias that we imported matplotlib as. Second, you can add titles to matplotlib visualizations by calling plt.title() and passing in your desired title as a string. Third, you can add labels to your x and y axes using the plt.xlabel() and plt.ylabel() methods. Lastly, with the three methods we just discussed - plt.title(), plt.xlabel(), and plt.ylabel() - you can change the font size of the title with the fontsize argument. Let's dig in to creating our first matplotlib visualizations in earnest.
How to Create Boxplots in Matplotlib
Boxplots are one of the most fundamental data visualizations available to data scientists. Matplotlib allows us to create boxplots with the boxplot function. Since we will be creating boxplots along our columns (and not along our rows), we will also want to transpose our DataFrame inside the boxplot method call.
plt.boxplot(bank_data.transpose())

This is a good start, but we need to add some styling to make this visualization easily interpretatable to an outside user. First, let's add a chart title:
plt.title('Boxplot of Bank Stock Prices (5Y Lookback)', fontsize = 20)

In addition, it is useful to label the x and y axes, as mentioned previously:
plt.xlabel('Bank', fontsize = 20) plt.ylabel('Stock Prices', fontsize = 20)
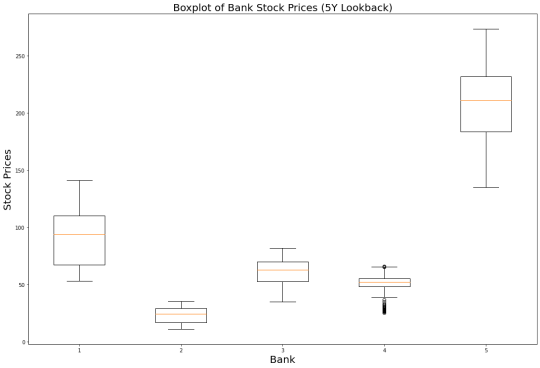
We will also need to add column-specific labels to the x-axis so that it is clear which boxplot belongs to each bank. The following code does the trick:
ticks = range(1, len(bank_data.columns)+1) labels = list(bank_data.columns) plt.xticks(ticks,labels, fontsize = 20)
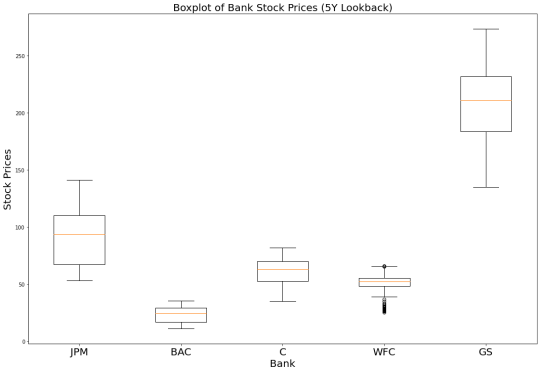
Just like that ,we have a boxplot that presents some useful visualizations in matplotlib! It is clear that Goldman Sachs has traded at the highest price over the last 5 years while Bank of America's stock has traded the lowest. It's also interesting to note that Wells Fargo has the most outlier data points. As a recap, here is the complete code that we used to generate our boxplots:
######################## #Create a Python boxplot ######################## #Set the size of the matplotlib canvas plt.figure(figsize = (18,12)) #Generate the boxplot plt.boxplot(bank_data.transpose()) #Add titles to the chart and axes plt.title('Boxplot of Bank Stock Prices (5Y Lookback)', fontsize = 20) plt.xlabel('Bank', fontsize = 20) plt.ylabel('Stock Prices', fontsize = 20) #Add labels to each individual boxplot on the canvas ticks = range(1, len(bank_data.columns)+1) labels = list(bank_data.columns) plt.xticks(ticks,labels, fontsize = 20)
How to Create Scatterplots in Matplotlib
Scatterplots can be created in matplotlib using the plt.scatter method. The scatter method has two required arguments - an x value and a y value. Let's plot Wells Fargo's stock price over time using the plt.scatter() method. The first thing we need to do is to create our x-axis variable, called dates:
dates = bank_data.index.to_series()
Next, we will isolate Wells Fargo's stock prices in a separate variable:
WFC_stock_prices = bank_data['WFC']
We can now plot the visualization using the plt.scatter method:
plt.scatter(dates, WFC_stock_prices)
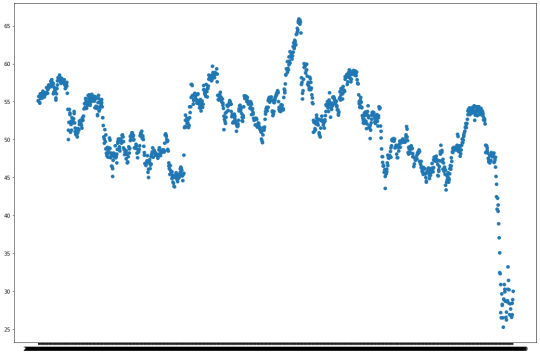
Wait a minute - the x labels of this chart are impossible to read! What is the problem? Well, matplotlib is not currently recognizing that the x axis contains dates, so it isn't spacing out the labels properly. To fix this, we need to transform every element of the dates Series into a datetime data type. The following command is the most readable way to do this:
dates = bank_data.index.to_series() dates = [pd.to_datetime(d) for d in dates]
After running the plt.scatter method again, you will generate the following visualization:
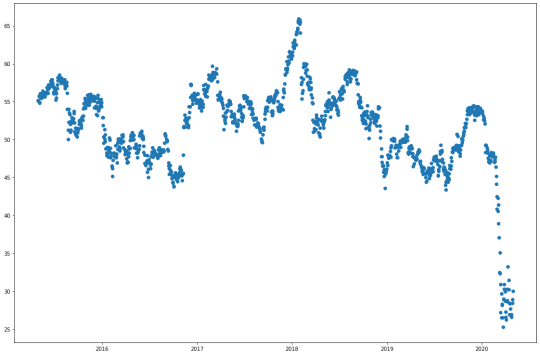
Much better! Our last step is to add titles to the chart and the axis. We can do this with the following statements:
plt.title("Wells Fargo Stock Price (5Y Lookback)", fontsize=20) plt.ylabel("Stock Price", fontsize=20) plt.xlabel("Date", fontsize=20)
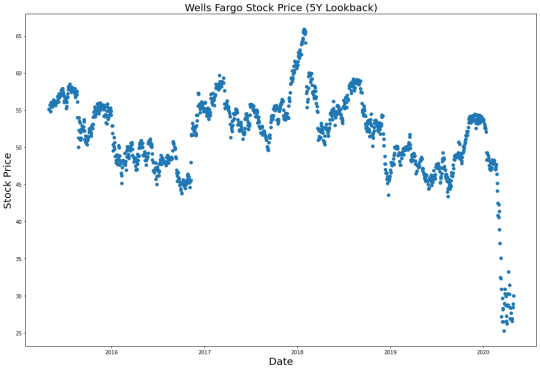
As a recap, here's the code we used to create this scatterplot:
######################## #Create a Python scatterplot ######################## #Set the size of the matplotlib canvas plt.figure(figsize = (18,12)) #Create the x-axis data dates = bank_data.index.to_series() dates = [pd.to_datetime(d) for d in dates] #Create the y-axis data WFC_stock_prices = bank_data['WFC'] #Generate the scatterplot plt.scatter(dates, WFC_stock_prices) #Add titles to the chart and axes plt.title("Wells Fargo Stock Price (5Y Lookback)", fontsize=20) plt.ylabel("Stock Price", fontsize=20) plt.xlabel("Date", fontsize=20)
How to Create Histograms in Matplotlib
Histograms are data visualizations that allow you to see the distribution of observations within a data set. Histograms can be created in matplotlib using the plt.hist method. Let's create a histogram that allows us to see the distribution of different stock prices within our bank_data dataset (note that we'll need to use the transpose method within plt.hist just like we did with plt.boxplot earlier):
plt.hist(bank_data.transpose())

This is an interesting visualization, but we still have lots to do. The first thing you probably noticed was that the different columns of the histogram have different colors. This is intentional. The colors divide the different columns within our pandas DataFrame. With that said, these colors are meaningless without a legend. We can add a legend to our matplotlib histogram with the following statement:
plt.legend(bank_data.columns,fontsize=20)
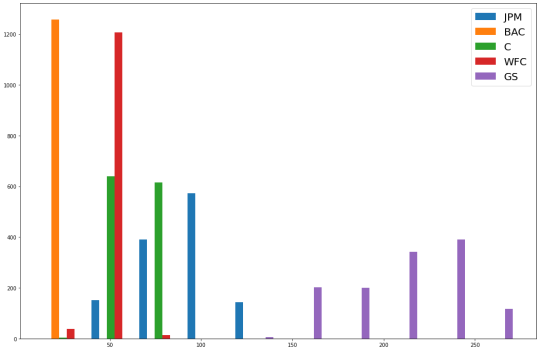
You may also want to change the bin count of the histogram, which changes how many slices the dataset is divided into when goruping the observations into histogram columns. As an example, here is how to change the number of bins in the histogram to 50:
plt.hist(bank_data.transpose(), bins = 50)
Lastly, we will add titles to the histogram and its axes using the same statements that we used in our other visualizations:
plt.title("A Histogram of Daily Closing Stock Prices for the 5 Largest Banks in the US (5Y Lookback)", fontsize = 20) plt.ylabel("Observations", fontsize = 20) plt.xlabel("Stock Prices", fontsize = 20)
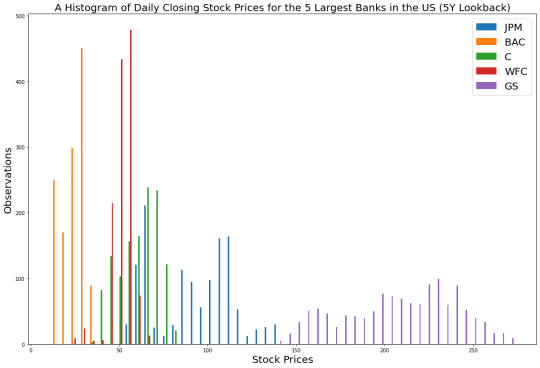
As a recap, here is the complete code needed to generate this histogram:
######################## #Create a Python histogram ######################## #Set the size of the matplotlib canvas plt.figure(figsize = (18,12)) #Generate the histogram plt.hist(bank_data.transpose(), bins = 50) #Add a legend to the histogram plt.legend(bank_data.columns,fontsize=20) #Add titles to the chart and axes plt.title("A Histogram of Daily Closing Stock Prices for the 5 Largest Banks in the US (5Y Lookback)", fontsize = 20) plt.ylabel("Observations", fontsize = 20) plt.xlabel("Stock Prices", fontsize = 20)
How to Create Subplots in Matplotlib
In matplotlib, subplots are the name that we use to referring to multiple plots that are created on the same canvas using a single Python script. Subplots can be created with the plt.subplot command. The command takes three arguments:
The number of rows in a subplot grid
The number of columns in a subplot grid
Which subplot you currently have selected
Let's create a 2x2 subplot grid that contains the following charts (in this specific order):
The boxplot that we created previously
The scatterplot that we created previously
A similar scatteplot that uses BAC data instead of WFC data
The histogram that we created previously
First, let's create the subplot grid:
plt.subplot(2,2,1) plt.subplot(2,2,2) plt.subplot(2,2,3) plt.subplot(2,2,4)

Now that we have a blank subplot canvas, we simply need to copy/paste the code we need for each plot after each call of the plt.subplot method. At the end of the code block, we add the plt.tight_layout method, which fixes many common formatting issues that occur when generating matplotlib subplots. Here is the full code:
################################################ ################################################ #Create subplots in Python ################################################ ################################################ ######################## #Subplot 1 ######################## plt.subplot(2,2,1) #Generate the boxplot plt.boxplot(bank_data.transpose()) #Add titles to the chart and axes plt.title('Boxplot of Bank Stock Prices (5Y Lookback)') plt.xlabel('Bank', fontsize = 20) plt.ylabel('Stock Prices') #Add labels to each individual boxplot on the canvas ticks = range(1, len(bank_data.columns)+1) labels = list(bank_data.columns) plt.xticks(ticks,labels) ######################## #Subplot 2 ######################## plt.subplot(2,2,2) #Create the x-axis data dates = bank_data.index.to_series() dates = [pd.to_datetime(d) for d in dates] #Create the y-axis data WFC_stock_prices = bank_data['WFC'] #Generate the scatterplot plt.scatter(dates, WFC_stock_prices) #Add titles to the chart and axes plt.title("Wells Fargo Stock Price (5Y Lookback)") plt.ylabel("Stock Price") plt.xlabel("Date") ######################## #Subplot 3 ######################## plt.subplot(2,2,3) #Create the x-axis data dates = bank_data.index.to_series() dates = [pd.to_datetime(d) for d in dates] #Create the y-axis data BAC_stock_prices = bank_data['BAC'] #Generate the scatterplot plt.scatter(dates, BAC_stock_prices) #Add titles to the chart and axes plt.title("Bank of America Stock Price (5Y Lookback)") plt.ylabel("Stock Price") plt.xlabel("Date") ######################## #Subplot 4 ######################## plt.subplot(2,2,4) #Generate the histogram plt.hist(bank_data.transpose(), bins = 50) #Add a legend to the histogram plt.legend(bank_data.columns,fontsize=20) #Add titles to the chart and axes plt.title("A Histogram of Daily Closing Stock Prices for the 5 Largest Banks in the US (5Y Lookback)") plt.ylabel("Observations") plt.xlabel("Stock Prices") plt.tight_layout()
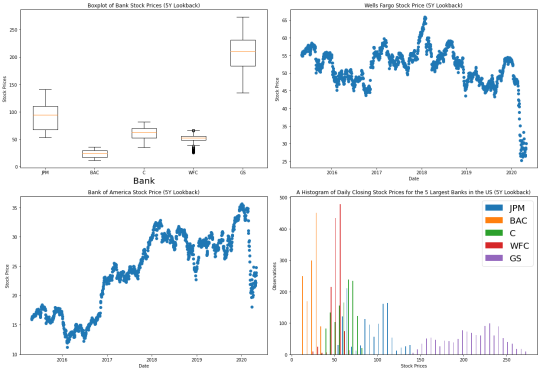
As you can see, with some basic knowledge it is relatively easy to create beautiful data visualizations using matplotlib. The last thing we need to do is save the visualization as a .png file in our current working directory. Matplotlib has excellent built-in functionality to do this. Simply add the follow statement immediately after the fourth subplot is finalized:
################################################ #Save the figure to our local machine ################################################ plt.savefig('bank_data.png')
Over the remainder of this tutorial, you will learn how to schedule this subplot matrix to be automatically updated on your live website every day.
Step 3: Create an Amazon Web Services Account
So far in this tutorial, we have learned how to:
Source the stock market data that we are going to visualize from the IEX Cloud API
Create wonderful visualizations using this data with the matplotlib library for Python
Over the remainder of this tutorial, you will learn how to automate these visualizations such that they are updated on a specific schedule. To do this, we'll be using the cloud computing capabilities of Amazon Web Services. You'll need to create an AWS account first. Navigate to this URL and click the "Create an AWS Account" in the top-right corner:
AWS' web application will guide you through the steps to create an account. Once your account has been created, we can start working with the two AWS services that we'll need for our visualizations: AWS S3 and AWS EC2.
Step 4: Create an AWS S3 Bucket to Store Your Visualizations
AWS S3 stands for Simple Storage Service. It is one of the most popular cloud computing offerings available in Amazon Web Services. Developers use AWS S3 to store files and access them later through public-facing URLs. To store these files, we must first create what is called an AWS S3 bucket, which is a fancy word for a folder that stores files in AWS. To do this, first navigate to the S3 dashboard within Amazon Web Services. On the right side of the Amazon S3 dashboard, click Create bucket, as shown below:

On the next screen, AWS will ask you to select a name for your new S3 bucket. For the purpose of this tutorial, we will use the bucket name nicks-first-bucket. Next, you will need to scroll down and set your bucket permissions. Since the files we will be uploading are designed to be publicly accessible (after all, we will be embedding them in pages on a website), then you will want to make the permissions as open as possible. Here is a specific example of what your AWS S3 permissions should look like:

These permissions are very lax, and for many use cases are not acceptable (though they do indeed meet the requirements of this tutorial). Because of this, AWS will require you to acknowledge the following warning before creating your AWS S3 bucket:
Once all of this is done, you can scroll to the bottom of the page and click Create Bucket. You are now ready to proceed!
Step 5: Modify the Python Script to Save Your Visualizations to AWS S3
Our Python script in its current form is designed to create a visualization and then save that visualization to our local computer. We now need to modify our script to instead save the .png file to the AWS S3 bucket we just create (which, as a reminder, is called nicks-first-bucket). The tool that we will use to upload our file to our AWS S3 bucket is called boto3, which is Amazon Web Services Software Development Kit (SDK) for Python. First, you'll need to install boto3 on your machine. The easiest way to do this is using the pip package manager:
pip3 install boto3
Next, we need to import boto3 into our Python script. We do this by adding the following statement near the start of our script:
import boto3
Given the depth and breadth of Amazon Web Services' product offerings, boto3 is an insanely complex Python library. Fortunately, we only need to use some of the most basic functionality of boto3. The following code block will upload our final visualization to Amazon S3.
################################################ #Push the file to the AWS S3 bucket ################################################ s3 = boto3.resource('s3') s3.meta.client.upload_file('bank_data.png', 'nicks-first-bucket', 'bank_data.png', ExtraArgs={'ACL':'public-read'})
As you can see, the upload_file method of boto3 takes several arguments. Let's break them down, one-by-one:
bank_data.png is the name of the file on our local machine.
nicks-first-bucket is the name of the S3 bucket that we want to upload to.
bank_data.png is the name that we want the file to have after it is uploaded to the AWS S3 bucket. In this case, it is the same as the first argument, but it doesn't have to be.
ExtraArgs={'ACL':'public-read'} means that the file should be readable by the public once it is pushed to the AWS S3 bucket.
Running this code now will result in an error. Specifically, Python will throw the following exception:
S3UploadFailedError: Failed to upload bank_data.png to nicks-first-bucket/bank_data.png: An error occurred (NoSuchBucket) when calling the PutObject operation: The specified bucket does not exist
Why is this? Well, it is because we have not yet configured our local machine to interact with Amazon Web Services through boto3. To do this, we must run the aws configure command from our command line interface and add our access keys. This documentation piece from Amazon share more information about how to configure your AWS command line interface. If you'd rather not navigate off freecodecamp.org, here are the quick steps to set up your AWS CLI. First, mouse over your username in the top right corner, like this:
Click My Security Credentials. On the next screen, you're going to want to click the Access keys (access key ID and secret access key drop down, then click Create New Access Key.
This will prompt you to download a .csv file that contains both your Access Key and your Secret Access Key. Save these in a secure location. Next, trigger the Amazon Web Services command line interface by typing aws configure on your command line. This will prompt you to enter your Access Key and Secret Access Key. Once this is done, your script should function as intended. Re-run the script and check to make sure that your Python visualization has been properly uploaded to AWS S3 by looking inside the bucket we created earlier:

The visualization has been uploaded successfully. We are now ready to embed the visualization on our website!
Step 6: Embed the Visualization on Your Website
Once the data visualization has been uploaded to AWS S3, you will want to embed the visualization somewhere on your website. This could be in a blog post or any other page on your site. To do this, we will need to grab the URL of the image from our S3 bucket. Click the name of the image within the S3 bucket to navigate to the file-specific page for that item. It will look like this:
If you scroll to the bottom of the page, there will be a field called Object URL that looks like this:
https://nicks-first-bucket.s3.us-east-2.amazonaws.com/bank_data.png
If you copy and paste this URL into a web browser, it will actually download the bank_data.png file that we uploaded earlier! To embed this image onto a web page, you will want to pass it into an HTML img tag as the src attribute. Here is how we would embed our bank_data.png image into a web page using HTML:
<img src="https://nicks-first-bucket.s3.us-east-2.amazonaws.com/bank_data.png">
Note: In a real image embedded on a website, it would be important to include an alt tag for accessibility purposes. In the next section, we'll learn how to schedule our Python script to run periodically so that the data in bank_data.png is always up-to-date.
Step 7: Create an AWS EC2 Instance
We will use AWS EC2 to schedule our Python script to run periodically. AWS EC2 stands for Elastic Compute Cloud and, along with S3, is one of Amazon's most popular cloud computing services. It allows you to rent small units of computing power (called instances) on computers in Amazon's data centers and schedule those computers to perform jobs for you. AWS EC2 is a fairly remarkable service because if you rent some of their smaller computers, then you actually qualify for the AWS free tier. Said differently, diligent use of the pricing within AWS EC2 will allow you to avoid paying any money whatsoever. To start, we'll need to create our first EC2 instance. To do this, navigate to the EC2 dashboard within the AWS Management Console and click Launch Instance:

This will bring you to a screen that contains all of the available instance types within AWS EC2. There is an almost unbelievable number of options here. We want an instance type that qualifies as Free tier eligible - specifically, I chose the Amazon Linux 2 AMI (HVM), SSD Volume Type:

Click Select to proceed. On the next page, AWS will ask you to select the specifications for your machine. The fields you can select include:
Family
Type
vCPUs
Memory
Instance Storage (GB)
EBS-Optimized
Network Performance
IPv6 Support
For the purpose of this tutorial, we simply want to select the single machine that is free tier eligible. It is characterized by a small green label that looks like this:

Click Review and Launch at the bottom of the screen to proceed. The next screen will present the details of your new instance for you to review. Quickly review the machine's specifications, then click Launch in the bottom right-hand corner. Clicking the Launch button will trigger a popup that asks you to Select an existing key pair or create a new key pair. A key pair is comprised of a public key that AWS holds and a private key that you must download and store within a .pem file. You must have access to that .pem file in order to access your EC2 instance (typically via SSH). You also have the option to proceed without a key pair, but this is not recommended for security reasons. Once this is done, your instance will launch! Congratulations on launching your first instance on one of Amazon Web Services' most important infrastructure services. Next, you will need to push your Python script into your EC2 instance. Here is a generic command state statement that allows you to move a file into an EC2 instance:
scp -i path/to/.pem_file path/to/file username@host_address.amazonaws.com:/path_to_copy
Run this statement with the necessary replacements to move bank_stock_data.py into the EC2 instance. You might believe that you can now run your Python script from within your EC2 instance. Unfortunately, this is not the case. Your EC2 instance does not come with the necessary Python packages. To install the packages we used, you can either export a requirements.txt file and import the proper packages using pip, or you can simply run the following:
sudo yum install python3-pip pip3 install pandas pip3 install boto3
We are now ready to schedule our Python script to run on a periodic basis on our EC2 instance! We explore this in the next section of our article.
Step 8: Schedule the Python script to run periodically on AWS EC2
The only step that remains in this tutorial is to schedule our bank_stock_data.py file to run periodically in our EC2 instance. We can use a command-line utility called cron to do this. cron works by requiring you to specify two things:
How frequently you want a task (called a cron job) performed, expressed via a cron expression
What needs to be executed when the cron job is scheduled
First, lets start by creating a cron expression. cron expressions can seem like gibberish to an outsider. For example, here's the cron expression that means "every day at noon":
00 12 * * *
I personally make use of the crontab guru website, which is an excellent resource that allows you to see (in layman's terms) what your cron expression means. Here's how you can use the crontab guru website to schedule a cron job to run every Sunday at 7am:

We now have a tool (crontab guru) that we can use to generate our cron expression. We now need to instruct the cron daemon of our EC2 instance to run our bank_stock_data.py file every Sunday at 7am. To do this, we will first create a new file in our EC2 instance called bank_stock_data.cron. Since I use the vim text editor, the command that I use for this is:
vim bank_stock_data.cron
Within this .cron file, there should be one line that looks like this: (cron expression) (statement to execute). Our cron expression is 00 7 * * 7 and our statement to execute is python3 bank_stock_data.py. Putting it all together, and here's what the final contents of bank_stock_data.cron should be:
00 7 * * 7 python3 bank_stock_data.py
The final step of this tutorial is to import the bank_stock_data.cron file into the crontab of our EC2 instance. The crontab is essentially a file that batches together jobs for the cron daemon to perform periodically. Let's first take a moment to investigate what in our crontab. The following command prints the contents of the crontab to our console:
crontab -l
Since we have not added anything to our crontab and we only created our EC2 instance a few moments ago, then this statement should print nothing. Now let's import bank_stock_data.cron into the crontab. Here is the statement to do this:
crontab bank_stock_data.cron
Now we should be able to print the contents of our crontab and see the contents of bank_stock_data.cron. To test this, run the following command:
crontab -l
It should print:
00 7 * * 7 python3 bank_stock_data.py
Final Thoughts
In this tutorial, you learned how to create beautiful data visualizations using Python and Matplotlib that update periodically. Specifically, we discussed:
How to download and parse data from IEX Cloud, one of my favorite data sources for high-quality financial data
How to format data within a pandas DataFrame
How to create data visualizations in Python using matplotlib
How to create an account with Amazon Web Services
How to upload static files to AWS S3
How to embed .png files hosted on AWS S3 in pages on a website
How to create an AWS EC2 instance
How to schedule a Python script to run periodically using AWS EC2 using cron
0 notes
Text
What Is The Difference Between A Fly Laser Marking Machine And A Static Laser Marking Machine
The online fly laser marking machine basically covers the entire application range of the static marking machine, that is, online marking and marking on the surface of various products or the surface of the outer packaging. Online fly laser marking is no longer a simple labeling product. Dates and lot numbers are very different from traditional laser marking machines that can only mark stationary objects.
In the marking process of online fly laser marking machine, the product keeps flowing on the production line, which greatly improves the production efficiency and makes the laser marking machine adapt to the requirements of industrial production. It has the following advantages:
1) Unique visual and tactile effects and never-scratch features
2) Strong anti-counterfeiting and anti-smuggling characteristics
3) Meeting the diverse needs of marking marking, automated production, line production, and the need for unconventional interface materials
So what is the difference between a flying laser marking machine and a static laser marking machine?
To put it simply, flying laser marking means following the line work. In conjunction with industrial automation, it is an automation manifestation of where the workpiece is finished marking in a period of time.
The still laser marking is a semi-automatic marking mode. The workpiece is manually loaded and unloaded, and the workpiece is placed on the working platform.
The online fly laser marking machine has strong text layout and graphic processing functions, and the online flight laser marking machine can automatically generate the batch number and serial number. The plug-in intelligent control interface can be flexibly connected with various automation devices and sensors, and the software functions can be flexibly modified for specific situations.
The online flight laser marking machine will have more use in the future. The fly dynamic marking means that there is no work surface, and in a more flexible way, the surface of the product can be marked with 360 degrees without restriction, or it can be assembled in the line. On the top, the track is rotated to achieve product marking.
Online and static marking, the main difference between the two in terms of product structure is the difference between the core device laser, galvanometer and control software. Simply put, the laser needs to work more efficiently, the speed of the galvanometer is faster, and the control software needs to be more comprehensive. The hardware equipment for flying laser marking must be highly matched with the hardware equipment for stationary laser marking.
CYCJET marking series products, there are three series of online flight laser marking models: online fiber laser marking machine LF series. Online CO2 laser marking machine LC series, online UV laser marking machine LV series. They have the following Advantage:
1 Using well-known brand fiber lasers, carbon dioxide lasers and UV lasers, stable performance
2 High-speed galvanometer, high processing precision, fast marking speed and stable performance
3 User-friendly software interface, easy to learn and powerful editing
4 It can automatically obtain the work order number, product batch number, material code, product name specifications and other information and automatically code
5 It can automatically read the QR code and save the data. It can automatically record and alarm when it cannot be read.
6 Compared with ordinary printing method, no consumables, environmental protection, no pollution, maintenance free.
0 notes