#Battery terminal Connectors
Explore tagged Tumblr posts
Visit Tumblr Blog
Explore Tumblr blogs with no restrictions, modern design and the best experience.
Last Seen Tumblr Blogs


Fun Fact
The average Tumblr user visits about 67 pages every month.
Text
Battery Copper Lugs are made from 99.9% pure annealed copper, providing a high degree of conductivity for maximum current flow. This particular variant is suitable for use with 2/0 or 00 Gauge Battery Cable & 3/8" (M10) Stud.

0 notes
Text
High power connectors, battery connector mobile, battery connector terminal
Z-PACK Series 154 Position 2 mm Pitch Press Fit Through Hole Backpanel Connector
0 notes
Text
High-Quality Nicket Tap and Al Chip for Different Batteries
Ni tap and Al chip mainly for various types of battery such as Li-ion battery, Li-polymer battery, Ni-Mh/Ni-CD batteries, LiFepo4 Battery and Primary battery pack. THK (mm) W (mm)THK (mm) W (mm)THK (mm) W (mm)THK (mm) W (mm)THK (mm) W…
#al bushub#al strip#al tap#aluminum chip#battery terminal tap#battery welding nickel tabs#battey wire connector#connect tab#Ni tap#Nickel sheet#nicket slip
0 notes
Text
https://www.futureelectronics.com/p/interconnect--connectors-rectangular-plastic-industrial/dt04-3p-ce04-te-connectivity-3108700
Cable accessories, Crimping Tool, electrical connectors plug, Contact Crimp Tool
DT Series Contact Size 16 3 Way Gray Receptacle Housing
#Connectors#Tooling and Accessories#DT04-3P-CE04#TE Connectivity#Cable accessories#Crimping Tool#electrical connectors plug#Contact Crimp Tool#push-in wire connector#wire#tools crimp guide#Nickel Plated Crimp Socket#battery terminal
1 note
·
View note
Text

Not reblogging from the OP because somehow over the course of three years, either no one has fact checked this, or OP has blocked everyone who’s tried.
https://www.reuters.com/article/fact-check/electric-cars-taken-off-french-roads-due-to-contract-termination-not-battery-fa-idUSL2N2N60XA/
The logo on the cars shows that they are from “Autolib”, a fleet of electric cars used in a car-sharing scheme in Paris and the surrounding suburbs that was launched in 2011 and had 150,000 active users who could take out the cars when they needed.
As reported by Reuters here , Parisian authorities ended the Bollore group’s contract to operate the Autolib electric vehicle fleet in June 2018 due to financial difficulties. Persistent issues with cleanliness, problems with parking and booking as well as competition from other modes of transport such as Uber pushed the service into the red, with cumulated losses of 293 million euros expected by 2023.
French media reports here , here and here which show pictures of the cars lined up in a field like those in the social media posts, explain that the termination of the contract meant that Bollore had to remove its 4,000 vehicles from the Paris region to Romorantin-Lanthenay, 200 kms (124 miles) south of Paris. Bollore sold the cars, most of them going to two companies, Autopuzz, which resells the cars throughout France, and Atis Production.
On claims about soil pollution risk posed by the cars, Paul Aouizerate, head of Atis Production, told France Info here “Our vehicles are properly stored. The firefighters are aware, the construction site is well organized. All the batteries have been removed and the connectors are isolated.”
He added that the cars were not going to a junkyard. Autopuzz told France TV Info it is reselling the cars to buyers across France at a rate of 50 per month (here).
I am once again begging people to actually fact-check anything that shows you an image and makes an unsourced claim.
It’s not that hard, I promise.
#fact check#electric cars#my asshole ex kinda instilled in me a general distrust of electric cars#and ever since I ditched them I’ve been trying to actually broaden my horizons on this stuff#so I get the knee jerk reaction#but it can be overcome#learn to double check your biases please
50 notes
·
View notes
Text
How can I tell if my headlight is blown?
You can diagnose a blown headlight using these steps, ranging from simple visual checks to electrical diagnostics. Here's how to confirm:
Basic Visual Inspection (Daytime)
Check for Darkness:
🔦 Turn on headlights and walk in front of your car. A blown bulb won't glow at all. Cracked/Hazed Housing:
💨 Foggy lenses or cracks scatter light, mimicking a blown bulb. Clean or restore lenses. Blackened Bulb:
⚫ Remove the bulb (cool first!). If the glass is darkened or the filament is broken, it's dead.
Electrical Tests (If No Light)
Test 1: Swap the Bulb Move the suspected blown bulb to the working side's socket.
Result:
✅ Glows = Original socket/fuse is faulty. ❌ No glow = Bulb is blown.
Test 2: Check Socket Voltage Tool Steps
Multimeter 1. Set to DC 20V. 2. Insert red probe into socket terminal, black to chassis ground. 3. Turn lights on. 💡 Reading: 12-14.5V = Socket good (bulb blown). 0V = Wiring/fuse issue.
Test 3: Fuse Check Locate headlight fuse (consult manual).
Look for broken filament or test continuity with a multimeter.
Common Failure Patterns
Symptom Likely Cause One headlight completely dead ✅ Blown bulb 🚫 Faulty socket/ground Both headlights out ❌ Blown fuse 🔌 Relay failure ⚡ Wiring short Headlight dim/flickering 🔋 Weak battery/alternator 💧 Moisture in socket
Bulb-Specific Signs
Halogen: Broken filament inside, blackened glass.
HID: No blue/purple ignition glow, pinkish tint = Failure.
LED: Darkened diodes, no light despite power.
Critical Safety Notes ⚠️ Wear gloves: Skin oils on halogen bulbs cause hotspots that lead to early failure.
⚡ Disconnect battery: Before handling wiring to prevent shorts.
🔧 Never force bulbs: Twisted connectors cause socket damage.
Troubleshooting Flowchart
graph TD A[Headlight Not Working] --> B{Any light?} -->No C[Test fuse/relay]
-->Dim/Flickering D[Check voltage at socket]
-->Fuse good E[Test bulb in working socket]
-->Still dead F[Replace bulb]
-->Works G[Inspect socket wiring]
-->Low voltage H[Test alternator/battery]
-->Fluctuating I[Check ground connection]
If all tests point to a good bulb and power supply, suspect:
Body control module (BCM) glitch (requires OBD2 scan)
Headlight relay (swap with identical relay like horn)
Damaged harness (trace wires for corrosion/pinches)
Replace blown bulbs in pairs to maintain balanced light output. If issues persist after replacement, focus on moisture intrusion or vibration damage as explored in our prior discussion. 🛠️

#led lights#car lights#led car light#youtube#led auto light#led headlights#led light#led headlight bulbs#ledlighting#young artist#race cars#cars#electric cars#classic cars#car#carlos sainz#porsche#truck#automobile#lamborghini#bmw#headlight bulb#headlamps#headlight restoration#headlamp#headlight#older vehicles#autonomous vehicle headlights#vehicle#overtake another vehicle
3 notes
·
View notes
Text
Documenting my Scummy Xbox 360 Restoration
Jesus H Christ restoring this Xbox 360 was a pain in the ass. Got it off of Ebay with no guarantee of condition, I was just excited it powered on. Then the issues started rolling in...
First, the disc tray wouldn't open. I cracked the console open, cleaned a disgusting amount of tobacco and dust out of it, then greased the gears in the drive. That helped it open for a bit.
Then the console was overheating, even on the menu. So, I tore it apart again and replaced the thermal paste. That got it working, so I went to bed.
When I woke up, it was both overheating again and the disc drive was stuck. And this is where things got scummy...
So, for starters, neither of the 2 controllers that came in the bundle were working great. One wouldn't power on, the other one disconnected constantly. Stretching out the battery connectors fixed the disconnecting one, but the dead one was too coroded to make a connection. So... I tore the battery holder open, cut an old VGA cable, removed some of the grounded outer weave, and made a little rats nest of wire connecting the battery terminals. On the plus side, it totally works now! On the other side, taking the battery pack out makes it fall apart. So that's scummy fix #1.
Scummy fix #2 was in the DVD drive. The tray getting stuck is caused by the belt slipping and not overpowering the magnet on the top shell. I said to myself, "what is a drive belt if not a rubber band?" So I grabbed a tiny, bare elastic hair tie and replaced the belt with that. Drive opens great now! And if that "belt" breaks, I have 100 other hair ties to replace it with lol (I will buy a real belt if/when this fails, I promise).
So at this point everything worked, but the console was still overheating and shutting off on the menu doing nothing. I figured out that only one of the two 80mm fans were running. I took the fan out and hooked it up to a 9V battery, and both fans spun properly, so the fan header on the motherboard for one of the fans was bad. Most people fix this by splicing into the DVD drive's power, but then the fans would run at max speed all the time and I'd have to solder. So instead, I did scummy fix #3: I took some more ground shielding from the VGA cable, twisted it into two short "cables", and bridged the functional fan's power and ground pins into the nonfunctional fan's pins. After a quick test with the 9V battery again, I shoved the fan assembly back into the 360 and both fans powered on like a charm. One hour of playing Halo 3 later, and the console was still going strong!
The worst part is all of this effort I put in over the last two days ultimately means nothing. This is a Xenon 360, so it WILL red ring one day, that's completely unavoidable. But, when that time comes, buying a Jasper isn't that expensive or hard to do.
TL;DR I should not be trusted to restore consoles, but how scummy can my fixes honestly be if they totally work?
#watching bringus studios has filled me with misplaced confidence#also I used a defective stick of sodimm RAM I had lying around to spread the thermal paste#because it was handy and why not?#what is a dead stick of RAM if not a paste spreader?#one of these days I'll buy a glitch chip
4 notes
·
View notes
Text
Arkodd Padbox Review: a fightpad for the arcade afficionado

by Amr (@siegarettes)
Sporting a clicky dpad and an enclosure large enough to accommodate 24mm arcade buttons, the Arkodd Padbox is a controller/fightstick hybrid set to fill the niche left by a lack of good 6 button fightpads.
The dpad is equipped with Omron mechanical switches, similar to the ones used in arcade sticks, and a left shoulder button and additional thumb button complement the standard 8 button layout, allowing access to extra functions and alternative button placements.

The Padbox comes as fully assembled units or DIY kits that include the case, dpad, wiring and function buttons. For this review I opted for the DIY kit, since I wanted to see what the build process was like, and customize the build with parts I had on hand.
Full disclosure: I was sent this kit to review, but I wasn’t given any instructions or limitations on what I could say.
With that out of the way, what immediately impressed me was how easy the build process was. The Padbox comes apart with only a few screws, and the dpad, shoulder button and aux buttons are already pre-installed. The wiring harnesses provided are sized appropriately for the available space, and headers for the dpad and shoulder buttons, alongside pre-made dupont connectors made wiring them to the screw terminals simple.

If there’s one thing to note it’s that the Padbox uses a direct USB connection for its USB C jack, rather than the Neutrik Type-D passthrough ports that many custom fightstick builds use. The connector is designed with Brook Fighting Boards in mind, which have pre-populated headers for USB, but I opted to use a RP2040 Advanced Breakout Board I had on hand to get access to the advanced features of GP2040ce. If you do goes this way, make sure you get the latest version of the board with the screw terminals for the extra functions, as those have pre-populated USB headers, otherwise you’ll have to solder on your own like I did.
You’ll also need to plug into the 5v VCC terminal for the power indicator LED, though if you are somehow doing an even more niche build of a niche product, and using a Brook Wireless board for it, you’ll need to connect to the player indicator LEDs instead, since the 5v terminal won’t output when running on battery.
Aside from these incredibly niche considerations, the overall build process is fast and painless. I built it all on a weeknight after work, and I even had time to stickerbomb it and test out a few games with it. I’ve had a harder time modding some fully built fightsticks.
Now the most important question: how’s the dpad. In short: they nailed it. No matter what style of game I played it was easy to get my inputs out, with no accidental inputs. After using so many controllers and handhelds, I can tell you this is a hell of an accomplishment. Even mechanical dpads aren’t a silver bullet to this problem, as I’ve seen so many of them with the same kind of satisfying feedback that are miserable in practice. So I’m happy to report that this dpad is not one of them.

One of the first games I tried the Padbox with was Ultimate Marvel vs Capcom 3’s trial mode, my go to for testing new fighting game controllers. Here it performed better than basically any first party controller dpad, with the combo of the microswitch dpad and larger arcade buttons making it easy to get in rhythm. The same happened in Street Fighter 6, where the extra buttons allowed me to access Drive Functions easier than the standard 8 button layout, and the shoulder button provided comfortable access to the assist function for characters I play with Modern Controls.
For anyone who plays primarily on pad, I could definitely see this as an upgrade to a regular gamepad or fightpad, especially for those who play claw grip and wouldn’t miss the extra shoulder buttons. With the swappable buttons, an all mechanical controller is even possible, given the growing options for buttons with keyboard style switches.
Personally, the Padbox won’t likely stay in rotation for playing fighting games, despite how much I like it. The Padbox can’t solve the fundamental problem I have with playing fighting games on pad: it’s too cramped. As someone particularly sensitive to this issue, I find that putting all the strain on my thumb wears me down faster when performing complex inputs, and the Padbox made it clear that for me, no pad can compete with the comfort of leverless for competitive games.
But who says you can only use a fighting game controller for fighting games?
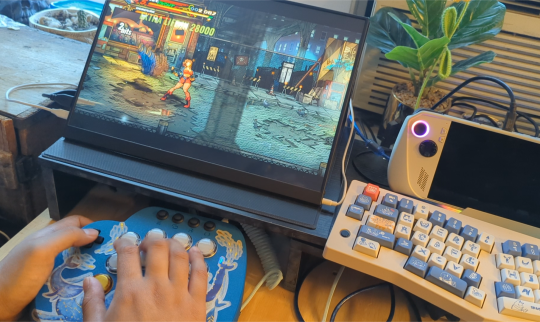
Arcade buttons are plenty of fun across multiple genres, and with its hybrid design, the Padbox enables a variety of approaches that both traditional fightsticks and pads can’t provide. I tested it with beat-em-ups like Streets of Rage 4 and Shredder’s Revenge, where the arcade layout made performing combos a joy.
Retro consoles and throwback games are another good candidate, with the tactile feedback a the Padbox’s dpad a definite upgrade to a lot of the membrane dpads and buttons of original controllers, with the bonus of arcade buttons being a lot more fun to mash in the many games that demanded it.
Action games that make limited use of the right stick for camera control are totally playable with the Padbox, and with the use of GP2040ce, you can even use the extra buttons to create modifiers that give you on the fly access to the dpad or right stick for item hotkeys or camera control.
I even managed to make a playable control scheme for Smash Bros Ultimate, complete with c-stick buttons for tilt and aerial attacks.
The Padbox might not be my personal choice for serious fighting game competition, but it’ll definitely stay in rotation as one of my alternative controllers for casual fighting, and playing plenty of other genres.
If there's any additions I'd like to see, it's the addition of additional shoulder and thumb buttons. These would not only give access to an extra shortcut button in fighting games, but enable layouts with extra functions or modifiers, such as tilt modifiers or dual directional input in the style of the Hitbox Crossup.

The Padbox is also a bit lightweight. It comes in a little heavier than a standard controller, but it's spread out across a larger surface area, and alongside the slickness of the 3D printed material, it threatens to slip during those literally sweaty matches. An optional metal bottom plate or a removable weight for the grip might help give it heft for longer play sessions and lap play.
My favorite part of the Padbox has to be how many possibilities it leaves open. With its form factor, it's easy to start thinking of new ways to mod the Padbox and make it your own. It brings the DIY spirit of arcade sticks to a pad, and I've already seen wild molds replacing the dpad with a split dpad, or building entire new bases for it and adding more buttons.
If you're a controller enthusiast looking for a good fightpad, or just something with a real good dpad, consider giving the Padbox a look.
2 notes
·
View notes
Text

Terminal Connectors are made from 99.9% pure annealed copper, providing a high degree of conductivity for maximum current flow. This particular variant is suitable for use with 6 Gauge Battery Cable & 1/4" (M6) Stud.
0 notes
Text
USB terminals are one of the most used terminals to power the electronic devices from battery chargers like wall charger and battery banks as they are robust and have been in use for many years now and are mainly used in medical equipment, phone chargers, powering development boards and small battery powered devices like dc motors etc. It is hard to read voltage and current flowing through it if something is not working so this USB Current and Voltage Tester which works as Ammeter and Voltmeter both to determine and debug the USB connector. This dongle plugs between the USB connector and output devices. You can use this device from the 3.5-7VDC input voltage (although most USB devices tend to hover around 4.75 to 5.25) and up to 3A of current. It flips between voltage and current readouts every 3 seconds or so.
5 notes
·
View notes
Text
Moisture sensor development - 2022/23
Multiple sensors have been running over winter 22 to summer 23 and some problems have arisen:
One temperature sensor stopped functioning but in a way that eluded the error detection. The symptom was that the two sensors showed exactly the same measurement. This turned out to be a configuration issue, where both sensor were mapped to the same temperature.
Battery life was too short on a couple of sensors. This may be because of poor quality batteries, poor connections in the battery holder or due to excess drain somewhere. After experimentation with better quality batteries (Samsung 25R rated at 2500 mAh) it seems the main problem is poor quality batteries.
Moisture sensors losing discrimination. On a new sensor the range from wet to dry is typically 900 but this reduced to 270. I found that cleaning off the old silicon sealant, cleaning the board and resealing brought the readings back to normal.
Moisture sensor connection. The waterproofing with silicon and the JST connector are a poor design. Securing this connector with a zip tie helps to secure this connector.
Rusty main board. One device failed due to rust getting into the pins and socket on the main board connector. This is evidence of moisture in the device container. The sensor cable entrance is sealed with a large amount of silicon sealant which often fails. However when a second device also failed, having drained new , quality batteries very quickly, it seems that the idea of using socket strips on an outdoor device, however well sealed, is a mistake. In any case the board and the chip are really the only significant components so they may as well be soldered together.
One sensor on a public Tiny Forest was stolen. This despite being well - hidden and having a notice inside the box explaining the scientific purpose of the device.
I had considered changing the design of the PCB to avoid the use of a ground plane since I found this made soldering to ground terminals difficult and poor connections created problems. On reflection, my problem is probably insufficient thermal inertia in my small iron and the use of a better, temperature-controlled iron would solve this issue whilst retaining the benefits of a ground plane.
Labels printed on a label printer fade very quickly in sunlight.
An error in the code for the test phase meant that sleep time could be negative with odd results.
It has been suggested that over-the-wire updating of the code should be implemented but I am concerned about the current demand,
Improvements
Have a working set of all three sensors which can be plugged into a device to check the cause of a failed sensor.
Replace the cheap 18650 batteries with Samsung 25R flat top batteries.
Solder the chip directly to the PCB instead of using a socket strip
Develop a better sealing system for the cable entry.
Use a chinagraph pen for labeling
Reconsider strategy for protecting devices in public places
3 notes
·
View notes
Text
Why the Cortelco ITT 2500 Series Remains the Gold Standard in Reliable SOHO Landline Phones
Why the Cortelco ITT 2500 Series Remains the Gold Standard in Reliable Small Office/Home Office Landline Phones In today’s high-tech world of smartphones and wireless communication, reliable corded phones still play a critical role—especially for businesses, government agencies, schools, and home offices. Among the top choices for dependable analog phones is the Cortelco ITT 2500 Series, known for its durability, simplicity, and consistent performance. What Makes the Cortelco ITT 2500 Series a Trusted Choice? Whether you're outfitting a call center or need a secure phone line for emergencies, the Cortelco 2500 desk phone delivers unmatched reliability. Here’s why this series remains a best-seller: ✅ Line-Powered Operation No batteries or external power source needed. The Cortelco 2500 series runs directly off your phone line, making it an ideal emergency backup phone during power outages. ✅ Classic Bell Ringer The mechanical bell ringer is loud and unmistakable—ideal for noisy environments or users with hearing difficulties. ✅ Hearing Aid Compatible Handset ADA-compliant and designed with comfort in mind, the Cortelco ITT 2500 handsets work seamlessly with most hearing devices. ✅ Wall or Desk Mountable Easily install it as a wall-mounted phone or use it as a traditional desk phone—flexible enough for home offices, security stations, or warehouses. ✅ Durable Construction Built with commercial-grade components and available in multiple colors, including Black (BK), Ash (ASH), Red (RD), and Ivory/Vanilla (VOE), these phones withstand daily wear and tear. ✅ RJ11 Compatibility With standard RJ11 connectors, installation is plug-and-play. Works with VoIP analog terminal adapters (ATAs), fax lines, and traditional copper landlines. Where Are Cortelco Phones Used? From hospitals and hotels to school front offices, warehouses, and correctional facilities, Cortelco phones are relied on across a wide range of industries. They’re also a smart choice for homeowners looking for an emergency-ready corded phone. Why Choose USA Trading Depot for Cortelco 2500 Series Phones? USA Trading Depot is a trusted distributor of Cortelco landline phones, offering competitive pricing, fast shipping, and excellent customer service. We carry the full range of ITT-2500-MD models with both desk and wall-mount capabilities. We also offer bundled savings for small businesses or multi-line setups! 📦 Save More with Our Small Office/Home Office Phone Bundle! Get a multi-color 3-pack of Cortelco ITT 2500 Series phones—perfect for home offices, property management teams, or small business needs. 👉 View the Bundle & Save Now Original post here: Why the Cortelco ITT 2500 Series Remains the Gold Standard in Reliable SOHO Landline Phones Why the Cortelco ITT 2500 Series Remains the Gold Standard in Reliable SOHO Landline Phones syndicated from https://www.usatradingdepot.com/ Originally published here: https://haroldthompsonn.blogspot.com/2025/06/why-cortelco-itt-2500-series-remains.html
0 notes
Text
Why the Cortelco ITT 2500 Series Remains the Gold Standard in Reliable SOHO Landline Phones
Why the Cortelco ITT 2500 Series Remains the Gold Standard in Reliable Small Office/Home Office Landline Phones In today’s high-tech world of smartphones and wireless communication, reliable corded phones still play a critical role—especially for businesses, government agencies, schools, and home offices. Among the top choices for dependable analog phones is the Cortelco ITT 2500 Series, known for its durability, simplicity, and consistent performance. What Makes the Cortelco ITT 2500 Series a Trusted Choice? Whether you’re outfitting a call center or need a secure phone line for emergencies, the Cortelco 2500 desk phone delivers unmatched reliability. Here’s why this series remains a best-seller: ✅ Line-Powered Operation No batteries or external power source needed. The Cortelco 2500 series runs directly off your phone line, making it an ideal emergency backup phone during power outages. ✅ Classic Bell Ringer The mechanical bell ringer is loud and unmistakable—ideal for noisy environments or users with hearing difficulties. ✅ Hearing Aid Compatible Handset ADA-compliant and designed with comfort in mind, the Cortelco ITT 2500 handsets work seamlessly with most hearing devices. ✅ Wall or Desk Mountable Easily install it as a wall-mounted phone or use it as a traditional desk phone—flexible enough for home offices, security stations, or warehouses. ✅ Durable Construction Built with commercial-grade components and available in multiple colors, including Black (BK), Ash (ASH), Red (RD), and Ivory/Vanilla (VOE), these phones withstand daily wear and tear. ✅ RJ11 Compatibility With standard RJ11 connectors, installation is plug-and-play. Works with VoIP analog terminal adapters (ATAs), fax lines, and traditional copper landlines. Where Are Cortelco Phones Used? From hospitals and hotels to school front offices, warehouses, and correctional facilities, Cortelco phones are relied on across a wide range of industries. They’re also a smart choice for homeowners looking for an emergency-ready corded phone. Why Choose USA Trading Depot for Cortelco 2500 Series Phones? USA Trading Depot is a trusted distributor of Cortelco landline phones, offering competitive pricing, fast shipping, and excellent customer service. We carry the full range of ITT-2500-MD models with both desk and wall-mount capabilities. We also offer bundled savings for small businesses or multi-line setups! 📦 Save More with Our Small Office/Home Office Phone Bundle! Get a multi-color 3-pack of Cortelco ITT 2500 Series phones—perfect for home offices, property management teams, or small business needs. 👉 View the Bundle & Save Now Originally published here: https://www.usatradingdepot.com/blogs/tech-corrner/why-the-cortelco-itt-2500-series-remains-the-gold-standard-in-reliable-soho-landline-phones Why the Cortelco ITT 2500 Series Remains the Gold Standard in Reliable SOHO Landline Phones syndicated from https://www.usatradingdepot.com/
0 notes
Text
Trusted Copper Strips Manufacturers in India: Precision and Quality by KWM India
Copper Strips Manufacturers in India: Consistent Quality from KWM India
Copper remains a vital material in numerous industrial and electrical applications due to its superior conductivity, flexibility, and corrosion resistance. Among its most practical forms are copper strips, which are used across a broad range of industries. When looking for dependable copper strip manufacturers in India, KWM India is a name that stands out for its commitment to quality, customization, and timely delivery.
What Are Copper Strips?
Copper strips are flat, narrow pieces of copper used in:
Electrical busbars and switchboards
Transformer windings and earthing systems
Connectors in automotive and electronic industries
Heat exchangers and industrial machinery
Decorative and architectural elements
Their high thermal and electrical conductivity, along with their excellent workability, make copper strips indispensable in technical and manufacturing sectors.
KWM India: Leading Manufacturer of Copper Strips
KWM India has established itself as a leading manufacturer and supplier of high-quality copper strips in India. The company’s modern production units, expert engineering team, and strict quality assurance processes ensure every product meets the highest standards.
Key Features of KWM India’s Copper Strips:
High Electrical Conductivity – Suitable for power and electronic applications Precision Thickness & Width – Ideal for automated and industrial processing Custom Dimensions Available – Manufactured to client specifications Oxidation and Corrosion Resistant – Reliable even in harsh environments Excellent Surface Finish – Consistent quality for visual and technical uses
Applications Across Industries
KWM India supplies copper strips to a wide range of sectors:
Electrical & Electronics – Busbars, terminals, PCB components
Automotive – Battery connections, EV components
Renewable Energy – Solar panel and wind power systems
Industrial Machinery – Conductive and structural applications
Construction & Architecture – Earth strips and decorative elements
Why Choose KWM India?
Advanced Machinery & Infrastructure
Rigorous Quality Control at Every Stage
Custom Manufacturing to Match Project Requirements
Timely Delivery Across India
Sustainable and Responsible Manufacturing
Conclusion
As one of the most reliable copper strip manufacturers in India, KWM India delivers products that are engineered for performance, precision, and longevity. Whether you’re a supplier, OEM, or infrastructure developer, you can count on KWM India to meet your copper strip requirements with excellence.
Get in touch with KWM India today to request a quote, sample, or more details about our copper strip products.
Visit:- https://www.kmwindia.com/copper-strips.html
0 notes
Text
How long does it take to replace a headlight bulb in a car?
Replacing a headlight bulb in a car can take anywhere from 5 minutes to 2+ hours, depending entirely on your vehicle’s design. Here’s a detailed breakdown:
⏱️ Time Ranges by Vehicle Type Vehicle Complexity Typical Time Examples Key Challenges
Simple 5–20 min Toyota Camry, older Honda Civic Easy hood access; no tools needed. Moderate 20–45 min Subaru Forester, Ford Escape Wheel well access; trim removal. Complex 45 min–2 hrs Audi A4, Mercedes C-Class Bumper/grille removal; coding. Extreme 2+ hrs Dodge Charger, BMW 5-Series Headlight assembly removal; calibration.
🔧 Key Factors Affecting Replacement Time Access to the Bulb
Easy: Bulb is reachable under the hood (e.g., twist-off cover behind the headlight).
Hard: Requires removing the tire, wheel liner, battery, or air intake box (common in trucks/SUVs).
Expert: Full bumper/grille removal (German luxury brands). Bulb Type & Mounting
Halogen bulbs: Usually plug-and-play (quick).
HID/LED bulbs: May need recalibration or have fragile bases.
Retaining Mechanism: Spring clips, screws, or twist-locks—some are fiddly in tight spaces. Reassembly & Calibration
Modern cars with adaptive headlights (e.g., Mazda, Audi) may need recalibration via dealership tools.
Improper sealing can cause moisture leaks.
🛠️ Step-by-Step Time Estimates Preparation (5 min):
Park on level ground, set parking brake, gather gloves/tools. Access the Bulb (5 min–1 hr):
Remove engine covers, air filters, or wheel liners if needed. Swap the Bulb (5 min):
Unplug connector → release clip → remove old bulb → insert new bulb (avoid touching glass!). Reassembly/Test (5–45 min):
Reattach all parts and test headlight aim (critical for safety).
⚠️ Surprising Time Traps "Easy" Cars That Fight Back:
Honda CR-V: Requires removing washer fluid tanks or battery.
Chevy Silverado: Grille clips that break easily.
Day vs. Night: Cold plastic/rusty bolts add frustration.
Unseen Issues: Corroded connectors or stripped clips.
💡 Pro Tips to Save Time Check YouTube First: Search "[Your Car] headlight bulb replacement" for model-specific hacks.
Buy OEM Bulbs: Aftermarket bulbs often fail faster or fit poorly.
Use Nitrile Gloves: Skin oils shorten bulb life.
Bring a Flashlight: Headlight assemblies are dark and cramped.
🔋 Battery Warning
Always disconnect the negative battery terminal before starting—accidental shorts can blow fuses or damage modules (e.g., Honda’s BCM). Reconnect after bulb installation.
When to Call a Pro: If bumper removal is required.
If adaptive headlights throw error codes.
Cost: 50–300 at shops (bulb included). Dealers charge up to $500 for luxury models.
DIY Reality Check: "My ‘simple’ Honda Odyssey took 45 minutes because I had to remove the cabin air filter housing."
"The Audi dealer quoted $400—I spent 3 hours and broke two clips."
Always budget 2× the time you expect—and keep bandages handy for skinned knuckles! 🔧💡

#led lights#car lights#led car light#youtube#led auto light#led headlights#led light#led headlight bulbs#ledlighting#young artist#race cars#electric cars#classic cars#car#cars#carlos sainz#porsche#truck#automobile#lamborghini#bmw#vehicle#autonomous vehicle headlights#overtake another vehicle#autos#automotive#autowreckers#chrysler#convertible#honda
3 notes
·
View notes
Text
Troubleshooting Common Issues with International Truck Parts

When it comes to maintaining commercial heavy-duty trucks, international truck parts play a critical role in ensuring optimal performance and longevity. These parts are specifically designed to withstand the rigorous demands of the trucking industry, but like any mechanical components, they are prone to wear and occasional failure. Understanding how to troubleshoot common issues related to these parts can save truck owners and fleet managers time and money while preventing downtime on the road.
Identifying the Most Frequent Problems with International Truck Parts
Heavy-duty trucks face harsh working conditions, making parts susceptible to damage and malfunction. Common issues with international truck parts include wear and tear on the suspension system, brake problems, and electrical failures. For instance, worn-out suspension components can lead to poor handling and uneven tire wear, impacting safety and fuel efficiency. Similarly, brake issues such as worn pads or leaking air lines can compromise stopping power. Electrical components, including sensors and wiring, may cause erratic engine behavior or failure to start if not properly maintained.
Diagnosing and Fixing Suspension and Brake Issues
To address suspension problems, start by inspecting shock absorbers, bushings, and springs for signs of damage or fatigue. Regular lubrication and timely replacement of worn parts can prevent costly repairs. When dealing with brakes, check for air leaks in the braking system and ensure that brake pads have sufficient thickness. Air brake systems require particular attention, as leaks or faulty valves can reduce braking efficiency. Testing air pressure and conducting visual inspections are effective ways to troubleshoot these issues. Implementing a routine maintenance schedule focused on these components will enhance reliability and safety.
Electrical Troubleshooting Tips for Heavy-Duty Truck Parts
Electrical issues with international truck parts often manifest as dashboard warning lights, intermittent starting problems, or inconsistent engine performance. Begin troubleshooting by scanning diagnostic codes using specialized tools, which can pinpoint faulty sensors or circuits. Inspect wiring harnesses for damage or corrosion, especially in connectors exposed to the elements. Ensuring battery terminals are clean and secure also helps maintain electrical integrity. In some cases, replacing a single sensor or fuse resolves the issue, but thorough testing is necessary to avoid overlooking underlying problems.
Conclusion:
Troubleshooting common issues with international truck parts requires a systematic approach that includes regular inspections, timely repairs, and preventative care. By understanding the symptoms and causes of typical failures in suspension, brakes, and electrical systems, trucking professionals can reduce downtime and extend the life of their commercial heavy-duty trucks. Investing effort in maintenance not only improves safety but also optimizes operational efficiency, making it a vital part of any trucking operation.
0 notes