#Beginner physics 2.0- the same thing just again
Explore tagged Tumblr posts
Visit Tumblr Blog
Explore Tumblr blogs with no restrictions, modern design and the best experience.
Last Seen Tumblr Blogs


Fun Fact
Tumblr.com rank in the US is 25.
Note
Mr stark riddle me why I have to do math ALL OVER AGAIN
I already did it once back home I don’t wanna take this againnnn
-Peter
Fucked up timeline and something to do with multiverse travel, per the usual. Also because the school system hates neurodivergents.
#This one applies to my personal life actually#Beginner physics 2.0- the same thing just again#I'm in the same boat kid#earth 47667872643#marvel#iron man#marvel iron man#marvel multiverse#ask blog#tony stark#tony wont shut up
4 notes
·
View notes
Note
I don't think i've seen this yet, but maybe a scenario where jigen tries to teach his crush how to shoot and it's like, a super intimate situation. :3c
I just like Jigen. He’s super funny to write for!! And of course he would be too much of a pro to admit he’s enjoying watching his crush under the xecuse of teaching. But in the end.... he’s a man. ^___^ Poor Jigen. And I kept this sfw. XP
“Why?”
Of course. His only question was this. After all the time being with the gang you had proven to be skilled with a knife and in close combat. But whenever you saw Lupin or Jigen shooting their guns, you could feel the jealousy. You wanted to be that cool! Or at least able to hit something that wasn’t an ally.
“Because I can’t,” you dead-panned.
He looked at you, cleaning his Magnum with calm hands.
“Sure. What gun do you want to use?”
Eh?! Of course you knew there were different models, but weren’t they all the same in the end?
“I thought of yours?”
He snorted and laid the gun on the table before turning to you with a laugh.
“Sure. And break your pretty face with the recoil.”
“It can’t be that bad! You do it all the time!”
“I’m shooting from the hip, with the right stance, having a different stance for shooting on eyelevel.”
You felt dumb now.
“Then what would you tell me to take?”
“A knife,” he grinned at you with good natured malice.
“I want to be able to shoot a gun, Jigen!”
“And I wouldn’t trust you with one.”
“Why?”
“Because you can’t shoot.”
You punched him in the upper arm, making him wince playfully.
“Fine, fine! Before you beat me unconscious, I will teach you,” he finally gave in under fits of laughter.
“This is the Smith and Wesson M&P380 Shield EZ 2.0. It’s easy to handle for a beginner and it doesn’t have such a strong recoil. Hold it.”
You stared at the gun Jigen offered you, before taking it carefully and almost letting it crash to the floor.
“It’s heavy!” you wondered aloud, making Jigen laugh.
“524 grams. It’s not that heavy. A good weight for a beginner like you.”
“What about your Magnum?”
“975 grams, unloaded.”
“Why is it so heavy?”
“Do you want to shoot or to learn the physics of a gun?”
“Shoot,” you admitted, saving the questions for later.
“I’m saving you a lot of time, so don’t be too disappointed, okay?” he told you, taking your hand and shoving your fingers into the right position.
“This gun doesn’t have a thumb safety, I will show you later what that means. For you it’s easier to use it.”
You nodded, slowly getting used to the weight in your hand.
“Safety first, so it’s unloaded for now. Just try and hold it like this…” he reached around you and raised your arm to eye level.
“And then the trigger, right?”
“You are going to hold it for now.”
Already your strength showed, or to say it better: your lack of strength. Just to hold the weight of this thing at the end of your outstretched arm was taxing enough and now Jigen had begun to press here and there on your arm to relax your shoulder and tensed muscles.
“Are you kidding me? How am I supposed to shoot like this?” you asked him annoyed.
“You aren’t. This is just to tell your body to relax when holding a gun. Humans tend to stiffen up when holding one.”
“Humans,” you imitated Jigen with a laugh. He looked at you and huffed.
“You want to learn it?”
“I just want to shoot.”
After a second he gave up and took the gun. With a swift movement he loaded it and had given it back to you.
“Back there is your target. Line up the…”
You had already pulled the trigger.
“Will you listen to me now?”
Jigen had found what he was looking for in the freezer and turned back to you, handing you a pack of frozen peas.
You covered your bruised face with it and whined at the pain.
At least you had learned your lesson to listen to the instructions before firing.
This time you wanted to be sure. Your knuckles had turned white, but as long as you had the gun under control, everything should be alright.
“Relax. I will help you.” Again Jigen positioned you with unlimited patience. But this time you actually listened to his advices, loosening your grip a bit, relaxing the elbow, taking a better stance. Finally it felt a bit better than before. Still unused to this stance, you wobbled a bit as soon as he took off his hands of you.
He had just laughed at you, asking you to hold this stance for 5 minutes. And you were ready to kill him. This was hard work!
“It’s another dimension from throwing a knife, right?” he asked, watching the clock on the wall.
“It’s hard.”
“That’s why you are getting a gun for beginners.”
Slowly it dawned on you what would have happened when you had taken his Magnum for the first shot. Your nose had bled, yes. And you had a black eye from being hit by the recoiled gun. But if it had been the Magnum? Surely your nose would be broken!
“I get it. I need to practice, right?”
“Learning by doing.” He got up from his chair and took the gun from you.
“Relax and watch.” Slowly he showed you how to load the chamber, unloaded it and shoved the gun to you.
“Do it.”
You imitated his movements, loading the gun successfully, smiling.
“Good. Raise it. Remember the stance.”
Again he patted every spot on your body down to bring you back into the first position and then he grinned. “Hold it for 5 minutes.”
You wouldn’t give him the satisfaction of giving up! You would show him what you were made of!!
Weak muscles. That was what you were made of. Weak, shaking muscles, ready to give up after the longest 5 minutes of your life. A loaded gun was a lot more heavier than an unloaded one!
“Ready for your shot?”
You nodded just a bit, fearing to give up your stance and having to do it all over again.
“Raise the gun a bit, hold it steady. Align the two bars here and there. Raise the gun half a centimetre,” he instructed you in a monotone voice, before nodding and saying: “And now lower the gun.”
What was wrong this time?
“Do it for 50 times.”
He hated you, didn’t he?!
“Jigen!” This was enough.
“You want to be a good shot? Your muscles know nothing of shooting. It’s a process of learning and repeating the same moves over and over again. Don’t presume you can raise a gun and hit something.”
You remembered your first shot. Not only had the recoil been to strong for you to handle, you had also missed the target by more than 5 metres.
“Fine.” And you began to count your routine with him watching your every move with a concentrated look.
“50!”
“Let us shoot.” He nodded, accepting your count.
You were done. How should you shoot and handle the recoil after this program?! Your muscles were already shaking and your hands were sweaty.
“You did well. Let me treat you.”
Your gun was taken away, unloaded and packed into a case you would own from now on.
In its place you were given his Magnum.
“She’s a whole other world,” he told you, grinning at your scared look.
“It’s heavy!”
“I’ll show you how to handle this beauty.”
His body was all around you, his hands laid on yours. Slowly he shoved you into the right stance, using his whole body, guiding your fingers with his.
His breath was even, tickling your neck a bit while his eyes were fixated on the opposite wall, focusing on the target.
“Are you ready?” His low voice made your body tense up, hands already sweating in anticipation of what was to come.
“Pull the trigger.” His simple command vibrated in the back of your head and you followed it without thinking twice.
The recoil was so much stronger than you had thought, leaving you as a mess in Jigen’s strong arms.
“That was different,” you told him, amazed by the sheer power of this weapon.
He smiled and let go of you. Was he blushing?
“That’s it for today. You will need to practice a lot more to be an able shooter,” he told you, a bit rushed before taking his gun and leaving you alone.
Did you just hear your name?
You shook your head, moving along the carpet of the old house. Your first lesson had left you with determination but also with an aching body. A hot shower would be nice now to relax you and your stiff muscles.
Again! Somebody just called your name!
But when you looked around you saw no one. Of course. Lupin had taken off to a date with Fujiko and Goemon had excused himself this morning to meditate in the woods. It was only you and Jigen in this house. And maybe a ghost?!
This time you were sure. Somebody said your name! And it was close.
You stopped and listened. Maybe Jigen needed your help?
“Yes… like that…”
You blushed, realizing what you had heard.
He must be under the shower. Calling your name. Moaning.
Slowly, you crept closer to the bathroom door, not wanting to miss out on this show. And in your mind you were already planning the next training session. He would need to correct your stance a lot more, you decided with all the dirty thoughts playing out.
“Are you joining me now or what?”
His voice made you blush and realize that he was watching you.
Damn, he was good.
29 notes
·
View notes
Text
Phrozen Sonic Mini 4K: Highest Resolution Budget Resin 3D Printer Yet
Phrozen Sonic Mini 4K
10.00 / 10
Read Reviews
Read More Reviews
Read More Reviews
Read More Reviews
Read More Reviews
Read More Reviews
Read More Reviews
Read More Reviews
Read More Reviews
Read More Reviews
Shop Now
With a larger than average build-plate and 4K resolution output, the Sonic Mini 4K simply produces the best prints we've seen yet from a budget device.
Specifications
Brand : Phrozen
XY Resolution: 3840 x 2160 (4K)
Build area: L5.2 x W2.9 x H5.1 in
Light Source: 405nm ParaLED Matrix 2.0
Layer Thickness: 0.01-0.30mm
Printer Size: L9.8 x W9.8 x H12.9 inches
Pros
Incredible print resolution
Industry-standard ChiTu firmware
Larger than average build plate
LCD monochrome screen for fast layer exposure times
Cons
No network connectivity
Buy This Product
Phrozen Sonic Mini 4K other
Shop
<![CDATA[ // Bottom var galleryThumbs1 = new Swiper('.gallery-thumbs-1', { spaceBetween: 10, slidesPerView: 10, freeMode: true, watchSlidesVisibility: true, watchSlidesProgress: true, centerInsufficientSlides: true, allowTouchMove: false, preventClicks: false, breakpoints: { 1024: { slidesPerView: 6, } }, }); // Top var galleryTop1 = new Swiper('.gallery-top-1', { spaceBetween: 10, allowTouchMove: false, loop: true, preventClicks: false, breakpoints: { 1024: { allowTouchMove: true, } }, navigation: { nextEl: '.swiper-button-next', prevEl: '.swiper-button-prev', }, thumbs: { swiper: galleryThumbs1 } }); ]]>
The Phrozen Sonic Mini 4K is a desktop-sized, budget resin 3D printer with phenomenal print quality, thanks to a 4K monochrome LCD screen. It's also fast, needing as little as two seconds per layer. If you thought resin 3D printers were already incredible, the Phrozen Sonic Mini 4K turns the dial up to 11.
youtube
This Isn't a Kickstarter
It's a shame I even need to add this note, but given the number of failed Kickstarters nowadays, I will anyway: this isn't a crowdfunding campaign. The Sonic Mini 4K is shipping from the end of September, and can be pre-ordered now directly from the Phrozen website or any number of retailers worldwide. Phrozen isn't new to the world of 3D printing, so you should have no concerns about a product actually being delivered. Phrozen is, in my opinion, one of the top three brands in the consumer resin 3D printer market, and the Sonic Mini 4K is the evolution of their original Sonic Mini.
Sonic Mini 4K Design
The design of the Sonic Mini 4K has changed little from the original Sonic Mini, and in fact, resembles nearly every other desktop resin printer in this price range.
With a footprint of just under 10 inches square, 12 inches height, and weighing 5KG, this compact printer can comfortably sit on the corner of any desktop.
A translucent brown acrylic cover protects from dust and sunlight, and must be lifted off fully to get to the print area–there is no hinged lid or other convenience. The machine arrives fully assembled, but you must perform manual bed leveling before you can print.
Leveling involves removing the resin vat (secured with two thumbscrews on either side), and unscrewing the build plate so it sits loosely on the Z arm. Then place a sheet of paper on the screen, and power on the machine. Locate the "zero" button in tools, allow it to move down to screen level, and press down on the build plate such that the paper can't move. Tighten the bolts, and you're done. The build tray should move back up, then you can re-attach the resin vat. These steps sound more complicated in writing than they actually are, but it's an essential step that you'll probably only need to do once. If you skip this step or allow one side of the build plate to be a bit higher than the other, you'll have failed prints, so take the time to get it right.
A fully metal resin vat and Z-axis lifts the Sonic Mini 4K above some cheaper printers, but also isn't uncommon in this category nowadays. Again though, this is an improvement over the previous Sonic Mini, which featured a colorful plastic tray.
A 2.8" touchscreen is also typical and required since there is no network connectivity. All designs must be loaded in using the USB port on the side.
A full set of tools is provided in the box: plastic spatula, metal scraper (though I'd recommend actually not using this, as it tends to scratch the build plate), and a hex key to tighten the four bolts that hold the build plate to the chassis.
What does stand out is the larger than average build plate. Compared to other printers in this class, the 135x75mm allows you to pack more in. However, the total build height of 130mm is actually a little smaller than other printers.
That said, for most purposes, you won't need height, but you can always use an additional tray space to print more at once. The Sonic Mini 4K seems to be aimed directly at those printing a lot of small, highly detailed miniatures, jewelry, or perhaps dental work. If you need the height to print, say, tall vases, this isn't for you.
In terms of detail, the 4K resolution screen results in an incredible 722PPI (pixels-per-inch), while a minimum layer height of 10 microns results in the highest detail we've seen yet.
Of course, we expect other manufacturers to follow suit soon, but for now the Phrozen Sonic Mini 4K sets a new standard in budget printing, and ships at the end of September.
The Need for Speed
Requiring no more than 2 seconds per layer, you can pump out a full tray of little miniatures in less than 3 hours, such as these pictured below, which were printed at 0.05mm layer thickness.
If you're wondering, pictured above are the latest Valour Korps minis from Maker's Cult, which you'll find on Patreon and CGTrader. I spray primed them, and started painting with some Games Workshop Contrast, just to highlight the details.
This speed is enabled through the use of a monochrome LCD display, which allows a greater intensity of light through compared to color LCD displays. More UV getting through to the resin results in a faster cure. This is in combination with a 405nm ParaLED Matrix 2.0, for smooth and even light distribution across the screen.
Is This a Revolution in 3D Printing?
The Sonic Mini 4K isn't so much a revolution, as an iterative upgrade on the original Sonic Mini. That's not to diminish the significance of a 4K screen and fast monochrome LCD– those result in incredible quality prints, for sure. But in every other aspect, the Sonic Mini 4K doesn't innovate.
It runs the same industry-standard ChiTu firmware as nearly every other resin printer on the market, so the workflow will be familiar to anyone with experience in 3D printing. For those new to ChiTuBox software, this boils down to load in a model, position it as desired, and add supports (either manually, or using the automated profiles). Then slice (the process of splitting the print into thin layers), and save to disk.
The fact it uses off-the-shelf software isn't a bad thing (quite the opposite in fact, given the huge support community you'll find out there) but does limit any innovation Phrozen might have performed to the hardware side of things only.
There is no Wi-Fi built-in, so you still need to copy your files to a USB drive and physically manipulate the touch panel screen in order to initiate a print.
The design is all metal, including the resin vat, leading to more reliable prints and greater durability, but it's certainly not the first printer to feature that.
Should You Buy The Phrozen Sonic Mini 4K?
The Sonic Mini 4K is fast, reliable, and produces incredible prints. I can't find fault with anything in particular, so if you need a tiny bit more detail from your prints, it's certainly worth considering. It's an iterative upgrade for sure, but a significant one none-the-less.
However, if you're new to resin printing, you could probably get away with something even cheaper and still get satisfying prints. At least, it might be worth starting with something cheaper just to see if resin printing is right for you.
Is Resin Printing For You?
The print quality you can get from resin printers is generally stunning, and the Sonic Mini 4K even more so.
But if you're new to 3D printing or specifically to resin printing, there are some other factors you may want to consider before investing in one.
Like all resin printers, the FEP film on the base of the resin vat is a consumable and will cost around $10-15 per sheet to replace (as well as some effort to actually swap it out).
The screen will also need to be replaced after about 2000 hours–though this is longer lasting than the previous generation of color screens. A new screen costs around $90 for the Sonic Mini 4K.
You'll need some 99% isopropyl alcohol to wash excess resin off of your prints. That's about $30 for 5L, though prices vary wildly at the moment since everyone realized it was the main ingredient of hand sanitizer.
Then you'll need some sort of UV curing device. I picked up a simple nail curing station for around $30, but it's not ideal. A proper cure and wash station can cost a few hundred dollars.
And you'll probably want some disposable gloves, and various tissues.
Resin printing is messy, can be dangerous, and involves a lot of effort post-processing your prints. If you're not prepared for the mess or effort involved, but want to learn about 3D printing anyway, a filament-based FDM printer might be better (though the results you'll get it out of it aren't comparable). Read our complete beginner's guide to 3D printing.
Phrozen Sonic Mini 4K: Highest Resolution Budget Resin 3D Printer Yet posted first on grassroutespage.blogspot.com
0 notes
Text
Dark Imperium
So I finally gave in. I jumped on the Warhammer 40k 8th edition bandwagon. It was faster and easier than I thought though. I still have some mixed feelings about it but overall I’m glad that I did it.
Games Workshop products are known for two things: 1) they probably are the best sculptures around with the finest details 2) they are insanely expensive. Notice I did not say overpriced 'cause you get what you pay for but still, they cost you an arm and a leg. This is the main reason that was holding me back from diving directly in. This and the fluff which I am not really sure I will ever be able to fully embrace. I mean, a fascist Roman empire in the far future? Duh...!
Anyway... how did I end up starting collecting Warhammer 40k do you ask? I was drinking a beer in Kobe Chinatown with my good board gamer friend when he described me a "Dark Imperium" unboxing he saw and how cool those miniatures looked. As a long-time tabletop wargamer, I knew what he was talking about and that’s probably why I was instantly sold. Also, why I should not decide to buy stuff when semi-drunk: the last thing I know is that I went back with a sense of urgency to scan the whole eBay for the cheapest Dark Imperium deal available. I found a pretty solid deal so I asked my friend how was he feeling about that and I got a weird and certainly unexpected answer: I’m going to London next week, I’ll take care of it. And he sure did. He came back to Japan with a big bag full of presents:
Dark Imperium starter box
1 extra rulebook
2 measuring tapes (GW original)
All for half the price you can get for just the starter box in this overpriced country. I have to admit, this was a great Christmas present.

The miniatures
I am pretty sure you all know about the Dark Imperium contents but the other day when I was trying to get a full list of the miniatures in the box I wasn’t able to find one in the first Google search page so I’ll make one. Let’s see what you get in the Dark Imperium box.
Primaris Space Marines
1 Captain
2 Lieutenants
1 Ancient
10 Intercessors
3 Interceptors
5 Hellblasters
Death Guard
1 Lord of Contagion
1 Noxious Blightbringer
1 Malignant Plaguecaster
7 Plague Marins
1 Foetid Bloat-drone
20 Poxwalkers
You get a total of 53 miniatures which is probably a lot even if I feel like the rulebook covers a big portion of the cost. As usual with GW starter sets you also get unique characters and they probably add a lot of value to the box anyway.
All the miniatures you get are provided in the new GW scale which means they are 32 mm. Roughly. Of course, according to GW’s official take on the matter, the new Primaris marines were bred to be bigger and stronger than ever but this doesn’t explain why the dudes in the Death Guard grew accordingly. Maybe the power of Nurgle? Or the power of the new GW board members trying to drive new blood in the game? I don’t care: the new sculpts are exceptionally good. Like good good good... they look easy to paint with abundant but still fairly large details and with some reasonable color scheme suggestion that can make painting them a breeze, even for beginners. In twenty years I’ve seen miniatures from all the possible sources, old GW, Reaper, Fantasy Flight games, Megacon Games, etc. etc. and the level these new minis reached is amazing. I can imagine that painting them will be a lot of fun. Not to mention that this box contains a figure that is probably one of the best GW miniatures ever: the Lord of Contagion.
The factions
As you can see in the previous section, the two factions that come in the box are the Primaris Space Marines and the Death Guard. Splitting between two friends we had to decide which faction to go with but we both agreed it could be better for him to stick to the marines: first, he likes the looks best and second, they’re easier to paint for a beginner. So I got to pick up the Death guard because models are more complex and you may agree with me that they may represent a fair challenge even for an experienced painter.
Wandering around the internet to see the whole army points you get, I found this thread on Reddit where they did some calculations: like all GW starter sets, the good guys are slightly overpowered, with the Space Marines scoring around 100 points of overhead in respect to the Death Guard. I don’t mind losing games so I don’t care that much but I saw the very same thing in the Age of Sigmar starter set where the Stormcast are way more powerful than the Korne dudes. In addition to this issue, the total points seem to be pretty low (don’t even know on which base I am saying this but bear with me) so we both decided to add some extra units to pump up the fun a little bit: you don’t get a super-powerful army from a starter set. As far as I know, my friend bought some Reavers, a Librarian and a bunch of the Space Marine Heroes (Japan limited edition) so he now has something like 4 or 5 HQs to choose from together with some ranks. I will describe my additions in the details below.
The rulebook
The last time I had a full (physical) rulebook from Games Workshop was back in the days of Warhammer Fantasy Battles 4th edition. I also had two army books (one for my Lizardmen and one for my Dark Elves armies). All the books were that kind of softcover with the glue binding on the side. I’m not a librarian so I don’t know the appropriate term to describe them. On the contrary, the new 40k 8th edition rulebook is hardcover and packed full of gorgeous imagery and fluff. It reminds me the special edition of the Mercs 2.0 rulebook. As per new GW policy, they tend not to show you drawings or renderings but more dioramas with full armies on display: case in point, the AoS books with lots of army photography but almost no drawings. I guess this way the result turns out cheaper for them. The WH40k 8th edition book, however, is packed of full-page (kickass) drawings up to the level that it feels very much the same as the old-school GW manuals but with a more high-quality look and feel. In a couple words? Fucking awesome. It’s so good that I went through it a few times and I still have to get a glimpse at the rules. Enough said.
Death Guard reinforcements
As my friend started buying a lot of additional figures I had to do the same. I did it my way, though. As usual, the first addition I did was some crap I found on the eBay (almost) for free. The auction was for 5 old Plague Marines and 5 old Chaos Space Marines (all painted). The price was more than fair as they turned out around 1$ per unit. I wanted them as test models anyway. I also got 10 Tyranid gargoyles for the same price, so good deal overall.
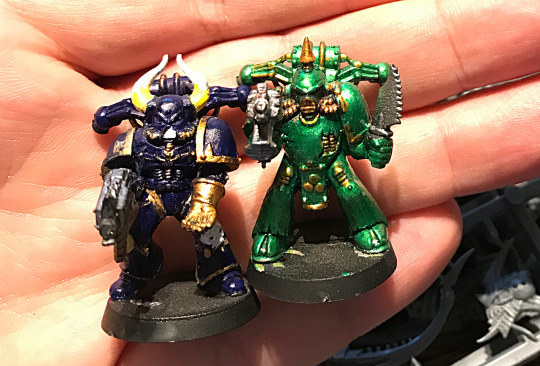
With such an ugly paint job, the idea was to strip them and make a tutorial out of the process, unfortunately, they were painted with some sort of metallic enamel and the paint did not fall off completely even after immersion in pure ethanol. I just primed on top of the old crappy colors and used them as test models. I had the insane idea to use pre-heresy Death Guard colors, a scheme that unfortunately involves a lot of white in the process and you all know how difficult is to paint a smooth white if you are not using an airbrush. So, God knows I needed some testing before hitting the road with the bigger new models. Talking about bigger models: the eBay dudes are 2nd edition figures so take a look what happens if you place them side by side with the new ones! I’m gonna call them my “baby plague marines” ‘cause they’re tiny!

The big boy in the pic is another of the reinforcements I got (together with some Poxwalkers), just a normal “push fit” easy to build plague marine. Despite being of different size, they will probably work well together on the battlefield as my friend is not terribly WYSIWYG but the style is still quite different. I was however surprised to see how the new sculpts are a straight evolution from the old ones: they have very similar features and you effectively feel like you are painting the same faction. Even after twenty years. I guess that showcasing the same colors and being slightly loose on the weapons etc. will do it. You can see the color scheme I chose in the picture below.

You have way more possibilities to get out some kickass effects on new models but the overall look-and-feel should be close to this one. It makes me feel good to see that even in this test stage it looks way better than the green metallic dude so I just cannot wait to paint my first new-era plague marine.
The last piece I bought is, again, another somewhat strange addition: Typhus. One of the named characters in the army. If you head to the GW page or Google for him, you can find many pictures and that’s exactly what I did. The only problem here is that the new sculpt looks super cartoonish and it’s simply not credible as a man-killing soulless machine. I do think the new sculpture is gorgeous, don’t take me wrong, but it doesn’t match the whole Death Guard look: I mean, he has smoke coming out with big mosquitoes and a Nurgling hugging him! Naah... I’ll pass on this sculpt. What do you guys think about him?
I still had to do something to add this dude to my army so I just headed to the Forgeworld page and grabbed the Horus Heresy special edition Character.

Oooh, yeah! Now we’re talking. This is what I call “Death Guard” look! Even for WYSIWYG purposes, he counts exactly as his future-self but with that badass factor that blows my mind. They also cost exactly the same amount of money so this one was a no-brainer: I pulled the trigger in the fraction of a second and the model is now flying over Russia, eastbound. Cannot wait to put my hands on him!
Ok, I wrote enough words on this. It’s time to get some paint flowing and see what I can do with a new model and my pre-heresy color scheme. I can already see a step-by-step tutorial coming in the future on how to paint Death Guard in these colors. You guys let me know what you think and stay tuned for the updates!
... game on!
0 notes
Text
Phrozen Sonic Mini 4K: Highest Resolution Budget Resin 3D Printer Yet

The Phrozen Sonic Mini 4K is a desktop-sized, budget resin 3D printer with phenomenal print quality, thanks to a 4K monochrome LCD screen. It's also fast, needing as little as two seconds per layer. If you thought resin 3D printers were already incredible, the Phrozen Sonic Mini 4K turns the dial up to 11.
youtube
It's a shame I even need to add this note, but given the number of failed Kickstarters nowadays, I will anyway: this isn't a crowdfunding campaign. The Sonic Mini 4K is shipping from the end of September, and can be pre-ordered now directly from the Phrozen website or any number of retailers worldwide. Phrozen isn't new to the world of 3D printing, so you should have no concerns about a product actually being delivered. Phrozen is, in my opinion, one of the top three brands in the consumer resin 3D printer market, and the Sonic Mini 4K is the evolution of their original Sonic Mini.
The design of the Sonic Mini 4K has changed little from the original Sonic Mini, and in fact, resembles nearly every other desktop resin printer in this price range.
With a footprint of just under 10 inches square, 12 inches height, and weighing 5KG, this compact printer can comfortably sit on the corner of any desktop.
A translucent brown acrylic cover protects from dust and sunlight, and must be lifted off fully to get to the print area–there is no hinged lid or other convenience. The machine arrives fully assembled, but you must perform manual bed leveling before you can print.

Leveling involves removing the resin vat (secured with two thumbscrews on either side), and unscrewing the build plate so it sits loosely on the Z arm. Then place a sheet of paper on the screen, and power on the machine. Locate the "zero" button in tools, allow it to move down to screen level, and press down on the build plate such that the paper can't move. Tighten the bolts, and you're done. The build tray should move back up, then you can re-attach the resin vat. These steps sound more complicated in writing than they actually are, but it's an essential step that you'll probably only need to do once. If you skip this step or allow one side of the build plate to be a bit higher than the other, you'll have failed prints, so take the time to get it right.
A fully metal resin vat and Z-axis lifts the Sonic Mini 4K above some cheaper printers, but also isn't uncommon in this category nowadays. Again though, this is an improvement over the previous Sonic Mini, which featured a colorful plastic tray.
A 2.8" touchscreen is also typical and required since there is no network connectivity. All designs must be loaded in using the USB port on the side.
A full set of tools is provided in the box: plastic spatula, metal scraper (though I'd recommend actually not using this, as it tends to scratch the build plate), and a hex key to tighten the four bolts that hold the build plate to the chassis.

What does stand out is the larger than average build plate. Compared to other printers in this class, the 135x75mm allows you to pack more in. However, the total build height of 130mm is actually a little smaller than other printers.
That said, for most purposes, you won't need height, but you can always use an additional tray space to print more at once. The Sonic Mini 4K seems to be aimed directly at those printing a lot of small, highly detailed miniatures, jewelry, or perhaps dental work. If you need the height to print, say, tall vases, this isn't for you.

In terms of detail, the 4K resolution screen results in an incredible 722PPI (pixels-per-inch), while a minimum layer height of 10 microns results in the highest detail we've seen yet.
Of course, we expect other manufacturers to follow suit soon, but for now the Phrozen Sonic Mini 4K sets a new standard in budget printing, and ships at the end of September.

Requiring no more than 2 seconds per layer, you can pump out a full tray of little miniatures in less than 3 hours, such as these pictured below, which were printed at 0.05mm layer thickness.

If you're wondering, pictured above are the latest Valour Korps minis from Maker's Cult, which you'll find on Patreon and CGTrader. I spray primed them, and started painting with some Games Workshop Contrast, just to highlight the details.
This speed is enabled through the use of a monochrome LCD display, which allows a greater intensity of light through compared to color LCD displays. More UV getting through to the resin results in a faster cure. This is in combination with a 405nm ParaLED Matrix 2.0, for smooth and even light distribution across the screen.
The Sonic Mini 4K isn't so much a revolution, as an iterative upgrade on the original Sonic Mini. That's not to diminish the significance of a 4K screen and fast monochrome LCD– those result in incredible quality prints, for sure. But in every other aspect, the Sonic Mini 4K doesn't innovate.
It runs the same industry-standard ChiTu firmware as nearly every other resin printer on the market, so the workflow will be familiar to anyone with experience in 3D printing. For those new to ChiTuBox software, this boils down to load in a model, position it as desired, and add supports (either manually, or using the automated profiles). Then slice (the process of splitting the print into thin layers), and save to disk.

The fact it uses off-the-shelf software isn't a bad thing (quite the opposite in fact, given the huge support community you'll find out there) but does limit any innovation Phrozen might have performed to the hardware side of things only.
There is no Wi-Fi built-in, so you still need to copy your files to a USB drive and physically manipulate the touch panel screen in order to initiate a print.
The design is all metal, including the resin vat, leading to more reliable prints and greater durability, but it's certainly not the first printer to feature that.

The Sonic Mini 4K is fast, reliable, and produces incredible prints. I can't find fault with anything in particular, so if you need a tiny bit more detail from your prints, it's certainly worth considering. It's an iterative upgrade for sure, but a significant one none-the-less.
However, if you're new to resin printing, you could probably get away with something even cheaper and still get satisfying prints. At least, it might be worth starting with something cheaper just to see if resin printing is right for you.
The print quality you can get from resin printers is generally stunning, and the Sonic Mini 4K even more so.
But if you're new to 3D printing or specifically to resin printing, there are some other factors you may want to consider before investing in one.
Like all resin printers, the FEP film on the base of the resin vat is a consumable and will cost around $10-15 per sheet to replace (as well as some effort to actually swap it out).
The screen will also need to be replaced after about 2000 hours–though this is longer lasting than the previous generation of color screens. A new screen costs around $90 for the Sonic Mini 4K.
You'll need some 99% isopropyl alcohol to wash excess resin off of your prints. That's about $30 for 5L, though prices vary wildly at the moment since everyone realized it was the main ingredient of hand sanitizer.
Then you'll need some sort of UV curing device. I picked up a simple nail curing station for around $30, but it's not ideal. A proper cure and wash station can cost a few hundred dollars.
And you'll probably want some disposable gloves, and various tissues.
Resin printing is messy, can be dangerous, and involves a lot of effort post-processing your prints. If you're not prepared for the mess or effort involved, but want to learn about 3D printing anyway, a filament-based FDM printer might be better (though the results you'll get it out of it aren't comparable). Read our complete beginner's guide to 3D printing.
Phrozen Sonic Mini 4K: Highest Resolution Budget Resin 3D Printer Yet posted first on grassroutespage.blogspot.com
0 notes
Text
Phrozen Sonic Mini 4K: Highest Resolution Budget Resin 3D Printer Yet

The Phrozen Sonic Mini 4K is a desktop-sized, budget resin 3D printer with phenomenal print quality, thanks to a 4K monochrome LCD screen. It's also fast, needing as little as two seconds per layer. If you thought resin 3D printers were already incredible, the Phrozen Sonic Mini 4K turns the dial up to 11.
youtube
It's a shame I even need to add this note, but given the number of failed Kickstarters nowadays, I will anyway: this isn't a crowdfunding campaign. The Sonic Mini 4K is shipping from the end of September, and can be pre-ordered now directly from the Phrozen website or any number of retailers worldwide. Phrozen isn't new to the world of 3D printing, so you should have no concerns about a product actually being delivered. Phrozen is, in my opinion, one of the top three brands in the consumer resin 3D printer market, and the Sonic Mini 4K is the evolution of their original Sonic Mini.
The design of the Sonic Mini 4K has changed little from the original Sonic Mini, and in fact, resembles nearly every other desktop resin printer in this price range.
With a footprint of just under 10 inches square, 12 inches height, and weighing 5KG, this compact printer can comfortably sit on the corner of any desktop.
A translucent brown acrylic cover protects from dust and sunlight, and must be lifted off fully to get to the print area–there is no hinged lid or other convenience. The machine arrives fully assembled, but you must perform manual bed leveling before you can print.

Leveling involves removing the resin vat (secured with two thumbscrews on either side), and unscrewing the build plate so it sits loosely on the Z arm. Then place a sheet of paper on the screen, and power on the machine. Locate the "zero" button in tools, allow it to move down to screen level, and press down on the build plate such that the paper can't move. Tighten the bolts, and you're done. The build tray should move back up, then you can re-attach the resin vat. These steps sound more complicated in writing than they actually are, but it's an essential step that you'll probably only need to do once. If you skip this step or allow one side of the build plate to be a bit higher than the other, you'll have failed prints, so take the time to get it right.
A fully metal resin vat and Z-axis lifts the Sonic Mini 4K above some cheaper printers, but also isn't uncommon in this category nowadays. Again though, this is an improvement over the previous Sonic Mini, which featured a colorful plastic tray.
A 2.8" touchscreen is also typical and required since there is no network connectivity. All designs must be loaded in using the USB port on the side.
A full set of tools is provided in the box: plastic spatula, metal scraper (though I'd recommend actually not using this, as it tends to scratch the build plate), and a hex key to tighten the four bolts that hold the build plate to the chassis.

What does stand out is the larger than average build plate. Compared to other printers in this class, the 135x75mm allows you to pack more in. However, the total build height of 130mm is actually a little smaller than other printers.
That said, for most purposes, you won't need height, but you can always use an additional tray space to print more at once. The Sonic Mini 4K seems to be aimed directly at those printing a lot of small, highly detailed miniatures, jewelry, or perhaps dental work. If you need the height to print, say, tall vases, this isn't for you.

In terms of detail, the 4K resolution screen results in an incredible 722PPI (pixels-per-inch), while a minimum layer height of 10 microns results in the highest detail we've seen yet.
Of course, we expect other manufacturers to follow suit soon, but for now the Phrozen Sonic Mini 4K sets a new standard in budget printing, and ships at the end of September.

Requiring no more than 2 seconds per layer, you can pump out a full tray of little miniatures in less than 3 hours, such as these pictured below, which were printed at 0.05mm layer thickness.

If you're wondering, pictured above are the latest Valour Korps minis from Maker's Cult, which you'll find on Patreon and CGTrader. I spray primed them, and started painting with some Games Workshop Contrast, just to highlight the details.
This speed is enabled through the use of a monochrome LCD display, which allows a greater intensity of light through compared to color LCD displays. More UV getting through to the resin results in a faster cure. This is in combination with a 405nm ParaLED Matrix 2.0, for smooth and even light distribution across the screen.
The Sonic Mini 4K isn't so much a revolution, as an iterative upgrade on the original Sonic Mini. That's not to diminish the significance of a 4K screen and fast monochrome LCD– those result in incredible quality prints, for sure. But in every other aspect, the Sonic Mini 4K doesn't innovate.
It runs the same industry-standard ChiTu firmware as nearly every other resin printer on the market, so the workflow will be familiar to anyone with experience in 3D printing. For those new to ChiTuBox software, this boils down to load in a model, position it as desired, and add supports (either manually, or using the automated profiles). Then slice (the process of splitting the print into thin layers), and save to disk.

The fact it uses off-the-shelf software isn't a bad thing (quite the opposite in fact, given the huge support community you'll find out there) but does limit any innovation Phrozen might have performed to the hardware side of things only.
There is no Wi-Fi built-in, so you still need to copy your files to a USB drive and physically manipulate the touch panel screen in order to initiate a print.
The design is all metal, including the resin vat, leading to more reliable prints and greater durability, but it's certainly not the first printer to feature that.

The Sonic Mini 4K is fast, reliable, and produces incredible prints. I can't find fault with anything in particular, so if you need a tiny bit more detail from your prints, it's certainly worth considering. It's an iterative upgrade for sure, but a significant one none-the-less.
However, if you're new to resin printing, you could probably get away with something even cheaper and still get satisfying prints. At least, it might be worth starting with something cheaper just to see if resin printing is right for you.
The print quality you can get from resin printers is generally stunning, and the Sonic Mini 4K even more so.
But if you're new to 3D printing or specifically to resin printing, there are some other factors you may want to consider before investing in one.
Like all resin printers, the FEP film on the base of the resin vat is a consumable and will cost around $10-15 per sheet to replace (as well as some effort to actually swap it out).
The screen will also need to be replaced after about 2000 hours–though this is longer lasting than the previous generation of color screens. A new screen costs around $90 for the Sonic Mini 4K.
You'll need some 99% isopropyl alcohol to wash excess resin off of your prints. That's about $30 for 5L, though prices vary wildly at the moment since everyone realized it was the main ingredient of hand sanitizer.
Then you'll need some sort of UV curing device. I picked up a simple nail curing station for around $30, but it's not ideal. A proper cure and wash station can cost a few hundred dollars.
And you'll probably want some disposable gloves, and various tissues.
Resin printing is messy, can be dangerous, and involves a lot of effort post-processing your prints. If you're not prepared for the mess or effort involved, but want to learn about 3D printing anyway, a filament-based FDM printer might be better (though the results you'll get it out of it aren't comparable). Read our complete beginner's guide to 3D printing.
Phrozen Sonic Mini 4K: Highest Resolution Budget Resin 3D Printer Yet published first on http://droneseco.tumblr.com/
0 notes