#CORSConfiguration
Explore tagged Tumblr posts
Visit Tumblr Blog
Explore Tumblr blogs with no restrictions, modern design and the best experience.
Last Seen Tumblr Blogs


Fun Fact
Tumblr Inc. is funded by 13 investors.
Text

We specialize in AngularJS development services. Our team is dedicated to creating dynamic and user-friendly web applications that meet your unique requirements.
#connectinfosofttechnologies#connectinfosoft#CORS#AngularJS#APIIntegration#ServerSide#FrontendDevelopment#CrossOrigin#WebDevChallenges#HTTPHeaders#AJAX#WebDevelopment#CORSFix#WebSecurity#RESTfulAPIs#WebDevTroubles#AngularCORS#APIAccess#WebDevIssues#HTTPRequests#AngularTroubleshooting#BackendIntegration#AngularDevelopment#WebDevProblems#CORSConfiguration#AngularTips#ServerCommunication#AngularSolutions#WebDevHelp#CORSWorkaround
1 note
·
View note
Text
How to optimize images/files for the web, save bandwidth, storage, and a lot of money
A question that any web developer had to ask themselves at some point in their life. It describes my journey through assets optimization with some examples, but mostly ideas to start your own research. Enjoy!
Why optimize assets?
1. Cost
Some of my websites are centered around images. A lot of images. When I launched them, I naively hosted everything, including static files and uploaded images, to a single EC2 instance. As soon as it got some users, my bill, unsurprisingly, skyrocketed.

2. Speed
While it's easy to jump to the conclusion that most people have modern computers and fast, reliable internet download speed, one must not forget that we are also still in the middle of the mobile era. 4G is slowly getting better, but can still be slow and costly for your users. Though the cost is not on your side, loading large image files on mobile data can affect user experience and drive your users away.
On my side, I also have to take into account the international aspects of my websites. They target English speakers worldwide, and in particular, attracts the South East Asian crowd, which, unfortunately, in many cases, has to rely on slow and unreliable internet.

How to optimize assets?
After years of running these images-centered websites, I went through a bunch of steps, one at a time, to reduce costs and improve user experience. In this article, I'll go through some ideas you can follow yourself, so, unlike me, you can skip the hassle for your future self and have everything ready now!
This article is purely based on my own experience and might not be 100% complete. As I continue on my journey to optimization, I'll make sure to update it. Feel free to comment your own ideas as well!

1. Basics
These should be pretty obvious to anybody with a tiny bit of experience making websites, but I'll list them anyway, for exhaustivity.
Some are more general assets related and not just images, and some might not make a big difference based on your usage. If you're not familiar with them, use them as a base to do your own research!
Resize your images
If your image is resized to 300x300px using CSS, might as well store your image in 300x300px, or you're loading an image that's bigger than needed.
Even in a responsive design, you generally know the limit at which your image can be displayed. For example, if you're using a Bootstrap container and have your image use img-responsive, you know that your image will never be displayed at more than 1170px width.
For SEO purpose, you might want search engines to have access to the high quality image, allowing your website to show up first in Image Search. What I personally do is provide an a href link to the full size image. This way, most of your users will only load the small version, but the larger version will still be available for both your users and search engines.
Use images sprites
This method is used widely, not just for websites, but also for game optimization. The idea is to put many small images loaded frequently (navigation icons, for example) into a single image, loaded once.
You then use a div with this image as a background, properly positioned to only show the image you want.
You can learn more about this method on W3Cschool.
Use SVG
Not only are SVG files much smaller, they can also be upscaled infinitely! Of course, SVG files won't work on photographs, but they're perfect for simple icons.
You can learn more about SVG files on SVGOnTheWeb.
Use fonts for icons
Just like SVG files, vector fonts can also scale infinitely and are pretty light weight, making them a great choice for icons around your website.
Many fixed sets of commonly used icons are available, the most famous one being FontAwesome.
If you want to make your own selection, I recommend using FlatIcon, which generates font files and the CSS that comes with it for you. That's the one I personally use the most and I recommend it.
FlatIcon doesn't let you provide your own icons, but Fontastic does, so you might want to consider it instead.
Minify your CSS and Javascript
Not related to images, but when optimizing for the web, it's better not to cut corners. Minifying is a well known method to reduce your files sizes by removing white space and renaming variables. It makes the source files very hard to read for human beings, but perfectly fine for your browser.
Many tools exist to minify your static files, including desktop clients, command line tools, and even online tools. Many full-featured deployment / continuous delivery tools and libraries come with minifiers as well.
I personally let CloudFlare minify static files for me, which I'll talk about below.
For websites that rely heavily on Javascript libraries, you might want to look into WebPack, which bundles your static sources for you, among many other features.
Use CDNs
CDN hosted files are optimized by being hosted closer to your end user and being heavily cached at multiple levels. Using CDNs also allows a user using multiple websites that use the same libraries to only load it once for both.
I personally use cdnjs, but many free CDNs exist for the most common Javascript and CSS libraries.
2. Storage: S3

After my EC2 nightmare bill I mentioned earlier, my first step to save money was then to host all my static files and uploaded content to S3.
S3 Storage is cheap, but you still pay for bandwidth, which we'll talk about below.
If you know your target demographic, you can pick the right region to speed up loading on your users’ end.
Below is the pricing for S3 in North Virginia. You can check the current pricing and pricing for different regions directly on AWS official website.

As you can see, S3's cost for storage is close to nothing.
You may also pick different storage options such as Standard Infrequent Access if your files are not loaded frequently (duh).
Glacier is another long-term, infrequent access storage. However, I do not recommend it for the web, as storage will be cheap but accessing your files will be very pricey. It's useful for archives of rarely used and not easily accessible files, such as old logs or backups.
Creating an S3 bucket is easy as ABC, so I won't go through that today.
Updating your static images/files on S3
For small, infrequently updated websites, you can opt for manual update. Whenever a file needs to be updated, open the AWS console and upload your files there. That's it!
If your website gets updated frequently, uploading them manually can be a hassle. I suggest to look into Continuous Delivery and the recommended tools for it depending on the web framework you're using. Many web frameworks also come with tools or libraries to automatically update your S3 bucket. GitHub can also provides hooks whenever you push to master, for example. Continuous Integration tools like Travis-CI can make use of these hooks to upload artifacts to S3 after a successful build.
User-uploaded files on S3
Files uploaded by your users should also go straight to S3. Many libraries exist for most web frameworks that let you configure your AWS key/secret and a bunch of other parameters to upload to S3.
If you use a server-side web framework, you may also consider reducing the load on your server by letting your front-end (ie Javascript) handle S3 uploading.
Frequent problems:
I want to use my own domain
You'll need a separate sub-domain for your assets (For example, website.com → s.website.com).
Your S3 bucket should be named exactly like your sub-domain.
Files don't get reloaded
Files get cached by your users’ browsers. You can ask your users to force reload the page, but it's not convenient, and if you opt for the caching solution I'll explain below, that won't work either.
To solve this, I append a version to my files. For example, instead of:
<img src="{{ static_url }}img/background.png" ...>
I'll load:
<img src="{{ static_url }}img/background.png?{{ version }}" ...>
The "version" variable can be something you manually update either per file or for all files, or something provided by your continuous delivery library/tool. Some frameworks have built-in support
Make sure the "version" is not always different (such as using the current date and time, which I've seen recommended multiple times on StackOverflow), and only changes when it needs to. Because if it's always different, files will always be reloaded, losing the whole point of caching files, and pretty much the point of this article :)
Files are not accessible (Permission denied)
When you upload your files on S3, make sure you grant public access to the files.

I get cross origin errors
If you're loading fonts or dynamic javascript files though other javascript files, you'll need to update your Cross-Origin policy under your S3 bucket settings, which is currently under "Permissions" then "CORS configuration".
Here's an extensive example:
<?xml version="1.0" encoding="UTF-8"?> <CORSConfiguration xmlns="http://s3.amazonaws.com/doc/2006-03-01/"> <CORSRule> <AllowedOrigin>*</AllowedOrigin> <AllowedMethod>GET</AllowedMethod> <AllowedMethod>HEAD</AllowedMethod> <AllowedMethod>POST</AllowedMethod> <AllowedMethod>PUT</AllowedMethod> <MaxAgeSeconds>3000</MaxAgeSeconds> <ExposeHeader>Content-Length</ExposeHeader> <AllowedHeader>Authorization</AllowedHeader> </CORSRule> </CORSConfiguration>
In most simple cases, you won't need ExposeHeader and AllowedMethod POST and PUT, so make sure you only add the configurations you need after testing.
Alternatives to consider:
Google Cloud Storage
3. Bandwidth: Caching with CloudFlare

CloudFlare has a free tier that comes packed with many incredible features that make managing your own website a bliss.
Though I originally used it to help counter DDOS attacks, I won't go over that nor any other CloudFlare features because it's not the point of this article. Visit CloudFlare's website to learn more about it.
CloudFlare caches your assets, for free.
Registering to CloudFlare is extremely easy. Just follow the guide you see when you sign up, which will ask you to change your DNS servers, and you're good to go.
Once CloudFlare is configured, visit the "Caching" and "Speed" tabs to see the options and change them to suit your needs.
I mentioned earlier that some of my websites are image-centric. Here's an example:

Above is one of my websites that gets on average around 100 000 monthly unique visitors.
With CloudFlare properly configure, around 97% of the time, the content loaded by my users comes from CloudFlare's cache and doesn't even hit my S3 server.
That's around 6.6 TB of bandwidth saved per month. Considering that S3 storage is cheap, but bandwidth makes most of the cost, this means I save around $600 / month, which for a small website like this is very significant.
I also mentioned earlier that minifying your Javascript and CSS files might not be much, but bandwidth can easily add up, so you don't want to cut corners on that.
Well, good news: CloudFlare also has an option to automatically minify these files for you!

Be careful when minifying HTML if you're using "pre" tags or "white-space: pre", or in other words, if you want to keep you new lines. The minifier will collapse any instance of multiple new lines into a single new line, which can visually affect your website.
4. Optimize images with close to lossless compression

I mentioned earlier that some of my websites are images-centered. To put that into perspective, the most loaded page of one of my website loads around 100 images, all of which around 800px width.
For this reason, I had to go one step further to optimize my images and ensure that the file size is as small as it could possibly be, without sacrificing how images look.
I've been using TinyPNG for years to save on bandwidth for most of my websites.
TinyPNG is proprietary software provided through an API. It comes with a price tag, but unless you process a lot of images every month, you won't have to worry about, because the first 500 compressions are free.

You can calculate how much it could potentially cost you using the price calculator.
On average, it will reduce the size of your PNG and JPG images to 60% less without affecting it to the naked eye.

Multiple alternatives exist, notably the free open-source python library and command line tool Crunch.
I have tested the same files using Crunch to compare how it performs:
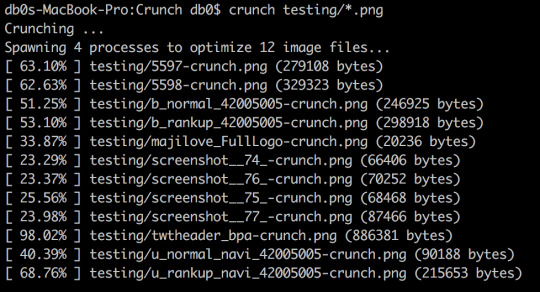
Though it performs significantly less than TinyPNG, it still averages at around 47%. It's also worth noting that it is much slower, though I don't believe you should worry about this for reasons I'll explain below.
TinyPNG also has many open libraries available making it very easy to integrate with any language of your choice.
Also keep in mind that even though you don't need to pay per compression when using Crunch, you'll still need to pay for the extra processing power - which should be cheaper, but not free.
Regardless of which option you go for, keep in mind that image optimization is slow and therefore should be done asynchronously.
To do so, you can:
Use a queue such as RabbitMQ or a good old crontab
Use AWS Lambda or an equivalent
Conclusion

Many solutions and tools exist, and this is really just a base to help you get started with the right mindset.
Make sure your understand your needs and your budget, your target and how you perform through analytics and monitoring, and prioritize based on that.
Happy programming!
TL;DR
Reduce your files' size to the minimum required, and go further in compression if you can
Keep in mind storage and bandwidth
Use smart, optimized and geographically well-chosen storage solutions
Cache, cache, and cache again
Images credit: Icons designed by Freepik, Icon Monk and turkkub from Flaticon and licensed by CC 3.0 BY. Screenshots and logos from AWS S3, CloudFlare and TinyPNG come from their respective websites.
1 note
·
View note
Photo

ブラウザからS3へのダイレクトアップロード https://ift.tt/2JjQQej
はじめまして、streampackチームのminsuです。
やりたいこと
S3へファイルをアップロードする際に、Railsサーバを通すことなくブラウザからS3へのダイレクトアップロードを実装してみます。 ブラウザからS3にファイルを直接アップロードすることにより、余分な負荷を削減できるメリットがあります。 また、Railsのgem aws-sdkを利用して生成したpresigned POSTを利用することでブラウザにaws credentialsを持たせる事なくアップロードを行えます。
AWSリソースの準備
まず、AWSアクセスキーを作成してACCESS_KEY_ID, SECRET_ACCESS_KEYを取得してください。
次にS3のバケットの作成します。 作成したバケットのCORSの設定を行い、外部からのPOSTを許可します。
<?xml version="1.0" encoding="UTF-8"?> <CORSConfiguration xmlns="http://s3.amazonaws.com/doc/2006-03-01/"> <CORSRule> <AllowedOrigin>*</AllowedOrigin> <AllowedMethod>GET</AllowedMethod> <AllowedMethod>PUT</AllowedMethod> <AllowedMethod>POST</AllowedMethod> <MaxAgeSeconds>3000</MaxAgeSeconds> <AllowedHeader>*</AllowedHeader> </CORSRule> </CORSConfiguration>
AllowedOrigin、AllowedHeaderはワイルドカードを設定しましたが、環境に合わせて変更してください。
Railsでpresigned POSTを返すアクションを設定
まずは環境変数に必要な値を持たせておきます。
.env
AWS_ACCESS_KEY_ID=your-key-id AWS_SECRET_ACCESS_KEY=your-secret-key BUCKET=your-bucket-name
次にGemfileに
Gemfile
gem `aws-sdk', '~3'
を追加して
$ bundle install
そして環境変数に保存した値を使ってS3のインスタンスを作成します。
config/initializers/aws.rb
Aws.config.update({ region: 'ap-northeast-1', credentials: Aws::Credentials.new(ENV['AWS_ACCESS_KEY_ID'], ENV['AWS_SECRET_ACCESS_KEY']), }) S3_BUCKET = Aws::S3::Resource.new.bucket(ENV['S3_BUCKET'])
GET 要求に対して、 ブラウザから S3 へ POST するために必要な情報を返すアクションを実装します。 今回は video モデルのコントローラーにアクションを追加しました。
VideosController < ApplicationController def upload filename = params[:filename] filetype = params[:filetype] post = S3_BUCKET.presigned_post( key: "upload_video/#{filename}", acl: 'public-read', content_type: filetype, metadata: { 'original-filename' => filename } }) render json: {url: post.url,fields: post.fields} end end
バケット内の保存先はkey:で指定するので、この値をDBに保存してモデルと紐づけることが可能です。
GET リクエストで filename,filetype パラメータ受け取ったuploadアクションは以下のpresigned POSTとして次のjsonを返します。
{ "url": "https://your-bucket-name.s3.ap-northeast-1.amazonaws.com", "fields": { "key": "upload_video/test.mp4", "acl": "public-read", "Content-Type": "video/mp4", "x-amz-meta-original-filename": "test.mp4", "policy": "eyJleHBpc...", "x-amz-credential": "oiMjAxO...", "x-amz-algorithm": "AWS4-HMAC-SHA256", "x-amz-date": "20190607T004657Z", "x-amz-signature": "mF0aW9uIj..." } }
ブラウザページの作成
動作としては
RailsにGETリクエストを送ってpresigned POSTを受け取る
presigned POSTを使ってS3へPOST
実装はfetch api
です
<!DOCTYPE html> <html> <head> <title>S3 POST Form</title> <meta http-equiv="Content-Type" content="text/html; charset=UTF-8" /> </head> <body> <input type="file" id="up_file"> <br><input type="button" id="send" onclick="upload();" value="アップロード"> <!-- fetch api --> <script> function upload(){ const up_files = document.getElementById('up_file'); const up_file = up_files.files[0]; if (up_files.value === "") { return false; } const url= 'http://localhost:3000/api/v1/video_upload/get_post_fields?filename=' + up_file.name + "&filetype=" + up_file.type; // Rails に GET console.log("GET 開始"); fetch( url, {method: 'GET'} ).then(response => { if(response.ok){ console.log("GET 成功"); return response.json(); } }).then((data)=>{ formdata = new FormData() for (key in data.fields) { formdata.append(key,data.fields[key]); } formdata.append("file",up_file); const headers = { "accept": "multipart/form-data" } // S3 に POST console.log("POST 開始"); fetch( data.url, { method: 'POST', headers, body: formdata } ).then((response) => { if(response.ok){ console.log("POST 成功"); return response.text(); } }) }); } </script> </body> </html>
これでブラウザからのS3へのダイレクトアップロードを実装することができました。
参考
Class: Aws::S3::PresignedPost
Creating an HTML Form (Using AWS Signature Version 4)
Fetch を使う – Web API – MDN – Mozilla
FormData オブ��ェクトの利用
元記事はこちら
「ブラウザからS3へのダイレクトアップロード」
July 03, 2019 at 04:00PM
0 notes
Link
Note
This article was first published on Exoscale blog with some minor modifications.
1
YouTube gives you the choice to not display ads on your videos. In advanced settings, you can unselect “Allow advertisements to be displayed alongside my videos.” Alternatively, you can also monetize your videos.
Hosting videos on YouTube is convenient for several reasons: pretty good player, free bandwidth, mobile-friendly, network effect and, at your discretion, no ads. On the other hand, this is one of the less privacy-friendly solution. Most other providers share the same characteristics—except the ability to disable ads for free.
2
Nowadays, everything supports MP4/H.264. It usually also brings hardware acceleration, which improves battery life on mobile devices. WebM/VP9 provides a better quality at the same bitrate.
With the <video> tag, self-hosting a video is simple:
<video controls> <source src="../videos/big_buck_bunny.webm" type="video/webm"> <source src="../videos/big_buck_bunny.mp4" type="video/mp4"> </video>
However, while it is possible to provide a different videos depending on the screen width, adapting the video to the available bandwidth is trickier. There are two solutions:
They are both adaptive bitrate streaming protocols: the video is sliced in small segments and made available at a variety of different bitrates. Depending on current network conditions, the player automatically selects the appropriate bitrate to download the next segment.
HLS was initially implemented by Apple but is now also supported natively by Microsoft Edge and Chrome on Android. hls.js is a JavaScript library bringing HLS support to other browsers. MPEG-DASH is technically superior (codec-agnostic) but only works through a JavaScript library, like dash.js. In both cases, support of the Media Source Extensions is needed when native support is absent. Safari on iOS doesn’t have this feature and cannot use MPEG-DASH. Consequently, the most compatible solution is currently HLS.
Encoding
To serve HLS videos, you need three kinds of files:
the media segments (encoded with different bitrates/resolutions),
a media playlist for each variant, listing the media segments, and
a master playlist, listing the media playlists.
Media segments can come in two formats:
MPEG-2 Transport Streams (TS), or
Fragmented MP4.
3
You could generate both formats and use them as variants in the master playlist. However, a limitation in hls.js prevents this option.
Fragmented MP4 media segments are supported since iOS 10. They are a bit more efficient and can be reused to serve the same content as MPEG-DASH (only the playlists are different). Also, they can be served from the same file with range requests. However, if you want to target older versions of iOS, you need to stick with MPEG-2 TS.
FFmpeg is able to convert a video to media segments and generate the associated media playlists. Peer5’s documentation explains the suitable commands. I have put together an handy (Python 3.6) script, video2hls, stitching together all the steps. After executing it on your target video, you get a directory containing:
media segments for each resolution (1080p_1_001.ts, 720p_2_001.ts, …)
media playlists for each resolution (1080p_1.m3u8, 720p_2.m3u8, …)
master playlist (index.m3u8)
progressive (streamable) MP4 version of your video (progressive.mp4)
poster (poster.jpg)
The script accepts a lot of options for customization. Use the --help flag to discover them. Run it with --debug to get the ffmpeg commands executed with an explanation for each flag. For example, the poster is built with this command:
ffmpeg \ `# seek to the given position (5%)` \ -ss 4 \ `# load input file` \ -i ../2018-self-hosted-videos.mp4 \ `# take only one frame` \ -frames:v 1 \ `# filter to select an I-frame and scale` \ -vf 'select=eq(pict_type\,I),scale=1280:720' \ `# request a JPEG quality ~ 10` \ -qscale:v 28 \ `# output file` \ poster.jpg
Serving
So, we got a bunch of static files we can upload anywhere. Yet two details are important:
4
Use https://example.org instead of the wildcard character to restrict access to your own domain.
When serving from another domain, CORS needs to be configured to allow GET requests. Adding Access-Control-Allow-Origin: * to response headers is enough.
Some clients may be picky about the MIME types. Ensure files are served with the ones in the table below.
Kind Extension MIME type Playlists .m3u8 application/vnd.apple.mpegurl MPEG2-TS segments .ts video/mp2t fMP4 segments .mp4 video/mp4 Progressive MP4 .mp4 video/mp4 Poster .jpg image/jpeg
5
There is no need to host those files behind a (costly) CDN. Latency doesn’t matter much as long as you can sustain the appropriate bandwidth.
Let’s host our files on Exoscale’s Object Storage which is compatible with S3 and located in Switzerland. As an example, the Caminandes 3: Llamigos video is about 213 MiB (five sizes for HLS and one progressive MP4). It would cost us less than 0.01 € per month for storage and 1.42 € for bandwidth if 1000 people watch the 1080p version from beginning to end—unlikely.
We use s3cmd to upload files. First, you need to recover your API credentials from the portal and put them in ~/.s3cfg:
[default] host_base = sos-ch-dk-2.exo.io host_bucket = %(bucket)s.sos-ch-dk-2.exo.io access_key = EXO..... secret_key = .... use_https = True bucket_location = ch-dk-2
The second step is to create a bucket:
$ s3cmd mb s3://hls-videos Bucket 's3://hls-videos/' created
You need to configure the CORS policy for this bucket. First, define the policy in a cors.xml file (you may want to restrict the allowed origin):
<CORSConfiguration> <CORSRule> <AllowedOrigin>*</AllowedOrigin> <AllowedMethod>GET</AllowedMethod> </CORSRule> </CORSConfiguration>
Then, apply it to the bucket:
$ s3cmd setcors cors.xml s3://hls-videos
The last step is to copy the static files. Playlists are served compressed to save a bit of bandwidth. For each video, inside the directory containing all the generated files, use the following command:
while read extension mime gz; do [ -z "$gz" ] || { # gzip compression (if not already done) for f in *.${extension}; do ! gunzip -t $f 2> /dev/null || continue gzip $f mv $f.gz $f done } s3cmd --no-preserve -F -P \ ${gz:+--add-header=Content-Encoding:gzip} \ --mime-type=${mime} \ --encoding=UTF-8 \ --exclude=* --include=*.${extension} \ --delete-removed \ sync . s3://hls-videos/video1/ done <<EOF m3u8 application/vnd.apple.mpegurl true jpg image/jpeg mp4 video/mp4 ts video/mp2t EOF
The files are now available at https://hls-videos.sos-ch-dk-2.exo.io/video1/.
HTML
We can insert our video in a document with the following markup:
<video poster="https://hls-videos.sos-ch-dk-2.exo.io/video1/poster.jpg" controls preload="none"> <source src="https://hls-videos.sos-ch-dk-2.exo.io/video1/index.m3u8" type="application/vnd.apple.mpegurl"> <source src="https://hls-videos.sos-ch-dk-2.exo.io/video1/progressive.mp4" type='video/mp4; codecs="avc1.4d401f, mp4a.40.2"'> </video>
Browsers with native support use the HLS version while others would fall back to the progressive MP4 version. However, with the help of hls.js, we can ensure most browsers benefit from the HLS version too:
<script src="https://cdn.jsdelivr.net/npm/hls.js@latest"></script> <script> if(Hls.isSupported()) { var selector = "video source[type='application/vnd.apple.mpegurl']", videoSources = document.querySelectorAll(selector); videoSources.forEach(function(videoSource) { var once = false; // Clone the video to remove any source var oldVideo = videoSource.parentNode, newVideo = oldVideo.cloneNode(false); // Replace video tag with our clone. oldVideo.parentNode.replaceChild(newVideo, oldVideo); // On play, initialize hls.js, once. newVideo.addEventListener('play',function() { if (!once) return; once = true; var hls = new Hls({ capLevelToPlayerSize: true }); hls.loadSource(m3u8); hls.attachMedia(newVideo); hls.on(Hls.Events.MANIFEST_PARSED, function() { newVideo.play(); }); }, false); }); } </script>
Here is the result, featuring Caminandes 3: Llamigos, a video created by Pablo Vasquez, produced by the Blender Foundation and released under the Creative Commons Attribution 3.0 license:
Most JavaScript attributes, methods and events work just like with a plain <video> element. For example, you can seek to an arbitrary position, like 1:00 or 2:00—but you would need to enable JavaScript to test.
The player is different from one browser to another but provides the basic needs. You can upgrade to a more advanced player, like video.js or MediaElements.js. They also handle HLS videos through hls.js.
Hosting your videos on YouTube is not unavoidable: serving them yourself while offering quality delivery is technically affordable. If bandwidth requirements are modest and the network effect not important, self-hosting makes it possible to regain control of the published content and not to turn over readers to Google. In the same spirit, PeerTube offers a video sharing platform. Decentralized and federated, it relies on BitTorrent to reduce bandwidth requirements.
Addendum
Preloading
In the above example, preload="none" was used for two reasons:
Most readers won’t play the video as it is an addon to the main content. Therefore, bandwidth is not wasted by downloading a few segments of video, at the expense of slightly increased latency on play.
We do not want non-native HLS clients to start downloading the non-HLS version while hls.js is loading and taking over the video. This could also be done by declaring the progressive MP4 fallback from JavaScript, but this would make the video unplayable for users without JavaScript. If preloading is important, you can remove the preload attribute from JavaScript—and not wait for the play event to initialize hls.js.
CSP
Setting up CSP correctly can be quite a pain. For browsers with native HLS support, you need the following policy, in addition to your existing policy:
image-src https://hls-videos.sos-ch-dk-2.exo.io for the posters,
media-src https://hls-videos.sos-ch-dk-2.exo.io for the playlists and media segments.
With hls.js, things are more complex. Ideally, the following policy should also be applied:
worker-src blob: for the transmuxing web worker,
media-src blob: for the transmuxed segments,
connect-src https://hls-videos.sos-ch-dk-2.exo.io to fetch playlists and media segments from JavaScript.
However, worker-src is quite recent. The expected fallbacks are child-src (deprecated), script-src (but not everywhere) and then default-src. Therefore, for broader compatibility, you also need to append blob: to default-src as well as to script-src and child-src if you already have them. Here is an example policy—assuming the original policy was just default-src 'self' and media, XHR and workers were not needed:
HTTP/1.0 200 OK Content-Security-Policy: default-src 'self' blob:; image-src 'self' https://hls-videos.sos-ch-dk-2.exo.io; media-src blob: https://hls-videos.sos-ch-dk-2.exo.io; connect-src https://hls-videos.sos-ch-dk-2.exo.io; worker-src blob:;
via Planet Debian
0 notes
Text
Build a Custom CMS for a Serverless Static Site Generator
Static Site Website Generators have been getting increasingly popular within the last 2 years. Much has been written (like this and this) and there have been many great open source projects and even funded companies launched to help you get up and running.
What if I told you that you could build a Static Site Generator with your own custom CMS without the need for a database? Not just that, but we can get to Hello World! in under 100 lines of JavaScript.
The historic problem with static site generators is that they typically require content to be authored in markdown. This works great for developers but not as well for clients who are used to working in a CMS authoring environment. Creating such an environment has traditionally meant the need to create a database to manage authentication, save content and upload media.
Thanks to the rise of so-called serverless architectures (aka Backend as a Service), this is no longer the case.
In this demo, we will create the bare bones of a static site generator with content authored by an admin user via a standard web form (no database necessary).
To accomplish this, we will use:
A serverless web application architecture (AWS SDK for JavaScript, Amazon Cognito, IAM and S3)
A front end template engine (JSRender).
View the completed files for this proof-of-concept demo project on GitHub.
Set Up a Static Website on Amazon S3
First, sign up for an account with Amazon Web Services (AWS) if you have not already. Once you have an AWS account it is easy to set up a static site hosted on AWS Simple Storage Service (S3).
First, create a bucket and then under Static Website Hosting in Properties, select Enable website hosting and set the Index Document to point to the homepage of the site (`index.html`).
Next, create a bucket policy to make your site publicly readable. For information on setting up bucket permissions, refer to the AWS S3 documentation. Additionally, we need a policy that will allow an admin to save content edits.
<?xml version="1.0" encoding="UTF-8"?> <CORSConfiguration xmlns="http://ift.tt/16OMIwO;> <CORSRule> <AllowedOrigin>*</AllowedOrigin> <AllowedMethod>POST</AllowedMethod> <AllowedMethod>GET</AllowedMethod> <AllowedMethod>PUT</AllowedMethod> <AllowedMethod>DELETE</AllowedMethod> <AllowedMethod>HEAD</AllowedMethod> <AllowedHeader>*</AllowedHeader> </CORSRule> </CORSConfiguration>
For more detailed information on how to host a static site on S3, including on one of your own domains, refer to Hosting a Static Website on Amazon Web Services.
Create Static Site Files
Create a new directory for your project. Construct a simple project page or pick a simple example from your front end framework of choice. In our demo, we use the Jumbotron example from Bootstrap.
Upload the files to the S3 bucket you created. Once the upload is complete, select the S3 bucket and view Properties. Click on the endpoint link and you will be able to view your site.
Create Admin Login
Amazon Cognito provides a simple way to add an authentication flow to a website.
The first step in this process is to create a UserPool. In the AWS Console, navigate to Amazon Cognito and create a user pool with the default settings. Read more about User Pools in the AWS Documentation.
Once your User Pool is created, you need to add an app with access to the pool. Select your User Pool to edit it, then select the Apps tab. Click the Add an app button and give your app a name. When adding an app, it is very important to uncheck the Generate client secret checkbox because the JavaScript in the Browser SDK does not support apps with a client secret.
We will directly create our admin users in the AWS Console, then provide them with credentials they can use to log in. Only these users will be able to get authenticated to have access to generate the static content for our site.
Go into the User Pool and select Users and Groups. Fill in your own information so you can be the first admin user. Select the option to send an invitation to the user via email.
Now we need to create a login page for our admins. Make a new admin directory in the project with an index.html with a login form inside it. In our demo, we use the Bootstrap Sign In Page.
To connect our form with Cognito, we will need to use the Amazon Cognito Identity SDK for JavaScript. Follow the installation instructions on the project page to add the scripts to our login page.
Next, use the Amazon Cognito Identity service to authenticate and establish a session for our admin user with the temporary password received via email.
Add a submit event listener to our login form that calls a login function based on the authentication example from the Amazon Cognito Identity SDK for JavaScript Project Page.
$('.form-signin').on('submit', function(e) { e.preventDefault(); var authenticationData = { Username : $('#inputUsername').val(), Password : $('#inputPassword').val() }; var authenticationDetails = new AWSCognito.CognitoIdentityServiceProvider.AuthenticationDetails(authenticationData); var poolData = { UserPoolId : '...', // your user pool id here ClientId : '...' // your client id here }; var userPool = new AWSCognito.CognitoIdentityServiceProvider.CognitoUserPool(poolData); var userData = { Username : $('#inputUsername').val(), Pool : userPool }; cognitoUser = new AWSCognito.CognitoIdentityServiceProvider.CognitoUser(userData); cognitoUser.authenticateUser(authenticationDetails, { newPasswordRequired: function(userAttributes, requiredAttributes) { $('#form-password').removeAttr('hidden'); $('#form-login').css('display', 'none'); if ($('#inputNewPassword').val() !== '') { cognitoUser.completeNewPasswordChallenge($('#inputNewPassword').val(), [], this); } }, onSuccess: function (result) { AWS.config.credentials = new AWS.CognitoIdentityCredentials({ IdentityPoolId : 'us-east-1:XXXXXXXX-XXXX-XXXX-XXXX-XXXXXXXXXXXX', Logins : { 'http://ift.tt/1X2l1YG' : result.getIdToken().getJwtToken() } }); $.getJSON('index.json', function(data) { $('.container').html($('#adminForm').render(data)); }).fail(function() { $('.container').html($('#adminForm').render({})); }); AWS.config.update({ region: 'us-east-1', credentials: new AWS.CognitoIdentityCredentials({ IdentityPoolId: 'us-east-1:XXXXXXXX-XXXX-XXXX-XXXX-XXXXXXXXXXXX', Logins: { 'http://ift.tt/1X2l1YG' : result.getIdToken().getJwtToken() } }) }); s3 = new AWS.S3({ apiVersion: '2006-03-01', params: { Bucket: YOUR_BUCKET_NAME } )}; }, onFailure: function(err) { alert(err); } }); });
We need to create an additional form to allow the admin to create a password. Admin will sign in with their temporary password then set a new password to complete authentication.
For more information on working with Amazon Cognito and User Pools, refer to these articles:
Amazon Cognito Developer Guide
Accessing Your User Pools using the Amazon Cognito Identity SDK for JavaScript
Customizing Amazon Cognito User Pool Authentication Flow
Create CMS Admin
With login complete, we want to allow our admin to edit content on the site. In this demo, we will edit the top jumbotron callout. After admin is authenticated, we display a form with inputs for site info, the callout headline, and text content.
When the form is submitted, we combine the data from the form with a template to generate static HTML. In this demo, we JSRender as our templating engine.
Create the template for our Jumbotron page by copying the HTML and embed it on our admin page as a JSX template. Replace the content with template tags mapped to the names of the admin edit form fields.
<script type="text/x-jsrender" id="jumbotronTemplate"> <html lang="en"> <head> <meta charset="utf-8"> <meta http-equiv="X-UA-Compatible" content="IE=edge"> <meta name="description" content=""> <meta name="author" content=""> <title></title> <link href="css/bootstrap.min.css" rel="stylesheet"> <link href="css/jumbotron.css" rel="stylesheet"> </head> <body> <nav class="navbar navbar-static-top navbar-dark bg-inverse"> <a class="navbar-brand" href="#"></a> <ul class="nav navbar-nav"> <li class="nav-item active"> <a class="nav-link" href="#">Home <span class="sr-only">(current)</span></a> </li> <li class="nav-item"> <a class="nav-link" href="#">About</a> </li> <li class="nav-item"> <a class="nav-link" href="#">Contact</a> </li> </ul> </nav> <div class="jumbotron"> <div class="container"> <h1 class="display-3"></h1> <p></p> <p> <a class="btn btn-primary btn-lg" href="#" role="button">Learn more »</a> </p> </div> </div> ...
Add an event listener to the edit form to capture the data entered as a JSON Object, then pass it to the JSRender template to generate HTML for uploading to S3 in the next step.
$('.container') .on('submit', '#form-admin',function(e) { e.preventDefault(); var formData = {}; var $formFields = $('#form-admin').find('input, textarea, select').not(':input[type=button],:input[type=submit],:input[type=reset]'); $formFields.each(function() { formData[$(this).attr('name')] = $(this).val(); }); var jumbotronHTML = '<!DOCTYPE html>' + $('#jumbotronTemplate').render(formData); var file = new File([jumbotronHTML], 'index.html', {type: "text/html", lastModified: new Date()}); ...
Save Static Site Files
Next, we grant permission to admin to save edits to S3 by creating an Identity and Access Management (IAM) role with a read/write policy for our S3 bucket.
Navigate to IAM in the AWS Console, and then select Policies. Create a new policy with the following Policy Document:
{ "Version": "2012-10-17", "Statement": [ { "Effect": "Allow", "Action": [ "s3:*" ], "Resource": [ "arn:aws:s3:::BUCKET_NAME/*" ] } ] }
Next select Roles, then create a new role and give it a name. Select Role for Identity Provider access then select Grant access to web identity providers. Use the default Policy Document for Verify Role Trust.
On the next step, attach the policy you just created for accessing the S3 bucket.
Once again select the Roles tab within the IAM section of the AWS Console. Select the role you just created. In Permissions, under Managed Policies you should see your policy for S3. If you do not, attach it now.
Update the AWS config settings on the admin page to include our S3 service.
// Instantiate AWS SDK service objects now that the credentials have been updated. AWS.config.update({ region: 'BUCKET_REGION', credentials: new AWS.CognitoIdentityCredentials({ IdentityPoolId: 'IDENTITY_POOL_ID' }) }); s3 = new AWS.S3({ apiVersion: '2006-03-01', params: {Bucket: 'BUCKET_NAME'} });
The last step for connecting our admin user to S3 is to create an Identity Pool. Return to Amazon Cognito in the AWS Console and click the Manage Federated Identitites button, then the Create new identity pool button.
Give your pool a name then expand the Authentication providers section. Select the Amazon Cognito tab and enter your User Pool ID and App Client ID.
As you can see, in addition to Amazon Cognito you can use other authentication providers such as Facebook and Google. For more information, read Integrating User Pools with Amazon Cognito Identity.
Continue through the rest of the steps then under Sample Code, take note of the Identity Pool Id. Back on our admin page, when our form is submitted we will upload our HTML file to S3.
Additionally, once the HTML file has successfully uploaded, we create and upload a JSON file to store our data so when we return to the form it has the newly updated values filled in.
var file = new File([jumbotronHTML], 'index.html', { type: "text/html", lastModified: new Date() }); s3.upload({ Key: 'index.html', Body: file, ACL: 'public-read', ContentDisposition: 'inline', ContentType: 'text/html' }, function(err, data) { if (err) { return alert('There was an error: ', err.message); } file = new File([JSON.stringify(formData)], 'index.json'); s3.upload({ Key: 'admin/index.json', Body: file, ACL: 'public-read' }, function(err, data) { if (err) { return alert('There was an error: ', err.message); } $('#form-admin') .remove('#success') .prepend('<p id="success">Update successful! View Website</p>'); }); });
Update Cognito’s authenticateUser onSuccess event handler to render the form as a template with values from the JSON file if it exists.
$.getJSON('index.json', function(data) { $('.container').html($('#adminForm').render(data)); }).fail(function() { $('.container').html($('#adminForm').render({})); });
Next Steps
Given the ability to generate and save static content to S3, there are many exciting possibilities for web content and admin interfaces that can be built.
Add image and file uploading capabilities
Add a rich text editor
Improve the login functionality by adding forgot password and MFA.
Build out the admin to edit components and content across multiple pages.
Use contenteditable to allow logged in admins to do in-page editing.
Manage different user permissions levels with User Pool groups.
Develop a workflow for building a custom CMS for each of your client projects.
Create your own content management platform.
Build a Custom CMS for a Serverless Static Site Generator is a post from CSS-Tricks
via CSS-Tricks http://ift.tt/2ive3M7
0 notes