#Calibrate Computer Screen for Photography
Explore tagged Tumblr posts
Visit Tumblr Blog
Explore Tumblr blogs with no restrictions, modern design and the best experience.
Last Seen Tumblr Blogs


Fun Fact
Forty percent of Tumblr users are between the ages of 18 to 25.
Text
Calibrate Computer Screen for Photography
Looking to calibrate computer screen for photography? PerfectLum offers precision tools to ensure accurate color and brightness on every display. Trusted by photographers, radiologists, and creatives, our Colour Calibration Software supports high standards like DIN 6868-157 and DICOM GSDF calibration. Use on Medical Imaging Monitors or standard displays for consistent visual results. Whether editing images or conducting diagnostics, PerfectLum is the essential solution for reliable screen calibration and compliance with professional standards like AAPM TG270.
0 notes
Text
Oh the photo and art printing is the worst. So many people have decided that the software has numbers that tell them what to do and don't bother to actually think about whether the computer is calibrated or consider that they have eyes that they could use to check whether the thing they've printed looks anything like the original art work.
My mother is an art photographer. The galleries in my area? Basically all of the photographs of their art that they use for publications/postcards/banners etc are hers. She spends so much time making sure everything she provides is the right fucking colour.
And then it gets made up into a post card or an exhibition catalogue or whatever and sent to the printers. The printers receive a perfectly correct file but god forbid they check that their computer screens or printers are actually fucking calibrated so they can actually print the art catalogue in the right fucking colour.
I went to one exhibition where there was a lovely impressionist painting that was all blues and blue-greens. I know the photograph will have been the right colour because it was my mother's photo. The picture in the (very expensive) book was fucking purple.
'Oh x number in photoshop/illustrator/whatever was right!'
No it wasn't and even if it was supposedly right, relying on a single number in your computer and never looking at the printed product compared to the actual art is just lazy.
The quality of photography in general has plummeted ever since digital came in because so many people assumed it was easy now they could just stick the card in the computer and then also assumed the raw file was better than any kind of film photograph. You used to be able to get so much amazingly rich detail in deep blues and blacks that you just can't anymore because that was a product of decent quality film and the processing labs having a high enough throughput for the best chemical balance for detail in both bright whites and deep blacks.
Historical context is of course very useful for important things like Politics and Science and everything, but will also open your eyes to things like, uh... the way the clothing/textile/crafting industries try to use the word "natural" as an excuse to sell shoddy and bad quality goods and make you think that's normal.
God knows there are worse things going on in the world, but it really pisses me off when I see companies advertising "Real Shell/Pearl buttons!" like that's supposed to be some upscale selling point, and the buttons in question are the thinnest, roughest, most crudely-made buttons in existence... 🙄😒 "But they're made from Natural Materials! You can't expect Natural Materials to look refined and consistent like synthetic ones!" They are lying to you. THEY ARE LYING TO YOU! And I know this because I've seen "real shell buttons" from 100 or even 50 years ago. And most of them are sturdy and smoothly polished, of a consistent thickness, and sometimes even finely carved. The buttons on nice men's dress shirts? Those are the cheap, plastic IMITATIONS of what people expected actual mother-of-pearl buttons to look like! "Natural" isn't an excuse! Your product is cheap and badly and lazily made! And I'm so sick of this, because I see it EVERYWHERE. "Linen-look" has become shorthand for "coarsely woven fabric with visible slubs" and that drives me CRAZY because do you KNOW what kinds of linen I have seen??? Antique linen so light and fine and smooth you can't even SEE the weave unless you magnify it!!! A fragment of a linen damask tablecloth so smooth and glossy, it looks like SILK? 😭 (On that note, "dupioni silk" is so roughly woven that it would have been considered hardly fit to sell a century ago) "This fabric is woven of Natural Materials, so imperfections will be inevitable!" 🙃 No! 😀 You just made it cheaply and sloppily, and that was your choice! 😊
17K notes
·
View notes
Text
Interests (& Ideas?)
Analogue photography and various formats
Customized development processes
Pasta
Digital photography
Green screen & Compositing
Alternative filming methods
Pixilation
Frame By Frame
Stop Motion
3Dtv/360vr
Surround sound
Audio Tape
Microphones
Speakers
Amplifiers
“Silent” film
Lenses
Projection
Darkroom labs
Nature
Camping
Exploration into the unknown
Scifi
Music
Mechanisms
Old-school machinery
Old-meets-new
Old video games
Vintage consoles
Computer building
Car repair
Suspension geometry
Volvo
Guitars
Instrument repair
Circuitry
Science Saru
Studio Ghibli
Studio Gainax
Joe Bennett animation
Joe Perra
The Number 42
Satoshi Kon
Madhouse Inc and the people + ideas that eventually became Science Saru
Samurai Jack
Emergent Storytelling
Calibrated displays
Ramen
Comfort food (American or international)
Exposed-element electric stoves (miss me with that glass-top garbage)
0 notes
Text
Exploring the Marvels of Science with Digital Microscopes
In the world of science and research, precision and clarity are paramount. Scientists, researchers, and educators rely on advanced tools and instruments to delve deeper into the mysteries of the microcosmic world. One such remarkable invention that has revolutionized the way we view tiny objects is the digital microscope. In this article, we will take a journey into the fascinating realm of digital microscopes, exploring their uses, benefits, and the technology behind them.
Introduction to Digital Microscopes
Digital microscopes are sophisticated optical instruments equipped with digital cameras that allow for the magnification and visualization of tiny objects on a computer screen or monitor. Unlike traditional optical microscopes, digital microscopes eliminate the need for eyepieces and offer several advantages in terms of image capture, analysis, and sharing.
How Digital Microscopes Work
Digital microscopes employ a combination of high-quality optics and digital imaging technology to capture and display detailed images. They use LEDs or other light sources to illuminate the specimen, and the reflected or transmitted light is collected by the objective lens. The image is then digitized and sent to a computer for display and analysis.
Applications in Scientific Research
Microbiology
In the field of microbiology, digital microscopes have become indispensable tools. They enable researchers to study microorganisms with high precision, making it easier to identify and classify various species.
Material Science
Digital microscopes are widely used in material science to examine the microstructure of materials, helping engineers and scientists develop stronger and more durable materials for various applications.
Medicine
In the medical field, digital microscopes aid in diagnosing diseases, conducting research on cellular structures, and training medical professionals. They provide a clearer and more accessible view of tissue samples and cells.
Education and Digital Microscopes
Digital microscopes are also transforming the way students learn. They offer interactive experiences, allowing students to explore the microscopic world with ease. This technology enhances science education by making complex subjects more accessible.
Industrial Applications
Numerous industries, including electronics, automotive, and aerospace, use digital microscopes for quality control and inspection. These microscopes enable rapid and accurate analysis of intricate components.
Advantages Over Traditional Microscopes
Digital microscopes offer several advantages over traditional optical microscopes, such as the ability to capture images and videos, easy sharing of findings, and precise measurements through software integration.
Choosing the Right Digital Microscope
Selecting the right digital microscope depends on various factors, including your specific application, budget, and required magnification levels. It's essential to do thorough research before making a purchase.
Maintenance and Care
To ensure the longevity and performance of your digital microscope, regular maintenance and proper handling are crucial. Cleaning lenses, updating software, and calibrating the microscope are essential tasks.
Future Trends in Digital Microscopy
As technology advances, we can expect even more impressive features in digital microscopes. Enhanced imaging capabilities, improved automation, and integration with artificial intelligence are on the horizon.
Digital Microscope vs. Optical Microscope: A Comparison
Comparing digital microscopes to their optical counterparts reveals the stark differences in functionality, versatility, and ease of use.
Photography and Digital Microscopes
Digital microscopes offer photography enthusiasts a unique opportunity to capture stunning macro and microphotographs, unlocking a new world of creativity.
Digital Microscope Accessories
Accessories such as specialized lighting, stages, and image analysis software can further enhance the capabilities of digital microscopes.
Challenges and Limitations
Despite their many advantages, digital microscopes have limitations, including cost, complexity, and the need for a stable power source and computer.
Cost Considerations
The price of digital microscopes varies widely, depending on their features and applications. It's essential to align your budget with your specific needs.
Conclusion: The Magnified World of Digital Microscopy
In conclusion, digital microscopes have transformed the way we explore and understand the microscopic world. Their applications in science, education, and industry are vast and continually expanding. As technology continues to advance, digital microscopes will play an increasingly significant role in shaping the future of research and discovery.
0 notes
Text
You are not alone in that. Display settings still confuse me despite hours and hours of research. I was just on the phone with tech support trying to figure out how to use my new color calibrator and trying to figure out if it was okay to use the "P3 color space."
Adjusting your screen should not be this hard.
I'm afraid a big part of the problem stems from a Japanese technology philosophy where they prioritize legacy features and old ways of doing things. Tradition is a very big deal in companies like Sony, Panasonic, and Toshiba and they were the biggest influences on how modern displays operate. And even though Samsung and LG have become the leading manufacturers, that traditional philosophy got sort of locked in.
This is especially true in the camera industry as well. Smartphones have reinvented how most people approach photography, but the Japanese camera companies refuse to evolve their approach with the bigger ILC cameras. The menus use a lot of outdated terminology. They refuse to use smartphone operating systems. They offer almost no image processing features. And transferring images usually requires pulling a little card out of the camera, sticking it into a USB reader, and copying everything to your computer drive. Whereas smartphones put everything on the cloud a second after the photo is taken.
TVs and displays have a lot of the same issues. They use a lot of legacy terminology and have confusing menus and they do a poor job of informing users how to configure their screens. Which is why a lot of folks just have to guess about which buttons to push or which settings to change.
Or there is a fear that if people change a setting, they might make things worse and won't know how to change it back.
The contrast setting made sense on a tube based television. It functioned more like the slider in a photo editing app. But when TVs went to LED tech, they were already tuned to be as contrasty as possible. So the contrast setting just ended up dimming the whites.
And many people aren't used to having a functional brightness setting. TVs used to be so dim, everyone just left it at 100%. Now displays are up to 10 times brighter (which is great for using in daylight) but no one is told how you are supposed to use the setting to match the ambient light.
It should be thought of more like a volume knob on a stereo. If the room is loud, you have to turn up the volume. If the room is quiet, turn it down.
If it were up to me, I would make display settings more like photo editing menus.

And contrast would go back to actually adjusting the contrast rather than how bright the whites are.
I'd change Exposure to Intensity, but otherwise these would be easy to understand adjustments any non-tech person could understand. And you could return every setting to 0 so you'd never have to worry about messing up your picture with a bad adjustment.
There is one way to get this kind of granular control over your image. But you have to obtain your content through... dubious means... and a VPN.
Or you can transfer your physical media to your computer.
There is a video player called "Media Player Classic." It is a powerful open source program that allows endless adjustments. It can be paired with an add-on called MadVR which gives you even more control and also has features that genuinely improve picture quality.
If you are willing to learn how to use these tools, you can custom craft how your video looks in just about any way you can imagine. You can cap the highlights at a certain brightness, you can warm the color temperature, you can boost the shadows. And you can apply your custom settings to any video you watch.
There is a steep learning curve, and there are some simpler adjustments that can do similar things in VLC player. But I think if people with particular eye sensitivities are looking for a way to get a decent image while accomodating their vision issues, this might be a helpful tool.
Reddit has a bunch of guides for how to setup MPC and MadVR. And by now there may be better alternatives. (People are making cool new shit all the time and it is hard to stay current). But I think that would be a good place to start if you are interested.
Let's talk about screens and eye comfort.
@krakenartificer wrote this in response to my motivated lighting post.
Maximum-visibility lighting is also accessible lighting. I cannot turn the brightness on my screen up any more than it is -- even a few seconds of a light-mode app at 75% brightness will give me a migraine. I believe you when you say that the train-light photos are legible to you. But with my screen at ~50% brightness in a medium-dim room, that second one, with the bright-white light, is already painful to look at. And since my pupils have constricted to protect me, I can't see almost anything else going on there.
I already mentioned that if people are having issues seeing dark elements in their content, their room may be too bright. That is a strategy to get the highest quality viewing experience, but it may not be the most comfortable for people with various eye sensitivities.
So I'm going to address eye comfort over image quality in this post.
I think many people have a misconception about the brightness setting on their display. Often people will turn it up and down depending on the content they are viewing. If something has a really bright element, they may turn it down. If something is too dark, they may turn it up.
That isn't really how display brightness is meant to work. This setting is meant to maintain picture quality and contrast as much as possible while raising and lowering the overall intensity of the display. And the intensity is meant to be adjusted according to the viewer's environment, not what is on the screen from moment to moment.
You want the intensity of light in the room to match the brightness of your screen.
Some people prefer to adjust their screen a little brighter than ambient so it is a little more legible. But that is a personal preference.
So if you are in a dark room, you'd turn the brightness down.
If you are out in bright sun, you'd turn your brightness up.
If your screen is displaying near white or pure white and it hurts your eyes, that usually means your room is too dark. A brighter ambient environment can help make "light mode" more comfortable. Try turning on some lights or going to a brighter space and see if it helps.
However, some people do not feel comfortable in brighter rooms. This is when you might consider "bias lighting." This is a soft light source behind your screen that you can adjust to the maximum tolerable brightness to keep your eyes from going into night vision mode or max dilation.

It's better if the bias lighting is spread out rather than using a small light source like a night light. Small light sources feel much more intense and can add to eye strain. You want the light to cover a large surface area.
String lights across a wall work well.

Or you can bounce a light off a wall or ceiling to diffuse and spread it out. Many people just put a light behind their TV and light up the wall behind it.

The idea is to make the room *feel* dark while still having enough light to keep your pupils from opening up and feeling like any sudden bright light source is blasting you in the eyeballs. Your pupils prefer gradual adjustments to light and dark. If you go straight from a dark scene to a bright scene without any bias lighting, your eyes might feel a bit melty.
If you are *still* uncomfortable with white on your screen and have a particularly strong eye sensitivity, then you might consider sacrificing picture quality for comfort.
Turning down your brightness is not a great solution because it makes *everything* darker. Again, the brightness of your screen should be close to the room lighting.
Typically, to get the highest quality image you want to adjust your screen so the blacks are as black as possible and the whites are as white as possible without losing any detail.
Rtings has a guide for monitors and TVs for this.
They have two patterns for black and white point adjustment.
They look like this.

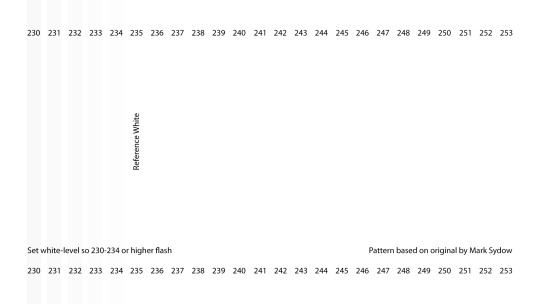
You want to see bars all the way up until the reference point.
The white point is most commonly called "contrast" in display settings. Sometimes there will be a contrast adjustment AND a white point adjustment. In that case, the white point only deals with the brightest highlights and the contrast will affect all whites.
But if you have really sensitive eyes... forget the charts. Forget peak image quality.
Instead, try lowering your contrast and reducing the intensity of *only* the white elements rather than darkening everything.
The picture might look a little gray and dull, but you won't lose as much legibility in the shadow areas. You are just turning down the brightest stuff to make your eyes more comfy.
Max white point...

Lowered white point...

And if you still need to turn down your screen brightness, you can raise the black point to keep more detail in the shadows.
Again, that might not look great, but it will keep your eyes comfortable and you will be able to make out all the details you need to see.
You might also consider adjusting the color temperature of your screen to be warmer. Blue light is higher frequency and more energetic. Which means it can pierce and glare more than warmer light. So shifting things to the orange could also bring some comfort to sensitive eyes. Search for a “Warm” mode, “Eye Comfort” mode, or Night Shift settings.
Most TVs and monitors have these adjustments. Sometimes they call them different things, so you may have to do some googling. (God forbid tech companies ever agree on a standard.)
And if you are on a phone or laptop, you may need a special app to adjust these specific things. I would research "how to reduce white point" for whatever device you are using.
To review...
Adjust your ambient room lighting first. Brighter ambient room lighting can make bright white elements on your display more comfortable.
Display "brightness" should be adjusted to your lighting environment, not the content on screen.
If you don't like bright rooms, bias lighting behind your display can keep your eyes from going into night vision mode. This can prevent bright screen elements from being too intense or glaring.
If you have eye sensitivity issues, try all of the above first, and then consider lowering your contrast or white point setting. This will dim only the brightest elements on screen without making everything else too dark.
If you need to lower the screen brightness AND white point/contrast, you may lose detail in the shadows as well. You can try raising the black point to compensate. This is a worst case scenario and will probably not look great.
Consider warmer color temperature settings to reduce glare from high-frequency blue light.
321 notes
·
View notes
Text
White Shirt Research
White Balance

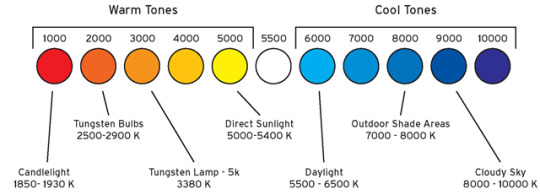
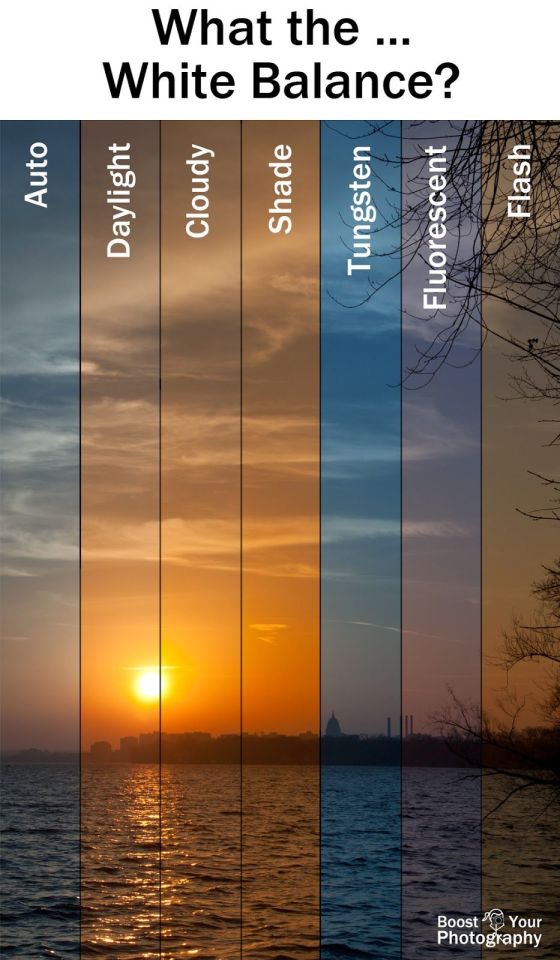
What in the world is white balance, you ask? Well, basically, it is a setting that tells the camera how to register color temperature. Um, what does “temperature” have to do with “colour?” Well, colour temperature is a measurement of the hue of a particular light source. It is measured in degrees Kelvin. We measure cold and heat with thermometers calibrated to show us degrees, so how come we are talking about colour using the same unit of measure? Well, thanks to Lord William Thomson, the 1st Baron Kelvin (a British engineer and mathematical physicist who was directly responsible for forming the first and second laws of thermodynamics) who heated carbon, an “incandescent radiator,” and noticed that as it got hotter, the color of the carbon changed as it heated, we have a color-temperature scale. The hot-or-cold Kelvin temperature scale starts at absolute freezing 0K (-273.15ºC) while the hue-based Kelvin scale relating to colour temperature starts with black as the zero point. The visible spectrum of the Kelvin scale ranges from about 1700K to 12000K or more. To the left of the visible portion of the scale is infrared. To the right is ultraviolet.

Most digital cameras have the following white balance settings: Auto (A), and then, from warm to cool, Tungsten (light-bulb symbol), Fluorescent (symbol resembling a light tube), Daylight (sun symbol), Shade (a house casting a shadow symbol), Cloudy (cloud symbol), Flash (lightning-bolt symbol), or Manual/Preset. The manual/preset option allows you to dial-in a specific Kelvin-degree setting. One thing you need to know is that these preset WB settings do not guarantee that you will neutralize a colour cast. Kelvin temperatures for specific lights are estimates and not precisely matched to each and every light source out there. For example, the sun changes color temperature as it moves across the sky, due to the ever-changing thickness and makeup of the atmosphere that filters the light. Also, we are usually being bombarded by multiple light sources when not in a controlled studio environment. Sitting at my desk here, I have fluorescent lights above, the illumination of the computer screens before me, and cloud-filtered sunlight coming in through the office windows.
https://www.bhphotovideo.com/explora/photography/tips-and-solutions/understanding-white-balance-and-color-temperature-digital-images
What is colour correction?
Color correction is the adjustment of white and black levels, exposure, contrast, and white balance. This returns the captured image to the accurate, unprocessed colors. But it's a little more complicated than that. The point of color correction is to ensure that whatever you do next to the color on screen yields the intended result. You mess with the mood and tone in ways you set out to do, not accidentally. Colour correction provides visual consistency and flow.
What is colour grading?
Once your footage is color corrected, it's time to bring it in for color grading. That's where things get more tricky. Color grading is a technical process in which atmosphere and tone are adjusted.
This process brings out what you want, and not what you don't want to tough. It becomes more surgical here. How do colour grading and correction work together? Both are used to deliver the finished look. It's not just about that, but also about establishing a standard that can be universally viewed.
https://nofilmschool.com/color-grading-vs-color-correction-process
https://youtu.be/U7Ua_GBy1Ao
3 notes
·
View notes
Text
My notes on Hito Steyerl, How Not to be Seen: A Fucking Didactic Educational .MOV File, 2013
Overall i found this piece quite strange. Personally I would dub it as 'arty farty' because of the mildly unsettled atmosphere. However i think i picked up some points that I could use in my own research. Below are my notes from watching the video. Most of the notes are a transcription of the voice over. The following section is what I can take from this.
----------------
Uses the daniel TTS voice
Lesson 1 how to make something invisible for camera. to hid it (hand cover), move it, take it off screen, disappear. Resolution target marks visibility of an image.
zoom out of a map, of the earth. whatever is not captured by resolution is invisible
Lesson 2, how to be invisible in plain sight. 7 ways: Pretend you are not there, hide in plain sight, scroll, wipe, to erase, to shrink, to take a picture, (hypnotic imagery?)
Love is invisible. so is war. capitalism. images of desert and lines on a grid
In the 1950s and 60s US Airforce installed grayscale resolution targets in the California desert.
Lesson 3. 7 ways of becoming a picture camoflague. conceal, cloak, mask, to be painted, to disguise, to mimicry, to key (aka chroma key)
In 2000 a new standard for resolution targets is introduced. Pixel based resolution target. 1966 photographic resolution = 12metres per pixel. today it is one foot. to become invisible you must become smaller or equal to one pixel.
ensue epic montage of people with box heads, being pixels
lesson 4. 13 ways of becoming invisible by disappearing gated community, living in a military zone, being in an airport factory or museum, owning an anti paparazzi handbag, wearing an invisibility cloak, being a superhero, being a woman over 50, surfing the dark web, being a dead pixel, being a wifi signal moving through human bodies, being a documented au pair, being spam caught by a filter, being caught as an enemy of the state, eliminated liquidated and the dissimulated
Digital revolution.170,000 people disappear. they are deleted, filtered
invisible people kept in 3d animations. they reemerge as pixels . they merge into a world made of images.
people in green niqab-like outfits spin menacingly on a computer desktop screen
Lesson 5 54 ways to merge into a world made of images. The green screen from before has shown up again!! in the desert!!
In 2006 this pattern used bc analog photography lost its importance.
haha text on screen says shoot real background, and then it becomes said background. Shots of the camera being used to film the scene. 3D animation walks out of the pop up screen and into the real world. and then eventually disappear.
Lots of text production notes pop up on screen. but they are not fulfilled.
invisible chroma people fight the line grid. fade to black
------------
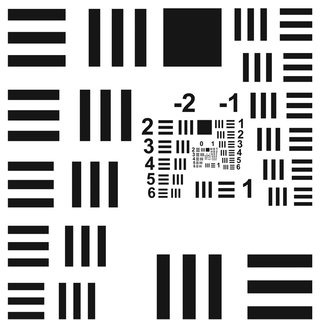
Figure 1. USAF 1951 optical calibration target.
This is the first time I learned about 'greyscale resolution targets'. they were used for ariel photography for the US airforce in the 1950s and 1960s. The bars used for it have a similar function to an optometrist's eyechart.
"...the smallest group of bars that can be resolved marks the limit of the resolution for the optical instrument that is being used. For aerial photography, it provides a platform to test, calibrate, and focus aerial cameras traveling at different speeds and altitudes. The targets can also be used in the same way by satellites.
Many of these resolution test targets are found in the Mojave desert of California, one of the principal development and test areas for surveillance aircraft. " (Photo Calibration Targets | The Center for Land Use Interpretation, 2013)
Many technological advancements start as military tech before being used by a wider scope of people, for example, GPS devices. Considering the resolution test targets were used in conjunction with surveillance aircrafts, the grid could be incorporated into my own visual outcome.
--
The notion of spatial resolutions is intriguing. I was aware that it was a thing but didn't make my own connection to it for this project. On printed maps there is a key that tells you how the distance on the page translates to the actual size of the place. This is known as a scale.
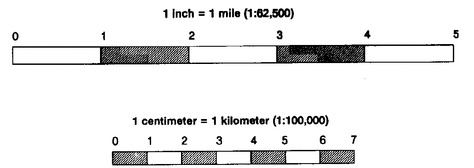
(Group 3, no date)
For satellite images, the same can be applied. Steyerl notes that a satellite image works in pixels. Anything that is smaller than one pixel effectively becomes invisible, because the resolution makes it invisible. She links this with imagery of a camera zooming far far out until the full earth is in view. This is effective because of the dramatic interpretation of it. The starting image is completely concealed because of how zoomed out the camera is, to the point where if you showed it to someone, they could only imagine what the starting image was, if it existed at all!
--
Chroma key is another form of invisibility for Steyerl's video. Chroma key is a film making technique of replacing one solid block colour, often green or blue, with another pre existing image or video. By using a green screen, you can place a subject in a completely different space. Instead of it looking like the bedroom you are filming in, it can look like you are in the jungle. A bright green tends to be used because it rarely appears in skintones or haircolour, and creates a clear distinction between a human subject and a background. Alternatively you could paint the subject green to disguise them within the background. Steyerl uses both approaches in her commentary, by painting her face with (presumably) green paint, and using a green backdrop in the production of many scenes.
----
Steyerl, H. (2015) ‘Hito Steyerl, _How Not to be Seen: A Fucking Didactic Educational .MOV File_, 2013’, Artforum, 20 April. Available at: https://www.artforum.com/video/hito-steyerl-how-not-to-be-seen-a-fucking-didactic-educational-mov-file-2013-51651 (Accessed: 14 November 2022).
Photo Calibration Targets | The Center for Land Use Interpretation (2013). Available at: https://clui.org/newsletter/winter-2013/photo-calibration-targets (Accessed: 14 November 2022).
Wide Field Scanning Telescope Using MEMS Deformable Mirrors - Scientific Figure on ResearchGate. Available from: https://www.researchgate.net/figure/USAF-1951-optical-calibration-target_fig1_230817663 [accessed 14 Nov, 2022]
What is Chroma Key? | Adobe (no date). Available at: https://www.adobe.com/creativecloud/video/discover/what-is-chroma-key.html (Accessed: 14 November 2022).
0 notes
Text
10 Best Drones With Camera 2019
Best Drones With Camera: Are you looking for the best drone with camera within a reasonable budget?
1. Holy Stone HS160 for Kids
We did the research and finally, we found that the Holy Stone HS 160 is the best drone for kids. If you are looking for a drone for your kids, then you should buy this holy stone HS 160 model. It is fordable and able to improve the transparency of the footages. The drone is allowed to calculate the air density for achieving suspension. To keep the lens safe HD camera drone is installed in the body. Simply download and install the customized app on your smartphone. You can connect the drone to your phone via Wi-Fi and see the real-time image on the phone.
Pros:
This drone is fordable and flexible ABS plastic Styrofoam. The machine is only quadrangle portable and palm shapes. This can prevent drones from damage or injuries. You can manage your drone with an app after connecting it to your phone with the Wi-Fi. It has a 720p camera with live video for a preview. Auto takeoff and automatic land fly and this is very easy. The included remote works well-labeled and the buttons are clearly labeled. This product includes the carrying case and extra battery. Videos and photos are better records than expected quality of the footage. Folds and shapes in the case of involving drone are sage. There are a few extra propellers and other spare parts included as free. Cons: USB indicator may not be turned off when charging is full. It creates loud noise that makes feel you boring. No AC adapter included in the drone. You will need two AC adapters to charge both batteries at the same time. This drone requires an iOS or Android device to be connected via WiFi. It is needed to video recording and taking photos. The Bottom- line of product: The drone is equipped with 720P HD camera. It has a WiFi function to send the FPV system to share airy photos and videos. Those will be stored on your phone and you can share happy moments with your friends and family. Lenses can be concentrated in the lower part. It is easy for you to take great spontaneity and moments. You can manage your drone with an app after connecting your drones through Wi-Fi to your phone. This function will be providing your real-time image transmission. The drone has one key take off and landing option. It would be activated more easily in applications such as in gravity sensor mode and 3D VR mode. Your drone and accessories will be stored properly in the Box. This Box will protect your drone from being harmed during traveling. It is easy to carry and has a portable case to make you free to fly in the sky. 2. Holy Stone F181C RC for beginners If you're a beginner in drone flying then the Holy Stone F181C RC will be good for you. It is the best drone to learn basic maneuvering and to reach an advanced level. Flips and rolls have got a nice performance with a simple push of the drone button. Hold the stick on the right side to perform a cool roll on each side. In the headless mode, the drone will not face any direction. The forward sticks to move forward, and the back stick for backward. All set to its initial adoption closed position. Pros: The drone is equipped with a return to home key and headless security systems to help drone back. The strong wind pressure height allows the drone function to its current height. It is done by the drone after releasing its throttle. It will be easy for you to take a quality picture and quality videos. It has a continuous roll with two batteries for longer flight time. It has a key 360 ° 4-way flip for perfect action and increasing performance. Cons: Most parts are made from the low quality of plastic. You will hear a lot of background noise when flying the drone. There are some complaints about the video in a review. It has taken the camera back and immediately got a replacement which is fine. There is some delay when flipping while quitting next to him. However, some entry-level quadrants can even do this. And this step allows the capture of pneumatic images from all directions. There is no GPS function, but the title protection feature is created for this. The Bottom-line of products: This drone is equipped with a new return to home and title protection system. And it helps in prevention and loss of drones. Height Hold function allows the drone to throttle its current height. By using this drone you will have quality images or videos. There has one Key to 360 ° 4-Way Flip. There is continuous Roll for perfect action and wonderful performance. It comes in two batteries and flight time is extended. Its rage is about 50-100 meters. Battery flight time is approximately 7-9 minutes. Time charge is about 80 minutes. No FPV (see the first person) option. Lights can help you to detect drones in the night, and they can be turned on/off. The drone has a 720p HD camera with up to 4 GB micro SD card including Sky Sense. 3. DJI Inspire 2 for photography DJI Inspire 2 is the best drone for photography that we have found in the market. It has the best image quality to meet the needs of professional photographers. DJI Inspire 2 Quad-copter is a powerful cinematic and photographic tools included. The drone is combining the Inspire 2 with the available X4S and X5S gimbals cameras. You can record in high bit rates using H.264 and H.265 formats. And in the case of the X5R, various flavors of Apple ProRes and Cinematic raw use the required licenses. The licenses are available from DJI. Pros: It is designed with magnesium to allow strong body that results from durable designs. There are two camera options. Its camera supports 5.2 k videos with 16 bit raw images. It offers PCle SSD storage with a 67 mph speed range. It works with effective obstacle avoidance and detection system. It has retractable landing gear and supports 360-degree camera rotation. It has come with dual operator control using FPV pilot camera. You will be able to access intelligent flight modes with this device. Cons: As it develops videos with 5.2 K resolution level but users need a strong CPU for their post-processing. This device is not designed to serve the purpose of hobbyist users. Micro Four Thirds camera unit is highly expensive. The Bottom-line of the product: Its advanced obstacle avoidance has also made its way to the Inspire 2. It is built into DJI's flight autonomy system. The copter can be detected and avoided automatically with flight autonomy system. This copter can even remember flight paths in case of an emergency RTH without GPS enabled. By using 2-axis stabilized FPV camera, the pilot can navigate the drone to the gimbals in field view. Everything you need to set up to fly that already included in the DJI Inspire 2. There are two batteries with a charger and an all-new transmitter controller. You will have also extra propellers, a calibration plate, and a carrying case to store. Forward and backward systems enable the Inspire 2 to detect obstacles up to 30 meters ahead. It's allowing for a protected flight at up to 34 mph at a controllable attitude angle of 25°. Upward-facing infrared sensors scan obstacles 16' above. It is done by adding protection when flying in enclosed spaces. Obstacle-sensing systems are active during normal flight. RTH and all intelligent flight modes are activated properly. 4. 3DR Solo Quadcopter for filming 3DR is the best filming drone on the market that we have ever found. It has a solo video game style controller. You can choose the second of it, even if you cannot drop it. Push-button keep both cameras and copper at your fingertips. Break off your flight midair with a single touch off and land immediately. Click to start or stop recording, or snap a photo, adjust the camera angle when you're still flying. If you miss it in the picture, it can be connected to the high-quality HDMI port from the controller directly. So you can actually connect solo to any screen. The full-featured apps for iOS and Android keep craft control at your fingertips. Pros: Gimbals come with stability and it works with GoPro cameras. It is proposed to repeat with smart shots. The drone provides automatic and smooth change facilities for gimbals. The feature has been brought back home. It can be connected to Android and iOS devices using dedicated apps. Cons: It gives very little battery life and takes too much time to charge. People find their GPS system a little spotty. Drifts hovers are observed during the time. The Bottom-line of products: This copter is made from the ground as a companion for the Zippo hero. It’s a solo quad-copter with 3D robotics follows me option. It has an aerial imaging-specific flight mode in Kid mode. Thanks to a quad-rotor configuration and for the flight stability. A twin computer flight control system capable of flying. Flight controller relies on GPS for navigational coordinates. It is done by using data from accelerators and other sensors help to keep the copter safe. Solo Gimbal is a 3-axis stabilizer compatible with GoPro Hero3 + or HERO4 action camera. It is a ready-to-fly (RTH) bundle. It combines a pre-bound transmitter. It’s a style after a video game controller for more intuitive activity. There has the dual joystick for flying. It integrates dedicated dials to handle solo giggles. There is a mobile application for iOS and Android devices. The app provides full control over the copter, gimbals and even GoPro. You can mount your smartphone directly on the transmitter. 5. SNAPTAIN S5C WiFi FPV Drone under $100 The best drone under $ 100 "SNAPTAIN S5C". SNAPTAIN S5C drone is user-friendly. Simply press a button, it will close, land or return to your destination. It is having a smart voices control, headless mode, and attractive 360 ° flips come for newbies player. SNAPTAIN S5C supplies up to 80 meters of video transmission. You can immediately edit and upload your videos to social media by iPhone. It has a 720P video transmission signal upload at 80 m scale and allowing you to fly further away. You edit HD footage and upload directly from your device to social media. Video clips are automatically stored on a micro SD card. Pros: Horizontal sensor technology can navigate the drone by flipping in any position. There are 3-speed modes, both of which are suitable for new and expert. More speed can reach up to 3.5m / s. Battery supports 7 to 10 minutes long flight time. The barriers to four clashes make drones difficult enough to clash. It is especially in four corners where propellers are considered to be fragile. SunPeten the app has voice control, gravity control, 3D-VR and trajectory flights, etc. Cons: The product has limited control distance. You will get an average camera quality to capture photos and videos. The copter includes a GPS mode only. It's the beginner’s drone as well. The Bottom-line of products: The drone can be completely controlled by the app on your smartphone by snapaten. Voice control lets you talk about your drone and stay perfect for photo/video shooting. There is a protective propeller guard to ensure a safe flight. It suddenly has a high-quality ABS material to shock or drop your anxiety. This is the best choice with enough fun for beginners. The height-hole function ensures a permanent windfall in the air at a certain height. Possible thanks to this function of great aerial photos and videos. The trajectory flight function will draw flight courses on your smartphone's touch screen. A built-in g-sensor is a vertical and horizontal position for your smartphone. It is designed for downloadable snapshots in the iOS and Android device. 6. Holy Stone HS100 under $200 Holy Stone HS100 is the best drone under $ 200 and the basic things are easy to learn. This drone supports GPS system while flying. The GPS helps to provide accurate location information for your drone. Built-in return-to-home (RTH) functions for safe flight. The drone will return to home when the battery is a low signal. So, if the flight signal beyond the limit becomes weak, do not worry about losing the drone. This 1080P 120 ° FOV FPV Wi-Fi camera is optimized. It has a 90 ° regular corner, high-quality video, and aerial photos. You can enjoy real-time viewing right from the remote control. You will have an ideal selfie while flying the drone. You can catch every moment of your holiday from the point of view of a bird's eye. Pros: One-off takeoff/landing just starts a drone by pressing a button. You will have an emergency stop button. This feature is perfect for flying and reducing learning curves. You can control the drone by using your phone app. Click the VR icon to turn on the mobile phone split-screen mode. Real-time transmission 3D visualization experiences wear VR glasses. Cons: You cannot refuse to take remote control charging. You have to use the camera for the first time to capture photos and videos. Do not forget the distance between the controllers and the drone. It is needed to avoid lose connection while the drone flying. The battery performance may go down when overusing the video recording. The Bottom-line of products: The drone will automatically follow and take you wherever you want to go. Always keep you in frames, easy to get complex shots, hand-free flying, and selfies. Drone's flying time is up to 15 minutes and has a long control distance. You will get a 2500mAh high-performance battery. A distance of 500m is ready to give you a more detailed flight experience. There has a headless mode, solid hold and one key option to take easy operation. You do not have to worry about adaptation and with the simple pressure of a button. Your drone will be at the height of the house, which is suitable for beginners. Blades are stored under the white foam box. GPS mode enables precise location and prevents drone losses. If the battery is low or if it loses the signal the drone will perform an auto-return. With this new function, you can enjoy more fun and secure flight. The built-in height function allows the drone to be raised. 7. Holy Stone HS700 under $300 We did the research and got the best drone that goes under $ 300. This is having 110-degree Fahrenheit (View of View) lens upgraded camera. It will give you a panoramic view to record your unforgettable moment. 5G 1300FT transmission ensures high-end real-time video. The drone is a GoPro hero 2/3/4 compatible. This drone can be stabilized and comes back to home automatically when its battery is low. Shot with ease when the drone can follow you or you can fly to a circle along the set path. Pros: You can consider the drone size that’s awesome comparatively others. This HS700 brush-less motor flies faster and quiet as quick as you want. It is very stable in air conditions compared to the DGI spark drone. Compared to DGI Spark, you do not have to buy any extra accessories. The 20-minute flight time allows the drone to fly very fast. It can fly further and create better shots. It can capture more footage as well as improve pilot skills. Removable cameras will let you install another action camera. It needs to improve your video quality up to 4K resolution on your drone. GoPro 2/3/4 supported as well as some other manufacturers. Cons: The whole battery charge takes 5-7 hours. It is more than 1 hour and 28 minutes of DGI spark. The range is somewhat limited to DGI Spark. You can achieve a 1.2-mile limit when the HS700 cannot fly more than half a mile. The drone is not light at all. Transporting it during travel can be a damage problem. Also, it requires a planned case for the drone, which requires it to be fold-able and large enough space. The Holy Stone HS700 flight features have been identified as the number of DJI sparks. So that it can be an idea for viewers who can gain as much experience as possible of piloting drones. The Bottom-line of products: High power 2800mAh intelligent battery produces up to 20 mins flight time. It has low power alert. You can immerse yourself in a significant flight. It's so cool but very powerful when it's running. Breaks rarely occur and need very little replacement of the motor. This replacement makes your flight more enjoyable. It has a quick launch by pressing one button on the remote control. Quick release propellers can be set up with no screw. It has a stable flight while its height is locked. It has easy direction control with title mode. You can control the camera and focus on more complex shots. The HS700 can always go back to take-off points according to your instructions. Application control drone is available. Just draw a route on the app screen and the HS700 will move to that direction. 8. DJI Spark under $500 DJI Spark is so popular among people who are really enthusiastic about flying drone in the sky. This drone goes under $ 500 in our category. Its intelligent flight mode is smart, reliable. It is having intuitive quick shot videos with a tap. This drone is able to detect the pattern surfaces with enough light and spread reflection (20%). Its high-performance camera shock-free shots of amazing images and stabilizing static video mechanical gimbals. Flight performance is strong. You will have an immersive experience with powerful prompt motion and accuracy control. Flight security is at your fingertips. Propeller guard is recommended while using 2-axis stable Gimbal camera. Pros: It is small in size since it is portable everywhere. Gesture control system support is really awesome. Smartphone-controlled flights are easy to handle. Drone photos and video capture are automatic shots. The subject tracking option makes drone popular. Forward bumps system is installed. There is a GPS stable for lost drone tracking while flying it a while. The RTH security features will help you to save the drone while flying if it goes low battery signal. Its good positioning system will help you to capture better footage. It has multiple control options for advanced level players. Cons: Flight time is about only 12 minutes battery net. It has a limited range and speed goes up and down when controlling with the phone. It has limited video. There has no support for 24fps or high frame rate capture. Applications and video editing features may be easy to use. Dedicated Remote Control is a wedding add-on. Short flight time and low air resistance. The Bottom- line of products: By recognizing your face with Face Awareness, Spark turns away from your hands. It takes power off and takes hovers in a few seconds. Propeller guard is recommended while using this function. Take a surprising gaseous photo using a hand gesture, without a remote controller. Remote controller (optional accessory) is required. Intelligent Flight mode and intuitive controls help you to create cinematic airy videos. The DJI GoPro-4 app coordinates an array of automated edit templates and filters. Quickly edit videos and share them directly into social media. In Tap-fly mode, just imagine your shot and Spark captures it for you. Using your vision technology, tap your phone screen and the spark. The drone will fly in the direction of your tap. With ActivVact, Spark recognizes different size and objects. This makes tracking a lot easier and more reliable. Accepting deep learning gestures allows you to take selfies with simple hand motion. Control the speed of the spark with the palm control mode. 9. DJI Mavic Air under $1000 It is the best drone under $ 1000 in our drone section. Ultrasonic Mavic Air features high-end flight performance and functionality for unlimited flying. Portable Mavic Air is a 3-axis mechanical gimbal with an angular vibration range. It is equipped for a gradual shooting. The Mavic Air can draw 4K video at 30 FPS and can draw record footage in 100 feet/second. Mavic Air's onboard camera integrates a 35bit / 2.3 "12MP CMOS sensor. And it has an F / 2.8 lenses with a 35 / mm equal focal length for high-quality photos and video shoots. You will get a full bundle here in the box. Pros: Everything seems to be well on the hardware as well. The Zimbal design is much better than the original Mavic Pro. The cameras are well-protected by low open and frames. There are no fragile rubber band attachments here. It is easy to deal with Gimbal lock process. The battery locking process is protected. Video bit-rate has now reached 100Mb in the 4K recording. In sports mode, the indicated GPS speeds reach 40 megawatts which are notified by the DJI. This drone is fast and with strong headwind conditions, it will not even struggle to fly home. Cons: Its 60 Mbps bit-rate is the main problem of Mavic Pro and DJI solution to Mavik Air problem. The range is not so great, which corresponds to the DGI spark. Without any radio interference in the country, the faster range test is more than one mile. Switching between 5.8 GHz and 2.4 GHz band will not help much. The bottom-line of products: This drone received 32.0 mp sphere panorama. Additionally, the drone is capable of moving horizontal, vertical and 180 ° panoramas. Mavic-Air crystal clear 32.0 MP spheres combine 25 photos in just eight seconds to create a panorama. Lightweight and compact fordable design will help you to take anywhere with you. It supports 4K video at 30 fps - 12.0 mp cameras are ready to shoot adobe dg ray support. It has a high-speed motion for smooth video. And sharp images and even three-axis capable of stabilizing the camera. You can control your drone up to 6562. Its intelligence flight lithium battery supplies 21-minute flight time per charge. A fold-able, low-profile, ergonomic design feature is able to hold smartphone for most convenience. Store the stick inside the remote controllers, more comfortable pack at isolated controls. You can fly through the phone. It has five vision sensors, GPS and GLONASS. It’s a pair of ultrasonic range explorers. A group of 24 powerful special computers ensures that your drones are flying safely. After turning on the drone with a hand gesture and take control of your favorite photos and videos. 10. FlyByCopters X8 640 in more money We have got a more expensive drone on the market, which is FlyByCopters X8. This surveys/mapping heat imaging quadcopter is fully configured outside the box. And it is enabled autopilot flights with wet points and RTLs. There are the TX controls six flight modes and 2 channels to control the jumbo's yaw and pitch. Its sony A6000 camera lets you take professional airline images. The included heat sensor automatically takes it to the image sabotages. The heat sensor also has a radiometric option. So you can see the live temperature readings from the FPV screen. With the included ground station, you can create an autopilot mission to survey. The ground station also features pneumatic images footage. This drone provides high precision centimeter accuracy in the GPS unit of multi-gnash rt. Pros: The low efficiency is not measured but it maintains balance much less structure and cables. Plus, the open view in front of the front is a big plus which can be made better if the arms push forward. Pix-watch 32-bit Autopilot Flight Controller. It has a flier Pro 336 thermal sensor. It has 3-axis 32 bite rate brush-less gimbals. The 4K UHD high-resolution camera will help you take high-quality pictures and videos. Cons: This drone is more expensive and for professionals. People buy this drone to get the extra benefit for professional reasons. Its main goal is to separate the drone from the other drone in the market. Its functions or options are using for more professional cases. Its weight is 4.7 kg that so heavier and it is larger in size. And its functions are more complex. This drone and learning all the features will be a problem. The Bottom-line of products: Multi-Nos RT is accurate to 2 centimeters of GPS. Handheld transmitters give you remote access to both camera shutters through a switch. Included telemetry radio and OSD 7 will send live flight data directly to the FPV screen. It will run over 6000 or more on the live video feed from Sony's 6000 or Flu Pro 640. Switch between Sony 6000 and video sensor from thermal sensors via the transmitter. This is a very powerful and stable X8 quadrilateral. Some X8 quad-copters have the ability to handle high winds, higher altitude, more power, and more stable and longer flight times. When you stop the four motor works, you can properly capture the drone until at least one motor works in each arm. Both beginners and advanced pilots love to fly. The conclusion of the article: In conclusion, I'll say we've discovered this article is the best drone collection in the worldwide. We spent the time studying and finally found 10 best products in the shortcut to choose one of your favorites from above. Based on the drone activates and in our limited time, we have shared the best drones on the basis of the price range that is very important for the people. It is clear that drone technology is an important part of the future and it is becoming a big commercial industry. Legislation in drones is now the most important reason. Because it determines the limitations needed to protect rights as future use of drones. In order to use effective drones and excessive drone lines, the restrictions must be placed. Drone is possible to be an important part of society, but they come with many difficulties. Drones have become necessary for the security of American people and other developed countries. With the appropriate constraints, the drone has become a policy of the United Nations based on the citizenship of foreign nationals. Determining where the drones are fit is not an easy task, but their control grows rapidly while controlling and the industry grows and develops.
1 note
·
View note
Text
Week 2 Practice Forums
Tayla has nicely let me borrow her notes since I was away in Christchurch for the practice forums… I have done this forum last year though :)
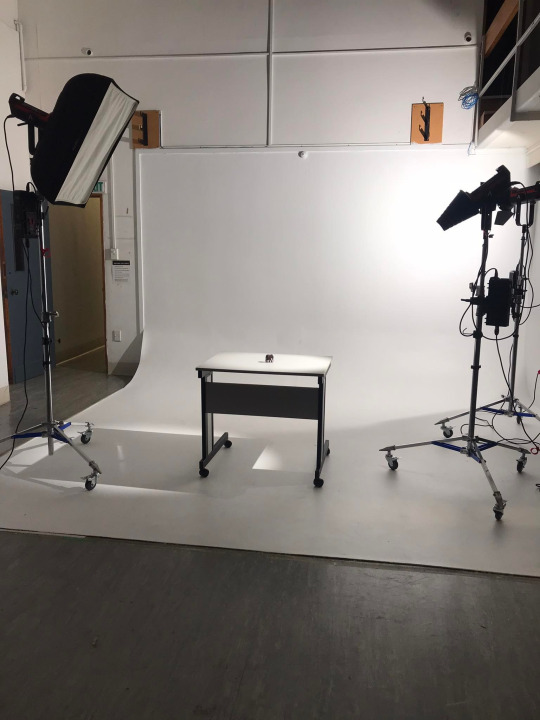
USING CONTINUOUS LIGHTS WITHIN THE STUDIO FOR STILL PHOTOGRAPHY
Run by Jane
Notes:
We started the morning off with a tour of the photography department, and what we had access to, and what we didn’t etc.
We can use the computer lab in there for editing and dealing with photos, as the screens are calibrated.
Can always email , ask technicians if you are wanting to print anything etc.
6B16 - we can book out this studio and use the lights and equipment in there, equipment such as cameras can also be booked out from 12-12:30, Monday-Friday for 24 hours.
In 6B16 we went over different lighting effects, using the lights, the soft box, the snoot, and spoke about how it depends on what mood or effect you want to portray.
We took some portraits and then practiced photographing objects, using backdrops, different lights, materials, etc.
Was really useful in learning how to document our work.
0 notes
Text
Download Reality Capture crack (license key) latest version G7LU+

💾 ►►► DOWNLOAD FILE 🔥🔥🔥 Useful for producing 3D articles in the own photos along with scans in reality. Reality Capture Crack can be utilized for developing 3D maps. Therefore, Only you ought to have a couple of images and make 3D content mechanical in only two or three moments. The consumer may reach their struggles radical boost product. Therefore, it can use to turns pics to 3D types Produce 3D types format at an excellent calibre and precision. Therefore, it can use to Mix unique inputs for a visually steady inguinal 3 d variation. Without limits. Reality catch is a fully-featured working with a rich easy-to-use UI, incredibly. Innovative hub and with a couple of Reality Capture Serial Key which drives the envelope of everything can be achieved with all the: unbelievable Rate, quality having a lesser requirement in your components. Truth Grab significantly enhances the product, precision, good quality, and protection throughout your undertaking. Carry your digital camera mobile; it will not have to be an expensive expert camera shoot any graphics and produce 3 d articles within merely a couple of moments. RC is not challenging to use with intuitive UI and tutorials. Truth Grab is a photo program option that may allow you to make 3D designs from laser or photo scans. While lowers some time and manual work demand. Therefore, the Reality Grab is the connection involving uncooked site states and also a clever BIM surround. Truth Catch Pro can it be, and the section of the software is also referred to as gallop. Hence that your fantasies will soon become a reality, they know of the way people running a business always appreciated my work. Reality Capture Torrent plays three stages capture, computation, along generation. Truth Capture Pro is photography software that results in 3D versions from unordered laser or photo scans with no seams. Even the absolute most often regions of its utilization are a simple fact, broadly speaking human anatomy scan. While, the gaming, studying, mapping and visual effects, and legacy. Reality Capture Key can be the tool of solution which is currently adjusting the organization. It enables you to focus on your targets, attracts for work, also will be just ten times more rapidly compared. While the other two other things on the present market. Digital reality screens textured 3D meshes project maps along with further scans. It is the use of the option to get a wide variety of organizations. Reality Capture Product Key grows software for model and filming out-of different tools and graphics. We mean to extend an excellent substitute. We assemble higher-excellent app growth run over the very last a long time and also research. How to Crack? Your email address will not be published. Save my name, email, and website in this browser for the next time I comment. Also, download the software, While installing the crack, Therefore, generate crack there, Similarly, the reboot system And you have done, Enjoy Crack! Official Site Link. Drawboard PDF Pro 5. Radmin 3. Posts You May Like. Leave a Reply Cancel reply Your email address will not be published.
1 note
·
View note
Text
Exploring the Microscopic World with Digital Microscopes
1. Introduction to Digital Microscopes
A digital microscope is an advanced imaging tool that enables users to capture high-resolution images and videos of tiny specimens. Unlike traditional microscopes, which rely on eyepieces for observation, digital microscopes have integrated cameras that project the magnified images onto screens, making it convenient for multiple viewers to observe simultaneously.
2. How Digital Microscopes Work
Digital microscopes use light or electron beams, depending on the type, to illuminate the specimen. The light interacts with the specimen, and the integrated camera captures the resulting image. The image is then processed and displayed on a connected device, such as a computer or tablet.
3. Advantages of Digital Microscopes
Digital microscopes offer numerous advantages, including adjustable magnification, easy image sharing, and the ability to record videos. The captured digital data can be stored, analyzed, and shared across different platforms, enhancing collaboration and research efficiency.
4. Applications in Scientific Research
In scientific research, digital microscopes have played a pivotal role in various fields such as biology, chemistry, and materials science. Researchers can now visualize intricate cellular structures, study microorganisms, and analyze the composition of materials at the nanoscale.
5. Digital Microscopes in Medical Diagnosis
The medical industry benefits from digital microscopes in areas like pathology, where precise examination of tissue samples is crucial for accurate diagnoses. Digital microscopes enable pathologists to store patient data digitally and consult with experts remotely.
6. Quality Control and Industrial Applications
Industries rely on digital microscopes for quality control during manufacturing processes. They ensure product consistency, identify defects, and measure dimensions accurately. These microscopes are especially useful in electronics and automotive industries.
7. Educational Benefits of Digital Microscopes
Digital microscopes are transforming education by offering interactive learning experiences. Students can engage with magnified specimens, enhancing their understanding of complex concepts in subjects like biology and geology.
8. Choosing the Right Digital Microscope
Selecting a digital microscope depends on factors such as magnification range, camera resolution, and illumination options. Researchers and hobbyists should assess their specific requirements before making a choice.
9. Maintenance and Care
Proper maintenance ensures the longevity of digital microscopes. Regular cleaning, calibration, and protection from dust and humidity are essential for optimal performance.
10. Comparing Digital and Optical Microscopes
Digital microscopes are often compared to optical microscopes. While optical microscopes offer a direct view through eyepieces, digital microscopes provide the advantage of capturing and sharing digital data.
11. Future Trends in Microscopy
The future of microscopy holds exciting possibilities, including enhanced imaging techniques, integration with artificial intelligence for analysis, and miniaturization of microscope components.
12. Challenges in Digital Microscopy
Despite their benefits, digital microscopes face challenges such as the need for skilled operators, limitations in capturing three-dimensional images, and the cost of high-quality instruments.
13. Exploring the Unseen: Captivating Discoveries
Digital microscopes have unveiled hidden worlds, from the intricate patterns on butterfly wings to the structure of microchips. These discoveries inspire curiosity and drive further scientific exploration.
14. Digital Microscopes vs. Macro Photography
Digital microscopes differ from macro photography in their ability to provide extreme magnification. They reveal details that are impossible to capture with standard cameras.
15. The Power of Visual Documentation
The digital documentation of microscopic observations contributes to research transparency and knowledge sharing. It enables researchers to revisit findings and allows others to validate or build upon them.
Conclusion
Digital microscopes have undoubtedly transformed how we perceive and explore the microscopic realm. Their ability to capture, store, and share high-quality images and videos has revolutionized various industries, from scientific research to education and manufacturing. As technology continues to advance, digital microscopes are poised to uncover even more secrets of the unseen world, driving innovation and enriching our understanding of the intricate details that surround us.
0 notes
Link
Check out this listing I just added to my Poshmark closet: 5 Spinel Gemstones: Mixed Color Lot.
0 notes
Text
Week 2 Practice Forums
Tayla has nicely let me borrow her notes since I was away in Christchurch for the practice forums... I have done this forum last year though :)
USING CONTINUOUS LIGHTS WITHIN THE STUDIO FOR STILL PHOTOGRAPHY
Run by Jane
Notes:
We started the morning off with a tour of the photography department, and what we had access to, and what we didn’t etc.
We can use the computer lab in there for editing and dealing with photos, as the screens are calibrated.
Can always email , ask technicians if you are wanting to print anything etc.
6B16 - we can book out this studio and use the lights and equipment in there, equipment such as cameras can also be booked out from 12-12:30, Monday-Friday for 24 hours.
In 6B16 we went over different lighting effects, using the lights, the soft box, the snoot, and spoke about how it depends on what mood or effect you want to portray.
We took some portraits and then practiced photographing objects, using backdrops, different lights, materials, etc.
Was really useful in learning how to document our work.
0 notes
Text
PRACTICE FORUMS, WK 2 FRIDAY:
USING THE CONTINUOUS LIGHTS WITHIN THE STUDIO FOR STILL PHOTOGRAPHY WITH JANE WILCOX:
Practice forum with Jane:
Notes:
We started the morning off with a tour of the photography department, and what we had access to, and what we didn’t etc.
We can use the computer lab in there for editing and dealing with photos, as the screens are calibrated.
Can always email , ask technicians if you are wanting to print anything etc.
6B16 - we can book out this studio and use the lights and equipment in there, equipment such as cameras can also be booked out from 12-12:30, Monday-Friday for 24 hours.
In 6B16 we went over different lighting effects, using the lights, the soft box, the snoot, and spoke about how it depends on what mood or effect you want to portray.
We took some portraits and then practiced photographing objects, using backdrops, different lights, materials, etc.
Was really useful in learning how to document our work.

I thoroughly enjoyed this workshop, and I found it really helpful in understanding what options we have as Fine Art students in the photography block. I am hoping to get back into this studio and book it out to take some photographs of my work, maybe after crit or leading up into my formative work. I feel a lot more confident about asking about equipment/spaces and booking out equipment after this session.


I am definitely not a photographer, and am not interested in photography work, but this space/knowledge will be good for documentation of my sculpture practice - for future reference, or proposals, workbook etc.
I am hoping to have time to book this space out, as well as a camera - to photograph some work between now and formative assessment.
0 notes
Text
UAL2 - UNIT4: Digital Imaging and Printing


1.1…Identify the characteristics of digital imaging and printing Managing and organising your digital files is an essential addition to the skills in professional or amateur photography, whether for fine art or commercial images. Essentially, you upload your image files from the camera’s memory card via a USB cable to your computer.
Then you organise, edit and manage them for display in a digital format (e.g. websites, social media) or an analogue physical format (e.g. art exhibition or glossy print magazine).
Each digital image comprises a collection of pixels (picture cells). The number of pixels per image can determine the photo’s quality/resolution. The higher the resolution, especially at the ideal 300 dpi (dots per inch) or ppi (pixels per inch), the more detailed the image is and therefore enlargement is easier.
2.1…Produce digital images to achieve solutions to identified goals My images are stored on SanDisk memory cards, which can have a storage capacity as high as 1TB (1,000 GB). I currently us a 16GB SanDisk Extreme Pro for my Nikon D200 camera. SanDisk is a subsidiary of Western Digital, which is famous for its hard drives that store large archives of photographic images. Another recommended hard-drive brand is the Lacie.
When uploaded on to the computer, the original image files come labelled with prefixes in the form of letters or numbers or both, whether in the RAW or jpeg format. Once on the computer, the images can be renamed for easier identification when access is needed.
And depending on the themes, topics, and/or dates, they can be re-arranged in different computer folders. The image files can also be converted into the TIFF format (very high resolution) or PNG for digital display on websites.
2.2…Produce digital prints from digital imaging sources to achieve solutions to identified goals Access the files can for editing and improving in Adobe Lightroom or the Image section in Adobe Photoshop. When editing, it is advisable to use a duplicate of the original, so that the latter is retained for other uses in the future. Once the editing is completed, the images can be retrieved for digital use or be printed for a physical copy.
The images can be sent by email or delivered on a memory stick to specialist printers. Examples of these specialists include the Print Space in London, DS Colour Labs Ltd and the retail chain Snappy Snaps. Another brand known for its quality photo paper is Germany’s Hahnemuehle.
These specialists offer to print on photo paper made with different finishes, including matte, glossy, pearl, satin, lustre or metallic, depending on the photographers’ objectives, especially if they want to produce fine art.
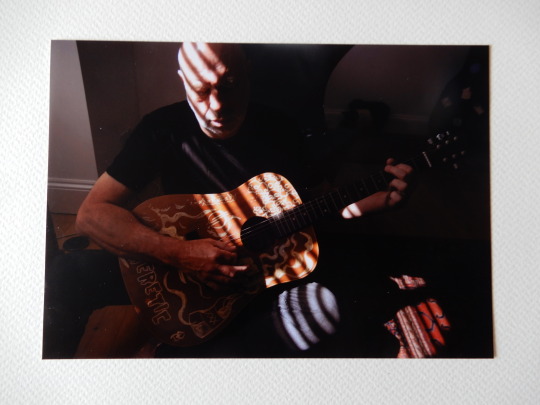
Future consideration will be the use of giclee paper for original artwork on very large quality-print formats. I’ve also attended exhibitions where the large paper canvas is described as having a gelatin silver base or platine fibre rag. For my class project on printing, I chose my Unit 2 Passion project for guitars. I sent my 300dpi images in the jpeg formats to the prints. I selected a matte finish for my 6in x 8in colour images and their textured feel. I felt they looked more viewer friendly than prints with a glossy finish. I chose Snappy Snaps as the printer as the outlet was physically near me to ensure same-day delivery to meet the project’s deadline.
2.3…Assess digital images and prints I do have not colour calibrated my computer. But while my on-screen images appear to be a faithful replica of the ones on my camera, the printed images appeared slightly darker than they would on other computers. That, however, was ideal as my photos as I was seeking the chiaroscuro effect (see images above).
The contrast between the lit areas and black sections in the images were effective. I also experimented with printed versions of creatively overexposed images, where the image’s background effectively looked white. Depending on how the opacity is managed, they also worked in the print format.
3.1…Identify and use safe working practices
When sitting to manage and edit images on your desktop computer, the recommended healthy practices for protecting your eyes, neck and back are similar to those for any office work.
Your eyes must be at the same level as the desktop’s monitor to prevent neck ache. Your feet must be flat on the floor; your knees at the same height as your hips. This helps protect your spine, which should also be supported by a cushion for a straight back. Frequent breaks away from the computer, the recommended up to 10 minutes every hour, prevent a strain on the eyes and unnecessary headaches.
As in all indoor working environments, make sure there is ample natural light, fresh air and that your surroundings are uncluttered. This is good for both physical and mental health, especially when working under pressure to meet deadlines. It also means when third parties are invited to work with you in your working space, their safety is also assured.
1 note
·
View note
Photo

Above: Serenity now, as the famous Seinfeld saying goes. Captured the first week of June in the forest of Cascades Conservation Area, Thunder Bay.
SPRING HAS FINALLY SPRUNG.
Spring is finally in the air with new life bursting at the seams. The Paper White Birch Tree sprouted its greenery in only two weeks. Thunder Bay experienced an unusually long winter this year. In fact, the first five months of 2022 were the coldest on record since 1952. Once it departed, spring arrived with what could be described as a beautiful vengeance, claiming its rightful place for this time of year.
SPRING’S PAPER BIRCH & POPLAR FOREST was photographed in high resolution and would make for a lovely custom print reproduction. Visit the DEAN OROS PHOTOGRAPHY + DESIGN virtual gallery to view full-size. Best viewed on a large monitor to see all of the detail.
We’re in an age of small mobile devices with tiny screens but if you’re in front of a computer with a large screen (at least 27″) it’s an entirely different viewing experience. Of course, a fine-art print is more tactile and you don’t have to ensure it’s colour calibrated to see colours and contrast correctly, or even have to login to see it!
Spring has now sprung into summer. Bye for now. Thanks for visiting.
0 notes