#Colour Calibration Software
Explore tagged Tumblr posts
Visit Tumblr Blog
Explore Tumblr blogs with no restrictions, modern design and the best experience.
Last Seen Tumblr Blogs


Fun Fact
Tumblr has been providing a Korean-language service since 2013.
Text
Calibrate Computer Screen for Photography
Looking to calibrate computer screen for photography? PerfectLum offers precision tools to ensure accurate color and brightness on every display. Trusted by photographers, radiologists, and creatives, our Colour Calibration Software supports high standards like DIN 6868-157 and DICOM GSDF calibration. Use on Medical Imaging Monitors or standard displays for consistent visual results. Whether editing images or conducting diagnostics, PerfectLum is the essential solution for reliable screen calibration and compliance with professional standards like AAPM TG270.
0 notes
Text
i saw someone joke about robot girls as an example of kinks that are just impossible to ever be made reality, like they're completely in the land of fiction. but ... that is just not true!
you can set the mood in your room. turn off the lights but put on some little coloured purple and blue blinkers. sit her down on the edge of your bed and sit down behind her. let her eyes flutter closed since there's no reason to keep them upon in this dark, safe room. softly coo into her ears, she's been such a good robot day! doing so many tasks so efficiently! making everyone around her so happy. but, silly her, she overdid it. so you're just going to have to do a tiny bit of repair work. "will that be okay, dear?" of course it will be. she trusts you completely. you're her admin. you created her. of course she has a safeguard preventing just anyone from powering her down, but she lets you override that with no resistance. such a good girl.
press your finger into the back of her neck, and then drag it down her spine. as she powers down, glide her limp body softly onto the bed. put her feet up so she's lying down completely now. maybe hold her limbs up a bit and let them drop. yep, she's powered down now. she's not unconscious, just mental faculties are capped at 10% and body autonomy is disabled. all you have to do now is find where she's sustained some damage. trace your fingers all along her chassis, poking in with a "screwdriver" to take her outer layer off and examine the wires and joints. hmmm... oil is a bit thin. these wires are too close together, could cause sparking and overheating. goodness, your fan is dusty. you've been working so hard, haven't you? gently turn her over onto her stomach now. it's time to investigate her processing unit, her software.
make sure her arms aren't stuck underneath her. once she's all comfy, you can unscrew her entire back panel. make sure to trace your fingers all around her back and spine as you do, robot girls love that shit. the soft human touch is heavenly to a machine of metal and electricity. and such a well designed chassis too, so beautiful. but off it comes, what's underneath is even prettier! oh, even now, it's still hot to the touch. you've been thinking so much today ... you don't need to think anymore though. just let me explore you. read out her event log for the day. algorithmic neural plasticity score. joint lubricant levels. corrupted data percentage. things like that. they're like scores to her. praise her if she's gotten good ones, tease her if she's gotten bad ones.
i could write so much more and maybe i will...like roleplaying injecting a virus into her neck or chest, and feeling the code flow all down her body...your cock can even be the usb!
also, at some point lay your whole body weight onto them - arms over her arms and legs over her legs. to calibrate pressure sensors or something. bc lets face it if she's a robot girl then she is 100% a neurodivergent cutie who'd love that sm <3
3K notes
·
View notes
Text
probing colour management - the case of discord grey
background: as described in canmom's guide to fixing the colours, I have gone to the trouble of getting a colorimeter to calibrate my monitor. because I want accurate colours, nya!
it turns out the story is even more of a mess than I thought, as I discovered when I tried profiling my laptop and was shocked, shocked to discover that even with profiling Discord looked different on the two screens side by side.
so let's say we're trying to render this shade of grey.

sRGB colour: srgb(50, 52, 57)
it's a slightly cool grey. this is the background colour in Discord, dark mode. (actually Discord specifies this in HSL according to hsl(223, 7%, 21%). I'm going to hope that the HSL-RGB conversion is standardised enough that it won't be different between browsers...)
desktop (Windows 11):
colour calculated in Firefox (monitor colour space): rgb_monitor(52,54,58)
colour calculated in Chrome/desktop Discord (monitor colour space): rgb_monitor(49, 51, 56)
since we're using colour management, we should expect these two sets of values to be different from the original sRGB, but equal to each other since the calculation should be identical in both cases.
so already we see a problem: same inputs, different outputs. not a good start.
ok, but which (if either) is right? we paste the screenshot into Krita (an art program) with the instruction "interpret the paste data as living in our monitor's colour space, not sRGB, and would you kindly please convert it back to sRGB for us". Krita's colour management generally seems to be pretty good, at least insofar the colours of the screenshot inside Krita look much the same as they do on my desktop. (in fact Krita has three different sRGB ICC profiles but they appear to be equivalent as far as this exercise is concerned).
monitor round-trip (sRGB-Firefox-Krita-sRGB): srgb(49, 51, 55)
monitor round-trip (sRGB-Chrome-Krita-sRGB): srgb(45, 48, 53)
going via firefox, it's very slightly darker but that is very likely an accumulating rounding error. going via chrome... it's around 8-10% darker, and I think a bit more saturated.
so we can conclude that the way Krita and Firefox handle this colour are pretty close. Firefox increased the values to convert from sRGB to the monitor space, and Krita decreased them again to convert back to sRGB. chrome on the other hand... honestly, I don't know what Chrome is doing. at first I thought it was just ignoring colour profile information, but the laptop test suggests it's doing something different on different devices.
here are the two shades of grey side by side (a screenshot converted back into sRGB in Krita)...

...ok, they're pretty close, i'll admit. I might not have noticed this problem if not for the laptop thing. it is more visible when the windows are bigger and not surrounded by bright white though.
now, all of this is in software that is using the same monitor ICC profile btw - we haven't even gotten to the question as to whether two computers with different screens really can be made to 'look the same' by profiling.
so next up, let's try this exercise on my laptop.
laptop (Windows 10):
my desktop monitor is a wide gamut screen. colours in a narrower gamut must take up a subset of the colours available on the monitor.
my laptop monitor is a narrow gamut screen covering about 70% of sRGB. colours outside of its gamut must be squashed inside. this will have the general effect of making uncorrected colours look less saturated.
so, in the laptop's space we get
Firefox: rgb_laptop(54,56,61)
Chrome/desktop Discord: rgb_laptop(52, 54, 59)
this time both Firefox and Chrome increased the values. Firefox increased them more.
once we ask Krita to convert back into sRGB...
laptop round-trip (sRGB-Firefox-Krita-sRGB): srgb(51, 53, 58)
laptop round-trip (sRGB-Chrome-Krita-sRGB): srgb(49, 51, 56)
this time, Firefox ends up slightly lighter than the target, and chrome slightly darker. but they're both pretty close.
part of what I think is happening here is that we've run up against the limit of bit depth. you can see we're changing values by only a few bits. if a colour lands halfway between two values, it gets rounded off. doing a series of colour space conversions like this causes rounding errors at each step.
so I think we've found two culprits here...
Chrome (and by extension Electron) is doing something wrong. i'm not quite sure how it's coming up with those numbers.
bit depth limits make it harder for software to compensate for hardware when the levels are lower, in general.
what this seems to suggest to me is that the lower the values, the more likely colour corrections are to be affected by rounding issues. it's easier to fix saturated primaries than dark greys. unfortunately, dark colours are also where the eye tends to be most sensitive. it's not that colour management is a sham - there is a logical explanation at the bottom of this!
you could mitigate this by doing the colour computations in 10bits per channel... funnily enough my graphics card is set to output in 10bit, but I guess applications need to be set up to do internal colour calculations in 10bit for that to actually be relevant. this would be a tradeoff against performance.
Krita admittedly has the option of using 16 bits per channel - the above calculations were all done in 8bit. for the sake of argument, let's see what happens if we convert our 8bit screenshot into 16bits before doing the colour space conversion. Firefox starts out as rgb_laptop_16bit(13828,14289,15585) in the laptop space, and after conversion to sRGB we land on srgb_16bit(13120,13634,14897). divide that by 256 and we can get an estimate that the 'correct' deltas in 8bit colour would be 2.76, 2.56, 2.69, which are all about halfway between 2 and 3. it's no surprise we see some rounding errors during the 'round trip'!
in general this all suggests the comparison I'm making is kind of the worst case comparison, where the screens will be most visibly different.
screens side by side
so we can conclude that if I were to put the laptop right by my monitor, there's no reason to expect anything in Chrome/Electron to look consistent, because whatever it's doing it doesn't seem to be properly converting to the monitor's space. but we could at least expect Firefox to look consistent, up to the limits of rounding errors, right?

I did this experiment. I can't meaningfully show you the 'real' difference because the camera adds a whole new layer of complications lmao (exposure, white balance, calibration of the tone response of the camera etc.), and I don't currently have the ability to just press the colorimeter against the screen and say 'what colour is this' - maybe DisplayCAL has that feature.
In any case, using my eyes, what I discovered was... viewing angles are a real issue! Doing a fullscreen colour comparison, the differences between a VA panel (a newer panel type which has good contrast and speed but poor viewing angles) and an IPS panel like on my laptop were very evident. At some angles the colours looked almost the same, at others quite noticeably different. The monitor's curve is supposed to help compensate for this a bit but damn! it's a strong reminder I have to hold my head pretty much dead central or I'll see a slight but definitely visible gradient across the screen. I guess it's one way to fix my posture. The current top dog panel type, plasma screens, should improve on this issue a lot, but they're still very $$$.
Even despite that, the monitor feels subtly 'cooler' in its grey balance than the laptop - perhaps more purple? Though it's hard to see if you don't have them side by side. I am starting to get hypersensitive to desaturated purple tones and thinking like 'is my monitor fucked or is that supposed to be grey' lmao. I think this is something DisplayCAL might be able to address - when the drivers drop I'll look forward to seeing if it will generate a better calibration.
It's crazy, I was getting by making digital art for years on monitors way less capable than this one and tbh those pictures look pretty much fine on a calibrated screen... but now I've become aware of all this shit it's really bugging me. Just gotta live with it for now though!
#canmom vs colour#i really thought i was done but digital colour just keeps finding new ways to get into my head
16 notes
·
View notes
Text
How To Maintain DTF Transfer Quality
Direct-to-Film (DTF) transfers have transformed the garment printing business by producing high-quality, long-lasting designs that can be applied to a variety of textiles. However, like with any printing method, sustaining DTF transfer quality necessitates attention to detail, the appropriate materials, and perfect technique. In this post, we'll go over some crucial methods for keeping your DTF transfers colourful, long-lasting, and professional.
1. Use High-Quality DTF Transfer Materials
Quality Film and Inks
The materials��you employ are essential for ensuring DTF transfer quality. Invest in premium DTF transfer film and inks. The film should be strong and able to withstand the intricate print without ripping or cracking. Premium inks guarantee that your colours stay vibrant and true to life after application and throughout the garment's lifespan.
Hot Melt Adhesive Powder
The hot melt adhesive powder is an important aspect of the DTF process since it secures the transfer to the cloth. Use a high-quality powder that melts evenly and adheres nicely. Poor-quality powder might lead to poor adherence, allowing the design to peel or flake.
2. Optimize Your Printing Setup
Printer Calibration
To preserve DTF transfer quality, make sure your printer is correctly calibrated. Incorrect printer settings can cause colour misalignment, fuzzy drawings, and unsteady ink application. To ensure that your designs are crisp and clear, check your printer's alignment on a regular basis and print test images.
Correct Ink Settings
Use the appropriate ink settings for your DTF printer. Overuse of ink can cause blotchy prints and prolonged drying periods, whilst insufficient ink might result in dull or incomplete transfers. Pay attention to your printer's output and make modifications as needed.
Use RIP Software
RIP (Raster Image Processor) software is critical for optimising your DTF printing workflow. This program regulates how ink is applied to the film, resulting in more accurate colour reproduction and improved print detail management. RIP software also aids in accurately layering white and coloured inks, which is very vital for dark clothes.
3. Pay Attention to the Curing Process
Proper Curing Temperature
Curing the DTF transfer is one of the most important stages towards assuring long-term durability and quality. The suggested curing temperature for most DTF transfers is roughly 160°C (320°F). This heat guarantees that the adhesive powder melt adheres properly and permanently to the clothing. If the temperature is too low, the glue will not melt completely, resulting in poor adherence. On the other side, high heat can destroy the ink, resulting in fading colours or fissures.
Adequate Curing Time
The curing procedure takes time, usually between 2 and 5 minutes, depending on the film, ink, and cloth. Rushing through this process may prevent the adhesive from adhering correctly with the cloth, resulting in poor DTF transfer quality. Set a timer to ensure that the curing duration is consistent.
4. Ensure Cleanliness and Care
Clean Work Environment
Dust, lint, and debris can readily adhere to the transfer film when printing and curing, reducing the quality of your DTF transfers. Maintaining a clean environment is essential for preventing pollutants from interfering with the transfer process. Cleaning your printer, heat press, and surrounding surfaces on a regular basis will help to avoid defects in the completed result.
Proper Handling
Handle DTF films with caution before and after printing to avoid smearing or scratching the design. Always use clean, dry hands to apply the transfer on the garment, and avoid touching the printed side as much as possible. Smudges, fingerprints, and dirt may all degrade the ultimate quality and longevity of the transfer.
5. Utilize the Right Heat Press Technique
Accurate Heat Press Settings
For the best DTF transfer quality, utilise the correct temperature, pressure, and time settings on your heat press. Most DTF transfers need a pressing temperature of around 160°C (320°F), with medium to high pressure applied for 15-20 seconds. Make careful you follow the directions for the specific cloth and transfer film you're using.
Post-Pressing Technique
After pressing the DTF transfer, let it cool fully before peeling off the film. Peeling the film too soon will ruin the pattern and cause the transfer to peel off the cloth. After peeling, it is advised that you press again for 5-10 seconds with a protective sheet over the design to better seal the print and increase its longevity.
6. Wash and Care Instructions for Longevity
Even after the DTF transfer has been performed, adequate garment maintenance is required to retain the quality. Provide clients with the following washing and maintenance guidelines to maintain the design's longevity:
Wash the item inside out to avoid friction.
Use cold water and gentle detergents to prevent harsh chemicals and bleach.
Choose moderate washing cycles to minimise damage on the fabric and design.
Avoid tumble drying since high temperatures might ruin the transfer. Air drying is suggested.
Avoid ironing directly onto the transfer; if required, use a protective cloth between the iron and the print.
7. Regular Maintenance and Quality Control
Printer Maintenance
To avoid ink blockages, print head failures, and other technical issues, keep your DTF printer clean and maintained on a regular basis. Printer maintenance involves monitoring ink levels, cleaning print heads, and conducting diagnostic tests to detect any possible problems early on.
Quality Control Checks
Implement quality control techniques to check DTF transfers after each stage. Before proceeding with mass printing, ensure colour accuracy, alignment, and adherence. This process prevents costly mistakes and guarantees that your final work meets the highest standards.
Conclusion
Maintaining DTF transfer quality is critical for producing professional, long-lasting, and vivid prints that delight clients. You can guarantee that your DTF transfers maintain their quality and longevity by focussing on high-quality materials, optimising your printing setup, following the proper curing procedure, and employing the suitable heat press method. Regular maintenance and quality control inspections, as well as suitable garment care recommendations, may help your DTF prints last longer and keep clients coming back for more.
Check out our Facebook Page and Community Group for offers and more updates.
2 notes
·
View notes
Text
DOES THE DISSEDENT NATION KNOW NO SHAME?
The dissident nation, which we cannot dare gift with a name, has once again shown us the depths of depravity that its cruel culture is so capable of. It seeks to destroy our great empire from WITHIN!
The dissident nation knows nought of Just War. The dissident nation knows nought of respect, or even dignity. Our pilots, our great and glorious pilots, are the targets of its latest SCHEME! They do not seek to fight them in fair combat. They do not seek to give them the fair and honest fight they are owed. They use OUTLAWED virus weaponry to infect their blessed frames! They DARE to spread data-viruses through our ranks, and dissolve any sense of morality within them. They seek to reflect their own depraved taste in our most exalted of warriors. This shall not be tolerated. This is an attack of the highest calibre against our Empire's sacred traditions and long-favoured technologies.
From HANDLER PRIME - JESSIUS KNOX:
Their latest corruption seeks to disrupt our valiant pilot's nutrition systems. All those with HANDLER permission-clearance or higher are implored to keep OS software up-to-date, to avoid errant infections. The virus causes the frame's nutrition systems to forgo its correct hourly routine, and dump it's ENTIRE payload into a pilot's digestive organs at once. To avoid the worst-case scenario, ensure that nutrition systems run at 23% power, and are stocked only to 8%, with LOW FAT rations.
[IMAGE ID: Pilot 1240-45, Known as Fortis, sits atop a small box. The image is rendered in black-and-white, but it is not hard to see the bulge of Fortis' stomach. Still in her plugsuit, the fact that it is far too tight for her is blatantly obvious. Her eyes are empty as she sits, perfectly straight, save for the sag of her belly. Her short hair, perfectly black even in the photo's muted colour-scheme, reaches down to her chest — or what would be her chest, if it wasn't so ballooned that her nipples slosh down to her tummy, where her ribs might once have been. As you look at the photo for longer and longer, the tiny tears in the elastic of her whitish plugsuit become more obvious, as if they are tearing in real-time. Her eyes are empty, as she starts to sob. Her hands, fat and chubby, grasp the sides of her body as if they need to be held in place. The interjector ports on her right arm are covered by fat. Her left arm is hooked up to an auto-medical device, the syringes of which have to plough through tub to reach their own ports. Her eyes are empty, save for the slight reflection of the camera-flash, that took the photo.]
Remember, the war effort counts on YOU!
2 notes
·
View notes
Text
Oh the photo and art printing is the worst. So many people have decided that the software has numbers that tell them what to do and don't bother to actually think about whether the computer is calibrated or consider that they have eyes that they could use to check whether the thing they've printed looks anything like the original art work.
My mother is an art photographer. The galleries in my area? Basically all of the photographs of their art that they use for publications/postcards/banners etc are hers. She spends so much time making sure everything she provides is the right fucking colour.
And then it gets made up into a post card or an exhibition catalogue or whatever and sent to the printers. The printers receive a perfectly correct file but god forbid they check that their computer screens or printers are actually fucking calibrated so they can actually print the art catalogue in the right fucking colour.
I went to one exhibition where there was a lovely impressionist painting that was all blues and blue-greens. I know the photograph will have been the right colour because it was my mother's photo. The picture in the (very expensive) book was fucking purple.
'Oh x number in photoshop/illustrator/whatever was right!'
No it wasn't and even if it was supposedly right, relying on a single number in your computer and never looking at the printed product compared to the actual art is just lazy.
The quality of photography in general has plummeted ever since digital came in because so many people assumed it was easy now they could just stick the card in the computer and then also assumed the raw file was better than any kind of film photograph. You used to be able to get so much amazingly rich detail in deep blues and blacks that you just can't anymore because that was a product of decent quality film and the processing labs having a high enough throughput for the best chemical balance for detail in both bright whites and deep blacks.
Historical context is of course very useful for important things like Politics and Science and everything, but will also open your eyes to things like, uh... the way the clothing/textile/crafting industries try to use the word "natural" as an excuse to sell shoddy and bad quality goods and make you think that's normal.
God knows there are worse things going on in the world, but it really pisses me off when I see companies advertising "Real Shell/Pearl buttons!" like that's supposed to be some upscale selling point, and the buttons in question are the thinnest, roughest, most crudely-made buttons in existence... 🙄😒 "But they're made from Natural Materials! You can't expect Natural Materials to look refined and consistent like synthetic ones!" They are lying to you. THEY ARE LYING TO YOU! And I know this because I've seen "real shell buttons" from 100 or even 50 years ago. And most of them are sturdy and smoothly polished, of a consistent thickness, and sometimes even finely carved. The buttons on nice men's dress shirts? Those are the cheap, plastic IMITATIONS of what people expected actual mother-of-pearl buttons to look like! "Natural" isn't an excuse! Your product is cheap and badly and lazily made! And I'm so sick of this, because I see it EVERYWHERE. "Linen-look" has become shorthand for "coarsely woven fabric with visible slubs" and that drives me CRAZY because do you KNOW what kinds of linen I have seen??? Antique linen so light and fine and smooth you can't even SEE the weave unless you magnify it!!! A fragment of a linen damask tablecloth so smooth and glossy, it looks like SILK? 😭 (On that note, "dupioni silk" is so roughly woven that it would have been considered hardly fit to sell a century ago) "This fabric is woven of Natural Materials, so imperfections will be inevitable!" 🙃 No! 😀 You just made it cheaply and sloppily, and that was your choice! 😊
17K notes
·
View notes
Text
From Concept to Completion: How Our UK Signage Solutions Deliver Results

What does a full signage solution include?
A full-service signage provider doesn’t just print signs — they handle everything from the ground up. This includes:
Custom design tailored to your brand
In-house manufacturing for quality control
On-site installation by professionals
Ongoing support and maintenance options
This end-to-end service helps ensure quality, consistency, and faster delivery — especially important for businesses operating across the UK.
Why is signage still important in a digital world?
Even in the age of online marketing, physical signage remains essential. Research shows:
76% of consumers have entered a store they’ve never visited before based on its signage (FedEx Office Survey)
60% of businesses reported that changing or improving their signage had a positive impact on sales, foot traffic, and profits
Digital signage, in particular, can increase brand awareness by 47.7% and boost average purchase amount by 29.5% (ScreenCloud, 2022)
For businesses in Staffordshire and beyond, signage isn’t just decoration — it’s a revenue-generating tool.
How does the signage process begin?
It starts with understanding your goals. Whether you’re opening a new shop or rebranding, the first step is a consultation. This usually includes:
A site visit to assess location and measurements
Discussions about brand identity, tone, and goals
Exploring traditional vs digital signage options
Timeline and budget planning
This stage is where the concept is shaped — and sets the foundation for success.
What makes a great signage design?
A good design grabs attention, but a great design guides customers and reinforces your brand. Key features of effective signage design include:
Readability: Clear fonts and contrasting colors
Size & Placement: Tailored to location and visibility range
Brand consistency: Logos, colours, and taglines align with your brand
Message hierarchy: Key messages stand out instantly
Designers often use mockups and 3D previews to help you visualize the final product before production begins.
What happens during manufacturing?
Once approved, the signage moves to production. A dedicated facility — like those found in Burton upon Trent — ensures tighter quality control and faster turnaround. Key steps include:
Material selection (e.g., acrylic, aluminum, LED panels)
Precision cutting using CNC routers or laser machines
Printing and finishing for branding and durability
Quality checks to meet safety and design standards
Digital signage also involves software integration, screen testing, and connectivity checks.
Why is installation a crucial part of signage?
Even the best-designed sign can fail if it’s not installed properly. Expert installers ensure:
Correct positioning for maximum visibility
Secure mounting that meets UK safety standards
Minimal disruption to your business operations
Testing and calibration for digital signage
Especially for digital signage in Staffordshire, trained installation teams are key to ensuring screens work seamlessly with your system — whether it’s a menu board or a live display screen.
What types of signage are most popular in the UK?

Digital signage, in particular, is growing quickly across Staffordshire, thanks to its flexibility and attention-grabbing potential.
How do UK signage solutions deliver real business results?
Effective signage doesn’t just look good — it drives business outcomes. Here’s how:
Increased foot traffic: Better visibility draws more walk-ins
Higher sales conversions: Clear messaging improves customer decision-making
Improved customer experience: Wayfinding and dynamic displays reduce confusion
Brand credibility: Professional signage builds trust
For example, a Staffordshire-based retail chain reported a 22% boost in sales within 3 months of switching to a custom digital signage solution.
How do I choose the right signage provider?
Look for providers who offer:
A proven track record and portfolio
In-house design and manufacturing
Local expertise (especially if you’re based in or near Staffordshire)
Clear communication throughout the project
Flexible options for both traditional and digital signage
Working with one team from start to finish often results in faster delivery, better alignment with your goals, and reduced errors.
Final thoughts
From the first conversation to the final bolt, getting your signage right takes expertise across multiple stages. Whether you’re a retailer in Staffordshire or a corporate office elsewhere in the UK, you need more than just a sign — you need a complete signage solution that meets today’s business needs.
Choosing a partner that offers concept-to-completion support ensures better outcomes — on time, on brand, and on budget.
Hardy Signs Ltd has been delivering trusted UK signage solutions since 1993, offering expert guidance and end-to-end service from their Burton-based facility.
0 notes
Text
Common Causes of iPhone Screen Damage in Australian Lifestyles
Cracked iPhone screens often result from accidental drops, particularly in urban areas with paved surfaces like Sydney’s CBD or Melbourne’s tram-heavy zones. Extreme weather fluctuations, from Darwin’s tropical humidity to Adelaide’s dry heat, weaken glass resilience over time. Pressure damage occurs frequently when devices sit in crowded bags during peak-hour commutes. Coastal lifestyles introduce saltwater corrosion and sand abrasion, while outdoor enthusiasts face higher risks during hiking or beach activities.
Australians’ reliance on smartphones for navigation, banking, and communication amplifies screen vulnerability. Repair shops note spikes in iPhone screen repair requests post-holiday seasons, correlating with increased outdoor usage. Protective measures like tempered glass screen guards reduce damage likelihood, though many users underestimate their importance until cracks appear.
Comparing Professional Repair Options: Costs and Considerations
Choosing between Apple Authorised Service Providers and local technicians involves balancing cost and quality. Authorised providers offer genuine parts and warranty compliance, critical for newer iPhones, but prices can reach $690 for premium models. Independent shops in suburbs like Prahran or South Yarra provide budget-friendly alternatives using OEM parts, often completing repairs within 90 minutes.
Mail-in services cater to regional Australians, though logistics may extend turnaround times. Consumers should verify technicians’ certification under Australian Consumer Law, which mandates 12-month warranties on repairs. Eco-conscious options, such as recycling damaged screens, appeal to environmentally aware demographics. Transparent pricing structures including GST help avoid hidden charges.
The Hidden Risks of DIY MacBook Screen Repairs
Attempting MacBook screen repair without expertise risks permanent damage to delicate components. The process involves:
Disassembling tightly bonded layers (LCD, backlight, True Tone sensors)
Handling micron-scale screws and fragile flex cables
Reconnecting logic board interfaces without electrostatic discharge protection
Third-party repair kits often lack precision tools, leading to colour calibration issues or malfunctioning Touch ID. Unlike iPhones, MacBooks aren’t designed for amateur repairs – a single misstep can necessitate costly logic board replacements. Professional services use anti-static workstations and pressure-sensitive adhesives unavailable to consumers.
Understanding Cost Variables in Computer Repairs Across Australia
Computer repair expenses fluctuate based on device age, component availability, and location. Urban centers like Brisbane or Perth offer competitive rates for hardware fixes ($200–$400), while rural areas face 15–20% surcharges due to shipping costs. Software issues like virus removal typically cost $100–$250, whereas data recovery from failed SSDs exceeds $500.
MacBook repairs demand higher investments – Retina display replacements range from $549 for 13-inch models to $1,079 for 15-inch variants. Labour charges reflect technical complexity; water damage diagnostics alone start at $129. Consumers should request itemised quotes to compare part quality (genuine vs. refurbished) and labour transparency.
Preventative Strategies for Device Longevity in Harsh Conditions Australians combat device wear using multi-layered protection. Tempered glass screen guards reduce shatter risks by 60% when paired with shock-absorbent cases. Workers in mining or construction sectors benefit from ruggedised casings with raised bezels. Regular maintenance habits include avoiding dashboard placement during summer heatwaves and using microfiber cloths to prevent abrasive scratches. Waterproof pouches prove essential for beachgoers, while hydrophobic coatings repel moisture in tropical climates. IT professionals recommend quarterly check-ups for older devices to address emerging issues preemptively. For MacBook screen repair prevention, keyboard covers minimise pressure on displays during transport.
0 notes
Text
The Easiest Way to Digitise VHS Tapes in Perth

Remember the good old days of VHS tapes? From family holidays to birthday parties and wedding ceremonies, those chunky cassettes captured precious memories. But as technology has evolved, VHS players have become relics of the past. If you’re sitting on a stack of VHS tapes in Perth, now is the perfect time to digitise them before time—and tape degradation—takes its toll.
In this article, we’ll walk you through the easiest way to digitise VHS tapes in Perth, the benefits of doing so, and the best local solutions to preserve your memories in digital format.
Why Digitise VHS Tapes?
VHS tapes were never built to last forever. Here’s why digitising them is essential:
1. Preserve Precious Memories
Magnetic tapes deteriorate over time, even if they’re stored in ideal conditions. Colours fade, sound quality drops, and eventually, your footage may become unwatchable.
2. Convenience and Accessibility
Watching VHS requires a VCR player, which is now rare and often unreliable. Once digitised, your videos can be watched on phones, laptops, tablets, or smart TVs—anytime, anywhere.
3. Save Space
Those bulky tapes can take up loads of room. By converting them to digital files, you free up shelf space and reduce clutter.
4. Easy Sharing
Want to show off your hilarious 90s haircut or your baby’s first steps? Once digitised, you can easily share videos via email, social media, or cloud services.
Common Methods for Digitising VHS Tapes
Before we dive into the easiest method, let’s briefly explore the common options available:
a) DIY with a VHS-to-Digital Converter
This involves connecting a VCR to a computer via an analogue-to-digital converter. You’ll need cables, capture software, and patience. While affordable, this method can be fiddly and time-consuming, especially if you’re not tech-savvy.
b) Professional Digitisation Services
If you're after hassle-free results, professional services are the way to go. These experts use commercial-grade equipment to convert VHS tapes to digital with high-quality results.
The Easiest Way to Digitise VHS Tapes in Perth: Hire a Local Professional
Without a doubt, the easiest, safest, and most time-efficient way to digitise your VHS tapes is by using a local professional video transfer service in Perth. Here's why:
✅ No Technical Headaches
Forget about connecting cables, installing drivers, or troubleshooting software. Professionals handle the process from start to finish, ensuring optimal playback and digital conversion.
✅ Superior Video Quality
Experts use calibrated equipment to maximise picture clarity and stabilise audio, far better than most DIY setups.
✅ Multiple Format Options
Most Perth-based services can provide digital files in a format that suits your needs—MP4, AVI, or even DVD or USB delivery.
✅ Safe Handling
Your tapes are valuable, often irreplaceable. Local services ensure safe transport and secure handling of your media, with many offering in-person drop-off and pick-up options.
What to Look for in a Perth VHS Digitisation Service
Not all digitisation services are created equal. Here are some key factors to consider when choosing a provider:
✔️ Experience and Equipment
Look for businesses with years of experience and professional-grade equipment. They’re more likely to produce clean, stable, and crisp digital transfers.
✔️ Transparent Pricing
Beware of hidden costs. Ensure the business provides upfront pricing based on tape length, format, and your preferred output (USB, DVD, cloud storage).
✔️ Fast Turnaround
A good service should give you a reasonable turnaround time. Most jobs are completed within a week, depending on the number of tapes.
✔️ Local Drop-Off or Collection
Being able to drop off your tapes in person adds peace of mind. Some companies in Perth even offer pick-up services if you’re located nearby.
✔️ Digital Backups
Some services can store a backup of your digital files for a limited time in case you need another copy down the track.
Recommended VHS Digitisation Services in Perth
Here are a few reputable options to consider:
🎥 Perth VHS to Digital
Located centrally, this local business specialises in converting VHS, VHS-C, and other analogue formats to high-quality digital files. They offer USB or DVD options and even backup storage upon request.
📼 Digital Memories WA
Serving all of Western Australia, Digital Memories WA offers a personalised touch with quick turnarounds and great customer reviews. They’re ideal for families and individuals wanting to preserve home movies.
📀 RetroMedia
RetroMedia is well-known for its experience with various tape formats and film reels. Their team is helpful, and their results are top-notch. They offer competitive prices and even video editing options.
How Much Does It Cost?
Prices vary depending on tape length, format, and the type of output you want. Here’s a general guide: ServiceEstimated Price (AUD)Short tapes (<1 hour)$25 – $35Standard tapes (2 hours)$30 – $50USB output (per job)$10 – $20DVD output (per disc)$10 – $15
Some providers offer bulk discounts, so it’s worth digitising all your tapes at once.
Tips for Preparing Your Tapes
Before handing over your tapes to a professional, keep the following in mind:
Label tapes clearly with names or numbers to keep track.
Rewind tapes fully to prevent damage during playback.
Mention any damaged tapes to the service provider upfront.
Ask about storage: if you don’t want DVDs, opt for USB or cloud storage options.
Conclusion: Don’t Wait to Save Your Memories
Digitising your VHS tapes isn’t just a smart move—it’s a necessary one. With the steady decay of magnetic tapes and the rarity of VCRs, your memories are at risk of disappearing forever.
If you’re based in Perth and want a stress-free, affordable, and professional solution, skip the DIY kits and opt for a trusted local digitisation service. It’s the easiest way to protect your family history and relive the past in the digital age.
Learn more:
Contact: Tapes To Digital Lancer Way, Alexander Heights WA 6064, Australia +61 1300 827 370
0 notes
Text
How to Fix Dead Pixels on a MacBook Screen

Introduction
A faultless display is critical for a unbroken person experience, whether you’re running, streaming, or gaming. However, useless pixels for your MacBook screen can be a irritating problem that disrupts your workflow. Dead pixels seem as small, non-functioning dots for your display that fail to show the suitable colours. While they may look like a minor difficulty, they are able to get worse over the years if left untreated.
Understanding a way to restoration useless pixels on a MacBook display can assist make bigger the lifestyles of your display and save you high priced upkeep. In this article, we’ll discover distinctive methods to fix lifeless pixels, the blessings of resolving the issue, and how expert Apple Screen Repair offerings can enhance your MacBook’s performance.
What Are Dead Pixels?
Dead pixels are tiny defective points on an LCD or LED display screen that fail to trade colors as anticipated. They can appear black (completely lifeless) or as stuck pixels showing a unmarried shade (pink, inexperienced, or blue). Dead pixels occur due to manufacturing defects, extended usage, or physical harm.
Unlike caught pixels, which might be revived, surely dead pixels are regularly everlasting. However, before considering Apple Screen Repair, trying a few troubleshooting strategies might also assist repair the problem.
Methods to Fix Dead Pixels on a MacBook Screen
1. Pixel-Refresher Software
Several online equipment and programs can help restore stuck pixels by using unexpectedly cycling shades to stimulate the affected location. Some of the most famous equipment include:
JScreenFix
UDPixel
PixelHealer
To use these tools:
Visit the software’s internet site or download the application.
Follow the instructions to apply rapid colour adjustments to the affected region.
Let the process run for as a minimum 10–20 minutes.
This method works first-class for caught pixels, though it can not usually revive absolutely lifeless pixels.
2. Pressure and Heat Methods
Another commonplace method includes applying mild stress or warmth to the affected pixels.
Applying Pressure:
Turn off your MacBook and unplug it.
Use a gentle cloth or microfiber fabric to prevent screen harm.
Gently press on the affected location together with your finger or a stylus for about 10 seconds.
Turn your MacBook lower back on and check if the pixel issue is resolved.
Applying Heat:
Use a heat, damp cloth and gently rub the display.
Alternatively, vicinity a warm item (like a rice-crammed sock) close to the affected area.
Be careful now not to overheat the display screen, as immoderate heat can worsen the damage.
3. Adjusting Display Settings
Sometimes, recalibrating your MacBook’s display settings can reduce the visibility of dead pixels.
Go to System Preferences > Displays and modify brightness and evaluation.
Run the built-in colour calibration tool in System Preferences > Displays > Color.
Restart your MacBook to see if the pixel refresh helped.
4. Professional Apple Screen Repair
If DIY strategies fail, the satisfactory direction of movement is searching for Apple Screen Repair from authorized technicians. Professional restore offerings make sure that lifeless pixels do no longer unfold and that your display screen keeps most appropriate overall performance. Apple-certified repair facilities can:
Diagnose whether the pixels are stuck or without a doubt useless.
Replace the display screen if important.
Prevent in addition harm to surrounding pixels.
Benefits of Fixing Dead Pixels
1. Enhanced Display Quality
Dead pixels can be distracting, especially while looking videos, editing images, or reading textual content. Fixing them improves display readability and ensures a continuing experience.
2. Increased Longevity of Your MacBook
Regular upkeep and upkeep assist make bigger your MacBook’s lifespan. Addressing useless pixels early can prevent further show degradation.
3. Preventing Further Damage
Neglecting dead pixels can result in additional display defects. Small pixel problems might also develop over the years, making the display screen much less responsive or requiring a full substitute.
4. Improved Resale Value
A perfect screen is a major promoting point if you ever determine to sell your MacBook. Fixing dead pixels via Apple Screen Repair can hold your device’s market cost.
5. Better User Experience
Whether for paintings or entertainment, a properly-functioning display complements usability, reducing eye stress and offering a smoother enjoy.
How Professional Apple Screen Repair Improves Your MacBook
Seeking professional Apple Screen Repair is the most reliable manner to handle lifeless pixels. Here’s how professional services can gain your MacBook:
1. Certified Technicians and Quality Parts
Apple-licensed restore centers use proper replacement components, making sure extraordinary fixes with out compatibility troubles.
2. Comprehensive Diagnostics
Professionals conduct in-depth diagnostics to become aware of underlying problems that might not be visible, which include internal show troubles or GPU malfunctions.
3. Warranty and Reliability
Authorized Apple repair offerings regularly provide warranties for his or her work, providing peace of mind in case problems get up later.
4. Safe and Effective Repairs
DIY fixes deliver dangers, consisting of causing extra harm or voiding warranties. Professional repair technicians observe Apple’s recommendations to ensure secure repairs.
Conclusion
Dead pixels on a MacBook display may be an demanding trouble, but with the proper approach, they could frequently be fixed. While DIY techniques along with pixel-refresher tools, pressure techniques, and display adjustments can now and again solve the trouble, expert Apple Screen Repair offerings stay the quality choice for everlasting solutions.
If useless pixels persist or get worse, searching for professional repair will assist restore your MacBook’s display screen to most advantageous situation. Investing in timely screen restore now not only complements display quality however also extends the longevity of your MacBook, making sure a unbroken revel in for years to come.
0 notes
Text
Diagnostic Radiology Displays
PerfectLum enhances Diagnostic Radiology Displays with robust DICOM calibration software that ensures compliance with AAPM TG270, DIN 6868-157, and ACR Display Test. Deliver precise grayscale accuracy and uniform luminance for every diagnostic task. Compatible with Barco Monitors Radiology, Medical Grade Monitors, and NYPDM NY Primary Diagnostic Monitor setups. PerfectLum also doubles as Colour Calibration Software, ideal for environments requiring the highest visual fidelity. Get professional Monitor Calibration Software for free and calibrate with confidence.
0 notes
Note
Hi! I'm trying to set up my own Calibre library for fics and your tutorials were so helpful! Thank you for writing them!
I even downloaded some fics and every column works fine except the #rating_level, because it only fills gen works with ratings. I wrote everything the way you showed, I only changed the colours for them "green, yellow, orange, red, blue" comma seperated and space. But even when I restart Calibre, it deletes the space between words and commas.
Here's the screenshot for showing:
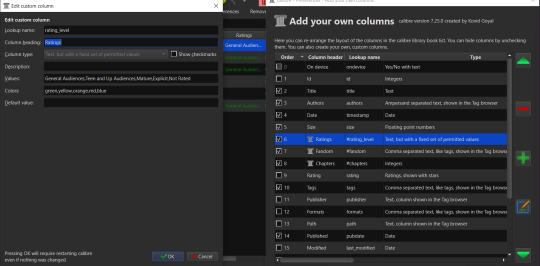
I only added some custom columns that you showed the same way I saw in your tutorial + personal.ini to access archived stuff and mature fics.
Do you have an advice to what to do in this case? Thank you for the help in advance! (Or just for the answer!) I'm so sorry for the dumb questions, I'm such a loser when it comes to technology :_D
So when I checked my own columns - I didn't end up assigning colors to the rating levels, but I did for my status column (Completed,In-Progress,Unfinished with the colors green,red,yellow)
So looking at both my rating_level and completion_status columns, none of them have a space after the comma either so I think that's just how Calibre prefers it? comma separated values but not comma-space separated. It could be that entering them with the comma-space is the problem and Calibre is only correcting it visually when displaying the column data to you when you revisit later but the space is still there in the data itself.
So one option is to delete clear out the values/colors for the column, re-enter them with the separating comma but no space (so the spaces within a fixed value such as 'Not Rated' would remain but there would be no space added before the N). This makes sense to me since as a software engineer I have to be aware that the computer will interpret the strings 'Not Rated' and ' Not Rated' as not equal due to the leading space.
You might also delete the column entirely and then remake it with the values entered so that they're only separated by commas and no spaces just to be really sure. Either way, once you've saved the changes and restarted Calibre, you can do a meta-data only update on a fanfic you've already downloaded that didn't get the rating set to see if it'll set correctly this time. (If you remake the column instead of updating the existing one you'll need to re-add it in the fanficfare settings again too before trying to update the meta-data for a fic and probably re-update all the meta-data for all your fics.)
Another thing to consider is it could be a bug in the interaction between the version of Calibre and the version of the FanFicFare plugin that you've got. if resetting or recreating the column doesn't help then you may want to update both to the latest if you haven't already. Or close to the latest in Calibre's case, as the current version of Calibre (7.25) has a txt file conversion bug that 7.24 didn't have. So if you're planning any txt file conversions maybe wait for 7.26 and upgrade to 7.24 for now instead. (i have a number of txt files i'd like to convert to epub but I have to wait for the next release because downgrading is too much of a pain.)
Looking at your screenshot, I don't think typos are your problem. But I also have mild dyslexia and cannot be fully trusted to spot typos. (Which is presumably why I can reread a fanfic I wrote, find typos I missed despite several editing passes, fix them, and then reread the same fic a few months later and find something else entirely has been misspelled all this time.)
If none of that helps, then you could consider deleting the rating_level column and creating a new one that uses 'Text, column shown in the tag browser' instead of the fixed set of permitted values. It will mean you can't assign colors to the different ratings, but once the new version of the Rating Level column is assigned in the FanFicFare settings it should grab the rating info from there forward without any problems. It'll accept any text as the rating which isn't necessarily a bad thing if you're pulling from multiple sources and not just Ao3.
#kitkatt0430 answers#fanficarchiving#calibre#I hope this helps#but if it doesn't i'm really not sure why it isn't
1 note
·
View note
Text
Key Reasons You Must Convert Audio Cassette Tapes to Digital Files!
As tapes deteriorate, stretch, or lose their ability to play over time, people must convert audio cassette tapes to digital files to save priceless old recordings and memories. This advanced process helps to maintain the sound quality for longer periods and makes them accessible without the use of antiquated technology.
In the same way, many people lose their precious old photos and videos due to physical handling, light, humidity, and deterioration over time. Well-established service providers of old video conversion and photo scanning in Melbourne use cutting-edge techniques to preserve these old memories, particularly those from traditional photography.

Key Reasons Why Professionals Suggest to Digitise Photos and Audio Files:
1. To guarantee the best possible preservation of priceless memories, reputable digital conversion specialists have the technological expertise to digitise old photos and audio recordings using a variety of specialised instruments and processes.
2. They employ sophisticated, high-resolution scanners to capture the fine details, colours, and textures of photographs. Modern optics and software are used in these sophisticated scanning systems to process a wide range of images, including old, fragile, fading, or damaged ones.
3. They are taught to manage these difficulties with restoration and care, nevertheless. Additionally, scanning and organising large collections can take a lot of time.
4. In these situations, expert photo scanning services offer helpful technological support to save audio recordings, important information, and cherished memories.
5. Additionally, they are skilled in the use of these cutting-edge devices and tools for meticulous calibration that results in precise colour reproduction and resolution, with the photographs saved in digital formats like TIFF or JPEG for convenient sharing and storing.
6. Renowned professionals convert ancient cassette tapes, vinyl records, or reel-to-reel cassettes into digital formats using analog-to-digital converters. They utilise specialised equipment to ensure that the original sound quality is maintained during the conversion process.
7. Reputable digital conversion services, on the other hand, are masters at processing digital audio files using specialised software to improve clarity, lower noise, and guarantee that the recordings are as close to the original as possible.
Meanwhile, carefully research the market to discover a reliable service that will convert old photos, videos, and audio files into a digital format to store, edit, and share across several platforms easily.
Source
0 notes
Link
Check out this listing I just added to my Poshmark closet: REIKER ASTRID BLACK BOOTS SZ 37.
0 notes
Text
A Deep Dive into Barco’s Innovative LED Control Systems
In the swiftly evolving international of show era, Barco has hooked up itself as a leader, specially in the realm of LED displays. Barco LED systems are famend for their excellent great, reliability, and flexibility, making them the pass-to choice for a variety of packages starting from enjoyment and sports to company and academic environments. At the coronary heart of this success lies Barco's innovative LED manage systems, which make certain that their presentations supply extremely good performance consistently. This article takes a closer observe what makes Barco’s LED manipulate systems stand out and how they contribute to the general excellence of Barco LED presentations.
Understanding LED Control Systems
Before diving into the specifics of Barco’s generation, it’s critical to understand what an LED manipulate system does. In simple phrases, an LED manage gadget manages the show's content, ensuring that snap shots, films, and other visuals are rendered accurately and seamlessly. This includes a range of responsibilities, including colour calibration, brightness adjustment, synchronization, and signal processing. The exceptional of the manipulate gadget without delay impacts the visible output, making it a crucial factor in any LED display setup.
The Core of Barco LED Control Systems
Barco’s LED manage structures are engineered with precision and innovation, incorporating numerous key technology that set them other than competitors. These structures are designed to deal with the maximum worrying visible duties, ensuring that Barco LED presentations constantly supply advanced image first-class.
Advanced Color Calibration
One of the standout capabilities of Barco LED control systems is their advanced coloration calibration era. Accurate colour duplicate is vital in many industries, specially in broadcasting, digital signage, and live events. Barco’s systems routinely calibrate hues across the whole display, making sure uniformity and consistency. This calibration isn't always a one-time procedure; Barco’s structures constantly screen the display, making actual-time changes to preserve color accuracy, while the LED panels age or environmental situations change.
High-Resolution Image Processing
Barco LED control systems are geared up with excessive-resolution picture processing abilities. This era lets in the gadget to manage and render content material at ultra-high resolutions, making sure that even the maximum specified visuals are displayed truly. Whether it’s a huge-scale video wall in a control room or a huge virtual billboard in a city center, Barco’s picture processing guarantees that every pixel contributes to a pointy, vibrant photograph.
Seamless Signal Processing and Synchronization
In applications in which multiple LED panels are used to create a large, unified display, synchronization is crucial. Barco LED manipulate systems excel on this area by offering seamless signal processing and synchronization across all panels. This guarantees that there are no visible seams or misalignments, that can distract visitors and decrease the impact of the display. Whether the content is speedy-paced motion or a static photograph, Barco’s control systems preserve the entirety perfectly in sync.
User-Friendly Interface and Controls
Despite the advanced technology packed into Barco’s LED manage systems, they stay relatively consumer-friendly. The structures feature intuitive interfaces that allow users to easily manipulate and modify the display settings. This is specially beneficial in live environments, such as concerts or proclaims, where brief adjustments may be vital. Barco’s software is designed to be on hand even to customers without extensive technical expertise, ensuring that the total strength of the manipulate device may be harnessed with minimum education.
Scalability and Flexibility
Another main gain of Barco LED control systems is their scalability. Whether you’re handling a small show in a retail environment or a sprawling video wall in a stadium, Barco’s structures may be scaled to satisfy the unique desires of the set up. This flexibility extends to the kinds of content material that may be displayed. Barco LED control structures guide a wide range of codecs and resolutions, making them flexible sufficient to deal with any visual requirement.
Robust Reliability and Redundancy
In crucial programs, along with manage rooms or stay broadcasts, reliability is paramount. Barco LED manage structures are constructed with sturdy redundancy functions to ensure non-stop operation, even within the occasion of a aspect failure. This manner that if one part of the system encounters an problem, the show will maintain to characteristic with out interruption. This stage of reliability is one of the reasons why Barco LED displays are depended on in venture-important environments around the arena.
Real-World Applications of Barco LED Control Systems
The real check of any generation is how well it performs in real-world packages. Barco LED control systems have been deployed in a number of settings, each with its very own specific demands.
Broadcasting: In television studios, where color accuracy and photo excellent are non-negotiable, Barco LED displays powered by using their superior manipulate systems provide crystal-clear visuals that enhance the viewing revel in.
Corporate Events: Barco’s manipulate structures allow seamless shows and dynamic content material displays at conferences and corporate events, ensuring that each detail is visible and each message is communicated efficiently.
Entertainment Venues: In live performance halls and theaters, wherein visible effects play a critical position inside the ordinary enjoy, Barco LED systems supply breathtaking imagery that captivates audiences.
Sports Arenas: Barco’s LED displays, managed via their sophisticated manipulate systems, offer real-time, high-definition visuals that preserve enthusiasts engaged and informed at some point of stay wearing occasions.
Conclusion
Barco’s innovative LED manage systems are a testament to the agency’s commitment to excellence in show era. By combining superior coloration calibration, high-resolution photo processing, seamless synchronization, and person-friendly controls, Barco ensures that their LED shows provide unrivaled performance. Whether in broadcasting, corporate occasions, enjoyment, or sports, Barco LED control systems play a essential role in turning in visible reports which are each impactful and dependable. As generation keeps to evolve, Barco stays at the forefront, riding the destiny of LED show solutions.
0 notes
Text
A Step-by-Step Guide for Mastering the B.Des Portfolio
A design portfolio is an important step in your design college admission. It is part of the process after your design aptitude test. Therefore, you must create an outstanding portfolio that steals the heart of the examiner. They should get a fair amount of idea about your design capabilities through it.
However, you must be wondering about the best way to create your portfolio. Let us take you through this step-by-step process.

Defining Your Design Style
The first step is to identify your personal design style. Your design style should reflect your personality. It must showcase your strengths and interests. However, don’t strive for perfection, as it can take away the ‘you’ factor from the portfolio. Instead, it should look unique and creative. You can explore different design styles and aesthetics to find the right one.
Curating Your Portfolio
The next step is to choose the projects you will include in your portfolio. As a fresher, you might not have much work to show. No worries. You should include everything you have done. Check out the requirements for a design school admission and include those designs. Set a clear narrative throughout your portfolio so the viewer finds it easy to navigate.
Visual Communication and Presentation
Visual storytelling is extremely important when designing a portfolio. The viewer should feel connected to your experience. Therefore, you need to freshen up their mind by using high-qulity images and layout. Use appropriate typography and colours to create a professional look. It should carry a polished and sophisticated aura while still being authentic.
Project Selection and Documentation
Your projects should highlight your talent. Showcase all your projects to display your range. You must also include a section that documents your design process. It will show the calibre of your design thinking. You will also demonstrate your problem-solving skills in the B.Design entrance exam. Also, remember to mention the design software that you used in your projects.
Portfolio Structure and Content
Your portfolio should start with an introduction section. It should follow a certain format. You can start with 2D designs first. Mention the entire thought process of your creativity. The interviewers must find your designs visually appealing and meaningful. You can also include any experimentations you do. It would highlight your enthusiasm for design.
Digital vs. Physical Portfolio
A portfolio comes in two formats. You can either choose a digital format on Behance or Canva. You can also make a physical portfolio that will showcase your hand-drawn designs. The choice is yours. However, a physical portfolio works best for admissions. The colleges vlaue your raw sketching skills more. Hence, it will be wiser to choose the latter.
By following these steps, you can transform your portfolio from a collection of projects to a compelling narrative showcasing your design journey. Remember, a strong portfolio is a valuable tool that can open doors to your dream bachelor of interior design college. So, invest time, showcase your passion, and create a portfolio that truly reflects your design voice!
0 notes