#CentOS Linux
Explore tagged Tumblr posts
Visit Tumblr Blog
Explore Tumblr blogs with no restrictions, modern design and the best experience.
Last Seen Tumblr Blogs


Fun Fact
Tumblr.com rank in the US is 25.
Text
#Ubuntu#Debian#Fedora#Arch Linux#Linux Mint#openSUSE#Manjaro#CentOS#Elementary OS#Zorin OS#Pop!_OS#Linux#Encuesta#Survey
67 notes
·
View notes
Text
Perhaps 3024 will finally be the year of the Linux desktop.
I hope that 100 years from now, a day will come when everyone uses privacy-enabled Linux (or some sort of *BSD), and those users have no clue what the Windows hell from soul-sucking corporations like Microsoft looks like. A boy can dream, can't he?
#linux#debian#ubuntu#sysadmin#arch linux#devlife#rhel#fedora#centos#freebsd#opensuse#privacy#security
33 notes
·
View notes
Text

118 notes
·
View notes
Text
I think I may be stupid? I've been going ":(((( its' so sad I can't get da vinci resolve to work on my linux PC" but??? guess what??? I've been using CSP inside a virtual machine bc I couldn't get THAT to work either?? so just get dvr on your virtual machine??? idiot?????
#just thinking thoughts...#the linux version of dvr only works on centOS and I use mint#and I've been sad abt this for a while. while I can still use it for motion picture prestidigitation it has trouble importing videos
6 notes
·
View notes
Text
Własny serwer Red Hat cz.8 - Statystyki serwera
W tym tutaorialu zainstalujemy Webalizer w dystrybucji Rocky Linux, bazującej na Red Hat i kompatybilnej z jego klonami, takimi jak CloudLinux, AlmaLinux, EuroLinux, CentOS Stream, MIRACLE Linux, etc. https://linuxiarze.pl/wlasny-serwer-red-hat-cz-8-statystyki-serwera/

0 notes
Text
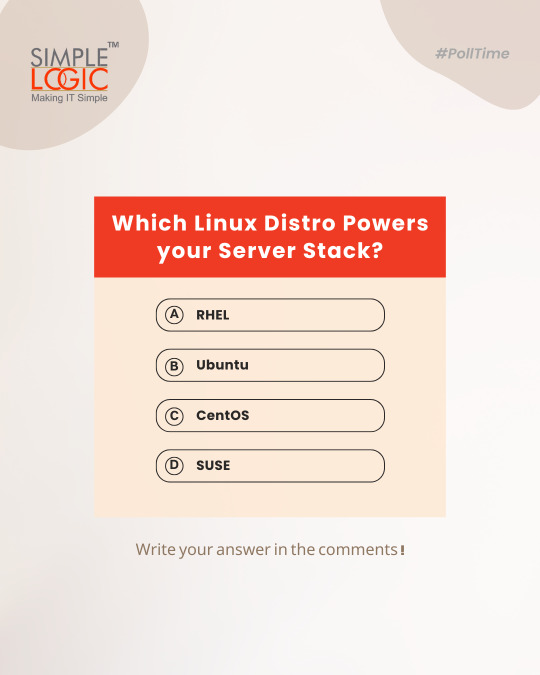
#PollTime Which Linux distro powers your server stack?
A) RHEL 🎯 B) Ubuntu 🧡 C) CentOS 🌀 D) SUSE 🟢
Comments your answer below👇
💻 Explore insights on the latest in #technology on our Blog Page 👉 https://simplelogic-it.com/blogs/
🚀 Ready for your next career move? Check out our #careers page for exciting opportunities 👉 https://simplelogic-it.com/careers/
#itcompany#dropcomment#manageditservices#itmanagedservices#poll#polls#linux#server#rhel#ubuntu#centos#suse#itserviceprovider#managedservices#testyourknowledge#makeitsimple#simplelogicit#simplelogic#makingitsimple#itservices#itconsulting
0 notes
Text
CentOS vs Ubuntu
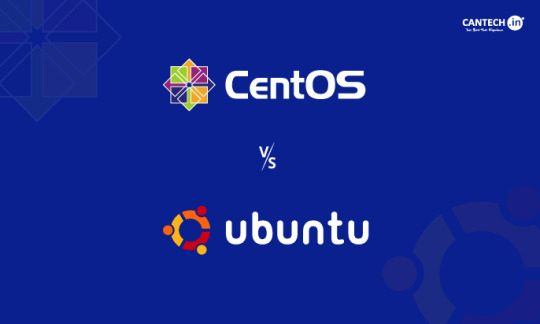
CentOS and Ubuntu are two popular Linux distributions, each catering to different needs. CentOS, based on Red Hat, is known for its stability and long-term support, making it ideal for servers and enterprise environments. In contrast, Ubuntu is more user-friendly, frequently updated, and widely used by developers and beginners for both desktops and servers. While CentOS is perfect for those who prioritize reliability and minimal changes, Ubuntu shines for its ease of use, active community, and regular updates. If you need a solid, long-term server setup, go for CentOS, but for a versatile, beginner-friendly experience, Ubuntu is the way to go.
0 notes
Text
XCP-ng
XCP-ng - a high performance enterprise level virtualization platform with a rich ecosystem, that can be integrated in an entire stack to do management and backup for it. https://archiveos.org/xcp-ng/

0 notes
Text
How to Migrate from CentOS 7 to CentOS Stream 8?
As CentOS 7 is obsolete on 30th June 2024, move on to CentOS Stream 8 with a simple migration.

Take your Backup – Secure your data and work before upgrading. ✅ Update & Install EPEL – yum update -y && yum install -y epel-release ✅ Upgrade to CentOS Stream 8 – Use centos-release-stream and run:
bash Copy Edit dnf install centos-release-stream -y dnf swap centos-linux-repos centos-stream-repos -y dnf distro-sync -y ✅ Reboot & Verify – cat /etc/centos-release should show CentOS Stream 8.
Make sure you use a powerful VPS when upgraded to CentoOS Stream 8? You can trust Oxtrys VPS for fulfilling your requirement!
0 notes
Text
So far it is going smoothly.
0 notes
Text
Guía sobre Debian: El Pilar de las Distribuciones Linux
1. Introducción
Presentación de Debian
Debian es una de las distribuciones Linux más antiguas y respetadas, conocida por su estabilidad, seguridad y adherencia a los principios del software libre. Fundada en 1993 por Ian Murdock, Debian ha servido como base para muchas otras distribuciones populares, incluyendo Ubuntu.
Importancia y legado de Debian en el ecosistema Linux
Como una de las "distribuciones madre", Debian ha jugado un papel crucial en el desarrollo y popularización de Linux. Su robustez y compromiso con el software libre lo han convertido en una elección preferida tanto para servidores como para entornos de escritorio.
2. Historia y Filosofía de Debian
Origen y evolución de Debian
Debian fue creado con la intención de ser una distribución gestionada de manera abierta y colaborativa. Desde su lanzamiento, ha tenido múltiples versiones, cada una con nombres basados en personajes de la película "Toy Story".
Filosofía y compromiso con el software libre
Debian sigue estrictamente las Directrices de Software Libre de Debian (DFSG), lo que significa que todo el software incluido en la distribución debe ser libre. Además, su contrato social garantiza la transparencia y la cooperación dentro de la comunidad.
3. Características Clave de Debian
Estabilidad y seguridad
Debian es conocido por su estabilidad, lo que lo convierte en una opción confiable para servidores y sistemas de producción. Las actualizaciones y nuevos paquetes se prueban rigurosamente antes de ser lanzados en la versión estable.
Gestor de paquetes
APT (Advanced Package Tool) es el gestor de paquetes principal de Debian. APT facilita la instalación, actualización y eliminación de software desde los repositorios de Debian.
Comandos básicos: sudo apt update, sudo apt install [paquete], sudo apt remove [paquete].
Formatos de paquetes soportados
Debian soporta varios tipos de archivos para la instalación de software:
.deb: El formato nativo de Debian para la instalación de paquetes.
.appimage: Formato portátil que puede ejecutarse directamente sin necesidad de instalación.
.snap: Aunque no es nativo de Debian, se puede habilitar soporte para instalar paquetes Snap.
.flatpak: Otro formato universal que puede ser instalado en Debian, aunque requiere la instalación previa de Flatpak.
Ramas de desarrollo
Stable (Estable): Ideal para entornos donde la estabilidad es crítica.
Testing (Pruebas): Contiene paquetes más recientes y es una buena opción para usuarios que desean un equilibrio entre estabilidad y novedades.
Unstable (Inestable/Sid): Donde se introduce el software más nuevo y experimental.
Amplia compatibilidad de hardware
Debian soporta una amplia gama de arquitecturas de hardware, desde las más comunes como x86 y ARM, hasta plataformas más especializadas.
4. Proceso de Instalación de Debian
Requisitos mínimos del sistema
Procesador: Pentium 4 o posterior.
Memoria RAM: 512 MB para un sistema básico, 1 GB o más recomendado para un entorno de escritorio completo.
Espacio en disco: 10 GB mínimo, 20 GB o más recomendados para una instalación con múltiples aplicaciones y entornos de escritorio.
Tarjeta gráfica: Compatible con X Window System.
Unidad de CD/DVD o puerto USB para la instalación.
Descarga y preparación del medio de instalación
El sitio web oficial de Debian ofrece imágenes ISO para descargar. Se puede preparar un USB booteable usando herramientas como Rufus o balenaEtcher.
Guía paso a paso para la instalación
Selección del entorno de instalación: Debian ofrece opciones de instalación tanto gráfica como en modo texto.
Configuración de particiones: Se puede optar por particionado automático o manual, dependiendo de las necesidades del usuario.
Configuración de la red y selección de paquetes: Durante la instalación, se configuran las opciones de red y se seleccionan los paquetes de software esenciales.
Primeros pasos post-instalación
Actualización del sistema: Es recomendable ejecutar sudo apt update && sudo apt upgrade para asegurarse de que el sistema esté completamente actualizado.
Instalación de controladores y software adicional: Dependiendo del hardware, puede ser necesario instalar controladores específicos. Además, se pueden instalar entornos de escritorio adicionales o programas específicos.
5. Entornos de Escritorio en Debian
Gnome (predeterminado)
Gnome es el entorno de escritorio predeterminado en Debian, conocido por su simplicidad y enfoque en la productividad.
KDE Plasma
Un entorno de escritorio altamente personalizable que ofrece una experiencia visualmente atractiva.
Xfce
Ligero y eficiente, ideal para sistemas con recursos limitados.
LXQt y otros
Alternativas para quienes buscan un entorno aún más ligero o con diferentes características.
6. Gestión de Paquetes en Debian
APT: El gestor de paquetes de Debian
Comandos básicos: apt-get, apt-cache, aptitude.
Instalación y eliminación de paquetes: sudo apt install [paquete], sudo apt remove [paquete].
Repositorios y backports
Debian ofrece diferentes repositorios: stable, testing, y unstable, así como backports que permiten instalar versiones más recientes de software en la rama estable.
Configuración de repositorios adicionales
Los usuarios pueden añadir repositorios adicionales en el archivo /etc/apt/sources.list para acceder a más software.
7. Debian en el Entorno Empresarial y Servidores
Uso de Debian en servidores
Debian es ampliamente utilizado en servidores debido a su estabilidad y seguridad. Es ideal para aplicaciones web, bases de datos, y como servidor de correo, entre otros.
Mantenimiento y soporte a largo plazo
Debian ofrece soporte a largo plazo (LTS) para sus versiones estables, garantizando actualizaciones de seguridad por al menos cinco años.
Herramientas de administración y automatización
Debian se integra bien con herramientas como Ansible, Puppet, y Docker, facilitando la gestión de infraestructuras complejas.
8. Comparativa de Debian con Otras Distribuciones
Debian vs. Ubuntu
Objetivo: Ubuntu se basa en Debian y se orienta más hacia el usuario final, con actualizaciones más frecuentes y un enfoque en la facilidad de uso.
Filosofía: Mientras que Debian sigue estrictamente los principios del software libre, Ubuntu incluye software propietario para mejorar la compatibilidad y experiencia del usuario.
Debian vs. CentOS
Objetivo: CentOS, basado en Red Hat, es otra opción popular para servidores, enfocada en la estabilidad y soporte a largo plazo en entornos empresariales.
Filosofía: CentOS es más conservador en cuanto a actualizaciones, mientras que Debian, aunque estable, ofrece más flexibilidad en la gestión de paquetes.
Debian vs. Arch Linux
Objetivo: Arch Linux es para usuarios avanzados que desean un sistema minimalista y personalizado, con un modelo de actualización continua (rolling release).
Filosofía: Debian prioriza la estabilidad, mientras que Arch sigue la filosofía KISS (Keep It Simple, Stupid) y proporciona control total al usuario.
9. Conclusión
Debian como una opción sólida y confiable
Debian sigue siendo una de las distribuciones más confiables y seguras disponibles. Su enfoque en la estabilidad y el software libre lo convierte en una elección excelente para usuarios, administradores de sistemas y desarrolladores.
Recomendaciones finales para quienes consideran usar Debian
Debian es ideal para aquellos que valoran la estabilidad sobre la última tecnología y están dispuestos a invertir tiempo en aprender sobre su gestión y mantenimiento.
10. Preguntas Frecuentes (FAQ)
¿Debian es adecuado para principiantes?
Aunque Debian es más técnico que distribuciones como Ubuntu, es accesible para principiantes con paciencia y disposición para aprender.
¿Cómo actualizo mi sistema Debian?
Ejecutando sudo apt update && sudo apt upgrade mantendrás tu sistema actualizado.
¿Es Debian una buena opción para servidores?
Sí, Debian es muy utilizado en servidores debido a su estabilidad, seguridad y soporte a largo plazo.
#Debian#distribución Linux#Linux#servidor Debian#instalación Debian#software libre#GNOME#KDE#APT#gestión de paquetes#Debian Stable#Debian Testing#Debian Sid#comunidad Debian#recursos Debian#seguridad en Debian#soporte a largo plazo#Debian vs Ubuntu#Debian vs CentOS#Debian vs Arch Linux#formatos de paquetes#.deb#.appimage#.snap#.flatpak
11 notes
·
View notes
Text
How to Copy One Hard Disk to Another in #Linux Using the dd, dcfldd, or GNU/ddresuce Command
25 notes
·
View notes
Text
Formation Linux CentOS à Bruxelles
Maîtrisez l’Administration Système pour des Environnements Entreprises – 3 Jours Découvrez comment CentOS, distribution Linux basée sur Red Hat Enterprise Linux (RHEL), peut répondre aux besoins d’entreprises à la recherche d’une solution stable et pérenne. Durant cette formation de 3 jours à Bruxelles, vous apprendrez les fondamentaux de l’administration CentOS, de l’installation au déploiement…
0 notes
Video
youtube
How to Install and Set Up Ubuntu 24.04 on VMware Workstation Pro 17 in Windows 11
Overview:
Setting up Ubuntu on VMware is a crucial skill for DevOps professionals who want to create isolated environments for testing, development, and automation workflows. VMware allows you to run multiple virtual machines (VMs) on a single system, enabling you to experiment with different Linux distributions without altering your primary operating system. In this hands-on guide, we’ll walk through the steps to install and configure Ubuntu on VMware, covering the key settings and best practices for optimizing performance in DevOps environments.
VMware: Getting Started
Step 1: Install VMware Workstation
To begin, you’ll need VMware Workstation or VMware Player installed on your system. Here’s how:
- Download VMware: Visit the official VMware website and download either VMware Workstation or VMware Player depending on your preference. Workstation is a paid tool with advanced features, while Player is a free option that’s perfect for basic VMs. - Install VMware: Run the installer and follow the setup wizard. Once installed, launch VMware.
Step-by-Step: Installing Ubuntu on VMware
Step 1: Download Ubuntu ISO
- Go to the [official Ubuntu website](https://ubuntu.com/download) and download the LTS (Long Term Support) version of Ubuntu, ensuring you have a stable version for long-term usage in your DevOps workflows.
Step 2: Create a New Virtual Machine in VMware
- Open VMware Workstation or VMware Player and select “Create a New Virtual Machine.” - Choose the ISO image by selecting the downloaded Ubuntu file, then click Next.
Step 3: Allocate Resources
- CPU: Assign at least 2 CPUs for smooth operation. - RAM: Allocate at least 4GB of RAM for optimal performance. You can assign more if your system allows. - Storage: Provide at least 20GB of disk space, especially if you plan to install DevOps tools.
Step 4: Installation of Ubuntu
- Start the VM, and Ubuntu’s installation wizard will appear. - Follow the prompts: choose language, keyboard settings, and select Install Ubuntu. - Choose installation type (erase disk if it’s a fresh VM) and configure time zones, user account, and password. - After installation, update your system by running: ```bash sudo apt update && sudo apt upgrade -y ```
Step 5: VMware Tools Installation
Installing VMware Tools improves VM performance, enabling better integration with the host machine.
- In VMware, go to the VM menu and select Install VMware Tools. ```bash sudo apt install open-vm-tools open-vm-tools-desktop -y sudo reboot vmware-toolbox-cmd -v ``` Verify VMware Tools Installation:
```bash vmware-toolbox-cmd -v ```
Step 6: Post-Installation Setup for DevOps
- Install Basic DevOps Tools: ```bash sudo apt install git curl vim ``` - Enable SSH Access: ```bash sudo apt install openssh-server sudo systemctl enable ssh sudo systemctl start ssh
Best Practices for Installing and Setting Up Ubuntu on VMware
1. Resource Allocation: Ensure you allocate sufficient CPU, RAM, and storage based on the workloads. For most DevOps tasks, assign at least 2 CPUs and 4GB of RAM for optimal performance. More demanding workloads may require additional resources.
2. Snapshots: Regularly take VM snapshots before major changes or installations. This allows you to revert to a stable state if something goes wrong during configuration or software testing.
3. VMware Tools Installation: Always install VMware Tools after setting up the OS. This ensures seamless mouse integration, smoother graphics, and better performance, reducing potential bugs and lag in your virtual environment.
4. Partitioning: For better performance and management, use custom partitioning if needed. This helps in allocating different parts of your virtual disk to `/`, `/home`, and `/var` partitions, improving system performance and flexibility in future updates or installations.
5. Automated Backups: Set up automated backups or export your VMs periodically. This practice is particularly important if your VMs store critical configurations, applications, or databases.
6. Networking Configuration: Ensure that your virtual machines are correctly configured to access the internet and your local network. Consider using NAT or Bridged Network options, depending on your networking needs. NAT works well for internet access, while Bridged is ideal for networked environments.
7. Security Considerations: Configure firewalls and SSH access carefully to secure your VMs from unauthorized access. Set up strong user permissions, enforce password complexity, and enable SSH keys for secure remote access.
8. Regular System Updates: Frequently update Ubuntu systems to ensure they are protected from vulnerabilities. Use the following commands to update packages: - For Ubuntu: ```bash sudo apt update && sudo apt upgrade ```
9. Monitor Resource Usage: VMware allows you to monitor CPU, memory, and storage usage. Use these tools to ensure that your VMs are not consuming excessive resources, especially in shared environments.
10. Test Environments: Use VMs as sandbox environments to test and experiment with new DevOps tools like Docker, Kubernetes, Jenkins, or Ansible before deploying them in production.
Conclusion:
By installing and setting up Ubuntu on VMware, you gain the flexibility to experiment with DevOps tools, test automation workflows, and learn Linux system administration in a safe and isolated environment. This hands-on tutorial provides you with the foundation to run and manage your Linux VMs effectively, setting you up for success in DevOps tasks ranging from development to deployment automation. Follow along in this video as we guide you step-by-step to mastering Linux installations on VMware for your DevOps journey.
how to install ubuntu 24.04,vmware player,windows 11,vmware workstation player,how to install ubuntu 24.04 lts desktop,How to Install and Set Up Ubuntu 24.04 on VMware Workstation Pro 17 in Windows 11,vmware workstation,vmware workstation 17 pro,ubuntu linux,cloudolus,cloudoluspro,linux,free,How to Post-Installation Setup For DevOps,How to Update and VMware Tools Install in Ubuntu 24.04 LTS?,Linux for DevOps,ubuntu installation,ubuntu 24.04,ubuntu,install ubuntu,
Linux Install and Setup Overview,Install and Setup VMware Workstation Pro 17,Installing Ubuntu on VMware Workstation Pro 17,Installing CentOS on VMware Workstation Pro 17,Linux Install and Setup Best Practices vmware,virtual machine,how to download and install vmware workstation pro,Hands On Guide: How to Install and Set Up Ubuntu and CentOS on VMware,centos 7,download and install vmware workstation on windows 11,the reality of using vmware,vmware tutorial,install centos 7 on vmware,installing centos 7 on vmware,ubuntu installation on vmware workstation 17,Linux Install and Setup Best Practices,cloudoluspro vmware,linux for devops,handson ubuntu,open source,linux terminal,distrotube,ubuntu is bad,linux tutorial,linux for beginners,linux commands,Linux installation,Linux beginner guide,Linux setup,how to install Linux,Linux for beginners,Linux distributions,Ubuntu installation,Fedora installation guide,Linux tips,Linux,Linux basics,DevOps basics,cloud computing,DevOps skills,Linux tutorial,Linux scripting,Linux automation,Linux shell scripting,Linux in DevOps,Ubuntu,CentOS,Red Hat Linux,DevOps tools,ClouDolus,DevOps career,Linux commands for beginners,Linux for cloud,Linux training,devops tutorial Linux,Linux commands for beginners ubuntu,cloud computing Linux for DevOps
***************************** *Follow Me* https://www.facebook.com/cloudolus/ | https://www.facebook.com/groups/cloudolus | https://www.linkedin.com/groups/14347089/ | https://www.instagram.com/cloudolus/ | https://twitter.com/cloudolus | https://www.pinterest.com/cloudolus/ | https://www.youtube.com/@cloudolus | https://www.youtube.com/@ClouDolusPro | https://discord.gg/GBMt4PDK | https://www.tumblr.com/cloudolus | https://cloudolus.blogspot.com/ | https://t.me/cloudolus | https://www.whatsapp.com/channel/0029VadSJdv9hXFAu3acAu0r | https://chat.whatsapp.com/D6I4JafCUVhGihV7wpryP2 *****************************
*🔔Subscribe & Stay Updated:* Don't forget to subscribe and hit the bell icon to receive notifications and stay updated on our latest videos, tutorials & playlists! *ClouDolus:* https://www.youtube.com/@cloudolus *ClouDolus AWS DevOps:* https://www.youtube.com/@ClouDolusPro *THANKS FOR BEING A PART OF ClouDolus! 🙌✨*
#youtube#Linux Install and Setup OverviewInstall and Setup VMware Workstation Pro 17Installing Ubuntu on VMware Workstation Pro 17Installing CentOS o#how to install ubuntu 24.04vmware playerwindows 11vmware workstation playerhow to install ubuntu 24.04 lts desktopHow to Install and Set Up#ClouDolus ClouDolusPro#ClouDolusPro
0 notes
Text
The Journey of Setting Up Apache: From Zero to Hero on Linux VPS
The Journey of Setting Up Apache: From Zero to Hero on Linux VPS
The Journey of Setting Up Apache: From Zero to Hero on Linux VPS Conquer the Command Line: Your Journey to Setting Up Apache on Linux VPS Website traffic has surged dramatically over the years, with over 3.5 billion searches conducted daily. A reliable web server is essential to manage this traffic efficiently. Without it, your site may face downtime, which can frustrate users and lead to lost…
0 notes
Text
Własny serwer Red Hat cz.7 – Antywirus i Antyspam
Ta część konfiguracji własnego serwera nie jest obowiązkowa, ale zalecana dla osób, które zainstalowały serwer poczty SMTP w części 5 oraz serwer poczty IMAP w części 6. Można go zastosować w Red Hat i jego klonach, takich jak: CloudLinux, AlmaLinux, EuroLinux, CentOS Stream, MIRACLE Linux, etc. https://linuxiarze.pl/wlasny-serwer-red-hat-cz-7-antywirus-i-antyspam/
0 notes