#Debian vs CentOS
Explore tagged Tumblr posts
Visit Tumblr Blog
Explore Tumblr blogs with no restrictions, modern design and the best experience.
Last Seen Tumblr Blogs


Fun Fact
Tumblr was created by web developers David Karp and Marco Arment.
Text
Guía sobre Debian: El Pilar de las Distribuciones Linux
1. Introducción
Presentación de Debian
Debian es una de las distribuciones Linux más antiguas y respetadas, conocida por su estabilidad, seguridad y adherencia a los principios del software libre. Fundada en 1993 por Ian Murdock, Debian ha servido como base para muchas otras distribuciones populares, incluyendo Ubuntu.
Importancia y legado de Debian en el ecosistema Linux
Como una de las "distribuciones madre", Debian ha jugado un papel crucial en el desarrollo y popularización de Linux. Su robustez y compromiso con el software libre lo han convertido en una elección preferida tanto para servidores como para entornos de escritorio.
2. Historia y Filosofía de Debian
Origen y evolución de Debian
Debian fue creado con la intención de ser una distribución gestionada de manera abierta y colaborativa. Desde su lanzamiento, ha tenido múltiples versiones, cada una con nombres basados en personajes de la película "Toy Story".
Filosofía y compromiso con el software libre
Debian sigue estrictamente las Directrices de Software Libre de Debian (DFSG), lo que significa que todo el software incluido en la distribución debe ser libre. Además, su contrato social garantiza la transparencia y la cooperación dentro de la comunidad.
3. Características Clave de Debian
Estabilidad y seguridad
Debian es conocido por su estabilidad, lo que lo convierte en una opción confiable para servidores y sistemas de producción. Las actualizaciones y nuevos paquetes se prueban rigurosamente antes de ser lanzados en la versión estable.
Gestor de paquetes
APT (Advanced Package Tool) es el gestor de paquetes principal de Debian. APT facilita la instalación, actualización y eliminación de software desde los repositorios de Debian.
Comandos básicos: sudo apt update, sudo apt install [paquete], sudo apt remove [paquete].
Formatos de paquetes soportados
Debian soporta varios tipos de archivos para la instalación de software:
.deb: El formato nativo de Debian para la instalación de paquetes.
.appimage: Formato portátil que puede ejecutarse directamente sin necesidad de instalación.
.snap: Aunque no es nativo de Debian, se puede habilitar soporte para instalar paquetes Snap.
.flatpak: Otro formato universal que puede ser instalado en Debian, aunque requiere la instalación previa de Flatpak.
Ramas de desarrollo
Stable (Estable): Ideal para entornos donde la estabilidad es crítica.
Testing (Pruebas): Contiene paquetes más recientes y es una buena opción para usuarios que desean un equilibrio entre estabilidad y novedades.
Unstable (Inestable/Sid): Donde se introduce el software más nuevo y experimental.
Amplia compatibilidad de hardware
Debian soporta una amplia gama de arquitecturas de hardware, desde las más comunes como x86 y ARM, hasta plataformas más especializadas.
4. Proceso de Instalación de Debian
Requisitos mínimos del sistema
Procesador: Pentium 4 o posterior.
Memoria RAM: 512 MB para un sistema básico, 1 GB o más recomendado para un entorno de escritorio completo.
Espacio en disco: 10 GB mínimo, 20 GB o más recomendados para una instalación con múltiples aplicaciones y entornos de escritorio.
Tarjeta gráfica: Compatible con X Window System.
Unidad de CD/DVD o puerto USB para la instalación.
Descarga y preparación del medio de instalación
El sitio web oficial de Debian ofrece imágenes ISO para descargar. Se puede preparar un USB booteable usando herramientas como Rufus o balenaEtcher.
Guía paso a paso para la instalación
Selección del entorno de instalación: Debian ofrece opciones de instalación tanto gráfica como en modo texto.
Configuración de particiones: Se puede optar por particionado automático o manual, dependiendo de las necesidades del usuario.
Configuración de la red y selección de paquetes: Durante la instalación, se configuran las opciones de red y se seleccionan los paquetes de software esenciales.
Primeros pasos post-instalación
Actualización del sistema: Es recomendable ejecutar sudo apt update && sudo apt upgrade para asegurarse de que el sistema esté completamente actualizado.
Instalación de controladores y software adicional: Dependiendo del hardware, puede ser necesario instalar controladores específicos. Además, se pueden instalar entornos de escritorio adicionales o programas específicos.
5. Entornos de Escritorio en Debian
Gnome (predeterminado)
Gnome es el entorno de escritorio predeterminado en Debian, conocido por su simplicidad y enfoque en la productividad.
KDE Plasma
Un entorno de escritorio altamente personalizable que ofrece una experiencia visualmente atractiva.
Xfce
Ligero y eficiente, ideal para sistemas con recursos limitados.
LXQt y otros
Alternativas para quienes buscan un entorno aún más ligero o con diferentes características.
6. Gestión de Paquetes en Debian
APT: El gestor de paquetes de Debian
Comandos básicos: apt-get, apt-cache, aptitude.
Instalación y eliminación de paquetes: sudo apt install [paquete], sudo apt remove [paquete].
Repositorios y backports
Debian ofrece diferentes repositorios: stable, testing, y unstable, así como backports que permiten instalar versiones más recientes de software en la rama estable.
Configuración de repositorios adicionales
Los usuarios pueden añadir repositorios adicionales en el archivo /etc/apt/sources.list para acceder a más software.
7. Debian en el Entorno Empresarial y Servidores
Uso de Debian en servidores
Debian es ampliamente utilizado en servidores debido a su estabilidad y seguridad. Es ideal para aplicaciones web, bases de datos, y como servidor de correo, entre otros.
Mantenimiento y soporte a largo plazo
Debian ofrece soporte a largo plazo (LTS) para sus versiones estables, garantizando actualizaciones de seguridad por al menos cinco años.
Herramientas de administración y automatización
Debian se integra bien con herramientas como Ansible, Puppet, y Docker, facilitando la gestión de infraestructuras complejas.
8. Comparativa de Debian con Otras Distribuciones
Debian vs. Ubuntu
Objetivo: Ubuntu se basa en Debian y se orienta más hacia el usuario final, con actualizaciones más frecuentes y un enfoque en la facilidad de uso.
Filosofía: Mientras que Debian sigue estrictamente los principios del software libre, Ubuntu incluye software propietario para mejorar la compatibilidad y experiencia del usuario.
Debian vs. CentOS
Objetivo: CentOS, basado en Red Hat, es otra opción popular para servidores, enfocada en la estabilidad y soporte a largo plazo en entornos empresariales.
Filosofía: CentOS es más conservador en cuanto a actualizaciones, mientras que Debian, aunque estable, ofrece más flexibilidad en la gestión de paquetes.
Debian vs. Arch Linux
Objetivo: Arch Linux es para usuarios avanzados que desean un sistema minimalista y personalizado, con un modelo de actualización continua (rolling release).
Filosofía: Debian prioriza la estabilidad, mientras que Arch sigue la filosofía KISS (Keep It Simple, Stupid) y proporciona control total al usuario.
9. Conclusión
Debian como una opción sólida y confiable
Debian sigue siendo una de las distribuciones más confiables y seguras disponibles. Su enfoque en la estabilidad y el software libre lo convierte en una elección excelente para usuarios, administradores de sistemas y desarrolladores.
Recomendaciones finales para quienes consideran usar Debian
Debian es ideal para aquellos que valoran la estabilidad sobre la última tecnología y están dispuestos a invertir tiempo en aprender sobre su gestión y mantenimiento.
10. Preguntas Frecuentes (FAQ)
¿Debian es adecuado para principiantes?
Aunque Debian es más técnico que distribuciones como Ubuntu, es accesible para principiantes con paciencia y disposición para aprender.
¿Cómo actualizo mi sistema Debian?
Ejecutando sudo apt update && sudo apt upgrade mantendrás tu sistema actualizado.
¿Es Debian una buena opción para servidores?
Sí, Debian es muy utilizado en servidores debido a su estabilidad, seguridad y soporte a largo plazo.
#Debian#distribución Linux#Linux#servidor Debian#instalación Debian#software libre#GNOME#KDE#APT#gestión de paquetes#Debian Stable#Debian Testing#Debian Sid#comunidad Debian#recursos Debian#seguridad en Debian#soporte a largo plazo#Debian vs Ubuntu#Debian vs CentOS#Debian vs Arch Linux#formatos de paquetes#.deb#.appimage#.snap#.flatpak
11 notes
·
View notes
Text
Price Comparison: DigitalOcean vs. Linode vs. Vultr vs. Amazon Lightsail vs. SSD Nodes vs. Many Others
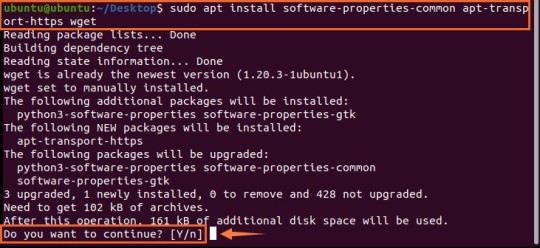
Whew! That's quite a tough headline to swallow. But choosing the right cloud hosting provider for your next virtual private server (VPS) shouldn't be difficult, too. Sometimes, it just comes down to price. Whether you're a cash-strapped student or just someone who wants to run a few essential applications without emptying our your wallet, you're in luck—there are a lot of low-cost options these days. That's why we're breaking down a bunch of 1GB RAM KVM plans in this new cloud hosting price comparison.
An unmanaged hosting service means that you have to install applications and administer the server yourself. KVM offers more flexibility than other options, like OpenVZ, but comes at a slight cost increase. Still, we recommend KVM for most users. At the very least, each of these providers offers Ubuntu, Debian, and CentOS. Read more...
2 notes
·
View notes
Text
Red Hat Enterprise Linux
Red Hat Linux was one of the most popular Linux distributions (distros) for both servers and desktops before it was discontinued. It played a key role in the development of Linux as a mainstream operating system. Here's a breakdown of Red Hat Linux and its modern successor:
1. Red Hat Linux (1994–2004):
Initial Release: Red Hat Linux was first released in 1994 by Red Hat, Inc., founded by Marc Ewing and Bob Young. It became one of the most widely used distributions, known for its stability and reliability, which made it popular in enterprise environments.
Package Management: It used the Red Hat Package Manager (RPM) format for installing and managing software, which became one of the most common package management systems in the Linux world.
Discontinuation: Red Hat discontinued Red Hat Linux in 2004, transitioning to a more enterprise-focused distribution—Red Hat Enterprise Linux (RHEL).
2. Red Hat Enterprise Linux (RHEL):
Enterprise-Focused: RHEL was launched to focus on businesses and large organizations. It is a paid, subscription-based Linux distribution that offers long-term support, regular security updates, and extensive hardware certification.
Key Features:
Stability: RHEL is designed for mission-critical environments, ensuring a stable platform for servers, databases, and applications.
Security: Features like SELinux (Security-Enhanced Linux) provide an additional layer of security for enterprise environments.
Long-Term Support: Each major version of RHEL is supported for around 10 years (with 5 years of full support and 5 years of maintenance support).
Software Repositories: RHEL includes official repositories containing enterprise-grade software and has commercial support from Red Hat.
RHEL vs. Fedora vs. CentOS:
Fedora: This is the upstream, community-driven version that serves as a testing ground for RHEL features.
CentOS: CentOS was originally a free, community-supported clone of RHEL. However, Red Hat shifted its focus in late 2020 to CentOS Stream, which serves as a rolling-release version that is positioned between Fedora and RHEL.
3. Modern Usage:
RHEL is widely used in enterprise environments, especially for web servers, application servers, cloud computing, and more. Red Hat also offers a variety of tools and services around RHEL, including automation, containerization (via OpenShift), and Kubernetes support.
4. Red Hat's Role in the Linux Ecosystem:
Open Source Commitment: Red Hat has been a significant contributor to the open-source community, funding many projects and sponsoring key development initiatives.
Acquisition by IBM: In 2019, IBM acquired Red Hat for $34 billion, further strengthening Red Hat's position as a leader in enterprise Linux solutions.
5. Alternatives:
Other Linux Distros: While Red Hat (and its enterprise variants) is quite popular, there are many alternatives such as Ubuntu, Debian, SUSE, and Arch Linux, each with different goals, community support, and use cases.
for more details please visit
www.qcsdclabs.com,
www.hawkstack.com
0 notes
Text
Rhel Docker

Rhel Docker
Rhel Docker Ce
Rhel Docker
Rhel Docker Ce
The Remote - Containers extension lets you use a Docker container as a full-featured development environment. Whether you deploy to containers or not, containers make a great development environment because you can:
Develop with a consistent, easily reproducible toolchain on the same operating system you deploy to.
Quickly swap between different, isolated development environments and safely make updates without worrying about impacting your local machine.
Make it easy for new team members / contributors to get up and running in a consistent development environment.
Try out new technologies or clone a copy of a code base without impacting your local setup.
Rhel Docker
Rhel Docker Ce
The extension starts (or attaches to) a development container running a well defined tool and runtime stack. Workspace files can be mounted into the container from the local file system, or copied or cloned into it once the container is running. Extensions are installed and run inside the container where they have full access to the tools, platform, and file system.
Rhel Docker
Amazon Web Services (AWS) and Red Hat provide a complete, enterprise-class computing environment. Red Hat solutions on AWS give customers the ability to run enterprise traditional on-premises applications, such as SAP, Oracle databases, and custom applications in the cloud.
Windows 10 Home (2004+) requires Docker Desktop 2.2+ and the WSL2 back-end. (Docker Toolbox is not supported.) macOS: Docker Desktop 2.0+. Linux: Docker CE/EE 18.06+ and Docker Compose 1.21+. (The Ubuntu snap package is not supported.) Containers: x8664 / ARMv7l (AArch32) / ARMv8l (AArch64) Debian 9+, Ubuntu 16.04+, CentOS / RHEL 7+ x8664.
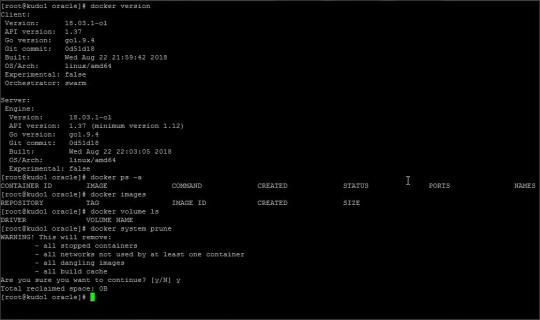
Docker volumes allow you to back up, restore, and migrate data easily. This tutorial explains what a Docker volume is and how to use it, as well as how to mount a volume in Docker.
Amazon Web Services (AWS) and Red Hat provide a complete, enterprise-class computing environment. Red Hat solutions on AWS give customers the ability to run enterprise traditional on-premises applications, such as SAP, Oracle databases, and custom applications in the cloud.
You then work with VS Code as if everything were running locally on your machine, except now they are isolated inside a container.
System Requirements
Local:
Windows:Docker Desktop 2.0+ on Windows 10 Pro/Enterprise. Windows 10 Home (2004+) requires Docker Desktop 2.2+ and the WSL2 back-end. (Docker Toolbox is not supported.)
macOS: Docker Desktop 2.0+.
Linux: Docker CE/EE 18.06+ and Docker Compose 1.21+. (The Ubuntu snap package is not supported.)
Containers:
x86_64 / ARMv7l (AArch32) / ARMv8l (AArch64) Debian 9+, Ubuntu 16.04+, CentOS / RHEL 7+
x86_64 Alpine Linux 3.9+
Other glibc based Linux containers may work if they have needed prerequisites.
While ARMv7l (AArch32), ARMv8l (AArch64), and musl based Alpine Linux support is available, some extensions installed on these devices may not work due to the use of glibc or x86 compiled native code in the extension. See the Remote Development with Linux article for details.
Note that while the Docker CLI is required, the Docker daemon/service does not need to be running locally if you are using a remote Docker host.
Installation
To get started, follow these steps:
Install VS Code or VS Code Insiders and this extension.
Install and configure Docker for your operating system.
Windows / macOS:
Install Docker Desktop for Mac/Windows.
If not using WSL2 on Windows, right-click on the Docker task bar item, select Settings / Preferences and update Resources > File Sharing with any locations your source code is kept. See tips and tricks for troubleshooting.
To enable the Windows WSL2 back-end: Right-click on the Docker taskbar item and select Settings. Check Use the WSL2 based engine and verify your distribution is enabled under Resources > WSL Integration.
Linux:
Follow the official install instructions for Docker CE/EE. If you use Docker Compose, follow the Docker Compose install directions.
Add your user to the docker group by using a terminal to run: sudo usermod -aG docker $USER Sign out and back in again so this setting takes effect.
Rhel Docker Ce
Working with Git? Here are two tips to consider:
If you are working with the same repository folder in a container and Windows, be sure to set up consistent line endings. See tips and tricks to learn how.
If you clone using a Git credential manager, your container should already have access to your credentials! If you use SSH keys, you can also opt-in to sharing them. See Sharing Git credentials with your container for details.
Getting started
Follow the step-by-step tutorial or if you are comfortable with Docker, follow these four steps:
Follow the installation steps above.
Clone https://github.com/Microsoft/vscode-remote-try-node locally.
Start VS Code
Run the Remote-Containers: Open Folder in Container... command and select the local folder.
Check out the repository README for things to try. Next, learn how you can:
Use a container as your full-time environment - Open an existing folder in a container for use as your full-time development environment in few easy steps. Works with both container and non-container deployed projects.
Attach to a running container - Attach to a running container for quick edits, debugging, and triaging.
Advanced: Use a remote Docker host - Once you know the basics, learn how to use a remote Docker host if needed.
Available commands
Another way to learn what you can do with the extension is to browse the commands it provides. Press F1 to bring up the Command Palette and type in Remote-Containers for a full list of commands.
You can also click on the Remote 'Quick Access' status bar item to get a list of the most common commands.
For more information, please see the extension documentation.
Release Notes
While an optional install, this extension releases with VS Code. VS Code release notes include a summary of changes to all three Remote Development extensions with a link to detailed release notes.
As with VS Code itself, the extensions update during a development iteration with changes that are only available in VS Code Insiders Edition.
Questions, Feedback, Contributing
Have a question or feedback?
See the documentation or the troubleshooting guide.
Up-vote a feature or request a new one, search existing issues, or report a problem.
Contribute a development container definition for others to use
Contribute to our documentation
...and more. See our CONTRIBUTING guide for details.
Or connect with the community...
Telemetry
Visual Studio Code Remote - Containers and related extensions collect telemetry data to help us build a better experience working remotely from VS Code. We only collect data on which commands are executed. We do not collect any information about image names, paths, etc. The extension respects the telemetry.enableTelemetry setting which you can learn more about in the Visual Studio Code FAQ.
License
By downloading and using the Visual Studio Remote - Containers extension and its related components, you agree to the product license terms and privacy statement.
2 notes
·
View notes
Text
virtual server 8
Panels Available NEW interworx
Supports CentOS Allows for multiple Admin and User level access Includes unlimited accounts Fixed price of $12.00/month
Features NodeWorx (to manage a server) and SiteWorx (to manage a website, email, and databases). Interworx makes it easy to migrate from other control panels such as SiteWorx, cPanel, DirectAdmin, Ensim, and Plesk 7-8. cpanel
Supports CentOS and CloudLinux Only allows for single Admin and User level access The number of accounts is dependent on the tier type ? Starts at $8.88/month for Solo tier
Simplify the management of your website from one single dashboard. cPanel lets you upload and manage files, create email accounts, and check the statistics of your website (e.g. the amount of visitors). Supports cPanel to cPanel website migration. VPS Server Management
Simply select your preferred type of management during the purchase phase.
User-Responsible FREE (default)
Basic $10.00 /mo
Complete UPDATED $25.00 /mo Security enhancements ?
Quasar (CXS license installed)
Pulsar (Free CXS server scans upon request) Restore Server Failure ? $10.00
flat rate per each restore Core Software Changes ? 1 hr - $15.00
flat rate 1 hr - $10.00
flat rate Fix Server Failure Cause ? 1 hr - $15.00
flat rate 1 hr - $10.00
flat rate
Complete management includes the CXS license installation for the VPS Quasar plan only — due to the resource limitations of Pulsar plans. Free scans upon request are available for the Basic management and VPS Pulsar plan. A CXS license or scan can be ordered at an additional fee for User-Responsible plans. Learn more about CXS license →
Your business, your call Namecheap's VPS vs. VPS Competitors
The choice is clear. Namecheap - Quasar GoDaddy - Grow Bluehost - Enhanced Cores
4
3
2 RAM
6 GB
6 GB
4 GB Disk Space
120 GB
150 GB
60 GB Bandwidth
3000 GB
Unmetered
2000 GB Price
$19.88/mo
$44.99/mo
$59.99/mo VPS Hosting Features
Why it’s the right hosting option. Complete Customization Complete Customization
Depending on your level of technical expertise, your VPS is completely customizable. Get root access to your server, choose your Operating System (CentOS, Ubuntu or Debian), and decide if you want to install a cPanel. Top-Level Security Top-Level Security
Keep your “virtual” hosting environment in the safest of hands thanks to state-of-the-art hardware and software firewalls, alongside our internal security package. Routine server backups also mean further peace of mind. Beyond Fast Beyond Fast
Enjoy 20X faster storage with pure Solid State Drive (SSD) storage, designed to enhance performance over the traditional Hard Disk Drives (HDD) preferred by VPS competitors. The result? Significant improvements to your website's speed, performance, and loading times. World-Class Support World-Class Support
Have any questions, want to discuss your customization options or upgrade your Server Management? With Namecheap, you can count on us to help you out — no matter what. Tech Specs Monthly Quarterly Yearly
Pulsar
$9.88/mo
$11.88/mo
Quasar
$15.88/mo
$19.88/mo Plan Features CPU ?
2
4 RAM ?
2048 MB
6144 MB Disk Space ?
40 GB SSD Raid 10
120 GB SSD Raid 10 Bandwidth ?
1000 GB/mo
3000 GB/mo Uptime ?
99.9%
99.9% Backups ? 100 GB Backup Storage ?
Included with Complete Management
Included with Complete Management Dedicated IP ?
1 IPv4
Up to 2 IPv4 Access Level ?
Root / Reseller depending on Server Management type
Root / Reseller depending on Server Management type Customized Configuration ? Streaming Audio/Video ? Money-Back Guarantee ?
30 days
30 days No Contract Required ? Operating System Software Add-Ons Support Features Pricing Scales with Your Business Scales with Your Business
If your business scales in size, your VPS is ready to act. Easy scalability lets you start as small as you can afford and grow as you expand — whether that’s additional disk space, CPU power or bandwidth. Stay In Control Stay In Control
Since you don’t depend on your virtual neighbors, your resources are fully isolated in their virtual environment to allow you greater stability and performance. Whether it’s installing a custom application or configuration, you control exactly how your website is run. Power with the Right Prices Power with the Right Prices
Let your business skyrocket, not your budget. By offering you all the necessary resources at a lower cost, you only pay for what you actually need. namecheap logo Web PanelsmanagementUPDATEDcompetitor chartFeaturestech specsbenefits buy now Why Namecheap? Privacy and Security
Your online security and privacy come first at Namecheap, and we will always support the rights of individuals and consumers online. It’s our mission to keep the Internet open, free, and safe for everyone. Your Business Online
Boost your business with industry-premium products and services, at prices that won’t break your budget. If it doesn’t provide you with a better Internet experience, we simply don’t offer it. Customer Service
You’re covered by a Support Team that’s renowned for being one of the most knowledgeable, friendly, and professional in the business. Real people are ready to assist you with any issue, any time, 24/7. Frequently Asked Questions What is VPS Hosting? How do I set up VPS Hosting? How should I choose the right VPS Hosting plan for my website? Why should I choose VPS Hosting from Namecheap? What’s the difference between VPS Hosting, Shared Hosting, and Dedicated Server Hosting? Disclaimers
Only first-time VPS Hosting customers are eligible for our 30-day money-back guarantee. For example, if you previously created an account with Namecheap, subsequently canceled and signed up again, unfortunately, you are ineligible for a refund. The same scenario applies to those who have already opened a second Namecheap account. Namecheap does not charge an additional fee to transfer an existing website and/or a VPS. Please note that a cPanel to cPanel transfer is fully supported while other transfer options may need to be checked by our Technical Team. The details in the comparison table were correct as of September, 2019 and the information for each competitor may not include certain features, functionalities or quantities and is subject to change. The number of cPanel accounts you can create is dependent on your tier type. Learn more about our tier-based cPanel pricing → By default, the latest stable OS template version is installed. If you prefer to change this OS to another template, please do so using your Solus VM management panel. Learn more →d=0
1 note
·
View note
Text
Disponible el octavo número de la revista digital SoloLinux #KDE
Hubo un tiempo en que las revistas sobre Linux digitales estuvieron de moda en el blog. Tenemos todavía a Atix, que continua con sus publicaciones (lo cual me alegra) y Full Circle Magazine (en inglés, gracias Vampiro Nocturno), y antes teníamos a Linux+, Papirux, Begins o TuxInfo, por citar algunas discontinuadas. Hoy me congratula compartir que ya está disponible el octavo número de la revista digital SoloLinux. Hora de promocionarlo un poco y leerla con detenimiento.
Disponible el octavo número de la revista digital SoloLinux
Fiel a su cita mensual, la revista digital SoloLinux lanza su octavo número, el cual llega cargado de manuales, artículos, novedades y trucos, con lo que seguro que encontráis alguna página para leer y conservar para futuras búsquedas.
El índice es el siguiente:
MANUALES Instalar CentOS 8 paso a paso con imágenes Instalar GKSu en Ubuntu 18.04, 18.10, 19.04 y derivados Instalar un servidor Lighttpd en CentOS 7 Instalar la ultima versión de LibreOffice en Linux Sincronizar la hora con tu zona horaria en CentOS 7 Modificar el GRUB con GRUO CUSTOMIZER Instalar Debian 10 Buster en imágenes Instalar y configurar Samba en Ubuntu Iniciar, detener, reiniciar, habilitar y deshabilitar Apache en Linux Borrar archivos y carpetas con el comando rm Qué es y como borrar un enlace simbólico Solución al error, perl: warning: Setting locale failed Instalar PHP 7.4 en Ubuntu con Apache Instalar PHP-FPM 7.4 en Ubuntu con NGINX Permitir el acceso remoto a MariaDB en Ubuntu Configurar NGINX como proxy inverso Iniciar sesión en terminal como root de forma predeterminada Instalar la última versión de nano Monitorizar una red con el comando ss Instalar KDE Plasma en Ubuntu y Linux Mint Instalar Manjaro 18.1 en imágenes Como degradar el kernel linux
SCRIPTS Incluir un script bash en otro script bash Mostrar archivos GIF en la terminal de Ubuntu
HARDWARE Y SOFTWARE
Las mejores alternativas a Rufus en Linux Establecer cuotas de disco en CentOS 7 Manual y comandos RAID Tamaño de la unidad de asignación al formatear un disco Snap vs Flatpak Instalar Java en Debian 10
SEGURIDAD Y REDES Desactivar la firma de un servidor Apache en CentOS 7
NOTICIAS Skidmap: el malware para linux
DISTRIBUCIONES LINUX
Descargar versiones antiguas de Debían Kali Linux 2019.3 – Novedades y descarga CentOS 8 – Listo para descargar
OPINIÓN DE LOS LECTORES Ramiro. Mar del Plata. Argentina. Fernando Villagra
EVENTOS Evento LYT19 RESULTADOS DEL SORTEO
La revista puede ser descargada o simplemente visualizarla en línea, ya que se cuelga en diferente servicios como Calameo. A continuación os dejo los enlaces de descarga y visualización directa de los cuatro primeros números.
Descarga:
Sololinux #1 Febrero 2019
Sololinux #2 Marzo 2019
Sololinux #3 Abril 2019
Sololinux #4 Mayo 2019
Sololinux #5 Junio 2019
Sololinux #6 Julio 2019
Sololinux #7 Agosto 2019
Sololinux #8 Septiembre 2019
Visualización directa:
Sololinux #1 Febrero 2019
Sololinux #2 Marzo 2019
Sololinux #3 Abril 2019
Sololinux #4 Mayo 2019
Sololinux #5 Junio 2019
Sololinux #6 Julio 2019
Sololinux #7 Agosto 2019
Sololinux #8 Septiembre 2019
Evidentemente, este proyecto no se centra en exclusivo a los contenidos de su web y está abierto a colaboraciones de todo tipo. De esta forma si estas interesado en insertar publicidad en nuestra revista, o quieres que publiquemos algún articulo que hayas escrito tu mismo, puedes contactar con «Adrián» por correo electrónico.
Muchos ánimos en este nuevo proyecto ya que facilita la difusión del Software Libre de una forma que ya no es tan habitual en estos tiempos pero que es igual de válida.
from Disponible el octavo número de la revista digital SoloLinux
2 notes
·
View notes
Text
macOS is an operating system that runs on every Mac. It was previously named Mac OS X and later OS X. MacOS was developed and marketed by Apple Inc from 2001. MacOS succeeded classic MacOS, a macintosh operating system with nine releases from 1984 to 1999. The first desktop version of macOS X was 10.0, released in 2001 and an update 10.1 coming a year later. Apple in 2012 shortened the name “macOS X” to “OS X” then later in 2016 changed it to macOS in order to align with other Apple’s operating systems i.e iOS, watchOS, and tvOS. The sixteenth version of macOS (10.15) was called macOS Catalina which was the first version of macOS to support 64-bit applications and also the first to include Activation Lock. After these 16 distinct versions of macOS 10 came macOS Big Sur (version 11) in 2020 and macOS Monterey in 2021. You can check out detailed article on macOS Big Sur vs Catalina. macOS Mojave has the following major features: Has the dark mode. Supports desktop stacks Has dynamic desktops Has improved OS and Safari security screenshot markup Continuity camera In this guide, I will demonstrate how to install macOS Catalina & Big Sur on VirtualBox. macOS installation on VirtualBox requirements The following are macOS installation requirements on Virtualbox. Primary display resolutions supported are 5120×2880, 2880×1800, 2560×1600, 2560×1440, 1920×1200, 1600×1200, 1680×1050, 1440×900, 1280×800, 1024×768, 640×480 VirtualBox version 5.2 and above. RAM above 4 GB Storage size above 25 GB. icloud and imessage connectivity and NVRAM Step 1: Install required Dependencies There are several dependencies required when installing macOS on VirtualBox. These are Wget, Coreutils, dmg2img, xxd, bash-completion, gzip and unzip ### RHEL/ Centos 8/ Rocky Linux 8 / Fedora ### sudo dnf install wget coreutils vim-common p7zip p7zip-plugins bash-completion gzip unzip #### Debian/Ubuntu ### sudo apt-get install wget coreutils dmg2img xxd bash-completion gzip unzip ### macOS ### brew install wget bash-completion gzip unzip brew install coreutils dmg2img Step 2: Download and Install macOS on Virtualbox We will proceed and install macOS Catalina on VirtualBox using the push-button installer. Here we will download macos-guest-virtualbox.sh using Wget as below. ### With curl ### curl -sLO https://raw.githubusercontent.com/myspaghetti/macos-guest-virtualbox/master/macos-guest-virtualbox.sh ### With wget ### wget https://raw.githubusercontent.com/myspaghetti/macos-guest-virtualbox/master/macos-guest-virtualbox.sh Then make the file executable. chmod +x macos-guest-virtualbox.sh Then proceed and install as below: ./macos-guest-virtualbox.sh Sample Output: Push-button installer of macOS on VirtualBox This script installs only open-source software and unmodified Apple binaries, and requires about 50GB of available storage, of which 25GB are for temporary installation files that may be deleted when the script is finished. The script interacts with the virtual machine twice, please do not interact with the virtual machine manually before the script is finished. Documentation about optional configuration, iCloud and iMessage connectivity, resuming the script by stages, and other topics can be viewed with the following command: ./macos-guest-virtualbox.sh documentation | less -R Press enter to review the script configuration vm_name="macOS" macOS_release_name="Catalina" # install "HighSierra" "Mojave" "Catalina" storage_size=80000 # VM disk image size in MB, minimum 22000 storage_format="vdi" # VM disk image file format, "vdi" or "vmdk" cpu_count=2 # VM CPU cores, minimum 2 memory_size=4096 # VM RAM in MB, minimum 2048 gpu_vram=128 # VM video RAM in MB, minimum 34, maximum 128 resolution="1280x800" # VM display resolution These values may be customized as described in the documentation.
Press enter to continue, CTRL-C to exit You will be asked to press enter to review the script configuration, this gives the specifications of the VM to be created in VirtualBox such as the VM name, disk size the OS to be run e.t.c. Continue by pressing enter. The installation starts as below; Checking that VirtualBox starts the virtual machine without errors. Checking that VirtualBox uses hardware-supported virtualization. stage: prepare_macos_installation_files Downloading Apple macOS Catalina software update catalog Catalina_sucatalog 100%[===================>] 6.43M 4.34MB/s in 1.5s Trying to find macOS Catalina InstallAssistant download URL Catalina_sucatalog_ 100%[===================>] 40.05K --.-KB/s in 0.02s Found download URL: http://swcdn.apple.com/content/downloads/26/37/001-68446/r1dbqtmf3mtpikjnd04cq31p4jk91dceh8/ ......... This opens and closes VirtualBox as it is checking and creating the macOS VM on it. Wait patiently for the downloading files to finish Downloading macOS installation files from swcdn.apple.com Catalina_BaseSystem 100%[===================>] 1.97K --.-KB/s in 0s Catalina_InstallInf 100%[===================>] 1.55K --.-KB/s in 0s Catalina_AppleDiagn 100%[===================>] 3.00M 2.73MB/s in 1.1s Catalina_AppleDiagn 100%[===================>] 328 --.-KB/s in 0s Catalina_BaseSystem 100%[===================>] 475.53M 2.28MB/s in 3m 56s Catalina_InstallESD 100%[===================>] 7.21G 2.23MB/s in 54m 42s With a successful download of the above files, the macOS Catalina installation begins. Splitting the several-GB InstallESDDmg.pkg into 1GB parts because VirtualBox hasn't implemented UDF/HFS VISO support yet and macOS doesn't support ISO 9660 Level 3 with files larger than 2GB. creating file 'Catalina_InstallESD.part00' creating file 'Catalina_InstallESD.part01' creating file 'Catalina_InstallESD.part02' creating file 'Catalina_InstallESD.part03' creating file 'Catalina_InstallESD.part04' creating file 'Catalina_InstallESD.part05' creating file 'Catalina_InstallESD.part06' creating file 'Catalina_InstallESD.part07' .... Creating VirtualBox 6 virtual ISO containing macOS Terminal script for partitioning and populating the bootable installer virtual disk. Starting virtual machine "macOS". This should take a couple of minutes. If booting fails, exit the script by pressing CTRL-C then see the documentation for information about applying different CPU profiles in the section CPU profiles and CPUID settings. Until the script completes, please do not manually interact with the virtual machine. Press enter when the Language window is ready. While at this step, VirtualBox is launched and you will see the created macOS running. When it has finished loading, you will see the language menu. When you see this language menu on VirtualBox, go back to your terminal and press enter, do not select anything. Next, you will see the macOS Utilities window. When you see it on VirtualBox, go back to the terminal and press enter. The next window you will see is the Terminal command prompt. Press enter on the terminal when you see it appear on VirtualBox. Wait patiently until disk partitioning is done. This happens on the VirtualBox Terminal command prompt. When this is complete, the macOS VM reboots and the process repeats itself. You are required to do similar actions as above (pressing enter on the terminal after seeing the displayed item) On completion, you will see this on your terminal. After the installer finishes preparing and the EFI and NVRAM files are copied, macOS will install and boot up when booting the target disk. Please wait For further information, such as applying EFI and NVRAM variables to enable iMessage connectivity, see the documentation with the following command: ./macos-guest-virtualbox.sh documentation | less -R
That's it! Enjoy your virtual machine. stage: prompt_delete_temporary_files Temporary files may be deleted when the virtual machine is powered off and without a suspended state by executing the following command at the script's working directory: ./macos-guest-virtualbox.sh prompt_delete_temporary_files In the mean time installation is on going on VirtualBox terminal window prompt. When it is complete, the system reboots but takes quite sometime. Step 3: Set up macOS Catalina on VirtualBox When the system finishes loading, you will see this window. Here select your country. Then select your prefered language and keyboard, the prefered language and keyboard for the Country you set is already given, although you can edit by clicking customize settings Then next, you will see this privacy settings window. The next step is choosing whether to transfer files from another mac or not. Then log in to your apple account. Here enter your account ID/email address and password You will be required to give the code sent to your device. If you see this error at this point, just skip and log in to the apple account after completing this setup. Next, agree to the License terms. Now, create a user account and password. Finish up with the express setup and analytics page. The settings made are then applied. Now we have successfully installed macOS Catalina on VirtualBox. Step 4: Upgrade from macOS Catalina to Big Sur Navigate to System preferences> Software Update. This will automatically start checking for macOS Big Sur Beta version update With the update found (macOS Big Sur) click on Upgrade now. This starts downloading the macOS Big Sur. Remember this process might take some time depending on your internet speed. When the download is complete, you will see this pop-up Click continue and install macOS Big Sur. Agree with the terms and conditions. Agree the new Big Sur to be installed on your VM’s hard disk. Enter your password to authorize this installation. The installation starts. This might take few minutes. When complete, restart the system. This takes some time as the system is still doing Big Sur installation. Wait patiently. Step 5: Delete Temporary Files After Installation Power off the Virtual Machine and delete temporary files using your client machine terminal. ./macos-guest-virtualbox.sh prompt_delete_temporary_files Accept the files to be deleted: Catalina selected to be downloaded and installed stage: prompt_delete_temporary_files The following temporary files are safe to delete: ApfsDriverLoader.efi AppleImageLoader.efi AppleSupport-v2.0.4-RELEASE.zip AppleUiSupport.efi Catalina_AppleDiagnostics.chunklist Catalina_AppleDiagnostics.dmg Catalina_BaseSystem.chunklist Catalina_BaseSystem.dmg Catalina_BaseSystem.vdi Catalina_bootable_installer.vdi Catalina_installation_files.viso Catalina_InstallESDDmg.pkg Catalina_InstallESD.part00 Catalina_InstallESD.part01 Catalina_InstallESD.part02 Catalina_InstallESD.part03 Catalina_InstallESD.part04 Catalina_InstallESD.part05 Catalina_InstallESD.part06 Catalina_InstallESD.part07 Catalina_InstallInfo.plist macOS_bootinst.txt macOS_configure_nvram.txt macOS_csr-active-config.bin macOS_MLB.bin macOS_populate_bootable_installer_virtual_disk.viso macOS_populate_macos_target_disk.viso macOS_ROM.bin macOS_startosinstall.txt macOS_startup.nsh macOS_system-id.bin Delete temporary files listed above? [y/N] y Now power on your macOS VM and enjoy! Conclusion In the above article, I have demonstrated how to install macOS Catalina & Big Sur on VirtualBox. I hope this article was of value to you.
0 notes
Text
Guía Integral para la Selección de Distribuciones Linux: Todo lo que Necesita Saber
1. Introducción
Breve introducción al mundo Linux
Linux es un sistema operativo de código abierto que se ha convertido en una base sólida para una amplia variedad de distribuciones, cada una adaptada a diferentes necesidades y usuarios.
Importancia de escoger la distribución adecuada
La elección de la distribución Linux correcta puede mejorar considerablemente la experiencia del usuario. Esta decisión afecta la facilidad de uso, la estabilidad del sistema, y la disponibilidad de software, entre otros factores.
2. ¿Qué es una Distribución Linux?
Definición de distribución Linux
Una distribución Linux es un sistema operativo compuesto por el kernel de Linux, software del sistema y aplicaciones, todo empaquetado para ofrecer una experiencia específica al usuario.
Componentes clave de una distribución
Kernel de Linux: El núcleo que interactúa directamente con el hardware.
Entorno de escritorio: La interfaz gráfica (Gnome, KDE, Xfce, etc.).
Gestores de paquetes: Herramientas para instalar, actualizar y gestionar software (APT, YUM, Pacman, etc.).
Cómo surgen las diferentes distribuciones
Las distribuciones Linux suelen derivarse de bases comunes como Debian, Red Hat o Arch, adaptadas para cumplir con diferentes filosofías, niveles de estabilidad y propósitos.
3. Tipos de Distribuciones Linux
Distribuciones basadas en Debian
Características principales: Estabilidad, gran comunidad, soporte a largo plazo.
Ejemplos populares: Ubuntu, Linux Mint.
Distribuciones basadas en Red Hat
Características principales: Orientación empresarial, robustez, soporte comercial.
Ejemplos populares: Fedora, CentOS, RHEL.
Distribuciones basadas en Arch
Características principales: Personalización, simplicidad, enfoque en el usuario avanzado.
Ejemplos populares: Arch Linux, Manjaro.
Distribuciones especializadas
Para servidores: CentOS, Ubuntu Server.
Para hardware antiguo: Puppy Linux, Lubuntu.
Para seguridad: Kali Linux, Parrot OS.
Para desarrolladores: Pop!_OS, Fedora Workstation.
4. Factores Clave a Considerar al Escoger una Distribución
Experiencia del usuario
Algunas distribuciones están diseñadas para ser amigables y fáciles de usar (ej. Linux Mint), mientras que otras requieren conocimientos avanzados (ej. Arch Linux).
Compatibilidad de hardware
Es crucial asegurarse de que la distribución sea compatible con el hardware disponible, especialmente en computadoras más antiguas.
Gestión de paquetes
La simplicidad en la instalación y actualización del software es esencial, y aquí es donde entran los gestores de paquetes.
Frecuencia de actualizaciones
Rolling release (actualizaciones continuas, como en Arch Linux) vs. release fijas (ciclos estables, como en Ubuntu).
Entorno de escritorio
El entorno de escritorio afecta la experiencia visual y funcional del usuario. GNOME, KDE, y Xfce son algunos de los más comunes.
Uso previsto
Dependiendo de si el sistema se usará para tareas de oficina, desarrollo, servidores, o seguridad, se debe elegir una distribución acorde.
5. Guía Comparativa de Distribuciones Populares
Ubuntu vs. Fedora
Objetivo: Ubuntu se centra en la facilidad de uso para el usuario final, mientras que Fedora impulsa la adopción de tecnologías más recientes y es una base para Red Hat.
Filosofía: Ubuntu se basa en la simplicidad y accesibilidad, mientras que Fedora sigue la filosofía de "Freedom, Friends, Features, First" (Libertad, Amigos, Características, Primero), priorizando la innovación.
Debian vs. Arch Linux
Objetivo: Debian prioriza la estabilidad y seguridad, siendo ideal para servidores, mientras que Arch Linux es para usuarios que desean un sistema personalizado y actualizado constantemente.
Filosofía: Debian se adhiere a la filosofía de software libre y estabilidad, mientras que Arch sigue el principio de "Keep It Simple, Stupid" (KISS), ofreciendo un sistema base para construir según las necesidades del usuario.
Kali Linux vs. Ubuntu
Objetivo: Kali Linux está diseñado para pruebas de penetración y auditorías de seguridad, mientras que Ubuntu es una distribución generalista para uso en escritorio.
Filosofía: Kali Linux sigue una filosofía de seguridad y especialización extrema, mientras que Ubuntu promueve una experiencia accesible y amigable para todos.
Manjaro vs. CentOS
Objetivo: Manjaro busca combinar la personalización de Arch con la facilidad de uso, mientras que CentOS es una opción estable y robusta para servidores.
Filosofía: Manjaro es para usuarios que desean la última tecnología con una curva de aprendizaje más accesible, mientras que CentOS sigue una filosofía de estabilidad y durabilidad a largo plazo en entornos empresariales.
6. Cómo Instalar y Probar Distribuciones Linux
Métodos para probar distribuciones
Live USB/CD: Permite ejecutar la distribución sin instalarla.
Máquina virtual: Usar software como VirtualBox o VMware para probar distribuciones sin modificar tu sistema principal.
Guía paso a paso para instalar una distribución
Preparación del medio de instalación: Crear un USB booteable con herramientas como Rufus o Etcher.
Configuración del sistema durante la instalación: Configurar particiones, seleccionar el entorno de escritorio y el gestor de arranque.
Post-instalación: Actualizar el sistema, instalar controladores, y personalizar el entorno.
7. Distribuciones Recomendadas para Diferentes Usuarios
Principiantes: Ubuntu, Linux Mint.
Usuarios intermedios: Fedora, Manjaro.
Usuarios avanzados: Arch Linux, Debian.
Administradores de servidores: CentOS, Ubuntu Server.
Desarrolladores y profesionales IT: Fedora, Pop!_OS.
Entusiastas de la seguridad: Kali Linux, Parrot OS.
8. Conclusión
Resumen de los puntos clave
Elegir una distribución Linux adecuada depende de varios factores, incluyendo la experiencia del usuario, el propósito del uso, y las preferencias personales.
Recomendaciones finales
Experimentar con diferentes distribuciones utilizando métodos como Live USB o máquinas virtuales es crucial para encontrar la que mejor se adapte a tus necesidades.
Llamada a la acción
Te invitamos a probar algunas de las distribuciones mencionadas y unirte a la comunidad de Linux para seguir aprendiendo y compartiendo.
9. Glosario de Términos
Kernel: El núcleo del sistema operativo que gestiona la comunicación entre el hardware y el software.
Entorno de escritorio: La interfaz gráfica que permite interactuar con el sistema operativo.
Gestor de paquetes: Herramienta que facilita la instalación y gestión de software en una distribución Linux.
Rolling release: Modelo de desarrollo en el cual el software se actualiza continuamente sin necesidad de versiones mayores.
Fork: Un proyecto derivado de otro, pero que sigue su propio camino de desarrollo.
10. FAQ (Preguntas Frecuentes)
¿Cuál es la mejor distribución para un principiante?
Ubuntu o Linux Mint suelen ser las mejores opciones para nuevos usuarios.
¿Puedo instalar Linux junto a Windows?
Sí, puedes instalar Linux en dual-boot para elegir entre ambos sistemas al iniciar la computadora.
¿Qué distribución es mejor para un servidor?
CentOS y Ubuntu Server son opciones populares para servidores.
¿Qué es una distribución rolling release?
Es un tipo de distribución que se actualiza de manera continua sin necesidad de esperar versiones nuevas.
#Linux#distribuciones Linux#Ubuntu#Fedora#Debian#Arch Linux#Manjaro#Linux Mint#Kali Linux#CentOS#Ubuntu Server#distribución rolling release#gestores de paquetes#entornos de escritorio#software libre#instalación de Linux#tutoriales Linux#comunidad Linux#recursos Linux#foros Linux#blogs de Linux#seguridad en Linux
4 notes
·
View notes
Text
Visual Studio Code Apt

Visit the VS Code install page and select the 32 or 64 bit installer. Install Visual Studio Code on Windows (not in your WSL file system). When prompted to Select Additional Tasks during installation, be sure to check the Add to PATH option so you can easily open a folder in WSL using the code command. Visual Studio Code is a free and open-source, cross-platform IDE or code editor that enables developers to develop applications and write code using a myriad of programming languages such as C, C, Python, Go and Java to mention a few. To Install Visual Studio Code on Debian, Ubuntu and Linux Mint: 1. Update your system by running the command. Introduction to Visual Studio Code. Introduction to Visual Studio Code. Skip to Content Current Page: Blog About Contact FAQs. Now, to install the Visual Studio Code DEB package file, run the APT command as follows. $ sudo apt install. / code.deb The APT package manager should start installing the DEB package file. At this point, Visual Studio Code should be installed.
Visual Studio Code Apt
Visual Studio Code Apt Install
Apt Remove Visual Studio Code
Installation
See the Download Visual Studio Code page for a complete list of available installation options.
By downloading and using Visual Studio Code, you agree to the license terms and privacy statement.
Snap
Visual Studio Code is officially distributed as a Snap package in the Snap Store:
You can install it by running:
Once installed, the Snap daemon will take care of automatically updating VS Code in the background. You will get an in-product update notification whenever a new update is available.
Note: If snap isn't available in your Linux distribution, please check the following Installing snapd guide, which can help you get that set up.
Learn more about snaps from the official Snap Documentation.
Debian and Ubuntu based distributions
The easiest way to install Visual Studio Code for Debian/Ubuntu based distributions is to download and install the .deb package (64-bit), either through the graphical software center if it's available, or through the command line with:
Note that other binaries are also available on the VS Code download page.
Installing the .deb package will automatically install the apt repository and signing key to enable auto-updating using the system's package manager. Alternatively, the repository and key can also be installed manually with the following script:
Then update the package cache and install the package using:
RHEL, Fedora, and CentOS based distributions
We currently ship the stable 64-bit VS Code in a yum repository, the following script will install the key and repository:
Then update the package cache and install the package using dnf (Fedora 22 and above):
Or on older versions using yum:
Due to the manual signing process and the system we use to publish, the yum repo may lag behind and not get the latest version of VS Code immediately.
openSUSE and SLE-based distributions
The yum repository above also works for openSUSE and SLE-based systems, the following script will install the key and repository:
Then update the package cache and install the package using:
AUR package for Arch Linux
There is a community-maintained Arch User Repository package for VS Code.
To get more information about the installation from the AUR, please consult the following wiki entry: Install AUR Packages.
Nix package for NixOS (or any Linux distribution using Nix package manager)
There is a community maintained VS Code Nix package in the nixpkgs repository. In order to install it using Nix, set allowUnfree option to true in your config.nix and execute:
Installing .rpm package manually
The VS Code .rpm package (64-bit) can also be manually downloaded and installed, however, auto-updating won't work unless the repository above is installed. Once downloaded it can be installed using your package manager, for example with dnf:
Note that other binaries are also available on the VS Code download page.
Updates
VS Code ships monthly and you can see when a new release is available by checking the release notes. If the VS Code repository was installed correctly, then your system package manager should handle auto-updating in the same way as other packages on the system.
Note: Updates are automatic and run in the background for the Snap package.
Node.js
Node.js is a popular platform and runtime for easily building and running JavaScript applications. It also includes npm, a Package Manager for Node.js modules. You'll see Node.js and npm mentioned frequently in our documentation and some optional VS Code tooling requires Node.js (for example, the VS Code extension generator).
If you'd like to install Node.js on Linux, see Installing Node.js via package manager to find the Node.js package and installation instructions tailored to your Linux distribution. You can also install and support multiple versions of Node.js by using the Node Version Manager.
To learn more about JavaScript and Node.js, see our Node.js tutorial, where you'll learn about running and debugging Node.js applications with VS Code.
Setting VS Code as the default text editor
xdg-open
You can set the default text editor for text files (text/plain) that is used by xdg-open with the following command:
Debian alternatives system
Debian-based distributions allow setting a default editor using the Debian alternatives system, without concern for the MIME type. You can set this by running the following and selecting code:
If Visual Studio Code doesn't show up as an alternative to editor, you need to register it:
Windows as a Linux developer machine
Another option for Linux development with VS Code is to use a Windows machine with the Windows Subsystem for Linux (WSL).
Windows Subsystem for Linux
Visual Studio Code Apt
With WSL, you can install and run Linux distributions on Windows. This enables you to develop and test your source code on Linux while still working locally on a Windows machine. WSL supports Linux distributions such as Ubuntu, Debian, SUSE, and Alpine available from the Microsoft Store.
When coupled with the Remote - WSL extension, you get full VS Code editing and debugging support while running in the context of a Linux distro on WSL.
See the Developing in WSL documentation to learn more or try the Working in WSL introductory tutorial.
Next steps
Once you have installed VS Code, these topics will help you learn more about it:
Additional Components - Learn how to install Git, Node.js, TypeScript, and tools like Yeoman.
User Interface - A quick orientation to VS Code.
User/Workspace Settings - Learn how to configure VS Code to your preferences through settings.
Common questions
Azure VM Issues
I'm getting a 'Running without the SUID sandbox' error?
You can safely ignore this error.
Debian and moving files to trash
If you see an error when deleting files from the VS Code Explorer on the Debian operating system, it might be because the trash implementation that VS Code is using is not there.
Run these commands to solve this issue:
Conflicts with VS Code packages from other repositories
Some distributions, for example Pop!_OS provide their own code package. To ensure the official VS Code repository is used, create a file named /etc/apt/preferences.d/code with the following content:
'Visual Studio Code is unable to watch for file changes in this large workspace' (error ENOSPC)
When you see this notification, it indicates that the VS Code file watcher is running out of handles because the workspace is large and contains many files. Before adjusting platform limits, make sure that potentially large folders, such as Python .venv, are added to the files.watcherExclude setting (more details below). The current limit can be viewed by running:
The limit can be increased to its maximum by editing /etc/sysctl.conf (except on Arch Linux, read below) and adding this line to the end of the file:
The new value can then be loaded in by running sudo sysctl -p.
While 524,288 is the maximum number of files that can be watched, if you're in an environment that is particularly memory constrained, you may wish to lower the number. Each file watch takes up 1080 bytes, so assuming that all 524,288 watches are consumed, that results in an upper bound of around 540 MiB.
Arch-based distros (including Manjaro) require you to change a different file; follow these steps instead.
Another option is to exclude specific workspace directories from the VS Code file watcher with the files.watcherExcludesetting. The default for files.watcherExclude excludes node_modules and some folders under .git, but you can add other directories that you don't want VS Code to track.
I can't see Chinese characters in Ubuntu
We're working on a fix. In the meantime, open the application menu, then choose File > Preferences > Settings. In the Text Editor > Font section, set 'Font Family' to Droid Sans Mono, Droid Sans Fallback. If you'd rather edit the settings.json file directly, set editor.fontFamily as shown:
Package git is not installed
This error can appear during installation and is typically caused by the package manager's lists being out of date. Try updating them and installing again:
The code bin command does not bring the window to the foreground on Ubuntu
Running code . on Ubuntu when VS Code is already open in the current directory will not bring VS Code into the foreground. This is a feature of the OS which can be disabled using ccsm.
Under General > General Options > Focus & Raise Behaviour, set 'Focus Prevention Level' to 'Off'. Remember this is an OS-level setting that will apply to all applications, not just VS Code.
Visual Studio Code Apt Install
Cannot install .deb package due to '/etc/apt/sources.list.d/vscode.list: No such file or directory'

This can happen when sources.list.d doesn't exist or you don't have access to create the file. To fix this, try manually creating the folder and an empty vscode.list file:
Cannot move or resize the window while X forwarding a remote window
If you are using X forwarding to use VS Code remotely, you will need to use the native title bar to ensure you can properly manipulate the window. You can switch to using it by setting window.titleBarStyle to native.
Using the custom title bar
The custom title bar and menus were enabled by default on Linux for several months. The custom title bar has been a success on Windows, but the customer response on Linux suggests otherwise. Based on feedback, we have decided to make this setting opt-in on Linux and leave the native title bar as the default.
Apt Remove Visual Studio Code
The custom title bar provides many benefits including great theming support and better accessibility through keyboard navigation and screen readers. Unfortunately, these benefits do not translate as well to the Linux platform. Linux has a variety of desktop environments and window managers that can make the VS Code theming look foreign to users. For users needing the accessibility improvements, we recommend enabling the custom title bar when running in accessibility mode using a screen reader. You can still manually set the title bar with the Window: Title Bar Style (window.titleBarStyle) setting.
Broken cursor in editor with display scaling enabled
Due to an upstream issue #14787 with Electron, the mouse cursor may render incorrectly with scaling enabled. If you notice that the usual text cursor is not being rendered inside the editor as you would expect, try falling back to the native menu bar by configuring the setting window.titleBarStyle to native.
Repository changed its origin value
If you receive an error similar to the following:
Use apt instead of apt-get and you will be prompted to accept the origin change:
0 notes
Link
Gestore di pacchetti
Ubuntu ha ereditato il suo gestore di pacchetti APT (Advanced Package Tool) direttamente da Debian. APT è uno standard in tutti i sistemi derivati dalla distro universale e si tratta di un potente tool che permette anche, quando è necessario di forzare aggiornamenti e importazioni di chiavi di autenticazione. Chi ha dimestichezza con Debian si ritroverà a suo agio anche su Ubuntu visto in quanto vi sarà sempre APT a gestire i pacchetti.
CentOS è un clone di Redhat Enterprise Linux e sfrutta Yum (Yellow dog Update). Anche Yum viene largamente utilizzato dalle derivate della distribuzione di Red Hat. E' un tool molto completo e può gestire senza problemi i pacchetti e i loro aggiornamenti. Già da anni esistono però alternative più evolute come DNF, il gestore di pacchetti sviluppato dal team di Fedora.
Yum infatti non ha le medesime potenzialità di APT, l'alternativa di Debian può gestire per esempio vari version upgrade tra più release dello stesso sistema. Questa capacità deriva dalla natura di Debian che è divisa in vari rami di sviluppo ben separati che possono essere combinati dall'utente tramite l'apt-pinning, APT risulta dunque essere molto elastico e versatile. Ecco perché molto spesso gli utenti Debian/Ubuntu aggiornano direttamente alla versione successiva del sistema, mentre molti utenti di CentOS prediligono un'installazione pulita delle nuove release proprio a causa di alcune lacune di Yum nella gestione degli upgrade software tra varie release del sistema.
Repository
I repository di Ubuntu, presi direttamente da Debian, sono i più vasti e completi dell'intero ecosistema Linux. Ubuntu vanta poi una pletora di repository di terze parti che offrono software aggiornabile in modo semplice e diretto. Questo perché Ubuntu è una distribuzione orientata anche verso l'utente Desktop, che solitamente richiede sempre la versione più recente di un software. Negli anni la community di Ubuntu ha inoltre provveduto a colmare le lacune dei repository tramite i PPA extra (Personal Package Archives).
CentOS invece presenta dei repository più limitati rispetto ad Ubuntu. Tuttavia è possibile trovare senza problemi tutto il necessario per lavorare con il proprio server. Anche se magari, a causa del suo ciclo di sviluppo più lento rispetto ad Ubuntu, si troveranno versioni meno recenti dei pacchetti software.
Questo può essere uno svantaggio per gli utenti che cercano di offrire un servizio più sicuro e aggiornato, mentre per altri sarà un vantaggio sopratutto se sono emersi nuovi bug con le nuove versioni che inficiano le prestazioni o la stabilità del software.
In sostanza CentOS è maggiormente orientata verso gli utenti che cercano soluzioni più stabili e durature, accettando quindi anche "ambienti legacy". Mentre Ubuntu invece si orienta verso gli utenti che cercano versioni più recenti, magari per sfruttare funzionalità inserite recentemente in un determinato tool.
Installer
Entrambi i sistemi godono di un installer davvero ben concepito e perfezionato negli anni. Ma quello di Ubuntu è stato pensato anche per un pubblico meno esperto rispetto a quello di CentOS, chiamato Anaconda, che invece è strutturato per essere utilizzato da un amministratore di sistema che sa sempre quello che sta facendo.
L'installar di Ubuntu dispone di opzioni estremamente semplici da utilizzare e quasi del tutto automatizzate, cosi da mettere a suo agio l'utente fin da subito. Da Anaconda invece è possibile impostare il proprio server direttamente dall'installazione, questo tool dispone di opzioni che consentono all'amministratore di sistema di configurare dischi e software necessari per iniziare sin da subito a lavorare con la nuova installazione di CentOS, cosi da risparmiare tempo ed iniziare a configurare altro software post-installazione.
Ciclo di Sviluppo
Entrambe le distribuzioni hanno delle versioni dedicate al mondo server ma seguono cicli di sviluppo molto diversi. Ubuntu ha una nuova versione ogni sei mesi ed un release LTS (Long Term Support) ogni 2 anni. Le versioni semestrali hanno come target primario l'utenza Desktop e ricevano un supporto di 1 anno, solitamente chi necessità di un sistema server si orienta verso le LTS che sono supportate per 5 anni.
CentOS invece riceve una nuova versione ogni 3/4 anni, il team di sviluppo segue i rilasci e gli update di Red Hat Enterprise Linux visto che sostanzialmente è un suo clone. Ogni versione di CentOS riceve un supporto per circa 10 anni, tale supporto è cosi duraturo anche perché il numero di versioni rilasciate negli anni è nettamente inferiore rispetto a quelle di Ubuntu, quindi gli sviluppatori hanno molte meno versioni di CentOS da supportare attivamente.
Anche sotto questo punto di vista CentOS si conferma una distribuzione indirizzata a chi è interessato ad un sistema estremamente duraturo e meno incline al cambiamento nel tempo.
Produttori
Sia Ubuntu che CentOS hanno alle spalle due grandi corporation ovvero Canonical e Red Hat. Canonical offre dei contratti di supporto alle aziende, per le versioni LTS, e da anni lavora a stretto contatto con la propria community per migliorare i propri tool e la distribuzione in generale. Inoltre Canonical ha realizzato molte partnership con i produttori hardware per migliorare il supporto alle varie periferiche hardware sul mercato, cosi da offrire un'esperienza ottimizzata alla sua utenza.
Al contrario Red Hat non offre contratti di supporto diretto per CentOS, visto che è appunto un clone di Red Hat Enterprise Linux. Tuttavia gli ingegneri di Red Hat aiutano e supportano lo sviluppo di CentOS e la sua community. Quindi se si è alla ricerca di un sistema supportato attivamente da un'azienda, anche con contratti di supporto, Ubuntu probabilmente sarà la scelta migliore. Red Hat infatti non esegue lo stesso lavoro di Canonical, non garantisce direttamente il supporto per CentOS ma lascia il grosso alla community di appassionati, Red Hat si limita quasi unicamente a garantire la piena compatibilità con RHEL.
1 note
·
View note
Text
What Makes ASTPP Better Than A2Billing Technically?
ASTPP and A2Billing are two popular names in the VoIP industry often referred to, when someone decided to use an open source VoIP billing solution with the class 4 Softswitch features or vice versa. If you are also considering using an open source VoIP billing software solution with the class 4 Softswitch features, then I will recommend using ASTPP. If you are wondering why then read on. In this article, I will share the top reason to use ASTPP over A2Billing by keeping technical aspects in mind.
1. Technologies
The first and foremost thing is ASTPP is a technically stronger platform than A2Billing. ASTPP is developed using different cutting edge technologies and platforms, including OpenSIPs and FreeSWITCH unlike A2Billing, which is developed using the Asterisk platform. FreeSWITCH makes ASTPP a highly scalable, robust, and reliable platform. You can handle 1000 concurrent calls on 2 servers unlike A2Billing, which can handle only 500 calls on 2 servers. By increasing servers, you can handle thousands of concurrent calls with ease if you use ASTPP.
2. Highly scalable solution
ASTPP is also a highly scalable solution. Whether the number of calls increases or some sort of fault occurs in the hardware, you can still be rest assured that your services will not stop. ASTPP offers excellent load balancing and failover support using OpenSIPs as SIP registrars. You must use ASTPP if you are looking for a reliable class 4 Softswitch with a billing solution. Bonus tips: ASTPP offers several other VoIP solutions unlike A2Billing, which only has a class 4 Softswitch with a VoIP billing system to offer.
3. Technical support
ASTPP has an active community, so in case if you need any technical help and if you are an open source version user, you can ask that easily. On the other hand, if you use the ASTPP enterprise solution, you can avail the technical help from experts. The ASTPP community also shares resources like webinars, video tutorials, documentation, etc. to provide active technical support to the ASTPP users.
4. Installation
Let’s talk about the installation, which is the first technical step to use any VoIP solution similar to other software or apps. A2Billing has some manual steps, which you need to follow to install it. Unlike that, ASTPP has an installation script. At your fingertips, you can install ASTPP. If you are using the ASTPP enterprise solution, then it will be installed by the ASTPP experts for you. A2Billing is not compatible with the latest technologies unlike ASTPP, which can be installed on the latest OS and platforms, including, Debian and CentOS.
Due to multiple reasons, ASTPP is better than A2Billing technically as well as from other aspects as well. If you want to know more about the difference between ASTPP and A2Billing, read this blog on the Difference between ASTPP and A2Billing.
To know the technical comparison between A2Billing and ASTPP, please visit https://www.astppbilling.org/blog/a2billing-vs-astpp/
0 notes
Text
If you are familiar with containers, you must have heard of Docker and maybe Kubernetes (the orchestrator). Here comes Podman which brings innovation to container tools in the spirit of Unix commands which do “one thing” well. If you have used Docker before, Podman offers a similar experience as the Docker CLI. How Docker CLI Works The Docker CLI is a client/server operation and the Docker CLI communicates with the Docker engine when it wants to create or manipulate the operations of a container. This client/server architecture can lead into problems in production because one, you have to start the Docker daemon before Docker CLI comes alive. The Docker CLI then sends an API call to the Docker Engine to launch Open Container Initiative (OCI) Container runtime, in most cases runc, to start the container (projectatomic.io). What this means is that the launched containers are child processes of the Docker Engine. What is Podman? What then is Podman? Podman is a daemonless container engine for developing, managing, and running OCI Containers on your Linux System. Docker vs Podman The major difference between Docker and Podman is that there is no daemon in Podman. It uses container runtimes as well for example runc but the launched containers are direct descendants of the podman process. This kind of architecture has its advantages such as the following: Applied Cgroups or security constraints still control the container: Whatever cgroup constraints you apply on the podman command, the containers launched will receive those same constraints directly. Advanced features of systemd can be utilized using this model: This can be done by placing podman into a systemd unit file and hence achieving more. What about Libpod? You must have seen Libpod on the title of this guide. Libpod just provides a library for applications looking to use the Container Pod concept, popularized by Kubernetes. It allows other tools to manage pods/container (projectatomic.io). Podman is the default CLI tool for using this library. There are other two important Libraries that make Podman possible: containers/storage – This library allows one to use copy-on-write (COW) file systems, required to run containers. containers/image – This library that allows one to download and install OCI Based Container Images from containers registries like Docker.io, Quay, and Artifactory, as well as many others (projectatomic.io). These two libraries were built from the ground up to support multiple independent processes to interact with the libraries at the same time. A good example is that you can be running a full Kubernetes environment with CRI-O, building container images using Buildah and managing your containers and pods with Podman at the same time (projectatomic.io). This brings the spirit of Unix commands which do “one thing” well. Such a combination of tools is not possible with Docker. Install Podman on CentOS / Fedora / Ubuntu Let us look at how Podman is installed in CentOS and Fedora How To Install Podman on CentOS 7 & Fedora Install Podman on CentOS 8 / RHEL 8 If you are on Ubuntu, please check: How to install Podman on Ubuntu For Debian, use: How To Install Podman on Debian Managing Container Images Pull image using Podman: podman pull ubuntu podman pull centos podman pull centos:8 To list downloaded images, use the command: $ podman images REPOSITORY TAG IMAGE ID CREATED SIZE docker.io/library/ubuntu latest 3556258649b2 2 weeks ago 66.6 MB docker.io/library/alpine latest b7b28af77ffe 3 weeks ago 5.85 MB docker.io/library/debian latest 00bf7fdd8baf 4 weeks ago 119 MB docker.io/library/centos latest 9f38484d220f 4 months ago 209 MB To remove an image, use -rmi option followed by image name/ID: $ podman rmi 00bf7fdd8baf 00bf7fdd8baf2ba6f0918e1f48415b2a4a1a616806e7cf32527a749dd2ce4b2c $ podman rmi docker.io/library/ubuntu
3556258649b2ef23a41812be17377d32f568ed9f45150a26466d2ea26d926c32 Tagging images You can add your custom name to images to make it more intuitive and to remind you what the image does in your set up # podman tag 7698f282e524 webserver # podman images REPOSITORY TAG IMAGE ID CREATED SIZE docker.io/library/ubuntu latest 7698f282e524 4 weeks ago 72.3 MB localhost/webserver latest 7698f282e524 4 weeks ago 72.3 MB Running Containers with Podman To run a simple container using Ubuntu image which prints a message, use: # podman run --rm ubuntu /bin/echo "Computing for Geeks" Computing for Geeks To run a container in background (detached mode), use -d option. podman run -dt -p 8080:8080/tcp -e HTTPD_VAR_RUN=/var/run/httpd -e HTTPD_MAIN_CONF_D_PATH=/etc/httpd/conf.d \ -e HTTPD_MAIN_CONF_PATH=/etc/httpd/conf \ -e HTTPD_CONTAINER_SCRIPTS_PATH=/usr/share/container-scripts/httpd/ \ registry.fedoraproject.org/f29/httpd /usr/bin/run-httpd This will return the container ID: Trying to pull registry.fedoraproject.org/f29/httpd...Getting image source signatures Copying blob d77ff9f653ce done Copying blob aaf5ad2e1aa3 done Copying blob 7692efc5f81c done Copying config 25c76f9dcd done Writing manifest to image destination Storing signatures d2cdf0efb0ddc6e2ae52a5a0bdadababa6ee6cc2e1e49145c92a0474b089b664 Listing running containers The Podman ps command is used to list creating and running containers. $ podman ps CONTAINER ID IMAGE COMMAND CREATED STATUS PORTS NAMES d2cdf0efb0dd registry.fedoraproject.org/f29/httpd:latest container-entrypo... 4 minutes ago Up 4 minutes ago 0.0.0.0:8080->8080/tcp cranky_borg # To include stopped / exited containers, use: $ podman ps --all Run a shell in a container To access a container shell, use the options -it: # podman run -it ubuntu bash root@d273c12899cd:/# root@d273c12899cd:/# apt update Get:1 http://archive.ubuntu.com/ubuntu bionic InRelease [242 kB] Get:2 http://security.ubuntu.com/ubuntu bionic-security InRelease [88.7 kB] Get:3 http://security.ubuntu.com/ubuntu bionic-security/universe amd64 Packages [717 kB] Get:4 http://archive.ubuntu.com/ubuntu bionic-updates InRelease [88.7 kB] Get:5 http://security.ubuntu.com/ubuntu bionic-security/main amd64 Packages [535 kB] Get:6 http://archive.ubuntu.com/ubuntu bionic-backports InRelease [74.6 kB] Searching in Podman $ podman search httpd Inspecting Containers This displays the low-level information on containers and images identified by name or ID. # podman inspect 024a277cc474 [ { "ID": "024a277cc4748ab48539c9ddea15d98c0e0bccc307506c44fbce12ec6c568dfc", "Created": "2019-06-14T10:58:07.764967058-04:00", "Path": "/bin/bash", "Args": [ "/bin/bash" See more on usage: $ podman inspect --help Removing containers First list all running containers: $ podman ps -a CONTAINER ID IMAGE COMMAND CREATED STATUS PORTS NAMES 024a277cc474 docker.io/library/ubuntu:latest /bin/bash 3 minutes ago Exited (0) 3 minutes ago laughing_blackwell cf4267fb7a2b docker.io/library/ubuntu:latest bash 4 hours ago Exited (0) 2 hours ago nostalgic_archimedes b800dd64ba11 docker.io/library/ubuntu:latest /bin/bash 4 hours ago Exited (0) 4 hours ago optimistic_hypatia To delete a single running container use the podman rm command followed by the container id: $ podman rm 024a277cc474 024a277cc4748ab48539c9ddea15d98c0e0bccc307506c44fbce12ec6c568dfc To remove all containers, both running and stopped use: podman rm $(podman ps -a -q) Viewing the container’s logs You can view the container’s logs with Podman as well:
$ podman logs --latest You can also specify container ID: $ podman ps $ podman logs d2cdf0efb0dd To follow the logs output in real-time, use: $ podman logs -f ContainerID $ podman logs --follow=true --since 10m ContainerID Show only last 10 lines in logs: $ podman logs --tail 10 d2cdf0efb0dd Viewing the container’s pids Use podman top to view container’s pids. $ podman top Example: $ podman top d2cdf0efb0dd USER PID PPID %CPU ELAPSED TTY TIME COMMAND default 1 0 0.000 29m22.496484247s pts/0 0s httpd -D FOREGROUND default 22 1 0.000 29m21.496767511s pts/0 0s /usr/bin/coreutils --coreutils-prog-shebang=cat /usr/bin/cat default 23 1 0.000 29m21.496866314s pts/0 0s /usr/bin/coreutils --coreutils-prog-shebang=cat /usr/bin/cat default 24 1 0.000 29m21.497020539s pts/0 0s /usr/bin/coreutils --coreutils-prog-shebang=cat /usr/bin/cat default 25 1 0.000 29m21.497127237s pts/0 0s /usr/bin/coreutils --coreutils-prog-shebang=cat /usr/bin/cat default 26 1 0.000 29m21.49723933s pts/0 0s httpd -D FOREGROUND default 27 1 0.000 29m21.497361006s pts/0 0s httpd -D FOREGROUND default 28 1 0.000 29m21.497459891s pts/0 0s httpd -D FOREGROUND default 29 1 0.000 29m21.497552695s pts/0 0s httpd -D FOREGROUND Checkpointing the container Checkpointing a container stops the container while writing the state of all processes in the container to disk. This capability requires CRIU 3.11 or later installed on the system. See CRIU installation. podman container checkpoint Example: $ podman container checkpoint d2cdf0efb0dd A container can later be restored and continue running at exactly the same point in time as the checkpoint. podman container restore Migrate the container First checkpoint the container on the source system: podman container checkpoint -e /tmp/checkpoint.tar.gz Copy it to the destination server: scp /tmp/checkpoint.tar.gz :/tmp On the destination system, restore container: podman container restore -i /tmp/checkpoint.tar.gz Manage container pods with Podman Podman pods are similar to the Kubernetes concept of Pods Most of the interaction with pods is exposed through the podman pod commands: $ podman pod --help NAME: podman pod - Manage container pods. Pods are a group of one or more containers sharing the same network, pid and ipc namespaces. USAGE: podman pod command [command options] [arguments...] COMMANDS: create Create a new empty pod exists Check if a pod exists in local storage inspect displays a pod configuration kill Send the specified signal or SIGKILL to containers in pod pause Pause one or more pods ps, ls, list List pods restart Restart one or more pods rm Remove one or more pods start Start one or more pods stats Display percentage of CPU, memory, network I/O, block I/O and PIDs for containers in one or more pods stop Stop one or more pods top Display the running processes of containers in a pod unpause Unpause one or more pods OPTIONS: --help, -h show help The example below will create a pod called web $ podman pod create --name web 0f565b11e9cb3736dc15b46f3361305e351ce556818e342a9fdf799ea4edf7ca This creates a pod without the extra attributes available on: $ podman pod create --help Confirm pod creation $ podman pod list POD ID NAME STATUS CREATED # OF CONTAINERS INFRA ID 0f565b11e9cb web Running About a minute ago 1 44cca777d12f By default, the created pod will have a container called infra. The infra container is in sleep mode and its purpose is to hold the namespaces associated with the pod to allow podman to connect other containers to the pod:
$ podman ps -a --pod CONTAINER ID IMAGE COMMAND CREATED STATUS PORTS NAMES POD 44cca777d12f k8s.gcr.io/pause:3.1 23 minutes ago Up 23 minutes ago 0f565b11e9cb-infra 0f565b11e9cb Now that the pod is created, we can add a container to it: podman run -dt --pod web alpine:latest top You should now see the pod has two containers $ podman ps -a --pod CONTAINER ID IMAGE COMMAND CREATED STATUS PORTS NAMES POD 36ccace2d653 docker.io/library/alpine:latest top About a minute ago Up About a minute ago zen_hugle 0f565b11e9cb 44cca777d12f k8s.gcr.io/pause:3.1 28 minutes ago Up 28 minutes ago 0f565b11e9cb-infra 0f565b11e9cb This how you’ll create a container and expose a port – root required for port binding. sudo podman pod create -p 8080:80 --name web1 sudo podman run -dt --pod web1 -p 8080 nginx:latest Note that you need to publish as many port as will be used during the pod creation. This can’t be changed after the creation. Conclusion Podman shows a lot of promise in the future of Containerization. In fact, Red Hat did not just remove the Docker container engine from OpenShift. It also removed the Docker container engine, along with the docker command, from Red Hat Enterprise Linux 8 entirely. Thank you for reading through. Reference : Red Hat Documentation Podman Documentation
0 notes
Text
El mejor VPS hosting en México
Todos los que nos movemos en el mundo de la tecnología entendemos hasta cierto punto que es un web hosting y un dominio. Sin embargo, para sitios con alto tráfico este tipo de alojamiento no es el adecuado, por lo tanto, y por esta razón hoy nos centraremos en el vps hosting en linux.
Para iniciar, debemos comprender ¿Qué es un VPS?
Según Wikipedia es un método de particionar un servidor físico en varios servidores virtuales (máquinas virtuales con tareas de servidor) de tal forma que todo funcione como si se estuviese ejecutando en una única máquina. Cada servidor virtual es capaz de funcionar bajo su propio sistema operativo y además cada servidor puede ser reiniciado de forma independiente.
Ya que tenemos comprendido que es un VPS procederemos a indagar las diferencias entre un Hosting Compartido vs VPS Hosting.

¿Cuándo es necesario escalar a un VPS Hosting y dejar de lado el hospedaje web tradicional?
Sí buscas mayor control sobre configuraciones, privacidad y seguridad a tu criterio, este tipo de servidores virtuales privados son la mejor opción para comenzar. En el caso de TUHOST es super fácil contratar, son servidores de alto rendimiento, bajo costo y con el maravilloso
panel directadmin.
Un vps es también una muy buena opción cuando se le desea sacar el mayor provecho, ya que puedes hospedar cientos de páginas web, instalar aplicaciones de linux, o de desarrollo como python o nodejs, entre otras utilidades.
Una de las ventajas de contratar un servidor vps en TuHost es que te asisten en cualquier instancia incluyendo en problemas relacionados con el mal funcionamiento de algún elemento de Directadmin o requerido. En casos de problemas con el sistema operativo Linux, ya sea Centos, Debian o Ubuntu te darán una serie de sugerencias para que puedas resolver el problema. He notado que sí lo solicitas te pueden cotizar la solución a tu problema.
Ubicaciones con buen Ping para México
Un factor muy importante es la ubicación geográfica de los nodos. Esto nos ayudará a obtener una carga más rápida de nuestros sitios, y no solo eso, sino que también en cuestión de conexiones remotas. En este caso TuHOST ofrece excelentes ubicaciones para residentes de México y USA.
Phoenix
Dallas
Nueva York
Diferencias de un VPS y un hosting compartido
¿Sigues sin tener claro en qué se diferencia un VPS y un hosting “clásico”? Para que se vea mejor, te explicamos las ventajas que tiene un VPS:
Mucho más potente.
Te permite gestionarlo tú mismo.
Puedes configurarlo según tus necesidades.
Tiene una IP en exclusiva para él.
Es más escalable.
Puedes reiniciarlo cuando quieras.

0 notes
Text
Razones para cambiar a linux

Razones para cambiar a linux. Prefieres Windows o Linux?. Si visitas mi sitio web sobre Linux, creo que ya se la respuesta, pero ¿cuáles son las razones para cambiar a Linux?. Linux es un sistema operativo 100% libre, eso está claro; pero existen otros motivos de peso para que mudes a linux, si es que no lo has echo ya, en el articulo de hoy vemos las mas importantes.
Razones para cambiar a linux
Linux es gratis Una de los motivos por los que debes cambiar a linux es su precio, independientemente de la distribución que elijas, Debian con Ubuntu y Linux MInt, derivados de Red Hat como Fedora o Centos, el propio Arch con Manjaro, y otras tantas que me dejo en el tintero; son gratis. Salvo alguna excepción o distribución especifica, la practica totalidad de distros linux no solo son gratuitas, también son de código abierto. Te parece poco?, pues tranquilo que aun tenemos más, porque de la misma forma que se distribuye linux, igualmente se concede la inmensa mayoría de su software. Soy consciente que "los de las ventanas" saldrán con lo de siempre... que si photoshop, que si no se que, bla,bla,bla, palabrería nada más. Vamos a ver, tu piensa, muchos son los que vienen a linux, muy pocos los que retornan a Windows. Linux es estable Tras más de 20 años usando linux y anteriormente otros sistemas Unix, puedo contar con los dedos de mis manos los bloqueos que me han ocurrido por culpa del sistema, algo común en otros sistemas con sus típicas pantallas azules más conocidas como pantallazo de la muerte, jaja. Linux es capaz casi al 100% sin reiniciarlo y sin peligro de cosas extrañas. Si por algún caso, una aplicación o software se bloquea en tu Linux, puede matarlo con un solo comando de forma sencilla y confiable desde la terminal. En Windows, cruza los dedos y reza a San Pantuflo para que el administrador de tareas sea capaz de cerrar el proceso que genera inestabilidad.

Linux vs Windows Privacidad y Seguridad Por su diseño, linux es un S.O. mucho más seguro que otros con coste. Nunca he visto ningún problema relacionado con la seguridad de un sistema que estuviera actualizado. Cuando vemos que las grandes empresas del sector, como Google, Amazon, incluso el propio Microsoft, apenas sufren violaciones de seguridad en sus sistemas... por algo será, no pienses que es casualidad, todos usan linux en sus servidores críticos (incluso Microsoft). Es evidente que nadie puede afirmar que linux es 100% seguro, pero que es el más seguro, si. Soporte y compatibilidad Soporte - Cambiar a linux El soporte para Linux no tiene comparación con ningún otro sistema operativo. No importa qué problema tienes y que distribución uses, tutoriales, manuales, usuarios altruistas, etc, seguro que encontraras la solución muy rápido. También tenemos sitios web como este, listas de correo, grupos y foros con el único propósito de ayudarte a resolver tus dudas y a que continúes aprendiendo. Ademas de la comunidad, cada distribución linux cuenta con sus propios manuales específicos y sistemas de foros, un buen ejemplo lo tenemos con la wiki de Arch Linux que es de lo mejor que puedes encontrar. Compatibilidad - Cambiar a linux En otros sistemas operativos, cada vez que lanzan una nueva versión parece que tienes que actualizar tu hardware. Esto nos hace sospechar que tanto los desarrolladores de los sistemas operativos, como los del hardware están de acuerdo, si no es así que alguien me lo explique. Tienen una política de fabricación, que ante los frecuentes cambios en los requisitos de diseño y especificaciones, todo se queda obsoleto de una forma casi insultante para el usuario. Es comercio abusivo, y pondría la mano en el fuego porque es una practica totalmente planificada por Windows, Apple, y los grandes fabricantes de hardware. y requieren ser reemplazados debido a . Hay, se llama obsolescencia planificada y Windows, Apple y los fabricantes de hardware son expertos en eso. Afortunadamente, esta practica abusiva no existe en el movimiento linux, y ademas es uno de los motivos por los que miles de usuarios de Windows 7 (termina su soporte) buscan refugio en distribuciones linux que sean similares estéticamente y fáciles de usar, te recomiendo revisar este articulo. Conclusión final Hemos visto las principales razones por las que deberías cambiar a Linux inmediatamente. Cada una de ellas es motivo suficiente para migrar, y eso que omitimos otras como la facilidad de uso, su excelente administración de paquetes, flexibilidad, actualizaciones constantes, velocidad, rendimiento, el peso del sistema operativo, y muchas más. ¡Linux te espera! Este articulo no es una critica, es una realidad; soy consciente que Windows tiene derecho a existir al igual que todo bicho viviente, incluyendo partes orgánicas pestilentes. Aun así lo tengo claro, de mi plato no comerá, que le invite otro. Canales de Telegram: Canal SoloLinux – Canal SoloWordpress Espero que este articulo te sea de utilidad, puedes ayudarnos a mantener el servidor con una donación (paypal), o también colaborar con el simple gesto de compartir nuestros artículos en tu sitio web, blog, foro o redes sociales. Read the full article
#Amazon#apple#cambiaralinux#codigoabierto#compatibilidad#google#hardware#Linux#linuxes100%seguro#Linuxesestable#Linuxesgratis#LinuxvsWindows#microsoft#pantallazodelamuerte#Photoshop#privacidad#Razonesparacambiar#SanPantuflo#sitioweb#soporte#unix#wikideArchLinux#windows#windows7#WindowsoLinux
0 notes
Text
How to Cloud Enhances Your Dedicated Server

Now more than ever, businesses need flexibility for their services.
What happens when you have outgrown Virtual Private Servers (VPS)? What do you do when you need the scalability of the cloud and also the resources of a physical, dedicated server?
If you need hosting for:
Resource-hungry websites & applications
Multiple websites of all kinds
Databases with or without the webserver on the same server
Reselling hosting to clients
Cloud firm Cloud Dedicated Servers provide a great solution worth considering. It is important for websites, applications, and platforms to be able to scale and have their hosting environments grow with them. Cloud services can do that, and more.
But what exactly is cloud?
What is Cloud?
Last July, we told you about our Cloud VPS and how it works. Recall that cloud computing is the practice of using a network of remote servers hosted on the Internet to store, manage, and process data. With this as the foundation, we are able to build and use other technologies to offer sophisticated solutions like the Cloud VPS.
A VPS is a server that exists as a piece of software running on a host or parent server. A hypervisor is used to manage these virtual servers. These virtual servers are clustered together under Liquid Web’s Cloud Platform, offering the ability to move server instances between parent servers without needing to migrate data or reconfigure the server settings.
What is a Traditional Dedicated Server?
By contrast, a traditional Dedicated Server takes the cloud out of the equation and gives you the bare metal server. Your server environment is run directly off of the hardware with the operating system and all files directly installed on the server. These servers provide customization that is attractive to most businesses because you are dealing with swappable internals.
Dedicated servers are single-tenant hosting services. Unlike with a VPS, there is no parent server dividing server instances. All components of the server, such as the CPU, cores, RAM, and storage are at the disposal of the tenant, which gives the owner reliability, performance, and security.
How the Cloud Enhances a Dedicated Server
The implementation for Cloud Dedicated Servers is similar to our Cloud VPS. Liquid Web’s proprietary Cloud Platform, based on KVM, is what drives the virtualization. It allows the servers to have dynamic provisioning in a scalable, virtual environment. But instead of sharing the processor with other instances, you have the full use of the CPU and its cores.
Think of Cloud Dedicated as an actual dedicated server with a virtual layer running on top.
Cloud Dedicated combines the processing power and resources of a traditional dedicated server with the instant provisioning and flexibility of the cloud. Bare metal cloud servers deliver the complete hardware transparency and scalability websites and applications demand.
One potential drawback to traditional dedicated servers is that moving to a new server involves migrating data. This can be a time-consuming process depending on the project(s) hosted on the server and the time it takes to migrate the data, test the data, and point the DNS. And with DNS propagation, your sites and apps can also see downtime.
Cloud Dedicated Servers make this process seamless. Like the VPS, you are able to resize the bare metal server instance from one to the other without having to migrate data or change server settings. Aside from a couple of server reboots, there is not much downtime as there are no DNS changes to speak of. While it is not an instant process, you are still able to scale faster than with a full-on data migration.
Use Cases for Cloud Dedicated
Cloud dedicated can be useful in a myriad of circumstances and setups, such as with database hosting, hosting multiple sites, cloud private networking and more.
Database Hosting
As mentioned previously, the resources of the host server are at your disposal because your server environment is the only one on the parent server. The full CPU and all cores are dedicated to your sites and databases.
The importance of having this kind of power is valuable to those that host resource intensive databases. Databases require the kind of single-threaded CPU performance per core that is found in a dedicated server. Adding our cloud platform only enhances this by giving you the ability to resize your server to another instance with a different CPU or other resources as your business grows.
Hosting Multiple Sites
Just as in the case with databases, Cloud Dedicated Servers act as an excellent choice for agencies and resellers that require hosting for several sites on the same server. The processing power would be more than capable of running your sites and handling their requests. And because resizing does not require a data migration, you can rest assured that all of the hard work put into setting up the sites and server settings will remain intact.
Cloud Private Networking
Need more than one server with the ability to communicate with each other? No problem! You can deploy a Cloud Private Network for your cloud servers to communicate with each other over an internal, isolated private network.
The bandwidth used on the closed system is free and does not count against your regular bandwidth usage, and there is no additional cost.
Cloud Firewall
The Cloud Firewall provides you with the protection and security isolation that a conventional hardware firewall would give to your dedicated server. You are given two options. The first is the Basic Firewall, which lets you allow or deny common web services with a simple checkbox interface. If you need more detailed rules the second option, our Advanced Firewall will enable you to specify services and ports as well as source and destination IPs for fine-grained tuning of firewall rules.
Cloud Load Balancing
More functionality exists for those that have a high load on their servers as a result of increased traffic. Liquid Web’s Cloud Load Balancer allows users to create Virtual IP addresses (VIPs) and intelligently distribute traffic across multiple cloud servers. Your site visitors can be shared across numerous devices to increase performance during times of high activity.
The Cloud Server Load Balancer can significantly increase the reliability of your web application because if one of your server nodes fails, the traffic is automatically shifted to another server node without any interruption of service.
Choosing a Cloud Dedicated Server
Having several options to choose from can make the final step of selecting the right server(s) a bit challenging. Here are some of the options you have as well as some things to consider when choosing a Cloud Dedicated Server.
What is My Budget?
In other words, how much are you able and willing to pay for hosting? Quite often, the cheapest solution is not the best solution.
Do your research to ensure the amount of service you will receive is reasonable for the cost
Think about current resources needed as well as future resources that may be required to expand your business
Do I Need a Specific Server Location?
It’s important to think about where your visitors are located relative to the geographic location of your server. While this can be alleviated by the use of a Content Delivery Network (CDN), you can also cut cost if your visitors are in the same concentrated area as your server. Knowing where your server is located will help determine if other services will be needed.
Liquid Web offers 2 data centers in Lansing, MI (Central US), one in Phoenix, AZ (Western US) and another in Amsterdam, The Netherlands (Europe) to serve the needs of our clients globally.
What Are My Security Needs?
Securing your server is paramount to ensuring your site and data remain protected. The extent of that security needs to be determined based on the amount of risk you plan to take versus the risk that your hosting provider will assume.
Knowing what you need and what your potential provider offers will save you headaches down the road.
Who will be Managing the Server?
Knowing who will be managing your server and the degree of management they provide is also an essential factor in choosing your server and provider. Decide up front whether the server will be handled by you, a developer, or your provider to determine responsibilities. You will want to plan to fill any gaps between the management you require and what can be given.
Cloud Dedicated Options Available
Liquid Web offers several different configurations of Cloud Dedicated Servers to fit your unique business needs.
Operating System: Linux vs Windows
Linux – Choose from CentOS, Ubuntu, and Debian
Windows – Choose from Windows Server 2012 R2 and Windows Server 2016
Management Levels: Self, Core, or Fully Managed
Self Managed – For expert users who need to customize their server fully. We take care of the hardware and infrastructure while you manage your server.
Core Managed – For those looking for management but don’t require a control panel like Plesk or cPanel. We manage your server’s infrastructure, hardware, and the core elements of the LAMP or WIMP server stacks.
Fully Managed – For those that need a bit more help with their server. Our expert techs manage your hardware, infrastructure, and the web server. Fully Managed servers include cPanel or Plesk, which are industry-leading control panels.
Backups
On-server backups – Use your primary storage to keep backups taken by your control panel or other solutions of your choosing.
Remote backups – Use our Cloud Backups to store full server backups on our servers, managed by us for your disaster recovery needs. Choose Pay Per Gig (As you Go) or Quota pricing.
The Best of Cloud and Dedicated
Cloud Firm Provide Cloud Server in India Lowest price. Cheap Cloud server. Best Cloud server at lowest price. Cloud server with excellent features at lowest cost. Our Cloud Servers come made to measure to ensure you get the best results for your business. Provision them with a wide choice of RAM, SSD /HDD hard drives and bandwidth options. High performance, Reliable, affordable Cloud Servers. High bandwidth Cloud Servers at lowest price. 24X7 supports. Best Cloud Server provider in India. We are providing various type Cloud Servers: • Custom Cloud Servers(100% customizable) • Dedicated Server instant setup Please visit website for more details:
more: http://cloud.firm.in
IT Monteur, B-71, Shalimar Garden Extn-2, Ghaziabad, UP, India-201005
Phone: +91-9582907788 +91-9654016484 0120-2631048 Mail: [email protected]
=============================================================
Related Post = Top 7 Technic of Choosing Google Cloud Hosting
=============================================================
0 notes
Text
LINUX OS ULTRA SECURE ENCRYPTED VPN SERVICE PROGRAMMING ON DEMAND
https://sites.google.com/view/linux-vpn-server

ULTRASECURE ENCRYPTION VPN SERVER ,SERVER VPN,SERVER VPN WINDOWS 10,SERVER VPN GRATUIT,SERVER VPN FREE,SERVER VPN RASPBERRY PI,SERVER VPN ROMANIA,SERVER VPN WINDOWS,SERVER VPN JAPAN,SERVER VPN 2019,SERVER VPN WIN 10,SERVER VPN ACASA,SERVER VPN ANDROID FREE,SERVER VPN ADDRESS,SERVER VPN ASUS,SERVER VPN ARGENTINA,SERVER VPN ARDUINO,SERVER VPN APP,VPN SERVER ADDRESS FREE,VPN SERVER ADDRESS USA,A VPN SERVER ADDRESS,A VPN SERVER,CREATE A SERVER VPN,ACCESS A SERVER VPN,CREATING A VPN SERVER,BUILD A VPN SERVER,CREATE A VPN SERVER AT HOME,SETUP A VPN SERVER AT HOME,CREATE A VPN SERVER UBUNTU,HOST A VPN SERVER,SERVER VPN BRAZIL,SERVER VPN BOT MOBILE LEGEND,SERVER VPN BUAT MOBILE LEGEND,VPN BRAZIL SERVER,VPNBOOK SERVER,SERVER VPN BITDEFENDER,SERVER VPN BANGLADESH,VPN SERVER BEHIND NAT,VPN SERVER BEHIND ROUTER,VPN SERVER BEHIND NAT ROUTER,RASPBERRY PI B+ VPN SERVER,SERVER VPN CISCO,SERVER VPN CHINA,SERVER VPN CENTOS,SERVER VPN CONFIGURATION,SERVER VPN CLIENT,SERVER VPN CLOUD,SERVER VPN.COM,SERVER VPN CHINA FREE,SERVER VPN CENTOS 7,SERVER VPN CHROME,C VPN SERVER,CELL C VPN SERVER,SERVER VPN DOWNLOAD,SERVER VPN DEBIAN,SERVER VPN DD-WRT,VPN SERVER DID NOT RESPOND,VPN SERVER DOCKER,VPN SERVER DIGITALOCEAN,VPN SERVER DID NOT RESPOND IPHONE,VPN SERVER DEBIAN 9,VPN SERVER DOWNLOAD FREE,VPN SERVER DID NOT RESPOND MAC,D'LINK VPN SERVER,D'LINK VPN SERVER ROUTER,D'LINK 850L VPN SERVER,SERVER VPN EINRICHTEN,EXPRESSVPN SERVER,VPN SERVER EUROPE,VPN SERVER EDGEROUTER,VPN SERVER EDGEROUTER X,VPN SERVER EN WINDOWS 10,VPN SERVER EASY,VPN SERVER ESSENTIALS 2016,VPN SERVER EDGEOS,WINDOWS SERVER ESSENTIALS VPN,SERVER VPN FOR WINDOWS,SERVER VPN FREEBOX,SERVER VPN FREE IPHONE,SERVER VPN FOR IPHONE,SERVER VPN FOR ANDROID,SERVER VPN FRANCE,SERVER VPN FREE USA,F-SECURE VPN SERVER 5.20,F-SECURE VPN SERVER,F-SECURE VPN SERVER LOCATIONS,F-SECURE FREEDOME VPN SERVER,SERVER VPN GATE,SERVER VPN GRATIS INDONESIA,SERVER VPN GRATIS TERCEPAT,SERVER VPN GRATIS UNTUK ANDROID,SERVER VPN GRATIS 2018,SERVER VPN GRATIS TERCEPAT PC,SERVER VPN GRATIS TERBAIK,SERVER VPN GRATIS INTERNET,SERVER VPN GRATIS TERCEPAT 2018,SERVER VPN HIDE.ME,SERVER VPN HOSTNAME,SERVER VPN HTTP INJECTOR,VPN SERVER HARDWARE,VPN SERVER HOME,VPN SERVER HOSTING,VPN SERVER HAS REACHED CAPACITY,VPN SERVER HOST,VPN SERVER HONG KONG,VPN SERVER HAWAII,OS X SERVER VPN PORTS,APPLE OS X SERVER VPN,APPLE OS X SERVER VPN PORTS,MAC OS X SERVER VPN ROUTES,MAC OS X SERVER VPN PORTS,SERVER VPN IPHONE,SERVER VPN INDONESIA,SERVER VPN INDIA,VPN ITALY SERVER,SERVER VPN IPSEC,SERVER VPN IOS,SERVER VPN IP,SERVER VPN IPSEC UBUNTU,SERVER VPN IN ROUTER,VPN SERVER IN CHINA,SERVER VPN JEPANG,VPN SERVER JAPAN FREE,VPN SERVER ADDRESS JAPAN,VPN JUMP SERVER,FREE PPTP VPN SERVER JAPAN,VPN SERVER JEPANG APK,VPN SERVER JEPANG GRATIS,VPN SERVER JEPANG ANDROID,VPN SERVER JAVA,SERVER VPN KOREA,SERVER VPN KERIO,SERVER VPN KURULUMU,SERVER VPN KENCANG,VPN SERVER KALI LINUX,VPN SERVER KOREA FREE,VPN SERVER KUBERNETES,VPN SERVER KALI,VPN SERVER KOSTENLOS,VPN SERVER KAUFEN,K-SECURE VPN SERVER,SERVER VPN LINUX,SERVER VPN L2TP,SERVER VPN LIST,SERVER VPN LINUX UBUNTU,SERVER VPN L2TP UBUNTU,SERVER VPN L2TP WINDOWS 7,SERVER VPN LOGS,SERVER VPN LA GI,SERVER VPN LOGIN,VPN SERVER LIST FREE,SERVER VPN MIKROTIK,SERVER VPN MAC,SERVER VPN MAC OS X,SERVER VPN MICROSOFT,SERVER VPN MOBILE,SERVER VPN MOBILE LEGENDS,SERVER VPN MOBILE LEGEND,SERVER VPN MIEN PHI,SERVER VPN ML,SERVER VPN MOBILE LEGEND BOT,SERVER VPN NAS QNAP,SERVER VPN NOOB MOBILE LEGEND,SERVER VPN NO WINDOWS,SERVER VPN NOTEBOOK,VPN SERVER NAME,VPN SERVER NAME OR ADDRESS,VPN SERVER NETFLIX,VPN SERVER NAS SYNOLOGY,VPN SERVER NAS,VPN SERVER NAME OR ADDRESS WINDOWS 10,SERVER VPN OPENVPN,SERVER VPN OPEN SOURCE,SERVER VPN ONLINE,SERVER VPN OPENWRT,VPN SERVER OS X,VPN SERVER ON WINDOWS 10,VPN SERVER ON RASPBERRY PI,VPN SERVER ON UBUNTU,VPN SERVER ON ANDROID,SERVER OF VPN,SERVER VPN PPTP,SERVER VPN PORT,SERVER VPN PC,SERVER VPN PROXY,SERVER VPN PRO,SERVER VPN PURE,SERVER VPN PORTS,SERVER VPN PHILIPPINES,SERVER VPN P2P,PRIVATE SERVER VPN,PRIVATE VPN SERVER LIST,PRIVATE VPN SERVER SETUP,PRIVATE VPN SERVER FREE,PRIVATE VPN SERVER SOFTWARE,PRIVATE VPN SERVER LOCATIONS,PRIVATE VPN SERVER WINDOWS,PRIVATE VPN SERVER CLOUD,PRIVATE VPN SERVER STATUS,PRIVATE VPN SERVER SERVICE,SERVER VPN QNAP,VPN SERVER QNAP NAS,VPN SERVER QATAR,SETUP VPN SERVER QNAP,OPENVPN SERVER QNAP,VPN SERVER QUE ES,VPN SERVER QNAP EINRICHTEN,FREE VPN SERVER QATAR,SYNOLOGY VPN SERVER QUICKCONNECT,FREE VPN SERVER QUORA,SERVER VPN RASPBERRY,SERVER VPN RDS,SERVER VPN RPI,VPN SERVER RUSSIA,VPN SERVER REQUIREMENTS,VPN SERVER REACHED CAPACITY,VPN SERVER RASPBIAN,SERVER VPN SETUP,SERVER VPN SINGAPORE,SERVER VPN SOFTWARE,SERVER VPN SYNOLOGY,SERVER VPN SSH,SERVER VPN SOFTETHER,SERVER VPN SSL,SERVER VPN SOFTWARE FREE,VPN SERVER SOFTWARE FOR WINDOWS,VPN SERVER SOFTWARE WINDOWS 10,SERVER VPN TP-LINK,SERVER VPN TO ANDROID,SERVER VPN TERCEPAT,SERVER VPN TELKOMSEL,SERVER VPN TERBAIK UNTUK MOBILE LEGEND,SERVER VPN TERCEPAT DI DUNIA,SERVER VPN TERMUDAH MOBILE LEGEND,VPN SERVER TEST,VPN SERVER THAILAND FREE,AT&T VPN SERVER ADDRESS,T MOBILE VPN SERVER ADDRESS,AT&T VPN SERVER,T-MOBILE VPN SERVER,AT&T VPN SERVER NAME,SERVER VPN UNTUK PUBG LITE,SERVER VPN UBUNTU,SERVER VPN USA,SERVER VPN US,SERVER VPN UK,SERVER VPN UNTUK MOBILE LEGEND,SERVER VPN UNTUK ML,SERVER VPN UDP 53,VPN SERVER UBUNTU 18.04,VPN SERVER USERNAME AND PASSWORD,CREARE UN SERVER VPN,CREARE UN SERVER VPN WINDOWS 10,CONFIGURARE UN SERVER VPN,CREARE UN SERVER VPN UBUNTU,CREER UN SERVEUR VPN,CREARE UN SERVER VPN A CASA,CREARE UN SERVER VPN PER NAVIGARE,INSTALLARE UN SERVER VPN,CREARE UN SERVER VPN SU WINDOWS 10,CREARE UN SERVER VPN SU WINDOWS 7,SERVER VPN VIETNAM,VPN SERVER VS CLIENT,VPN SERVER VPS,VPN SERVER OR CLIENT,VPN SERVER OR ROUTER,PROXY SERVER VS VPN,VPN SERVER VPN,VPN SERVER VENEZUELA,VPN SERVER VS ROUTER,VPN SERVER VIRTUAL,V SERVER VPN,VPN SERVER ON HYPER V,PROXY SERVER OR VPN,STRATO V-SERVER VPN,SERVER VPN WINDOWS 2008,SERVER VPN WINDOWS 2016,SERVER VPN WINDOWS 8.1,SERVER VPN WINDOWS XP,SERVER VPN WINDOWS 8,SERVER VPN WIN 7,VPN SERVER WIKI,PI ZERO W VPN SERVER,SERVER VPN W DOMU,SERVER VPN XP,VPN SERVER XIAOMI ROUTER,VPN SERVER WINDOWS XP PROFESSIONAL,VPN SERVER WINDOWS XP SETUP,VPN-X SERVER,VPN SERVER XS4ALL,X VPN SERVER,EDGEROUTER X VPN SERVER,ER-X VPN SERVER,X VPN SERVER ADDRESS,X-VPN SERVER LOCATIONS,X-VPN SERVER LIST,X VPN SERVER NAME,SERVER VPN YANG BAGUS BUAT MOBILE LEGEND,SERVER VPN YANG BAGUS,SERVER VPN YANG CEPAT,SERVER VPN YANG PALING CEPAT,SERVER VPN YG BAGUS,SERVER VPN YANG AKTIF,SERVER VPN YOUR FREEDOM,VPN SERVER YEASTAR,VPN SERVER NEW YORK,VPN SERVER HAS REFUSED YOUR LICENSE FILE,VPN SERVER ZYXEL NAS,VPN SERVER ZIGGO,VPN SERVER ZUHAUSE,VPN SERVER ZYXEL,VPN SERVER ZYXEL KEENETIC,VPN SERVER ZIGGO MODEM,VPN SERVER ZIMBABWE,VPN SERVER ZIGGO GO,VPN SERVER ZERTIFIKAT KONNTE NICHT ÜBERPRÜFT WERDEN,SERVER VPN 1 MONTH,SERVER VPN UBUNTU 16.04,VPN SERVER WINDOWS 10 L2TP,VPN SERVER WINDOWS 10 SOFTWARE,VPN SERVER WINDOWS 10 PPTP,VPN SERVER UBUNTU 17.10,VPN-1 SERVER COULD NOT FIND ANY CERTIFICATE TO USE FOR IKE,RASPBERRY PI 1 VPN SERVER,1&1 SERVER VPN,1 MONTH VPN SERVER,SERVER #1 EURO217.VPNBOOK.COM,UK SERVER 1 VPN SETTINGS,VPN-1 SERVER COULD NOT FIND CERTIFICATE TO USE FOR IKE,VPN-1 SERVER CAN'T FIND ANY CERTIFICATE TO USE FOR IKE,1UND1 VPN SERVER,1&1 CLOUD SERVER VPN,SERVER VPN 2016,SERVER VPN 2012,SERVER VPN 2018,VPN SERVER 2008,SERVER 2016 VPN SETUP,SERVER 2012 VPN SETUP,VPN SERVER 2012 R2,VPN SERVER 2008 R2,VPN SERVER 2012 R2 STEP BY STEP,RASPBERRY PI 2 VPN SERVER,DOTA 2 VPN SERVER,ENIGMA 2 VPN SERVER,SUPERHUB 2 VPN SERVER,RASPBERRY PI 2 VPN SERVER PERFORMANCE,RASPBERRY PI 2 VPN SERVER SPEED,2 VPN SERVER HINTEREINANDER,KEENETIC LITE 2 VPN SERVER,SPEEDPORT SMART 2 VPN SERVER,KEENETIC EXTRA 2 VPN SERVER,SERVER VPN 360,SERVER VPN RASPBERRY PI 3,VPN SERVER 30 DAYS,VPN SERVER 3G ROUTER,ALAMAT SERVER VPN 3,ALAMAT SERVER VPN KARTU 3,RASPBERRY PI 3 SERVER VPN,RASPBERRY PI 3 VPN SERVER PERFORMANCE,RASPBERRY PI 3 VPN SERVER SETUP,3 IKE SERVER VPN,RASPI 3 VPN SERVER,RASPBERRY PI 3 VPN SERVER EINRICHTEN,MI ROUTER 3 VPN SERVER,RASPBERRY PI 3 VPN SERVER KURULUMU,RASPBERRY PI 3 VPN SERVER SPEED,RASPBERRY PI 3 VPN SERVER IPSEC,SERVER VPN IPHONE 4,VPN SERVER 4PDA,VPN SERVER 4G,VPN SERVER 443,PACKETIX VPN SERVER 4.0,VPN SERVER PORT 443,PACKETIX VPN SERVER 4.0 HOME EDITION,SOFTETHER VPN SERVER 443 ERROR,FREE VPN SERVER 4,VPN SERVER OVER 4G,EDGEROUTER 4 VPN SERVER,LIVEBOX 4 VPN SERVER,USG PRO 4 VPN SERVER,XIAOMI ROUTER 4 VPN SERVER,SERVER 5.4 VPN,SERVER 5.7.1 VPN,SERVER VPN TCP 53,VPN SERVER UNREACHABLE (-5),MACOS SERVER 5.7.1 VPN,VPN SERVER CENTOS 5,CENTOS 5 VPN SERVER,ZYWALL 5 VPN SERVER,VPN SERVER FRITZBOX 6490,VPN SERVER IPHONE 6,VPN SERVER DEBIAN 6,VPN SERVER ERROR 619,CENTOS 6 VPN SERVER,DSM 6 VPN SERVER,CENTOS 6 VPN SERVER PPTP,SYNOLOGY DSM 6 VPN SERVER,IPHONE 6 VPN SERVER ANTWORTET NICHT,VPN SERVER WINDOWS 7 FREE DOWNLOAD,VPN SERVER WINDOWS 7 MULTIPLE CONNECTIONS,VPN SERVER WINDOWS 7 FREE,VPN SERVER WINDOWS 7 L2TP,VPN SERVER WINDOWS 7 SOFTWARE,VPN SERVER WINDOWS 7 SETUP,WINDOWS 7 SERVER VPN,WIN 7 SERVER VPN,WINDOWS 7 SERVER VPN SETUP,CENTOS 7 VPN SERVER,WINDOWS 7 VPN SERVER L2TP,CENTOS 7 VPN SERVER L2TP,WINDOWS 7 VPN SERVER SOFTWARE,CENTOS 7 VPN SERVER PPTP,WINDOWS 7 VPN SERVER PORT,CENTOS 7 VPN SERVER SETUP,SERVER VPN ERROR 800,VPN SERVER SETUP WINDOWS 8.1,VPN SERVER DEBIAN 8,VPN SERVER PORT 80,VPN SERVER WINDOWS 8.1 PRO,VPN SERVER ERROR 807,WINDOWS SERVER VPN ERROR 800,SERVER 2012 VPN ERROR 800,WINDOWS 8 SERVER VPN,WINDOWS 8 VPN SERVER SETUP,CREATE WINDOWS 8 VPN SERVER,DEBIAN 8 SERVER VPN,WINDOWS 8 VPN SERVER PORT,WINDOWS 8 VPN SERVER EINRICHTEN,WINDOWS 8 VPN SERVER KURULUMU,DEBIAN 9 VPN SERVER VPN,SERVER VPN WINDOWS 10,SERVER VPN GRATUIT,SERVER VPN FREE,SERVER VPN RASPBERRY PI,SERVER VPN ROMANIA,SERVER VPN WINDOWS,SERVER VPN JAPAN,SERVER VPN 2019,SERVER VPN WIN 10,SERVER VPN ACASA,SERVER VPN ANDROID FREE,SERVER VPN ADDRESS,SERVER VPN ASUS,SERVER VPN ARGENTINA,SERVER VPN ARDUINO,SERVER VPN APP,VPN SERVER ADDRESS FREE,VPN SERVER ADDRESS USA,A VPN SERVER ADDRESS,A VPN SERVER,CREATE A SERVER VPN,ACCESS A SERVER VPN,CREATING A VPN SERVER,BUILD A VPN SERVER,CREATE A VPN SERVER AT HOME,SETUP A VPN SERVER AT HOME,CREATE A VPN SERVER UBUNTU,HOST A VPN SERVER,SERVER VPN BRAZIL,SERVER VPN BOT MOBILE LEGEND,SERVER VPN BUAT MOBILE LEGEND,VPN BRAZIL SERVER,VPNBOOK SERVER,SERVER VPN BITDEFENDER,SERVER VPN BANGLADESH,VPN SERVER BEHIND NAT,VPN SERVER BEHIND ROUTER,VPN SERVER BEHIND NAT ROUTER,RASPBERRY PI B+ VPN SERVER,SERVER VPN CISCO,SERVER VPN CHINA,SERVER VPN CENTOS,SERVER VPN CONFIGURATION,SERVER VPN CLIENT,SERVER VPN CLOUD,SERVER VPN.COM,SERVER VPN CHINA FREE,SERVER VPN CENTOS 7,SERVER VPN CHROME,C VPN SERVER,CELL C VPN SERVER,SERVER VPN DOWNLOAD,SERVER VPN DEBIAN,SERVER VPN DD-WRT,VPN SERVER DID NOT RESPOND,VPN SERVER DOCKER,VPN SERVER DIGITALOCEAN,VPN SERVER DID NOT RESPOND IPHONE,VPN SERVER DEBIAN 9,VPN SERVER DOWNLOAD FREE,VPN SERVER DID NOT RESPOND MAC,D'LINK VPN SERVER,D'LINK VPN SERVER ROUTER,D'LINK 850L VPN SERVER,SERVER VPN EINRICHTEN,EXPRESSVPN SERVER,VPN SERVER EUROPE,VPN SERVER EDGEROUTER,VPN SERVER EDGEROUTER X,VPN SERVER EN WINDOWS 10,VPN SERVER EASY,VPN SERVER ESSENTIALS 2016,VPN SERVER EDGEOS,WINDOWS SERVER ESSENTIALS VPN,SERVER VPN FOR WINDOWS,SERVER VPN LINUX VPN SERVER,LINUX VPN CLIENT,LINUX VPN FREE,LINUX VPN SOLUTIONS,LINUX VPN DISTRO,LINUX VPN CONNECT,LINUX VPN REDDIT,LINUX VPN CLIENT CHECKPOINT,LINUX VPN SERVER DEBIAN,LINUX VPN APK,LINUX VPN APK DOWNLOAD,LINUX VPN APP,LINUX VPN APPLIANCE,LINUX VPN AUTO RECONNECT,LINUX VPN ANDROID,LINUX VPN AUTO CONNECT,LINUX VPN ANYCONNECT,LINUX VPN APPLICATION,LINUX AND VPN,CREATE A LINUX VPN SERVER,SETUP A LINUX VPN SERVER,BUILD A LINUX VPN SERVER,CREATE A VPN LINUX,SETUP A VPN LINUX,MAKE A VPN LINUX,CONNECT TO A VPN LINUX,HOW TO MAKE A LINUX VPN SERVER,LINUX VPN BOX,VPNBOOK LINUX,LINUX VPN BRIDGE,LINUX VPN BONDING,LINUX VPN BAIXAR,LINUX VPN BEHIND NAT,LINUX VPN BYPASS,LINUX VPN BEST PRACTICES,LINUX VPN CLIENTS,LINUX VPN COMMAND LINE,LINUX VPN CLIENT COMMAND LINE,LINUX VPN CLIENT IPSEC,LINUX VPN CISCO,VPN C LINUX,LINUX VPN DOWNLOAD,LINUX VPN DISTRIBUTION,LINUX VPN DEBIAN,LINUX VPN DOWNLOAD FREE,LINUX VPN DESCARGAR,LINUX VPN DNS,LINUX VPN DNS RESOLUTION,LINUX VPN DNS LEAK,LINUX VPN DEFAULT GATEWAY,LINUX VPN EINRICHTEN,LINUX VPN ENDPOINT,LINUX VPN EASY,LINUX VPN ETH,LINUX EXPRESS VPN,LINUX EASY VPN SERVER,KALI LINUX EXPRESS VPN,LINUX MINT EXPRESS VPN,VPN EN LINUX MINT,VPN EN LINUX UBUNTU,LINUX VPN FIREWALL,LINUX VPN FOR ANDROID,LINUX VPN FREE DOWNLOAD,LINUX VPN FORTICLIENT,LINUX VPN FOR WINDOWS,LINUX VPN FORTINET,LINUX VPN FREE SERVER,LINUX VPN FOR NETFLIX,LINUX VPN FRITZBOX,F SECURE VPN LINUX,LINUX VPN GATEWAY,LINUX VPN GUI,LINUX VPN GATE,LINUX VPN GITHUB,GLOBALPROTECT VPN FOR LINUX,LINUX VPN GRATUIT,LINUX VPN GRATIS,LINUX VPN GUI CLIENT,LINUX VPN GATEWAY DISTRO,LINUX VPN HOWTO,LINUX VPN HOST,LINUX VPN HOME SERVER,LINUX VPN HOTSPOT,LINUX VPN HIDE IP,LINUX HTTPS VPN,LINUX VPN TUNNEL HOWTO,LINUX VPN SERVER HOW TO,LINUX MINT VPN HOW TO,LINUX VPN PPTP CLIENT HOW TO,LINUX VPN IKEV2,LINUX VPN INSTALL,LINUX VPN IPSEC CLIENT,LINUX VPN IPSEC SERVER,LINUX VPN INDIR,LINUX VPN IMPORT FROM FILE,LINUX VPN INTERFACE,LINUX VPN IPHONE,LINUX INSTALL VPN SERVER,LINUX VPN JUNIPER,LINUX JUNIPER VPN CLIENT,LINUX JOURNAL VPN,ARCH LINUX JUNIPER VPN,LINUX MINT JUNIPER VPN,LINUX CONNECT TO JUNIPER VPN,JYU LINUX VPN,JHU LINUX VPN,LINUX VPN KILL SWITCH,LINUX VPN KERNEL,LINUX VPN KEEP ALIVE,LINUX VPN KEEPS DISCONNECTING,LINUX VPN KURULUMU,LINUX VPN KOSTENLOS,LINUX VPN KERNEL MODULE,LINUX VPN KAPATMA,LINUX VPN KILL SWITCH IPTABLES,LINUX VPN KILL,LINUX VPN LOGS,LINUX VPN L2TP,LINUX VPN LIST,LINUX VPN L2TP CLIENT,LINUX VPN L2TP SERVER,LINUX VPN L2TP IPSEC,LINUX VPN LANCOM,LINUX VPN L2TP UBUNTU,LINUX VPN COMMAND LINE CLIENT,LINUX VPN MANAGER,LINUX VPN MESH,LINUX VPN MTU,LINUX VPN MONITOR,LINUX VPN MESH NETWORK,LINUX VPN MIT FRITZBOX,LINUX VPN METRIC,LINUX VPN MTN,VPN LINUX MINT,LINUX VPN NOT CONNECTING,LINUX VPN NETFLIX,LINUX VPN NO INTERNET,LINUX VPN NETWORK MANAGER,LINUX VPN NAT,LINUX VPN NEW,LINUX VPN NETWORK,NORDVPN LINUX,ARCH LINUX VPN NETWORK MANAGER,LINUX VPN OPEN SOURCE,LINUX VPN OVER SSH,LINUX VPN OS,OPENVPN LINUX,OPENVPN SERVER LINUX,OPENVPN GUI LINUX,OPENVPN LINUX MINT,ARCH LINUX OPENVPN,LINUX VPN PROXY,LINUX VPN PORT FORWARDING,LINUX VPN PROTOCOLS,LINUX VPN PROXY SERVER,LINUX VPN PRE-SHARED KEY,LINUX VPN PPTP CLIENT,LINUX VPN PPTP SERVER,LINUX VPN PLUGIN,LINUX VPN PALO ALTO,LINUX QUICK VPN,LINUX VPN ROUTE ADD,LINUX VPN ROUTER,LINUX VPN ROUTING,LINUX VPN REMOTE ACCESS SERVER,LINUX VPN ROUTER DISTRO,LINUX VPN RASPBERRY PI,LINUX VPN REMOTE DESKTOP,LINUX VPN ROUTING TABLE,LINUX VPN REVIEW,LINUX VPN SERVER UBUNTU,LINUX VPN SERVER CENTOS,LINUX VPN SERVER SETUP,LINUX VPN TUTORIAL,LINUX VPN TERMINAL,LINUX VPN TO WINDOWS,LINUX VPN TO AZURE,LINUX VPN TIMEOUT,LINUX VPN TWO FACTOR AUTHENTICATION,LINUX VPN TO WINDOWS SERVER,LINUX VPN TOR,AT&T VPN LINUX,LINUX VPN UBUNTU,LINUX VPN UNLIMITED,LINUX VPN UK,LINUX VPN USA,LINUX USE VPN,LINUX UBUNTU VPN SERVER,VPN LINUX UBUNTU FREE,LINUX UBUNTU VPN SETUP,LINUX SET UP VPN,LINUX SET UP VPN SERVER,LINUX VPN VERBINDUNG,LINUX VPN VIVO,FRITZBOX VPN LINUX VPNC,VPN VOOR LINUX,LINUX VPN VERBINDUNG HERSTELLEN,LINUX VPN WIREGUARD,LINUX VPN WITH GUI,LINUX VPN WINDOWS,LINUX VPN WINDOWS SERVER,LINUX VPN WATCHGUARD,LINUX VPN WITHOUT ROOT,LINUX VPN WINDOWS CLIENT,LINUX VPN WEB GUI,LINUX VPN WEB INTERFACE,LINUX VPN WITHOUT TUN,VPN W LINUX,LINUX VPN XAUTH,LINUX VPN IPSEC XAUTH PSK,LINUX MINT XFCE VPN,VPN X LINUX,VPN LINUX XFCE,X VPN LINUX,VPN YF LINUX,YOCTO LINUX VPN,LINUX VPN YÜKLEME,KALI LINUX VPN YÜKLEME,VPN YHTEYS LINUX,VPN LINUX Y WINDOWS,ZYXEL LINUX VPN CLIENT,ZYXEL LINUX VPN,ZYWALL LINUX VPN CLIENT,LINUX VPN ZU FRITZBOX,LINUX Z VPN,VPN ZWISCHEN LINUX UND WINDOWS,LINUX MINT 19.1 VPN,VPN LINUX 16.04,VPN LINUX MINT 18,VPN LINUX MINT 19,LINUX MINT 18.3 VPN,LINUX MINT 19 VPN CLIENT,LINUX VPN 2018,LINUX VPN 2FA,KALI LINUX VPN 2018,KALI LINUX VPN 2017,KALI LINUX 2.0 VPN,LINUX 2 VPN CONNECTIONS,BEST LINUX VPN 2018,KALI LINUX VPN 2019,LINUX LAYER 2 VPN,LAYER 2 VPN LINUX,OPERA VPN LINUX 32,VPN 360 LINUX,3CX LINUX VPN,OPERA VPN LINUX 32 BIT,LINUX VPN SERVER CENTOS 6,JUNIPER VPN LINUX 64 BIT,VPN LINUX CENTOS 6,JUNIPER VPN LINUX 64,FORTICLIENT SSL VPN LINUX 64 BIT DOWNLOAD,FORTICLIENT 6 LINUX VPN,LINUX VPN CENTOS 7,ORACLE LINUX 7 VPN,VPN LINUX WINDOWS 7,SCIENTIFIC LINUX 7 VPN,LINUX PPTP VPN CENTOS 7,ORACLE LINUX 7 VPNC,LINUX VPN 9.4.6,LINUX-VPN 9.4.6.APK MOBILE VPN WITH SSL CLIENT,MOBILE VPN WITH SSL,MOBILE VPN FOR UAE,MOBILE VPN WITH SSL WATCHGUARD DOWNLOAD,MOBILE VPN THAT WORKS WITH NETFLIX,MOBILE VPN FOR NETFLIX,MOBILE VPN FREE,MOBILE VPN WITH SSL CLIENT DOWNLOAD,MOBILE VPN DOWNLOAD,MOBILE VPN APPS,MOBILE VPN ANDROID FREE,MOBILE VPN APP FREE,MOBILE VPN ANDROID FREE DOWNLOAD,MOBILE VPN APK,MOBILE VPN ACCESS,MOBILE AS VPN SERVER,WATCHGUARD MOBILE VPN ANDROID,DOES A MOBILE VPN USE DATA,WHAT IS A MOBILE VPN,WHY USE A MOBILE VPN,MOBILE VPN BEST,MOBILE VPN BENEFITS,MOBILE VPN BATTERY,MOBILE VPN BLOCKER,MOBILE VPN BOX,VPN MOBILE BANKING,OPERA MOBILE VPN BROWSER,PUBG MOBILE BEST VPN,MOBILE LEGENDS BEST VPN,B-MOBILE APN,B-MOBILE VPN接続,MOBILE VPN CLIENT,MOBILE VPN CHROME,MOBILE VPN CHINA,MOBILE VPN CHANGER,MOBILE VPN CONNECTION,MOBILE VPN CISCO,MOBILE VPN CRACK,MOBILE VPN CONFIGURATION,MOBILE VPN CHINA FREE,MOBILE VPN CHECKPOINT,MOBILE VPN DOWNLOAD WATCHGUARD,MOBILE VPN DEFINITION,MOBILE VPN DEVICE,MOBILE VPN DUBAI,MOBILE VPN DOESN'T WORK,MOBILE VPN DELIVERING ADVANCED SERVICES IN NEXT GENERATION WIRELESS SYSTEMS PDF,MOBILE VPN DATA COMPRESSION,VPN MOBILE DATA,VPN MOBILE DATA FREE,POINT D'ACCÈS MOBILE VPN,MOBILE EXPRESS VPN,FORTNITE MOBILE VPN ERROR,MOBILE CHROME VPN EXTENSION,MOBIL VPN EKŞI,MOBIL VPN EKLEME,MOBIL VPN EN IYI,MOBILEXPRESSION VPN,FORTNITE MOBILE VPN ERROR FIX,MOBILE VPN FREE INTERNET,MOBILE VPN FOR ANDROID,MOBILE VPN FREE ANDROID,MOBILE VPN FOR CHROME,MOBILE VPN FORTIGATE,F-VPN MOBILE,F-SECURE MOBILE VPN,F-SECURE FREEDOME VPN MOBILE,VPN MOBILE GRATUIT,MOBILE GAMING VPN,WATCHGUARD MOBILE VPN,GOOD MOBILE VPN,VPN GATE MOBILE,GOOGLE MOBILE VPN,GHIBLI MOBILE VPN,MOBILE LEGEND GB VPN,VPN MOBILE GROUP,VPN MOBILE GRATIS,MOBILE VPN HOW IT WORKS,MOBILE VPN HOW TO USE,MOBILE VPN HARDWARE,MOBILE VPN HACK,MOBILE VPN HONG KONG,MOBILE VPN HANDLER,MOBILE HOTSPOT VPN NOT WORKING,MOBILE HOTSPOT VPN WINDOWS 10,MOBILE LEGENDS VPN HACK,MOBILE VPN INDIA,MOBILE VPN IOS,MOBILE VPN IPSEC WATCHGUARD,MOBILE VPN IPHONE,MOBILE VPN IPSEC,MOBILE VPN IPSEC WATCHGUARD DOWNLOAD,MOBILE VPN IPHONE FREE,MOBILE VPN IP,VPN MOBILE INTERNET FREE,BEST MOBILE VPN IOS FREE,MOBILE VPN JAPAN,MOBILE JUMP VPN,VPN MOBILE JAVA,NOKIA MOBILE VPN JAR,VPN MOBILE LEGEND JEPANG,JALANTIKUS VPN MOBILE LEGEND,VPN MOBILE LEGEND JALANTIKUS,VPN JAPAN MOBILE LEGEND,VPN MOBILE LEGENDS,VPN MOBILE KILL SWITCH,WATCHGUARD MOBILE VPN KEEPS DISCONNECTING,MOBILE ME VPN KAISE SET KARE,FORTNITE MOBILE VPN KICK,WATCHGUARD MOBILE VPN KEEP ALIVE,MOBIL VERIDE VPN KULLANMAK,MOBIL VERI VPN KULLANMAK,MOBILE VPN LINE,MOBILE VPN L2TP WATCHGUARD,MOBILE VPN LAPTOP,MOBILE LEGENDS VPN CHEAT,MOBILE LEGENDS VPN TRICK,VPN MOBILE LEGENDS MEANING,VPN MOBILE LEGEND,VPN MOBILE LEGEND APK,VPN MOBILE LEGENDS APK,MOBILE VPN MEANS,MOBILE VPN MARKET,WATCHGUARD MOBILE VPN MAC,MOBILE LEGENDS VPN MEANING,CHECKPOINT MOBILE VPN CLIENT MAC,WATCHGUARD MOBILE VPN MAC DOWNLOAD,MOBILE LEGEND VPN MASTER,MOBILE LEGEND MENGGUNAKAN VPN,VPN MOBILE LEGEND MIKROTIK,VPN MOBILE LEGEND MOD,BUSINESS MOBILE M VPN,MOBILE VPN NETFLIX,MOBILE VPN NOT WORKING,MOBILE VPN NOT CONNECTING,MOBILE VPN NETWORK,MOBILE VPN NUMBER,NETMOTION MOBILITY VPN,MOBILE VPN NET,MOBILE NORD VPN,MOBILE VPN OPERA,MOBILE VPN ONLINE,MOBILE VPN ON ANDROID,MOBILE VPN OPERA BROWSER,MOBILE VPN ON IPHONE,WATCHGUARD MOBILE VPN ON MAC,PUBG MOBILE ON VPN,MOBILE HOTSPOT OVER VPN,VPN ON MOBILE,VPN ON MOBILE DATA,USE OF MOBILE VPN,OPERA ON MOBILE VPN,USES OF MOBILE VPN,MOBILE VPN PASSWORD,MOBILE VPN PHILIPPINES,MOBILE VPN PROVIDERS,MOBILE VPN PFSENSE,MOBILE VPN PROXY,MOBILE VPN PROTOCOL,MOBILE VPN PROFILE,MOBILE VPN PDF,MOBILE VPN PALO ALTO,MOBILE VPN PPTP,BEST MOBILE VPN QUORA,Q MOBILE APN SETTING,VPN MOBILE O QUE SIGNIFICA,MOBILE VPN REDDIT,MOBILE VPN REVIEW,MOBILE VPN ROUTER,MOBILE VPN REDDIT IOS,MOBILE VPN REQUIRED,MOBILE WIFI ROUTER VPN,BEST MOBILE VPN REDDIT,FREE MOBILE VPN REDDIT,MOBILE VPN UPDATE REQUIRED,AVAST MOBILE VPN REVIEW,MOBILE VPN SETTING,MOBILE VPN SSL,MOBILE VPN SSL CLIENT,MOBILE VPN SOLUTIONS,MOBILE VPN SERVICE,MOBILE VPN SOFTWARE,MOBILE VPN SERVER,MOBILE VPN SECURITY,MOBILE VPN SSL WATCHGUARD,BUSINESS MOBILE S VPN,T MOBILE BUSINESS MOBILE S VPN,MOBILE VPN TELEKOM,MOBILE VPN TELKOMSEL,MOBILE VPN THAT WORKS IN CHINA,MOBILE VPN TUNNEL,MOBILE VPN TO PC,MOBILE VPN TECHNOLOGY,MOBILE VPN TUTORIAL,MOBILE VPN TYPE,T MOBILE APN,T MOBILE APN IPHONE,T MOBILE APN CONFIGURATION,T MOBILE APN SETUP,T MOBILE VPN SERVICE,T MOBILE VPN ISSUES,T MOBILE VPN SERVER ADDRESS,T MOBILE VPN,MOBILE VPN UK,MOBILE VPN USES,MOBILE VPN USE,MOBILE VPN UAE,MOBILE VPN UNIBAS,MOBILE VPN USA,MOBILE VPN UNSUCCESSFUL,MOBILE VPN US,U MOBILE VPN,U MOBILE VPN UNLIMITED,U MOBILE UNLIMITED VPN APK,APN U MOBILE 4G,U MOBILE IPHONE VPN,U MOBILE FREE VPN,U MOBILE UNLIMITED INTERNET VPN,VPN U MOBILE MALAYSIA,VECTONE MOBILE VPN,MOBILE VPN FREE VPN SERVER,MOBILE VPN FREE VPN,VPN MOBILE VIKINGS,VPN MOBILE VODAFONE,MOBIL VERI VPN,MOBIL VERI VPN DEĞIŞTIRME,MOBIL VERI VPN BAĞLANMIYOR,VPN V MOBILE,MOBILE VPN WITH SSL CLIENT ANDROID,MOBILE VPN WIKI,MOBILE VPN WATCHGUARD ANDROID,MOBILE VPN WITH SSL CLIENT FREE DOWNLOAD,MOBILE VPN WITH SSL CLIENT SOFTWARE DOWNLOAD,WINDOWS MOBILE VPN,WINDOWS MOBILE VPN FREE,WINDOWS 10 MOBILE VPN,WINDOWS MOBILE 6.5 VPN,WINDOWS MOBILE 6.5 VPN CLIENT,WINDOWS 10 MOBILE VPN CLIENT,WINDOWS MOBILE 6.5 VPN SETUP,WINDOWS 10 MOBILE VPN FREE,WINDOWS MOBILE VPN CLIENT,WINDOWS MOBILE VPN APP,MOBILE X VPN,XFINITY MOBILE VPN,XFINITY MOBILE APN SETTINGS,WATCHGUARD MOBILE VPN WINDOWS XP,BUSINESS MOBILE XL VPN,X VPN MOBILE,VPN MOBILE LEGEND YANG TIDAK LAG,VPN MOBILE LEGEND YANG BAGUS,FREE MOBILE YOUTUBE VPN ANDROID,Y MOBILE VPN,VPN YEMEN MOBILE,VPN YOUTUBE MOBILE,YEMEN MOBILE APN SETTING,YAHOO MOBILE VPN,VPN MOBILE LEGEND YG BAGUS,Y MOBILE VPN設定,MOBILE ZONE VPN,MOBILE IP VPN ZUSATZVERTRÄGE,T MOBILE VPN ZA SVE M,T MOBILE VPN ZA SVE L,Z MOBILE VPN,ZSCALER MOBILE VPN,ZYXEL MOBILE VPN,ZENMATE MOBILE VPN,WINDOWS MOBILE 10 VPN,MOBILE HOTSPOT WINDOWS 10 VPN,WATCHGUARD MOBILE VPN 10.22,WATCHGUARD MOBILE VPN 12,WATCHGUARD MOBILE VPN 12 DOWNLOAD,WATCHGUARD MOBILE VPN 11.12.4,WATCHGUARD MOBILE VPN 10.22 BUILD 15 DOWNLOAD,WATCHGUARD MOBILE VPN 12.2,MOBILE VPN WITH SSL 12.0 FOR WINDOWS,VPN 1 MOBILE,MOBILE LEGENDS VPN 2018,MOBILE VPN 2018,MOBILE LEGEND VPN 2018,BEST MOBILE VPN 2018,BEST MOBILE VPN 2019,WATCHGUARD MOBILE VPN 2FA,MOBILE LEGEND VPN 2019,BEST FREE MOBILE VPN 2018,VPN MOBILE LEGEND 2018 APK,PUBG MOBILE LITE VPN 2019,3 MOBILE APN,THREE MOBILE VPN,VPN MOBILE 4G,WATCHGUARD MOBILE VPN 5.31,TOP 5 MOBILE VPN,WINDOWS MOBILE 6.1 VPN,WINDOWS MOBILE 6 VPN CLIENT,WINDOWS MOBILE 6.1 VPN CLIENT,MOBILE VPN WATCHGUARD WINDOWS 7,WINDOWS 10 MOBILE VPN 789,CHECKPOINT MOBILE VPN WINDOWS 7,CHECKPOINT MOBILE VPN CLIENT 80.80,WINDOWS 10 MOBILE VPN 809,9 MOBILE VPN,MOBILE9 FREE VPN
0 notes