#Ceph Storage Configuration
Explore tagged Tumblr posts
Visit Tumblr Blog
Explore Tumblr blogs with no restrictions, modern design and the best experience.
Last Seen Tumblr Blogs


Fun Fact
The most popular pages on Tumblr are about Minecraft, GIFs, and David J. Peterson.
Text
Mastering Ceph Storage Configuration in Proxmox 8 Cluster
Mastering Ceph Storage Configuration in Proxmox 8 Cluster #100daysofhomelab #proxmox8 #cephstorage #CephStorageConfiguration #ProxmoxClusterSetup #ObjectStorageInCeph #CephBlockStorage #CephFileSystem #CephClusterManagement #CephAndProxmoxIntegration
The need for highly scalable storage solutions that are fault-tolerant and offer a unified system is undeniably significant in data storage. One such solution is Ceph Storage, a powerful and flexible storage system that facilitates data replication and provides data redundancy. In conjunction with Proxmox, an open-source virtualization management platform, it can help manage important business…

View On WordPress
#Ceph and Proxmox Integration#Ceph Block Storage#Ceph Cluster Management#Ceph File System#Ceph OSD Daemons#Ceph Storage Configuration#Data Replication in Ceph#High Scalability Storage Solution#Object Storage in Ceph#Proxmox Cluster Setup
0 notes
Text
Enterprise Kubernetes Storage with Red Hat OpenShift Data Foundation (DO370)
In today’s fast-paced cloud-native world, managing storage across containers and Kubernetes platforms can be complex and resource-intensive. Red Hat OpenShift Data Foundation (ODF), formerly known as OpenShift Container Storage (OCS), provides an integrated and robust solution for managing persistent storage in OpenShift environments. One of Red Hat’s key training offerings in this space is the DO370 course – Enterprise Kubernetes Storage with Red Hat OpenShift Data Foundation.
In this blog post, we’ll explore the highlights of this course, what professionals can expect to learn, and why ODF is a game-changer for enterprise Kubernetes storage.
What is Red Hat OpenShift Data Foundation?
Red Hat OpenShift Data Foundation is a software-defined storage solution built on Ceph and tightly integrated with Red Hat OpenShift. It provides persistent, scalable, and secure storage for containers, enabling stateful applications to thrive in a Kubernetes ecosystem.
With ODF, enterprises can manage block, file, and object storage across hybrid and multi-cloud environments—without the complexities of managing external storage systems.
Course Overview: DO370
The DO370 course is designed for developers, system administrators, and site reliability engineers who want to deploy and manage Red Hat OpenShift Data Foundation in an OpenShift environment. It is a hands-on lab-intensive course, emphasizing practical experience over theory.
Key Topics Covered:
Introduction to storage challenges in Kubernetes
Deployment of OpenShift Data Foundation
Managing block, file, and object storage
Configuring storage classes and dynamic provisioning
Monitoring, troubleshooting, and managing storage usage
Integrating with workloads such as databases and CI/CD tools
Why DO370 is Essential for Modern IT Teams
1. Storage Made Kubernetes-Native
ODF integrates seamlessly with OpenShift, giving developers self-service access to dynamic storage provisioning without needing to understand the underlying infrastructure.
2. Consistency Across Environments
Whether your workloads run on-prem, in the cloud, or at the edge, ODF provides a consistent storage layer, which is critical for hybrid and multi-cloud strategies.
3. Data Resiliency and High Availability
With Ceph at its core, ODF provides high availability, replication, and fault tolerance, ensuring data durability across your Kubernetes clusters.
4. Hands-on Experience with Industry-Relevant Tools
DO370 includes hands-on labs with tools like NooBaa for S3-compatible object storage and integrates storage into realistic OpenShift use cases.
Who Should Take This Course?
OpenShift Administrators looking to extend their skills into persistent storage.
Storage Engineers transitioning to container-native storage solutions.
DevOps professionals managing stateful applications in OpenShift environments.
Teams planning to scale enterprise workloads that require reliable data storage in Kubernetes.
Certification Pathway
DO370 is part of the Red Hat Certified Architect (RHCA) infrastructure track and is a valuable step for anyone pursuing expert-level certification in OpenShift or storage technologies. Completing this course helps prepare for the EX370 certification exam.
Final Thoughts
As enterprises continue to shift towards containerized and cloud-native application architectures, having a reliable and scalable storage solution becomes non-negotiable. Red Hat OpenShift Data Foundation addresses this challenge, and the DO370 course is the perfect entry point for mastering it.
If you're an IT professional looking to gain expertise in Kubernetes-native storage and want to future-proof your career, Enterprise Kubernetes Storage with Red Hat OpenShift Data Foundation (DO370) is the course to take. For more details www.hawkstack.com
0 notes
Text
OpenShift Virtualization Architecture: Inside KubeVirt and Beyond
OpenShift Virtualization, powered by KubeVirt, enables organizations to run virtual machines (VMs) alongside containerized workloads within the same Kubernetes platform. This unified infrastructure offers seamless integration, efficiency, and scalability. Let’s delve into the architecture that makes OpenShift Virtualization a robust solution for modern workloads.
The Core of OpenShift Virtualization: KubeVirt
What is KubeVirt?
KubeVirt is an open-source project that extends Kubernetes to manage and run VMs natively. By leveraging Kubernetes' orchestration capabilities, KubeVirt bridges the gap between traditional VM-based applications and modern containerized workloads.
Key Components of KubeVirt Architecture
Virtual Machine (VM) Custom Resource Definition (CRD):
Defines the specifications and lifecycle of VMs as Kubernetes-native resources.
Enables seamless VM creation, updates, and deletion using Kubernetes APIs.
Virt-Controller:
Ensures the desired state of VMs.
Manages operations like VM start, stop, and restart.
Virt-Launcher:
A pod that hosts the VM instance.
Ensures isolation and integration with Kubernetes networking and storage.
Virt-Handler:
Runs on each node to manage VM-related operations.
Communicates with the Virt-Controller to execute tasks such as attaching disks or configuring networking.
Libvirt and QEMU/KVM:
Underlying technologies that provide VM execution capabilities.
Offer high performance and compatibility with existing VM workloads.
Integration with Kubernetes Ecosystem
Networking
OpenShift Virtualization integrates with Kubernetes networking solutions, such as:
Multus: Enables multiple network interfaces for VMs and containers.
SR-IOV: Provides high-performance networking for VMs.
Storage
Persistent storage for VMs is achieved using Kubernetes StorageClasses, ensuring that VMs have access to reliable and scalable storage solutions, such as:
Ceph RBD
NFS
GlusterFS
Security
Security is built into OpenShift Virtualization with:
SELinux: Enforces fine-grained access control.
RBAC: Manages access to VM resources via Kubernetes roles and bindings.
Beyond KubeVirt: Expanding Capabilities
Hybrid Workloads
OpenShift Virtualization enables hybrid workloads by allowing applications to:
Combine VM-based legacy components with containerized microservices.
Transition legacy apps into cloud-native environments gradually.
Operator Framework
OpenShift Virtualization leverages Operators to automate lifecycle management tasks like deployment, scaling, and updates for VM workloads.
Performance Optimization
Supports GPU passthrough for high-performance workloads, such as AI/ML.
Leverages advanced networking and storage features for demanding applications.
Real-World Use Cases
Dev-Test Environments: Developers can run VMs alongside containers to test different environments and dependencies.
Data Center Consolidation: Consolidate traditional and modern workloads on a unified Kubernetes platform, reducing operational overhead.
Hybrid Cloud Strategy: Extend VMs from on-premises to cloud environments seamlessly with OpenShift.
Conclusion
OpenShift Virtualization, with its KubeVirt foundation, is a game-changer for organizations seeking to modernize their IT infrastructure. By enabling VMs and containers to coexist and collaborate, OpenShift bridges the past and future of application workloads, unlocking unparalleled efficiency and scalability.
Whether you're modernizing legacy systems or innovating with cutting-edge technologies, OpenShift Virtualization provides the tools to succeed in today’s dynamic IT landscape.
For more information visit: https://www.hawkstack.com/
0 notes
Text
Proxmox is an open-source server virtualization platform that allows you to manage and deploy virtual machines and containers. It is based on Debian and provides a powerful web-based graphical interface for easy management. Here's an ultimate guide on how to install and configure Proxmox: [tie_index]System Requirements[/tie_index] [padding top="0" bottom="0" right="5%" left="5%"] System Requirements: A dedicated physical machine or server. Sufficient CPU, RAM, and storage resources for your virtualization needs. Compatible hardware for virtualization (CPU with Intel VT or AMD-V support). [tie_index]Installation[/tie_index] [padding top="0" bottom="0" right="5%" left="5%"] Installation: Download the Proxmox VE ISO image from the Proxmox website (https://www.proxmox.com/downloads). Create a bootable USB or burn the ISO to a DVD. Boot your server from the USB or DVD. Follow the on-screen instructions to install Proxmox VE. Choose a suitable installation option, such as wiping the entire disk or installing alongside an existing operating system. Set a root password and configure the network settings. [tie_index]Initial Configuration[/tie_index] [padding top="0" bottom="0" right="5%" left="5%"] Initial Configuration: After installation, access the Proxmox web interface by opening a web browser and entering the IP address of your Proxmox server (https://:8006). Accept the self-signed SSL certificate warning (or install a trusted SSL certificate). Log in using the root username and the password you set during installation. [tie_index]Network Configuration[/tie_index] [padding top="0" bottom="0" right="5%" left="5%"] Network Configuration: Configure your network interfaces by going to "Datacenter" in the left-hand menu and selecting "Network" in the top menu. Edit the "vmbr0" interface to match your network settings, such as IP address, subnet mask, gateway, and DNS servers. [tie_index]Storage Configuration[/tie_index] [padding top="0" bottom="0" right="5%" left="5%"] Storage Configuration: Proxmox uses different storage types, including local storage, iSCSI, NFS, and Ceph. Choose the appropriate storage type based on your requirements. To add storage, go to "Datacenter" and select "Storage" in the top menu. Click "Add" and follow the wizard to configure the storage type, path, and other relevant settings. [tie_index]Create Virtual Machines (VMs)[/tie_index] [padding top="0" bottom="0" right="5%" left="5%"] Create Virtual Machines (VMs): Click on "Create VM" in the top menu to start the VM creation wizard. Select the desired options, such as VM ID, name, guest OS, CPU, RAM, and disk size. Choose the storage location for the VM disk. Configure the network settings for the VM. Complete the wizard, and the VM will be created. [tie_index]Additional Configuration[/tie_index] [padding top="0" bottom="0" right="5%" left="5%"] Additional Configuration: Proxmox offers many advanced features, such as high availability (HA), clustering, and backups. Explore the Proxmox documentation for more details on these features and how to configure them based on your requirements. Remember to regularly update your Proxmox installation by applying the latest updates and security patches. Please note that this is a general guide, and the steps may vary based on the specific version of Proxmox you are using. Always refer to the official Proxmox documentation for detailed instructions and the most up-to-date information.
0 notes
Text
In this guide, we will cover the install... https://www.computingpost.com/how-to-install-ceph-storage-cluster-on-ubuntu-18-04-lts/?feed_id=19538&_unique_id=6375672c5baaf
0 notes
Text
Ceph Client

Ceph.client.admin.keyring ceph.bootstrap-mgr.keyring ceph.bootstrap-osd.keyring ceph.bootstrap-mds.keyring ceph.bootstrap-rgw.keyring ceph.bootstrap-rbd.keyring Use ceph-deploy to copy the configuration file and admin key to your admin node and your Ceph Nodes so that you can use the ceph CLI without having to specify the monitor address.
Generate a minimal ceph.conf file, make a local copy, and transfer it to the client: juju ssh ceph-mon/0 sudo ceph config generate-minimal-conf tee ceph.conf juju scp ceph.conf ceph-client/0: Connect to the client: juju ssh ceph-client/0 On the client host, Install the required software, put the ceph.conf file in place, and set up the correct.
1.10 Installing a Ceph Client. To install a Ceph Client: Perform the following steps on the system that will act as a Ceph Client: If SELinux is enabled, disable it and then reboot the system. Stop and disable the firewall service. For Oracle Linux 6 or Oracle Linux 7 (where iptables is used instead of firewalld ), enter: For Oracle Linux 7, enter.
Ceph kernel client (kernel modules). Contribute to ceph/ceph-client development by creating an account on GitHub. Get rid of the releases annotation by breaking it up into two functions: prepcap which is done under the spinlock and sendcap that is done outside it.
Ceph Client List
Ceph Client Log
Ceph Client Windows
A python client for ceph-rest-api After learning there was an API for Ceph, it was clear to me that I was going to write a client to wrap around it and use it for various purposes. January 1, 2014.
Ceph is a massively scalable, open source, distributed storage system.
These links provide details on how to use Ceph with OpenStack:
Ceph - The De Facto Storage Backend for OpenStack(Hong Kong Summittalk)
Note
Configuring Ceph storage servers is outside the scope of this documentation.
Authentication
We recommend the cephx authentication method in the Cephconfig reference. OpenStack-Ansible enables cephx by default forthe Ceph client. You can choose to override this setting by using thecephx Ansible variable:
Deploy Ceph on a trusted network if disabling cephx.
Configuration file overrides
OpenStack-Ansible provides the ceph_conf_file variable. This allowsyou to specify configuration file options to override the defaultCeph configuration:
The use of the ceph_conf_file variable is optional. By default,OpenStack-Ansible obtains a copy of ceph.conf from one of your Cephmonitors. This transfer of ceph.conf requires the OpenStack-Ansibledeployment host public key to be deployed to all of the Ceph monitors. Moredetails are available here: Deploying SSH Keys.
The following minimal example configuration sets nova and glanceto use ceph pools: ephemeral-vms and images respectively.The example uses cephx authentication, and requires existing glance andcinder accounts for images and ephemeral-vms pools.
For a complete example how to provide the necessary configuration for a Cephbackend without necessary access to Ceph monitors via SSH please seeCeph keyring from file example.
Extra client configuration files
Deployers can specify extra Ceph configuration files to supportmultiple Ceph cluster backends via the ceph_extra_confs variable.

Ceph Client List
These config file sources must be present on the deployment host.
Ceph Client Log
Alternatively, deployers can specify more options in ceph_extra_confsto deploy keyrings, ceph.conf files, and configure libvirt secrets.
The primary aim of this feature is to deploy multiple ceph clusters ascinder backends and enable nova/libvirt to mount block volumes from thosebackends. These settings do not override the normal deployment ofceph client and associated setup tasks.
Deploying multiple ceph clusters as cinder backends requires the followingadjustments to each backend in cinder_backends Onyx sierra.
The dictionary keys rbd_ceph_conf, rbd_user, and rbd_secret_uuidmust be unique for each ceph cluster to used as a cinder_backend.
Monitors
The Ceph Monitor maintains a master copy of the cluster map.OpenStack-Ansible provides the ceph_mons variable and expects a list ofIP addresses for the Ceph Monitor servers in the deployment:
Configure os_gnocchi with ceph_client
Ceph Client Windows

If the os_gnocchi role is going to utilize the ceph_client role, the followingconfigurations need to be added to the user variable file:
0 notes
Text
How to Deploy a Ceph Storage to Bare Virtual Machines
Ceph is a freely available storage platform that implements object storage on a single distributed computer cluster and provides interfaces for object-, block- and file-level storage. Ceph aims primarily for completely distributed operation without a single point of failure. Ceph storage manages data replication and is generally quite fault-tolerant. As a result of its design, the system is both self-healing and self-managing.
Ceph has loads of benefits and great features, but the main drawback is that you have to host and manage it yourself. In this post, we'll check two different approaches of virtual machine deployment with Ceph.
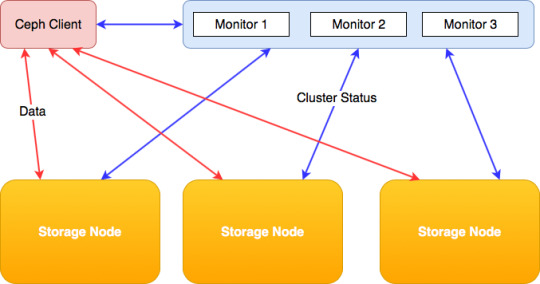
Anatomy of a Ceph cluster
Before we dive into the actual deployment process, let's see what we'll need to fire up for our own Ceph cluster.
There are three services that form the backbone of the cluster
ceph monitors (ceph-mon) maintain maps of the cluster state and are also responsible for managing authentication between daemons and clients
managers (ceph-mgr) are responsible for keeping track of runtime metrics and the current state of the Ceph cluster
object storage daemons (ceph-osd) store data, handle data replication, recovery, rebalancing, and provide some ceph monitoring information.
Additionally, we can add further parts to the cluster to support different storage solutions
metadata servers (ceph-mds) store metadata on behalf of the Ceph Filesystem
rados gateway (ceph-rgw) is an HTTP server for interacting with a Ceph Storage Cluster that provides interfaces compatible with OpenStack Swift and Amazon S3.
There are multiple ways of deploying these services. We'll check two of them:
first, using the ceph/deploy tool,
then a docker-swarm based vm deployment.
Let's kick it off!
Ceph Setup
Okay, a disclaimer first. As this is not a production infrastructure, we’ll cut a couple of corners.
You should not run multiple different Ceph demons on the same host, but for the sake of simplicity, we'll only use 3 virtual machines for the whole cluster.
In the case of OSDs, you can run multiple of them on the same host, but using the same storage drive for multiple instances is a bad idea as the disk’s I/O speed might limit the OSD daemons’ performance.
For this tutorial, I've created 4 EC2 machines in AWS: 3 for Ceph itself and 1 admin node. For ceph-deploy to work, the admin node requires passwordless SSH access to the nodes and that SSH user has to have passwordless sudo privileges.
In my case, as all machines are in the same subnet on AWS, connectivity between them is not an issue. However, in other cases editing the hosts file might be necessary to ensure proper connection.
Depending on where you deploy Ceph security groups, firewall settings or other resources have to be adjusted to open these ports
22 for SSH
6789 for monitors
6800:7300 for OSDs, managers and metadata servers
8080 for dashboard
7480 for rados gateway
Without further ado, let's start deployment.
Ceph Storage Deployment
Install prerequisites on all machines
$ sudo apt update $ sudo apt -y install ntp python
For Ceph to work seamlessly, we have to make sure the system clocks are not skewed. The suggested solution is to install ntp on all machines and it will take care of the problem. While we're at it, let's install python on all hosts as ceph-deploy depends on it being available on the target machines.
Prepare the admin node
$ ssh -i ~/.ssh/id_rsa -A [email protected]
As all the machines have my public key added to known_hosts thanks to AWS, I can use ssh agent forwarding to access the Ceph machines from the admin node. The first line ensures that my local ssh agent has the proper key in use and the -A flag takes care of forwarding my key.
$ wget -q -O- 'https://download.ceph.com/keys/release.asc' | sudo apt-key add - echo deb https://download.ceph.com/debian-nautilus/ $(lsb_release -sc) main | sudo tee /etc/apt/sources.list.d/ceph.list $ sudo apt update $ sudo apt -y install ceph-deploy
We'll use the latest nautilus release in this example. If you want to deploy a different version, just change the debian-nautilus part to your desired release (luminous, mimic, etc.).
$ echo "StrictHostKeyChecking no" | sudo tee -a /etc/ssh/ssh_config > /dev/null
OR
$ ssh-keyscan -H 10.0.0.124,10.0.0.216,10.0.0.104 >> ~/.ssh/known_hosts
Ceph-deploy uses SSH connections to manage the nodes we provide. Each time you SSH to a machine that is not in the list of known_hosts (~/.ssh/known_hosts), you'll get prompted whether you want to continue connecting or not. This interruption does not mesh well with the deployment process, so we either have to use ssh-keyscan to grab the fingerprint of all the target machines or disable the strict host key checking outright.
10.0.0.124 ip-10-0-0-124.eu-north-1.compute.internal ip-10-0-0-124 10.0.0.216 ip-10-0-0-216.eu-north-1.compute.internal ip-10-0-0-216 10.0.0.104 ip-10-0-0-104.eu-north-1.compute.internal ip-10-0-0-104
Even though the target machines are in the same subnet as our admin and they can access each other, we have to add them to the hosts file (/etc/hosts) for ceph-deploy to work properly. Ceph-deploy creates monitors by the provided hostname, so make sure it matches the actual hostname of the machines otherwise the monitors won't be able to join the quorum and the deployment fails. Don't forget to reboot the admin node for the changes to take effect.
$ mkdir ceph-deploy $ cd ceph-deploy
As a final step of the preparation, let's create a dedicated folder as ceph-deploy will create multiple config and key files during the process.
Deploy resources
$ ceph-deploy new ip-10-0-0-124 ip-10-0-0-216 ip-10-0-0-104
The command ceph-deploy new creates the necessary files for the deployment. Pass it the hostnames of the monitor nodes, and it will create cepf.conf and ceph.mon.keyring along with a log file.
The ceph-conf should look something like this
[global] fsid = 0572e283-306a-49df-a134-4409ac3f11da mon_initial_members = ip-10-0-0-124, ip-10-0-0-216, ip-10-0-0-104 mon_host = 10.0.0.124,10.0.0.216,10.0.0.104 auth_cluster_required = cephx auth_service_required = cephx auth_client_required = cephx
It has a unique ID called fsid, the monitor hostnames and addresses and the authentication modes. Ceph provides two authentication modes: none (anyone can access data without authentication) or cephx (key based authentication).
The other file, the monitor keyring is another important piece of the puzzle, as all monitors must have identical keyrings in a cluster with multiple monitors. Luckily ceph-deploy takes care of the propagation of the key file during virtual deployments.
$ ceph-deploy install --release nautilus ip-10-0-0-124 ip-10-0-0-216 ip-10-0-0-104
As you might have noticed so far, we haven't installed ceph on the target nodes yet. We could do that one-by-one, but a more convenient way is to let ceph-deploy take care of the task. Don't forget to specify the release of your choice, otherwise you might run into a mismatch between your admin and targets.
$ ceph-deploy mon create-initial
Finally, the first piece of the cluster is up and running! create-initial will deploy the monitors specified in ceph.conf we generated previously and also gather various key files. The command will only complete successfully if all the monitors are up and in the quorum.
$ ceph-deploy admin ip-10-0-0-124 ip-10-0-0-216 ip-10-0-0-104
Executing ceph-deploy admin will push a Ceph configuration file and the ceph.client.admin.keyring to the /etc/ceph directory of the nodes, so we can use the ceph CLI without having to provide the ceph.client.admin.keyring each time to execute a command.
At this point, we can take a peek at our cluster. Let's SSH into a target machine (we can do it directly from the admin node thanks to agent forwarding) and run sudo ceph status.
$ sudo ceph status cluster: id: 0572e283-306a-49df-a134-4409ac3f11da health: HEALTH_OK services: mon: 3 daemons, quorum ip-10-0-0-104,ip-10-0-0-124,ip-10-0-0-216 (age 110m) mgr: no daemons active osd: 0 osds: 0 up, 0 in data: pools: 0 pools, 0 pgs objects: 0 objects, 0 B usage: 0 B used, 0 B / 0 B avail pgs:
Here we get a quick overview of what we have so far. Our cluster seems to be healthy and all three monitors are listed under services. Let's go back to the admin and continue adding pieces.
$ ceph-deploy mgr create ip-10-0-0-124
For luminous+ builds a manager daemon is required. It's responsible for monitoring the state of the Cluster and also manages modules/plugins.
Okay, now we have all the management in place, let's add some storage to the cluster to make it actually useful, shall we?
First, we have to find out (on each target machine) the label of the drive we want to use. To fetch the list of available disks on a specific node, run
$ ceph-deploy disk list ip-10-0-0-104
Here's a sample output:

$ ceph-deploy osd create --data /dev/nvme1n1 ip-10-0-0-124 $ ceph-deploy osd create --data /dev/nvme1n1 ip-10-0-0-216 $ ceph-deploy osd create --data /dev/nvme1n1 ip-10-0-0-104
In my case the label was nvme1n1 on all 3 machines (courtesy of AWS), so to add OSDs to the cluster I just ran these 3 commands.
At this point, our cluster is basically ready. We can run ceph status to see that our monitors, managers and OSDs are up and running. But nobody wants to SSH into a machine every time to check the status of the cluster. Luckily there's a pretty neat dashboard that comes with Ceph, we just have to enable it.
...Or at least that's what I thought. The dashboard was introduced in luminous release and was further improved in mimic. However, currently we're deploying nautilus, the latest version of Ceph. After trying the usual way of enabling the dashboard via a manager
$ sudo ceph mgr module enable dashboard
we get an error message saying Error ENOENT: all mgr daemons do not support module 'dashboard', pass --force to force enablement.
Turns out, in nautilus the dashboard package is no longer installed by default. We can check the available modules by running
$ sudo ceph mgr module ls
and as expected, dashboard is not there, it comes in a form a separate package. So we have to install it first, luckily it's pretty easy.
$ sudo apt install -y ceph-mgr-dashboard
Now we can enable it, right? Not so fast. There's a dependency that has to be installed on all manager hosts, otherwise we get a slightly cryptic error message saying Error EIO: Module 'dashboard' has experienced an error and cannot handle commands: No module named routes.
$ sudo apt install -y python-routes
We're all set to enable the dashboard module now. As it's a public-facing page that requires login, we should set up a cert for SSL. For the sake of simplicity, I've just disabled the SSL feature. You should never do this in production, check out the official docs to see how to set up a cert properly. Also, we'll need to create an admin user so we can log in to our dashboard.
$ sudo ceph mgr module enable dashboard $ sudo ceph config set mgr mgr/dashboard/ssl false $ sudo ceph dashboard ac-user-create admin secret administrator
By default, the dashboard is available on the host running the manager on port 8080. After logging in, we get an overview of the cluster status, and under the cluster menu, we get really detailed overviews of each running daemon.


If we try to navigate to the Filesystems or Object Gateway tabs, we get a notification that we haven't configured the required resources to access these features. Our cluster can only be used as a block storage right now. We have to deploy a couple of extra things to extend its usability.
Quick detour: In case you're looking for a company that can help you with Ceph, or DevOps in general, feel free to reach out to us at RisingStack!
Using the Ceph filesystem
Going back to our admin node, running
$ ceph-deploy mds create ip-10-0-0-124 ip-10-0-0-216 ip-10-0-0-104
will create metadata servers, that will be inactive for now, as we haven’t enabled the feature yet. First, we need to create two RADOS pools, one for the actual data and one for the metadata.
$ sudo ceph osd pool create cephfs_data 8 $ sudo ceph osd pool create cephfs_metadata 8
There are a couple of things to consider when creating pools that we won’t cover here. Please consult the documentation for further details.
After creating the required pools, we’re ready to enable the filesystem feature
$ sudo ceph fs new cephfs cephfs_metadata cephfs_data
The MDS daemons will now be able to enter an active state, and we are ready to mount the filesystem. We have two options to do that, via the kernel driver or as FUSE with ceph-fuse.
Before we continue with the mounting, let’s create a user keyring that we can use in both solutions for authorization and authentication as we have cephx enabled. There are multiple restrictions that can be set up when creating a new key specified in the docs. For example:
$ sudo ceph auth get-or-create client.user mon 'allow r' mds 'allow r, allow rw path=/home/cephfs' osd 'allow rw pool=cephfs_data' -o /etc/ceph/ceph.client.user.keyring
will create a new client key with the name user and output it into ceph.client.user.keyring. It will provide write access for the MDS only to the /home/cephfs directory, and the client will only have write access within the cephfs_data pool.
Mounting with the kernel
Now let’s create a dedicated directory and then use the key from the previously generated keyring to mount the filesystem with the kernel.
$ sudo mkdir /mnt/mycephfs $ sudo mount -t ceph 13.53.114.94:6789:/ /mnt/mycephfs -o name=user,secret=AQBxnDFdS5atIxAAV0rL9klnSxwy6EFpR/EFbg==
Attaching with FUSE
Mounting the filesystem with FUSE is not much different either. It requires installing the ceph-fuse package.
$ sudo apt install -y ceph-fuse
Before we run the command we have to retrieve the ceph.conf and ceph.client.user.keyring files from the Ceph host and put the in /etc/ceph. The easiest solution is to use scp.
$ sudo scp [email protected]:/etc/ceph/ceph.conf /etc/ceph/ceph.conf $ sudo scp [email protected]:/etc/ceph/ceph.client.user.keyring /etc/ceph/ceph.keyring
Now we are ready to mount the filesystem.
$ sudo mkdir cephfs $ sudo ceph-fuse -m 13.53.114.94:6789 cephfs
Using the RADOS gateway
To enable the S3 management feature of the cluster, we have to add one final piece, the rados gateway.
$ ceph-deploy rgw create ip-10-0-0-124
For the dashboard, it's required to create a radosgw-admin user with the system flag to enable the Object Storage management interface. We also have to provide the user's access_key and secret_key to the dashboard before we can start using it.
$ sudo radosgw-admin user create --uid=rg_wadmin --display-name=rgw_admin --system $ sudo ceph dashboard set-rgw-api-access-key <access_key> $ sudo ceph dashboard set-rgw-api-secret-key <secret_key>
Using the Ceph Object Storage is really easy as RGW provides an interface identical to S3. You can use your existing S3 requests and code without any modifications, just have to change the connection string, access, and secret keys.
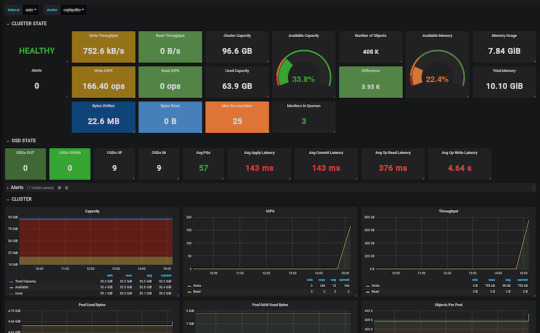
Ceph Storage Monitoring
The dashboard we’ve deployed shows a lot of useful information about our cluster, but monitoring is not its strongest suit. Luckily Ceph comes with a Prometheus module. After enabling it by running:
$ sudo ceph mgr module enable prometheus
A wide variety of metrics will be available on the given host on port 9283 by default. To make use of these exposed data, we’ll have to set up a prometheus instance.
I strongly suggest running the following containers on a separate machine from your Ceph cluster. In case you are just experimenting (like me) and don’t want to use a lot of VMs, make sure you have enough memory and CPU left on your virtual machine before firing up docker, as it can lead to strange behaviour and crashes if it runs out of resources.
There are multiple ways of firing up Prometheus, probably the most convenient is with docker. After installing docker on your machine, create a prometheus.yml file to provide the endpoint where it can access our Ceph metrics.
# /etc/prometheus.yml scrape_configs: - job_name: 'ceph' # metrics_path defaults to '/metrics' # scheme defaults to 'http'. static_configs: - targets: ['13.53.114.94:9283]
Then launch the container itself by running:
$ sudo docker run -p 9090:9090 -v /etc/prometheus.yml:/etc/prometheus/prometheus.yml prom/prometheus
Prometheus will start scraping our data, and it will show up on its dashboard. We can access it on port 9090 on its host machine. Prometheus dashboard is great but does not provide a very eye-pleasing dashboard. That’s the main reason why it’s usually used in pair with Graphana, which provides awesome visualizations for the data provided by Prometheus. It can be launched with docker as well.
$ sudo docker run -d -p 3000:3000 grafana/grafana
Grafana is fantastic when it comes to visualizations, but setting up dashboards can be a daunting task. To make our lives easier, we can load one of the pre-prepared dashboards, for example this one.
Ceph Deployment: Lessons Learned & Next Up
CEPH can be a great alternative to AWS S3 or other object storages when running in the public operating your service in the private cloud is simply not an option. The fact that it provides an S3 compatible interface makes it a lot easier to port other tools that were written with a “cloud first” mentality. It also plays nicely with Prometheus, thus you don’t need to worry about setting up proper monitoring for it, or you can swap it a more simple, more battle-hardened solution such as Nagios.
In this article, we deployed CEPH to bare virtual machines, but you might need to integrate it into your Kubernetes or Docker Swarm cluster. While it is perfectly fine to install it on VMs next to your container orchestration tool, you might want to leverage the services they provide when you deploy your CEPH cluster. If that is your use case, stay tuned for our next post covering CEPH where we’ll take a look at the black magic required to use CEPH on Docker Swarm and Kubernetes.
In the next CEPH tutorial which we'll release next week, we're going to take a look at valid ceph storage alternatives with Docker or with Kubernetes.
PS: Feel free to reach out to us at RisingStack in case you need help with Ceph or Ops in general!
How to Deploy a Ceph Storage to Bare Virtual Machines published first on https://koresolpage.tumblr.com/
0 notes
Text
Ceph Dashboard Install and Configuration for Microceph
Ceph Dashboard Install and Configuration for Microceph @vexpert #vmwarecommunities #ceph #cephdashboard #microceph #ubuntu #opensource #hcistorage #kubernetes #docker #homelab #homeserver
If you are running Microceph, can you run the Ceph Dashboard as you can in full-blown Ceph? Yes you can! The process to spin this up is fairly straightforward with a few commands to run that will allow you to spin up the solution to monitor your Microceph storage. Let’s look at Microceph Ceph Dashboard install and configuration. Table of contentsWhat is Microceph?What is the Ceph dashboard?Ceph…
0 notes
Text
Enterprise Kubernetes Storage with Red Hat OpenShift Data Foundation (DO370)
As organizations continue their journey into cloud-native and containerized applications, the need for robust, scalable, and persistent storage solutions has never been more critical. Red Hat OpenShift, a leading Kubernetes platform, addresses this need with Red Hat OpenShift Data Foundation (ODF)—an integrated, software-defined storage solution designed specifically for OpenShift environments.
In this blog post, we’ll explore how the DO370 course equips IT professionals to manage enterprise-grade Kubernetes storage using OpenShift Data Foundation.
What is OpenShift Data Foundation?
Red Hat OpenShift Data Foundation (formerly OpenShift Container Storage) is a unified and scalable storage solution built on Ceph, NooBaa, and Rook. It provides:
Block, file, and object storage
Persistent volumes for containers
Data protection, encryption, and replication
Multi-cloud and hybrid cloud support
ODF is deeply integrated with OpenShift, allowing for seamless deployment, management, and scaling of storage resources within Kubernetes workloads.
Why DO370?
The DO370: Enterprise Kubernetes Storage with Red Hat OpenShift Data Foundation course is designed for OpenShift administrators and storage specialists who want to gain hands-on expertise in deploying and managing ODF in enterprise environments.
Key Learning Outcomes:
Understand ODF Architecture Learn how ODF components work together to provide high availability and performance.
Deploy ODF on OpenShift Clusters Hands-on labs walk through setting up ODF in a variety of topologies, from internal mode (hyperconverged) to external Ceph clusters.
Provision Persistent Volumes Use Kubernetes StorageClasses and dynamic provisioning to provide storage for stateful applications.
Monitor and Troubleshoot Storage Issues Utilize tools like Prometheus, Grafana, and the OpenShift Console to monitor health and performance.
Data Resiliency and Disaster Recovery Configure mirroring, replication, and backup for critical workloads.
Manage Multi-cloud Object Storage Integrate NooBaa for managing object storage across AWS S3, Azure Blob, and more.
Enterprise Use Cases for ODF
Stateful Applications: Databases like PostgreSQL, MongoDB, and Cassandra running in OpenShift require reliable persistent storage.
AI/ML Workloads: High throughput and scalable storage for datasets and model checkpoints.
CI/CD Pipelines: Persistent storage for build artifacts, logs, and containers.
Data Protection: Built-in snapshot and backup capabilities for compliance and recovery.
Real-World Benefits
Simplicity: Unified management within OpenShift Console.
Flexibility: Run on-premises, in the cloud, or in hybrid configurations.
Security: Native encryption and role-based access control (RBAC).
Resiliency: Automatic healing and replication for data durability.
Who Should Take DO370?
OpenShift Administrators
Storage Engineers
DevOps Engineers managing persistent workloads
RHCSA/RHCE certified professionals looking to specialize in OpenShift storage
Prerequisite Skills: Familiarity with OpenShift (DO180/DO280) and basic Kubernetes concepts is highly recommended.
Final Thoughts
As containers become the standard for deploying applications, storage is no longer an afterthought—it's a cornerstone of enterprise Kubernetes strategy. Red Hat OpenShift Data Foundation ensures your applications are backed by scalable, secure, and resilient storage.
Whether you're modernizing legacy workloads or building cloud-native applications, DO370 is your gateway to mastering Kubernetes-native storage with Red Hat.
Interested in Learning More?
📘 Join HawkStack Technologies for instructor-led or self-paced training on DO370 and other Red Hat courses.
Visit our website for more details - www.hawkstack.com
0 notes
Text
30 Widely Used Open Source Software
Suggested Reading Time: 10 min
Copyright belongs to Xiamen University Malaysia Open Source Community Promotion Group (for Community Service course)
*WeChat Public Account: XMUM_OSC
It is undeniable that open source technology is widely use in business. Companies who lead the trend in IT field, such as Google and Microsoft, accept and promote using open source software. Partnerships with companies such as MongoDB, Redis Labs, Neo4j, and Confluent of Google Cloud are good examples of this.
Red Hat, the originator of linux, the open source company, firstly launched an investigation into the “The State of Enterprise Open Source” and released the investigation report on April 16, 2019. This report is a result of interviews with 950 IT pioneers around the world. The survey areas include the United States, the United Kingdom, Latin America, and the Asia-Pacific region, aiming to understand corporate open source profiles in different geographic regions.
Does the company believe that open source is of strategic significance? This is the question that Red Hat first raised and most wanted to understand. The survey results show that the vast majority of 950 respondents believe that open source is of strategic importance to the company's overall infrastructure software strategy. Red Hat CEO Jim Whitehurst said at the beginning of the survey report, “The most exciting technological innovation that has occurred in this era is taking shape in the open source community.”
Up to now, the investigation has continued to the third round, and the results have been published on February 24, 2021.
Some of the most open source projects favored by IT companies. These are mainly enterprise-oriented application software projects, covering several categories such as web servers, big data and cloud computing, cloud storage, operating systems, and databases.
Web Servers: Nginx, Lighttpd, Tomcat and Apache
1. Nginx
Nginx (engine x) is a high-performance HTTP and reverse proxy web server developed by the Russians. It also provides IMAP/POP3/SMTP services. Its characteristics are that it occupies less memory and has strong concurrency. The concurrency of Nginx performs better in the same type of web server. Many people use Nginx as a load balancer and web reverse proxy.
Supported operating systems: Windows, Linux and OS X.
Link: http://nginx.org/
2. Lighttpd
Lighttpd is a lightweight open source web server software whose fundamental purpose is to provide a safe, fast, compatible and flexible web server environment specifically for high-performance websites. It has the characteristics of very low memory overhead, low cpu occupancy rate, good performance and abundant modules. It is widely used in some embedded web servers.
Supported operating systems: Windows, Linux and OS X
Link: https://www.lighttpd.net/
3. Tomcat
Tomcat server is a free and open source Web application server, which is a lightweight application server, mainly used to run JSP pages and Servlets. Because Tomcat has advanced technology, stable performance, and free of charge, it is loved by Java enthusiasts and recognized by some software developers, making it a popular Web application server.
Supported operating systems: Windows, Linux and OS X
Link: https://tomcat.apache.org/
4. Apache HTTP Server
Apache HTTP Server (Apache for short) is an open source web server of the Apache Software Foundation. It can run on most computer operating systems. Because of its cross-platform and security, it has been widely used since 1996. The most popular Web server system on the Internet since the beginning of the year. It is said that 55.3% of all websites are currently supported by Apache.
Supported operating systems: Windows, Linux and OS X
Link: https://httpd.apache.org/
Big Data and Cloud Computing: Hadoop、Docker、Spark、Storm
5. Hadoop
Hadoop is a distributed system infrastructure developed by the Apache Foundation. It is recognized as a set of industry big data standard open source software, which provides massive data processing capabilities in a distributed environment. Almost all mainstream vendors focus on Hadoop development tools, open source software, commercial tools, and technical services. Hadoop has become the standard framework for big data.
Supported operating systems: Windows, Linux and OS X
Link: http://hadoop.apache.org/
6. Docker
Docker is an open source application container engine. Developers can package their own applications into containers, and then migrate to docker applications on other machines, which can achieve rapid deployment and are widely used in the field of big data. Basically, companies that do big data will use this tool.
Supported operating systems: Windows, Linux and OS X
Link: https://www.docker.com/
7. Spark
Apache Spark is a fast and universal computing engine designed for large-scale data processing. Spark is similar to the general parallel framework of Hadoop MapReduce. Apache Spark claims, "It runs programs in memory up to 100 times faster than Hadoop MapReduce and 10 times faster on disk. Spark is better suited for data mining and machine learning algorithms that require iterative MapReduce.
Supported operating systems: Windows, Linux and OS X
Link: http://spark.apache.org/
8. Storm
Storm is a Twitter open source distributed real-time big data processing system, which is called the real-time version of Hadoop by the industry. As more and more scenarios cannot tolerate the high latency of Hadoop's MapReduce, such as website statistics, recommendation systems, early warning systems, financial systems (high-frequency trading, stocks), etc., big data real-time processing solutions (stream computing) The application is becoming more and more extensive, and it is now the latest breaking point in the field of distributed technology, and Storm is the leader and mainstream in stream computing technology.
Supported operating systems: Windows, Linux and OS X
Link: https://storm.apache.org/
9. Cloud Foundry
Cloud Foundry is the industry's first open source PaaS cloud platform. It supports multiple frameworks, languages, runtime environments, cloud platforms and application services, enabling developers to deploy and expand applications in a few seconds without worrying about anything Infrastructure issues. It claims to be "built by industry leaders for industry leaders," and its backers include IBM, Pivotal, Hewlett-Packard Enterprise, VMware, Intel, SAP and EMC.
Supported operating systems: Independent of operating system
Link: https://www.cloudfoundry.org/
10. CloudStack
CloudStack is an open source cloud computing platform with high availability and scalability, as well as an open source cloud computing solution. It can accelerate the deployment, management, and configuration of highly scalable public and private clouds (IaaS). Using CloudStack as the foundation, data center operators can quickly and easily create cloud services through the existing infrastructure.
Supported operating systems: Independent of operating system
Link: https://www.cloudfoundry.org/
11. OpenStack
OpenStack is an open source cloud computing management platform project, a combination of a series of software open source projects. It is an authorized open source code project developed and initiated by NASA (National Aeronautics and Space Administration) and Rackspace. OpenStack provides scalable and elastic cloud computing services for private clouds and public clouds. The project goal is to provide a cloud computing management platform that is simple to implement, scalable, rich, and standardized. This very popular cloud computing platform claims that "hundreds of big brands in the world" rely on it every day.
Supported operating systems: Independent of operating system
Link: https://www.openstack.org/
Cloud Storage: Gluster, FreeNAS, Lustre, Ceph
12. Gluster
GlusterFS is a highly scalable and scalable distributed file system suitable for data-intensive tasks such as cloud storage and media streaming. All standard POSIX interfaces are implemented, and fuse is used to realize virtualization, making users look like local disks. Able to handle thousands of clients.
Supported operating system: Windows and Linux
Link: https://www.gluster.org/
13. FreeNAS
FreeNAS is a set of free and open source NAS servers, which can turn an ordinary PC into a network storage server. The software is based on FreeBSD, Samba and PHP, supports CIFS (samba), FTP, NFS protocols, Software RAID (0,1,5) and web interface setting tools. Users can access the storage server through Windows, Macs, FTP, SSH, and Network File System (NFS). FreeNAS can be installed on the hard disk or removable media USB Flash Disk. The FreeNAS server has a promising future. It is an excellent choice for building a simple network storage server
Supported operating systems: Independent of operating system
Link: http://www.freenas.org/
14. Lustre
Lustre is an open source, distributed parallel file system software platform, which has the characteristics of high scalability, high performance, and high availability. The construction goal of Lustre is to provide a globally consistent POSIX-compliant namespace for large-scale computing systems, which include the most powerful high-performance computing systems in the world. It supports hundreds of PB of data storage space, and supports hundreds of GB/s or even several TB/s of concurrent aggregate bandwidth. Some of the first users to adopt it include several major national laboratories in the United States: Lawrence Livermore National Laboratory, Sandia National Laboratory, Oak Ridge National Laboratory, and Los Alamos National Laboratory.
Supported operating system: Linux
Link: http://lustre.org/
15. Ceph
Ceph is a distributed file system designed for excellent performance, reliability and scalability. It is the earliest project dedicated to the development of the next generation of high-performance distributed file systems. With the development of cloud computing, Ceph took advantage of the spring breeze of OpenStack, and then became one of the most concerned projects in the open source community.
Supported operating system: Linux
Link: https://ceph.com/
Operating System: CentOS, Ubuntu
16. CentOS
CentOS (Community Enterprise Operating System) is one of the Linux distributions, which is compiled from the source code released by Red Hat Enterprise Linux in accordance with the open source regulations. Since it comes from the same source code, some servers that require high stability use CentOS instead of the commercial version of Red Hat Enterprise Linux. The difference between the two is that CentOS is completely open source.
Link: http://www.centos.org/
17. Ubuntu
Ubuntu is also open source and has a huge community power. Users can easily get help from the community and provide a popular Linux distribution. There are multiple versions: desktop version, server version, cloud version, mobile version, tablet version And the Internet of Things version. The claimed users include Amazon, IBM, Wikipedia and Nvidia.
Link: http://www.ubuntu.com/
Database: MySQL, PostgreSQL, MongoDB, Cassandra, CouchDB, Neo4j
18. MySQL
MySQL is a relational database written in C/C++. It claims to be "the most popular open source database in the world". It is favored by many Internet companies. In addition to the free community version, it also has a variety of paid versions. Although it is free and open source, its performance is sufficiently guaranteed. Many domestic IT companies are using MySQL.
Supported operating system: Windows, Linux, Unix and OS X
Link: https://www.mysql.com/
19. PostgreSQL
PostgreSQL is a very powerful client/server relational database management system with open source code. The well-known Huawei Gauss database and Tencent's TBase database are both developed on the basis of this database. All the codes of the best Alibaba OceanBase database in China are independently developed. Although it is not developed on the basis of PostgreSQL, it should also draw on many features and advantages of PostgreSQL.
Supported operating system: Windows, Linux, Unix and OS X
Link: https://www.postgresql.org/
20. MongoDB
MongoDB is a NoSQL database, a database based on distributed file storage. Written by C++ language. Designed to provide scalable high-performance data storage solutions for applications. MongoDB is a product between relational and non-relational databases. Among non-relational databases, MongoDB is the most versatile and most similar to relational databases. Users include Foursquare, Forbes, Pebble, Adobe, LinkedIn, eHarmony and other companies. Provide paid professional version and enterprise version.
Supported operating system: Windows, Linux, OS X and Solaris
Link: https://www.mongodb.org/
21. Cassandra
This NoSQL database was developed by Facebook, and its users include Apple, CERN, Comcast, Electronic Harbor, GitHub, GoDaddy, Hulu, Instagram, Intuit, Netflix, Reddit and other technology companies. It supports extremely large data sets and claims to have very high performance and outstanding durability and flexibility. Support can be obtained through a third party.
Supported operating systems: Independent of operating system
Link: https://cassandra.apache.org/
22. CouchDB
CouchDB is a document-oriented database system developed in Erlang. This NoSQL database stores data in JSON documents. Such documents can be queried through HTTP and processed with JavaScript. CouchDB is now owned by IBM, and it provides a software version supported by professionals. Users include: Samsung, Akamai, Expedia, Microsoft Game Studios and other companies.
Supported operating systems: Windows, Linux, OS X and Android
Link: https://couchdb.apache.org/
23. Neo4j
Neo4J is a high-performance NOSQL graph database that stores structured data on the network instead of in tables. It claims to be "the world's leading graph database" for fraud detection, recommendation engines, social networking sites, master data management, and More areas. Users include eBay, Walmart, Cisco, Hewlett-Packard, Accenture, CrunchBase, eHarmony, Care.com and many other enterprise organizations.
Supported operating system: Windows and Linux
Link: https://neo4j.com/
Developing Tools and Components
24. Bugzilla
Bugzilla is the darling of the open source community, users include Mozilla, Linux Foundation, GNOME, KDE, Apache, LibreOffice, Open Office, Eclipse, Red Hat, Novell and other companies. Important features of this software bugtracker include: advanced search functions, email notifications, scheduled reports, time tracking, excellent security and more features.
Supported operating system: Windows, Linux and OS X
Link: https://www.bugzilla.org/
25. Eclipse
The most well-known of the Eclipse project is that it is a popular integrated development environment (IDE) for Java. It also provides IDEs for C/C++ and PHP, as well as a large number of development tools. The main supporters include Guanqun Technology, Google, IBM, Oracle, Red Hat and SAP.
Supported operating systems: Independent of operating system
Link: https://www.eclipse.org/
26. Ember.js
Ember.js is an open source JavaScript client-side framework for developing Web applications and using the MVC architecture pattern. This framework is used to "build ambitious Web applications" and aims to improve work efficiency for JavaScript developers. The official website shows that users include Yahoo, Square, Livingsocial, Groupon, Twitch, TED, Netflix, Heroku and Microsoft.
Supported operating systems: Independent of operating system
Link: https://emberjs.com/
27. Node.js
Node is a development platform that allows JavaScript to run on the server. It makes JavaScript a scripting language on par with server-side languages such as PHP, Python, Perl, and Ruby. It allows developers to use JavaScript to write server-side applications. The development work was previously controlled by Jwoyent and is now overseen by the Node.js Foundation. Users include IBM, Microsoft, Yahoo, SAP, LinkedIn, PayPal and Netflix.
Supported operating system: Windows, Linux and OS X
Link: https://nodejs.org/
28. React Native
React Native was developed by Facebook. This framework can be used to build native mobile applications using JavaScript and React JavaScript libraries (also developed by Facebook). Other users include: "Discovery" channel and CBS Sports News Network.
Supported operating system: OS X
Link: https://facebook.github.io/react-native/
29. Ruby on Rails
Ruby on Rails is a framework that makes it easy for you to develop, deploy, and maintain web applications. This web development framework is extremely popular among developers, and it claims to be "optimized to ensure programmers' satisfaction and continuous and efficient work." Users include companies such as Basecamp, Twitter, Shopify, and GitHub.
Supported operating system: Windows, Linux and OS X
Link: https://rubyonrails.org/
Middleware
30. JBoss
JBoss is an open source application server based on J2EE. JBoss code follows the LGPL license and can be used for free in any commercial application. JBoss is a container and server that manages EJB. It supports EJB 1.1, EJB 2.0 and EJB3 specifications, but JBoss core services do not include WEB containers that support servlet/JSP, and are generally used in conjunction with Tomcat or Jetty. JBoss middleware includes a variety of lightweight, cloud-friendly tools that combine, integrate, and automate various enterprise applications and systems at the same time. Users include: Oak Ridge National Laboratory, Nissan, Cisco, Crown Group, AMD and other companies.
Supported operating system: Linux
Link: https://www.jboss.org/
0 notes
Text
Welcome to our guide on how you can configure NFS Filesystem for use in OpenNebula Cloud Storage. In OpenNebula a Storage datastore is is required to store disk images for running virtual machines. There are three different datastore types officially supported by OpenNebula: Images Datastore: This stores the images repository. System Datastore: This holds disk for running virtual machines. Disk are moved, or cloned to/from the Images datastore when the VMs are deployed or terminated; or when disks are attached or snapshotted. Files & Kernels Datastore: Used to store plain files and not disk images. The plain files can be used as kernels, ram-disks or context files. Disk images are transferred between the Image and System datastores by the transfer manager (TM) drivers. These drivers are specialized pieces of software that perform low-level storage operations. The following table summarizes the available transfer modes for each datastore: Datastore Image to System Datastore disk transfers methods Filesystem shared, images are exported in a shared filesystem ssh, images are copied using the ssh protocol qcow2, like shared but specialized for the qcow2 format Ceph ceph, all images are exported in Ceph poolsshared, volatile & context disks exported in a shared FS. LVM fs_lvm, images exported in a shared FS but dumped to a LV Raw Devices dev, images are existing block devices in the nodes iSCSI libvirt iscsi, images are iSCSI targets Step 1: Install NFS Server This should be done on an NFS Server instance Ubuntu / Debian Update APT package index: sudo apt update Then install NFS Server packages: sudo apt -y install nfs-kernel-server CentOS / RHEL / Fedora Run the commands below to install NFS server packages: sudo yum -y install nfs-utils Step 2: Configure NFS Exports for OpenNebula I’ve mounted external storage devices on /mnt directory. I’ll create relevant directories there: sudo mkdir -p /mnt/opennebula/images,system,files Where: /mnt/opennebula/images is the image repository path /mnt/opennebula/system holds disk for running virtual machines /mnt/opennebula/files stores plain files and not disk images We will edit /etc/exports and export these paths. $ sudo vim /etc/exports # Example configurations to allow mounts from any host /mnt/opennebula/images *(rw,no_root_squash,no_subtree_check) /mnt/opennebula/system *(rw,no_root_squash,no_subtree_check) /mnt/opennebula/files *(rw,no_root_squash,no_subtree_check) # Example configurations to allow mounts from known/trusted networks /mnt/opennebula/images 10.10.20.0/24(rw,no_root_squash,no_subtree_check) /mnt/opennebula/system 10.10.20.0/24(rw,no_root_squash,no_subtree_check) /mnt/opennebula/files 10.10.20.0/24(rw,no_root_squash,no_subtree_check) Restart the nfs-server after updating the changes: # Ubuntu / Debian sudo systemctl restart nfs-server # CentOS / RHEL sudo systemctl enable --now rpcbind nfs-server sudo firewall-cmd --add-service=nfs --permanent sudo firewall-cmd --add-service=nfs3,mountd,rpc-bind --permanent sudo firewall-cmd --reload Validate NFS exports: $ sudo exportfs -rvv exporting 10.10.20.0/24:/mnt/opennebula/files exporting 10.10.20.0/24:/mnt/opennebula/system exporting 10.10.20.0/24:/mnt/opennebula/images Step 3: Mount NFS Shares on Frontend/KVM Nodes Install NFS Client packages on the Front-end and virtualization host systems. # CentOS / RHEL sudo yum -y install nfs-utils # Debian / Ubuntu sudo apt update sudo apt -y install nfs-common Mounts on OpenNebula Frontend The frontend only needs to mount the Image Datastores and not the System Datastores. The Frontend needs to prepare the storage area for: The Image Datastores, to store the images. The System Datastores, will hold temporary disks and files for VMs stopped and undeployed. Get pre-defined datastores IDs: Login to the front-end node and mount the Image Datastore directory in /var/lib/one/datastores/ directory.
$ sudo vim /etc/fstab 10.10.20.250:/mnt/opennebula/images /var/lib/one/datastores/1 nfs defaults,soft,intr,rsize=32768,wsize=32768 0 0 10.10.20.250:/mnt/opennebula/files /var/lib/one/datastores/2 nfs defaults,soft,intr,rsize=32768,wsize=32768 0 0 Where 10.10.20.250 is the IP Address of the NFS Server. Mount the NFS Shares using the mount command to confirm the changes in /etc/fstab are valid. $ sudo mount -av / : ignored /boot : already mounted none : ignored /media/cdrom0 : ignored mount.nfs: timeout set for Tue Mar 23 16:55:04 2021 mount.nfs: trying text-based options 'soft,intr,rsize=32768,wsize=32768,vers=4.2,addr=10.10.20.250,clientaddr=10.10.20.251' /var/lib/one/datastores/1: successfully mounted /var/lib/one/datastores/2: successfully mounted Confirm the mount status with the df command: $ df -hT /var/lib/one/datastores/1 Filesystem Type Size Used Avail Use% Mounted on 10.10.20.250:/mnt/opennebula/images nfs4 915G 1.6G 867G 1% /var/lib/one/datastores/1 $ df -hT /var/lib/one/datastores/2 Filesystem Type Size Used Avail Use% Mounted on 10.10.20.250:/mnt/opennebula/files nfs4 915G 1.6G 867G 1% /var/lib/one/datastores/2 Datastores listing in the UI after the changes. Mounts on OpenNebula Virtualization Nodes Login to the Nodes running the VMS and do the mounting in a similar way done in the front-end. $ sudo vim /etc/fstab 10.10.20.250:/mnt/opennebula/system /var/lib/one/datastores/0 nfs defaults,soft,intr,rsize=32768,wsize=32768 0 0 10.10.20.250:/mnt/opennebula/images /var/lib/one/datastores/1 nfs defaults,soft,intr,rsize=32768,wsize=32768 0 0 10.10.20.250:/mnt/opennebula/files /var/lib/one/datastores/2 nfs defaults,soft,intr,rsize=32768,wsize=32768 0 0 Create mount directories: sudo mkdir /var/lib/one/datastores/0,1,2 sudo chown -R oneadmin:oneadmin /var/lib/one/datastores/0,1,2 Run the mount command: $ sudo mount -av / : ignored /boot : already mounted none : ignored mount.nfs: timeout set for Tue Mar 23 17:12:25 2021 mount.nfs: trying text-based options 'soft,intr,rsize=32768,wsize=32768,vers=4.2,addr=10.10.20.250,clientaddr=10.10.20.252' /var/lib/one/datastores/0: successfully mounted mount.nfs: timeout set for Tue Mar 23 17:12:25 2021 mount.nfs: trying text-based options 'soft,intr,rsize=32768,wsize=32768,vers=4.2,addr=10.10.20.250,clientaddr=10.10.20.252' /var/lib/one/datastores/1: successfully mounted mount.nfs: timeout set for Tue Mar 23 17:12:25 2021 mount.nfs: trying text-based options 'soft,intr,rsize=32768,wsize=32768,vers=4.2,addr=10.10.20.250,clientaddr=10.10.20.252' /var/lib/one/datastores/2: successfully mounted Confirm mount status: $ df -hT | grep one 10.10.20.250:/mnt/opennebula/system nfs4 915G 3.6G 865G 1% /var/lib/one/datastores/0 10.10.20.250:/mnt/opennebula/images nfs4 915G 3.6G 865G 1% /var/lib/one/datastores/1 10.10.20.250:/mnt/opennebula/files nfs4 915G 3.6G 865G 1% /var/lib/one/datastores/2 More guides: Create CentOS|Ubuntu|Debian VM Templates on OpenNebula Import CentOS 8 | CentOS 7 Qcow2 Images on OpenNebula Reference: OpenNebula Storage Setup Documentation Filesystem Datastore
0 notes
Text
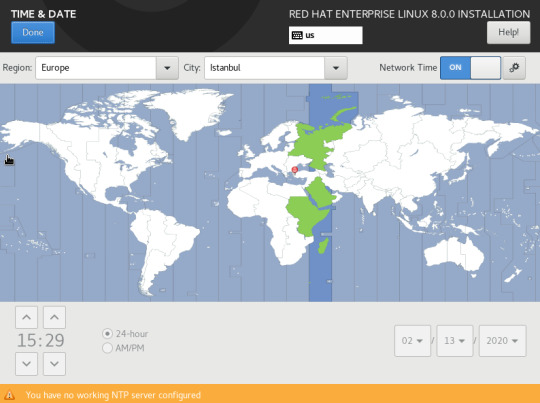
Redhat Enterprise Linux 8 Kurulumu–Bölüm 1
Hazırlayan:Tayfun Yaban
Selamlar,
Redhat Enterprise Linux(RHEL) yeni sürümü çıktı.Bu yazıda yeni sürümün kurulumunu yapıyoruz.Yazının çok uzun olmasını istemediğim,okuyanlarıda sıkmak istemediğim için diğer ayarları göstermeye ikinci bölümde devam edeceğim.Öncelikle elinizde rhel8 iso dosyası olduğunu ve taktığınızı varsayıyorum.
Rhel 8’in beraberinde getirdiği yeniliklerin bazılarına bakalım.
Yum paket yöneticisi yerini Dnf’ye bırakıyor.(Yum halen kullanılabiliyor)
Yine iptables yerini nftables’a bırakıyor.
Kvm üzeride Ceph storage iyileştirilmiş olarak geliyor.
2 adet repo tanıtımı var(Appstream ve BaseOS)
Cockpit web konsolu ile cli üzerinden yapılan bazı işlemler yapılabiliyor.
Boom boot manager ile upgrade işlemleri daha kolay yapılabiliyor.
Gelelim kurulum adımlarına;
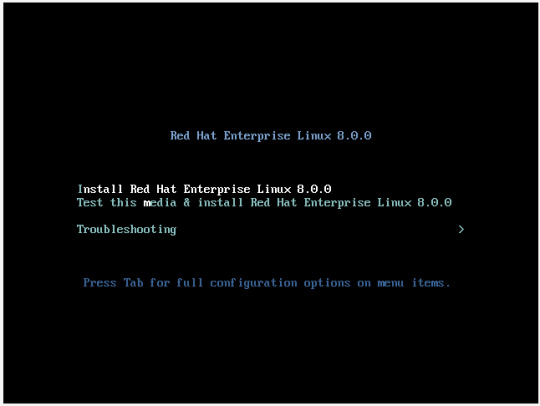
Boot ettikten sonra gelen ekrandan “ Install Redhat Enterprise Linux 8.0.0 “ seçeneğini seçip devam ediyoruz.
Özellikle bir amaç yoksa işletim sistemi dilinin ingilizce olmasında yarar var.Dili ingilizce seçip “Continue” ile devam ediyoruz.

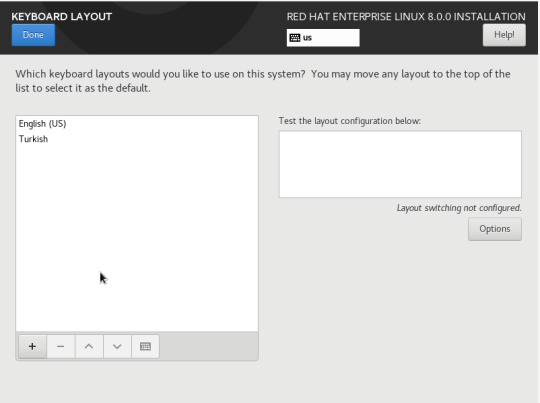
Gelen ekrandan ilk önce klavye ayarlarımızı yapıyoruz.”+” (artı) işaretine basarak “Turkish” seçeneğini seçip sırasıyla “add ve done” ile devam ediyoruz.

Döndüğümüz ekranda “Installation Destination” kısmını seçip “Automatic” olarak bırakıyoruz(Yine herhangi bir konfigurasyon yapılmayacaksa) “Done” ile ilk ekrana dönüyoruz.

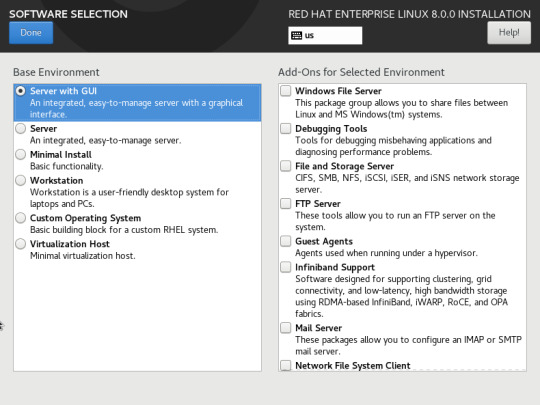
“Software Selection” kısmından sunucumuza hangi rolleri vermek istiyorsak seçimimizi yapıyoruz.Ben test için “Server with Gui” olarak bırakıp devam ediyorum.Burada kurulumunuzu minimal(cli),Sanallaştırma sunucusu,Mail server vs. vs. olarak yapabilirsiniz.
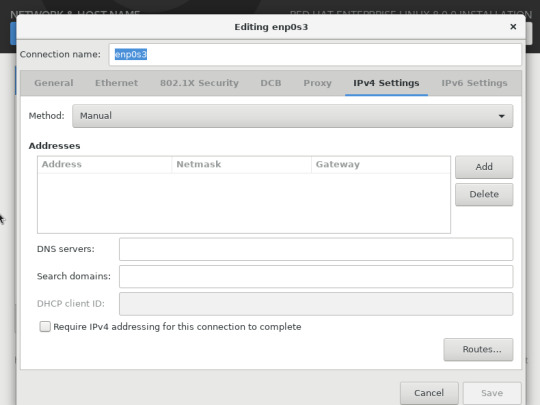
Burada ise ethernet kartımızı “ON” durumuna getiriyoruz ve aşağıya bilgisayar adımızın ne olmasını istiyorsak yazıp,”Apply” demeyi unutmuyoruz.İp ayarlarınızı korumak istiyorsanız(Dhcp) “Done” tıklayarak devam edebilirsiniz.Ben static ip konfigurasyonu yapacağım için “Configure” ile devam ediyorum.

“IPv4 settings” tabına gelip ip,dns ve domain ayarlarımızı yapıp,save ile kaydediyoruz.
İlk ekrana dönüyoruz ve “Time&Date” kısmına giriyoruz.Buradan saat dilimi ayarlarımızı seçiyoruz.”Network time” seçeneği ile eğer ortamımızda Ntp sunucusu varsa giriyoruz.

“System Purpose” kısmından Development/test seçiyorum.(Burada lisans modelinize göre seçimlerinizi yapabilirsiniz.Production vs.)


Ayarlarımızı tamamladık şimdi “Begin installation” ile kurulumumuzu başlatıyoruz.
Görüşmek üzere...
0 notes
Text
SUSECON ‘20

Securelinx is delighted to announce that SUSE's premier global Open Source event SUSECon will take place in the Convention Centre Dublin on March 23rd to 27th. This will be the largest Open Source technology event happening in Ireland this year. Securelinx is proud to be a sponsor of this major event as it represents a significant opportunity for local customers, partners and organisations to experience all that SUSE and Open Source can offer the enterprise IT sector.
Who Is SUSE?
As a global Open Source Vendor, SUSE works with an ecosystem of partners and communities to deliver enterprise-grade, open source software-defined infrastructure and application delivery solutions backed by superior service and support. SUSE is the world’s largest independent Linux company.

SUSECon Dublin
With SUSECON 2020 you can lead your company into a digital transformation by learning how to apply reliable, secure open source solutions to meet the demands of your business. At the event, you will discover the latest developments in enterprise-class Linux, Ceph storage, Kubernetes, Cloud Foundry and other cutting edge open source projects.
You will meet leading technical experts, ecosystem partners and your peers from around the world. You will learn about the technology from those who are creating it and gain new insights to solve your current business problems and better position you for the future.
Attendance at SUSECON provides the best content and value of any conference in the industry, from hands-on training to complimentary certifications to meeting with experts — it’s all here! If you would like more information on how to attend SUSECon or how Securelinx can help you to do that, contact us on +353 1 5065615

Who Are Securelinx?
Securelinx is an award-winning Enterprise Linux and Open Source solutions supplier. We have been at the forefront of Linux adoption since 2002 and today have a broad portfolio that includes hybrid cloud infrastructure, Kubernetes, High Performance Computing (HPC) & Artificial Intelligence (AI), management frameworks and storage - all designed to assist organisations become more agile, efficient, and interconnected.
Securelinx provides Linux based infrastructure solutions such as subscriptions, services, support and training to customers throughout Ireland and the UK. We win and retain customers through the provision of superior Open Source expertise, dedicated service and exceptional commitment to customer satisfaction. Holding the highest levels of partner recognition for the leading providers of enterprise Linux, Securelinx comprises teams of highly experienced, trained and certified Linux engineers.
Our technical project delivery skills have proved so popular that our work now takes us beyond Ireland and the UK and into Europe. Securelinx is a pure play Open Source company - it is in our DNA for the last 18 years, so if you believe as we do that Open Source is the best way to enhance your IT infrastructure, then we are here to help.
Our messaging is simple – If you want a lower cost IT infrastructure, without compromising on performance or security, then consider engaging with enterprise grade Open Source solutions. Securelinx can show you how.

Securelinx & SUSE Relationship
Securelinx has been a key SUSE Partner since 2004 and comprises the largest selection of SUSE Certified Linux Engineers in Ireland. This strength and depth across the entire SUSE solution portfolio has resulted in Securelinx being recognised as one of an elite group of global Solution Partners.
Securelinx is also the sole Authorised Training Partner for SUSE within Ireland and the UK, delivering in-depth technical training for customers throughout the region. Recognised by SUSE as the most technically competent partner within Ireland and the UK, Securelinx provides enterprise grade support and training to numerous organisations running SUSE Linux in both countries.
SUSE Linux delivers a comprehensive set of time-saving installation, configuration, deployment and administration tools and has found particular success with the following product portfolios: As one of a select number of SUSE Solution Partners globally and a Partner since 2003 Securelinx offers unrivalled expertise for the entire software stack along with services, support, and training. For more information please visit our website or get in touch.

0 notes
Text
How to Deploy a Ceph Storage to Bare Virtual Machines

Ceph is a freely available storage platform that implements object storage on a single distributed computer cluster and provides interfaces for object-, block- and file-level storage. Ceph aims primarily for completely distributed operation without a single point of failure. It manages data replication and is generally quite fault-tolerant. As a result of its design, the system is both self-healing and self-managing.
Ceph has loads of benefits and great features, but the main drawback is that you have to host and manage it yourself. In this post, we'll check two different approaches of deploying Ceph.
Anatomy of a Ceph cluster
Before we dive into the actual deployment process, let's see what we'll need to fire up for our own Ceph cluster.
There are three services that form the backbone of the cluster
monitors (ceph-mon) maintain maps of the cluster state and are also responsible for managing authentication between daemons and clients
managers (ceph-mgr) are responsible for keeping track of runtime metrics and the current state of the Ceph cluster
object storage daemons (ceph-osd) store data, handle data replication, recovery, rebalancing, and provide some monitoring information
Additionally, we can add further parts to the cluster to support different storage solutions
metadata servers (ceph-mds) store metadata on behalf of the Ceph Filesystem
rados gateway (ceph-rgw) is an HTTP server for interacting with a Ceph Storage Cluster that provides interfaces compatible with OpenStack Swift and Amazon S3.
There are multiple ways of deploying these services. We'll check two of them:
first, using the ceph/deploy tool,
then a docker-swarm based deployment.
Let's kick it off!
Ceph Setup
Okay, a disclaimer first. As this is not a production infrastructure, we’ll cut a couple of corners.
You should not run multiple different Ceph demons on the same host, but for the sake of simplicity, we'll only use 3 VMs for the whole cluster.
In the case of OSDs, you can run multiple of them on the same host, but using the same storage drive for multiple instances is a bad idea as the disk’s I/O speed might limit the OSD daemons’ performance.
For this tutorial, I've created 4 EC2 machines in AWS: 3 for Ceph itself and 1 admin node. For ceph-deploy to work, the admin node requires passwordless SSH access to the nodes and that SSH user has to have passwordless sudo privileges.
In my case, as all machines are in the same subnet on AWS, connectivity between them is not an issue. However, in other cases editing the hosts file might be necessary to ensure proper connection.
Depending on where you deploy Ceph security groups, firewall settings or other resources have to be adjusted to open these ports
22 for SSH
6789 for monitors
6800:7300 for OSDs, managers and metadata servers
8080 for dashboard
7480 for rados gateway
Without further ado, let's start deployment.
Ceph Storage Deployment
Install prerequisites on all machines
$ sudo apt update $ sudo apt -y install ntp python
For Ceph to work seamlessly, we have to make sure the system clocks are not skewed. The suggested solution is to install ntp on all machines and it will take care of the problem. While we're at it, let's install python on all hosts as ceph-deploy depends on it being available on the target machines.
Prepare the admin node
$ ssh -i ~/.ssh/id_rsa -A [email protected]
As all the machines have my public key added to known_hosts thanks to AWS, I can use ssh agent forwarding to access the Ceph machines from the admin node. The first line ensures that my local ssh agent has the proper key in use and the -A flag takes care of forwarding my key.
$ wget -q -O- 'https://download.ceph.com/keys/release.asc' | sudo apt-key add - echo deb https://download.ceph.com/debian-nautilus/ $(lsb_release -sc) main | sudo tee /etc/apt/sources.list.d/ceph.list $ sudo apt update $ sudo apt -y install ceph-deploy
We'll use the latest nautilus release in this example. If you want to deploy a different version, just change the debian-nautilus part to your desired release (luminous, mimic, etc.).
$ echo "StrictHostKeyChecking no" | sudo tee -a /etc/ssh/ssh_config > /dev/null
OR
$ ssh-keyscan -H 10.0.0.124,10.0.0.216,10.0.0.104 >> ~/.ssh/known_hosts
Ceph-deploy uses SSH connections to manage the nodes we provide. Each time you SSH to a machine that is not in the list of known_hosts (~/.ssh/known_hosts), you'll get prompted whether you want to continue connecting or not. This interruption does not mesh well with the deployment process, so we either have to use ssh-keyscan to grab the fingerprint of all the target machines or disable the strict host key checking outright.
10.0.0.124 ip-10-0-0-124.eu-north-1.compute.internal ip-10-0-0-124 10.0.0.216 ip-10-0-0-216.eu-north-1.compute.internal ip-10-0-0-216 10.0.0.104 ip-10-0-0-104.eu-north-1.compute.internal ip-10-0-0-104
Even though the target machines are in the same subnet as our admin and they can access each other, we have to add them to the hosts file (/etc/hosts) for ceph-deploy to work properly. Ceph-deploy creates monitors by the provided hostname, so make sure it matches the actual hostname of the machines otherwise the monitors won't be able to join the quorum and the deployment fails. Don't forget to reboot the admin node for the changes to take effect.
$ mkdir ceph-deploy $ cd ceph-deploy
As a final step of the preparation, let's create a dedicated folder as ceph-deploy will create multiple config and key files during the process.
Deploy resources
$ ceph-deploy new ip-10-0-0-124 ip-10-0-0-216 ip-10-0-0-104
The command ceph-deploy new creates the necessary files for the deployment. Pass it the hostnames of the monitor nodes, and it will create cepf.conf and ceph.mon.keyring along with a log file.
The ceph-conf should look something like this
[global] fsid = 0572e283-306a-49df-a134-4409ac3f11da mon_initial_members = ip-10-0-0-124, ip-10-0-0-216, ip-10-0-0-104 mon_host = 10.0.0.124,10.0.0.216,10.0.0.104 auth_cluster_required = cephx auth_service_required = cephx auth_client_required = cephx
It has a unique ID called fsid, the monitor hostnames and addresses and the authentication modes. Ceph provides two authentication modes: none (anyone can access data without authentication) or cephx (key based authentication).
The other file, the monitor keyring is another important piece of the puzzle, as all monitors must have identical keyrings in a cluster with multiple monitors. Luckily ceph-deploy takes care of the propagation of the key file during deployment.
$ ceph-deploy install --release nautilus ip-10-0-0-124 ip-10-0-0-216 ip-10-0-0-104
As you might have noticed so far, we haven't installed ceph on the target nodes yet. We could do that one-by-one, but a more convenient way is to let ceph-deploy take care of the task. Don't forget to specify the release of your choice, otherwise you might run into a mismatch between your admin and targets.
$ ceph-deploy mon create-initial
Finally, the first piece of the cluster is up and running! create-initial will deploy the monitors specified in ceph.conf we generated previously and also gather various key files. The command will only complete successfully if all the monitors are up and in the quorum.
$ ceph-deploy admin ip-10-0-0-124 ip-10-0-0-216 ip-10-0-0-104
Executing ceph-deploy admin will push a Ceph configuration file and the ceph.client.admin.keyring to the /etc/ceph directory of the nodes, so we can use the ceph CLI without having to provide the ceph.client.admin.keyring each time to execute a command.
At this point, we can take a peek at our cluster. Let's SSH into a target machine (we can do it directly from the admin node thanks to agent forwarding) and run sudo ceph status.
$ sudo ceph status cluster: id: 0572e283-306a-49df-a134-4409ac3f11da health: HEALTH_OK services: mon: 3 daemons, quorum ip-10-0-0-104,ip-10-0-0-124,ip-10-0-0-216 (age 110m) mgr: no daemons active osd: 0 osds: 0 up, 0 in data: pools: 0 pools, 0 pgs objects: 0 objects, 0 B usage: 0 B used, 0 B / 0 B avail pgs:
Here we get a quick overview of what we have so far. Our cluster seems to be healthy and all three monitors are listed under services. Let's go back to the admin and continue adding pieces.
$ ceph-deploy mgr create ip-10-0-0-124
For luminous+ builds a manager daemon is required. It's responsible for monitoring the state of the Cluster and also manages modules/plugins.
Okay, now we have all the management in place, let's add some storage to the cluster to make it actually useful, shall we?
First, we have to find out (on each target machine) the label of the drive we want to use. To fetch the list of available disks on a specific node, run
$ ceph-deploy disk list ip-10-0-0-104
Here's a sample output:
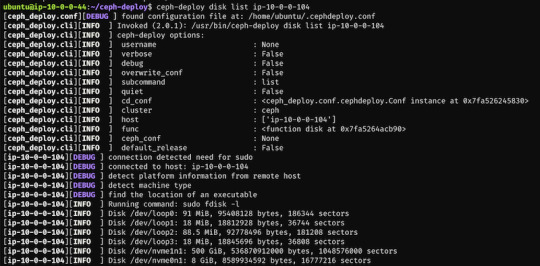
$ ceph-deploy osd create --data /dev/nvme1n1 ip-10-0-0-124 $ ceph-deploy osd create --data /dev/nvme1n1 ip-10-0-0-216 $ ceph-deploy osd create --data /dev/nvme1n1 ip-10-0-0-104
In my case the label was nvme1n1 on all 3 machines (courtesy of AWS), so to add OSDs to the cluster I just ran these 3 commands.
At this point, our cluster is basically ready. We can run ceph status to see that our monitors, managers and OSDs are up and running. But nobody wants to SSH into a machine every time to check the status of the cluster. Luckily there's a pretty neat dashboard that comes with Ceph, we just have to enable it.
...Or at least that's what I thought. The dashboard was introduced in luminous release and was further improved in mimic. However, currently we're deploying nautilus, the latest version of Ceph. After trying the usual way of enabling the dashboard via a manager
$ sudo ceph mgr module enable dashboard
we get an error message saying Error ENOENT: all mgr daemons do not support module 'dashboard', pass --force to force enablement.
Turns out, in nautilus the dashboard package is no longer installed by default. We can check the available modules by running
$ sudo ceph mgr module ls
and as expected, dashboard is not there, it comes in a form a separate package. So we have to install it first, luckily it's pretty easy.
$ sudo apt install -y ceph-mgr-dashboard
Now we can enable it, right? Not so fast. There's a dependency that has to be installed on all manager hosts, otherwise we get a slightly cryptic error message saying Error EIO: Module 'dashboard' has experienced an error and cannot handle commands: No module named routes.
$ sudo apt install -y python-routes
We're all set to enable the dashboard module now. As it's a public-facing page that requires login, we should set up a cert for SSL. For the sake of simplicity, I've just disabled the SSL feature. You should never do this in production, check out the official docs to see how to set up a cert properly. Also, we'll need to create an admin user so we can log in to our dashboard.
$ sudo ceph mgr module enable dashboard $ sudo ceph config set mgr mgr/dashboard/ssl false $ sudo ceph dashboard ac-user-create admin secret administrator
By default, the dashboard is available on the host running the manager on port 8080. After logging in, we get an overview of the cluster status, and under the cluster menu, we get really detailed overviews of each running daemon.

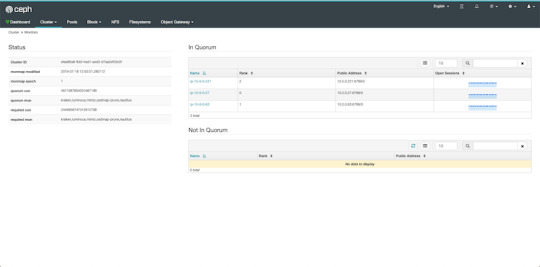
If we try to navigate to the Filesystems or Object Gateway tabs, we get a notification that we haven't configured the required resources to access these features. Our cluster can only be used as a block storage right now. We have to deploy a couple of extra things to extend its usability.
Quick detour: In case you're looking for a company that can help you with Ceph, or DevOps in general, feel free to reach out to us at RisingStack!
Using the Ceph filesystem
Going back to our admin node, running
$ ceph-deploy mds create ip-10-0-0-124 ip-10-0-0-216 ip-10-0-0-104
will create metadata servers, that will be inactive for now, as we haven’t enabled the feature yet. First, we need to create two RADOS pools, one for the actual data and one for the metadata.
$ sudo ceph osd pool create cephfs_data 8 $ sudo ceph osd pool create cephfs_metadata 8
There are a couple of things to consider when creating pools that we won’t cover here. Please consult the documentation for further details.
After creating the required pools, we’re ready to enable the filesystem feature
$ sudo ceph fs new cephfs cephfs_metadata cephfs_data
The MDS daemons will now be able to enter an active state, and we are ready to mount the filesystem. We have two options to do that, via the kernel driver or as FUSE with ceph-fuse.
Before we continue with the mounting, let’s create a user keyring that we can use in both solutions for authorization and authentication as we have cephx enabled. There are multiple restrictions that can be set up when creating a new key specified in the docs. For example:
$ sudo ceph auth get-or-create client.user mon 'allow r' mds 'allow r, allow rw path=/home/cephfs' osd 'allow rw pool=cephfs_data' -o /etc/ceph/ceph.client.user.keyring
will create a new client key with the name user and output it into ceph.client.user.keyring. It will provide write access for the MDS only to the /home/cephfs directory, and the client will only have write access within the cephfs_data pool.
Mounting with the kernel
Now let’s create a dedicated directory and then use the key from the previously generated keyring to mount the filesystem with the kernel.
$ sudo mkdir /mnt/mycephfs $ sudo mount -t ceph 13.53.114.94:6789:/ /mnt/mycephfs -o name=user,secret=AQBxnDFdS5atIxAAV0rL9klnSxwy6EFpR/EFbg==
Attaching with FUSE
Mounting the filesystem with FUSE is not much different either. It requires installing the ceph-fuse package.
$ sudo apt install -y ceph-fuse
Before we run the command we have to retrieve the ceph.conf and ceph.client.user.keyring files from the Ceph host and put the in /etc/ceph. The easiest solution is to use scp.
$ sudo scp [email protected]:/etc/ceph/ceph.conf /etc/ceph/ceph.conf $ sudo scp [email protected]:/etc/ceph/ceph.client.user.keyring /etc/ceph/ceph.keyring
Now we are ready to mount the filesystem.
$ sudo mkdir cephfs $ sudo ceph-fuse -m 13.53.114.94:6789 cephfs
Using the RADOS gateway
To enable the S3 management feature of the cluster, we have to add one final piece, the rados gateway.
$ ceph-deploy rgw create ip-10-0-0-124
For the dashboard, it's required to create a radosgw-admin user with the system flag to enable the Object Storage management interface. We also have to provide the user's access_key and secret_key to the dashboard before we can start using it.
$ sudo radosgw-admin user create --uid=rg_wadmin --display-name=rgw_admin --system $ sudo ceph dashboard set-rgw-api-access-key <access_key> $ sudo ceph dashboard set-rgw-api-secret-key <secret_key>
Using the Ceph Object Storage is really easy as RGW provides an interface identical to S3. You can use your existing S3 requests and code without any modifications, just have to change the connection string, access, and secret keys.
Ceph Storage Monitoring
The dashboard we’ve deployed shows a lot of useful information about our cluster, but monitoring is not its strongest suit. Luckily Ceph comes with a Prometheus module. After enabling it by running:
$ sudo ceph mgr module enable prometheus
A wide variety of metrics will be available on the given host on port 9283 by default. To make use of these exposed data, we’ll have to set up a prometheus instance.
I strongly suggest running the following containers on a separate machine from your Ceph cluster. In case you are just experimenting (like me) and don’t want to use a lot of VMs, make sure you have enough memory and CPU left on your VM before firing up docker, as it can lead to strange behaviour and crashes if it runs out of resources.
There are multiple ways of firing up Prometheus, probably the most convenient is with docker. After installing docker on your machine, create a prometheus.yml file to provide the endpoint where it can access our Ceph metrics.
# /etc/prometheus.yml scrape_configs: - job_name: 'ceph' # metrics_path defaults to '/metrics' # scheme defaults to 'http'. static_configs: - targets: ['13.53.114.94:9283]
Then launch the container itself by running:
$ sudo docker run -p 9090:9090 -v /etc/prometheus.yml:/etc/prometheus/prometheus.yml prom/prometheus
Prometheus will start scraping our data, and it will show up on its dashboard. We can access it on port 9090 on its host machine. Prometheus dashboard is great but does not provide a very eye-pleasing dashboard. That’s the main reason why it’s usually used in pair with Graphana, which provides awesome visualizations for the data provided by Prometheus. It can be launched with docker as well.
$ sudo docker run -d -p 3000:3000 grafana/grafana
Grafana is fantastic when it comes to visualizations, but setting up dashboards can be a daunting task. To make our lives easier, we can load one of the pre-prepared dashboards, for example this one.

Ceph Deployment: Lessons Learned & Next Up
CEPH can be a great alternative to AWS S3 or other object storages when running in the public operating your service in the private cloud is simply not an option. The fact that it provides an S3 compatible interface makes it a lot easier to port other tools that were written with a “cloud first” mentality. It also plays nicely with Prometheus, thus you don’t need to worry about setting up proper monitoring for it, or you can swap it a more simple, more battle-hardened solution such as Nagios.
In this article, we deployed CEPH to bare VMs, but you might need to integrate it into your Kubernetes or Docker Swarm cluster. While it is perfectly fine to install it on VMs next to your container orchestration tool, you might want to leverage the services they provide when you deploy your CEPH cluster. If that is your use case, stay tuned for our next post covering CEPH where we’ll take a look at the black magic required to use it on Kubernetes and Docker Swarm.
In the next article which we'll release next week, we're going to take a look at valid ceph storage alternatives with Docker or with Kubernetes.
PS: Feel free to reach out to us at RisingStack in case you need help with Ceph or Ops in general!
Hey Friends! The pace on the RisingStack blog was a little slow this summer, but WE'RE BACK! 🥳👽🤘 We just released a longform howto article on deploying a @Ceph storage to bare VM's. Take a look, we would love to get some feedback! 👇👇https://t.co/vTKdA4w5jI
— RisingStack 👉 Node.js, K8S & Microservices (@RisingStack) September 23, 2019
How to Deploy a Ceph Storage to Bare Virtual Machines published first on https://koresolpage.tumblr.com/
0 notes
Text
Ceph Dashboard Configuration for Storage Health Metrics
Ceph Dashboard Configuration for Storage Health Metrics @vexpert #vmwarecommunities #ceph #cephstorage #grafana #prometheus #homelab #homeserver #objectstorage #virtualization
If you are using Ceph storage either in Proxmox or using Ceph storage in vanilla Linux outside of Proxmox, you likely want to have a way to see the health of your Ceph storage environment. Setting up a Ceph dashboard to see the health of your Ceph storage environment is a great way to have visibility on the health of your Ceph environment. Let’s look at how to setup a Ceph Dashboard for object…
0 notes