#Proxmox Cluster Setup
Explore tagged Tumblr posts
Visit Tumblr Blog
Explore Tumblr blogs with no restrictions, modern design and the best experience.
Last Seen Tumblr Blogs


Fun Fact
Post activity is at the highest at 4:00 pm EDT; notes peak at 10:00 pm EDT.
Text
Proxmox Homelab: First 5 Basic Configuration Steps
Proxmox Homelab: First 5 Basic Configuration Steps! #homelab #selfhosted #ProxmoxHomelabSetupGuide #VLANTaggingProxmox #ProxmoxSubscriptionRepositoryUpdate #CephStorageInProxmox #ProxmoxVMTemplateCreation #ProxmoxClusterSetup #ProxmoxVE #Proxmoxstorage
Proxmox VE is becoming a favorite among home lab enthusiasts or those who want to easily stand up a hypervisor host at home to play around with different types of technology. After you install Proxmox VE, what are the basic steps to get up and running so you can start playing around with VMs and containers? This post will cover the first 5 basic steps you will want to consider. Table of…

View On WordPress
#Ceph storage in Proxmox#Proxmox Cluster Setup#Proxmox command line interface#Proxmox homelab setup guide#Proxmox local and shared storage#Proxmox server operating systems#Proxmox subscription repository update#Proxmox virtual machines management#Proxmox VM template creation#VLAN tagging Proxmox
0 notes
Text
My Homelab/Office 2020 - DFW Quarantine Edition
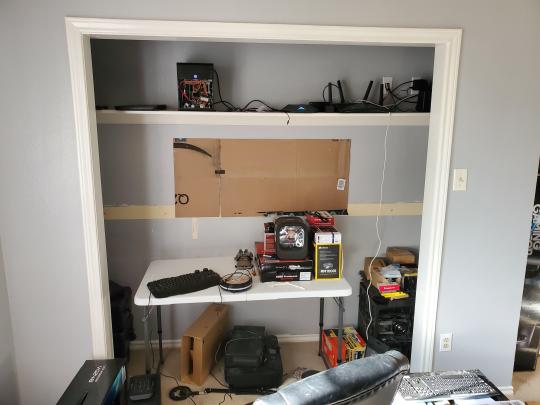
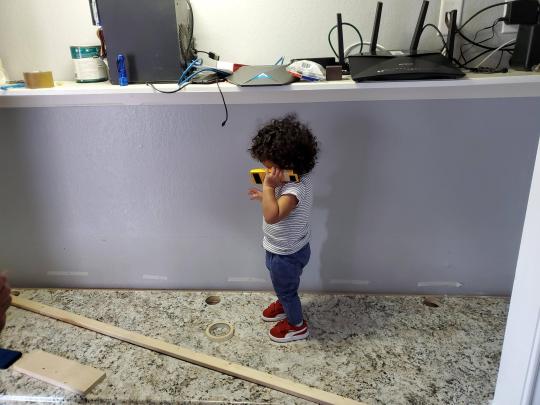
Moved into our first home almost a year ago (October 2019), I picked out a room that had 2 closets for my media/game/office area. Since the room isn't massive, I decided to build a desk into closet #1 to save on space. Here 1 of 2 shelves was ripped off, the back area was repainted gray. A piece of card board was hung to represent my 49 inch monitor and this setup also gave an idea how high I needed the desk.
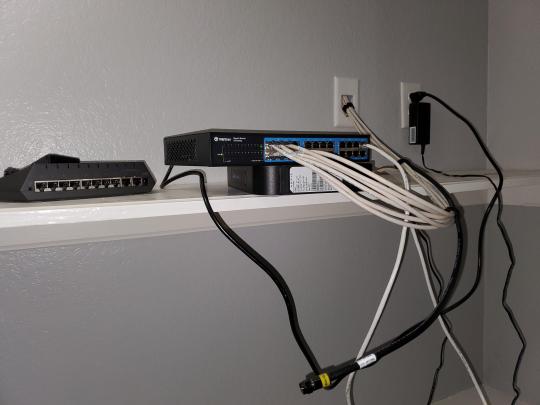
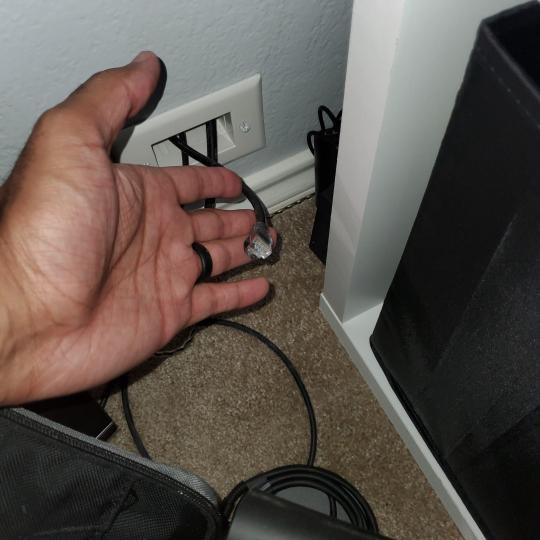
On my top shelf this was the initial drop for all my Cat6 cabling in the house, I did 5 more runs after this (WAN is dropped here as well).
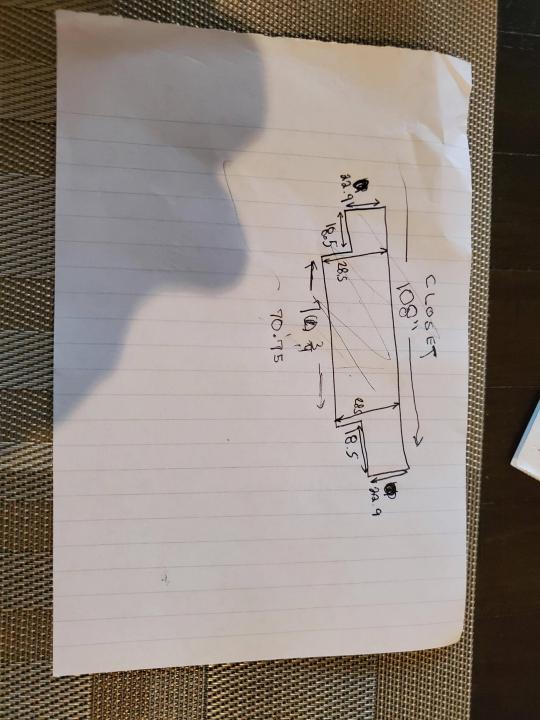
I measured the closet and then went to Home Depot to grab a countertop. Based on the dimensions, it needed to be cut into an object shape you would see on Tetris.

Getting to work, cutting the countertop.
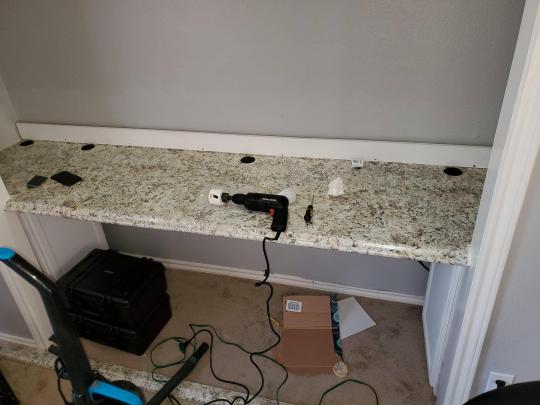
My father-in-law helped me cut it to size in the driveway and then we framed the closet, added in kitchen cabinets to the bottom (used for storage and to hide a UPS). We ran electrical sockets inside the closet. I bought and painted 2 kitchen cabinets which I use for storage under my desk as well.
The holes allowed me to run cables under my desk much easier, I learned many of these techniques on Battlestations subreddit and Setup Wars on Youtube. My daughter was a good helper when it came to finding studs.
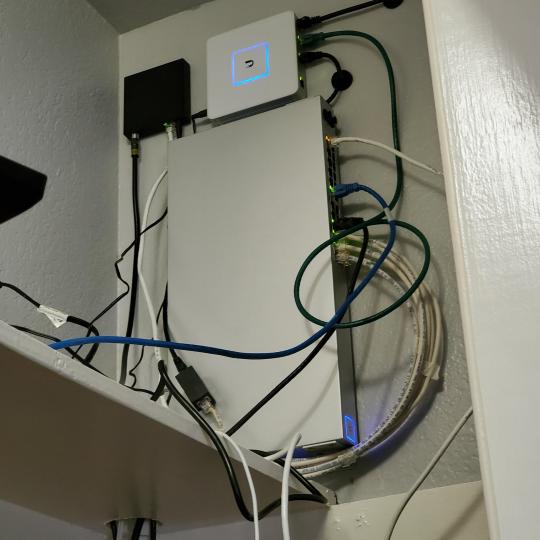
Some of my cousins are networking engineers, they advised me to go with Unifi devices. Here I mounted my Unifi 16 port switch, my Unifi Security Gateway (I'll try out pfSense sometime down the line), and my HD Homerun (big antenna is in the attic). I have Cat6 drops in each room in the house, so everything runs here. On my USG, I have both a LAN #2 and a LAN #1 line running to the 2nd closet in this room (server room). This shot is before the cable management.
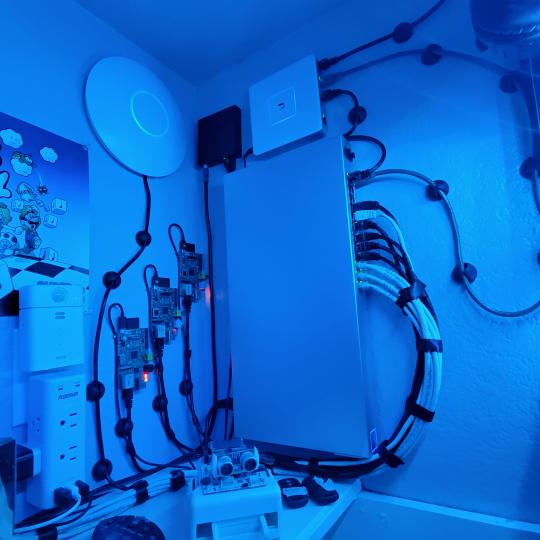
Cable management completed in closet #1. Added an access point and connected 3 old Raspberry Pi devices I had laying around (1 for PiHole - Adblocker, 1 for Unbound - Recursive DNS server, and 1 for Privoxy - Non Caching web proxy).
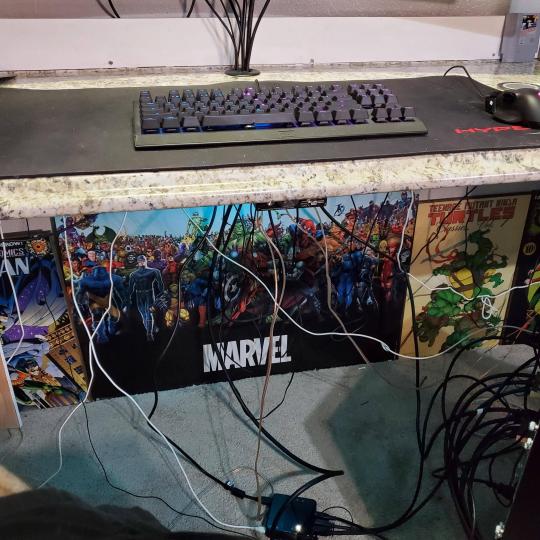
Rats nest of wires under my desk. I mounted an amplifier, optical DVD ROM drive, a USB hub that takes input from up to 4 computers (allows me to switch between servers in closet #2 with my USB mic, camera, keyboard, headset always functioning), and a small pull out drawer.

Cable management complete, night shot with with Nanoleaf wall lights. Unifi controller is mounted under the bookshelf, allows me to keep tabs on the network. I have a tablet on each side of the door frame (apps run on there that monitor my self hosted web services). I drilled a 3 inch hole on my desk to fit a grommet wireless phone charger. All my smart lights are either running on a schedule or turn on/off via an Alexa command. All of our smart devices across the house and outside, run on its on VLAN for segmentation purposes.

Quick shot with desk light off. I'm thinking in the future of doing a build that will mount to the wall (where "game over" is shown).
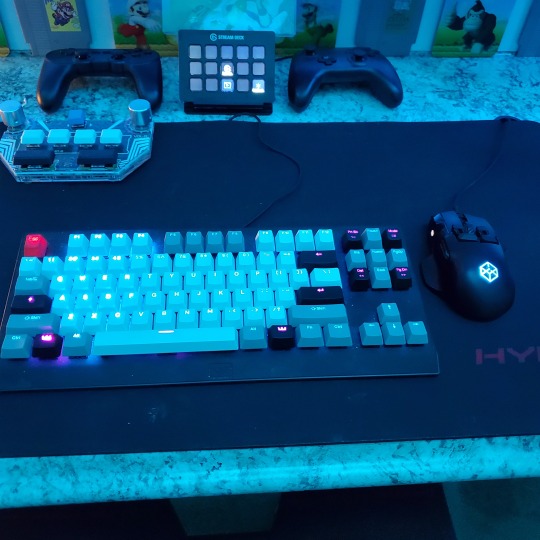
Wooting One keyboard with custom keycaps and Swiftpoint Z mouse, plus Stream Deck (I'm going to make a gaming comeback one day!).

Good wallpapers are hard to find with this resolution so pieced together my own.
Speakers and books at inside corner of desk.

Speakers and books at inside corner of desk.

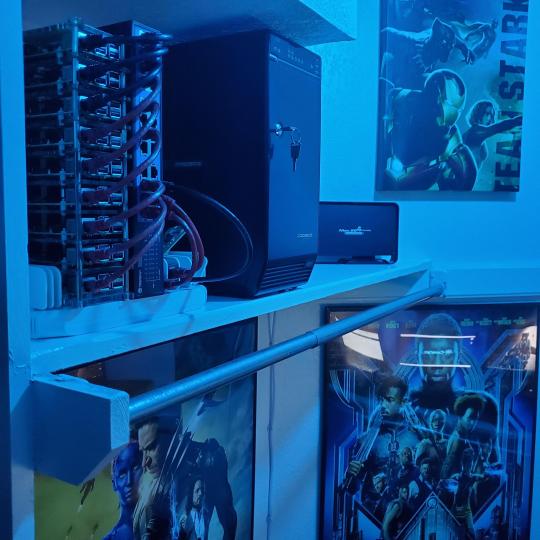
Closet #2, first look (this is in the same room but off to the other side). Ran a few CAT6 cables from closet #1, into the attic and dropped here (one on LAN #1, the other on LAN #2 for USG). Had to add electrical sockets as well.

I have owned a ton of Thinkpads since my IBM days, I figured I could test hooking them all up and having them all specialize in different functions (yes, I have a Proxmox box but it's a decommissioned HP Microserver on the top shelf which is getting repurposed with TrueNAS_core). If you're wondering what OSes run on these laptops: Windows 10, Ubuntu, CentOS, AntiX. All of these units are hardwired into my managed Netgear 10gigabit switch (only my servers on the floor have 10 gigabit NICs useful to pass data between the two). Power strip is also mounted on the right side, next to another tablet used for monitoring. These laptop screens are usually turned off.
Computing inventory in image:
Lenovo Yoga Y500, Lenovo Thinkpad T420, Lenovo Thinkpad T430s, Lenovo Thinkpad Yoga 12, Lenovo Thinkpad Yoga 14, Lenovo Thinkpad W541 (used to self host my webservices), Lenovo S10-3T, and HP Microserver N54L

Left side of closet #2
**moved these Pis and unmanaged switch to outside part of closet**
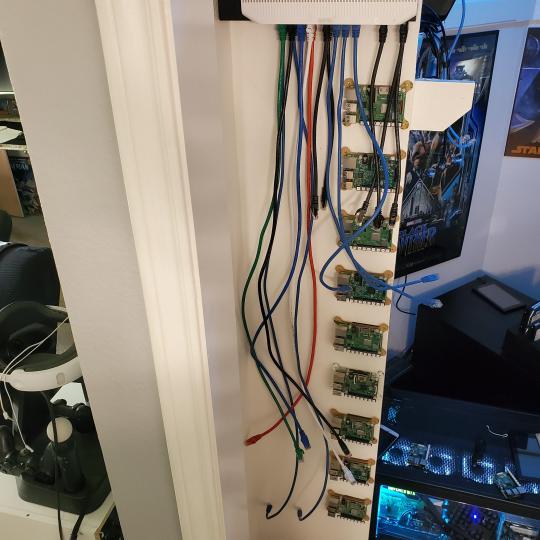
Since I have a bunch of Raspberry Pi 3s, I decided recently to get started with Kubernetes clusters (my time is limited but hoping to have everything going by the holidays 2020) via Rancher, headless. The next image will show the rest of the Pis but in total:
9x Raspberry Pi 3 and 2x Raspberry Pi 4
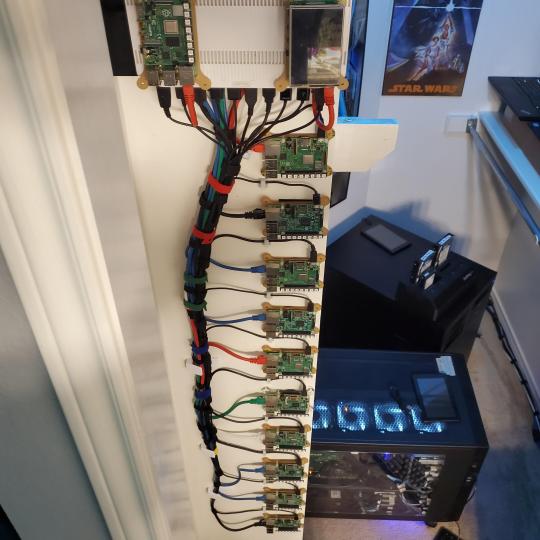
2nd shot with cable management. The idea is to get K3s going, there's Blinkt installed on each Pi, lights will indicate how many pods per node. The Pis are hardwired into a switch which is on LAN #2 (USG). I might also try out Docker Swarm simultaneously on my x86/x64 laptops. Here's my compose generic template (have to re-do the configs at a later data) but gives you an idea of the type of web services I am looking to run: https://gist.github.com/antoinesylvia/3af241cbfa1179ed7806d2cc1c67bd31
20 percent of my web services today run on Docker, the other 80 percent are native installs on Linux and or Windows. Looking to get that up to 90 percent by the summer of 2021.
Basic flow to call web services:
User <--> my.domain (Cloudflare 1st level) <--> (NGINX on-prem, using Auth_Request module with 2FA to unlock backend services) <--> App <--> DB.
If you ever need ideas for what apps to self-host: https://github.com/awesome-selfhosted/awesome-selfhosted
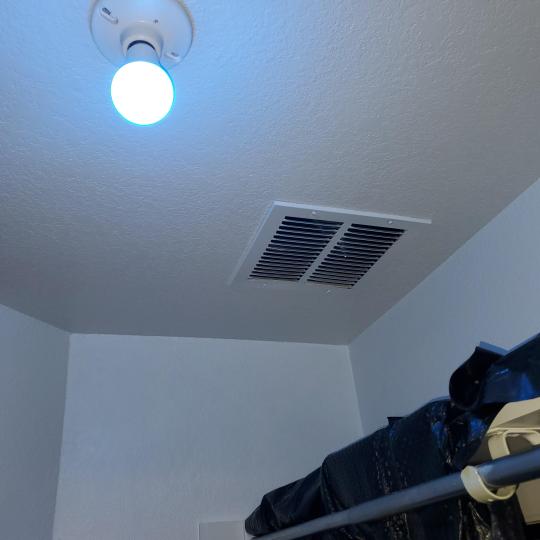
Homelabs get hot, so I had the HVAC folks to come out and install an exhaust in the ceiling and dampers in the attic.
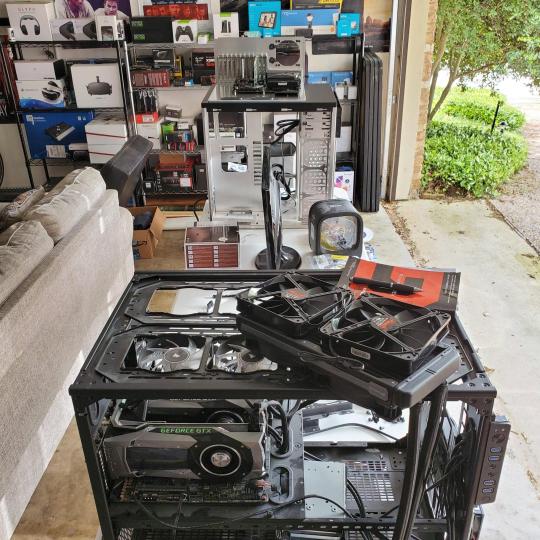
I built my servers in the garage this past winter/spring, a little each night when my daughter allowed me to. The SLI build is actually for Parsec (think of it as a self hosted Stadia but authentication servers are still controlled by a 3rd party), I had the GPUs for years and never really used them until now.
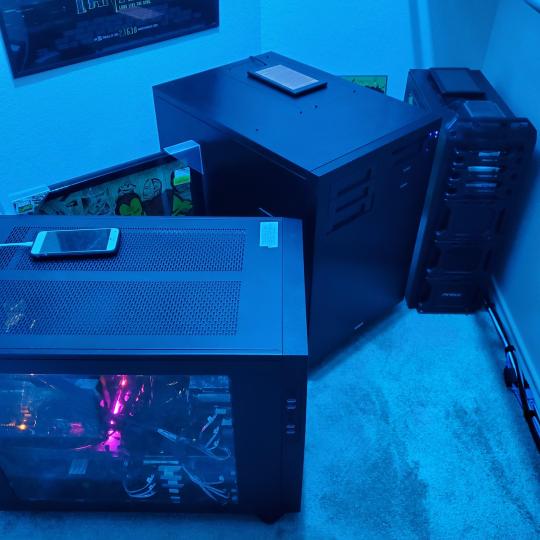
Completed image of my 2 recent builds and old build from 2011.
Retroplex (left machine) - Intel 6850 i7 (6 core, 12 thread), GTX 1080, and 96GB DDR4 RAM. Powers the gaming experience.
Metroplex (middle machine) - AMD Threadripper 1950x (16 core, 32 thread), p2000 GPU, 128GB DDR4 RAM.
HQ 2011 (right machine) - AMD Bulldozer 8150 (8 cores), generic GPU (just so it can boot), 32GB DDR3 RAM.

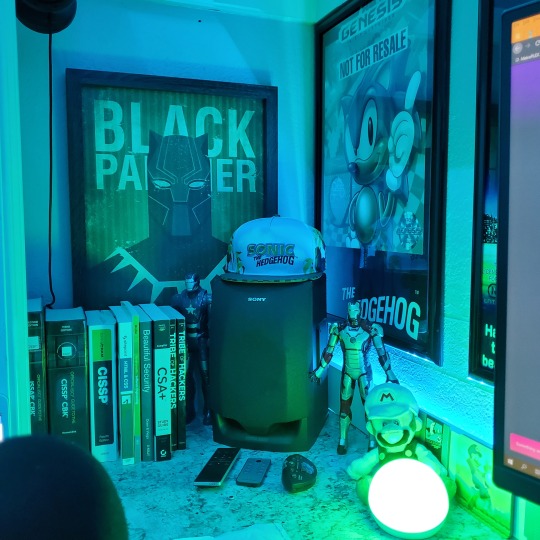
I've been working and labbing so much, I haven't even connected my projector or installed a TV since moving in here 11 months ago. I'm also looking to get some VR going, headset and sensors are connected to my gaming server in closet #2. Anyhow, you see all my PS4 and retro consoles I had growing up such as Atari 2600, NES, Sega Genesis/32X, PS1, Dreamcast, PS2, PS3 and Game Gear. The joysticks are for emulation projects, I use a Front End called AttractMode and script out my own themes (building out a digital history gaming museum).
My longest CAT6 drop, from closet #1 to the opposite side of the room. Had to get in a very tight space in my attic to make this happen, I'm 6'8" for context. This allows me to connect this cord to my Unifi Flex Mini, so I can hardware my consoles (PS4, PS5 soon)

Homelab area includes a space for my daughter. She loves pressing power buttons on my servers on the floor, so I had to install decoy buttons and move the real buttons to the backside.
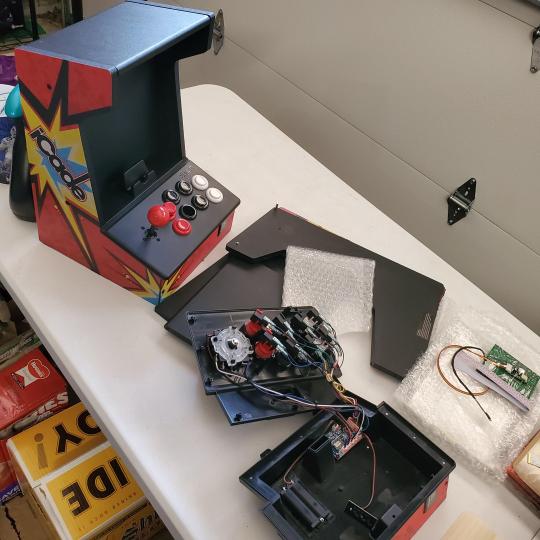
Next project, a bartop with a Raspberry Pi (Retropie project) which will be housed in an iCade shell, swapping out all the buttons. Always have tech projects going on. Small steps each day with limited time.
6 notes
·
View notes
Text
We can all agree Proxmox VE is such an amazing Virtualization solution for home users and corporate business application setups. There is no need for separate management tool in Proxmox since everything can be done through the web browser. A built-in HTML5 console is used to access the guest console. As an alternative, SPICE can be used. Proxmox Virtual Environment offers excellent command-line tools and REST API for third-party application integrations. By design, Proxmox comes with a single theme upon its installation. In this guide we shall cover the steps you’ll follow to install a custom Discord-like dark theme for the Proxmox Web UI. But first let’s look at the features of Proxmox Web Interface. Features of Proxmox VE Graphical User Interface Some of the features available on Proxmox VE Graphical User Interface are: Seamless integration and management of Proxmox VE clusters AJAX technologies for dynamic updates of resources Fast search-driven interface, capable of handling hundreds and probably thousands of VMs Secure access to all Virtual Machines and Containers via SSL encryption (https) Secure HTML5 console or SPICE Role based permission management for all objects (VMs, storages, nodes, etc.) Support for multiple authentication sources (e.g. local, MS ADS, LDAP, …) Two-Factor Authentication (OATH, Yubikey) Based on ExtJS 6.x JavaScript framework Install Discord-like dark theme on Proxmox VE We’ll use a dark theme for the Proxmox Web UI, inspired by Discord’s color scheme. The project is available on Github if you’re interested in code sources. In this theme, everything is dark, including the graphs, context menus and all in between. Before theme installation, the Proxmox VE graphical user interface (GUI) has a look shown in screenshot below. We will perform theme installation via the CLI utility. Login to your PVE node running Web UI, see our example below: $ ssh [email protected] 10:32:31 root@pve01 ~ → Install wget tool if not available on the node. sudo apt update && sudo apt install wget curl -y Use wget utility to download theme installation script. wget https://raw.githubusercontent.com/Weilbyte/PVEDiscordDark/master/PVEDiscordDark.sh Make the script executable and run it. chmod +x PVEDiscordDark.sh sudo ./PVEDiscordDark.sh install Installation process should complete in seconds. ✔ Backing up template file ✔ Downloading stylesheet ✔ Downloading patcher ✔ Applying changes to template file ✔ Downloading images (29/29) Theme installed. To see all script options run the command: $ ./PVEDiscordDark.sh -h Usage: ./PVEDiscordDark.sh [OPTIONS...] COMMAND Manages the PVEDiscordDark theme. -h --help Show this help -s --silent Silent mode Commands: status Check current theme status (returns 0 if installed, and 1 if not installed) install Install the theme uninstall Uninstall the theme update Update the theme (runs uninstall, then install) Exit status: 0 OK 1 Failure 2 Already installed, OR not installed (when using install/uninstall commands) This scripted installer relies on the /meta/supported and /meta/imagelist files being present in the repository. Below is new look on the login screen. Web interface overview page view with the new theme. The theme can be updated to new release with the command: $ sudo ./PVEDiscordDark.sh update ✔ Removing stylesheet ✔ Removing patcher ✔ Reverting changes to template file ✔ Removing images Theme uninstalled. ✔ Backing up template file ✔ Downloading stylesheet ✔ Downloading patcher ✔ Applying changes to template file ✔ Downloading images (29/29) Theme installed. Uninstall Discord-like dark theme on Proxmox VE If you want to uninstall the theme use the commands below to remove it and all its associated files. $ sudo ./PVEDiscordDark.sh uninstall
✔ Removing stylesheet ✔ Removing patcher ✔ Reverting changes to template file ✔ Removing images Theme uninstalled. Enjoy your new look on Proxmox VE GUI. We hope this guide was helpful. We have other guides on Proxmox Virtual Environment in the links shared here. How To Install Pritunl VPN on Debian / Proxmox VE Using Dnsmasq DHCP Server in Proxmox for VMs IP Create Private Network Bridge on Proxmox VE with NAT Protect VM from accidental deletion in Proxmox VE How To Mount and Use NFS ISO Share on Proxmox VE Remove “No valid subscription” warning on Proxmox VE 7
0 notes
Text
Hosting Sebuah server berdedikasi direkomendasikan untuk setiap proyek web yang membutuhkan penggunaan tunggal dari sumber daya yang dapat server menyediakan atau yang juga akan digunakan sebagai server permainan. Dengan server yang berdedikasi di sağlayanhost Anda akan Menerima server berdedikasi Anda sendiri. Dan Anda juga manfaat dari perangkat keras terbaru di pasar. Anda mendapatkan server root yang berdedikasi dengan kinerja terbaik dengan harga yang terjangkau karena kita menggunakan secara khusus Powerfull XEON CPUs dari Intel, dikombinasikan dengan DDR4 RAM dan SSD hard drive. Server berdedikasi Anda adalah setup dan disiapkan terutama untuk Anda oleh teknisi di sağlayanhost. Server yang didedikasikan sağlayanhost Aktifkan virtualisasi. Anda mendapatkan kinerja optimum untuk virtualisasi server sampai 16 vCores dan 64 GB DDR4 RAM. Dengan kinerja ini, Anda dapat mengoperasikan beberapa mesin virtual satu server fisik. Untuk virtualisasi, sağlayanhost menyediakan perangkat lunak virtualisasi, vSphere dari VMware, serta Proxmox dan Hyper-V. perlu dicatat bahwa Anda harus melakukan konfigurasi perangkat lunak virtualisasi dan bahwa kita tidak menyediakan layanan itu. Aplikasi khas untuk server yang didedikasikan adalah proyek web resource-intensif, situs dengan volume tinggi queries basis data, situs dinamis dan streaming dan mendownload portal. Server berdedikasi juga populer untuk digunakan sebagai server permainan karena permainan yang sebagian besar membutuhkan server dengan performa tinggi CPUs dan RAM. Server yang didedikasikan juga idealnya cocok menjadi tuan rumah server game Minecraft. Apa RAM di situs web hosting? Berapa banyak yang dibutuhkan? - Quora Sejujurnya, ini hal terbesar yang harus dipertimbangkan saat memilih tuan rumah. Dengan RAM rendah situs Anda dapat bahkan menahan lonjakan lalu lintas kecil. Situsmu bisa turun . Ram Di Dam Tinggalkan Penganalisa Tanda Mp3. Mp3 gratis dan streaming. Unduh Ram Di Dam meninggalkan tanda dari sambungan cepat dan pribadi . Dengar untuk semua lagu dari seniman terbaik - Mp3Freex RAM Host-Premium Linux VPS & Shared Linux Web Hosting Selamat Datang di RAM Host kami menawarkan, terjangkau, dan solusi Linux hosting ubahan untuk nanti. semuanya. Dirancang dari awal, menjadi tuan rumah . Cisco UCS manajer instalasi kinerja, Lepaskan 2.0.0. Dec 6, 2015 . Membuat cluster kontrol multi-host. ... Sebuah tunggal-host deployment memiliki cukup menghitung, memori, dan sumber daya penyimpanan untuk . Persyaratan Sistem Perangkat Lunak Manajemen Aset Digital Jika Anda bertujuan untuk menjadi tuan rumah aset Bank pada server sendiri maka halaman ini menjelaskan sistem . intensif Anda akan melihat kinerja yang signifikan meningkat jika Anda menambahkan lebih RAM. . "Visi kami untuk bank aset adalah kualitas Perangkat lunak bendungan dengan harga yang besar. Layanan Hosting / Bendungan Orphea. Tawaran pelayanan hosting juga didasarkan pada tingkat pelayanan . Xeon 6 - core prosesor ganda, masing-masing dengan 144 Gb RAM. . spesialis dalam aset Digital Manajemen. Google Masih banyak lagi " pilihan rekening . Masuk; Setelan penelusuran RAM Host-Premium Linux VPS & Berbagi Linux Web Hosting. Selamat Datang di RAM Host. kami menawarkan handal, terjangkau, dan sistem komunikasi Linux. solusi dengan rencana untuk semua orang. Dirancang dari awal, menjadi tuan rumah . Menyederhanakan Pengelolaan Kapasitas Awan Swasta-Intel host (masing-masing untuk private cloud host dan VM): total pemanfaatan CPU MHz, . memori adalah yang paling efektif biaya konfigurasi private cloud host untuk kantor kita dan . Pemenang penghargaan SSD Hosting dari SSD asli Tuan rumah .. Atasan kami SSD hosting memiliki domain gratis dan situs web. 32 GB DDR4 RAM: 2 X 250 GB SSD: Premium . 4231 San Pablo Dam Rd Apt 27 El Sobante . Solusi, layanan dan Hosting / Orphea DAM Produk manajemen aset Digital kami menawarkan dan Manajemen Faktur Manajemen Komersial Royalty. . Tawaran pelayanan hosting juga didasarkan pada . RAM ,penyimpanan. Layanan Plate – Hosting - Telenet.be layanan Hosting yg berdedikasi, dialokasikan dan virtual (Flex dan virtual).. assigns Pelanggan sumber daya yang sesuai (CPU, RAM, kapasitas disk). Citrix XenServer 7.0 Instalasi Guide-Citrix Docs Menghubungkan XenCenter ke Host XenServer . ... virtual( berbasis perangkat lunak) sendiri CPU ,RAM, hard disk dan kartu antarmuka jaringan (NIC). XenServer membiarkanmu. Cisco Expressway pada Panduan Instalasi Mesin Virtual X8. 1). Dec 1, 2013 . host VM "startup/Shutdown mesin Virtual" telah dikonfigurasi . tidak pesan lebih dari RAM: 1: 1 alokasi dari vRAM ke memori fisik. Web hosting untuk orang non-teknis: apa I/O, RAM dan CPU . Jul 31, 2013 . I / O adalah kecepatan dimana data ditempatkan pada drive penyimpanan server Anda diserahkan untuk menjadi dieksekusi atau diproses dengan cara tertentu. RAM adalah . Server terbaik yang berdedikasi. Tenang! >>> Bubbykins dari bertransaksi yang bagus, layanan yang sangat baik dari penjual.Terima kasih banyak. Johnnie from Lillie Item Rcd hari ini, pengiriman cepat, produk bagus akan dibeli lagi, layanan yang bagus,
0 notes
Link
In the last ~5 years Hetzner basically killed OVH’s dedicated servers line. I can remember, 3 years ago, OVH being almost double at low-mid configurations.
Here’s a brief comparison between them at the end of 2019.
Low-end/budget servers
Hetzner, with their EX/AX lines, is absolutely killing SoYouStart and Kimsufi. There’s no comparison to be made, SYS being treated as the “retarded cousin” of OVH, with absolutely zero (real) support and/or “support via forum” (?!).
Mid-end servers
It seems that OVH put their s**t together and launched some new configs (Rise & Advance). They are basically targeting Hetzner’s “PX” line, which is great for competition. Just check this example, with OVH destroying Hetzner’s offer.
High-end servers
OVH is the clear winner here. The best you could get from Hetzner is a W-2145 at about $100/mo, and their most expensive server is a “unnamed, SP Gold 16-Core” at $220.
Virtualisation
Using OVH for virtualisation is better because they offer you a lot of data-center locations and free (really functional) IPMI. When installing and tweaking the OSs you really need IPMI, especially in OpenStack/CloudStack deployments. Also I had countless times when an OS upgrade broke grub or the filesystem, and you really can’t do anything without KVM. Hetzner needs you to ask for a KVM, and wait “about 2 hours” for it to be manually deployed by a technician. I got mixed results, from 30 mins to 3 hours, but still … when your system is not booting and you have no idea why, you really need IPMI *now*, not in one hour.
Plesk, cPanel, DirectAdmin
For more simple stuff like cPanel, Plesk, “bald” bare-metals”, I’m usually choosing Hetzner. These things barely need a reboot, and we had very little need for IPMI in these scenarios. These control panels tend to be “idiot-proof” and have a lot of safety checks, so they are not very prone to total system failures.
Support
OVH is bad. Really bad. We paid for their “VIP support” and have our own sales manager. Still, when something breaks, the fastest way to solve your problem is to…just buy another server and restore from backup. We have horror events with servers having their drives changed without warning, different motherboards models replaced, broken drives replaced with other broken drives, different components changed in vain because of a broken cooler etc. You name it, we had it. There’s no reply to your tickets. The “best” way to handle an issue is to submit a ticket (which is usually totally ignored, or replied after 1-2 weeks), call them indicating the ticket and then re-call them every 30 minutes. Yeah, at some point you kinda “develop a relation” with their support guys (which are admittedly friendly). At this point we’re being like “Hey Mark, how’r you doin’ today? Look man, that darn server broke again, can you please ask John to take a look on it? Cheers mate!”. And yeah…we know most of their IRC handles as well. So that’s how you usually “get support” from OVH.
At Hetzner things are very efficient. Hats down for Hetzner’s support department! All hardware failures were treated really fast, usually in less than 30 minutes. They usually process a ticket in maximum 2 hours (had less than 30 minutes some times), and reply back in less than 30 minutes. There’s nothing I could think that they didn’t fixed in a satisfactory amount of time. There was no bad hardware installed, no mix-ups, everything was (until now) by the book.
Hardware
We had at least 70% less failures at Hetzner compared with OVH. They both use Supermicro, they both use consumer-grade hardware where they shouldn’t. OVH basically “refurbishes” everything to the point the component gets unusable. If your drive gets replaced by OVH, you first take a look at how long was the “new” drive used and hope that you’ll be fine (sometimes you’re not). If your drive gets replaced by Hetzner, it’s usually brand new (or with very low usage). We had almost no motherboard replacements at Hetzner, we had quite a few at OVH. We had zero failed coolers at Hetzner, we had a few at OVH.
Network
OVH is the clear winner as they have a huge amount of data-centers all around the world and a very straight forward network setup. You could make a Multi-AZ OpenStack deployment between France, UK and CA, and keep it all in the same VLAN. Latency between data-centers is great. The last “big f***up” was about 3 years ago, when all their EU network got offline. Except that, I can’t really complain about the last ~7 years.
Hetzner is also very good, with good latency between data-centers. If you’re OK with all your servers being in the same zone, or only in DE and Finland, you’re good to go.
They both provide VLANs and Floating IPs.
The network setup is more straight forward at OVH, with Hetzner asking you to jump through some hoops if you want to do “more”. Just check Hetzner’s Proxmox install tutorial, it’s not something that “just works”, but you have to (admittedly slightly) work around. I personally dislike Hetzner’s network setup, as sometimes ends up with your head banging on the wall; still almost everything is “doable” if you know how to get around.
IPs
OVH is asking 1 EUR/IP once. Hetzner is asking 1 EUR/IP monthly.
Example: if you’ll start a public cloud you’ll need at least 512 IPs. On a 5 year lifespan, you’ll end up paying 512 EUR at OVH and 30,720 EUR at Hetzner. That’s a thing you need to take into consideration when doing your business plan.
Customer Panels
OVH’s control panel is a pile of s**t. Yes, it works if you know how to get around it, but it’s hugely slow and crashes a lot. And I mean…a lot! Hetzner’s old panel is bad (welcome back to the ’90s) but stable and snappy; the new one is pretty slick, fast and intuitive. The bright side is that you really don’t need to access the Customer Panel so often, so it’s not a “big deal”.
Deployment & Automation
Hetzner has slightly better deployment times. Usually servers are deployed in less than 30 minutes by both companies. Still, OVH had more delays than Hetzner. Recently we’ve waited for about 16 hours for a server that was marked as “ready in 120 seconds”. So never trust OVH’s “deployment indicator”: if it states “120 seconds”, expect between 5 minutes and 48 hours. If it states “72 hours”, expect that to be a week (and a lot of phone calls from your side). If it states “10 days”, just get something else, we’ve waited three weeks for a storage cluster to be fully deployed.
OS install works pretty ok on both sides, with Hetzner being slightly faster. They both fail sometimes, but it’s nothing that should be taken into consideration.
Conclusions
It’s impossible to choose a clear winner, as they both have pros and cons. Hetzner wins at support and low-end bang for the buck. OVH wins at network and a larger server offer.
The best one is, really, the one that checks more points for the needs of your project.
I hope this helps you. If you need more information, please feel free to leave a comment. Cheers!
Submitted December 06, 2019 at 02:03AM by The_Gowk https://www.reddit.com/r/webhosting/comments/e6wbbg/a_fast_comparison_ovh_and_hetzner_are_finally/?utm_source=ifttt
from Blogger http://webdesignersolutions1.blogspot.com/2019/12/a-fast-comparison-ovh-and-hetzner-are.html via IFTTT
0 notes
Text
PROXMOX
https://www.proxmox.com/en/proxmox-ve/requirements
System Requirements
Recommended Hardware
CPU: 64bit (Intel EMT64 or AMD64)
Intel VT/AMD-V capable CPU/Mainboard (for KVM Full Virtualization support)
8 GB RAM is good, more is better (grab as much as possible)
Hardware RAID with batteries protected write cache (BBU) or flash protection
Fast hard drives, best results with 15k rpm SAS, Raid10
Two or more Gbit NIC (for bonding), additional NIC´s depending on the preferred storage technology and cluster setup
For evaluation
Minimum Hardware (for testing only)
CPU: 64bit (Intel EMT64 or AMD64)
Intel VT/AMD-V capable CPU/Mainboard (for KVM Full Virtualization support)
Minimum 1 GB RAM
Hard drive
One NIC
Testing with desktop virtualization
Proxmox VE can be installed as a guest on all common used desktop virtualization solutions as long as they support nested virtualization.
Proxmox VE on a Debian System
If you want you can install Proxmox VE on top of a running Debian 64-bit. This is especially interesting, if you want to have a custom partition layout.
0 notes
Text
Proxmox help getting cluster to work
Proxmox help getting cluster to work
Description: I setup a 3 server cluster in Proxmox, and I can't get corosync to properly behave. Need some …Category: Web, Software & ITRequired skills: linux, clustered systems, linux server, server administrationFixed Price budget: Under $250Job type: PublicFreelancer Location: Worldwide APPLY HERE: Proxmox help getting cluster to work
View On WordPress
0 notes
Text
Mastering Ceph Storage Configuration in Proxmox 8 Cluster
Mastering Ceph Storage Configuration in Proxmox 8 Cluster #100daysofhomelab #proxmox8 #cephstorage #CephStorageConfiguration #ProxmoxClusterSetup #ObjectStorageInCeph #CephBlockStorage #CephFileSystem #CephClusterManagement #CephAndProxmoxIntegration
The need for highly scalable storage solutions that are fault-tolerant and offer a unified system is undeniably significant in data storage. One such solution is Ceph Storage, a powerful and flexible storage system that facilitates data replication and provides data redundancy. In conjunction with Proxmox, an open-source virtualization management platform, it can help manage important business…

View On WordPress
#Ceph and Proxmox Integration#Ceph Block Storage#Ceph Cluster Management#Ceph File System#Ceph OSD Daemons#Ceph Storage Configuration#Data Replication in Ceph#High Scalability Storage Solution#Object Storage in Ceph#Proxmox Cluster Setup
0 notes
Text
In today’s article we shall look at the steps required to install and configure Pritunl VPN on Debian 11 / Debian 10 / Proxmox VE. Pritunl VPN is an opensource VPN server that you can adopt as an alternative to Aviatrix and Pulse Secure solutions. In Pritunl all configurations are done from a web interface which makes it easy to manage irregardless of the size of an organization or complexity of where it’s deployed. Security is a top priority in Pritunl solution, all traffic between clients and the server is encrypted. You can optionally enable two-step authentication using Google Authenticator. Here are some notable features of Pritunl VPN; It has support for multi-cloud VPN peering It is simple to install, configure and manage You can configure upto five layers of authentication giving it better security. Wireguard and OpenVPN clients are supported Highly scalable for upto thousands of users – both in Cloud and On-prem infrastructures Can be configured for multi-cloud site-to-site links with VPC peering. VPC peering is available for Google Cloud, AWS, Azure and Oracle Cloud. Interconnect AWS VPC networks across AWS regions and provide reliable remote access with automatic failover that can scale horizontally Architecture of Pritunl VPN Pritunl VPN presents a distributed and scalable infrastructure that can be easily scaled to thousands of users. MongoDB clusters can be deployed in HA setup to guarantee availability of VPN system in your environment. Pritunl works on client-server architecture, where user profiles are downloaded on clients, while servers and users are configured on the VPN server. Pritunl is built on MongoDB – a highly scalable, and reliable NoSQL database solution. MongoDB has support for replication that can be done in minutes making a Pritunl cluster deployment fast and easy. Setup Pritunl VPN on Debian 11 / Debian 10 / Proxmox VE In this section we’ll discuss the installation and configurations of Pritunl VPN server on Debian 11 / Debian 10 / Proxmox VE. We recommend you perform this installation on a fresh installation of Debian Linux. Also ensure you access the server as user with sudo privs or as root user. Step 1: Update Debian system Login to your Debian machine and perform an update and optionally upgrade all packages on the system. sudo apt update && sudo apt -y full-upgrade After updates are committed, check if a reboot is required on the system. [ -f /var/run/reboot-required ] && sudo reboot -f Step 2: Add MongoDB and Pritunl repositories Install basic utility packages required for this operation: sudo apt update sudo apt install gpg curl gnupg2 software-properties-common apt-transport-https lsb-release ca-certificates Import MongoDB APT repository keys to your system. curl -fsSL https://www.mongodb.org/static/pgp/server-5.0.asc|sudo gpg --dearmor -o /etc/apt/trusted.gpg.d/mongodb-5.gpg Import Pritunl VPN GPG keys: $ sudo apt-key adv --keyserver hkp://keyserver.ubuntu.com --recv 7AE645C0CF8E292A Executing: /tmp/apt-key-gpghome.6ZjhVSgCdC/gpg.1.sh --keyserver hkp://keyserver.ubuntu.com --recv 7AE645C0CF8E292A gpg: key 7AE645C0CF8E292A: public key "Pritunl " imported gpg: Total number processed: 1 gpg: imported: 1 Add Pritunl repository: echo "deb http://repo.pritunl.com/stable/apt $(lsb_release -cs) main" | sudo tee /etc/apt/sources.list.d/pritunl.list Add Mongodb repository by running the commands below: echo "deb http://repo.mongodb.org/apt/debian buster/mongodb-org/5.0 main" | sudo tee /etc/apt/sources.list.d/mongodb-org-5.0.list Step 3: Install Pritunl and MongoDB With both repositories added and confirmed to be working let’s proceed to install pritunl and mongo-server packages. sudo apt update sudo apt install mongodb-org pritunl Now start and enable Pritunl and MongoDB as below: sudo systemctl start pritunl mongod sudo systemctl enable pritunl mongod Step 4: Configure Pritunl VPN Server Our Pritunl VPN server is now installed and running.
Next we access its web console on a web browser server’s IP to configure it. http://. You’ll need Setup Key to proceed. Run the command setup-key to generate it: $ sudo pritunl setup-key c76683c87efe4774887a9a223a2f1fd6 Once you enter the setup-key and mongodb url, it will prompt you for username and password. The default username and password are obtained with the below command: $ sudo pritunl default-password [undefined][2022-06-28 15:13:50,043][INFO] Getting default administrator password Administrator default password: username: "pritunl" password: "vzjTDicF92Ol" You’ll land on a page like below where you can change admin user and password, set domain and Let’s Encrypt SSL. Next configure organizations, users and servers. VPN users are added by clicking on ‘Users’. Users are mapped to server in an organization. To create a new organization click on ‘Add organization’ then specify a name and ‘Add’. Create a VPN server by clicking on ‘servers’ then ‘Add server’ Provide server information required then click ‘Add’. Finally attach the server to an organization by clicking on ‘Attach organization’ and choosing your organization. Adding users Click on ‘Add user’ to create a user profile on your VPN server. To add many users at once use the ‘Bulk Add user’ function on the web interface. Step 5: Configure Pritunl Clients Visit the Pritunl VPN clients page and choose one for your Workstation to download and install. Once VPN client has been installed, login to Pritunl VPN server to download user profile. Click on ‘Users’ select the particular user and click on the download icon to get the user profile. Launch your Pritunl VPN client, then choose “Import Profile” Locate user’s profile .tar file downloaded and import it, then you’ll be able to connect to Pritunl VPN server.
0 notes
Text
This guide has been written to help Linux and Cloud users to install and configure Proxmox VE 7 on Hetzner root server. Root server in Hetzner Cloud is a dedicated server which is completely isolated from one another to give you full access and control to configure the server anyway you want without affecting other users. Hetzner Online GmbH provides auctions for dedicated server hardware at a very competitive rates with a monthly payment model. Visit Hetzner Server auction page to bid on servers and save money. Proxmox Virtual Environment (VE) is a very powerful and enterprise-grade server virtualization software using Debian Linux as its base with a modified Linux kernel. With Proxmox you can run both Virtual Machines and Containers powered by KVM and LXC technologies respectively. The Proxmox VE source code is free, released under the GNU Affero General Public License, v3 (GNU AGPL, v3). This guide is intended for personal Labs only. We’ll do a single node installation of Proxmox VE Server on Debian 11 (Bullseye) operating system. It comes with an integrated graphical user interface (GUI) for management, there is no need to install a separate management tool. For a multi-node Proxmox VE Cluster setup, visit the official Proxmox VE High Availability to read more if interested with the solution. In this article, we shall perform installation of Proxmox VE 7 on a Hetzner root server with the following hardware specifications. CPU: Intel(R) Xeon(R) CPU E5-1650 v3 @ 3.50GHz (Cores 12) Memory: 256GB RAM Disk: 2 x 480GB SSD Network: 1Gbit IPV4 Addresses: 1 x IPV4 public address When you order an hetzner root server, by default, you get a single IPv4 public IP address. If you need more public addresses, you’ll have to order separately. Step 1 – Boot the Server in to Rescue Mode Login to your Hetzner root server console and move Main functions > Servers > Server Label > Rescue section to boot your server in rescue mode. From the page shown, select the Operating system, CPU Architecture, and public key or password and click on “Activate rescue system” to use activate rescue system. After activating rescue system, the system has to be rebooted. This is done on Server > ServerName > Reset section in the console. Step 2 – Create Root Server Configuration. SSH to the server in rescue mode using root user and password shown during Rescue activation. $ ssh root@serverip Welcome to the Hetzner Rescue System. This Rescue System is based on Debian 9 (stretch) with a newer kernel. You can install software as in a normal system. To install a new operating system from one of our prebuilt images, run 'installimage' and follow the instructions. More information at http://wiki.hetzner.de Rescue System up since 2021-12-03 21:01 +02:00 Hardware data: CPU1: Intel(R) Xeon(R) CPU E5-1650 v3 @ 3.50GHz (Cores 12) Memory: 257653 MB Disk /dev/sda: 480 GB (=> 447 GiB) doesn't contain a valid partition table Disk /dev/sdb: 480 GB (=> 447 GiB) doesn't contain a valid partition table Total capacity 894 GiB with 2 Disks Network data: eth0 LINK: yes MAC: b4:2e:99:47:fa:5c IP: xxxxxxxxxxxxxxxxxx IPv6: xxxxxxxxxxxxxxxxxx Intel(R) Gigabit Ethernet Network Driver root@rescue ~ # As seen from the output, the server we’re using has two disks @480GB. We’ll configure them in non-redundant RAID 0 configuration. Disk /dev/sda: 480 GB (=> 447 GiB) Disk /dev/sdb: 480 GB (=> 447 GiB) Next we create our Hetzner server installer configuration file. We’ll name it debian-install-config.txt vim install-config.txt This is the data populated that will be used by the installimage to install Debian 11 (Bullseye) operating system from pre-built image. DRIVE1 /dev/sda DRIVE2 /dev/sdb SWRAID 1 SWRAIDLEVEL 0 # Use 1 for Raid 1 BOOTLOADER grub HOSTNAME proxmox7.example.com # Set correct hostname PART /boot ext4 512M PART lvm vg0 all
LV vg0 root / ext4 50G LV vg0 swap swap swap 8G LV vg0 var /var ext4 300G # List images with ls /root/.oldroot/nfs/install/../images IMAGE /root/images/Debian-1101-bullseye-amd64-base.tar.gz Configure your own partitioning scheme depending on storage hardware and usable space. Step 3 – Install Debian 11 (Bullseye) on Hetzner root server With correct installer configurations, initiate the installation process of Debian Linux on Hetzner root server by running the following command: # installimage -a -c install-config.txt Installation process will start immediately after command execution: Found AUTOSETUP file '/autosetup' Running unattended installimage installation ... DRIVE1 /dev/sda DRIVE2 /dev/sdb SWRAID 1 SWRAIDLEVEL 0 # Use 1 for Raid 1 BOOTLOADER grub HOSTNAME myrootserver.computingpost.com PART /boot ext3 512M PART lvm vg0 all LV vg0 root / ext4 50G LV vg0 swap swap swap 8G LV vg0 var /var ext4 300G IMAGE /root/.oldroot/nfs/install/../images/Debian-1101-bullseye-amd64-base.tar.gz WARNING: Starting installation in 20 seconds ... Press X to continue immediately ... Installation will DELETE ALL DATA ON DISK(s)! Press CTRL-C to abort now! The script will do disk preparation and Debian server installation for you. Just sit and relax as magic happens! Hetzner Online GmbH - installimage Your server will be installed now, this will take some minutes You can abort at any time with CTRL+C ... : Reading configuration done : Loading image file variables done : Loading debian specific functions done 1/17 : Deleting partitions done 2/17 : Test partition size done 3/17 : Creating partitions and /etc/fstab done 4/17 : Creating software RAID level 0 done 5/17 : Creating LVM volumes done 6/17 : Formatting partitions : formatting /dev/md/0 with ext4 done : formatting /dev/vg0/root with ext4 done : formatting /dev/vg0/swap with swap done : formatting /dev/vg0/var with ext4 done 7/17 : Mounting partitions done 8/17 : Sync time via ntp done : Importing public key for image validation done 9/17 : Validating image before starting extraction done 10/17 : Extracting image (local) done 11/17 : Setting up network config done 12/17 : Executing additional commands : Setting hostname done : Generating new SSH keys done : Generating mdadm config done : Generating ramdisk done : Generating ntp config done 13/17 : Setting up miscellaneous files done 14/17 : Configuring authentication : Fetching SSH keys done : Disabling root password done : Disabling SSH root login without password done : Copying SSH keys done 15/17 : Installing bootloader grub done 16/17 : Running some debian specific functions done 17/17 : Clearing log files done INSTALLATION COMPLETE You can now reboot and log in to your new system with the same credentials that you used to log into the rescue system. When installation is done, reboot to Debian 11 (Bullseye) environment. # shutdown -r now SSH to the server as root user with password or SSH Public key if set. $ ssh root@serverip Linux proxmox7.
example.com 5.13.19-2-pve #1 SMP PVE 5.13.19-4 (Mon, 29 Nov 2021 12:10:09 +0100) x86_64 The programs included with the Debian GNU/Linux system are free software; the exact distribution terms for each program are described in the individual files in /usr/share/doc/*/copyright. Debian GNU/Linux comes with ABSOLUTELY NO WARRANTY, to the extent permitted by applicable law. We can review our current system partitions on the server. If you used LVM and still have space in VG, you can adjust Logical Volumes capacity. # lsblk NAME MAJ:MIN RM SIZE RO TYPE MOUNTPOINT sda 8:0 0 447.1G 0 disk ├─sda1 8:1 0 512M 0 part │ └─md0 9:0 0 511M 0 raid1 /boot └─sda2 8:2 0 446.6G 0 part └─md1 9:1 0 893G 0 raid0 ├─vg0-root 253:0 0 50G 0 lvm / ├─vg0-swap 253:1 0 8G 0 lvm [SWAP] └─vg0-var 253:2 0 300G 0 lvm /var sdb 8:16 0 447.1G 0 disk ├─sdb1 8:17 0 512M 0 part │ └─md0 9:0 0 511M 0 raid1 /boot └─sdb2 8:18 0 446.6G 0 part └─md1 9:1 0 893G 0 raid0 ├─vg0-root 253:0 0 50G 0 lvm / ├─vg0-swap 253:1 0 8G 0 lvm [SWAP] └─vg0-var 253:2 0 300G 0 lvm /var # pvs PV VG Fmt Attr PSize PFree /dev/md1 vg0 lvm2 a-- 893.00g 535.00g # vgs VG #PV #LV #SN Attr VSize VFree vg0 1 3 0 wz--n- 893.00g 535.00g # lvs LV VG Attr LSize Pool Origin Data% Meta% Move Log Cpy%Sync Convert root vg0 -wi-ao---- 50.00g swap vg0 -wi-ao---- 8.00g var vg0 -wi-ao---- 300.00g See below example which adds extra 50GB to /dev/vg0/var Logical Volume # lvextend -r -L +50G /dev/vg0/vg0 Confirm Debian successful installation by querying OS release info: root@proxmox ~ # cat /etc/os-release PRETTY_NAME="Debian GNU/Linux 11 (bullseye)" NAME="Debian GNU/Linux" VERSION_ID="11" VERSION="11 (bullseye)" VERSION_CODENAME=bullseye ID=debian HOME_URL="https://www.debian.org/" SUPPORT_URL="https://www.debian.org/support" BUG_REPORT_URL="https://bugs.debian.org/" Update and upgrade your Debian 11 (Bullseye) system apt update apt -y full-upgrade apt install wget vim sudo bash-completion [ -f /var/run/reboot-required ] && reboot -f Step 4 – Install Proxmox VE 7 on Debian 11 (Bullseye) Now that our Cloud server is ready, we can dive to the actual installation of Proxmox VE. Refer to our guide below to proceed with the setup. How To Install Proxmox VE 7 on Debian 11 (Bullseye) To change Proxmox VE UI theme see guide below: How To Customize Proxmox VE Web UI With dark theme
0 notes
Text
A fast comparison - OVH and Hetzner are finally (re)starting to get competitive
In the last ~5 years Hetzner basically killed OVH's dedicated servers line. I can remember, 3 years ago, OVH being almost double at low-mid configurations.
Here's a brief comparison between them at the end of 2019.
Low-end/budget servers
Hetzner, with their EX/AX lines, is absolutely killing SoYouStart and Kimsufi. There's no comparison to be made, SYS being treated as the "retarded cousin" of OVH, with absolutely zero (real) support and/or "support via forum" (?!).
Mid-end servers
It seems that OVH put their s**t together and launched some new configs (Rise & Advance). They are basically targeting Hetzner's "PX" line, which is great for competition. Just check this example, with OVH destroying Hetzner's offer.
High-end servers
OVH is the clear winner here. The best you could get from Hetzner is a W-2145 at about $100/mo, and their most expensive server is a "unnamed, SP Gold 16-Core" at $220.
Virtualisation
Using OVH for virtualisation is better because they offer you a lot of data-center locations and free (really functional) IPMI. When installing and tweaking the OSs you really need IPMI, especially in OpenStack/CloudStack deployments. Also I had countless times when an OS upgrade broke grub or the filesystem, and you really can't do anything without KVM. Hetzner needs you to ask for a KVM, and wait "about 2 hours" for it to be manually deployed by a technician. I got mixed results, from 30 mins to 3 hours, but still ... when your system is not booting and you have no idea why, you really need IPMI *now*, not in one hour.
Plesk, cPanel, DirectAdmin
For more simple stuff like cPanel, Plesk, "bald" bare-metals", I'm usually choosing Hetzner. These things barely need a reboot, and we had very little need for IPMI in these scenarios. These control panels tend to be "idiot-proof" and have a lot of safety checks, so they are not very prone to total system failures.
Support
OVH is bad. Really bad. We paid for their "VIP support" and have our own sales manager. Still, when something breaks, the fastest way to solve your problem is to...just buy another server and restore from backup. We have horror events with servers having their drives changed without warning, different motherboards models replaced, broken drives replaced with other broken drives, different components changed in vain because of a broken cooler etc. You name it, we had it. There's no reply to your tickets. The "best" way to handle an issue is to submit a ticket (which is usually totally ignored, or replied after 1-2 weeks), call them indicating the ticket and then re-call them every 30 minutes. Yeah, at some point you kinda "develop a relation" with their support guys (which are admittedly friendly). At this point we're being like "Hey Mark, how'r you doin' today? Look man, that darn server broke again, can you please ask John to take a look on it? Cheers mate!". And yeah...we know most of their IRC handles as well. So that's how you usually "get support" from OVH.
At Hetzner things are very efficient. Hats down for Hetzner's support department! All hardware failures were treated really fast, usually in less than 30 minutes. They usually process a ticket in maximum 2 hours (had less than 30 minutes some times), and reply back in less than 30 minutes. There's nothing I could think that they didn't fixed in a satisfactory amount of time. There was no bad hardware installed, no mix-ups, everything was (until now) by the book.
Hardware
We had at least 70% less failures at Hetzner compared with OVH. They both use Supermicro, they both use consumer-grade hardware where they shouldn't. OVH basically "refurbishes" everything to the point the component gets unusable. If your drive gets replaced by OVH, you first take a look at how long was the "new" drive used and hope that you'll be fine (sometimes you're not). If your drive gets replaced by Hetzner, it's usually brand new (or with very low usage). We had almost no motherboard replacements at Hetzner, we had quite a few at OVH. We had zero failed coolers at Hetzner, we had a few at OVH.
Network
OVH is the clear winner as they have a huge amount of data-centers all around the world and a very straight forward network setup. You could make a Multi-AZ OpenStack deployment between France, UK and CA, and keep it all in the same VLAN. Latency between data-centers is great. The last "big f***up" was about 3 years ago, when all their EU network got offline. Except that, I can't really complain about the last ~7 years.
Hetzner is also very good, with good latency between data-centers. If you're OK with all your servers being in the same zone, or only in DE and Finland, you're good to go.
They both provide VLANs and Floating IPs.
The network setup is more straight forward at OVH, with Hetzner asking you to jump through some hoops if you want to do "more". Just check Hetzner's Proxmox install tutorial, it's not something that "just works", but you have to (admittedly slightly) work around. I personally dislike Hetzner's network setup, as sometimes ends up with your head banging on the wall; still almost everything is "doable" if you know how to get around.
IPs
OVH is asking 1 EUR/IP once. Hetzner is asking 1 EUR/IP monthly.
Example: if you'll start a public cloud you'll need at least 512 IPs. On a 5 year lifespan, you'll end up paying 512 EUR at OVH and 30,720 EUR at Hetzner. That's a thing you need to take into consideration when doing your business plan.
Customer Panels
OVH's control panel is a pile of s**t. Yes, it works if you know how to get around it, but it's hugely slow and crashes a lot. And I mean...a lot! Hetzner's old panel is bad (welcome back to the '90s) but stable and snappy; the new one is pretty slick, fast and intuitive. The bright side is that you really don't need to access the Customer Panel so often, so it's not a "big deal".
Deployment & Automation
Hetzner has slightly better deployment times. Usually servers are deployed in less than 30 minutes by both companies. Still, OVH had more delays than Hetzner. Recently we've waited for about 16 hours for a server that was marked as "ready in 120 seconds". So never trust OVH's "deployment indicator": if it states "120 seconds", expect between 5 minutes and 48 hours. If it states "72 hours", expect that to be a week (and a lot of phone calls from your side). If it states "10 days", just get something else, we've waited three weeks for a storage cluster to be fully deployed.
OS install works pretty ok on both sides, with Hetzner being slightly faster. They both fail sometimes, but it's nothing that should be taken into consideration.
Conclusions
It's impossible to choose a clear winner, as they both have pros and cons. Hetzner wins at support and low-end bang for the buck. OVH wins at network and a larger server offer.
The best one is, really, the one that checks more points for the needs of your project.
I hope this helps you. If you need more information, please feel free to leave a comment. Cheers!
Submitted December 06, 2019 at 02:03AM by The_Gowk https://www.reddit.com/r/webhosting/comments/e6wbbg/a_fast_comparison_ovh_and_hetzner_are_finally/?utm_source=ifttt from Blogger http://webdesignersolutions1.blogspot.com/2019/12/a-fast-comparison-ovh-and-hetzner-are.html via IFTTT
0 notes
Text
A fast comparison - OVH and Hetzner are finally (re)starting to get competitive via /r/webhosting
A fast comparison - OVH and Hetzner are finally (re)starting to get competitive
In the last ~5 years Hetzner basically killed OVH's dedicated servers line. I can remember, 3 years ago, OVH being almost double at low-mid configurations.
Here's a brief comparison between them at the end of 2019.
Low-end/budget servers
Hetzner, with their EX/AX lines, is absolutely killing SoYouStart and Kimsufi. There's no comparison to be made, SYS being treated as the "retarded cousin" of OVH, with absolutely zero (real) support and/or "support via forum" (?!).
Mid-end servers
It seems that OVH put their s**t together and launched some new configs (Rise & Advance). They are basically targeting Hetzner's "PX" line, which is great for competition. Just check this example, with OVH destroying Hetzner's offer.
High-end servers
OVH is the clear winner here. The best you could get from Hetzner is a W-2145 at about $100/mo, and their most expensive server is a "unnamed, SP Gold 16-Core" at $220.
Virtualisation
Using OVH for virtualisation is better because they offer you a lot of data-center locations and free (really functional) IPMI. When installing and tweaking the OSs you really need IPMI, especially in OpenStack/CloudStack deployments. Also I had countless times when an OS upgrade broke grub or the filesystem, and you really can't do anything without KVM. Hetzner needs you to ask for a KVM, and wait "about 2 hours" for it to be manually deployed by a technician. I got mixed results, from 30 mins to 3 hours, but still ... when your system is not booting and you have no idea why, you really need IPMI *now*, not in one hour.
Plesk, cPanel, DirectAdmin
For more simple stuff like cPanel, Plesk, "bald" bare-metals", I'm usually choosing Hetzner. These things barely need a reboot, and we had very little need for IPMI in these scenarios. These control panels tend to be "idiot-proof" and have a lot of safety checks, so they are not very prone to total system failures.
Support
OVH is bad. Really bad. We paid for their "VIP support" and have our own sales manager. Still, when something breaks, the fastest way to solve your problem is to...just buy another server and restore from backup. We have horror events with servers having their drives changed without warning, different motherboards models replaced, broken drives replaced with other broken drives, different components changed in vain because of a broken cooler etc. You name it, we had it. There's no reply to your tickets. The "best" way to handle an issue is to submit a ticket (which is usually totally ignored, or replied after 1-2 weeks), call them indicating the ticket and then re-call them every 30 minutes. Yeah, at some point you kinda "develop a relation" with their support guys (which are admittedly friendly). At this point we're being like "Hey Mark, how'r you doin' today? Look man, that darn server broke again, can you please ask John to take a look on it? Cheers mate!". And yeah...we know most of their IRC handles as well. So that's how you usually "get support" from OVH.
At Hetzner things are very efficient. Hats down for Hetzner's support department! All hardware failures were treated really fast, usually in less than 30 minutes. They usually process a ticket in maximum 2 hours (had less than 30 minutes some times), and reply back in less than 30 minutes. There's nothing I could think that they didn't fixed in a satisfactory amount of time. There was no bad hardware installed, no mix-ups, everything was (until now) by the book.
Hardware
We had at least 70% less failures at Hetzner compared with OVH. They both use Supermicro, they both use consumer-grade hardware where they shouldn't. OVH basically "refurbishes" everything to the point the component gets unusable. If your drive gets replaced by OVH, you first take a look at how long was the "new" drive used and hope that you'll be fine (sometimes you're not). If your drive gets replaced by Hetzner, it's usually brand new (or with very low usage). We had almost no motherboard replacements at Hetzner, we had quite a few at OVH. We had zero failed coolers at Hetzner, we had a few at OVH.
Network
OVH is the clear winner as they have a huge amount of data-centers all around the world and a very straight forward network setup. You could make a Multi-AZ OpenStack deployment between France, UK and CA, and keep it all in the same VLAN. Latency between data-centers is great. The last "big f***up" was about 3 years ago, when all their EU network got offline. Except that, I can't really complain about the last ~7 years.
Hetzner is also very good, with good latency between data-centers. If you're OK with all your servers being in the same zone, or only in DE and Finland, you're good to go.
They both provide VLANs and Floating IPs.
The network setup is more straight forward at OVH, with Hetzner asking you to jump through some hoops if you want to do "more". Just check Hetzner's Proxmox install tutorial, it's not something that "just works", but you have to (admittedly slightly) work around. I personally dislike Hetzner's network setup, as sometimes ends up with your head banging on the wall; still almost everything is "doable" if you know how to get around.
IPs
OVH is asking 1 EUR/IP once. Hetzner is asking 1 EUR/IP monthly.
Example: if you'll start a public cloud you'll need at least 512 IPs. On a 5 year lifespan, you'll end up paying 512 EUR at OVH and 30,720 EUR at Hetzner. That's a thing you need to take into consideration when doing your business plan.
Customer Panels
OVH's control panel is a pile of s**t. Yes, it works if you know how to get around it, but it's hugely slow and crashes a lot. And I mean...a lot! Hetzner's old panel is bad (welcome back to the '90s) but stable and snappy; the new one is pretty slick, fast and intuitive. The bright side is that you really don't need to access the Customer Panel so often, so it's not a "big deal".
Deployment & Automation
Hetzner has slightly better deployment times. Usually servers are deployed in less than 30 minutes by both companies. Still, OVH had more delays than Hetzner. Recently we've waited for about 16 hours for a server that was marked as "ready in 120 seconds". So never trust OVH's "deployment indicator": if it states "120 seconds", expect between 5 minutes and 48 hours. If it states "72 hours", expect that to be a week (and a lot of phone calls from your side). If it states "10 days", just get something else, we've waited three weeks for a storage cluster to be fully deployed.
OS install works pretty ok on both sides, with Hetzner being slightly faster. They both fail sometimes, but it's nothing that should be taken into consideration.
Conclusions
It's impossible to choose a clear winner, as they both have pros and cons. Hetzner wins at support and low-end bang for the buck. OVH wins at network and a larger server offer.
The best one is, really, the one that checks more points for the needs of your project.
I hope this helps you. If you need more information, please feel free to leave a comment. Cheers!
Submitted December 06, 2019 at 02:03AM by The_Gowk via reddit https://www.reddit.com/r/webhosting/comments/e6wbbg/a_fast_comparison_ovh_and_hetzner_are_finally/?utm_source=ifttt
0 notes