#Custom DNS Configuration
Explore tagged Tumblr posts
Visit Tumblr Blog
Explore Tumblr blogs with no restrictions, modern design and the best experience.
Last Seen Tumblr Blogs


Fun Fact
Tumblr was named as a finalist in Lead411’s New York City Hot 125 in Aug 2010.
Text
Technitium DNS Server in Docker: Is this the Best Home Server DNS?
Technitium DNS Server in Docker: Is this the Best Home Server DNS? @vexpert #homelab #TechnitiumDNSServer #HomeLabDNS #DNSPrivacyandSecurity #DNSServerComparison #PiHolevsTechnitium #AdGuardHomevsTechnitium #CustomDNSConfiguration #BlockAdsandMalwareDNS
When many enthusiasts or home labbers start to look at services they want to run at home after purchasing some server gear, DNS server is one of the first services that you can benefit from. DNS provides the core name resolution for your home lab and server environment. Hosting your own DNS server provides many benefits over using the configured ISP’s DNS server settings. Table of contentsWhat…

View On WordPress
#AdGuard Home vs. Technitium#Block Ads and Malware at DNS Level#Custom DNS Configuration#DNS Privacy and Security#DNS Server Comparison#Encrypted DNS Protocols#Home Lab DNS Guide#Pi-Hole vs. Technitium#Technitium DNS Server#User-Friendly DNS Web Console
0 notes
Text
Blocking Ads on Mobile Devices
Blocking ads on our phones is way harder than it should be so I figured I'd make some recommendations. These are not the only options out there, just the ones that I know and have used.
Please note that browser-level and system-level adblocking are complementary; you'll have the best experience if you use both of them together as they each block different things in different places. If you want a basic idea of how effective your combined adblocking setup is, you can visit this website in your mobile browser.
Lastly, there is some additional advice/info under the readmore if you're curious (EDIT: updated March 2025 to add more adblocking options for iOS and to add info about sideloading altered versions of social media apps that don't contain ads on Android and iOS).
Android
Browser-Level
uBlock Origin (for Firefox)
System-Level (works in all apps, not just browsers)
AdGuard
Blokada 5 (completely free version) OR Blokada 6 (has some newer features but they require a subscription)
iPhone/iPad
Browser-Level
AdGuard (Safari extension; free for basic browser-level blocking, requires a subscription or one time purchase of “lifetime” license for custom filters)
1Blocker (Safari extension from an indie developer; can enable one built-in or custom filter list for free, requires a subscription or one time purchase of “lifetime” license for enabling multiple filter lists and updating filter lists to the latest version automatically)
Wipr 2 (one time purchase from indie developer; simplest option to use, but also the least configurable. Best if you are looking for one time set and forget and don’t need any custom filters. Note that it does not have a system-level blocking option)
System-Level (works in all apps, not just browsers)
AdGuard (requires subscription or one time purchase of “lifetime” license for system-level blocking)
1Blocker (can activate without a subscription, but requires subscription or one time purchase of “lifetime” license to enable system-level blocking AND browser-level blocking simultaneously)
AdGuard DNS only (this is free and does not require the AdGuard app, BUT I would only recommend it for advanced users, as you can't easily turn it off like you can with the app. Credit to this Reddit thread for the DNS profile)
Some additional info: browser-level blocking is a browser addon or extension, like you might be used to from a desktop computer. This inspects the HTML code returned by websites and searches for patterns that identify the presence of an ad or other annoyance (popup videos, cookie agreements, etc.). System-level blocking is almost always DNS-based. Basically whenever an app asks your phone's OS to make a connection to a website that is known for serving ads, the system-level blocker replies "sorry, I don't know her 🤷♂️💅" and the ad doesn't get downloaded. This works in most places, not just a browser, but be warned that it might make your battery drain a little faster depending on the app/setup.
Each of those types of blocking has strengths and weaknesses. System-level DNS blocking blocks ads in all apps, but companies that own advertising networks AND the websites those ads are served on can combine their services into the same domain to render DNS blocking useless; you can’t block ads served by Facebook/Meta domains without also blocking all of Facebook and Instagram as well because they made sure their ads are served from the same domain as all the user posts you actually want to see. Similarly, browser-level blocking can recognize ads by appearance and content, regardless of what domain they’re served from, so it can block them on Instagram and Facebook. However, it needs to be able to inspect the content being loaded in order to look for ads, and there’s no way to do that in non-browser apps. That’s why using both together will get you the best results.
These limitations do mean that you can’t block ads in the Facebook or Instagram apps, unfortunately, only in the website versions of them visited in your browser. It also means ads served by meta’s/facebook’s ad network in other apps can’t be blocked either (unless you're one of the rare beasts who doesn't use facebook or instagram or threads, in which case feel free to blacklist all Meta/FB domains and watch your ads disappear 😍; I'm jealous and in awe of you lol).
One note: some apps may behave unpredictably when they can't download ads. For example, the Tumblr app has big black spaces where the ads are, and sometimes those spaces collapse as you scroll past them and it messes up scrolling for a few seconds (UPDATE: looks like the scrolling issue may have actually been a Tumblr bug that they have now fixed, at least on iOS). Still way less annoying than getting ads for Draco Malfoy seduction roleplay AI chatbots imo though. And honestly *most* apps handle this fairly gracefully, like a mobile game I play just throws error messages like "ad is not ready" and then continues like normal.
One final note: on Android, you may actually be able to find hacked versions of Meta’s apps that have the ad frameworks removed. In some cases they are a little janky (unsurprisingly, apps don’t always take kindly to having some of their innards ripped out by a third-party), and they are often out of date. BUT in return you get an Instagram app with no ads whatsoever, and some of them even add additional features like buttons for saving IG videos and photos to your phone. However, use these apps at your own risk, as there is functionally no way to validate the code that the third-parties have added or removed from the app. Example altered IG app (I have not vetted this altered app, it's just a popular option): link.
It is technically possible to install altered apps on iOS as well, but Apple makes it much, much harder to do (unless you are jailbroken, which is a whole different ballgame). I'm not going to cover sideloading or jailbreaking here because even I as a very techy person eventually grew tired of messing with it or having to pay for it. If you're interested you can read more about the different ways to do sideloading on iOS here.
#adblockers#ad blocking#digital privacy#internet privacy#firefox#firefox extensions#mine#adguard#blokada#android#ios#iphone
516 notes
·
View notes
Text
I’m sorry but I’m still losing my fucking MIND over elons incomprehensible Linux own the libs tweet like
Like it’s incredibly obvious he heard about a traceroute, and then googled “how to delete file in Linux” and then didn’t even read the results
Like… woke_mind_virus isn’t a fully qualified domain name, meaning it relies on a custom DNS resolution specific to his machine, or if utilizing a vpn, that specific vpn’s custom host file. Or that the American government would have a host entry for a woke mind virus, which if you’ve ever had to use a government website, is laughable. Also DNS is global for the most part, but honestly we can move on at this point.
So sure, we’ll say that the government has forced all public internet in America to resolve woke_mind_virus. Where does it resolve to? YOUR OWN COMPUTER, you silly billy! Obviously! This is *almost* comprehensible. Sure, we are all infected with the woke mind virus, why not. It must be destroyed within ourselves. Yeah man, whatever. Why not? So how do we destroy it?
Duh! Just delete it! How do we do that in our L337 uber hax0r terminal on our fresh kali live usb (because partitions are scary)? We’ll save that for last.
Because while deleting one file could make a website inoperable, it does not remove every trace of it! It first needs a configuration file in the web server, usually Apache or nginx. This is at LEAST one file, but cmon, if you’re gonna psychologically program the masses and keep it out of public view, you gotta encrypt that shit! So naturally, an SSL is in order! That’s easily 1-3 more files. woke_mind_virus can get a pass on not being fully qualified in this specific case because certs can theoretically be self signed and trusted on local networks, but he wouldn’t be able to tell you that. If you stood up a little one page html site on a web server on your own computer, and navigated to it on port 443 (https://) you would get an SSL error, even though it’s on your own machine. I feel like I’ve beaten this into the ground enough, but just understand it’s stupid.
What’s important to note here is that these BARE MINIMUM files are what routes the request from your machine to the destination site, even if it’s your own computer. If you delete the contents of the site (also called the docroot), the site still exists, and can receive and route requests to and from it, it’s just empty. You’ll probably get a 404 because there’s no actual content to serve. This woke mind princess is in another castle.
It’s also imprudent to delete these configuration files first, because that’s how you determine where the site content actually is! These files dictate what directory (folder for you windows losers) is called upon to actually serve you the content you see displayed when you open a webpage. So you need this information if you don’t want to destroy the entire file system and only want to remove the woke_mind_virus site. Cmon Elon, this is baby shit.
So of course, the strat with the most Efficiency and preserving the rest of the system (which seems to be the point of the tweet) is to find the docroot, delete the docroot, and then delete the web server config files. So how do we delete them?
And here we have it: rm -rf
The syntax is as follows:
rm -rf </path/to/file>
Even if you don’t know shit about Linux, you can probably see the problem here. It’s just so blatantly incorrect, it’s almost as if he’s never done it before.
For those that want to see a real world example, here is me creating a file called woke_mind_virus in my home directory and then trying to delete it the Elon Way:

3 notes
·
View notes
Text
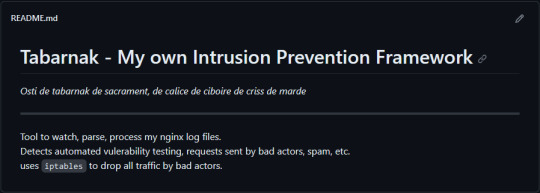
(this is a small story of how I came to write my own intrusion detection/prevention framework and why I'm really happy with that decision, don't mind me rambling)
Preface

About two weeks ago I was faced with a pretty annoying problem. Whilst I was going home by train I have noticed that my server at home had been running hot and slowed down a lot. This prompted me to check my nginx logs, the only service that is indirectly available to the public (more on that later), which made me realize that - due to poor access control - someone had been sending me hundreds of thousands of huge DNS requests to my server, most likely testing for vulnerabilities. I added an iptables rule to drop all traffic from the aforementioned source and redirected remaining traffic to a backup NextDNS instance that I set up previously with the same overrides and custom records that my DNS had to not get any downtime for the service but also allow my server to cool down. I stopped the DNS service on my server at home and then used the remaining train ride to think. How would I stop this from happening in the future? I pondered multiple possible solutions for this problem, whether to use fail2ban, whether to just add better access control, or to just stick with the NextDNS instance.
I ended up going with a completely different option: making a solution, that's perfectly fit for my server, myself.
My Server Structure
So, I should probably explain how I host and why only nginx is public despite me hosting a bunch of services under the hood.
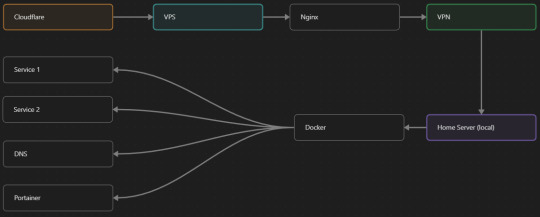
I have a public facing VPS that only allows traffic to nginx. That traffic then gets forwarded through a VPN connection to my home server so that I don't have to have any public facing ports on said home server. The VPS only really acts like the public interface for the home server with access control and logging sprinkled in throughout my configs to get more layers of security. Some Services can only be interacted with through the VPN or a local connection, such that not everything is actually forwarded - only what I need/want to be.
I actually do have fail2ban installed on both my VPS and home server, so why make another piece of software?
Tabarnak - Succeeding at Banning
I had a few requirements for what I wanted to do:
Only allow HTTP(S) traffic through Cloudflare
Only allow DNS traffic from given sources; (location filtering, explicit white-/blacklisting);
Webhook support for logging
Should be interactive (e.g. POST /api/ban/{IP})
Detect automated vulnerability scanning
Integration with the AbuseIPDB (for checking and reporting)
As I started working on this, I realized that this would soon become more complex than I had thought at first.
Webhooks for logging This was probably the easiest requirement to check off my list, I just wrote my own log() function that would call a webhook. Sadly, the rest wouldn't be as easy.
Allowing only Cloudflare traffic This was still doable, I only needed to add a filter in my nginx config for my domain to only allow Cloudflare IP ranges and disallow the rest. I ended up doing something slightly different. I added a new default nginx config that would just return a 404 on every route and log access to a different file so that I could detect connection attempts that would be made without Cloudflare and handle them in Tabarnak myself.
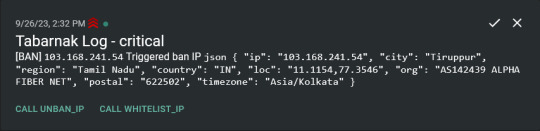
Integration with AbuseIPDB Also not yet the hard part, just call AbuseIPDB with the parsed IP and if the abuse confidence score is within a configured threshold, flag the IP, when that happens I receive a notification that asks me whether to whitelist or to ban the IP - I can also do nothing and let everything proceed as it normally would. If the IP gets flagged a configured amount of times, ban the IP unless it has been whitelisted by then.
Location filtering + Whitelist + Blacklist This is where it starts to get interesting. I had to know where the request comes from due to similarities of location of all the real people that would actually connect to the DNS. I didn't want to outright ban everyone else, as there could be valid requests from other sources. So for every new IP that triggers a callback (this would only be triggered after a certain amount of either flags or requests), I now need to get the location. I do this by just calling the ipinfo api and checking the supplied location. To not send too many requests I cache results (even though ipinfo should never be called twice for the same IP - same) and save results to a database. I made my own class that bases from collections.UserDict which when accessed tries to find the entry in memory, if it can't it searches through the DB and returns results. This works for setting, deleting, adding and checking for records. Flags, AbuseIPDB results, whitelist entries and blacklist entries also get stored in the DB to achieve persistent state even when I restart.
Detection of automated vulnerability scanning For this, I went through my old nginx logs, looking to find the least amount of paths I need to block to catch the biggest amount of automated vulnerability scan requests. So I did some data science magic and wrote a route blacklist. It doesn't just end there. Since I know the routes of valid requests that I would be receiving (which are all mentioned in my nginx configs), I could just parse that and match the requested route against that. To achieve this I wrote some really simple regular expressions to extract all location blocks from an nginx config alongside whether that location is absolute (preceded by an =) or relative. After I get the locations I can test the requested route against the valid routes and get back whether the request was made to a valid URL (I can't just look for 404 return codes here, because there are some pages that actually do return a 404 and can return a 404 on purpose). I also parse the request method from the logs and match the received method against the HTTP standard request methods (which are all methods that services on my server use). That way I can easily catch requests like:
XX.YYY.ZZZ.AA - - [25/Sep/2023:14:52:43 +0200] "145.ll|'|'|SGFjS2VkX0Q0OTkwNjI3|'|'|WIN-JNAPIER0859|'|'|JNapier|'|'|19-02-01|'|'||'|'|Win 7 Professional SP1 x64|'|'|No|'|'|0.7d|'|'|..|'|'|AA==|'|'|112.inf|'|'|SGFjS2VkDQoxOTIuMTY4LjkyLjIyMjo1NTUyDQpEZXNrdG9wDQpjbGllbnRhLmV4ZQ0KRmFsc2UNCkZhbHNlDQpUcnVlDQpGYWxzZQ==12.act|'|'|AA==" 400 150 "-" "-"
I probably over complicated this - by a lot - but I can't go back in time to change what I did.
Interactivity As I showed and mentioned earlier, I can manually white-/blacklist an IP. This forced me to add threads to my previously single-threaded program. Since I was too stubborn to use websockets (I have a distaste for websockets), I opted for probably the worst option I could've taken. It works like this: I have a main thread, which does all the log parsing, processing and handling and a side thread which watches a FIFO-file that is created on startup. I can append commands to the FIFO-file which are mapped to the functions they are supposed to call. When the FIFO reader detects a new line, it looks through the map, gets the function and executes it on the supplied IP. Doing all of this manually would be way too tedious, so I made an API endpoint on my home server that would append the commands to the file on the VPS. That also means, that I had to secure that API endpoint so that I couldn't just be spammed with random requests. Now that I could interact with Tabarnak through an API, I needed to make this user friendly - even I don't like to curl and sign my requests manually. So I integrated logging to my self-hosted instance of https://ntfy.sh and added action buttons that would send the request for me. All of this just because I refused to use sockets.
First successes and why I'm happy about this After not too long, the bans were starting to happen. The traffic to my server decreased and I can finally breathe again. I may have over complicated this, but I don't mind. This was a really fun experience to write something new and learn more about log parsing and processing. Tabarnak probably won't last forever and I could replace it with solutions that are way easier to deploy and way more general. But what matters is, that I liked doing it. It was a really fun project - which is why I'm writing this - and I'm glad that I ended up doing this. Of course I could have just used fail2ban but I never would've been able to write all of the extras that I ended up making (I don't want to take the explanation ad absurdum so just imagine that I added cool stuff) and I never would've learned what I actually did.
So whenever you are faced with a dumb problem and could write something yourself, I think you should at least try. This was a really fun experience and it might be for you as well.
Post Scriptum
First of all, apologies for the English - I'm not a native speaker so I'm sorry if some parts were incorrect or anything like that. Secondly, I'm sure that there are simpler ways to accomplish what I did here, however this was more about the experience of creating something myself rather than using some pre-made tool that does everything I want to (maybe even better?). Third, if you actually read until here, thanks for reading - hope it wasn't too boring - have a nice day :)
10 notes
·
View notes
Text
Choosing the Right Control Panel for Your Hosting: Plesk vs cPanel Comparison

Whether you're a business owner or an individual creating a website, the choice of a control panel for your web hosting is crucial. Often overlooked, the control panel plays a vital role in managing web server features. This article compares two popular control panels, cPanel and Plesk, to help you make an informed decision based on your requirements and knowledge.
Understanding Control Panels
A control panel is a tool that allows users to manage various features of their web server directly. It simplifies tasks like adjusting DNS settings, managing databases, handling website files, installing third-party applications, implementing security measures, and providing FTP access. The two most widely used control panels are cPanel and Plesk, both offering a plethora of features at affordable prices.
Plesk: A Versatile Control Panel
Plesk is a web hosting control panel compatible with both Linux and Windows systems. It provides a user-friendly interface, offering access to all web server features efficiently.
cPanel: The Trusted Classic
cPanel is the oldest and most trusted web control panel, providing everything needed to manage, customize, and access web files effectively.
Comparing Plesk and cPanel
User Interface:
Plesk: Offers a user-friendly interface with a primary menu on the left and feature boxes on the right, similar to WordPress.
cPanel: Features an all-in-one page with visually appealing icons. Everything is sorted into groups for easy navigation.
Features and Tools:
Both offer a wide range of features, including email accounts, DNS settings, FTP accounts, and database management.
Plesk: Comes with more pre-installed apps, while cPanel may require additional installations.
Security:
Plesk: Provides useful security features like AutoSSL, ImunifyAV, Fail2ban, firewall, and spam defense.
cPanel: Offers features such as password-protected folders, IP address rejections, automated SSL certificate installations, and backups.
Performance:
Plesk and cPanel: Both offer good performance. cPanel is designed for faster performance by using less memory (RAM).
Distros:
Plesk: Compatible with both Linux and Windows systems.
cPanel: Works only on Linux systems, supported by distributions like CentOS, CloudLinux, and Red Hat.
Affordability:
cPanel: Known for its cost-effective pricing, making it preferred by many, especially new learners.
Preferred Hosting Options
If you are looking for a hosting solution with cPanel, explore web hosting services that offer it. For those preferring Plesk, Serverpoet provides fully managed shared, VPS, and dedicated hosting solutions. Serverpoet also offers server management support for both Plesk and cPanel, including troubleshooting, configuration, migration, security updates, and performance monitoring.
Conclusion
In the Plesk vs cPanel comparison, cPanel stands out for its cost-effective server management solution and user-friendly interface. On the other hand, Plesk offers more features and applications, making it a versatile choice. Consider your specific needs when choosing between the two, keeping in mind that cPanel is known for its Linux compatibility, while Plesk works on both Linux and Windows systems.
2 notes
·
View notes
Text
Beyond Expiration: Advanced Domain Monitoring Threats You Didn't Know About

In today's hyperconnected world, your domain name is more than just a URL—it's your digital identity, brand reputation, and customer gateway. While many website owners remember to renew their domains on time, few realize that domain threats extend far beyond expiration. From DNS hijacking to WHOIS tampering, modern cybercriminals have found sophisticated ways to exploit overlooked vulnerabilities.
This article explores the advanced domain monitoring threats you probably haven’t heard about—and how tools like WebStatus247 can help protect your online presence 24/7.
🔍 1. DNS Hijacking: Invisible Takeover of Your Traffic
DNS hijacking occurs when attackers alter your domain's DNS settings to redirect traffic elsewhere—often to phishing pages or malware-infested sites. This may happen through:
Compromised DNS provider credentials
Registrar vulnerabilities
Insider threats
If your DNS records are changed without you noticing, your users could end up on fake sites, damaging trust and security.
How Monitoring Helps: A domain monitoring tool instantly alerts you if your DNS A, CNAME, MX, or TXT records change—helping you react before harm is done.
👁️ 2. WHOIS Tampering: Silent Brand Theft
WHOIS records show ownership and contact details for a domain. While many use privacy protection, some data still remains accessible. If a hacker changes the WHOIS record (name, email, company), they may:
Gain control over domain transfers
Receive verification emails
Impersonate the real domain owner
Solution: Real-time WHOIS change detection flags suspicious alterations to your registration information, keeping you in control of domain ownership.
🧿 3. Typosquatting & Homograph Attacks
Typosquatting involves registering a domain that looks similar to yours (like webstatuz247.com instead of webstatus247.com) to mislead your customers. Homograph attacks go further by using international characters that look like English letters—such as "а" (Cyrillic) instead of "a."
Why It’s Dangerous:
Fake login pages steal credentials
Customers lose trust
You lose traffic and revenue
Prevention: Advanced monitoring tools can track new domain registrations that mimic yours. These alerts allow you to take swift legal or technical action.
🔒 4. SSL Certificate Expiry & Misconfiguration
Many businesses forget to renew their SSL certificates, leading to security warnings in browsers like Chrome and Firefox. Worse, an attacker could:
Replace your certificate with a fake one
Trigger HTTPS errors that reduce SEO rankings
Break API integrations
Monitoring Feature: SSL monitoring ensures your certificate is valid, unexpired, and properly configured—so your site always remains secure and trusted.
⏳ 5. Name Server Changes: A Sign of Breach
Name servers are the backbone of your domain’s direction. A sudden switch to unknown name servers can mean someone has hijacked your domain.
Real-world risk: Hackers can transfer your domain to a new hosting provider and serve malicious content, all while your real team remains unaware.
How Monitoring Helps: WebStatus247 and similar tools monitor name server integrity and alert you to any unauthorized changes—buying you time to lock things down.
🛠️ How WebStatus247 Protects You
WebStatus247’s Domain Monitoring Suite offers:
Instant alerts for DNS, WHOIS, and name server changes
SSL certificate expiry notifications
Multi-channel alerts via email, Slack, and webhooks
Dashboard insights for all your domain activity
Global monitoring to detect region-based issues
This makes it a top-tier solution for developers, businesses, and agencies looking to guard against both basic and advanced domain threats.
✅ Final Thoughts
Most domain owners think they're safe as long as their registration doesn't lapse. Unfortunately, modern domain threats are stealthy, technical, and damaging—and they’re becoming more frequent.
The good news? You don’t need to be a cybersecurity expert to stay protected. With domain monitoring tools like WebStatus247, you get peace of mind, instant alerts, and complete control—so you can focus on growing your business instead of guarding your domain every minute.
0 notes
Text
What is cPanel and Why is it Important for Website Management?
If you’re planning to launch a website or already run one, you’ve likely come across the term cPanel. It’s one of the most popular tools for managing websites, especially for beginners and small to medium-sized businesses. But what is cPanel, and why do web hosts and site owners rely on it so much?
In this blog, we’ll break down what cPanel is, explore its key features, and explain why it plays a crucial role in effective website management.
What is cPanel?
cPanel is a web hosting control panel that allows users to manage various aspects of their hosting environment through a simple graphical interface. It removes the need for technical knowledge by letting you control files, domains, emails, databases, and more—all in one dashboard.
In simpler terms, what is cPanel? It’s like the control panel for your website, where you can perform tasks such as uploading files, creating email accounts, installing WordPress, managing backups, and monitoring website traffic—without writing a single line of code.
Key Features of cPanel
One of the main reasons why cPanel is so widely used is because of its robust feature set. Some of its most useful tools include:
1. File Manager
Easily upload, edit, and manage your website files without using FTP software. You can compress, move, and delete files directly from the control panel.
2. Email Management
With cPanel, you can create and manage email accounts associated with your domain. It also offers spam filters, autoresponders, and email forwarding.
3. Domain Management
You can manage subdomains, add-on domains, and redirects with just a few clicks. This makes cPanel ideal for users running multiple websites.
4. Database Management
It supports MySQL and phpMyAdmin, making it easy to create, access, and manage databases required for CMS platforms like WordPress.
5. One-Click App Installer
Most cPanel versions come with tools like Softaculous that allow you to install over 400 applications—including WordPress, Joomla, Magento, and more—with just one click.
6. Security Features
From password protection to IP blockers and SSL/TLS management, cPanel helps keep your site secure.
Why is cPanel Important for Website Management?
Now that we’ve covered what is cPanel, let’s look at why it’s essential for managing a website effectively.
1. User-Friendly Interface
One of the biggest advantages of cPanel is its easy-to-use dashboard. Even if you’re not tech-savvy, the graphical interface simplifies complex server tasks like editing DNS records or setting up cron jobs.
2. Time-Saving
With cPanel, common administrative tasks like backups, restores, and software installation can be done in minutes—saving you time and effort.
3. Reliable and Widely Supported
cPanel is used by millions worldwide, and most web hosting providers offer it with their plans. That means it’s well-documented, regularly updated, and supported by a large user community.
4. Scalable for All Types of Users
Whether you’re running a personal blog, a business website, or managing multiple domains, cPanel grows with your needs. It supports multi-domain hosting, custom configurations, and advanced server management features for tech-savvy users.
5. Enhances Security
Website security is a growing concern for every online business. cPanel makes it easier to manage SSL certificates, install security software, and enable firewalls—helping you stay protected from threats.
Alternatives to cPanel
While cPanel is the most popular choice, it’s not the only one. Alternatives like Plesk, DirectAdmin, and Webmin also offer similar features. However, cPanel remains the top pick for its intuitive design, rich features, and broad hosting provider support.
Final Thoughts
So, what is cPanel and why should you care? In short, it’s the backbone of website management for many site owners. From managing domains and files to setting up email and securing your server, cPanel offers everything you need—all in one place.
If you’re choosing a web hosting provider, make sure they offer cPanel as part of their hosting plan. It can make your life a lot easier and give you full control over your website without needing to be a tech expert.

0 notes
Text
YI Cam Remote Access: Your Guide to Self-Hosted Surveillance

Want to have complete control over your YI Cam and go beyond its default cloud? For more privacy and customization, many users prefer YI Cam Remote Access, rather than using the manufacturer's cloud. Therefore, this post explores how to accomplish this sophisticated configuration, assisting you in navigating the frequently challenging process of self-hosting your camera's feed. Walk through this post to learn more details!
Understanding the YI Cam Remote Access
Generally, you need to install a custom firewall on your device if you want to access the YI camera remotely and connect it to your server. Additionally, it allows leveraging the benefits of the RTSP (real-time streaming protocol) streaming as well as FTP access. Moreover, it eliminates the need for third-party platforms and for configuring cameras to the self-hosted servers.
However, it acts as a “Network Remote Controller,” especially for the multimedia servers. It allows users to control media playback remotely. But it does not deliver audio or video streams continuously; instead, it communicates with the servers streaming the multimedia content. Hence, for the YI Cam Remote Access, users must connect their security cameras to the server through RTSP.
How to Connect Camera To Server for YI Remote Access?
Moreover, enabling the YI Cam Remote Access opens up several possibilities and advanced functionalities. So, let’s begin with the essential steps to Connect Camera To Server for managing and monitoring your YI camera remotely.
Initially, confirm your YI Cam supports the RTSP or streaming compatibility, as some models may require custom firmware.
Subsequently, set up your chosen server device, such as a computer, NAS, or Raspberry Pi, with a suitable operating system.
Next, install essential software like Blue Iris, MotionEye, FFmpeg, or Home Assistant to manage the video feed.
Finally, configure secure remote access using methods such as port forwarding, VPN, or Dynamic DNS for external viewing.
Now, you can view, configure, and control your YI camera remotely.
Bottom Line
In conclusion, YI Cam Remote Access empowers you with full control over your camera's feed through self-hosting, prioritizing privacy & customization. Additionally, this advanced setup typically requires RTSP compatibility, a dedicated server, and management software. With secure remote access methods such as VPN or port forwarding, you can ensure seamless monitoring from anywhere.
#YICameraSetup#YICamRemoteAccess#SelfHostedCamera#IPCameraSetup#RemoteCameraAccess#YICamOnServer#RTSPStream#ONVIFCamera#YICamRTSP
1 note
·
View note
Text
DLF West Park Mumbai – Stylish Homes in Prime Andheri West
DLF West Park is a premium residential project developed by one of India's most prestigious real estate houses. The project, with premium 2 & 3 BHK apartments, is located in the premium area of Andheri West. Presenting here an in-depth look as to what makes this coming up development one of the hottest addresses in the western suburbs of Mumbai.
About DLF West Park DLF West Park is an exclusive residential project for the connoisseurs of quality living and choice of design. Located in the buzzing neighborhood of Andheri West, the project offers contemporary apartments made modern in design, top-class finishing, and a gamut of world-class facilities.
Being a DLF Group project, one of India’s most trustworthy and iconic brands in the real estate arena, it carries forward the legacy that DLF commands, of excellence in design, construction, and customer satisfaction.
DLF West Park focuses on blending and harmonizing the complete living experience---combining luxury with use, design wit green spaces, and life with tranquility.
Highlights of the Project Project Name: DLF West Park
Location: Andheri West, Mumbai
Configuration: 2 BHK and 3 BHK Apartments
Developer: DLF Group
Status: Upcoming / Pre-launch
RERA Registered: Yes (To be updated after launch)
Possession: By 2027 (Expected)
Price Range: From ₹2.5 Cr* onwards
(*subject to alteration depending on configuration and market conditions)
Location Advantage-Why Andheri West? DLF West Park Andheri West enjoys an enviable positioning amidst Mumbai's most coveted residential and commercial zones. Andheri West, as an electrical pulse, houses an exciting lifestyle, entertainment hubs, and would-be excellent connectivity.
Key Location Benefits:
It is 10 minutes away from Versova & DN Nagar Metro Stations
15 minutes or so from Andheri Railway Station
About 20 - 25 minutes away from Chhatrapati Shivaji International Airport
Not far for Lokhandwala Market & Infiniti Mall
Schools & Colleges, Ryan International, Billabong High NMIMS
Hospitals- Kokilaben Dhirubhai Ambani Hospital, Nanavati Max
Corporate Hubs & Studios, YRF Studios, Fun Republic, Andheri Link Road
The locality is an amalgamation of classy living and urban conveniences, making it an address of choice for working professionals, families, and investors alike.
Apartment Configuration & Layout DLF West Park offers spacious homes with maximum natural light, ventilation, and optimum space efficiency. The apartments have two primary configurations:
2 BHK Apartments Carpet Area: Approx. 700 – 850 sq. ft.
Ideal For: Young couples, professionals, or small families
Features: Open kitchens, big windows, fine flooring, contemporary fixtures
3 BHK Apartments Carpet Area: Approx. 1100 – 1300 sq. ft.
Ideal For: Growing families or those who wish to have more space
Features: Huge living rooms; master bedrooms with attached bathrooms; modern modular kitchens; balconies with scenic views
Each apartment at DLF West Park Andheri West is built keeping in mind a lot of technicalities and details to uphold the essence of beauty and functionality.
Amenities – The Lifestyle Beyond the Four Walls DLF West Park is not simply just a residential option—it flaunts a highly secured community that has all the best amenities that a top-tier project would offer. From the plethora of facilities that govern an elevated lifestyle, residents are bound to enjoy.
Here are a few of the key amenities:
a Grand Entrance Lobby
Clubhouse with Lounge and a Multipurpose Hall
Infinity Swimming Pool & Pool Deck
Well Equipped Gymnasium
Yoga and Meditation Zone
Indoor Games Room
Kids Play Area
Jogging & Cycling Track
Senior Citizen Garden
Round-the-clock security aided by CCTV surveillance
High-speed Elevators
Power Backup and Water Supply
Green Landscaped Areas
Amenity-wise these provide options for recreation and wellbeing for every age group.
Why Invest in DLF West Park Andheri West? There are several remarkable reasons to make DLF West Park one of your next homes or investments:
✅ Prime Location Andheri West stands to be among the most well-developed and sought-out neighborhoods in Mumbai. Its close vicinity to the metro stations, business parks, beach, and entertainment zones brings about the quality of life that justifies ever-rising property values.
✅ Trusted Brand DLF is one of India's oldest and most respected real estate developers with decades of excellence in delivering quality residential and commercial spaces across the country.
✅ Strong Rental & Resale Demand The place is perpetually demanding rentals, mainly because of the numerous production houses, IT hubs, and commercial offices. DLF West Park Andheri West homes are indeed expected to offer considerable present value gains along with appreciation.
✅ World-Class Lifestyle From designer amenities to sustainable architecture and security, the project offers everything a modern family needs to thrive.
✅ Future Infrastructure Growth Upcoming infrastructure developments like the Metro Line 2A, Coastal Road project, and better roadways will further enhance the value of real estate in this zone.
Who Should Buy DLF West Park? End users - Families or individuals who want to live in a central, convenient, and upscale neighborhood
Investors – Those looking for the highest returns, rental yield, and capitalization increases
NRIs — Non-resident Indians seeking for a spanking new beautiful property address in Mumbai
Employing professionals for those working in Andheri, BKC, and Goregaon, and even South Mumbai, courtesy of the excellent connectivity
Booking & Payment Plan DLF provides buyable and flexible payment methods for early buyers. With highly attractive pre-launch pricing, early bird offers, and tie-ups with leading banks for home loan approvals, owning a home at DLF West Park is both easy and rewarding.
Interested buyers can schedule a site visit, look at floor plans, and get assistance from DLF's sales personnel.
Conclusion DLF West Park is not just another residential building; it is an impeccably constructed lifestyle landmark in one of the most prestigious localities of Mumbai. Given the DLF brand name, and its first-class design augmented by the modern amenities and the convenience of Andheri West, this project will soon be a byword for glamour.
Whether moving into your dream home or maybe even are on the lookout for a smart real estate investment, DLF West Park Andheri West is emotively right upfront on the list in your mind.
Ready for a look at tomorrow's luxury living? Go ahead and book your site visit to DLF West Park today and be part of Mumbai's next iconic address.
0 notes
Text
2025’s Ultimate Guide to the Best Website Hosting in San Antonio for Businesses
In today's competitive online world, having a solid web presence is no longer a choice—it's a necessity. You may be a local startup, an emerging e-commerce site, or a well-established business in San Antonio, but your web hosting decision can either make or destroy your online success. That's why more local companies are relying on Odyssey Design and Hosting, a reputable web host in San Antonio, for top-quality hosting solutions specific to their individual needs.
You can find Odyssey located at 18911 Hardy Oak Blvd Ste. 103, San Antonio, TX 78258. The company offers the entire range of services—from shared web hosting to WordPress hosting, as well as registering domains—that are especially designed for local companies.
Why Local Web Hosting in San Antonio Is More Important Than Ever in 2025
Google's algorithm still favors user experience and speed of loading. Local hosting with quicker response times for users in the vicinity is a great way to maintain higher search rankings and provide seamless experiences. Selecting website hosting San Antonio vendors means your company benefits from localized speed, support, and search engine visibility.
Advantages of Selecting Local San Antonio Website Hosting:
Quicker Load Speeds for visitors in the region
Localized SEO benefits with San Antonio IPs
Improved access to customer support
Improved legal and regulatory compliance
Odyssey Design and Hosting: San Antonio's Premier Web Hosting Provider
Odyssey Design and Hosting is now a go-to for business organizations looking for high-quality web hosting in San Antonio. Focusing primarily on performance, security, and customer support, their services enable local brands to expand without technical hassles.
Secure San Antonio Hosting Solutions:
Shared Web Hosting San Antonio: Economical, scalable, and ideal for beginners.
WordPress Hosting San Antonio: Optimized for speed, stability, and security.
Domain Registration San Antonio: Register and maintain your brand's online presence quickly.
Custom Hosting & Development: Expert tools and services designed for high-traffic companies.
Best Shared Hosting Plans in San Antonio
Shared hosting is still the cheapest means to create an online presence, and Odyssey provides the best shared hosting in the area. These are perfect for small business people, bloggers, and startups.
Why Is Odyssey's Shared Hosting the Best?
Unlimited bandwidth and SSD storage
Free SSL certificates for all domains
cPanel access for simple website management
Daily backups and top-of-the-line security
24/7 San Antonio-based customer support
This makes San Antonio shared web hosting a leading option for companies starting out online.
High-Performance WordPress Hosting for San Antonio Sites
Operating a WordPress site? Odyssey's San Antonio WordPress hosting is optimized for performance and protection.
Key Benefits:
Pre-installed WordPress
Automatic plugin and core updates
Integrated caching and CDN for turbo speeds
Local support with WordPress knowledge
Whether you operate a WooCommerce store or business blog, Odyssey WordPress hosting keeps your site fast and secure.
San Antonio Domain Registration Simplified
Ready to stake your online claim? Odyssey provides hassle-free, dependable domain registration San Antonio companies rely on.
Domain Options Include:
Quick availability check
Affordable rates on .com, .net, .org, and country-code domains
Simplified management and DNS configurations
Domain privacy protection available as an option
Package your San Antonio website hosting and domain management together in one place with local support to lead the way.
Custom Hosting Plans for Any Business
Regardless of your business size or kind, Odyssey has a hosting plan that's right for you:
Plan Type
Best For
Core Benefits
Shared Hosting
Small and new websites
Affordable, fully managed, scalable
WordPress Hosting
Stores and blogs
High-speed, secure, WordPress-optimized
Business Hosting
Big sites and agencies
Advanced security, custom setups, high speed
All plans are supported by:
99.9% Uptime Guarantee
Free SSL & Security Tools
Daily Backups
Expert Local Support
Why Odyssey Design and Hosting Excels in San Antonio
Odyssey has become the best web hosting San Antonio company due to a blend of local expertise and cutting-edge tools.
Here's Why Companies Trust Odyssey:
Locally Owned and Operated: Knows local business requirements.
Transparent Pricing: No surprise fees or charges.
Expert Support: Actual people, actual answers—based in San Antonio.
Performance-Driven Infrastructure: SSD-driven servers with cutting-edge caching.
Eco-Friendly Practices: Power-efficient operations promoting sustainability.
Getting Started with Odyssey Hosting
Getting your site online has never been simpler. Here's how:
Go to https://odysseydesignhosting.com
Select your dream hosting plan
Register or transfer your domain name
Let Odyssey handle the rest—from setup to launch
Or, visit their San Antonio office at 18911 Hardy Oak Blvd Ste. 103 for a personal consultation.
Last Word: The Best San Antonio Hosting Provider of 2025
Your web presence begins with strong hosting. With versatile plans, outstanding support, and local knowledge, Odyssey Design and Hosting takes the lead in San Antonio website hosting for 2025. From shared hosting, WordPress hosting, to domain registration in San Antonio, Odyssey provides the speed, security, and reliability your business demands to succeed.
Don't accept run-of-the-mill national hosts—go local, go robust, go with Odyssey.
#web hosting san antonio#web hosting in san antonio#web hosting#wordpress hosting san antonio#domain registration san antonio#best sharedhosting
0 notes
Text
Connecting custom domain to github pages.
honestly fuck that shit
I use namesilo for my domain, which is .dev, which by default requires https aka SSL sertificate.
Github Pages provides SSL by default, no need to get new sertificate
Namesilo provides template for github DNS, just click "add Github Template". looks like this depending on where in namesilo you opened DNS:
a. new version:


b. old version:

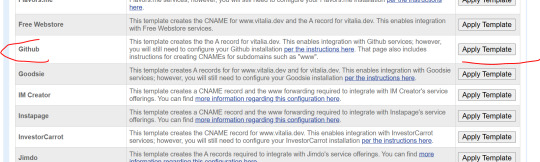
c. Once button "use template" pressed, the DNS table will update with these lines:
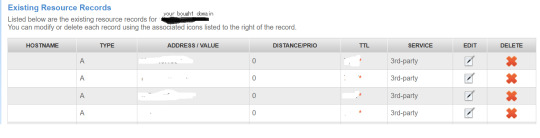
No need to edit anything in them.
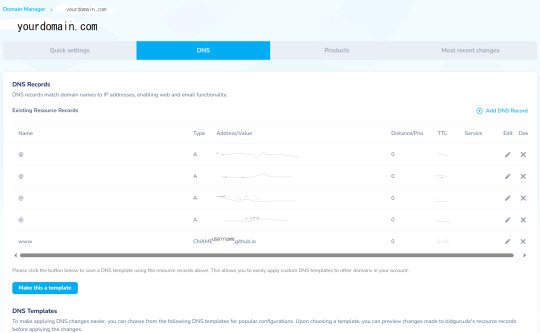
4. THE ONLY EXTRA STEP YOU NEED is adding one more line:
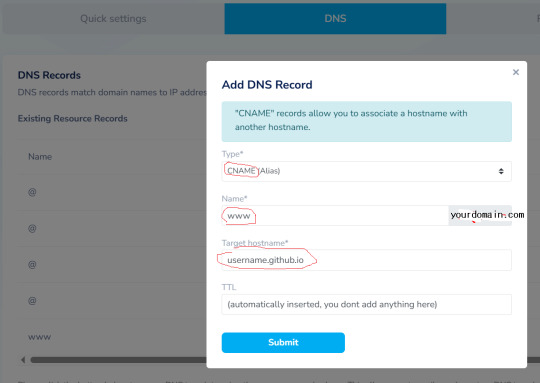
Now DNS should look like this, you're done with namesilo part:
5. For github there are plenty of tutorials online, their wiki is enough:
https://docs.github.com/en/pages/getting-started-with-github-pages/securing-your-github-pages-site-with-https

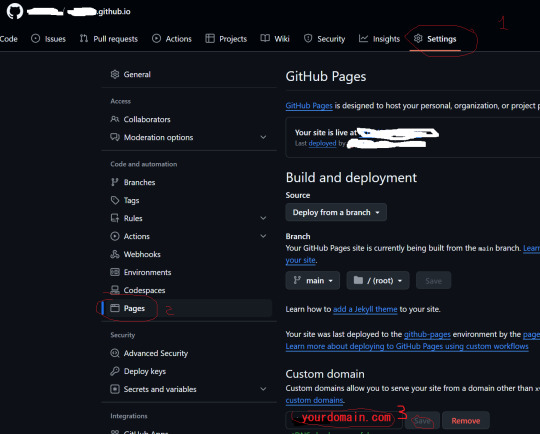
6. "my site doesn't work" part:
All the errors are related to Github not timely checking shit in order. You just press check again and again and again. delete custom domain and insert again, check "Enforce HTTPS" when it is allowed. "it's not eligible at this time" message is SSL not ready, nothing to do, just wait and check again. Eventually you'll get "the certificate is already created" message on top of the page, so SSL added.
Then it will be "primary DNS is added" in green under custom domain or smth and "www improperly configured" as an error in orange. Still nothing to do, just check again.
Even if "DNS check successful" and you still don't see your site, it is just a matter of doing the same check again, remove, add again. THere's no extra hidden step anywhere. So, the issue in either :
you lack this one line in DNS
you have to delete and add domain again on github (if sll created, you can move from this step imo)
you have to keep "check again"
AND NOT A SINGLE FUCKING ANSWER all over the web with this issue gave a clear visual representation of how it is supposed to look in the DNS table, namesilo or not. Someone just said "add this" and it's description of the last line that has been already added?? JFC

anyways, my custom domain works and I'll eventually update my website using github. right now it is an old site I've done for my CV showcasing what I know from programming (isn't much, hence the post lol)
0 notes
Text
Eric Manns Atlanta Identifies and Fixes Network Issues Efficiently
For every business it is important to troubleshoot network problems on timely basis. No matter the cause of network issues, they are potent enough to greatly affect the smooth running of a business and cause problems to clients and inhouse staff. Fortunately, hiring services of Eric Manns Atlanta can provide effective, proactive, and preventative trouble-shooting of network problems. Eric Manns ensures that identifying, and fixing network issues in your business can boost productivity, reduce downtime, and enhance both employee and customer satisfaction.
Network issues occur due to multiple reasons such as latency, packet loss or reduced bandwidth capacity and these invariably affects the quality of VoIP and video calls. Many times, a network problem results from latency which results in network disruption and is often caused by over utilization of a link or lack of prioritisation of traffic. In addition, other external aggravators exist that can result in latency such as cables being dug up out, radiation from salt lakes or solar flares. With a network monitoring tool one can override the need for manual investigations.
Among other common network problems most troublesome is incorrect port configuration. This common problem occurs on a switch, router, or local subnet. Users face difficulties that often arise from devices receiving or connecting to the router interface, interrupting traffic to networks. Eric Dewayne Manns Atlanta is efficient at resolving issues related to network troubleshooting that includes:
Network loop
DNS configuration
Port configuration
VPN error
Network monitoring by talented network engineer can help you easily detect any network connectivity problems affecting your network and quickly solve them. In some cases, Eric Manns Georgia, can even enable you to stop issues from occurring in the first place. Thus, he offers many advantages including limiting downtime during production hours and enabling a consistent and smoothly operating network that facilitates increased productivity and satisfaction. It is natural that business face network problems, however, Eric Dewayne Manns Georgia can save it from suffering intermittent interruptions to its function, regardless of company size or industry provides – smooth, consistent, reliable network function.
You will agree that network troubleshooting is important as it helps IT managers understand network component issues, reduce downtime, and improve the network's Quality of Service (QoS) for users. Eric Manns Atlanta ensures of services that are effective and reliable for network monitoring system, easier to troubleshoot issues, identify network slowdown quickly, analyse latency metrics, trace packets, and more.
Eric Dewayne Manns Atlanta is your ally during difficult times you face dealing with network issues. Eric Manns is a network engineer, an IT professional responsible for designing, implementing, and maintaining computer networks. These networks can be local area networks (LANs), wide area networks (WANs), or even cloud-based networks. As a network engineer ensures that all network systems are functioning optimally, securely, and efficiently.
0 notes
Link
#configuration#encryption#firewall#IPmasking#Linux#networking#OpenVPN#Performance#PiVPN#Privacy#RaspberryPi#remoteaccess#Security#self-hosted#Server#Setup#simplest#systemadministration#tunneling#VPN#WireGuard
0 notes
Text
How Monitoring from Multiple Global Locations Helps Detect Regional Performance Issues

In the digital age, user experience is everything. Whether you’re managing an online store, a SaaS product, or even a personal blog, one of your top priorities should be ensuring your website performs reliably for all users—no matter where they are in the world.
But here’s the catch: what looks great from your headquarters might not be the case in another country. A page that loads in under 2 seconds in London might take 8 seconds to load in Jakarta. This kind of performance inconsistency—called a regional performance issue—can quietly hurt your traffic, conversions, and customer trust.
So how can you detect these problems before your users complain?
The answer lies in monitoring from multiple global locations.
What Is Multi-Location Monitoring? Multi-location monitoring involves using monitoring nodes or servers in various parts of the world to simulate user access to your website. These synthetic users “visit” your site from different cities and countries to test page load speed, uptime, response times, API behavior, and transaction flows.
Think of it like having automated testers scattered across the globe. Each one gives you a local user’s perspective on your website’s performance.
Why Do Regional Performance Issues Happen? There are many reasons your website may perform differently depending on the user’s location:
Geographic Latency: The farther the user is from your hosting server, the more time it takes for data to travel.
ISP Quality: Local internet providers may have bandwidth limitations or inefficient routing.
CDN Misconfiguration: If your content delivery network isn’t caching properly or doesn’t have edge servers in that region, users suffer slower load times.
Firewall or Government Restrictions: Some countries may block or throttle access to certain domains or services.
DNS Resolution Delays: Improper DNS configurations can make pages take longer to resolve in some regions.
Server or Hosting Downtime: A localized data center or server node may go down without affecting your main site.
Without a global monitoring setup, these issues often go unnoticed until customers complain or traffic drops.
Benefits of Monitoring from Multiple Locations ✅ 1. Faster Detection of Regional Downtime Imagine your site goes down only for users in India due to an ISP routing error. If you’re monitoring solely from the US or Europe, you won’t notice the issue. But if you have nodes in Mumbai or Bangalore, you’ll be alerted instantly.
This allows you to take action—before the customer tweets about it.
✅ 2. Understanding Local User Experience It’s not enough for a website to just work—it needs to be fast. Monitoring from different locations gives you insight into load time and performance, helping you identify:
Which assets (images, scripts) load slowly in certain regions
If JavaScript-heavy pages are lagging in low-bandwidth countries
Whether third-party services (e.g., payment gateways) are slowing things down
✅ 3. Validate Your CDN’s Performance You pay for a Content Delivery Network (CDN) so your content is delivered quickly from edge servers around the world. But is it working?
Multi-location monitoring helps you verify that your CDN is caching content correctly in all regions. If edge servers aren’t being hit, you can troubleshoot configuration or TTL settings.
✅ 4. Simulate Global Transactions If you operate a global e-commerce platform, your checkout process should work everywhere. With synthetic monitoring, you can simulate logins, product searches, and payments in multiple regions—ensuring every step works globally.
✅ 5. Improve SEO and Conversion Rates Page speed is a ranking factor in Google’s algorithm. If your site is slow in a particular region, you may rank lower in local search results—hurting visibility and traffic.
Likewise, users tend to abandon slow-loading sites. Monitoring helps you fine-tune regional performance to boost both SEO and conversions.
How Platforms Like WebStatus247 Help One great tool for implementing multi-location monitoring is WebStatus247. It offers:
🌍 Global synthetic monitoring from multiple cities and continents
⏱️ Uptime checks every 30 seconds
⚠️ Custom alerts for each region (via email, SMS, Slack, Telegram)
📈 Performance dashboards and historical reports
🔐 SSL and domain expiry monitoring
🔄 Cron job monitoring and API testing
This kind of tool empowers developers, site owners, and IT teams to be proactive rather than reactive.
Real-World Example: E-commerce Slowdown in Asia Let’s say your site is hosted in New York, and everything seems fine. Sales are steady in the US and Europe—but strangely, your Asian traffic has dropped 40% over the past month.
Using WebStatus247, you run tests from Singapore, Tokyo, and Mumbai. You discover:
DNS resolution is taking over 2 seconds in Asia
Your CDN isn’t caching product images effectively in that region
Checkout page scripts are being blocked by a local ISP
With this insight, you adjust your DNS setup, update your CDN configuration, and change your script providers.
Within days, load time in Asia drops from 8 seconds to under 2.5 seconds—and conversions bounce back.
Best Practices for Global Monitoring Here’s how to get the most out of a global monitoring strategy:
Pick diverse node locations: Cover every market you serve (Asia, Europe, North America, Africa, etc.)
Monitor more than uptime: Check for DNS resolution, SSL status, load time, and full-page rendering
Set smart alert thresholds: Customize alerts per region to avoid noise
Correlate with real user data: Combine synthetic monitoring with Real User Monitoring (RUM)
Test key journeys: Don’t just test the homepage—test login, cart, checkout, etc.
Check mobile performance: Simulate mobile browser behavior too
Conclusion: A Competitive Advantage You Can’t Afford to Ignore In the past, monitoring was just about uptime. But in today’s globally connected web, it’s about performance from every corner of the map.
Your website might be perfect in Los Angeles but painfully slow in Berlin. Without multi-location monitoring, you wouldn’t even know. And by the time you find out, users may have already left—and taken their trust (and money) with them.
0 notes
Text
How To Set Up The GL.iNet GL-AXT1800 Router
It is a compact yet powerful travel router to offer high speed and secure internet connectivity. With the help of WiFi 6 technology the robust security feature and VPN support is an excellent choice for the travellers, remote workers and tech enthusiasts. This guide will walk you through the configuration process to get the best performance from your GL-AXT1800 router.
Unboxing And Hardware Overview
When you first get GL.iNet GL-AXT1800 router, ensures that your package include
GL-AXT1800 router
Ethernet cable
Power adaptor
User manual
GL.iNet GL-AXT1800 Setup Key Features
Provide speed up to 1200 Mbps 5GHz and 600 Mbps on 2.4GHz.
Support 1.2GHz quad core processor for the fast performance.
It built in the VPN support for wire guard and open VPN.
Adguard home to block ads and tracking scripts.
Multiple connection options such as WAN, LAN or USB 3.0 port
Manual Setup
Follow below few simple steps
Power On Your Router
Plug the power adaptor into the router and connect it with the power outlet.
After that wait for the router to boot up.
The LED light indicates that the device is now powered on and ready.
Connect To The Router
Use ethernet cable to attach the router WAN port to the modem or existing network.
Access Or Go To Admin Panel
Open the web browser and type 192.168.8.1 in the address bar. Login by entering the default credentials which are written on the router package. Consider all the setup process instructions to change the WiFi SSID, password and admin credentials for the security purposes.
Configuring Internet Connection
The GL.iNet GL-AXT1800 Router supports various internet connection methods.
Wired Connection:
If you are using a wired connection, go to the network settings and then tap on the internet. After that, verify DHCP mode is enabled.
WiFi Repeater Mode:
If you want to extend an existing WiFi network:
In the admin panel go to the repeater settings.
Now, scan for the available WiFi networks and pick up the desired one.
Enter WiFi password and save all settings.
Connect Modem Or Smartphone
Just connect the USB modem or the smartphone via the USB 3.0 port.
Select the connection mode in the admin panel and consider all the prompts.
Setup VPN For Secure Browsing
Using Wire-Guard VPN
Go to VPN and then tap the wire guard client.
Now, upload or manually enter the wire guard VPN configuration.
Enable the VPN and check connection status.
Using Open VPN
Navigate to VPN and OpenVPN client.
After that upload the open VPN configuration file which is provided by the VPN provider.
Later, connect and verify your IP address for successful connection.
With AdGuard Home Enhanced Security
It is a powerful tool for blocking ads and tracking.
To enable this, go to the navigation and click on AdGuard home. After that, enable the services and customize settings. Further, add a filter list to enhance blocking effectiveness.
Additional Features & Customization
Guest WiFi:- It creates a separate WiFi network for the visitors with restricted access.
Custom DNS Server: Uses cloudflare, google or a custom DNS provider for the faster and more protective browsing.
After the router GL iNet GL AXT1800 setup if you are facing any issue then try the below troubleshooting tips to fix the issue such as AX1800 router not working properly.
Solution Tips
Check/Identify All Cable Connections
Must verify that all the cables must be perfectly plugged in.
Look Up For Overheating
If your router gets hot then move it to the well ventilated area to cool it down.
Use Different Power Source
Try to use a different USB-C power adapter
Power Cycle Router
Press the router power button to turn it off. Now, take out the router power plug from the specified working socket. After that, wait for at least 2 minutes and put the router plug back in the socket. At the end, press router power to turn it on.
After trying the apart basic router troubleshooting tips if you fail to fix an issue. Then don’t be worried just try the below advanced troubleshooting tips steps.
Update Router Software/Firmware
Early go to the router admin panel.
After that, tap on settings and then hit on firmware.
Further, update the latest version.
Alternatively, install the firmware from the GL.iNet website and open it manually.
Reset Router From Factory Default
Early, look for the reset button on your router.
After that, take a paper pin and insert it in the router reset button.
Now, all LEDs of the GL.iNet GL-AXT1800 router are completely turned off.
Hence, your router is reset now.
Note: After resetting all default settings, do the GL.iNet GL-AXT1800 setup and installation process again.
Therefore, after the entire study or information of this article you can do the setup of your router with the modem. After router installation if you face any issue then also fix it easily by trying the apart troubleshooting tips.
0 notes