#CustomEvents
Explore tagged Tumblr posts
Visit Tumblr Blog
Explore Tumblr blogs with no restrictions, modern design and the best experience.
Last Seen Tumblr Blogs


Fun Fact
Hackers stole 65M passwords from Tumblr in 2013.
Text
Personalize Your June Experience Customize your June 2025 calendar by adding vacations, family reunions, and other key dates that matter most to you.
1 note
·
View note
Text

📢 National Science Day | 28th February ➡️ Paying a tribute to Prof. Sir CV Raman For his legacy - Raman Effect Included Features: ✅ Wedding Invitations ✅ Business Invitations ✅ Baby Shower Invitations ✅ Birthday Party Invitations ✅ Event/Function ✅ Importing Guest List ✅ Personalized Invitations ✅ Customised Invitations Contact Details: ☎ +91 99132 99806 🌐 www.aamantranam.com 📧 Email:[email protected]
#aamantranam#custominvites#nationalscienceday#sciencefacts#experiment#scientificdiscover#invitedesign#invitationdesign#customevents
0 notes
Photo


From elegant monograms to full-room elegance, Every step is a picture-perfect. #DanceFloorWrap #EventDesign #CustomEvents #FMEventProductions #LuxuryWeddings #DecorGoals
0 notes
Text
VIDEO capta a hombre atacando a mapaches en Playa Miramar
News https://portal.esgagenda.com/video-capta-a-hombre-atacando-a-mapaches-en-playa-miramar/
VIDEO capta a hombre atacando a mapaches en Playa Miramar

Un acto de maltrato animal en Playa Miramar, ubicada en Ciudad Madero, Tamaulipas, se viralizó en redes sociales y causó la indignación de internautas, pues se difundió un video en el que un hombre, aparentemente un adulto mayor, rocía una sustancia en el rostro de varios mapaches que deambulaban entre las escolleras del arenal.
El clip compartido en las redes sociales provocó la respuesta inmediata de usuarios, quienes comenzaron una campaña de denuncia pública para identificar al presunto agresor. Incluso llegaron a ofrecer una recompensa económica para quienes pudieran aportar datos que ayudaran a dar con el hombre.
LEER TAMBIÉN: Muere ‘Negrita’, la perrita atropellada tres veces en Kanasín, Yucatán
Hombre captado en video atacando a mapaches en Ciudad Madero se presenta ante autoridades
De acuerdo con información en redes sociales, el pasado 2 de abril, el hombre señalado por el ataque se presentó ante las autoridades locales para dar su versión de lo sucedido. En su comparecencia, admitió haber rociado a los mapaches, pero negó que haya sido cloro o ácido, asegurando que usó únicamente “agua con jabón” con la intención de ahuyentarlos.
No obstante, sus declaraciones fueron rápidamente desmentidas por veterinarios, quienes señalaron que los animales presentan daños visibles en los ojos, los cuales no son compatibles con el uso de jabón común, lo que refuerza la hipótesis del uso de un agente químico agresivo, como cloro.
TE PUEDE INTERESAR: Rescatan a perrita maltratada en SM 72 de Cancún: ¿Qué le pasó?
Finalmente, tras la comparecencia del hombre y ante las pruebas recabadas, los activistas y ciudadanos interpusieron una denuncia formal ante autoridades ambientales, por lo que los inconformes esperan una sanción conforme a la ley, ya que el maltrato animal es considerado un delito.
Muere la perrita Negrita en Yucatán; fue atropellada tres veces
[VIDEO] Luego de haber sido atropellada varias veces, la perrita Negrita perdió la vida.
window.fbAsyncInit = function() FB.init( appId: '1245090243515186', status: false, xfbml: true, cookie: true, oauth: true, autoLogAppEvents: true, version: 'v18.0' ); let fbAppId = 1245090243515186; window.facebookSdkReady = 'fbAppId': fbAppId; let fbSdkLoadedEvent = new CustomEvent('facebookSdkReady', detail:'fbAppId': fbAppId); document.dispatchEvent(fbSdkLoadedEvent); ;
(function(d, s, id) var js, fjs = d.getElementsByTagName(s)[0]; if (d.getElementById(id)) return; js = d.createElement(s); js.id = id; js.src="https://connect.facebook.net/es_ES/sdk.js"; js.defer = true; js.crossorigin = 'anonymous'; fjs.parentNode.insertBefore(js, fjs); (document, 'script', 'facebook-jssdk'));
0 notes
Text
Day Three (Part One) Arrays, High Scores, and Saving Systems
Workshop for the first part of today.
(There is a LOT, so if there's a lack of screenshots in some areas, it's because I hit the limit of 30 screenshots.)
Opening a new ThirdPersonMap within Unreal, and removing a wall and all inside objects as instructed.

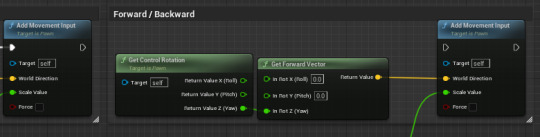
Then, the character camera and jump mappings from inside of the BP_ThirdPersonCharacter blueprint are deleted.

And lastly, the white pin connecting the Left/Right movement input to the Forward/Backward movement input is disconnected.
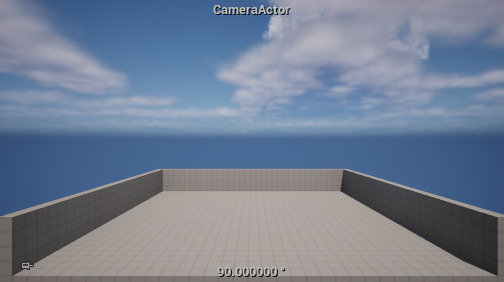
To make this work properly, we are making a fixed camera again. Adding a camera actor and pulling it back so that the level fills the bottom of the CameraActor preview.
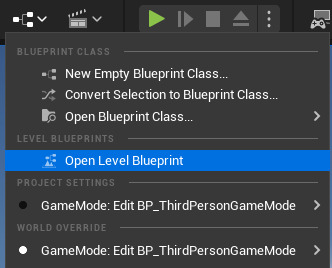
I have to make this CameraActor the main camera that the game uses though. So I open the ThirdPersonMap blueprint editor.
And I do basically the exact same as I did yesterday, so I won't tread over the same details, but this is the end result.

Now I look at how it looks ingame, and adjust it slightly so that it is even on both sides.

Not sure what's happening next, but I think we're now working on the spawn system, so I tag the floor tile with the tag 'Floor'.
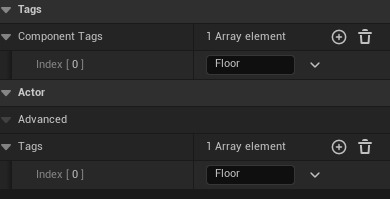
(Double tagged to be extra safe.)
Making a new Actor Blueprint, called 'Score System.'
Inside of this, I make a new scene called SpawnPointMID (because this will be the most middle spawn point I'll have. Then I made four more scenes, indicating the spawn points around the middle. These will be named SpawnPointLeft, SpawnPointMIDLeft, etc. For visualising sake, I also made a sphere for each SpawnPoint scene just so I know what's going on.

Now to actually make these do something.
In the event graph, I imported each sphere as a variable and slotted them each into an array. (I renamed the Sphere's so that, again, I can easily identify which one belongs where.)
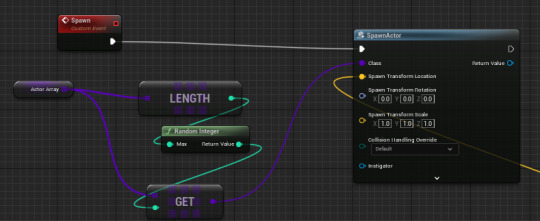
Off of the Array pin, I made two nodes. One was LENGTH, and the other was GET. From the LENGTH node, I added on an additional 'Random Integer' node, and then connected that node back to GET. Confusing, I know. And then finally, off of GET, there is a Get World Location node.
Meanwhile, up above, there are more nodes to create and join together. First making a CustomEvent node that I named 'Spawn', and then connecting that to a new node of 'SpawnActor Item Parent'. Then connecting the previously mentioned 'Get World Location' node to the 'Spawn Transform Location' pin on the 'SpawnActor Item Parent' completes this mildly confusing tree.
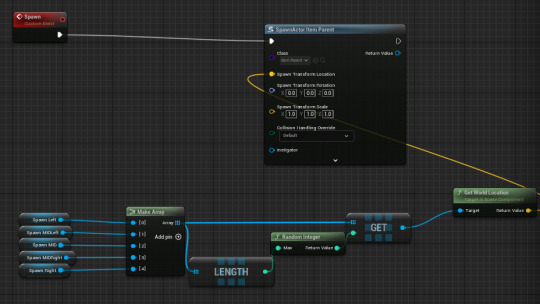
And lastly, up above, I add an 'Event Tick' node so that the points spawn on a regular interval. I set it to 1 second per spawn.

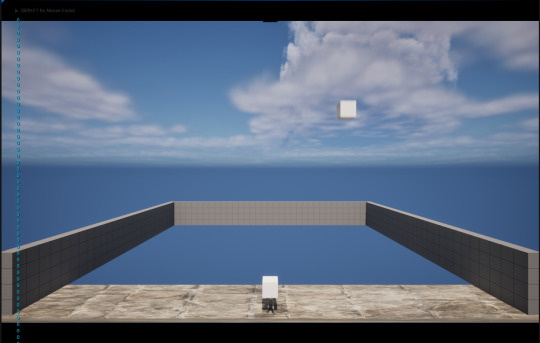
Now I need to actually spawn something from the spheres. So the most logical thing to spawn are cubes.
So that's what I did, making a new Actor Blueprint titled 'item_parent'.
This is where, when you overlap with the cube, it will add +1 to your score.

Not too sure why, but the default floor didn't seem to like being tagged with 'Floor', so I replaced it with a hastily made ActorBlueprint with the tag Floor which seems to work.
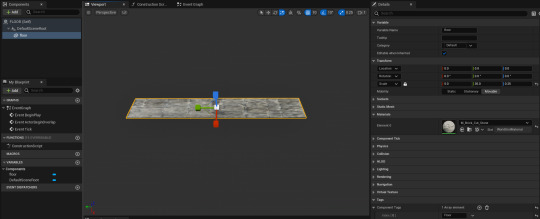
I also gave it a new Material so I could differentiate it from the falling cubes as they were originally both white, making it hard to tell what was happening.
Additionally, the cubes seem to be only spawning in the middle currently, so I will need to fix that.
Okay, so it turns out that my scenes were all stacked ontop of one another, so I had to move them to the same positions as my spheres.

And now it works properly!

Bad news though. If you ALT+Tab, it can make it spawn a lot more than it is meant to as it is still spawning every second, even though Unreal Engine runs a lot slower when it isn't in focus to save resources I assume.
Oops.
An easy fix for this is to just tab back into Unreal, as it will quickly fix itself in no time. And there won't be any way to ALT+Tab when playing on an actual arcade machine, so this is a nothing issue that will only occur on regular PC hardware.
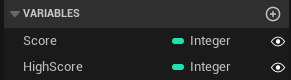
I need to make a new Game Instance that I called 'ArcadeScoreInstance.' Within this, I made two Integer variables of 'Score' and 'High Score'
I need to change the Game Instance to the Game Instance I made so that it works properly. Accessing this menu by going to Edit, Project Settings, searching Game Instance and changing the drop down to the one I made.

Not too sure why, but it isn't adding anything to my score, as when I overlap with a cube, the score stays at 0.
Okay nevermind, I am a bit silly as I managed to miss the singular option in the one tab I didn't check to actually change the value from 0 to 1. Not sure why I didn't check here, I think I just assumed that it would be within the cube itself rather than the variable details. But it is fixed now, so it is fine.

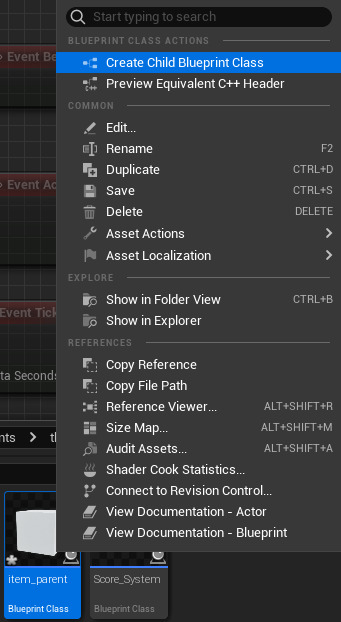
Now I'm making a child actor. Right-clicking the blueprint of the item_parent gives me the option to create a Child Blueprint Class.
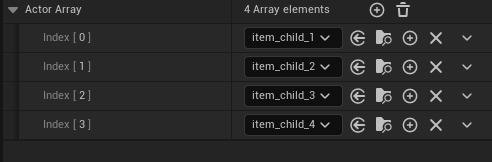
I made four child actors. In one of them, I select the Cog icon in the My Blueprints tab, and make sure that Show Inherited Variables is turned on.

Now I want to change the score values on these. Because I have 4 of them, I make them worth 1, 5, 10, and 25 points respectively.
And to make sure that I can differentiate these actors from one another, I apply different materials to each of them. I use the default built in Metal materials as I feel this would be the easiest to tell them apart rather than something like 4 different types of stone.
Now, in my Score_System blueprint, I make a new variable.
I search up Actor (as it isn't one of the default variables.) and make sure to select the variable just simply titled Actor. But before clicking it, I need to hover over it and make sure that I make it with a Class Reference.

Now in the details panel, I see that the Variable Type for actor is Single, but I can open the drop down and change it to Array.
At the bottom of the details panel, I added 4 Indexs to the Actor Array tab and assigned each one to one of the childs.
Then I put the Actor Array into the Event Graph and select 'Get Actor Array'. Now what I'm doing is like earlier, where I have a LENGTH and a GET off of the Actor Array, before linking LENGTH to GET with a Random Integer node. Then finally, I connect GET to the previous SpawnActor node I made earlier.
And now it should work!
Such a high score. This game is so easy.
0 notes
Text
AI Enemies

I had to add an enemy to the game, because what is a dungeon crawler without any dangers? I added a customevent to a new pawn, which will cause the AI to move towards the player character, if it cannot do that it will keep checking if it can, otherwise there is a delay before they move to the player, less delay = faster speed.
0 notes
Text
Looking to invest in a custom Virtual Event Solution to host immersive events?
B2B Sales Arrow's Virtual Events has built new ways for us to connect with our audience base. We've been working with them for over a year now, and they've done a fantastic job creating virtual events that serve as an ongoing relationship in new and innovative ways. They created events that stir up excitement and appeal to the target market we're trying to reach. B2B Sales Arrows' virtual events help our customers build strong relationships.>https://b2bsalesarrow.com/virtual-event.php
0 notes
Photo
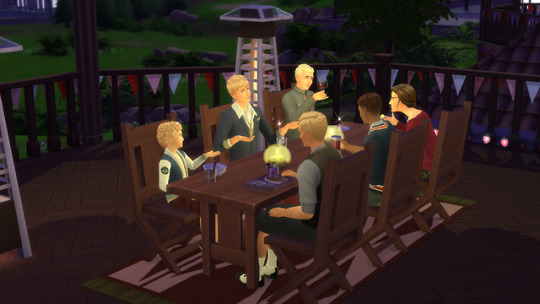


Calendar Event Add On: Plan A Meal in a Restaurant
I had high hopes for the calendar system in Seasons and... I can’t say I’m very satisfied by the current possibilities, so I made it able to plan a restaurant outing on the calendar...More organized gameplay!
With this mod, you can plan your restaurant meals on the calendar! It doesn’t actually add too much to the game itself as it’s basically just a new event but it might be good for storytelling...and an event, unlike a ‘Travel With...‘, always forces your guests to come, so that’s another method to use...
If you choose this event as an goaled event, it has only one main goal---Request a Table. Basically I don’t want to force you to do any linear gameplay within the event, just a meal in a reataurant where everything can happen.
So...Obviously NOT base game compatible, you need Dine Out for it to work. And if ou don’t own Seasons it’s really not that useful.
DOWNLOAD HERE
571 notes
·
View notes
Text
Custom Ez Ups For A Quick And Easy Process Setup | USA
A custom ez ups is a quick and easy process. We offer a range of sizes as well as various printing and fabric options to help you create a perfect ez up custom. Without the need for any tools, each of our custom printed canopy may be set up and taken down. We have created a variety of pop up tent categories suitable for your needs and events.

0 notes
Photo

Today we had a very unique visitor at The Shop. Holly brought her very cool Tesla Model Y sporting a one of a kind Lilly Pulitzer wrap in for a full 3M ceramic tint. Who says you can’t personalize your EV? #tesla #vinylwrap #customev #teslamodely #tint #evlife #customcars #bradenton #theshopfl #electriccar (at The Shop) https://www.instagram.com/p/CqWvCOTtpV1/?igshid=NGJjMDIxMWI=
0 notes
Video
tumblr
#fmeventproductions Bringing your dream event to life! EventServices #EventProduction #WeddingDecor #PartyRentals #CustomEvents #FMEventProductions
0 notes
Text
REVIVING 1990S DIGITAL DRESS-UP DOLLS WITH SMOOCH

Libby Horacek
POSITION DEVELOPMENT
@horrorcheck
What is the Kisekae Set System: It is a system to make digital dress up dolls!
Created in 1991 by MIO.H for use in a Japanese BBS. Pre-web!!! By separating the system from the assets of the dolls, you can make the systems much smaller
CEL image format. They have a transparent background and indexed colors like GIFs!
There is also the KCF Palette Format. Each GUF stores its own palette, with CELs there is a shared KCF palette file. Which is a file size cost savings. You do not have to repeat your color info per file.
Having your palette in another file makes palette swapping really easy! Just swap the KCF file!
CNF configuration files dictate layering, grouping, setting, and positions!
KiSS dolls have a lot of files, so they used LhA, the most popular compression format in Japan at the time.
In 1994, KLS (a user) created the KiSS General Specification
1995 FKiSS is born by Dov Sherman and Yav, which adds sounds, and animation!
FKiSS 2, 3, 4, two versions of FKiSS 5! So much innovation!
1995-2005 huge growth in KiSS! Increase of access, mainstreaming of anime, younger and more female audience.
2007-2012: KiSS declined due to it being much harder to make. All the old tutorials were written for older systems, English-speaking KiSS-making died out by 2010
The Sims, and other doll making was more accessible.
But, why KiSS? If I can make dolls in other places. They are great snapshots of the pre-internet world, and how play online evolved early on.
Lots of fun dolls were available, and it would be cool to save it.
Picrew is a modern thing people use to make dolls.
Tagi Academy is a tamagochi game within KiSS. Impressive!
KiSS has an open specification!!!! That is super cool! That means anyone can make your own viewer, as opposed to a closed system in The Sims.
So, why NOT make a KiSS interpreter?!!
Libby made Smooch, a KiSS renderer written in Haskell, which at the Recurse Center!
Smooch used a web framework called Fn (fnhaskell.com)
Had to make a CNF file parser using Parsec library that uses parsing combinators.
She created a data type that houses everything that can be in a CNF file, and parses it correctly in priority order.
Parsing is a great candidate for test-driven development. You can write a test with a bad CNF file, and then make sure your parser handles it.
The parser translates CNF lines into JSON. Uses the ASON library to translate into JSON.
First tried cel2pnm, coded with help from Mark Dominus at Recurse Center Made a C program that converted cels to portable bitmaps, which could be translated into PNGs.
Then JuicyPixels was created to translate palette files directly in Haskell
Now it is converted to JavaScript! No libraries, just JS!
Using PNGs in JS, thought, made it hard to click on parts of the clothing! Since it is squares.
So, you use ghost canvases! You use tow canvases, one on top of the other, to find the color of the pixel you clicked on, If you clicked on a scarf color, it will pick the scarf, and if you pick the sweater, you get the sweater!
Libby just added FKiSS 1 to Smooch! So we have animations now! The animations are basically event-based scripting the CEL files.
Smooch translates FKiSS to JSON, then the interpreter translates the JSON to JavaScript!
An action in FKiSS is translated into a function in JS. To do this you have to use bind in JS.
The events become CustomEvents in JS! So it looks like a regular event on the DOM.
What is the future of KiSS? Let's get more people making KiSS dolls!!! So why not make it easy to make dolls using PNGs.
How can we make people interested in building KiSS dolls and KiSS tooling.
Smooch need contributors!
Thank you, Libby, for the great talk!
9 notes
·
View notes
Text
AWSで使うRust
κeenです。この記事では IdeinでのAWSの利用例の開示の一環として、どのようにRustをAWS上で動かしているかをご紹介します。
Ideinの提供しているサービスActcastではサーバの主たる部分をRustで書いています。 はじめの頃は本当にRustだけだったのですが、各方面に秀でたメンバーが集まった結果、今ではHaskellやTypeScript、一部ですがGoも動いています。
そもそもRustの採用事例が少ないことからRustをAWSで扱う知見はそこまで多くなさそうです。 そこで今回はIdeinでどのようにAWS上でRustを動かしているか、動かすにあたって必要だった知見などを紹介していきます。
全体像
全体の中で、Rustが動いている環境はECSとLambdaです。 ECSで動いているのはActcastのバックエンドAPIで、Actcastのサーバ本体とも言える部分です。
Lambdaの方は全部で4つあります。 起���トリガで分類するとAPI GatewayのAuthorizerとHandlerに1つづつ、CloudWatch EventsのEventとTimerに1つづつです。

Actcastでは今のところAWSの構成を全てterraformで管理しているのでECSジョブやLambdaもterraformからデプロイしています。 これについてはサービスリリースを乗り越えたので構成の見直しを予定しています。
ECSはdockerコンテナさえ作ってしまえば大きな懸念なく動くので以下ではLambdaでの動かしかたについて紹介します。
コード
使っているライブラリやコーディング上のテクニックを紹介します。
全般
Lambdaランタイム
LambdaのRustランタイムはありません。 しかしカスタムランタイムを使えばRustを動かすことができます。 カスタムランタイムでRustを動かすためのライブラリも公開されています。 このライブラリ(lambda-runtime)を使えばエントリポイント( main 関数)だけLambda用に作ってあげれば動くのでコードの残りの部分はあまりLambdaについて気にしなくてよくなります。 ��の言い方をするとLambda特有の処理は全てエントリポイント部分に集約しています。 つまり、 main 関数の見た目は以下のようになっています。
use tokio::runtime::current_thread::block_on_all; use app::{api, App}; pub async fn handle( app: &App, event: api::CustomEvent, _ctx: Context, ) -> Result { app.do_something_with_event(event, hoge, fuga) // do other things... } fn main() { /* 初期化のコード */; let app = App::new(...); lambda!(|req, ctx| { block_on_all(handle(&app, req, ctx)) }) }
コードを少し解説すると以下のようになっています。
Lambdaのランタイムは何度か使われるので Appはメインループの外で作って使い回す
lambda! マクロでLambdaのメインループに入る
リクエストとレスポンスはserdeの Deserialize/Serialize を実装した型を書いておけばJSONから変換される
Futureを走らせるために block_on_all を呼んでいる
このうち3と4についてもう少し詳しく触れます。
出入力フォーマット
リクエストとレスポンスはAWSのドキュメントを読んで、自分の欲しいフィールドを扱えるようなデータ型を定義します。例えばAPI GatewayのCustom Authorizerであれば以下のようなデータ型を定義しています。
#[derive(Debug, Clone, PartialEq, Eq, PartialOrd, Ord, Deserialize)] #[serde(rename_all = "camelCase")] pub struct CustomEvent { #[serde(rename = "type")] pub type_: String, pub authorization_token: String, pub method_arn: String, } #[derive(Debug, Clone, PartialEq, Eq, PartialOrd, Ord, Serialize)] #[serde(rename_all = "camelCase")] pub struct CustomOutput { pub principal_id: String, pub policy_document: PolicyDocument, } #[derive(Debug, Clone, PartialEq, Eq, PartialOrd, Ord, Serialize)] #[serde(rename_all = "PascalCase")] pub struct PolicyDocument { pub version: String, pub statement: Vec, } #[derive(Debug, Clone, PartialEq, Eq, PartialOrd, Ord, Serialize)] #[serde(rename_all = "PascalCase")] pub struct Statement { pub action: String, pub effect: Effect, pub resource: String, } #[derive(Debug, Clone, PartialEq, Eq, PartialOrd, Ord, Serialize)] #[serde(rename_all = "PascalCase")] pub enum Effect { Allow, Deny, }
少し冗長ですが実行時にエラーが出るよりはマシなので1つ1つ丁寧にデータ型を定義しています。
同期と非同期
我々のコードは全て非同期で書かれていますが(cf プロダクションのRustコードを async / await に移行した話)lambda_runtimeは非同期サポートをしていないので明示的にブロックする必要があります。 非同期サポートが欲しいというissueはあるのですが、進捗芳しくないみたいです。 ここは期待せずにブロックするコードを書きましょう。
コード構成
コード構成はLambda依存の部分とビジネスロジックを完全に切り離しています。 具体的にはCargoのWorkspaceの機能を使ってコアとなるビジネスロジック部分と、それに依存するECSやLambdaのエントリポイント部分のパッケージを分けています。 他にも外部(RDBやその他のAWSリソース)とのやりとりもパッケージを分けていますがこれは普通の書き方ですね。
Rusoto
Lambdaで完結することは少なくて、他のAWSサービス群を利用しています。 RustからAWSサービス群を利用するのにはRusotoを使っています。 過去には機能が足りなくてPull-Requestを送ることもありますが、最近はおおむねそのまま使えています。
ただしasync/await対応(とそれに伴なう依存ライブラリのアップデート)がまだなのでasync/await移行してしまった我々のコードベースからは少し使いづらいものがあります。 これについてはPull-Requestが出ていますがマージされるまでもう少し掛かりそうです。 これらのPRがマージされ次第我々もRusotoを使っている部分を async/await に書き換えていく予定です。 本当はRusotoの依存ライブラリが他の依存ライブラリとコンフリクトしてバージョンの更新がブロックしているなどの問題も発生してりるので、 async / await 対応以外の更新もありますがそれはまた別の話。
DLL
Rusotoを使う際にSSLライブラリが依存に入ります。これについて注意点があります。 詳しくはビルドの節で説明しますがLambda内でopensslを使うのは非常にハードルが高いのです。 なのでLambda内でRusotoを使う際はopensslではなくpure rustのrustlsを使いたいです。 一方でECSなどopensslの使用に差し障りのない場面では枯れたライブラリであるopensslを使いたいです。
そこで、ECSでもLambdaでも使われるコアロジック部分は以下のようにopensslでもrustlsでも動くように作っています。
# Cargo.toml [dependencies] hyper = "0.12" # hyper-rustlsとhyper-tlsをoptionalにしておく hyper-rustls = { version = "0.16", optional = true } hyper-tls = { version = "0.3", optional = true } rusoto_core = { version = "0.40", default_features = false } rusoto_credential = "0.40" rusoto_ecr = { version = "0.40", default_features = false } [features] # featureで全体のtlsを切り替えられるようにしておく default = ["native-tls"] native-tls = ["hyper-tls", "rusoto_core/native-tls", "rusoto_ecr/native-tls"] rustls = ["hyper-rustls", "rusoto_core/rustls", "rusoto_ecr/rustls"]
// src/lib.rs // Rustのコード内では有効にされた方を使うようにしておく #[cfg(feature = "hyper-rustls")] use hyper_rustls as tls; #[cfg(feature = "hyper-tls")] use hyper_tls as tls;
上記のようにコードとしてはopensslまたはrustlsで動くように作っておいて、使うときに選択するようにしています。
同様にLambdaやECSのエントリポイントとなるパッケージでもフィーチャを用いてどちらでも動くようにしています。 そしてビルドするときに --no-default-features --features rustls などのオプションを渡してopensslとrustlsを使い分けています。
本当はビルド時ではなくエントリポイントの Cargo.toml 時点でフィーチャを固定したかったのですがそれは難しいようでした。 hyper-tls を有効にするECSのコードと hyper-rustls を有効にするLambdaのコードが混在する状況でワークスペースのビルド (cargo build 相当)をするとどちらのフィーチャも有効になってしまい、ビルドに失敗します。 もうちょっと言うと cargo check や cargo test もままならなくなってしまうので大変不便です。 一応、個別のパッケージ毎のビルド(cargo build -p package 相当)ではフィーチャが混在しなくなるので成功するものの、エディタ/IDEの設定ではデフォルトで -p オプションが付かないものが多いので何もせずに使える方式にしたいです。 なのでデフォルトを全て hyper-tls に寄せてしまい、Lambdaのコードをビルドするときだけ rustls を使うようにしました。
もう1つ、Lambda内からPostgreSQLにもアクセスしています。PostgreSQLを使うためにlibpqに依存しています。 これについてはビルド時に頑張ってLambda内からも使えるようにしてますので、ビルドの節を参照して下さい。
HTTP
RustでLambdaを使うときの一般論としては前項の通りですが、ALBやAPI GatewayのハンドラとしてのLambdaを使うときはもう少しライブラリのサポートがあります。 具体的にはlambda-httpクレートが用意されています。
Actcastでlambda-httpを使っているのは比較的アクセスの少ないAPIで、メインとなるエンドポイント1つとそれに付随するエンドポイント数個からなります。 小用にいくつもLambdaを作るのも管理が大変ですし、cold start問題もあります。 そこで1つのLambdaで全てのエンドポイントを処理しています。 そのLambdaではルーティングに以下のようにHTTPメソッドとリソースパスを match 式に掛けています。
let (http_method, resource_path) = match request.request_context() { RequestContext::ApiGateway { http_method, resource_path, authorizer, .. } => (http_method, resource_path), _ => unreachable!(), }; match (http_method.as_str(), resource_path.as_str()) { ("GET", "/path1") => { // ... } ("GET", "/path1/{some_id}") => { let some_id = request.get_id("some_id")?; // ... } ("POST", "/path2/{other_id}/hoge") => { let other_id = request.get_id("other_id")?; // ... } ("POST", "/path2/{other_id}/fuga") => { let other_id = request.get_id("other_id")?; // ... } _ => unreachable!(), }
マッチ対象が多くなると破綻しそうですが目で数を数えられるくらいの範囲なら問題ないでしょう。
ビルド
ECS
少しだけECSのビルドに触れておきます。
基本的にはビルドと実行のベースコンテナされ揃えればバイナリをコピーしてあげるだけで動きます。 ほとんど大したことをしないのにDockerfileを管理するのが面倒なので cargo-pack-dockerというツールを作ってCargoだけでパッケージングまで済むようにしています。
Lambda
Lambda内で動かすバイナリは普段と勝手が違うところが多くあります。 例えば何も気にせずにビルドしたバイナリをLambda環境に持っていって動かすとglibcのバージョンの問題で version `GLIBC_2.27' not found とエラーが出たりします。 また、今回の我々のようにlibpqを使いたい場合もLambdaのランタイムにlibpqが存在しないのでどうにかしないといけません。
glibcやlibpqなどのダイナミックリンクライブラリ(DLL)が上手く使えずに起動に失敗してしまう問題にはおおまかに2つの対策があります
DLLを使わない
DLLを頑張って使う
DLLを使わない
glibcが動かない環境でバイナリを動かしたいときのノウハウは古くからあります。 musl libcを使い、それをバイナリに静的にリンクしてしまえば実行時にlibcのDLLに依存しなくなります。 同様にlibpqについても静的リンクしてしまえば問題が発生しなくなります。
そのためにrust_musl_dockerのようにmusl libcや静的リンク可能なlibpqが入ったビルド用コンテナも用意されています。 このノウハウを使えばLambdaに限らず色々な場所で動かせるようになります。
しかし今回はこの方法は採用しませんでした。 一応libcとしてはglibcとmusl libcは互換性はありますが、実装は別物です。 細かい部分の挙動やパフォーマンス特性も違うため、glibc環境で開発しているアプリケーション(や、もっと言うと依存ライブラリも)をmusl libcで動かすのは一定のリスクがあります。 それに、今回はglibc��動かない環境という訳ではなくて、ビルド時に使ったglibcと実行時に利用できるglibcのバージョンが異なるだけです。 glibcのバージョンを揃える方向に舵を切ってみます。
DLLを頑張って使う
RustのLambdaランタイムlambda_runtimeのREADMEをよく見るとLambda向けのビルド方法が書かれています。 そこではsoftprops/lambda-rustというdockerコンテナでビルドしています。
このコンテナを詳細に調べると、Lambdaの実行環境と同じバージョンのAmazon Linuxのイメージを使ってRustをビルドしています。 現時点での実行環境のバージョンはドキュメントによると、2018.03.0.20181129-x86_64-gp2 と、いささか古いものになっています。 因みに、今のところRustの動くカスタムランタイムではAmazon Linux 2は使えないようです。
softprops/lambda-rustがそのままビルドに使えたら良かったのですが、残念ながら今回は使えません。 libpq などのライブラリも一緒に使う術が用意されていないからです。
しかし基本となるアイディアはそのまま流用できそうなので使います。 すなわち、以下のような方法を採ります:
Lambdaと互換性のあるAmazon LinuxのDockerイメージを使う
DockerイメージにRustのツールチェーンをインストールする
Dockerイメージにlibpqなどをインストールする
Dockerコンテナ内でRustをビルドし、成果物をZIPにまとめる
Lambdaの実行環境と同じDockerイメージを使��たいのですがどうやらピタリとバージョンの合うDockerイメージが配られているとは限らないようです。 今回は 2018.03.0.20191219.0 を使います。 余談ですがActcastではRaspbianをはじめとしてDebian系のOSを統一して使っています。しかしここだけRedHat系をOSを使っていることになります。
次はlibpqのインストールです。 我々はPostgrSQL 11の機能を使いたいので、libpqもそれに相当するものをインストールしたいです。 しかしAmazon Linuxのイメージが古いためyumではインストールできません。 仕方ないのでPostgreSQL 11のレジストリからlibpqをインストールしています(因みにAmazon Linux2なら yum で入るようです)。
ビルド用のイメージが準備できたとして、次はビルドです。ビルドは概ね以下のようなコマンドで行っています。
$ docker run --rm \ -e CARGO_TARGET_DIR=/tmp/app/your_app/target/lambda \ -v $ROOT_DIR/:/tmp/app \ -v $ROOT_DIR/.cache/cargo/registry:/root/.cargo/registry \ -v $ROOT_DIR/.cache/cargo/git:/root/.cargo/git \ -t your/build_image /tmp/app/build-script.sh your_app
ここで、 $ROOT_DIR はワークスペースのルートを指す変数です。 ポイントで解説すると
ビルド用のイメージ(your/build_image)内でビルドする
ビルド用のスクリプト(build-script.sh)を使ってビルドする(後述)
ワークスペース全体を /tmp/app にマウントする
ワークスペースのルートに .cache/ ディレクトリを作っておき、そこにCargoのキャッシュを持たせる
Cargoのターゲットディレクトリは target/ ではなく target/lambda にしておく
となっています。
4.と5.について補足します。 コンテナ内でビルドするときにもホスト同様ビルドキャッシュは持っておいて欲しいです。 しかしホスト環境とコンテナ環境で同じキャッシュを使うと権限の問題が発生します。 コンテナ内はrootユーザで動作しているのでコンテナ内から作ったキャッシュはrootのものになり、ホストに戻ったときに取り回しが面倒になってしまうからです。 そこでコンテナ内で使うキャッシュとホストのキャッシュを分けることで問題を解決します。 それが .cache/ ディレクトリと target/lambda ディレクトリです。 また、 target/lambda はビルド成果物であるZIPファイルの受け渡し場所としての役割もあります。
さて、次はビルドに使うスクリプト(build-script.sh)です。 概ね以下のようなことをしています。
# ビルド cargo build --release # バイナリ名はbootstrapにしておく cp "$CARGO_TARGET_DIR/release/your_app" bootstrap # bootstrapが動的リンクしているライブラリをlibに入れる。ここでは `pq` 。 mkdir -p lib ldd bootstrap | grep pq | grep -o '=> [^ ]*' | sed 's/=> //' | xargs -I@ cp @ lib/ # bootstrapとlibをまとめてZIPに固める zip -X "$CARGO_TARGET_DIR/release/your_app.zip" bootstrap lib/* rm -rf bootstrap lib
ざっくりいうとビルドしてZIPに固めているだけですが、途中で動的リンクしているライブラリのパスを取得してlibディレクトリに入れ���います。 これでできあがるZIPファイルは以下のような構造になっています
. ├── bootstrap └── lib └── libpq.so // その他ライブラリ
LambdaのドキュメントによるとZIPの中のlibディレクトリにDLLを入れておくと LD_LIBRARY_PATH が通っているので($LAMBDA_TASK_ROOT/lib)、実行時に参照できるようになります。
これであとはLambdaにデプロイすると期待通りに動いてくれます。 我々のシステムでは今のところTerraformからデプロイしているのでTerraformが target/lambda 以下にあるZIPファイルを参照することになります。
上記の手法はlibpqに依存した箇所はないので原理的にはあらゆるDLLを同じ方法で使えるようになるはずです。 しかし何故かopensslだけは上手くいきませんでした(crypto.oがみつからないとかなんとか…)。 未だに原因が不明なのですが、現時点では前述のとおりrustlsを使って問題を回避しています。
テスト
テストについてはlambda_runtimeのドキュメントに載っている通りのコマンドが使えます。
unzip -o \ target/lambda/release/your_app.zip \ -d /tmp/lambda && \ docker run \ -i -e DOCKER_LAMBDA_USE_STDIN=1 \ --rm \ -v /tmp/lambda:/var/task \ lambci/lambda:provided
これにヒアドキュメントを使って標準入力からJSONを渡し、出力のJSONを得ています。
単体テストはこれで済むのですがインテグレーションテストはもうちょっと複雑なセットアップが必要です。 実を言うとActcastでは今のころローカル環境でのインテグレーションテストをできていません。 Lambdaは総じて多彩なAWSリソースと相互連携しながら動くのでローカルに環境を構築するのが難しいからです。 現在は開発/サンドボックス環境に実際にデプロイして動作確認や自動テストを行っています。
振り返って
RustでLambdaを使いはじめたのはカスタムランタイムとRustのサポートライブラリが発表されて間もない頃でした。 Rustを動かす情報がほとんどない上に私が個人的にLambdaを触ったのがはじめてだったこともあり、手探りで進めていって今の形に落ち着きました。
最初に作ったLambdaはAPI Gatewayの裏で動くHandlerとカスタムAuthorizerでした。 新規開発のAPIということもあり、既存のサーバとはコードベースをほとんど共有せずに作ってLambdaで動かすノウハウを獲得しました。 要するに技術的投資として新しいことを始めたのです。 PostgreSQLに接続しているのもその一環です。 複数のコンポーネントがRDBにアクセスするのはアンチパターンとされていますが、様々な状況判断からこのような選択をとりました。 そのあとに既存のコードを流用しつつ動くLambdaも作っていきました。
これらを振り返ってみます。
RustをLambdaで動かす
おおむね良さそうでした。 最初、正しく動くバイナリをビルドするの��苦戦して時間が掛かりましたが一度作り方を把握しさえしてしまえば大きな懸念なく使えます。
新規コードベースで開発した
どちらかというと良くなさそうでした。 一番最初に既存の複雑性を排して新しい技術に取り組める点は良かったです。 しかしコード(ビジネスロジック)に重複があるなどの問題がありました。 実際、他のメンバーから「最近ここに変更加えたけどLambdaの動作に影響ない?」などの問い合わせが来ることもありました。
それだけでなく、Rustのように強い静的型付言語ではコンパイラがある程度の全体整合性を検査してくれることに強みがあります。 コードベースを分けてしまうとその恩恵に与れなくなってしまいます。 コードの重複の排除だけでなく、一歩進んで積極的な整合性検査のためにもコードベースの統合が必要そうでした。
将来的に現在別のコードベース(別ディレクトリ)になっているものを1つにまとめられたらなと思っています。
まとめ
この記事ではActcastでRustをどのようにAWS上で動かしているかを紹介しました。 これで完璧と言えるものではないですし、エコシステムの今後の発展に期待すべき点もあります。 しかしある程度の規模でRustをAWS上で動かしている例として皆さまの一助になれば幸いです。
さいごに、IdeinではRustでWebサービスを作りたいエンジニアを募集しています!!
6 notes
·
View notes
Video
instagram
Making things come to life is a specialty @airbnb @bnegnightlife @resolume_ #eventproduction #eventtransformations #ledwalls #production #corprateevents #specialevents #projectionmapping #asianlanterns #customevents #eventproduction #productionlife (at Empire Restaurant & Lounge)
#production#projectionmapping#asianlanterns#eventtransformations#specialevents#customevents#ledwalls#corprateevents#productionlife#eventproduction
0 notes
Photo

Griya Wisaya Herbal.. Menyediakan juga paket ekonomis untuk pelajar dan mahasiswa.. more info phone/wa 082257450104 #adventurebatumalang #batumalangadventure #griyawisataherbalbatu #griyawisataherbal #edukasiherbal #batuorganizer #wisatabatumalang #wisatabatu #customevents #eventplanner #eventorganizer #weddingorganizer #wonderfulindonesia #jeep #kulinerbatu #kulinerbatumalang #adventurebatu #wisataantimainstream #shiningbatu #explorebatu #explorebatumalang
#wisatabatu#shiningbatu#adventurebatu#kulinerbatu#weddingorganizer#batumalangadventure#explorebatumalang#eventplanner#griyawisataherbalbatu#kulinerbatumalang#adventurebatumalang#wonderfulindonesia#explorebatu#edukasiherbal#eventorganizer#griyawisataherbal#jeep#wisataantimainstream#batuorganizer#customevents#wisatabatumalang
0 notes
Photo
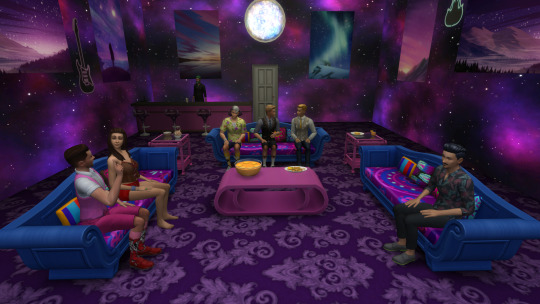
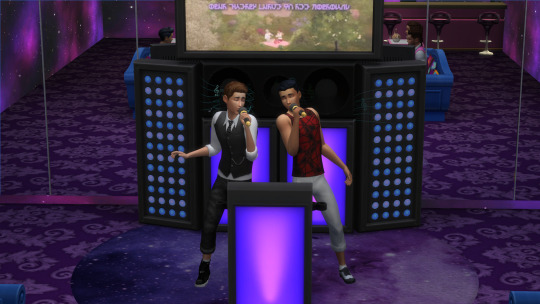


Custom Event---Karaoke Night
Do you ever want a karoake event in your game? Well, with this mod, you can!
With this mod, you can:
Plan a new type of event: Karaoke Night
Have your party at a karaoke bar, bar, nightclub, or even your house
Complete custom goals
Discuss lack of new songs, Joke about Tone-Deaf Sims, Complain about uncreative videos and Brag about karaoke skill during the event!
Learn what others think about your karaoke performance after singing on the karaoke machine
Invite other Sims to sing or watch karaoke during the event.
Get custom buffs for hosting or attending the event


Alright! This is finally done! I started the mod three weeks ago and finished it about ten days ago...I struggled about the rewards because I’m totally blank in Blender...But I’m learning Blender so I promise to update this mod when I can make great custom rewards...For now you’ll have to make do with the game objects XD
If you find any bugs, just report it to me. I’m glad to listen!
NOTICE: This mod is NOT base game compatible. You apparently have to own City Living for this mod to work. This mod IS a script file, please check if you enabled script mod.
NOTE:
'Ask about karaoke performance’ interaction will pop up after you sing a song on the karaoke machine
You need a karaoke machine to complete the goals
DOWNLOAD HERE
Thanks for @brittpinkiesims for testing and support! And of course her cc I used in my screenshots!
Thanks to S4S for the tool I used to creat the mod
Thanks to @plumbobteasociety for the wallpapers and posters I used in the screeshot.
747 notes
·
View notes