#CustomValidation
Explore tagged Tumblr posts
Visit Tumblr Blog
Explore Tumblr blogs with no restrictions, modern design and the best experience.
Last Seen Tumblr Blogs


Fun Fact
There were a total of 171.5 billion posts on Tumblr in 2019.
Text
Handling forms and validation is a crucial part of web development. Vue.js provides a flexible framework for building dynamic applications, and with the help of VeeValidate, a popular form validation library for Vue, managing form validation becomes much easier. VeeValidate helps you validate user inputs, display error messages, and ensure that data entered into forms meets the required standards before submission.
In this guide, we'll go step by step to implement form handling and validation in a Vue.js application using VeeValidate. By the end, you'll know how to set up form validation, display error messages, and improve user experience in Vue.js apps.
#VueJS#VeeValidate#FormValidation#FrontendDevelopment#JavaScript#WebDevelopment#VueComponents#Vue3#FormHandling#Validation#VueJSForms#UserInput#ValidationRules#VueJSPlugins#VueFormValidation#WebAppDevelopment#UIForms#ErrorHandling#ReactiveForms#JavaScriptValidation#VueJSArchitecture#SinglePageApplications#SPA#InputValidation#CustomValidation#FormErrorMessages#UIUX
0 notes
Text
Flask Custom Validators: Enhancing Data Integrity with Marshmallow
Discover how to build #customvalidators using #Marshmallow in #Flask applications. Enhance your data integrity, enforce business rules, and create robust APIs. Learn practical examples and best practices
Are you tired of dealing with messy data in your Flask applications? Well, you’re in luck! Today, we’re diving into the world of custom validators using Marshmallow. These powerful tools will help you keep your data clean and your app running smoothly. Why Custom Validators Matter First things first, let’s talk about why custom validators are so important. In essence, they act as gatekeepers…
0 notes
Link
Hello, Magento Buddies!!
With back end validation, you have the final say when it comes to whether something should be executed or not. The input of custom customer attributes must also be validated in order to avoid inaccurate data. Learn How to Apply Validation on Backend Customer Custom Field in Magento 2.
0 notes
Link
Custom validator feature can be used to define custom validation rules using RegEx which can be selected from 'Validations' drop-down when creating or editing checkout fields. To create new custom validators,
https://www.themehigh.com/help-guides/woocommerce-checkout-field-editor/custom-validation-rules
#woocommerce wordpress woocomerceplugins woocheckouteditor woocheckoutmanager checkoutmanager#customvalidation#confirmvalidation#woocustomvalidation
0 notes
Text
Visual basic menustrip mnu

VISUAL BASIC MENUSTRIP MNU HOW TO
VISUAL BASIC MENUSTRIP MNU CODE
VISUAL BASIC MENUSTRIP MNU PASSWORD
VISUAL BASIC MENUSTRIP MNU MP3 DOWNLOAD
Inline Coding Model in ASP.NET using VB. When creating menus with the MenuStrip component, the Name property is used to hold the words that will appear on the screen in the menu bar.
Working With Hidden Field Control In ASP.NET Using VB.NET.
BulletedList and Bullet Style property in ASP.NET using VB.NET.
Splash screen effects to your web application in ASP.NET using VB.NET.
Lo stile dei controlli ToolStrip e MenuStrip dipende dallimpostazione delle proprietà RenderMode e Renderer.
GridViewComplexHead in ASP.NET using VB.NET Questo lavoro contiene un piccolo esempio di come sia possibile dotare le proprie applicazioni di controlli ToolStrip o MenuStrip con stile e colori personalizzati e soprattutto indipendenti dal sistema operativo in uso dallutente.
Embed Flash Banner in ASP.NET page using VB.NET.
Creating Text Files in ASP.NET using VB.NET.
ASP.NET change selected color of the menu item using VB.NET.
Check/Uncheck the GridView CheckBox in ASP.NET Using VB.NET.
Highlight ASP.NET GridView Rows On Mouse Over Using VB.NET.
ASP.NET validate DropDownList control using VB.NET.
Retrieving And Storing Values From Session Using VB.NET.
Rotate an Image in ASP.NET using VB.NET.
ASP.NET DataBinder.Eval Method in VB.NET.
HelpProvider Control with HelpClass in VB.NET.
ASP.NET Bind Records with ListView in VB.NET.
VISUAL BASIC MENUSTRIP MNU PASSWORD
ASP.NET Generate Random Password Using VB.NET.
VISUAL BASIC MENUSTRIP MNU MP3 DOWNLOAD
Uploaded by: ITS InfoTechSkills Watch Video Download MP3 Download MP4.
VISUAL BASIC MENUSTRIP MNU HOW TO
Web Form Authentication in ASP.NET Using VB.NET HOW TO USE MENU STRIP IN VB.NET PROPERTIES AND EVENTS VISUAL BASIC TUTORIAL.
ASP.NET 2.0 SqlDataSource Control in VB.NET.
ASP.NET RichTextbox control using VB.NET.
Horizontal Accordion script in ASP.NET using VB.NET.
Scroll to Top of page using VB.NET in ASP.NET Add and remove menu item for File Menu (Recent file list menuitem) Visual Basic 2005 Programmers Reference by Rod Stephens (Author) Publisher: Wrox.
Caching Mechanism in ASP.NET Using VB.NET.
OpenFileDialog and SaveFileDialog control in VB.NET.
NumericUpDown and DomainUpDown control in VB.NET.
Retrieving user password and email address from database in VB.NET.
Storing and Retrieving control data using View State in ASP.NET using VB.NET.
Existance Of Email Address In ASP.NET using VB.NET.
Sort The Columns Of Grid View In VB.NET.
CustomValidator Control Using ASP.NET In VB.NET.
Private Sub Form1_Load( ByVal sender As System.
VISUAL BASIC MENUSTRIP MNU CODE
Than add the Following code on the Form load to show the MenuStrip on left side.
Now Type Text to create SubMenu of the Menu.
Now add the Menu items.After adding the menu names the form looks Like the below Form.
than the window will looks like the below window
First drag the MenuStrip Control from the toolbox on the form.
How to use the MenuStrip Control In vb.net:
AutoSize: a value Showing whether the control is automatically resized to display its entire contents.
GripStyle: For the visibility of the grip used to reposition the control.
CanOverflow: you can get or set a value showing whether the MenuStrip Support OverFlow feature.
ShortcutKeys: Either you can Get or set the shortcut keys available with the ToolStripMenuItem.
this control support overflow, menu merging, tool tips.MenuStrip Control works with Multiple Document InterFace(MDI) and also with Single Document Interface(SDI). When you add a sub-menu, another text box with 'Type Here' text opens below it.Ĭomplete the menu structure shown in the diagram above.A Visual Basic MenuStrip Control Provides a MenuBar On the form.It replaces the Features of MainMenu control.It provides an application menu system. In this example, let us add menu and sub-menu items.ĭrag and drop or double click on a MenuStrip control, to add it to the form.Ĭlick the Type Here text to open a text box and enter the names of the menu items or sub-menu items you want. Occurs when the MenuStrip is deactivated. Occurs when the user accesses the menu with the keyboard or mouse. The following are some of the commonly used events of the MenuStrip control − Sr.No. Gets or sets a value indicating whether the MenuStrip stretches from end to end in its container. Gets or sets a value indicating whether ToolTips are shown for the MenuStrip. Gets or sets the ToolStripMenuItem that is used to display a list of Multiple-document interface (MDI) child forms. Gets or sets the visibility of the grip used to reposition the control. Gets or sets a value indicating whether the MenuStrip supports overflow functionality. The following are some of the commonly used properties of the MenuStrip control − Sr.No. The following diagram shows adding a MenuStrip control on the form − Properties of the MenuStrip Control The ToolStripMenuItem class and the ToolStripDropDownMenu class provide the functionalities to create menu items, sub menus and drop-down menus. The MenuStrip control works as the top-level container for the menu structure. The MenuStrip control represents the container for the menu structure.
0 notes
Text
Как создать свой процессор с отношениями и Java-аннотациями: Apache NiFi для инженера данных
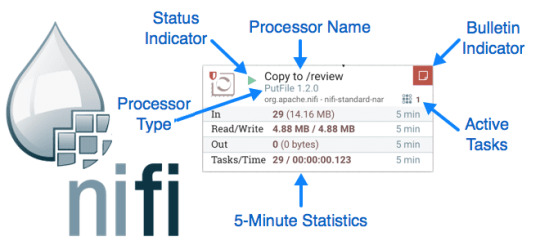
В этой ��татье в поддержку курсов по Apache NiFi заглянем под капот этой платформы маршрутизации потоковых данных и рассмотрим, как дата-инженер может создать собственный процессор. Смотрите далее, как устроены процессоры в Apache NiFi, что общего между отношениями и маршрутами движения потоковых данных, как создать FlowFile, зачем нужен метод onTrigger() и каким образом аннотировать другие Java-методы.
Процессоры в Apache NiFi: что это и как они работают
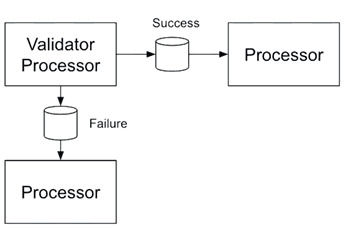
В Apache NiFi процессор можно рассматривать как функцию, которая принимает входные данные и производит на выходе результат с различными конфигурациями. NiFi включает широкий перечень типовых процессоров с большим набором коннекторов и функций. Однако, иногда дата инженеру необходимо написать собственный процессор, который выполняет некоторую комбинацию маршрутизации данных, преобразования или взаимодействия между системами. Как сделать это, мы рассмотрим чуть позже, а пока разберем что такое процессоры и как они работают.Процессоры имеют доступ к метаданным (атрибутам) потокового файла (FlowFile) и его содержимому, подключаясь друг к другу по принципу направленного ациклического графа (DAG) в конвейере данных. Один и тот же вывод процессора может быть отправлен на несколько разных процессоров, соединенных очередью. Сообщения, которыми обмениваются процессоры, называются потоковыми файлами, которые передаются от одного процессора к другому через очередь. Вход в процессор может поступать от другого вышестоящего процессора из внешней системы, например, Apache Kafka, СУБД, файловый сервер и пр. Выходные данные каждого процессора представляют собой FlowFile с содержимым и метаданными. Процессор может выводить несколько потоковых файлов за один раз, которые могут быть направлены по одному или нескольким маршрутам. Например, процессор Validator проверяет валидность сообщения по определенным критериями и отправляет валидные данные по маршруту успешной обработки (Success), а недопустимые сообщения - на отказ (Failure). Такие маршруты в NiFi называются отношениями (relationships).
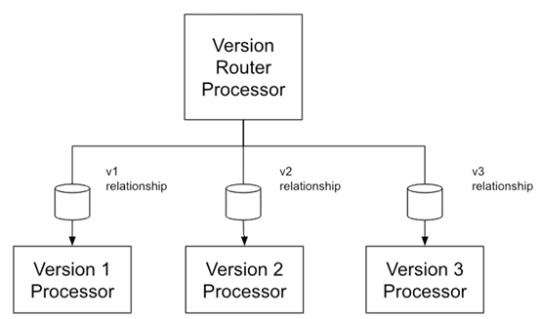
Пример маршрутизации FlowFile к разным процессорам Apache NiFi К примеру, система поддерживает входные сообщения в трех видах, каждый из которых обрабатывается по-разному. Для этого пользовательский процессор Version Router может получить потоковый файл, определить его формат и отправить в одно из трех отношений (v1, v2, v3), соединенных с соответствующими процессорами (Version 1 Processor, Version 2 Processor, Version 3 Processor).
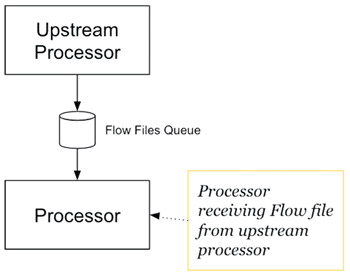
Примеры разных маршрутов (отношений) в Apache NiFi Отношения, поддерживаемые процессором, объявляются в процессоре как набор relationship-объектов. Чтобы выполнять различные функции или подключаться к внешней системе, процессор использует конфигурации. Например, для подключения к системе обмена сообщениями Azure Event Hub необходимы сведения об аутентификации и конечной точке, которые передаются как свойства процессора.Свойство, которое требуется или поддерживается процессором, является объектом PropertyDescriptor с разными полями, включая имя, описание, обязательное и конфиденциальное. Список таких дескрипторов свойств, которые закодированы в процессоре, используется веб-приложением для отображения свойств процессора. Свойства, определенные пользователем для экземпляра процессора, могут быть дополнительно проверены путем переопределения метода customValidate() родительского класса AbstractConfigurableComponent . Процессор, подключенный к другому вышестоящему процессору, ��ожет получить FlowFile с помощью различных методов. Например, метод EvaluateJsonPath() получает потоковый файл из восходящего потока и проверяет ожидаемый путь в его JSON-содержимом.
Пример конвейера из процессоров Apache NiFi Метод onTrigger() для выполнения работы реализуется в каждом процессоре. Реализация метода onTrigger (ProcessContext, ProcessSession) использует сеанс процесса ProcessSession для получения входного FlowFile. Конфигурация, которая определяет свойства в пользовательском интерфейсе, получается из контекста процесса ProcessContext, обеспечивающим мост между процессором и NiFi. Таким образом, создание одного или нескольких FlowFile из процессора сводится к следующим шагам : - создание FlowFile с использованием create; - добавление содержимого в FlowFile с write; - добавление атрибутов с помощью writeAttribute; - передача потокового файла потока в отношение с transfer; - фиксация сеанса с commit. Унифицированное логирование во время обработки можно выполнить с помощью ComponentLog, доступного процессору из метода getLogger(). Далее рассмотрим, что будет внутри пользовательского процессора.
Как написать собственный процессор: простой пример с ликбезом по аннотациям Java
Прежде чем перейти к подробностям написания пользовательского процессора, отметим, что в Apache NiFi процессоры, как и другие компоненты, имеют свой жизненный цикл. Для поддержки жизненного цикла компонентов API NiFi использует аннотации Java из пакета org.apache.nifi.annotation.lifecycle. Напомним, в языке Java, на котором написан фреймворк, аннотация – это специальная форма синтетических метаданных, которая может быть добавлена в исходный код для его анализа, компиляции или выполнения. Аннотированы могут быть пакеты, классы, методы, переменные и параметры. Аннотация предоставляет необходимую информацию для компилятора и различных инструментов генерации другого кода, конфигураций и пр. а также может быть использована во время работы.Аннотации представляют из себя дескрипторы в тексте программы для хранения метаданных программного кода на разных этапах ее жизненного цикла. Информация в аннотациях может использоваться соответствующими обработчиками для создания необходимых вспомогательных файлов или маркировки классов, полей и т.д. Аннотации могут быть применены к декларациям классов, полей и методов, а также самих аннотаций . В Apache NiFi к методам Java в процессоре могут применяться следующие аннотации, чтобы указать платформе, когда следует их вызывать :- @OnAdded - вызывает метод сразу после создания компонента. Метод инициализации компонента будет вызываться после создания компонента, за которым следуют методы, помеченные @OnAdded. Если какой-либо метод, помеченный @OnAdded, выдает исключение, пользователю будет возвращена ошибка, и этот компонент не будет добавлен в поток. Другие методы с этой аннотацией не будут вызываться. Метод initialize() или init() для подклассов абстрактного класса AbstractProcessor вызывается только один раз за время жизни компонента и не имеет аргументов. - @OnRemoved - вызывает метод перед удалением компонента из потока, чтобы освободить ресурсы. Методы с этой аннотацией не имеют аргументов. Если метод с этой аннотацией вызывает исключение, компонент все равно будет удален. - @OnScheduled - указывает, что метод вызывается каждый раз при планировании запуска компонента. Если какой-либо метод с этой аннотацией вызывает исключение, другие методы с ней не будут вызваны, о чем пользователь будет уведомлен. В этом случае затем запускаются методы с аннотацией @OnUnscheduled, за которыми следуют методы с аннотацией @OnStopped. Причем если какой-либо из этих методов выдает исключение, эти исключения игнорируются. Затем компонент завершит свое выполнение в течение некоторого периода времени, называемого Administrative Yield Duration, значение которого настраивается в файле properties. Наконец, процесс будет запущен снова, пока все методы, помеченные @OnScheduled, не вернутся без выдачи исключения. - @OnUnscheduled - методы с этой аннотацией будут вызываться каждый раз, когда выполнение процессора больше не запланировано, хотя многие потоки все еще могут быть активны в его методе onTrigger(). Если такой метод вызывает исключение, это логируется, исключение игнорируется, а другие методы с этой аннотацией по-прежнему будут вызываться. - @OnStopped - методы с этой аннотацией будут вызываться, когда выполнение процессора больше не запланировано и все потоки вернулись из метода onTrigger(). Если такой метод вызывает исключение, это логируется, исключение игнорируется, а другие методы с этой аннотацией по-прежнему будут вызываться. - @OnShutdown – методы с этой аннотацией будут вызываться при успешном завершении работы NiFi. Если такой метод вызывает исключение, будет сгенерировано сообщение журнала, в противном случае исключение будет проигнорировано, а другие методы с этой аннотацией по-прежнему будут вызываться. Методы с этой аннотацией не должны иметь аргументов. Интересно, NiFi не всегда может вызывать методы с этой аннотацией на всех компонентах, которые ее используют. Например, процесс может быть неожиданно остановлен без возможности вызвать указанные методы. Поэтому на методах, аннотированных @OnShutdown, не следует использовать для критическ��й бизнес-логики. Методы, аннотированные @OnScheduled, @OnUnScheduled и @OnStopped могут принимать единственный аргумент с типом ProcessContext для процессора или не иметь аргументов вообще. Таким образом, типовая реализация процессора выглядит так :class SampleProcessor { Set getRelationships() List getSupportedPropertyDescriptors() Collection customValidate() public void onTrigger(...) @OnScheduled public void onScheduled() @OnStopped void close() @OnUnscheduled public void stopConnectionRetainer() } Написать собственный процессор, а также детально освоить администрирование и использование Apache NiFi для современной дата-инженерии вам помогут специализированные курсы для разработчиков, ИТ-архитекторов, инженеров данных, администраторов, Data Scientist’ов и аналитиков Big Data в нашем лицензированном учебном центре обучения и повышения квалификации в Москве: - Apache NiFI для инженеров данных - Администрирование кластера Apache NiFi Источники1. https://raghavan-c.medium.com/nifi-processors-7cb9d27f58ab 2. http://java-online.ru/java-annotation.xhtml 3. https://nifi.apache.org/docs/nifi-docs/html/developer-guide.html#component-lifecycle Read the full article
0 notes
Text
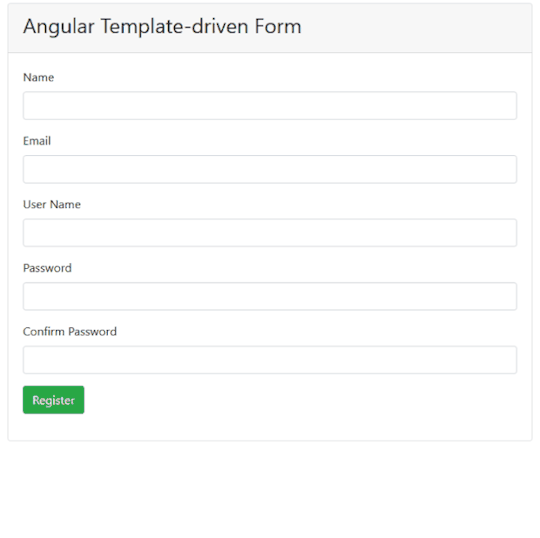
How to Validate Angular Template-Driven Forms
Introduction
In this article, we will learn about validations in Angular template-driven forms. We will create a simple user registration form and implement some inbuilt validations on it. Along with the inbuilt validations, we will also implement some custom validations for the template-driven form. We will consider the following custom validations for this demo:
Checking for user name availability
Password pattern validation
Matching the password entered in two different fields
Take a look at the application in action.
Prerequisites
Install Visual Studio code from here
Install the latest version of Angular CLI from here
Install the latest LTS version of Node.js from here
Source Code
Get the source code from GitHub.
Create the Angular app
Navigate to the folder where you want to create your project file. Open a command window and run the command shown below:
ng new angular-forms-validation --routing=false --style=scss
We are specifying the command to create a new Angular application. The option to create the routing module is set to false and style files extension is set to scss. This command will create the Angular project with name as angular-forms-validation.
Change directories to the new project and open the project in VS Code using the set of commands below:
cd angular-forms-validation code .
Install Bootstrap
Run the following command to install the bootstrap.
npm install bootstrap --save
Add the following import definition in styles.scss file.
@import "~bootstrap/dist/css/bootstrap.css";
Create the validation service
Run the following command to create a new service.
ng g s services\customvalidation
This command will create a folder named services having two files inside it – customvalidation.service.ts and customvalidation.service.spec.ts. Open customvalidation.service.ts and put the following code inside it.
import { Injectable } from '@angular/core'; import { ValidatorFn, AbstractControl } from '@angular/forms'; import { FormGroup } from '@angular/forms'; @Injectable({ providedIn: 'root' }) export class CustomvalidationService { patternValidator(): ValidatorFn { return (control: AbstractControl): { [key: string]: any } => { if (!control.value) { return null; } const regex = new RegExp('^(?=.*?[A-Z])(?=.*?[a-z])(?=.*?[0-9]).{8,}$'); const valid = regex.test(control.value); return valid ? null : { invalidPassword: true }; }; } MatchPassword(password: string, confirmPassword: string) { return (formGroup: FormGroup) => { const passwordControl = formGroup.controls[password]; const confirmPasswordControl = formGroup.controls[confirmPassword]; if (!passwordControl || !confirmPasswordControl) { return null; } if (confirmPasswordControl.errors && !confirmPasswordControl.errors.passwordMismatch) { return null; } if (passwordControl.value !== confirmPasswordControl.value) { confirmPasswordControl.setErrors({ passwordMismatch: true }); } else { confirmPasswordControl.setErrors(null); } } } userNameValidator(userControl: AbstractControl) { return new Promise(resolve => { setTimeout(() => { if (this.validateUserName(userControl.value)) { resolve({ userNameNotAvailable: true }); } else { resolve(null); } }, 1000); }); } validateUserName(userName: string) { const UserList = ['ankit', 'admin', 'user', 'superuser']; return (UserList.indexOf(userName) > -1); } }
The method patternValidator is used to validate the password pattern in our form. The parameter for this method is of type AbstractControl which is a base class for the FormControl. We will use a regular expression to validate the password. This regular expression will check for the following four conditions in the password.
The password should be a minimum of eight characters long.
It should have at least one lower case letter
It should have at least one upper case letter
It should have at least one number
If the password fails the regex check, we will set the invalidPassword property to true.
The method MatchPassword is used to compare the passwords in two fields. This method will accept two parameters of type string. These parameters represent the name of the fields to be matched. We will get the FormControl for these two fields and then match the values in them. If the values do not match, we will set the passwordMismatch property to true.
The method userNameValidator is used to verify if the username is already taken or not. This method will accept a parameter of type AbstractControl. We will check if the value of this field is present in a static array, UserList. If the value entered by the user is already present, we will set the userNameNotAvailable property to true. We are using the setTimeout function to invoke this check every two seconds. This will ensure that the error will be thrown after two seconds from the time the user stops typing in the field.
For the sake of simplicity of this article, we are using a static array to search for the availability of user names. Ideally, it should be a service call to the server to search the value in a database.
Create the User model
Create a new folder called models inside the src/app folder. Add a new file called user.ts inside the models folder. Put the following code in the user.ts file.
export class User { public name: string; public email: string; public username: string; public password: string; public confirmPassword: string; }
Create custom directives
We will create custom directives to implement custom validators for template-driven forms.
Run the command shown below to create the passwordPattern directive.
ng g d directives\passwordPattern
This command will create a folder named directives having two files inside it – passwordPattern.directive.ts and passwordPattern.directive.spec.ts. Open passwordPattern.directive.ts and put the following code inside it.
import { Directive } from '@angular/core'; import { NG_VALIDATORS, Validator, AbstractControl } from '@angular/forms'; import { CustomvalidationService } from '../services/customvalidation.service'; @Directive({ selector: '[appPasswordPattern]', providers: [{ provide: NG_VALIDATORS, useExisting: PasswordPatternDirective, multi: true }] }) export class PasswordPatternDirective implements Validator { constructor(private customValidator: CustomvalidationService) { } validate(control: AbstractControl): { [key: string]: any } | null { return this.customValidator.patternValidator()(control); } }
This directive is used to validate the password pattern. We will implement the Validator interface on the class PasswordPatternDirective. We will override the validate method which accepts a parameter of type AbstractControl i.e. the control we want to validate. We will then invoke the patternValidator method from the service.
Run the command shown below to create matchPassword directive.
ng g d directives\matchPassword
Open matchPassword.directive.ts and put the following code inside it.
import { Directive, Input } from '@angular/core'; import { NG_VALIDATORS, Validator, ValidationErrors, FormGroup } from '@angular/forms'; import { CustomvalidationService } from '../services/customvalidation.service'; @Directive({ selector: '[appMatchPassword]', providers: [{ provide: NG_VALIDATORS, useExisting: MatchPasswordDirective, multi: true }] }) export class MatchPasswordDirective implements Validator { @Input('appMatchPassword') MatchPassword: string[] = []; constructor(private customValidator: CustomvalidationService) { } validate(formGroup: FormGroup): ValidationErrors { return this.customValidator.MatchPassword(this.MatchPassword[0], this.MatchPassword[1])(formGroup); } }
This directive is used to validate if the password entered in two fields are matching or not. This directive will accept an input of the type string array, which contains the fields to match. We will override the validate method and pass the parameter of type FormGroup. We will then invoke the MatchPassword method from the service. Run the command shown below to create validateUserName directive.
ng g d directives\validateUserName
Open validateUserName.directive.ts and put the following code inside it.
import { Directive, forwardRef } from '@angular/core'; import { Validator, AbstractControl, NG_ASYNC_VALIDATORS } from '@angular/forms'; import { CustomvalidationService } from '../services/customvalidation.service'; import { Observable } from 'rxjs'; @Directive({ selector: '[appValidateUserName]', providers: [{ provide: NG_ASYNC_VALIDATORS, useExisting: forwardRef(() => ValidateUserNameDirective), multi: true }] }) export class ValidateUserNameDirective implements Validator { constructor(private customValidator: CustomvalidationService) { } validate(control: AbstractControl): Promise<{ [key: string]: any }> | Observable<{ [key: string]: any }> { return this.customValidator.userNameValidator(control); } }
This directive is used to validate the availability of the user name. We will override the validate method and pass the parameter of type AbstractControl. We will then invoke the userNameValidator method from the service. This method will return a promise.
Create the template-driven form component
Run the command shown below to create the template-driven-form component.
ng g c template-driven-form
Open template-driven-form.component.ts and put the following code in it.
import { Component } from '@angular/core'; import { User } from '../models/user'; @Component({ selector: 'app-template-driven-form', templateUrl: './template-driven-form.component.html', styleUrls: ['./template-driven-form.component.scss'] }) export class TemplateDrivenFormComponent { userModal = new User(); constructor() { } onSubmit() { alert('Form Submitted succesfully!!!\n Check the values in browser console.'); console.table(this.userModal); } }
We have created an object userModal of type User. We will bind the form fields with the property of this object. The onSubmit method will show the success message on the screen and print the content of the form on the console.
Open template-driven-form.component.html and put the following code in it.
<div class="container"> <div class="row"> <div class="col-md-8 mx-auto"> <div class="card"> <div class="card-header"> <h3>Angular Template-driven Form</h3> </div> <div class="card-body"> <form class="form" #registerForm="ngForm" [appMatchPassword]="['password', 'confirmPassword']" (ngSubmit)="registerForm.form.valid && onSubmit()" novalidate> <div class=" form-group"> <label>Name</label> <input type="text" class="form-control" [(ngModel)]="userModal.name" name="name" #name="ngModel" required> <span class="text-danger" *ngIf="(name.touched || registerForm.submitted) && name.errors?.required"> Name is required </span> </div> <div class="form-group"> <label>Email</label> <input type="text" class="form-control" [(ngModel)]="userModal.email" name="email" #email="ngModel" required email> <span class="text-danger" *ngIf="(email.touched || registerForm.submitted) && email.errors?.required"> Email is required </span> <span class="text-danger" *ngIf="email.touched && email.errors?.email"> Enter a valid email address </span> </div> <div class="form-group"> <label>User Name</label> <input type="text" class="form-control" [(ngModel)]="userModal.username" name="username" #username="ngModel" appValidateUserName required> <span class="text-danger" *ngIf="(username.touched || registerForm.submitted) && username.errors?.required"> User Name is required </span> <span class="text-danger" *ngIf="username.touched && username.errors?.userNameNotAvailable"> User Name not available </span> </div> <div class="form-group"> <label>Password</label> <input type="password" class="form-control" [(ngModel)]="userModal.password" name="password" #password="ngModel" appPasswordPattern required> <span class="text-danger" *ngIf="(password.touched || registerForm.submitted) && password.errors?.required"> Password is required </span> <span class="text-danger" *ngIf="password.touched && password.errors?.invalidPassword"> Password should have minimum 8 characters, at least 1 uppercase letter, 1 lowercase letter and 1 number </span> </div> <div class="form-group"> <label>Confirm Password</label> <input type="password" class="form-control" [(ngModel)]="userModal.confirmPassword" name="confirmPassword" #confirmPassword="ngModel" required> <span class="text-danger" *ngIf="(confirmPassword.touched || registerForm.submitted) && confirmPassword.errors?.required"> Confirm Password is required </span> <span class="text-danger" *ngIf="confirmPassword.touched && confirmPassword.errors?.passwordMismatch"> Passwords doesnot match </span> </div> <div class="form-group"> <button type="submit" class="btn btn-success">Register</button> </div> </form> </div> </div> </div> </div> </div>
We will create a template-driven form and use the Bootstrap card for styling. The card header will contain a title whereas the card body will have the form fields. We will use the appMatchPassword directive on our form and pass the password and confirmPassword fields for validation. The ngModel property is used to bind the form control to the model. For validating the user name availability we will use the appValidateUserName directive on the username field. Similarly, we will use the appPasswordPattern directive on the password field to validate the password pattern. We will check for the errors in the form controls and then display the appropriate validation error message on the screen.
Create the nav-bar component
Run the commandshown below to create the nav-bar component.
ng g c nav-bar
Open nav-bar.component.html and put the following code in it.
<nav class="navbar navbar-expand-sm navbar-dark bg-dark fixed-top"> <a class="navbar-brand" [routerLink]='["/"]'>Form Validation Demo</a> <div class="collapse navbar-collapse"> <ul class="navbar-nav mr-auto"> <li class="nav-item"> <a class="nav-link" [routerLink]='["/template-form"]'>Template Form</a> </li> </ul> </div> </nav>
Here we are adding the navigation link to the template-driven form component.
Update the app component
Open the app.component.html file and put the following code in it.
<app-nav-bar></app-nav-bar> <div class="container"> <router-outlet></router-outlet> </div>
Update the App module
We will import the forms module and also set up the routing for our application in the app module. Add the following code in the app.module.ts file. You can refer to GitHub for the complete source code of this file.
import { RouterModule } from '@angular/router'; import { FormsModule } from '@angular/forms'; @NgModule({ ... imports: [ ... FormsModule, RouterModule.forRoot([ { path: '', component: TemplateDrivenFormComponent }, { path: 'template-form', component: TemplateDrivenFormComponent } ]), ], })
Execution demo
We will use the following command to start the webserver.
ng serve -o
This command will launch the application in your default browser at http://localhost:4200/. You can perform all the form validations which we have discussed here. This application is also hosted at https://ng-forms-validation.herokuapp.com/. Navigate to the link and play around for a better understanding.
Summary
We have created a sample user registration form using the template-driven form approach in Angular. We have implemented the inbuilt validations as well as custom validations to the form. The Bootstrap library is used to style the form. Get the source code from GitHub and play around for a better understanding.
See Also
The post Template-Driven Form Validation In Angular appeared first on Ankit Sharma's Blog.
via freeCodeCamp.org https://ift.tt/38W5qom
0 notes
Text
Need to Know RoleManager Asp.Net Core 2019
New Post has been published on https://is.gd/o87W7Q
Need to Know RoleManager Asp.Net Core 2019

(adsbygoogle = window.adsbygoogle || []).push();
Previous article links :- https://sagarjaybhay.com/asp-net-core/
RoleManager In Asp.Net Core
For this, we have a RoleManager class to
(adsbygoogle = window.adsbygoogle || []).push();
Create
Read
Update
Delete
The roles and we use this conjunction with userManager class and for this, we have to pass IdentityUser object. For saving role identity created one table for it in a database which is the AspNetRoles table.
First, we create a view model for creating role and for that we create rolename field in our model.
public class RoleViewModel [Required] public string RoleName get; set;
After this, we create a view for that and in this view, we use the above-created view model.
@model RoleViewModel @ ViewData["Title"] = "CreateRoles"; <h1>CreateRoles</h1> <div class="row"> <div class="col-md-4"> <form asp-action="CreateRoles" method="post"> <div asp-validation-summary="ModelOnly" class="text-danger"></div> <div class="form-group"> <label asp-for="RoleName" class="control-label"></label> <input asp-for="RoleName" class="form-control" /> <span asp-validation-for="RoleName" class="text-danger"></span> </div> <div class="form-group"> <input type="submit" value="Create" class="btn btn-primary" /> </div> </form> </div> </div>
After this we have created onecontroller in that we have method for register user.
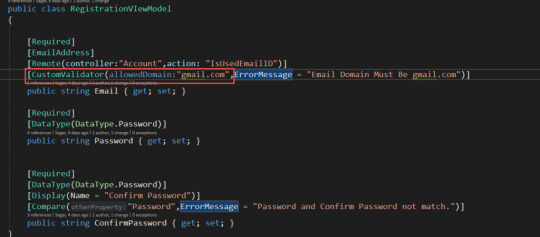
public class RegistrationVIewModel [Required] [EmailAddress] [Remote(controller:"Account",action: "IsUsedEmailID")] [CustomValidator(allowedDomain:"gmail.com",ErrorMessage = "Email Domain Must Be gmail.com")] public string Email get; set; [Required] [DataType(DataType.Password)] public string Password get; set; [Required] [DataType(DataType.Password)] [Display(Name = "Confirm Password")] [Compare("Password",ErrorMessage = "Password and Confirm Password not match.")] public string ConfirmPassword get; set; public string City get; set; public string Zip get; set;

Roles in asp.net core 2019
How to create, update, delete roles in asp.net core?
First, we have created a list of all roles present in our table which is AspNetRole.

Roles created in asp.net core
Create Role In Asp.Net Core
In this, we have created action in our controller which is CreateRole in that we have added 2 methods for CreateRole. One is httpget to get only Html and another post which is for posting the roles data to a database.
[HttpGet] public IActionResult CreateRoles() return View();
For this below is the html code for this
@model RoleViewModel @ ViewData["Title"] = "CreateRoles"; <h1>CreateRoles</h1> <div class="row"> <div class="col-md-4"> <form asp-action="CreateRoles" method="post"> <div asp-validation-summary="ModelOnly" class="text-danger"></div> <div class="form-group"> <label asp-for="RoleName" class="control-label"></label> <input asp-for="RoleName" class="form-control" /> <span asp-validation-for="RoleName" class="text-danger"></span> </div> <div class="form-group"> <input type="submit" value="Create" class="btn btn-primary" /> </div> </form> </div> </div>
In which we have show create role html page and page looks like below

Create Role Ui in asp.net core
For post method
[HttpPost] public async Task<IActionResult> CreateRoles(RoleViewModel roleView) if (ModelState.IsValid) IdentityRole role=new IdentityRole() Name = roleView.RoleName ; IdentityResult result=await this.rolesManager.CreateAsync(role); if (result.Succeeded) return RedirectToAction("ListOfRoles", "Rolemanag"); foreach (var identityErrorLE in result.Errors) ModelState.AddModelError("",identityErrorLE.Description); return View(roleView);
Method this is code in controller.
Display All Roles in Asp.Net Core
In our constructor, we injected RoleManager by using dependency injection below is the code for that
public RoleManager<IdentityRole> rolesManager get; set; public RolemanagController(RoleManager<IdentityRole> rolesManager,UserManager<ExtendedIdentityUser> userManager) _userManager = userManager; this.rolesManager = rolesManager;
So by using this object, we are able to get all roles present currently. For that, we have created one method in our controller below is the method.
public IActionResult ListOfRoles() var list = this.rolesManager.Roles; return View(list);
and html code for this is
@model IQueryable<IdentityRole>; @ ViewData["Title"] = "ListOfRoles"; <h1>All Roles</h1> @if (Model.Any()) foreach (var role in Model) <div class="card"> <div class="card-header"> @role.Id </div> <div class="card-body"> <h4 class="card-title"> @role.Name </h4> </div> <div class="card-footer"> <a class="btn btn-info" asp-action="EditRole" asp-controller="Rolemanag" asp-route-id="@role.Id">Edit</a> <a class="btn btn-danger" asp-action="" asp-controller="">Delete</a> </div> </div> else <div class="card"> <div class="card-header"> No Roles Found In Table </div> <div class="card-body"> <a class="btn btn-info" asp-action="CreateRoles" asp-controller="Rolemanag">Create Role</a> </div> </div>
Below is the output of that Html code

All Roles in Asp.net Core
In this, we are giving the functionality of the Edit and Delete role.
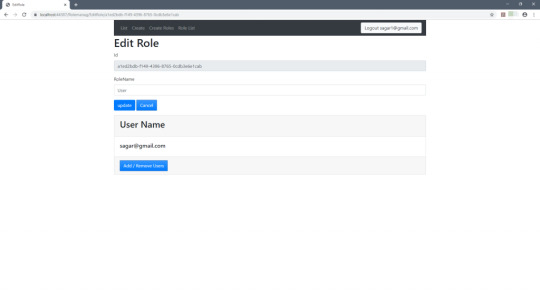
Edit Role in asp.net core
As you can see In AspNetRole table contains a name, normalized name, id and concurrency stamp. By using the edit role you can edit the name of a role. For edit role, we required ID which is auto-generated and we pass this id to our function and get a role from this.
Also for edit role, we created 2 action methods one for HttpGet and another for HttpPost and below is httpget method for EditRole which sends us Html
[HttpGet] public async Task<IActionResult> EditRole(string id) var role =await this.rolesManager.FindByIdAsync(id); if (role == null) ViewBag.ErrorMessages = $"Role of given id id is not found."; return View("NotFound"); else var model=new EditRoleViewModel() RoleName = role.Name, Id =(role.Id), ; foreach (var users in _userManager.Users) if (await _userManager.IsInRoleAsync(users, role.Name)) model.Users.Add(users.UserName); return View(model);
Which and Html for this is like below
@model EditRoleViewModel @ ViewData["Title"] = "EditRole"; <h1>Edit Role</h1> <form asp-action="EditRole" method="post"> <div asp-validation-summary="ModelOnly" class="text-danger"></div> <div class="form-group"> <label asp-for="Id" class="control-label"></label> <input asp-for="Id" class="form-control" disabled="disabled" /> <span asp-validation-for="Id" class="text-danger"></span> </div> <div class="form-group"> <label asp-for="RoleName" class="control-label"></label> <input asp-for="RoleName" class="form-control" /> <span asp-validation-for="RoleName" class="text-danger"></span> </div> <div class="form-group"> <button type="submit" class="btn btn-primary"> update</button> <a type="submit" value="Cancel" class="btn btn-primary" asp-action="ListOfRoles" asp-controller="Rolemanag">Cancel</a> </div> <div class="card"> <div class="card-header"> <h2 class="card-title">User Name </h2> </div> <div class="card-body"> @if (Model?.Users?.Any()!=null) foreach (var user in Model.Users) <h5>@user</h5> else <h3 class="text-danger" >No matching user found with this role</h3> </div> </div> </form>
Html for edit view we created one view model for that which is shown below
public class EditRoleViewModel public string Id get; set; [Required(ErrorMessage = "Role Name Is Required.")] public string RoleName get; set; public List<string> Users get; set;
And we use this in our view.

Edit Role in Asp.net core
In this, we pass Id as a parameter and by that id, we retrieve the role. Then if we change the name we can update this.
Update Role For Users
In identity, framework Users are stored in the AspNetUsers table
Roles are stored in AspNetRoles
We have these 2 tables i.e AspNetUsers and AspNetRoles have many to many relationships between table.
We have another table AspNetUserRoles which is inbuilt and have 2 columns only UserId and RoleId and these both columns are foreign keys of AspNetUsers nad AspNetRoles.
First, we have a list of all roles which is shown below

All Saved Roles In asp.net core
When we click on Edit role we see below result
Edit Roles New In asp.net core
For edit, role post-action below is the method when we click on the Update button.
[HttpPost] public async Task<IActionResult> EditRole(EditRoleViewModel model) var role = await this.rolesManager.FindByIdAsync(model.Id); if (role == null) ViewBag.ErrorMessages = $"Role of given id model.Id is not found."; return View("NotFound"); else role.Name = model.RoleName; var res=await this.rolesManager.UpdateAsync(role); if (res.Succeeded) return RedirectToAction("ListOfRoles", "Rolemanag"); foreach (var erros in res.Errors) ModelState.AddModelError("",erros.Description); return View(model);
And View of this is below
@model EditRoleViewModel @ ViewData["Title"] = "EditRole"; <h1>Edit Role</h1> <form asp-action="EditRole" method="post"> <div asp-validation-summary="ModelOnly" class="text-danger"></div> <div class="form-group"> <label asp-for="Id" class="control-label"></label> <input asp-for="Id" class="form-control" disabled="disabled" /> <span asp-validation-for="Id" class="text-danger"></span> </div> <div class="form-group"> <label asp-for="RoleName" class="control-label"></label> <input asp-for="RoleName" class="form-control" /> <span asp-validation-for="RoleName" class="text-danger"></span> </div> <div class="form-group"> <button type="submit" class="btn btn-primary"> update</button> <a type="submit" value="Cancel" class="btn btn-primary" asp-action="ListOfRoles" asp-controller="Rolemanag">Cancel</a> </div> <div class="card"> <div class="card-header"> <h2 class="card-title">User Name </h2> </div> <div class="card-body"> @if (Model?.Users?.Any() != null) foreach (var user in Model.Users) <h5>@user</h5> else <h3 class="text-danger">No matching user found with this role</h3> </div> <div class="card-footer"> <a type="submit" class="btn btn-primary" asp-action="EditUsersInRoles" asp-controller="Rolemanag" asp-route-RoleId="@Model.Id"> Add / Remove Users</a> </div> </div> </form>
Complete controller code
using System; using System.Collections.Generic; using LearnAspCore.ViewModel; using Microsoft.AspNetCore.Identity; using Microsoft.AspNetCore.Mvc; using System.Threading.Tasks; using LearnAspCore.Models; using Microsoft.AspNetCore.Identity.UI.V3.Pages.Internal.Account; namespace LearnAspCore.Controllers public class RolemanagController : Controller private readonly UserManager<ExtendedIdentityUser> _userManager; public RoleManager<IdentityRole> rolesManager get; set; public RolemanagController(RoleManager<IdentityRole> rolesManager,UserManager<ExtendedIdentityUser> userManager) _userManager = userManager; this.rolesManager = rolesManager; [HttpGet] public IActionResult CreateRoles() return View(); [HttpPost] public async Task<IActionResult> CreateRoles(RoleViewModel roleView) if (ModelState.IsValid) IdentityRole role=new IdentityRole() Name = roleView.RoleName ; IdentityResult result=await this.rolesManager.CreateAsync(role); if (result.Succeeded) return RedirectToAction("ListOfRoles", "Rolemanag"); foreach (var identityErrorLE in result.Errors) ModelState.AddModelError("",identityErrorLE.Description); return View(roleView); public IActionResult ListOfRoles() var list = this.rolesManager.Roles; return View(list); [HttpGet] public async Task<IActionResult> EditRole(string id) var role =await this.rolesManager.FindByIdAsync(id); if (role == null) ViewBag.ErrorMessages = $"Role of given id id is not found."; return View("NotFound"); else var model=new EditRoleViewModel() RoleName = role.Name, Id =(role.Id), ; foreach (var users in _userManager.Users) // model.Users=new List<string>(); if (await _userManager.IsInRoleAsync(users, role.Name)) model.Users.Add(users.UserName); return View(model); [HttpPost] public async Task<IActionResult> EditRole(EditRoleViewModel model) var role = await this.rolesManager.FindByIdAsync(model.Id); if (role == null) ViewBag.ErrorMessages = $"Role of given id model.Id is not found."; return View("NotFound"); else role.Name = model.RoleName; var res=await this.rolesManager.UpdateAsync(role); if (res.Succeeded) return RedirectToAction("ListOfRoles", "Rolemanag"); foreach (var erros in res.Errors) ModelState.AddModelError("",erros.Description); return View(model); [HttpGet] public async Task<IActionResult> EditUsersInRoles(string RoleId) ViewBag.RoleId = RoleId; var role = await rolesManager.FindByIdAsync(RoleId); if (role == null) ViewBag.Message = $"Role of RoleId of this Id is Not found"; return View("NotFound"); else var model = new List<UserRoleViewModel>(); foreach (var users in _userManager.Users) var Users = new UserRoleViewModel() UserName = users.UserName, UserId = users.Id ; if (await _userManager.IsInRoleAsync(users, role.Name)) Users.IsSelected = true; else Users.IsSelected = false; model.Add(Users); return View(model); [HttpPost] public async Task<IActionResult> EditUsersInRoles(List<UserRoleViewModel> model, string RoleId) var role = await rolesManager.FindByIdAsync(RoleId); if (role == null) ViewBag.ErrorMessage = $"Role with Id=RoleId not found"; return View("NotFound"); else for (int i = 0; i < model.Count; i++) var user=await _userManager.FindByIdAsync(model[i].UserId); IdentityResult result = null; if (model[i].IsSelected == true&&!(await _userManager.IsInRoleAsync(user,role.Name))) result= await _userManager.AddToRoleAsync(user, role.Name); else if(!model[i].IsSelected&&await _userManager.IsInRoleAsync(user,role.Name)) result = await _userManager.RemoveFromRoleAsync(user, role.Name); else continue; if (result.Succeeded) if(i<(model.Count-1)) continue; else return RedirectToAction("EditRole", new Id = RoleId); return View("NotFound");
And for EditUsersInRoles html template is below
@model List<UserRoleViewModel> @ ViewData["Title"] = "EditUsersInRoles"; <h1>EditUsersInRoles</h1> @ var RoleID = ViewBag.RoleId; <form method="post"> <div class="card"> <div class="card-header"> <h3>Add and Remove Users For this Role</h3> </div> <div class="card-body"> @for (int i = 0; i < Model.Count; i++) <div class="form-check"> <input type="hidden" asp-for="@Model[i].UserId" /> <input type="hidden" asp-for="@Model[i].UserName" /> <input asp-for="@Model[i].IsSelected" class="form-check-input" /> <label>@Model[i].UserName</label> </div> </div> <div class="card-footer"> <input type="submit" value="Update" class="btn btn-primary" /> <a type="submit" class="btn btn-primary" asp-action="EditUsersInRoles" asp-controller="Rolemanag" asp-route-RoleId="@RoleID">Cancel</a> </div> </div> </form>
Now when we click on add and remove user roles below is output

Edit The Users In Roles
GitHub Project Link: https://github.com/Sagar-Jaybhay/LearnAspNetCore
0 notes
Text
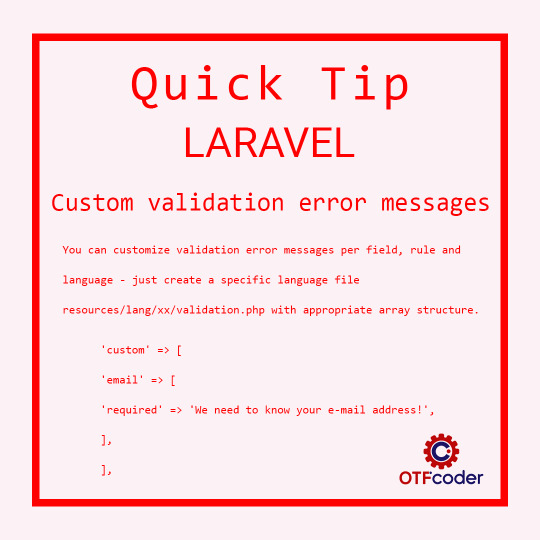
#Laravel Tip for the Day...
Custom Validation Error Messages
Follow us on Facebook, Instagram, LinkedIn, Pinterest, Tumblr, And Twitter...for more Tips and Updates. . . . . . #customvalidation #errormessage #validation #validationerror #laraveldevelopers #laraveltips #laravelphp #php #programming #programmer #developer #tips #webdevelopmentcompany #coding #codingtips #otfcoder #otfcodermarketingservices #laraveldeveloper
0 notes
Photo

ASPNET MVC 4 Razor Data Annotations Validations Validator Required Display Remote CustomValidation http://ift.tt/2A2AuEP
0 notes
Text
week, day = 3, 3
Day 13 of App Academy = Day 1 of Rails
We've finally dived into the Rails pool (which actually sounds rather painful, but it isn't, I swear). Monday was SQL day, Tuesday was advanced SQL day which basically involved writing a simple ORM (object-relational mapping) and today, we got to play with a real ORM: Active Record. So given our recent trajectory and the fact that web app design nearly always involves database management, I suppose it's only logical that the first part of rails we go into with any degree of depth is database management. And in Rails, that is done in large part with ActiveRecord.
Essentially, ActiveRecord is a Ruby library that allows us to get our model and database working together. It follows the general active record pattern and adds inheritance and associations for an even more versatile and powerful system. We learned about using migrations to create and alter tables and table columns. We wrote associations to make our data more easily accessible and validations for user-supplied input to make sure our database didn't end up a giant mess.
Just like yesterday, the last thing my partner and I wrote today was definitely the coolest thing of the day. All day we had been writing associations and validations. The validations mostly looked like:
class ShortenedUrl < ActiveRecord::Base validates :submitter_id, presence: true validates :short_url, presence: true, uniqueness: true validates :long_url, presence: true, length: { maximum: 1024 } end
Pretty straightforward stuff: make sure the submission is linked to a valid user, make sure the submission includes the necessary components for it to be useful, make sure we're not duplicating things that shouldn't be duplicated, and make sure that we're not letting users enter novels in place of URLs.
But then we were tasked with preventing a user from using our service faster than a human should be able to; basically, catching bots. There is no built-in validation for this (that I am aware of, although, maybe there should be?), so we got to write it ourself.
Ultimately, we wrote a helper method that checks to see how many submissions have been made by the current user in the last minute and then using that to determine whether the user's behavior is symptomatic of a non-human. We then called that method in its own validation statement to prevent a non-human (or perhaps super-human) user from continuing to create new entries.
class ShortenedUrl < ActiveRecord::Base ... validate :not_a_spammer ... private def not_a_spammer if submitter.num_recent_submissions > 5 errors[:spammer] << "too many submissions in the last minute (>5)" end end end
(the helper method lives in the User class)
class User < ActiveRecord::Base def num_recent_submissions submitted_urls.select(:id).where("created_at > '#{1.minute.ago}'").count end end
As expected, as soon as we tried to submit our 6th shortened URL in under a minute, we got an error and were shut down.
While this was super cool, there was a lot of work that went into building the associations that made this little snippet of code work so well. And that was less fun, but ultimately very rewarding. I definitely approve of the over-arching flow of this week. Each day makes the previous day's tedium make perfect sense. And without the previous day's tedium, the current day would be full of mystery, wonder, and automagical moments, which is not what you want when you're trying to become a Rails ninja.
Also, lecture was super long because difficult concepts. But Jeff was really on his game. Look for Jeff quotes in the coming days.
0 notes
Text
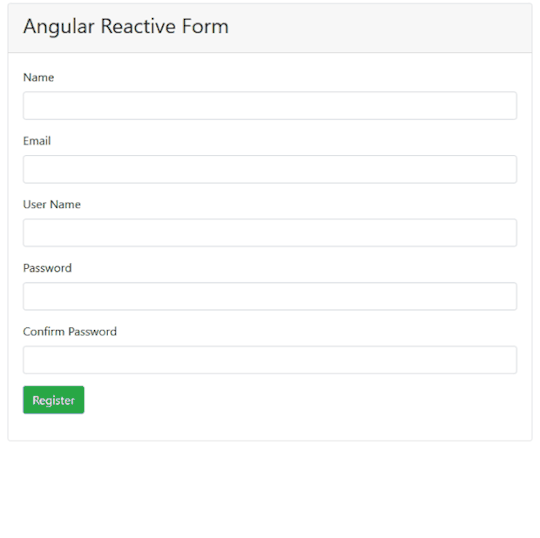
How to Validate Angular Reactive Forms
Introduction
In this article, we will learn about validations in Angular reactive forms. We will create a simple user registration form and implement some inbuilt validations on it. Along with the inbuilt validations, we will also implement some custom validations to the reactive form.
We will consider the following custom validations for this demo:
Check for user name availability
Password pattern validation
Match the password entered in two different fields
Take a look at the application in action.
Prerequisites
Install Visual Studio code from here
Install the latest version of Angular CLI from here
Source Code
Get the source code from GitHub.
Create the Angular app
Navigate to the folder where you want to create your project file. Open a command window and run the command shown below.
ng new angular-forms-validation --routing=false --style=scss
We are specifying the command to create a new Angular application. The option to create the routing module is set to false and the style files extension is set to scss. This command will create the Angular project with the name angular-forms-validation.
Change directories to the new project and open the project in VS Code using the set of command shown below:
cd angular-forms-validation code .
Install Bootstrap
Run the following command to install the Bootstrap library:
npm install bootstrap --save
Add the following import definition in the styles.scss file:
@import "~bootstrap/dist/css/bootstrap.css";
Create the validation service
Run the following command to create a new service:
ng g s services\customvalidation
This command will create a folder named services that has two files in it – customvalidation.service.ts and customvalidation.service.spec.ts. Open the customvalidation.service.ts file and put the following code in it:
import { Injectable } from '@angular/core'; import { ValidatorFn, AbstractControl } from '@angular/forms'; import { FormGroup } from '@angular/forms'; @Injectable({ providedIn: 'root' }) export class CustomvalidationService { patternValidator(): ValidatorFn { return (control: AbstractControl): { [key: string]: any } => { if (!control.value) { return null; } const regex = new RegExp('^(?=.*?[A-Z])(?=.*?[a-z])(?=.*?[0-9]).{8,}$'); const valid = regex.test(control.value); return valid ? null : { invalidPassword: true }; }; } MatchPassword(password: string, confirmPassword: string) { return (formGroup: FormGroup) => { const passwordControl = formGroup.controls[password]; const confirmPasswordControl = formGroup.controls[confirmPassword]; if (!passwordControl || !confirmPasswordControl) { return null; } if (confirmPasswordControl.errors && !confirmPasswordControl.errors.passwordMismatch) { return null; } if (passwordControl.value !== confirmPasswordControl.value) { confirmPasswordControl.setErrors({ passwordMismatch: true }); } else { confirmPasswordControl.setErrors(null); } } } userNameValidator(userControl: AbstractControl) { return new Promise(resolve => { setTimeout(() => { if (this.validateUserName(userControl.value)) { resolve({ userNameNotAvailable: true }); } else { resolve(null); } }, 1000); }); } validateUserName(userName: string) { const UserList = ['ankit', 'admin', 'user', 'superuser']; return (UserList.indexOf(userName) > -1); } }
The method patternValidator is used to validate the password pattern in our form. The parameter for this method is of type AbstractControl which is a base class for the FormControl.
We will use a regular expression to validate the password. We will validate the following four conditions using the regular expression:
The password should be a minimum of eight characters long.
It has at least one lower case letter.
It has at least one upper case letter.
It has at least one number.
If the password fails the regex check, we will set the invalidPassword property to true.
The method MatchPassword is used to compare the passwords in two fields. This method will accept two parameters of type string. These parameters represent the name of the fields to be matched. We will get the FormControl for these two fields and then match the values in them. If the values do not match, we will set the passwordMismatch property to true.
The method userNameValidator is used to verify whether the username is already taken or not. This method will accept a parameter of type AbstractControl. We will check if the value of this field is present in a static array, UserList. If the value entered by the user is already present, we will set the userNameNotAvailable property to true.
We are using the setTimeout function to invoke this check every two seconds. This will ensure that the error will be thrown after two seconds from the time the user stops typing in the field.
For the sake of simplicity of this article, we are using a static array to search for the availability of user names. Ideally, it should be a service call to the server to search the value in a database.
Create the reactive form component
Run the following command to create the reactive-form component:
ng g c reactive-form
Open reactive-form.component.ts and put the following code in it:
import { Component, OnInit } from '@angular/core'; import { Validators, FormGroup, FormBuilder } from '@angular/forms'; import { CustomvalidationService } from '../services/customvalidation.service'; @Component({ selector: 'app-reactive-form', templateUrl: './reactive-form.component.html', styleUrls: ['./reactive-form.component.scss'] }) export class ReactiveFormComponent implements OnInit { registerForm: FormGroup; submitted = false; constructor( private fb: FormBuilder, private customValidator: CustomvalidationService ) { } ngOnInit() { this.registerForm = this.fb.group({ name: ['', Validators.required], email: ['', [Validators.required, Validators.email]], username: ['', [Validators.required], this.customValidator.userNameValidator.bind(this.customValidator)], password: ['', Validators.compose([Validators.required, this.customValidator.patternValidator()])], confirmPassword: ['', [Validators.required]], }, { validator: this.customValidator.MatchPassword('password', 'confirmPassword'), } ); } get registerFormControl() { return this.registerForm.controls; } onSubmit() { this.submitted = true; if (this.registerForm.valid) { alert('Form Submitted succesfully!!!\n Check the values in browser console.'); console.table(this.registerForm.value); } } }
We will create a variable registerForm of type FormGroup. In the ngOnInit method, we will set the controls for the form using the FormBuilder class. All the fields are set as a required field for this form. We will invoke the userNameValidator method of the service using the bind function.
For the password field, we will use the compose method to merge in multiple validators into a single function. We will also invoke the MatchPassword method and pass the name of the password and confirmPassword form controls as parameters.
The registerFormControl property will return the form controls of the form. The onSubmit method will print the content of the form on the console if the form is valid and submitted successfully.
Open reactive-form.component.html and put the following code in it:
<div class="container"> <div class="row"> <div class="col-md-8 mx-auto"> <div class="card"> <div class="card-header"> <h3>Angular Reactive Form</h3> </div> <div class="card-body"> <form class="form" [formGroup]="registerForm" (ngSubmit)="onSubmit()"> <div class="form-group"> <label>Name</label> <input type="text" class="form-control" formControlName="name"> <span class="text-danger" *ngIf="(registerFormControl.name.touched || submitted) && registerFormControl.name.errors?.required"> Name is required </span> </div> <div class="form-group"> <label>Email</label> <input type="text" class="form-control" formControlName="email"> <span class="text-danger" *ngIf="(registerFormControl.email.touched || submitted) && registerFormControl.email.errors?.required"> Email is required </span> <span class="text-danger" *ngIf="registerFormControl.email.touched && registerFormControl.email.errors?.email"> Enter a valid email address </span> </div> <div class="form-group"> <label>User Name</label> <input type="text" class="form-control" formControlName="username"> <span class="text-danger" *ngIf="(registerFormControl.username.touched || submitted) && registerFormControl.username.errors?.required"> User Name is required </span> <span class="text-danger" *ngIf="registerFormControl.username.touched && registerFormControl.username.errors?.userNameNotAvailable"> User Name is not available </span> </div> <div class="form-group"> <label>Password</label> <input type="password" class="form-control" formControlName="password"> <span class="text-danger" *ngIf="(registerFormControl.password.touched || submitted) && registerFormControl.password.errors?.required"> Password is required </span> <span class="text-danger" *ngIf="registerFormControl.password.touched && registerFormControl.password.errors?.invalidPassword"> Password should have minimum 8 characters, at least 1 uppercase letter, 1 lowercase letter and 1 number </span> </div> <div class="form-group"> <label>Confirm Password</label> <input type="password" class="form-control" formControlName="confirmPassword"> <span class="text-danger" *ngIf="(registerFormControl.confirmPassword.touched || submitted)&& registerFormControl.confirmPassword.errors?.required"> Confirm Password is required </span> <span class="text-danger" *ngIf="registerFormControl.confirmPassword.touched && registerFormControl.confirmPassword.errors?.passwordMismatch"> Passwords doesnot match </span> </div> <div class="form-group"> <button type="submit" class="btn btn-success">Register</button> </div> </form> </div> </div> </div> </div> </div>
We will create a reactive form and use the Bootstrap card for styling. The card header will contain a title whereas the card body will have the form fields. We will bind the formGroup property of the <form> tag to the name of our form which is registerForm. The onSubmit method will be invoked on submitting the form. We will also bind the formControlName property of each input field to the control name of our FormGroup. We will check for errors in the form controls and then display the appropriate validation error message on the screen.
Create the nav-bar component
Run the following command to create the nav-bar component:
ng g c nav-bar
Open nav-bar.component.html and put the following code in it:
<nav class="navbar navbar-expand-sm navbar-dark bg-dark fixed-top"> <a class="navbar-brand" [routerLink]='["/"]'>Form Validation Demo</a> <div class="collapse navbar-collapse"> <ul class="navbar-nav mr-auto"> <li class="nav-item"> <a class="nav-link" [routerLink]='["/reactive-form"]'>Reactive Form</a> </li> </ul> </div> </nav>
We are adding the navigation link to the reactive form component in the nav bar.
Update the app component
Open the app.component.html file and put the following code in it:
<app-nav-bar></app-nav-bar> <div class="container"> <router-outlet></router-outlet> </div>
Update the App module
Add the following code in the app.module.ts file. We will import the forms module and define the routing for our application. You can refer to GitHub for the complete source code of this file.
import { RouterModule } from '@angular/router'; import { ReactiveFormsModule } from '@angular/forms'; @NgModule({ ... imports: [ ... ReactiveFormsModule, RouterModule.forRoot([ { path: '', component: ReactiveFormComponent }, { path: 'reactive-form', component: ReactiveFormComponent } ]), ], })
Execution demo
We will use the following command to start the web server:
ng serve -o
This command will launch the application in your default browser at http://localhost:4200/. You can perform all the form validations which we have discussed here.
This application is also hosted at https://ng-forms-validation.herokuapp.com/. Navigate to the link and play around for a better understanding.
Summary
We have created a sample user registration form using the reactive form approach in Angular. We have implemented the inbuilt validations as well as custom validations to the form. The Bootstrap library is used to style the form.
Get the source code from GitHub and play around for a better understanding.
See Also
You can find other posts like Reactive Form Validation in Angular on Ankit Sharma's Blog.
via freeCodeCamp.org https://ift.tt/38QpIQ6
0 notes
Text
Custom Validation Attribute Asp.Net Core 2019
New Post has been published on https://is.gd/GGnVSn
Custom Validation Attribute Asp.Net Core 2019

(adsbygoogle = window.adsbygoogle || []).push();
Complete Asp.Net Core Tutorial Step By Step :-https://sagarjaybhay.com/asp-net-core/
How to Create Custom Validation Attrbute Asp.Net Core?
Built-in Validation Attribute
(adsbygoogle = window.adsbygoogle || []).push();
Required
Range
StringLength
RegularExpression
Compare
Etc..
When in your project we have some requirements that can not be full fill with some in-built validation attributes then we need to create some Custom validation attribute. In this, we have created one CustomValidator class which inherits from ValidationAttribute inbuilt class. After inheriting from this we need to override the IsValid method.
Now in our example, we have to achieve the functionality of we are valid for only Gmail domain mail-id. Other than Gmail we restrict the user for creating an account.
After creating this CustomValidator attribute you can use this as our normal attributes.

Custom Validation Attribute Class in Asp.net core
Now we are adding code for this validation
public class CustomValidator:ValidationAttribute private string allowedDomain get; set; public CustomValidator(string allowedDomain) this.allowedDomain = allowedDomain; public override bool IsValid(object value) string[] array = value.ToString().Split("@"); if (array.Length > 1) return array[1].ToLower() == allowedDomain.ToLower(); else return false;
In this code, we have created one property allowed domain which is for we pass the domain name from our CustomValidator as a parameter.
See below code
public class RegistrationVIewModel [Required] [EmailAddress] [Remote(controller:"Account",action: "IsUsedEmailID")] [CustomValidator(allowedDomain:"gmail.com", ErrorMessage = "Email Domain Must Be gmail.com")] public string Email get; set; [Required] [DataType(DataType.Password)] public string Password get; set; [Required] [DataType(DataType.Password)] [Display(Name = "Confirm Password")] [Compare("Password",ErrorMessage = "Password and Confirm Password not match.")] public string ConfirmPassword get; set;
Now see the image
Custom Validation Attribute Declaration in asp.net core
Here we pass that parameter for that reason we need to create property and constructor in this class and need to catch this.
In this we have split the email id with the use of @ symbol then we check first array length greater than 1 and then we check with email id domain name.
See the below output

Output Of Custom Validation Attribute
GitHub Project Link: https://github.com/Sagar-Jaybhay/LearnAspNetCore
0 notes
Photo

ASPNET MVC 4 Razor Data Annotations Validations Validator Required Display Remote CustomValidation http://ift.tt/2AOXRin
0 notes