#DXOMARK lab
Text
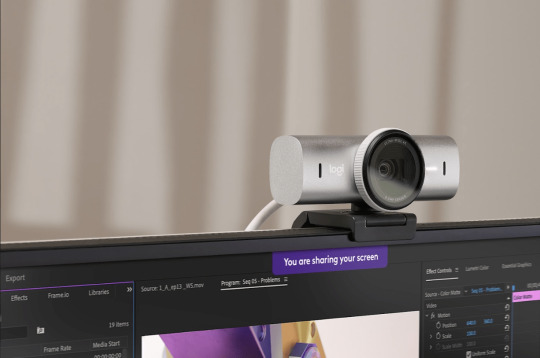
Logitech Introduces MX Brio, Its Most Advanced Webcam
March 6, 2024 – Today, Logitech (SIX: LOGN) (NASDAQ: LOGI) unveiled MX Brio, a revolutionary high-end webcam for end users and enterprises, designed to meet the demanding needs of advanced users. MX Brio is Logitech’s most advanced webcam yet and joins the Master Series ecosystem alongside MX keyboards and mice to deliver outstanding performance and streaming experiences, while fostering quality…
View On WordPress
#advanced users#AI-enhanced image quality#Anatoliy Polyanker#Australia#auto light correction#background noise reduction#beamforming mics#carbon neutral#collaboration#creative professionals#customisation options#developers#DXOMARK lab#face-based enhancement#FSC-certified#G HUB software#General Manager#Graphite#high-end webcam#Logi Options+#Logi Tune#Logitech#March 2024#Master Series#MX Brio#MX Business#MX keyboards#MX mice#NASDAQ: LOGI#Pale Grey
0 notes
Text
What is DXOMark? - Simplified!
DXOMark is a website that specializes in camera and lens testing and reviews. It was founded in 2008 by the French company DxO Labs, which is best known for its DxO Optics Pro software for post-processing photos. The website’s primary focus is on providing in-depth and objective analyses of the image quality of various camera and lens models.
One of the key features of DXOMark is its…

View On WordPress
0 notes
Text
Iphone xs max for honor background

#Iphone xs max for honor background plus
#Iphone xs max for honor background plus
On the plus side, at 58, the Apple phone achieved the top score for Background attributes in our recording testing protocol, providing overall good background rendering for a smartphone. It is once more among the best for almost all sub-attributes, but lags a little behind for Spatial, where memo wideness and life video directivity leave some room for improvement. The Apple iPhone XS Max performed well for Recording, achieving a score of 69. It’s also one of the best for playback volume, although other high-end devices also scored well. It is the best-scoring device for Spatial, offering very good wideness and localizability moreover, its Dynamics score is excellent as well, and the second-highest we have seen so far, with the device delivering good performance across a range of modern music genres. The XS Max also does very well for Timbre and again is beaten only by the Mate 20 X for this attribute. The Apple iPhone XS Max in the DXOMARK Audio lab (For more details about our Playback protocol, click here for more details about our Recording protocol, click here.) Test summary Note that we evaluate both Playback and Recording using only the device’s built-in hardware and default apps. This article highlights the most important results of our testing. Active noise cancellation with dedicated microphoneĪbout DXOMARK Audio tests: For scoring and analysis in our smartphone audio reviews, DXOMARK engineers perform a variety of objective tests and undertake more than 20 hours of perceptual evaluation under controlled lab conditions.Read on to find out how the Apple iPhone XS Max performed in our new DXOMARK Audio test protocol. One set of speakers and microphones is embedded in the notch at the top of the display facing outwards the other set is at the bottom of the device with the perforations facing downwards when the device is held in portrait mode. On the audio side of things, the device features dual speakers and microphones. The Apple iPhone XS Max, a flagship device when it was introduced in 2018, is powered by Apple’s A12 Bionic chipset and features a large OLED-display as well as a dual-camera setup with dedicated tele-lens.Īlthough slightly larger than its predecessor, the iPhone X, the external design of the iPhone XS Max is otherwise virtually identical.
0 notes
Text
DxOMark and DxO Labs Break Up, Now Separate Entities
One company becomes two: DxOMark and DxO Labs have split, and apparently it was months ago!
DxOMark and DxO Labs have split, and apparently it was months ago. It was just revealed, in a DxOMark email that was sent out to cover milestones for the company during 2017, that DxOMark was officially spun off from DxO Labs into its own company. This change actually happened back in September according to the email, but for whatever reason, the company/companies chose not to disclose this until…
View On WordPress
1 note
·
View note
Text
CellphoneS News: Apple iPhone Xs Max is the second best camera phone in 2018 reviewed by DxOMark
2018 is a year with an era of Smartphone phones equipped with 2 & 3 cameras. In 2018, DxOMark has published a list of the best smartphone cameras available today. Most of the names on the list have 2 or more cameras. Let @applenguyen2212 see who is the best offline.

We thought the phone from Apple phone maker Apple iPhone Xs Max would be the head. though, the truth is flat, the result is not so.
In 2018, DxOMark released a ranking of the best photography-capable smartphones. & this list includes 31 candidates over the course of 1 year including low-cost, mid-range to high-end smartphones. Each test is performed and adheres to the strict procedures of DxOMark Mobile Lab
Based on the results, the Huawei P20 Pro is the owner of the first position when it is the first smartphone to have 3 cameras on the market, it is very normal to get 109 points with the highest score. phones with 2 cameras like Apple iPhone Xs Max, Galaxy Note 9, etc.Not too bad, they have a score of 98 points or more.
In addition, DxOMark has also stated that, Google Pixel 3, Huawei P20 Pro & iPhone XR phones are the three smart touch phones with the best movie recording capacity.
With this ranking, many are surprised when the genuine Smartphone iPhone Xs Max 64GB phone cannot reach the leading position but has to pity At the second position.
What do you think about this ranking? Please comment At below.
2 notes
·
View notes
Text
Samsung Galaxy M51 A Winner On New DXOMARK Battery Score

The French hi-tech company DXOMARK has announced a new score for smartphone battery experience that covers a wide range of common real-life uses smartphones including social media, communication, and multimedia applications.
The Samsung Galaxy M51 emerged as the top-ranked device for its overall performance. Lasting 80 hours in average usage, the Wiko U30 is on the top of the autonomy rankings.
“The Find X3 range by OPPO finds top places in the ranking table for charging, enabling users to charge ultra-fast from 0-80 percent. Apple’s iPhone 12 Pro Max finds itself way ahead of the competition in terms of efficiency,” the company announced in a statement.
DXOMARK is known for the tests and scores of the camera, audio, and display quality of consumer electronics.
In the first set of new DXOMARK battery scores, 17 phones from all price segments were tested.
“While battery performance is critical for consumers, they have negligible information pre-purchase to understand which device will best suit their needs. Specs like mAh and W do not indicate true battery performance,” said Olivier Simon, Battery Evaluation Director.
Battery performance depends on a combination of factors including the choice of hardware components and power management software optimization.
“Using our score centered on the end-user, we aim to guide consumers in their purchasing decisions,” Simon said in a statement.
The proprietary battery test protocol covers 70 measurements, 6.5 days of testing behind each DXOMARK Battery score and evaluates the entire battery experience and quantifies 3 main areas: autonomy, charging and efficiency.
The test protocol contains lab measurements performed in indoor stationary settings complemented with tests in mobility.
Over a year ago, DXOMARK setup a dedicated team of battery experts for the development of its battery evaluation system.
The company said it has invested in state-of-the-art equipment such as a set of touch robots that simulate human usage like gaming and browsing social media apps.
Source: Insight Online News / Technology Update
0 notes
Text
Updated Nikon Z7 II sensor measurements published at PhotonsToPhotos
Updated Nikon Z7 II sensor measurements published at PhotonsToPhotos
PhotonsToPhotos published new/updated Nikon Z7 II sensor measurements based on the latest DxOMark test results (DxOMark derived charts) – here are a few Z7II comparisons with other similar mirrorless cameras (click for larger view):
Source: Photonstophotos
15% off Topaz Labs products with code RUMORS15
20% off ON1 products with code NIKONRUMORS
10% off Viltrox lenses with code NIKONRUMORS
5%…

View On WordPress
0 notes
Text
DxO PhotoLab Review 2021
DxO PhotoLab Review 2021
Now a separate entity from the DxOMark camera equipment testing lab, DxO has long been among the most dynamic photo editing software makers. PhotoLab 4 continues DxO’s tradition of automatic lens and camera body-based image correction, unmatched noise reduction, and other innovative image tools. The software incorporates Nik U Point local selection technology for some excellent local adjustment…

View On WordPress
0 notes
Quote
平時有在關注影像器材拍照評分消息的讀者們,應該都對於 DxOMark 的評分不陌生,其分數常成為手機品牌拿來宣...
這篇文章 DxO Labs 正尋求破產託管,但 DxOMark 不受影響 最早出現於 電腦王阿達。
https://www.kocpc.com.tw/archives/194126
1 note
·
View note
Text
The best smartphone cameras
At DXOMARK we test a large number of smartphone cameras every year, covering many brands and models across the spectrum, from budget to high-end. If you want to find out about a specific model’s overall camera performance compared to the competition, you can simply check our DXOMARK Camera ranking. For those who have more specific imaging requirements, it’s best to dive deeper and have a closer look at the sub-scores as well. And that’s exactly what we’ve done in compiling the list below (which we will update on a continuous basis). So without further ado, here are the currently best smartphone cameras, by category:
With a Photo score of 140, the Huawei P40 Pro is currently the top device for still image capture in our database. The score is based on top-level photo performance across all test categories, without any real weaknesses in sight. Images captured on the P40 Pro’s main camera show a very wide dynamic range and class-leading texture/noise balance. This means the Huawei is a great option even in challenging conditions, such as high-contrast scenes or very low light.
The P40 Pro is capable of capturing good image quality in almost any condition.
The camera’s zoom capabilities are impressive, too, and the 5x tele-camera in combination with the main camera, along with innovative computational methods, achieves outstanding detail and low noise levels across all tested zoom factors. At an equivalent focal length of 18mm, the Huawei’s ultra-wide camera doesn’t let you squeeze quite as much scene into the frame as some rivals, but image quality is excellent, with wide dynamic range, very good detail, and low noise.
Huawei P40 images show excellent detail and exposure, even in low light.
The ultra-wide camera doesn’t offer the widest field-of-view we have seen but image quality is excellent.
In addition, bokeh mode captures natural-looking portrait shots, with good subject isolation, pleasant bokeh shape, and a wide dynamic range; and the autofocus system is one of the best we have seen on a smartphone, performing flawlessly in lab and real-life conditions alike. Overall, the Huawei P40 is currently the device of choice for mobile users with a focus on still photography.
Also consider: Both the Honor 30 Pro+ and Huawei Mate 30 Pro 5G come pretty close to the P40 Pro across a range of test categories, but lag behind a little more noticeably for Zoom and Night photography. Still, both devices are excellent options for mobile photographers.
The Huawei P40 Pro isn’t only the best phone we have tested for photo capture, it also tops our ranking for Video with 105 points. Like for stills, the camera does not show any real weaknesses in any of the test categories, and is either the best or among the best in all of them. Video footage shows good exposure and wide dynamic range, with only some minor clipping in challenging high-contrast scenes; and as long as you are not recording under low tungsten light, white balance and color rendering are mostly accurate.
youtube
There’s very little to complain about with the P40 Pro’s video footage. Video stabilization is particularly good.
The P40 Pro renders detail pretty well, but we occasionally saw a loss of fine textures. Noise is very well under control in good light, but temporal noise becomes visible under low tungsten illumination. Video autofocus works as well as that for stills, delivering quick and reliable focus with good tracking, and the stabilization system effectively keeps things steady when walking or holding the camera still in your hands, making the P40 Pro a true mobile video powerhouse.
Also consider: Competition at the top of our Video ranking is fierce and the differences between devices are pretty small. Both the Honor 30 Pro+ and the Xiaomi Mi 10 Pro are almost on the same level as the Huawei P40 Pro and are definitely worth a closer look for any budding mobile cinematographers.
At 47 points, the Samsung Galaxy S20 Ultra tops our Wide category, thanks to an ultra-wide camera that delivers excellent exposure and color, as well as very effective geometric distortion correction. Although the specs list a 13mm lens, we measured it closer to 14mm, but even so, the S20 Ultra offers a very wide field of view and allows you to fit more scene into the frame than many competitors. Artifacts commonly associated with ultra-wide shots such as color fringing and ringing are slightly visible, but are not overly problematic. Anamorphosis, or stretching of elements towards the edges of the frame, is sometimes slightly noticeable, but the Samsung controls geometric distortion better than many of its rivals, with straighter lines and less barrel distortion.
The S20 Ultra’s ultra-wide camera offers a very wide angle of view and excellent overall image quality.
On the downside, detail deteriorates noticeably when you zoom in just a little bit, so it’s best to stick with the native focal length when shooting with the Galaxy S20 Ultra’s ultra-wide.
Also consider:
It looks like ultra-wide cameras are a bit of a Samsung specialty, with the Galaxy S20+ and Galaxy Note 10+ 5G following right in the S20 Ultra’s slipstream, offering equally wide fields of view and overall image quality that is not far off the top-ranked device. At 18mm, the Huawei P40 Pro’s ultra-wide camera is noticeably less wide than the Samsung devices. However, it offers the best dynamic range and detail/noise trade-off of all ultra-wide cameras we have tested. So if you can live with the slightly longer lens, the Huawei is a great ultra-wide option, too.
The current ne plus ultra for night and low light photography is, again, the Huawei P40 Pro. Its 70-point top score in this category is based on outstanding performance across all sub-tests—flash-on, flash-auto, flash-off, and night mode.
With the flash forced on, images show a very good texture/noise balance, good exposure, and accurate white balance, making the Huawei device a good option for flash portraits in dark settings. Both exposure and white balance are also very consistent across a series of images.
When shooting in flash-auto mode, the flash usually triggers for portraits and images show good exposure and dynamic range. Exposure is not only good on the subject’s face but also for the background, which indicates Huawei might be using a frame-stacking algorithm with flash shots.
P40 Pro night images show good detail and low noise.
Huawei P40 Pro, crop
With the flash switched off, night shots show accurate exposure and a wide dynamic range, resulting in good highlight detail, even in difficult night cityscapes. In addition, it still renders fine textures nicely in low light and controls image noise very well. When using its dedicated Night mode, the P40 Pro is capable of achieving better exposure and color than most rivals, but there is some room for improvement in terms of texture and noise.
Also consider: Just as ultra-wide angle cameras are a Samsung domain, Huawei is currently ahead of the pack in terms of low-light performance. In our ranking, the P40 Pro is followed by two models from Huawei’s sister brand Honor, the V30 Pro and 30 Pro+. Both come pretty close to the Huawei flagship but cannot quite match it, with the P40 Pro maintaining a small advantage in all sub-tests.
Camera-wise, the Huawei P40 Pro is a step ahead of its rivals, and that’s particularly clear for the Zoom category, where the Huawei flagship blows the rest of the competition out of the water, thanks to a 5x optical tele-lens and improved processing and software over last year’s P30 Pro.
The Huawei P40 Pro zoom is capable of delivering good detail, even at long range and indoors
Huawe P40 Pro, long-range zoom
When zooming, the Huawei camera is capable of recording higher levels of detail than competing devices at all zoom ranges while keeping image noise well under control. The advantage is most visible at longer zoom distances, where the Huawei camera manages to maintain good detail on fine textures, while most rivals show a strong loss of detail. In medium-range shots, the Huawei also records excellent detail at the center of the frame, but there is a noticeable loss of detail towards the edges, caused by the image fusion algorithm. Overall, there is no way past the Huawei P40 Pro, though, if you frequently rely on your smartphone’s zoom function.
Also consider: The Xiaomi Mi 10 Pro comes with not one but two tele-lenses for optimized image quality across the zoom range. This allows for excellent zoom results that come pretty close to the P40 Pro’s, especially at medium range.
Samsung devices have always been a great option for shooting portraits with a background-blurring simulated bokeh effect, and the current top-ranked device for this category, the Samsung Galaxy Note 10 5G, is no different. Bokeh results are outstanding, with excellent subject isolation, spotlight rendering, and blur gradient. Texture on faces is particularly good. Noise is also well controlled, giving the Samsung an advantage over the competition for indoor bokeh shots.
In addition, HDR processing in bokeh mode works very well in high-contrast scenes, maintaining good brightness on faces when the background is much brighter. Spotlights in the background have a good shape and contrast, too.
The Note 10+ 5G is capable of capturing excellent bokeh shots in outdoor scenes…
…and under indoor conditions alike.
As on pretty much all devices, depth estimation isn’t perfect, with some slight masking errors and artifacts occasionally visible, but the depth-of-field effect is consistently applied to both portraits and static objects. The overall effect is pleasant and blur transitions look natural, with objects both in front and behind the subject blurred.
The only downside to the Note 10+ 5G’s bokeh simulation is a slight lack of contrast that can make images look a little flat in the shadows, but overall, the Note 10+ 5G is the device to beat in the Bokeh category.
Also consider: Both the Honor V30 Pro and Samsung’s new flagship, the Galaxy S20 Ultra, are very close to the Note 10+ 5G in terms of bokeh performance and worth a closer look if shooting portraits with your smartphone camera is high up on your list of priorities.
Source
The post The best smartphone cameras appeared first on abangtech.
from abangtech https://abangtech.com/the-best-smartphone-cameras/
0 notes
Text
Oppo Find X2 Pro, Find X2 Coming to India in Second Wave of Launches: Report
New Post has been published on https://magzoso.com/tech/oppo-find-x2-pro-find-x2-coming-to-india-in-second-wave-of-launches-report/
Oppo Find X2 Pro, Find X2 Coming to India in Second Wave of Launches: Report

Oppo Find X2 Pro and Oppo Find X2 that were unveiled earlier this month will reportedly come to India soon. Although the precise launch date in India is yet to be revealed by the Chinese tech company, the smartphones are expected to come in the upcoming months. The duo flagship smartphones were launched in China on March 6. Ever since Oppo launched the Oppo Find X2 Pro, the smartphone has received favourable reviews for its overall phone and camera performance. Now, a new report details the global launch timelines for the two smartphones.
According to a report by GSMArena citing the company, the Oppo Fisnd X2-series will first launch in limited countries by the end of March. These countries are the Netherlands, Malaysia, Indonesia, Thailand, Philippines, Cambodia, Singapore and Vietnam. Following that, the Find X2 smartphones will reportedly arrive in more countries, including India, Pakistan, Qatar, Kuwait, United Arab Emirates, Saudi Arabia, Germany, France, Australia, New Zealand, Spain, Italy, Russia, Switzerland, Turkey, Ukraine, United Kingdom, Kazakhstan, Japan, and Romania. We’ve reached out for clarity from Oppo, and will update this space when we hear back.
Oppo Find X2 Pro, Find X2 price
At the time of the launch, the price of Oppo Find X2 Pro was set at EUR 1,199 (roughly Rs. 1,00,100) for the single 12GB + 512GB variant. Whereas, the price of Oppo Find X2’s 12GB + 256GB variant was set at EUR 999 (roughly Rs. 83,400).
We are expecting more details about the global launch plus the prices of the Oppo Find X2 phones in the upcoming weeks. It is also safe to assume that the Find X2-series will cost relatively lesser in India when compared with the smartphones’ European prices.
Oppo Find X2 Pro, Find X2 specifications
Since the launch of the Find X2 phones, the Pro variant from the lineup has particularly gotten favourable reviews. On the day of the launch, Oppo’s Find X2 Pro received the highest score by DxOMark Image Labs for its camera performance. Moreover, the phone has been praised for its stunning display which also received an A+ rating by DisplayMate. Oppo’s latest flagship smartphone further received a massive score of 6,11,627 from AnTuTu for its overall phone performance.
To recall, both Oppo Find X2 Pro and Find X2 come with a Qualcomm Snapdragon 865 and run on Android 10. The Oppo Find X2 Pro has is a triple rear camera setup that includes two 48-megapixel primary and secondary sensors. There’s a third 13-megapixel sensor with a telephoto lens.
In contrast, the Oppo Find X2 also has a triple rear camera setup which includes a 48-megapixel primary shooter. There’s a 12-megapixel secondary sensor along with a third 13-megapixel tertiary sensor. In terms of the battery, the base unit has a 4,200mAh battery while the Find X2 Pro has 4,260mAh battery.
0 notes
Text
Xem những màn “tra tấn” kiểm thử chất lượng điện thoại Vsmart

Mỗi chiếc điện thoại Vsmart đến tay người sử dụng phải trải qua hàng trăm bài test đặc biệt trong các phòng lab hiện đại hàng đầu thế giới của VinSmart, để đảm bảo chất lượng cao nhất
Thả cho rơi tự do xuống mặt sàn bê tông; ép uốn cong ở mức tối đa; bấm phím hàng vạn lần; thử khả năng “sinh tồn” trong các điều kiện tới 80 độ C rồi hạ sốc đến âm 40 độ C, hay trong môi trường bụi bặm nhất và ẩm ướt nhất… là một vài trong tổng số hàng trăm bài kiểm tra mà mỗi chiếc mobi thông minh Vsmart phải trải qua tại các phòng lab của hãng tại Khu công nghệ tiên tiến Hoà Lạc (Hà Nội).
Chỉ khi “sống sót” qua 7 phòng kiểm tra sự uy tín với hàng trăm màn “tra tấn” mô phỏng tất cả điều kiện sử dụng thường ngày, phòng kiểm tra âm thanh tiêu chuẩn Đức, phòng kiểm tra máy ảnh với toàn bộ thiết bị của DxOMark (đây là phòng Lab thứ 77 của DxOMark của các nước khác) và đặc biệt là phòng lab kiểm thử sóng điện thoại 2G, 3G, 4G, WiFi, BT, NFC… điện thoại Vsmart mới được phép lên kệ để đến tay người sử dụng với chất lượng cao nhất.
Nguồn: ictnews
Bài viết Xem những màn “tra tấn” kiểm thử chất lượng điện thoại Vsmart đã xuất hiện đầu tiên vào ngày Đồ Chơi Công Nghệ.
source https://dochoicongnghe.com.vn/xem-nhung-man-tra-tan-kiem-thu-chat-luong-dien-thoai-vsmart-7172.html
0 notes
Text
DXOMARK遭質疑:拍照能力不該只看評分

而談到評判手機拍照素質和能力時,我們最常聽到的就是:DXO。 DXOMARK在近幾年的確是名聲大噪,在很多發布會上都能看到他的身影,各大手機廠商都紛紛亮出DXO的評分從而表明他們的手機是優秀的。
但近日有外媒表示了對DXO的不滿,知名科技媒體androidauthority編輯Robert Triggs認為:越來越依賴一家公司的評分來判斷攝像頭質量對於整個行業來說都是一個小問題,尤其是當我們意識到DXOMARK不僅用於對手機攝像頭進行排名時。
DXOMARK是一家怎樣的公司?
我們都知道DXO是一家拍照評分機構,通過測試相機曝光率、顏色、紋理、噪音、變焦、夜拍能力等等因素,來評判處各個方面的分數以及總分。
但實際上,DXO出來拍照評分,運行測試套件的公司DXO Labs主要是一家諮詢公司,換句話說,該公司收取費用以建議廠商如何改進其攝影產品。這是基於其自身在相機行業的分析和專業知識。

不能保證評分網站會在主觀上存在偏見,但是DXO的諮詢業務吸引很多廠商來提前學習以他們的標準來看,如何讓相機變得更好,這樣的行為相當於去考試出題人那裡上輔導班,這給他們的評分增加了很多不客觀的因素。
Robert Triggs質疑:DXO聲稱要進行獨立測試,但同時提供營利性諮詢服務確實可行嗎?
通過諮詢到的測試標準去調整相機的手機得分可能會比不了解測試標準的手機廠商更高。有些手機製造商認為DXO的諮詢費不值得,那麼這個手機在DXO的測試中往往不會獲得很高的評分。
付了錢,分數更高?
除了提供諮詢服務,DXO實驗室還銷售用於測試和測量相機的DXO分析儀解決方案。獲得使用該套件的許可證是非常貴的,尤其是考慮到安裝和培訓的成本,以便讓公司熟悉測試功能。這在原則上是沒有問題的。然而,用戶會認為,一個公司,比如說一個智能手機製造商,在DXOMARK測試最終產品時,使用DXO提供的解決方案,用來改進相機硬件的公司將獲得高分。
對於一家公司來說,為一項能讓他們的智能手機擁有更高質量的攝像頭的服務來付費,本身並沒有什麼錯。然而,通常媒體依賴DXOMARK評分來判斷相機質量,這讓該公司不僅對行業成像質量有很大的影響力,而且對消費者如何看待智能手機產品也有很大的影響力。
那些花錢與DXOMARK密切合作的公司,可能會在測試中獲得更高的分數。許多其他評估網站隨後會引用DXOMARK的測試結果。但這樣會讓這些智能手機廠商有很大的壓力,他們必須為DXO的測試來付費,而這僅僅是為了獲得媒體的認可。

該公司自豪地指出:“所有十大DSC製造商以及所有頂級智能手機和相機模塊製造商都是DxO分析儀客戶。”
智能手機和專業相機市場上的許多大品牌都是DXO的客戶。 HTC、華為、三星和富士康都在名單上。這些可能會覺得物有所值,因為每一代產品得分都會有提高,問題是得分提高了,但真得給消費者的體驗帶來提升嗎?
DXO的客戶獲得了最高的相機分數。這是一個非常敏感的問題,那就是整個行業對DXOMARK的依賴。如果說各家公司都在圍繞這些測試制定自己的相機發展規劃,那麼DXOMARK也因此在一定程度上決定了智能手機產品的發展軌跡。
然而,由於測試並不全面,而是優先考慮某些功能,這可能不符合消費者的利益。 DXO花了很長時間來改善變焦和夜景,但它的得分並不總是能反映市場的主流趨勢。
寫在最後
一家與手機製造商緊密合作以提高圖像質量的公司對於消費者來說無疑是一件好事。但如果要進行諮詢調整相機後,再對這家緊密合作的手機廠商進行評分,難免會有些偏向,可能就會造成測試不去全面以及評分權衡不佳的狀況。

Pixel 3,Galaxy Note 10和Mate 30 Pro是否都具有同類最佳的相機功能?答案是肯定的。 DXOMARK的排名系統是否反映了相機的質量?答案就沒那麼一定了。如果我們想對手機相機質量進行更透明的測試,那麼消費者,和業內人士都應該看看更多的來源,而不是只依賴一家機構。
.
from DXOMARK遭質疑:拍照能力不該只看評分
via KKNEWS
0 notes
Text
Capture & Output

Introduction & Brief
Overview
It is important for a photographer to understand some of the ways in which
photographic images maybe captured and their impact on image quality. It
is equally beneficial to have an appreciation and recognition of a range of
image printing presentation methods and their impact on the ‘look’ of the
final images.
All of which will aid and inform professional practice and decision making.
Create
An illustrated report comparing two methods of Capture:
Your current Camera v Your dream Professional camera?
& at least two methods of Output from either:
• C-Type, Inkjet or Giclee?
Produce
A formal illustrated report with a minimum of 1000 of your own words.
Add a bibliography to list all the sources that you have consulted in your
research.
Submit either in word(.docx) or PDF format to the MyCity > Submissions >
Capture & Output area.
Capture
In this part of the report, I would like to demonstrate the differences of two methods of capture. The first method is using my current camera, a Nikon D5600 and the second, a much higher specification model called a Nikon D850.
Nikon D5600

“The Nikon D5600 is an F-mount DSLR announced by Nikon on November 10, 2016. The successor of the D5500.
D5600 offers only small changes over the predecessor, among them is Bluetooth connection. With SnapBridge application on smart device, the camera can be remote controlled. SnapBridge also allows automated updating of camera's clock and GPS.”
Source: https://en.wikipedia.org/wiki/Nikon_D5600
Nikon D850

“The Nikon D850 is a professional-grade full-frame digital single-lens reflex camera (DSLR) produced by Nikon. The camera was officially announced on July 25, 2017 (the 100th anniversary of Nikon's founding), launched on August 24, 2017, and first shipped on September 08, 2017. Nikon announced it could not fill the preorders on August 28, 2017 and filled less than 10% of preorders on the first shipping day. It is the successor to the Nikon D810.
The D850 is the first Nikon DSLR featuring a back-illuminated image sensor claiming overall a one-stop image quality (image noise) improvement. This camera was the first full frame DSLR achieving 100 points at Dxomark. The D850 also won Camera of the Year for 2017 at Imaging Resource.”
Source: https://en.wikipedia.org/wiki/Nikon_D850
From our group research questions, we identified there are three main types of camera sensors, CCD, Foveon and CMOS.
CCD stands for Couple Charged Device. It is an integrated circuit etched onto a silicon surface forming light sensitive elements called pixels. Photons fall on this surface and generate a charge that can be read by electronics and turned into a digital copy of the light patterns falling on the device.
Foveon The Foveon X3 sensor is an image sensor for digital cameras, designed by Foveon, Inc. and manufactured by Dongbu Electronics. It uses an array of photosites, each of which consists of three vertically stacked photodiodes, organized in a two-dimensional grid. This could be described as the “Betamax” of camera sensors as although (arguably) it is a better method of capturing the light using RGB for each photosite, it was never widely adopted.
CMOS stands for Complimentary Metal-Oxide Semiconductor. A solid state circuit is present at each photosite and manipulates the date for each individual pixel on the sensor. Essentially it is a more refined process where each photosite can be uniquely accessed. It responds to lighting conditions in ways that a CCD cannot.
The D5600 has a 25MP CMOS sensor with a physical size of 23.5 x 15.6mm whereas the D850 has a 45.7MP CMOS sensor measuring 35.9 x 23.9mm, giving it a much more accurate and detailed image capture.
The chart below shows the difference in size between the two sensors with the D850 shown as the “Full Frame” size on the top left and the D5600 as the “APS-C” on the top line second from the right.

Dynamic range is also very important in selecting your camera as it dictates the difference between the darkest and lightest tones of an image and the higher the dynamic range, the more detail in both the highlights and the shadows. The image below shows the differences in dynamic range from poor (far left) to good (far right)

The D5600 has a 14EV while the D850 has a 14.8EV
Bit depth is also important when selecting a camera as it measures how many colours are available in an images colour palate. The higher the number, the more refined detail and truer depth of colours.
The D5600 has a bit depth of 14 bit while the D850 is almost double that at 24.6 bit.
Another consideration is the range of ISO. Digital noise can be introduced at high levels of ISO as when high levels of amplification are required in extremely low light level situations, this can cause the sensor to produce heat which manifests as grain and distortion on the image. The D5600 has a range of 100-256000 while the D850’s range is 64-256000 (even higher possible with step increments).
Additional factors to consider between the models are: Processor (the D5600 uses a Nikon EXPEED engine whereas the D850 uses the higher specification EXPEED 5) Focus points are also important in allowing greater accuracy of focus across the image and the D850 boasts 153 versus the D5600’s 39. The build quality and weatherproofing of the camera is also important and the D5600 has a polycarbonate (plastic) body while the D850 uses magnesium alloy and carbon fibre which is more durable and lighter. The D5600 is weather resistant, however the D850 is full weather sealed meaning it can be used in much wetter conditions than the D5600 without the possibility od water or other types of damage. Both cameras have a wide selection of accessories available and can use most Nikon F mount lenses manufactured over the last 50-60 years.
Output
From our group questions, we ascertained there are two main outputs that photographers use. The first one is print, via CMYK and this can take the form of photographic prints via C-Type, which uses RGB lasers, exposing onto light sensitive paper then developed and washed (as seen on our visit to Loxley, where we were shown their mini wet labs that can complete the process in around four minutes) The maximum size of print Loxely can achieve using this process is 50” x 100”
Kodak and Fuji are two of the most popular manufacturers of the paper used in C-Type printing and their archival stability is around 50 years (dependant on the environment they are kept in and not in direct sunlight).

A Noritsu QSS-3301 digital minilab
Source: https://en.wikipedia.org/wiki/Minilab
Dry lab methods include dye sublimation (for printing on metal and plastics), inkjet for fine art prints, press printing for cheaper, low volume runs (such as books), UV printing for certain surfaces like leather and fabric and laser printing for low quality black and white or colour prints.
Main paper types used for printing are: gloss, lustre, metallic and velvet. The main surfaces used are acrylic, leather, aluminium, wood, fabric and glass.
Fine Art prints (or Giclee) are achieved by spraying microscopic dots of pigment based inks onto high quality fine art papers. Loxley’s system uses ten inks per print (nine used at the one time with the black changing between glossy and matt depending on the paper). DP2 software is used as a bridge to speak to the printers from the submission portal on the website. The dot size on the printer head is 3.5PL (picolitres) and an A3 print takes approximately five minutes. Archival stability using this method is around 100 years – again depending on the environment the print is located in. The maximum output size for this format is 60” x 40” and turnaround time is three working days.

Source: https://www.artsyshark.com/2018/10/10/what-artists-need-to-know-about-fine-art-printing/
Another type of output that photographers use is via digital, using RGB. As CMYK is used for print, this method is concerned with absorption and reflection of colour using light whereas, the opposite is true of RGB as it achieves this by emitting light from pixels for the viewer to see the image. Examples of this kind of output include monitors, projectors, smart phones and indeed, anything that has a screen that generates an image the viewer can see.
Conclusion
This has been a very interesting brief as it has really helped me gain a much greater understanding of the importance of the quality (and size) of various components in the capture devices (cameras) and also taught me some really important aspects of the output methods and what the benefits are of each one. (Print & Digital)
Bibliography
https://en.wikipedia.org/wiki/Nikon_D5600
https://en.wikipedia.org/wiki/Nikon_D850
P119 Langford’s Basic Photography
https://www.cambridgeincolour.com/tutorials/bit-depth.htm
https://www.howtogeek.com/321311/what-is-dynamic-range-in-photography/
https://www.picturecorrect.com/tips/digital-noise-photography/
http://www.specinst.com/What_Is_A_CCD.html
https://en.wikipedia.org/wiki/Minilab
0 notes
Text
Huawei Mate 30 Guru camera reclaims the DxOMark photography crown

The boffins from the DxOMark labs are busy placing the Huawei Mate 30 Pro’s brand new camera through its paces. Surprise surprise, Huawei's latest enormous 40MP camera detector regains the crown to the Chinese producer. In total, the Mate 30 Professional scores 121 points in DxOMark's camera [...]
Read full article here 📄 👉 http://bit.ly/2lP0gqL
https://www.seowebdev.co/huawei-mate-30-guru-camera-reclaims-the-dxomark-photography-crown/
0 notes
Text
طریقه نصب جی کم GCam بر روی گوشی های اندرویدی

طریقه نصب جی کم GCam بر روی گوشی های اندرویدی
How to install GCam on android phones
کیفیت عکس گوشی شما بالا، متوسط یا پایین باشد طبیعتا بستگی زیادی به مشخصات دوربین گوشی هوشمند از جمله، کیفیت لنز، اندازهی حسگر تصویر، لرزشگیر تصویر، گشودگی دریچهی دیافراگم، مگاپیکسل و... غیره دارد؛ اما جدا از این شاخصههای سختافزاری یک مسئلهی مهم که معمولا شرکتها یا از آن غافل میشوند یا عملکرد رضایتبخشی در آن ندارند، مرحلهی پس از عکس گرفتن یعنی پردازش نرمافزاری عکس است.
یک پردازش قدرتمند میتواند عکسی ضعیف را به کیفیتی متوسط ارتقا دهد و عکسی باکیفیت را به عالی تبدیل کند. نرمافزار دوربین در موارد بسیاری مانند کاهش نویز و ثبت جزئیات در نور کم میتواند تا حد زیادی به سختافزار کمک کند تا خروجی کار عکسی قابلقبول باشد. بهطور مشخص، در گوشیهای هوشمند بهدلیل کمبود فضا و ناتوانی تولیدکننده در افزایش اندازهی سنسور، رقابت اصلی در بهبود پردازش عکس است. سالها پیش، گوگل، با درک این مسئله گام در مسیری گذاشت که به ابداع روشی ختم شد که ابتدا در عینک واقعیت مجازی خود، گوگل گلس و سپس در گوشی خود، گوگل پیکسل از آن بهره برد. در این مقاله ضمن معرفی فناوری پردازش تصویر ابداعی گوگل، به نحوهی بهرهمندی از آن در گوشیهای اندرویدی میپردازیم.
طریقه نصب جی کم GCam بر روی گوشی های اندرویدی
GCam چیست؟
GCam یکی از دستاوردهای عظیم گوگل در زمینهی عکاسی، یعنی +HDR را در خود جای داده است.جیکم محصول شرکت گوگل X است. این شرکت، مرکز نیمه محرمانهی تحقیق و توسعهی گوگل برای انجام پروژههای درازمدت است. برخی مواقع تیم X در جریان حل یک مشکل به فناوری خاصی دست پیدا میکنند که کاربردهای فراتری از آنچه که مد نظر آنها بوده است پیدا میکند. GCam یکی از همین موارد است. پروژهی عکاسی رایانشی که امروزه در دوربین گوشیهای هوشمند پیکسل خودنمایی میکند، در واقع حاصل تلاش تیم گوگل اکس برای حل مشکل کمبود جا در گوگل گلس به حساب میآید.
در سال ۲۰۱۱، سباستین تران، رئیس وقت شرکت X، در پی یافتن دوربینی برای گوگل گلس بود که با استفاده از آن کاربر بتواند از نگاه اولشخص به راحتی عکاسی کرده و تجربهی کاربری خود را به اشتراک بگذارد. تمامی کاربران، از یک کودک گرفته تا یک پزشک جراح، میتوانستند از این قابلیت بهره ببرند؛ اما کیفیت تصاویر این دوربین باید دستکم با دوربینهای موبایلی برابری میکرد.
تیم گلس طراحیهای مختلفی را برای دوربین مورد بحث ارائه کرد؛ اما هرکدام به دلیل کوچک بودن اندازهی سنسور و عملکرد ضعیف در نور کم رد شدند.
از آنجایی که گوگل گلس باید سبک و قابلپوشیدن میبود، ساخت دوربین بزرگتر برای حل چالشهای ذکرشده امکانپذیر نبود. بنابراین، تیم ایکس به فکر حل نرمافزاری مشکل افتاد. از این رو مجموعهای از تکنیکهای پردازشی تحت عنوان عکاسی رایانشی جهت بهبود کیفیت تصویر خروجی در دستورکار قرار گرفت.
هدایت این پروژه را مارک لووی که در آن زمان عضو هیئت علمی دانشگاه استنفورد در رشتهی علوم رایانهای بود برعهده گرفت. بنابراین، تیم GCam در سال ۲۰۱۱ با هدف ارتقاء کیفیت عکس دستگاههای همراه با استفاده از روشهای عکاسی رایانشی شکل گرفت. این تیم در راستای پیدا کردن راهحلی برای گلس روشی به نام image fusion یا ادغام تصویر را ابداع کرد. در این روش تعدادی عکس بهصورت پیاپی گرفته میشود و از ادغام یا تلفیق این عکسها، تصویر نهایی باکیفیت حاصل میشود. این تکنیک در محیطهای تاریک باعث بهبود جزئیات شده و در محیطهای روشن، افزایش وضوح تصویر را به همراه میآورد؛ این یعنی تصاویر روشنتر و شفافتر بدون استفاده از سنسور بزرگتر.
ادغام تصویر یا ایمج فیوژن در سال ۲۰۱۳ به همراه گلس رونمایی شد و بلافاصله مشخص شد که قابلیت بهکارگیری در محصولاتی فراتر از گلس را نیز دارد.
از آنجایی که کاربران برای ثبت و به اشتراکگذاری لحظات خاطرهانگیز خود روز به روز بیشتر به گوشیهای هوشمند تکیه میکردند، نیاز به ارتقاء کیفیت عکس دوربین این گوشیها مخصوصا در شرایط نوری ضعیف بهشدت احساس میشد. به همین جهت، GCam نسخهی جدیدی از ایمج فیوژن را با نام +HDR تهیه کرد و آن را در اپلیکیشن دوربین گوشیهای اندرویدی گوگل در آن زمان یعنی نکسوس ۵ و سال بعد نکسوس ۶ بهکار بست.
در سالهای اخیر فناوری +HDR به حالت پیشفرض در گوشیهای گوگل پیکسل قرار گرفت و توانست تحسین Dxomark، شرکت مشهور کیفیت سنجی دوربینها را برانگیزد. مارک، رئیس تیم GCam میگوید: «این پروژه حدود پنج سال طول کشید تا به بلوغ کافی برسد و از این بابت از شرکت X که به ما این استقلال را داد که بتوانیم به افقهای دوردست خود دست پیدا کنیم ممنون هستیم.»
تا اینجا با تاریخچهی GCam و سازوکار آن آشنا شدیم. در ادامه به ویژگیها و قابلیتهای جیکم یا همان دوربین گوشیهای پیکسل میپردازیم تا مشخص شود آیا نتیجهی پنج سال تلاش مهندسان گوگل ارزش دستکاری سیستمی گوشی و نصب کردن آن را دارد یا خیر.
برای این منظور، ابتدا باید به گوشهای از ویژگیهای اندروید که تا به حال کمتر به آن پرداخته شده است نور بیاندازیم و آن را مورد بررسی و واکاوی قرار دهیم. قابلیتی که به آن خواهیم پرداخت Camera2 api نام دارد. این api باعث میشود دوربین گوشیهای هوشمند بیش از پیش قدرت یافته و تواناییهایی از قبیل عکاسی با فرمت RAW پیدا کنند. موضوع این مقاله میتواند برای افراد علاقهمند به عکاسی موبایل بسیار جذاب باشد؛ چرا که امکان اعمال تنظیمات دستی فراوانی را با خود به همراه میآورد.
API چیست؟
این عبارت مخفف Application Programming Interface به معنی رابط برنامهنویسی اپلیکیشن است. یک سیستمعامل برای اینکه به توسعهدهندگان متفرقه، امکان دسترسی به بخشهایی از سیستم را بهمنظور استفاده در اپلیکیشن بدهد از API استفاده میکند. از نقطهنظر دیگر، این یعنی سازندهی سیستمعامل میتواند دسترسی به بخشهای خاصی از سیستم را محدود و مسدود کند. به عبارت کلی، api مجموعهای از روشهای ارتباطی کاملا مشخص و تعریفشده بین اجزای مختلف نرمافزار یک سیستم است. شخص برنامهنویس با در دست داشتن api اجزای سیستم میتواند با حداکثر استفاده از تواناییهای سیستم برنامهی بهتری را بسازد.
Camera2 API چیست؟
در سیستمعامل اندروید تا نسخهی ۴.۴ کیتکت، ایپیآی استانداردی که در سیستمعامل وجود داشت و امکان دسترسی به دوربین را فراهم میکرد بسیار محدود بود. با انتشار نسخهی ۵ لالیپاپ، گوگل Camera2 api را معرفی کرد تا به توسعهدهندگان اپلیکیشن دوربین دسترسی بیشتری بدهد و آنها بتوانند تنظیمات پیشرفتهتری مانند نوردهی دستی، فوکوس دستی، ثبت عکس با فرمت RAW و... را به اپلیکیشنهای خود اضافه کنند.
هرچند تولیدکنندگان گوشی هوشمند میتوانند نسخهی اختصاصی خود از اندروید را ارائه دهند و وابستگی چندانی به ایپیآی جدید گوگل ندارند، توسعهدهندگان متفرقه تنها قادر به استفاده از ابزاری هستند که در اختیار آنها قرار میگیرد.
در اینجا ممکن است این سؤال مطرح شود که آیا تمام گوشیهایی که اندروید لالیپاپ را اجرا میکنند از ایپیآی جدید پشتیبانی میکنند؟ جواب هم بله است هم خیر. هرچند ایپیآی Camera2 استاندارد دسترسی جدیدی است که از اندروید لالیپاپ اضافه شد، سطوح مختلفی از بهکارگیری این api وجود دارد که بین تولیدکنندگان و دستگاههای مختلف متفاوت است. مجموعا چهار سطح بهکارگیری برای Camera2 وجود دارد؛ لگسی (Legacy)، محدود، کامل و سطح ۳. لگسی یعنی اینکه تنها قابلیتهای قدیمی Camera1 در دسترس هستند. محدود یا Limited یعنی بخشی از قابلیتهای ایپیآی جدید در دسترس است؛ فول یا کامل به معنی این است که تمام قابلیتهای ابتدایی Camera2 پشتیبانی میشوند و نهایتا سطح ۳ یا Level 3 به معنی پشتیبانی کامل قابلیتهای Camera2 به اضافهی قابلیتهای بیشتری نظیر ثبت تصویر با فرمت RAW است.
بسته به سطح بهکارگیری این api، توانایی شما در استفاده اپلیکیشنهای پیشرفتهی دوربین متفاوت خواهد بود. اپلیکیشن GCam که محصول غول دنیای فناوری یعنی گوگل است و در گوشیهای اختصاصی این شرکت استفاده میشود، یکی از اپلیکیشنهای معروفی است که نیاز به دسترسی سطح سهی ایپیآی camera2 دارد. در صورت نداشتن این سطح از بهکارگیری camera2 نهایتا میتوانید اپلیکیشن گوگل کمرا که قابلیتهای چندانی ندارد را نصب کنید و نسخهی اختصاصی گوشیهای پیکسل برای شما قابل اجرا نخواهد بود. بنابراین، اگر مایل به نصب Gcam یا هر اپلیکیشن پیشرفتهی دوربین دیگری هستید باید ایپیآی camera2 در گوشی شما فعال باشد.
کدام گوشیها از Camera2 پشتیبانی میکنند؟
در حال حاضر گوشیها از لحاظ پشتیبانی پیشفرض از Camera2 به دو دسته تقسیم میشوند:
گوشیهای اختصاصی گوگل
گوشیهای پرچمداری که بعد از انتشار اندروید لالیپاپ عرضه شدند
البته بسیاری از گوشیهای دستهی دوم با دریافت اندروید مارشمالو به این امکان مجهز شدند؛ احتمالا به این خاطر که شرکتها برای درک قابلیت جدید به زمان نیاز داشتند. در خصوص دستهی اول، تعجبی ندارد که گوگل تمام دستگاههای خود از قبیل سری نکسوس و سری پیکسل را به camera2 مجهز کرده است؛ این یعنی حتی اگر گوشی نکسوس شما قبل از انتشار لالیپاپ عرضه شده است، اما با دریافت بروزرسانی به نسخهی لالیپاپ ارتقاءیافته نیز پشتیبانی تام و تمام از camera2 را دارد. نکسوس ۶، ۵ ایکس و ۶ پی نیز به همراه گوشیهای سری پیکسل همگی این قابلیت را در خود دارند.
در خصوص سایر تولیدکنندگان، مانند سامسونگ، الجی، HTC، هواوی، سونی، لنوو، وانپلاس، شیائومی و... باید گفت بیشتر آنها روی پرچمدارهای خود که با اندروید مارشمالو عرضه شده باشند، حداقل دسترسی کامل یعنی Full را برای دسترسی به امکانات ابتدایی ارائه میکنند. برخی نیز مانند سامسونگ در نسخهی لالیپاپ نیز camera2 را فعال کردند. سری اس سامسونگ با عرضهی بهروزرسانی برای اس ۶، سریهای G و V از الجی با عرضهی جی ۴ و V10، اچتیسی از HTC 10 ، وانپلاس از وانپلاس ۳ و... شروع به اعمال این ایپیآی در سیستمعامل گوشیهای خود کردند. از سوی دیگر هنوز تولیدکنندگانی مانند هواوی، شرکت زیرمجموعهی هواوی یعنی آنر و شیائومی نسبت به فعال کردن این امکان مقاومت به خرج میدهند که خوشبختانه در دنیای اندروید همواره راههایی برای دستکاری فعالسازی غیررسمی آن روی گوشیهایی که از پردازندهی کوالکام استفاده میکنند وجود دارد.
احتمالا موردی که تا به اینجای مطلب نسبت به آن کنجکاو شدهاید، این است که بدانید گوشی شما چه سطحی از بهکارگیری camera2 را پشتیبانی میکند. برای اطلاع از این موضوع چند اپلیکیشن کارآمد و رایگان در گوگلپلی وجود دارد که میتوانند بدون نیاز به روت، شما را از مسئلهی فوق مطلع کنند. یکی از این اپلیکیشنها Camera2 probe است که اطلاعات جامعی را بهدست میدهد.
نحوهی بررسی سطح بهکارگیری Camera2 api
بهصورت پیشفرض نه سیستمعامل نه دفترچه راهنما و نه اپلیکیشن دوربین پیشفرض گوشی شما اطلاعاتی را در مورد اینکه آیا گوشی از camera2 پشتیبانی میکند یا نه، شامل نمیشوند. بنابراین، برای اطلاع از این موضوع باید از اپلیکیشن جانبی استفاده شود. طبق بررسیهای انجام گرفته Camera2 probe یکی از بهترین اپلیکیشنهایی است که سطح دسترسی را به تفکیک دوربین اصلی و دوربین جلو نمایش میدهد. این اپلیکیشن که توسط شرکت March Media Labs توسعه یافته است، روی گوشیهای مخالف تست شده و عملکرد رضایتبخشی داشته است. بنابراین، پیشنهاد میکنیم اپلیکیشن مذکور را که نسخههای مشابه و حتی همنام آن در پلیاستور کم نیستند از اینجا دانلود و نصب کنید.
پس از نصب اپلیکیشن، آن را اجرا کنید تا جزئیات پشتیبانی از Camera2 در دستگاه اندرویدی شما نمایان شود. بهعلاوه، اطلاعاتی را در خصوص مدل دستگاه و نسخهی اندروید در حال اجرا مشاهده خواهید کرد.
بهطور کلی دو بخش Camera ID: 0 و Camera ID: 1 را در صفحهی برنامه همانند تصویر زیر مشاهده خواهید کرد که اولی اطلاعات دوربین اصلی و دومی وضعیت دوربین سلفی را در خصوص سطح پشتیبانی از ایپیآی جدید نمایش میدهد.
هر کدام از سطوح که به رنگ سبز در آمده و تیک داشته باشد، نشانگر وضعیت پشتیبانی دستگاه شما از camera2 خواهد بود.
در پایان مفهوم عبارات بهکار رفته برای سطوح دسترسی را مرور میکنیم.
Level 3: پشتیبانی کامل از camera2 به اضافهی ویژگیهای اضافه از سوی شرکت سازندهی گوشی
Full: پشتیبانی کامل گوشی هوشمند از Camera2 api
Limited: گوشی تنها برخی از قابلیتهای آیپیآی Camera2 را پشتیبانی میکند
Legacy: پشتیبانی از Camera1 و عدم پشتیبانی از Camera2
همانطور که اشاره شد یکی از فواید ایپیآی Camera2 امکان ثبت تصاویر RAW یا خام است. اما اساسا RAW چیست و عکاسی در این فرمت چه فوایدی دارد؟
فرمت RAW چیست؟
برای درک ماهیت عکس خام (RAW)، بهتر است نگاهی به فرایند ثبت عکس دیجیتال بیاندازیم. معمولا در عکاسی دیجیتال، عکسها در فرمت Jpeg ذخیره میشوند. روند کلی کار به این شکل است که نرمافزار سیستم، دادهای را که سنسور تصویر به آن منتقل کرده است، دریافت کرده و پس از انجام پردازشهایی از قبیل تنظیم نوردهی، کنتراست، وضوح و... آن را فشرده کرده و نهایتا در قالب یک فایل تصویری Jpeg ذخیره میکند؛ فایلی که تقریبا در تمام دستگاههایی که قابلیت باز کردن عکس را داشته باشند، قابلمشاهده خواهد بود.
در مقام مقایسه، وقتی در فرمت RAW عکسبرداری کنید، نرمافزار سیستم دادهی ارسالی توسط سنسور تصویر را دریافت کرده و کار به همین جا ختم میشود.
در اندروید، دادهی یادشده در فرمت DNG. ذخیره میشود؛ فرمتی که در واقع فرمت خام مخصوص شرکت ادوبی است. دوربینهای دیجیتال معمولا از فرمت خام متفاوت مخصوص به خود استفاده میکنند. برای باز کردن عکس خام خود باید نرمافزار مخصوص به آن را داشته باشید.
پردازش فایلهای RAW
وقتی عکسهای خام خود را باز کنید احتمالا احساس خواهید کرد که تصویر، بیروح است و رنگ و لعاب چندانی ندارد. این مسئله کاملا طبیعی است؛ چرا که عکس Jpeg یک تصویر پردازش شده از لحاظ نور و رنگ و وضوح است؛ حال آنکه عکس RAW پردازشنشده و خام بوده و دقیقا همان دادهای است که حسگر تصویر دوربین به سیستم انتقال داده است و شما باید شخصا پردازشها را انجام دهید.
در ادوبی لایتروم به شرط فعال بودن Camera2 api هم میتوانید عکس خام بگیرید و هم آن را ویرایش کنید
فایدهی عکاسی در فرمت RAW
فایدهی اصلی این کار، بهدست آوردن تصویری است که فشردهسازی نشده باشد. عکس Jpeg که معمولا توسط دوربینهای موبایل ثبت میشود بهطور متوسط حجمی برابر با پنج مگابایت دارد؛ این در حالی است که همان عکس در فرمت RAW میتواند بیش از ۱۵ مگابایت حجم داشته باشد. بنابراین، در فشردهسازی انجامشده در فرمت Jpeg، مقداری از جزئیات از دست میروند؛ اما عکس خام از آنجایی که فشردهسازی نشده است، حداکثر جزئیات ممکن را به دست میدهد. در نتیجه، فایلهای RAW هنگام ویرایش کردن، انعطافپذیری بهتری دارند. بهعنوان عکاس یا گرافیست، میتوانید جزئیاتی که در سایه قرار گرفتهاند را نمایان کنید یا بخشهایی که بیش از حد درخشان هستند را اصلاح کنید و لطمهای هم به کیفیت تصویر وارد نشود.
در این تصویر مقایسهی عکس خام ویرایش شده و عکس Jpeg ویرایش شده را میبینید
بنابراین، تصاویر خام، برای انجام ویرایشهای حرفهای مانند اصلاح توازن سفیدی، بسیار مناسبتر هستند و نتیجهی کار فارغ از اینکه چه میزان از تغییرات ایجاد میکنید، افت کیفیت نخواهد داشت. فرمت RAW با اینکه ممکن است زحمت زیادتری داشته باشد، برای کسانی که به عکاسی اهمیت میدهند و میخواهند حداکثر کیفیت ممکن را از دوربین موبایل خود بهدست آورند، گزینهای بسیار ارزشمند است.
همانطور که ذکر شد، تمامی گوشیهای گوگل و بیشتر گوشیهای سایر شرکتها که با اندروید ۵ و نسخههای جدیدتر از آن عرضه شدهاند، از camera2 پشتیبانی میکنند؛ اما برخی شرکتها مانند شیائومی این API را فعال نکردهاند. بنابراین، اگر بعد از اجرای اپلیکیشن فوق متوجه شدید که گوشی شما با وجود بهرهمندی از اندروید جدید، camera2 را پشتیبانی نمیکند، لازم است آن را از قسمت build.prop فعال کنید. برای انجام اینکار چند روش وجود دارد که مستلزم داشتن دسترسی روت هستند. پس، چنانچه camera2 در دستگاه شما فعال نیست، ابتدا دستگاه خود را ترجیحا با استفاده از ابزار روت مجیسک روت کنید و سپس camera2 را به یکی از روشهایی که در ادامه عنوان میشود، فعال کنید.
فعال کردن Camera2 در Build.prop
قبل از هر چیز باید بدانید که بیلدپراپ، اساسا فایل بسیار مهم و حساسی است. بسیاری از اطلاعات سیستم شامل نسخهها و تنظیمات و دستورالعمل کار سختافزار گوشی در آن گنجانده شدهاند. بنابراین توصیه میشود حتما قبل از ویرایش از بیلدپراپ خود بکاپ بگیرید و یک کپی از نسخهی اصلی آن داشته باشید. البته، طبق معمول تمام آموزشها، بهتر است از کل اطلاعات خود پشتیبان داشته باشید تا در صورت بروز مشکل، اطلاعات مهم را از دست نداده و بتوانید آنها را بازگردانی کنید.
روش اول: ویرایش دستی Build.prop
در این روش پس از روت کردن دستگاه، به اپلیکیشنی نیاز خواهید داشت که بتوانید با آن فایل Build.prop را ویرایش کنید. برای اینکار میتوانید از یک فایل اکسپلورر با پشتیبانی از روت مانند ES Explorer یا Root Explorer استفاده کنید یا اپلیکیشنی مجزا مانند JRummy BuildProp Editor را نصب کنید.
در هر صورت فایل Build.prop در مسیر روت و داخل فولدر system قرار دارد. با رفتن به این مسیر از طریق یکی از اپلیکیشنهای ذکرشده، Build.prop را باز کرده و خط زیر را در آن پیدا کنید.
در انتهای خط فوق، مقدار 0 را به 1 تبدیل کرده و Save کنید.
build.prop
چنانچه خط فوق در بیلدپراپ شما وجود نداشت، باید شخصا آن را به انتهای فایل اضافه کنید. برای این کار خط زیر را عینا زیر آخرین خط موجود در بیلدپراپ وارد کرده و پس از آن نیز با رفتن سر سطر یک خط خالی ایجاد کنید. سپس، تغییرات را ذخیره کنید. حالا، دستگاه را راهاندازی مجدد کرده و مجددا وضعیت فعال بودن ایپیآی را از طریق اپلیکیشن Camera2 probe بررسی کنید.
روش دوم: استفاده از Terminal Emulator
چنانچه با دستورات ترمینال آشنایی دارید و کار با آن برای شما آسانتر است، میتوانید از این روش استفاده کنید. توجه داشته باشید این روش نیز نیازمند دسترسی روت است.
برای فعالسازی camera2 از طریق ترمینال کافی است اپلیکیشن شبیهساز ترمینال یا Terminal Emulator را در گوشی روتشدهی خود نصب کنید و دستورات زیر را به ترتیب در آن وارد کنید.
su
su persist.camera.HAL3.enabled 1
exit
exit
حال، دستگاه را راهاندازی مجدد کرده و وضعیت فعال بودن ایپیآی camera2 را با اپلیکیشن camera2 probe بررسی کنید.
روش سوم: فعالسازی به کمک مجیسک
این روش نیاز به ابزار magisk manager دارد. اگر گوشی خود را به روشی غیر از مجیسک روت کردهاید، لازم است ابتدا مجیسک را از ریکاوری فلش کنید و سپس از قسمت ماژولهای برنامه، ماژول Enable camera2 API را نصب کنید.
برای آشنایی با مجیسک و نحوهی نصب آن به این صفحه مراجعه کنید.
پس از نصب برای فعالسازی نیاز به راهاندازی مجدد است؛ بنابراین روی reboot بزنید تا دستگاه ریاستارت شده و camera2 api فعال شود.
برتری این روش نسبت به دو روش دیگر این است که با زدن روی ماژول یادشده و ریاستارت دوباره میتوانید به راحتی camera2 را فعال و غیرفعال کنید. این امکان در گوشیهای شیائومی کاربرد فراوان دارد؛ چرا که دوربین اصلی miui از camera1 استفاده میکند و در صورت فعالسازی camera2 از کار میافتد. به همین دلیل، برای استفادهی مجدد از دوربین شیائومی لازم است camera2 را غیرفعال کنید که این کار در مجیسک راح��تر صورت میپذیرد.
روش چهارم: با استفاده از ADB و بدون نیاز به روت یا حتی نصب ریکاوری
این روش تنها روشی است که نیاز به روت ندارد. البته بوتلودر باید آنلاک باشد. اگر بوتلودر گوشی شما آنلاک نیست، میتوانید از روش عنوانشده در این آموزش اقدام به آنلاک آن کنید. در واقع، ما در این روش از امکانی به نام ADB استفاده میکنیم تا تغییرات سیستمی را بدون نیاز به روت انجام دهیم. برای آشنایی با ADB و نحوهی نصب درایورهای آن میتوانید به این مقاله مراجعه کنید.
پس از اینکه درایورهای ADB و Fastboot را نصب کردید. باید ریکاوری کاستوم مخصوص گوشی خود را دانلود کنید. توجه داشته باشید که ما قصد نداریم ریکاوری twrp را نصب کنیم، بلکه فقط آن را بهطور موقت اجرا میکنیم. در برخی موارد، ممکن است لازم باشد بررسی اعتبار درایور در ویندوز غیرفعال شود. اگر با چنین موردی برخورد کردید، میتوانید با استفاده از روش موجود در این آموزش، Windows Signature Driver Enforcement را در انواع ویندوزها بهطور موقت غیرفعال کنید.
۱. برای دریافت ریکاوری TWRP مخصوص مدل دستگاه خود به این آدرس مراجعه کنید.
۲. فایل ریکاوری را در پوشهای روی دسکتاپ قرار دهید. بهتر است این پوشه همان پوشهی درایورهای adb و fastboot باشد؛ چرا که ممکن است هنگام نصب درایور، آن را بهصورت system wide نصب نکرده باشید و از تمام مسیرها امکان ارسال دستور را نداشته باشید.
۳. فایل ریکاوری را به یک اسم ساده مانند abc تغییر نام دهید.
۴. حالا باید گوشی را به حالت فستبوت ببرید. اکثر گوشیها با خاموش کردن و سپس نگه داشتن همزمان دکمهی پاور و کاهش صدا وارد حالت فستبوت میشوند؛ اما اگر شرکت سازندهی گوشی شما روش دیگری را ترجیح داده باشد، باید آن را در اینترنت جستجو کنید.
۵. پس از ورود به بخش فستبوت، گوشی را با کابل USB به سیستم وصل کنید.
۶. در فضای فولدری که ریکاوری قرار دارد، ضمن نگه داشتن کلید شیفت، راست کلیک کنید و گزینهی Open a command prompt را انتخاب کنید.
۷. در پنجرهی سیامدی باز شده دستور زیر را وارد کنید.
fastboot boot abc.img
۸. با وارد کردن این دستور و فشردن کلید اینتر، گوشی شما ریکاوری TWRP را اجرا خواهد کرد.
۹. در صفحهی ابتدایی twrp در گوشی گزینهی keep read only را بزنید.
TWRP
۱۰. حال، جهت بررسی اتصال صحیح گوشی و سیستم از راه adb دستور زیر را وارد کنید.
adb devices
در صورت برقراری اتصال، پس از زدن کلید اینتر باید سریال گوشی در صفحهی CMD نشان داده شود.
۱۱. حال، دستور زیر را وارد کرده و اینتر بزنید.
adb shell
۱۲. برای فعال کردن camera2 دستور زیر را با دقت عینا وارد کرده و اینتر بزنید.
setprop persist.camera.HAL3.enabled 1
پس از انجام اینکار، camera2 api فعال میشود و میتواند با وارد کردن دستور exit خارج شوید.
برای راهاندازی مجدد دستگاه نیز میتوانید از دستور زیر کمک بگیرید.
adb reboot
گوشی مجددا راهاندازی میشود و بدون اینکه ریکاوری کاستومی روی آن نصب شده باشد بالا خواهد آمد و میتوانید GCam را بدون روت روی آن نصب و اجرا کنید.
پس از اینکه Camera2 را به یکی از روشهای فوق فعال کردید، نوبت به آن میرسد که با ترکیبی از آنچه تا به اینجا در مورد آن صحبت شد، کیفیت عکس دوربین موبایل خود را ارتقاء ببخشیم. با فعال شدن camera2 امکان استفاده از اپلیکیشن دوربین GCam که از گوشیهای پیکسل پورت شده است مهیا میشود. با استفاده از این اپلیکیشن میتوانید از حاصل پنج سال تلاش گوگل یعنی +HDR بهرهمند شوید. بهعلاوه، قادر خواهید بود با گوشی معمولی خود که از دوربین دوگانه بیبهره است، هم با دوربین اصلی و هم با دوربین سلفی عکسهای پرترهی کمنظیری بگیرید و از افکت بوکه و وضوح بالای سوژه لذت ببرید. عکاسی با فرمت RAW نیز در GCam فراهم شده است تا نیاز شما به هرگونه اپلیکیشن دوربین دیگر برطرف شود.
از آنجایی که GCam برای ثبت تصاویر از موتور DSP Hexagon استفاده میکند، استفاده از این دوربین تنها برای گوشیهایی که به پردازندههای اسنپدراگون شرکت کوالکام مجهز هستند امکانپذیر است. بنابراین، اگر پردازندهی گوشی شما اگزینوس، کرین یا مدیاتک است، ممکن است بهدلیل فعال بودن camera2 بهصورت پیشفرض امکان عکاسی با فرمت RAW را داشته باشید اما بهرهمندی از GCam و فناوری آن برای شما میسر نخواهد بود. در گوشیهایی که از پردازندهی مدیاتک استفاده شده است، امکان عکاسی با فرمت RAW به صورت پیشفرض وجود دارد، اما باید آن را فعال کرد.
عکاسی با فرمت RAW در گوشیهایی که پردازندهی آنها مدیاتک است
اگر پردازندهی دستگاه شما ساخت شرکت تایوانی مدیاتک است، میتوانید بدون فعال کردن Camera2 عکس خام بگیرید. برای انجام اینکار باید گزینهی مربوط به آن را درمنوی Engineerjng Mode فعال کنید. چند روش برای دسترسی به این منو وجود دارد که سادهترین آنها شمارهگیری کاراکترهای زیر از شمارهگیر است.
*#*#3646633#*#*
همچنین، برای اینکه هربار نیاز به شمارهگیری نداشته باشید، میتوانید اپلیکیشنی مثل MTK Engineering Mode را نصب کنید تا همواره یک آیکون شورتکات یا میانبر برای ورود سریع به این منو داشته باشید.
پس از اینکه به کمک یکی از روشهای فوق وارد Engineering Mode شدید، در قسمت Hardware روی Testing زده و Camera را انتخاب کنید. در واقع، این منو برای تست سختافزار گوشی است؛ اما میتوانید هرکدام از گزینههای مربوط به دوربین را که میخواهید، از جمله RAW، فعال کرده و عکاسی کنید.
در این حالت وقتی عکسی بگیرید، دو فایل در مسیر /DCIM/CameraEM/ ذخیره خواهد شد که یکی با فرمت JPEG است تا بتوانید عکسی که گرفتهاید را دیده و مواردی مانند قاببندی را بررسی کنید و دیگری فایل خام عکس شما یا همان RAW است که قابل باز کردن و مشاهده نیست. برای مشاهده و ویرایش این فایل که فرمت dng دارد، باید از نرمافزارهای شرکت ادوبی نظیر Lightroom و فوتوشاپ استفاده کنید.
آشنایی با دوربین GCam و نصب آن
تا اینجا، آموختیم برای اینکه بتوانیم از نسخهی پورت شدهی دوربین گوگل پیکسل در گوشی خود استفاده کنیم، باید از چند شرط اساسی بهرهمند باشیم. اول اینکه نسخهی اندروید گوشی بالاتر از لالیپاپ باشد و Camera2 در گوشی شما فعال باشد. camera2 در تمامی رامهای کاستوم بر پایهی AOSP یا Lineage OS بهصورت پیشفرض فعال است؛ اما اگر از رام استوک یا اصلی شرکت سازندهی گوشی خود استفاده میکنید ممکن است لازم باشد این api را فعال کنید. شرط اساسی دیگر این است که پردازندهی گوشی یکی از پردازندههای جدید شرکت کوالکام یعنی اسنپدراگون ساخت ۲۰۱۴ و بالاتر باشد. نهایتا، اپلیکیشن پورتشدهای که نصب میکنید با گوشی شما سازگاری داشته باشد. با دقت به مواردی که ذکر شد، دیگر مشکلی در استفاده از دوربین گوگل نخواهید داشت.
توجه داشته باشید آنچه که ما در این مطلب از آن با عنوان دوربین گوگل یاد کردیم، google camera نیست. گوگل کمرا برای کلیهی گوشیها از پلی استور قابل دانلود و نصب است. حال آنکه GCam دوربین اختصاصی گوگل برای گوشیهای سری پیکسل است که علاوهبر داشتن قابلیتهایی مثل پانوراما، Photosphere و Lens Blur که در گوگل کمرا وجود دارند، قابلیتهای اختصاصی دیگری ارائه میکند که در ادامه به معرفی مختصر برخی از آنها میپردازیم.
معرفی قابلیتهای GCam
در این قسمت به برخی قابلیتهای متمایزکنندهی دوربین گوگل میپردازیم تا ببینیم آیا فناوریهای گوگل تأثیری در کیفیت عکس و تجربهی عکاسی ما ایجاد میکنند یا خیر.
شاخصهی اصلی دوربین گوگل +HDR است. این ویژگی باعث میشود گوشی بهجای یک عکس، چند عکس تهیه کند و با ترکیب آنها بتواند نویز تصاویر را کاهش داده و رنگها و جزئیات را بهبود ببخشد. تصاویر زیر که با استفاده از گوشی شیائومی ردمی ۴ از صحنههای مشابه تهیه شدهاند بهخوبی نشاندهندهی تأثیر پردازش رایانشی گوگل بر کیفیت عکسها هستند.
در GCam حالت +HDR به معنی خودکار بودن این حالت است. درست مثل زمانی که تنظیمات فلش را روی حالت خودکار قرار میدهید و بسته به نیاز عمل میکند. چنانچه مایل هستید تحت هر شرایطی از +HDR استفاده شود، باید گزینهی HDR+ enhanced را فعال کنید.
موشن فوتو (Motion Photo)
موشن فوتو در دوربین گوگل مشابه حالت Live Photo در iOS است. با فعال کردن این گزینه، یک ویدیوی بسیار کوتاه از لحظات قبل از ثبت عکس که معمولا رزولوشن پایینی دارد به عکس ضمیمه میشود.
لرزشگیر الکترونیکی
اگر دوربین گوشی شما از هرگونه لرزشگیر بیبهره است، جیکم لرزشگیر الکترونیکی را تحت عنوان Video Stabilization به ارمغان میآورد.
اسمارت برست با زدن روی دکمه ثبت عکس و نگه داشتن آن فعال میشود. وقتی هنگام عکس گرفتن، بهجای یکبار لمس دکمهی نرمافزاری شاتر، انگشت خود را روی آن نگه دارید، در یک ثانیه حدود ۱۳ عکس ثبت میشود که بهترین آنها بهصورت خودکار برای شما به نمایش در خواهد آمد و امکان انتخاب از سایر شاتها را نیز خواهید داشت.
ویدیوی صحنه آهسته یا اسلو موشن
این قابلیت که چندان نیاز به معرفی ندارد، در دستگاههایی که توانایی آن را داشته باشند با ثبت ۱۲۰ فریم بر ثانیه ویدیوی صحنه آهسته ضبط میکند. این قابلیت ممکن است روی برخی گوشیهای میانرده که پردازندهی قدرتمندی ندارند، کار نکند و منجر به توقف عملکرد اپلیکیشن شود.
پورتره
یکی از ویژگیهای برجستهی GCam امکان گرفتن عکسهای پرتره با یک لنز است. گوشیهایی که عکس پرتره با افکت بوکه میگیرند، از دو لنز برای این کار استفاده میکنند؛ اما قدرت نرمافزاری گوگل در این بخش نیز به کمک غول دنیای فناوری آمده است و GCam قادر است با محاسبات نرمافزاری ویژهی خود پسزمینهی تصاویر را بهخوبی تشخیص داده و آن را محو کند تا سوژه با وضوح کامل خودنمایی کند.
تصاویر ثبت شده با دوربین شیائومی ردمی ۴ توسط اپلیکیشن GCam در حالت پرتره
بهعلاوه، ویژگی face retouching به بهترین شکل ممکن صورت سوژه را روتوش کرده و برخلاف قابلیت روتوش در خیلی از اپلیکیشنهای دوربین شرکتهای دیگر، ابعاد و رنگها و جزئیات چهره را از بین نمیبرد.
استیکرهای واقعیت افزوده یا AR Stickers
این قابلیت در اواخر سال ۲۰۱۷ و با معرفی پیکسل ۲ و پیکسل ۲ ایکس ال معرفی شد. AR Stickers از پلتفرم جدید گوگل یعنی ARCore استفاده میکند و با استفاده از آن میتوانید اشیاء و شخصیتهای کارتونی را به عکس یا ویدیوی خود هنگام ضبط و به صورت لایو اضافه کنید. البته اضافه شدن این قابلیت به دوربین گوگل مستلزم نصب جداگانهی ARCore و ARStickers است که نحوهی انجام آن موضوع این مقاله نیست.
اگر با دیدن عملکرد جیکم و آشنایی با تواناییهای آن ترغیب شدهاید که آن را روی گوشی خود نصب کنید، طبق آموزشهایی که ذکر شد پس از اطمینان از داشتن شرایطی که ذکر شد، یکی از نسخههای موجود در این وبسایت را دانلود و نصب کنید.
با ورود به لینک فوق خواهید دید که توسعهدهندگان زیادی در حال کار روی پروژهی پورت هر چه بهتر GCam هستند و این خود نشان از اهمیت موضوع دارد. اینکه کدام نسخه بهتر است بستگی زیادی به گوشی شما دارد؛ به همین دلیل نمیتوان نسخهای عمومی برای همهی گوشیها صادر کرد؛ اگر نسخهای مخصوص برای گوشی شما وجود دارد، چنان که برای وانپلاس ۳، ردمی ۴ ایکس و می مکس ۲ و... وجود دارد، میتوانید از آن استفاده کنید، در غیر اینصورت باید با آزمایش کردن نسخههای مختلف، نسخهی پورتشدهای که با گوشی شما سازگارتر است را شناسایی کنید. به یاد داشته باشید که این نسخهها به نوعی سفارشیسازی نیز شدهاند و همواره در قسمت تنظیمات آنها میتوانید گزینههای جذابی پیدا کرده و با اعمال تنظیمات دلخواه مطلوبترین نتیجه را از عکاسی خود با جیکم به دست آورید.
Read the full article
0 notes
Last Seen Blogs

jinkookista
Jinkookista

2lubangdunia
Untitled

kakaotauri
Stream Mr. Morale and the Big Steppers

mvmfores-blog
o' sour grapes

curtvilescomic
Curtvile's Comicblog