#Database Seeding From JSON File
Explore tagged Tumblr posts
Visit Tumblr Blog
Explore Tumblr blogs with no restrictions, modern design and the best experience.
Last Seen Tumblr Blogs


Fun Fact
Tumblr is used by 21% of adults online aged 18-29 years.
Text
CodeIgniter 4 How To Read Parse JSON File Tutorial
JSON (JavaScript Object Notation) files stand as a prevalent format for storing structured data, often used for configuration settings, API responses, or data interchange. In CodeIgniter 4, parsing JSON files enables developers to effortlessly handle and extract structured data within their applications.
#codeigniter 4 tutorial in hindi#codeigniter 4 tutorial#codeigniter4#codeigniter#codeigniter development#php development
0 notes
Text
CodeIgniter 4 Database Seeding From JSON File Tutorial
Inside this article we will see the concept of database seeding in CodeIgniter 4 using json file. CodeIgniter 4 database seeding from json file is a technique to dump test data into tables in bulk.
This tutorial will be super easy to understand and it’s steps are easier to implement in your code as well. Database seeding is the process in which we feed test data to tables. We can insert data either using Faker library, manual data or means of some more data sources like CSV, JSON.
0 notes
Text
Build a dynamic JAMstack app with GatsbyJS and FaunaDB
In this article, we explain the difference between single-page apps (SPAs) and static sites, and how we can bring the advantages of both worlds together in a dynamic JAMstack app using GatsbyJS and FaunaDB. We will build an application that pulls in some data from FaunaDB during build time, prerenders the HTML for speedy delivery to the client, and then loads additional data at run time as the user interacts with the page. This combination of technologies gives us the best attributes of statically-generated sites and SPAs.
In short…<deep breath>...auto-scaling distributed websites with low latency, snappy user interfaces, no reloads, and dynamic data for everyone!
Heavy backends, single-page apps, static sites
In the old days, when JavaScript was new, it was mainly only used to provide effects and improved interactions. Some animations here, a drop-down there, and that was it. The grunt work was performed on the backend by Perl, Java, or PHP.
This changed as time went on: client code became heavier, and JavaScript took over more and more of the frontend until we finally shipped mostly empty HTML and rendered the whole UI in the browser, leaving the backend to supply us with JSON data.
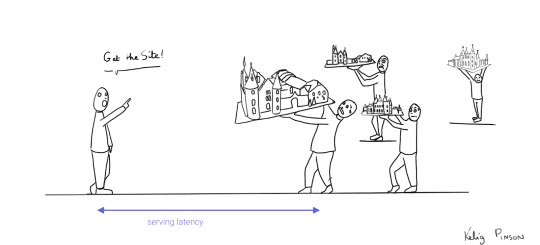
This led to a neat separation of concerns and allowed us to build whole applications with JavaScript, called Single Page Applications (SPAs). The most important advantage of SPAs was the absence of reloads. You could click on a link to change what's displayed, without triggering a complete reload of the page. This in itself provided a superior user experience. However, SPAs increased the size of the client code significantly; a client now had to wait for the sum of several latencies:
Serving latency: retrieving the HTML and JavaScript from the server where the JavaScript was bigger than it used to be
Data loading latency: loading additional data requested by the client
Frontend framework rendering latency: once the data is received, a frontend framework like React, Vue, or Angular still has to do a lot of work to construct the final HTML
A royal metaphor

We can analogize the loading a SPA with the building and delivery of a toy castle. The client needs to retrieve the HTML and JavaScript, then retrieve the data, and then still has to assemble the page. The building blocks are delivered, but they still need to be put together after they're delivered.
If only there were a way to build the castle beforehand...
Enter the JAMstack
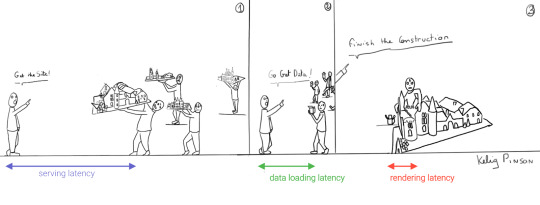
JAMstack applications consist of JavaScript, APIs and Markup. With today's static site generators like Next.js and GatsbyJS, the JavaScript and Markup parts can be bundled up into a static package and deployed via a Content Delivery Network (CDN) that delivers files to a browser. A CDN geographically distributes the bundles, and other assets, to multiple locations. When a user’s browser fetches the bundle and assets, it can receive them from the closest location on the network, which reduces the serving latency.
Continuing our toy castle analogy, JAMstack apps are different from SPAs in the sense that the page (or castle) is delivered pre-assembled. We have a lower latency since we receive the castle in one piece and no longer have to build it.

Making static JAMstack apps dynamic with hydration
In the JAMstack approach, we start with a dynamic application and prerender static HTML pages to be delivered via a speedy CDN. But what if a fully static site is not sufficient and we need to support some dynamic content as the user interacts with individual components, without reloading the entire page? That's where client-side hydration comes in.
Hydration is the client-side process by which the server-side rendered HTML (DOM) is "watered" by our frontend framework with event handlers and/or dynamic components to make it more interactive. This can be tricky because it depends on reconciling the original DOM with a new virtual DOM (VDOM) that's kept in memory as the user interacts with the page. If the DOM and VDOM trees do not match, bugs can arise that cause elements to be displayed out of order, or necessitate rebuilding the page.
Luckily, libraries like GatsbyJS and NextJS have been designed so as to minimize the possibility of such hydration-related bugs, handling everything for you out-of-the-box with only a few lines of code. The result is a dynamic JAMstack web application that is simultaneously both faster and more dynamic than the equivalent SPA.
One technical detail remains: where will the dynamic data come from?
Distributed frontend-friendly databases!
JAMstack apps typically rely on APIs (ergo the "A" in JAM), but if we need to load any kind of custom data, we need a database. And traditional databases are still a performance bottleneck for globally distributed sites that are otherwise delivered via CDN, because traditional databases are only located in one region. Instead of using a traditional database, we’d like our database to be on a distributed network, just like the CDN, that serves the data from a location as close as possible to wherever our clients are. This type of database is called a distributed database.
In this example, we’ll choose FaunaDB since it is also strongly consistent, which means that our data will be the same wherever my clients access it from and data won’t be lost. Other features that work particularly well with JAMstack applications are that (a) the database is accessed as an API (GraphQL or FQL) and does not require you to open a connection, and (b) the database has a security layer that makes it possible to access both public and private data in a secure way from the frontend. The implications of that are we can keep the low latencies of JAMstack without having to scale a backend, all with zero configuration.
Let's compare the process of loading a hydrated static site with the building of the toy castle. We still have lower latencies thanks to the CDN, but also less data since most the site is statically generated and therefore requires less rendering. Only a small part of the castle (or, the dynamic part of the page) needs to be assembled after it has been delivered:

Example app with GatsbyJS & FaunaDB
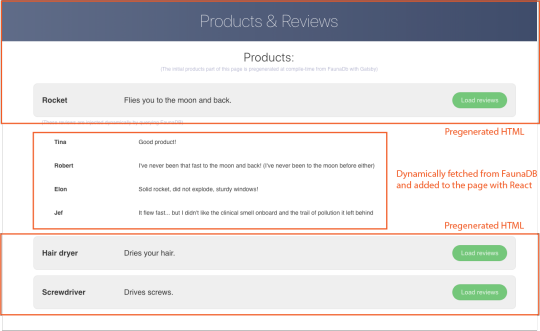
Let’s build an example application that loads data from FaunaDB at build time and renders it to static HTML, then loads additional dynamic data inside the client browser at run time. For this example, we use GatsbyJS, a JAMstack framework based on React that prerenders static HTML. Since we use GatsbyJS, we can code our website completely in React, generate and deliver the static pages, and then load additional data dynamically at run time. We’ll use FaunaDB as our fully managed serverless database solution. We will build an application where we can list products and reviews.
Let’s look at an outline of what we have to do to get our example app up and running and then go through every step in detail.
Set up a new database
Add a GraphQL schema to the database
Seed the database with mock-up data
Create a new GatsbyJS project
Install NPM packages
Create the server key for the database
Update GatsbyJS config files with server key and new read-only key
Load the pre-rendered product data at build time
Load the reviews at run time
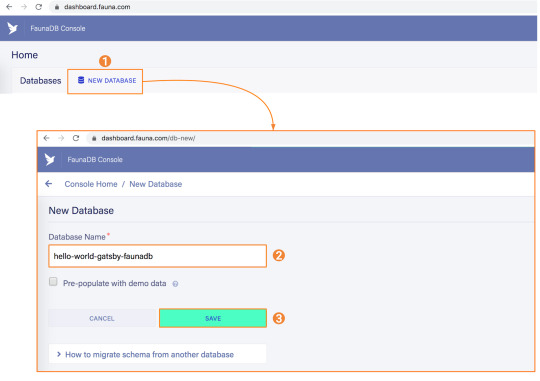
1. Set up a new database
Before you start, create an account on dashboard.fauna.com. Once you have an account, let’s set up a new database. It should hold products and their reviews, so we can load the products at build-time and the reviews in the browser.
2. Add a GraphQL schema to the database
Next, we use the server key to upload a GraphQL schema to our database. For this, we create a new file called schema.gql that has the following content:
type Product { title: String! description: String reviews: [Review] @relation } type Review { username: String! text: String! product: Product! } type Query { allProducts: [Product] }
You can upload your schema.gql file via the FaunaDB Console by clicking "GraphQL" on the left sidebar, and then click the "Import Schema" button.
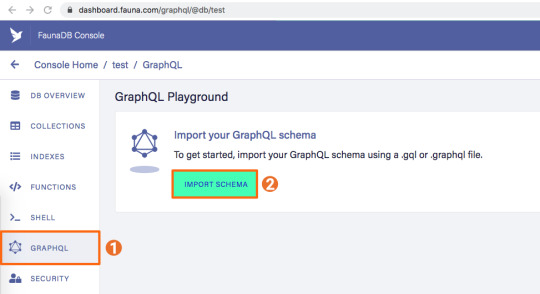
Upon providing FaunaDB with a GraphQL schema, it automatically creates the required collections for the entities in our schema (products and reviews). Besides that, it also creates the indexes that are needed to interact with those collections in a meaningful and efficient manner. You should now be presented with a GraphQL playground where you can test out
3. Seed the database with mock-up data
To seed our database with products and reviews, we can use the Shell at dashboard.fauna.com:
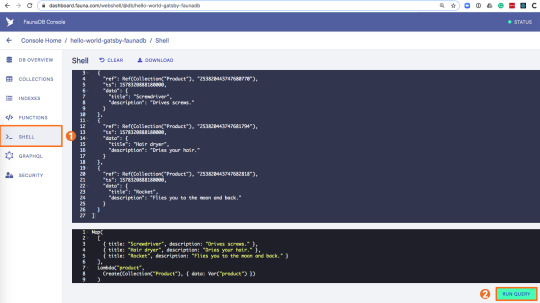
To create some data, we’ll use the Fauna Query Language (FQL), after that we’ll continue with GraphQL to build are example application. Paste the following FQL query into the Shell to create three product documents:
Map( Paginate(Match(Index("allProducts"))), Lambda("ref", Create(Collection("Review"), { data: { username: "Tina", text: "Good product!", product: Var("ref") } })) );
We can then write a query that retrieves the products we just made and creates a review document for every product document:
Map( Paginate(Match(Index("allProducts"))), Lambda("ref", Create(Collection("Review"), { data: { username: "Tina", text: "Good product!", product: Var("ref") } })) );
Both types of documents will be loaded via GraphQL. However, there is a significant difference between products and reviews. The former will not change a lot and is relatively static, while the second is user-driven. GatsbyJS allows us to load data in two ways:
data that is loaded at build time which will be used to generate the static site.
data that is loaded live at request time as a client visits and interacts with your website.
In this example, we chose to let the products be loaded at build time, and the reviews to be loaded on-demand in the browser. Therefore, we get static HTML product pages served by a CDN that the user immediately sees. Then, as our user interacts with the product page, we load the data for the reviews.
4. Create a new GatsbyJS project
The following command creates a GatsbyJS project based on the starter template:
$ npx gatsby-cli new hello-world-gatsby-faunadb $ cd hello-world-gatsby-faunadb
5. Install npm packages
In order to build our new project with Gatsby and Apollo, we need a few additional packages. We can install the packages with the following command:
$ npm i gatsby-source-graphql apollo-boost react-apollo
We will use gatsby-source-graphql as a way to link GraphQL APIs into the build process. Using this library, you can make a GraphQL call from which the results will be automagically provided as the properties for your react component. That way, you can use dynamic data to statically generate your application. The apollo-boost package is an easily configurable GraphQL library that will be used to fetch data on the client. Finally, the link between Apollo and React will be taken care of by the react-apollo library.
6. Create the server key for the database
We will create a Server key which will be used by Gatsby to prerender the page. Remember to copy the secret somewhere since we will use it later on. Protect server keys carefully, they can be used to create, destroy, or manage the database to which they are assigned. To create the key we can go to the fauna dashboard and create the key in the security tab.

7. Update GatsbyJS config files with server and new read-only keys
To add the GraphQL support to our build process, we need to add the following code into our graphql-config.js inside the plugins section where we will insert the FaunaDB server key which we generated a few moments ago.
{ resolve: "gatsby-source-graphql", options: { typeName: "Fauna", fieldName: "fauna", url: "https://graphql.fauna.com/graphql", headers: { Authorization: "Bearer <SERVER KEY>", }, }, }
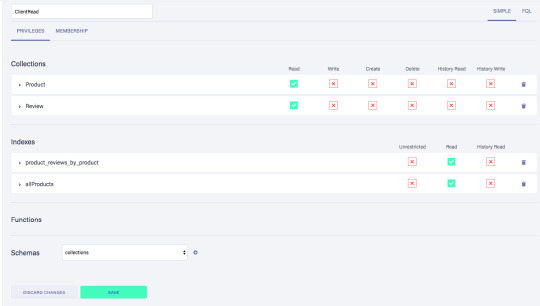
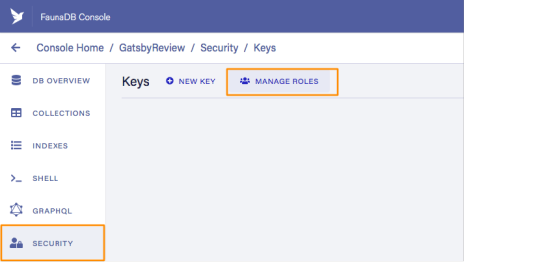
For the GraphQL access to work in the browser, we have to create a key that only has permissions to read data from the collections. FaunaDB has an extensive security layer in which you can define that. The easiest way is to go to the FaunaDB Console at dashboard.fauna.com and create a new role for your database by clicking "Security" in the left sidebar, then "Manage Roles," then "New Custom Role":

Call the new custom role ‘ClientRead’ and make sure to add all collections and indexes (these are the collections that were created by importing the GraphQL schema). Then, select Read for each for them. Your screen should look like this:
You have probably noticed the Membership tab on this page. Although we are not using it in this tutorial, it is interesting enough to explain it since it's an alternative way to get security tokens. In the Membership tab can specify that entities of a collection (let's say we have a 'Users' collection) in FaunaDb are members of a particular role. That means that if you impersonate one of these entities in that collection, the role privileges apply. You impersonate a database entity (e.g. a User) by associating credentials with the entity and using the Login function, which will return a token. That way you can also implement password-based authentication in FaunaDb. We won't use it in this tutorial, but if that interests you, check the FaunaDB authentication tutorial.
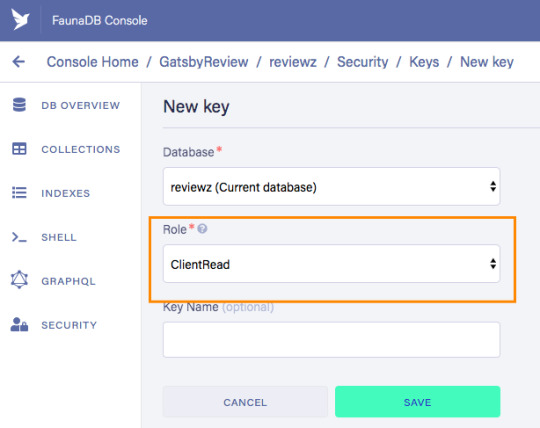
Let’s ignore Membership for now, once you have created the role, we can create a new key with the new role. As before, click "Security", then "New Key," but this time select "ClientRead" from the Role dropdown:
Now, let's insert this read-only key in the gatsby-browser.js configuration file to be able to call the GraphQL API from the browser:
import React from "react" import ApolloClient from "apollo-boost" import { ApolloProvider } from "react-apollo" const client = new ApolloClient({ uri: "https://graphql.fauna.com/graphql", request: operation => { operation.setContext({ headers: { Authorization: "Bearer <CLIENT_KEY>", }, }) }, }) export const wrapRootElement = ({ element }) => ( <ApolloProvider client={client}>{element}</ApolloProvider> )
GatsbyJS will render its Router component as a root element. If we want to use the ApolloClient everywhere in the application on the client, we need to wrap this root element with the ApolloProvider component.
8. Load the pre-rendered product data at build time
Now that everything is set up, we can finally write the actual code to load our data. Let’s start with the products we will load at build time.
For this we need to modify src/pages/index.js file to look like this:
import React from "react" import { graphql } from "gatsby" Import Layout from "../components/Layout" const IndexPage = ({ data }) => ( <Layout> <ul> {data.fauna.allProducts.data.map(product => ( <li>{product.title} - {product.description}</li> ))} </ul> </Layout> ) export const query = graphql` { fauna { allProducts { data { _id title description } } } } ` export default IndexPage
The exported query will automatically get picked up by GatsbyJS and executed before rendering the IndexPage component. The result of that query will be passed as data prop into the IndexPage component.If we now run the develop script, we can see the pre-rendered documents on the development server on http://localhost:8000/.
$ npm run develop
9. Load the reviews at run time
To load the reviews of a product on the client, we have to make some changes to the src/pages/index.js:
import { gql } from "apollo-boost" import { useQuery } from "@apollo/react-hooks" import { graphql } from "gatsby" import React, { useState } from "react" import Layout from "../components/layout" // Query for fetching at build-time export const query = graphql ` { fauna { allProducts { data { _id title description } } } } ` // Query for fetching on the client const GET_REVIEWS = gql ` query GetReviews($productId: ID!) { findProductByID(id: $productId) { reviews { data { _id username text } } } } ` const IndexPage = props => { const [productId, setProductId] = useState(null) const { loading, data } = useQuery(GET_REVIEWS, { variables: { productId }, skip: !productId, }) } export default IndexPage
Let’s go through this step by step.
First, we need to import parts of the apollo-boost and apollo-react packages so we can use the GraphQL client we previously set up in the gatsby-browser.js file.
Then, we need to implement our GET_REVIEWS query. It tries to find a product by its ID and then loads the associated reviews of that product. The query takes one variable, which is the productId.
In the component function, we use two hooks: useState and useQuery
The useState hook keeps track of the productId for which we want to load reviews. If a user clicks a button, the state will be set to the productId corresponding to that button.
The useQuery hook then applies this productId to load reviews for that product from FaunaDB. The skip parameter of the hook prevents the execution of the query when the page is rendered for the first time because productId will be null.
If we now run the development server again and click on the buttons, our application should execute the query with different productIds as expected.
$ npm run develop
Conclusion
A combination of server-side data fetching and client-side hydration make JAMstack applications pretty powerful. These methods enable flexible interaction with our data so we can adhere to different business needs.
It’s usually a good idea to load as much data at build time as possible to improve page performance. But if the data isn’t needed by all clients, or too big to be sent to the client all at once, we can split things up and switch to on-demand loading on the client. This is the case for user-specific data, pagination, or any data that changes rather frequently and might be outdated by the time it reaches the user.
In this article, we implemented an approach that loads part of the data at build time, and then loads the rest of the data in the frontend as the user interacts with the page.
Of course, we have not implemented a login or forms yet to create new reviews. How would we tackle that? That is material for another tutorial where we can use FaunaDB’s attribute-based access control to specify what a client key can read and write from the frontend.
The code of this tutorial can be found in this repo.
The post Build a dynamic JAMstack app with GatsbyJS and FaunaDB appeared first on CSS-Tricks.
via CSS-Tricks https://ift.tt/2RjR7mI
0 notes
Text
Build a dynamic JAMstack app with GatsbyJS and FaunaDB
In this article, we explain the difference between single-page apps (SPAs) and static sites, and how we can bring the advantages of both worlds together in a dynamic JAMstack app using GatsbyJS and FaunaDB. We will build an application that pulls in some data from FaunaDB during build time, prerenders the HTML for speedy delivery to the client, and then loads additional data at run time as the user interacts with the page. This combination of technologies gives us the best attributes of statically-generated sites and SPAs.
In short…<deep breath>...auto-scaling distributed websites with low latency, snappy user interfaces, no reloads, and dynamic data for everyone!
Heavy backends, single-page apps, static sites
In the old days, when JavaScript was new, it was mainly only used to provide effects and improved interactions. Some animations here, a drop-down there, and that was it. The grunt work was performed on the backend by Perl, Java, or PHP.
This changed as time went on: client code became heavier, and JavaScript took over more and more of the frontend until we finally shipped mostly empty HTML and rendered the whole UI in the browser, leaving the backend to supply us with JSON data.
This led to a neat separation of concerns and allowed us to build whole applications with JavaScript, called Single Page Applications (SPAs). The most important advantage of SPAs was the absence of reloads. You could click on a link to change what's displayed, without triggering a complete reload of the page. This in itself provided a superior user experience. However, SPAs increased the size of the client code significantly; a client now had to wait for the sum of several latencies:
Serving latency: retrieving the HTML and JavaScript from the server where the JavaScript was bigger than it used to be
Data loading latency: loading additional data requested by the client
Frontend framework rendering latency: once the data is received, a frontend framework like React, Vue, or Angular still has to do a lot of work to construct the final HTML
A royal metaphor

We can analogize the loading a SPA with the building and delivery of a toy castle. The client needs to retrieve the HTML and JavaScript, then retrieve the data, and then still has to assemble the page. The building blocks are delivered, but they still need to be put together after they're delivered.
If only there were a way to build the castle beforehand...
Enter the JAMstack
JAMstack applications consist of JavaScript, APIs and Markup. With today's static site generators like Next.js and GatsbyJS, the JavaScript and Markup parts can be bundled up into a static package and deployed via a Content Delivery Network (CDN) that delivers files to a browser. A CDN geographically distributes the bundles, and other assets, to multiple locations. When a user’s browser fetches the bundle and assets, it can receive them from the closest location on the network, which reduces the serving latency.
Continuing our toy castle analogy, JAMstack apps are different from SPAs in the sense that the page (or castle) is delivered pre-assembled. We have a lower latency since we receive the castle in one piece and no longer have to build it.
Making static JAMstack apps dynamic with hydration
In the JAMstack approach, we start with a dynamic application and prerender static HTML pages to be delivered via a speedy CDN. But what if a fully static site is not sufficient and we need to support some dynamic content as the user interacts with individual components, without reloading the entire page? That's where client-side hydration comes in.
Hydration is the client-side process by which the server-side rendered HTML (DOM) is "watered" by our frontend framework with event handlers and/or dynamic components to make it more interactive. This can be tricky because it depends on reconciling the original DOM with a new virtual DOM (VDOM) that's kept in memory as the user interacts with the page. If the DOM and VDOM trees do not match, bugs can arise that cause elements to be displayed out of order, or necessitate rebuilding the page.
Luckily, libraries like GatsbyJS and NextJS have been designed so as to minimize the possibility of such hydration-related bugs, handling everything for you out-of-the-box with only a few lines of code. The result is a dynamic JAMstack web application that is simultaneously both faster and more dynamic than the equivalent SPA.
One technical detail remains: where will the dynamic data come from?
Distributed frontend-friendly databases!
JAMstack apps typically rely on APIs (ergo the "A" in JAM), but if we need to load any kind of custom data, we need a database. And traditional databases are still a performance bottleneck for globally distributed sites that are otherwise delivered via CDN, because traditional databases are only located in one region. Instead of using a traditional database, we’d like our database to be on a distributed network, just like the CDN, that serves the data from a location as close as possible to wherever our clients are. This type of database is called a distributed database.
In this example, we’ll choose FaunaDB since it is also strongly consistent, which means that our data will be the same wherever my clients access it from and data won’t be lost. Other features that work particularly well with JAMstack applications are that (a) the database is accessed as an API (GraphQL or FQL) and does not require you to open a connection, and (b) the database has a security layer that makes it possible to access both public and private data in a secure way from the frontend. The implications of that are we can keep the low latencies of JAMstack without having to scale a backend, all with zero configuration.
Let's compare the process of loading a hydrated static site with the building of the toy castle. We still have lower latencies thanks to the CDN, but also less data since most the site is statically generated and therefore requires less rendering. Only a small part of the castle (or, the dynamic part of the page) needs to be assembled after it has been delivered:
Example app with GatsbyJS & FaunaDB
Let’s build an example application that loads data from FaunaDB at build time and renders it to static HTML, then loads additional dynamic data inside the client browser at run time. For this example, we use GatsbyJS, a JAMstack framework based on React that prerenders static HTML. Since we use GatsbyJS, we can code our website completely in React, generate and deliver the static pages, and then load additional data dynamically at run time. We’ll use FaunaDB as our fully managed serverless database solution. We will build an application where we can list products and reviews.

Let’s look at an outline of what we have to do to get our example app up and running and then go through every step in detail.
Set up a new database
Add a GraphQL schema to the database
Seed the database with mock-up data
Create a new GatsbyJS project
Install NPM packages
Create the server key for the database
Update GatsbyJS config files with server key and new read-only key
Load the pre-rendered product data at build time
Load the reviews at run time
1. Set up a new database
Before you start, create an account on dashboard.fauna.com. Once you have an account, let’s set up a new database. It should hold products and their reviews, so we can load the products at build-time and the reviews in the browser.

2. Add a GraphQL schema to the database
Next, we use the server key to upload a GraphQL schema to our database. For this, we create a new file called schema.gql that has the following content:
type Product { title: String! description: String reviews: [Review] @relation } type Review { username: String! text: String! product: Product! } type Query { allProducts: [Product] }
You can upload your schema.gql file via the FaunaDB Console by clicking "GraphQL" on the left sidebar, and then click the "Import Schema" button.

Upon providing FaunaDB with a GraphQL schema, it automatically creates the required collections for the entities in our schema (products and reviews). Besides that, it also creates the indexes that are needed to interact with those collections in a meaningful and efficient manner. You should now be presented with a GraphQL playground where you can test out
3. Seed the database with mock-up data
To seed our database with products and reviews, we can use the Shell at dashboard.fauna.com:

To create some data, we’ll use the Fauna Query Language (FQL), after that we’ll continue with GraphQL to build are example application. Paste the following FQL query into the Shell to create three product documents:
Map( Paginate(Match(Index("allProducts"))), Lambda("ref", Create(Collection("Review"), { data: { username: "Tina", text: "Good product!", product: Var("ref") } })) );
We can then write a query that retrieves the products we just made and creates a review document for every product document:
Map( Paginate(Match(Index("allProducts"))), Lambda("ref", Create(Collection("Review"), { data: { username: "Tina", text: "Good product!", product: Var("ref") } })) );
Both types of documents will be loaded via GraphQL. However, there is a significant difference between products and reviews. The former will not change a lot and is relatively static, while the second is user-driven. GatsbyJS allows us to load data in two ways:
data that is loaded at build time which will be used to generate the static site.
data that is loaded live at request time as a client visits and interacts with your website.
In this example, we chose to let the products be loaded at build time, and the reviews to be loaded on-demand in the browser. Therefore, we get static HTML product pages served by a CDN that the user immediately sees. Then, as our user interacts with the product page, we load the data for the reviews.
4. Create a new GatsbyJS project
The following command creates a GatsbyJS project based on the starter template:
$ npx gatsby-cli new hello-world-gatsby-faunadb $ cd hello-world-gatsby-faunadb
5. Install npm packages
In order to build our new project with Gatsby and Apollo, we need a few additional packages. We can install the packages with the following command:
$ npm i gatsby-source-graphql apollo-boost react-apollo
We will use gatsby-source-graphql as a way to link GraphQL APIs into the build process. Using this library, you can make a GraphQL call from which the results will be automagically provided as the properties for your react component. That way, you can use dynamic data to statically generate your application. The apollo-boost package is an easily configurable GraphQL library that will be used to fetch data on the client. Finally, the link between Apollo and React will be taken care of by the react-apollo library.
6. Create the server key for the database
We will create a Server key which will be used by Gatsby to prerender the page. Remember to copy the secret somewhere since we will use it later on. Protect server keys carefully, they can be used to create, destroy, or manage the database to which they are assigned. To create the key we can go to the fauna dashboard and create the key in the security tab.

7. Update GatsbyJS config files with server and new read-only keys
To add the GraphQL support to our build process, we need to add the following code into our graphql-config.js inside the plugins section where we will insert the FaunaDB server key which we generated a few moments ago.
{ resolve: "gatsby-source-graphql", options: { typeName: "Fauna", fieldName: "fauna", url: "https://graphql.fauna.com/graphql", headers: { Authorization: "Bearer <SERVER KEY>", }, }, }
For the GraphQL access to work in the browser, we have to create a key that only has permissions to read data from the collections. FaunaDB has an extensive security layer in which you can define that. The easiest way is to go to the FaunaDB Console at dashboard.fauna.com and create a new role for your database by clicking "Security" in the left sidebar, then "Manage Roles," then "New Custom Role":
Call the new custom role ‘ClientRead’ and make sure to add all collections and indexes (these are the collections that were created by importing the GraphQL schema). Then, select Read for each for them. Your screen should look like this:

You have probably noticed the Membership tab on this page. Although we are not using it in this tutorial, it is interesting enough to explain it since it's an alternative way to get security tokens. In the Membership tab can specify that entities of a collection (let's say we have a 'Users' collection) in FaunaDb are members of a particular role. That means that if you impersonate one of these entities in that collection, the role privileges apply. You impersonate a database entity (e.g. a User) by associating credentials with the entity and using the Login function, which will return a token. That way you can also implement password-based authentication in FaunaDb. We won't use it in this tutorial, but if that interests you, check the FaunaDB authentication tutorial.
Let’s ignore Membership for now, once you have created the role, we can create a new key with the new role. As before, click "Security", then "New Key," but this time select "ClientRead" from the Role dropdown:

Now, let's insert this read-only key in the gatsby-browser.js configuration file to be able to call the GraphQL API from the browser:
import React from "react" import ApolloClient from "apollo-boost" import { ApolloProvider } from "react-apollo" const client = new ApolloClient({ uri: "https://graphql.fauna.com/graphql", request: operation => { operation.setContext({ headers: { Authorization: "Bearer <CLIENT_KEY>", }, }) }, }) export const wrapRootElement = ({ element }) => ( <ApolloProvider client={client}>{element}</ApolloProvider> )
GatsbyJS will render its Router component as a root element. If we want to use the ApolloClient everywhere in the application on the client, we need to wrap this root element with the ApolloProvider component.
8. Load the pre-rendered product data at build time
Now that everything is set up, we can finally write the actual code to load our data. Let’s start with the products we will load at build time.
For this we need to modify src/pages/index.js file to look like this:
import React from "react" import { graphql } from "gatsby" Import Layout from "../components/Layout" const IndexPage = ({ data }) => ( <Layout> <ul> {data.fauna.allProducts.data.map(product => ( <li>{product.title} - {product.description}</li> ))} </ul> </Layout> ) export const query = graphql` { fauna { allProducts { data { _id title description } } } } ` export default IndexPage
The exported query will automatically get picked up by GatsbyJS and executed before rendering the IndexPage component. The result of that query will be passed as data prop into the IndexPage component.If we now run the develop script, we can see the pre-rendered documents on the development server on http://localhost:8000/.
$ npm run develop
9. Load the reviews at run time
To load the reviews of a product on the client, we have to make some changes to the src/pages/index.js:
import { gql } from "apollo-boost" import { useQuery } from "@apollo/react-hooks" import { graphql } from "gatsby" import React, { useState } from "react" import Layout from "../components/layout" // Query for fetching at build-time export const query = graphql ` { fauna { allProducts { data { _id title description } } } } ` // Query for fetching on the client const GET_REVIEWS = gql ` query GetReviews($productId: ID!) { findProductByID(id: $productId) { reviews { data { _id username text } } } } ` const IndexPage = props => { const [productId, setProductId] = useState(null) const { loading, data } = useQuery(GET_REVIEWS, { variables: { productId }, skip: !productId, }) } export default IndexPage
Let’s go through this step by step.
First, we need to import parts of the apollo-boost and apollo-react packages so we can use the GraphQL client we previously set up in the gatsby-browser.js file.
Then, we need to implement our GET_REVIEWS query. It tries to find a product by its ID and then loads the associated reviews of that product. The query takes one variable, which is the productId.
In the component function, we use two hooks: useState and useQuery
The useState hook keeps track of the productId for which we want to load reviews. If a user clicks a button, the state will be set to the productId corresponding to that button.
The useQuery hook then applies this productId to load reviews for that product from FaunaDB. The skip parameter of the hook prevents the execution of the query when the page is rendered for the first time because productId will be null.
If we now run the development server again and click on the buttons, our application should execute the query with different productIds as expected.
$ npm run develop
Conclusion
A combination of server-side data fetching and client-side hydration make JAMstack applications pretty powerful. These methods enable flexible interaction with our data so we can adhere to different business needs.
It’s usually a good idea to load as much data at build time as possible to improve page performance. But if the data isn’t needed by all clients, or too big to be sent to the client all at once, we can split things up and switch to on-demand loading on the client. This is the case for user-specific data, pagination, or any data that changes rather frequently and might be outdated by the time it reaches the user.
In this article, we implemented an approach that loads part of the data at build time, and then loads the rest of the data in the frontend as the user interacts with the page.
Of course, we have not implemented a login or forms yet to create new reviews. How would we tackle that? That is material for another tutorial where we can use FaunaDB’s attribute-based access control to specify what a client key can read and write from the frontend.
The code of this tutorial can be found in this repo.
The post Build a dynamic JAMstack app with GatsbyJS and FaunaDB appeared first on CSS-Tricks.
Build a dynamic JAMstack app with GatsbyJS and FaunaDB published first on https://deskbysnafu.tumblr.com/
0 notes
Text
Mirage JS Deep Dive: Using Mirage JS And Cypress For UI Testing (Part 4)
About The Author
Kelvin Omereshone is the CTO at Quru Lab. Kelvin was formerly a Front-end engineer at myPadi.ng. He’s the creator of NUXtjs Africa community and very passionate … More about Kelvin …
In this final part of Mirage JS Deep Dive series, we will be putting everything we’ve learned in the past series into learning how to perform UI tests with Mirage JS.
One of my favorite quotes about software testing is from the Flutter documentation. It says:
“How can you ensure that your app continues to work as you add more features or change existing functionality? By writing tests.”
On that note, this last part of the Mirage JS Deep Dive series will focus on using Mirage to test your JavaScript front-end application.
Note: This article assumes a Cypress environment. Cypress is a testing framework for UI testing. You can, however, transfer the knowledge here to whatever UI testing environment or framework you use.
Read Previous Parts Of The Series:
Part 1: Understanding Mirage JS Models And Associations
Part 2: Understanding Factories, Fixtures And Serializers
Part 3: Understanding Timing, Response And Passthrough
UI Tests Primer
UI or User Interface test is a form of acceptance testing done to verify the user flows of your front-end application. The emphasis of these kinds of software tests is on the end-user that is the actual person who will be interacting with your web application on a variety of devices ranging from desktops, laptops to mobile devices. These users would be interfacing or interacting with your application using input devices such as a keyboard, mouse, or touch screens. UI tests, therefore, are written to mimic the user interaction with your application as close as possible.
Let’s take an e-commerce website for example. A typical UI test scenario would be:
The user can view the list of products when visiting the homepage.
Other UI test scenarios might be:
The user can see the name of a product on the product’s detail page.
The user can click on the “add to cart” button.
The user can checkout.
You get the idea, right?
In making UI Tests, you will mostly be relying on your back-end states, i.e. did it return the products or an error? The role Mirage plays in this is to make those server states available for you to tweak as you need. So instead of making an actual request to your production server in your UI tests, you make the request to Mirage mock server.
For the remaining part of this article, we will be performing UI tests on a fictitious e-commerce web application UI. So let’s get started.
Our First UI Test
As earlier stated, this article assumes a Cypress environment. Cypress makes testing UI on the web fast and easy. You could simulate clicks and navigation and you can programmatically visit routes in your application. See the docs for more on Cypress.
So, assuming Cypress and Mirage are available to us, let’s start off by defining a proxy function for your API request. We can do so in the support/index.js file of our Cypress setup. Just paste the following code in:
// cypress/support/index.jsCypress.on("window:before:load", (win) => { win.handleFromCypress = function (request) { return fetch(request.url, { method: request.method, headers: request.requestHeaders, body: request.requestBody, }).then((res) => { let content = res.headers.map["content-type"] === "application/json" ? res.json() : res.text() return new Promise((resolve) => { content.then((body) => resolve([res.status, res.headers, body])) }) }) }})
Then, in your app bootstrapping file (main.js for Vue, index.js for React), we’ll use Mirage to proxy your app’s API requests to the handleFromCypress function only when Cypress is running. Here is the code for that:
import { Server, Response } from "miragejs" if (window.Cypress) { new Server({ environment: "test", routes() { let methods = ["get", "put", "patch", "post", "delete"] methods.forEach((method) => { this[method]("/*", async (schema, request) => { let [status, headers, body] = await window.handleFromCypress(request) return new Response(status, headers, body) }) }) }, })}
With that setup, anytime Cypress is running, your app knows to use Mirage as the mock server for all API requests.
Let’s continue writing some UI tests. We’ll begin by testing our homepage to see if it has 5 products displayed. To do this in Cypress, we need to create a homepage.test.js file in the tests folder in the root of your project directory. Next, we’ll tell Cypress to do the following:
Visit the homepage i.e / route
Then assert if it has li elements with the class of product and also checks if they are 5 in numbers.
Here is the code:
// homepage.test.jsit('shows the products', () => { cy.visit('/'); cy.get('li.product').should('have.length', 5);});
You might have guessed that this test would fail because we don’t have a production server returning 5 products to our front-end application. So what do we do? We mock out the server in Mirage! If we bring in Mirage, it can intercept all network calls in our tests. Let’s do this below and start the Mirage server before each test in the beforeEach function and also shut it down in the afterEach function. The beforeEach and afterEach functions are both provided by Cypress and they were made available so you could run code before and after each test run in your test suite — hence the name. So let’s see the code for this:
// homepage.test.jsimport { Server } from "miragejs" let server beforeEach(() => { server = new Server()}) afterEach(() => { server.shutdown()}) it("shows the products", function () { cy.visit("/") cy.get("li.product").should("have.length", 5)})
Okay, we are getting somewhere; we have imported the Server from Mirage and we are starting it and shutting it down in beforeEach and afterEach functions respectively. Let’s go about mocking our product resource.
// homepage.test.jsimport { Server, Model } from 'miragejs'; let server; beforeEach(() => { server = new Server({ models: { product: Model, }, routes() { this.namespace = 'api'; this.get('products', ({ products }, request) => { return products.all(); }); }, });}); afterEach(() => { server.shutdown();}); it('shows the products', function() { cy.visit('/'); cy.get('li.product').should('have.length', 5);});
Note: You can always take a peek at the previous parts of this series if you don’t understand the Mirage bits of the above code snippet.
Part 1: Understanding Mirage JS Models And Associations
Part 2: Understanding Factories, Fixtures And Serializers
Part 3: Understanding Timing, Response And Passthrough
Okay, we have started fleshing out our Server instance by creating the product model and also by creating the route handler for the /api/products route. However, if we run our tests, it will fail because we don’t have any products in the Mirage database yet.
Let’s populate the Mirage database with some products. In order to do this, we could have used the create() method on our server instance, but creating 5 products by hand seems pretty tedious. There should be a better way.
Ah yes, there is. Let’s utilize factories (as explained in the second part of this series). We’ll need to create our product factory like so:
// homepage.test.jsimport { Server, Model, Factory } from 'miragejs'; let server; beforeEach(() => { server = new Server({ models: { product: Model, }, factories: { product: Factory.extend({ name(i) { return `Product ${i}` } }) }, routes() { this.namespace = 'api'; this.get('products', ({ products }, request) => { return products.all(); }); }, });}); afterEach(() => { server.shutdown();}); it('shows the products', function() { cy.visit('/'); cy.get('li.product').should('have.length', 5);});
Then, finally, we’ll use createList() to quickly create the 5 products that our test needs to pass.
Let’s do this:
// homepage.test.jsimport { Server, Model, Factory } from 'miragejs'; let server; beforeEach(() => { server = new Server({ models: { product: Model, }, factories: { product: Factory.extend({ name(i) { return `Product ${i}` } }) }, routes() { this.namespace = 'api'; this.get('products', ({ products }, request) => { return products.all(); }); }, });}); afterEach(() => { server.shutdown();}); it('shows the products', function() { server.createList("product", 5) cy.visit('/'); cy.get('li.product').should('have.length', 5);});
So when we run our test, it passes!
Note: After each test, Mirage’s server is shutdown and reset, so none of this state will leak across tests.
Avoiding Multiple Mirage Server
If you have been following along this series, you’d notice when we were using Mirage in development to intercept our network requests; we had a server.js file in the root of our app where we set up Mirage. In the spirit of DRY (Don’t Repeat Yourself), I think it would be good to utilize that server instance instead of having two separate instances of Mirage for both development and testing. To do this (in case you don’t have a server.js file already), just create one in your project src directory.
Note: Your structure will differ if you are using a JavaScript framework but the general idea is to setup up the server.js file in the src root of your project.
So with this new structure, we’ll export a function in server.js that is responsible for creating our Mirage server instance. Let’s do that:
// src/server.js export function makeServer() { /* Mirage code goes here */}
Let’s complete the implementation of the makeServer function by removing the Mirage JS server we created in homepage.test.js and adding it to the makeServer function body:
import { Server, Model, Factory } from 'miragejs'; export function makeServer() { let server = new Server({ models: { product: Model, }, factories: { product: Factory.extend({ name(i) { return `Product ${i}`; }, }), }, routes() { this.namespace = 'api'; this.get('/products', ({ products }) => { return products.all(); }); }, seeds(server) { server.createList('product', 5); }, }); return server;}
Now all you have to do is import makeServer in your test. Using a single Mirage Server instance is cleaner; this way you don’t have to maintain two server instances for both development and test environments.
After importing the makeServer function, our test should now look like this:
import { makeServer } from '/path/to/server'; let server; beforeEach(() => { server = makeServer();}); afterEach(() => { server.shutdown();}); it('shows the products', function() { server.createList('product', 5); cy.visit('/'); cy.get('li.product').should('have.length', 5);});
So we now have a central Mirage server that serves us in both development and testing. You can also use the makeServer function to start Mirage in development (see first part of this series).
Your Mirage code should not find it’s way into production. Therefore, depending on your build setup, you would need to only start Mirage during development mode.
Note: Read my article on how to set up API Mocking with Mirage and Vue.js to see how I did that in Vue so you could replicate in whatever front-end framework you use.
Testing Environment
Mirage has two environments: development (default) and test. In development mode, the Mirage server will have a default response time of 400ms(which you can customize. See the third article of this series for that), logs all server responses to the console, and loads the development seeds.
However, in the test environment, we have:
0 delays to keep our tests fast
Mirage suppresses all logs so as not to pollute your CI logs
Mirage will also ignore the seeds() function so that your seed data can be used solely for development but won’t leak into your tests. This helps keep your tests deterministic.
Let’s update our makeServer so we can have the benefit of the test environment. To do that, we’ll make it accept an object with the environment option(we will default it to development and override it in our test). Our server.js should now look like this:
// src/server.jsimport { Server, Model, Factory } from 'miragejs'; export function makeServer({ environment = 'development' } = {}) { let server = new Server({ environment, models: { product: Model, }, factories: { product: Factory.extend({ name(i) { return `Product ${i}`; }, }), }, routes() { this.namespace = 'api'; this.get('/products', ({ products }) => { return products.all(); }); }, seeds(server) { server.createList('product', 5); }, }); return server;}
Also note that we are passing the environment option to the Mirage server instance using the ES6 property shorthand. Now with this in place, let’s update our test to override the environment value to test. Our test now looks like this:
import { makeServer } from '/path/to/server'; let server; beforeEach(() => { server = makeServer({ environment: 'test' });}); afterEach(() => { server.shutdown();}); it('shows the products', function() { server.createList('product', 5); cy.visit('/'); cy.get('li.product').should('have.length', 5);});
AAA Testing
Mirage encourages a standard for testing called the triple-A or AAA testing approach. This stands for Arrange, Act and Assert. You could see this structure in our above test already:
it("shows all the products", function () { // ARRANGE server.createList("product", 5) // ACT cy.visit("/") // ASSERT cy.get("li.product").should("have.length", 5)})
You might need to break this pattern but 9 times out of 10 it should work just fine for your tests.
Let’s Test Errors
So far, we’ve tested our homepage to see if it has 5 products, however, what if the server is down or something went wrong with fetching the products? We don’t need to wait for the server to be down to work on how our UI would look like in such a case. We can simply simulate that scenario with Mirage.
Let’s return a 500 (Server error) when the user is on the homepage. As we have seen in a previous article, to customize Mirage responses we make use of the Response class. Let’s import it and write our test.
homepage.test.jsimport { Response } from "miragejs" it('shows an error when fetching products fails', function() { server.get('/products', () => { return new Response( 500, {}, { error: "Can’t fetch products at this time" } ); }); cy.visit('/'); cy.get('div.error').should('contain', "Can’t fetch products at this time");});
What a world of flexibility! We just override the response Mirage would return in order to test how our UI would display if it failed fetching products. Our overall homepage.test.js file would now look like this:
// homepage.test.jsimport { Response } from 'miragejs';import { makeServer } from 'path/to/server'; let server; beforeEach(() => { server = makeServer({ environment: 'test' });}); afterEach(() => { server.shutdown();}); it('shows the products', function() { server.createList('product', 5); cy.visit('/'); cy.get('li.product').should('have.length', 5);}); it('shows an error when fetching products fails', function() { server.get('/products', () => { return new Response( 500, {}, { error: "Can’t fetch products at this time" } ); }); cy.visit('/'); cy.get('div.error').should('contain', "Can’t fetch products at this time");});
Note the modification we did to the /api/products handler only lives in our test. That means it works as we previously define when you are in development mode.
So when we run our tests, both should pass.
Note: I believe its worthy of noting that the elements we are querying for in Cypress should exist in your front-end UI. Cypress doesn’t create HTML elements for you.
Testing The Product Detail Page
Finally, let’s test the UI of the product detail page. So this is what we are testing for:
User can see the product name on the product detail page
Let’s get to it. First, we create a new test to test this user flow.
Here is the test:
it("shows the product’s name on the detail route", function() { let product = this.server.create('product', { name: 'Korg Piano', }); cy.visit(`/${product.id}`); cy.get('h1').should('contain', 'Korg Piano');});
Your homepage.test.js should finally look like this.
// homepage.test.jsimport { Response } from 'miragejs';import { makeServer } from 'path/to/server; let server; beforeEach(() => { server = makeServer({ environment: 'test' });}); afterEach(() => { server.shutdown();}); it('shows the products', function() { console.log(server); server.createList('product', 5); cy.visit('/'); cy.get('li.product').should('have.length', 5);}); it('shows an error when fetching products fails', function() { server.get('/products', () => { return new Response( 500, {}, { error: "Can’t fetch products at this time" } ); }); cy.visit('/'); cy.get('div.error').should('contain', "Can’t fetch products at this time");}); it("shows the product’s name on the detail route", function() { let product = server.create('product', { name: 'Korg Piano', }); cy.visit(`/${product.id}`); cy.get('h1').should('contain', 'Korg Piano');});
When you run your tests, all three should pass.
Wrapping Up
It’s been fun showing you the inners of Mirage JS in this series. I hope you have been better equipped to start having a better front-end development experience by using Mirage to mock out your back-end server. I also hope you’ll use the knowledge from this article to write more acceptance/UI/end-to-end tests for your front-end applications.
Part 1: Understanding Mirage JS Models And Associations
Part 2: Understanding Factories, Fixtures And Serializers
Part 3: Understanding Timing, Response And Passthrough
Part 4: Using Mirage JS And Cypress For UI Testing
(ra, il)
Website Design & SEO Delray Beach by DBL07.co
Delray Beach SEO
Via http://www.scpie.org/mirage-js-deep-dive-using-mirage-js-and-cypress-for-ui-testing-part-4/
source https://scpie.weebly.com/blog/mirage-js-deep-dive-using-mirage-js-and-cypress-for-ui-testing-part-4
0 notes
Text
Mirage JS Deep Dive: Using Mirage JS And Cypress For UI Testing (Part 4)
About The Author
Kelvin Omereshone is the CTO at Quru Lab. Kelvin was formerly a Front-end engineer at myPadi.ng. He’s the creator of NUXtjs Africa community and very passionate … More about Kelvin …
In this final part of Mirage JS Deep Dive series, we will be putting everything we’ve learned in the past series into learning how to perform UI tests with Mirage JS.
One of my favorite quotes about software testing is from the Flutter documentation. It says:
“How can you ensure that your app continues to work as you add more features or change existing functionality? By writing tests.”
On that note, this last part of the Mirage JS Deep Dive series will focus on using Mirage to test your JavaScript front-end application.
Note: This article assumes a Cypress environment. Cypress is a testing framework for UI testing. You can, however, transfer the knowledge here to whatever UI testing environment or framework you use.
Read Previous Parts Of The Series:
Part 1: Understanding Mirage JS Models And Associations
Part 2: Understanding Factories, Fixtures And Serializers
Part 3: Understanding Timing, Response And Passthrough
UI Tests Primer
UI or User Interface test is a form of acceptance testing done to verify the user flows of your front-end application. The emphasis of these kinds of software tests is on the end-user that is the actual person who will be interacting with your web application on a variety of devices ranging from desktops, laptops to mobile devices. These users would be interfacing or interacting with your application using input devices such as a keyboard, mouse, or touch screens. UI tests, therefore, are written to mimic the user interaction with your application as close as possible.
Let’s take an e-commerce website for example. A typical UI test scenario would be:
The user can view the list of products when visiting the homepage.
Other UI test scenarios might be:
The user can see the name of a product on the product’s detail page.
The user can click on the “add to cart” button.
The user can checkout.
You get the idea, right?
In making UI Tests, you will mostly be relying on your back-end states, i.e. did it return the products or an error? The role Mirage plays in this is to make those server states available for you to tweak as you need. So instead of making an actual request to your production server in your UI tests, you make the request to Mirage mock server.
For the remaining part of this article, we will be performing UI tests on a fictitious e-commerce web application UI. So let’s get started.
Our First UI Test
As earlier stated, this article assumes a Cypress environment. Cypress makes testing UI on the web fast and easy. You could simulate clicks and navigation and you can programmatically visit routes in your application. See the docs for more on Cypress.
So, assuming Cypress and Mirage are available to us, let’s start off by defining a proxy function for your API request. We can do so in the support/index.js file of our Cypress setup. Just paste the following code in:
// cypress/support/index.js Cypress.on("window:before:load", (win) => { win.handleFromCypress = function (request) { return fetch(request.url, { method: request.method, headers: request.requestHeaders, body: request.requestBody, }).then((res) => { let content = res.headers.map["content-type"] === "application/json" ? res.json() : res.text() return new Promise((resolve) => { content.then((body) => resolve([res.status, res.headers, body])) }) }) } })
Then, in your app bootstrapping file (main.js for Vue, index.js for React), we’ll use Mirage to proxy your app’s API requests to the handleFromCypress function only when Cypress is running. Here is the code for that:
import { Server, Response } from "miragejs" if (window.Cypress) { new Server({ environment: "test", routes() { let methods = ["get", "put", "patch", "post", "delete"] methods.forEach((method) => { this[method]("/*", async (schema, request) => { let [status, headers, body] = await window.handleFromCypress(request) return new Response(status, headers, body) }) }) }, }) }
With that setup, anytime Cypress is running, your app knows to use Mirage as the mock server for all API requests.
Let’s continue writing some UI tests. We’ll begin by testing our homepage to see if it has 5 products displayed. To do this in Cypress, we need to create a homepage.test.js file in the tests folder in the root of your project directory. Next, we’ll tell Cypress to do the following:
Visit the homepage i.e / route
Then assert if it has li elements with the class of product and also checks if they are 5 in numbers.
Here is the code:
// homepage.test.js it('shows the products', () => { cy.visit('/'); cy.get('li.product').should('have.length', 5); });
You might have guessed that this test would fail because we don’t have a production server returning 5 products to our front-end application. So what do we do? We mock out the server in Mirage! If we bring in Mirage, it can intercept all network calls in our tests. Let’s do this below and start the Mirage server before each test in the beforeEach function and also shut it down in the afterEach function. The beforeEach and afterEach functions are both provided by Cypress and they were made available so you could run code before and after each test run in your test suite — hence the name. So let’s see the code for this:
// homepage.test.js import { Server } from "miragejs" let server beforeEach(() => { server = new Server() }) afterEach(() => { server.shutdown() }) it("shows the products", function () { cy.visit("/") cy.get("li.product").should("have.length", 5) })
Okay, we are getting somewhere; we have imported the Server from Mirage and we are starting it and shutting it down in beforeEach and afterEach functions respectively. Let’s go about mocking our product resource.
// homepage.test.js import { Server, Model } from 'miragejs'; let server; beforeEach(() => { server = new Server({ models: { product: Model, }, routes() { this.namespace = 'api'; this.get('products', ({ products }, request) => { return products.all(); }); }, }); }); afterEach(() => { server.shutdown(); }); it('shows the products', function() { cy.visit('/'); cy.get('li.product').should('have.length', 5); });
Note: You can always take a peek at the previous parts of this series if you don’t understand the Mirage bits of the above code snippet.
Part 1: Understanding Mirage JS Models And Associations
Part 2: Understanding Factories, Fixtures And Serializers
Part 3: Understanding Timing, Response And Passthrough
Okay, we have started fleshing out our Server instance by creating the product model and also by creating the route handler for the /api/products route. However, if we run our tests, it will fail because we don’t have any products in the Mirage database yet.
Let’s populate the Mirage database with some products. In order to do this, we could have used the create() method on our server instance, but creating 5 products by hand seems pretty tedious. There should be a better way.
Ah yes, there is. Let’s utilize factories (as explained in the second part of this series). We’ll need to create our product factory like so:
// homepage.test.js import { Server, Model, Factory } from 'miragejs'; let server; beforeEach(() => { server = new Server({ models: { product: Model, }, factories: { product: Factory.extend({ name(i) { return `Product ${i}` } }) }, routes() { this.namespace = 'api'; this.get('products', ({ products }, request) => { return products.all(); }); }, }); }); afterEach(() => { server.shutdown(); }); it('shows the products', function() { cy.visit('/'); cy.get('li.product').should('have.length', 5); });
Then, finally, we’ll use createList() to quickly create the 5 products that our test needs to pass.
Let’s do this:
// homepage.test.js import { Server, Model, Factory } from 'miragejs'; let server; beforeEach(() => { server = new Server({ models: { product: Model, }, factories: { product: Factory.extend({ name(i) { return `Product ${i}` } }) }, routes() { this.namespace = 'api'; this.get('products', ({ products }, request) => { return products.all(); }); }, }); }); afterEach(() => { server.shutdown(); }); it('shows the products', function() { server.createList("product", 5) cy.visit('/'); cy.get('li.product').should('have.length', 5); });
So when we run our test, it passes!
Note: After each test, Mirage’s server is shutdown and reset, so none of this state will leak across tests.
Avoiding Multiple Mirage Server
If you have been following along this series, you’d notice when we were using Mirage in development to intercept our network requests; we had a server.js file in the root of our app where we set up Mirage. In the spirit of DRY (Don’t Repeat Yourself), I think it would be good to utilize that server instance instead of having two separate instances of Mirage for both development and testing. To do this (in case you don’t have a server.js file already), just create one in your project src directory.
Note: Your structure will differ if you are using a JavaScript framework but the general idea is to setup up the server.js file in the src root of your project.
So with this new structure, we’ll export a function in server.js that is responsible for creating our Mirage server instance. Let’s do that:
// src/server.js export function makeServer() { /* Mirage code goes here */}
Let’s complete the implementation of the makeServer function by removing the Mirage JS server we created in homepage.test.js and adding it to the makeServer function body:
import { Server, Model, Factory } from 'miragejs'; export function makeServer() { let server = new Server({ models: { product: Model, }, factories: { product: Factory.extend({ name(i) { return `Product ${i}`; }, }), }, routes() { this.namespace = 'api'; this.get('/products', ({ products }) => { return products.all(); }); }, seeds(server) { server.createList('product', 5); }, }); return server; }
Now all you have to do is import makeServer in your test. Using a single Mirage Server instance is cleaner; this way you don’t have to maintain two server instances for both development and test environments.
After importing the makeServer function, our test should now look like this:
import { makeServer } from '/path/to/server'; let server; beforeEach(() => { server = makeServer(); }); afterEach(() => { server.shutdown(); }); it('shows the products', function() { server.createList('product', 5); cy.visit('/'); cy.get('li.product').should('have.length', 5); });
So we now have a central Mirage server that serves us in both development and testing. You can also use the makeServer function to start Mirage in development (see first part of this series).
Your Mirage code should not find it’s way into production. Therefore, depending on your build setup, you would need to only start Mirage during development mode.
Note: Read my article on how to set up API Mocking with Mirage and Vue.js to see how I did that in Vue so you could replicate in whatever front-end framework you use.
Testing Environment
Mirage has two environments: development (default) and test. In development mode, the Mirage server will have a default response time of 400ms(which you can customize. See the third article of this series for that), logs all server responses to the console, and loads the development seeds.
However, in the test environment, we have:
0 delays to keep our tests fast
Mirage suppresses all logs so as not to pollute your CI logs
Mirage will also ignore the seeds() function so that your seed data can be used solely for development but won’t leak into your tests. This helps keep your tests deterministic.
Let’s update our makeServer so we can have the benefit of the test environment. To do that, we’ll make it accept an object with the environment option(we will default it to development and override it in our test). Our server.js should now look like this:
// src/server.js import { Server, Model, Factory } from 'miragejs'; export function makeServer({ environment = 'development' } = {}) { let server = new Server({ environment, models: { product: Model, }, factories: { product: Factory.extend({ name(i) { return `Product ${i}`; }, }), }, routes() { this.namespace = 'api'; this.get('/products', ({ products }) => { return products.all(); }); }, seeds(server) { server.createList('product', 5); }, }); return server; }
Also note that we are passing the environment option to the Mirage server instance using the ES6 property shorthand. Now with this in place, let’s update our test to override the environment value to test. Our test now looks like this:
import { makeServer } from '/path/to/server'; let server; beforeEach(() => { server = makeServer({ environment: 'test' }); }); afterEach(() => { server.shutdown(); }); it('shows the products', function() { server.createList('product', 5); cy.visit('/'); cy.get('li.product').should('have.length', 5); });
AAA Testing
Mirage encourages a standard for testing called the triple-A or AAA testing approach. This stands for Arrange, Act and Assert. You could see this structure in our above test already:
it("shows all the products", function () { // ARRANGE server.createList("product", 5) // ACT cy.visit("/") // ASSERT cy.get("li.product").should("have.length", 5) })
You might need to break this pattern but 9 times out of 10 it should work just fine for your tests.
Let’s Test Errors
So far, we’ve tested our homepage to see if it has 5 products, however, what if the server is down or something went wrong with fetching the products? We don’t need to wait for the server to be down to work on how our UI would look like in such a case. We can simply simulate that scenario with Mirage.
Let’s return a 500 (Server error) when the user is on the homepage. As we have seen in a previous article, to customize Mirage responses we make use of the Response class. Let’s import it and write our test.
homepage.test.js import { Response } from "miragejs" it('shows an error when fetching products fails', function() { server.get('/products', () => { return new Response( 500, {}, { error: "Can’t fetch products at this time" } ); }); cy.visit('/'); cy.get('div.error').should('contain', "Can’t fetch products at this time"); });
What a world of flexibility! We just override the response Mirage would return in order to test how our UI would display if it failed fetching products. Our overall homepage.test.js file would now look like this:
// homepage.test.js import { Response } from 'miragejs'; import { makeServer } from 'path/to/server'; let server; beforeEach(() => { server = makeServer({ environment: 'test' }); }); afterEach(() => { server.shutdown(); }); it('shows the products', function() { server.createList('product', 5); cy.visit('/'); cy.get('li.product').should('have.length', 5); }); it('shows an error when fetching products fails', function() { server.get('/products', () => { return new Response( 500, {}, { error: "Can’t fetch products at this time" } ); }); cy.visit('/'); cy.get('div.error').should('contain', "Can’t fetch products at this time"); });
Note the modification we did to the /api/products handler only lives in our test. That means it works as we previously define when you are in development mode.
So when we run our tests, both should pass.
Note: I believe its worthy of noting that the elements we are querying for in Cypress should exist in your front-end UI. Cypress doesn’t create HTML elements for you.
Testing The Product Detail Page
Finally, let’s test the UI of the product detail page. So this is what we are testing for:
User can see the product name on the product detail page
Let’s get to it. First, we create a new test to test this user flow.
Here is the test:
it("shows the product’s name on the detail route", function() { let product = this.server.create('product', { name: 'Korg Piano', }); cy.visit(`/${product.id}`); cy.get('h1').should('contain', 'Korg Piano'); });
Your homepage.test.js should finally look like this.
// homepage.test.js import { Response } from 'miragejs'; import { makeServer } from 'path/to/server; let server; beforeEach(() => { server = makeServer({ environment: 'test' }); }); afterEach(() => { server.shutdown(); }); it('shows the products', function() { console.log(server); server.createList('product', 5); cy.visit('/'); cy.get('li.product').should('have.length', 5); }); it('shows an error when fetching products fails', function() { server.get('/products', () => { return new Response( 500, {}, { error: "Can’t fetch products at this time" } ); }); cy.visit('/'); cy.get('div.error').should('contain', "Can’t fetch products at this time"); }); it("shows the product’s name on the detail route", function() { let product = server.create('product', { name: 'Korg Piano', }); cy.visit(`/${product.id}`); cy.get('h1').should('contain', 'Korg Piano'); });
When you run your tests, all three should pass.
Wrapping Up
It’s been fun showing you the inners of Mirage JS in this series. I hope you have been better equipped to start having a better front-end development experience by using Mirage to mock out your back-end server. I also hope you’ll use the knowledge from this article to write more acceptance/UI/end-to-end tests for your front-end applications.
Part 1: Understanding Mirage JS Models And Associations
Part 2: Understanding Factories, Fixtures And Serializers
Part 3: Understanding Timing, Response And Passthrough
Part 4: Using Mirage JS And Cypress For UI Testing
(ra, il)
Website Design & SEO Delray Beach by DBL07.co
Delray Beach SEO
source http://www.scpie.org/mirage-js-deep-dive-using-mirage-js-and-cypress-for-ui-testing-part-4/ source https://scpie.tumblr.com/post/621217772438011904
0 notes
Text
Mirage JS Deep Dive: Using Mirage JS And Cypress For UI Testing (Part 4)
About The Author
Kelvin Omereshone is the CTO at Quru Lab. Kelvin was formerly a Front-end engineer at myPadi.ng. He’s the creator of NUXtjs Africa community and very passionate … More about Kelvin …
In this final part of Mirage JS Deep Dive series, we will be putting everything we’ve learned in the past series into learning how to perform UI tests with Mirage JS.
One of my favorite quotes about software testing is from the Flutter documentation. It says:
“How can you ensure that your app continues to work as you add more features or change existing functionality? By writing tests.”
On that note, this last part of the Mirage JS Deep Dive series will focus on using Mirage to test your JavaScript front-end application.
Note: This article assumes a Cypress environment. Cypress is a testing framework for UI testing. You can, however, transfer the knowledge here to whatever UI testing environment or framework you use.
Read Previous Parts Of The Series:
Part 1: Understanding Mirage JS Models And Associations
Part 2: Understanding Factories, Fixtures And Serializers
Part 3: Understanding Timing, Response And Passthrough
UI Tests Primer
UI or User Interface test is a form of acceptance testing done to verify the user flows of your front-end application. The emphasis of these kinds of software tests is on the end-user that is the actual person who will be interacting with your web application on a variety of devices ranging from desktops, laptops to mobile devices. These users would be interfacing or interacting with your application using input devices such as a keyboard, mouse, or touch screens. UI tests, therefore, are written to mimic the user interaction with your application as close as possible.
Let’s take an e-commerce website for example. A typical UI test scenario would be:
The user can view the list of products when visiting the homepage.
Other UI test scenarios might be:
The user can see the name of a product on the product’s detail page.
The user can click on the “add to cart” button.
The user can checkout.
You get the idea, right?
In making UI Tests, you will mostly be relying on your back-end states, i.e. did it return the products or an error? The role Mirage plays in this is to make those server states available for you to tweak as you need. So instead of making an actual request to your production server in your UI tests, you make the request to Mirage mock server.
For the remaining part of this article, we will be performing UI tests on a fictitious e-commerce web application UI. So let’s get started.
Our First UI Test
As earlier stated, this article assumes a Cypress environment. Cypress makes testing UI on the web fast and easy. You could simulate clicks and navigation and you can programmatically visit routes in your application. See the docs for more on Cypress.
So, assuming Cypress and Mirage are available to us, let’s start off by defining a proxy function for your API request. We can do so in the support/index.js file of our Cypress setup. Just paste the following code in:
// cypress/support/index.js Cypress.on("window:before:load", (win) => { win.handleFromCypress = function (request) { return fetch(request.url, { method: request.method, headers: request.requestHeaders, body: request.requestBody, }).then((res) => { let content = res.headers.map["content-type"] === "application/json" ? res.json() : res.text() return new Promise((resolve) => { content.then((body) => resolve([res.status, res.headers, body])) }) }) } })
Then, in your app bootstrapping file (main.js for Vue, index.js for React), we’ll use Mirage to proxy your app’s API requests to the handleFromCypress function only when Cypress is running. Here is the code for that:
import { Server, Response } from "miragejs" if (window.Cypress) { new Server({ environment: "test", routes() { let methods = ["get", "put", "patch", "post", "delete"] methods.forEach((method) => { this[method]("/*", async (schema, request) => { let [status, headers, body] = await window.handleFromCypress(request) return new Response(status, headers, body) }) }) }, }) }
With that setup, anytime Cypress is running, your app knows to use Mirage as the mock server for all API requests.
Let’s continue writing some UI tests. We’ll begin by testing our homepage to see if it has 5 products displayed. To do this in Cypress, we need to create a homepage.test.js file in the tests folder in the root of your project directory. Next, we’ll tell Cypress to do the following:
Visit the homepage i.e / route
Then assert if it has li elements with the class of product and also checks if they are 5 in numbers.
Here is the code:
// homepage.test.js it('shows the products', () => { cy.visit('/'); cy.get('li.product').should('have.length', 5); });
You might have guessed that this test would fail because we don’t have a production server returning 5 products to our front-end application. So what do we do? We mock out the server in Mirage! If we bring in Mirage, it can intercept all network calls in our tests. Let’s do this below and start the Mirage server before each test in the beforeEach function and also shut it down in the afterEach function. The beforeEach and afterEach functions are both provided by Cypress and they were made available so you could run code before and after each test run in your test suite — hence the name. So let’s see the code for this:
// homepage.test.js import { Server } from "miragejs" let server beforeEach(() => { server = new Server() }) afterEach(() => { server.shutdown() }) it("shows the products", function () { cy.visit("/") cy.get("li.product").should("have.length", 5) })
Okay, we are getting somewhere; we have imported the Server from Mirage and we are starting it and shutting it down in beforeEach and afterEach functions respectively. Let’s go about mocking our product resource.
// homepage.test.js import { Server, Model } from 'miragejs'; let server; beforeEach(() => { server = new Server({ models: { product: Model, }, routes() { this.namespace = 'api'; this.get('products', ({ products }, request) => { return products.all(); }); }, }); }); afterEach(() => { server.shutdown(); }); it('shows the products', function() { cy.visit('/'); cy.get('li.product').should('have.length', 5); });
Note: You can always take a peek at the previous parts of this series if you don’t understand the Mirage bits of the above code snippet.
Part 1: Understanding Mirage JS Models And Associations
Part 2: Understanding Factories, Fixtures And Serializers
Part 3: Understanding Timing, Response And Passthrough
Okay, we have started fleshing out our Server instance by creating the product model and also by creating the route handler for the /api/products route. However, if we run our tests, it will fail because we don’t have any products in the Mirage database yet.
Let’s populate the Mirage database with some products. In order to do this, we could have used the create() method on our server instance, but creating 5 products by hand seems pretty tedious. There should be a better way.
Ah yes, there is. Let’s utilize factories (as explained in the second part of this series). We’ll need to create our product factory like so:
// homepage.test.js import { Server, Model, Factory } from 'miragejs'; let server; beforeEach(() => { server = new Server({ models: { product: Model, }, factories: { product: Factory.extend({ name(i) { return `Product ${i}` } }) }, routes() { this.namespace = 'api'; this.get('products', ({ products }, request) => { return products.all(); }); }, }); }); afterEach(() => { server.shutdown(); }); it('shows the products', function() { cy.visit('/'); cy.get('li.product').should('have.length', 5); });
Then, finally, we’ll use createList() to quickly create the 5 products that our test needs to pass.
Let’s do this:
// homepage.test.js import { Server, Model, Factory } from 'miragejs'; let server; beforeEach(() => { server = new Server({ models: { product: Model, }, factories: { product: Factory.extend({ name(i) { return `Product ${i}` } }) }, routes() { this.namespace = 'api'; this.get('products', ({ products }, request) => { return products.all(); }); }, }); }); afterEach(() => { server.shutdown(); }); it('shows the products', function() { server.createList("product", 5) cy.visit('/'); cy.get('li.product').should('have.length', 5); });
So when we run our test, it passes!
Note: After each test, Mirage’s server is shutdown and reset, so none of this state will leak across tests.
Avoiding Multiple Mirage Server
If you have been following along this series, you’d notice when we were using Mirage in development to intercept our network requests; we had a server.js file in the root of our app where we set up Mirage. In the spirit of DRY (Don’t Repeat Yourself), I think it would be good to utilize that server instance instead of having two separate instances of Mirage for both development and testing. To do this (in case you don’t have a server.js file already), just create one in your project src directory.
Note: Your structure will differ if you are using a JavaScript framework but the general idea is to setup up the server.js file in the src root of your project.
So with this new structure, we’ll export a function in server.js that is responsible for creating our Mirage server instance. Let’s do that:
// src/server.js export function makeServer() { /* Mirage code goes here */}
Let’s complete the implementation of the makeServer function by removing the Mirage JS server we created in homepage.test.js and adding it to the makeServer function body:
import { Server, Model, Factory } from 'miragejs'; export function makeServer() { let server = new Server({ models: { product: Model, }, factories: { product: Factory.extend({ name(i) { return `Product ${i}`; }, }), }, routes() { this.namespace = 'api'; this.get('/products', ({ products }) => { return products.all(); }); }, seeds(server) { server.createList('product', 5); }, }); return server; }
Now all you have to do is import makeServer in your test. Using a single Mirage Server instance is cleaner; this way you don’t have to maintain two server instances for both development and test environments.
After importing the makeServer function, our test should now look like this:
import { makeServer } from '/path/to/server'; let server; beforeEach(() => { server = makeServer(); }); afterEach(() => { server.shutdown(); }); it('shows the products', function() { server.createList('product', 5); cy.visit('/'); cy.get('li.product').should('have.length', 5); });
So we now have a central Mirage server that serves us in both development and testing. You can also use the makeServer function to start Mirage in development (see first part of this series).
Your Mirage code should not find it’s way into production. Therefore, depending on your build setup, you would need to only start Mirage during development mode.
Note: Read my article on how to set up API Mocking with Mirage and Vue.js to see how I did that in Vue so you could replicate in whatever front-end framework you use.
Testing Environment
Mirage has two environments: development (default) and test. In development mode, the Mirage server will have a default response time of 400ms(which you can customize. See the third article of this series for that), logs all server responses to the console, and loads the development seeds.
However, in the test environment, we have:
0 delays to keep our tests fast
Mirage suppresses all logs so as not to pollute your CI logs
Mirage will also ignore the seeds() function so that your seed data can be used solely for development but won’t leak into your tests. This helps keep your tests deterministic.
Let’s update our makeServer so we can have the benefit of the test environment. To do that, we’ll make it accept an object with the environment option(we will default it to development and override it in our test). Our server.js should now look like this:
// src/server.js import { Server, Model, Factory } from 'miragejs'; export function makeServer({ environment = 'development' } = {}) { let server = new Server({ environment, models: { product: Model, }, factories: { product: Factory.extend({ name(i) { return `Product ${i}`; }, }), }, routes() { this.namespace = 'api'; this.get('/products', ({ products }) => { return products.all(); }); }, seeds(server) { server.createList('product', 5); }, }); return server; }
Also note that we are passing the environment option to the Mirage server instance using the ES6 property shorthand. Now with this in place, let’s update our test to override the environment value to test. Our test now looks like this:
import { makeServer } from '/path/to/server'; let server; beforeEach(() => { server = makeServer({ environment: 'test' }); }); afterEach(() => { server.shutdown(); }); it('shows the products', function() { server.createList('product', 5); cy.visit('/'); cy.get('li.product').should('have.length', 5); });
AAA Testing
Mirage encourages a standard for testing called the triple-A or AAA testing approach. This stands for Arrange, Act and Assert. You could see this structure in our above test already:
it("shows all the products", function () { // ARRANGE server.createList("product", 5) // ACT cy.visit("/") // ASSERT cy.get("li.product").should("have.length", 5) })
You might need to break this pattern but 9 times out of 10 it should work just fine for your tests.
Let’s Test Errors
So far, we’ve tested our homepage to see if it has 5 products, however, what if the server is down or something went wrong with fetching the products? We don’t need to wait for the server to be down to work on how our UI would look like in such a case. We can simply simulate that scenario with Mirage.
Let’s return a 500 (Server error) when the user is on the homepage. As we have seen in a previous article, to customize Mirage responses we make use of the Response class. Let’s import it and write our test.
homepage.test.js import { Response } from "miragejs" it('shows an error when fetching products fails', function() { server.get('/products', () => { return new Response( 500, {}, { error: "Can’t fetch products at this time" } ); }); cy.visit('/'); cy.get('div.error').should('contain', "Can’t fetch products at this time"); });
What a world of flexibility! We just override the response Mirage would return in order to test how our UI would display if it failed fetching products. Our overall homepage.test.js file would now look like this:
// homepage.test.js import { Response } from 'miragejs'; import { makeServer } from 'path/to/server'; let server; beforeEach(() => { server = makeServer({ environment: 'test' }); }); afterEach(() => { server.shutdown(); }); it('shows the products', function() { server.createList('product', 5); cy.visit('/'); cy.get('li.product').should('have.length', 5); }); it('shows an error when fetching products fails', function() { server.get('/products', () => { return new Response( 500, {}, { error: "Can’t fetch products at this time" } ); }); cy.visit('/'); cy.get('div.error').should('contain', "Can’t fetch products at this time"); });
Note the modification we did to the /api/products handler only lives in our test. That means it works as we previously define when you are in development mode.
So when we run our tests, both should pass.
Note: I believe its worthy of noting that the elements we are querying for in Cypress should exist in your front-end UI. Cypress doesn’t create HTML elements for you.
Testing The Product Detail Page
Finally, let’s test the UI of the product detail page. So this is what we are testing for:
User can see the product name on the product detail page
Let’s get to it. First, we create a new test to test this user flow.
Here is the test:
it("shows the product’s name on the detail route", function() { let product = this.server.create('product', { name: 'Korg Piano', }); cy.visit(`/${product.id}`); cy.get('h1').should('contain', 'Korg Piano'); });
Your homepage.test.js should finally look like this.
// homepage.test.js import { Response } from 'miragejs'; import { makeServer } from 'path/to/server; let server; beforeEach(() => { server = makeServer({ environment: 'test' }); }); afterEach(() => { server.shutdown(); }); it('shows the products', function() { console.log(server); server.createList('product', 5); cy.visit('/'); cy.get('li.product').should('have.length', 5); }); it('shows an error when fetching products fails', function() { server.get('/products', () => { return new Response( 500, {}, { error: "Can’t fetch products at this time" } ); }); cy.visit('/'); cy.get('div.error').should('contain', "Can’t fetch products at this time"); }); it("shows the product’s name on the detail route", function() { let product = server.create('product', { name: 'Korg Piano', }); cy.visit(`/${product.id}`); cy.get('h1').should('contain', 'Korg Piano'); });
When you run your tests, all three should pass.
Wrapping Up
It’s been fun showing you the inners of Mirage JS in this series. I hope you have been better equipped to start having a better front-end development experience by using Mirage to mock out your back-end server. I also hope you’ll use the knowledge from this article to write more acceptance/UI/end-to-end tests for your front-end applications.
Part 1: Understanding Mirage JS Models And Associations
Part 2: Understanding Factories, Fixtures And Serializers
Part 3: Understanding Timing, Response And Passthrough
Part 4: Using Mirage JS And Cypress For UI Testing
(ra, il)
Website Design & SEO Delray Beach by DBL07.co
Delray Beach SEO
source http://www.scpie.org/mirage-js-deep-dive-using-mirage-js-and-cypress-for-ui-testing-part-4/
0 notes
Text
Mirage JS Deep Dive: Using Mirage JS And Cypress For UI Testing (Part 4)
About The Author
Kelvin Omereshone is the CTO at Quru Lab. Kelvin was formerly a Front-end engineer at myPadi.ng. He’s the creator of NUXtjs Africa community and very passionate … More about Kelvin …
In this final part of Mirage JS Deep Dive series, we will be putting everything we’ve learned in the past series into learning how to perform UI tests with Mirage JS.
One of my favorite quotes about software testing is from the Flutter documentation. It says:
“How can you ensure that your app continues to work as you add more features or change existing functionality? By writing tests.”
On that note, this last part of the Mirage JS Deep Dive series will focus on using Mirage to test your JavaScript front-end application.
Note: This article assumes a Cypress environment. Cypress is a testing framework for UI testing. You can, however, transfer the knowledge here to whatever UI testing environment or framework you use.
Read Previous Parts Of The Series:
Part 1: Understanding Mirage JS Models And Associations
Part 2: Understanding Factories, Fixtures And Serializers
Part 3: Understanding Timing, Response And Passthrough
UI Tests Primer
UI or User Interface test is a form of acceptance testing done to verify the user flows of your front-end application. The emphasis of these kinds of software tests is on the end-user that is the actual person who will be interacting with your web application on a variety of devices ranging from desktops, laptops to mobile devices. These users would be interfacing or interacting with your application using input devices such as a keyboard, mouse, or touch screens. UI tests, therefore, are written to mimic the user interaction with your application as close as possible.
Let’s take an e-commerce website for example. A typical UI test scenario would be:
The user can view the list of products when visiting the homepage.
Other UI test scenarios might be:
The user can see the name of a product on the product’s detail page.
The user can click on the “add to cart” button.
The user can checkout.
You get the idea, right?
In making UI Tests, you will mostly be relying on your back-end states, i.e. did it return the products or an error? The role Mirage plays in this is to make those server states available for you to tweak as you need. So instead of making an actual request to your production server in your UI tests, you make the request to Mirage mock server.
For the remaining part of this article, we will be performing UI tests on a fictitious e-commerce web application UI. So let’s get started.
Our First UI Test
As earlier stated, this article assumes a Cypress environment. Cypress makes testing UI on the web fast and easy. You could simulate clicks and navigation and you can programmatically visit routes in your application. See the docs for more on Cypress.
So, assuming Cypress and Mirage are available to us, let’s start off by defining a proxy function for your API request. We can do so in the support/index.js file of our Cypress setup. Just paste the following code in:
// cypress/support/index.js Cypress.on("window:before:load", (win) => { win.handleFromCypress = function (request) { return fetch(request.url, { method: request.method, headers: request.requestHeaders, body: request.requestBody, }).then((res) => { let content = res.headers.map["content-type"] === "application/json" ? res.json() : res.text() return new Promise((resolve) => { content.then((body) => resolve([res.status, res.headers, body])) }) }) } })
Then, in your app bootstrapping file (main.js for Vue, index.js for React), we’ll use Mirage to proxy your app’s API requests to the handleFromCypress function only when Cypress is running. Here is the code for that:
import { Server, Response } from "miragejs" if (window.Cypress) { new Server({ environment: "test", routes() { let methods = ["get", "put", "patch", "post", "delete"] methods.forEach((method) => { this[method]("/*", async (schema, request) => { let [status, headers, body] = await window.handleFromCypress(request) return new Response(status, headers, body) }) }) }, }) }
With that setup, anytime Cypress is running, your app knows to use Mirage as the mock server for all API requests.
Let’s continue writing some UI tests. We’ll begin by testing our homepage to see if it has 5 products displayed. To do this in Cypress, we need to create a homepage.test.js file in the tests folder in the root of your project directory. Next, we’ll tell Cypress to do the following:
Visit the homepage i.e / route
Then assert if it has li elements with the class of product and also checks if they are 5 in numbers.
Here is the code:
// homepage.test.js it('shows the products', () => { cy.visit('/'); cy.get('li.product').should('have.length', 5); });
You might have guessed that this test would fail because we don’t have a production server returning 5 products to our front-end application. So what do we do? We mock out the server in Mirage! If we bring in Mirage, it can intercept all network calls in our tests. Let’s do this below and start the Mirage server before each test in the beforeEach function and also shut it down in the afterEach function. The beforeEach and afterEach functions are both provided by Cypress and they were made available so you could run code before and after each test run in your test suite — hence the name. So let’s see the code for this:
// homepage.test.js import { Server } from "miragejs" let server beforeEach(() => { server = new Server() }) afterEach(() => { server.shutdown() }) it("shows the products", function () { cy.visit("/") cy.get("li.product").should("have.length", 5) })
Okay, we are getting somewhere; we have imported the Server from Mirage and we are starting it and shutting it down in beforeEach and afterEach functions respectively. Let’s go about mocking our product resource.
// homepage.test.js import { Server, Model } from 'miragejs'; let server; beforeEach(() => { server = new Server({ models: { product: Model, }, routes() { this.namespace = 'api'; this.get('products', ({ products }, request) => { return products.all(); }); }, }); }); afterEach(() => { server.shutdown(); }); it('shows the products', function() { cy.visit('/'); cy.get('li.product').should('have.length', 5); });
Note: You can always take a peek at the previous parts of this series if you don’t understand the Mirage bits of the above code snippet.
Part 1: Understanding Mirage JS Models And Associations
Part 2: Understanding Factories, Fixtures And Serializers
Part 3: Understanding Timing, Response And Passthrough
Okay, we have started fleshing out our Server instance by creating the product model and also by creating the route handler for the /api/products route. However, if we run our tests, it will fail because we don’t have any products in the Mirage database yet.
Let’s populate the Mirage database with some products. In order to do this, we could have used the create() method on our server instance, but creating 5 products by hand seems pretty tedious. There should be a better way.
Ah yes, there is. Let’s utilize factories (as explained in the second part of this series). We’ll need to create our product factory like so:
// homepage.test.js import { Server, Model, Factory } from 'miragejs'; let server; beforeEach(() => { server = new Server({ models: { product: Model, }, factories: { product: Factory.extend({ name(i) { return `Product ${i}` } }) }, routes() { this.namespace = 'api'; this.get('products', ({ products }, request) => { return products.all(); }); }, }); }); afterEach(() => { server.shutdown(); }); it('shows the products', function() { cy.visit('/'); cy.get('li.product').should('have.length', 5); });
Then, finally, we’ll use createList() to quickly create the 5 products that our test needs to pass.
Let’s do this:
// homepage.test.js import { Server, Model, Factory } from 'miragejs'; let server; beforeEach(() => { server = new Server({ models: { product: Model, }, factories: { product: Factory.extend({ name(i) { return `Product ${i}` } }) }, routes() { this.namespace = 'api'; this.get('products', ({ products }, request) => { return products.all(); }); }, }); }); afterEach(() => { server.shutdown(); }); it('shows the products', function() { server.createList("product", 5) cy.visit('/'); cy.get('li.product').should('have.length', 5); });
So when we run our test, it passes!
Note: After each test, Mirage’s server is shutdown and reset, so none of this state will leak across tests.
Avoiding Multiple Mirage Server
If you have been following along this series, you’d notice when we were using Mirage in development to intercept our network requests; we had a server.js file in the root of our app where we set up Mirage. In the spirit of DRY (Don’t Repeat Yourself), I think it would be good to utilize that server instance instead of having two separate instances of Mirage for both development and testing. To do this (in case you don’t have a server.js file already), just create one in your project src directory.
Note: Your structure will differ if you are using a JavaScript framework but the general idea is to setup up the server.js file in the src root of your project.
So with this new structure, we’ll export a function in server.js that is responsible for creating our Mirage server instance. Let’s do that:
// src/server.js export function makeServer() { /* Mirage code goes here */}
Let’s complete the implementation of the makeServer function by removing the Mirage JS server we created in homepage.test.js and adding it to the makeServer function body:
import { Server, Model, Factory } from 'miragejs'; export function makeServer() { let server = new Server({ models: { product: Model, }, factories: { product: Factory.extend({ name(i) { return `Product ${i}`; }, }), }, routes() { this.namespace = 'api'; this.get('/products', ({ products }) => { return products.all(); }); }, seeds(server) { server.createList('product', 5); }, }); return server; }
Now all you have to do is import makeServer in your test. Using a single Mirage Server instance is cleaner; this way you don’t have to maintain two server instances for both development and test environments.
After importing the makeServer function, our test should now look like this:
import { makeServer } from '/path/to/server'; let server; beforeEach(() => { server = makeServer(); }); afterEach(() => { server.shutdown(); }); it('shows the products', function() { server.createList('product', 5); cy.visit('/'); cy.get('li.product').should('have.length', 5); });
So we now have a central Mirage server that serves us in both development and testing. You can also use the makeServer function to start Mirage in development (see first part of this series).
Your Mirage code should not find it’s way into production. Therefore, depending on your build setup, you would need to only start Mirage during development mode.
Note: Read my article on how to set up API Mocking with Mirage and Vue.js to see how I did that in Vue so you could replicate in whatever front-end framework you use.
Testing Environment
Mirage has two environments: development (default) and test. In development mode, the Mirage server will have a default response time of 400ms(which you can customize. See the third article of this series for that), logs all server responses to the console, and loads the development seeds.
However, in the test environment, we have:
0 delays to keep our tests fast
Mirage suppresses all logs so as not to pollute your CI logs
Mirage will also ignore the seeds() function so that your seed data can be used solely for development but won’t leak into your tests. This helps keep your tests deterministic.
Let’s update our makeServer so we can have the benefit of the test environment. To do that, we’ll make it accept an object with the environment option(we will default it to development and override it in our test). Our server.js should now look like this:
// src/server.js import { Server, Model, Factory } from 'miragejs'; export function makeServer({ environment = 'development' } = {}) { let server = new Server({ environment, models: { product: Model, }, factories: { product: Factory.extend({ name(i) { return `Product ${i}`; }, }), }, routes() { this.namespace = 'api'; this.get('/products', ({ products }) => { return products.all(); }); }, seeds(server) { server.createList('product', 5); }, }); return server; }
Also note that we are passing the environment option to the Mirage server instance using the ES6 property shorthand. Now with this in place, let’s update our test to override the environment value to test. Our test now looks like this:
import { makeServer } from '/path/to/server'; let server; beforeEach(() => { server = makeServer({ environment: 'test' }); }); afterEach(() => { server.shutdown(); }); it('shows the products', function() { server.createList('product', 5); cy.visit('/'); cy.get('li.product').should('have.length', 5); });
AAA Testing
Mirage encourages a standard for testing called the triple-A or AAA testing approach. This stands for Arrange, Act and Assert. You could see this structure in our above test already:
it("shows all the products", function () { // ARRANGE server.createList("product", 5) // ACT cy.visit("/") // ASSERT cy.get("li.product").should("have.length", 5) })
You might need to break this pattern but 9 times out of 10 it should work just fine for your tests.
Let’s Test Errors
So far, we’ve tested our homepage to see if it has 5 products, however, what if the server is down or something went wrong with fetching the products? We don’t need to wait for the server to be down to work on how our UI would look like in such a case. We can simply simulate that scenario with Mirage.
Let’s return a 500 (Server error) when the user is on the homepage. As we have seen in a previous article, to customize Mirage responses we make use of the Response class. Let’s import it and write our test.
homepage.test.js import { Response } from "miragejs" it('shows an error when fetching products fails', function() { server.get('/products', () => { return new Response( 500, {}, { error: "Can’t fetch products at this time" } ); }); cy.visit('/'); cy.get('div.error').should('contain', "Can’t fetch products at this time"); });
What a world of flexibility! We just override the response Mirage would return in order to test how our UI would display if it failed fetching products. Our overall homepage.test.js file would now look like this:
// homepage.test.js import { Response } from 'miragejs'; import { makeServer } from 'path/to/server'; let server; beforeEach(() => { server = makeServer({ environment: 'test' }); }); afterEach(() => { server.shutdown(); }); it('shows the products', function() { server.createList('product', 5); cy.visit('/'); cy.get('li.product').should('have.length', 5); }); it('shows an error when fetching products fails', function() { server.get('/products', () => { return new Response( 500, {}, { error: "Can’t fetch products at this time" } ); }); cy.visit('/'); cy.get('div.error').should('contain', "Can’t fetch products at this time"); });
Note the modification we did to the /api/products handler only lives in our test. That means it works as we previously define when you are in development mode.
So when we run our tests, both should pass.
Note: I believe its worthy of noting that the elements we are querying for in Cypress should exist in your front-end UI. Cypress doesn’t create HTML elements for you.
Testing The Product Detail Page
Finally, let’s test the UI of the product detail page. So this is what we are testing for:
User can see the product name on the product detail page
Let’s get to it. First, we create a new test to test this user flow.
Here is the test:
it("shows the product’s name on the detail route", function() { let product = this.server.create('product', { name: 'Korg Piano', }); cy.visit(`/${product.id}`); cy.get('h1').should('contain', 'Korg Piano'); });
Your homepage.test.js should finally look like this.
// homepage.test.js import { Response } from 'miragejs'; import { makeServer } from 'path/to/server; let server; beforeEach(() => { server = makeServer({ environment: 'test' }); }); afterEach(() => { server.shutdown(); }); it('shows the products', function() { console.log(server); server.createList('product', 5); cy.visit('/'); cy.get('li.product').should('have.length', 5); }); it('shows an error when fetching products fails', function() { server.get('/products', () => { return new Response( 500, {}, { error: "Can’t fetch products at this time" } ); }); cy.visit('/'); cy.get('div.error').should('contain', "Can’t fetch products at this time"); }); it("shows the product’s name on the detail route", function() { let product = server.create('product', { name: 'Korg Piano', }); cy.visit(`/${product.id}`); cy.get('h1').should('contain', 'Korg Piano'); });
When you run your tests, all three should pass.
Wrapping Up
It’s been fun showing you the inners of Mirage JS in this series. I hope you have been better equipped to start having a better front-end development experience by using Mirage to mock out your back-end server. I also hope you’ll use the knowledge from this article to write more acceptance/UI/end-to-end tests for your front-end applications.
Part 1: Understanding Mirage JS Models And Associations
Part 2: Understanding Factories, Fixtures And Serializers
Part 3: Understanding Timing, Response And Passthrough
Part 4: Using Mirage JS And Cypress For UI Testing
(ra, il)
Website Design & SEO Delray Beach by DBL07.co
Delray Beach SEO
source http://www.scpie.org/mirage-js-deep-dive-using-mirage-js-and-cypress-for-ui-testing-part-4/ source https://scpie1.blogspot.com/2020/06/mirage-js-deep-dive-using-mirage-js-and.html
0 notes
Text
New Features Incorporated in Laravel 5.6 Version
The latest version of Laravel framework is Laravel 5.6. Laravel always produces the best code which is clean and readable. Laravel is also known for its features like Authentication caching, Routing, Application logic, dependency logic etc. The most important concern when building the large web applications along with Laravel is its performance.
Pros of Laravel for website development
One can get dynamic templates which are light in weight. Also, this process is further facilitated by content seeding.
The most powerful and architectured widgets i.e. CSS and JSS add an overall appeal to your site.
Rather than using any SQL code for writing database queries, to facilitate your developer’s work you can get PHP syntax.
Laravel also offer high-level security with a strong password.
The delays can occur due to repetitive tasks but with the help of Artisan tool which is the powerful tool offering an automated mechanism for the repetitive tasks.

The list of new features in Laravel 5.6 is listed below.
1. Logging improvements:
This is the most improved and one of the biggest features incorporated in the Laravel 5.6 version. At the start, the logging configuration of the version V5.6 moves to config/logging.php to config/app.php.
One can also configure stacks which can send the log messages to multiple handlers. for example, you can even send all the debug messages to the system log, and then send error logs to the slack.
2. Single Server Task Scheduling
If you have any task scheduler which runs on more than one servers, the task runs on each server. One should indicate that the task must run on one of the servers having onOneServer() method.
3. Dynamic Rate Limiting:
Next is the dynamic rate limiting. Laravel 5.6 version introduces this and gives flexibility so that one can easily limit the per-user basis. Look at the example below:
Route::middleware('auth:api', 'throttle:rate_limit,1')
->group(function () {
Route::get('/user', function () {
//
});
});
Here, rate_limit is the attribute of the model App\User which determines the number of requests possible in the provided time limit.
4. Broadcast Channel Classes
Rather than using the closures, you can also use the channel classes in the routes/channels.php file. In order to generate the new channel class, the new version of Laravel i.e. Laravel 5.6 version provides the following:
php artisan make:channel OrderChannel
You register your channel in the routes/channels.php file like so:
use App\Broadcasting\OrderChannel; Broadcast::channel('order.{order}', OrderChannel::class);
5. API Controller Generation
Next, one can even generate the resources controller for API which does not include the edit and create actions which are no more required. These actions are applicable for resource controllers itself while returning the HTML. You can also use an –api flag.
php artisan make:controller API/PhotoController --api
6. Eloquent Date Casting
One can customize individually the formats of eloquent date and time casting. The format can also be used in model serialization to the JSON data or an array.
protected $casts = [ 'birthday' => 'date:Y-m-d', 'joined_at' => 'datetime:Y-m-d H:00', ];
7. Blade Component Aliases
One can also alias the blade components for the suitable access. For example, to store a component at the resources/views/components/alert.blade.php one can use the component() method to alias it in the shorter name.
Blade::component('components.alert', 'alert');
You can then render it with the defined alias:
@component('alert') <p>This is an alert component</p> @endcomponen
8. Argon2 Password Hashing
The new version of Laravel 5.6 also supports a password hashing algorithm for PHP 7.2 and above versions. One can control and check which hashing driver is being used by default in the next configuration file. new config/hashing.phpconfiguration file.
9. UUID Methods
Two new methods are now available in the Illuminate\Support\Str class for generating Universal Unique Identifiers (UUID):
In order to support or illuminate string class to generate UUID, below code is important.
return (string) Str::uuid();
return (string) Str::orderedUuid();
10. Collision
Collision provides error reporting which is a dev dependency.
11. Learning More About Laravel 5.6
In order to upgrade the Laravel version you need to refer the upgrade guide. The up-gradation time required is between 10 to 30 minutes and the mileage varies depending on your application.
Conclusion
Looking at the updates in the newer version of Laravel 5.6, if you want to upgrade your Laravel installation to next version, you need to follow the reference guide. Also, Laravel strives to update your application in between short and major releases. If you make an upgrade from 5.5 to the next version it takes approximately 30 minutes but your mileage might vary depending on your application.
0 notes
Text
CodeIgniter 4 Database Seeding From CSV File Tutorial
Inside this article we will see the concept of database seeding in CodeIgniter 4 using csv file. CodeIgniter 4 database seeding from csv file is a technique to dump test data into tables in bulk.
This tutorial will be super easy to understand and it’s steps are easier to implement in your code as well. Database seeding is the process in which we feed test data to tables. We can insert data either using Faker library, manual data or means of some more data sources like CSV, JSON.
0 notes
Text
Meet my Free, Local API Server for your Front-End Adventures (written in Node.js)!
Hey, fellow Stackarians!
I hope that 2018 has been gracious to you so far, and you are ready for the upcoming challenges!
As this article is kinda long, let’s kick it off with a TLDR version:
I created a free API service you can run locally using Docker. This API service can be used as data source for your front-end project, since it has all the necessary basic functions needed to learn or experiment with different front-end frameworks.
Read the Documentation here!
Usage:
Install and start Docker
Download the pre-configured docker-compose file: docker-compose.yml
Open a new terminal tab and navigate to the folder where you downloaded the docker-compose file and run docker-compose up
Hit CTRL-C to stop the process and get back the command prompt
Run docker-compose down to remove the containers
Connecting to the database:
With these credentials, you can connect to the DB using your favorite client. I can recommend Postico if you are on Mac, or DBeaver if you are looking for a multi-platform solution:
Default credentials:
user: root password: root host: localhost port: 1330 database: api-db
The database is seeded with two different users with different privileges:
The pre-defined user with admin privileges:
username: admin, email: [email protected], password: admin
The pre-defined regular user:
username: User Doe email: [email protected] password: 12345
--
And now, if you are still with me, to full the story!
There are plenty of shiny toys to put your hands on this year if you would like to keep up the pace front-end-wise. React is still on the rocks, VueJs is right on its tail, and the good old Angular is getting better and better, so there are lots of opportunities to learn and experiment!
If backend programming is not your best side, or you just don't want to waste time coding your own, here is a handy little thingy you can use: your very own local API server and database! (yaaaay!)
Sure, some great online services provide decent API servers, like Mockaroo, or you can just use your favorite service's public API, like Spotify's.
But - for me at least - they are just not scratching at the right spot. You know, I wanted something simple, but with all the most common things you can come by, like registering a new user, logging in, listing, adding and deleting stuff from a database. Just the usual CRUD operations.
I know, I know. First world problems.
So I decided to create my own super simple API server (emphasis on super simple), that can run locally. It has an attached database that I can browse with a UI database client app, pre-seeded, ready to go out of the box.
But then I thought: Hey, I cannot be the only one who needs this. Why don't I make it public?
But then immediately:
'But not everyone is comfortable with installing databases locally, not to mention the OS differences and yadda-yadda-yadda...'
Sure, these things are relatively easy, and anyone can do it with some documentation checking, but if you are not experienced with these kinds of things, it is just stealing your time from your primary goal: working on front-end. Why not make it simple then?
Probably you are now like,
'Ok, Rob, this is some pretty long intro, we get it, you made something for yourself what is already out there, good work...'
BUT WHAT IS THIS AND WHERE IS THE LOOT?!
This is a simple backend service with a PostgreSQL database hooked up to it, seeded with some fake products data for a simple e-commerce site.
The server provides some features you can use through its API. You can:
register a new user
login and reach protected endpoints using JWT
list fake products with enough details to create common product cards (with all-time favorites like Intelligent Frozen Chicken, Handcrafted Rubber Pizza not to mention the great Licensed Granite Salad! God, I love Faker!)
search for a product by name or ingredient
show one particular product
edit a product
delete a product
For further details, please see the documentation
The best part is that you don't need to install PostgreSQL on your local machine, or add fake data (however you can)!
If you are reading this blog frequently, I'm sure you've already heard about Docker and containerization. If not, please let me summarize and (way over)simplify it for you:
Each container is a separate environment which is running on your machine, and you can reach it through a specific port, kinda like a virtual machine. This environment contains everything that is needed to run your code, and every time, on every platform, once it is created, it will be exactly the same as its image file declares it.
Why is this good for your health? Because I already made this image file and the one that runs the database in another container and links them together for you, and all you need to run it is Docker.
Dude, seriously... I won't ask you twice…
I can imagine you've just shoveled a big chunk of coal to the rage train engine... But easy now, we are at the meat of it, finally!
This is what you need to do to run this backend service:
1. Install and run Docker
You find the instructions on the official site: Docker Install With Docker, you will be able to run containers on your local machine without any environment setup hassle. Don’t forget to start it after installation, or your command line won’t recognize the docker command!
2. Grab this docker-compose file: docker-compose.yml
This file serves as a config file telling Docker which images you would like to have a copy of up and running. The image files are stored in Docker Hub. If it is not already on your machine, Docker will download it for you and cache it. So next time you wish to run it, it will be ready to use! Let’s take a closer look at it!
version: '3.3' services: freebie-api-server: container_name: api-server image: robertczinege/freebie-api-server:latest ports: - '1337:1337' depends_on: - db environment: - DB_HOST=db - DB_PORT=5432 - DB_USER=root - DB_PASSWORD=root - DB_DATABASE=api-db - PORT=1337 - LOGGER_LEVEL=silly - TOKEN_SECRET='thisIsASuperSecretS3cr3t' - TOKEN_EXPIRATION=1h db: container_name: api-db image: postgres:10 environment: - POSTGRES_USER=root - POSTGRES_PASSWORD=root - POSTGRES_DB=api-db ports: - '1330:5432'
This file tells Docker to set up two services, the 'freebie-api-server' called api-server and the 'db' called api-db. You will find them among the containers in Docker with these names after you started them.
The image property tells which image file should be used for this. As you can see, the service itself has its own image file available on my Docker Hub account, and the database is the official PostgreSql image file. If you don't have them, Docker will download and save them.
There is an interesting line, the depends_on. This tells Docker to start the 'db' service (called api-db) first.
The ports is a really important property. The ports listed here will be exposed, so you can use them from the outside. In this case, the API service is available on the port 1337 and the database is available on port 1330 (the port 5432 is Postgres' default port, which is exposed as 1330).
You can see a bunch of environmental variables. These environmental variables will be passed to the services running in the containers as you would pass them in through command line.
However, the DB_HOST env var is strange. It is not a URL or a connection string, as you would expect it to be. Well, Docker Compose will give this property automatically when started the 'db' service.
You can use these environment variables if you wish to deploy this service. But this is another whole story.
3. Navigate in the terminal to the directory where you saved the docker-compose file and run docker-compose up.
Docker Compose comes with Docker by default, and it really helps you to run multiple containers depending on each other.
This command will start both the server and the Postgres database linked to it. First, the server will fill the database with fake products and a default admin and regular user.
You will see the process of the startup in the command line. When you see the 'Server is up!' message, you know that everything is jolly good!
4. To stop the service, hit CTRL-C
CTRL-C will stop the processes, but will leave the containers up. You will get back your command prompt, so you can type in further commands.
If you run docker-compose down now, that will stop and remove both of the containers. When you start again with docker-compose up, the containers will be set up again with new random products.
5. You are good to go, and you can start developing your own frontend for it!
You can reach the service on localhost:1337/api. You can try this out using e.g. Postman, or just navigating to the localhost:1337/api/products URL in your browser. You will see the actual JSON response with the list of products.
Advanced, totally ethical pro tips:
TIP 1: You can check if the service is up and running if you type in docker ps -a. This command lists all the running containers on your machine. If you see the api-server and the api-db in the list, you are good to go.
TIP 2: You are able just to stop the containers but not removing them. In this case, the database will keep your changes and won't be reseeded again. To achieve this, stop the containers like this: CTRL-C to exit the process and get back the command prompt docker stop api-server api-db to stop both of the containers docker start api-server api-db to start them again
TIP 3: Connecting to the DB using database client
I recommend you to use Postico if you are on Mac or DBeaver if you are on Windows or Linux, but you can use it on Mac as well for exploring the database. They are free and very user-friendly.
You can connect to the database with the following credentials:
user: root password: root host: localhost port: 1330 database: api-db
And boom, you are in. You can check and edit the data you find here. It is especially useful when you would like to add more users with admin privileges, since the database only comes with one predefined admin user to the service, or you can dump or restore the db. Well, for reasons.
Time to say goodbye!
So, this is it guys; I hope it was not so boring to read all those letters.
If you have any questions or feedback, please do not hesitate to drop them in the comments below, I much appreciate them! If you have any idea how I could improve it, that's even better! I would love to hear them because this little project definitely could use some more love!
I hope you will find a good use for this thing as I already do!
See you later, alligator! ;)
And now, time for some self-advertisement!
If you are interested how to create a backend app like this, I recommend you our Node Fundations training, where you can learn all the necessary knowledge to put together a service like this.
If you are more interested in the client side code and want to learn cool front-end frameworks, check out Angular and React trainings!
Meet my Free, Local API Server for your Front-End Adventures (written in Node.js)! published first on https://koresolpage.tumblr.com/
0 notes
Text
Software Architect – Backend Developer job at Maxerence Singapore
Pillpresso is an electronic medication dispenser from the company Maxerence.
It is a connected device that automates medication sorting, reminding and dispensing. The aim is to deliver convenience and improve medication adherence, which has been identified by the World Health Organization as a global issue that requires attention.
Selected from close to 100 ideas, our team won the top prize of S$50,000 in seed funding at Modern Aging, a business competition organised by NUS Enterprise and Access Health that focuses on developing solutions for the elderly.
One of the judges was Dr. William Haseltine, who is well known for his pioneering work on cancer, HIV/AIDS and genomics, and has been listed by Time Magazine as one of the world's 25 most influential business people.
Our team has received endorsement from several healthcare organisations, and is in discussions with Tan Tock Seng Hospital and home nursing providers on a project collaboration.
Pillpresso has been featured multiple times in the press (e.g. Straits Times, Lianhe Zaobao), including a special mention by Senior Minister of State, Dr Amy Khor.
See articles here:
• http://www.straitstimes.com/singapore/health/tap-on-science-and-technology-to-transform-ageing-dr-amy-khor
• http://www.straitstimes.com/business/growing-focus-on-creating-products-for-the-elderly
• http://www.channelnewsasia.com/news/singapore/3-teams-receive-s-125- 000/2319006.html
• https://www.techinasia.com/modern-aging-winner-startups/
• https://news.nus.edu.sg/highlights/9793-start-ups-support-modern-ageing
BACKGROUND
Pillpresso is building a software backend and frontend to remotely control a personal, IoT-enabled medication device, and track the user's compliance history and medication profile.
DAY-TO-DAY RESPONSIBILITIES
Oversee the development and execution of the product roadmap
Develop web & mobile platforms for:
Medication management by multiple parties; and
Tracking of medication compliance for the elderly and healthcare professionals
Collaborate with external software and hardware developers on the mobile app development and hardware-software interfacing respectively.
Liaise with customers and external stakeholders to understand their needs, prioritise product features and work on API integration (if needed)
In general, your responsibilities will cut across several domains, including:
Front end concerns
Back-end infrastructure
Technical architecture
Dev ops
REQUIREMENTS:
Perform collaborative coding and Git
AngularJS and/or Ionic framework
NodeJS
Javascript/HTML5/CSS3
JSON based RESTful APIs
OPTIONAL:
Experience with embedded systems and hardware-software interfacing databases, preferably MySQL and MongoDB
WHOM WE ARE LOOKING FOR:
Pro-active and driven
Independent and hardworking
Good communication skills
Not afraid to share new ideas, or ways for improvement
We're looking for people who will grow with our team for the long-term.
We welcome new graduates / candidates with less experience to apply — as long as you have the drive and intellect to work with us!
WHY JOIN US?
Play a key Architect role in the software development process from end-to-end, and support the hardware from prototype to production.
Develop a real-world solution that will help the elderly who are struggling to manage their medications – a big problem not just in Singapore, but globally.
Make an impact by working with a fast-growth, healthcare start-up that seeks to solve a global problem in healthcare.
The IoT device will beimplemented in a pilot trial by 2017. It may also lead to a patent filing and be potentially rolled out across Singapore and Southeast Asia.
Engage with senior, influential healthcare professionals who are well-known in geriatric medicine and pharmacy
Fun Start-Up Environment: We share the floor with some exciting startups at The Hangar, NUS's incubator for startups. Fun activities are organized on a regular basis!
From http://www.startupjobs.asia/job/27801-software-architect-backend-developer-architect-job-at-maxerence-singapore
from https://startupjobsasiablog.wordpress.com/2017/05/09/software-architect-backend-developer-job-at-maxerence-singapore/
0 notes
Text
How to Build an Ionic 4 App with SQLite Database & Queries (And Debug It!)
If your app needs a solid database or you already got data that you want to inject in your Ionic application, there’s the great underlying SQLite database inside that week can use just like any other storage engine to store our data.
But the usage of the SQLite database is a bit more tricky than simply using Ionic Storage, so in this tutorial we will go through all the steps needed to prepare your app, inject some seed data and finally make different SQL queries on our database.
This tutorial is by no means a general SQL introduction, you should know a bit about it when you incorporate this into your Ionic 4 app!
Setting up our SQLite App
To get started we create a blank new app, add two pages and a service so we got something to work with and then install both the SQLite package and also the SQLite porter package plus the according Cordova plugins.
Now go ahead and run:
ionic start devdacticSql blank --type=angular cd devdacticSql ionic g service services/database ionic g page pages/developers ionic g page pages/developer npm install @ionic-native/sqlite @ionic-native/sqlite-porter ionic cordova plugin add cordova-sqlite-storage ionic cordova plugin add uk.co.workingedge.cordova.plugin.sqliteporter
As said in the beginning, we will inject some initial seed data that you might have taken from your existing database. You could also infject JSON data using the porter plugin as well!
So for our case I created a simple file at assets/seed.sql and added this data for testing:
CREATE TABLE IF NOT EXISTS developer(id INTEGER PRIMARY KEY AUTOINCREMENT,name TEXT,skills TEXT,img TEXT); INSERT or IGNORE INTO developer VALUES (1, 'Simon', '', 'https://pbs.twimg.com/profile_images/858987821394210817/oMccbXv6_bigger.jpg'); INSERT or IGNORE INTO developer VALUES (2, 'Max', '', 'https://pbs.twimg.com/profile_images/953978653624455170/j91_AYfd_400x400.jpg'); INSERT or IGNORE INTO developer VALUES (3, 'Ben', '', 'https://pbs.twimg.com/profile_images/1060037170688417792/vZ7iAWXV_400x400.jpg'); CREATE TABLE IF NOT EXISTS product(id INTEGER PRIMARY KEY AUTOINCREMENT,name TEXT, creatorId INTEGER); INSERT or IGNORE INTO product(id, name, creatorId) VALUES (1, 'Ionic Academy', 1); INSERT or IGNORE INTO product(id, name, creatorId) VALUES (2, 'Software Startup Manual', 1); INSERT or IGNORE INTO product(id, name, creatorId) VALUES (3, 'Ionic Framework', 2); INSERT or IGNORE INTO product(id, name, creatorId) VALUES (4, 'Drifty Co', 2); INSERT or IGNORE INTO product(id, name, creatorId) VALUES (5, 'Drifty Co', 3); INSERT or IGNORE INTO product(id, name, creatorId) VALUES (6, 'Ionicons', 3);
This SQL should create 2 tables in our database and inject a few rows of data. As you might have seen from the data, there are developers and also products, and products have the creatorId as a foreign key so we can build a nice join later!
Before using the plugins, like always, you need to make sure you add them to your app/app.module.ts and also the HttpClientModule as we need it to load our local SQL dump file, so go ahead and change it to:
import { NgModule } from '@angular/core'; import { BrowserModule } from '@angular/platform-browser'; import { RouteReuseStrategy } from '@angular/router'; import { IonicModule, IonicRouteStrategy } from '@ionic/angular'; import { SplashScreen } from '@ionic-native/splash-screen/ngx'; import { StatusBar } from '@ionic-native/status-bar/ngx'; import { AppComponent } from './app.component'; import { AppRoutingModule } from './app-routing.module'; import { SQLitePorter } from '@ionic-native/sqlite-porter/ngx'; import { SQLite } from '@ionic-native/sqlite/ngx'; import { HttpClientModule } from '@angular/common/http'; @NgModule({ declarations: [AppComponent], entryComponents: [], imports: [BrowserModule, IonicModule.forRoot(), AppRoutingModule, HttpClientModule], providers: [ StatusBar, SplashScreen, { provide: RouteReuseStrategy, useClass: IonicRouteStrategy }, SQLite, SQLitePorter ], bootstrap: [AppComponent] }) export class AppModule {}
Finally we need to make a tiny change to our routing to include the two pages we created. One will host lists of data, the second is to display the details for one entry so simply change the app/app-routing.module.ts to:
import { NgModule } from '@angular/core'; import { Routes, RouterModule } from '@angular/router'; const routes: Routes = [ { path: '', redirectTo: 'developers', pathMatch: 'full' }, { path: 'developers', loadChildren: './pages/developers/developers.module#DevelopersPageModule' }, { path: 'developers/:id', loadChildren: './pages/developer/developer.module#DeveloperPageModule' }, ]; @NgModule({ imports: [RouterModule.forRoot(routes)], exports: [RouterModule] }) export class AppRoutingModule { }
Alright, that’s everything for the setup phase, let’s dive into using all of this.
Accessing our SQLite Database with a Service
Because you don’t want to end up with all the database calls in your pages we build a service that holds all relevant functionality that our app needs (which is always a good idea).
In the constructor of our service we first need to perform a few steps:
Wait until the platform is ready
Create the database file, which will also open it if it already exists
Fill the Database with our initial SQL data
All of this is simply chaining the different actions. But what’s more important is how to let your classes know the database is ready?
For this we are using a BehaviourSubject like we did in other scenarios with user authentication as well.
That means, our classes can later easily subscribe to this state to know when the database is ready. And we will also use this mechanism to store the data in our service as well in order to limit SQL queries.
But before we get into the SQL queries, go ahead with the first part of our services/database.service.ts and insert:
import { Platform } from '@ionic/angular'; import { Injectable } from '@angular/core'; import { SQLitePorter } from '@ionic-native/sqlite-porter/ngx'; import { HttpClient } from '@angular/common/http'; import { SQLite, SQLiteObject } from '@ionic-native/sqlite/ngx'; import { BehaviorSubject, Observable } from 'rxjs'; export interface Dev { id: number, name: string, skills: any[], img: string } @Injectable({ providedIn: 'root' }) export class DatabaseService { private database: SQLiteObject; private dbReady: BehaviorSubject<boolean> = new BehaviorSubject(false); developers = new BehaviorSubject([]); products = new BehaviorSubject([]); constructor(private plt: Platform, private sqlitePorter: SQLitePorter, private sqlite: SQLite, private http: HttpClient) { this.plt.ready().then(() => { this.sqlite.create({ name: 'developers.db', location: 'default' }) .then((db: SQLiteObject) => { this.database = db; this.seedDatabase(); }); }); } seedDatabase() { this.http.get('assets/seed.sql', { responseType: 'text'}) .subscribe(sql => { this.sqlitePorter.importSqlToDb(this.database, sql) .then(_ => { this.loadDevelopers(); this.loadProducts(); this.dbReady.next(true); }) .catch(e => console.error(e)); }); } getDatabaseState() { return this.dbReady.asObservable(); } getDevs(): Observable<Dev[]> { return this.developers.asObservable(); } getProducts(): Observable<any[]> { return this.products.asObservable(); } }
Now we can focus on the second part which contains the actual SQL fun. Yeah!
Everything we do in the following functions is based on calling executeSql() on our database to perform whatever query you want to do.
The problematic part is actually going on once you get the data from database, as you need to iterate the rows of the result to get all the entries. For example to get all developers, we need to go through all rows and add them one by one to another array variable before we can finally use it.
In this example we also added a Typescript interface called Dev but that’s just some syntactic sugar on top!
Note: Because things were to easy I also wanted to show how to store an array under “skills”. To do so, you have to convert your data a few times and you’ll see it multiple times along the tutorial. When we read the data from the database we have to parse the JSON that we have written to it, because you can’t store an array as array in SQLite databases, that type doesn’t exist!
When you are done iterating the data you could return it, but we decided to simply call next() on our BehaviourSubject for developers (and later same for products) so again, everyone subscribed will receive the change!
By doing this you classes don’t have to make an additional call to receive new data all the time.
Let’s go ahead and add the second part inside your services/database.service.ts:
loadDevelopers() { return this.database.executeSql('SELECT * FROM developer', []).then(data => { let developers: Dev[] = []; if (data.rows.length > 0) { for (var i = 0; i < data.rows.length; i++) { let skills = []; if (data.rows.item(i).skills != '') { skills = JSON.parse(data.rows.item(i).skills); } developers.push({ id: data.rows.item(i).id, name: data.rows.item(i).name, skills: skills, img: data.rows.item(i).img }); } } this.developers.next(developers); }); } addDeveloper(name, skills, img) { let data = [name, JSON.stringify(skills), img]; return this.database.executeSql('INSERT INTO developer (name, skills, img) VALUES (?, ?, ?)', data).then(data => { this.loadDevelopers(); }); } getDeveloper(id): Promise<Dev> { return this.database.executeSql('SELECT * FROM developer WHERE id = ?', [id]).then(data => { let skills = []; if (data.rows.item(0).skills != '') { skills = JSON.parse(data.rows.item(0).skills); } return { id: data.rows.item(0).id, name: data.rows.item(0).name, skills: skills, img: data.rows.item(0).img } }); } deleteDeveloper(id) { return this.database.executeSql('DELETE FROM developer WHERE id = ?', [id]).then(_ => { this.loadDevelopers(); this.loadProducts(); }); } updateDeveloper(dev: Dev) { let data = [dev.name, JSON.stringify(dev.skills), dev.img]; return this.database.executeSql(`UPDATE developer SET name = ?, skills = ?, img = ? WHERE id = ${dev.id}`, data).then(data => { this.loadDevelopers(); }) } loadProducts() { let query = 'SELECT product.name, product.id, developer.name AS creator FROM product JOIN developer ON developer.id = product.creatorId'; return this.database.executeSql(query, []).then(data => { let products = []; if (data.rows.length > 0) { for (var i = 0; i < data.rows.length; i++) { products.push({ name: data.rows.item(i).name, id: data.rows.item(i).id, creator: data.rows.item(i).creator, }); } } this.products.next(products); }); } addProduct(name, creator) { let data = [name, creator]; return this.database.executeSql('INSERT INTO product (name, creatorId) VALUES (?, ?)', data).then(data => { this.loadProducts(); }); }
As you can see we implemented all of the basic operations like GET, CREATE, DELETE or UPDATE for the developers table. All of them follow the same scheme, you just need to make sure when you need to refresh your local data or what/how your functions return.
Same goes for the product table, here we are also using a little JOIN but again, that’s basic SQL (and actually my knowledge about more advanced SQL statements was lost after university).
Besides the general SQL queries you can also replace the values of your statements with some data by simply putting in a ? in the right places and then passing an array with arguments as the second parameter to the executeSql() function!
You could also do this inline within the string, that’s totally up to you. I just included some different ways to do it for the different calls in which we need to store data to the DB or find something by its ID.
Loading and Displaying our Database Rows
So by now we have created the layer that will return us all relevant data and functionality, let’s make use of it.
In our pages, especially the first, we need to make sure the database is ready by subscribing to the Observable of the state. Only once we know the database is ready, we can also use it safely.
Actually we could also subscribe to the developers and products before but just in case to make sure everything is fine we do it in there as well. Again in here I show two ways of doing it, you can either subscribe right here to the data and then use it locally or simply use the async pipe inside the view.
We also create the add functionality which only needs to be called on the service – remember, the array of our data will update and emit the new values automatically because we have added the calls in our service upfront after we add data.
At this point you also see another part of the array conversion: In the view it’s a simple input with comma separated values, so here we convert it to an array that will later be stringified for the database.
I know, storing the array would be more easy. Or having another table. Or saving it with commas. So many options to do everything!
Ok now go ahead and change the pages/developers/developers.page.ts to:
import { DatabaseService, Dev } from './../../services/database.service'; import { Component, OnInit } from '@angular/core'; import { Observable } from 'rxjs'; @Component({ selector: 'app-developers', templateUrl: './developers.page.html', styleUrls: ['./developers.page.scss'], }) export class DevelopersPage implements OnInit { developers: Dev[] = []; products: Observable<any[]>; developer = {}; product = {}; selectedView = 'devs'; constructor(private db: DatabaseService) { } ngOnInit() { this.db.getDatabaseState().subscribe(rdy => { if (rdy) { this.db.getDevs().subscribe(devs => { this.developers = devs; }) this.products = this.db.getProducts(); } }); } addDeveloper() { let skills = this.developer['skills'].split(','); skills = skills.map(skill => skill.trim()); this.db.addDeveloper(this.developer['name'], skills, this.developer['img']) .then(_ => { this.developer = {}; }); } addProduct() { this.db.addProduct(this.product['name'], this.product['creator']) .then(_ => { this.product = {}; }); } }
We’ve already had a lot of code in here so let’s keep the view short. At least the explanation.
We need a way to display both the developers and products, and for this we can use an ion-segment with two views.
Also, both views need a simple input so we can create new developers and also new products. For products, we also use a little select so we can assign a creator to a new product and use the ID of the creator as value. The select comes in really handy there!
That’s basically all the view needs to do. The only further thing is that clicking on a developer will bring us to the details page using the appropriate routerLink.
So go ahead and put this into your pages/developers/developers.page.html:
<ion-header> <ion-toolbar color="primary"> <ion-title>Developers</ion-title> </ion-toolbar> </ion-header> <ion-content padding> <ion-segment [(ngModel)]="selectedView"> <ion-segment-button value="devs"> <ion-label>Developer</ion-label> </ion-segment-button> <ion-segment-button value="products"> <ion-label>Products</ion-label> </ion-segment-button> </ion-segment> <div [ngSwitch]="selectedView"> <div *ngSwitchCase="'devs'"> <ion-item> <ion-label position="stacked">What\'s your name?</ion-label> <ion-input [(ngModel)]="developer.name" placeholder="Developer Name"></ion-input> </ion-item> <ion-item> <ion-label position="stacked">What are your special skills (comma separated)?</ion-label> <ion-input [(ngModel)]="developer.skills" placeholder="Special Skills"></ion-input> </ion-item> <ion-item> <ion-label position="stacked">Your image URL</ion-label> <ion-input [(ngModel)]="developer.img" placeholder="https://..."></ion-input> </ion-item> <ion-button expand="block" (click)="addDeveloper()">Add Developer Info</ion-button> <ion-list> <ion-item button *ngFor="let dev of developers" [routerLink]="['/', 'developers', dev.id]"> <ion-avatar slot="start"> <img [src]="dev.img"> </ion-avatar> <ion-label> <h2></h2> <p></p> </ion-label> </ion-item> </ion-list> </div> <div *ngSwitchCase="'products'"> <ion-item> <ion-label position="stacked">Product name</ion-label> <ion-input [(ngModel)]="product.name" placeholder="Name"></ion-input> </ion-item> <ion-item> <ion-label position="stacked">Creator?</ion-label> <ion-select [(ngModel)]="product.creator"> <ion-select-option *ngFor="let dev of developers" [value]="dev.id"></ion-select-option> </ion-select> </ion-item> <ion-button expand="block" (click)="addProduct()">Add Product</ion-button> <ion-list> <ion-item *ngFor="let prod of products | async"> <ion-label> <h2></h2> <p>Created by: </p> </ion-label> </ion-item> </ion-list> </div> </div> </ion-content>
Now you can already run your app but remember, because we use Cordova plugins you need to execute it on a device!
Updating & Deleting data from the SQLite Database
Finally we need the simple view to update or delete a row of data. In there we can again make use of the service to first of all get the details for one database entry using the ID we passed through the route.
Again, to display the skills we need to have a little conversion in both directions when we update the database row. Nothing special besides that, so open your pages/developers/developer.page.ts and change it to:
import { DatabaseService, Dev } from './../../services/database.service'; import { Component, OnInit } from '@angular/core'; import { ActivatedRoute, Router } from '@angular/router'; import { ToastController } from '@ionic/angular'; @Component({ selector: 'app-developer', templateUrl: './developer.page.html', styleUrls: ['./developer.page.scss'], }) export class DeveloperPage implements OnInit { developer: Dev = null; skills = ''; constructor(private route: ActivatedRoute, private db: DatabaseService, private router: Router, private toast: ToastController) { } ngOnInit() { this.route.paramMap.subscribe(params => { let devId = params.get('id'); this.db.getDeveloper(devId).then(data => { this.developer = data; this.skills = this.developer.skills.join(','); }); }); } delete() { this.db.deleteDeveloper(this.developer.id).then(() => { this.router.navigateByUrl('/'); }); } updateDeveloper() { let skills = this.skills.split(','); skills = skills.map(skill => skill.trim()); this.developer.skills = skills; this.db.updateDeveloper(this.developer).then(async (res) => { let toast = await this.toast.create({ message: 'Developer updated', duration: 3000 }); toast.present(); }); } }
Now we just need the last piece of code to display the details view – basically the same input fields we had before.
The only thing to note here is that the skills input is now an own variable which we filled after we got the initial developer data, and later we will use that variable to create the array which we then pass to the update function.
Wrap things up by changing your pages/developers/developer.page.html to:
<ion-header> <ion-toolbar color="primary"> <ion-buttons slot="start"> <ion-back-button defaultHref="developers"></ion-back-button> </ion-buttons> <ion-title>Developer</ion-title> <ion-buttons slot="end"> <ion-button (click)="delete()"> <ion-icon name="trash"></ion-icon> </ion-button> </ion-buttons> </ion-toolbar> </ion-header> <ion-content padding> <div *ngIf="developer"> <ion-item> <ion-label position="stacked">What\'s your name?</ion-label> <ion-input [(ngModel)]="developer.name" placeholder="Developer Name"></ion-input> </ion-item> <ion-item> <ion-label position="stacked">What are your special skills (comma separated)?</ion-label> <ion-input [(ngModel)]="skills" placeholder="Special Skills"></ion-input> </ion-item> <ion-item> <ion-label position="stacked">Your image URL</ion-label> <ion-input [(ngModel)]="developer.img" placeholder="https://..."></ion-input> </ion-item> <ion-button expand="block" (click)="updateDeveloper()">Update Developer Info</ion-button> </div> </ion-content>
That’s it for the code, but before we leave let’s quickly talk about debugging as I’m 100% there will be problems.
Debug Device Database
The biggest problem for most is debugging the code or in this case, debugging the database. We can’t simply run this code on the browser because we are using Cordova plugins, so all of the debugging needs to take place on a device/simulator!
So we need a way to access the database and check if it was created correctly, if data was added and so on, and to open the file you might want to get a tool like the SQLite Browser.
Android
For Android you can do all of the work from the command line. Simply build your app like always, install it with ADB and once you want to get the databse you can use the ADB shell as well to extract it from your app to your local filesystem like this:
ionic cordova build android # Install the APK with adb install # Run the app through the shell and copy the DB file adb -d shell "run-as io.ionic.starter cat databases/data.db" > ~/androiddb.db
Just make sure that you are using the bundle ID of your application that you configured in the config.xml.
iOS
For iOS, things are a bit more complicated. But we have to distinguish between using the simulator or a real device.
So for the iOS simulator you can run a bunch of commands to get the active running simulator ID, then finding the folder on your system and finally finding the database in it like this:
# Find the ID of the running Simulator $ ps aux | grep 'CoreSimulator/Devices' # Use ID inside the Path! $ cd ~/Library/Developer/CoreSimulator/Devices/6EE9F4ED-C1FE-4CE8-854A-D228099E7D4A/data/ # Find the database file within the folder $ find ./ -type f -name 'data.db'
If you are trying things out on your connected iOS device, you need to open Xcode -> Window -> Devices & Simulators to bring up a list of your connected devices.
In there you should see your device and the installed apps. From there, select your app, click the settings wheel and pick Download Container
Hold on, we are not yet finished!
Find the container you just donwloaded and right click it and pick Show Package Contents which will let you dive into the application data. From there you can find the database file like in the image below.
Now you can open the database file with the SQLite Browser (for example) and inspect all the data of your application!
Conclusion
Although it’s not super tricky to work with an SQLite database, things can take a lot of time as you always need to go through a new deployment when you test new functionality.
The good thing is we can debug all aspects of the process to find any errors and therefore build great apps with underlying SQL queries!
You can also find a video version of this tutorial below.
youtube
The post How to Build an Ionic 4 App with SQLite Database & Queries (And Debug It!) appeared first on Devdactic.
via Devdactic http://bit.ly/2XgMyKa
0 notes
Text
Software Architect - Backend Developer job at Maxerence Singapore
Pillpresso is an electronic medication dispenser from the company Maxerence.
It is a connected device that automates medication sorting, reminding and dispensing. The aim is to deliver convenience and improve medication adherence, which has been identified by the World Health Organization as a global issue that requires attention.
Selected from close to 100 ideas, our team won the top prize of S$50,000 in seed funding at Modern Aging, a business competition organised by NUS Enterprise and Access Health that focuses on developing solutions for the elderly.
One of the judges was Dr. William Haseltine, who is well known for his pioneering work on cancer, HIV/AIDS and genomics, and has been listed by Time Magazine as one of the world’s 25 most influential business people.
Our team has received endorsement from several healthcare organisations, and is in discussions with Tan Tock Seng Hospital and home nursing providers on a project collaboration.
Pillpresso has been featured multiple times in the press (e.g. Straits Times, Lianhe Zaobao), including a special mention by Senior Minister of State, Dr Amy Khor.
See articles here:
• http://www.straitstimes.com/singapore/health/tap-on-science-and-technology-to-transform-ageing-dr-amy-khor
• http://www.straitstimes.com/business/growing-focus-on-creating-products-for-the-elderly
• http://www.channelnewsasia.com/news/singapore/3-teams-receive-s-125- 000/2319006.html
• https://www.techinasia.com/modern-aging-winner-startups/
• https://news.nus.edu.sg/highlights/9793-start-ups-support-modern-ageing
BACKGROUND
Pillpresso is building a software backend and frontend to remotely control a personal, IoT-enabled medication device, and track the user’s compliance history and medication profile.
DAY-TO-DAY RESPONSIBILITIES
Oversee the development and execution of the product roadmap
Develop web & mobile platforms for:
Medication management by multiple parties; and
Tracking of medication compliance for the elderly and healthcare professionals
Collaborate with external software and hardware developers on the mobile app development and hardware-software interfacing respectively.
Liaise with customers and external stakeholders to understand their needs, prioritise product features and work on API integration (if needed)
In general, your responsibilities will cut across several domains, including:
Front end concerns
Back-end infrastructure
Technical architecture
Dev ops
REQUIREMENTS:
Perform collaborative coding and Git
AngularJS and/or Ionic framework
NodeJS
Javascript/HTML5/CSS3
JSON based RESTful APIs
OPTIONAL:
Experience with embedded systems and hardware-software interfacing databases, preferably MySQL and MongoDB
WHOM WE ARE LOOKING FOR:
Pro-active and driven
Independent and hardworking
Good communication skills
Not afraid to share new ideas, or ways for improvement
We’re looking for people who will grow with our team for the long-term.
We welcome new graduates / candidates with less experience to apply – as long as you have the drive and intellect to work with us!
WHY JOIN US?
Play a key Architect role in the software development process from end-to-end, and support the hardware from prototype to production.
Develop a real-world solution that will help the elderly who are struggling to manage their medications – a big problem not just in Singapore, but globally.
Make an impact by working with a fast-growth, healthcare start-up that seeks to solve a global problem in healthcare.
The IoT device will beimplemented in a pilot trial by 2017. It may also lead to a patent filing and be potentially rolled out across Singapore and Southeast Asia.
Engage with senior, influential healthcare professionals who are well-known in geriatric medicine and pharmacy
Fun Start-Up Environment: We share the floor with some exciting startups at The Hangar, NUS’s incubator for startups. Fun activities are organized on a regular basis!
StartUp Jobs Asia - Startup Jobs in Singapore , Malaysia , HongKong ,Thailand from http://www.startupjobs.asia/job/27801-software-architect-backend-developer-architect-job-at-maxerence-singapore Startup Jobs Asia https://startupjobsasia.tumblr.com/post/160471585354
0 notes
Text
Software Architect - Backend Developer job at Maxerence Singapore
Pillpresso is an electronic medication dispenser from the company Maxerence.
It is a connected device that automates medication sorting, reminding and dispensing. The aim is to deliver convenience and improve medication adherence, which has been identified by the World Health Organization as a global issue that requires attention.
Selected from close to 100 ideas, our team won the top prize of S$50,000 in seed funding at Modern Aging, a business competition organised by NUS Enterprise and Access Health that focuses on developing solutions for the elderly.
One of the judges was Dr. William Haseltine, who is well known for his pioneering work on cancer, HIV/AIDS and genomics, and has been listed by Time Magazine as one of the world's 25 most influential business people.
Our team has received endorsement from several healthcare organisations, and is in discussions with Tan Tock Seng Hospital and home nursing providers on a project collaboration.
Pillpresso has been featured multiple times in the press (e.g. Straits Times, Lianhe Zaobao), including a special mention by Senior Minister of State, Dr Amy Khor.
See articles here:
• http://www.straitstimes.com/singapore/health/tap-on-science-and-technology-to-transform-ageing-dr-amy-khor
• http://www.straitstimes.com/business/growing-focus-on-creating-products-for-the-elderly
• http://www.channelnewsasia.com/news/singapore/3-teams-receive-s-125- 000/2319006.html
• https://www.techinasia.com/modern-aging-winner-startups/
• https://news.nus.edu.sg/highlights/9793-start-ups-support-modern-ageing
BACKGROUND
Pillpresso is building a software backend and frontend to remotely control a personal, IoT-enabled medication device, and track the user's compliance history and medication profile.
DAY-TO-DAY RESPONSIBILITIES
Oversee the development and execution of the product roadmap
Develop web & mobile platforms for:
Medication management by multiple parties; and
Tracking of medication compliance for the elderly and healthcare professionals
Collaborate with external software and hardware developers on the mobile app development and hardware-software interfacing respectively.
Liaise with customers and external stakeholders to understand their needs, prioritise product features and work on API integration (if needed)
In general, your responsibilities will cut across several domains, including:
Front end concerns
Back-end infrastructure
Technical architecture
Dev ops
REQUIREMENTS:
Perform collaborative coding and Git
AngularJS and/or Ionic framework
NodeJS
Javascript/HTML5/CSS3
JSON based RESTful APIs
OPTIONAL:
Experience with embedded systems and hardware-software interfacing databases, preferably MySQL and MongoDB
WHOM WE ARE LOOKING FOR:
Pro-active and driven
Independent and hardworking
Good communication skills
Not afraid to share new ideas, or ways for improvement
We're looking for people who will grow with our team for the long-term.
We welcome new graduates / candidates with less experience to apply -- as long as you have the drive and intellect to work with us!
WHY JOIN US?
Play a key Architect role in the software development process from end-to-end, and support the hardware from prototype to production.
Develop a real-world solution that will help the elderly who are struggling to manage their medications – a big problem not just in Singapore, but globally.
Make an impact by working with a fast-growth, healthcare start-up that seeks to solve a global problem in healthcare.
The IoT device will beimplemented in a pilot trial by 2017. It may also lead to a patent filing and be potentially rolled out across Singapore and Southeast Asia.
Engage with senior, influential healthcare professionals who are well-known in geriatric medicine and pharmacy
Fun Start-Up Environment: We share the floor with some exciting startups at The Hangar, NUS's incubator for startups. Fun activities are organized on a regular basis!
StartUp Jobs Asia - Startup Jobs in Singapore , Malaysia , HongKong ,Thailand from http://www.startupjobs.asia/job/27801-software-architect-backend-developer-architect-job-at-maxerence-singapore
0 notes
Text
Mirage JS Deep Dive: Understanding Factories, Fixtures And Serializers (Part 2)
About The Author
Kelvin Omereshone is the CTO at Quru Lab. Kelvin was formerly a Front-end engineer at myPadi.ng. He’s the creator of NUXtjs Africa community and very passionate … More about Kelvin …
In this second part of the Mirage JS Deep Dive series, we will be looking at Mirage JS’ Factories, Fixtures, and Serializers. We’ll see how they enable rapid API mocking using Mirage.
In the previous article of this series, we understudied Models and Associations as they relate to Mirage. I explained that Models allow us to create dynamic mock data that Mirage would serve to our application when it makes a request to our mock endpoints. In this article, we will look at three other Mirage features that allow for even more rapid API mocking. Let’s dive right in!
Note: I highly recommend reading my first two articles if you haven’t to get a really solid handle on what would be discussed here. You could however still follow along and reference the previous articles when necessary.
Factories
In a previous article, I explained how Mirage JS is used to mock backend API, now let’s assume we are mocking a product resource in Mirage. To achieve this, we would create a route handler which will be responsible for intercepting requests to a particular endpoint, and in this case, the endpoint is api/products. The route handler we create will return all products. Below is the code to achieve this in Mirage:
import { Server, Model } from 'miragejs'; new Server({ models: { product: Model, }, routes() { this.namespace = "api"; this.get('products', (schema, request) => { return schema.products.all() }) } }); },
The output of the above would be:
{ "products": [] }
We see from the output above that the product resource is empty. This is however expected as we haven’t created any records yet.
Pro Tip: Mirage provides shorthand needed for conventional API endpoints. So the route handler above could also be as short as: this.get('/products').
Let’s create records of the product model to be stored in Mirage database using the seeds method on our Server instance:
seeds(server) { server.create('product', { name: 'Gemini Jacket' }) server.create('product', { name: 'Hansel Jeans' }) },
The output:
{ "products": [ { "name": "Gemini Jacket", "id": "1" }, { "name": "Hansel Jeans", "id": "2" } ] }
As you can see above, when our frontend application makes a request to /api/products, it will get back a collection of products as defined in the seeds method.
Using the seeds method to seed Mirage’s database is a step from having to manually create each entry as an object. However, it wouldn’t be practical to create 1000(or a million) new product records using the above pattern. Hence the need for factories.
Factories Explained
Factories are a faster way to create new database records. They allow us to quickly create multiple records of a particular model with variations to be stored in the Mirage JS database.
Factories are also objects that make it easy to generate realistic-looking data without having to seed those data individually. Factories are more of recipes or blueprints for creating records off models.
Creating A Factory
Let’s examine a Factory by creating one. The factory we would create will be used as a blueprint for creating new products in our Mirage JS database.
import { Factory } from 'miragejs' new Server({ // including the model definition for a better understanding of what’s going on models: { product: Model }, factories: { product: Factory.extend({}) } })
From the above, you’d see we added a factories property to our Server instance and define another property inside it that by convention is of the same name as the model we want to create a factory for, in this case, that model is the product model. The above snippet depicts the pattern you would follow when creating factories in Mirage JS.
Although we have a factory for the product model, we really haven’t added properties to it. The properties of a factory can be simple types like strings, booleans or numbers, or functions that return dynamic data as we would see in the full implementation of our new product factory below:
import { Server, Model, Factory } from 'miragejs' new Server({ models: { product: Model }, factories: { product: Factory.extend({ name(i) { // i is the index of the record which will be auto incremented by Mirage JS return `Awesome Product ${i}`; // Awesome Product 1, Awesome Product 2, etc. }, price() { let minPrice = 20; let maxPrice = 2000; let randomPrice = Math.floor(Math.random() * (maxPrice - minPrice + 1)) + minPrice; return `$ ${randomPrice}`; }, category() { let categories = [ 'Electronics', 'Computing', 'Fashion', 'Gaming', 'Baby Products', ]; let randomCategoryIndex = Math.floor( Math.random() * categories.length ); let randomCategory = categories[randomCategoryIndex]; return randomCategory; }, rating() { let minRating = 0 let maxRating = 5 return Math.floor(Math.random() * (maxRating - minRating + 1)) + minRating; }, }), }, })
In the above code snippet, we are specifying some javascript logic via Math.random to create dynamic data each time the factory is used to create a new product record. This shows the strength and flexibility of Factories.
Let’s create a product utilizing the factory we defined above. To do that, we call server.create and pass in the model name (product) as a string. Mirage will then create a new record of a product using the product factory we defined. The code you need in order to do that is the following:
new Server({ seeds(server) { server.create("product") } })
Pro Tip: You can run console.log(server.db.dump()) to see the records in Mirage’s database.
A new record similar to the one below was created and stored in the Mirage database.
{ "products": [ { "rating": 3, "category": "Computing", "price": "$739", "name": "Awesome Product 0", "id": "1" } ] }
Overriding factories
We can override some or more of the values provided by a factory by explicitly passing them in like so:
server.create("product", {name: "Yet Another Product", rating: 5, category: "Fashion" })
The resulting record would be similar to:
{ "products": [ { "rating": 5, "category": "Fashion", "price": "$782", "name": "Yet Another Product", "id": "1" } ] }
createList
With a factory in place, we can use another method on the server object called createList. This method allows for the creation of multiple records of a particular model by passing in the model name and the number of records you want to be created. Below is it’s usage:
server.createList("product", 10)
Or
server.createList("product", 1000)
As you’ll observe, the createList method above takes two arguments: the model name as a string and a non-zero positive integer representing the number of records to create. So from the above, we just created 500 records of products! This pattern is useful for UI testing as you’ll see in a future article of this series.
Fixtures
In software testing, a test fixture or fixture is a state of a set or collection of objects that serve as a baseline for running tests. The main purpose of a fixture is to ensure that the test environment is well known in order to make results repeatable.
Mirage allows you to create fixtures and use them to seed your database with initial data.
Note: It is recommended you use factories 9 out of 10 times though as they make your mocks more maintainable.
Creating A Fixture
Let’s create a simple fixture to load data onto our database:
fixtures: { products: [ { id: 1, name: 'T-shirts' }, { id: 2, name: 'Work Jeans' }, ], },
The above data is automatically loaded into the database as Mirage’s initial data. However, if you have a seeds function defined, Mirage would ignore your fixture with the assumptions that you meant for it to be overridden and instead use factories to seed your data.
Fixtures In Conjunction With Factories
Mirage makes provision for you to use Fixtures alongside Factories. You can achieve this by calling server.loadFixtures(). For example:
fixtures: { products: [ { id: 1, name: "iPhone 7" }, { id: 2, name: "Smart TV" }, { id: 3, name: "Pressing Iron" }, ], }, seeds(server) { // Permits both fixtures and factories to live side by side server.loadFixtures() server.create("product") },
Fixture files
Ideally, you would want to create your fixtures in a separate file from server.js and import it. For example you can create a directory called fixtures and in it create products.js. In products.js add:
// <PROJECT-ROOT>/fixtures/products.js export default [ { id: 1, name: 'iPhone 7' }, { id: 2, name: 'Smart TV' }, { id: 3, name: 'Pressing Iron' }, ];
Then in server.js import and use the products fixture like so:
import products from './fixtures/products'; fixtures: { products, },
I am using ES6 property shorthand in order to assign the products array imported to the products property of the fixtures object.
It is worthy of mention that fixtures would be ignored by Mirage JS during tests except you explicitly tell it not to by using server.loadFixtures()
Factories vs. Fixtures
In my opinion, you should abstain from using fixtures except you have a particular use case where they are more suitable than factories. Fixtures tend to be more verbose while factories are quicker and involve fewer keystrokes.
Serializers
It’s important to return a JSON payload that is expected to the frontend hence serializers.
A serializer is an object that is responsible for transforming a **Model** or **Collection** that’s returned from your route handlers into a JSON payload that’s formatted the way your frontend app expects.
Mirage Docs
Let’s take this route handler for example:
this.get('products/:id', (schema, request) => { return schema.products.find(request.params.id); });
A Serializer is responsible for transforming the response to something like this:
{ "product": { "rating": 0, "category": "Baby Products", "price": "$654", "name": "Awesome Product 1", "id": "2" } }
Mirage JS Built-in Serializers
To work with Mirage JS serializers, you’d have to choose which built-in serializer to start with. This decision would be influenced by the type of JSON your backend would eventually send to your front-end application. Mirage comes included with the following serializers:
JSONAPISerializer This serializer follows the JSON:API spec.
ActiveModelSerializer This serializer is intended to mimic APIs that resemble Rails APIs built with the active_model_serializer gem.
RestSerializer The RestSerializer is Mirage JS “catch all” serializer for other common APIs.
Serializer Definition
To define a serialize, import the appropriate serializer e.g RestSerializer from miragejs like so:
import { Server, RestSerializer } from "miragejs"
Then in the Server instance:
new Server({ serializers: { application: RestSerializer, }, })
The RestSerializer is used by Mirage JS by default. So it’s redundant to explicitly set it. The above snippet is for exemplary purposes.
Let’s see the output of both JSONAPISerializer and ActiveModelSerializer on the same route handler as we defined above
JSONAPISerializer
import { Server, JSONAPISerializer } from "miragejs" new Server({ serializers: { application: JSONAPISerializer, }, })
The output:
{ "data": { "type": "products", "id": "2", "attributes": { "rating": 3, "category": "Electronics", "price": "$1711", "name": "Awesome Product 1" } } }
ActiveModelSerializer
To see the ActiveModelSerializer at work, I would modify the declaration of category in the products factory to:
productCategory() { let categories = [ 'Electronics', 'Computing', 'Fashion', 'Gaming', 'Baby Products', ]; let randomCategoryIndex = Math.floor( Math.random() * categories.length ); let randomCategory = categories[randomCategoryIndex]; return randomCategory; },
All I did was to change the name of the property to productCategory to show how the serializer would handle it.
Then, we define the ActiveModelSerializer serializer like so:
import { Server, ActiveModelSerializer } from "miragejs" new Server({ serializers: { application: ActiveModelSerializer, }, })
The serializer transforms the JSON returned as:
{ "rating": 2, "product_category": "Computing", "price": "$64", "name": "Awesome Product 4", "id": "5" }
You’ll notice that productCategory has been transformed to product_category which conforms to the active_model_serializer gem of the Ruby ecosystem.
Customizing Serializers
Mirage provides the ability to customize a serializer. Let’s say your application requires your attribute names to be camelcased, you can override RestSerializer to achieve that. We would be utilizing the lodash utility library:
import { RestSerializer } from 'miragejs'; import { camelCase, upperFirst } from 'lodash'; serializers: { application: RestSerializer.extend({ keyForAttribute(attr) { return upperFirst(camelCase(attr)); }, }), },
This should produce JSON of the form:
{ "Rating": 5, "ProductCategory": "Fashion", "Price": "$1386", "Name": "Awesome Product 4", "Id": "5" }
Wrapping Up
You made it! Hopefully, you’ve got a deeper understanding of Mirage via this article and you’ve also seen how utilizing factories, fixtures, and serializers would enable you to create more production-like API mocks with Mirage. Look out for the next part of this series.
(ra, il)
Website Design & SEO Delray Beach by DBL07.co
Delray Beach SEO
source http://www.scpie.org/mirage-js-deep-dive-understanding-factories-fixtures-and-serializers-part-2/ source https://scpie.tumblr.com/post/619503990995058688
0 notes