#DiskSpd
Explore tagged Tumblr posts
Visit Tumblr Blog
Explore Tumblr blogs with no restrictions, modern design and the best experience.
Last Seen Tumblr Blogs


Fun Fact
Tumblr posted its first advertisements in May 2012 and subsequently earned $13M in revenue.
Text
TempDB and Disk IO Tips and Tricks for SQL Server
TempDB and Disk IO Tips and Tricks for SQL Server
One common issue with database performance is TempDB tuning. There are some basic tips and tricks to getting the best possible performance from your TempDB, but you need to understand that each instance will need tuning. There isn’t a checkbox in the server configuration that enables peak performance. You will need to investigate the specifics of your database instance and tune the server so that…

View On WordPress
0 notes
Text
March 2017 Server StorageIO Data Infrastructure Update Newsletter
March 2017 Server StorageIO Data Infrastructure Update Newsletter
Volume 17, Issue III
Hello and welcome to the March 2017 issue of the Server StorageIO update newsletter.
First a reminder world backup (and recovery) day is on March 31. Following up from the February Server StorageIO update newsletter that had a focus on data protection this edition includes some additional posts, articles, tips and commentary below.
Other data infrastructure (and…
View On WordPress
#AWS#Azure#Azure Stack#backup#bc#Benchmark#br#CI#Cloud#converged#Data Center#data infrastructure#diskspd#dr#DSSD#EC2#fio#FLASH#HCI#HPE#hyper-v#iometer#microsoft#nand#network#Nimble#NVMe#rdma#SCM#sddc
0 notes
Text
DiskSpd Storage Performance Tool 2.1 [Latest]
https://weacrack.com/?p=24841 DiskSpd Storage Performance Tool 2.1 [Latest] - https://weacrack.com/?p=24841 -
0 notes
Text
This open-source Microsoft benchmark is a powerful server testing tool - TechRepublic
0 notes
Text
File Server Stress Test Tool

File Server Stress Test Tool Harbor Freight
Server Stress Tester
Server Stress Test Software
Web Server Stress Test
DTM DB Stress is a software for stress testing and load testing the server parts of information systems and database applications, as well as databases and servers themselves. It is suitable for solution scalability and performance testing, comparison and tuning. The stress tool supports all unified database interfaces: ODBC, IDAPI, OLE DB and Oracle Call Interface. The dynamic SQL statement support and built-in test data generator enable you to make test jobs more flexible. Value File allows users to emulate variations in the end-user activity. I’m working with my customer to perform a file server (Win2k8 R2) stress test exercise and I found the FSCT is a great tool that can help to simulate users workload. However I can’t find an option to define the file size using the tool. Whether you have a desktop PC or a server, Microsoft’s free Diskspd utility will stress test and benchmark your hard drives. NOTE: A previous version of this guide explained using Microsoft’s old “SQLIO” utility. The program says that the information passed to the server is anonymous. If you select a different stress level, the program cannot upload the results even if they are visible in the pane to the left. Most of the tests were completed quite fast, except for the Files Encrypt test which took 67 seconds to complete.
By: John Sterrett | Updated: 2012-07-18 | Comments (15) | Related: More >Testing
Problem
I have a stored procedure and I need to add additional stress and test thestored procedureusing a random set of parameters before it can be pushed to production. I don'thave a budget for stress testing tools. Can you show me how to accomplish thesegoals without buying a third party tool?
Solution
Yes, theSQLQueryStresstool provided byAdam Machaniccan be used to apply additional stress when testing your stored procedures. Thistool can also be used to apply a dataset as random parameter values when testingyour stored procedures. You can also read more about SQLStressTest on the toolsdocumentation page to find more details about how you can use the tool.
For the purpose of this tip we are going to use the uspGetEmployeeManagers storedprocedure in theAdventureWorks2008R2 database. You can exchange this with your stored procedureto walk through this tip in your own environment.
Step 1
Our first step is to test the following stored procedure with a test parameter.This is done in Management Studio using the query shown below.
Now that we know we have a working stored procedure and a valid parameter thatreturns data we can get started with theSQLStressTool.Once you downloaded and installed SQLQueryStress, fire the tool up and pastein the code that you used in Management Studio. Next, we need to click on the databasebutton to configure our database connection.
Step 2 - Configure Database Connectivity
Now that we clicked on the database button we will want to connect to our AdventureWorksdatabase. In this example I am using a instance named 'r2' on my localhost. We willconnect with windows authentication and our default database will be AdventureWorks2008R2.Once this is done we will click on Test Connection and click on the 'OK' box inthe popup window. We'll see the Connection Succeeded message to verify that ourconnection settings are connect.
Step 3 - Clear Proc Cache
Before we execute our stored procedure using SQLQueryStress we are going to clearout the procedure cache so we can track the total executions of our stored procedure.This shouldn't be done on a production system as this can causesignificant performance problems. You would have to recompile all user objects toget them back into the procedure cache. We are doing this in this walkthrough tipto show you how we can count the total executions of the stored procedure.
File Server Stress Test Tool Harbor Freight
NOTE: In SQL Server 2008 and up you can actually clear a specificplan from the buffer pool. In this example we are clearing out all plan's incaseyour using SQL 2005. Once again, this shouldn't be done on a productionsystem . Pleasesee BOL for a specific example on clearing out a single plan.
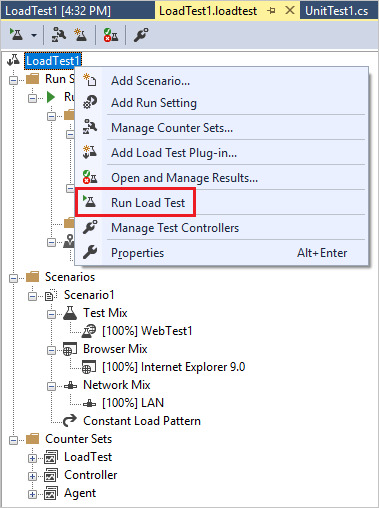
Step 4 - Execute Stored Procedure Using SQLQueryStress
Now that we have established our connection and specified a default databasewe are going to execute our stored procedure specified in step one. You can executethe stored procedure once by making sure the number of interations and number ofthreads both have the value of 'one.' We will go over these options in more detailsa little later in the tip. Once those values are set correctly you can execute thestored procedure once by clicking on the 'GO' button on the top right side of theSQLQueryStress tool.
Once the stored procedure execution completes you will see that statistics aregenerated to help give you valuable feedback towards your workload. You can seethe iterations that completed. In this case we only executed the stored procedureonce. You can also see valuable information for actual seconds, CPU, Logical readsand elapsed time as shown in the screen shot below.
Step 5 - View Total Executions via T-SQL
Now we will execute the following T-SQL script below, which will give us theexecution count for our stored procedure. We just cleared the procedure cache soyou will get an execution count of one as shown in the screen shot below.
Step 6 - Using SQLQueryStress to Add Additional Stress with Multiple Threads.
Now that we have gone over the basics of executing a stored procedure with SQLQueryStresswe will go over adding additional stress by changing the values for Number of Threadsand Number of Iterations. The number of Iterations means the query will be executedthis amount of times for each thread that is specified. The numbers of threads specifyhow many concurrent threads (SPIDS) will be used to execute the number of iterations.
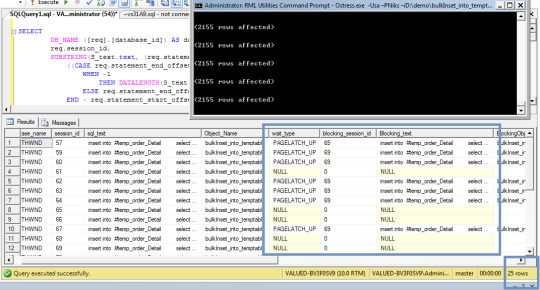
Being that we changed the number of iterations to five and the number of threadsto five we will expect the total number of iterations completed to be twenty-five.The iterations completed is twenty-five because we used five threads and had fiveiterations that were executed for each thread. Below is a screen shot of thethe workload completed after we clicked on the 'GO' button with valuable averagestatistics during the workload.
If we rerun our T-SQL script from step 5, you will see that there is a totalof twenty-six executions for the uspGetEmployeeManagers stored procedure. This includesour initial execution from step 4 and the additional stress applied in step 6.
Server Stress Tester
Step 7 - Use Random Values for Parameters with SQLQueryStress
Next, we are going to cover using a dataset to randomly provide parameters toour stored procedure. Currently we use a hard coded value of eight as the valuefor the BusinessEntityID parameter. Now, we are going to click on the 'ParameterSubstitution' button to use a T-SQL script to create a pool of values that willbe used during our stress testing of the uspGetEmployeeManagers stored procedure.
Once the parameter substitution window opens we will want to copy our T-SQL statementprovided below that will generate the BusinessEntityID values we would want to passinto our stored procedure.
Once you added the T-SQL script, you would want to select the column you wouldlike to map to the parameter used for your stored procedure.
Finally, the last part of this step is to drop the hard coded value assignmentfor the stored procedure. This way the parameter substitution will be used for theparameter value.
Step 8 - Wrap-up Results
To wrap up this tip, we have gone over controlling a workload to provide additionalstress and randomly substituting parameters to be used for your workload replay.If you capture aSQL traceand replay the workload you should see a similar output as the one provided in thescreen shot below. Looking at the screen shot below you will notice that each thread(SPID) has five iterations. Also, you will notice that the values for the businessentityidprovided are randomly selected from our block of code provided for the parametersubstitution.
Next Steps
If you need to do some load testing, start usingSQLQueryStresstool.
Review severaltips on SQL Profiler and trace
Revew tips on working withStored Procedures
Last Updated: 2012-07-18
About the author
John Sterrett is a DBA and Software Developer with expertise in data modeling, database design, administration and development. View all my tips

One of the questions that often pops up in our forums is “how do I run a stress test on my game”?
There are several ways in which this can be done. A simple way to stress test your server side Extension is to build a client application that acts as a player, essentially a “bot”, which can be replicated several hundreds or thousands of times to simulate a large amount of clients.
» Building the client
For this example we will build a simple Java client using the standard SFS2X Java API which can be downloaded from here. The same could be done using C# or AS3 etc…
The simple client will connect to the server, login as guest, join a specific Room and start sending messages. This basic example can serve as a simple template to build more complex interactions for your tests.
» Replicating the load
Before we proceed with the creation of the client logic let’s see how the “Replicator” will work. With this name we mean the top-level application that will take a generic client implementation and will generate many copies at a constant interval, until all “test bots” are ready.
The class will startup by loading an external config.properties file which looks like this:
Server Stress Test Software
The properties are:
the name of the class to be used as the client logic (clientClassName)
the total number of clients for the test (totalCCU)
the interval between each generated client, expressed in milliseconds (generationSpeed)
Once these parameters are loaded the test will start by generating all the requested clients via a thread-pool based scheduled executor (ScheduledThreadPoolExecutor)
In order for the test class to be “neutral” to the Replicator we have created a base class called BaseStressClient which defines a couple of methods:
The startUp() method is where the client code gets initialized and it must be overridden in the child class. The onShutDown(…) method is invoked by the client implementation to signal the Replicator that the client has disconnected, so that they can be disposed.
» Building the client logic
Web Server Stress Test
This is the code for the client itself:
The class extends the BaseStressClient parent and instantiates the SmartFox API. We then proceed by setting up the event listeners and connection parameters. Finally we invoke the sfs.connect(…) method to get started.
Notice that we also declared a static ScheduledExecutorService at the top of the declarations. This is going to be used as the main scheduler for sending public messages at specific intervals, in this case one message every two second.
We chose to make it static so that we can share the same instance across all client objects, this way only one thread will take care of all our messages. If you plan to run thousands of clients or use faster message rates you will probably need to increase the number of threads in the constructor.
» Performance notes
When replicating many hundreds / thousands of clients we should keep in mind that every new instance of the SmartFox class (the main API class) will use a certain amount of resources, namely RAM and Java threads.
For this simple example each instance should take ~1MB of heap memory which means we can expect 1000 clients to take approximately 1GB of RAM. In this case you will probably need to adjust the heap settings of the JVM by adding the usual -Xmx switch to the startup script.
Similarly the number of threads in the JVM will increase by 2 units for each new client generated, so for 1000 clients we will end up with 2000 threads, which is a pretty high number.
Any relatively modern machine (e.g 2-4 cores, 4GB RAM) should be able to run at least 1000 clients, although the complexity of the client logic and the rate of network messages may reduce this value.
On more powerful hardware, such as a dedicated server, you should be able to run several thousands of CCU without much effort.
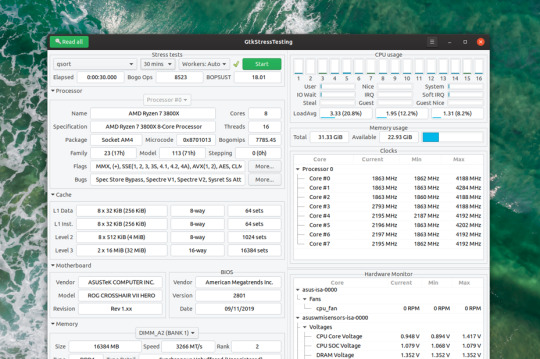
Before we start running the test let’s make sure we have all the necessary monitoring tool to watch the basic performance parameters:
Open the server’s AdminTool and select the Dashboard module. This will allow you to check all vital parameters of the server runtime.
Launch your OS resource monitor so that you can keep an eye on CPU and RAM usage.
Here are some important suggestions to make sure that a stress test is executed successfully:
Monitor the CPU and RAM usage after all clients have been generated and make sure you never pass the 90% CPU mark or 90% RAM used. This is of the highest importance to avoid creating a bottleneck between client and server. (NOTE: 90% is meant of the whole CPU, not just a single core)
Always run a stress test in a ethernet cabled LAN (local network) where you have access to at least a 100Mbit low latency connection. Even better if you have a 1Gbps or 10Gbps connection.
To reinforce the previous point: never run a stress test over a Wifi connection or worse, a remote server. The bandwidth and latency of a Wifi are horribly slow and bad for these kind of tests. Remember the point of these stress tests is assessing the performance of the server and custom Extension, not the network.
Before running a test make sure the ping time between client and server is less or equal to 1-5 milliseconds. More than that may suggest an inadequate network infrastructure.
Whenever possible make sure not to deliver the full list of Rooms to each client. This can be a major RAM eater if the test involves hundreds or thousands of Rooms. To do so simply remove all group references to the “Default groups” setting in your test Zone.
» Adding more client machines
What happens when the dreaded 90% of the machine resources are all used up but we need more CCU for our performance test?
It’s probably time to add another dedicated machine to run more clients. If you don’t have access to more hardware you may consider running the whole stress test in the cloud, so that you can choose the size and number of “stress clients” to employ.
The cloud is also convenient as it lets you clone one machine setup onto multiple servers, allowing a quick way for deploying more instances.
In order to choose the proper cloud provider for your tests make sure that they don’t charge you for internal bandwidth costs (i.e. data transfer between private IPs) and have a fast ping time between servers.
We have successfully run many performance tests using Jelastic and Rackspace Cloud. The former is economical and convenient for medium-size tests, while the latter is great for very large scale tests and also provides physical dedicated servers on demand.
Amazon EC2 should also work fine for these purposes and there are probably many other valid options as well. You can do a quick google research, if you want more options.
» Advanced testing
1) Login: in our simple example we have used an anonymous login request and we don’t employ a server side Extension to check the user credentials. Chances are that your system will probably use a database for login and you wish to test how the DB performs with a high traffic.
A simple solution is to pre-populate the user’s database with index-based names such as User-1, User-2 … User-N. This way you can build a simple client side logic that will generate these names with an auto-increment counter and perform the login. https://loadingiwant517.tumblr.com/post/661702399021481984/how-to-play-marvels-spider-man-on-pc. Passwords can be handled similarly using the same formula, e.g. Password-1, Password-2… Password-N
TIP: When testing a system with an integrated database always monitor the Queue status under the AdminTool > Dashboard. Slowness with DB transactions will show up in those queues.
2) Joining Rooms: another problem is how to distribute clients to multiple Rooms. Suppose we have a game for 4 players and we want to distribute a 1000 clients into Rooms for 4 users. A simple solution is to create this logic on the server side.
The Extension will take a generic “join” request and perform a bit of custom logic:
search for a game Room with free slots:
if found it will join the user there
otherwise it will create a new game Room and join the user
A similar logic has been discussed in details in this post in our support forum.
» Source files
The sources of the code discussed in this article are available for download as a zipped project for Eclipse. If you are using a different IDE you can unzip the archive and extract the source folder (src/), the dependencies (sfs2x-api/) and build a new project in your editor.
0 notes
Text
HP Spectre x360 14 Convertible Review: An Instant Favorite
The Spectre x360 14 is HP's latest flagship convertible in its high-end Spectre series joining the existing 13.3-inch Spectre x360 13 and 15.6-inch Spectre x360 15. Despite what its name may suggest, the Spectre x360 14 utilizes a 13.5-inch display instead of a 14-inch one but in a squarer 3:2 form factor that's becoming increasingly common on newer Ultrabooks. HP is hoping to capture a wider audience of professionals and office users with the new aspect ratio as opposed to the traditional 16:9.
Current configurations range from FHD (1920 x 1280) to OLED (3000 x 2000) with 400 nit or 1000 nit options, the Core i5-1135G7 or Core i7-1165G7 CPU, 8 GB to 16 GB of RAM, and up to 2 TB of SSD storage starting at $1300 to over $1700 USD. All options come with integrated Iris Xe graphics only. Our specific test unit is a middle configuration sporting the Core i7 CPU, 400-nit FHD touchscreen, and 512 GB SSD for approximately $1500 USD.
Competitors in this space include other 16:10 or 3:2 subnotebooks like the Huawei MateBook X Pro, Microsoft Surface Laptop 3 13, Dell XPS 13 9300, Razer Book 13, or Asus ZenBook S.
Case
If you've handled a Spectre x360 13 or 15 in the past, then you'll know exactly what to expect from the Spectre x360 14. HP has translated the existing luxurious Spectre design and metal materials to the new 3:2 form factor without any surprises. Both the base and lid exhibit little flexing and no creaking when attempting to twist their corners or depress their surfaces. Chassis rigidity doesn't feel any better or worse than the Asus ZenBook S or XPS 13, but its gold trims are arguably classier.
One thing we would improve is the rigidity of the hinges at certain angles. The lid falls over too easily once it reaches past 120 degrees which can be annoying when typing or transporting the laptop. This also doesn't give a good sense of longevity as the hinges will inevitably become weaker over time.
The system is larger and slightly heavier than the 13.3-inch Spectre x360 13 and so tablet mode is a bit more cumbersome to handle as a result. Of course, owners get a larger display in return without needing to opt for the even bigger Spectre x360 15. Note that the Dell XPS 13 9300 is smaller than our Spectre x360 14 in every dimension due in part to its smaller 13.4-inch 16:10 display.
Connectivity
Port options are identical to the Spectre x360 13 but with a couple of minor changes. Firstly, both the power button and camera kill switch are now directly on the keyboard instead of the rear corner or right edge of the chassis, respectively. Secondly, both USB-C ports now support Thunderbolt 4 in addition to Thunderbolt 3 for users who can take advantage of the extra bandwidth.
The corner USB-C port can feel a little weird at first. We would've preferred a USB-C port on both the left-hand and right-hand edges so users can charge the laptop on either side much like on the Razer Book 13.
Communication
The Intel AX201 comes standard for Wi-Fi 6 and Bluetooth 5.1 connectivity. We experienced no issues when connected to our Netgear RAX200 test router.
Maintenance
The bottom panel is secured by two T5 Torx screws and four Philips screws hidden underneath the rear rubber feet. These latter screws are annoyingly difficult to access which can make simple SSD upgrades more involved than it needs to be. Both RAM and WLAN are soldered.
Accessories and Warranty
The retail packaging include a carrying sleeve and the HP MPP2.0 active pen free of charge. The standard one-year limited warranty applies with plenty of extension options if ordered directly from HP.com.
Input Devices
Keyboard
HP has some of the best laptop keyboards for its Spectre and EliteBook families. Feedback feels crisper and deeper for a more satisfying typing experience when compared to the oftentimes shallower and spongier keyboards on most other Ultrabooks. keys on the XPS 13 keyboard, for example, are shallower and with lighter input pressure. It all comes down to user preference, of course. We recommend testing out the keyboards on the Spectre x360 13 or 15 to get a good sense of what the Spectre x360 14 keyboard feels like.
Key layout is a mixed bag. The fingerprint reader in particular replaces the Ctrl key meaning users who have been relying on this key on other laptops will find the change annoying. Meanwhile, the power button takes slightly more force to depress than the surrounding keys to avoid accidental presses, but we would have preferred a fingerprint-enabled power button instead.
Touchpad
The clickpad is larger than the one on the Spectre x360 13 (11.5 x 7.4 cm vs. 11.1 x 5.6 cm) due to the longer length of the chassis. Texture is similarly smooth and with very little sticking when gliding at slow speeds for accurate cursor control. Clicking on the clickpad has a satisfying audible click even though feedback could have been firmer.
Display
The base LG Philips FHD panel is a high quality IPS panel worthy of the Spectre name. It excels in offering a very high contrast ratio of over 2500:1 compared to half that on most other flagship Ultrabooks. Black-white response times, however, are relatively slow for noticeable ghosting. Upgrading to the pricier OLED option will solve that problem completely.
HP offers 1000-nit brightness options to be at least two times brighter than anything from the Dell XPS, Lenovo Yoga, Microsoft Surface, or Asus ZenBook series. This feature is available only for the FHD IPS SKUs and it can also be found on certain EliteBook laptops. The base 400-nit option is otherwise sufficient if you mostly plan on using the convertible indoors as it's already brighter than the display on the Lenovo Yoga 9i.
Outdoor visibility is about the same as the Spectre x360 13 or Asus ZenBook S since they all have similar maximum brightness levels. The higher contrast ratio of the Spectre x360 14 display, however, helps to mitigate washed out colors by just a bit when under sunlight. Glare is otherwise almost unavoidable. We recommend the 1000-nit option if outdoor visibility is priority.
Performance
The 11th gen Tiger Lake Core i7-1165G7 directly replaces last year's 10th gen Ice Lake Core i7-1065G7. Unlike the Envy series, there are unfortunately no AMD options available on this Spectre since it is an Intel Evo-certified laptop. The Spectre would lose its Evo certification if it came equipped with AMD options.
We set our unit to Performance mode via HP Command Center prior to running any performance tests below for the highest possible scores. We recommend owners become familiar with Command Center since it includes manufacturer-specific performance and network controls.
Processor
Much like on the Dell XPS 13 9310 with the same Core i7-1165G7 CPU, processor performance can be unsteady when running high loads for long periods as clock rates will cycle to keep core temperatures in check. However, the amplitude and range at which clock rates cycle on the HP is tighter than on the Dell for a more predictable level of performance. Our CineBench R15 xT loop test below illustrates this as our Spectre 14 would generally score between 770 and 820 points compared to 620 and 750 points on the XPS 13. The HP system is seemingly better at sustaining both tighter and faster clock rates than the Dell as a result.
Raw multi-thread performance is about 20 to 40 percent faster than the Core i7-1065G7 in the Spectre x360 13. Some laptops with the same Core i7-1165G7 CPU are able to run even faster like the Razer Book 13.
System Performance
PCMark 10 results are where we expect them to be relative to other laptops with the same Core i7-1165G7 CPU. The HP system edges out ahead of Ultrabooks sporting older generation CPUs like the Asus Zenbook S or Spectre x360 13.
We experienced no software or hardware issues with our test unit save for an interesting Smart Sense observation that we will note in our Power Consumption section below.
DPC Latency
LatencyMon reveals DPC latency issues related to ACPI.sys. 4K UHD video playback at 60 FPS is otherwise smooth and with no dropped frames during our minute-long YouTube test.
Storage Devices
Our unit ships with the Samsung PM981a which is a high-end PCIe 3.0 NVMe SSD. Running DiskSpd Read in a loop shows that the motherboard interface is able to utilize the high x4 transfer rates of the SSD. Optane options are available much like on the Spectre x360 13, but most office users will be just fine without it.
See our table of SSDs and HDDs for more comparisons.
GPU Performance
Graphics performance is excellent and towards the higher-end of the spectrum when compared to other laptops with the same GPU. 3DMark scores are notably well above the GeForce MX350 by about 30 percent, but real-world games will still run faster on the Nvidia GPU more often than not due to its more mature game-ready drivers.
Frame rates when gaming on the Spectre 14 tend to fluctuate due to the fluctuating clock rates when under stressful conditions. When idling on Witcher 3 on the lowest settings, for example, frame rates would constantly cycle between 80 and 95 FPS instead of remaining constant as shown by our graph below. This behavior is similar to the XPS 13 albeit it is even more pronounced on Dell's machine. We explore this further in our Stress Test section.
See our dedicated page on the Iris Xe 96 EUs for more technical information and benchmarks.
Emissions
System Noise
Fan noise remains quiet even when browsing the web or video streaming on Performance mode. Running the first benchmark scene of 3DMark 06, for example, would induce a fan noise of just 26.4 dB(A) against a silent background of 25.9 dB(A). It's not until we would run Witcher 3 for longer periods would the fans begin to run at higher and more audible RPMs. At worst, users can expect a noise of 41.5 dB(A) with thankfully no annoying pulsing behavior.
Temperature
Surface temperature development is symmetrical due to the symmetrical cooling solution inside. The keyboard center can be as warm as 39 C while the bottom hot spot can be as high as 53 W when under high processing stress. These results are even warmer than what we recorded on the 13.3-inch Spectre x360 13 by 5 to 10 degrees C on each side. Though the palm rests are never too warm, a cooler bottom would have been appreciated.
Stress Test
When stressed with Prime95, the CPU would boost to 4 GHz for the first few seconds and at a core temperature of 95 C. Clock rates and core temperature would then steadily fall and eventually cycle between 2.1 and 3.4 GHz and 75 C and 95 C, respectively. Running this same test on the XPS 13 9310 with the same Core i7-1165G7 CPU would result in slower clock rates of 1.9 to 3.1 GHz and a cooler core temperature of 71 to 78 C.
Both CPU and GPU clock rates would fluctuate when gaming as well resulting in unsteady frame rates. Our screenshot below illustrates this when running Witcher 3. You may want to enable v-sync to reduce screen tearing and uneven frame pacing.
Running on battery power limits processor performance even when on the Performance power profile. A 3DMark 11 test on batteries would return Physics and Graphics scores of 3209 and 6714 points, respectively, compared to 11810 and 6658 points when on mains.
Energy Management
Power Consumption
Power consumption fluctuates more readily on the Spectre x360 14 when compared to most other Ultrabooks with the same Core i7-1165G7 like the Asus ZenBook 14. Our screenshots below illustrate the ranges owners can expect when running high processing loads. This behavior is in line with the fluctuating clock rates we observed above.
On average, however, power consumption when running higher loads isn't all that different from the Asus Zenbook S or Lenovo Yoga 9i 14 each equipped with less powerful Ice Lake or Core i5 processors. The HP is especially efficient when compared to Ultrabooks with discrete GeForce MX graphics like the Huawei MateBook 14 which consumes about 15 to 20 W more when gaming.
We're able to record a temporary maximum draw of 56.2 W from the small (~8.8 x 5.3 x 2.1 cm) 65 W AC adapter when running extreme loads.
It's worth noting that the default HP Smart Sense power profile is not the most power efficient mode. During our tests, the system would consume at least 6 W on Smart Sense mode compared to just 2 to 3 W when on Quiet mode. You'll want to use Quiet mode if battery life is of utmost importance.
Battery Life
Battery capacity is 10 percent larger than on the Spectre x360 13 (66 Wh vs 60 Wh) and with a longer WLAN runtime of about 1.5 hours. Users can expect almost 12 hours of real-world WLAN usage on a full charge.
Idling on desktop at the lowest brightness setting on HP Smart Sense mode would last for just 14.5 hours compared to over 36 hours on Quiet mode. The wide discrepancy may be due to the higher power consumption of Smart Sense mode mentioned above.
Charging from empty to full capacity takes about 2 to 2.5 hours.
Verdict
The best thing about the Spectre x360 14 is that it's a perfect adaptation of the Spectre x360 13. Almost everything we loved about the 13.3-inch model can be found unscathed on the 13.5-inch model including the excellent keyboard feedback, strong and classy metal design, high contrast ratio display with full sRGB coverage, and long battery life. However, this also means that the system inherits many of the same drawbacks as the Spectre x360 13 like the cycling CPU clock rates, non user-upgradeable RAM, average hinge rigidity at certain angles, and slow black-white response times. There's definitely still room for improvement in this regard.
We're not fans of a couple of changes. Whereas the Spectre x360 13 had WAN options, the Spectre x360 14 has silently omitted them. Meanwhile, the larger fingerprint reader is easier to use, but it comes at the expense of a Ctrl key. If you never relied on these features in the first place, however, then these changes won't be much of a problem.
The 13.5-inch Spectre x360 14 puts the 13.3-inch Spectre x360 13 in a tight spot. Though HP insists that the former won't replace the latter, we can see a scenario where the Spectre x360 13 will be slowly phased out anyway in favor of the Spectre x360 14 because both are so similar. If you're in the market for a Spectre, we recommend the 13.5-inch model over the 13.3-inch one simply because it is able to offer a noticeably larger screen size with only marginal increases to size and weight.
HP's latest convertible is faster than the Dell XPS 13 with the same Core i7 CPU while offering a larger and optionally two times brighter display. There are a few faults, but they are generally easy to overlook given that the Spectre x360 14 is so well-crafted and a joy to work on.
0 notes
Text
[圖]CrystalDiskMark 7.0發布:使用GUI重建UI 新增混合測試項目
下載地址:CrystalDiskMark 7.0


CrystalDiskMark是衡量媒體數據存儲驅動器傳輸速度的基準軟件,如HDD,SSD,USB存儲器,SD卡和NAS。小巧的體積加上簡單且易於操作的界面讓你隨時可以測試你的存儲設備。
CrystalDiskMark 7.0的內部開發代號為“Marginality”,開發週期為2018年6月30日至2019年10月31日。根據官方更新日誌,主要調整如下
● 重建UI(從HTML遷移到GUI)
● 更改連續基準(塊大小128KiB-> 1MiB)
● 更改隨機基準(Q8T8 -> Q32T16)
● 添加了Peak/Real World性能配置文件
● 添加了混合(讀/寫)測試
● 添加了字體更改功能
● 更改了DiskSpd Affinity選項(-ag-> -n)
● 包含對ZIP / INSTALLER的ARM64支持
● 安裝程序不支持XP / 2003
.
from [圖]CrystalDiskMark 7.0發布:使用GUI重建UI 新增混合測試項目 via KKNEWS
0 notes
Text
A few months ago we reviewed the iStorage datAshur Pro2 128GB – a USB flash drive with hardware encryption. DataLocker saw the review and got in touch to ask if we’d like to review their Sentry K300. Both are encrypted USB flash drives with a high capacity, and promise high performance. Uniquely though, DataLocker are bringing a screen to the fight – something that should substantially improve ease of use. Today we’ll be seeing how the Sentry K300 compares.
DataLocker Sentry K300 64GB Specifications & Features
Capacities 8GB, 16GB, 32GB, 64GB, 128GB, 256GB Interface USB 3.1 gen1 (5Gbps) Operating System (drive) Almost any – including Windows, macOS, Linux, iOS, Android, ChromeOS Operating System (SafeConsole management) Windows 7, Windows 10 Read Speed (8GB-32GB models) 220MB/s Read Speed (64GB-256GB models) 220MB/s Write Speed (8GB-32GB models) 100MB/s Write Speed (64GB-256GB models) 200MB/s Dimensions (LxWxD) 101x22x13mm Water Resistance IP57 (immersion up to 1m) Health, Environmental and Electromagnetic Certifications FCC, CE, KCC, RoHS, WEEE, RCM (AS/NZS CISPR 32), IC (ICE-003) Encryption AES (FIPS 197) Trade Certification TAA Compliant FIPS 140 Certification No Interface Keypad with Screen
Today we’re looking at the 64GB model of the Sentry K300. That means speeds rated for 220MB/s read and 200MB/s write.
Security Certification
One thing you might notice from the specs is a long list of regulatory and trade certifications, but when it comes to security certifications there’s a lot less noise. FIPS 140 certification would mean a stamp of approval from the US government, and that the device was approved to carry sensitive data. Think medical or banking records, as well as state secrets. It would also mean the device had gone through a long, expensive validation process.
The FIPS approved AES encryption algorithm should in theory get the Sentry K300 to at least FIPS 140-2 Level 1. We don’t think lacking FIPS 140 certification means the device is likely to be vulnerable (though we’re not equipped to replicate the long, expensive FIPS testing). It’s entirely possible DataLocker just don’t want to spend all that money on a certification that’s being superseded by FIPS 140-3 this year. However for some people it’s a box that has to be ticked.
If you’re working with less sensitive data, and don’t have to tick that box, ease of use could be more important. If working securely is made difficult, it’s more tempting to just work insecurely. It’s also important to remember than an average joe has no way to break into a device like this. Even if it actually couldn’t meet any FIPS 140 standard, this drive would still provide security against all but the most capable and determined attacker.
DataLocker Sentry K300 64GB Closer Look
Packaging
The packaging for the Sentry K300 is similar to most USB flash drives – a cardboard outer with information, and an inner plastic clamshell. What surprised us was how strongly it’s all glued together. In fact, it was very difficult to extract the drive without obliterating the instructions on the back. This is probably intentional, as it adds an extra layer of defence against tampering in the supply chain. Though helpful, the instructions on the packaging aren’t strictly necessary, thankfully. You can find the manual for the Sentry K300 on DataLocker’s website.
Interface
The Sentry K300 has a straightforward, intuitive interface that makes the most of the screen. Visual feedback when entering a password makes it easy to correct any mistakes, and menu options are intuitive. Datalocker also include plenty of warning screens and confirmation dialogues for anything that risks your data.
Having entered the default password of 1234567, the drive prompts you to change the password – something it forces after a couple of uses. Minimum password length is 7 characters. Front and centre are options to connect the drive normally, in read only mode, or in ‘boot mode’. Boot mode tolerates brief disconnection without locking, to allow the drive to be used with a portable operating system.
The drive can be securely wiped from the menu, or by entering an incorrect password too many times. The menu also provides configuration for a longer minimum password length (up to 30 characters), strong password enforcement (which rejects passwords with consecutive characters), and the inactivity time before the drive locks itself. The user password option allows a second password to be created that has less access than the administrator password.
Performance – H2testw
H2testw is a utility to confirm drive operation, written by Harald Boegeholz. It works by filling a drive with procedurally generated, incompressible data. This data is then all read back and checked. As well as reporting if the data was stored accurately, H2testw reports read and write speeds.
For comparison we have data from a selection of 16GB USB 3.0 drives. These aren’t competitors, but do provide some context.
Testing the entire drive capacity with h2testw gave us read speeds of 198MB/s and write speeds of 38.9MB/s. Because it’s so long, H2testw defeats caching and potentially hits thermal limits. Still, pulling 198MB/s read speed across the entire capacity is impressive.
Performance – CrystalDiskMark (Light Settings)
CrystalDiskMark is a simple, popular piece of disk benchmarking software based on Microsoft’s DiskSpd. We’ve tested the Sentry K300 with light CrystalDiskMark settings (128MiB test size, 3 passes), appropriate to smaller flash drives.
With the smaller test size, the Sentry K300 blows past the rated 220MB/s read and 200MB/s write in sequential loads. In more difficult random loads, we see the real power of being a “micro SSD”. Random writes are really hard on the controller, and the colossal performance gulf shows how much stronger DataLocker’s controller is than a basic implementation.
Performance – PCMark10
PCMark10‘s data drive benchmark aims to evaluate the performance of a drive with large numbers of small files. Specifically, it tests writing, copying and reading of 339 jpeg photos totalling 2.37GB. We’re not seeing cheap controllers brought to their knees like with CrystalDiskMark’s Q32T16 random write. However, this is a realistic test that still manages to be very hard on the drive.
In PCMark10’s data drive benchmark we got a throughput of 38MB/s.
Performance – CrystalDiskMark (Default Settings)
Finally, the test you’ve all been waiting for. We can’t review the DataLocker Sentry K300 without putting it side-by-side with the competitor that prompted the whole thing. So, we ran CrystalDiskMark again – this time with the heavier default settings used in the datAshur Pro2 review. Though different staff tackled each drive, we’ve also made sure the tests were also carried out on the same platform.
The Sentry K300 was far faster in CrystalDiskMark despite the controller having half the flash to work with. On performance, the DataLocker Sentry K300 is a clear winner.
The DataLocker Sentry K300 64GB Review: The Verdict
Overall, DataLocker have absolutely blown us away. The Sentry K300 is astonishingly fast for a USB drive. DataLocker call it a “micro SSD”, and it’s easy to see why. Not only is it speedy, but it’s also very easy to use. Novice users should have no trouble here. If you’re worried about misplacing a drive and want to keep Joe Public out of your data, this drive is ideal.
What’s hot:
Easy to use
Impressive performance
Self-wiping feature makes secure data destruction easy
Good support for portable operating systems
Keeps your personal data private
What’s not:
No FIPS 140 certification
Most models of DataLocker Sentry K300 can be found from third-party sellers through Amazon. The best price we found for the Senty K300 64GB as reviewed, however, was £209.29 from LambdaTek. There’s no question that this is very expensive, but for such a unique product we’re inclined not to be too harsh on it for cost.
The only problem with the DataLocker Sentry K300 is that it lacks FIPS 140 certification or equivalents. If you’re handling data that’s formally classed as “sensitive”, this may be a requirement. Because of this, we can’t currently recommend the drive to anyone in that position. This will change if DataLocker get the drive certified in the future.
For anyone else, this drive is great. Whether you’re looking to protect your own privacy, or fulfil GDPR obligations for data that’s “personal” rather than “sensitive”, the great performance and ease of use make the DataLocker Sentry K300 an excellent option.
Thanks to DataLocker for sending a sample of the Sentry K300 64GB in for review.
Related Reading:
iStorage datAshur Pro2 USB 3.2 128GB Encrypted Flash Drive Review
Kingmax KE31 480GB Portable SSD Review
iStorage diskAshur Pro2 USB 3.1 Ultra Secure HDD Review
Samsung 970 EVO Plus SSD Review
iStorage DiskAshur2 USB 3.1 Encrypted HDD Review
Armed with a screen, the DataLocker Sentry K300 takes ease of use for an encrypted USB drive to the next level. Read on for benchmarks and analysis... A few months ago we reviewed the iStorage datAshur Pro2 128GB - a USB flash drive with hardware encryption.
#256-bit AES Encryption#AES256 encryption#DataLocker#Encryption#Review#Sentry K300#SK300-064#storage#USB 3.1#USB Flash Drive#uSSD
0 notes
Text
Testing NAS Throughput
This week we had to validate our NAS performance.
The easist way to do that is push and pull data to the NAS. But how to do that in a way that could control the amount of data, data frequency, process threads etc.
The approach we took was to use DiskSpd from Microsft.
We tested an 11 node Qumulo cluster from a windows host.
DiskSpd's documentation was clear and easy to understand. As an added bonus, it also runs on linux.
0 notes
Text
DiskSpd. Teste de IOPS do Windows
DiskSpd. Teste de IOPS do Windows
O DiskSpd é um utilitário para gerar uma carga em um sistema de disco e medir seu desempenho.
O download do DiskSpd pode estar nos links: https://aka.ms/diskspd https://gallery.technet.microsoft.com/DiskSpd-A-Robust-Storage-6ef84e62 https://github.com/microsoft/diskspd
Após o download, colocamos o arquivo do utilitário exe em qualquer diretório e executamos o teste na linha de comando, por exemplo:
1
View On WordPress
0 notes
Text
Teste Performance IOPs no Windows Storage Pool / Storage Spaces com DiskSpd
Teste Performance IOPs no Windows Storage Pool / Storage Spaces com DiskSpd
Nesse artigo vamos falar um pouco sobre a ferramenta DiskSpd para efetuamos testes de performance em um Windows Storage Pool ou Storage Spaces. O Diskspd é uma ferramenta que substitui o antigo SQLIO e de uma forma mais eficiente, nos traz dados importantíssimos em relação aos IOPs, leitura e gravação em disco. Esse tipo de procedimento e testes sao muito importantes quando vamos montar novos…
View On WordPress
0 notes
Text
Some server storage I/O benchmark workload scripts (Part I)
Some server storage I/O benchmark workload scripts (Part I)
Some server storage I/O benchmark workload scripts (Part I)
This is part one of a two-part series of posts about using some common server storage I/O benchmark tools and workload scripts. View part II here which includes the workload scripts and where to view sample results.
There are various tools and workloads for server I/O benchmarktesting, validation and exercising different storage devices…
View On WordPress
0 notes
Text
TempDB and Disk IO Tips and Tricks for SQL Server
TempDB and Disk IO Tips and Tricks for SQL Server
One common issue with database performance is TempDB tuning. There are some basic tips and tricks to getting the best possible performance from your TempDB, but you need to understand that each instance will need tuning. There isn’t a checkbox in the server configuration that enables peek performance. You will need to investigate the specifics of your database instance and tune the server so…
View On WordPress
0 notes
Text
Part II - Some server storage I/O workload scripts and results
Part II ��� Some server storage I/O workload scripts and results
Part II – Some server storage I/O workload scripts and results
This is the second in a two part series of posts pertaining to using some common server storage I/O benchmark tools and workload scripts. View part I here which includes overview, background and information about the tools used and related topics.
Various NVM flash SSD including NVMe devices
Following are some server I/O benchmarkwo…
View On WordPress
0 notes
Text
Part 7 - HDDs for Content Applicaitons - HDDs continue to evolve
Part 7 – HDDs for Content Applicaitons – HDDs continue to evolve
Part 7 – HDDs for Content Applications – HDD’s continue to evolve
Which enterprise HDD to use with a content server platform Insight for effective server storage I/O decision making Server StorageIO Lab Review
This is the seventh and final post in this multi-part series (read part six here) based on a white paper hands-on lab report I did compliments of Servers Direct and Seagate that you can
View On WordPress
0 notes