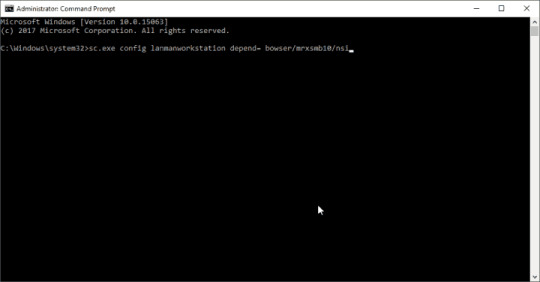
#Dism-coded things :)
Explore tagged Tumblr posts
Visit Tumblr Blog
Explore Tumblr blogs with no restrictions, modern design and the best experience.
Last Seen Tumblr Blogs


Fun Fact
There were a total of 171.5 billion posts on Tumblr in 2019.
Text
BATTLE IN THE CENTRE OF THE MIND CONTINUES TO BE ONE OF THE MOST TROPES EVER
#just pav things#once a favourite always a favourite ✨#anyways I was reading about sea of stars as part of researching indie game environmental art styles#i was on wikipedia btw. which#Pav went to the search bar and jumped to reading about in stars and time (I thought of it as another indie game with stars in the title~)#Read the plot of the game out of curiosity and BOYYY#WHY DID NOBODY TELL ME SIFFRIN WAS LIKE *THAT*#battle in the center of the mind WITH abandonment issues?? YOU COULDN’T MAKE A MORE APPEALING CHARACTER 😭😭😭#I have such a high affinity for characters who are deeply lonely and don’t want to be alone#and who have the WORST coping mechanisms for this#what I mean to say is dism 🤝 siffrin :’)#Dism-coded characters will always be adopted by me and held dearly#I think they’re the sweetest beans ever 🥲#so anyways I’ve watched the last fifth of isat and damn. I’m giving siffrin some snacks because he deserves them 😭
7 notes
·
View notes
Text
YEAH. okay one more, here are two actual problems i've had and the way i fixed them.
Linux issue (computer doesn't boot, see above):
states "file '/vmlinuz-linux' not found", i look it up, it's the kernel.
i remember from when i installed, i booted off a usb stick and then changed the root to my drive. I can boot the linux kernel off of a usb and go to my files and system on the drive from there, skipping the broken kernel, and it works, but it's not a good solution and temporary
i think something's wrong with the bootloader, i updated the config and the option to boot into linux dissapears
i remember i had some issues when installing packages last time, so i reinstall the 'linux' package
rerun the thing to update the config and Linux gets added back to the bootloader, reboot and things work fine!
Fixing a windows issue (updates and microsoft store give errors):
It throws an error code which means absolutely nothing to me. i cant even copy and paste it so i type it character by character into google.
no results. though there's similar issues apparently.
they tell me to run sfc /scannow and some DISM bullshit. people say it worked for them. it didn't work for me
okay well there's the event viewer i can see what's going on there. and there's a DIFFERENT error code and this one DOES have results on google. two of them, multiple years old. at least it's not just a windows 11 issue.
it says to run sfc /scannow and DISM. cool. still doesn't work for me.
okay maybe something in the update broke, let me manually install an update and oops looks like the manual install update relies on some thing thats broken with the normal update.
Get around it using a powershell script i found online and it seems to work. reboot and the start menu is completely missing, and it didnt even update!!!
literally what else can i do than give up and reinstall windows entirely. i never figured out what that issue was or what the correct way to fix it because it gave me no information and there's nothing you can really do other than run sfc and dism. you're given the bare minimum diagnostic tools, and basically no tools to actually change and fix things. it's horrid
every computer i touch fucking explodes
70 notes
·
View notes
Text
Chessboard
Ah, this song's so beautiful. This isn't officially released yet as a Higedan song, but I guess it actually is officially released already as this song is going to be used in a choral competition for middle school students. As a choral music lover, I loved the choir arrangement so much, thus this translation. Really looking forward to the Higedan version of this song.
As usual, this I do not guarantee that this translation is 100% correct as I'm still learning Japanese, so there may be errors/corrections/mistranslations in this (in reality, I'm really just doing the translations for myself, so that I can practice my Japanese reading skills and can understand their songs hehe. Just shared it here hoping that it will be helpful for others, too). If there are any mistakes in the translation, please feel free to reach out and tell me so I can make the necessary corrections. :)
Edit notes:
(08/01/2023) edited to reflect the additional verse (pink text) from the artist version released by NHK.
(08/09/2023) added Spotify link. It's finally officially released! Also removed color coding since apparently all lyrics are in the official release :)
--
チェスボードみたいなこのせかいへ僕らは ルールもないまま��生まれてきた
幸せと悲しみの市松模様 そのどこかで息をする
王様もいないこの盤上で僕らは どんな役を与えられたんだろうか?
行ける場所 行けない場所 目指すべき場所 知らないままで息をする
不意に誰か隣に来て 風が吹けば離れ離れ
繰り返す不時者の数だけ増えるメモリー
振り返れば優しく揺れる猫じゃらし 白も黒も関係なく芽生えた
穂先で心をくすぐりながら 枯れることなく伸びている
チェスボードみたいなこの世界で僕らは いつしか地に足がつき始めた
行く場所 行かない場所 帰るべき場所 自分で決めて歩いていく
綿毛みたいに風に任せ 飛べた頃を羨むけど
空中からじゃ見落とすような小さな1マス そこであなたに会えたんだ
ゲームは続いてく このフィールドで今度は どんな事が待ち受けているのだろう?
一歩づつ大切に種を蒔きながら…
大きいな歩幅で ひとっ飛びのナイトやクイーンみたいになれる日ばかりじゃない
からこそ躓いた 進めずに引き返した
そんな日にも芽生えてる あなたの足元から 足跡から
繰り返しも迷いも後悔も旅立ちも全て
美しい緑色 こちらには見えているよ
貴方が生きた証は 時間と共に育つのでしょう
美しい緑色 役に立たない思い出も
消したいような過去も いつかきっと色づくのでしょう
そしてチェスボードみたいなこの世界でいつか あなたのことを見失う日が来ても
果てないこの盤上でまた出会えるかな?
その答えが待つ日まで 知らないままでただ息をする
--
Chesuboodo mitai na kono sekai e bokura wa ruuru mo nai mama ni umaretekita
Shiawase to kanashimi no ichimatsu moyou sono dokoka de iki wo suru
Ousama mo inai kono banjou de bokura wa donna yaku wo ataeraretandarou ka?
Ikeru basho ikenai basho mezasubeki basho shiranai mama de iki wo suru
Fui ni dareka tonari ni kite kaze ga fukeba hanarebanare
Kurikaesu fujichaku no kazu dake fueru memori
Furikaereba yasashiku yureru nekojarashi shiro mo kuro mo kankei naku mebaeta
Hosaki de kokoro wo kusuguri nagara kareru koto naku nobiteiru
Chesuboodo mitai na kono sekai de bokura wa itsu shika ji ni ashi ga tsuki hajimeta
Iku basho ikanai basho kaeru beki basho jibun de kimete aruiteiku
Watage mitai ni kaze ni makase tobeta koro wo urayamu kedo
Kuuchuu kara ja miotosu you na chiisana hitomasu soko de anata ni aetanda
Geemu wa tsudzuiteku kono fiirudo de kondo wa donna koto ga machiuketeiru no darou?
Ippo dzutsu taisetsu ni tane wo maki nagara…
Ooki na hohaba de hito ttobi no naito ya kuiin mitai ni nareru hi bakari janai
Kara koso tsumazuita susumezu ni hikikaeshita
Sonna hi ni mo mebaeteru anata no ashimoto kara ashiato kara
Kurikaeshi mo mayoi mo koukai mo tabidachi mo subete
Utsukushii midori iro kochira ni wa mieteiru yo
Anata ga ikita akashi wa jikan to tomo ni sodatsu no deshou
Utsukushii midori iro yaku ni tatanai omoide mo
Keshitai you na kako mo itsuka kitto irodzuku no deshou
Soshite chesuboodo mitai na kono sekai de itsuka anata no koto wo miushinau hi ga kitemo
Hatenai kono banjou de mata deaeru kana?
Sono kotae ga matsu hi made shiranai mama de tada iki wo suru
--
We were born in this chessboard-like world without knowing any rules
Somewhere in between the checkered-patterened (alternating) happiness and sadness, we live
On this kingless board, what role can be given to us?
A place we can go to, a place we can't go to, a place we should head on to - without knowing these things, we continue to live
Suddenly, someone comes beside us, and when the wind blows, we become separated
A memory that grows just as the number of people crashing in (our lives) again and again adds up*
Whenever I look back, I see the nekojarashi** as it gently sways; it sprouted no matter what happened***
As its tips tickles my heart, it grows without withering
On this chessboard-like world, we started to make ourselves grounded without us realizing it
The places we'll go to, we won't go to, and places we'll go home to - we decide on it ourselves and walk towards it
I envy the times fluff can just leave it up to the wind to be able to fly
But (if I did fly) I might not notice that one small square from the sky - that (small square) was where I met you
I wonder what more we could expect in the future as the game continues on this field
While we sow the precious seeds (we've planted), one step at a time
Our days won't always be fast paced like knights or queens taking one big leap
It's because (there are times) we stumble (and) we turn back without moving forward
(But even then) something will grow from these days, from these footsteps, from these footprints
Even from the repetitions, the hesitations, the regrets, the journey - everything
I can see the beautiful green color from here
All the proof that you lived - it will probably grow with time, right?
The beautiful green color, the worthless memories
As well as the past you want to disappear - someday, they will all surely change color, too
And even when there will come a time when I lose sight of you on this chessboard-like world
Will we be able to meet again on this endless board?
Until the awaited day we can answer that question, I'll continue to live without knowing
T/N
*I feel like this line (actually this whole stanza) pertains to chess moves, like suddenly someone else moves beside you, or how in the blink of an eye a piece is moved to another square, or in the case of crashing into, pertaining to when we try to replace or take over the opponent's piece. Idk really I'm not so sure haha I don't play chess I'm just making this reference with the very little chess knowledge that I have HAHAHA
**Nekojarashi - green foxtail/green bristlegrass. (pic from Google)

***Shiro mo kuro mo kankei naku mebaeta, when translated literally, would be "may it be black or white, it doesn't matter, it still sprouts". I feel like there are a lot of ways to interpret this line. My understanding of this line is that no matter what happens, may it be good (weather) or bad (weather), it will still sprout in time, pertaining to how the plant survives harsh conditions. I feel like the white or black part pertains to the plant being under the sun (where it will sprout/bloom best) and under the shade (where it won't sprout, but will still be alive).
****Iki wo suru literally translates to "to breathe". But i feel like it was kinda awkward to put it just like that. So i put "to live", because when you breathe, you're alive, therefore you live.
1 note
·
View note
Note
How about a fic where the whole team goes to Lance's home town in Cuba, playing on the beach?
Thanks for the fun ask @aquaburst07 ! My apologies for taking so long this cold did a number on me.
**This follows the action of Season 6 so SPOILERS AHEAD!!!**
This is going to be the third part of the series after “Reforging the Bond” and “Through Your Eyes” There will be one more for a request, but it’s a side quest (a.k.a. 18+!)
Sink or Swim
Keith dug his toes into the dry sand, possibly in the hope he’d take root in his spot on the beach. Even though he grew up surrounded by the stuff, it just wasn’t the same as being here on the shores of Varadero, where the Atlantic joined the Gulf of Mexico. No barrier divided the two, and it would take a massive undertaking to do so. He mused at how two bodies of water flowed into each other and yet were separate.
Kind of like how things were with Allura. Or had been, at least. He thought they were two bodies flowing into the other as well. The current he had long imagined could not be altered was suddenly cut off by a cursed kiss and harsh words. The dam may have been designed by Lotor but Keith had built it himself.
He was happy they were at least on speaking terms again. Weeks passed and the discomfort had begun to subside, but the ease they’d long shared failed to resurface. Keith suspected Allura had begun to confide in Krolia, possibly because of her short history with the team. For that he was thankful, though, because his mother could advise her without bias. He’d never told his mom about his feelings for the Princess, after all.
And for her part Allura seemed happier. She had jumped at the chance to meet Lance’s family and relax with friends after spending so long working on Earth’s new defense system. In fact, the sound of her laughing and splashing in the water with Romelle, Lance, and Matt, made him think she was sounding a lot more like her old self. That made him incredibly happy, even if it did sting a little.
He chanced a glance their direction and was flustered when he immediately met her gaze. At first he expected her to look away but instead she smiled and waved for him to join them. Nervously he waved back, almost tempted to check over his shoulder to see if Pidge or Hunk were standing behind him.
Nope, he could see them in the distance looking for seashells. And Coran was sunning himself dangerously close to the water’s edge. If that was the case he was the only one left she could be waving to, right?
Just as he was getting his nerve up to join them he felt a gritty foot shove playfully at his back. Confused he let his head loll backwards to see Lance’s sister, Veronica, smiling down at him. She was holding two drinks and had a beach towel tucked under her arm.
“Mind if I join you?” she asked, briefly setting down the drinks to unfurl her blanket before he could even respond.
They’d only been in Cuba for a day and Keith had barely spoken with any of Lance’s siblings, so he wasn’t sure what his sister could possibly want with him. Maybe she’d heard about their contentious relationship, or how her brother viewed them as rivals. She didn’t seem angry though so– despite being annoyed that he was blocked from having fun with Allura– he decided to take the friendly approach.
“Sure, go ahead.”
He wasn’t sure why he’d bothered responding but figured it was still polite to do so. She flashed a bright smile of gratitude, handing one of the slushy drinks to Keith before planting herself next to him. After thanking her for the treat he sat for a while slowly slurping the mix of tropical fruits, wondering to himself why he’d never learned to identify poisons by their taste. Veronica was all of five-foot-two so not a danger physically, at least. He could take her in a knife fight.
“So Keith, how do you like it here?” Her question brought him back to reality, making him feel a bit guilty for making such wild assumptions about her.
“It’s nice. You must like living so close to the beach, huh?” he asked, hoping to keep the conversation to a minimum.
Veronica gave him a quick once-over before responding. “The scenery has gotten a lot nicer, for sure,” she answered with a wink.
Despite his social ineptitude Keith was beginning to suspect she might just be flirting with him. The flushed feeling in his cheeks seemed to confirm this. Granted she was certainly cute; her curly hair and bright eyes and sunny disposition were attractive features for certain. But they were more attractive on Allura, that he couldn’t deny.
Allura, the goddess playing in the surf. Her white hair pulled into a ponytail that bounced adorably as she chased the others with a bucket of water. Her dark skin and gentle curves perfectly complemented by a fiery red bikini. A bikini a top that tied around her neck and back.
Ties that looked dangerously loose and why wasn’t someone telling her to double knot them?
“Hellooooo! Earth to Keith!”
Keith’s eyes blinked instinctively as a manicured hand snapped fingers in his face. He hadn’t even realized that the woman sitting next to him had been trying to get his attention for several seconds. Despite managing to stutter out an apology he knew she wasn’t in a forgiving mood. Her eyes could have pierced a hole in his head as intently as she was glaring at him.
She didn’t break her focus until she noticed his focus had shifted to the distance once again. Glancing over her shoulder she let out a dejected sigh, her head dropping as the realization apparently set in. Then she turned her attention back to Keith, angrily snatching the half-finished drink from his hands.
“Look, I don’t know what your story is,” she started, “but you’re going to walk your ass over there and be honest with that girl.”
“I wha? Wh- who?” he stuttered. If he was hoping to play this off he was failing miserably.
Veronica stood grabbed her towel, shaking it off in his direction. Keith jumped up to protect his face from the blast of sand.
“What the hell?”
“Guess you have to go in the water now, don’t you?” she smirked. “Better hurry, you might miss your chance to come clean.”
Swiftly she turned to walk away, whipping her hair as she sauntered off to the spot where her brothers were hanging out with their families. Pausing for just a moment she looked back in Keith’s direction, winking at him but this time in a way that wasn’t in the least bit suggestive. This time is was like she’d given him the secret to a code he hadn’t yet deciphered.
After a foolhardy attempt to brush himself off he resigned himself to take her advice and jump in the ocean, figuring it would be way more effective than the showers posted near the dunes. He ducked into the waves a few times with the hope the current had done most of the work for him. As he emerged the last time he just happened to catch a glimpse of red in the corner of his eye. Instinctively his eyes rolled in that direction as red had become an important color to him.
Allura was looking at him, concern coloring her features.
Had she seen everything?
Allura had seen everything.
Well, most of it. She tried to pretend she didn’t see Lance’s super-hot sister approach Keith as the she herself was trying to get his attention. The others didn’t seem to notice her distraction at the sight of the seductress wooing the handsome paladin as he sat alone, far out of earshot.
And she was definitely proud of the fact that she didn’t outwardly cheer when Veronica stormed away, obviously after Keith had rebuffed her advances.
She did feel a bit badly for him having sand rained over his head. On the bright side, she thought, he’s in the water now. Despite the coolness of the day she felt a sudden spike in temperature as she watched the ocean bead around his chiseled form, his muscles accented by the outlines it traced.
“Head’s up!”
Matt’s alert came half-a-tick before the beach ball struck the side of her face. It didn’t really even hurt but for whatever reason she yelped as her hand rushed to cradle her right cheek. Embarrassed she hoped to simply play it off, waving her hand and playfully kicking water in Matt’s direction before chasing after the ball that had been pulled further out to sea.
By the time she reached it the water was much deeper, nearly covering her shoulders. She grabbed the ball, holding it high over her head triumphantly as Lance cheered her on. Or at least that’s what she thought he was doing. It was an obvious misunderstanding.
The wave that crashed over her head was far more powerful than the ones closer to shore. It swept her off her feet as she felt her body being sucked further out. Frantically she tried to gain a foothold as she struggled to keep her head above the surf. A second wave pushed her back down, sending her into a panic.
Suddenly a pair of arms came from behind and wrapped around her waist, pulling her to the surface. She sputtered as her rescuer swam parallel to the shoreline to an area where the waters were much calmer.
Right, Lance had told her about riptides. She’d completely forgotten.
As they came to a stop the grip on her loosened but didn’t let go completely. She could still feel the warmth of his chest against her back, his breathing labored. Something told her that if she turned around she’d be met with a very familiar face. And yet she hesitated to do so for fear her instinct was wrong.
“Allura, are you okay?”
Despite the fact that she’d almost just drowned she couldn’t imagine being more okay. Of all the voices in the universe it was the one she hoped to hear most. Maybe that was because it belonged to the man she’d loved for so long, who as always was the one to save her when she felt she could no longer breathe.
“I’m fine, thank you.”
No, that’s not what she wanted to say. What did she want to say? Words had always flowed so easily between them before, but now they were stuck in her throat and threatened to choke her.
Instead she turned to face him, throwing her arms around his neck and pulling him tightly to her. To her dismay his body went rigid, his arms floating languidly at her sides. Her heart sank as she realized he may not have forgiven her yet. Perhaps he never would.
“Um, Allura,” Keith finally spoke, his voice cracking slightly. “I think you lost something.”
Lost something? Surely he wasn’t concerned about the stupid beach ball. No,he wasn’t looking out, he was looking up. So Allura looked up too, then to her left. Her right. Then over his shoulder.
Oh.
The something was the item that Pidge was trying to flag her down with. The red triangular flags that had been plucked from the ocean. The familiar top that should have been a barrier between their skin. She cursed the red strings that cruelly taunted her as they danced in the breeze.
“Keith?”
“Hmm?”
“Could you please fetch that for me?”
This time it was Keith’s turn to sputter. “Um, sure, I guess.” Finally he lowered his gaze to hers and she could see the pink that was spreading over his cheeks. “Let’s get you a bit closer to shore first, though.”
Allura swam obediently behind him, stopping once she had to crouch significantly to maintain her dignity. She watched Keith drag himself through the foamy waves towards Pidge, awkwardly accepting the offering of Allura’s immodesty with the grace of a child holding a smelly sock. For a moment she thought to be offended, until he made his next move which was towards the beach.
Rage began to boil her blood, the cool water surrounding her hissing steam as it lapped her skin. She watched as he raced for his towel, snatching it up quickly. Forcefully he shook the sand loose and threw it over his shoulder. If he planned to leave her stranded there while he ran off with the–
Ah.
Anger turned to embarrassment as the Princess realized he was headed back to her. Of all people to trust, Keith should always be the first. Well, maybe Coran. But Keith would certainly be next. He’d always been there for her when she needed him, even when she wasn’t willing to give him the benefit of the doubt. That’s the kind of man he’d been since the day they met.
Once he reached her he held out the bikini top rather unceremoniously, waiting for her to grab it. Then Keith unfurled the towel, holding it end to end between his fingers. She realized he was offering her some privacy so she could stand to redress. He even had his eyes shut so tightly his entire face was scrunched up. Even though he looked much older than before he still had a boyish charm to him, she thought.
It took a few minutes of stretching and fumbling and barely getting a bow tied around her neck before Allura resigned herself to ask for assistance. Romelle had helped her put the top on that morning because it was rather difficult to tie a knot behind her own back. Add the difficulty of not getting her hair caught in said tie, the mission became nearly impossible.
So, she stood musing. For Keith to help her he would need to drop the towel. If he did that, she’d have no privacy. However, his shoulders were now much broader, and his chest, well….she was sure it was enough to block the view from the shore. Grabbing the remaining straps and holding them behind her she called Keith’s name to get his attention.
Three times.
The last time she raised her voice as she shot a glance over her shoulder. He looked like he wanted to be anywhere else besides there. The third time she called he jumped and nearly dropped the makeshift privacy curtain.
“Yes, Princess,” he responded stiffly.
“Can you tie this for me, please?”
He cocked his head slightly and blinked back his surprise. “Sure, I guess. I mean, if it’s okay.”
“Of course it’s okay,” she laughed in response. Did he think she would ask if it wasn’t?
“I’ll try not to touch you then,” he promised as he swept her ponytail over her shoulder.
“Don’t try too hard.”
Allura shocked herself with such a response, but Keith? He was even more unsteady than before. She worried that he might fail to tie it properly his hands were shaking so much. Still, she relished the feel of his fingertips as they brushed her skin. Once he finished she asked him to retie the one around her neck and thankfully he complied. Certainly he noticed the raised bumpy flesh on the back of her neck as his hands ghosted across it.
“All set.”
“Oh,” she responded, sounding somewhat disappointed. “Well, I hope you tied them properly. Can’t have that happen again.”
Keith laughed humorlessly at the statement, then cleared his throat. “Those knots will never come undone. You’re safe, Princess.”
Allura spun around wide-eyed upon hearing that. “Never? As in ever?”
“It would take my blade to get you out of that,” he teased, apparently amused at her panicked state.
Two could play at this game, mister.
“Then I suppose I’ll come see you it’s time to get undressed,” she retorted, poking him with her finger to emphasize her point.
To her surprise he simply narrowed his eyes and smiled suggestively.
“Room 111. I’ll be waiting.”
38 notes
·
View notes
Text
Missing Protocol Windows 10

Windows 10 Network Protocol Error: Missing Windows Sockets Registry Entries By Corey October 5, 2020 No Comments My colleagues work computer running Windows 10 began to lose Internet access from time to time (once in 2-3 days with the Limited connection status in the tray). Temporarily Disable or Reinstall your Antivirus Software. First things first, if you are using any. Simply updating your PC's Windows 10 operating system could also fix this issue and restore any missing default apps. Step 1: Hit the Windows logo + I short to launch the Windows Settings menu.
Simple Network Management Protocol or SNMP is used for monitoring, event notification, and network device management on corporate networks. The protocol consists of a set of network management standards, including the Application Layer protocol, database schemas, and a set of data objects. SNMP can receive various information (uptime, performance counters, device parameters, etc.) from any network devices: switches, servers, routers or computers on which the SNMP agent is installed. In Windows 10, the SNMP service is available as a separate Windows component and it’s not installed by the default.
How to Install SNMP Service in Windows 10?
You can check if the SNMP service is installed on your Windows 10 using the Get-Service:
Most likely, the service has not been installed yet.
You can install the SNMP service via the Control Panel. Go to the Control Panel > Programs and Features > Turn Windows features on or off. In the list of Windows features, select Simple Network Management Protocol (SNMP) and the WMI SNMP Provider (provides access to SNMP information via the Windows Management Instrumentation interfaces) and click OK.
You can also install SNMP service using PowerShell:
This command can help you to install SNMP service on Windows 10 in 1803 build or earlier. Starting from Windows 10 1809 Microsoft has changed the way to deploy snmp service on desktop OSs.
Installing SNMP Service in Windows 10 1803 and Newer
Missing Protocol Windows 10 64-bit
In Windows 10 1803 and later (1809, 1903), the SNMP service is considered deprecated and is not listed in the Windows features in the Control Panel list.
Microsoft plans to completely remove the SNMP service in the next Windows builds because of the security risks associated with this protocol. Instead of SNMP, it is recommended to use the Common Information Model (CIM), which is supported by Windows Remote Management. On the current builds of Windows 10, the SNMP service is hidden.
READ ALSOHow to Setup FTP Server in Windows 10?
The SNMP service is now missing from the Windows 10 image and can only be installed as Feature On Demand (FoD).
If your computer has a direct Internet connection, you can install the SNMP service components online from Microsoft servers. To do this, open the elevated PowerShell console and run the command:
You can also use DISM to install the SNMP service:
After that, you can verify that the SNMP service is installed:
Name : SNMP.Client~~~~0.0.1.0
State : Installed
DisplayName : Simple Network Management Protocol (SNMP)
Description : This feature includes Simple Network Management Protocol agents that monitor the activity in network devices and report to the network console workstation
DownloadSize : 595304
Default Protocols Windows 10
InstallSize : 1128133
To disable the SNMP service, use the PowerShell command:
You can also install the SNMP service through the Optional Features graphical interface.
Go to the Settings > Apps > Apps & Features > Manage optional feature > Add Feature. Select in the list the following features: Simple Network Management Protocol (SNMP) and WMI SNMP Provider (to get all SNMP service configuration tabs).
After that, the SNMP service will appear in the services.msc console.
If when performing the Add-WindowsCapability command you received the “Add-WindowsCapability failed error. Error code = 0x800f0954”, most likely your computer receives Windows updates not from Microsoft Update servers but from the internal WSUS server. To make SNMP service receiving install files from Microsoft servers, you need to temporarily bypass the WSUS.
READ ALSOAccessing Hyper-V VM Console Using RDCMan
To do this, run the command:
After that, restart the Windows Update service:
Now try to install the SNMP service with the Add-WindowsCapability command. If all goes well, return the initial wusuaserv service registry parameter pointing to the WSUS server. Run the command:
And restart the Windows Update Service.
Configure SNMP on Windows 10 Computer
After the installation, SNMP services should start automatically. Open the Services management console (services.msc). Two new services should appear in the service list:
SNMP Service – This is the primary SNMP agent service, that tracks activity and sends information;
SNMP Trap – Receives trap messages from local or remote SNMP agents, and forwards messages to the SNMP management software that is being run on that computer.
Open the properties of the SNMP Service. If it is stopped, start it by pressing the Start button and change the startup type to Automatic.
Click the Agent tab. Fill in the Contact and Location fields (you can specify the user’s contact name and computer location), and select the list of services from which you want to collect data and send it to the monitoring device. There are five service-based options:
Physical;
Applications;
Internet;
End-to-end;
Datalink and subnetwork.
Click the Security tab. Here you can configure various security settings for different SNMP servers.
The list of Accepted community names contains the names of the communities whose SNMP hosts are authenticated to send SNMP requests to this computer. The community name has the same functions like login and password.
READ ALSOChanging Active Directory krbtgt Account Password
Click the Add button and specify the Community Name and one of the five access levels (None, Notify, READ ONLY, READ WRITE, READ CREATE). READ WRITE is the maximum access level at which the SNMP management server can make changes on the system. For monitoring systems, it is usually enough to select READ ONLY, while the monitoring server can only poll the system, but not make changes. In our example, we added a community name public with READ ONLY permissions.
Add to the Accept SNMP packets from these hosts list of monitoring servers (hostnames or IP addresses) from which you want to accept SNMP packages.
Tip. You can select the Accept SNMP packets from any host option, but this is not safe.
Save the changes and restart the SNMP service.
This completes the SNMP service configuration in Windows 10. If you need to enable SNMP on multiple computers or servers, you can remotely install and configure SNMP service using PowerShell or Group Policy.
AuthorRecent PostsCyril KardashevskyI enjoy technology and developing websites. Since 2012 I'm running a few of my own websites, and share useful content on gadgets, PC administration and website promotion.Latest posts by Cyril Kardashevsky (see all)
Fix: Active Directory Domain Controller Could Not Be Contacted - December 10, 2020Manage and Disable Windows Defender Using PowerShell - December 9, 2020Using Out-File Cmdlet to Redirect Output to File in PowerShell - December 4, 2020='font-size:14px>='font-size:14px>='font-size:14px>
This site uses cookies to analyze traffic, personalize your experience and serve ads. By continuing browsing this site, we will assume that you are agree with it. =cn-notice-text>
A Network Protocol is a set of rules that define how data is communicated between different computers that are connected through a network connection.
Network Protocols are of different types such as Ethernet, FDDI, LocalTalk and TokenRing. They comprise of procedures and formats to be followed during data transmission. You might encounter the One or more protocols are missing error on a Windows 10 laptop/ PC due to one or more of the following reasons:
Your system doesn’t support usage of IPv6
Your WinSock defaults have been changed
DNS registration issues
Corrupt Registry keys, code identifier issues
Insufficient Registry permissions to access network data
A protocol needs to be installed
Use Internet Protocol Version 4
IPv6 is a next-generation protocol. If you’re encountering problems deploying IPv6, configure your laptop to use an older protocol such as IPv4.
Press Windows Key + X; choose Control Panel.
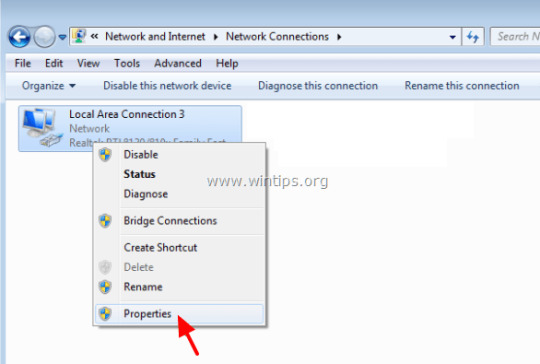
Click Network and Internet | Network and Sharing Center.
Click the Wi-Fi/ Wired Broadband connection that appears in Connections.
Wi-Fi/ Wired Broadband Status dialog will open up on your screen.
Click Properties.
Uncheck Internet Protocol Version 6 (TCP/ IPv6).
Check Internet Protocol Version 4 (TCP/ IPv4).
Click OK | Close.
Restore Winsock Defaults
WinSock, earlier known as WSA, deals with network services such as TCP/IP. Problems with the functioning of WinSock can cause protocol errors. Restore default WinSock configurations using an elevated CMD.
Press Windows Key + X; select Command Prompt (Admin).
Type the following command: Netsh winsock reset
Press the Enter key of your keyboard.
Restart your system using the following command-line: Shutdown /r
Flush & Register New DNS
Domain Name Servers (DNS)translates a website’s name into the corresponding Internet Protocol (IP) Address. If the process of converting human-readable website names fails, you may get the protocol missing error.
Open an elevated Command Prompt.
Flush the existing DNS: ipconfig /flushdns
Register a new DNS: ipconfig /registerdns
Release and renew the information: ipconfig /release ipconfig /renew
Reset the Catalog: netsh winsock reset catalog
Store the logs in a separate file named reset.log netsh int ipv4 reset reset.log netsh int ipv6 reset reset.log pause
Restart your computer: shutdown /r
Modify Registry Configurations
Provide appropriate read, write and access permissions to the Registry subkeys that deal with your computer’s network connection.
Type RegEdit in the Search Box on the Taskbar.
Open Registry Editor from the Search Results.
Locate the following Registry path: HKEY_LOCAL_MACHINE | SYSTEM | CurrentControlSet | Control | Nsi | {eb004a00-9b1a-11d4-9123¬-0050047759bc}
Right-click a 26 subkey, choose Permissions.
In the new dialog, specify the Group or User Name as Everyone.
Check the Allow box ahead of Full Control.
Click Apply | OK.
Install New Protocol
Go to your Connection Properties and then install a new protocol through the steps given below:
Type ncpa.cpl in the Search Box and open it from the Search Results.
Right-click your Wi-Fi/ Wired Broadband connection icon, choose Properties.
Click the Install button.
Choose Protocol in the subsequent Select Network Feature Type dialog, and click Add.
Click Hard Disk button.
Specify the following path: C:Windowsinf
Click OK.
You have a new dialog – Select Network Protocol
Select Internet Protocol (TCP/ IP) – Tunnels
Click OK.
Delete Code Identifier
Make sure the code identifier keys aren’t corrupt. Delete the corrupted data so that your system will generate default settings.
Open Registry Editor.
Locate following Registry path: HKEY_LOCAL_MACHINE | SOFTWARE | Policies | Microsoft | Windows | Safer | CodeIdentifiers | 0
Delete the Paths subkey. (Right-click > Delete)
Exit the Registry Editor and restart your laptop.
0 notes
Link
Windows 10 is a weird OS when it comes to updates, the updates are too frequent, and you do not have a choice of stopping them by yourself. Well, the 0x80070020 error is an update error that you might face, and it becomes important to fix 0x80070020 error in Windows 10 for a seamless experience.
Well, you will likely see this error whenever Microsoft rolls out a new Windows 10 update. And you can easily fix 0x80070020 error in Windows 10 by following these methods.
How to Fix 0x80070020 Error in Windows 10
Well, there are some methods that you can use and fix 0x80070020 error in Windows 10 and we have listed them here. You can try these ones to solve your problem.
Disable the Antivirus
The third-party antivirus is the tricky spot. These are not the best thing to be installed on your Windows computer. The Windows defender with regular updates and Internet safety rules is more than enough. So, you must try to disable your third-party antivirus software as it might hinder Windows updates.
Restarting the BITS
This is also the potential solution to fixing the 0x80070020 error. The Background Intelligent Transfer Services (BITS) process is the one that delivers the Windows updates to the computer. So, it is really essential that you restart the process if you are facing such an issue. To do that follow these steps:
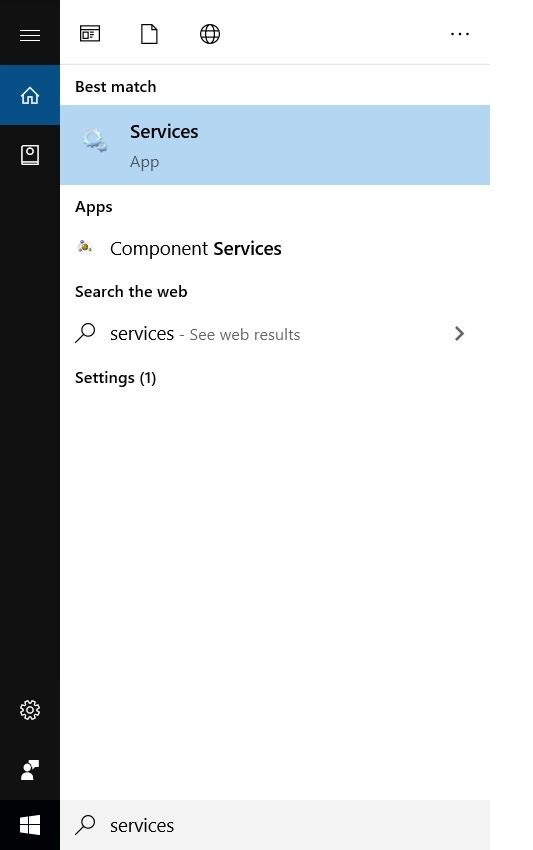
Step 1: Type ‘Services’ in the Windows Search bar.
Step 2: In the services navigate to Background Intelligent Transfer Services and right click on it and click on ‘Properties’.

Step 3: In the ‘General’ tab you will see ‘Startup type:’ make sure that it is ‘Automatic(Delayed Start)’, and see the ‘Service status’ and if it shows ‘Running’, it is okay otherwise click on ‘Start’ and press ‘OK’.
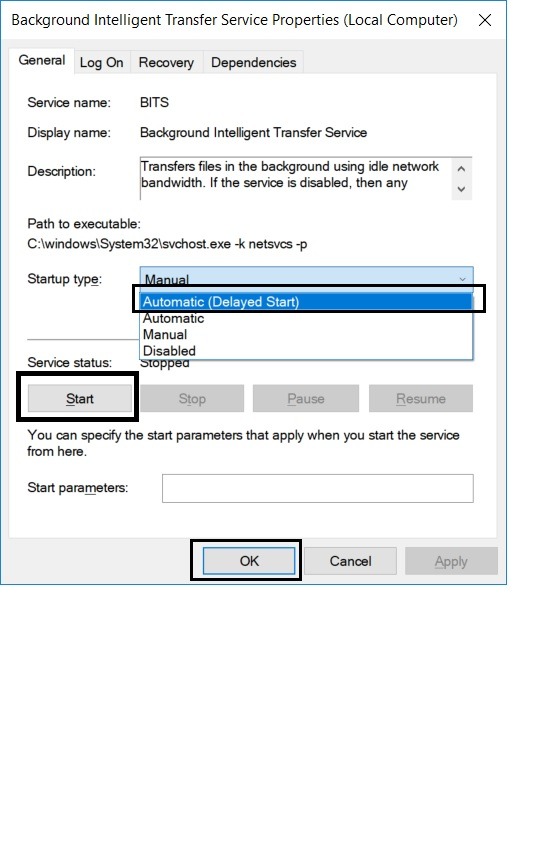
That is it and this should probably fix your problem.
Corrupted Windows System Files
If you are facing a very slow performance and face driver errors, blue screen, black screen, and other stupid and irritating stuff, then chances are that you have some corrupted files on your system and these files are causing the system to be slow.
You can fix this issue very easily, just follow these steps:
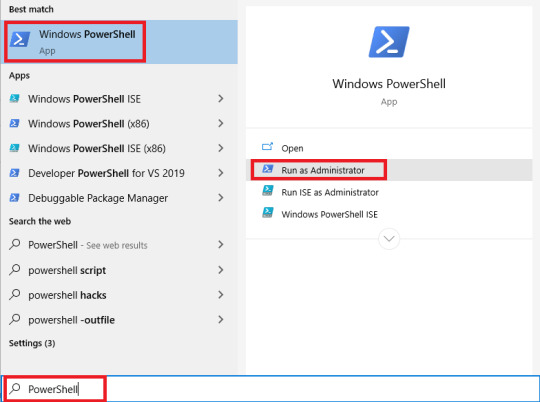
Step 1: Go to Windows Search Bar and type ‘PowerShell’, right click on it and click on ‘Run as administrator’.
Step 2: You will see a command line where you have to type the code,
dism.exe/Online/Cleanup-image/Restorehealth
and press enter.
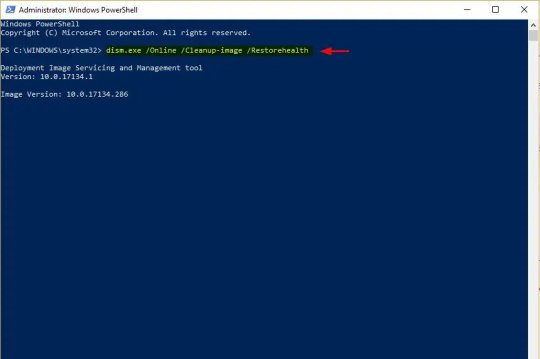
That is it the DISM tool will find the corrupted files and fix them for you.
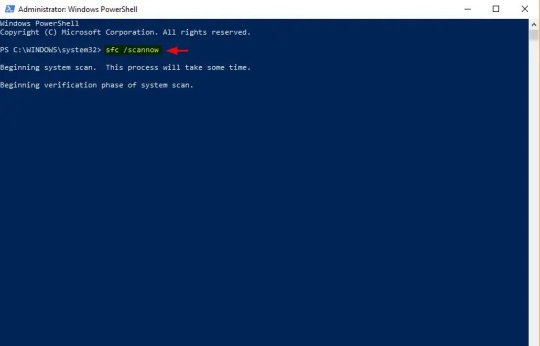
You can also try the SFC tool, just open the PowerShell as you did in Step 1 above and then type
sfc/scannow
and press enter. The tool will find corrupted files and fix them and after the completion, you have to start your device again. And you are all set.
Troubleshooting
So, if these solutions do not work and you are still facing the error then you should try troubleshooting for that that you can use Windows Update Troubleshooter. Follow these simple steps:
Step 1: Download Windows Update Troubleshooter from Microsoft.
Step 2: Launch the tool, follow the instructions, and update the Windows again.
So, these were some of the methods by which you can fix 0x80070020 error in Windows 10. Do follow either of these steps and let us know if that worked. I know that it is annoying to get updates so frequently, but it is good for the optimum performance of your system and it also keeps the entire system healthy. So, you should always try to keep your system updated.
[su_box title="More Like This" box_color="#000000"]
How to Fix Slow Windows 10 Performance Issues
How to Fix 0x0000007f Blue Screen Error in Windows 10
How to Fix ‘File Too Large for Destination File System’ Error in Windows 10
How To Fix ‘Your PC Ran Into a Problem and Needs to Restart’ in Windows 10
[/su_box]
via TechLatest
0 notes
Text
How to Fix Windows 10 Update Error Code ox8024a105
When attempting to refresh your Windows 10 PC, you may run into a couple of mistakes en route.
One of the successive Windows Update mistakes is Error Code 0x8024a105 which is generally brought about by ill-advised establishment, an infection, tainted or missing documents. This mistake is additionally absent from Window's authentic blunder code list. On the off chance that your update has halted, you may see a mistake saying:
"There were a few issues introducing refreshes, however we'll attempt again later. On the off chance that you continue seeing this, take a stab at looking through the web or reaching support for help. This mistake code may support: (0x8024a105)"
For this situation, there are a few arrangements that we can apply to fix windows update error 0x8024a105.
This guide will give you 7 known fixes to mistake code 0x8024A105, so feel free to attempt them.
Fix #1: Use the Advanced Repair Tool (Restoro)
The simplest method to understand any issues with Windows Update Error Code 0x8024a105 is to utilize Restoro. This program will enable you to sweep, update, and fix any framework issues, including the ones associated with Windows Update. The incredible thing about this program is that you don't need to accomplish any manual stir other than setting up the program itself, which is truly direct.
Read - How to Fix Windows 10 Keyboard Not Working
Follow these means to download and introduce Restoro on your PC:
Step #1
Download Restoro for nothing.
Hang tight for the download to finish, at that point open the record to begin the establishment procedure.
Step #2
Start the establishment procedure by tapping on the record, acknowledge the permit understanding by checking the "I Accept the EULA and Privacy Policy" stamps, and snap on the Install and Scan button.
Step #3
Once introduced, Restoro will check your framework for mistakes and shortcomings, for example, obsolete drivers. It'll likewise find the blunder that caused your Windows Update mistake. When complete, you will get a nitty gritty perspective on any mistakes found, and a choice to fix them consequently. While the program works for some issues, you may require a full form to get the full advantages from it.
Step #4
When the full sweep is finished, select the green "Clean Now" catch to fix your issues.
Restoro will continue to fix all blunders found on your PC, incorporating any issues with Windows Update. When complete, restart your PC and verify whether everything works fine. Your sound should now work fine and dandy, and the program ought to be open from the Start menu and taskbar.
In the event that you want to physically fix your Error Code 0x8024a105 issues, follow the means underneath.
Fix #2: Reboot the PC
"Have you taken a stab at turning it now and again once more?"
At times, the best thing you can do is to reboot your PC, and this fix is known to determine the mistake code 0x8024a105.
Go to Start, click the Shut Down fasten and reboot your PC.
A short time later, attempt to run the Windows Update by and by.
On the off chance that the blunder despite everything remains, attempt one of the techniques underneath.
Fix #3: Switch Your Internet Connection
In the wake of rebooting your PC, the following thing to check is your web association.
Check if your present web association is fine and there are no blunders with it.
From that point onward, you should switch your web association. In the event that you're utilizing a LAN association, at that point change to WIFI, and in case you're utilizing WIFI, attempt to interface with a wired association, ideally with a Cat5 link. After you switch the associations, attempt to start Windows Update once more.
This strategy is famous and it as a rule attempts to fix Windows update blunder 0x8024a105.
On the off chance that the issue despite everything remains, attempt one of the manual strategies beneath.
Fix #4: Run Windows Update Troubleshooter
In the event that something isn't right with your Windows 10, a troubleshooter can fix numerous normal issues for you, for example, the windows update blunder 0x8024a105.
Step #1
Go to Search Bar and search for your Windows Update settings.
Step #2
Once there, snap and head over to the Troubleshoot area beneath.
Step #3
Discover the Windows Update troubleshooter, click on it and select "Run the troubleshooter" button.
The troubleshooter will search for issues and attempt to discover arrangements and it's known to fix Windows Update mistakes, for example, the blunder code 0x8024a105.
After it's done, attempt to refresh your Windows by and by and check whether it works.
In the event that the blunder is still there, attempt one of the manual specialized arrangements beneath.
Fix #5: Reset Software Distribution Folder
Programming Distribution envelope can cause issues with windows update, and resetting it can fix the 0x8024a105 mistake now and again.
Programming Distribution organizer is a Windows Update part, and here's the means by which you can reset it:
Step #1
Start the Command Prompt (or Windows PowerShell) and run it as executive.
Step #2
In the order brief, record the accompanying orders individually:
net stop bits
Step #3
Next up, discover the Software Distribution envelope on your PC.
You can open the Run order (Windows Key + R) and type in the accompanying:
run SoftwareDistribution
Step #4
Select all records found in the Software Distribution organizer and erase them.
NOTE: Do not erase or rename Software Distribution envelope, simply erase the entirety of the documents discovered inside.
Step #5
Return to Command Prompt (Admin) and type in the accompanying orders:
net beginning bits
net beginning wuauserv
Step #6
Restart your PC and attempt to download Windows Updates once more.
This technique restarts your Software Distribution envelope and your Windows will download back the records all alone, fixing the mistake.
Fix #6: Employ the DISM Tool
Since mistake 0x8024a105 can be brought about by ruined records, you ought to likewise have a go at utilizing the DISM instrument as a fix.
Step #1
Adhering to the directions above, run the Command Prompt (or PowerShell) as director.
Step #2
In the CMD, type in the accompanying order:
Dism/Online/Cleanup-Image/CheckHealth
CheckHealth
Step #3
The DISM apparatus will endeavor to examine the framework for debasement and resolve the current issues.
When it's set, restart your PC and attempt to run Windows Update once more.
Fix #7: Reset Catroot2 Folder
In the event that none of the techniques above worked, take a stab at resetting the Catroot2 organizer.
The methodology here is like the one with the Software Distribution envelope.
Step #1
Start the Command Prompt (or Windows PowerShell) as director.
Step #2
In CMD, type in the accompanying orders:
net stop cryptsvc
md %systemroot%system32catroot2.old
xcopy %systemroot%system32catroot2 %systemroot%system32catroot2.old/s
Step #3
Next, erase the entirety of the documents in your Catroot2 envelope.
Discover it utilizing the Run order (Windows Key + R) and type in the accompanying:
C:WindowsSystem32catroot2
erase all documents in catroot2 organizer
NOTE: Do not erase or rename the catroot2 organizer, simply erase the entirety of the documents discovered inside.
Step #4
Open the Command Prompt as executive and type in the accompanying order:
net beginning cryptsvc
Step #5
Reboot your framework and attempt to refresh your windows by and by.
Fix #8: Reinstall Windows 10
In the case of nothing helps, odds are there's some kind of problem with your Windows 10 establishment.
On the off chance that no other arrangement can enable you, to attempt to reinstall your Windows 10.
Legitimate Windows 10 establishment will dispose of any framework mistakes, and it's the last answer for any issues with respect to Windows Update 0x8024a105.
Follow these means and your Windows Update blunder code 0x8024a105 will be fixed!
0 notes
Text
Alright, I’ve been fighting with this for an hour, I give, I can’t figure this out.
How do you ACTUALLY “switch your scripts” to use DISM? I Googled it to hell with every boolean and punctuation-based modifier I could think of, and all I found was people talking about how to use DISM to do things involving servers or the system image. Nothing on how to switch from “PkgMgr” to DISM.

All I want to do is install Windows Media Player so I can rip an old cd. (Yes I’ve tried it with VLC, and VLC crashes every time it tries reading the disc). And I am NOT paying for a $10 Music Pass to rip it with Groove.
(It’s a local band anyways, and a cd from 2007-- they’re no longer around, the producer’s site is down, and Windows can’t make any money on it.)
I’m on Windows 10 64-bit. I’m a power user but 10 keeps tripping me up, and while I know how to use Command Prompt to accomplish tasks with a copy-paste, I can’t find the code I need to copy+paste to make this happen.
0 notes
Text
TAGGED!
Rule: Tag six followers you want to get to know better Tagged by: @dunsparcee
Relationship Status: single, but I am getting back into the dating ring as of late
Favorite Color: blue
Pets: None that I have, but my parents have a german shepherd named Annie!
Last song I listened to: For Kicks by Metric
Favorite TV Shows: I don’t really watch TV anymore, I guess Stranger Things if that even counts???
First Fandom: Code Lyoko
Hobbies: viddy gaems, cosplay, reading, researching history
Books I’m currently reading: Nothing at this moment.
I’ll tag @risetothesunset @klefkitoyourheart @mirylicious @damnsparce @dism-ember and @suzy-odin-and-salem
4 notes
·
View notes
Text
How to Fix 0x80073712 Windows Update Error?
Microsoft has officially terminated offering Windows 7 support, which makes it all the more necessary to update to Windows 10. However, the process can land you in some trouble as well. Error code 0x80073712 one such issue, and if you are facing it, then we can help you out.
Perform Windows Update Troubleshooter
If you would like to perform Windows update troubleshooter, then abide by the given steps.
Hold the Window button on the keyboard and enter troubleshoot into it.
Then select the troubleshoot option from the result.
Thereafter, select the Windows Update and select Run the troubleshooter.
After finishing all these instructions, you require to pursue the on-screen steps to run the troubleshooting procedure.
Now, once you finish all these instructions, you require to reboot the system and attempt you rerun Windows Update, and expectantly, you will be capable to solve this error.
Run the SFC Scan
If you wish to run an SFC scan, then pursue the given instructions.
Press the Window button on the keyboard to launch the Windows search.
Enter ‘cmd’ into it, then select the Command Prompt and right-click on it, then choose the option Run as administrator.
Select the Yes tab if you are pop-up to verify the action.
Thereafter, go to the screen of Command Prompt, you require to enter ‘sfc/scannow’ and press the Enter key to proceed.
This process takes a little time to find and exchange damaged computer files.
Wait until the device finishes this process.
Now, you require to reboot the system and check if you are capable of solving the 0x80073712 error code or not.
Perform DISM Tool
If you would like to perform the DISM tool, then abide by the given steps.
Click on the Windows button to launch the Windows search.
You should enter cmd into it.
You will be able to check the application of Command Prompt in the best compatible field.
Go to the Command Prompt and right-click on it then select the Run as administrator.
Enter “DISM.exe /Online /Cleanup-image /Restorehealth” and press the Enter button.
You have to wait until this entire procedure completes. Thereafter, you require to reboot the system and the SFC scan once more, so that it should be able to help you to exchange whichever damaged files with the right ones.
Now, look for the Windows update and see if it works.
Remove Windows Update Cache
If you wish to remove Windows update cache, then pursue the given instructions.
To open the Run dialogue section by pressing Win + R keys altogether on the keyboard.
Then enter ‘services.msc’ into the section then select the OK tab to proceed.
You should move down to the end of the screen and go to the Windows update, then right-click on it.
Click on the Stop tab.
Thereafter, you require to hold the Windows button + R together to open the Run box, and then you require to copy and paste this C:\Windows\SoftwareDistribution\Download into it then press the Enter button to proceed.
If you are asked to give permission of the administrator against to do this for all recent things and select the continue option.
Finally, you require to get a return to the screen of Services and reach the Windows then right-click on it.
Now, select the Start button.
Source:-https://devinsmith007.wordpress.com/2020/03/13/how-to-fix-0x80073712-windows-update-error/
0 notes
Text
Haizzz its ok. You can do this. You are supposed to be a SP DISM student. Doing some cryptography thing can’t be that bad... Just write the codes to secure your system... Even though it’s difficult and I have absolutely no idea what I am doing right now, it will work out soon... soon... Yes, don’t give up. It will be fine.
19 Feb 2020, 1:29am
0 notes
Text
Fix Service Host Local System High Disk or CPU Windows 10
There are numerous individuals the country over who has been confronting an issue with the fix benefit have neighborhood framework high plate or CPU (organizing confined). Be that as it may, there are numerous who are a casualty of this issue however don't realize what this thing precisely is. So for those, we will give a full exchange on what this really is and how we can deal with this issue. This issue chiefly happens in the Windows 10 working framework and the indications of this issue is it will make your framework moderate by expending 90% of the space.
So this issue for the most part happens because of pretense.Numerous conceives that it is a framework which gives refreshes in the framework however in real it is a framework with a pack of administration run. While this framework is on it makes your gadget CPU full by 90%. The procedure which I will examine today are anything but difficult to take after and will effortlessly assist you with getting free of framework high circle utilization. So immediately how about we begin the talk. Here we have just specified the most ideal and the approaches to deal with the issue.

Procedure To Halt System High Disk or CPU Consumption:
Recorded underneath are a portion of the most ideal ways which will assist you with getting free of this issue.
By Disabling Superfetch Service:
By following this administration you can just dispose of this issue to do that first you need to squeeze hold the windows key and the R key which will open up the RUN alternative. Presently in the run box compose services.msc and press on enter. Presently there you will get a rundown look for the superfetch. When you have found it double tap on it with the goal that you can alter it on its settings. The following errand will tap on the stop catch to end the administration. Presently you need to just adjust the startup write with the goal that you can incapacitate superfetch. After this procedure simply select the alternative to apply and after that go for Ok. This is one of the viable ways.
By settling memory spill at the non-paged pool of your memory:
Sometimes, it is discovered that the main arrangement did not work out so all things considered, you can at present proceed with this choice. To do that you need to press the Windows and R key which will consequently open the RUN choice. There you need to type for Regedit and afterward push on the enter key to execute. In registry editorial manager scan for the accompanying index which is HKEY_LOCAL_MACHINE>SYSTEM>CONTROL SET001. Presently you need to tap on the alternative administration and after that you have look beneath to choose the choice NDU. When this is over at the correct hand of the sheet look for the registry titled START to revise it. There you should revise the esteem information to 4 will be handicapped and encourages you to plug memory spill at nonpaged pool. Presently tap the alright choice and close registry proofreader once this is over basically restart your PC and when the framework will on you will see the change.
Run the System's File Checker
To utilize this first you need to go to the begin menu and after that write for CMD. Presently right tap on order fast and select on RUN as the manager. Presently acknowledge the UAC provoke when it shows up. Presently at the charge incite compose SFC/Scannow and hit enter. Presently you need to just sit tight for the effective output to get over. When this is done you need to type the accompanying codes which are dism/on the web/cleanup-picture/reestablish wellbeing. Presently once you have given it see the issue still exists or not confident it will be over at this point.
Kill the SVC have
Numerous said by essentially executing the SVC procedure at errand supervisor will enable you to dispose of this issue. For that you have to press the CTRL-SHIFT-DEL to open assignment administrator. After that tap the more detail alternative which will lift the administrator choice. It will demonstrate to all of you the procedure which is running. Presently from that point, you need to discover the procedure SERVICE HOST LOCAL SYSTEM. This aides in facilitating the refresh of the coordination. Presently select it and tap the alternative of END TASK. This will demonstrate the affirmation alternative from that point you need to findAbandoned un-spared information and close down and after that you need to close the framework down. Presently check the heap of the CPU and see the issue is dealt with or not.
So these were the ways which will assist you with fixing administration have neighborhood framework high circle or CPU (organizing confined). There are numerous who have agreeable outcomes in the wake of utilizing these strategies. These means may look like confounded however in real they are simple. The means are simple and for the most part these are tried. You simply need to take after the directions well ordered and you are finished with your administration have nearby framework high plate or CPU (organizing confined). So rush attempt these procedures and deal with the issues.
0 notes
Link
The majority of us now use a PC that has Windows 10 OS installed in it. Now the Windows 10 in itself is a very good operating system but chances are that you never had that seamless experience on Windows 10 and it was just slow Windows 10 performance that you are getting. And you want to fix slow Windows 10 performance.
It is just very irritating, to be honest. You get black screen sometimes, the blue screen that says that the system will restart and you lose your data(the most irritating thing ever), the PC takes forever to start sometimes, the whole UI behaves very slow, Chrome doesn’t start fast, the list goes on. Slow Windows 10 performance is a real issue and there are some reasons for that.
[su_box title="Common Windows 10 Errors"]
How to Fix 0x0000007f Blue Screen Error in Windows 10
How to Fix 0xC004f074 Error in Windows 10
How to Fix 0xC1900101 Error in Windows 10
How to Fix All Sound Issues in Windows 10?
How to Fix Bluetooth Problems in Windows 10?
How to Fix ‘File Too Large for Destination File System’ Error in Windows 10
[/su_box]
In this article, we will try to know why we face a slow Windows 10 performance and what are the potential solutions for this problem.
Reasons and How to Fix Slow Windows 10 Performance
So there are a number of reasons why you face a very slow Windows 10 performance and we have listed them below and we have also listed how to fix slow Windows 10 performance issues.
Too Many Apps and Programs Launch at Startup
As soon as you open your PC and you see a welcome screen on Windows 10, too many apps just get triggered and launch automatically at the startup and they are just too many. So this huge load just at the very beginning is problematic.
Well, you can fix this issue with ease. Just press ‘Ctrl+Shift+Esc’ to go to ‘Task Manager’ and then navigate to ‘Startup’ and you can disable many non-necessary apps that launch at the startup by right-clicking and selecting the ‘Disable’ option.

Corrupted Windows System Files
If you are facing a very slow performance and face driver errors, blue screen, black screen, and other stupid and irritating stuff, then chances are that you have some corrupted files on your system and these files are causing the system to be slow.
You can fix this issue very easily, just follow these steps:
Step 1: Go to Windows Search Bar and type ‘PowerShell’, right click on it and click on ‘Run as administrator’.
Step 2: You will see a command line where you have to type the code,

dism.exe/Online/Cleanup-image/Restorehealth
and press enter.

That is it the DISM tool will find the corrupted files and fix them for you.
You can also try the SFC tool, just open the PowerShell as you did in Step 1 above and then type
sfc/scannow
and press enter. The tool will find corrupted files and fix them and after the completion, you have to start your device again. And you are all set.

Opening Too Many Programs at Once
If you have opened too many programs and working on them simultaneously, chances are that you are stressing your RAM way too much causing slow performance. This is not a big issue.
Just press ‘Ctrl+Shift+Esc’ to go to ‘Task Manager’ and you will see various ‘Processes’ and their memory consumption. From here you can control which apps to run and the apps that you do not want, you can right-click on them and just click the ‘End task’. This shall fix the issue.
Less Space on Hard Disk
This is also one of the big reasons why your device might be working slow. There might be some huge amounts of temporary and junk files that are causing this problem. Well you can fix that too with ease.
Go to Windows Explorer and browse for folders that contain various type of data and clean those folders and this will do some good.
Your PC Power Plan
So, if you get a huge battery life from your device but it does not work as good then this method will help you.
Step 1: Type ‘Power Options’ in the Windows search bar and go to ‘Edit power plan’ in the control panel.

Step 2: Click on ‘Change advanced power settings'.

Step 3: Click on ‘High performance’ and click OK.

This will definitely boost the performance of your PC but it will consume high battery compared to the previous one.
So, these were some of the reasons why you face a slow Windows 10 performance and along with the reasons you also have the methods to fix slow Windows 10 performance.
Read More About
3+ Methods to Take Screenshot in Windows 10
How to Setup Parental Controls in Windows 10
via TechLatest
0 notes
Text
How to Fix 0x800703f1 Update Error Code on Windows 10?
Windows is among the most-reputable OS globally, and Microsoft’s timely updates play a key role in it. Routine Windows updates ensure that your system stays secure and optimized too. However, there can be minor hindrances while updating your OS> One such problem is the error code 0x800703f1. If you are facing it as well, then the blog will be useful to you. So, here are the steps to fix the error.
Launch Windows Update Troubleshooter
In case the user wishes to launch Windows update troubleshooter, then they can pursue the mentioned instructions.
Go to the Start tab and right-click on it.
You should click on the Settings option.
Navigate to the right-hand side and move down unless you view Windows Update entry.
You have to select it once and choose the Run the troubleshooter.
Now, wait for Windows check errors and reports back.
Check for Malware via a Full System Scan
In case the user wants to check for malware via a full system scan, then abide by the provided steps.
Go to the Windows search and enter Security into it.
After that, select the Virus and threat protection option.
You should click on the Scan options.
Now, navigate to the Full scan and choose the Scan now tab.
Uninstall Newest Windows Updates
In case the user wishes to uninstall newest Windows updates, then they can pursue the mentioned instructions.
Navigate to the Windows search section and input the Control Panel into it.
You should click on the Enter key.
After that, reach the Program option.
Then select the Uninstall a program.
Go to the left-hand side and click on the ‘View installed updates.’
You have to select the most current Windows updates.
Later, select it, and right-click on it then select the Uninstall option.
Now, restart the Windows and attempt to apply updates again.
Perform DISM and SFC Scans
In case the user wants to perform DISM and SFC scans, then abide by the provided steps.
Navigate to the Windows search and enter ‘cmd’ into it then hit the Enter key.
After that, reach the Command Prompt from the search results and right-click on it.
Then click on the Run as administrator.
You will see the freshly launched screen, enter the pursuing command then hit the Enter key: ‘sfc /scannow’.
You have to wait until completes the scan process and solve the system errors.
In case it’s doesn’t guide you, then you can use the DISM utility- it should run a cleanup and recovery of the OS.
Launch the Command Prompt with administrative privileges again.
Enter the pursuing command and press the Enter key: DISM /Online /Cleanup-Image /RestoreHealth.
Now, the scan process might perform for a while.
Reboot Windows Update Service
In case the user wishes to reboot the Windows update service, then they can pursue the mentioned instructions.
Hold the Win + R keys altogether on the keyboard to launch the Run dialogue box.
After that, enter ‘services.msc’ then press the Enter key.
You should move down to Windows Update tab.
Later, right-click on it then choose the Restart option.
Now, reboot the system.
Reset Windows Update Components through Command Prompt
In case the user wants to reset Windows update components through command prompt, then abide by the provided steps.
Enter to Command Prompt (Admin) as described in step 4.
Enter every command, holding Enter after every one of them:
net stop wuauserv
net stop cryptSvc
net stop bits
net stop msiserver
ren C:WindowsSoftwareDistribution SoftwareDistribution.old
ren C:WindowsSystem32catroot2 Catroot2.old
net start wuauserv
net start cryptSvc
net start bits
net start msiserver
Check the Drivers
In case the user wishes to check the drivers, then they can pursue the mentioned instructions.
Go to the Start, and right-click on it then select the Device Manager.
You should open the Display adapters field.
Reach the NVIDIA driver and choose the Uninstall Device.
You have to choose the option ‘Delete the driver software for this device’.
Then click on the Uninstall option.
Restart the system and open the Device Manager once more.
Go to the upper side of the screen, ‘select the Scan for hardware changes’ option.
Now, you have to wait until Windows installs fresh drive drivers.
Install Windows Again
In case all things fail, you can attempt to install the Windows again. There are multiple methods you can avail of, but the offical one is always prefreable.
Source:-https://devinsmith007.wordpress.com/2020/03/13/how-to-fix-0x800703f1-update-error-code-on-windows-10/
0 notes