#Docker Desktop Extensions
Explore tagged Tumblr posts
Visit Tumblr Blog
Explore Tumblr blogs with no restrictions, modern design and the best experience.
Last Seen Tumblr Blogs


Fun Fact
After the announcement of the deal with Yahoo!, there were 170K signatures of unhappy Tumblr users petitioning to prevent the sale in 2013.
Text
Docker Development Environment: Test your Containers with Docker Desktop
Docker Development Environment: Test your Containers with Docker Desktop #homelab #docker #DockerDesktopDevelopment #SelfHostedContainerTesting #DockerDevEnvironment #ConfigurableDevelopmentEnvironment #DockerContainerManagement #DockerDesktopGUI
One of the benefits of a Docker container is it allows you to have quick and easy test/dev environments on your local machine that are easy to set up. Let’s see how we can set up a Docker development environment with Docker Desktop. Table of contentsQuick overview of Docker Development EnvironmentSetting Up Your Docker Development Environment with Docker Desktop1. Install Docker Desktop2. Create…

View On WordPress
#Configurable Development Environment#Docker and Visual Studio Code#Docker Container Management#Docker Desktop Development#Docker Desktop Extensions#Docker Desktop GUI#docker dev CLI Plugin#Docker Dev Environment#Docker Git Integration#Self-Hosted Container Testing
0 notes
Text
Mastering .NET for Modern Application Development
Introduction to .NET Framework
.NET, developed by Microsoft, is a robust and versatile framework designed for building modern, scalable, and high-performance applications. From desktop solutions to web-based platforms, .NET has solidified its position as a developer’s go-to choice for application development in the tech-driven era.

Why Choose .NET for Application Development?
.NET offers a plethora of features that make it ideal for creating modern applications:
Cross-Platform Compatibility: With .NET Core, developers can build applications that run seamlessly across Windows, macOS, and Linux.
Language Flexibility: It supports multiple programmtuing languages, including C#, F#, and VB.NET, giving developers the freedom to choose.
Scalability and Performance: Optimized for high-speed execution, Custom .NET Solutions ensures your applications are fast and scalable.
Comprehensive Libraries: The extensive class library simplifies coding, reducing the need for writing everything from scratch.
Key Features of .NET Framework
Rich Development EnvironmentThe Visual Studio IDE provides powerful tools, including debugging, code completion, and cloud integration.
Security and ReliabilityBuilt-in authentication protocols and encryption mechanisms ensure application security.
Integration with Modern ToolsCompatibility with tools like Docker and Kubernetes enhances deployment efficiency.
Core Components of .NET
Common Language Runtime (CLR): Executes applications, providing services like memory management and exception handling.
Framework Class Library (FCL): Offers a standardized base for app development, including classes for file management, networking, and database connectivity.
ASP.NET Core: Specializes in building dynamic web applications and APIs.
How .NET Supports Modern Application Development
Building Scalable Web Applications
Modern web development often demands real-time, scalable, and efficient solutions. ASP.NET Core, a key component of the .NET ecosystem, empowers developers to create:
Interactive web applications.
Microservices using minimal resources.
APIs that integrate seamlessly with third-party tools.
Cloud-Native Development
With the integration of Microsoft Azure, .NET simplifies the development of cloud-native applications. Features like automated deployment, serverless computing, and global scalability make it indispensable.
Understanding .NET for Mobile Applications
Xamarin, a .NET-based framework, has become a popular choice for mobile application development. It enables developers to write code once and deploy it across Android, iOS, and Windows platforms. This approach significantly reduces development time and costs.
Comparing .NET with Other Frameworks
While frameworks like Java Spring and Node.js offer unique features, .NET stands out due to:
Unified Ecosystem: Provides a single platform for diverse app types.
Ease of Use: The learning curve is smoother, especially for developers familiar with Microsoft tools.
Cost-Effectiveness: Free tools and extensive documentation make it budget-friendly.
Diving Deeper into .NET Application Development
Cross-Platform Development Made Easy
With .NET Core, developers can write applications that run uniformly across multiple operating systems. This cross-platform capability is particularly beneficial for businesses targeting a broad audience.
Microservices Architecture
The modular nature of .NET makes it perfect for building microservices architectures, enabling efficient scaling and maintenance of applications.
Leveraging .NET for AI and Machine Learning
The integration of ML.NET offers developers the ability to create AI-powered applications directly within the .NET ecosystem. This includes:
Predictive analytics.
Image and speech recognition.
Natural language processing.
Best Practices for Mastering .NET
Stay UpdatedMicrosoft frequently updates .NET, introducing new features and optimizations. Regular learning ensures you stay ahead.
Focus on Code ReusabilityUse libraries and components to minimize repetitive coding tasks.
Leverage Debugging ToolsVisual Studio’s debugging capabilities help identify and resolve issues efficiently.
Embrace Cloud IntegrationCombining .NET with Azure ensures seamless scalability and deployment.
A Glance at Eminence Technology
Eminence Technology stands as a leading name in web development services. Specializing in .NET application development, the company delivers tailor-made solutions that cater to diverse industry needs. With a team of skilled developers, Eminence Technology excels in creating high-performance, secure, and scalable applications.
Why Choose Eminence Technology?
Proven expertise in the web development process.
Commitment to delivering cutting-edge solutions.
Exceptional customer support and post-development services.
#Mastering .NET#Modern Application Development#Custom .NET Solutions#ASP.NET Core#Microsoft Azure#.NET for Mobile Applications#microservices architectures#web development services#web development process
0 notes
Text
Essential Tools for .NET Developers

.NET development requires a robust set of tools to enhance productivity, streamline development, and ensure high-quality applications.
Whether you’re building web applications, desktop software, or cloud-based solutions, having the right tools can make a significant difference. Here’s a list of essential tools for .NET developers:
1. IDEs and Code Editors
Visual Studio — The most powerful and widely used IDE for .NET development, offering features like IntelliSense, debugging, and seamless integration with Azure.
Visual Studio Code (VS Code) — A lightweight, cross-platform editor with great extensions for C#, .NET, and debugging.
2. Package Management
NuGet — The default package manager for .NET, allowing developers to install and manage libraries with ease.
3. Build and CI/CD Tools
MSBuild — Microsoft’s build system for compiling, packaging, and deploying .NET applications.
Azure DevOps — Provides CI/CD pipelines, version control, and project management tools.
GitHub Actions — Automates builds, tests, and deployments within GitHub.
Jenkins — A widely used automation tool for building, testing, and deploying applications.
4. Version Control
Git — The most widely used version control system.
GitHub / GitLab / Bitbucket — Popular platforms for hosting Git repositories.
5. Debugging and Profiling
Visual Studio Debugger — A built-in debugger with advanced features for breakpoints, watch variables, and call stacks.
dotTrace — A powerful profiling tool for performance analysis.
PerfView — A Microsoft tool for analyzing CPU usage, memory, and performance bottlenecks.
6. Testing Frameworks
xUnit.net — A modern unit testing framework for .NET.
NUnit — A widely used unit testing framework with rich assertions.
MSTest — Microsoft’s built-in testing framework for .NET applications.
SpecFlow — A BDD (Behavior-Driven Development) framework for .NET.
7. Dependency Injection & Inversion of Control (IoC)
Autofac — A flexible IoC container for .NET applications.
Microsoft.Extensions.DependencyInjection — The built-in DI container for .NET Core and .NET 5+.
8. ORM and Database Management
Entity Framework Core — A modern ORM for .NET applications.
Dapper — A lightweight, high-performance ORM for .NET.
SQL Server Management Studio (SSMS) — A must-have tool for managing SQL Server databases.
9. API Development and Testing
Postman — A popular tool for testing and documenting APIs.
Swagger (Swashbuckle) — Generates interactive API documentation for ASP.NET Core applications.
10. Logging and Monitoring
Serilog — A structured logging library for .NET applications.
NLog — A flexible logging framework.
Application Insights — Microsoft’s monitoring tool integrated with Azure.
11. Cloud & DevOps Tools
Azure SDK for .NET — A set of libraries for interacting with Azure services.
AWS SDK for .NET — For working with AWS services in .NET applications.
Docker — Essential for containerizing .NET applications.
Kubernetes — For orchestrating containerized applications in cloud environments.
12. Productivity and Collaboration
ReSharper — A powerful extension for Visual Studio that enhances code analysis and refactoring.
Notepad++ / WinMerge — Handy tools for quick code edits and file comparisons.
WEBSITE: https://www.ficusoft.in/dot-net-training-in-chennai/
0 notes
Text
Upgrading .NET Framework Projects to .NET Core: A Comprehensive Guid

The transition from the .NET Framework to .NET Core is a significant step for modernizing applications. With its cross-platform capabilities, improved performance, and modular architecture, .NET Core (now unified as .NET 6 and beyond) offers a robust framework for building modern applications. In this blog, we will guide you through the process of upgrading your existing .NET Framework projects to .NET Core.
Why Upgrade to .NET Core?

Before diving into the upgrade process, let’s understand why upgrading is beneficial:
Cross-Platform Development: Build and run applications on Windows, macOS, and Linux.
Improved Performance: Optimized runtime and faster execution.
Unified Framework: Support for all application types (desktop, web, cloud, IoT, etc.) under the unified .NET platform.
Active Development: Access to the latest features, security updates, and community support.
Containerization and Cloud: Seamless integration with Docker and cloud services like Azure.
Pre-Upgrade Considerations
Before starting the upgrade, take note of the following:
Compatibility Check: Use the Portability Analyzer to identify unsupported APIs.
Project Type: Not all .NET Framework project types can be migrated directly. Confirm that your project type is supported by .NET Core.
Third-Party Dependencies: Ensure that all third-party libraries and NuGet packages used in your project are compatible with .NET Core.
Testing: Prepare a robust test plan to validate functionality post-migration.
Step-by-Step Upgrade Process

1. Analyze Your Project
Start by analyzing your existing .NET Framework project to determine compatibility and dependencies. Tools like the .NET Upgrade Assistant can automate much of this analysis.
2. Set Up Your Environment
Install the latest .NET SDK.
Update your IDE to the latest version (e.g., Visual Studio 2022).
3. Create a New .NET Core Project
Create a new .NET Core project using your IDE or command line:mkdir MyDotNetCoreApp cd MyDotNetCoreApp dotnet new <project_type>
Replace <project_type> with the appropriate template, such as console, webapi, or mvc.
4. Migrate Code
Copy Code: Move your existing code files into the new project.
Update References: Replace any references to .NET Framework libraries with .NET Core-compatible equivalents.
Replace Configuration: Migrate configuration files (e.g., Web.config to appsettings.json).
5. Update NuGet Packages
Ensure all NuGet packages are compatible with .NET Core. Use the following command to update packages:dotnet add package <package_name>
6. Address API Changes
Resolve API compatibility issues identified during the analysis phase. For unsupported APIs, look for alternative solutions or redesign parts of your application.
7. Rebuild and Test
Rebuild your project and fix any compilation errors.
Run your test suite to verify that the application behaves as expected.
8. Optimize for .NET Core
Leverage .NET Core-specific features such as:
Dependency Injection (DI)
Asynchronous programming with async/await
Lightweight middleware in ASP.NET Core
9. Deploy the Upgraded Application
Deploy your upgraded application to your preferred environment. .NET Core supports cross-platform deployment, so you can now target multiple operating systems.
Common Challenges and Solutions

Unsupported APIs: Use the .NET Compatibility Pack or rewrite code to avoid reliance on deprecated APIs.
Third-Party Libraries: Reach out to library maintainers or explore alternatives if certain libraries are not compatible.
Performance Issues: Profile your application to identify bottlenecks and optimize them using .NET Core’s performance features.
Click here to learn more about ASP.NET
Best Practices
Incremental Migration: Upgrade one project or module at a time instead of migrating everything at once.
Leverage Tools: Use tools like .NET Upgrade Assistant and Portability Analyzer to streamline the process.
Test Rigorously: Conduct extensive testing to ensure functionality, performance, and stability.
Documentation: Maintain detailed documentation of the migration process for future reference.
Extend your knowledge by watching this video
Conclusion
Upgrading from .NET Framework to .NET Core is a strategic move that positions your application for long-term success. While the migration process requires effort and careful planning, the benefits — including cross-platform support, improved performance, and access to modern features — make it worthwhile. By following this guide and adhering to best practices, you can transition your projects smoothly and unlock the full potential of the .NET ecosystem.
Start your migration journey today and take advantage of the future-proof capabilities of .NET Core!
0 notes
Text
10 Essential Tools for Aspiring Software Developers
In the ever-evolving world of software development, having the right tools at your disposal can make a huge difference. Whether you’re a beginner stepping into the coding world or an aspiring developer sharpening your skills at Srishti Campus, understanding the tools that simplify workflows and boost productivity is crucial.
Here’s a list of 10 essential tools every software developer should explore to enhance their learning and professional growth.
1. Visual Studio Code (VS Code)
Why It’s Essential: VS Code is one of the most popular code editors, loved for its simplicity, flexibility, and a vast array of extensions. It supports multiple programming languages like Python, JavaScript, and C++, making it perfect for beginners and experts alike.
Top Features:
Intelligent code completion.
Built-in Git support.
Extensions for debugging and language tools.
Pro Tip: Use extensions like Prettier for formatting and Live Server for real-time web development.
2. Git and GitHub
Why It’s Essential: Version control is the backbone of modern software development. Git helps track code changes, while GitHub allows collaboration and sharing with other developers.
Top Features:
Manage project versions seamlessly.
Collaborate with teams using pull requests.
Host and showcase projects to potential employers.
Pro Tip: Beginners can start with the GitHub Desktop app for an easy GUI interface.
3. Postman
Why It’s Essential: Postman is a must-have for testing APIs. With its user-friendly interface, it helps developers simulate requests and check responses during backend development.
Top Features:
Test RESTful APIs without writing code.
Automate API tests for efficiency.
Monitor APIs for performance.
Pro Tip: Use Postman collections to organize and share API tests.
4. Docker
Why It’s Essential: For developers building scalable applications, Docker simplifies the process of deploying code in isolated environments. This ensures your application works consistently across different systems.
Top Features:
Create lightweight, portable containers.
Simplify development-to-production workflows.
Enhance team collaboration with containerized apps.
Pro Tip: Use Docker Compose for managing multi-container applications.
5. Slack
Why It’s Essential: Communication is key in software development teams, and Slack has emerged as the go-to tool for efficient collaboration. It’s particularly useful for remote teams.
Top Features:
Channels for organizing team discussions.
Integration with tools like GitHub and Trello.
Real-time messaging and file sharing.
Pro Tip: Customize notifications to stay focused while coding.
6. IntelliJ IDEA
Why It’s Essential: For Java developers, IntelliJ IDEA is the ultimate Integrated Development Environment (IDE). It provides advanced features that simplify coding and debugging.
Top Features:
Code analysis and refactoring tools.
Support for frameworks like Spring and Hibernate.
Integrated version control.
Pro Tip: Explore the community edition for free if you're starting with Java.
7. Figma
Why It’s Essential: Understanding UI/UX design is crucial for front-end developers, and Figma offers a collaborative platform for designing and prototyping interfaces.
Top Features:
Cloud-based collaboration for teams.
Interactive prototypes for testing.
Easy integration with development workflows.
Pro Tip: Use Figma plugins for assets like icons and mockup templates.
0 notes
Text
7 Open Source Projects You Should Know - JavaScript Edition
Overview
Hi everyone 👋🏼 In this article, I'm going to look at seven OSS repository that you should know written in JavaScript, interesting projects that caught my attention and that I want to share. Let's start 🤙🏼
1. Appwrite
Appwrite is an end-to-end backend server for Web, Mobile, Native, or Backend apps. You can easily integrate your app with user authentication, a database for storing and querying users and team data, storage and file management, image manipulation, Cloud Functions, and more services.
appwrite / appwrite
Your backend, minus the hassle.
Our Appwrite Init event has concluded. You can check out all the new and upcoming features on our Init website 🚀
Appwrite is a backend platform for developing Web, Mobile, and Flutter applications. Built with the open source community and optimized for developer experience in the coding languages you love.
English | 简体中文
Announcing Appwrite Cloud Public Beta! Sign up today!
Appwrite is an end-to-end backend server for Web, Mobile, Native, or Backend apps packaged as a set of Docker microservices. Appwrite abstracts the complexity and repetitiveness required to build a modern backend API from scratch and allows you to build secure apps faster.
Using Appwrite, you can easily integrate your app with user authentication and multiple sign-in methods, a database for storing and querying users and team data, storage and file management, image manipulation, Cloud Functions, and more services.
Find out more at: https://appwrite.io
Table of Contents:
Installation
…
View on GitHub
2. melonJS
melonJS is an HTML5 game engine that empowers developers and designers to focus on content. The framework provides a comprehensive collection of components and support for a number of third-party tools. It is an alternative to other JavaScript game engines such as Phaser 🤞
melonjs / melonJS
a fresh, modern & lightweight HTML5 game engine
melonJS 2
A fresh, modern & lightweight HTML5 game engine
melonJS 2 is a modern version of the melonJS game engine that was first released in 2011. It has been rebuilt entirely using ES6 class, inheritance and semantic, and bundled using esbuild for blazing fast build performance and provide modern features such as tree-shaking.
Note: migrating an existing project to melonJS 2 (version 10.0 and higher) will definitely break your game (ES6 semantic and inheritance, nodeJS event emitter, and no backward compatibility with deprecated legacy APIs), and you might want to read first this small step by step guide on upgrading to melonJS 2. If you are looking at the legacy version (9.x and lower) of melonJS, you can find it here under the legacy branch.
melonJS is open-source, licensed under the MIT License, and actively developed and maintained with the help of a small team of enthusiasts…
View on GitHub
3. GDevelop
GDevelop is another free, open-source game engine build from any platforms like PC or phone. The peculiarity of this game engine is that it is possible to create video games without using code, because it uses a logic system based on conditions and actions.
4ian / GDevelop
🎮 Open-source, cross-platform 2D/3D/multiplayer game engine designed for everyone.
GDevelop is a full-featured, no-code, open-source game development software. You can build games for mobile, desktop and the web. GDevelop is fast and easy to use: the game logic is built up using an intuitive and powerful event-based system.
Getting started
❔ I want to... 🚀 What to do Download GDevelop to make games Go to GDevelop website to download the app! Contribute to the editor Download Node.js and follow this README. Create/improve an extension Download Node.js and follow this README. Help to translate GDevelop Go on the GDevelop project on Crowdin or translate in-app tutorials.
Are you interested in contributing to GDevelop for the first time? Take a look at the list of good first issues, good first contributions or the "🏐 not too hard" cards on the Roadmap.
Overview of the architecture
Directory ℹ️ Description Core GDevelop core library, containing common tools to implement
…
View on GitHub
4. Egg.js
Egg.js is a simple library that allows you to easily add web easter eggs by watching the user's key strokes. It's simple to use and very funny 🤣
mikeflynn / egg.js
A simple javascript library to add easter eggs to web pages.
Egg.js
Egg.js is a simple JS library that has no prerequisites and allows you to easily add web easter eggs by watching the user's key strokes.
Example
It's really easy to use. Just include the egg.js file on the page...
<script type="text/javascript" src="https://cdnjs.cloudflare.com/ajax/libs/egg.js/1.0/egg.min.js"></script>
(Thanks to Cloudflare for hosting the library!)
...then use the addCode() function to add in your easter eggs. You need to pass it the character sequence to trigger the easter egg callback (which can either be in plain English or Javascript key codes), a function to trigger when it happens, and an optional set of metadata. Metadata can be anything from a string to an object.
var egg = new Egg(); egg .addCode("up,up,down,down,left,right,left,right,b,a", function() { jQuery('#egggif').fadeIn(500, function()
…
View on GitHub
5. API Vault
API Vault is a beautiful project written in JavaScript: it's an online platform that works as a gateway to a world of public APIs. You can also filter the APIs by category and find the one that's right for you 🖐
Exifly / ApiVault
Your gateway to a world of public APIs.
Prerequisites • How To Use • Credits • Contributing • Support • License
Click here to submit your API
Built with
Prerequisites
Before starting to use the software make sure you have docker installed.
How To Use
Clone the repository
git clone https://github.com/exifly/ApiVault
Set .env file
Inside root repository folder rename .env.dev file
cat .env.dev > .env
Inside /frontend folder rename .env.sample file
cd frontend cat .env.dev > .env
Same action inside /backend folder
cd backend cat .env.dev > .env
Client/Server side using Docker
# Go into the root folder cd ApiVault # Run docker docker-compose up
Important note:
On first docker-compose launch, your terminal could tell you:
database_dev | 2023-05-26 13:38:01.598 UTC [83] ERROR: relation "vault_api" does not exist at character 232 database_dev | 2023-05-26 13:38:01.598 UTC [83] STATEMENT: SELECT "vault_api"."id", "vault_api"."name", "
…
View on GitHub
6. sweetalert2
sweetalert2 is a beautiful, responsive, customizable, accessible replacement for JavaScript's popup boxes without external dependencies. Primarily designed for JavaScript projects, you can integrate it with the three big frontend frameworks: Angular, React, and Vue.
sweetalert2 / sweetalert2
✨ A beautiful, responsive, highly customizable and accessible (WAI-ARIA) replacement for JavaScript's popup boxes. Zero dependencies. 🇺🇦
A beautiful, responsive, customizable, accessible (WAI-ARIA) replacement for JavaScript's popup boxes. Zero dependencies.
Installation | Usage | Examples | Recipe gallery | Themes | React | Angular
Sponsors
For all questions related to sponsorship please get in touch with me via email [email protected]
Become a sponsor Kryptovaluutat DLX Plugins Tiago de Oliveira Stutz
Roboflow ZezeLife SERP Empire Real Spy Apps
Phone Tracking Apps Metal Raised Garden Bed
NSFW Sponsors
Important notice about the usage of this software for .ru
…
View on GitHub
7. Video.js
Video.js is a web video player built that supports HTML video and Media Source Extensions, as well as other playback techs like YouTube and Vimeo. It supports video playback on desktops and mobile devices. As with sweetalert2, you can integrate this library with the three JavaScript frameworks: Angular, React, and Vue.
videojs / video.js
Video.js - open source HTML5 video player
Video.js - HTML5 Video Player
Video.js is a web video player built from the ground up for an HTML5 world. It supports HTML5 video and Media Source Extensions, as well as other playback techs like YouTube and Vimeo (through plugins). It supports video playback on desktops and mobile devices. This project was started mid 2010, and the player is now used on over 50,000 100,000 200,000 400,000 700,000 websites.
Table of Contents
Quick Start
Contributing
Code of Conduct
License
Quick Start
Thanks to the awesome folks over at Fastly, there's a free, CDN hosted version of Video.js that anyone can use. Add these tags to your document's <head>:
<link href="//vjs.zencdn.net/8.3.0/video-js.min.css" rel="stylesheet"> <script src="//vjs.zencdn.net/8.3.0/video.min.js"></script>
For the latest version of video.js and URLs to use, check out the Getting Started page on…
View on GitHub
Conclusion
This list lists seven open source projects that are worth checking out, either to use them or even to contribute🖖 Happy coding!✨
1 note
·
View note
Text
DZ Bank Secrets to Developer Efficiency Cloud Workstations

Experience with developers is highly valued at DZ BANK. The development environment’s security profile shouldn’t be jeopardised, though, at the same time. Google Cloud started a mission to significantly improve both Cloud and DZ Bank security posture and the developer experience as part of DZ Bank cooperation with Google Cloud. Here’s how Google Cloud used Cloud Workstations to accomplish DZ Bank objectives.
Lack of emphasis on developer experience
In the past, there was no common method for automating project setup and developer environments. The onboarding process for new developers might take days or weeks, depending on the complexity of the project. They had to manually set up their projects, which required them to comb through numerous internal documentation sources, provision infrastructure, and speak with colleagues when they encountered problems. This was a considerable amount of labour that ought to be automated.
Moreover, the developers didn’t have a prescribed method for obtaining specific container tools, such as Docker runtime and the tooling around it. Consequently, a great deal of teams were operating independently and not exchanging best practices for production. Standardising development environments is essential to better understand security posture and to give transparency about the tools and frameworks that development teams are using. It desired the ability to regularly check tools for potential vulnerabilities and to have control over which tools developers use.
Workstations in the cloud to the rescue
Cloud Workstations offer a simple solution to standardize DZ Bank development environments because they are a fully managed service. Without putting in additional work, it can use predefined base images to handle infrastructure, OS patches, and security patches. Additionally, users can redirect traffic between ports on a local machine and ports workstation without exposing it to the internet by directly accessing Workstation tools via SSH (or any other TCP protocol). It is able to encrypt resources with a customer-managed encryption key thanks to CMEK support.
Furthermore, Cloud Workstations facilitates persistent discs, which let they store data in between sessions, and offers multiple base images with preset Integrated Development Environments (IDEs) that are frequently used by developers. These base images provide support for Docker-in-Docker and can be further customised. For workstation setups, Google Cloud might install JetBrains IDEs or other standardised IDE extensions and plugins.
It also have a lot of alternatives with Cloud Workstations to help DZ Bank expedite the developer experience. To provision resources and permissions for Cloud Workstations, for example, DZ Bank can use the infrastructure-as-code tool Terraform. This allows DZ Bank to automate the configuration of the entire development environment. In order to speed up startup times and enable engineers to get started more quickly, DZ Bank also set up a series of pre-warmed workstations. Additionally, inactivity time limitations can be set, which will cause workstations to automatically shut down after a predetermined amount of inactivity. DZ Bank have also managed it’s expenditures by using Cloud Workstations, where you just pay for workstation uptime.
DZ BANK architecture for deployment
Image credit to Google Cloud
Google Cloud operate DZ Bank’s workstations within DZ Bank’s secure Google Cloud landing zone, or deployed cloud environment, in a private workstation cluster with private IP addresses within a shared VPC network. There are two Private Service Connect (PSC) endpoints needed to access the workstation cluster and private network:
Workstation clusters with a private gateway by default construct a PSC endpoint to connect the control plane to workstations in DZ Bank’s private network.
An extra PSC endpoint that facilitates connections between developers and desktops within DZ Bank’s VPC. In DZ Bank’s private DNS zone, it additionally establish a DNS record for the workstation domain using the IP address of this PSC endpoint.
Ongoing input from developers
After gaining access to DZ Bank’s Cloud Workstations within the Google Cloud landing area, it proceeded to modify them to suit their needs. Using the preset basic images that the Cloud Workstation team provided, it produced DZ Bank’s own unique Docker images, which featured the following:
A centrally located proxy configuration
A package and tool download artefact server that is routinely inspected by the cyber security team
Package manager configurations particular to a language (e.g., mvn, pip, npm, etc.)
Additional standardised tools according to project requirements and programming language
Pre-installation and IDE plugin and extension upgrades carried out automatically
Repositories of the OS package manager that are accessible via the artefact server (i.e., without internet connectivity)
An automated setup of the environment that includes the Java Keytool, Git certificates, IDE setups, and other standard environment variables
X11 enablement utilising SSH, so that the developers can also access GUI apps, such as tools for UI testing
Certain bash scripts
Additionally, it carried out several proofs of concept with different DZ BANK development teams, each of which represented a distinct set of issues and tooling environments. It further enhanced and tailored DZ Bank’s Cloud Workstations environment based on their input.
Project-specific customisations are one instance. Even while standardised images cover the majority of developer needs, some requirements like project-specific tools and environment variables cannot be included in the standardised images. It utilise bash scripts to customise images on startup in order to automate tasks.
It generate a unique workstation.yaml file for every project, with all the necessary automation commands, and we double-check it in DZ Bank’s Git repository. DZ Bank’s script is a bash script that searches for this file at startup of a Cloud Workstation and executes the commands found within. This enables them to fully automate the setup of DZ Bank’s projects, allowing a fresh developer to contribute from the outset.
A cloud workstation order CI pipeline was also developed by DZ Bank. It’s Git repository houses the custom image code, which, when committed, starts a continuous integration process. This pipeline produces all the necessary container images depending on the hierarchy of images provided in DZ Bank’s Dockerfiles.
Docker images are inspected for vulnerabilities according to Google cloud’s cyber security requirements and pushed into an Artifact Registry of DZ Bank’s Google Cloud project allocated for testing by DZ Bank’s testers and developers. Following a successful scan and testing process, photos are combined and put into production.
Developers can place internal orders for Cloud Workstations using an automated procedure that starts DZ Bank’s order CI pipeline and installs all the appropriate permissions and infrastructure. No more looking in documentation is necessary! In order to further empower and expedite DZ Bank’s devs, they are excited to investigate into AI-enabled code development now that Gemini Code Assist powers Cloud Workstations.
Learnings
It’s collaboration with Google Cloud and the use of Cloud Workstations has made it possible for it to greatly increase the development productivity of bank teams.
“Before Cloud Workstations, onboarding new devs took a week, but now it only takes one day. The cloud-native development environment is fully automated, safe, and standardised, allowing developers to begin working on the code base right away. The qualities of automation and standardisation make development easier. – Gregor Otto Milenkovic, DZ BANK AG Product Owner
Along the road, DZ Bank picked up a lot of knowledge that may be helpful for your own travels:
In order to arrive at a solution that pleases all parties involved, the ongoing developer feedback cycle is essential.
It’s essential to strike the right balance between the freedom provided to developers and the environment’s security requirements.
Bank Customer Engineers and the Product Engineering team are instrumental in seeing projects through to the end.
This Bank had regular touch with them to answer it’s concerns, report bugs, and feature requests.
Automate everything and eliminate toil!
Read more on govindhtech.com
#dzbank#GoogleCloud#VPC#VPCNetworking#cloudworkstation#cybersecurity#geminicode#AI#CIPipeline#Terraform#news#technews#technology#technologynews#technologytrends#govindhtech
0 notes
Text
Exploring Career Opportunities for Python Developers
Python, with its versatile applications and widespread adoption, offers a vast scope for professionals seeking a rewarding career in technology.

Here's a comprehensive overview of the career opportunities available to Python developers:
1. Software Development: Python developers can embark on a rewarding career path in software development. They can contribute to building a wide array of applications, ranging from web and mobile apps to desktop software and enterprise solutions. With Python's simplicity and readability, developers can quickly prototype and develop robust software solutions, making it a preferred choice for many organizations.
2. Web Development: Python's extensive web frameworks like Django and Flask empower developers to create scalable, dynamic, and feature-rich web applications. Python's ecosystem offers a plethora of tools and libraries for handling various aspects of web development, including server-side logic, database management, and frontend design. Python developers specializing in web development can build cutting-edge websites, APIs, and web services for clients across different industries.
3. Data Science and Analytics: Python's rich ecosystem of data science libraries, such as NumPy, Pandas, and Matplotlib, makes it a go-to choice for data scientists and analysts. Python developers proficient in data science can leverage their skills to extract insights from complex datasets, perform statistical analysis, and develop machine learning models. They play a crucial role in industries like finance, healthcare, retail, and marketing, where data-driven decision-making is paramount.
4. Machine Learning and Artificial Intelligence: Python's simplicity and powerful libraries like TensorFlow, PyTorch, and scikit-learn have made it the language of choice for machine learning and artificial intelligence (AI) projects. Python developers specializing in ML and AI can develop predictive models, natural language processing (NLP) applications, computer vision systems, and recommendation engines. They contribute to cutting-edge research and innovation in fields like autonomous vehicles, healthcare diagnostics, and personalized marketing.

5. DevOps and Automation: Python's versatility extends to DevOps and automation, where it plays a crucial role in streamlining workflows, automating repetitive tasks, and managing infrastructure. Python developers skilled in DevOps practices and tools like Ansible, Docker, and Kubernetes can build robust CI/CD pipelines, automate deployments, and maintain scalable, resilient infrastructure. They enable organizations to achieve faster time-to-market and improve operational efficiency through automation.
6. Game Development: Python's simplicity and accessibility make it an excellent choice for game development, particularly for indie developers and small studios. Python developers can leverage game development frameworks like Pygame and Panda3D to create immersive gaming experiences across various platforms. With Python, developers can prototype game mechanics, develop game logic, and create interactive experiences for gamers worldwide.
7. Cybersecurity: Python's versatility and extensive library support make it well-suited for cybersecurity applications. Python developers can contribute to building tools and scripts for vulnerability assessment, penetration testing, threat detection, and incident response. They play a critical role in securing networks, systems, and applications from cyber threats and vulnerabilities, making Python an indispensable language in the cybersecurity domain.
8. Education and Training: Python's simplicity and readability make it an ideal choice for teaching programming concepts to beginners and aspiring developers. Python developers can pursue careers in education and training, working as instructors, trainers, or course developers. They can create tutorials, online courses, and educational content to empower learners of all ages to develop coding skills and pursue careers in technology.
In conclusion, the scope for Python developers is vast and diverse, encompassing a wide range of career opportunities across industries and domains. Whether you're passionate about software development, data science, AI, DevOps, game development, cybersecurity, or education, Python offers abundant opportunities for growth, innovation, and impact. By honing your Python skills and staying abreast of the latest trends and technologies, you can embark on a fulfilling and rewarding career journey in the dynamic world of technology.
0 notes
Text
Mastering Full Stack Java Development: A Comprehensive Guide
Are you ready to embark on a journey into the world of Full Stack Java Development? Whether you're a seasoned developer looking to expand your skill set or a newcomer to the field, this comprehensive guide will equip you with the knowledge and tools needed to master Full Stack Java Development.
What is Full Stack Java Development?
Full Stack Development refers to the practice of working on both the frontend and backend of a web application. In the context of Java, it means using Java for both the server-side (backend) and client-side (frontend) development. This approach allows developers to create end-to-end solutions and have full control over the entire application stack.
The Java Programming Language: A Solid Foundation
Java is known for its platform independence, robustness, and extensive libraries. It's an excellent choice for Full Stack Development because it can be used on both ends of the development spectrum. Whether you're building RESTful APIs, managing databases, or crafting interactive user interfaces, Java has you covered.
Mastering the Backend with Java
To excel in Full Stack Java Development, you must first become proficient in backend development. This includes understanding concepts like:
Server-side frameworks: Learn popular Java frameworks like Spring Boot and Java EE for building robust and scalable backend services.
Database management: Explore Java's database integration capabilities using technologies like JDBC and JPA, allowing you to work with relational databases seamlessly.
API development: Master the art of building RESTful APIs with Java, ensuring efficient data communication between your frontend and backend.
Crafting Responsive User Interfaces
Once you've got a solid grip on the backend, it's time to focus on the frontend. Here are key areas to consider:
HTML, CSS, and JavaScript: These are the building blocks of web development. Understanding these technologies is crucial for creating dynamic and visually appealing user interfaces.
Frontend libraries and frameworks: Familiarize yourself with popular frontend frameworks like React Angular, or Vue.js, and integrate them seamlessly with your Java backend.
Responsive design: Ensure that your user interfaces are responsive and accessible on various devices, from desktops to smartphones.
Connecting the Dots: Integrating Frontend and Backend
The true power of Full Stack Java Development lies in the seamless integration of the frontend and backend. Achieving this requires knowledge of technologies like RESTful API calls, AJAX, and asynchronous programming. You'll be able to build interactive web applications that can send and receive data from the server without page reloads, providing a smooth user experience.
Testing, Security, and Deployment
As a Full Stack Java Developer, your responsibilities go beyond coding. You'll need to:
Implement robust testing: Ensure the reliability and stability of your applications through unit testing, integration testing, and end-to-end testing.
Prioritize security: Protect your application from common vulnerabilities with practices like input validation, authentication, and authorization.
Master deployment: Understand deployment strategies, containerization with Docker, and deployment pipelines to take your application live.
Continuous Learning and Staying Updated
The technology landscape is ever-evolving. To master Full Stack Java Development, commit to continuous learning. Follow industry trends, experiment with new tools and frameworks, and stay engaged with the developer community.
In conclusion, mastering Full Stack Java Development is a rewarding journey that empowers you to create end-to-end web solutions with Java. By building a strong foundation in backend and frontend development, integrating the two seamlessly, and keeping up with industry trends, you can become a proficient Full Stack Java Developer capable of tackling complex web projects. So, are you ready to embark on this exciting adventure? Start by building a strong understanding of Java, and the possibilities are endless.
0 notes
Text
Rhel Docker


Rhel Docker
Rhel Docker Ce
Rhel Docker
Rhel Docker Ce
The Remote - Containers extension lets you use a Docker container as a full-featured development environment. Whether you deploy to containers or not, containers make a great development environment because you can:
Develop with a consistent, easily reproducible toolchain on the same operating system you deploy to.
Quickly swap between different, isolated development environments and safely make updates without worrying about impacting your local machine.
Make it easy for new team members / contributors to get up and running in a consistent development environment.
Try out new technologies or clone a copy of a code base without impacting your local setup.
Rhel Docker
Rhel Docker Ce
The extension starts (or attaches to) a development container running a well defined tool and runtime stack. Workspace files can be mounted into the container from the local file system, or copied or cloned into it once the container is running. Extensions are installed and run inside the container where they have full access to the tools, platform, and file system.
Rhel Docker
Amazon Web Services (AWS) and Red Hat provide a complete, enterprise-class computing environment. Red Hat solutions on AWS give customers the ability to run enterprise traditional on-premises applications, such as SAP, Oracle databases, and custom applications in the cloud.
Windows 10 Home (2004+) requires Docker Desktop 2.2+ and the WSL2 back-end. (Docker Toolbox is not supported.) macOS: Docker Desktop 2.0+. Linux: Docker CE/EE 18.06+ and Docker Compose 1.21+. (The Ubuntu snap package is not supported.) Containers: x8664 / ARMv7l (AArch32) / ARMv8l (AArch64) Debian 9+, Ubuntu 16.04+, CentOS / RHEL 7+ x8664.
Docker volumes allow you to back up, restore, and migrate data easily. This tutorial explains what a Docker volume is and how to use it, as well as how to mount a volume in Docker.
Amazon Web Services (AWS) and Red Hat provide a complete, enterprise-class computing environment. Red Hat solutions on AWS give customers the ability to run enterprise traditional on-premises applications, such as SAP, Oracle databases, and custom applications in the cloud.
You then work with VS Code as if everything were running locally on your machine, except now they are isolated inside a container.
System Requirements
Local:
Windows:Docker Desktop 2.0+ on Windows 10 Pro/Enterprise. Windows 10 Home (2004+) requires Docker Desktop 2.2+ and the WSL2 back-end. (Docker Toolbox is not supported.)
macOS: Docker Desktop 2.0+.
Linux: Docker CE/EE 18.06+ and Docker Compose 1.21+. (The Ubuntu snap package is not supported.)
Containers:
x86_64 / ARMv7l (AArch32) / ARMv8l (AArch64) Debian 9+, Ubuntu 16.04+, CentOS / RHEL 7+
x86_64 Alpine Linux 3.9+
Other glibc based Linux containers may work if they have needed prerequisites.
While ARMv7l (AArch32), ARMv8l (AArch64), and musl based Alpine Linux support is available, some extensions installed on these devices may not work due to the use of glibc or x86 compiled native code in the extension. See the Remote Development with Linux article for details.
Note that while the Docker CLI is required, the Docker daemon/service does not need to be running locally if you are using a remote Docker host.
Installation
To get started, follow these steps:
Install VS Code or VS Code Insiders and this extension.
Install and configure Docker for your operating system.
Windows / macOS:
Install Docker Desktop for Mac/Windows.
If not using WSL2 on Windows, right-click on the Docker task bar item, select Settings / Preferences and update Resources > File Sharing with any locations your source code is kept. See tips and tricks for troubleshooting.
To enable the Windows WSL2 back-end: Right-click on the Docker taskbar item and select Settings. Check Use the WSL2 based engine and verify your distribution is enabled under Resources > WSL Integration.
Linux:
Follow the official install instructions for Docker CE/EE. If you use Docker Compose, follow the Docker Compose install directions.
Add your user to the docker group by using a terminal to run: sudo usermod -aG docker $USER Sign out and back in again so this setting takes effect.
Rhel Docker Ce
Working with Git? Here are two tips to consider:
If you are working with the same repository folder in a container and Windows, be sure to set up consistent line endings. See tips and tricks to learn how.
If you clone using a Git credential manager, your container should already have access to your credentials! If you use SSH keys, you can also opt-in to sharing them. See Sharing Git credentials with your container for details.
Getting started
Follow the step-by-step tutorial or if you are comfortable with Docker, follow these four steps:
Follow the installation steps above.
Clone https://github.com/Microsoft/vscode-remote-try-node locally.
Start VS Code
Run the Remote-Containers: Open Folder in Container... command and select the local folder.
Check out the repository README for things to try. Next, learn how you can:
Use a container as your full-time environment - Open an existing folder in a container for use as your full-time development environment in few easy steps. Works with both container and non-container deployed projects.
Attach to a running container - Attach to a running container for quick edits, debugging, and triaging.
Advanced: Use a remote Docker host - Once you know the basics, learn how to use a remote Docker host if needed.
Available commands
Another way to learn what you can do with the extension is to browse the commands it provides. Press F1 to bring up the Command Palette and type in Remote-Containers for a full list of commands.
You can also click on the Remote 'Quick Access' status bar item to get a list of the most common commands.
For more information, please see the extension documentation.
Release Notes
While an optional install, this extension releases with VS Code. VS Code release notes include a summary of changes to all three Remote Development extensions with a link to detailed release notes.
As with VS Code itself, the extensions update during a development iteration with changes that are only available in VS Code Insiders Edition.
Questions, Feedback, Contributing
Have a question or feedback?
See the documentation or the troubleshooting guide.
Up-vote a feature or request a new one, search existing issues, or report a problem.
Contribute a development container definition for others to use
Contribute to our documentation
...and more. See our CONTRIBUTING guide for details.
Or connect with the community...
Telemetry
Visual Studio Code Remote - Containers and related extensions collect telemetry data to help us build a better experience working remotely from VS Code. We only collect data on which commands are executed. We do not collect any information about image names, paths, etc. The extension respects the telemetry.enableTelemetry setting which you can learn more about in the Visual Studio Code FAQ.
License
By downloading and using the Visual Studio Remote - Containers extension and its related components, you agree to the product license terms and privacy statement.
2 notes
·
View notes
Text
What Is Software Testing? Interpretation, Fundamentals & Kind
Ninja Training For Software Program Testers.
#toc background: #f9f9f9;border: 1px solid #aaa;display: table;margin-bottom: 1em;padding: 1em;width: 350px; .toctitle font-weight: 700;text-align: center;
Content
Certified Software Application Test Automation Designer.
Automation Testing Resources.
Test Automation With Selenium Webdriver.
Top Tips For Learning Java Programming.
Develop A Junit Examination Class
Certified Software Test Automation Designer.
How many days will it take to learn Java?
Bottom line -- beyond the most elementary, the math you need will come from the problem domain you're programming in. NONE of that needs to be a barrier to learning Java development. If you can learn Java, you can probably learn more math if you need it -- just don't try to do both at the same time.
Nonetheless this is dissuaded, as well as utilizing one web browser per node is taken into consideration best practice for optimum efficiency. You can after that make use of the TestNG library to run your examinations on multiple nodes in parallel customarily. The simplest means to use these in a local Selenium Grid is to build a Docker Compose documents within the root directory site of your project. Call the documents docker-compose. yml to maintain points easy.
Java 7 can be set up on Lion and Mountain Lion to run applets. Lion and also Mountain can have both Java 6 and also Java 7 set up simultaneously.
And also, there will be much better assistance for Docker, parallel testing will be included natively, and also it will certainly give a much more useful UI. Request mapping with Hooks will certainly likewise help you to debug your grid. As any kind of examination automation engineer knows, waits are crucial to the security of your examination automation structure. They can additionally speed up your examination by making any kind of sleeps or pauses repetitive as well as get rid of sluggish network and cross-browser concerns.

Automation Testing Resources.
Is Java a good career choice?
Similar to COBOL, thousands of critical enterprise systems have been written in Java and will need to be maintained and enhanced for decades to come. I'd be surprised if it's not around for at least another 15 years. But it will change, and is changing.
However, as these are often made use of to develop screenshots of a solitary component, it deserves knowing that there will certainly additionally be an API command to capture a screenshot of an aspect in Selenium 4. The Selenium Grid will certainly be more steady and also less complicated to establish and handle in Selenium 4. Users will no more require to set up as well as begin nodes and also centers separately as the grid will certainly function as a consolidated node as well as center.
To get up as well as running, initially you need to have Docker as well as Docker Compose installed on your maker. If you're running Windows 10 or a Mac, then they will both be installed through the Docker Desktop. Selenium Grid is notoriously hard to set up, unpredictable, and difficult to either release, or version control, on a CI pipe. A much easier, maintainable and also stable way is to use the pre-built Selenium Docker images. This is important to making certain the continued extensive adoption of their structure within their business.
As a whole, puffed up, obsolete structures fall out of style quickly. He started at IBM, relocated to EADS, then Fujitsu, and also currently runs his own company.
Below are some suggestions to make your waits a lot more resistant. To produce a steady variation of the Grid for your CI pipe, it's likewise possible to deploy your Grid onto Kubernetes or Swarm. If they do fail, this makes sure that any type of Dockers are promptly recovered or changed. It deserves keeping in mind that it is feasible to have multiple web browsers running on each node.
Examination Automation With Selenium Webdriver.
I utilize TestNG as it's specifically created for Acceptance Examinations, while structures such as JUnit are commonly utilized for system testing.
One more excellent structure that is well worth exploring is Spock as it's very easy as well as very meaningful to review.
I would certainly likewise recommend setting a day to do this a minimum of once a year, although ideally it would be every 6 months.
Rest will certainly always stop for a collection amount of time before carrying out some code, while wait will just stop briefly execution until an anticipated condition happens or it breaks, whichever comes first.
You ought to never make use of sleep in an examination automation framework as you want your examinations to run as quick as feasible.
Google's Truth assertion collection is additionally an excellent way to compose readable examinations.
youtube
Check to make certain that you have actually the recommended version of Java mounted for your os. I wrote a publication that gets testers started with Java fast, is simple to adhere to, as well as has instances connected to their job. A driver.switchTo(). parentFrame() technique has been included in make frame navigating much easier. WebElement.getSize() and WebElement.getLocation() are now replaced with a single method WebElement.getRect().
youtube
Apple did not produce an Update 38 for the Mac, they maxed out at Update 37. On Windows, the Java runtime may or may not be pre-installed, the decision is left approximately the hardware maker. A Java variation 6 runtime was pre-installed by Apple on OS X Leopard as well as Snow Leopard, but starting with Lion, Apple stopped pre-installing Java. Java 6 can be mounted on Lion as well as Hill Lion, but it will certainly not run applets.
Leading Tips For Learning Java Programs.
You code as soon as, and the JVM does all the operate in making certain your amazing brand-new programme runs efficiently on any type of platform, whether Windows, Mac, Linux or Android mobile. Java is one of the most prominent shows language in use given that it's the only language that works across all computer system systems without requiring to be recompiled each. Obtain opleiding tester to 4,000+ top Udemy courses anytime, anywhere.

Check to guarantee that you have the advised version of Java set up on your Windows computer system and recognize any type of variations that run out date and should be uninstalled. We are not able to validate if Java is currently mounted and enabled in your web browser.
You do not need to have experience of doing this as your expertise of the technology will certainly be enough (we'll help you with the rest till you're up to speed). Teaching is our enthusiasm and we develop every training course so you can go back to square one, understanding nothing regarding a subject as well as come to be a specialist after the program as well as can deal with enterprise projects. You will certainly obtain the best in course assistance from the instructor for any concern you have actually connected to the training course.
Suggestion # 3: Chrome Devtools: Replicating Network Conditions
Where can I practice Java?
JavaScript can be used to do monotonous things like creating animation in HTML. In short, when it comes to how each programming language is used, Java is typically used for all server-side development, while creating client-side scripts for tasks such as JS validation and interactivity is reserved for.
Toptal handpicks leading Java programmers to suit your requirements. There's likewise a creative side to the role as you will certainly design training course content as well as add ideas for coding difficulties for the learners.
1 note
·
View note
Text
Theme Updates, Offline Upgrades Headline New Additions to Pop!_OS 19.10

Halloween came early this year with our latest release of Pop!_OS. Fill your treat bag with theme updates, Tensorman, easy upgrading, and more as we unwrap the details of Pop!_OS 19.10:
Theme Updates
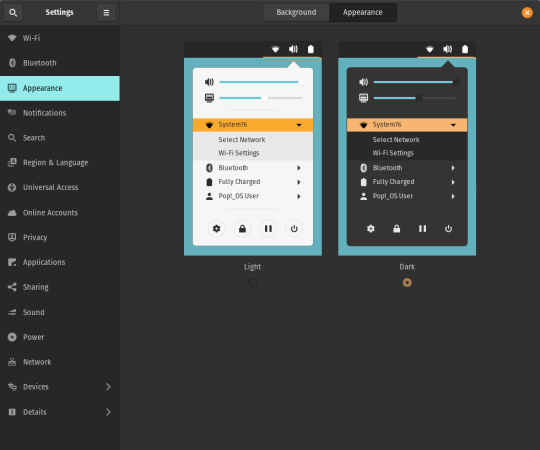
A new Dark Mode for Pop!_OS is available in the operating system’s Appearance Settings. Both the Light and Dark modes feature higher contrast colors using a neutral color palette that’s easy on the eyes.
The functionality of Dark Mode has been expanded to include the shell, providing a more consistently dark aesthetic across your desktop. If you’re using the User Themes extension to set the shell theme, disable it to use the new integrated Light and Dark mode switcher.
The default theme on Pop!_OS has been rebuilt based on Adwaita. Though users may only notice a slight difference in their widgets, the new OS theme provides significant measures to prevent application themes from experiencing UI breakage. This breakage manifests in the application as missing or misaligned text, broken widgets, and scaling errors, and should not occur with the new theme in place.
The updated theme includes a new set of modernized sound effects. Users will now hear a sound effect when plugging and unplugging a USB or charging cable. The sound effect for adjusting the volume has been removed.
Tensorman
Tensorman is a new tool that we’ve developed to serve as a toolchain manager for Tensorflow, using the official Docker builds of Tensorflow. For example, executing a python script inside of a Tensorflow Docker container with CUDA GPU and Python 3 support will now be as simple as running:
tensorman run --gpu python -- ./script.py
Tensorman allows users to define a default version of Tensorflow user-wide, project-wide, and per run. This will enable all releases of Pop!_OS to gain equal support for all versions of Tensorflow, including pre-releases, without needing to install Tensorflow or the CUDA SDK in the system. Likewise, new releases of Tensorflow upstream will be made immediately available to install with Tensorman.
Examples of how to use Tensorman are in the tool’s support page. Tensorman is now available on Pop!_OS 19.10, and will be coming to Pop!_OS 18.04 LTS soon.
To install Tensorman, enter this command into the Terminal:
sudo apt install tensorman
GNOME 3.34
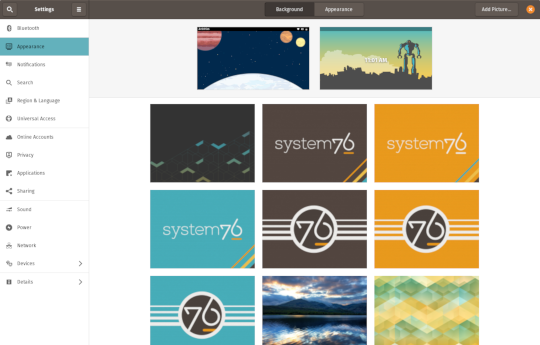
In addition to theming improvements, the GNOME 3.34 release brings some new updates to the fold. From GNOME’s 3.34 Release Notes:
A redesigned Background panel landed in the Appearance settings. Now when you select a background, you will see a preview of it under the desktop panel and lock screen. Custom backgrounds can now be added via the Add Picture… button.
Performance improvements bring smoother animations and a more responsive desktop experience.
Icons in the application overview can be grouped together into folders. To do this, drag an icon on top of another to create a group. Removing all icons from a group will automatically remove the group, too. This makes organizing applications much easier and keeps the application overview clutter-free.
The visual style for the Activities overview was refined as well, including the search entry field, the login password field, and the border that highlights windows. All these changes give the GNOME desktop an improved overall experience.
Some animations in the Activities overview have been refactored, resulting in faster icon loading and caching.
The Terminal application now supports right-to-left and bi-directional languages.
The Files application now warns users when attempting to paste a file into a read-only folder.
Search settings for the Activities overview can now be reordered in the Settings application by dragging them in the settings list. The Night Light section has been moved to the Display panel.
New Upgrade Process

Offline upgrades are now live on Pop!_OS 19.04, bringing faster, more reliable upgrades. When an upgrade becomes available, it is downloaded to your computer. Then, when you decide to upgrade to the newest version of your OS, the upgrade will overwrite the current version of your software. However, this is not to be confused with an automatic update; your OS will remain on the current version until you yourself decide to upgrade.
To upgrade to 19.10 from a fully updated version of Pop!_OS 19.04, open the Settings application and scroll down on the sidebar menu to the Details tab. In the About panel of the Details tab, you will see a button to download the upgrade. Once the download is complete, hit the button again to upgrade your OS. This will be the standard method of upgrading between Pop!_OS releases going forward.
Alternatively, a notification will appear when your system is ready to upgrade. This notification appears on your next login on your fully updated version of Pop!_OS 19.10. Clicking it will take you to the About panel in the Settings application.
In early November, Pop!_OS 18.04 LTS users will be notified to update to Pop!_OS 19.10 or remain on 18.04 until the next LTS version is available.
New to Pop!_OS:
Visit the official Pop!_OS page to download Pop!_OS 19.10.
Upgrade Ubuntu to 19.10
See our support article on upgrading Ubuntu for information on how to upgrade Ubuntu 19.04 to 19.10.
17 notes
·
View notes
Link
0 notes
Text
Parity Wallet
The Parity Wallet is one of several well-liked remedies that were designed for you to serve as each a wallet and a software between the Ethereum software and your laptop or computer. Like MyEtherWallet, Parity is genuinely a browser and not some sort of budget. Parity even bills itself as an �Ethereum Browser� � a web browser is needed because Ethereum is really an extensive system. The idea guiding Parity is to provide the particular most effective connection between Ethereum and various technologies possible. Ethereum came to be as a decentralized data safe-keeping solution, but it is widespread since cryptocurrency because it will be encrypted and very safe. The great way to think of Ethereum is a new second, encrypted network in the internet. Parity is created like a entrance to that network together with an software between the web and even Ethereum. A FULL NODE WALLET Parity was designed since a full-node pocket book the fact that means you can carry out everything this. You will store Ethereum and ERC-20 up to date initial cryptocurrency solutions (ICOs). More importantly, you are able to send and receive bills, buy and sell Azure and ICO tokens, mine, invest in Ethereum plus add the wallet with a wide variety of programs. That makes Parity Ethereum management tool you can add to a number regarding internet browsers and run upon a number of operating systems. Presently, it works with Ubuntu, OS 10, Dockers and Home windows. One reason why users like the Parity Wallet is definitely that provides a dashboard that can be used to manage Ether on your own screen. It will perhaps purpose on desktops just where MyEtherWallet and Mist have got been extra. EASY TO BE ABLE TO USE Parity is pretty effortless if you abide by the instructions in the dash, which are fairly straightforward together with explanatory. If anyone look carefully you ought to see everything explained in order to anyone. This makes saving and managing Ethereum since easy as shopping with Amazon. Although it might take a good while to get your money to exhibit way up in Parity, users survey that it takes many time to be able to record dealings. Another favorite feature is the easy recovery bed sheet with a quick study (QR) code that an individual can scan with nearly any phone. That permits you regain your Parity account quick if that is lost or your own personal pc crashes. LOTS INVOLVING SUPPORT Several developers and even consumers like Parity mainly because the idea has a lot of assist. It is quite uncomplicated to contact and assist the firm responsible intended for the finances. The browser was the creation of the company named Parity Solutions. Based in Manchester and Munich, Parity�s aim is certainly to create a superfast networking that combines expert to see payments, networking, algorithms, cryptography, databases, and decentralized purposes. This provides a new more specialized operation in addition to a higher level connected with assistance than some connected with Parity�s challengers. Parity offers what it wants to phone the �world�s best plus lightest client� that may be included immediately into a net cell phone browser. That means it is a lot a great deal more than a wallet. You can store, receive and send Ethereum by means of Parity, yet you can likewise create or execute contracts and even design, deploy, plus any wide variety involving Ethereum-based applications. The best way it does that is to be able to work as the interface involving various networks. The assist on Parity includes device tests and review designed to make certain every performs. That also contains some associated with the most experienced cryptocurrency technical engineers around. HIGH AMOUNT OF KNOWLEDGE Parity Systems includes some of the people that helped develop Ethereum itself. Parity�s founder Doctor Gavin Solid wood, worked well together with Ethereum founder Vitalik Buterin when this individual first designed the blockchain system. Wood is actually wanting to develop a greater and much more comprehensive Ethereum software built to serve as the full-service payment network. Often the Parity Wallet is meant to become the cornerstone of that system. Ethereum Parity v2.3.4 can be to create next-generation Fin-Tech solutions which can be marketed for you to banks, retailers, off-set money, credit card companies, governing bodies, and other organizations. These remedies would certainly utilize the Ethereum blockchain to make market segments, retail systems, and economic products. THE FEATURES CONNECTED WITH PARITY Some Parity�s illustrates and selling things incorporate: Will work with The apple company McIntosh computers via the OSX operating technique. Will certainly work using the Linux-based Ubuntu operating system. Works together with an ecommerce applications software called Docker. Basic one-word online setup intended for Apple pc and Ubuntu, and perhaps Stainless and Android. PARITY FEATURES The most impressive matter about Parity is several of the very advanced features it provides. They look to possibly be years prior to other wallets and handbags and might supply a good more effective payment alternative. Competitors would be well-advised to help imitate some of Parity�s very-impressive new attributes. These are a little technological but if they will work as offered, those people features will make Parity of the best level of privacy wallets currently available. One least appreciated Parity attribute is often the Rust programming terminology which usually is low-level. That helps make Parity, simple and faster than other wallets and handbags, and even should reduce errors. Rust will allow the creation regarding complex smart contracts using JITEVM turbocharging and multi-level storage caching. Parity Systems claims that Rust guarantees safety with actor-based modality, unit testing, and expert review. That is made to create a better made and resilient process. More levels of durability are really created along with a standard, JSON-based company specs structure, native rate contracts plus modular design. Higher levels of security, privateness, and even anonymity are offered by means of Parity�s small impact. Acquiring a small footprint helps make Parity harder to detect and track on-line. A smaller footprint provides a bigger level involving cache management and generates a more compact storage footprint that is certainly less complicated to manage but harder for the bad guys to be able to discover. Even though the website fails to mention Android mobile phone or Chromium, the builders claim it truly is highly suitable with Linux-based operating systems. This kind of is achieved through 100% test conformant consensus conformant execution, standard devp2p community standard protocol, and full match ups with JSON-RPC-API. All the fact that should really make Parity specific simple to operate with one collection Apple pc and even Linux installation. That means one line installation on Chrome and even Android might be available for the reason that those Google solutions usually are Linux-based. Installation can furthermore be made with Docker photos. PARITY VS MYETHERWALLET Parity by far is made for the considerably more techie user who needs to get smart having the interior workings associated with ethereum wallets and handbags. There� Parity Wallet Download 2.4.0 for stuff like multisig legal papers, manual adjustment associated with GWEI (useful if a person are trying to find directly into a new highly reasonably competitive ICO) values, and more. However, Parity does not necessarily have the easiest-to-use user interface and, as things proceed, certainly not as user-friendly as MyEtherWallet. Power users will certainly almost certainly prefer Parity in excess of MyEther Wallet. Casual consumers who else just need a good private pocket to shop ERC20 tokens will most likely desire MyEtherWallet Is Parity with regard to You? All this creates Parity a great solution for severe Ethereum geeks and people that are trying to developing next-generation Ethereum solutions. Parity would end up being a great use for you if you want for you to create or maybe execute great contracts one example is. Persons together with organizations that want a internet browser that can help average people access and usage Ethereum would be well-served simply by Parity. That causes a great substitute for ecommerce companies and fiscal professionals. Parity may well certainly not be a good alternate for somebody who is definitely just searching for a good suggests of buying, stocking, sending and trading Ethereum. The big drawback to Parity that individuals can see is definitely that this will not look to be compatible together with any of the well-liked cryptocurrency hardware wallets. It appears to be as if no assist can be obtained for the TREZOR or any in the Journal products such as this Piccolo S. That may well make MyEtherWallet which will easily be installed on often the TREZOR and Piccolo T, some sort of better alternative. Why You Need More in comparison with Only one Cryptocurrency Wallet A good totally obvious solution for the particular person that will wants for you to store Ethereum will be to possess two or more wallets and handbags. A major advantage to Parity is that it is supposed to be compatible with pouches like the Mist together with MyEtherWallet. A person can use Parity regarding sophisticated Ethereum tasks like making money with smart contracts, as well as the additional wallet for storing altcoins or switching it to equipment wallets. One of typically the best strengths to Parity is that it is creators� acknowledge the need for several wallet. If an individual watch good news, you almost certainly know that every altcoin within the sun has been recently hacked. Using two or maybe more wallets can add more security and produce the idea harder for crooks to swipe your current coins. Parity�s recognition on this a weakness in addition to the need for diversity is a solid marketing point with regard to the items. It might likewise possibly be an indication that Parity Technologies is planning some other products in the future such as a Australian visa or MasterCard debit credit card or a mobile app that converts cryptocurrency for you to fiat currencies such while money. A smart strategy is to possess two or more wallets and handbags with your computer and much more in comparison with one hardware wallet. A good good mix of billfolds would have been a Parity, MyEtherWallet, a new standard commercial wallet like Coinbase, a trading remedy like CEX. IO, a TREZOR for travel, one other components wallet for storage space, including least wallet using a MasterCard or Australian visa payment selection. There may be now several wallets linked to MasterCard and Visa debit cards such as TenX. These a option would be some sort of superior option � as you can make use of the debit card in places like the grocery store and also to get dollars from ATMs if have be. A VERY INNOVATIVE BUDGET WITH A LARGE LEVEL OF TESTING You should definitely consider using Parity should you need an innovative wallet that provides a great deal of support. The Parity Technological innovation Team seems to offer a lot more support and a new a higher level00 seriousness than a few of it is competitors. Their best attribute is undertaking a lot of examining. There is certainly enough support to help create a merchandise honestly, that is stable and basically gets results. Unlike some other altcoin solution providers, Parity Technology tests its merchandise alone rather than dumping all of them out online for uninformed consumers to tests. A proven way Parity tries to sustain sturdiness and stability is definitely by trying to test and release new editions or updates every six weeks. An additional is through 100 % unit-testing which many cryptocurrency geeks know is definately not often the industry standard. Parity features even managed to conduct more than 1, 000 opinion checks in a great hard work to be sure its products really work. Individuals reviews contain static program code checking, and even obtaining more than one expert programmers review every single update in advance of it is revealed. In the event you need a wallet of which completely has to help work, Parity is intended for you. The testing should really provide a higher levels of resilience plus trustworthiness than you are possibly utilized to. HIGH LEVEL REGARDING TRANSPARENCY Additionally, Parity basically outlines its� testing techniques and procedures online. This actually goes out of the way to reveal this kind of attributes as block-processing rate, memory footprint, and trie benchmarks online. That indicates techies can actually for you to see if Parity�s promises are for real. Parity Wallet v2.3.4 delivers a far higher amount of transparency than will be usually seen through several crypto solution suppliers. It is a true start taken solution created using a dangerous of visibility and sincerity. Developers will certainly definitely appreciate the fact that although so will regular people that want something sufficient for the pros to be able to use. A person big advantages to Parity is the fact that the idea is a professional alternative.

PARITY IS A GOOD SOLUTION FOR ENTREPRENEURS When you need something of which developers might access in addition to play with, Parity is normally definitely for you. That would help it become some sort of fine solution for anyone that is trying to produce smart contracts, a good ICO, or an Ethereum-based web commerce market platform, or product. Somebody that expects to hire a team connected with engineers to help develop a good new Ethereum-solution would be incredibly well served by Parity. So would entrepreneurs looking to do business with large institutions such like big banks, governments, large firms, investment banking institutions, hedge funds, credit-card providers, and technology companies. Parity might be more likely to be able to offer the degree of documentation, safety, and visibility those companies require. That makes Parity a great choice of finances for those trying for you to create or even design following generation internet solutions. In case you own a organization or website and you want to add more Ethereum � Parity will be a great way to do the idea. This means Parity is certainly not necessarily a fantastic solution to get private individuals. It appears to be like some sort of business solution for professionals � that requires some level of technical skills to implement. In case you want to understand Ethereum and how to help produce Ethereum-based solutions, you should definitely get informed about Parity and learn to use it. Persons that will just want to make use of Ethereum as a repayment alternative, might be better served by way of a more consumer-friendly solution like MyEtherWallet. With luck ,, the Parity Technologies group will generate a simpler version of their wallet for use by this general public eventually. Their product is impressive and it also deserves to find the large advertise and market. Note that typically the split developers behind parity are putting their abilities in to developing a new crypto that aims to become the next big movement above ethereum � many might argue the next generation regarding blockchain technological innovation � using a internet of �blockchains� that aims to interface together with connect with different blockchains. This new cryptocurrency is termed Polkadot and goes survive Q4 2019. People the fact that want to see what a cryptocurrency wallet plus an Ethereum browser have to look such as must check out Parity. Parity Ethereum v2.3.5 might well come to be the yellow metal standard involving Ethereum-interface alternatives.
1 note
·
View note
Text
Best practices to strengthen Plesk server security
For any web hosting company or server administrator, server security is the most important aspect of server management. Every internet company needs to provide careful attention to protecting its servers. In this section, we will discuss the most crucial parts of hardening Plesk servers and monitoring them for security flaws.

What is Plesk?
Plesk was initially introduced to the public in the year 2001 after being developed by Plesk, Inc., a Russian corporation. In 2003, Plesk was acquired by SWSoft, which then transformed itself into Parallels the following year. After Oakley Capital had purchased it in 2015, it was spun off into its own independent company. The commercial web hosting data centre automation software known as Plesk was designed specifically for Linux/Unix and Windows-based companies that provide commercial hosting services.
The user-friendliness of Plesk's menu makes it an excellent choice as a control panel solution for virtual private servers (VPS) and dedicated servers. To put it another way, a server that uses Plesk is so simple to operate that even someone with little to no prior server administration knowledge may begin managing their server right away. The administrator has the ability to establish client and site templates, which, in essence, is the process of allotting resources for domains and/or customers. In addition, Plesk was developed with the goal of making the normal management and administration of websites easier to perform. On a single server or across numerous servers, Plesk can automate a wide variety of operations and tasks. Plesk is a web hosting platform that comes with a control panel that gives the administrator the ability to set up websites, reseller accounts, e-mail accounts, DNS, and database accounts from a web browser.
Integration of support for content management systems (CMS) is included in Plesk; supported CMS include WordPress, Joomla, and Drupal, among others; this list is not exhaustive. Other technologies, such as Docker, multi-server management, and framework environments for Node.js, PHP, Python, Ruby on rails, and a great deal more, have also been added to it. In addition to Microsoft Windows, Plesk is compatible with a variety of Linux and Unix operating systems. In addition, the MySQL and PostgreSQL databases, the Microsoft SQL Server and Desktop Engine, the Apache Tomcat Java platform server, and the ColdFusion server are all supported by Plesk.
The term "extensions" refers to "add-ons," and those "add-ons" comprise software packs that are not included in the core codebase. These extensions interact and integrate completely with Plesk on every level. In addition, you do not have to pay for extensions that you do not require because Plesk's user interface was built to just add the features that you require.
Hardening the Security of Plesk Servers Using Generic Steps
Latest After installation, Plesk immediately provides a higher level of protection than before. Advisor, which integrates the best possible security practices and speed tune-up of the server and hosted domains, was recently released as part of the Plesk software suite. At the same time, it is a smart idea to make certain that the following normal actions are carried out:
Ensure regular Plesk updates
Change the strength of your password to Strong.
Install Google Authenticator on your device and use two-step verification to access your account.
To protect the mail server, make use of SSL and TLS.
Set sFTP connection
Restrict the access that administrators have to the system
Limit remote access via XML API
Be sure to make regular use of the Web Application Firewall.
You should make regular use of the WP Toolkit Security Check.
Configure automatic updates for all instances of WordPress.
Ensure that out-of-date web applications are not being used and that those that are being used are regularly updated. Failure to comply with this guideline may result in unanticipated holes in security.
Checking existing websites with VirusTotal's Website Check is recommended.
The Firewall should be used to close any ports that are not currently being used.
Tips for Maintaining Server Safety with Plesk on Linux
Make use of the key file in order to enable SSH access.
When establishing SSH connections, use a port of your choice.
There is no root SSH authentication available.
If you do not use Perl or Python on your website, turn off those languages' support and do not use them yourself. Mod /mod python
Use the Opsani vulnerability scanner.
Configure Fail2Ban to thwart any efforts at hacking.
Stay away from PHP handlers that are served up as Apache modules because this is not a secure approach.
Ensure that the option to update system packages automatically is selected.
Server Security Tips for Plesk under Windows
Custom port usage for RDP connections is a must
Get rid of unused programming languages
Make sure you install the latest Windows updates
Restrict users from overriding handlers via the web. config files
Keep DDOS protection enabled
Top Security Best Practices to Protect Your Plesk Server
1. Always Use the Latest Version of Plesk
Before you do anything further, check to see if your Plesk configurations have been brought up to date. The updates to Plesk install any additional components that you might require in order to significantly improve the server's level of security. The most effective method for ensuring the safety of a Plesk server is to ensure that it is always kept up to date. You may determine whether or not you have an updated version by using the following methods:
In the options menu, select the option to "Automatically Install Plesk Updates."
As part of the security updates, you need to make sure that the Plesk Firewalls, Fail2Ban, and ModSecurity packages have been properly installed.
2. The Safeguarding Process
It's possible that the security settings in Plesk will let you make secure FTP connections to the server. You have the ability to change the password settings by using a robust password.
To make changes to the minimum password requirement:
Under "Settings," click "Security." Once there, locate the "Password Strength" button within that section, and choose the level of security that best suits your needs. Now, select the OK button.
If FTP is configured to only allow authorized connections to the server, it can prevent attacks from occurring. The use of a strong password to protect the server from intrusions at the principal login location is one way to increase the level of security provided by Plesk. By employing this strategy, we are able to protect the server from being attacked with brute force.
3. Attack Utilizing Both Fail2Ban and Force
With the assistance of the Fail2Ban, the log files on the Plesk server are monitored and secured against attacks using brute force. It treats as suspect any attempt to log in that is not authorized. In the event that any of these failed login attempts are performed, the Fail2Ban will either send a notification to the user or temporarily prevent the user's IP address from gaining access to the server.
How to Configuration instructions for Fail2Ban
Make a filter that looks for odd activity in log files by utilizing one or more regular expressions. This filter may be used to search for it.
The sentence you receive in jail depends on the specific circumstances of your case. In the event of an attack, this might make it possible to carry out vital measures by utilizing the information that has been provided.
Please provide a listing of the IP address that was provided. You can protect your server from being attacked by limiting access to only the IP addresses that have been allowed.
In addition to this, you might also try either activating or deactivating a jail that you have set up. On the other hand, if you think it's necessary, you might make an effort to unblock the IP address that was previously banned. In general, Plesk comes equipped with a large number of predefined prison configurations and filters.
4. The configuration of the Web Application Firewall under ModSecurity
ModSecurity is a tool that assists in the detection and prevention of attacks on your web applications. The web application firewall has a rule set that decides how to respond to incoming requests and how they should be treated. In other words, the Firewall is activated whenever a user makes a request, and the HTTP request will only acquire material from the website if the check is successful.
Using Plesk, you are now able to activate ModSecurity and add your own personalized configurations to the parameters for the ruleset.
In order to install the ModSecurity component, you should follow these steps:
You will need to navigate to the "Updates and Upgrades" settings in order to get rid of or add any component. Find the Web Hosting Groups by going to the submenu that says "Add/Remove Components" under that.
You now have the option of using predefined ModSecurity rules or creating your own from scratch.
5. Changing the settings on the Firewall
The network connections that are trying to establish a connection to your server are monitored and kept safe by the Plesk Firewall. The following is a list of the steps to configure:
The first thing you need to do is go to "Tools and Settings" and then pick "Firewall Management." Pick "Firewall Rules Management" from the menu, and then activate it.
At this point, a preview of the status box that authorizes the Firewall module will be displayed. You just need to turn it on.
You have successfully arrived at your destination when a green box indicating success displays and the firewall rules management is operational.
To modify the settings of the Firewall,
Using the Plesk Tools and Settings interface, you are able to modify the Plesk Firewall rules.
At this point, pick the SSH server.
Select the option for the property that will permit you to allow traffic from some sources while preventing it from entering from others.
Include the IP address to which you would like access to be granted.
Select the OK button.
What to do in the event that the server's security is breached
Moving everything over to the new server is what we recommend in this situation. If the attack is successful, the invaders will have their privileges raised to the root level, which means they will have complete control over the server. Even if you uncover malware or rootkits during the investigation and remove them, this does not guarantee that there will be no more instances of either on your system. Malware can be loaded straight into RAM if the user so chooses. It is possible for already infected servers to have backdoors enabled or even common cronjobs set up for use in order to download rootkits.
Even if you successfully restore the server to a previous snapshot, there may still be issues with the server. Because, in many instances, it is unclear exactly when the server was hacked and when rootkits were uploaded to the server.
The question now is how to locate the origin of the issue.
When utilizing security solutions that are specifically designed to scan for rootkits and malware, it is important to keep the following in mind: these solutions rely solely on previously identified patterns in order to determine the presence of malware, and they may be completely ineffective in detecting brand new forms of malicious software. Please call a security audit company that specializes in such circumstances if you want to be absolutely certain about how the server was compromised. Please refrain from changing anything before the investigation has been completed in order to prevent the loss of traces.
Conclusion
There are a few recommended procedures that should be carried out in order to improve the security of a Plesk server. Among these is the utilization of a firewall, the updating of software, and the monitoring of logs. In the event that you come under assault, having a backup and security strategy that is kept up to date is of the utmost importance.

Myresellerhome.com
We offer experienced web hosting services that are customized to your specific requirements.
0 notes
Text
Welcome to this amazing guide on how to set up Bitwarden Self-Hosted Password Manager using Docker Container. By the end of this guide, you should be able to install the latest version of docker and docker-compose, as well as setting up an automatic password saving with Bitwarden. What is Bitwarden? Bitwarden is a free and open-source password manager that stores sensitive information such as websites credentials in an encrypted vault as well as generating strong|unique passwords for browsers or devices. It has two plans i.e a free and a paid version both coming with many amazing features Features of Bitwarden include: It is open-source Bitwarden uses 256-bit AES to secure the user data Two-factor authentication via applications such as email, Duo e.t.c Password auditing and breach monitoring. It supports biometric unlock. The Bitwarden server is self-hosted on-premises keeping content safe and secure Cross-platform client applications with desktop applications, web interface, browser extensions, mobile applications as well as CLI. Getting Started Before we begin this guide, ensure that your system is updated and the required packages installed. ## On RHEL/CentOS/RockyLinux 8 sudo yum update sudo yum install curl vim ## On Debian/Ubuntu sudo apt update && sudo apt upgrade sudo apt install curl vim ## On Fedora sudo dnf update sudo dnf -y install curl vim Step 1 – Install Docker and Docker-Compose In this guide, you need docker and docker-compose installed on your machine. Install the latest version of Docker on your Linux system using the guide on: How to Install Docker CE on Linux Systems Check the installed docker version. $ docker -v Docker version 20.10.9, build c2ea9bc Add your user account to Docker group: sudo usermod -aG docker $USER newgrp docker With Docker installed successfully, proceed and install the latest version of Docker-Compose using cURL as well. curl -s https://api.github.com/repos/docker/compose/releases/latest | grep browser_download_url | grep docker-compose-linux-x86_64 | cut -d '"' -f 4 | wget -qi - Make the downloaded file executable. chmod +x docker-compose-linux-x86_64 Move the file to your PATH. sudo mv docker-compose-linux-x86_64 /usr/local/bin/docker-compose Now confirm your installation by checking the docker-compose version installed. $ docker-compose version Docker Compose version v2.0.1 Start and enable docker. sudo systemctl start docker && sudo systemctl enable docker Step 2 – Provision the Bitwarden Server Now we will create a folder for the Bitwarden server. I will name mine bitwarden cd ~ mkdir bitwarden && cd bitwarden Now in the folder, we will create a docker-compose.yml file. This file will be used by docker-compose to orchestrate the docker instance. touch docker-compose.yml Then open the file for editing using your favorite text editor. vim docker-compose.yml Add the contents below in the file. # docker-compose.yml version: '3' services: bitwarden: image: bitwardenrs/server restart: always ports: - 8000:80 volumes: - ./bw-data:/data environment: WEBSOCKET_ENABLED: 'true' # Required to use websockets SIGNUPS_ALLOWED: 'true' # set to false to disable signups In this guide, I will use the bitwarden_rs Docker image written in Rust, this is faster and more reliable and it is entirely open-source with high usage all over. Step 3 – Run Bitwarden Self-Hosted Password Manager using Docker Now that everything is provisioned for the Bitwarden Server, we will proceed and run it using the simple code below. docker-compose up -d In case the above command fails to start, you might be required to execute it using the root user privileges. The command above will start pulling the images as below. [+] Running 8/8 ⠿ bitwarden Pulled 6.5s ⠿ 33847f680f63 Pull complete 1.9s
⠿ 64e13e5f1ad2 Pull complete 2.7s ⠿ 148922a88961 Pull complete 2.8s ⠿ cc66172bd48b Pull complete 3.2s ⠿ 2372942a3bb8 Pull complete 3.6s ⠿ 35b316a20d10 Pull complete 3.7s ⠿ 6b2893b1d24a Pull complete 3.9s [+] Running 2/2 ⠿ Network bitwarden_default Created 0.1s ⠿ Container bitwarden-bitwarden-1 Started 0.9s See the Bitwarden Server instance using the command: $ docker ps Sample Output: CONTAINER ID IMAGE COMMAND CREATED STATUS PORTS NAMES 62fbe97d43e5 bitwardenrs/server "/usr/bin/dumb-init …" About a minute ago Up About a minute (healthy) 3012/tcp, 0.0.0.0:8000->80/tcp, :::8000->80/tcp bitwarden-bitwarden-1 You can now access the Bitwarden web dashboard on the server’s IP address and port 8000. But you will not be able to create an account with Bitwarden unless you have access to the site using HTTPS. Step 4 – Secure Bitwarden with Trusted Certificates. Install Nginx webserver for reverse proxy ##On RHEL/CentOS/Rocky Linux 8 sudo yum install nginx ##On Debian/Ubuntu sudo apt install nginx For this instance I am using a Rhel-based system, I will create a conf file at /etc/nginx/conf.d/bitwarden.conf sudo vim /etc/nginx/conf.d/bitwarden.conf In the file, add the content below for VirtualHost replacing your domain name appropriately server listen 80 default_server; listen [::]:80 default_server; server_name bitwarden.example.com; root /usr/share/nginx/html; # Load configuration files for the default server block. include /etc/nginx/default.d/*.conf; location / proxy_pass http://localhost:8000/; index index.html index.htm; error_page 404 /404.html; location = /40x.html error_page 500 502 503 504 /50x.html; location = /50x.html Grant Nginx privileges to the created file above. # CentOS / RHEL / Fedora sudo chown nginx:nginx /etc/nginx/conf.d/bitwarden.conf sudo chmod 755 /etc/nginx/conf.d/bitwarden.conf # Debian / Ubuntu sudo chown www-data:www-data /etc/nginx/conf.d/bitwarden.conf sudo chmod 755 /etc/nginx/conf.d/bitwarden.conf Start the Nginx web server. sudo systemctl start nginx sudo systemctl enable nginx In case Nginx fails to start, remove the server part in the /etc/nginx/nginx.conf file. In this guide, I will demonstrate two ways to install trusted certificates on your Linux system. The main aim of this step is to add HTTPS access to the BItwarden site. Using Let’s encrypt(Public IPs/FQDN) Using a self-signed Certificate(Private IPs) 4.a – Using Let’s Encrypt SSL Since we need to access the web via HTTPS, we are required to generate SSL certificates. Let’s Encrypt is used to issue trusted SSL certificates free for any FQDN. Install Certbot as below: ##On RHEL 8/CentOS 8/Rocky Linux 8/Fedora sudo dnf install https://dl.fedoraproject.org/pub/epel/epel-release-latest-8.noarch.rpm sudo dnf install certbot python3-certbot-nginx ##On Debian/Ubuntu sudo apt install certbot python3-certbot-nginx Install the SSL certificates for your domain name sudo certbot --nginx Proceed as below Saving debug log to /var/log/letsencrypt/letsencrypt.log Enter email address (used for urgent renewal and security notices) (Enter 'c' to cancel): Enter a valid Email address here - - - - - - - - - - - - - - - - - - - - - - - - - - - - - - - - - - - - - - - -
Please read the Terms of Service at https://letsencrypt.org/documents/LE-SA-v1.2-November-15-2017.pdf. You must agree in order to register with the ACME server. Do you agree? - - - - - - - - - - - - - - - - - - - - - - - - - - - - - - - - - - - - - - - - (Y)es/(N)o: y - - - - - - - - - - - - - - - - - - - - - - - - - - - - - - - - - - - - - - - - Would you be willing, once your first certificate is successfully issued, to share your email address with the Electronic Frontier Foundation, a founding partner of the Let's Encrypt project and the non-profit organization that develops Certbot? We'd like to send you email about our work encrypting the web, EFF news, campaigns, and ways to support digital freedom. - - - - - - - - - - - - - - - - - - - - - - - - - - - - - - - - - - - - - - - - (Y)es/(N)o: y Account registered. Which names would you like to activate HTTPS for? - - - - - - - - - - - - - - - - - - - - - - - - - - - - - - - - - - - - - - - - 1: bitwarden.example.com - - - - - - - - - - - - - - - - - - - - - - - - - - - - - - - - - - - - - - - - Select the appropriate numbers separated by commas and/or spaces, or leave input blank to select all options shown (Enter 'c' to cancel): 1 Requesting a certificate for bitwarden.example.com Performing the following challenges: http-01 challenge for bitwarden.example.com Waiting for verification... Cleaning up challenges Deploying Certificate to VirtualHost /etc/nginx/conf.d/bitwarden.conf Redirecting all traffic on port 80 to ssl in /etc/nginx/conf.d/bitwarden.conf Successfully received certificate. Certificate is saved at: a2enmod ssl /etc/letsencrypt/live/bitwarden.example.com/fullchain.pem Key is saved at: /etc/letsencrypt/live/bitwarden.example.com/privkey.pem This certificate expires on 2022-01-09. These files will be updated when the certificate renews. Certbot has set up a scheduled task to automatically renew this certificate in the background. - - - - - - - - - - - - - - - - - - - - - - - - - - - - - - - - - - - - - - - - If you like Certbot, please consider supporting our work by: * Donating to ISRG / Let's Encrypt: https://letsencrypt.org/donate * Donating to EFF: https://eff.org/donate-le - - - - - - - - - - - - - - - - - - - - - - - - - - - - - - - - - - - - - - - - Now your configuration file at /etc/nginx/conf.d/bitwarden.conf will have the SSL certificates as below. ........... server listen 443 ssl http2 default_server; listen [::]:443 ssl http2 default_server; server_name _; root /usr/share/nginx/html; ssl_certificate "/etc/letsencrypt/live/bitwarden.example.com/fullchain.pem"; ssl_certificate_key "/etc/letsencrypt/live/bitwarden.example.com/privkey.pem"; ssl_session_cache shared:SSL:1m; ssl_session_timeout 10m; ssl_ciphers PROFILE=SYSTEM; ssl_prefer_server_ciphers on; # Load configuration files for the default server block. include /etc/nginx/default.d/*.conf; location / proxy_pass http://localhost:8000/; index index.html index.htm; error_page 404 /404.html; location = /40x.html error_page 500 502 503 504 /50x.html; location = /50x.html 4.b – Using a Self-signed Certificate Another alternative for those who do not have a fully qualified domain name is to secure SSL certificates using self-signed certificates. Ensure that OpenSSL is installed on your system. Then proceed and create this config file for the certificates vim bitwarden_ssl.conf In the file, add the below information. [req] default_bits = 2048 default_keyfile = bitwarden_ssl.key distinguished_name = req_distinguished_name req_extensions = req_ext x509_extensions = v3_ca [req_distinguished_name] countryName = Country Name (2 letter code)
countryName_default = KE stateOrProvinceName = State or Province Name (full name) stateOrProvinceName_default = Nairobi localityName = Locality Name (eg, city) localityName_default = Nairobi organizationName = Organization Name (eg, company) organizationName_default = Bitwarden organizationalUnitName = organizationalunit organizationalUnitName_default = Development commonName = Common Name (e.g. server FQDN or YOUR name) commonName_default = Your_IP-Address commonName_max = 64 [req_ext] subjectAltName = @alt_names [v3_ca] subjectAltName = @alt_names [alt_names] DNS.1 = localhost DNS.2 = Your_IP-Address Now generate the certificates from the config file as below. openssl req -x509 -nodes -days 365 -newkey rsa:2048 -keyout bitwarden_ssl.key -out bitwarden_ssl.crt -config bitwarden_ssl.conf Press enter till the end. Next copy the generated files to /etc/ssl/certs directory as shown. sudo cp bitwarden_ssl.crt /etc/ssl/certs/bitwarden_ssl.crt sudo mkdir -p /etc/ssl/private/ sudo cp bitwarden_ssl.key /etc/ssl/private/bitwarden_ssl.key With this command, your private key and signed certificate (.crt) will be saved in the /etc/ssl/certs/ directory. Now copy these certificate paths to your Nginx conf as shown sudo vim /etc/nginx/conf.d/bitwarden.conf You will require to add them to Nginx as below. server listen 443 ssl http2 default_server; listen [::]:443 ssl http2 default_server; server_name Your IP_Address; root /usr/share/nginx/html; ssl_certificate /etc/ssl/certs/bitwarden_ssl.crt; ssl_certificate_key /etc/ssl/private/bitwarden_ssl.key; ssl_protocols TLSv1.2 TLSv1.1 TLSv1; # Load configuration files for the default server block. include /etc/nginx/default.d/*.conf; location / proxy_pass http://localhost:8000/; index index.html index.htm; error_page 404 /404.html; location = /40x.html error_page 500 502 503 504 /50x.html; location = /50x.html Allow HTTP and HTTPS through the firewall if you are using firewalld. sudo firewall-cmd --add-service=http --permanent sudo firewall-cmd --add-service=https --permanent sudo firewall-cmd --reload Reload the Nginx service. sudo systemctl restart nginx Step 5 – Access the Bitwarden Web Interface Now you can access the Bitwarden Web interface using the URL https://biwarden.example.com or https://IP_Address (for those using self-signed certificates) If you see this page, Bitwarden is running well. The first step is to create an account, do so by clicking on Create account on the login page displayed. A new window will appear where you are required to fill in the details. Fill each field appropriately and remember to use a strong master password. You will then be redirected to the login screen, log in with the set credentials, and access this web vault. Now your Bitwarden installation is complete successfully! Step 6 – Disable Anonymous User Sign Up Now that Bitwarden has been installed, we need to make it more secure by disabling user registration. Stop the running Bitwarden instance. docker-compose down Navigate to the file you created the Bitwarden YAML file: cd ~/bitwarden Edit the file and set SIGNUPS_ALLOWED=false as below. vim docker-compose.yml Edit the file as below: # docker-compose.yml version: '3' services: bitwarden: image: bitwardenrs/server restart: always ports: - 8000:80 volumes: - ./bw-data:/data environment: WEBSOCKET_ENABLED: 'true' # Required to use websockets SIGNUPS_ALLOWED: 'false' # set to false to disable signups Now start a new Bitwarden instance with SIGNUPS_ALLOWED set to false as below. docker-compose up -d After this, trying to create a new account will result in the below error.
Step 7 – Use Bitwarden Self-Hosted Password Manager Now access the Bitwarden Web dashboard using the credentials created. There are a couple of activities you can do. Navigate to the tools window, here you can generate unique passwords, import and export data to the vault, check reports for exposed, weak, reused passwords e.t.c Under the settings tab, you can change credentials for your master account, set the vault timeout, whether to lock or logout as a security enhancement You can also enable a two-factor authenticator for Bitwarden by navigating to Two-step Login Congratulations! We have successfully walked through how to set up Bitwarden Self-Hosted Password Manager using Docker Container. You can now manage your passwords using Bitwarden.
0 notes