#Duplicate Photos Remover Software
Explore tagged Tumblr posts
Visit Tumblr Blog
Explore Tumblr blogs with no restrictions, modern design and the best experience.
Last Seen Tumblr Blogs


Fun Fact
The “We are the 99%” Tumblr blog became the slogan for the Occupy Wall Street movement.
Note
Since you don't see many edits here, and i am a dumbass in editing, could you make a tutorial on it? Like: what apps should we use, what should or shouldn't do, devices, etc. Since i personally worship your editing prowess, i couldn't help myself but ask for your guidance sensei. 🙇♀️
I don't use a "special device" to make my edits, just a computer which can run a videoediting software and Wallpaper Engine correctly (in my case it's an Apple Mac Pro 4,1 from 2009 with upgraded RAM and GPU, and also with Windows 10 installed on it, but that's not important). My server pc build out of my spare parts, and it's serves as a network bridge, and a file storge (like a NAS, or something) to store my personal files, like the assets for the edits on HPP. The way I make my edits, is a different story. I like to put the charaters in different scenarios to make the edit more enjoyable. I usually chose one image from my pre-granarated ones, or I use (if i see a, as i call an edit "suspicious" image here on Tumblr or X) an image from my "Likes", or if I can't find any which is good for the scanario in my head I generate one using PixAI's Ebora Pony XL AI model. Than if I have an image, I put together a static version of the edit in Paint.NET (PaintdotNET). Here I cut down the unnecessary and the broken (weirdly generated hands, .etc) parts of the image, and I remove the background if I'd like to use a different one. Than I chose a stethoscope png what are suitable for the edit, but I recently using the hand with stethoscope one which you can see in my recent edits. I also make some barely visble changes to the main image and the stething image. If it's done, and looks good I save them (the base image, the background, and the steting png separately) in a folder. After that it's time to "animate" the edit, which is just using the Wallpaper Engine's built in Shake effect, if that part is done, I record the animated soundless edit using OBS, which is usually a 5-6 minutes raw mp4 file. Than I put the raw recording into the video editor which is my case is the Wondershare Filmora X. I chose one of the heartbeat and bearthing audios from my server (if it's needed I modify it a bit in Audacity), and speed them up to mach with the animation. I make the breathing way quieter to have the heartbeat in focus, also i duplicate the hb sound to make a stereo effect, which means the I make the left side a bit louder and add more bass to it than the right side, which make a really good heart pulse effect (ROLL CREDITS). Also in here I add some video effects, cut down the unnecessary parts, I cut down the video to 2 minutes to become uploadable for X, than it's time to export it. After I exported the final edit, i check it for mistakes and I fix them if i find any, and the fixed version gonna be uploaded to Tumblr and X. This whole process is 2+ hours usually, but it's could be more for longer and more complex edits. But you doesn't need to follow my way to make edits, if you ever used a photo editor and a video editor before, and you know how put a transparent png on an image, and a greenscreen video on another one, you good to go. There is a lot of ways you can make an edit, so you can chose one which are suitable for you. If you still need help, you can join the Cardio Editor's Hub, there are lot of other people who gladly gives you some tips and tricks. Good luck, have fun! :D
10 notes
·
View notes
Text
How do I manage to cite thousands of photos?

I have officially passed 1,000 posts cited on this blog! That's 1000 posts of riots, exercises, mildly disgruntled guys in balaclavas, whatever.
If you were wondering if I do all the citing myself, you'd be correct! Every citation has been agonizingly researched by me. Is it a waste of time? Definitely. But I'm too far in to stop now...
However, it's not all by hand. I'm a software developer by trade, so I did make something to help with citation. Using the Tumblr API, these are the tools I made to make the process just a bit less painful!

You may have noticed all of my posts follow a certain format. Well, this is why! The citations view brings up my most recent unattributed post for me to add a citation to. Then, I can search multiple reverse image websites to find the source!
Google Lens is usually best for most things (even Russian pictures on VK and official military websites). TinEye is great for photos that are heavily cropped, or are stock, since they're sponsored by Adobe and Alamy. Everything else, including Yandex, kind of sucks.
I can also create new posts using this tool, which you've probably seen recently:

Throughout it all I've developed an auto tagging system that picks up on keywords inside the posts I write. This list goes on and on! Who knew there were so many special forces with three letter acronyms...

BRI SEK AOS KSK BAC B2R CDI DSI СБУ DSU BMD KSM SAS JTF! Which ones can you name?
You may have seen me delete posts that you liked. That was the job of the duplicate remover, which helps me find and delete identical posts. Even I forget what I've reblogged...

Of course, I have to fetch all 6000 images first and compare them using a unique "perceptual hash", but... it's worth it!

Through all my editing, posting, sorting, and loading, I need to keep an eye on the Tumblr API limits. I can actually reach them with the amount of posts I'm making...

And that's pretty much it! I probably won't release the tool since I doubt anyone would actually want to waste time doing this, but I'm pretty proud of it.
I might make a post later about the things I've found, but here are some fun facts:
France and Germany make up almost half of my entire list. For reference, the USA is about 40!
137 posts are marked with #needs-attribution, or about one in ten. 14 are under #needs-more-info. The sources for these are lost to time :(
There's a limit of 1000 likes per day. I've reached it...
There's a limit of 1000 posts in the queue, which I've pretty much been at since I started this blog. However, my current "cited" backlog is about 10 days long at 25 posts per day.
I still have about 3500 posts left to go before everything's done...
Thanks for sticking with me as I add summaries to posts that most people would have probably liked more if it was just the picture :^)


Maybe my captions are making things... too real?
18 notes
·
View notes
Text
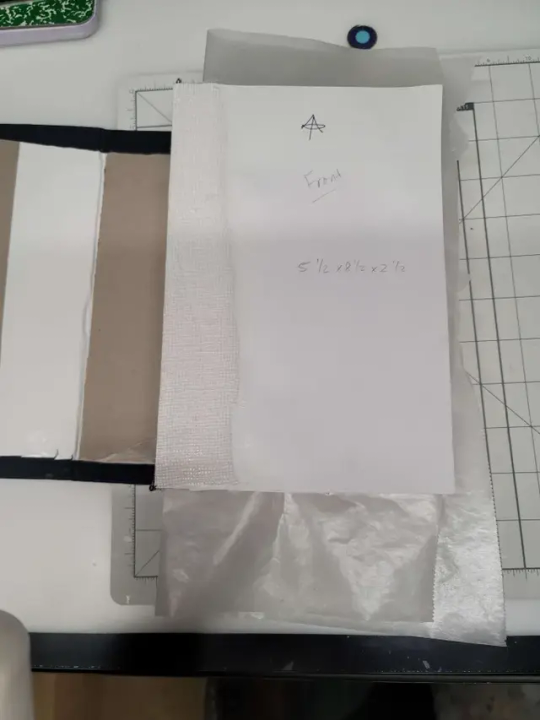
Covers Bookbinding for beginners by a beginner- The Home Stretch
*drinks half a gallon of coffee*
COVERS!
You've gotten your typeset done for the fic, you've battled the demon that is your printer, folded pages, stitched pages, glued pages, glued end pages, and end bands. Made the cover, covered the cover in potentially homemade book cloth.
Now it's time to design a cover.
It's time to make this thing into a fully functioning book and slide it on your shelf and have a nice bout of "Laying on the Floor while Questioning the Human Condition (TM)".
There are a few options.
It depends on what you want.
I can only take you so far with Cricut/vinyl applications. But I researched enough to maybe, MAYBE give you the run down on at least how to get your cover from Canva to the software to cut out your vinyl. I'll start there since this is what I know the least.
Open up your version of Canva.
Make a document, I've seen some fanbinders make all this in the cricut software but I can only smile and nod along. But for me- this is the best I've figured:

go to the search bar and type in book cover (or use the drop down menu) click on a random template.
Fiddle and fart your way into a design you like. Text and Font Options are available in drop down menus and find some designs that are "Easy to Weed" which I understand as "Getting rid of all the stuff that's not going on the cover".
For Example:

Do you like it? It took me 40 seconds, I'm very proud of it. But this isn't to impress you really I just need to show you how to save your file so you can make the leap from one software application to the next.
Hit "Share", Hit "Download", File Type- Hit the down arrow, Hit "PNG" I missed this for the first few times--- BUT!

Click the "Transparent Background"
If you're doing more than one colour Vinyl you're going to duplicate the page that is located right next to the lock icon above the document. Hit that. Delete the stuff that you want to be different colours. Otherwise it will just cut everything out as one colour and I've seen some vinyl covers that get damn fancy.
You can also build a title cover just measure the spine and height of your spine and rotate your text to horizontal if you please.
Now for how I do mine. I use Printable Iron On Vinyl. Keynote there is a difference, there is stuff for light fabrics, and stuff for dark. Choose for what your primary book cloth will be but the paper itself will be white.
Make your design.
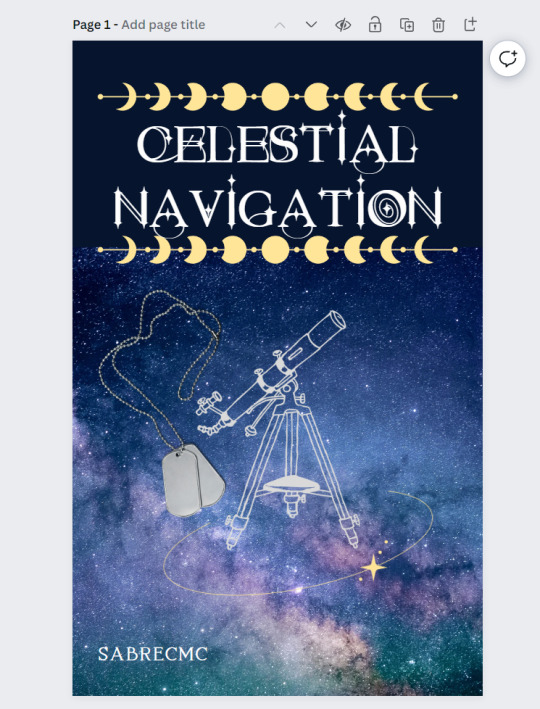
I have 3 different covers for Celestial Navigation by Sabrecmc just because of how LARGE the fic itself is. I had to split the text block up for ease of handling.
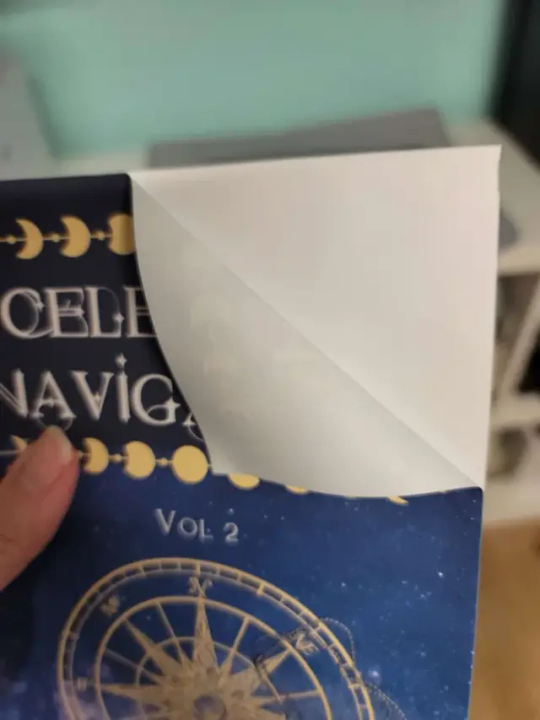
I saved as a PNG, and loaded up my fancy printable vinyl into my printer and went through the software for printing, I had to do some fiddling but for my purposes I had to get the whole cover in the right size on the page- it took some fiddling yours might be simpler it might be more complex. But once I got it printed I trimmed off the white and was left with a peel-able rather velvety feeling thing.
Remove the backing. Get the iron on and go low and slow with the provided barrier material to prevent melting and damage to the print you've just done.
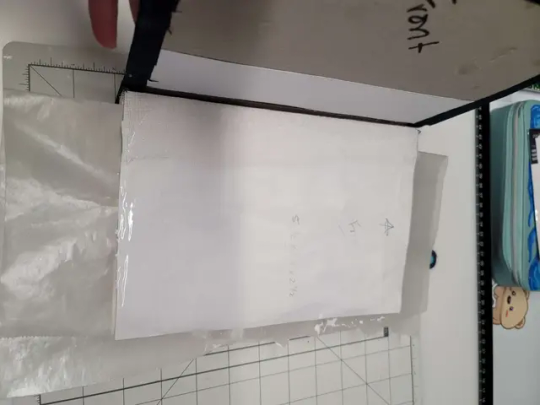
I made spines as well and made an 11 x 8.5 (Or brochure template)

And lined up my spines accordingly as to not waste materials. There will be grids that pop up automatically to let you know if things line up.
Print them out on the "highest quality" out put for your photo software.
It peels like a sticker. It may take a bit to get it going.

Line it up as nicely as you can on the cover (double check on the still exposed board).

There is a protective sheet that comes with it USE IT. Set your iron to a low heat and move it around frequently.
If you're in a relatively humid area (I live in a coastal town so the humidity is pretty high all year). Have a heavy book to squish your covers down with to try and get out any bends that may happen post ironing (also why we want low and slow).
Leave to cool.
Now you have a text block and a cover.
For all intents and purposes for my demonstration I'm leaving the spine off and am redoing everything with this fic from the ground up. There are aspects and mistakes that I have made that have irked my brain. So I will be leaving the spines off for this round. This is the learning curve and since a lot have things have clicked into place since beginning this series that have given me the "AH HA! CLARITY!" moment. I have completely reworked EVERYTHING in my text block of Celestial Navigation. Plus I've a perfectionist issue that is a lot milder than what it was.
But these two text blocks will work as my "Ground Zero" and will be the books I compare all potential future binds too.
As a note that I said in the beginning of this endeavor:
THIS IS FOR PERSONAL USE ONLY. FOR THE LOVE OF FUCK DO NOT SELL WORK THAT DOES NOT BELONG TO YOU!!!! YOU HAVE ASKED PERMISSION (I dearly hope) TO DO THIS DO NOT BREAK TRUST WITH THE AUTHOR.
IF You want to offer a copy to the author- GO FOR IT. Close friend that is showing interest in the fic?? Sure ok.
But if you sell it for monetary gain? I hope you stub your toe, and just before it finally heals you stub your toe again and may all your breakfast cereal turn to slugs.
DO NOT BE A DICK. I am writing this whole 'How To' Series as an experiment of Good Faith that you, the potential binder, will do right by the community and not compound an issue that has been cropping up. Etsy sellers, and this horrible Facebook community that will steal other's typesets, and begin selling them.
Like I said- this is a breech in Fair Use.
Now with that lecture, again, out of the way lets settle the rest of this series.
You will need:
Glue
Book Press
glue brush
Wax Paper.
Your Cover.
Your Text block.
Get your textblock and cover lined up with some wax paper in the middle of the decorative pages (if you're doing them other wise the page you glue down to the cover and the rest of the text block.
Fiddle, fart and dry fit until you are satisfied.
Lay down a layer of glue on the page NOT THE COVER ITSELF.
DON'T BE ME. I FUCKED UP HARDCORE AND DID THE COVER WITH THE GLUE. HOOOOO NELLY LET ME TELL YOU HOW BADLY THAT FUCKED SHIT UP.
HOW BAD WAS IT? BAD. VERY BAD. DON'T BE LIKE ME THAT FIRST ROUND, BE LIKE ME ON THE SECOND ROUND AND PUT GLUE ON THE END PAGE.
Line up the textblock for a final time and then apply the paper to the cover open the textblock and smooth what you just glued down. Flip over and repeat.
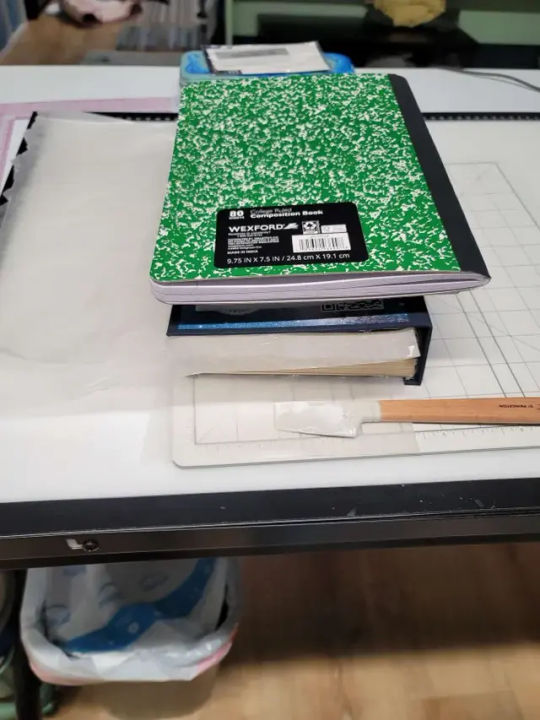
Then add weight to the text block put it back in your press, or if you're like me and have a reprint in the press just throw books atop the block.
Allow glue to cure over night.
Shiver, shudder, and lay on the floor. Your fic is now a book that you can put on your shelf.
Welcome to the wild wild world of bookbinding.
I've been your host trying their best to explain all the things.
I will likely continue this series with "OK SO I LEARNED SOME SHIT ALL THAT SHIT I WROTE BEFORE FEEL FREE TO LISTEN BUT I'VE GOT BETTER SOLUTIONS NOW" time stuff.
#bookbinding#ficbinding#diy#bookbinding for beginners by a beginner#oh my god I'm done for now#I've done it#I wrote out all of the things#and i likely have to go back and FIX some shit cause.... whooooooooooo I learned a LOOOOOOOOOT#mistakes are great learning tools don't get me wrong but hoooooo I learned a lot
45 notes
·
View notes
Note
hi sel! i was wondering if you had any tips or tricks or advice for making fic banners and dividers? yours are always so cohesive! ❤️🧡💛���💙💜
hi nonie! omg i'm so flattered you asked me this 🥺 i’m happy you like them!! admittedly, i am a bit particular about the aesthetics of my fics, but don't really expect anyone to notice 😭
i am by no means a designer! but i'll share a few of the things that have worked for me 🥺 under the cut will be what i do for sizing, editing, and inspo!
SIZING (w x h dimensions, 300 dpi)
› banners: 1280 x 320 for my thicker banners. 1280 x 249 for my thinner ones. i've been preferring the thicker ones lately just because i prefer how it looks on the post compared to my thinner ones (more balanced and stuff!)
› dividers: 1280 x any size you want or 500 x 5. i have both jpg (thinner) and png (thicker) versions for my dividers, mainly because my jpg ones stopped working after a while* 😭 i use the png ones more now because the actual image itself is also bigger in height; there are transparent spaces above the bar itself that allow more control over the space your divider will have between text (please let me know if this is confusing! i'm not sure if i'm explaining it well).
*tumblr can be really selective with the media it allows on the feed and tags, and for some reason, some dividers have been causing that problem 😭 i still haven't figured out what characteristics/factors exactly cause it, but i suspect it might be a combination of size + colours. i usually have to do test posts to make sure it appears!
i'm attaching some screenshots below for reference!


EDITING
› software: photoshop, figma. though i know there are others you can use (e.g., photopea, canva, picsart, etc.)! i just use these because i'm more accustomed to them 🥹
› process:
find a manga panel i like and clean it up (background removers can usually do the trick)
find colours i like and use it as the base for the background
*if using photoshop/figma/photopea: set the manga panel layer as 'multiply'
add the text
*for dividers: i usually just grab from the background of the banner (either i crop a portion of it or colour a long, thin rectangle the same colour)
attaching what my editing board looks like on figma! (i could be more organised but i usually do these things in such a rush i could never be bothered 😭)


› things i consider
for general fic banners: i like to keep a consistent format, which is: character panel + name + identifiable colour because they're the details that i'd like to inform people of first when they stumble upon my post! (some people will put fic titles too, which i don't do bc i can't be bothered to mess with the spacing 😭)
*keeping a consistent format also makes it easier to duplicate elements of your banners into other banners you'll be making! ex. if i'm writing 2 different gojo fics and decide to change what manga panel to use, at least i can always duplicate certain elements (i.e., name text) and find colours along a similar saturation/hue! it makes things a lot quicker and easier.
for event fic banners: i usually pattern it after the event banner itself! so for example, the fics under my 'how to be your loverboy' collab share similar elements (i.e., the wavy edge) to the main event banner. sometimes i use the same colours too (i.e., in's and out's event).
*on dividers not showing up on the dash: i notice it a lot more with light-coloured banners (some neutrals) and super thin ones. to find a way around this, i either change the colour and/or the size OR i'll find a photo that shares the colours i want and crop it to the size that i want (for some reason, it works this way 😭)
INSPO
i usually browse through pinterest for inspo on digital design stuff! i learned a bit of UX/UI so there's also a part of me that's influenced by its trends.
lately, i've been really into gradients! because it's a fun and easy way to make things look clean but not boring, and i think it can evoke the ~vibe of the fic based off the colours you end up choosing!
when i can't think of anything and want to come up with the banner quickly, i'll usually choose a photo/aesthetic i associate with the fic and blur the image until all you see are kind of blobs of colours. they're similar to gradients but have more shapes and require less of your brain power 😭 (i.e., by your passenger seat, and there's something...)
... and that's it!
sorry for this really lengthy post, i hope it's helpful nonie 🥹 let me know if you have any other questions/if anything is unclear!
#sorry it took me a while to answer!! i was gathering what to say 🥹#i hope this was helpful!#ask#rep#anon#reference
8 notes
·
View notes
Note
may I ask how you did this edit? it's a beautiful effect and I'd like to replicate it (only if you don't mind sharing, of course). tumblr.com/ijustdontlikepeople/739905108314324992
Hi anon! Thank you!! I’ve always been very fond of this guy and I am always happy to talk about making stuff!

It’s been a little while so my memory of the process is a little blurry and unfortunately, I cleaned out my project storage last week so I can’t go back layer by layer anymore but here’s the best of my memory
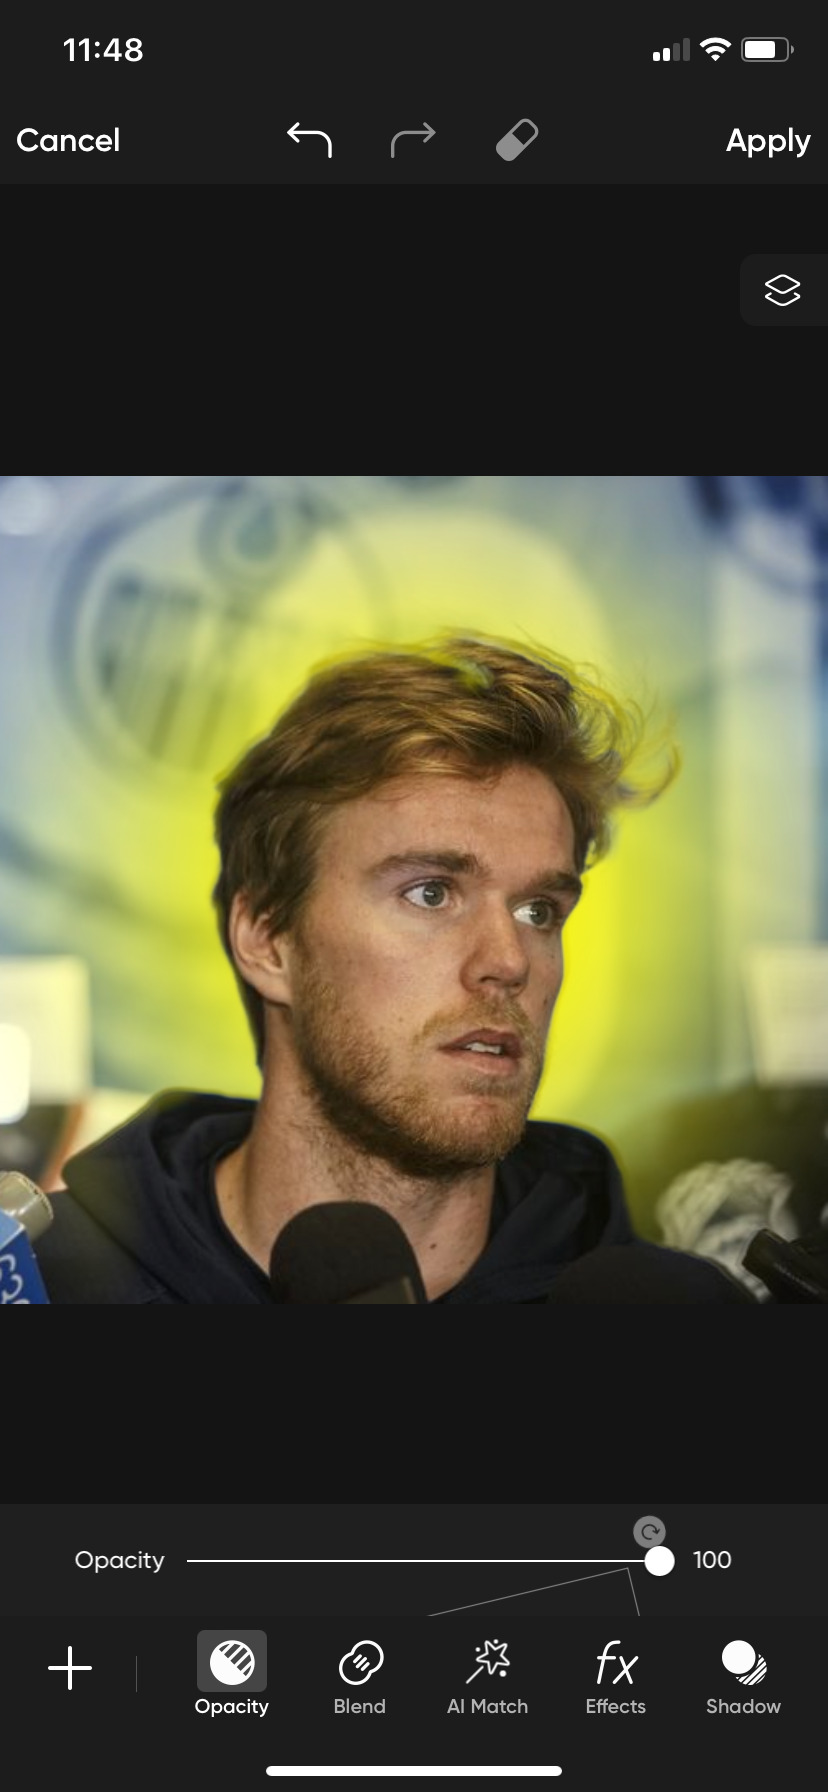
So, it started when I saw this base image and Davo looked very “heavy is the head that wears the crown” and I loved it

I brought it into PicsArt on my phone and cropped it so he was a bit more centered.
I went through the PicsArt stickers for an “orb” or “light burst” this is the one I used

To place the orb behind Davo like I wanted I added in another layer of that original photo, and removed the background until I just had Davo’s head
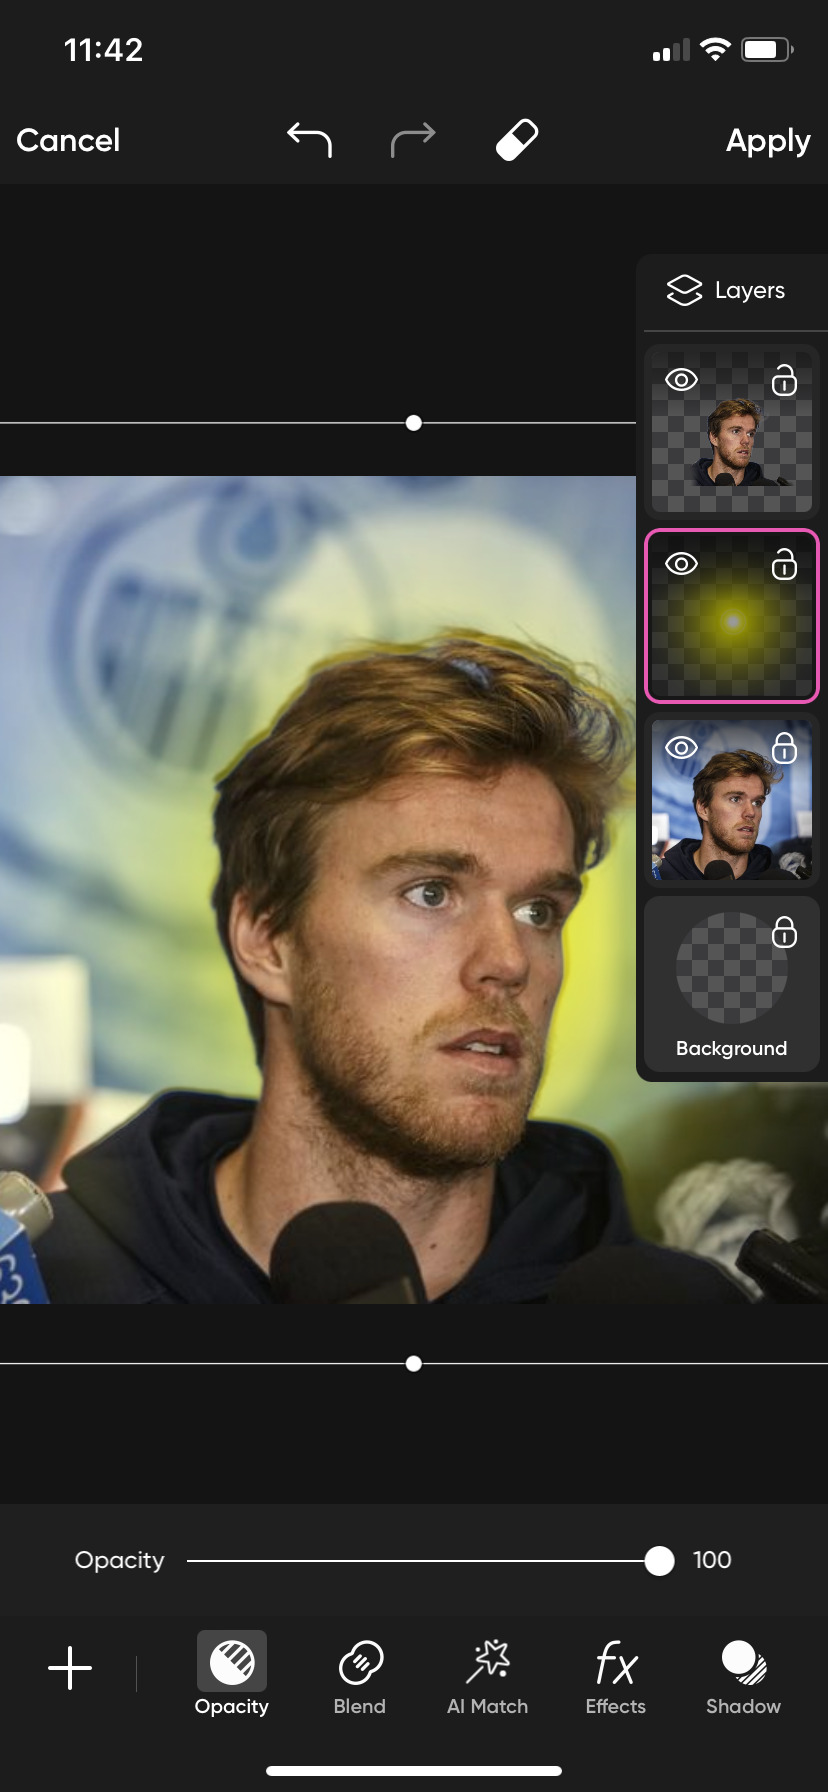
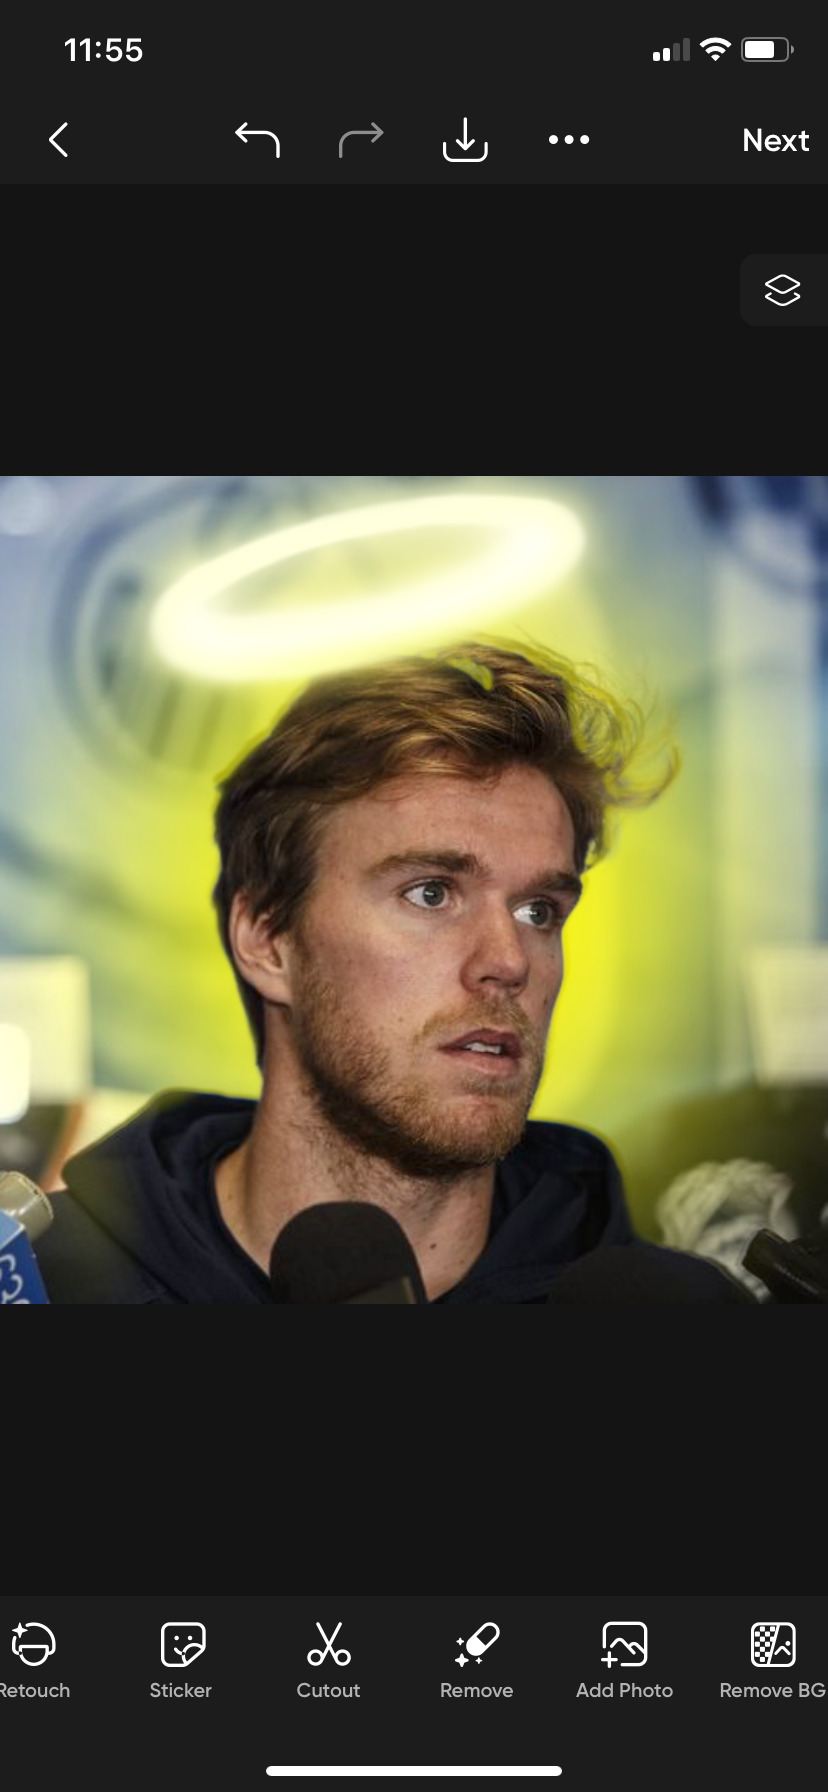
They should be layered original photo, burst, head, like above. Now you can see some spots in his hair and such that the orb light is not visible through so you go back through and erase bits of the Davo head layer. you don’t have to be too too particular about it bc the same photo of him is underneath.
If I remember right, the brightness of the orb wasn’t as high as I wanted so I doubled up on the same sticker
I think I one was centered over his left eye and then the other a few inches above it, and the i placed them both back behind the head layer again

Then added a sticker halo
Then I moved over to lens flare

I picked a light orangey one and placed one over his eye, lining it up with his Iris, then blending it with the light setting and duplicating the the layer and repeating for the other eye. I could have sworn that I gradually erased the edges so it faded into the rest of the photo but the software isn’t giving my an option to erase? So I’m not sure if that’s a change on their side or if I’m misremembering
From there, you apply and then go to FXs. (I may have tinkered with some color levels last time before this step but I don’t remember)
I’m not sure exactly which filters I used. I feel like there were two or three. I am about 80% sure I used these with roughly these specifics.
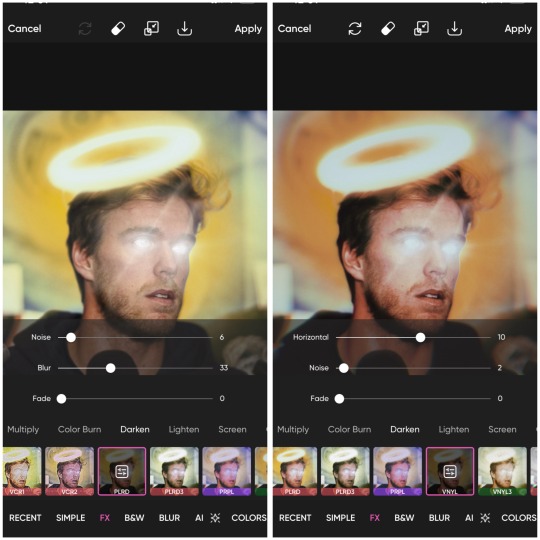
His face is cut out of PLRD which is done first than VINYL

So they didn’t turn out exactly the same but this about the gest. It’ll all be a little different depending on your starting photo. If you ever have any questions or just want to talk about what you’re making, my DMs and ask box are always open! I can give u my discord too if that’s easier! I hope this was a least a bit helpful!!
#actually know that I’m thinking about it maybe it was just one orb#behind his head to be like the light from the halo#that I turned the saturation up really high on#I remember struggling to get the color to stand out#but this time with the two it almost too much color without really do anything extra 🤔#nonnie#Annie.resp#Edit Talk#McJesus Edit Breakdown#it is bothering me that I can’t get them exactly the same#I may mess with this more and update you if I figure it out#but I got do some work now#so gotta break away#his face probably had a bit of blur and color to make it so pink#I wonder if I went back over the first fx with just his face but lighter and less blur than the rest of the photo got the first time hmmmm#nope nope gotta go to work#already spent an hour and half on this lol#I think that’s probably more than the originally making it 😭
3 notes
·
View notes
Note
Your pictures and screenshots are so pretty though! How do you do it? I love your blog btw!!
Thank you!! I really appreciate you saying that! I'm not totally sure if you want a tutorial or not. I can't give you a step-by-step run down, since it's different every time. but I can tell you a few of the things that I do the most often. If you want yours to look a bit like mine!
I editing software I use is Photoshop. But there are many alternatives like Pixlr, and Gimp.
Another big factor that plays into the coloring and depth of an edit is by using Reshade. I couldn't do anything without it.


before and after with just Reshade
Next I hop into Photoshop. and do the basics that I do for every edit. that's what I'll show you today.
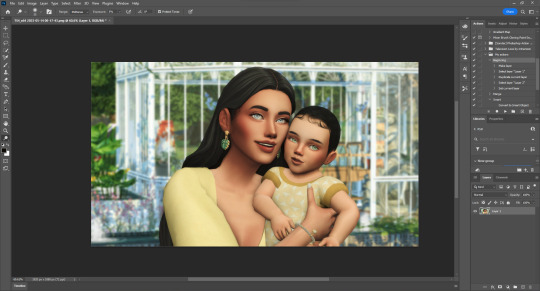
I would first crop it, if that's what I needed to do. but for this one I won't.
Then I would make one duplicate layer of the image, and then a blank layer. That blank layer would be put on multiply.

I use these layers to add shading and highlights. First I use the blank layer use the eyedrop tool (shortcut: I) to select the color in the shadows. and draw them on. Next I use Dodge tool (shortcut: O) to add highlights in the t-zones of their faces, in their eyes, on their jewelry, and in their hair.


before and after
The next steps are one after the other. and Illustrated below with letters. I do it in that order.
A. I merge the layers for the shadow and highlights.
B. This next step uses an action that I made for my editing. but you can replicate it one by one on any editing software. The Action makes my life easier, by editing the photo with settings that I've specified. I sharpen the image with it, adding a few shadows and highlights. You will have to find a specific setting that works with your photos, as each Reshade is different. this is just what works for me.
C. Lastly I put all of my PSD settings into a folder. and then saved all of those settings into my library. So All I have to do now is drag and drop everything over the image. and in most cases, I could be done.
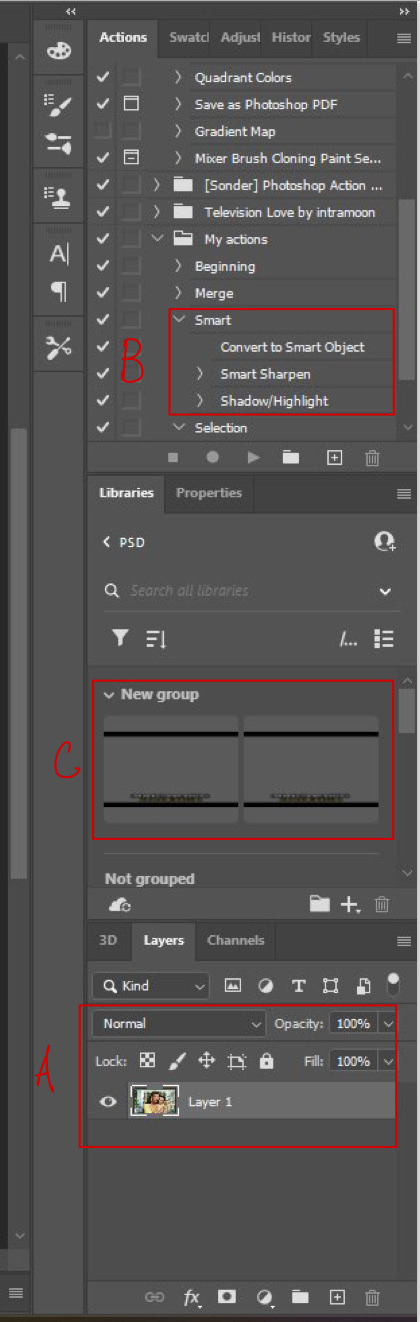
C (continued).

This is how the image looks right after I put the PSD on. As you can see this is how I get the Letterbox effect. and how I write the dialogue. but I remove that for edits, of course.

This is what my layers look like. It's all quite organized, But the editing folder is where the magic really happens.
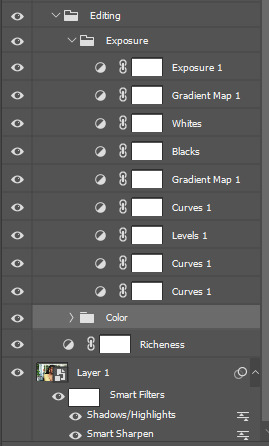
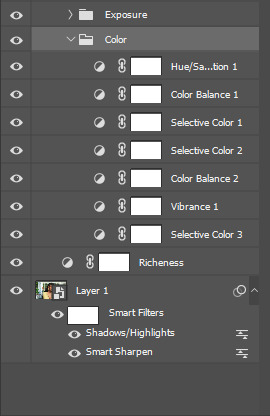
Although the pictures of settings might not help that much. but I can tell you most of these are just subtle changes. but all together they make something great.
So this is the before:


And this is the after
So all of that to say, This is the main coloring and editing for all my edits. but most of them are different. To get the magazine covers, I use the devilliers magazine PSDs for the most part. While they aren't available on Patreon anymore. @lucky-content uploaded them all onto SimsFileShare. You can find them here!
Anyway, that was a lot, but I hope it helps you or someone else! If this wasn't what you meant send me another, and I'll figure it out!
8 notes
·
View notes
Text
Boost Your Organization's Efficiency with Enterprise Digital Asset Management (DAM)
In today's fast-paced digital environment, organizations are inundated with vast volumes of digital content—images, videos, documents, presentations, and more. Managing these assets effectively is no longer a luxury; it’s a necessity. This is where Enterprise Digital Asset Management (DAM) systems come into play. Designed to centralize, organize, and streamline access to digital files, a DAM system significantly enhances productivity, consistency, and collaboration across departments.
What Is Enterprise Digital Asset Management?
Enterprise DAM is a centralized platform that allows businesses to store, organize, retrieve, and distribute digital assets from a single location. These systems go beyond basic cloud storage by offering features such as metadata tagging, version control, user permissions, workflow automation, and integration with other enterprise tools like content management systems (CMS), project management platforms, and marketing software.
For large organizations or those that manage a high volume of digital assets, a robust DAM system Contact us ensures that valuable content is easily accessible, properly cataloged, and secure.
Why Centralization Matters
Imagine a scenario where marketing teams, designers, sales personnel, and external vendors all need access to the same brand assets—logos, product photos, promotional videos, and templates. Without a DAM, these assets are often scattered across different computers, email threads, cloud drives, and hard disks. This leads to lost files, duplicated efforts, and inconsistencies in branding.
With a centralized DAM system:
All assets are stored in one secure, cloud-based hub.
Users can quickly find what they need using powerful search and filter functions.
Version control ensures that everyone uses the most up-to-date materials.
Redundant storage and asset duplication are minimized, saving time and space.
The result? A dramatic improvement in operational efficiency and reduced frustration among teams.
Enhanced Organization with Metadata and Tagging
One of the core features of an enterprise DAM is the ability to add metadata and tags to digital assets. This structure makes it easier to search and categorize assets based on criteria such as type, date, campaign, usage rights, or even color and format.
By enabling advanced search capabilities, metadata transforms what could be a chaotic file archive into an intuitive and user-friendly system. This is particularly useful for large-scale marketing departments, creative agencies, or global brands that manage thousands of assets across various regions and campaigns.
Streamlined Distribution and Collaboration
Digital Asset Management systems are not just about storage—they're about distribution too. With a DAM, sharing files internally or with external stakeholders is seamless. You can:
Generate shareable links with expiry dates and download limits.
Set user permissions to control who can view, download, or edit files.
Integrate DAM systems with platforms like Adobe Creative Cloud, Microsoft Office, and CMS tools to embed assets directly into your workflows.
This level of integration and control reduces time spent on manual tasks such as emailing files, searching through folders, or verifying asset versions.
Brand Consistency and Governance
For organizations with multiple departments or global teams, maintaining brand consistency is a critical challenge. A DAM system acts as a single source of truth Contact us for brand assets. By centralizing approved files—such as logos, font kits, brand guidelines, and media templates—teams are empowered to create consistent, on-brand content across all touchpoints.
Moreover, governance features ensure that expired, unapproved, or outdated assets are automatically flagged or removed, reducing the risk of miscommunication or off-brand messaging.
Improved Workflow Efficiency
Enterprise DAM solutions often include workflow automation tools that streamline the creation, approval, and publishing of digital content. For example:
Designers can upload drafts directly to the DAM for review.
Managers receive automatic notifications for approval.
Approved assets are instantly available to teams for use or publication.
This kind of workflow efficiency accelerates campaign delivery, enhances team collaboration, and frees up time for creative and strategic work rather than administrative tasks.
Scalability and Security
As your organization grows, so does your digital asset library. Enterprise DAM systems are built to scale with your needs, offering storage for millions of assets without compromising speed or usability.
Security is another key benefit. With robust access controls, encryption, backup options, and audit trails, DAM systems protect your digital assets from unauthorized access, accidental deletion, or data breaches.
Measurable ROI and Business Impact
Implementing an enterprise DAM is not just a technical upgrade—it’s a strategic investment. The benefits translate into measurable returns:
Reduced time spent searching for assets (up to 30% according to some studies).
Faster campaign rollouts thanks to automated workflows.
Lower asset production costs due to reuse and repurposing of existing materials.
Improved compliance and risk management through access controls and audit logs.
When digital asset management is optimized, your organization can move faster, operate more efficiently, and deliver better experiences to customers and stakeholders.
Conclusion
Enterprise Digital Asset Management (DAM) is a game-changer for organizations looking to centralize, organize, and optimize their digital content. By bringing all your assets under one intelligent system, you not only improve efficiency but also empower your teams to collaborate better, stay on-brand, and scale content operations with confidence.
Whether you're a marketing team managing hundreds of campaigns or a global enterprise navigating complex media workflows, an enterprise DAM system provides the foundation for smarter, faster, and more secure digital asset management.
1 note
·
View note
Text
Enhancing Image Quality with Photoshop
Enhancing Images With Photoshop: Common Queries Answered
1. How to enhance images in Photoshop?
To enhance images in Photoshop, use the following steps: 1. Open the image. 2. Adjust brightness/contrast via Image > Adjustments. 3. Use the Levels or Curves tools for total adjustments. 4. Apply sharpening filters (Filter > Sharpen). 5. Use the Vibrance or Hue/Saturation adjustments for color enhancement. 6. Crop or straighten as needed. 7. Save your edited image.
2. How to enhance photo quality?
To enhance photo quality, use photo editing software to adjust brightness, contrast, and saturation. Apply sharpening filters to improve clarity, and use noise reduction tools to minimize graininess. Crop to improve composition and remove distractions. For higher resolution, consider using interpolation techniques. Additionally, shooting in good lighting conditions and using a higher-quality camera can significantly improve photo quality.
3. Can Photoshop auto enhance photos?
Yes, Photoshop has an "Auto" feature under the "Image" menu that can automatically enhance photos by adjusting levels, contrast, and colors. Additionally, Adobe offers a feature called "Camera Raw," which includes an "Auto" button for quick adjustments. While these features can improve images, results may vary, and manual editing is often preferred for more control.
4. How do you enhance a blurry picture in Photoshop?
To enhance a blurry picture in Photoshop, use the "Filter" menu and select "Sharpen" followed by "Shake Reduction" for overall improvement. You can also apply "Unsharp Mask" or "Smart Sharpen" for more control. Adjust the sliders to achieve the desired sharpness. Always work on a duplicate layer to preserve the original image. Save your work afterward.
5. What's new in Photoshop 2024?
Photoshop 2024 introduces AI-powered features like Generative Fill and enhanced object selection, improving creative workflows. The new “Quick Actions” panel simplifies tasks such as background removal and skin smoothing. Additional improvements include a streamlined interface, better performance, and enhanced collaboration tools for easier sharing and feedback. The update also offers expanded support for new file formats and plugins.

Visit: VS Website See: VS Portfolio
0 notes
Text

10 Easy Photoshop Tips for Beginners to Edit Like an Expert
Adobe Photoshop is one of the most powerful tools available for digital artists, photographers, and designers. But when you open it for the first time, it can be overwhelming. With so many tools, panels, and features, where should a beginner even begin? Fortunately, you don’t need to know everything at once. By mastering just a few core techniques, you can significantly improve your editing skills and grow more comfortable using the software. In this post, we’ll share 10 easy Photoshop tips that will help beginners get started the right way.
1. Learn to Work with Layers
Layers are the foundation of Photoshop. Every image you edit should involve layers so that you can work on different elements independently. This means you can apply changes, add effects, or move objects without affecting the rest of the design. For instance, you can keep the background on one layer and a subject on another, making it easier to isolate and edit either element. Always name your layers for clarity and group related layers together. Mastering layers early will give you much more control over your edits.
2. Use Adjustment Layers Instead of Direct Edits
One of the best habits to adopt as a beginner is non-destructive editing. Instead of applying changes directly to the image, use adjustment layers for things like brightness, contrast, hue/saturation, or levels. Adjustment layers sit on top of your image, and you can modify or delete them at any time without harming the original image. It’s a safer and more flexible way to experiment with edits.
3. Improve Your Composition with the Crop Tool
Cropping isn’t just about cutting out parts of an image, it’s also a powerful composition tool. Using the crop tool, you can reframe your image to draw more attention to the subject, remove unnecessary space, or follow visual rules like the Rule of Thirds. The crop tool helps create balance and improves the overall visual impact of your photo.
4. Get Comfortable with Keyboard Shortcuts
Photoshop has hundreds of tools and functions, and constantly clicking through menus can slow you down. Learning keyboard shortcuts can dramatically improve your speed and efficiency. For example, ‘Ctrl+Z’ undoes your last action, ‘Ctrl+T’ enables free transform, and pressing ‘B’ selects the brush tool. Even learning just a few shortcuts will save time and make your workflow smoother.
5. Use the Clone Stamp Tool for Precise Retouching
The Clone Stamp Tool is incredibly useful for duplicating or removing parts of an image. It allows you to sample one area of an image and paint that sample over another area. This is especially handy for removing blemishes, dust, or objects from photos. The key is to sample from a nearby, similar area for the most natural results.
6. Play Around with Blending Modes
Blending modes let you change how layers interact with each other, and they can add depth, texture, or drama to your work. Try setting a text layer to "Overlay" or a duplicate image layer to "Multiply" to see how the result changes. Blending modes are creative tools that give your images a unique touch.
7. Heal with the Healing Brush Tool
While the Clone Stamp Tool copies pixels exactly, the Healing Brush Tool blends them more naturally with the surrounding area. It’s a fantastic tool for touching up skin, removing small objects, or fixing minor imperfections without obvious signs of editing. It blends tone and texture for seamless results.
8. Save Your Work Regularly
Photoshop is powerful, but it’s also memory-intensive, which means it can occasionally crash. To avoid losing progress, save your work regularly by pressing ‘Ctrl+S’ (or ‘Cmd+S’ on Mac). You can also use "Save As" to create multiple versions of your project as it evolves.
9. Customize Your Workspace to Fit Your Needs
Photoshop allows you to customize your layout, so you can create a workspace that suits your editing style. You can rearrange panels, open specific tools, and even save your custom workspace for future sessions. Having a familiar layout improves comfort and efficiency, especially as you begin using Photoshop more often.
10. Always Use Non-Destructive Editing Methods
Finally, one of the most important tips is to avoid editing your original image directly. Always duplicate your layers or use layer masks when making changes. This non-destructive method keeps your original content safe and allows you to make adjustments at any point in the process without starting over.
Conclusion
Photoshop is a deep and powerful program, but you don’t need to master everything at once. By focusing on these 10 beginner-friendly tips, you can start creating better edits and gain confidence with the tools Photoshop offers. Keep practicing, be patient with yourself, and don’t be afraid to experiment, that’s how real progress begins.
#Photoshop tips#Photoshop for beginners#Easy Photoshop tutorials#Photoshop editing tips#Beginner Photoshop guide
0 notes
Text
Apple Certified Experts Recover Data with Precision
Data is more than just files it’s your work, your memories, and your life. When disaster strikes and your data is lost or becomes inaccessible, the last thing you want is guesswork. You need precision, and that’s exactly what Apple Certified Experts deliver. With specialized knowledge, advanced tools, and a deep understanding of Apple’s ecosystem, these professionals are your best chance at restoring your lost data accurately and securely.
The Value of Apple Certification
Not all technicians are created equal. Apple Certified Experts, often referred to as Apple Certified Macintosh Technicians (ACMTs), undergo extensive training and testing to earn their credentials. Their certification ensures they are proficient in diagnosing and repairing Apple hardware and navigating Apple’s proprietary software systems.
This expertise is critical for data recovery. Apple devices—from iPhones and iPads to MacBooks and iMacs—are uniquely designed with custom components and security features that make data access both secure and complex. Without certified knowledge, an untrained technician may inadvertently cause more harm than good.
Why Apple Data Recovery Requires Specialized Precision
Apple’s security-first design is excellent for protecting users’ privacy but poses challenges when recovering lost data. Here are some reasons why Apple data recovery requires such a high level of precision:
Proprietary File Systems: Apple devices use APFS or HFS+—file systems that require deep technical knowledge to interpret and repair.
Soldered SSDs: Many Macs have soldered storage, meaning standard recovery methods won’t work.
T2/M1/M2 Security Chips: These chips encrypt data at the hardware level. Without the correct credentials and tools, access is virtually impossible.
iCloud Integration: Data may be synced, duplicated, or removed from local storage depending on iCloud settings, complicating recovery efforts.
Apple Certified Experts understand these systems intimately. They use Apple-approved diagnostic tools, follow strict protocols, and maintain up-to-date training on the latest hardware and software updates.
When Precision Matters Most
In data recovery, even a small error can result in permanent loss. That’s why precise recovery isn’t just preferred—it’s essential. Here are some situations where expert accuracy makes all the difference:
Accidentally Deleted Files or Photos
Corrupted macOS or Failed Software Updates
Failed System Restores or iCloud Sync Errors
Liquid Damage or Hardware Malfunction
Encrypted Drives or Forgotten Passwords
With Apple Certified Experts, recovery is handled carefully and methodically to avoid data overwriting, physical damage to components, or file system corruption.
Step-by-Step Recovery with Certified Precision
Here’s how Apple Certified Experts approach data recovery:
1. Detailed Diagnosis
Experts begin by assessing your device to identify what caused the data loss. They check for physical damage, file system issues, or software failures. Every detail matters—this helps form the safest and most effective recovery strategy.
2. Secure Data Imaging
If the storage drive is at risk, a full image of the drive is created. This process clones the data bit-by-bit, allowing recovery attempts to be made on the copy—not the original—preserving the integrity of your device.
3. Advanced File Recovery
Using specialized software, experts scan for recoverable files. They rebuild damaged file systems, repair corrupted files, and extract usable data—even from severely compromised drives.
4. Verification and Restoration
Recovered data is tested for usability and consistency. Once verified, it's transferred to a secure destination—like an external hard drive or encrypted cloud storage.
5. Post-Recovery Support
Experts don’t just recover your files—they help you prevent future loss by setting up automatic backups, optimizing storage, and recommending best practices.
Why Clients Trust Apple Certified Technicians
Here’s what makes Apple Certified Experts stand out:
Precision-Driven Process: Every action is calculated and secure.
Higher Success Rates: Their training ensures fewer mistakes and more recoverable data.
Genuine Apple Tools: They use Apple-authorized software and equipment.
Secure Handling: Your data is protected throughout the process.
Clear Communication: Experts explain the issue, the recovery process, and preventive steps.
How to Choose the Right Apple Data Recovery Expert
If you’re facing data loss, look for:
Apple Certification (ACMT or equivalent)
Positive Reviews and Proven Track Record
Transparent Pricing and Diagnostics
Quick Turnaround Times
Data Privacy Guarantees
Avoid general repair shops or third-party tools that aren’t Apple-specific. The risks of permanent damage or data compromise are too high.
Data loss can be devastating but it doesn’t have to be permanent. With Apple Certified Experts, you get more than just recovery; you get peace of mind knowing that your files are being handled with care, precision, and professionalism.
Whether it’s an accidental deletion or a major system crash, trust the experts who know Apple inside and out. They don’t guess—they recover, restore, and protect your most valuable digital assets with unmatched precision.
Apple Certified Experts recover data with precision because every file matters.
#Data recovery Calgary#macbook pro screen replacement#iPhone Battery Replacement#Iphone Repair#Macbook Repair
0 notes
Text
Price: [price_with_discount] (as of [price_update_date] - Details) [ad_1] Net protector premium mobile security antivirus provides superior security for your Android smartphone or tablet. Now get your mobile devices secured protect your data in your handset with this awesome and secure security software. Providing you the best mobile security for your photos, messages, & memories. Enjoy premier protection against viruses, trojans, ransomware and other malware which can expose your sensitive information or encrypt your data. The Payment Protection feature also provides extra security to your online shopping and banking. Net Protector's Mobile Security Premium offers an "Anti-Theft" feature with a web dashboard that allows you to remotely locate, lock, and wipe your phone, ensuring that any data stored on your device remains inaccessible to others in case it is lost or stolen. It includes essential features such as Full Scan, Fast Scan, Scheduled Scan, Antivirus Updates, Secure QR Scanner, Threats Report, System Info, Secure Payment, App Manager, Vulnerable Apps Detection, Privacy Control, Weak Settings Scan, Motion Alarm, Photo Vault, App Lock, App Usage Tracking, SMS Phishing Protection, Duplicate File Fixer, Privacy Advisor, Malware Scanner, Account Privacy, and Autopilot, along with the ability to recover your device in case of loss or theft, all while ensuring zero impact on battery life. Protects against malicious virus attacks, malware, cyber-attacks, wipers, and other threats by offering robust antivirus, anti-spyware, and anti-hacking features. It is easy to use, automatically detecting and removing viruses to keep your device safe and secure. Visit your "Buyer/Seller message box" within 2 hours of ordering. Registration link and configuration instructions will be available in Buyer/Seller messages under Message Center at "Amazon.in/msg" and your Amazon regd. email Id Net Protector Antivirus Software activation code along with download instructions will be delivered in your registered e-mail address. This software works on devices with India IP addresses only. If your account does not have an email Id on amazon, Please register the same before purchasing. Cash on delivery is not available and this item is non-returnable. [ad_2]
0 notes
Text
Streamlining Your Presence: Tips for Efficient Online Business Listing Management

In today's fast-paced digital environment, online business listing management is essential for maintaining a strong online presence and attracting local customers. At GMB Briefcase, we specialize in helping businesses streamline their online listings to maximize visibility and credibility. Effective online business listing management involves a strategic approach to managing local listings, optimizing Google My Business profiles, leveraging listing management software, and enhancing local search management.
Understanding Local Listing Management
Local listing management is a critical component of online business listing management. It involves ensuring that your business information is accurate and consistent across all local directories, such as Google My Business, Yelp, and Bing Places. Consistency in Name, Address, and Phone Number (NAP) information is vital for improving local SEO and preventing confusion among customers and search engines. By maintaining accurate listings, businesses can enhance their discoverability and build trust with potential customers.
The Role of GMB Listing Management
GMB listing management is pivotal for businesses aiming to dominate local search results. A well-optimized Google My Business profile not only boosts local SEO but also provides a platform for engaging with customers through features like posts, reviews, and Q&A. By actively managing your GMB listing, you can increase foot traffic, foster a strong online reputation, and improve customer engagement.
Leveraging Listing Management Software
Utilizing listing management software can significantly streamline the process of managing multiple listings across various platforms. This software offers centralized management, real-time updates, duplicate listing removal, and analytics to track performance. At GMB Briefcase, we recommend using listing management tools to simplify the process and maximize visibility efficiently. For more information on how listing management software can benefit your business, visit our guide on local listing management software.
Effective Local Search Management
Local search management involves optimizing your online presence to appear prominently in local search results. This includes selecting relevant business categories, ensuring mobile-friendly listings, and maintaining up-to-date information such as business hours and services. By focusing on local search management, businesses can increase their visibility in Google Maps and the Google 3-Pack, thereby attracting more local customers.
Tips for Efficient Management
Here are some key tips for efficient online business listing management:
Claim and Verify Listings: Ensure that you have control over your listings on major platforms like Google My Business and Yelp.
Maintain NAP Consistency: Ensure that your business name, address, and phone number are consistent across all listings.
Use High-Quality Visuals: Add high-quality photos to enhance the appeal of your listings.
Engage with Reviews: Respond promptly to customer reviews to build trust and credibility.
Utilize Analytics: Leverage insights from listing platforms to refine your strategy and optimize listings.
Conclusion
Effective online business listing management is crucial for businesses seeking to enhance their online presence and reputation. By focusing on local listing management, GMB listing management, leveraging listing management software, and optimizing local search management, businesses can significantly improve their visibility, credibility, and customer engagement. At GMB Briefcase, we are committed to helping businesses navigate the complexities of online business listing management to achieve long-term success.
Contact Us
GMB Briefcase
STPI, T 16 - B, MIDC, opp. Garware Stadium, MIDC Industrial Area, Chikalthana, Chhatrapati Sambhajinagar, Maharashtra, 431210, India
+91 98222 98988
https://gmbbriefcase.com/
Find Us Online
Facebook
LinkedIn
Twitter
YouTube Channel
GMB Briefcase On Google Map
youtube
0 notes
Text
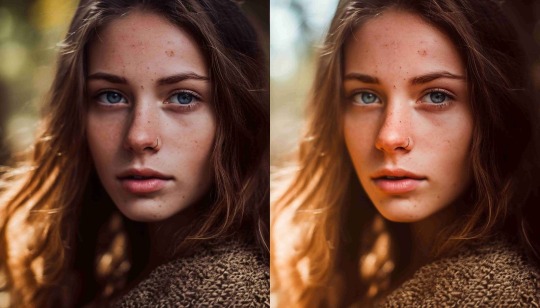
Retouching photos is an essential skill.
Let that sink in. Photo retouching isn't just an option. It's a necessity. Because when you retouch photos: • Imperfections disappear • Aesthetics improve • Images stand out • Your work gets noticed But here's the kicker: Retouching needs to be: → Precise → Subtle It's best when done with: → The right tools → The right techniques It's not just about fixing flaws. It's about enhancing the overall look and feel of the image. 10 steps to retouch photos effectively: 1. Choose Your Software Select a photo editing software that suits your needs. Adobe Photoshop is the industry standard, but options like Lightroom, Snapseed, and Photoshop Express can also work for simpler tasks. 2. Import Your Photo Begin by importing your photo into the chosen software. This can usually be done through an "Import" or "Open" option in the menu. 3. Basic Adjustments Before diving into retouching, make some basic adjustments: - Brightness and Contrast: Use sliders to improve overall lighting. - Crop and Composition: Crop the image to remove unwanted areas and improve framing. 4. Remove Blemishes Use tools designed for blemish removal: - Spot Healing Brush: Quickly removes small imperfections like dust spots - Healing Brush Tool: Allows for more control by sampling pixels from a clean area to cover up flaws. - Clone Stamp Tool: Useful for more complex corrections where you need to duplicate parts of the image. 5. Skin Smoothing To achieve smoother skin textures: - Frequency Separation: This technique separates color and texture layers, allowing you to smooth skin without losing detail. - Smoothing Tools: Many apps offer specific tools for skin smoothing; use them sparingly to avoid an unnatural look. 6. Enhance Features Focus on enhancing specific features: - Eye Retouching: Brighten eyes, remove bags, and enhance color using adjustment layers or local adjustments. - Dodge and Burn: Use this technique to selectively lighten (dodge) or darken (burn) areas of the photo, adding depth and dimension. 7. Color Correction Adjust colors for a more vibrant image: - Curves/Levels Adjustment: Use these tools to manipulate brightness and contrast levels across different tonal ranges. - Saturation/Vibrancy: Increase color intensity carefully to avoid oversaturation. 8. Sharpening Enhance details: - Use sharpening filters (like Smart Sharpen) to bring out details without introducing noise or halos around the edges. 9. Apply Filters and Effects (Optional) You should consider applying filters for stylistic effects, but use them carefully. 10. Save Your Work Once you're satisfied with the retouched image, save it in the desired format (e.g., JPEG, PNG) ensuring you keep a copy of the original file intact for future reference. These steps make your photos look professional and polished.

#photographers on tumblr#original photographers#photography#photographer#cute#girlblogging#beauttiful girls
1 note
·
View note
Text
Complete Guide to Editing Text in Images with PhotoCut
Images are so important in the digital world used for personal use, marketing, or social media. Sometimes, you'll need to change the text that’s within an image, as it may be a typographical error, updating certain information, or giving visuals a new look. Everyone thinks that editing text inside an image requires advanced software skills, and PhotoCut makes it extremely easy for everyone. Be it a business flyer, a social media post, or perhaps even an original photo, it's so simple to make rapid text modifications through PhotoCut. You can create PNGs using PhotoCut to use in your designs. In the following tutorial, we'll present you how to use it, and all its features, and answer some of your most often-asked questions on how to obtain the maximum benefit from PhotoCut.
What is PhotoCut?
PhotoCut is an AI-powered online tool that can help you easily edit images, particularly in terms of text modification. Be it removing the existing text or adding new content, PhotoCut makes the process very easy. Using advanced AI technology, PhotoCut removes the text without leaving any trace, so your image looks clean and professional. With over 1,000 fonts to select from, PhotoCut enables you to duplicate the original font style or produce an entirely new design; it's very versatile when it comes to any image editing job. Crop images according to your needs using PhotoCut.
How to Edit Text in Images Using PhotoCut?
PhotoCut makes editing text in images surprisingly easy, whether you are an amateur or a professional designer. Here's how to alter text in your images:
Step 1: Upload Your Image
Uploading is the first step to upload the picture you intend to edit. You can do this by uploading an image of a photo with words, graphics, or any form of picture where you might need to change the word. You can also generate faces using PhotoCut’s AI and upload it.
Step 2: Use the Object Removal Tool
Once the photo is uploaded, you would then delete any text that exists. PhotoCut's object removal tool is powered by AI, so this means it can easily capture and remove text without distorting the areas around your photo. To do that, you only need to highlight the text you want to delete and let the tool do its magic. You can also generate art using PhotoCut’s AI and remove unwanted objects in the photo.
Step 3: Add New Text
After you remove the old text, you can input your new text. PhotoCut offers numerous fonts with both standard and decorative styles. You can make any size, color, and positioning adjustments so that the font complements the image perfectly. In case you want to duplicate the same font or style used on the original, you just browse the available fonts until you get one that would fit your preference best.
Step 4: Customize the Text
PhotoCut allows you to customize the text in various ways. You can:
Change the font size: Adjust the size to fit the layout of your image.
Modify the font color: Choose a color that complements your image or creates the desired impact.
Arrange text: Move the text in position to fit well into the image's design.
Add text effects: It can also add effects to texts by adding a shadow, bold, or italics to make it attractive for viewing.
Step 5: Save and Download
Once you're satisfied with your changes, you need to download the changed image. PhotoCut allows downloading in high resolution so that you can guarantee a well-presented final piece.
Key Features of PhotoCut
1. Easy-to-Use Interface
PhotoCut is a simple application designed to be user-friendly. Any beginner can easily edit texts in images with no problem at all. It is so easy that no technical knowledge is needed to change it.
2. Advanced AI Technology for Text Removal
PhotoCut is very powerful when using an object removal tool; the removal of text is accomplished using artificial intelligence and precision accuracy that removes text without a trace left on the images. This method will capture the text detected, remove it, and replace it with the background, creating an immaculate picture.
3. Vast Collection of Fonts
Whether you wish to match some font style already used in your image, or you want something entirely different, PhotoCut can offer you over 1,000 fonts to choose from. You're free to experiment with different styles and find out which suits your project's needs best. The tool enables you to adjust the font size, as well as spacing and alignment, to make sure text fits just right within an image.
4. Customizable Text Options
You will not only be allowed to customize the font size of the text by PhotoCut, but the package can let you fully customize the text so it can change colors, dimensions, locations, and more. It would ensure the uniqueness of edited texts through customization.
5. Mobile-Friendly
PhotoCut is available for desktops and mobile devices. It's a convenient way to edit the text in pictures anywhere and anytime. With this software, you can use your computer or smartphone as the platform has been optimized for all devices, making it easy for people on the go.
6. Versatile Image Editing Tool
PhotoCut can fulfill various image editing tasks. From updating marketing visual material, and correcting typos to inserting personalized messages in photos, the tool can do the task. It is best for businesses, content developers, and many other users who wish to alter text in an image within a short span.
Applications of PhotoCut’s Image Text Editing Tool
1. Update Marketing Visuals
The most popular use of PhotoCut is updating marketing images. In place of redesigning a whole brochure or flyer, because you want to change some words, you can easily alter the text in your picture. This is especially handy when you need to update contact information, dates, or promotions.
2. Correct Typos in Images
A small typo in an image can negatively impact your brand’s image. With PhotoCut, you can quickly fix spelling errors or adjust text formatting issues. This helps correct any errors without having to do the whole design again, saving time and ensuring that your visuals are perfect.
3. Add Personal Touches
For personal use, PhotoCut lets you add a custom message, greeting, or note to your images. You can personalize your images to spread love and connect with others whether it's for a birthday card, holiday greeting, or a personal note on a special occasion.
4. Create Social Media Graphics
Social media graphics often require frequent text updates to reflect the latest information, events, or promotions. PhotoCut makes it easy to change text on images for posts, stories, and ads, ensuring your social media presence remains current and engaging. You can also create passport photos with PhotoCut and add your name as text.
Why Choose PhotoCut?
Here are a few reasons why PhotoCut stands out as one of the best tools for editing text in images:
1. User-Friendly
PhotoCut is aimed at every user, skill level included. The navigation is pretty simple, with a straightforward step-by-step process which makes it convenient for editing images in record time.
2. Fast and Efficient
PhotoCut's AI technology lets you remove text and add new content in a fraction of the time it would take with other software. It is all fast, meaning you get to work on several projects without wasting any time.
3. High-Quality Results
You don't have to worry if much editing is done; its high-quality output ensures your final picture will look very professional, indeed.
4. Mobile-Friendly
Since PhotoCut operates on both desktop and mobile devices, you can easily edit your pictures whenever, where you are. Such ease makes it an even handier solution for busier users.
Conclusion
PhotoCut is one of the most powerful simple tools for editing text in pictures. It can be used if you need to update the marketing materials, correct the typo, or add your messages. PhotoCut makes it quick and painless to do so using its AI-powered text removal tool, vast font library, and user-friendly interface. Give it a try today and experience the convenience of seamless text editing for all your image projects!
FAQs
Q1. Is PhotoCut free to use?
Ans. PhotoCut offers a free version with basic features, but you can also get premium features for a paid subscription. The free version is good for the casual user, but the premium is ideal for those who need a bit more functionality.
Q2. Can I use my fonts in PhotoCut?
Ans. PhotoCut provides a lot of fonts today, but uploading custom fonts is not allowed. Still, the choice of over 1,000 fonts should be enough for any design.
Q3. How do I remove the text from an image without damaging the background?
Ans. PhotoCut uses AI-based cutting-edge technology to remove the text from images. It uses AI to identify the text and replace it with a background that blends well with the areas around it so that there is no damage to the original image.
Q4. Can I resize the text in my image?
Ans. Yes, PhotoCut offers an adjustment feature for the size of the text to fit the picture's layout. You can increase the size of the text and even reduce it to whatever fits.
Q5. How do I save the edited image?
Ans. After you are satisfied with the change you have made, click on the "Download" button to save your edited image in high quality.
0 notes
Text
10 Tips For PicsArt Photo Editor That can Help You Use it Like a Pro
PicsArt has emerged as one of the most versatile and user-friendly mobile apps for photography and digital image editing. Whether you’re a content creator, aspiring photographer, or someone who enjoys editing photos for fun, PicsArt offers a vast array of tools to turn ordinary images into extraordinary works of art. With over 500 million downloads globally, its intuitive interface is packed with professional-grade features, making photo editing on your phone seamless and enjoyable.
This guide will walk you through 10 pro tips for mastering PicsArt, showcasing features like image masking, background removal, color correction, and advanced photo editing techniques, to elevate your creative projects.
1. Master the Layering Tool
Layering is one of PicsArt’s most robust features, akin to professional desktop software like Photoshop. With layers, you can stack images, adjust opacity, and apply effects to individual layers, enabling non-destructive editing and image masking for professional results.
Pro Tip: Use the “Add Photo” function to layer images. Adjust opacity or blending modes to merge elements harmoniously.
How to Use Layers:
Tap on “Add Photo” in the menu.
Select the image to layer.
Resize, reposition, and apply effects to each layer independently.
Layering gives you the flexibility to create complex, polished designs, perfect for e-commerce photo editing services and collages.
2. Simplify Background Removal
PicsArt’s Background Remover tool allows you to isolate objects or subjects in an image effortlessly. Whether you’re creating product mockups, removing distractions, or enhancing e-commerce photos, this tool is a game-changer.
Pro Tip: For intricate backgrounds, combine auto-detect with manual touch-ups for precision.
Steps to Remove Backgrounds:
Open your image and go to “Tools” > “Remove Background.”
Use the auto-detect function or manually refine areas with the eraser tool.
Save the cutout as a PNG to maintain transparency.
Effective background removal is crucial for creating professional-quality visuals, especially in product photography for e-commerce.
3. Enhance Images with Color Correction
PicsArt’s Adjust tool allows you to fine-tune your image’s brightness, contrast, saturation, shadows, and highlights, breathing life into dull photos. Proper color correction ensures your visuals look sharp, vibrant, and consistent.
Pro Tip: Adjust individual photos manually rather than applying a universal filter. This ensures a unique and tailored aesthetic.
Steps to Correct Colors:
Open your photo and navigate to “Tools” > “Adjust.”
Use the sliders to tweak brightness, contrast, saturation, sharpness, and tone.
Experiment with small adjustments to achieve professional results.
For ecommerce photo editing, this technique helps showcase products in their true colors, building customer trust.
4. Perfect Edits with the Clone Tool
The Clone Tool in PicsArt is ideal for removing unwanted objects, filling gaps, or duplicating design elements seamlessly. It works by copying pixels from one part of the image and “painting” them over another area.
Pro Tip: Always zoom in for precision and use a smaller brush size for intricate details. Work on a duplicate layer to preserve the original image.
Steps to Use the Clone Tool:
Select the image and go to “Tools” > “Clone.”
Choose a source area, then brush over the section to edit.
From retouching blemishes to creating symmetry, the Clone Tool enhances the quality and professionalism of your photos.
5. Use Magic Effects for Instant Artistry
PicsArt’s Magic Effects can transform your photos into digital paintings, neon art, or glowing masterpieces with just a tap. These effects are perfect for adding a creative touch without diving deep into manual edits.
Pro Tip: Use Magic Effects sparingly in conjunction with manual edits to maintain control over the final look.
How to Use Magic Effects:
Select your photo, tap “Effects,” and choose “Magic.”
Adjust the intensity with the slider for a subtle or dramatic transformation.
6. Create Stunning Collages
Collages are an excellent way to tell a story with your photos. PicsArt’s Collage Tool offers various templates and freeform options, enabling you to combine multiple images creatively.
Pro Tip: Use freeform collages to create asymmetrical designs, adding shadows and frames for a dynamic look.
How to Make a Collage:
Select “Collage” from the home menu.
Choose a grid or freeform layout.
Arrange, resize, and embellish your images for a cohesive design.
7. Add Text and Customize Fonts
PicsArt’s Text Tool allows you to add captions, titles, or creative typography to your images. With a variety of fonts, colors, and effects, you can easily personalize your visuals.
Pro Tip: Blend text into your design by lowering opacity or using blend modes. Add shadows, outlines, or 3D effects for depth.
How to Add Text:
Select the image and tap “Text.”
Customize font, size, and color, then apply effects to match your style.
For e-commerce photos, text overlays can highlight key features or promotional details.
8. Unleash Creativity with the Drawing Tool
PicsArt’s Drawing Tool lets you sketch, doodle, or decorate your photos directly. Whether you’re creating illustrations or adding playful elements, this tool gives you complete creative control.
Pro Tip: Use layers when drawing to experiment without altering the original image.
How to Draw:
Tap on the “Brush” icon.
Choose brush type, size, and opacity.
Start drawing over your image or on a blank canvas.
9. Elevate Photos with Filters and Overlays

PicsArt offers a wide range of filters and overlays to enhance your images. Use them in combination with blending modes and opacity adjustments to achieve unique, artistic effects.
Pro Tip: Don’t rely on a single filter. Experiment with overlays and blend modes to create custom aesthetics that align with your style.
How to Apply Filters and Overlays:
Open your image and tap “Effects.”
Select a filter, then add overlays like textures or patterns.
Adjust blending modes and opacity as needed.
Filters and overlays can establish a mood or add visual interest, especially in promotional or creative projects.
10. Connect with the PicsArt Community
PicsArt’s built-in community is a treasure trove of inspiration and learning. Explore user-created content, save your favorite designs, and discover tutorials to refine your skills.
Pro Tip: Engage with the community by sharing your work, following creators, and participating in challenges for fresh ideas.
How to Explore the Community:
Click on the “Discover” icon to browse user creations and tutorials.
The community is a fantastic resource for staying motivated and improving your editing skills.
Conclusion
PicsArt combines the power of professional-grade photo editing tools with the convenience of a mobile app. From background removal to color correction and image masking, PicsArt helps create visuals suitable for personal use, e-commerce, or marketing.
However, for advanced edits requiring meticulous attention—like ecommerce image editing services or complex retouching—professional services like UKClippingPath can deliver flawless results. Let experts handle the editing, so you can focus on creativity and growth.
0 notes
Text
Is Your Phone Running Out of Storage Space? Here’s How to Fix It

In today’s digital age, smartphones have become essential companions in our daily lives. Whether we use them for work, entertainment, or social connection, our phones are continuously collecting data, apps, and files. However, as convenient as this is, many users eventually face the issue of running out of storage space. A lack of storage can not only slow down your phone but also prevent you from downloading new apps or taking pictures. In this article, we will guide you on how to free up space on your phone, ensuring it runs efficiently.
1. Clear Out Unnecessary Apps
The first step in freeing up storage space is to remove unused apps. Over time, we tend to download apps for specific purposes and then forget about them. These dormant apps still take up valuable storage.
Identify unused apps: Go to your phone’s settings and check the app usage stats to see which apps you haven't used in a while.
Uninstall: If an app hasn’t been opened in weeks or months, consider uninstalling it. For essential apps that are seldom used, you can always reinstall them when needed.
Additionally, some pre-installed apps, often referred to as bloatware, can be disabled if you can’t uninstall them directly.
2. Optimize Media Storage
Photos and videos are some of the biggest storage hogs on any smartphone. High-resolution images and 4K videos can quickly fill up your available space.
Back up to the cloud: Using cloud services such as Google Photos or iCloud can automatically back up your media files and free up local storage. Once backed up, you can safely delete them from your phone.
Compress files: There are apps available that can reduce the file size of photos and videos without compromising too much on quality. This is particularly useful if you want to keep them on your phone without consuming significant storage.
3. Clear App Cache and Data
Many apps store temporary data or "cache" files to speed up their performance. Over time, this cached data can accumulate and take up valuable space.
Manually clear cache: You can clear the cache of specific apps by going to your phone’s settings under storage. Be cautious about clearing data, as this might delete settings or saved states in certain apps.
Regular cleaning: Some phones come with built-in tools that help optimize storage by clearing out unnecessary files. If your phone doesn’t have this, there are third-party cleaning apps available that can help.
4. Use External Storage
If your phone supports external storage options such as microSD cards, you can move certain apps, media files, and documents to the external card to free up internal storage.
Transfer files: Move large files, such as videos or downloads, to the SD card.
Move apps: Some Android phones allow you to move apps to external storage. This can be particularly useful for freeing up significant internal storage space.
If your phone doesn’t support external storage, you may want to invest in a portable external drive or use cloud storage as an alternative.
5. Delete Old Downloads and Junk Files
The downloads folder is often overlooked but can contain large files that are no longer needed. These might include PDFs, images, or videos you downloaded but forgot to delete.
Review downloads: Regularly check your downloads folder and delete unnecessary files.
Remove duplicate files: Sometimes, we download the same files multiple times. Use a file management app to identify and delete duplicates.
6. Update Your Phone Diagnostic Software
If your phone consistently runs out of space or slows down, it could be a sign of underlying issues beyond just storage problems. In such cases, using a phone diagnostic software can help identify and address other performance-related concerns, such as background apps hogging memory or even a phone speaker issue that might arise due to software glitches. Regularly updating diagnostic tools can ensure your phone operates efficiently.
7. Check for Large, Hidden Files
Some apps and processes create large hidden files that aren't always easy to identify. This can include system logs, outdated backups, or even incomplete downloads.
Use file explorer apps: These apps can help you locate and manage hidden files on your device.
Factory reset as a last resort: If your phone is significantly bogged down with hidden files, a factory reset may be necessary. Be sure to back up all important data before doing so.
8. Manage Messages and Attachments
Messaging apps, especially those that allow for multimedia sharing (like WhatsApp or Messenger), can accumulate large amounts of data over time.
Delete old conversations: If there are chat threads you no longer need, especially those filled with media, it’s a good idea to delete them.
Restrict automatic downloads: Go to the settings of messaging apps and turn off automatic downloads for media files. This way, only files you choose to download will take up space.
9. Disable Offline Data Syncing for Certain Apps
Some apps, like music streaming or navigation apps, store data offline to be accessed without an internet connection. While this can be useful, it also consumes storage.
Review offline data: Check the apps that sync data offline and decide whether you really need those files. For example, if you no longer listen to downloaded music or use offline maps, delete the files to reclaim space.
Final Thoughts
Running out of storage space is a common issue, but with the right strategies, you can easily free up space and improve your phone’s performance. Whether it’s deleting old apps, clearing cached data, or backing up media files, these tips can help extend the life of your device. For more comprehensive solutions, using a phone diagnostic software can help identify storage issues, as well as other performance problems like phone speaker issues that might be affecting your device. Keeping your phone optimized ensures that you continue to enjoy a seamless and efficient user experience.
By following these steps, you can reclaim valuable storage space and avoid the frustration of a slow, cluttered phone.
0 notes