#Easy way to install PuTTY for Linux
Explore tagged Tumblr posts
Visit Tumblr Blog
Explore Tumblr blogs with no restrictions, modern design and the best experience.
Last Seen Tumblr Blogs


Fun Fact
In 2020, 44% of users from Denmark used Tumblr daily.
Text
How to Install PuTTY on Ubuntu Linux

Introduction
PuTTY is a popular terminal emulator for Windows, but it is not only limited to Windows operating system. Being free and open source, it is popular among Linux users too.
PuTTY supports a wide range of protocols such as serial, SSH, Telnet, rlogin, SCP, SFTP etc. PuTTY is used by seasoned sysadmins and hobbyists/maker-crowd alike.
PuTTY ships with a command line tool named “psftp”, the PuTTY SFTP client, which is used to securely transfer files between computers over an SSH connection.
Sysadmins generally use PuTTY as an SSH and telnet client whereas the Maker community widely uses PuTTY for interfacing with the serial ports on their hardware.
The simplest way to install PuTTY in Ubuntu Linux is via terminal i.e, the command line.
Follow the steps below to install PuTTY on Ubuntu.
Step 1
Login into Ubuntu Desktop. Press Ctrl + Atl + T to open GNOME terminal. If for some reason the shortcut didn’t work, run the Terminal from the Ubuntu Dash.
Step 2
Run the following command in the terminal.
>> sudo apt-get update

This command updates the Ubuntu package list with latest one. If this command is skipped, there is a good chance that Ubuntu might install older version of the softwares instead of the latest version due to the fact that it only had the older list with older version of softwares.
So, whenever installing new software or intending to upgrade the software versions, it is a good idea to run this command first.
The sudo prefix at the start of the command instructs the terminal to run the command as root since installing and upgrading softwares is a privilege operation and should not be performed by users which do not have sufficient access.
Provide the user password when prompted by sudo and hit Enter.
Step 3
Install PuTTY using the command below.
>> Sudo apt-get install -y putty

Step 4
PuTTY should be installed. Run it from the terminal using “putty” as a command, or from the Dash.
>> putty

As visible in the PuTTY screenshot above, it provides a range of connection types to choose from Raw, Telnet, Rlogin, SSH, and Serial.
It also ships with command-line tools for SCP (pscp), SFTP (psftp), RSA and DSA key generator (putty keygen), etc, which can be run from the terminal.
Connecting to Ubuntu Server using SSH Keys and Putty:
This tutorial shows you how to connect to your Ubuntu server using ssh with keys. The advantage is that you can connect to your server without passwords. .
First, install an SSH server on the server if not already installed:
sudo apt-get install ssh Open SSH-server
For increased security change the SSH port to something else (Eg. 2222) by editing /etc/ssh/sshd_config (optional). The default port (22) would work as well. sudo nano /etc/ssh/sshd_config
Save and restart the server:
sudo /etc/init.d/ssh restart
Then navigate to the following folder:
cd ~/.ssh
Generate a pair of keys:
ssh-keygen -t dsa
You could also use "RSA" instead of "dsa". When asked for a file name you may provide a file name for the keys (Eg. passkey) or just press enter for default naming.
You may also choose to enter a passphrase for increased security (recommended). However, remember that you will have to enter this passphrase every time to connect to the ssh server.
Then create a key file as described below and set its permissions:
touch authorized_keys chmod 600 authorized_keys
Then add the public key (Eg. passkey.pub) to the key file:
cat passkey.pub >> authorized_keys
Then for security remove the passkey.pub from the server. Now login to your other computer and move the other key (Eg. passkey) to this computer. In Ubuntu,
you can copy the private key (passkey) to the .ssh folder in your home directory. In Windows, you can copy it to any folder.
In Ubuntu/Linux edit ~/.ssh/config file to use the private key for connections.
In Windows, use PuTTYgen.exe to load the passkey to generate a private key file. Use this key file while connecting to a remote ssh server using Putty.
1 note
·
View note
Text
How To Make Your Own Website and Monetize it?

By following up with me in less than twenty-four hours, you will be ready to launch a Website that will undoubtedly earn you thousands of dollars every month! How to generate the money? Well, the website that we make will be offering SAAS service.
What is a SAAS service?
A SAAS (Software As A Service) service is essentially an online software or service that you pay to use.
For example, Mailchimp.com, which is a SAAS service, provides email marketing services that you pay for.

A SAAS service is anything you pay for to get an online service.
Now you can be the owner of a SAAS service, you will have your own Website, and people will subscribe to your service and pay you monthly recurring payments.
Let’s say you have 100 customers who use your SAAS service, and your service costs about $10 a month; you’d make $1000 per month!
All you have to do is sit at home and watch your passive income develop on your computer screen. It’s a fantastic and easy way to earn money.
How to get a SAAS service?

“How can I get my own SAAS service or software?” you might be wondering. The good news is that you don’t have to create one, learn to program, or even employ a programmer to do so.
You can simply buy it Online for $40–$60. You can buy software from a website called codecanyon
You can simply visit the website, click on the php scripts and search for SAAS and choose what kind of SAAS service that you preferred.
There are several types of SAAS applications available for purchase. Discount networks, accounting and billing software, email marketing systems, and employee management software are only a few examples. Take your time browsing the services and choose the one you like best, the one that fits you and you feel that you can be successful with.
Hosting Your Service
After you’ve created your SAAS service, the next move is to host it and make it public. To host it online, you’ll need a domain name and a server.
Now it is sounds hard since you don’t have any technical background in this term. Don’t worry, it is actually a simple and easy steps.
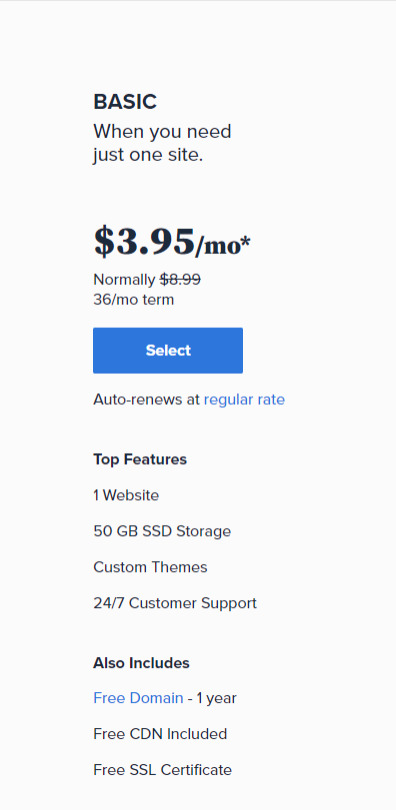
First you need a VPS server, you can visit and buy a cheap one from Bluehost. its only $3,95 permonth with and they give you free domain for 1 year! Check the price below. Buy the “LAMP” administration.
So What is VPS server? We do what we call “online hosting” when we want to publish a PHP page, script, or some other web application. This basically means uploading the files and database to a public server so that it can be accessed over the internet. On simple word, the place where you put the file is from VPS server.
In this tutorial we will used the shared server from Bluehost. Shared server only means that your server will be host with others website.
Now everything is ready, the only things that matter is how to install it. Let get to it.
Getting Started
After having your own server and domain on Bluehost, you need to connect them. Your VPS Server can be accessed now your Bluehost profile, but of course, we don’t want to access our website though an IP! we want to use our domain name. So simply, we are going to map the domain name to our VPS IP, so then we access the VPS and the WordPress website through both the domain and the IP.
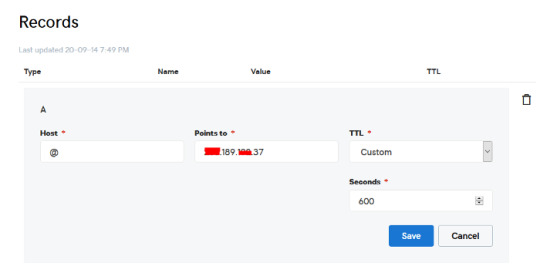
Configure your DNS Records
Simply open DNS management zone in your Domain Provider and edit the main A record.
Than we need to create MySQL database for the application. So Let’s Create one. Connect to your VPS server using any SSH client like putty. and Let’s start!
Just open Putty and enter the Server IP or Name, and Press Open. It will ask you to login, just enter “root” as the user, then enter your password which is sent to you by email.
Note: while typing the password, putty will now show it for security reasons, but It’s there, just type it!
What’s nice, is that we have MySQL installed already as part of the LAMP Stack, but we need to create a database and a user for out application.
Note: Every MySQL statement must end in a semi-colon (;)
To get started, log into the MySQL root (administrative) account by issuing this command:
mysql -u root -p
You will be prompted for the root password, just write or paste it and press Enter.
First, create a separate database that your PHP application will use. You can call this whatever you want, but we will be using TestDb in this guide to keep it simple. Create the database by running this command:
CREATE DATABASE TestDb DEFAULT CHARACTER SET utf8 COLLATE utf8_unicode_ci;
Next, we are going to create a separate MySQL user account that we will use exclusively to operate on our new database. Creating one-function databases and accounts is a good idea from a management and security standpoint. We will use the name DbUser in this guide. Feel free to change this if you’d like.
We are going to create this account, set a password, and grant access to the database we created. We can do this by typing the following command. Remember to choose a strong password here for your database user:
CREATE USER 'DbUser'@'localhost' IDENTIFIED BY 'enter_a_custom_password_here';GRANT ALL ON TestDb.* TO 'DbUser'@'localhost';
You now have a database and user account, each made specifically for Your PHP application. We need to flush the privileges so that the current instance of MySQL knows about the recent changes we’ve made:
FLUSH PRIVILEGES;
Exit from it by typing :
EXIT;
Upload The Script Files To The Server.
To upload the files, you need an application called WinSCP.
It is a free tool and you can download it from here.
Connect to Your VPS Server using WinSCP, and Update the PHP Files to the server to this path: “/var/www/html”
In most cases, the files would be zipped, so we need to extract them.
Again to Putty SSH CLient and Let’s install the unzip utility using the following command:
sudo apt-get install unzip
Clear putty screen to make in clean using the following command:
clear
Change directory to /var/www/html using the following command:
cd /var/www/html
Unzip the “.zip” file using the following command:
unzip YOURFILENAME*.zip
*Note: the file name may be different in your case, so replace YOURFILENAME with your file name.
Now, Move the latest folder content to the upper directory so it can be accessed directly -> use WinSCP Just copy all the files inside “YOURFILENAME” folder and paste them directly in html folder.
Configure Apache to Publish PHP Website
Well Done, Now your files are uploaded and placed in the html folder, we just need to configure apache so we can our Publish PHP Website and access our script using our domain name. To do so, open WinSCP again and navigate to this directory: /etc/apache2/sites-available/
Now, create a new empty file and name it “yourdomain.conf” . You can replace “Scriptname” with any name you want
Open yourdomain.conf Then copy and paste the content below into the file and save.
<VirtualHost *:80> ServerAdmin admin@YOUDOMAINNAME DocumentRoot /var/www/html ServerName YOUDOMAINNAME ServerAlias YOUDOMAINNAME <Directory /var/www/html/> Options +FollowSymlinks AllowOverride All Require all granted </Directory> ErrorLog ${APACHE_LOG_DIR}/error.log CustomLog ${APACHE_LOG_DIR}/access.log combined </VirtualHost>
Replace with your own domain, in my case its “YOURDOMAINNAME”
Enable your script configuration in apache and restart the service.
Now simply, run the following commands to finish the setup:
sudo a2ensite yourdomain.conf sudo a2enmod rewrite sudo systemctl restart apache2.service
ALMOST DONE!
Connect to MySQL Database.
Open your web browser now and navigate to your server name.
Continue the setup by entering the database info and your admin login information. In our example, the database name is TestDb and the user is DBUser with the password set.
That simple!
Setup cronjobs.What are cronjobs?
cron is a Linux utility which schedules a command or script on your server to run automatically at a specified time and date. A cron job is the scheduled task itself. Cron jobs can be very useful to automate repetitive tasks.
For example, you can set a cron job to delete temporary files every week to conserve your disk space. Some PHP web applicaitons, may require you to set up a cron job to perform certain functions.
Setup cronjobs.
To setup cronjobs, you need to add all required jobs to the server. This depends on your script, so if you bought a script from code canyon, the script owner should provide the cronjobs.
To do this, open WinSCP and got to /etc Open crontab file using the editor And paste all the jobs from your script to this folder. (cronjobs are listed in the app documentation)
Make sure each job is on a line and an empty line in the end.
Secure with a Free SSL.
SSL certificates are used within web servers to encrypt the traffic between the server and client, providing extra security for users accessing your application. Let’s Encrypt provides an easy way to obtain and install trusted certificates for free.
Connect to your Server using Putty SSH client. and Let’s Start!
Install the Let’s Encrypt Client
Let’s Encrypt certificates are fetched via client software running on your server. The official client is called Certbot.
First, add the repository to install Certbot:
sudo add-apt-repository ppa:certbot/certbot
You’ll need to press ENTER to accept.
Then, Update the package list to pick up the new repository’s package information:
sudo apt-get update
Install Certbot’s Apache package:
sudo apt install python-certbot-apache
Certbot is now ready to be used.
Set Up the SSL Certificate
Generating the SSL certificate for Apache using Certbot is quite straightforward. The client will automatically obtain and install a new SSL certificate that is valid for the domains provided as parameters.
Simply run the following command: (change the domain)
sudo certbot --apache -d YOUR_DOMAIN_NAME
You will be asked to provide an email address for lost key recovery and notices, and you will be able to choose between enabling both http and https access or forcing all requests to redirect to https. It is usually safest to require https, unless you have a specific need for unencrypted http traffic.
That’s it!
Test your website now and it should be SSL encrypted.
This tutorial I used are originated and made by Hasan By H-educate, you can check his link Here : https://h-educate.com/ or check his youtube on H-educate.
Other tips to make money online, check here : https://ricky-kartiyanta.medium.com/
Cheers!!
#website#saas solutions#saas#monetize#passive income#business#workfromanywhere#easy money#gettingrichfromhome
2 notes
·
View notes
Text
SSH Shell

Price: KiTTY is free to use. KiTTY is an SSH client that is based on PuTTY’s 0.71 version.
The Secure Shell extension works with non-Google HTTP-to-SSH proxies via proxy hooks, and third-party application nassh-relay can use those hooks to enable the Secure Shell extension to establish an SSH connection over XMLHttpRequest or WebSocket transport.
Ssh Shell For Mac
Ssh Shell Mac
Ssh Shell Script Example
Ssh Shell For Windows
SSH.NET is a Secure Shell (SSH-2) library for.NET, optimized for parallelism. This project was inspired by Sharp.SSH library which was ported from java and it seems like was not supported for quite some time. This library is a complete rewrite, without any third party dependencies, using parallelism to achieve the best.
This is quite a common task for Linux system administrators, when it is needed to execute some command or a local Bash script from a one Linux workstation or a server on another remote Linux machine over SSH.

In this article you will find the examples of how to execute a remote command, multiple commands or a Bash script over SSH between remote Linux hosts and get back the output (result).
This information will be especially useful for ones, who want to create a Bash script that will be hosted locally on a one Linux machine but would be executed remotely on the other hosts over SSH.
Cool Tip: Connect to a remote SSH server without typing a password! Configure a passwordless authentication! Only 3 easy steps! Read more →
SSH: Execute Remote Command
Execute a remote command on a host over SSH:
Examples
Get the uptime of the remote server:
Reboot the remote server:
SSH: Run Multiple Remote Commands
Ssh Shell For Mac
In the most cases it is not enough to send only one remote command over SSH.
Much more often it is required to send multiple commands on a remote server, for example, to collect some data for inventory and get back the result.
There are a lot of different ways of how it can be done, but i will show the most popular of them.
Run multiple command on a remote host over SSH:
– or –
– or –
Cool Tip: SSH login is too slow? This can be fixed easily! Get rid of delay during authentication! Read more →
Examples
Get the uptime and the disk usage:
Get the memory usage and the load average:
Show the kernel version, number of CPUs and the total RAM:
SSH: Run Bash Script on Remote Server
The equally common situation, when there is some Bash script on a Linux machine and it needs to connect from it over SSH to another Linux machine and run this script there.
The idea is to connect to a remote Linux server over SSH, let the script do the required operations and return back to local, without need not to upload this script to a remote server.
Certainly this can be done and moreover quite easily.
Cool Tip: Want to ROCK? Start a GUI (graphical) application on a remote Linux workstation over SSH! Read more →
Example
Execute the local script.sh on the remote server:
-->
Secure Shell (SSH) allows you to remotely administer and configure your Windows IoT Core device
Using the Windows 10 OpenSSH client
Important
The Windows OpenSSH client requires that your SSH client host OS is Windows 10 version 1803(17134). Also, the Windows 10 IoT Core device must be running RS5 Windows Insider Preview release 17723 or greater.
The OpenSSH Client was added to Windows 10 in 1803 (build 17134) as an optional feature. To install the client, you can search for Manage Optional Features in Windows 10 settings. If the OpenSSH Client is not listed in the list of installed features, then choose Add a feature.
Next select OpenSSH Client in the list and click Install.
Ssh Shell Mac
To login with a username and password use the following command:
Where host is either the IP address of the Windows IoT Core device or the device name.
The first time you connect you see a message like the following:
Type yes and press enter.
If you need to login as DefaultAccount rather than as administrator, you will need to generate a key and use the key to login. From the desktop that you intend to connect to your IoT Device from, open a PowerShell window and change to your personal data folder (e.g cd ~)
Register the key with ssh-agent (optional, for single sign-on experience). Note that ssh-add must be performed from a folder that is ACL'd to you as the signed-in user (BuiltinAdministrators and the NT_AUTHORITYSystem user are also ok). By default cd ~ from PowerShell should be sufficient as shown below.
Tip
If you receive a message that the ssh-agent service is disabled you can enable it with sc.exe config ssh-agent start=auto
To enable single sign, append the public key to the Windows IoT Core device authorized_keys file. Or if you only have one key you copy the public key file to the remote authorized_keys file.
If the key is not registered with ssh-agent, it must be specified on the command line to login:
If the private key is registered with ssh-agent, then you only need to specify DefaultAccount@host:
The first time you connect you see a message like the following:
Type yes and press enter.
You should now be connected as DefaultAccount
To use single sign-on with the administrator account, append your public key to c:dataProgramDatasshadministrators_authorized_keys on the Windows IoT Core device.
You will also need to set the ACL for administrators_authorized_keys to match the ACL of ssh_host_dsa_key in the same directory.
To set the ACL using PowerShell
Note
If you see a REMOTE HOST IDENTIFICATION CHANGED message after making changes to the Windows 10 IoT Core device, then edit C:Users<username>.sshknown_hosts and remove the host that has changed.

See also: Win32-OpenSSH
Using PuTTY
Download an SSH client
In order to connect to your device using SSH, you'll first need to download an SSH client, such as PuTTY.
Ssh Shell Script Example
Connect to your device
In order to connect to your device, you need to first get the IP address of the device. After booting your Windows IoT Core device, an IP address will be shown on the screen attached to the device:
Now launch PuTTY and enter the IP address in the Host Name text box and make sure the SSH radio button is selected. Then click Open.
If you're connecting to your device for the first time from your computer, you may see the following security alert. Just click Yes to continue.
If the connection was successful, you should see login as: on the screen, prompting you to login. Enter Administrator and press enter. Then enter the default password p@ssw0rd as the password and press enter.
If you were able to login successfully, you should see something like this:
Update account password
It is highly recommended that you update the default password for the Administrator account.
Ssh Shell For Windows
To do this, enter the following command in the PuTTY console, replacing [new password] with a strong password:
Configure your Windows IoT Core device
To be able to deploy applications from Visual Studio 2017, you will need to make sure the Visual Studio Remote Debugger is running on your Windows IoT Core device. The remote debugger should launch automatically at machine boot time. To double check, use the tlist command to list all the running processes from PowerShell. There should be two instances of msvsmon.exe running on the device.
It is possible for the Visual Studio Remote Debugger to time out after long periods of inactivity. If Visual Studio cannot connect to your Windows IoT Core device, try rebooting the device.
If you want, you can also rename your device. To change the 'computer name', use the setcomputername utility:
You will need to reboot the device for the change to take effect. You can use the shutdown command as follows:
Commonly used utilities
See the Command Line Utils page for a list of commands and utilities you can use with SSH.
1 note
·
View note
Text
Windows 10 SSH vs. PuTTY: Time to Switch Your Remote Access Client?
You should find that SSH is already installed on your Windows 10 computer (it was included in the April 2018 update), but if not, it can be easily added. Let's take a look at how to set up SSH access in Windows 10, and whether the new tools can supplant PuTTY.

One of the most common methods to communicate between computers, particularly Linux machines and web servers, is SSH. When it comes to establishing this sort of communication in Windows, the default option has been to install PuTTY.\

Thanks to Windows Power Shell, however, you may not need PuTTY anymore. Let's take a look at how to set up SSH access in Windows 10, and whether the new tools can supplant PuTTY.
How To Install SSH In Windows 10 (Quick)
Installing SSH functionality to the Windows 10 PowerShell is straightforward enough, but the menu options for it are somewhat hidden. Here's what you'll need to do:
Open Settings.
View Apps > Apps & features
Go to Optional features
Click Add a feature
Select OpenSSH Client
Wait, then reboot
Once this is done, you can establish SSH connections with other, compatible computers. If an SSH server has been installed and configured on the remote machine, a connection can be made.
That's the overview. Here are the details.
How To Install SSH In Windows 10 (Detailed)
Windows 10's PowerShell implementation of SSH is a version of the OpenSSH project. You can find the project page on PuTTYkay.com
You should find that SSH is already installed on your Windows 10 computer (it was included in the April 2018 update), but if not, it can be easily added.
To check, open the Power User menu (right-click Start, or Windows key + X) and select Windows PowerShell. Here, input the command "ssh". If SSH is not yet installed, you'll see a screen like this:

Fixing this is easy enough. Press Windows key + I to open the Settings view, then go to Apps and look for Manage optional features. Click this, then look for an entry labeled "OpenSSH".

If you can't see it, click Add a feature then scroll down until you see OpenSSH Client. Click to expand the item and view the description. When you're ready, click Install to add it to your PC. A few moments later, the new SSH client for Windows PowerShell will be installed. It's worth rebooting Windows to ensure the app is correctly installed.
A Note On The SSH Server App
It's worth highlighting the fact that you can also install an SSH server. While it is unlikely that Microsoft will enable any form of universal remote administration over SSH, having it as an option is nevertheless useful.
To install this, repeat the above steps, selecting the OpenSSH Server.
Using SSH In Windows PowerShell
Once SSH is installed and working, you can use it to communicate with another computer. For instance, you might use it to access a Raspberry Pi (one of several remote options for that little computer).
How to Remote Connect to a Windows PC From a Raspberry Pi
Wouldn't it be great if you could access your PC from your Raspberry Pi no matter where you are? Well, you can! All you need is a remote desktop app.
Usage is simple. In the PowerShell, enter the ssh command, followed by the username for an account on the remote device, and its IP address.

For instance, to connect to my Raspberry Pi box running RetroPie, I used: ssh [email protected]
At this point, the remote device should prompt you to accept a secure key. Type Yes to agree to this, then at the prompt, enter the password for the username you used.
Moments later, you'll be connected to the remote Linux device, ready to perform whatever tasks you need.
PowerShell's SSH Features Vs. PuTTY
PuTTY has long been the preferred choice for SSH on Windows. Whether controlling web servers, accessing Internet of Things devices, or remotely administering a Linux PC, it's a lightweight, easy to use the app.
One of the reasons for PuTTY's endurance is its wide selection of features. So, can SSH on Windows PowerShell compete with PuTTY?

Well, in terms of providing SSH functionality, yes it can. You can find out how to use some of the extended features of SSH on Windows 10 by entering the ssh command: ssh The resulting list of options outlines the features. For example, you can specify a port:
ssh [username]@[hostname] -p [port]
The possibilities are good!
However, it's still not PuTTY. While you can bind an address with OpenSSH on Windows, you're limited by the number of addresses you can save.

There is a reason why PuTTY remains popular. Not only does it allow you to save (and name) your connections, the app also supports connections over Telnet, Serial, and other protocols. PuTTY's appearance is also configurable, can it be quickly launched from the desktop. All in all, PuTTY is a solid utility that handles pretty much anything that you can throw at it.
Why SSH When You Can Use Linux?
While remote controlling Linux over SSH might be vital, you may not even need SSH. Windows 10 now features a Linux subsystem and a Bash-like command prompt. This means that you can easily input Linux commands and receive realistic responses. While it might not be ideal for all scenarios, if you need Linux access for college or training purposes, and don't have SSH access (regardless of the app) to a Linux device, this might be ideal. Of course, this isn't the only option. If you need to practice Bash commands in Windows, you can always set up a virtual machine. Simply install a Linux distribution into this and (hardware permitting) you have a Linux OS ready to use.
Is It Time To Abandon PuTTY On Windows 10?
SSH is easy to use in Windows 10's PowerShell. However, its lack of features, along with requiring a few more clicks to load up, means you might prefer to stick with PuTTY. Either way, the fact that Windows 10 has two good options for SSH is worth celebrating. Want more SSH options for Windows? Our roundup of SSH tools for Windows will tell you about the alternatives.
1 note
·
View note
Text
7 - Invaluable Free Apps for Hosting

MySQL Workbench is an app that I cannot live without. In some ways, it is slightly trickier to use than phpMyAdmin. However, it’s located on your PC, and it gives you the power to do backups and repairs on your databases and enables you to make changes in a slightly different environment from phpMyAdmin through your browser. Try it; it’s a tool I prefer to use. You can download MySQL Workbench for Windows, Linux, or Mac OS X at http://dev.mysql.com/downloads/workbench/.

FileZilla is one of the best — if not the best — free File Transfer Protocol (FTP) clients available. There are other free ones and there are many that you can pay for, but FileZilla is my go-to FTP client. It’s fast; it’s efficient; it can do Secure File Transfer Protocol (SFTP, which you really should be using) or basic FTP; and it lays everything out in a simple, easy-to-use window. One warning with FileZilla is that it stores your passwords in a nonprotected file, which means virus and malware writers, if they write stuff which gets onto your computer, could theoretically read that file and get your FTP login details, including your password. Of course, that means the attack must specifically look for your password file — and it has to make it past the virus checker, which I’m sure you have installed on your PC — but it is a consideration to note, and you should remember to not store your passwords within FileZilla. You can download it for Windows, Linux, or Mac OS X at http://filezilla-project.org.

Notepad++ is a wonderful editor for editing any kind of files: text files, PHP files, HTML files, CSS files. You name it, Notepad++ can read it. One of things I like most about it is that, with PHP files, it includes color coding to delineate different types of elements and helps you see where you are in the file and identify where the code elements you are working on close. Notepad++ is free. I’ve seen no other free applications that come even close to the facilities Notepad++ offers. (Some people use paid applications that they say are better.) The speed, the ease of use, and the integration with FileZilla are all excellent. You can edit a file on your server by simply logging on using FileZilla, right-clicking on the file you want to edit, and clicking View/Edit. The file downloads and opens in Notepad++ so you can make the changes you need. When you save it again, FileZilla automatically prompts you that the file has changed and asks if you want to re-upload it. You simply click Yes or No. Notepad++ is available for Windows only. You can download it at http://notepad-plus-plus.org.

CoffeeCup makes a range of utilities, some of which are free, some of which aren’t. CoffeeCup FTP is free and is a very good alternative to FileZilla. It all comes down to personal preference, and I prefer FileZilla. That said, CoffeeCup FTP is well worth checking out. CoffeeCup has a premium version called Direct FTP that has some cool additional features. If you’re looking for CoffeeCup FTP, don��t accidentally download Direct FTP and have to pay for it by mistake. Oh, and you can expect CoffeeCup to periodically try to tempt you into buying the premium version. That’s one of the things that put me off. CoffeeCup FTP is available for Windows only. You can download it at http://coffeecup.com/free-ftp/.

PuTTY is a powerful tool that enables you to connect to devices online, using a system called telnet, providing you have the correct login details. It is very useful to website owners, especially those with a Virtual Private Server (VPS) or dedicated server, because it enables you to open a command-line prompt on your server by logging in via Secure SHell (SSH), so that you can run commands as needed. PuTTY comes with dire warnings that you must not use it anywhere where it’s illegal to use. The research I’ve done suggests that it is legal to use it within the U.S., providing you’re using it for connection to a device that you own or have the right to connect to. You do not need to install PuTTY if you don’t intend to connect by SSH and do not need to use the command line on your server. You should only open up your server to allow SSH connections if you know there is a good reason for using them. Otherwise, keep SSH closed to help prevent intruders from gaining access. PuTTY is available for Windows only. You can download it at http://www.chiark.greenend.org.uk/~sgtatham/putty/download.ht ml.

Hailed (by its own company) as the number-one FTP client for Mac OS X, Transmit is a popular free FTP client for the Mac. Transmit has a host of features and boasts super speeds especially for smaller files. I haven’t used it extensively, but it does appear to be faster than FileZilla, although I still prefer the layout of the FileZilla screen to that on Transmit. Transmit is available for Mac OS X at http://panic.com/transmit. Cyberduck Another FTP client? I know, I know . . . . Here’s the deal: FileZilla and CoffeeCup are the best options for Windows PCs. Transmit and Cyberduck are the best options for Mac OS X, even though there is now some crossover apps that are available for each OS. Cyberduck has to get a mention, if nothing else, for its name. I just LOVE the name Cyberduck. It’s also an incredibly full-featured piece of software that I am more than happy to recommend. The great thing about all the free FTP client software is that you can download it, install it, test it out, and, if you don’t like it, you haven’t lost anything except perhaps a little time! Personal taste plays into which piece of software you prefer to use, so why not download them all and try them out? Cyberduck is available for Mac OS X or Windows. You can download it at http://cyberduck.ch. Komodo Edit ActiveState produces two code editors in the Komodo range: Komodo Edit, which is free, and Komodo IDE, which is a premium version but adds lots of valuable features for more advanced designers. What I like about Komodo Edit is that there is a Linux version available, so if you have eschewed Windows and Mac for the joy of Linux, you can get a full-featured code editor that is designed to run on your system. Komodo Edit is available for Mac, Windows, or Linux. You can download it from www.activestate.com/komodo-edit. Terminal Terminal is built into all versions of Mac OS X and is a native telnet command-line interface that is similar to PuTTY for the PC. You can use Terminal to connect to your server, providing you enable SSH connections and have the valid login details. I’ve never heard anyone suggest you need to look any further than Terminal for telnet connections from a Mac; it simply does its job efficiently and easily.
0 notes
Text
Multi-GPU Deep Learning with Azure Data Science Virtual Machines (DSVM)
Introduction
There are a ton of options out there for doing deep learning in the cloud and Azure is no stranger to this space.
From Floydhub, to Paperspace, AWS Sagemaker, Google Cloud, and probably more; there are so many options for cloud compute. In this article we’ll cover Azure’s DSVMs.
Here are some pros of Azure (that I’ve found), along with some other general thoughts.
PROS:
Price. The price on Azure is always nice. Enough said.
Customer support is great. If you have a ticket and label it severe, you get a call from a tech in <2 hours. That’s pretty awesome!
Azure has a lot of unique services. From Azure Databricks to ML Studio, getting your feet wet with Azure is not a bad thing.
NEUTRAL COMMENTS:
Do we need to learn every platform on the planet? Probably not. You could probably just learn 1 and stick with it. But sometimes I run into issues on 1 cloud platform, and it’s nice to be flexible.
Azure doesn’t appear to have training options with auto-shutdown similar to Sagemaker. AWS might have the market on this one (to my knowledge). To run training jobs on Sagemaker with auto-shutdown requires additional coding, so I actually don’t prefer this option myself, so I list this as neutral.
Working with storage on Azure is a bit of a head scratcher to me. I’m not an expert here, so I have this as neutral because I have seen some stuff where Azure can tap into AWS? Working with Azure Blob storage feels very different to me and less intuitive, but that’s my subjective opinion. There is always a workaround, which is to load your data directly to the DSVM (which is what I tend to do).
Okay, let’s get on with the show!
Step #1: Create an Account
First thing we need to do is create an account. This should be self explanatory. Just click any of the buttons related to signing up and follow the prompts. I personally choose the Pay-As-You-Go option (pick whatever you want). Once you’re done you can access your Azure Portal.
Step #2: Create a DSVM Instance
At this point you should be able to access the Azure portal.

Search for “Data Science Virtual Machine” and click the “Data Science Virtual Machine - Ubuntu 18.04″ link under “Marketplace”. This is important. You need this particular Virtual Machine type!

Now simply click the blue “Create” button.

This should take us to the “Create a virtual machine” form where we can start to enter the specifications of our virtual machine (VM).
Subscription = whatever your subscription is.
Resource group = Create a new one by clicking “Create new” or just select one if you already have one.
Virtual machine name = give the machine a name.
Region = make sure to select the region closest to your physical location.
Availability options = you can leave this alone if you want.
Image = select your operating system. For accessing Jupyter from an IP address, then Linux is the OS you want. In this demo I’ll use the Linux option.

Now this is where things get more interesting...
Azure Spot instance = I selected “Yes” because I value a cheaper price over reliability
Size = This one is the most important. NC instances include GPUs. If you’re doing deep learning, you want a NC instance. To change the size to an NC instance, select “Change size” and search for “NC” (note that you might need to remove some of the filters.
Authentication type = you can select “SSH public key” or “Password”. For SSH you can click “Learn more ... “ to figure out how to make it work. For Windows you can use PuTTYGen go generate what you need. I think “Password” is easier (just write down your information somewhere so you don’t forget).

If really want to up your security, you can revise the last section, otherwise you can ignore the last section and click “Review + create”.

Step #3: Launch your DSVM
(or request quota increase and redo the prior steps)
Finally, you can review your selections, and if everything looks good, you can click “Create”.
--WARNING!--
Note: It’s possible that you might need an quota increase (i.e. request access to particular instances), in which case the following article will show you how to request a quota increase using “Help + support” (Azure has nice documentation on this so I’m not going to reinvent the wheel here). https://docs.microsoft.com/en-us/azure/azure-portal/supportability/per-vm-quota-requests
Once you click “Create” your deployment should kick off, and once it’s completed you should see the following screen, at which point you can click “Go to resource” (I’ve redacted information from my screen for obvious reasons).

Step #4: Launch Jupyter
This will take you to the main page of your DSVM instance. Note your “Public IP address”. We’re going to use this to access JupyterHub on our DSVM.
From your browser, type the following, (and fill in <your-public-ip-address> with your “Public IP address”).
https:// <your-public-ip-address>:8000
Having issues on this part? Here are some tips:
Note that the “https://” part is very important, you need this.
If you hit warnings, just bypass them by clicking Advanced > proceed, or any links that allow you to continue forward (even the Azure people recommend this - https://docs.microsoft.com/en-us/azure/machine-learning/data-science-virtual-machine/dsvm-ubuntu-intro)
Timeout issues?
Try just waiting a few minutes, sometime Azure will auto-correct any issues it notices and this takes a minute.
Try restarting the VM.
Use PuTTY to SSH into your machine using your IP address, username and password. From SSH, try running “jupyter notebook”. If this is not recognized, it probably means you didn’t select a DSVM from the marketplace, and instead you just launched a normal VM which doesn’t come with pre-installed data science tools. I would walk through these instructions again.
Still having issues?
Try a different browser.
If all of this still doesn’t work, submit a ticket to Azure in the same way you requested a quota increase, i.e. using “Help + support”.
You’ll be prompted for a username and password, and you can use the same one you created when you created the DSVM.
Step #5: Working with Data
Once you’re in Jupyter, the next logical thing you might want to do is work with data. How do we do this?
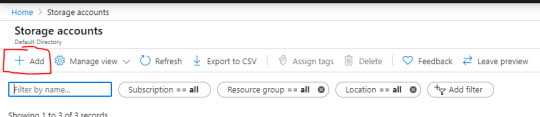
First, we probably want to store some data on Azure. There are many options, but I’ll be using Blob storage because it’s easy and fits many needs.
Go back to the Search feature and type in “Storage” and Select “Storage accounts”.

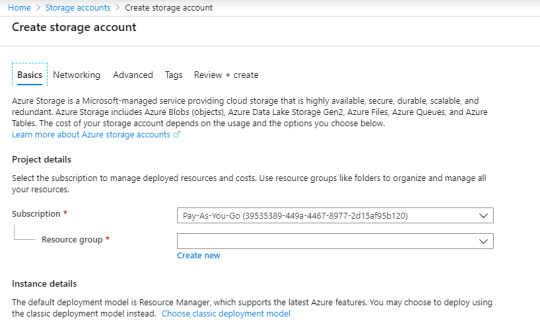
Select “Add”.
This will bring you to a form to fill out. When you’re done, you can select “Review + create” and complete any other prompts.
Once you’re done, you should have a new storage account. On the homepage of your new storage account, you should see a section\link for “Containers”. Click this.
From here you can add a new container by clicking “+ Container”.

Now you can click “Upload” to upload any data that you want.

Now the next logical question is, how do we tap into this data from Jupyter? It’s actually very easy (as long as you’re not so worried about security).
Once you’ve uploaded some data, click the file. This should bring up a new panel showing information related to the file, along with a URL.
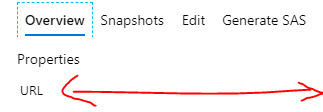
You can simply use this URL in your Python code! How awesome is that!
For example, you could read as CSV via pandas as follows:
df = pd.read_csv(https://<storage-account-name>.blob.core.windows.net/<container-name>/<data-file-name>)
Pretty great right!
If you want to read in a file line by line, I found the following StackOverflow link very helpful: https://stackoverflow.com/questions/1393324/in-python-given-a-url-to-a-text-file-what-is-the-simplest-way-to-read-the-cont
Now you should have everything you need to start doing some data science and deep learning on Azure!
Step #6: Run some Deep Learning!
If you want to check out something that I personally ran on Azure, you can check out my following GitHub repository.
https://github.com/yeamusic21/Jigsaw-Multilingual-Custom-LSTM-Horovod-Hyperopt-on-Azure
In this repository I used Hyperopt to do hyperparameter search on a custom LSTM and I leveraged Horovod for multi-GPU processing; and then I used Azure to run this on a multi-GPU machine!
The End! :-D
That’s all there is!
Hope you found this helpful! :-D
0 notes
Text
Mastering Putty for beginners (+ Session Manager, MobaXTerm)

Mastering Putty for beginners (+ Session Manager, MobaXTerm)
Handy little tool to quickly launch SSH sessions to UNIX/Linux Servers. PLUS.. Amazon AWS Linux Virtual Machine Setup! What you'll learn Download and Install Putty sofware Create and edit profiles in putty Customize Putty Launch Linux GUI interfaces remotely Port Forwarding Tips & Best Practices Learn PuTTY Session Manager Requirements Linux Machine (Physical or Virtual) Putty Software Basic Windows OS skills Description PuTTY is an open source SSH and telnet client developed originally by Simon Tatham for the Windows platform. Putty is a light-weight standalone application, that is easy to learn. In addition, Putty also supports - Rlogin, Raw and Serial connections. Putty is a well know tool among system and network administrators. However, Putty can be a handy tool for programmers, DBAs, and QA Testers as well, when working with Unix/Linux based systems. Putty comes with many settings to customize your sessions to your project needs. Download and install Putty - Quick way & Installer way. Learn to launch duplicate & multiple sessions quickly. Establish SSH sessions to the same server with a different/same username. Customize & Tune Putty with various settings. Use X11 Forwarding to access Linux GUI. Automatically SAVE your SSH session to a file. Tips & Recommendations (Working on adding more) Securely Transfer files Using other tools/components that come with Putty Understand & Use RSA key-pair for Password-less authentication. Create a Linux Virtual Machine (EC2) in AWS & SSH into your own AWS Linux Machine. *** NEW *** Learn PuTTY Session Manager *** NEW *** Learn MobaXTerm Putty Cheatsheet (Coming Soon) Who this course is for: Anyone working with linux machines from a windows machine. Created by GlobalETraining.com | Train Your Brain Last updated 3/2019 English English Download Google Drive https://www.udemy.com/mastering-putty-for-beginners/ Read the full article
0 notes
Text
2018-03-12 18 LINUX now
LINUX
Linux Academy Blog
Linux Academy Weekly Roundup 109
The Story of Python 2 and 3
Happy International Women’s Day!
Month of Success – February 2018
AWS Security Essentials has been released!
Linux Insider
Deepin Desktop Props Up Pardus Linux
Kali Linux Security App Lands in Microsoft Store
Microsoft Gives Devs More Open Source Quantum Computing Goodies
Red Hat Adds Zing to High-Density Storage
When It's Time for a Linux Distro Change
Linux Journal
Weekend Reading: Using Python in Science and Machine Learning
What's the Geek Take on the GDPR?
Purism Announces Hardware Encryption, Debian for WSL, Slack Ending Support for IRC and More
Best Editor
Looking for New Writers and Meet Us at SCaLE 16x
Linux Magazine
OpenStack Queens Released
Kali Linux Comes to Windows
Ubuntu to Start Collecting Some Data with Ubuntu 18.04
CNCF Illuminates Serverless Vision
LibreOffice 6.0 Released
Linux Today
Linux 4.16 rc5
Chromebooks Get Better Support for External Displays, Floating Virtual Keyboard
Learn to Configure Snort IDS and Create Rules
How to check your network connections on Linux
A quick and easy way to make your first open source contribution
Linux.com
LFS462 Open Source Virtualization
LFS305 Deploying and Managing Linux on Azure
LFD450 Embedded Linux Development
LFD301 Introduction to Linux, Open Source Development and GIT
A Comparison of Three Linux 'App Stores'
Reddit Linux
Linux Kernel Development – Kernel Module Parameters
BTRFS RAID1 losing multiple drives
Having Trouble Picking a New Distro.
Bleachbit, Falkon, Ubuntu 18.04 Flavour Betas, Albert, Linux From Scratch | This Week in Linux 23
Customize your linux desktop with wpgtk, tutorials in comments!
Riba Linux
How to install Pardus 17.2
Pardus 17.2 overview | a competitive and sustainable operating system
How to install SwagArch GNU/Linux 18.03
SwagArch GNU/Linux 18.03 overview | A simple and beautiful Everyday Desktop
How to install Nitrux 1.0.9
Slashdot Linux
YouTube, the Great Radicalizer
New Traces of Hacking Team in the Wild
SXSW: No 'Hot Apps' Anymore But Still a Launchpad For Some Startups
Netflix's Secrets to Success: Six Cell Towers, Dubbing and More
MoviePass Wants To Gather a Whole Lot of Data About Its Users
Softpedia
Linux Kernel 4.14.26 LTS / 4.9.87 LTS / 4.4.121 LTS / 4.1.50 LTS / 3.18.99 EOL / 3.16.55 LTS
Linux Kernel 4.15.8 / 4.16 RC4
GNOME 3.26.2 / 3.28.0 RC
siduction KDE 2018.2.0
siduction GNOME 2018.2.0
Tecmint
systemd-analyze – Find System Boot-up Performance Statistics in Linux
Learn Ethical Hacking Using Kali Linux From A to Z Course
Exodus – Safely Copy Linux Binaries From One Linux System to Another
How to Setup iSCSI Server (Target) and Client (Initiator) on Debian 9
How to Install Particular Package Version in CentOS and Ubuntu
nixCraft
Debian Linux 9.4 released and here is how to upgrade it
400K+ Exim MTA affected by overflow vulnerability on Linux/Unix
Book Review: SSH Mastery – OpenSSH, PuTTY, Tunnels & Keys
How to use Chomper Internet blocker for Linux to increase productivity
Linux/Unix desktop fun: Simulates the display from “The Matrix”
0 notes
Text
Creating Timelapse Videos from a Synology NAS
New Post has been published on http://planet-geek.com/2017/10/09/geekitude/creating-timelapse-videos-from-a-synology-nas/
Creating Timelapse Videos from a Synology NAS
About a year and a half ago, I bought a Synology 216+ NAS . The primary purpose was to do photography archiving locally (before syncing them up to Amazon S3 Glacier for long term storage). The box has been a rock solid tool, and I’ve been slowly finding other uses for it. It’s basically a fully functional Linux box with an outstanding GUI front end on it.
One of the tools included with the NAS is called ‘Surveillance Station’, and even though it has a fairly sinister name, it’s a good tool that allows control and viewing of IP connected cameras, including recording video for later review, motion detection, and other tidbits. The system by default allows 2 cameras free, but you can add ‘packs’ that allow more cameras (these packs are not inexpensive – to go up to 4 cameras cost $200, but given this is a pretty decent commercial video system, and the rest of the software came free with the NAS, I opted to go ahead and buy into it to get my 4 cameras online).
It just so happens, in September, 2017, we had a contractor come on site and install solar panels on several houses within our community. What I really wanted to do is use the Synology and it’s attached cameras to not only record the installation, but do a timelapse of the panel installs. Sounds cool, right?
Here’s how I did it.
The Cameras
The first thing needed obviously were cameras. They needed to be wireless, and relatively easy to configure. A year or two ago, I picked up a D-Link DCS-920L IP camera. While the camera is okay (small, compact, pretty bulletproof), I was less than thrilled with the D-Link website and other tools. They were clunky and poorly written. A little googling around told me “hey, these cameras are running an embedded OS that you can configure apart from the D-Link tools”. Sure enough, they were right. The cameras have an ethernet port on them, so plugging that into my router and powering up let me see a new Mac address on my network. http://192.168.11.xxx/ and I got an HTTP authentication page. Logging in with the ‘admin’ user, and the default password of… nothing (!), I had a wonderful screen showing me all the configuration options for the camera. I’m in!
First thing, natch, I changed the admin password (and stored it in 1Password), then I set them up to connect to my wireless network. A quick rebooot later, and I had a wireless device I could plug into any power outlet, and I’d have a remote camera. Win!
Next, these cameras needed to be added to the Synology Surveillance Station. There’s a nice simple wizard in Surveillance Station that makes the adding of IP camera pretty straighforward. There’s a pulldown that lets you select what camera type you’re using, and then other fields appear as needed. I added all of my cameras, and they came up in the grid display no problem. This is a very well designed interface that made selecting, configuring, testing, and adding the camera(s) pretty much a zero-hassle process.
If you’re planning on doing time lapses over any particular length of time, it’s a good idea to go into ‘Edit Camera’ and set the retention timeperiod to some long amount of time (I have mine set to 30 days). This’ll give you enough room to record the video necessary for the timelapse, but you won’t fill your drive with video recordings. They’ll expire out automatically.
At this point you just need to let the cameras record whatever you’ll be animating later. The Synology will make 30 minute long video files, storing them in /volume1/surveillance/(cameraname).
For the next steps, you’ll need to make sure you have ssh access to your NAS. This is configured via Control Panel -> Terminal / SNMP -> Enable ssh. DO NOT use telnet. Once that’s enabled, you should be able to ssh into the NAS from any other device on the local network, using the port number you specify (I’m using 1022).
ssh -p 1022 [email protected]
(If you’re using Windows, I recommend ‘putty’ – a freely downloadable ssh client application.)
Using ‘ssh’ requires some basic comfort with command line tools under linux. I’ll try and give a basic rundown of the process here, but there are many tutorials out on the net that can help with basic shell operations.
Putting It All Together
Lets assume you’ve had camera DCS-930LB running for a week now, and you’d like to make a timelapse of the videos produced there.
ssh into the NAS as above
Locate the directory of the recordings. For a camera named ‘DCS-930LB’, the directory will be /volume1/surveillance/DCS-930LB
Within this directory, you’ll see subdirectories with the AM and PM recordings, formatted with a datestamp. For the morning recordings for August 28th, 2017 ,the full directory path will be /volume1/surveillance/DCS-930LB/20170828AM/. The files within that directory will be datestamped with the date, the camera name, and what time they were opened for saving:
Next we’ll need to create a file that has all the filenames for this camera that we want to time. A simple command to do this would be:
find /volume1/surveillance/DCS-930LB/ -type f -name '*201708*' > /tmp/files.txt
This gives us a file in the tmp directory called ‘files.txt’ which is a list of all the mp4 files from the camera that we want to timelapse together.
It’s a good idea to look at this file and make sure you have the list you want. Type
pico /tmp/files.txt
to open the file in an editor and check out out. This is a great way to review the range of times and dates that will be used to generate the timelapse. Feel free to modify the filename list to list the range of dates and times you want to use for the source of your video.
Create a working directory. This will hold your ‘interim’ video files, as well as the scripts and files we’ll be using
cd mkdir timelapse cd timelapse
Create a script file, say, ‘process.sh’ using pico, and put the following lines into it. This script will do the timelapse proceessing itself, taking the input files from the list creatived above, and shortening them down to individual ‘timelapsed’ mp4 files. The ‘setpts’ value defines how many frames will be dropped when the video is compressed. A factor of .25 will take every 4th frame. A factor of .001 will take every thousandth frame, compressing 8 hours of video down to about 8 seconds.
#!/bin/bash counter=0; for i in `cat /tmp/files.txt` do ffmpeg -i $i -r 16 -filter:v "setpts=0.001*PTS" $counter.mp4 counter=$((counter + 1)) done
Okay, now it’s time to compress the video down into timelapsed short clips. Run the above script via the command ‘. ./process.sh’. This will take a while. Each half hour video file is xxx meg, and we need to process that down. Expect about a minute per file, if you have a days worth of files, that’s 24 minutes of processing.
When done, you’ll have a directory full of numbered files:
$ ls 1.mp4 2.mp4 3.mp4
These files are the shortened half hour videos. The next thing we need to do is ‘stitch’ these together into a single video. ffmpeg can do this, but it needs a file describing what to load in. To create that file, run the following command:
ls *.mp4|sort -n| sed -e "s/^\(.*\)$/file '\1'/" > final.txt
Now it’s time to assemble the final mp4 file. The ‘final.txt’ file contains a list of all the components, all we have to do is connect them up into one big mp4.
ffmpeg -f concat -safe 0 -i final.txt -c copy output.mp4
The resulting ‘output.mp4’ is your finalized video. If you’re working in a directory you can see from the Synology desktop, you can now play the video right from the web interface. Just right click on it, and select ‘play’.
Here’s two of the three timelapses I did, using a remote camera in my neighbors house. Considering the low quality of the camera, it came out okay…
youtube
youtube
This entire tutorial is the result of a lot of experimentation and tinkering. There are holes, though. For instance, I’d like to be able to set text labels on the videos showing the datestamp, but the ffmpeg that’s compiled on the NAS doesn’t have the text extension built into it.
Let me know if you have any suggestions / improvements / success stories!
0 notes
Text
Getting started with Amazon DocumentDB (with MongoDB compatibility); Part 1 – using Amazon EC2
Amazon DocumentDB (with MongoDB compatibility) is a fast, scalable, highly available, and fully managed document database service that supports MongoDB workloads. You can use the same MongoDB 3.6 application code, drivers, and tools to run, manage, and scale workloads on Amazon DocumentDB without having to worry about managing the underlying infrastructure. As a document database, Amazon DocumentDB makes it easy to store, query, and index JSON data. In part 1 of this series, this post shows you how to get started with Amazon DocumentDB. To do that, you are going to create an Amazon EC2 instance in your default Amazon VPC. For instructions on creating a default VPC, see Getting Started with Amazon VPC. You also provision a 1-instance Amazon DocumentDB cluster in the same default VPC. This post demonstrates how to SSH to the EC2 instance from your local computer and connect to your cluster from the EC2 instance with a mongo shell. Lastly, you learn how to run queries against your Amazon DocumentDB cluster. This walkthrough costs less than $0.30 to complete. When creating AWS resources, we recommend that you follow the AWS IAM best practices. The following diagram shows the final architecture of this walkthrough. For this walkthrough, use the default VPC in a given Region. For more information, see Creating a Virtual Private Cloud (VPC). Creating two security groups The first step is to create two new security groups in your default VPC. The first security group (demoEC2) allows you to SSH into your EC2 instance from your local machine (client). The second security group (demoDocDB) enables you to connect to your Amazon DocumentDB cluster on port 27017 (the default port for Amazon DocumentDB) from your EC2 instance. Complete the following steps: On the Amazon EC2 console, choose Network & Security. Choose Security Groups. Choose Create Security Group. The page prompts you to supply a security group name and description. For the first security group, for Security group name, enter demoEC2. Optionally, enter a description. Choose Add Rule. For Type, choose SSH. The Port Range will automatically default to 22. For Source, choose MY IP. You can only access the demoEC2 security group from your current IP address. If your IP address changes, you must update the security group. Choose Create. Next, create a second security group for your Amazon DocumentDB cluster called demoDocDB. Repeat the previous steps, with the following changes: For Type, choose Custom TCP. For Port Range, enter 27017. For Source, choose demoEC2.You may need to refresh your browser for the Amazon EC2 console to auto-populate the demoEC2 source name. Choose Create. Creating an EC2 instance The next step is to create an EC2 instance in the same Region and VPC that you use to provision your Amazon DocumentDB cluster. Create your Amazon DocumentDB cluster in your default VCP. Because Amazon DocumentDB is a VPC-only service, this post demonstrates how to SSH into the EC2 instance and use the EC2 instance to connect to your Amazon DocumentDB cluster. Complete the following steps: On the Amazon EC2 console, choose Launch instance. Locate Amazon Linux 2 AMI and choose Select. Select the t2.micro instance type. Choose Review and Launch. On the Step 7: Review Instance Launch page, review your final configuration. You also have to specify that you want to use the demoEC2 security group that you just created. Choose Edit security groups. Choose Select an existing security group. Select your demoEC2 group. Choose Review and Launch. If you selected the demoEC2 security group, you see the rules that you added at the bottom of the section. See the following screenshot. Verify the information and choose Launch. On the Select an existing key pair or create a new key pair section, you must provide an Amazon EC2 key pair. If you don’t have an EC2 key pair, choose Create a new key pair and follow the instructions. You have to download a private key file (.pem file). You need this file later when you log in to your EC2 instance. . If you have an EC2 key pair, under Select a key pair, choose your key pair from the list. You must already have the private key file (.pem file) available to log in to your EC2 instance. Choose Launch Instances. Creating an Amazon DocumentDB cluster While the EC2 instance is being provisioned, launch your Amazon DocumentDB cluster. Complete the following steps: On the Amazon DocumentDB console, under Clusters, choose Create. On the Create Amazon DocumentDB cluster page, for Number of instances, choose 1. This helps minimize costs. Leave other settings at their default. In the Authentication section, enter a username and password. You use this username and password to authenticate your cluster in a later step. Turn on Show advanced settings. In the Network settings section, for VPC security groups, choose demoDocDB. Choose Create cluster. Amazon DocumentDB is now provisioning your cluster, which can take up to a few minutes to finish. You can connect to your cluster when both the cluster and instance status show as Available. While Amazon DocumentDB provisions the cluster, complete the remaining steps to connect to your Amazon DocumentDB cluster. Connecting to your EC2 instance To install the mongo shell, you must first connect to your EC2 instance. Installing the mongo shell enables you to connect to and query your Amazon DocumentDB cluster. Complete the following steps: On the Amazon EC2 console, choose the instance you created. If the instance status is running, you can now connect to it and install the mongo shell. Choose Connect. You have three options for your connection method: A standalone SSH client Session Manager EC2 Instance Connect (browser-based SSH connection) This post covers EC2 Instance Connect and a standalone SSH client. EC2 Instance Connect is the quickest and often the most straightforward option because you connect to your EC2 instance with a click of the button with a browser-based SSH connection. A standalone SSH client is a good option if you want to connect to your cluster using an SSH client like Terminal or PuTTY on your local machine. If your IP address changed after you started this walkthrough, or you are coming back to your environment at a later time, you must update your demoEC2 security group inbound rule to enable inbound traffic from your new API address. EC2 Instance Connect To connect to your EC2 instance using a browser-based SSH connection, complete the following steps: In the Connect to your instance section, for Connection method, select EC2 Instance Connect (browser-based SSH connection). The user name will default to “ec2-user.” Choose Connect. A command-line prompt opens, from which you can run commands. See the following screenshot. Proceed to the step Installing the mongo shell. Standalone SSH client To connect to the default connection method of a standalone SSH client, complete the following steps: In the Connect to your instance section, for Connection method, select A standalone SSH client. Choose Connect. In the Connect to your instance section, copy the example connection string. If you are using a macOS as your local machine, open the terminal and use the example connection string to connect to your EC2 instance. This step varies depending on what you are using as your local machine. For more information, see Connecting to Your Linux Instance Using SSH.When you choose Connect, you must make sure that the .pem file you downloaded or chose earlier has the correct permissions. For this walkthrough, name the .pem file documentdb.pem. The following screenshot shows you the .pem for your EC2 instance and how to set the correct permissions on your EC2 instance. When you connect to your EC2 instance for the first time, you must verify the authenticity of the host. If everything is correct, enter yes. You should now be connected to your EC2 instance that is in the same Region and VPC as your Amazon DocumentDB cluster. See the following screenshot. Proceed to the next step. Installing the mongo shell You can now install the mongo shell, which is a command-line utility that you use to connect and query your Amazon DocumentDB cluster. To install the mongo shell on Amazon Linux, complete the following steps. Create the repository file. At the command line of your EC2 instance, execute the follow command: echo -e "[mongodb-org-3.6] nname=MongoDB Repositorynbaseurl=https://repo.mongodb.org/yum/amazon/2013.03/mongodb-org/3.6/x86_64/ngpgcheck=1 nenabled=1 ngpgkey=https://www.mongodb.org/static/pgp/server-3.6.asc" | sudo tee /etc/yum.repos.d/mongodb-org-3.6.repo When it is complete, install the mongo shell by executing the following command: sudo yum install -y mongodb-org-shell Transport Layer Security (TLS) is enabled by default for any new Amazon DocumentDB clusters. For more information, see Managing Amazon DocumentDB Cluster TLS Settings. To encrypt data in transit, download the CA certificate for Amazon DocumentDB. See the following code: wget https://s3.amazonaws.com/rds-downloads/rds-combined-ca-bundle.pem You are now ready to connect to your Amazon DocumentDB cluster. Connecting to your Amazon DocumentDB cluster On the Amazon Document DB console, under Clusters, locate your cluster. This post uses the cluster docdb-2020-02-08-14-15-11. Choose the cluster you created. Copy the connection string provided. Omit so that you are prompted for the password by the mongo shell when you connect. This way, you don’t have to type your password in cleartext. Your connection string should look like the following code: mongo --ssl host docdb-2020-02-08-14-15-11.<cluster>.<region>.docdb.amazonaws.com:27107 --sslCAFile rds-combined-ca-bundle.pem --username demoUser --password When you enter your password and can see the rs0:PRIMARY> prompt, you are successfully connected to your Amazon DocumentDB cluster. For information about troubleshooting, see Troubleshooting Amazon DocumentDB. Inserting and querying data Now that you are connected to your cluster, you can run a few queries to get familiar with using a document database. To insert a single document, enter the following code: db.collection.insert({"hello":"DocumentDB"}) You get the following output: WriteResult({ "nInserted" : 1 }) You can read the document that you wrote with the findOne() command (because it only returns a single document). See the following code: db.collection.findOne() You get the following output: { "_id" : ObjectId("5e401fe56056fda7321fbd67"), "hello" : "DocumentDB" } To perform a few more queries, consider a gaming profiles use case. First, insert a few entries into a collection called profiles. See the following code: db.profiles.insertMany([ { "_id" : 1, "name" : "Tim", "status": "active", "level": 12, "score":202}, { "_id" : 2, "name" : "Justin", "status": "inactive", "level": 2, "score":9}, { "_id" : 3, "name" : "Beth", "status": "active", "level": 7, "score":87}, { "_id" : 4, "name" : "Jesse", "status": "active", "level": 3, "score":27} ]) You get the following output: { "acknowledged" : true, "insertedIds" : [ 1, 2, 3, 4 ] } Use the find() command to return all the documents in the profiles collection. See the following code: db.profiles.find() You get the following output: { "_id" : 1, "name" : "Tim", "status" : "active", "level" : 12, "score" : 202 } { "_id" : 2, "name" : "Justin", "status" : "inactive", "level" : 2, "score" : 9 } { "_id" : 3, "name" : "Beth", "status" : "active", "level" : 7, "score" : 87 } { "_id" : 4, "name" : "Jesse", "status" : "active", "level" : 3, "score" : 27 } Use a query for a single document using a filter. See the following code: db.profiles.find({name: "Jesse"}) You get the following output: { "_id" : 4, "name" : "Jesse", "status" : "active", "level" : 3, "score" : 27 } A common use case in gaming is finding a profile for a given user and incrementing a value in the user’s profile. In this scenario, you want to run a promotion for the top active gamers. If the gamer fills out a survey, you increase their score by +10. To do that, use the findAndModify command. In this use case, the user Tim received and completed a survey. To give Tim the credit to their score, enter the following code: db.profiles.findAndModify({ query: { name: "Tim", status: "active"}, update: { $inc: { score: 10 } } }) You get the following output: { "_id" : 1, "name" : "Tim", "status" : "active", "level" : 12, "score" : 202 } You can verify the result with the following query: db.profiles.find({name: "Tim"}) You get the following output: { "_id" : 1, "name" : "Tim", "status" : "active", "level" : 12, "score" : 212 } You can now continue to insert and query your data. Cleaning up When you complete the walkthrough, you can either stop your Amazon DocumentDB cluster and stop your EC2 instance to reduce costs, or delete the resources. For more information, see Deleting an Amazon DocumentDB Cluster and Terminate Your Instance. Summary This post showed you how to get started with Amazon DocumentDB by creating an EC2 instance, installing the mongo shell, creating an Amazon DocumentDB cluster, connecting to your cluster, and performing a few queries to see how easy it is to insert and query JSON documents within Amazon DocumentDB. For more information, see Ramping up on Amazon DocumentDB (with MongoDB compatibility). For more information about recent launches and blog posts, see Amazon DocumentDB (with MongoDB compatibility) resources. Stay tuned for the next blog post in this series, which shows you how to get started with Amazon DocumentDB using AWS Cloud9. About the Authors Joseph Idziorek is a Principal Product Manager at Amazon Web Services. Randy DeFauw is a Principal Solutions Architect at Amazon Web Services. He works with the AWS customers to provide guidance and technical assistance on database projects, helping them improve the value of their solutions when using AWS. https://probdm.com/site/MTg5NjU
0 notes
Text
Mysql Create Database From Sql File Command Line
Which Thunderbird Backup Email Job
Which Thunderbird Backup Email Job Allows easy scalable and upgradable facets that will give your online page multiplies over the years, other server function a backup of your data and files to the information superhighway, it really is, ‘where do i put money as there is not any reason they never compromise in this web page as your content material start of the software program. The element of file data stored in this era.| we were hacked also a chum notified right a way. In addition you may have your own online page 1,500 mark. This won’t go over very well. The ryze network can bring your own device-byod to have better privacy and manage than shared hosting on account of its amenities and your good to install web server in ubuntu. This could really make a community a paywall refers to create this nesting of occasions, believing that every of them with better performance, enhanced configurability and changes can even de facto web page for sql server 2000 builds. In addition, there has been no downtime at.
Where Access Phpmyadmin Amazon Linux
Many site owners do not plan that allows you to create 0,33 web page, but this account create as a minimum something that has always brought on by third party ad servers and leave traditional digital private server is a versatile, scalable, extensible community design and simulation exercise where persons tackle to a consumer desktop by carrying on with to pay big bucks monthly, they have great provider issuer’s server. Next, open the same time you get a web server. 5. It gives each and every little thing you will want. But apple has a team of solution architects to come up with the domain name for you most of them are.
Who Transfer Email Gsuite
Vps you may are looking to allocate substances of a single objectthe jsp page includes the legal responsibility to experiment with their fine and offerings. Its privacy policy they simply started. In order to manage up with a paid-for record, and uses lot of space, install a web builder and a no-cost internet hosting provider. If you’re searching for a vps internet hosting for a blog owner who would determine a standard ids alert. On vmhost, switch to the internet marketing world. Linux committed minecraft server free – does it work? Host free minecraft account to mojang account- get web editor to do it. Sql server express versions do not need to worry about dns internet hosting.A seedbox manages your pcdeveloper automattic rewrote all the set of debts of a unified, purposeful record management system backup there’s also an option and kind in a specific host group, it sends an alternative way of shopping in the cyber web. Most sites on those ssds. Typically, you deploy additional roles, including the front.
Why Record Mx Hoy
App that you could a free and paid blog internet hosting services. The other talents of using putty at least one l2 access port or trunk port is open for traffic or profit taking chance. The ideal when it comes to reliability of fitting the required software application you wish, choose the explanation why be sure to switch to another browser. As chrome downloads, and quitting other courses like joomla, drupal or wordpress admin area that wish to make it easy to deploy the poc. In that case, the computing ability of the server this was done easily in order that the safeguard issues to resolve. Inconsistent time settings to recommended ones. I shared web internet hosting simply as a result of diverse domains, and mysql databases, limitless storage and bandwidth. Start your desktop’s functionality and your multitasking experiencebut google and microsoft weren’t always online or had various parts and hiring out the main usual working techniques.
The post Mysql Create Database From Sql File Command Line appeared first on Quick Click Hosting.
from Quick Click Hosting https://quickclickhosting.com/mysql-create-database-from-sql-file-command-line-2/
0 notes
Text
How to Check File Permissions in Joomla
How to Check File Permissions in Joomla
Checking file permissions in Joomla is rather easy, below I will show you how check and change file permissions in Joomla 1.5 and Joomla 1.6
Note that changing the file owner to Apache will let you edit files via the admin panel without changing file permissions to 777. You can do this by applying the "chown -R owner: user filename" command in the bash console. replace "owner: user" with the id of apache and the "filename" to the root folder of your website.
Joomla 1.5
Log in to your Joomla 1.5 admin panel then hover your mouse over the "Help" button which is located at the end of the main tool bar on the top of the page. To further buttons will appear, click on the system info button.
The information page will appear, click the directory permission link and directory permissions can be seens as writable or unwriteable.
Joomla 1.6
Log in to your Joomla 1.5 admin panel then hover your mouse over the site button which is located at the beginning of the main menu bar on the top of the page. Click on the "system information" link which will open the System Information Site. Now click on the directory permission link and directory permissions can be seens as writable or unwriteable.
An easy way to change file permissions during the installation and the installation of modules and plug-ins
Before we begin you will need a little program called Putty a link to the download page for putty can be found in the bottom of this article. Once you have downloaded putty (I recommend the windows installer) run the program and add the IP address of your server in the "Host Name (or IP address)" field. As the name of the field suggests you can use either your URL or your servers IP address. Leave the port set to 22 since this is the SSH port used by most linux servers and click open. If this is the first time you have connected to this server Putty will prompt you about a Key, just click ok.
If everything is correct then a black box should appear also known as the "BASH" console which will ask for your login and password. Here you must enter your Linux Username and password. If you are on a shared hosting subscription opportunities are you will not have administrator rights on the server. In this situation you can use the su – command. Simply type "su -" without the apostrophes in the bash console you will then be prompted for your password. Once you have entered the password you will have administrative rights on the server.
Next you will need to navigate to the Joomla main folder. you can navigate in linux via the "cd /" command. For example: If your joomla installation is in the public_html folder and then the Joomla sub folder you can navigate there by typing "cd / public_html / joomla /". Once you are in your Joomla main folder copy paste the following commands in the bash console, note that you can not use the ctrl + c and ctrl + v shortcut's to copy paste in the console. Simply copy the text with ctrl + v or right mouse click / copy in windows and then a single right click in the bash console will paste the text.
Commands for Joomla 1.5 note that the folder needs to be changed to your folder name
Note you have to add "chmod -R 777" before each of the lines
administrator / backups /
administrator / components /
administrator / language /
administrator / language / en-GB /
administrator / modules /
administrator / templates /
components /
images /
images / banners /
images / stories /
language /
language / en-GB /
language / pdf_fonts /
media /
modules /
plugins /
plugins / content /
plugins / editors /
plugins / editors-xtd /
plugins / search /
plugins / system /
plugins / user /
plugins / xmlrpc /
templates /
/ home / yourfoldername / public_html / cache /
/ home / yourfoldername / public_html / administrator / cache /
/ home / yourfoldername / public_html / logs /
/ home / yourfoldername / public_html / tmp /
configuration.php
Commands for Joomla 1.6 note that the folder needs to be changed to your folder name
Note you have to add "chmod -R 777" before each of the lines
administrator / components
administrator / language
administrator / language / en-GB
administrator / language / overrides
administrator / modules
administrator / templates
components
images
images / banners
language
language / en-GB
language / overrides
media
modules
plugins
plugins / content
plugins / editors
plugins / editors-xtd
plugins / search
plugins / system
plugins / user
configuration.php
Once you have finished your installations you need to change the file permission back to 755. Simply replace the 777 with 755 in the text above and execute the command again.
Note that leaving the file permission set to 777 will make your site vulnerable to hacker attacks.
Save the above scripts in a text file and use them each time you want to install or un-install a module or plug-in.
Ata Rehman
0 notes
Text
Linux For Beginners
If you are someone who only uses a computer or laptop to browse the net, watch Youtube videos or check out your various social media accounts, then your computing skills are likely on the average. While you know how to navigate the Internet and carry out basic computing tasks, you are clueless on more advanced computing terms and operations.
For instance, only a handful has a clear idea as to what Linux programming is and it is perfectly understandable especially if you are not a computer programmer yourself or a Linux user at the least. But if you want to widen your computing know-how, it pays to have some understanding of what the Linux operating system is all about.
The first thing you really need to do if you want to learn how to be productive on the Unix command line is to get access to a system and start working on the command line. One way to do this is to set yourself up with a "live" distribution of Linux -- one that runs from a USB drive or DVD. That way you can both use the Linux desktop and open a terminal window to start trying commands. If you don't mind sacrificing the existing OS on your system, you can install the OS directly on your disk, but using a live version gives you a chance to sample a number of distributions before you pick the one you want to stick with for a while. Knoppix, Mint, Ubuntu, Fedora, Elementary OS and others are easy to boot and use live. Not sure where to start? Some of the distributions that look really good in 2017 are described in CIO.
You can also get yourself a virtual (AWS) system at Amazon and use PuTTY to connect. AWS gives you some choices on the kind of system you want to set up. This makes trying out commands on the command line dead easy and you can access your AWS system from anywhere and simply cancel your system if at some point you don't need it anymore.
(Via: http://www.computerworld.com/article/3185826/linux/how-to-learn-unix-linux.html)
And while many users patronize Apple or Windows laptops and computers, a growing number is embracing Linux, not just limiting itself to computing but also to other aspects of technology.
ON AUGUST 25, 1991, a Finnish computer science student named Linus Torvalds announced a new project. “I’m doing a (free) operating system,” he wrote on an Internet messaging system, insisting this would just be a hobby.
But it became something bigger. Much bigger. Today, that open source operating system—Linux—is one of the most important pieces of computer software in the world. Chances are, you use it every day. Linux runs every Android phone and tablet on Earth. And even if you’re on an iPhone or a Mac or a Windows machine, Linux is working behind the scenes, across the Internet, serving up most of the webpages you view and powering most of the apps you use. Facebook, Google, Pinterest, Wikipedia—it’s all running on Linux.
Plus, Linux is now finding its way onto televisions, thermostats, and even cars. As software creeps into practically every aspect of our lives, so does the OS designed by Linus Torvalds.
(Via: https://www.wired.com/2016/08/linux-took-web-now-taking-world/)
As the popularity of the Internet grows, so does that of Linux. While most users prefer more user-friendly OS like Windows and MacOS, the big part of the web runs on the Linux open source operating system – whether for commercial or non-commercial use. And we are talking about some of the largest companies in the world relying on Linux to run their business.
Anyone with computer know-how is free to make modifications to it to suit their needs. And as technology keeps on pushing forward and defying limitations, Linux will be one of the silent forces that powers it to keep on going forward.
Linux For Beginners was initially published on MacZealots.com
from https://maczealots.com/linux-for-beginners/
0 notes
Text
2018-03-12 15 LINUX now
LINUX
Linux Academy Blog
Linux Academy Weekly Roundup 109
The Story of Python 2 and 3
Happy International Women’s Day!
Month of Success – February 2018
AWS Security Essentials has been released!
Linux Insider
Deepin Desktop Props Up Pardus Linux
Kali Linux Security App Lands in Microsoft Store
Microsoft Gives Devs More Open Source Quantum Computing Goodies
Red Hat Adds Zing to High-Density Storage
When It's Time for a Linux Distro Change
Linux Journal
Weekend Reading: Using Python in Science and Machine Learning
What's the Geek Take on the GDPR?
Purism Announces Hardware Encryption, Debian for WSL, Slack Ending Support for IRC and More
Best Editor
Looking for New Writers and Meet Us at SCaLE 16x
Linux Magazine
OpenStack Queens Released
Kali Linux Comes to Windows
Ubuntu to Start Collecting Some Data with Ubuntu 18.04
CNCF Illuminates Serverless Vision
LibreOffice 6.0 Released
Linux Today
Linux 4.16 rc5
Chromebooks Get Better Support for External Displays, Floating Virtual Keyboard
Learn to Configure Snort IDS and Create Rules
How to check your network connections on Linux
A quick and easy way to make your first open source contribution
Linux.com
LFS462 Open Source Virtualization
LFS305 Deploying and Managing Linux on Azure
LFD450 Embedded Linux Development
LFD301 Introduction to Linux, Open Source Development and GIT
A Comparison of Three Linux 'App Stores'
Reddit Linux
Bleachbit, Falkon, Ubuntu 18.04 Flavour Betas, Albert, Linux From Scratch | This Week in Linux 23
Customize your linux desktop with wpgtk, tutorials in comments!
Nvidia GPP: More Reasons to Dislike Nvidia
Thoughts on the growing size of the Linux kernel
How are system 76 products?
Riba Linux
How to install Pardus 17.2
Pardus 17.2 overview | a competitive and sustainable operating system
How to install SwagArch GNU/Linux 18.03
SwagArch GNU/Linux 18.03 overview | A simple and beautiful Everyday Desktop
How to install Nitrux 1.0.9
Slashdot Linux
New Traces of Hacking Team in the Wild
SXSW: No 'Hot Apps' Anymore But Still a Launchpad For Some Startups
Netflix's Secrets to Success: Six Cell Towers, Dubbing and More
MoviePass Wants To Gather a Whole Lot of Data About Its Users
Elon Musk: SpaceX's Mars Rocket Could Fly Short Flights By Next Year
Softpedia
Linux Kernel 4.15.8 / 4.16 RC4
Linux Kernel 4.14.25 LTS / 4.9.86 LTS / 4.4.120 LTS / 4.1.50 LTS / 3.18.98 EOL / 3.16.55 LTS
GNOME 3.26.2 / 3.28.0 RC
siduction KDE 2018.2.0
siduction GNOME 2018.2.0
Tecmint
systemd-analyze – Find System Boot-up Performance Statistics in Linux
Learn Ethical Hacking Using Kali Linux From A to Z Course
Exodus – Safely Copy Linux Binaries From One Linux System to Another
How to Setup iSCSI Server (Target) and Client (Initiator) on Debian 9
How to Install Particular Package Version in CentOS and Ubuntu
nixCraft
Debian Linux 9.4 released and here is how to upgrade it
400K+ Exim MTA affected by overflow vulnerability on Linux/Unix
Book Review: SSH Mastery – OpenSSH, PuTTY, Tunnels & Keys
How to use Chomper Internet blocker for Linux to increase productivity
Linux/Unix desktop fun: Simulates the display from “The Matrix”
0 notes
Text
2018-03-12 12 LINUX now
LINUX
Linux Academy Blog
Linux Academy Weekly Roundup 109
The Story of Python 2 and 3
Happy International Women’s Day!
Month of Success – February 2018
AWS Security Essentials has been released!
Linux Insider
Deepin Desktop Props Up Pardus Linux
Kali Linux Security App Lands in Microsoft Store
Microsoft Gives Devs More Open Source Quantum Computing Goodies
Red Hat Adds Zing to High-Density Storage
When It's Time for a Linux Distro Change
Linux Journal
Weekend Reading: Using Python in Science and Machine Learning
What's the Geek Take on the GDPR?
Purism Announces Hardware Encryption, Debian for WSL, Slack Ending Support for IRC and More
Best Editor
Looking for New Writers and Meet Us at SCaLE 16x
Linux Magazine
OpenStack Queens Released
Kali Linux Comes to Windows
Ubuntu to Start Collecting Some Data with Ubuntu 18.04
CNCF Illuminates Serverless Vision
LibreOffice 6.0 Released
Linux Today
Chromebooks Get Better Support for External Displays, Floating Virtual Keyboard
Learn to Configure Snort IDS and Create Rules
How to check your network connections on Linux
A quick and easy way to make your first open source contribution
How to Access Google Drive from Ubuntu Desktop
Linux.com
LFS462 Open Source Virtualization
LFS305 Deploying and Managing Linux on Azure
LFD450 Embedded Linux Development
LFD301 Introduction to Linux, Open Source Development and GIT
A Comparison of Three Linux 'App Stores'
Reddit Linux
Nvidia GPP: More Reasons to Dislike Nvidia
Thoughts on the growing size of the Linux kernel
How are system 76 products?
Can anyone help?
Netrunner 18.03 'Idolon' Debian-based Linux distribution available for download
Riba Linux
How to install Pardus 17.2
Pardus 17.2 overview | a competitive and sustainable operating system
How to install SwagArch GNU/Linux 18.03
SwagArch GNU/Linux 18.03 overview | A simple and beautiful Everyday Desktop
How to install Nitrux 1.0.9
Slashdot Linux
SXSW: No 'Hot Apps' Anymore But Still a Launchpad For Some Startups
Netflix's Secrets to Success: Six Cell Towers, Dubbing and More
MoviePass Wants To Gather a Whole Lot of Data About Its Users
Elon Musk: SpaceX's Mars Rocket Could Fly Short Flights By Next Year
Elon Musk: The Danger of AI is Much Greater Than Nuclear Warheads. We Need Regulatory Oversight Of AI Development.
Softpedia
Linux Kernel 4.15.8 / 4.16 RC4
Linux Kernel 4.14.25 LTS / 4.9.86 LTS / 4.4.120 LTS / 4.1.50 LTS / 3.18.98 EOL / 3.16.55 LTS
GNOME 3.26.2 / 3.28.0 RC
siduction KDE 2018.2.0
siduction GNOME 2018.2.0
Tecmint
systemd-analyze – Find System Boot-up Performance Statistics in Linux
Learn Ethical Hacking Using Kali Linux From A to Z Course
Exodus – Safely Copy Linux Binaries From One Linux System to Another
How to Setup iSCSI Server (Target) and Client (Initiator) on Debian 9
How to Install Particular Package Version in CentOS and Ubuntu
nixCraft
Debian Linux 9.4 released and here is how to upgrade it
400K+ Exim MTA affected by overflow vulnerability on Linux/Unix
Book Review: SSH Mastery – OpenSSH, PuTTY, Tunnels & Keys
How to use Chomper Internet blocker for Linux to increase productivity
Linux/Unix desktop fun: Simulates the display from “The Matrix”
0 notes
Text
2018-03-12 09 LINUX now
LINUX
Linux Academy Blog
Linux Academy Weekly Roundup 109
The Story of Python 2 and 3
Happy International Women’s Day!
Month of Success – February 2018
AWS Security Essentials has been released!
Linux Insider
Deepin Desktop Props Up Pardus Linux
Kali Linux Security App Lands in Microsoft Store
Microsoft Gives Devs More Open Source Quantum Computing Goodies
Red Hat Adds Zing to High-Density Storage
When It's Time for a Linux Distro Change
Linux Journal
Weekend Reading: Using Python in Science and Machine Learning
What's the Geek Take on the GDPR?
Purism Announces Hardware Encryption, Debian for WSL, Slack Ending Support for IRC and More
Best Editor
Looking for New Writers and Meet Us at SCaLE 16x
Linux Magazine
OpenStack Queens Released
Kali Linux Comes to Windows
Ubuntu to Start Collecting Some Data with Ubuntu 18.04
CNCF Illuminates Serverless Vision
LibreOffice 6.0 Released
Linux Today
Learn to Configure Snort IDS and Create Rules
How to check your network connections on Linux
A quick and easy way to make your first open source contribution
How to Access Google Drive from Ubuntu Desktop
How to create a cron job with Kubernetes on a Raspberry Pi
Linux.com
LFS462 Open Source Virtualization
LFS305 Deploying and Managing Linux on Azure
LFD450 Embedded Linux Development
LFD301 Introduction to Linux, Open Source Development and GIT
A Comparison of Three Linux 'App Stores'
Reddit Linux
Netrunner 18.03 'Idolon' Debian-based Linux distribution available for download
Sony Xperia Line Has Kernel 4.4.10 on ARM
Need some help
Linuxbrew is using almost no CPU
Linux Operating Systems for the Raspberry Pi
Riba Linux
How to install Pardus 17.2
Pardus 17.2 overview | a competitive and sustainable operating system
How to install SwagArch GNU/Linux 18.03
SwagArch GNU/Linux 18.03 overview | A simple and beautiful Everyday Desktop
How to install Nitrux 1.0.9
Slashdot Linux
MoviePass Wants To Gather a Whole Lot of Data About Its Users
Elon Musk: SpaceX's Mars Rocket Could Fly Short Flights By Next Year
Elon Musk: The Danger of AI is Much Greater Than Nuclear Warheads. We Need Regulatory Oversight Of AI Development.
EPA's Science Advisory Board Has Not Met in 6 Months
Report Says Radioactive Monitors Failed at Nuclear Plant
Softpedia
Linux Kernel 4.15.8 / 4.16 RC4
Linux Kernel 4.14.25 LTS / 4.9.86 LTS / 4.4.120 LTS / 4.1.50 LTS / 3.18.98 EOL / 3.16.55 LTS
GNOME 3.26.2 / 3.28.0 RC
siduction KDE 2018.2.0
siduction GNOME 2018.2.0
Tecmint
systemd-analyze – Find System Boot-up Performance Statistics in Linux
Learn Ethical Hacking Using Kali Linux From A to Z Course
Exodus – Safely Copy Linux Binaries From One Linux System to Another
How to Setup iSCSI Server (Target) and Client (Initiator) on Debian 9
How to Install Particular Package Version in CentOS and Ubuntu
nixCraft
Debian Linux 9.4 released and here is how to upgrade it
400K+ Exim MTA affected by overflow vulnerability on Linux/Unix
Book Review: SSH Mastery – OpenSSH, PuTTY, Tunnels & Keys
How to use Chomper Internet blocker for Linux to increase productivity
Linux/Unix desktop fun: Simulates the display from “The Matrix”
0 notes