
Don't wanna be here? Send us removal request.
Statistics
We looked inside some of the posts by daveshevett and here's what we found interesting.
Average Info
Notes Per Post
2
Likes Per Post
2
Reblog Per Post
0
Reply Per Post
0
Time Between Posts
2 months
Number of Posts By Type
Text
17
Last Seen Tumblr Blogs


Fun Fact
Tumblr.com is the 103rd most visited website in the world.
Text
Best Cyberpunk Movies and Books
New Post has been published on https://planet-geek.com/2022/10/24/reviews/best-cyberpunk-movies-and-books/
Best Cyberpunk Movies and Books
Cyberpunk 2077 from CD Projekt Red
Lately, the concept of “Cyberpunk” has come back into the general discourse. With the success of the Hackaday Cyberdeck Contest (and my modest contribution to it), not to mention a certain large social media company throwing around terms we’ve all heard for years like they were something new, there’s renewed interest in the entire cyberpunk genre.
To that end, I thought it might be a good idea to look at the books and movies that best exemplify the art form. To that end, I give you my recommendations of the best in Cyberpunk…
Movies
The Matrix – 1999 Not really a lot needs to be said here. This movie came out of nowhere and pretty much reset the whole nerd culture worldview.
Ghost in the Shell – 1996 animated. Remade in 2017 as live action There’s some wonderful crossover details in this movie with a view of gritty life in the streets and
absolutely jawdropping technology – being able to install a human being into an artificial ‘shell’, granting them what amounts to superpowers. The original anime was groundbreaking in it’s concepts, exploring the concept of self identity. The live action movie did a great job of expanding the visuals into a modern form, but I feel sacrificed story and depth for action.
Johnny Mnemonic – 1995 Sigh. So, for those who don’t know, this movie is based on a short story by William Gibson from Burning Chrome. The story is fantastic, but this movie adaptation… isn’t. I mean, if you’re into the most 90s SF movie you can get, this is it. But lets be frank. It’s not a good movie.
Blade Runner – 1982 There’s a great interview where William Gibson went to see Blade Runner…
I was afraid to watch Blade Runner in the theater because I was afraid the movie would be better than what I myself had been able to imagine. In a way, I was right to be afraid, because even the first few minutes were better. Later, I noticed that it was a total box-office flop, in first theatrical release. That worried me, too. I thought, Uh-oh. He got it right and nobody cares! Over a few years, though, I started to see that in some weird way it was the most influential film of my lifetime, up to that point.
William Gibson
Pretty much no matter how you look at it, Blade runner is the best representation of Gibson’s Sprawl in movie-dom. While the movie was not a box office success when it came out, it has gained a cult status, and for good reason. The story of an overpopulated city and a damaged ecosystem (it always rains), coupled with technology and staggering wealth is unparalleled.
Strange Days – 1995 This is a movie that snuck under a lot of peoples radar, but absolutely exemplifies the Cyberpunk mindset. Sensory link technology co-opted for nefarious purposes far beyond it’s original design. The movie isn’t as well known as it should be, but it absolutely should be required viewing for anyone interested in the cyberpunk genre
Books
It all started with books. Before Netflix, before Youtube, before the movie industry cottoned on to the fact there’s money to be made in hard SF, there were the books. Here’s the best examples…
Mirrorshades – The Cyberpunk Anthology Unfortunately out of print now (though there’s a free version hosted on Rudy Rucker’s site), Mirrorshades is a short story collection edited by Bruce Sterling. It has the honor of being the first collection to explicitely describe itself as Cyberpunk, and as such, has a place of honor in this list.
Snow Crash
Snow Crash – Neal Stephenson One of the best of the genre, IMHO. So many fantastic concepts, so brilliantly presented. The book hasn’t aged well, as many of the concepts really don’t make much sense anymore, but who can resist
this writing?
“The Deliverator’s car has enough potential energy packed into its batteries to fire a pound of bacon into the Asteroid Belt. Unlike a bimbo box or a Burb beater, the Deliverator’s car unloads that power through gaping, gleaming, polished sphincters… You want to talk contact patches? Your car’s tires have tiny contact patches, talk to the asphalt in four places the size of your tongue. The Deliverator’s car has big sticky tires with contact patches the size of a fat lady’s thighs. The Deliverator is in touch with the road, starts like a bad day, stops on a peseta.”
Diamond Age – Neal Stephenson Of Neal Stephenson’s work, this may be one of my favorites. Not strictly cyberpunk as it loosely ties in with Snow Crash but after nanotechnology has become the norm, but still gritty and enjoyable. The world building is outstanding.
Neuromancer Count Zero Mona Lisa Overdrive Burning Chrome – William Gibson Basically, where it all started. Gibson’s Sprawl Trilogy is the G.O.A.T. in the Cyberpunk realm. Gibson was the man to bring the term Cyberspace into full form in his stories, starting with Burning Chrome, and then into the the Sprawl trilogy. Arguably he was the man to define what Cyberpunk looks and feels like, and his influence drives everything
Altered Carbon – Richard Morgan A great book (and later TV show) that explores what happens when technology is integrated tightly into society, to the point where individuals are, in many ways, immortal. Lives are recorded and uploaded and can be placed into a new body. But as in so many things, this experience is primarily for the wealthy.
Trouble and her Friends – Melissa Scott Many people interested in this genre may not have heard of this one. The scenario sounds familiar –
netwalking hackers evading deadly IC(E) (Intrustion Countermeasures (Electronic)) using implanted brain computer interfaces – but Scott’s characters in many ways are more human, more real, and definitely not cut from the mold the male-dominated circles have created.
Final Thoughts
I’ve grown quite attached to the concepts of high technology tightly coupled with humanity – and we’re slowly on the road to these sorts of things being the norm. Witness things like cochlear implants, and other types of brain computer interfaces. While what results will likely not resemble the imaginative geometry and immersion described in Snow Crash and Trouble and Her Friends, I feel the barrier between “human” and “computer” continues to thin, and what will happen when that interface is complete, only the SF writers can speculate.
1 note
·
View note
Text
Google Voice: A slow slide into disfunctionality
New Post has been published on https://planet-geek.com/2022/09/19/rants/google-voice-a-slow-slide-into-disfunctionality/
Google Voice: A slow slide into disfunctionality
I’ve been a Google Voice user for over a decade. The service has been reliable, steadfast, and for the most part, works as expected.
But as with so many Google products, I feel Voice is slowly rotting on the vine, and each day I find another thing that is not working properly, or is simply unfathomable in it’s behaviour.
Lets run down the challenges facing Voice now.
Integration with chat on mobile devices Google has a dreadful track record when it comes to chat apps / communication. Hangouts, Allo, Chat, Messages, heck even Plus – each of these lived at some point. Some died, some moved, some… we’re just not sure what’s going on. Until Google figures out their messaging strategy and actually executes it, we’re all going to be fidgeting.
The only option for message handling.
Voice originally integrated with Hangouts, but that integration has long since gone by the wayside. Now the only way to use google voice with IM is either in the Voice App on the phone, or via https://voice.google.com/.
The web app Okay, so there’s https://voice.google.com – a relatively useful webpage for sending//receiving calls, texts, etc. But… it’s a TERRIBLE application. I feel it was written once in 2013 and basically hasn’t been improved since. Some examples:
Contacts integration is dreadful. Trying to find or update a contact in the page is an exercise in frustration.
In the text chat, image handling is completely useless. No paste, no simple “Send this file”, and even when you do send something, it may simply fail with “Not sent” – more on this in a moment. But at it’s basic level, here’s how to send a photo / pic in voice:
The least useful dialog ever
Find your image / pic / whatever you want to sendSave a copy of that image to your desktop
Open the voice app and click the little photo icon in the send boxYou’d think you could paste an image here. You’d be wrong. Click Select photos from your computer
Find the photo you were just editing, double-click on that. This ‘uploads’ the photo to… something. Not google photos – something specific to Voice?
Select the photo. Now it’s a thumbnail in your send box
Click send
It probably won’t send. You’ll get the intensely informative and useful error “Not sent”. That’s it!
Other than that Mrs Lincoln…
Seriously though, other than that, the basic function of Voice is still outstanding. One phone number that rings in multiple places. I can take a call ringing on my cell phone on any desktop machine I’m logged into via voice. That’s amazingly useful. My phone number has been the same for 15 years now – when I get a new service plan or change phones, I can just route my Voice number to it, without having to port any numbers.
I really enjoy being able to use my USB Microphone and desktop speakers for cell phone calls without having to haul my phone out if someone is calling me. The audio quality is excellent and it’s very convenient. I would really hate to lose the product, but I also wish Google would fix some of the rough edges that are just getting rougher as the Voice ages.
If I didn’t have the nagging feeling Google will abandon Voice just like they do so many other products, I’d be a much bigger fan, but the slow eroding of functionality doesn’t give me a lot of hope.
0 notes
Text
Overhead LED Light Replacement for RV Camper Trailer
New Post has been published on https://planet-geek.com/2022/09/13/reviews/overhead-led-light-replacement-for-rv-camper-trailer/
Overhead LED Light Replacement for RV Camper Trailer
When we got our 2016 Starcraft hybrid trailer, it felt like a great combination of small size, expandable living space, and conveniences. I mean, we have our own bathroom, shower, AC, heating, and kitchenette. Heaven!
One thing irked me right off the bat though. The internal lighting. The trailer came with round 12v ceiling lights that were blazingly bright. No dimmer, no adjustment, and it was direct lighting – ie, it shined directly on whatever you were illuminating, unlike, say, a table lamp, which uses a shade to diffuse the light.
I decided to replace them.
The Light
After doing some research, I settled on the BlueFire 700LM Dimmable LED dome lights. They offered a couple advantages:
They fit the aesthetic of the interior – flush mount, easy to attach
These panels are dimmable. You can use the slider to bring the intensity down to whatever you’re looking for
They have a ‘temperature’ setting that lets you go from ‘electric blue bright’ to ‘soft yellow’, depending on what you prefer.
Installation
Here’s what the old lights look like. They’re pretty basic, just an on/off switch. There’s about 4 in the interior (I’m not touching the ceiling lights, these are just for the sitting areas)
Uninstalling the light was pretty straightforward. Pop off the cover, unscrew the 4 mounting screws. Of course, that revealed this top notch installation job on the part of Starcraft. Looks like they just poked away at it with a small drill until they could smash a hole. Sigh.
After that, it was just a matter of wiring in the two leads, and screwing the new planel into place. I really like how it looks, and nighttimes are FAR FAR more comfortable now, as I can dim the lights down, put some quiet music on, and relax.
I really like being able to do basic changes to the trailer, upgrading bits and pieces, and slowly tweaking it to something I’m really comfortable in. One big project I’m hoping to figure out is how to make the sitting area more comfortable. Those bench seats around the table are uncomfortable as heck. A project for another time.
0 notes
Text
Virtuscope Cyberdeck Build
New Post has been published on https://planet-geek.com/2022/08/22/stuff-n-bother/virtuscope-cyberdeck-build/
Virtuscope Cyberdeck Build
Somewhere in the 2nd year of the pandemic, I stumbled across a posting on Hackster.io about a design for a ‘Cyberdeck’.
A what now?
For those who don’t know, the term Cyberdeck was coined by William Gibson (the inventor of the terms “Cyberpunk” and “Cyberspace” by the way) to describe a piece of computing equipment used to to jack into the net in the future. These fictional machines were basically the hot rods of the grunge tech and hacker scene, able to do anything from simple education stuff all the way to allowing a talented hacker to penetrate the most well protected systems out in cyberspace. They were fast, personalized tech that marked the owner as someone serious about hacking.
BootDSC’s Original Cyberdeck Design
I’ll admit, I’ve read everything by William Gibson, Neal Stephenson (you know, the guy who actually invented the term ‘metaverse’?), Bruce Sterling, and Philip K Dick. In particular, Gibson’s portrayal of Ono-Sendai decks that could jack into and surf cyberspace are well wedged in my psyche. The idea of building and customizing my own ‘deck was too good a concept to pass up, so I took the plunge.
The Printer
There are basically 3 major components to a build like this. The case, the keyboard, and the computer. While it’s possible to build your own keyboard and computer, I wasn’t ready for all that, so I used off the shelf parts for that. The case, however, I’d manufacture myself.
The first phase of this was to get my 3d printer up and running again. I’d been doing a bunch of printing, learning the ropes as it were on how to use TinkerCAD and Cura to take a shape and turn it into a Real Live Thing. I built a healthy respect for people who operated industrial equipment. 3d printing isn’t a push a button, get an object system. It requires constant tinkering, adjusting, repair, and fiddling to keep it all working, and there’s a million small ‘tricks’ you learn in the process to keep a 3d printer running smoothly. It’s a good feeling when you can get your system dialed into the point where you can just power it up, prep the surface, and say “PRINT THIS”, and it works.
Some smooth first layer porn.
My printer (a Creality CR10) had been acting twitchy for a while. I’ve used it for a couple projects in the past, but nothing serious in the last year or two. The problem(s) turned out to be a combination of bad bed levelling, bad bed prep, and a completely horked print nozzle. Once I got those straightened out, I was printing clean, flat prints without any fiddling. I was ready!
The Design
I have to give full credit to BootDSC and the full on Virtuscope design on Thingiverse. This was my first exposure to decks, and I immediately went “I WANT ONE”. Fortunately, the Cyberdeck Cafe website had an entire build page that details all the parts needed. I set up my printer and started printing components, dove into Amazon and various websites to order the parts needed.
Printing the frame, hinges, panels, and other components took about a week. In that time, some of my components had started to arrive, most importantly the Raspberry Pi 4 that was to be the heart of the system, as well as a Geekworm X728 LIPO battery/power module. Screen, keyboard, and other componentry arrived over the next few days.
Display portion of the lid
Gluing the base panels together
This was my first decent ‘build from scratch’ project, and I learned early on I was missing a lot of build supplies. M3 screws and nuts, bolts, a good rotary tool (I had been using an old Craftsman tool I bought 30 years ago? But it died a horrible death partway through the build. The Ryobi rotary tool is excellent, though it really does sound like a dentist drill while in operation).
Eventually I had all the pieces I needed, and I could get on with the build.
I wanted to make one relatively large change – I wanted to use a touchscreen. The 7″ HDMI display I used has a ‘mouse’ function in it that connects to the Pi via USB cable. The problem though is fitting it into the lid of the deck was problematic. I ended up redesigning the lid to give it more ‘depth’ to allow the driver board and cabling to fit. Probably my first real 3d design project – I also had to redesign the component bay lid to make room for the new larger lid and hinge. Multiple prints later, it all fit together the way I wanted it to.
Bench testing the display and controller and realizing the lid needed to be deeper.
This is one of those projects that will really never end. I’m constantly modifying the design, adding new components, removing others. I found that the power connection setup on the back was really awkward, so I designed and printed a USB-C port to go in the opening. This means the whole thing can be recharged via USBC cable, or just run off a power adapter. Win!
I also ran into a problem with the touchscreen USB cable, which, as it came from the supplier, had a 6′ long cable with a ferrite core on it. I picked up a kit to allow me to truncate the cable and put a new end on it, but it turns out I got the wrong connectors. So I ended up just chopping the cable in half and soldering it into an older USB-A jack. I only need about a foot of cable, so that worked great.
The Final Product
I love how this looks. I love knowing that I built it, and there’s no other one thats just like it.
So what’s next?
There’s still stuff to do though:
The keyboard setup (a Royal Kludge RK61 USBC / Bluetooth keyboard), while fitting perfectly into the case, I find sort of difficult to work with. The ‘modifier’ keys are awkward and easy to get confused, and as it sits now, I can’t run it off USB while in the case. I have to pull it to recharge it and reconnect via USB.
The rear panel needs more love. The system is supposed to support a secondary Wifi interface to allow it to run Aircrack-NG and other tools without taking down the primary interface. I have the parts, but haven’t put it all together.
Finding the final location for the ‘stack’ (CPU and power board) is proving slightly problematic, as I need space for the USB connections and other wiring. Until that’s locked down, I really can’t mount the boards. I may jsut drill and mount them anyway to keep things from banging around.
Still need to get hte lid closures working – this can be done with a magnetic plate, but it seems a little iffy. May come up with something else.
Mouse input. Sigh. I had hoped the touch screen would work for this, but it really doesn’t. The screen is small (7″) and my finger is fat. I may explore using a stylus, but I think I’ll need some sort of trackball or thumbwheel or something.
Viewing angle – this may be the killer for me. For the lid / screen to work well, the viewing angle has to be relatively laid back. To do that, the hinge and cabling need to be very flexible, and finding that space is mighty hard. If I can’t solve the viewing angle problem, this will be likely remain a toy project, and not something I can use seriously.
Conclusions
I LOVED doing this project. It looks cool, I can say “I BUILT THAT” and I can keep tinkering and making it better. The Pi4 is enough horsepower to have fun on it, while still having decent battery life. Once I get the mobility stuff fixed up, I’ll start carting it around more.
1 note
·
View note
Text
Five Days on Cardigan Mountain
New Post has been published on https://planet-geek.com/2022/05/29/hiking/five-days-on-cardigan-mountain/
Five Days on Cardigan Mountain
I’m on my sabbatical. That means I get a month off from work to do whatever the heck I want. And what I wanted to do, was go hike. Go camp. Get out. Get off the grid. Turn off the gadgets and the internet and the netflix and the news, and just… detach.
So I did.
Folks may remember a couple years ago I took a backpacking trip to try and make it around the Pemigewasset wilderness on my own. It.. didn’t end as expected, but I came away with a lot of self-knowledge and experience. I was determined to do it again, and this sabbatical was a great time to go.
The Plan
I’ve already spent time up in the White Mountains this year, hiking in Tuckerman’s Ravine and enjoying the wintery landscapes. For all those visits, I’d stay at Pinkham Notch in Joe Dodge Lodge. That’s awesome, and the AMC does a great job hosting, but I hadn’t actually ‘gone backpacking’. I wanted to get more out on my own, and do some ‘detach’ time.
I’ve read about High Cabin, on Cardigan Mountain in western New Hampshire, and even walked by a couple years ago, but I’ve never stayed there. The idea of being in a completely off grid, hike-in only, no power, no water cabin on a mountain, by myself, for a couple days sounded like just the ticket. After a couple phone calls with AMC, I booked the cabin for Monday through Friday. It would be just me. So things were set.
The Leadup
This trip, as mentioned, would be the most ‘committed’ out-back adventure I’ve done. While I wasn’t completely in the wasteland with just a buck knife and my wits, there were a lot of details I had to figure out. I set some guidelines for myself. First, I’d only take what I could carry in one backpack up. I wouldn’t depend on the lodge (a 1.5 mile hike downhill, and then back up on the return) for anything. Second, I’d minimize the ‘distraction’ aspect. I’m a nerd. I like gadgets and toys. But this trip wasn’t about the gadgets and toys. It was about detaching, taking care of myself, and getting as much outdoors time as I could. Which brings me to third: I needed to push myself physically. Vacations are wonderful, and travel and getaways are great. But they’re also recipes for just sitting around and getting fatter. I’m old enough now that I’m very aware of how my body is dealing with idleness. I need to stay physically active to stay healthy. So this trip wasn’t going to be sitting around basketweaving all day. I needed to get on the trails every day.
With these guidelines in place, I looked at what the cabin provides. The short version is – it’s a rustic cabin. It has windows, a roof, screens (yay), a wood stove, bunks, a propane stove, and a limited number of pots, pans, and dishes. Also a composting toilet. That’s… pretty much it. 200 feet from the cabin was a spring that intermittently went dry, so I had to make sure I drew water and kept it on hand in the cabin for cooking, cleaning, and drinking. Everything else I had to bring with me.
The Loadout
My pack, not quite full
Okay, right, this is the fun part. What did I bring? Backpackers / hikers LOVE talking about gear. And I’m sure there’ll be endless discussion about (“you have a WHAT? That’s Junk, you should have a…”), but screw it. This is what I brought:
REI 40 liter internal frame backpack
Generic ’45 degree’ mummy sleeping bag
Hiking poles
Sleeping bag liner
Camping pillow (loaned by a friend, very lightweight)
Camelback-style water system
2 1 liter plastic bottles (carried up empty, used for filtering water)
Sawyer water filter
Waterproof matches
First aid kit
Spork
Toothbrush and Toothpaste
100% Deet bug spray
Hankerchief
Leatherman tool and belt holder
Food / water:
2x tubes Nuun electrolyte water tablets (one with caffeine, one without)
8 packets of Trader Joes Instant Coffee
4 Mountain House scrambled egg breakfastw
2 Backpackers Pantry Three Cheese Mac and Cheese
2 Backpackers Pantry Lasagna
3 Swiss Miss hot chocolate packets
4 Nutri-grain bars
4 Soylent Mocha packets
Clothing
Nylon long pants with zipoffs
2x hiking socks
Hiking boots
1 lightweight flannel pajama bottoms
1 long sleeve tee shirt
1 fleece vest
1 long sleeve cotton sweatshirt (this was an absolute indulgence)
1 pair underwear
Wide brimmed hat
Lightweight flipflops (for wearing around the cabin)
Emergency poncho
Foul weather rain jacket
Electronics / Gadgetry
Garmin inReach GPS satellite receiver / messaging / SOS tracker
Anker 25000 mAh battery
Headlamp
LED flashlight + fire starter
Canon TG-6 waterproof camera with 2 extra batteries
Samsung cell phone
Samsung watch and charger
Kindle Paperwhite Reader
Total pack weight – around 32lbs. Considering this was my entire kit for 5 days, it was a pretty good weight. I was 100% OUT of storage space though. I may have been able to stuff in an extra napkin or two, but that was it. No room left.
Day 1 – Monday – Arrival
I had spent the weekend packing and repacking and making sure I wasn’t forgetting anything. This was one of those “get it right the first time” adventures that challenges my OMG SHINY THING brain to organize and plan down to the oz. I tossed my backpack into the Jeep and headed up the Cardigan Lodge. The drive was pretty straight-forward, about 2 hours or so. I had checked with AMC to make sure it was okay to leave the Jeep parked there for the week, and they were fine with it. I had one last sandwich and coffee from Dunkin Donuts on the way.
By 1:30 I had checked in, gotten the combination for the cabin, and gotten a briefing on Things To Do and Things Not To do. The woman at the checkin counter in the lodge was super nice, and almost apologetically gave me the list. “Don’t write on the furniture or walls. Don’t leave ANYTHING behind, even if you think it might be useful to the next person. Filter your water. No fires other than in the wood stove.” Seemed like pretty basic stuff to me, but they did have to go through the list. Avoiding the incredibly noisy 13 year olds there on a school trip, I filled my water reservoir, settled my pack on my hips, turned on my GPS tracker, and I was off.
On the trail!
It was pretty much perfect hiking weather. Cool, dry, breezy. But, the bugs were DEFINITELY there. I was glad I had my bug spray (I use it very sparingly, just on the back of my hands, and lightly wiped on my neck and forehead). My long sleeve shirt kept them off my arms, and my hat worked well to keep my head all set. I knew from a previous time up Cardigan that the ‘lower half’ of the trail system was relatively easy. I took my time and settled into my rhythm. It took about 45 minutes to reach ‘Grand Junction’, a point in the middle of the lower part of the mountain where a ton of trails come together.
I was amused at the sign warning against going up Holt Trail – I’ve heard that that route is very rough, and that sign definitely warned me off it. I turned to head up the ski trail, but another sign warned that it wasn’t a hiking trail, and we shouldn’t walk on it. Ooookkay fine, a slight adjustment and a consultation with GaiaGPS, and I was off on a slightly different route. This took me a little wider than I had planned, but the route looked smooth and steady, so I headed up.
I made it up to the cutoff for the cabin and definitely was feeling the pack weight by this time (about an hour and a half in). I was pacing myself carefully, I wanted to make sure everything was ‘working right’. Last thing I wanted to do was injure myself on the first day.
After 2 hours I was on the cabin porch, going into what would be my home for the week.
High Cabin is… well, a rustic cabin on a mountain. It’s been on the site for almost 100 years, and has gone through a lot of changes and upgrades and repairs, but it still remains a building with no plumbing, no electricity, and no insulation. The latter wasn’t a problem for this trip, but folks up there in the winter, I’ve heard, go through a prodigious amount of firewood. There was a big pile of wood just outside the porch (I was told later it was 3 cords of firewood that was delivered by helicopter). This is perfect fuel for the woodstove.
Inside, there’s 12 bunks, a big central table, some very well worn plastic/metal chairs, and a kitchen area that has 2 work surfaces, a dry sink, a cabinet with wild assortment of cookware and dishes, and an old-ish Coleman cooler. More about the cooler later
I spent an hour or two familiarizing myself with my new home, unpacking all my kitchen supplies, my bedding, etc. During this time I changed into what would be my ‘casual’ outfit – my flannel pajamas and my sweatshirt, with my flipflops. I’m really glad I brought these because they were a comfortable and a nice change from my backpacking outfit. Downtime wear.
By this time it was into evening, and I started thinking about dinner. The cabin has no water, so I took one of the big soup pots the couple hundred feet over to the spring and filled it. The times of drinking ‘pure unfiltered spring water’ are long past, so my plan was to use the big soup pot as my inside ‘water tank’, and filter water from it as needed for cooking or drinking. The process I settled on was fill one of the 1L plastic bottles with water from the pot, screw the filter onto it, and squeeze the bottle to push water out into whatever I was going to use, be it the other plastic bottle (so I could mix up the Nuun tablets), or into a cup for Soylent, or into the tea kettle to be boiled for dinner or coffee (TECHNICALLY I didn’t need to do this last, as the filter’s main goal is to make sure I don’t get giardia or other nasties into my stomach. Those things would be eliminated in boiling water, but I was also slightly concerned about sediment and other muck in the water, so I filtered the stuff I was going to boil just to be safe.
Once I had water ready to boil, I had to light the propane stove. I absolutely love my littler plasma lighter / flashlight gizmo. It’s like having a rechargeable set of matches. But as I was trying to get the stove started, I realized the propane tank was empty. There was a second tank, so I swapped out the gas line for the new tank (this was behind the building), turned on the valve and… immediately smelled propane. This is why the old tank was empty – there’s a slight leak on the feed line by the valve. This wasn’t bad enough to prevent me from using the tank, but it DID mean I had to turn off the valve after every use. Okay, I could do that. I tightened down the line as best I could, turned it on, rushed back inside, and held my lighter to the burner while turning the inside valve on… hisss… hisss… VOOMPH. It lit. Right. One drawback of the plasma lighter is you have to be VERY CLOSE to what you’re lighting. I figured out a good angle to set the lighter so the lit flame on the burner woulnd’t get close to my hands, but it was dramatic.
I boiled up my water (yay whistling kettles!), and poured it into my vegetarian lasgna packet from Backpackers Pantry. It takes about 10 minutes of a combination of stirring and waiting for it to get ready, but it smelled great from the start.
In what was to become basic ritual, I sat down at the big table, turned on my Kindle, and just… ate and relaxed. The area was incredibly quiet, and I found myself settling into what I’d come to think of as ‘downtime’. No internet, no distractions, it was basically just ‘sit, eat, and read’.
By the time I was done, it was pretty dark. One of OTHER challenges for this trip was I only brought one backup battery. I could recharge my devices from it a few times, but after that, I had no other way of making power. I had considered bringing along some solar panels, but I just didn’t have the pack space (or the money for that matter) to indulge. Given that, I couldn’t just leave my lights on all the time. So I got used to sitting in the dark and turning on my flashlight only when I needed it. I got very comfortable with the Kindle backlighting (which was giving every indication of being able to run the entire week without recharging), but when it got dark there, it got DARK.
I cleaned up from dinner (tricky again because no running water. Used an open flat bottomed dish basin to wash everything up in, then drained it into an outside sort of sump like thing that’s used for dishwater. It drains water into an underground rock field, I believe, so the animals don’t dig around where they smell the food.
I did take a little bit to start the woodstove. It’s been a while since I set a fire, but after only a little bit of fumbling, I got it going. That stove became one of my best friends, because when it gets rolling, it turned the cabin into the tropics. I had to modulate it with the front vent to keep it from melting the furniture. But I was warm and cozy. It continued radiating heat until about 3 in the morning (after I had let it burn down on its own), so while the morning wasn’t that warm, I was able to go to sleep in a warm room, and as it cooled off overnight, I just snuggled further down into my sleeping bag.
I read for another hour or so, then started to settle into bed. The bunks were functional, if not luxurious, but with the little pillow I had brought, and rolling up my sweatshirt and my vest, I was comfy.
A note about the cooler in the kitchen. I came to really appreciate it when I realized late at night that… there’s quite the family of mice living in the cabin. It really gave me pause, as there’s nothing relaxing about going to sleep listening to mice scrabbling / chewing around the walls, and wondering if one is going to scamper across you in the night. But mice are mostly interested in food, and I’m not very tasty (I’m also a big carnivore, so they mostly avoided me). HOWEVER, they absolutely will go after anything that remotely smells like food. I made the mistake of leaving out a couple of my cocoa packets the first night, and lo! One had a hole chewed in it when I went to see what the noise was. From then on, I stored all my food inside the Coleman cooler, with a heavy pot on top of it. The mice lost interest in the kitchen after that, and my food was safe.
Day 2 – Tuesday – Let’s go hiking!
Tuesday I slept in longer than I expected to. I remembered from previous trips it’s common to… go to sleep when the sun goes down, get up when it’s light out again. I somehow missed this memo, and even though sunrise around this time is about 5:30am, I didn’t get up until almost 8. I powered up the Garmin and sent a message to Mrs. Geek saying good morning (turns out the Garmin needs to be out on the porch to be able to reach the satellites, so when I was in the cabin and it was on, I left it on the railing outside. I could hear if it beeped with a new message).
Scrambled eggs, bacon coffee, and reading
I started the meal ritual, but this morning would be scrambled eggs with bacon and coffee. Everything went fine, and I was pleasantly surprised at how good the Trader Joe’s Instant Coffee Packet thingies were. They include cream, sugar, and instant coffee, an two of them in a decent sized coffee mug was JUUUUUUUST right. Those morning cups ended up being the highlight of the day. I could only haver one cup each day, unfortunately, but it was SO good.
My friends Dave and Perley had said they were going to come up on Thursday for my last night in cabin, so I knew there’d probably be a summit hike with them. I wasn’t in a mad rush to get up on top, so I planned out a route for the day that would take up to the Cardigan South peak, the Cardigan Rim Rock, and then if I was up for it, out to Mount Gilman – about 3-4 miles total, with not much ups and downs.
I changed into my hiking gear, put on bug spray, reconfigured my backpack into ‘day hike’ mode (water, first aid kit, emergency stuff), enabled tracking on the InReach, sent a message to Mrs. Geek that I was heading out, and… headed out.
Of course, it can never go perfectly. I realized halfway up to the South Peak that I had forgotten my camera. Well, the trip was all about covering a lot of ground, so I trudged back to the cabin, picked up the camera, and headed out again. I didn’t want to rely on my cell phone for photography this trip — mostly because it was needed for mapping and communication if needed. Running down the battery on the camera isn’t a problem. Running out my phone is.
The views from South Peak were glorious as expected, and I could clearly see the summit of Cardigan (and darnit, those kids on the school trip were swarming all over it. Even though it was a good 3/4 mile away over open air, I could hear them whopping it up. I was glad I was over on my own). I did chat with a nice couple sitting at the South Peak, they were super polite and enjoying the views.
After that I decided to go down to Rim Rock, and then continued on to Gilman. The Gilman hike was really enjoyable, as it was a lightly travelled trail and wound through some beautiful woods and trees. It was quite the hoof, and took about an hour and a half to reach, but was worth the alone-thinky time. The bugs were definitely active when down in the trees, as there wasn’t enough of a breeze to keep them at bay. Hooray for bugspray.
At Gilman I paused for a quick snack (just a bar), and headed back. Eventually I made it back to the cabin, having been on the trail for 4-5 hours. A good first full day on the trails. Once back at the cabin, I changed, rested a bit, and pretty much repeated the previous night’s pattern.
One thing this did start to underline though, and something I was worried about. Boredom.
This cabin is remote and quite primitive. I can’t hike 10 hours a day, so there’s going to be downtime. How do you fill that time?
I preloaded a Kindle Paperwhite with a bunch of books as recommended from friends, and that really covered my ‘downtime’ entertainment. I kind of wished I had enough capacity (carrying, whatever) to have something else for fun. For instance, I didn’t have a way to listen to music (long term battery usage was a problem), and the quiet times would have been nice with some quiet tunes. I did end up using my phone to listen to some Spotify playlists I had downloaded, but only mid-week after I knew my batteries would hold out for the entire week.
Day 3 – Wednesday – In which Dave screws up
Wednesday I decided to go ahead and summit Cardigan, and extend the hike to a ‘full loop’ – basically going all the way around the ‘valley’ that was the mountain approach, with Cardigan Mountain at one end, and the lodge at the other. Mapping it out, it should have taken 5 hours or so, which is what I was hoping to be my average days hike
I headed out around 10am as usually, and after an hour or so, was on top, admiring the views as always. It really is a spectacular area, with the summit 100% open granite, with a fire tower jutting up. The day was clear and sunny, with a light breeze. The bugs on top were a little busy, but if you stayed in the breeze, it was okay. I got to get my face licked by a very cute puppy who had excitedly made the journey up top and they splashed happily in the rain puddle in the rocks.
I continued down the other side of the valley – it was a sharp descent, and involved some scrabbling and clambering, but all in all wasn’t too bad. I decided I was going to make the cross down one of the ski trails (which are marked “NOT FOR HIKING”, but it was going in the right direction and seemed okay. The trail actually wasn’t bad. It was open vegetation with a narrow path through the middle, but was definitely in ‘deep forest’ for most of the time. BUG CITY. About a third of the way down the ski trail (now about 3 hours into the hike), I started… not feeling great. Remembering back to the Pemi hike I did, I began to worry I had blown out my electrolytes again, but that didn’t seem quite right. I had half a bottle of the Nuun water before I left, so that shouldn’t be it. As I continued, I was feeling worse and worse. Fatigued, slightly nauseous, weak. The problem was I had to climb back up to the cabin after crossing the bottom of the trails, and I was NOT looking forward to that. Stopping to rest was problematic because of al the bugs – I really wanted nothing more than to just curl up in a ball on the side of the trail and hide.
Not a happy hiker.
The rest of the hike up to the cabin was horrible. I was tired, weak, worried my water was going to run out (It didn’t. But you can’t tell how much is in the reservoir without pulling it out of the backpack. When I got in, turns out I had about half a cup left). I remembered this feeling from other hikes. I do not recommend it. All you want to do is crawl into a corner somewhere and hide. “Why am I doing this? This is dreadful. I hurt, I’m uncomfortable, I’m tired, I’m hungry, ahhhhh!”). I was worried I had hit my strength limit, but that didn’t seem right as I’d been doing a couple days of hiking already… I didn’t know what was wrong.
Eventually I made it back to the cabin, and the relief of being out of the elements and away from the bugs was immense. I dropped my pack, drank some Nuun water and had a bite of a cereal bar, and laid down for an hour of absolute black-out sleep. I was vaguely worried about killing my sleeping schedule, but screw it, I was WIPED.
After I woke up, changed into my casual clothes, and settled in, I tried to figure out what went wrong. I was feeling slightly better, but still weak, and my appetite was GONE. I made dinner but only ate half of it. Considering I planned to eat about 1200-1400 calories a day (which is far less than I was burning), I should have been starving. But I couldn’t finish dinner. Just had no appetite. I was thirsty though, so I was drinking a fair amount… hmmm.
It took until bed time before I started having a clue what was wrong. When I hiked on Monday and Tuesday, I wore my long sleeve t-shirt, and my fleece vest. The fleece vest has… a collar. And that collar and the vest covered my neck and shoulders. On Wednesday I didn’t wear the vest because it was so warm. So my shoulders and neck were exposed. And on top of a mountain, that means sunburn.
I had burned a stretch of my shoulders quite bright red. That explained the fatigue, the nasea, and the lack of appetite. Fortunately, the burn didn’t seem to get beyond “turn my shoulder bright red” in terms of skin damage, but it did affect my entire state. It didn’t sting so badly I couldn’t sleep or anything, so thank goodness for that, but what an error on my part. It’s made slightly more embarrassing because Mrs. Geek had warned me to bring sunscreen. Sigh. Oops.
That night I turned my cell phone off ‘airplane mode’ for the first time on the trip. I’ve been deliberately staying offline, only using the InReach to stay in touch. Perley was planning on coming up Thursday, but Dave said he had to bail. I wanted to check in with Mrs. Geek just have a quick phone call. It was nice talking with someone close for a little bit.
Day 4 – Thursday – Company’s coming!
Hey, I’m going to have visitors!
Today Perley was going to come visit and stay over Thursday night. We had coordinated a bit over messages, and he said he’d make it up around 2pm. No problem, I’ll take a casual morning. I was still a bit wobbly from Wednesday, so I had a late breakfast and read for the morning. At one point he messaged me and asked if I needed anything… and asked if a vanilla shake is worth dragging up… I tried to dissuade him, but…
Friends, he did in fact put the milkshake in a Nalgene bottle and hauled it up the mountain for me.
Perley and I on top
He got there around 2:15, and… the milkshake was delicious (and appreciated), but… it was really rich. After 4 days of dehydrated food, this was.. maybe a bit much. But it sure did taste good!
After a lunch of (MILK SHAKE) and other snacks, we headed out for an afternoon of hiking and exploring. I took super-extra care to cover up my shoulders and neck (put the vest back on, and put a handkerchief around my beck),
to keep the sun off the sunburn. I never felt any more ‘burn’, so I guess it covered it up fine. It was a good, breezy, cool day, and we had a lovely hike.
That night I had my normal meals, showed Perley around the cabin and how to prepare stuff, as well as warning him about leaving food out, and we turned in around 10:30.
Day 5 – Friday – Time to go home
End of the week. Time to go home.
To be honest, I was READY. I wanted a shower, I wanted to sit on a comfortable chair, I wanted to see my wife, I wanted a cheeseburger in the worst way. I was ready to go home.
Packup and cleanup was super-easy. We followed the posted procedure and swept out the cabin, cleaned all the surfaces, cleaned out the wood stove, and locked up on the way out. Our packs were back up to ‘full weight’, though for me I had eaten through all my food, so that lightened things up a bit (I think I weighed it out – something like 6lbs was food).
The hike down and out was uneventful and remarkably quick (“Wow this seems shorter than when we went up.”). We had a lovely conversation with the staff at Cardigan Lodge where I let them know of any of the small problems I found (like the mice and the possibly leaking propane line). The fellow there was super nice and he told us some stories about previous visitors and stuff left at the cabin.
After that, it was a matter of climbing into the Jeep, reveling in the feel of a comfortable chair and air conditioning, and driving home.
For the record, I didn’t get a cheeseburger, I got a chicken parm sandwich at the Hooksett rest area, and that was just as magical.
After
Coming home was great. We had a sleepover scheduled for the (now) 14yo and his friends, so that was a bit busy in the house, but not as bad as you’d think. The kids were great, and it was just awesome to be HOME.
So how do I feel about the trip? Mostly good, but also a lot of thinky stuff.
Wednesday was awful. It reminded me that there are times on the trail that are just despair and sadness. It left me with the constant “Why am i doing this? This isn’t fun. This is just a way of making myself uncomfortable. Why do this?”
On the other hand, I did detach. My very busy brain… stopped being busy. For those 3-4 days I was alone, I slowed down, like an engine going to idle. It was VERY good for me to get that in at the beginning of my sabbatical.
Does it make me want to do more backpacking? I honestly don’t know. I need to think on this. I think the strongest feeling / experience I got from it was those 4-5 days my entire… experience was based on me and me alone. I took care of myself, I took care of my food, my living space, my body, my gear. The success of that time was based solely on me, my planning, and my execution of the plan. And it WORKED. I didn’t forget anything, I didn’t miss anything, I was fed, healthy, and comfortable the entire time (save aforementioned sunburn). That’s huge. I like that feeling. I wonder if I can do it again, but maybe just be a little more comfortable, and a little less bored? To be honest, the ‘boredom’ thing may be fixable with the ‘comfort’ thing. I didn’t have a comfortable place to sit or relax (just the hard chairs or my bunk), so spending 3 hours reading a book wasn’t the best. I had considered packing one of those tiny nylon hammocks so I had a bit of recreational ‘furniture’, but space in the pack ended up being too tight. Maybe if I do this again, I’ll add that to the list.
Conclusion and Thanks
I have to thank a few people for helping make this trip possible
My awesome wife, who makes it all worthwhile. She enables me, supports me, and keeps me going. Thank you.
Zachary, my awesome kid. They were invaluable for support, advice, and just being a sounding board when I wasn’t sure if this whole hiking thing would work, and if I was going down the wrong path. Thanks Z for listening.
My friends Perley and Dave, who were enthusiastic and supportive and wanted to be In On It. Thanks guys.
The Appalachian Mountain Club, who maintain the trails and the cabin (among other lodges and huts all through the White Mountains).
0 notes
Text
Hackaday and VCF East and Handhelds, Oh my!
New Post has been published on https://planet-geek.com/2022/05/03/vintagehandhelds/hackaday-and-vcf-east-and-handhelds-oh-my/
Hackaday and VCF East and Handhelds, Oh my!
Looks like Hackaday has an article about VCF East and I got chatted up a bit on it. Thanks Tom Nardi! VCF East was a blast, and I had a great time. Most of my chitter chatter and pics are on my Twitter feed. Thanks to everyone who showed up and made the event work. I had some great conversations, picked up some new gear, and got a good solid soar throat from talking for two days straight.
I’m hoping to bring the handhelds page up to date with all the latest acquisitions soon. A recent visit to Near-Fest definitely helped things along on that front!
0 notes
Text
My Portable Media Carry-Sack
New Post has been published on https://planet-geek.com/2022/01/09/geekitude/my-portable-media-carry-sack/
My Portable Media Carry-Sack
I have a little Case Logic zippered pouch that I carry in my backpack everywhere I go. It’s where I put USB thumb drives, SD cards, Micro SD cards, adapters – pretty much anything I may need while on the road. It’s gotten me out of so many jams where I’m like “I need a quick Micro SD card… where the heck were they again??”
In particular, when I’m out doing photography, having a couple spare cards at hand is a total win.
Today, I fished out a 32gig card so I could re-image my Octoprint server that drives my Creality CR10 3d printer. I’ve been running the “Python 2” version for ages, it’s time to upgrade.
0 notes
Text
The Royal Kludge RK61 Keyboard is Growing On Me
New Post has been published on https://planet-geek.com/2022/01/07/reviews/the-royal-kludge-rk61-keyboard-is-growing-on-me/
The Royal Kludge RK61 Keyboard is Growing On Me
I’m in the middle of A Large Project (stay tuned!), and as part of it, I laid out the money on my first actual mechanical keyboard. If you bring up ‘mechanical keyboards’ in any nerd setting, you’ll get some absolutely rabid folks going on about cherry switches, stroke type, PCB design, blah blah blah.
Me, I just wanted a mechanical keyboard that had a nice feel.
The RK61 fits the model of what I’m building, and it was a good ‘entry point’ into this concept.
The Deets
The Royal Kludge Rk61 is a 60% mechanical keyboard that has both USBC and Bluetooth connectivity. It has a full stroke set of ‘blue switch’ keys that have a good tactile feedback. It includes a decent sized battery, so when on full bluetooth mode, it’ll run for several weeks before needing to be plugged in.
Here’s the breakdown.
60% – This is a ‘60%’ keyboard. This is a loose definition that generally means there’s around 60 keys on it, as opposed to the standard 104 keyboard that most people know. The keys are normal sized, so don’t let the percentage throw you off
USBC connectivity – used for either HID connection or charging the keyboard’s battery.
Bluetooth connectivity – this is nice, in that the keyboard supports 3 bluetooth profiles, and switching between them is just a matter of Function-Q, W, or E. THat’s handy since I’ve been using this for both my gaming PC and my project.
Blue Switch keys. If you talk to any keyboard nerd, this will immediately classify this keyboard for them. The blue switch designation refers to the mechanical switch type used in the keys. In this case, the keys have a very distinctive ‘CLICK’ sound, and a good tactile feedback. This isn’t the best for gaming, but for rapid typing and good feedback, it works well.
Battery – the battery is good. While I don’t type on it full time, I’ve only had to recharge it about every 2-3 weeks, which is just a matter of plugging in the USBC cable.
Lighting – Yes, it has animated lighting. There’s all sorts of pretty patterns you can set the keys to. In my case, since I have a white keyboard, the backlighting is soft blue, and I have it simply set to light the key then fade out after I release the key. You can get as fancy as you like.
Some drawbacks
There are a few drawbacks. Probably the most noteable is with only 60 keys, some keys no longer have unique functions. There’s not a Function key row – those keys are shared with the numerics and puncuation. There’s no separate arrow keys, so those are shared with the right hand modifiers, but most irritatingly, also the ‘/’ and ��?’ key. I found having the RK61 manual at hand (even in digital form) can be helpful, since there’s very little feedback from the keyboard itself when changing modes.
It’s loud. I mean, it’s a mechanical keyboard, so no duh. But if you’re looking for stealth computing on your project machine, this is probably not the right tool. There’s ways to ‘quiet’ these keyboards using rubber o-rings and the like, but I feel if you’re at that point, you probably have bought the wrong keyboard.
Conclusion
The RK61 is a solid, well built, and aside from some oddities in the keyboard layout, useable keyboard. In general, I’m enjoying it. It’s not cheap, running about $59 on Amazon but if you’re looking for a keyboard that doesn’t take up a lot of space, has a good feel, and you like full stroke mechanicals, it’s not a bad option.
0 notes
Text
Baking Adventure: 2021 NYE
New Post has been published on https://planet-geek.com/2022/01/01/stuff-n-bother/baking-adventure-2021-nye/
Baking Adventure: 2021 NYE
At the beginning of 2021, when the Pandemic was in full swing, I took up baking. Nothing particularly fancy, just learning how to bake breads and cakes and similar stuff. It’s fun, people really enjoy it, and, heck, lets be honest, it’s SCIENCE!
As the summer rolled around, I took a bit of a hiatus, and didn’t bake for a while. It’s hard getting motivated to work in a hot kitchen when it’s a bzillion degrees out. So the mixer and bread pans went idle.
This fall, I’ve picked it back up, and made bagels for the family for Christmas (like ya do), so for New Years, I decided to do something again.
Mosaic has a yankee swap every New Years. The pandemic has made this challenging of course, and even though we were optimistic, this year we did it virtually again (believe it or not, it went really well). The 13yo suggested that I bake a cake for our gift item, since ‘no one has ever done that before!’ (honestly I suspect he wanted some himself). So M and I dithered around a while and decided on a standard yellow cake but tried something new for the icing. The icing ended up being a Italian style maple meringue that was AMAZEBALLS. Once we realized we didn’t have a double-boilers (so we put a pot in a big skillet of boiling water, and also realized we REALLY needed a hand mixer to make this work – and was saved by a neighbor who brought one over in mid-stir), the meringue eventually cooked and turned glossy and thick.
Then we burned the cake.
So I ended up cutting out the middle of one, and took one of the bundt mini cakes we had used the extra batter for, and made this , which we able to ‘wrap’ as a gift without making a mess. The little dark bits are cruzeilles, which are AMAZINGLY tasty, and bits of caramel on the top.
Presentation, I give it a 3. Taste, an 8.
Recipe links:
https://www.allrecipes.com/recipe/7559/seafoam-icing/
https://www.allrecipes.com/recipe/42148/scottleys-basic-yellow-cake/
0 notes
Text
Jeep JKU Overlanding Build - My Covid-19 Project
New Post has been published on https://planet-geek.com/2021/06/17/jeep/jeep-jku-overlanding-build-my-covid-19-project/
Jeep JKU Overlanding Build - My Covid-19 Project

The last year has been a doozie. When the pandemic got rolling and didn’t look like it was going to be over quickly, I, like many folks, looked for ways to ‘get away’. Some of these plans were born from fear and doom, some from a basic need to just Be Away, and for others, it was a way to do SOMETHING during the pandemic that felt like you were building for the future. An uncertain future to be sure, but a something you could point at and go “I did this. Now I can enjoy it.”
I’ve had a Jeep, off and on, for the last 8 years. Starting with a JKU (which I sold quickly, unfortunately), and then settling into my 2000 Jeep TJ (affectionally referred to as Ol Yeller), I enjoyed having a ‘toy’ that I could go romp in the woods, or just drive with the top off. It was freeing.
I sold Ol Yeller right at the beginning of the pandemic, because I had gotten fascinated with the concept of Overlanding, and the more I thought about it, the more I realized my 20 year old, small (but still fun!) Jeep TJ just wasn’t going to cut it. And, to be fair, the TJ was not exactly a luxury vehicle. It was time to upgrade to a vehicle I could build out into my overlanding vision.
How it started
I began hunting for a JKU (the 4 door version of the JK) in May, 2020. My criteria was:
A relatively low set of miles. 50k-75k was okay.
Manual transmission – Manual cars are slowly going away. This was the last chance for me to have a manual vehicle, I was going to take advantage of it. And besides, it’s fun.
Hard top. I could have gotten a soft top and upgraded it, but either way, I wanted a hard top in the end. In the winter, it’s really the only way to stay warm.
No rust. Jeeps rust. The JK’s are better about it than previous versions, but they still will rust.
The first version of Ghost
I found a JKU that fit the bill, aside from the hard top at a dealership not far away. Took it for a test drive, reviewed it, and it seemed like it would fit the bill. I paid cash for it, and drove it home. While driving it back from the dealer, something felt… off with it. It wasn’t tracking right, and had a bit of a shimmy in it. I had brought up the shimmy with the dealer, and they said they had fixed it, but it still didn’t feel right.
I made an appointment with my local shop (folks I trust a lot), to have them go over it. They did… and… there were problems. It turns out this jeep had obviously been in at least one accident, if not several. The chassis had been shifted forward by an inch on the frame and the body mount bolts were all twisted. The frame had been cut and re-welded (poorly) which threw off all it’s alignment. My shop was definitely of the opinion “This vehicle is unsafe. You need to return it.”
I was, naturally, hurt and felt lied to. I contacted the dealer, relayed all my issues, and they, surprisingly, agreed to take it back and refund ALL the money spent. No restocking, no tax issues, nothing. Just a check back to me. So that’s what I did. I felt a little taken advantage of because I didn’t do a thorough check, but I did have a conversation with one of the sales reps there who said they had another buyer, cautioning him “this vehicle is unsafe. Please take that into consideration when you decide to sell it again.” – I doubt it had any affect, but I had to try.
Second Verse, Same as the First, but better!
So, back onto the market I go. Strangely, I find another JKU, also white, this time with a black hardtop, less than 10 miles from the original dealer. So off I go, give it a test drive, and things look and feel… good! No shakes, it’s smooth and strong, AC works great – I’m cautiously optimistic. THIS time I make an appointment with my shop and make arrangements with the dealer to take the car to the shop for the day for a full evaluation. They agree, and a few hours later, I have a 100% clean bill of health. Nothing wrong with it!

So I became an owner of a white 2013 Jeep JKU Sahara, which was promptly named Ghost.
Ghost was basically stock. Stock Sahara wheels, bumpers, roof, interior. The only ‘enhancements’ were a bit of ‘armor’ on the sides of hte hood, and running boards. It did have the Alpine amp and subwoofer, which was a nice bonus. The head unit was the basic CD player and radio, but everything else was there including steering wheel controls and everything else. Oddly, it didn’t have an FM antenna (??), not sure what that was about. But it was the right price, the right configuration, and felt great. I was ready to get started.
The Build
Over the next 10 months, using whatever tools and basic skills I have, I upgraded Ghost. Through Craigslist, Facebook Marketplace, ebay, Crutchfield, and trips to Lowes, I built. There was a LOT of learning. I’ve always been okay doing stereo installs and upgrades, and doing wiring, but this build would require mechanical work. Moving equipment around the engine bay, mounting hardware, figuring out what options to do where. The physical build took months, and wasn’t cheap.
Here’s a simplified version of all the work I did. (If you’d like a fully detailed nitty gritty “show me the rust and bolts” review, checkout my build thread on WranglerForum.com).
Found a GobiRack on Facebook Marketplace – I’ve always wanted a safari rack on the jeep, because I love the look and the flexibility it provides. The fellow who had it was happy to hold onto it for a few weeks until we could get down there. It came with a full on lightbar, and was a very reasonable price. I also learned that these racks were INCREDIBLY hard to come by. The manufacturer was way behind on filling orders, and the prices were through the roof (so to speak). I got this for a good price, and was happy to put it in the garage until I was ready to install it.
A set of XRC Bumpers (front and rear) to replace the stock ones. I was originally thinking these would be needed (on the rear) to mount the rack, but it turns out the rack mounts to the underside of the body, not the bumper. Regardless, I wanted a front bumper to mount a winch, and a rear bumper that was rugged and able to handle towing and getting banged around. This was another Facebook Marketplace purchase. Met the fellow at a rest stop down in CT. Super nice!
A Harbor Freight winch. Yea yeah, harbor freight, blah blah. But if I’m going to be anywhere off road where I might get stuck, a winch is absolutely necessary. I got this during a sale somewhere in November, but didn’t get around to installing it until April this year. It sat on my porch the entire time. My wife is very patient.
A new power control panel and relay box – this is a system that gives you switches on the interior to control exterior lights and accessories, using a separate set of relays. Very handy for high current thing (like trail lights)
A set of grips / handles from Wild Boar. The Jeep is TALL, and climbing in and out of it is a lot easier if you have something to grab onto.
A Vector equipment mounting bar – this goes on the dash and lets you mount equipment to it, like phone mounts, radios, etc.
A Boss BE10ACP-C Android Auto screen to replace the head unit – this took a lot of research to arrive at, but I’m reasonably happy with the result. I find floating screen displays really useful (I know others disagree), and having my gmaps on that screen, plus Spotify, an audio interface, backup camera, etc – a huge upgrade.
A set of new rims (via Craigslist) to replace the stock rims
BF Goodrich T/A K02 Tires.
Replaced the headlights from the stock ‘sealed beam’ whatever those garbage things were with a set of LED lights. The improvement is staggering.
So far so good, but we’re not done yet!
Now everything up until now has been pretty basic ‘kit out your jeep’ type stuff. Folks do this sort of build out all the time, and honestly, the result is pretty awesome. It looks great, it drives great, it’s fun, and it’s comfortable.
But the real goal of this project wasn’t to make another kitted jeep, it was to make something I could go camping and backwoods exploring in, and basically live out of for at least a small stretch of time. To do that, we needed to keep building.
Overlanding Buildout
The next things are parts that any camper would get. I needed a place to sleep, I needed water, food, storage, power, a way to cook, and it all had to fit in or on the jeep in a way that wasn’t horrible.
The first step there is a rooftop tent. This is a type of tent that folds up like a big taco when you’re driving, but unfolds into a big comfortable space when parked. The one I settled on is a Smittybilt Overlander XL tent. It’s quite large, fits me and all my gear and company if needed without a problem, and fits fine on top of the Jeep. This was one of the big reasons I got the JKU – this tent would not have fit on the TJ (of maybe it would have, but would have added more weight in a place that vehicle did not need it. High off the ground.
Once the tent was all set up and useful, I needed to start adding things to make camping out comfortable and sustainable. Anyone who is exploring overland builds will be familiar with this list, it’s the sort of accessory pile that anyone doing camping will understand.
Basic camping stuff like a sleeping bag and the like. I already had all this, so that was easy. The tent has a very nice foam floor on it so its quite comfortable.
A Mr. Heater portable propane heater. This heater is designed to run inside enclosed spaces, so it can warm up the tent REALLY fast and make it quite comfortable. I tend not to run it all night, but for going to bed at night and waking up on a cold morning, one button and you have a very nice toasty room to get dressed or undressed in.
A Gooloo 500w Lithium Ion battery bank that charges from the Jeep when it’s running, and when I’m camped, I can use it to power lights, equipment, recharge various bits, and also power my…
A Foho Portable fridge / freezer! Yes, I have a fridge in my jeep. For food from spoiling without the hassle of ice or ice packs, it’s amazingly useful. When I’m driving, the Jeep powers the battery, which powers the fridge. When I’m parked, the fridge runs off the battery. I can run a day or two in that mode without needing to start things up to recharge.
A full cooking kit that includes pans, utensils, a cooking stove, etc. The stove runs on propane, and I”m thinking of upgrading to a more peppy stove.
A folding table
A 5 gallon water jug
A medical kit
A variety of other gear to keep the Jeep and myself safe, such as recovery gear, spare rope, a shovel, hatchet, spare knife, etc etc.
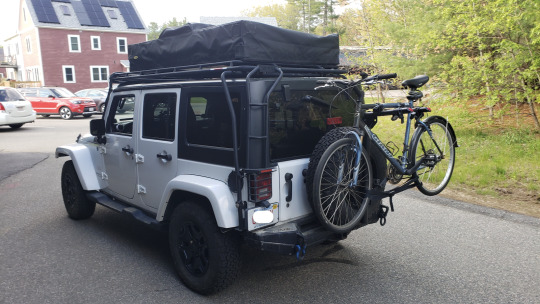
A bike rack! Having my bike with me means I can leave the Jeep parked and go off and explore, then come back for meals and sleeping.
Given all this, I feel like I have a setup that… i can take just about anywhere. It’s comfortable, it’s complete, and it’s mine. My escape vehicle. Say hello to Ghost.


Conclusions
This has been a year of challenges for everyone. For me, this project has helped channel my needs into a project to build a vehicle I’m enormously proud of (and lets be frank, I love showing off). So far I’ve been camping in it 4 times, and will be going again next weekend. I’m constantly tweaking and adding to the build.
What’s next? Honestly, I’m not sure. I suspect I’ll be fiddling my cooking and heating arrangements a bunch (my current stove isn’t powerful enough). I’m considering a better propane management, something that lets me use a 5lb propane tank with multiple connections. Solar panels have been a thought, but I’m not sure if they’d be helpful (since I tend to camp in the woods). I’m definitely going to be upgrading my radio communications (I have no CB or Ham radio yet), and I want to have a permanent mount for a GPS locator / rescue device.
I hope to go on a couple long trips soon, but we’ll see how the weather, work, and my budget come together. Stay tuned!
0 notes
Text
My Herman Miller Aeron Chair is probably Beyond Repair
New Post has been published on https://planet-geek.com/2021/04/24/life-dont-talk-to-me-about-life/my-herman-miller-aeron-chair-is-probably-beyond-repair/
My Herman Miller Aeron Chair is probably Beyond Repair

So I’ve had an Aeron C for, oh, 15+ years. It’s been awesome, and I’ve done a a variety of repairs on it, including replacing the seat pan and the above linked repairs on the recline mechanism. A month or two ago, I noticed the chair would not stay fully upright. A little weight backwards would cause it to go ‘clunk’ and move back to about 10 degrees recline. I knew this was probably a broken or damaged cam, so I ordered a replacement, and last week, took the chair apart to replace it.

This doesn’t look good.
Unfortunately, it looks like the post the cam is on is bent. I’m not that surprised, I’m a big person, and leaning back in the chair puts an enormous amount of pressure on that post.
I tried hammering the post back into vertical, and was able to straighten it most of the way, but couldn’t quite get it right, and in the process, probably weakened the frame and post (they are one unit, not something that can be taken apart, as far as I can tell).
I put things back together as best I could, and it was slightly improved, but still ‘shifting’ when i leaned back, and wouldn’t hold in place. Turns out that post is weakened and out of place, and won’t hold. Taking it apart again shows the post has shifted again, so I have to assume the mount is weak to the point of not being able to hold its shape. Not only that, but it looks like the entire frame is bent and twisted out of true.
This makes me super-sad, because the chair is so repairable otherwise, but as far as I can tell, this is basically the main frame that’s damaged, and while I could probably get a new frame, that’s really a ton of work to basically replace the body of the chair.
It breaks much of my “buy it for life” models, but I will probably part this chair out and replace it. I may get another Aeron, but I’m also looking at the Autonomous chair (i’m very tall, choices are limited).
Edit: it’s now a month after I originally wrote about this issue, and I’ve replaced my Aeron with one of the Ergo 2 chairs. So far I’m quite happy with it, and it fits my 6’6″ frame just fine. I’m hoping to modify the Aeron to disable the recline mechanism completely so it’ll be useful at my workbench, but as my primary office chair, it has been put into retirement.
0 notes
Text
Milestones in Home Automation - Tablet Wall Mount
New Post has been published on https://planet-geek.com/2021/02/14/home-automation/milestones-in-home-automation-tablet-wall-mount/
Milestones in Home Automation - Tablet Wall Mount
My home automation projects has been churning along for over a year now. I’ve been able to set up motion detectors for stairway lights, LED strips for colorful lighting, and voice control integration through the whole house. Even my wife admits that having voice control in every room is convenient as heck.
We’ve gotten very used to the ability to turn on or off all the lights in an area, like saying “Downstairs lights off” which shuts off the 3 lamps in the living room as well as the kitchen and dining room lights.
But one thing that has been a steady thorn in my side is the difficulty setting up a wall mounted tablet to show the status of the lights, heating, and motion detectors, and allow you to turn things on and off via this panel.
Nowadays most folks use tablets – anything from an iPad down to the cheapest Android tablet you can find. They work fine, but for me the problem has always been power. The tablet needs to be turned on full time, and to do that, you need power. Running power to a spot in the middle of the wall is problematic and cumbersome. This is doubly irritating in that most tablets only require a simple USB cable to keep running.
The solution!
This lack of easy access to power has stalled my ‘tablet’ rollout for quite a while, until I found this combination USB port / lightswitch from Bryant Electric (model USBB102W). Using this plus a short jump cable, it seemed possible to mount the tablet just over the light switch. And lo, it was!
The lightswitch was a basic “interruptor” – it was wired with 2 black wires, plus a ground. The black wire is the “hot” feed to the ceiling fixture, so opening or closing the switch would open or close the circuit. Fortunately, the people who wired the house also had a neutral wire in there. It wasn’t wired to teh switch, but had a 6 way insertion connector, so it would be easy to wire it up.
Once I had the fitting apart, the wiring on the new USB enabled switch was a little confusing. Fortunately, I found a very nice post (on Amazon’s feedback page interestingly enough) that described how to wire it up:
I was able to replace the press-in connector on the neutral lines with a wirenut, and used proper gauge for the jumper. Reset the breakers, and yay! Everything works!
Once I reassembled the switch and put a new plate on it, I was ready to mount the tablet. I’ve been using ActionTiles to control Smartthings connected devices, so putting that on the tablet was the goal. I ordered a couple short USB cables (making sure the orientation would work for the tablet), and then 3d printed some wall brackets for the tablet. A little VHB tape later, my tablet was mounted and working!
I enabled developer mode on the tablet, and set it to ‘never turn off while plugged in’, and my setup was complete!
So now what?
So where to next? Well, doing the Alexa integration with Smartthings is cumbersome (I’ll write this up at some point). I’ll need to solve this at some point – Alexa is just too useful to have, but the lack of a programmatic API for integrating display devices (like this one) with it is a problem (You can use a ‘kindle fire’ tablet for this, but the interface is not good, and ONLY controls Alexa devices :-/. Same problem, just in reverse.
I also want to add more items to the display board – like indicators about the status of my motion detectors, and possible a camera feed to the front porch. We’ll see!
0 notes
Text
The Toyota Prius Prime Dashboard - A Study in Bad UX
New Post has been published on https://planet-geek.com/2020/12/30/ev-cars/the-toyota-prius-prime-dashboard-a-study-in-bad-ux/
The Toyota Prius Prime Dashboard - A Study in Bad UX
The Toyota Prius Prime. In so many ways, a remarkable piece of engineering. Efficient, comfortable, and not so bad in the cargo territory. In it’s plugin form, it can run 20-25 miles on pure EV power, and after that, it still chugs along at 40mpg. For people wanting to dip their toes into the electric vehicle world, it’s not a bad place to start, assuming you’re okay with the styling. With all that, what the HELL went wrong when they ‘designed’ the dashboard and the information systems? I’m rarely speechless when it comes to engineering projects, particularly ones backed by such a well respected and successful company as Toyota. But jumpin jehosephat. Who the heck designed the dashboard? It’s… it’s… nnnnng…. well… let me show you.
The Dashboard – An Introduction
First, lets take a look at the interior. This is the 2019 Prius Prime dashboard, directly from Toyota’s brochure…
Now before I go straight to the jugular, lets note a few positive aspects here.
A large, centrally located touchscreen. I like that. It’s easy to reach, everyone in the car can see it, it’s bright and visible.
The steering wheel has easy to reach controls, right under the thumbs. Nice.
The upper display (directly in front of the window) has 3 smaller screens that can show a variety of information panels. The most obvious one is a speedometer, but the other options are battery usage, mileage, map directions, etc. As compared to the Tesla, which puts everything on one display in the middle of the car, these secondary displays that ALWAYS display certain information is a nice touch.
Well, that’s nice, but what’s your beef?
Sounds all peachy so far, right? I mean, it looks all shiny and clean, so what’s wrong?
Turns out, plenty.
Lets start at the meta level. That big central display? It only controls a small subset of the car systems. It’s a bad design to have to go hunting for an external button or switch or toggle or display to get a basic function that the display should have on it.
Another problem with the central display are the buttons on the glass on either side. Those are flush contacts. You have to look at them to determine if you’re pushing them, and there’s no feedback when you do. Talk about distracted driver problems. No feedback contact buttons should be used VERY CAREFULLY in motor vehicles. Why some of these buttons are glass and others in the car are standard switches, I have no idea.
Okay, but lets hear the real fails.
Okay, you asked for it, lets start running down some absolutely batshit decisions made on this car.
Lets start simple. Seat heaters. Everyone loves ’em, right? Took us literally googling and watching youtube videos to figure out how to turn them on. The controls for the seat heaters are tucked under the dash, on either side of the central console. Once I scrunched down in the seat, bent my head to one side, I was able to see them. My wife, who is a foot and a half shorter than I am, never saw them either. Who thought this was the appropriate placement for these switches?
Remember those little screens under the front windshield? Nice, aren’t they? Well, they are configurable. You can change what each one shows. At some point, my wife brought up “Hey, that middle display used to show how much battery time I had left, now it doesn’t. How do you change that?” – I, a systems engineer, could absolutely not figure out how to change those displays. The answer? Tap the right arrow on the steering wheel right control pad. No other feedback that this is how to do this – no menus, no prompts, no information – I had to google this one too. There’s nothing on that nice big central display that lets you configure these smaller displays. They are completely separate.
At one point we were driving around at night, and I was wondering why the central screen was so bright. Most cars switch into ‘night mode’ when it gets dark, but this screen was blazing white. Going through all the menus, I found a screen setting for ‘DAY MODE’ ON/OFF – what exactly that means is sort of a mystery. There was no NIGHT MODE ON/OFF. Just that one toggle. Turns out, you need to use the OTHER screen control. The one on the left side of the steering column around knee height. There’s a dial there that on older cars would set the brightness of the dashboard instruments. Some bright engineer at Toyota decided that if that little knob was spun to a certain point, the central console would always be in day mode. the DAY MODE apparently can override this setting? Who knows – but having to go off-screen to some random control when the option should have been RIGHT THERE on the screen is definitely a fail.
Backup beeper. Did you know the Prius has a backup beeper? Going by Wikipedia : A back-up beeper, also known as back-up alarm or vehicle motion alarm, is a device intended to warn passers-by of a vehicle moving in reverse. They typically produce 1000 Hz pure tone beeps at 97-112 decibels.[1] Matsusaburo Yamaguchi of Yamaguchi Electric Company, Japan, invented the back-up beeper. It was first manufactured as model BA1 in 1963.[2] ISO 6165 describes “audible travel alarms”, and ISO 9533 describes how to measure the performance of the alarms Great idea, right? Except the Prius backup beeper SOUNDS INSIDE THE CAR. Not externally. You can’t hear it outside. Who exactly is this supposed to be warning?
The mapping software sucks. I mean, you just can’t get around it. It’s cumbersome, it’s painful to use, the search functions are absolute shit, and it’s just a nightmare to try and use productively. Took us another zillion years to figure out how to turn off the turn by turn navigation (you can’t except via a buried setting – makes listening to music really terrifying – why can’t you just say ‘turn off turn by turn for now, I’m listening to something cool, I don’t need the interruptions telling me that I’ll be on this interstate until the heat death of the universe.’
Most functions are disabled while in motion. This seems to carry over from day 0 of cars getting anything more complicated than an FM stereo head unit. Someone somewhere said “We should disable any function that may be a distraction to the driver, with no option to get around it”, and so it was. But, what if you’re traveling in a modern vehicle that thoughtfully placed the navigation system between the driver and passenger seat, where the passenger has the same access as the driver, wouldn’t it make sense to allow the passe… NOPE! Locked out! You can’t modify your route or destination or settings while in motion. DENIED.
Denoument
I’m sure I’ll be adding to this list as more things come up. What’s bothersome about all this is so much of this can be fixed in software. But as far as I can tell, Toyota is following the auto manufacturer trend of assuming once a model year of a car is complete, so is the software, and it doesn’t need to change. They may do minor tweaks and fixes, but they do not actually revise the systems with major improvements (unlike Tesla, who put out major software updates pretty much constantly, frequently adding new features or overhauling others).
It may sound like I’m bashing Toyota and ignoring flaws in other manufacturers. That’s not the case at all. I’ve written in the past about my issues with the Tesla Model 3, and while I didn’t have a lot of complaints about my Chevy Volt, there were some frustrations with GM. (In fact, I had some UX problems with the Volt as well, but the Volt didnt’ have the big touchscreen that SHOULD have made those problems easy to fix.)
Modern car manufacturers absolutely need to get on board, and stop thinking of the dashboard with a touchscreen as just a ‘shiny’ version of the old knobs and dials dashboards. It’s a fully functioning digital information and control system, and should be treated as such, with regular updates, and some put into UX design. Tesla is the only company that is doing this right. What the heck is everyone else thinking?
0 notes
Text
Creality CR-10 - How I Fixed Stuttering / Levelling Problems
New Post has been published on https://planet-geek.com/2020/07/17/geekitude/creality-cr-10-how-i-fixed-stuttering-levelling-problems/
Creality CR-10 - How I Fixed Stuttering / Levelling Problems

About 6 months ago I bought a Creality CR-10 3d Printer. All the cool kids were using 3d printers for just abouyt everything, I was starting to feel left out. Our makerspace has some great printers, but with the pandemic (and also that the space was 45 minutes away), I wanted something nearby that I could tinker with on my own time.
Secondarily, there’s something attractive about being your own fabricator. Having a printer means I can manufacture my own items. That’s pretty cool. I needed to learn how to do that.
For the most part, the printer works great. 3d printing with PLA is not a fast process. Most prints take hours to complete. The CR-10 worked like a champ though. Prints were clean, the end results were useable, and the machine was dependable and easy to manage. I learned to use Ultimaker Cura to set up the jobs and all was well.
I didn’t print anything for a month or so, then went back to print some cable runners to try and organize my desk wiring a bit. When home-ing the print bed, I heard a sort of chattering / stuttering noise during Y axis motion:
Creality CR-10 3d printer stuttering
I didn’t think much about it, but the print failed with layers shifting in a weird way. Obviously something was wrong.
I spent some time trying to find problems with wiring, stuff blocking the motion of the stepper – nothing was obvious. It was weird though, because the chattering would only happen in one direction, and even odder, it happened when the printer was completely powered off. Moving the bed by hand would cause this sound even when nothing was powered up.
Hmmmmm.
Yesterday I decided enough was enough. Posting on reddit asking for help got no good feedback. I submitted a bug report to Creality, unsurprisingly, I never even got an acknowledgement to the message. I chatted with friends who suggested stepper motor failure, bed misalignment, power supply problems – a whole host of things. None of these were it.
Turns out, like so many things, it was something stupid.
On the front of the Y axis travel arm, there’s a bracket that holds the pully for the belt. This bracket ‘sticks out’ from the frame of the printer, and apparently, somewhere along the line, I had bumped into this bracket, pushing it down about a cm. That was enough to have the belt rub against the end of the track. Travel in one direciton was smooth, but in the other, the teeth on the belt would catch on the end of the track.
Correct position of front assembly
Incorrect / bent position of front assembly
The answer of course was to just move the assembly up into the right position, and BEHOLD! No chattering, no stuttering, no problems. Thus ended a month of having the printer mocking me in its uselessness.
I did, however, run into one other problem. Bed levelling is the nemesis of any 3d printer owner. It can be tedious and time consuming, but is absolutely critical to getting good, solid, well formed prints.
On the CR-10, levelling is accomplished via a set of wheels under the bed that compress set of strong springs to get the bed where you want it. In this case, the springs were 100% compressed, and I couldn’t get enough clearance between the glass and the print head. In the past I was able to wrangle enough slack to make it happen, but today, maybe due to humidity or whatever, I just couldnt’ get it to clear.

Fully compressed spring on the CR-10 levelling knobs.
I solved the problem by essentially raising the 0 position on the Z axis stepper. Because there’s no built-in function to do this on the printer, but being the ever adaptive type, I made do with 4 strips of electrical tape, added to the Z gantry just above the homing switch. This effectively told the printer to stop the the print head about a mm higher than it had before, thus giving me some working room to adjust the bed

MAGIC TAPE
Conclusions
I really do like the CR-10. When it’s running, it’s rock solid, and prints like a dream. I’m hoping to do some mods to it once the office situation settles down a few notches, but right now I’m just happy to have a working, non-chattery, dependable machine again.
0 notes
Text
Zeos Pocket PC
New Post has been published on https://planet-geek.com/2020/07/11/vintagehandhelds/zeos-pocket-pc/
Zeos Pocket PC

When PCs were hitting their stride, handheld versions were starting to make their appearances. The early versions were pretty limited in their performance, but they were functional, mobile, and not too bad.
A fellow on one of the retro forums reached out to me recently and asked if I’d be interested in a Zeos Pocket PC. At first I thought it was another Windows CE machine, and I was really avoiding those. But this turns out to be a very basic DOS based handheld, so I said “Sure, I’ll take it!”
The Zeos Pocket PC was made in 1992, around the time the HP 95LX and similar ‘clamshell’ computers were being manufactured.
Specifications
Released: 1992
Original price: $595 ($1,108 in 2020 dollars)
CPU: NEC V30 (80C86) @ 4.77MHz / 7.15MHz
Memory: 640k RAM
Display: 80×25 LCD text, 640×200 graphics
Batteries: Two AA
MS-DOS 5.5
1.3lbs
Interesting Bits
The Zeos PC has a couple features on it that make it pretty interesting. The first is it has a parallel and a serial port on it. Unfortunately, they use a custom cable connector (which I happen to have), so connecting up to them can be a little challenging.
However, they also have dual PCMCIA slots, which means it’s easy to dock new cards into it (conveniently located under the case). The Zeos supports SRAM cards… these cards are Type 1 PCMCIA devices, which are pretty hard to find, and require a battery in the card to retain their storage. I have 1-2 that I use on my Newtons, so I’m looking forward to tinkering with them.
Another neat feature is it has a quite large and comfortable keyboard. That can be a win or lose – easy to type on, but it makes the entire unit quite bulky. Not something that would fit comfortably in a jacket pocket
The screen is not particularly easy to work with. It has no backlighting, so visibility requires just the right light setup (a direct light, but not one that reflects badly).
It is, however, extremely light and portable for a fully functional PC-DOS machine from 1991.
Conclusions
The Zeos Pocket PC is a cute representation of the state of DOS based computers in the early 90’s. Extremely limited funtionally in it’s basic state, but I’m going to see if I can get some simple applications on it. It comes with Works (an extremely simple software suite for notes and stuff), but it might be fun to get some more complex applications on it and get some connectivity going.
0 notes
Text
Chasing Things That Bring Me Joy
New Post has been published on https://planet-geek.com/2020/02/18/life-dont-talk-to-me-about-life/chasing-things-that-bring-me-joy/
Chasing Things That Bring Me Joy
I really don’t like making New Years Resolutions. It always strikes me as something people do because.. “it’s a thing you do”.
This year though, I inadvertently made one, and it’s turning out to be a good thing.
Over the winter vacation, I had a great conversation with my wife that ranged all over, and was one of those conversations that can be a turning point. The topic was “What is it that’s important to you? What makes you happy?”
Turns out, something that made me happy was definitely not taking a bigger role. I wasn’t making time for it, so it was falling behind.
Music.
Fifteen or so years ago I was in a blues band, playing bass, and having a great time. We were gigging out, we were playing the most god awful bars you could find, but it was fun, and while there were times it was challenging, there were also times of great joy… those moments when things just come together and we rocked the place.
Because of my work schedule, I had to leave the band (lots of travel makes it hard to stay on the performance schedule), and music sort of fell on the wayside. I still had my guitars, I still played… a little, but I definitely stopped growing and learning. Things slowed down.
My kid is getting pretty serious about their music, and has been steadily pushing me to play more. I’ve been resisting under the normal arguments “I suck, I don’t know enough, I’m embarrassed). We’ve played a few times, and it made me sad, because what I knew was too limited, too constrained. And my fingers hurt.
Over the winter break, after that conversation with my wife, I decided it was time to change that. Music is something I truly love, I just never made the choice to dedicate time and energy into learning in all the things I didn’t know, and… of course, I needed to PRACTICE.
So, since somewhere around New Years, I’ve thrown myself into finally learning guitar properly. YouTube is a wonderful source of lessons, demonstrations, and backing tracks. That, coupled with help from Zach, and lots of practice, I’m starting to fill in the gaps in my guitar knowledge that was sorely lacking.
But, most importantly of all, I’ve been sticking with a regular practice schedule with a very simple rule. Play every day. Even if it’s only 10 minutes… pick up an instrument, and run scales, run fingering exercises, play some part of a song. Keep your fingers active, keep the knowledge alive, and keep building.
Since January, I’ve held to this schedule. I play every day. Sometimes 10 minutes, sometimes an hour or two. What’s happened is my fingers are building up calluses, and I’m learning pick and finger control – things I never had before. I’m learning to solo, something that’s always been a mystery to me. Music theory is filling in, though very slowly, and with the possible pitfall a lot of guitarists fall into. A lot of theory on guitar matches to patterns and arrangements on the neck. The theory is subsumed by learning patterns and relationships between positions, rather than the theory itself and how the neck represents it. I’m okay with this for now, but I recognize I’ll need to fill things in later.
I’ve also invested in a new (to me) guitar. It’s an Ovation Balladeer, made in 1972. I’ve always had a weak spot for Ovations, and even though they’re not the magic they were once considered, I still love the feel, styling, and sound of them. I found one on Craigslist that, unfortunately, had a broken headstock. It’s currently at the luthier being repaired, hopefully done soon. For acoustic practice, I’m using a Takamine 6 string I inherited from friends over a decade ago. It has horrible action, an uncomfortable neck, but it sure is strengthening my fingers and building up my calluses. 🙂
My goal is to keep this up through the year. To get to the point where given a key, I can solo and play along with it comfortably. There’s a long road to this, but now, after 2 months, I’m starting to see progress. I spend an hour playing over a backing track on my SX electric guitar (a yard sale find about a year ago), and it feels… good. Still not the expressiveness I want, but it sounds like music, and feels a bit like music. Progress.
At some point, I’m sure I’ll be able to share some things I’m playing – not yet though. But I’m cautiously hopeful that sometime I’ll be able to stand up in front of folks with some friends, we’ll play a song, and at some point we’ll start a go-around for soloing, someone will nod to me, I’ll kick my pedal, and I’ll solo… in a way that will make me smile, and make others smile, and… hopefully… give me joy.
0 notes
Text
Epson HX-20 - Worlds First Laptop
New Post has been published on https://planet-geek.com/2020/02/14/vintagehandhelds/epson-hx-20-worlds-first-laptop/
Epson HX-20 - Worlds First Laptop

Boy am I happy about this one.
I first saw the Epson HX-20 back when I was working a computer store in New Jersey in the 80’s. I believe I read some articles about it in Infoworld or something similar, and thought it was awesome. At some point I got to look at one / type a few characters on it, but never got to own one.
Until now!
Epson HX-20
This came to me as part of a large equipment sale not far away. It is in EXCELLENT shape, complete with carrying case, power supply, and a couple microscassettes. The printer works fine, everything is in perfect working order.
Released to mass market in 1982, this is widely recognized as the very first laptop computer. It is A4 sized, has decent battery life, a full stroke, full sized keyboard, and many expansion ports.
Specifications:
Released: 1982
Original price: $795 ($2040 in 2020 dollars)
CPU: Dual Hitach 6301 CPU at 614khz
Memory: 16k RAM (expandable to 32k)
Display: 4lines at 20 characters
Graphics: 120×32
Batteried: NiCad
Weight: 3.5lbs
The unit works perfectly, and is a true delight to type on and tinker around with. I will be a great addition to my collection. I’m looking forward to learning more about it!
0 notes