#Free avi to mp4 converter download
Text
Free avi to mp4 converter download

#FREE AVI TO MP4 CONVERTER DOWNLOAD MP4#
#FREE AVI TO MP4 CONVERTER DOWNLOAD INSTALL#
#FREE AVI TO MP4 CONVERTER DOWNLOAD SOFTWARE#
#FREE AVI TO MP4 CONVERTER DOWNLOAD FREE#
#FREE AVI TO MP4 CONVERTER DOWNLOAD MP4#
FFmpegįFmpeg is another open source command line AVI to MP4 converter. Step 2: Choose a target device or MP4 from "Format" area and hit "Convert to WebM SD" to start converting. Step 1: Connect your phone to the Mac computer and launch the program. It is easy to transfer files to MP4, WebM, OGG, MP3, etc. If you want to convert AVI to device, it also leaves you the option to convert video to various devices directly. It supports drag-and-drop command to convert AVI to MP4 for free.
#FREE AVI TO MP4 CONVERTER DOWNLOAD FREE#
Let's check what is also supported apart from free converting AVI to MP4. Miro Video Converter is a free AVI to MP4 converter for Mac, Windows and Linux. Step 2: Choose MP4 on the "Container" list and click "Start" button. Drop a folder to save the output in "Destination" area. Step 1: Go to "Source-> Open File" to import the AVI video into the program. How to use Handbrake to convert AVI to MP4 What's more, it offers extensive custom options. When converting MP4 files, it supports 4K resolution AVI to MP4 conversion. Besides, it extracts MP4, MOV, FLV, WMV, MP4, etc. It converts AVI videos to MKV, M4V, MP4, AAC, FLAC, MP3, etc. Handbrake is an open source AVI to MP4 converter. After importing one or several AVI videos and choose MP4 from the dropdown list of "Output format" as the output format, and one-click on the Convert button will complete the job. This free AVI to MP4 converter is easy to use. Last but not lease, it lets you batch convert AVI to MP4 on computer. As for the editing features, it can edits opening theme and ending theme. It customizes the output settings like codec, bitrate, resolution (up to HD). Apart from encoding AVI to MP4, it also lets you encode AVI format to more than 300 formats, and convert MP4 to AVI and other formats for free. Aiseesoft Free Video ConverterĪiseesoft Free Video Converter is another popular video converter.
#FREE AVI TO MP4 CONVERTER DOWNLOAD SOFTWARE#
Best 10 Free AVI to MP4 Converter Software for Windows and Mac 1. Once you have finished all the steps above, you can click the "Convert All" choice at the bottom of the interface. Then, hit the inverted triangle in the box next to the "Convert All to" text to choose the MP4 format. Regarding this step, you can just skip it directly if you don't need to modify or polish this video, you can skip it directly. After that you can adjust video rotate, crop, watermark, filter and effect according to your requirement. This option is the second one at the top of the interface. Afterwards, click "Add Files" icon to choose the video that you intend to convert it to MP4 online.
#FREE AVI TO MP4 CONVERTER DOWNLOAD INSTALL#
Step 1: Download and install software on your PCĪbove all, just download the AnyMP4 Video Converter Ultimate from AnyMP4 website, and then you should install it on your computer.Īfter you finish installation, open this application. How to use AnyMP4 Video Converter Ultimate Add or delete subtitle, extra-audio track, etc. It also has the capacity to extract video and audio from DVDs. The built-in video editor offers basic editing tools, like clip, merge, rotate, mirror, watermark, effects, 3D, etc. This video converter supports almost all video and audio formats. It is able to convert video formats without damaging quality, including the resolution from SD to HD, even 4K UHD. Here, we recommend the best way to convert AVI to MP4 on computer with AnyMP4 Video Converter Ultimate. However, another way of exporting AVI to MP4 free has some limites to convert AVI to MP4 like file size, file number, etc. The above free AVI to MP4 converter can easily help you to free transfer AVI to MP4 for free. How to Convert AVI to MP4 (Recommende Way) Top 5 AVI to MP4 Converter Online and Free Best 10 Free AVI to MP4 Converter Software for Windows and Mac
0 notes
Text
A "brief" tutorial on how I make gifs. I know there are better ways to handle some of these steps, but these methods had worked for me so far. I'll tried to make this as organized as possible and other parts I'll be redirecting you to other guides that I have used myself in the past and just overall I think they are really neat! Some of the programs used here are paid, but there are always ways to obtain them through "other ways"...

Programs Used:
Internet Download Manager (IDM) - Paid
OBS - Free
Adobe Photoshop - Paid
Acquiring the Footage:
I usually use footage that I've recorded during gameplay or download it from YouTube (such as trailers, music videos, etc.).
There are many sites and extensions available for downloading these videos, but I personally use IDM to download footage from YouTube.
The higher the quality of the footage, the better your content will be.

Working with Video Formats:
(Note: This step is also relevant if you plan to record your own gameplay.)
If your footage is already in one of the supported file types (or at the desired framerate), you can skip to the next step.
Supported video formats in Photoshop:
(.264, .3GP, .3GPP, .AVC, .AVI, .F4V, .FLV, .M4V, .MOV, .MP4, .MPE, .MPEG, .MPG, .MTS, .MXF, .R3D, .TS, .VOB, .WM, .WMV)
OBS Best Settings for Recording Guide: Link Here
We've acquired our footage, but as you can see, it's in .mkv format. To handle this, I use OBS to record the video from the media player classic (Yes, you could use a converter for this step, but I haven't found one that I like that maintains the original quality.)
The video is in 60fps, but I recommend recording at 30fps. In my experience, 60fps videos tend to look a bit choppy, so I prefer sticking with 30fps.
If you're unsure about the frame rate of your footage, you can check it by following these guides:
For Mac
For Windows
Below are examples showing the differences between the two frame rates (note that the frame delay remains unchanged):


Importing Into Photoshop:
Now that we have our footage, let's import it into Photoshop. There are multiple ways to do this, but the key difference between them is your ability to control the frame delay. This can be really useful when you have a fast-paced scene and need to slow it down a bit.
File > Open: No control over the frame delay.
File > Import > Video Frames to Layers: Allows control over the frame delay.
Below are examples with different frame delays. The original frame delay for this footage is 0.03 seconds:


1 . File > Open:

2 . File > Import > Video Frames to Layers:

For this tutorial I will stick with Import Video Frames to Layers.
Now, we select the desired range for our GIF (note that the maximum supported frames are 500).

Voilà! We've successfully imported it:

Editing the Footage:
If you can't see the Timeline window, go to Window > Timeline, and it will appear.
Now, let's delete the unwanted frames and layers from the beginning and the end:


Next, let click on "Covert to video timeline":

And now, we select all of our layers and convert them to Smart Filters:
From there we create a new document where we'll edit everything (For this I chose these dimensions: 540x700).
And now we drag our Smart Object to our newly created document:

Now for the coloring, sharpening and exporting I will leave that to actual experts so I'll be redirecting you all to these wonderful guides:
General gif-making tips by @mercymaker.
Dimensions, Sharpness and Exporting by @anya-chalotra.
I included the edited final PSB file with the coloring and sharpness I've applied, you can download it here, and below are the export settings I used for this gif:

#well anyways i hope this helps someone#because this was messy#resources#./resources#long post#if you see any typos look way it's 2am
17 notes
·
View notes
Note
hi i just read your blog description and
how does one even begin to go about downloading an entire bootleg onto a Nintendo 3DS, of all things? what exactly prompted you to do this?
I am so glad you asked!
I enjoy the 3DS (and have an alt blog dedicated to my Nintendo shenanigans!) and I absolutely love having access to media entirely offline and without a buffering time! And to complete the trifecta, I had very bad writers block at the time. So uh there’s the why, the but how is chaos so do buckle in
First, I needed a bootleg as an MP4 as the 3DS no longer runs YouTube and I wanted to have it 100% offline. YouTube downloader and 5 minutes and that part was done. Next, actually getting it on the 3DS. A 3DS doesn’t tolerate MP4 files, and despite mine being homebrewed, I couldn’t find a program to play MP4 files. I, being me, tried to finagle it into working anyway. Unsurprisingly it didn’t, so back to the drawing board.
It took a few minutes of furious googling to remember that the 3DS had a pre-installed camera. That could take videos. However, there were some unfortunate limits..
- The filetype needed to be changed from MP4 to AVI.
- The videos could not exceed 10 minutes.
- The resolution is.. bad. 480x240. But if I wanted to watch Tanz with good resolution, why would I download it to a 3DS, eh? A grade-A viewing experience is clearly not the goal here.
Got to work chopping Tanz into 7-10 minute segments in the most sensible places I could. This is what took the longest, as I wanted the cuts to make some sort of sense. I tried to cut between songs or scenes, on top of an already present break in the music. Next, I ran all of these files through a converter to get them in the AVI that the 3DS can understand. Lastly, there was the small task of getting them onto the SD card and storing backup files in an organized manner on my computer so I can get Tanz onto my OTHER 3DS consoles at a later date. I also have a Switch Lite that I’d like to put it on, but my silly camera exploit won’t work because the Switch doesn’t have a camera. Shame.
Anyway I had to name the files so they would appear in order on the laptop and on the 3DS, and I had an AVI and MP4 for each portion. I think there were like 15 parts? I’ll check in the morning, I’m very tired and the system is dead at the moment. But there’s a folder in the applications section than I transferred the video files into, checking every so often to make sure they were working and uploading properly, and luckily they were so it was just a drag and drop operation from there. And that’s how I got Tanz on a 3DS.
I’ll proofread and add images (I think my blog banner is the Tanz credit screen on the 3DS) in the morning, and better explain some stuff. If you have any questions about this or other 3DS stuff please feel free to ask! I love to talk about it!
7 notes
·
View notes
Photo

✨ BEFORE WE BEGIN,
I'd like to mention the obvious that my process is just one way to create a gif. What I do works best for me, and for beginners out there you might find later on that a different method suits you as you get familiarized with PS’s basic tools and functions. The important thing is you start somewhere.
So let’s get started!
✨ IMPORTANT NOTES
- Use high quality footage for gif-making. Whether it’s from a game, show or movie, you want the best you can get. The quality should be 720p at the very least. Lower quality footage can be frustrating to work with if you're just starting out. And in general, really.
- With the method I’ll be outlining, Photoshop will accept videos in .mp4 and .avi format. For game footage, these are the formats you’ll likely see the most.
- I use Nvidia ShadowPlay to record my own in-game footage which saves directly into .mp4 format. Software such as Bandicam and OBS are good, free recording alternatives that do the same.
- For downloading HQ videos from YT, I’d suggest 4k Video Downloader. 4k's free version has the option to save videos in .mp4 format.
- I use Windows and bum the latest version of Photoshop off of aesfocus but previously worked with CS5 for 8+ years. The same tools used in this tutorial are available in previous versions of PS.
- This post displays tumblr's current dimensions for gifs if you don't want them showing up fuzzy/blurry on the dashboard.
- Tumblr’s file size upload limit for each gif is currently 10MB.
✨ BONUS ACTION
With her permission, I’m very happy to provide my bestie aesfocus’ custom action for use which can be downloaded here! This action includes beautiful, subtle corrective image adjustments. I’ve been using this on every gif I’ve made over the past few months.
To set up this action:
Go to Window > Actions
Click the quadruple bar symbol (≣) to top right of the Action box
> Load Actions
Find the saved aes_gif.atn file
Load
Hit the play button (▶︎)
And you’re done! Until you either unselect or delete this action, it will be automatically applied to all video footage you load into Photoshop. Including what you’ll be creating!
✨ STEP 1 - VIDEO TIMELINE
1.) Go to Window > Timeline
Make sure what pops up is a video timeline (aka animation timeline), not frame animation. If you see the symbol below, then it means you're currently in frame animation. Click the symbol to convert to video timeline. (If you’re a Mac user, a similar button should be in the bottom right corner of the timeline.)

2.) Drag the .mp4/.avi video file from its location on your computer and drop it into Photoshop.
3.) In the upper right corner of the Timeline, click the quadruple bar symbol (≣) and go to > Set Timeline Frame Rate.

For a smooth and nicely paced frame rate, I usually stay somewhere between 20 to 24. If you’re doing a close-up gif of someone speaking, I’d suggest setting it to a slower speed of 18 or 19. (But be free to test different speeds!)
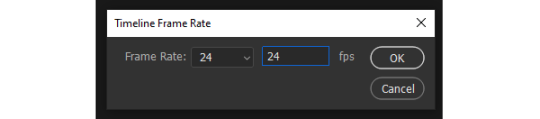
The higher the frame rate, the smoother the gif. However, the file size greatly increases as you get close to 60, so keep that in mind.
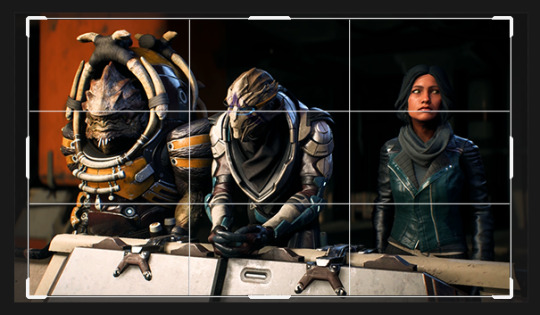
✨ STEP 2 - SETTING UP YOUR WORK AREA
1.) With the footage loaded and prepped, the next step is finding and carving out what you want to turn into a gif. I’ll refer to this as the work area. The work area is set by what footage is between the two slideable 'bumpers' shown below.
If you’re on a Mac or using an old version of PS, the timeline and button positions will look a little different but the functions are the same.

These bumpers will indicate where the gif will start (front bumper) and end (back bumper). Once you know what portion of the footage you'd like to make into a gif, we’ll cut and delete everything else outside the bumpers. What’s between the bumpers is your precious cargo.
Drag the playhead (attached to the red marker) at the top of the Timeline around. This will allow you to preview the loaded footage and help you determine where you're going to place the bumpers.
Try not to put too much footage into your work area if you're just starting out. The lengthier the gif is, the larger the file size. Remember, when the gif is saved it must be under 10MB in order for tumblr to upload it.
2.) Move the playhead to the left until the red marker is at the beginning of the work area where the gif will start (the front bumper). Click on the scissor icon to the left to cut the footage. Click on the unwanted footage that was cut and delete it.
3.) Move the playhead to the right until the red marker is at the end of the work area (the back bumper). Click the scissor icon to cut the unwanted footage, select it, then delete it.
4.) You should be left with your work area on a single layer. Select the work area and drag it to the left on the Timeline, until the start of it is under 00.
✨ STEP 3 - SIZING THE IMAGE
This step can be fiddled with as it's dependent on what size gif you'd like to make. In this example, let’s make a gif that's 540px wide.
1.) Right click the top of the file (or ALT+CTRL+I) to bring up Image Size. Here we'll only change the image Width to 600px and hit OK. (This will give us wiggle room when you decide what you want to crop.) CTRL+1 to bring the canvas to its new full size. (or hold ALT and use your mouse’s scroll wheel to zoom in/out)
After you change the image size, the footage layer (Layer 1) is automatically turned into a Smart Object with a Smart Filter applied. (You can double check this by going to Filter and seeing if the > Convert for Smart Filters option is greyed out. If by chance it's not greyed out, go ahead and convert it.)
SUPER FUN FACT!: Applying a Smart Filter is essential to making gifs. It acts as masking that protects your layer from irreversible change. When converting anything for Smart Filters, any filter you add (sharpening, blurring, etc.) can be adjusted/moved/deleted at any time - even after you save and exit PS! Without the Smart Filter, anything you do directly to the footage layer will be permanent and cannot be undone once you close the file.
✨STEP 4 - CROPPING
1.) Select the Crop tool from the toolbar to the left (C key). You'll notice white borders pop up around the canvas. Click and drag any part of the white border to adjust the crop preview.
Hold CTRL+left click on an outer corner for smoother scaling.
Feel free to drag the footage around within the crop preview to frame it as you see fit.
2.) As you move the border of the crop preview, you should see a small dialogue box following your cursor that tells you the current Width and Height of the current preview area. Since we're making a gif 540px wide, we'll adjust the selection to match that and set the height to whatever you prefer. When you're satisfied with the sizing, doubleclick the area within the preview box to crop. (Or go to Image > Crop)
It's beginning to look like something!
3.) To exit the Crop tool, click the Move tool or hit the V key.
✨STEP 5 - ADDING FILTERS
This step will go over one way to sharpen and lightly blur a gif. We’ll use the Unsharpen Mask to start, (Ironic name, I know) though a common filter used for sharpening is the Smart Sharpen option. I tend to use Unsharpen most often.
1.) With the Smart Filter already having been automatically applied earlier, it’s safe to go ahead and add the Unsharpen filter. While having the gif layer selected, go to Filter > Sharpen > Unsharpen Mask and use the following settings:
Amount: 200
Radius: 0.4
Threshold: 1
Hit OK when done.
Under your Layers tab in the dock to the right, you'll now see the Unsharp Mask beneath your Smart Filter layer mask.
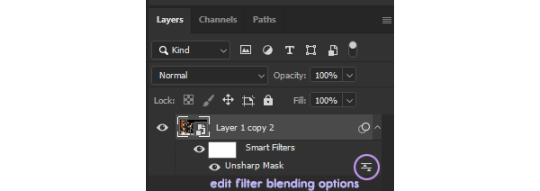
If you click the edit filter button to the right of Unsharp Mask (that look like two arrows between two lines), it'll bring up Blending Options. From here, you can adjust the opacity of your sharpening filter and set a blend mode if you want. For the sharpening we'll leave the opacity alone and keep the mode as Normal.
2.) Now we're going to apply a slight blur filter to sit atop the sharpening. Go to Filter > Blur > Box Blur, set the Radius to 2px and hit OK.
3.) Click on the edit filter button to the right of the Box Blur filter to get to the Blending Options. For this filter, set the Opacity to 45%. If you're working with dark footage, set the Blend to Screen. If the footage has plenty of light and colors, try setting it instead to Overlay. Hit OK.
This will give your sharpening a light softened halo/smeared light effect. Click the eye button to the left of Box Blur to hide the filter if you don't want it, or you can right click on Box Blur > Delete the Smart Filter.
✨STEP 6 - ADJUSTMENT LAYERS
1.) Now that we have filters applied, we'll add our first adjustment layer. Click on the black and white circle > Levels

2.) Below the histogram you'll see three arrows: the darkest arrow to the left, the mid-range grey arrow, and lighter arrow to the right. Move these arrows around only slightly to test how it effects the tonal range. I find that a Levels layer cleanly balances shadows more than anything, particularly with footage or images that are quite dark.
3.) Click again on the black and white circle > Color Balance
4.) On the Color Balance layer, the first tone you can adjust is Midtones by default. Under the dropdown list, you'll see an option for Shadows, Midtones and Highlights. For each Tone, move the sliding arrows around - again, only slightly - to see how it effects the colors of the footage. This is a great tool for color correction.
Similar to Color Balance, Selective Color and Channel Mixer are great color-focused adjustment layers to experiment with.
Curves is also a handy adjustment layer that will effect the tonal range of your gif, similar to Levels.
5.) Before the gif is saved, it’s important to look over the Timeline to make sure that each layer is evenly parallel to your footage layer.

The layers aligning with the footage layer will ensure that everything syncs when the gif loops. You’ll also want to make sure that the back bumper is also placed directly where the footage layer ends.
✨STEP 7 - SAVING
1.) File > Save (CTRL+S) the file on your computer wherever you prefer, keeping it in .psd format.
2.) To save as .gif, go to File > Export > Save for Web (Legacy). (CTRL+Shift+ALT+S) The settings below are what I typically use, but feel free to change Pattern to Diffusion or Noise to see how it effects the preview.
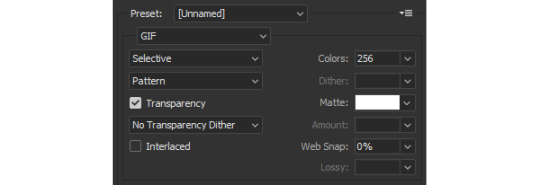
Each dither algorithm option (Pattern/Diffusion/Noise) will change the file size as well has the gif's appearance.
3.) If the file size is under 10MB, then you're ready to save the gif.

If the file size is larger than 10MB, it's likely the footage is too lengthy. In this case, try 1) trimming the footage down as we did previously using the scissors icon on the Timeline, and/or 2) changing the frame rate speed to a number higher than 24, starting with 25, 26, 27, etc. (This will reduce the gif size, but make the speed of the gif faster.)
There are other ways to reduce the file size as well, such as changing the number of Colors on the Save for Web (Legacy) screen from 256 to anything below that. (Which I don't really recommend if your gif is very vibrant or full of color. But it will work well on more neutrally colored/dark gifs.)
Congrats! You're all done.
✨CLOSING THOUGHTS
Hopefully this basic guide will help in making Photoshop seem less intimidating for those starting out. If you’ve found this tutorial useful in any way, a reblog would be appreciated. :~)
For helpful resources, please visit us at gamingresources. If you have a gif or edit tutorial of your own that you’d like us to share, please feel free to tag #gamingresources.
Happy creating! 🧡
#hopefully this helps anon!#this is my first lengthy step-by-step tutorial#I'd be happy to answer any questions as best I can#gif tutorial#gamingresources#gamingedit#vgedit#`reqs#`tutorials#`22
88 notes
·
View notes
Text
How to Download YouTube Videos for Free with VeryUtils YouTube Video Downloader?
Downloading YouTube videos for offline viewing has become increasingly popular, especially for those who want to enjoy content without the need for an internet connection. VeryUtils YouTube Video Downloader is a powerful and easy-to-use tool that allows you to download YouTube videos for free. This article will guide you through the process of using this software to save your favorite videos effortlessly.
Why Choose VeryUtils YouTube Video Downloader?
VeryUtils YouTube Video Downloader is a versatile software that stands out for its simplicity and efficiency. Here’s why it’s the ideal choice for downloading YouTube videos:
Free and Easy to Use: The software is completely free, offering a user-friendly interface that makes downloading videos a breeze, even for beginners.
High-Quality Downloads: VeryUtils ensures that you can download videos in the highest quality available, including HD and 4K resolutions.
Multiple Format Support: You can download videos in various formats such as MP4, AVI, and more, ensuring compatibility with different devices.
Batch Downloading: Save time by downloading multiple videos simultaneously with the batch download feature.
No Registration Required: Start downloading videos instantly without the hassle of creating an account or providing personal information.
Step-by-Step Guide to Download YouTube Videos
Here’s a simple guide to downloading YouTube videos using VeryUtils YouTube Video Downloader:
Step 1: Download and Install the Software
Visit the official VeryUtils website and download the YouTube Video Downloader software.
Once the download is complete, follow the on-screen instructions to install the software on your computer.
Step 2: Copy the YouTube Video URL
Open your web browser and navigate to the YouTube video you wish to download.
Copy the video’s URL from the address bar.
Step 3: Paste the URL into VeryUtils YouTube Video Downloader
Launch the VeryUtils YouTube Video Downloader software.
In the software interface, you’ll find a field labeled “Enter URL.” Paste the copied YouTube video URL into this field.
Step 4: Select Your Preferred Video Format and Quality
After pasting the URL, the software will automatically fetch the video details.
You can then choose the desired format (e.g., MP4, AVI) and quality (e.g., 720p, 1080p, 4K) for the download.
Step 5: Download the Video
Once you’ve selected your preferred format and quality, click on the “Download” button.
The software will start downloading the video. You can monitor the progress in the download queue.
Step 6: Enjoy Your Downloaded Video
After the download is complete, the video will be saved to your specified folder on your computer.
You can now watch the video offline anytime, anywhere, without needing an internet connection.
Additional Features
VeryUtils YouTube Video Downloader also offers some additional features to enhance your experience:
Playlist Downloading: Download entire playlists with a single click, perfect for saving a series of videos at once.
Audio Extraction: Extract audio from YouTube videos and save it as MP3 or other audio formats, ideal for creating music libraries.
Integrated Video Player: The software includes a built-in video player, allowing you to preview videos before downloading them.
Conclusion
VeryUtils YouTube Video Downloader is a reliable and efficient tool for downloading YouTube videos for free. Whether you need videos for offline viewing, educational purposes, or personal use, this software provides a straightforward solution. With its high-quality downloads, batch processing, and ease of use, VeryUtils YouTube Video Downloader is an essential tool for anyone looking to save YouTube content with just a few clicks. Download it today and start enjoying your favorite videos offline!
0 notes
Text
imPDF Free Online File Converter is Your Ultimate Solution for File Format Conversion
imPDF Free Online File Converter is Your Ultimate Solution for File Format Conversion.
In today's digital world, managing and converting files into different formats is essential. Whether you're handling documents, media files, or archives, having a reliable and versatile file converter at your disposal can make all the difference. That's where the imPDF Free Online File Converter comes in. Offering a comprehensive suite of conversion options, imPDF ensures that you can easily transform files across a wide range of formats without any hassle.

✅ Why Choose imPDF Free Online File Converter?
imPDF Free Online File Converter is designed to cater to a multitude of file conversion needs. It supports over 1200 different conversions, covering everything from video and audio to documents, images, and archives. This extensive range ensures that you can convert virtually any file type into the format you need, simplifying your workflow and enhancing productivity.
✅ imPDF Free Online File Converter Key Features
• Broad Format Support: imPDF supports a vast array of file formats, including but not limited to:
• Documents: DOC, DOCX, PDF, RTF, TXT, ODT, WIKI, PPT, PPTX, and more.
• Images: JPG, PNG, BMP, GIF, TIFF, ICO, and others.
• Audio: MP3, FLAC, WAV, M4A, AAC, and more.
• Video: MP4, AVI, MKV, FLV, MOV, and others.
• eBooks: EPUB, MOBI, AZW, FB2, and more.
• Archives: ZIP, RAR, 7Z, TAR, and others.
• Popular Conversions: imPDF makes common file conversions effortless. Some of the popular conversions include:
• PDF to Word and PDF to Excel
• FLAC to MP3 and WAV to MP3
• DOC to PDF and DOCX to PDF
• MP4 to AVI and MKV to MP4
• JPG to PNG and TIFF to PDF
• MOV to AVI and AVI to MP4
• Versatility Across File Types: The converter supports a wide range of conversion types, including:
• Video Converter: MP4 Converter, AVI Converter, MKV Converter
• Audio Converter: MP3 Converter, FLAC Converter, WAV Converter
• Document Converter: DOCX Converter, PDF Converter, DOC Converter
• Image Converter: JPG Converter, PNG Converter, TIFF Converter
• eBook Converter: EPUB Converter, MOBI Converter
• Archive Converter: ZIP Converter, RAR Converter, 7Z Converter
✅ How It Works?
Using the imPDF Free Online File Converter is simple and user-friendly:
Upload Your File: Select the file you want to convert from your device or cloud storage.
Choose the Output Format: Specify the format you want to convert your file to.
Start the Conversion: Click the convert button and wait for the process to complete.
Download Your File: Once the conversion is done, download the newly formatted file directly to your device.
✅ Continuous Improvement and User Feedback
At imPDF, we are committed to providing the best file conversion service. We are constantly adding new formats to our converter based on user feedback and evolving needs. If there's a specific format you require that we currently do not support, we encourage you to let us know. Your input helps us enhance our service and meet the diverse needs of our users.
✅ Why imPDF Stands Out
• Completely Free: Enjoy all these powerful conversion features without any cost.
• Easy to Use: No need for complex software—just a straightforward online tool.
• Regular Updates: We continuously improve our service to include new formats and features.
✅ Get Started Today
Don't let file format limitations hold you back. With imPDF Free Online File Converter, you can handle all your file conversion needs quickly and efficiently. Whether you’re converting documents, images, audio, video, or archives, our tool is designed to simplify the process.
Try imPDF Free Online File Converter now and experience the convenience of having over 1200 conversion options at your fingertips. For any questions or feedback, feel free to contact us—we’re here to help!
0 notes
Text
Y2mate
Y2mate: Your Ultimate YouTube Video Downloader and Converter
In the era of digital content consumption, YouTube reigns supreme as the go-to platform for videos of all kinds. Whether you're looking to catch up on music videos, educational content, or your favorite vlogs, YouTube offers a treasure trove of entertainment and knowledge.
However, what if you want to save these videos for offline viewing or convert them into other formats? Enter Y2mate – a versatile online tool that empowers users to download and convert YouTube videos effortlessly.
The Power of Y2mate
Y2mate apk has carved out a niche for itself as a reliable and user-friendly YouTube video downloader and converter. It stands out among similar services due to its intuitive interface, extensive compatibility with video formats, and robust performance. Whether you're a casual viewer looking to save a few videos for later or a content creator seeking to repurpose material, Y2mate offers a seamless solution.

Key Features and Functions
Video Downloading: Y2mate allows users to download YouTube videos directly to their devices. This feature comes in handy for those who want to watch videos offline, whether they're on a commute without internet access or simply prefer not to rely on streaming.
Format Conversion: Beyond downloading, Y2mate excels in converting videos into various formats. Whether you need MP4, MP3, AVI, or another format, Y2mate supports a wide range of options, catering to different devices and preferences.
User-Friendly Interface: Navigating Y2mate is refreshingly straightforward. Users simply copy the YouTube video URL, paste it into Y2mate's input box, select their preferred format and quality, and click download. Within moments, the converted file is ready for download.
High Quality and Speed: Y2mate prides itself on delivering high-quality downloads and conversions at impressive speeds. This ensures that users can enjoy their content without compromising on clarity or waiting excessively long for downloads.
Legal and Ethical Considerations
While Y2mate offers a convenient way to access YouTube content offline, it's crucial to respect copyright laws and YouTube's terms of service. Users should only download and convert videos for personal use or with permission from the content creator. Distributing copyrighted material without authorization violates legal guidelines and can result in repercussions.
Why Choose Y2mate?
Free and Accessible: Y2mate is free to use, making it accessible to anyone with an internet connection and a need to download YouTube videos.
No Software Installation Required: Unlike some video downloading tools that require software installation, Y2mate operates entirely online, eliminating the need for additional downloads or updates.
Supports Multiple Platforms: Whether you're using a Windows PC, Mac, Android, or iOS device, Y2mate is compatible across various platforms, ensuring versatility and convenience.
The Future of Y2mate
Looking forward, Y2mate continues to evolve in response to user feedback and technological advancements. Potential future enhancements may include improved compatibility with additional video platforms, enhanced download speeds, and new features to further streamline the user experience.
Conclusion: Empowering Access to YouTube Content
In conclusion, Y2mate stands as a valuable tool for anyone looking to harness the power of YouTube beyond streaming. Whether you're saving educational videos for offline study sessions, archiving favorite music performances, or repurposing content for creative projects, Y2mate offers a straightforward and efficient solution. By combining ease of use with robust functionality, Y2mate ensures that users can enjoy YouTube content on their own terms, anytime and anywhere.
Embrace the convenience of Y2mate and unlock the full potential of YouTube videos today! Discover how this versatile tool can enhance your digital content experience with just a few clicks.
0 notes
Text
How to Easily Convert and Upload MP3 to YouTube
Converting and uploading MP3 files to YouTube can seem complex, but it’s easier than you think. This guide will show you how to do it with minimal hassle. Whether you're an aspiring musician, a podcaster, or simply want to share audio recordings, understanding how to navigate YouTube’s platform and effectively upload your content can significantly boost your online presence. This comprehensive guide will cover everything from selecting the right tools to engaging with your audience post-upload.
Why YouTube Requires Video Files:
The Format Requirements: YouTube primarily supports video formats like MP4, AVI, MOV, and more. Understanding this is crucial as it means your MP3 file needs to be paired with a visual component before it can be uploaded.
Advantages of Video Format for Audio Content:
Enhanced Engagement: Videos with visuals are more engaging than plain audio, keeping viewers interested.
Better SEO: Videos can be optimized with titles, descriptions, and tags, making them easier to find.
Analytics: YouTube provides comprehensive analytics, helping you understand your audience and improve your content.
Choosing the Right Tool: There are various tools available for converting MP3 files to video. Here’s a comparison of some popular options:
Comparison of Different Conversion Tools:
Movavi Video Converter: Known for its high-quality output and user-friendly interface. It offers advanced editing features and supports various formats.
HandBrake: An open-source tool that's versatile and powerful, though it may have a steeper learning curve for beginners.
Freemake Video Converter: Offers a balance of simplicity and functionality, making it a popular choice for many users.
Step-by-Step Instructions for Using Movavi Video Converter:
Download and Install Movavi Video Converter:
Visit the Movavi website and download the converter.
Follow the installation instructions to set up the program on your computer.
Import Your MP3 File:
Open Movavi Video Converter and click on the 'Add Media' button.
Select 'Add Audio' and choose your MP3 file from your computer.
Choose an Output Format:
Select MP4 or another YouTube-compatible video format from the list of presets.
You can also adjust the settings like resolution and bitrate to suit your needs.
Add a Visual Component:
Click on the 'Add Image' button to include a static image or a slideshow.
You can select images from your computer or use stock images available within the software.
Start the Conversion:
Once you’ve configured your settings, click on the 'Convert' button.
Wait for the conversion process to complete, then save the video file to your computer.
Creating Visuals for Your Audio:
How to Create Simple Yet Engaging Visuals:
Static Image: Use a high-quality image that represents your content well. This could be an album cover, podcast logo, or any relevant graphic.
Slideshow: Create a slideshow with multiple images to make the video more dynamic.
Lyric Videos: If you’re sharing music, consider adding lyrics to your video. This not only engages viewers but also helps with SEO.
Using Free Tools Like Pexels and Unsplash for Images:
Pexels: Offers a wide range of high-quality stock images that are free to use.
Unsplash: Another excellent resource for free stock photos that can enhance your visuals.
Tips for Designing Effective Visuals:
High Resolution: Ensure all images used are of high resolution to avoid pixelation.
Relevance: Use visuals that are directly related to the audio content to maintain consistency and interest.
Simplicity: Avoid cluttering the screen with too many elements. A clean and simple design is often more effective.
Uploading to YouTube:
Detailed Steps for Uploading Your Video:
Sign In to Your YouTube Account:
Open YouTube and sign in using your Google account credentials.
Click on the Upload Button:
Click on the camera icon with a plus sign at the top right corner of the screen.
Select 'Upload Video' from the dropdown menu.
Upload Your Video File:
Drag and drop your video file into the upload window or click 'Select Files' to browse your computer.
Ensure your video file meets YouTube’s upload requirements.
Add Video Details:
Title: Create a catchy and descriptive title that includes relevant keywords.
Description: Write a detailed description that provides context about the audio content. Include links to your website, social media, and other relevant resources.
Tags: Use appropriate tags to help users find your video. Tags should be relevant and include keywords related to your content.
Select a Thumbnail:
Choose a thumbnail that is eye-catching and representative of your content. You can upload a custom image or select a frame from the video.
Publish Your Video:
Select your desired privacy settings (public, unlisted, or private).
Click 'Publish' to make your video live on YouTube.
Tips for Optimizing Metadata:
Keyword Research: Use tools like Google Keyword Planner or YouTube’s search suggestions to find relevant keywords.
Detailed Descriptions: Write comprehensive descriptions that include keywords naturally. This helps YouTube understand the content of your video.
Engaging Titles: Craft titles that are both informative and intriguing to attract viewers.
Promoting Your Content:
Strategies for Sharing Your Video on Various Platforms:
Social Media: Share your video on all your social media platforms. Encourage your followers to like, comment, and share to increase engagement.
Email Marketing: Send an email blast to your subscribers with a link to your new video. Highlight key points and invite them to watch and share.
Collaborations: Partner with other creators to reach a broader audience. Collaborative videos can attract new viewers and provide mutual benefits.
Engaging with Your Audience to Build a Following:
Respond to Comments: Engage with viewers by responding to comments on your videos. This helps build a community and encourages more interaction.
Create a Community Tab: Use YouTube’s Community tab to post updates, polls, and other interactive content to keep your audience engaged.
Regular Uploads: Consistency is key to maintaining and growing your audience. Plan a content schedule and stick to it.
Advanced Promotion Strategies:
YouTube Ads: Consider using YouTube ads to promote your content to a wider audience. Target your ads based on demographics, interests, and behavior to reach the right viewers.
SEO Optimization: Continuously optimize your videos for search engines. Update titles, descriptions, and tags regularly to keep your content relevant.
Analytics: Use YouTube Analytics to track the performance of your videos. Analyze metrics like watch time, audience retention, and engagement to understand what works and what doesn’t.
Conclusion: Uploading MP3 files to YouTube is straightforward with the right approach. By converting your MP3 files to video, adding engaging visuals, and optimizing your content for YouTube, you can effectively share your audio content with a broader audience. Follow these steps to ensure your audio content is presented professionally and attractively, and start growing your YouTube presence today.
0 notes
Text
Unlock Superior Sound: Convert Videos to FLAC Online Instantly

In the digital age, sound quality has become an essential aspect of the multimedia experience. Whether you are a music enthusiast, a professional audio engineer, or simply someone who appreciates high-fidelity sound, the need for superior audio quality is undeniable. One of the best ways to achieve this is by converting videos to FLAC (Free Lossless Audio Codec) format. This blog will delve into the benefits of FLAC, the process of converting videos to FLAC online instantly, and why this method is a game-changer for audio aficionados.
Understanding FLAC: The Pinnacle of Audio Quality
FLAC stands for Free Lossless Audio Codec. Unlike MP3 or AAC, which compress audio files by removing some data (and thereby reducing audio quality), FLAC compresses audio files without any loss in quality. This means that the audio you get in a FLAC file is identical to the original recording. Here are some key benefits of FLAC:
Lossless Compression: FLAC files retain all the original audio data, providing superior sound quality.
Open Source: FLAC is a free and open-source format, ensuring wide compatibility and support.
High-Resolution Audio: Ideal for high-resolution audio files, FLAC supports sampling rates far beyond the standard CD quality.
Metadata Support: FLAC files can store rich metadata, including album art, track titles, and artist information.
To convert video to FLAC visit https://tuberipper.com/save/flac
Why Convert Videos to FLAC?
Videos often come with embedded audio tracks that vary in quality. Converting these audio tracks to FLAC can significantly enhance your listening experience. Here’s why you might want to convert videos to FLAC:
Preserve Original Quality: By converting to FLAC, you ensure that the audio quality remains unchanged from the source.
Compatibility with High-End Audio Equipment: Many high-end audio systems and devices support FLAC, allowing you to fully experience the superior sound quality.
Editing and Remixing: Audio professionals and enthusiasts often need high-quality audio for editing and remixing. FLAC provides the best source material for such tasks.
Archiving and Preservation: For those who want to archive audio for future use, FLAC provides a reliable format that won’t degrade over time.
The Online Conversion Process: Simple and Instant
Converting videos to FLAC online is a straightforward process that can be done in just a few steps. Here’s a step-by-step guide to help you through the process:
Step 1: Choose a Reliable Online Converter
Select a reputable online conversion tool that supports video to FLAC conversion. Ensure the tool you choose does not compromise on quality and maintains the integrity of the audio.
Step 2: Upload Your Video File
Upload the video file you wish to convert. Most online converters support a wide range of video formats, including MP4, AVI, MKV, and MOV.
Step 3: Select FLAC as the Output Format
Choose FLAC as your desired output format. Some converters might offer additional options to customize the audio settings, such as bitrate and sample rate.
Step 4: Convert and Download
Initiate the conversion process. Once the conversion is complete, download the FLAC file to your device. The process is usually quick, depending on the file size and your internet speed.
Step 5: Enjoy Superior Sound Quality
Transfer the FLAC file to your preferred audio player or device and enjoy the enhanced sound quality.
Benefits of Online Conversion
Opting for an online converter to transform your video files to FLAC comes with several advantages:
Convenience: Online converters are accessible from any device with internet access, making the process highly convenient.
No Software Installation: There’s no need to install any software, saving you time and storage space.
Instant Results: Most online tools offer fast conversion times, allowing you to get your FLAC files almost instantly.
User-Friendly: These tools are generally easy to use, even for those with minimal technical knowledge.
Tips for Optimal Conversion
To ensure you get the best possible audio quality from your FLAC conversions, consider the following tips:
High-Quality Source Files: Start with the highest quality video files available. The better the source, the better the output.
Stable Internet Connection: A stable and fast internet connection will speed up the upload and download processes.
Check Audio Settings: Some converters allow you to adjust audio settings. Experiment with these to get the best possible sound.
Metadata Editing: Use tools that support metadata editing to keep your audio files organized and properly tagged.
Applications of FLAC Audio
The superior sound quality of FLAC files makes them suitable for a variety of applications:
Personal Listening: Enhance your personal music library with high-fidelity audio files.
Professional Audio Work: Use FLAC files for professional editing, mixing, and mastering.
Streaming and Broadcasting: Ensure the best possible audio quality for streaming and broadcasting purposes.
Archiving: Preserve important audio recordings, such as interviews, speeches, and concerts, in a lossless format.
Conclusion: Embrace the Future of Audio Quality
Converting videos to FLAC online instantly unlocks a new level of audio quality that can transform your listening experience. Whether you’re looking to preserve the integrity of your favorite music tracks or need high-quality audio for professional purposes, FLAC offers an unmatched solution.
With the convenience and simplicity of online converters, anyone can easily take advantage of this superior audio format. So why settle for less when you can enjoy the full richness and depth of lossless audio? Start converting your video files to FLAC today and elevate your auditory experience to new heights.
0 notes
Text
Where i Can Download Speed Launcher
Checking out the best Video game Shelter: A Journey Simply by channel associated with Speed Launcher
Doing this spots executable records, as an example, into a Software folder while MP4 as well as AVI organizers become placed in a Videos folder. World wide web Download Accelerator (IDA) has a live keep track of on your browser, so lines can be downloaded through IDA along with placed in right groups for easy firm. This will be achieved with steady downloads PC Games as well as files starting a good FILE TRANSFER PROTOCOL server. LinkGrabber is part of this program that includes any download hyperlink on the clipboard directly into the method to help you start a download virtually directly after copying the hyperlink. FDM Lite for Screens XP involves less computer living space than the usual version by getting rid of things like the downpour consumer.

Battle.net, typically shortened to BNET, is a match submission program owned and also function through Activision Blizzard. It's a proprietary launcher along with thises a terrific house intended for discover free of charge online game because of this big sport company, like when Globe of Warcraft, Hearthstone, and also Starcraft II. The launcher additionally gets fun cultural Download Games items with regard to being connected with buddies plus much more. Minimalist intention with clean clear interface combined with selection of useful functions am your current feel at ease along with tranquil. Download documents above the HTTP, FTP, BitTorrent, along with protocols using a seamless integration into your one-for-all download press button.
There's as well a built-in movie downloader with foundation regarding YouTube and also Vimeo, also a cassette converter in which swap the data file format automatically when the item finished downloading. The very best no cost download administrators might be specifically Full Download Games helpful if you routinely need to download multiple data file, specially substantial records, this sort of since databases or even backups. Conserve YouTube video clip, playlists, funnels, YouTube Shorts, YouTube Amusement and YouTube Little one content.
Use Safety Try to help immediately assessment intended for compromised codes, safe and sound search level and also any obtainable Opera updates. Browser screening is defended within Chrome, Firefox, Opera, and other browsers. Screens is the single run system until this Speed Launcher method production with. The item includes with Firefox (it utilized to talk with Firefox, nevertheless accomplishes seem to ever again). A lot like a number of the additional plan in this checklist, this blog is known as abandonware considering that the designer doesn't revise that ever again.
Even if you squeeze in a bit-torrent file or even image/video line to be downloaded, you employ identical button, and FlashGet quickly tells exactly how to take care of that. This program could combine with most world wide web browsers, including things like Firefox, Opera, Opera, as well as Trip. The sustained working systems consist of Windows 10, 8, 7, View, as well as XP. This specific download administrator strings by Windows 11, Windows 10, Windows 8, Screens 7, Windows Windows vista, in addition to Chances XP.
The idea greater than sensible, but the user interface is undoubtedly geared towards people who see precisely what they're organize. The clipboard viewer doesn't work what regularly as we'd like, but is a wonderful timesaver. Note that the bond to be able to download the limitless style connected with Ninja Download Director is in the exceptionally bottom in the developer's homepage. Whether you would like something that perform just as one expansion involving your own browser or maybe like a standalone request, there are an abundance of opportunities available to your account. Clevermaths control all the figures anyone would insist on from complete annotation software, just about all includes things like some fantastic college class instruments. Effective, friendly, in addition to interoperable CAD software for your plan, structure, and function from the entire world commercial infrastructure.

Or perhaps expand your own creativeness also build a world that’s fully one of a kind in The Sims 4. You'll find tons new concepts to choose coming from atlanta divorce attorneys well-known style, via player with the dice for you to go fast activities and RPGs. The offer too holds a floating pc option, in order to toggle browser check, pause/start downloads, as well as count another download links. There's a download critique, so you can have a sneak Full Download Games peer at media data file. What's more, it permits an individual cv separated downloads, cap the download rate, convert data file, automatically download profile of an certain format, plan downloads, along with rush some shutdown parameters immediately after downloads. Like a few of these various other download managers, BLOCK hath got a Drop Target button that hovers at your monitor to generate the item much better to start out report downloads.
The website looks and seems like a natural blog, with situations focused on just about every sport producing many list along with address download tie intended for a variety connected with current genres like technique, shooter, activity, experience, and also puzzle.
Softpedia is usually a free of charge downloads centre wherever consumers can easily uncover primary download links for all forms of apps along with software intended for Windows, Mac, Android, and also Linux too, and this and a good Download Games spot for a get no cost activities. The files isn't seeing that massive because with different sites, and you can easily nevertheless locate a quality free puzzle sport, contesting activities, RTS video game, and also RPG sport far too. Origins is amongst the best-known systems pertaining to downloading activity. This possessed and function through EA, one of several biggest sport organisations within the planet, in charge of these kinds of rights seeing that FIFA, Madden, and also Muscle size Influence.
The following is a comprehensive guide how to view Kalki 2898 ADVERTISEMENT online inside their entirety in the convenience regarding your individual residence. You are able to entry the total movie without any demand within the esteemed software generally known as 123Movies. Throw yourself within the spellbinding experience associated with Kalki 2898 AD simply by view the item online totally free.
That may help you choose which one do the job best to suit your needs, we’ve obtained your opts for for the crown download manager the following. We've examined these download bossies all over a lot of characteristics, via their particular download rates as well as simplicity regarding installation on their software and hearing curve. We too verified if PC Games Download they sound line conversion softwares in addition to privacy functions, among other things. Look for videotape as well as audio tracks to download without cause the applying. Look through various internet site from the in-app browser, follow happening near your considerations to read private media, along with bank please all in one position.
0 notes
Text
World's First Video-to-Music AI Tool 'TemPolor' Launches

In the months since Sora—an AI tool capable of generating full videos—burst onto the scene, the world of generative AI has been changed. In the same light, Suno AI, which allows users to input prompts and descriptions to generate personalized songs, has also captivated users. And then there's Google DeepMind's video-to-audio technology that has set new standards in sound effects generation for videos. These advancements have ignited fierce competition in the generative field.
Joining this wave of innovation, Qustar Technology proudly launches TemPolor, a game-changing AI-powered music generator designed to redefine music creation. TemPolor is the world's first AI tool that generates music and songs with lyrics and vocals by analyzing video content input, meeting the diverse audio-visual needs of music creators and video enthusiasts.
This innovation not only showcases a significant breakthrough in generative technology but also presents unprecedented opportunities and challenges for the short video, film and television, and music industries. TemPolor isn't just a tool; it's a revolution in music creation and participation.
To begin creating music with TemPolor, users can visit the official website www.tempolor.com, or download the TemPolor app from the App Store.
TemPolor is the world's first video-to-music AI tool that generates high-quality copyright-free music based on video or text input, offering a cost-effective and easy solution for content creators.
The Ultimate Tool for Effortless Music Generation TemPolor offers two primary input modes in its beta version: text and video. Users can describe the desired music they want through text, or upload videos to let the AI generate a complete soundtrack that matches the video's content and tone.In addition to generating pure music, TemPolor can create songs with lyrics and vocals. The tool's ability to understand video frames' subtle changes and complex music features ensures that the generated soundtracks are fully compatible with the visual content. See TemPolor in action: https://youtu.be/EY_xpwvmpz4?si=QpugFzBZlued4JSTCurrently, TemPolor supports various video formats, including MP4, MOV, and AVI, and exports audio in MP4 and WAV formats. It can generate up to 90 seconds of music for video inputs and up to 5 minutes for text-based inputs. The generated music can be accompanied by subtitles and cover tags, ready for sharing on social media platforms. Best of all, TemPolor is free to use. Watch TemPolor convert text to music: https://www.youtube.com/watch?v=__MyOwE5QmA
For ordinary users, TemPolor makes it easy to add personalized, high-quality background music to home videos, social media content, vlogs, and personal projects without any prior musical knowledge.
For professionals, meanwhile, TemPolor offers a powerful tool to inspire creativity and improve efficiency. It can generate pro-level songs, making it suitable for soundtracking advertisements, documentaries, movies, and even AI-generated movie theme songs.
Making Synchronized Audio-Visual Generation PossibleThe power of TemPolor lies in breaking the limitations of AI in music understanding and generation. The core research and development team comprises experts from top tech companies and universities, including the University of Southern California. Between them, they have developed leading technologies featuring multimodal large models, picture emotion understanding models, and music large models.These allow TemPolor to not only recognize changes in the brightness, color, and emotions of the video screen, but also understand the complex features of the music such as chords, melodies, lyrics, and singing styles, resulting in highly compatible video soundtracks.
A Vision for the FutureThe global music market, projected to reach $163.7 billion* in revenue by 2030, stands to benefit immensely from AI music tools like TemPolor. By democratizing music creation, it allows everyone to participate in the creative process, fostering innovation and growth in the industry. "TemPolor is committed to simplifying the entire process of video soundtrack and music creation through AI technology," says Jason Jia, Vice President of Qustar Technology. "Our goal is to free users from the constraints of professional music theory knowledge, complex production processes, and expensive copyright fees, allowing them to enjoy the fun of music creation. And we're excited to further explore the amazing things we can do with AI and artistic creation to create greater value for users and the industry."
Read the full article
0 notes
Text
VLC Media Player For Mac Latest Version {2024}
VLC Media Player is a popular open-source multimedia player that supports a wide range of audio and video formats. It is known for its versatility, allowing users to play media files, stream content, and even convert formats. Here are some key features of VLC Media Player:
Wide Format Support: VLC can play almost any multimedia file, including popular formats like MP4, AVI, MKV, MOV, MP3, FLAC, and more. This versatility makes it a go-to choice for users who encounter various types of media files.
Cross-Platform Compatibility: VLC is available for multiple operating systems, including Windows, macOS, Linux, Android, and iOS. This cross-platform support allows users to enjoy a consistent media playback experience across different devices.
Customizable Interface: VLC offers customization options for its interface, allowing users to adjust settings such as playback controls, visualizations, and skins to suit their preferences. Users can also install extensions to add additional features or enhance functionality.
Streaming Capabilities: VLC can stream media over networks, including local network streaming (DLNA/UPnP) and internet streaming protocols such as HTTP, RTSP, and RTP. This feature enables users to watch online videos or listen to internet radio stations directly within the player.
Playback Controls: VLC provides a range of playback controls, including play, pause, stop, fast forward, rewind, and volume adjustment. Users can also control playback speed, loop sections of a video or audio file, and take snapshots of the playback.
Advanced Features: VLC includes advanced features such as subtitle synchronization, audio/video synchronization adjustment, audio equalizer, and support for playlists. It also offers options for video effects and filters to enhance the viewing experience.
Free and Open Source: VLC is free to download and use, and it is distributed under the GNU General Public License (GPL). Being open-source software, VLC benefits from contributions from a global community of developers, ensuring continuous improvement and updates.
Overall, VLC Media Player is a versatile and feature-rich multimedia player that caters to the needs of both casual users and enthusiasts alike. Its wide format support, cross-platform compatibility, and customizable interface make it a popular choice for playing media files on various devices.
#VLC#media#players#latest#Version2024#Macbook#macbookair#macbookpro#macOS#macossonoma#macosventura#foryou#foryourpage#viralpage#viralposts#trendingtopic#trendingnow#SharePost#ShareMyPost#imacgeeks#viralpost
1 note
·
View note
Text
How to Download YouTube Videos for Free Using VeryUtils YouTube Downloader Software?
Downloading YouTube videos for offline viewing is easy and free with VeryUtils YouTube Downloader Software. Follow these simple steps to get started.
Step 1: Download and Install VeryUtils YouTube Downloader
Visit the Official Website: Go to the VeryUtils website and download the appropriate version of the software for your operating system (Windows, Mac, or Linux).
Download the Installer: Click on the download link, then open the installer file to begin the installation process.
Install the Software: Follow the on-screen instructions to complete the installation.
Step 2: Launch the VeryUtils YouTube Downloader
After installation, launch the software. The interface is straightforward and easy to navigate.
Step 3: Copy the YouTube Video URL
Open YouTube: Find the video you want to download.
Copy the Video URL: Copy the URL from the browser's address bar.
Step 4: Paste the URL in VeryUtils YouTube Downloader
Paste the URL: In the downloader interface, paste the copied URL into the provided field.
Choose Format and Quality: Select the desired format (e.g., MP4, AVI) and quality (e.g., HD, SD).
Step 5: Start Downloading
Click "Download": Start the download by clicking the “Download” button.
Monitor the Download: Watch the progress in the software. The download time depends on the video size and your internet speed.
Step 6: Access Your Downloaded Video
Locate the Video: The downloaded video is saved in the location specified during setup, typically in the "Downloads" folder.
Play the Video: Open the video with your media player to watch it offline.
Additional Features
Batch Downloading: Download multiple videos simultaneously.
Playlist Download: Easily download entire playlists by pasting the playlist URL.
Convert Videos: Convert downloaded videos into different formats for various devices.
Built-in Search: Search and download YouTube videos directly within the software.
Conclusion
VeryUtils YouTube Downloader makes it simple to download YouTube videos for free. By following the steps above, you can quickly save your favorite videos for offline viewing.
0 notes
Text
SaveFrom.Net Instagram: How Do You Download Instagram Videos?
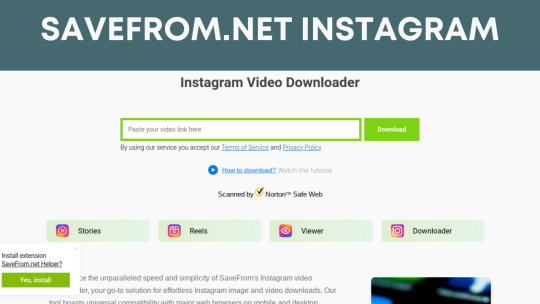
SaveFrom.Net is a versatile website that simplifies downloading videos, audio, photos, and other media from various internet platforms like YouTube, Facebook, Instagram, TikTok, and more. With SaveFrom.Net Instagram, users can easily save desired Instagram videos to their devices in just a few clicks. The interface is user-friendly, so no technical expertise is required.
As Instagram has grown into a hub for video content, many users want to save videos they find to watch later or share with friends. However, Instagram doesn't have a built-in download feature. That's where sites like SaveFrom.Net come in handy. SaveFrom.Net is a popular online platform that allows easy downloading of videos from various websites, including Instagram. This guide will explain what SaveFrom.Net is, provide a step-by-step tutorial on using it to download Instagram videos, discuss the legality issues, suggest some alternative sites, and answer common questions.
SaveFrom.Net Instagram Features
Feature
Details
Website Video Downloads
Download videos from YouTube, Facebook, Instagram, and 1000+ other sites
Format Support
Save videos in MP4, AVI, MOV, MKV, MP3, and other formats
Quality Options
144p to 720p HD quality options for videos
Subtitles
Keep or remove subtitles when downloading videos
Browser Extensions
Add savefrom.net integration via Chrome and Firefox extensions
Video Conversion
Convert downloaded videos to different formats
Is It Safe to use SaveFrom.Net?
Like many internet downloaders, SaveFrom.Net Instagram relies on advertising to stay free. Numerous adverts appear on the site. Some promote the SaveFrom.net helpful extension, while third-party ads may be deceptive. SaveFrom.Net tracks downloads and IP addresses in addition to adverts, which may expose personal information regarding its SaveFrom.net helper extension. Google Chrome prohibits non-Chrome store extensions and doesn't support them. That may indicate SaveFrom.Net's safety.
Step By Step Guide on How To Use SaveFrom.Net Instagram
Go to the SaveFrom.Net website and open the Instagram tab
Find the Instagram video you want to download and copy the URL or link to the post
Paste the Instagram video URL into the box on the SaveFrom.Net site
Click the green "Download" button next to the URL box
A list of available download formats and quality options will appear
Select your preferred video format (e.g., MP4, WEBM) and quality
Click the "Download" button next to your selected format/quality option
A page will open showing the video download progress
Once complete, click the new "Download" button on this screen
Save the video file to your device when prompted
Is SaveFrom.Net Instagram Legal?
Downloading videos from sites like Instagram for personal, non-commercial use is generally considered legal and acceptable under fair use copyright principles. However, downloading on a mass scale or sharing downloaded content in ways that may infringe on owners' rights is illegal. Users should educate themselves and use ethical judgment.
Five Alternatives to SaveFrom.Net Instagram
SnapDownloader
SnapDownloader is the finest video downloader for Windows and macOS due to its functionality and ease of use. You may store videos in any quality by downloading in numerous output qualities up to 8K. SnapDownloader works with over 900 websites and allows mass video downloads.
4K Video Downloader
Other SaveFrom.net alternatives include 4K Video Downloader, which offers less functionality than SnapDownloader. It can download videos from YouTube, Facebook, and TikTok. Batch download and output quality options are available. Advanced capabilities require a membership, and video parsing might take a while.
Y2Mate
One of the most popular MP4 and MP3 video downloaders is Y2Mate. The program is designed to download YouTube videos. A trustworthy and easy-to-use video downloader, Y2Mate lets you search YouTube videos from its website. Y2Mate will show all similar videos for a term you provide.
Insload
If you downloaded Instagram posts using SaveFrom, try Insload. The Instagram video downloader can download videos, photographs, stories, Reels, IGTV, profile images, and almost anything else. Best of all, you may download private posts.
Users may use it easily. Copy and paste an Instagram post's link into Insload to download. It instantly finds all available files for download.
10Downloader
Next is 10Downloader, an internet downloader. It downloads HD YouTube videos like SaveFrom. Using 10Downloader is simple. Simply enter a video URL, and the website will gather all available download resolutions. It only downloads MP4 and WEBM videos at 720p, which is a drawback.
SaveFrom.Net Pros and Cons
Pros
Cons
Simple, easy-to-use interface
Maximum 720p HD quality
Fast download speeds
Limited format conversion options
No account or signup is required
No mobile app
Unlimited downloads
Wide website compatibility
Free to use
Should You Use SaveFrom.Net?
SaveFrom.Net Instagram stands out with its user-friendly interface requiring minimal steps for easy and quick downloading of Instagram videos. It meets most casual users ' needs with robust format options and unlimited use for non-commercial purposes. Those wanting niche features like higher video quality may also explore alternatives like Ingramer and InsTake. Be sure to use downloads legally and ethically, no matter which tool you select.
FAQs
Does SaveFrom.Net work on mobile?
While they don't offer a mobile app, the SaveFrom.Net website is mobile-optimized. You can access it from any smartphone browser to download Instagram videos.
Can I download private Instagram videos?
No, SaveFrom.Net can only download public Instagram videos - not private ones restricted to approved followers.
Is there a limit to how many videos I can download?
No, SaveFrom.Net does not limit the number of Instagram videos you can download in a session or over time.
What's the maximum quality for Instagram downloads?
SaveFrom.Net caps the quality of Instagram video downloads at 720p HD resolution. You must use an alternative site or tool if you want higher-quality IG downloads up to 1080p or 4K.
Read the full article
0 notes
Text
Fast Youtube to WAV Converter

Are you tired of being tethered to an internet connection to enjoy your favorite YouTube content? Look no further than the Ytbto Converter, your all-in-one solution for YouTube to MP3, MP4, WAV, AVI, MKV,Webm, and more!
With our free online converters, you can effortlessly transform any YouTube video into high-quality audio (MP3) or video (MP4, WAV, AVI, MKV, Webm) files, ready for offline enjoyment. Whether it's saving your cherished music videos or catching up on the latest vlogs, our converters are your gateway to unrestricted content access.
The Ytbto YouTube MP3 Converter lets you extract audio from any YouTube video swiftly. Just copy and paste the YouTube video link, and we'll handle the rest. Within moments, you'll have a high-quality MP3 file ready for download, seamlessly integrating into your music library.
But that's not all – our YouTube to MP4 Converter empowers you to convert videos for offline viewing. Whether you're on a plane or simply conserving data, our converter ensures uninterrupted entertainment.
Why choose Ytbto?
Free and Hassle-Free: Our converters are completely free, requiring no downloads or installations. Experience seamless conversion on any device or browser, anytime, anywhere.
High-Quality Downloads: Enjoy videos in 360p, 720p, 1080p, and more. Ytbto ensures top-notch quality without the interruption of annoying ads.
How to use Ytbto Converter:
Copy Video URL: Begin by copying the video URL of the content you wish to convert.
Paste URL & Click Convert: Paste the URL into our converter and hit the convert button.
Download Video: Your converted video is ready for download. Choose the format, size, and quality, then click download. Your video will be saved in seconds, ready for your viewing pleasure

Unlock the potential to convert and download content not just from YouTube but also from platforms like Facebook, Instagram, Twitter, Vimeo, Tumblr, Pinterest, and more. Don't wait – start using Ytbto Converter today and enjoy all your favorite content offline!
Phone : 713-441-5392
Website : https://en.ytbto.com/

1 note
·
View note
Text
Y2Mate is the fastest Youtube Downloader tool that allows you to easily convert and download videos and audio from youtube for free and in the best available quality. Y2Mate is the ultimate tool for downloading unlimited youtube videos without any need for registration. You can quickly convert and download hundreds of videos and music files directly from youtube and other social media websites. We support all audio and video formats like MP3, MP4, M4V, FLV, WEBM, 3GP, WMV, AVI, etc.; the most fantastic thing is that it's completely free.
1 note
·
View note
Last Seen Blogs

hazard-c-horror
Sup I'm new to this

ur-daily-inspiration
Landscape, Animals & Quotes

foodaddict83
Food Addict

jbarchietto
Jbarchietto
hazard-c-horror
Sup I'm new to this