#GPS Arduino
Explore tagged Tumblr posts
Visit Tumblr Blog
Explore Tumblr blogs with no restrictions, modern design and the best experience.
Last Seen Tumblr Blogs


Fun Fact
In Q3 of 2020, 31% of US users access the Tumblr app daily.
Text
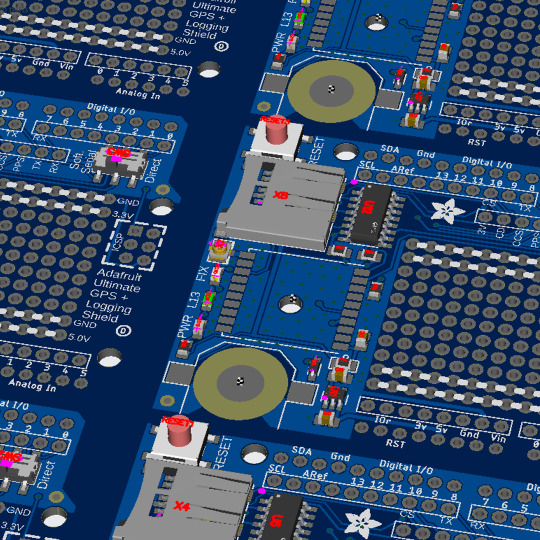
PCB of the day! Ultimate GPS Logger Shield 🌐🔌🛰️
MTK3333 chipset with -165 dBm sensitivity, 10 Hz updates, 99 channels, 30mA power draw, Arduino-compatible. Includes MicroSD slot, RTC battery (7-year backup), built-in & external antenna options, PPS output, LEDs, big prototyping area. Enables high-speed logging/tracking.
#adafruit#electronics#pcb#opensource#opensourcehardware#pcboftheday#gps#arduino#mtk333#gpslogger#shield#sensitivity#lowpower#tracking#arduinocompatible#microsd#rtcbackup#externalantenna#prototyping
17 notes
·
View notes
Video
youtube
Real-Time Vehicle🚗 Accident Prevention & Detection System with MEMS, GPS...
#youtube#Smart Vehicle Accident Prevention System Using Arduino GPS and GSM | Arduino-Based Vehicle Safety System with GPS and GSM Integration | Real
0 notes
Text
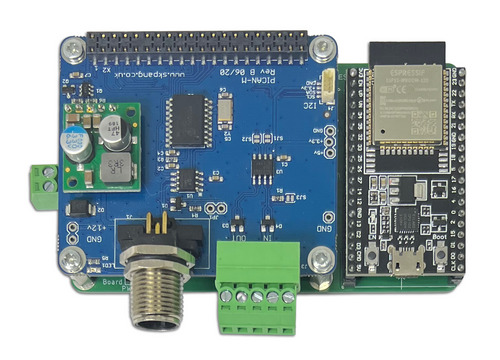
espBerry - ESP32 Development Board with NMEA 2000 & NMEA 0183 HAT
The espBerry DevBoard combines the ESP32-DevKitC development board with any Raspberry Pi HAT by connecting to the onboard RPi-compatible 40-pin GPIO header. We combine the espBerry with the PICAN-M (M = Marine), a Raspberry Pi HAT with NMEA 0183 and NMEA 2000 connection. The system comes with source code demonstrating the access to the NMEA 2000 and NMEA 0183 ports.
1 note
·
View note
Text
#khabar samay#police#khabar samay news#vehicle tracking#vehicle tracking system using gps and arduino
0 notes
Text
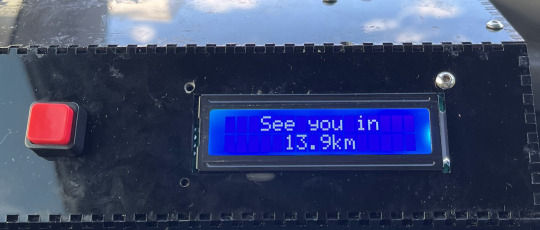
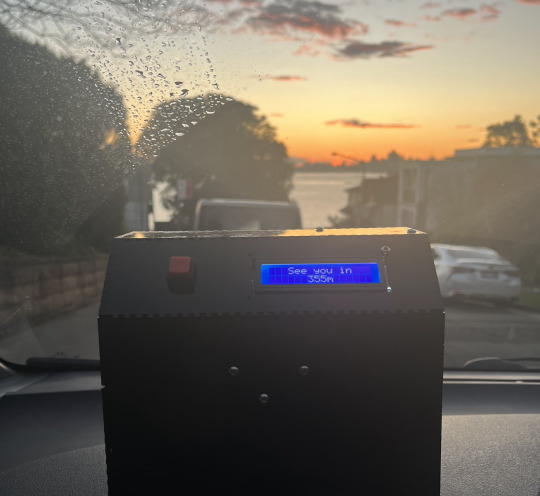
Creating a GPS Treasure Box
Andrew did a write up of one of his projects that we would love to share. We wish you all a happy ❤️Valentines Day!❤️
---
Many years ago I came across the idea for a GPS treasure box, from a post originally by Kenton Harris (I think - apologies if it was somebody else). Some called it a reverse geocache too, but in simple terms, it's a locked box that only opens at a certain location.
The idea behind the box was a very simple interaction - one button, and a screen. The process would go like this:
Press button
Screen lights up, and GPS begins scanning
Screen tells you how many attempts you have left
Once GPS has location, the distance from the target location in kilometers is shown
One attempt is removed from total # of attempts
Screen turns off
Eventually, the target location would be found (and the box unlocks), or the attempts will run out and the box will be sealed shut forever!
Inspired to create a fun adventure for myself and a friend on a weekend in Spain, I ordered all the relevant components including GPS module, Arduino Uno, batteries and a servo motor to lock the box. This was back in January of 2020.
Ah, how times change...
---
Fast forward to January of 2023. I'd moved back to Sydney years prior and still had all of these components sitting around. I knew I'd get to this project one day.
I came across a local makerspace with access to a laser cutter. This was the missing ingredient I needed - not only were there the facilities I needed to create the treasure box, there was also vibrant community of people who had done similar things before.
I started out by gathering some code to power the project, and thankfully found a number of helpful repositories on Github.
I was able to clone one, and adapt it to the paricular hardware and display I was using pretty easily. Annoyingly I had to learn all about Baud rates and GPS modules - but I'm glad I did as I'm sure it will contribute to projects in the future.
---
At long last, the finished project was here.

Not too shabby I thought, but it was time to put it to the test.
I enlisted the help of my girlfriend. We began at home and she pressed the button.
As a guess, she told me to head to Pyrmont, an inner-city suburb. So off we drove.
Getting warmer! And still with heaps of attempts left.

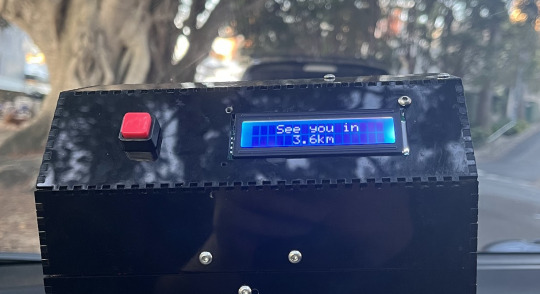
With the sun setting, we headed to a nice spot in Rose Bay, by the water.
It was close enough to continue on foot, so we decided to put the dog in a backpack (I didn't realise prior that he was not allowed in Sydney Harbour National Park, so I hope this was an OK compromise! Apologies to the national parks service).
---
Here, my true colours were revealed. I'd actually added some extra code into the mix - getting the box to ask a very important question on my behalf.

And sure enough, the box opened on cue, revealing an exciting treasure hidden within!

7 notes
·
View notes
Note
My comment responding to you on your post about the autonomous tractor kept being removed: I couldn't find any info, but if you wanted to know a bit more, it looks like 4 ~300W panels and 4 ~150amp hour batteries. Panels>charge controller>batteries>inverter>microcontroller like raspberry pi or arduino running a platform like OpenMower with GPS unit>actuators and motor controller. Probably has 433mhz or wifi or something for local control too. Hard to guess what electric motor, you wouldn't want to use anything more powerful than necessary.
Neat, none of that is really complicated other than the code. It would probably take ages to actucaly fine tune it though. Didnt know about openmower will look into that.
3 notes
·
View notes
Text
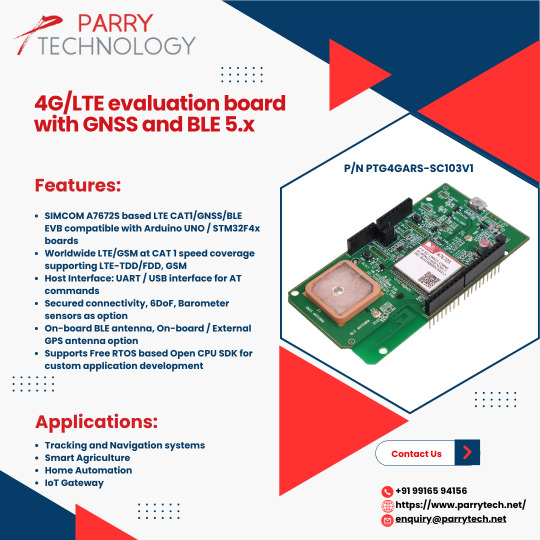
4G/LTE GNSS / BLE 5.0 Module
SIMCOM A7672S based LTE CAT1/GNSS/BLE modem compatible with Arduino
Host Interface: UART / USB interface for AT commands
Secured connectivity, 6DoF, Barometer sensors as option
On-board BLE antenna, On-board / External GPS antenna option
Operating voltage of 5V±10%
Operating temperature: -30°C to +70°C
Supports Free RTOS based Open CPU SDK for custom application development https://www.parrytech.net/4g-lte-modem/
0 notes
Text
Price: [price_with_discount] (as of [price_update_date] - Details) [ad_1] The Arduino is a cheap, flexible, open source microcontroller platform designed to make it easy for hobbyists to use electronics in homemade projects. With an almost unlimited range of input and output add-ons, sensors, indicators, displays, motors, and more, the Arduino offers you countless ways to create devices that interact with the world around you.In Arduino Workshop, you'll learn how these add-ons work and how to integrate them into your own projects. You'll start off with an overview of the Arduino system but quickly move on to coverage of various electronic components and concepts. Hands-on projects throughout the book reinforce what you've learned and show you how to apply that knowledge. As your understanding grows, the projects increase in complexity and sophistication.Among the book's 65 projects are useful devices like:– A digital thermometer that charts temperature changes on an LCD–A GPS logger that records data from your travels, which can be displayed on Google Maps– A handy tester that lets you check the voltage of any single-cell battery– A keypad-controlled lock that requires a secret code to openYou'll also learn to build Arduino toys and games like:– An electronic version of the classic six-sided die– A binary quiz game that challenges your number conversion skills– A motorized remote control tank with collision detection to keep it from crashingArduino Workshop will teach you the tricks and design principles of a master craftsman. Whatever your skill level, you'll have fun as you learn to harness the power of the Arduino for your own DIY projects.Uses the Arduino Uno board Publisher : No Starch Press; 1st edition (13 May 2013) Language : English Paperback : 392 pages ISBN-10 : 1593274483 ISBN-13 : 978-1593274481 Item Weight : 726 g Dimensions : 17.98 x 2.31 x 23.5 cm Country of Origin : USA [ad_2]
0 notes
Text
How are they applied in robotics?
How Are Embedded Systems Applied in Robotics?
Embedded systems play a vital role in the field of robotics by acting as the brain that controls various robotic functions. These systems are small, dedicated computing units embedded within a robot to perform specific tasks such as processing sensor data, controlling motors, managing communication, and executing algorithms. Unlike general-purpose computers, embedded systems are designed to perform real-time tasks efficiently and reliably with limited hardware resources.
In industrial robotics, embedded systems are used to control robotic arms on assembly lines. These systems process input from various sensors (like proximity or pressure sensors) and translate commands into precise motor movements. In mobile robots, such as autonomous vehicles or drones, embedded systems are responsible for navigation, obstacle detection, and power management. They integrate data from GPS, cameras, and LiDAR sensors to help the robot understand its environment and make real-time decisions.
Healthcare robotics also heavily rely on embedded systems. Surgical robots, for example, need accurate and stable control to assist surgeons in performing delicate procedures. Embedded systems ensure that every movement is calculated and responsive to commands. In domestic robotics, such as vacuum cleaners or lawn-mowing robots, embedded systems manage task scheduling, movement patterns, and user interface functions.
Moreover, in educational and research-based robotics platforms, embedded systems are used to teach concepts such as sensor interfacing, motion control, and real-time computing. The growing popularity of open-source hardware like Arduino and Raspberry Pi has made embedded systems more accessible for robotics innovation at all levels.
As robotics continues to evolve across industries—from agriculture and defense to healthcare and home automation—the demand for skilled professionals in this domain is rising. Enrolling in an embedded system certification course is an excellent way to build practical knowledge and open doors to exciting opportunities in robotics development.
0 notes
Text
How will AI Power the Next Generation of Healthcare Wearables?
Wearables have become one of the most sought-after tools for proactive healthcare and wellness management. Be it tracking heart rate, ECG, blood oxygen levels, and fall detection using the Apple Watch; monitoring blood glucose levels with Dexcom G6; gaining crucial insights into one’s sleep quality, heart rate, and body temperature with the Oura Ring; or using the iRhythm Zio Patch for extended ECG monitoring to diagnose heart conditions; wearables have become an integral part of our healthcare and wellness objectives.
Nevertheless, the future of these devices is even more promising, thanks to the integration of Artificial Intelligence in wearable app development. But how exactly will AI power the next generation of healthcare wearables? What should be the approach of healthcare and wellness providers? Let’s explore!
The Convergence of Wearables and AI
Artificial Intelligence has already made significant strides in healthcare, from diagnosing diseases with greater accuracy to predicting health trends. Wearable devices, which have traditionally focused on tracking physical metrics, are now set to evolve by incorporating AI algorithms. This convergence of AI and wearables will enable devices to do far more than simply collect data; they will offer actionable insights, personalized health recommendations, and even early warnings about potential health issues.
Key Drivers of Convergence
Miniaturization of Hardware: The development of compact sensors and processors enables wearables to host AI capabilities without compromising comfort.
Data Proliferation: Wearables generate vast amounts of biometric and activity data, fueling AI algorithms to deliver accurate insights.
Cloud and Edge Computing: These technologies empower wearables with the ability to process data locally (edge) or leverage extensive computational resources (cloud).
Emerging Trends
Devices like AI-integrated patches and smart glasses are becoming diagnostic tools, bridging the gap between home care and clinical settings.
AI dynamically adjusts wearable interfaces, enhancing accessibility and usability for diverse users.
AI wearables integrate seamlessly with smart home and IoT devices, creating a unified personal technology environment
Use Cases of AI-powered Wearables
Healthcare Monitoring
Early Diagnosis: AI-powered wearables monitor vital signs like heart rate, blood oxygen levels, and glucose levels, identifying anomalies indicative of conditions like arrhythmias or diabetes.
Chronic Disease Management: Continuous monitoring and AI analysis help patients manage chronic illnesses effectively, providing actionable feedback to users and healthcare providers.
Fitness and Lifestyle
Personalized Fitness Plans: AI in wearables interprets activity levels and fitness goals to design tailored workout regimens.
Sleep Analysis: Smart wearables analyze sleep patterns, suggesting interventions to improve rest quality.
c. Mental Health Support
AI-enabled wearables detect stress through biometric markers like heart rate variability and galvanic skin response. They offer real-time interventions, such as guided breathing or meditation exercises.
d. Enhanced Productivity
Smart Assistants: Voice-controlled AI assistants in wearables streamline task management and reminders.
Context-Aware Notifications: AI filters and prioritizes alerts based on user context to reduce distractions.
How to code an AI-powered Wearable?
1. Choose Your Wearable Hardware
Select a suitable platform for your wearable, such as:
Smartwatches (Fitbit Smartwatch, Apple Watch, Google Pixel Watch, etc.)
Fitness trackers (Fitbit, Garmin)
Custom hardware (using platforms like Arduino or Raspberry Pi with sensors)
Ensure your device has sensors like accelerometers, gyroscopes, heart rate monitors, or GPS, depending on the functionality you want.
2. Set Up Development Environment
Smartwatch/Phone Apps: Use SDKs for specific platforms like Apple's WatchKit, Google Fit, or other wearable APIs.
Custom Hardware: Use Arduino IDE, Raspberry Pi with Python, or ESP32 for Bluetooth connectivity.
3. Sensor Data Collection
Wearables collect various data types, such as:
Accelerometer data (motion, step count)
Heart rate (using sensors like PPG)
Temperature or humidity (depending on the wearable)
GPS data (for location tracking)
Use appropriate libraries or APIs to fetch sensor data. For example:
Apple Watch: Use HealthKit to retrieve health-related data.
Fitbit: Use Fitbit API for activity data.
Custom Hardware: Use libraries specific to sensors (e.g., Adafruit libraries for accelerometers or temperature sensors).
4. Preprocessing the Data
Before sending the data to your AI model, you'll often need to preprocess it:
Noise removal: Use filters to remove noise from sensor data.
Normalization: Normalize the sensor data for better model performance.
Feature extraction: Extract meaningful features (e.g., step count, movement patterns, heart rate variability).
5. Develop or Integrate AI Models
AI models can enhance the wearable’s functionality. Examples include:
Activity recognition: Detect types of activities (walking, running, etc.) using sensor data.
Health prediction: Predict heart health, stress levels, or sleep patterns.
Personalized feedback: Provide suggestions for exercise, rest, etc.
You can develop machine learning models in:
Python: Using frameworks like TensorFlow, Keras, or PyTorch.
Edge AI frameworks: For running models directly on the wearable (e.g., TensorFlow Lite for mobile/embedded devices).
You might need to train the models on large datasets (e.g., sensor data labeled with activities or health metrics). Once the model is trained, convert it into a format suitable for deployment on the wearable device.
6. Deploying the AI Model
On-device AI: For real-time AI processing, you can deploy the model directly onto the wearable’s hardware (using TensorFlow Lite, CoreML for Apple devices, etc.).
Cloud AI: Alternatively, send data to the cloud (via Bluetooth or Wi-Fi) for processing. This requires setting up APIs for data transmission and creating cloud-based AI models.
7. Integrating User Interface
Smartwatch Apps: Use UI frameworks like SwiftUI (for iOS) or Jetpack Compose (for Android) to display AI insights.��
Feedback and Interaction: Depending on the application, give the user real-time feedback (e.g., "You're walking briskly, keep going!") or notifications for specific health metrics (e.g., "Your heart rate is high, take a break").
8. Testing and Optimization
Test your wearable AI application under real-life conditions to ensure it responds well to various user behaviors and sensor inputs.
Optimize power consumption, especially for battery-powered wearables.
Ensure that AI computations do not overburden the device's processor or memory.
9. Security and Privacy
Wearable devices handle sensitive personal data (health data, location, etc.), so it’s critical to ensure strong encryption for data storage and transmission.
Implement secure authentication methods, like two-factor authentication for cloud-based services.
Comply with privacy regulations like GDPR or HIPAA.
10. Continuous Improvement
Continuously gather more data and retrain your models to improve accuracy.
Collect user feedback to refine the AI’s predictive abilities and response.
By combining hardware with AI models, you can create a powerful wearable device that offers personalized, intelligent experiences to users.
Example Code Snippet (Activity Recognition with Python)
For custom hardware (e.g., Arduino with accelerometer):
import numpy as np
from sklearn.svm import SVC
# Collect and preprocess sensor data (e.g., accelerometer)
X_train = np.array([...]) # training data (sensor values)
y_train = np.array([...]) # corresponding activity labels
# Train a simple classifier
clf = SVC(kernel='linear')
clf.fit(X_train, y_train)
# Once trained, predict activity based on new sensor data
X_test = np.array([...]) # new data
activity = clf.predict(X_test)
print(f"Predicted activity: {activity}")
Challenges and Considerations
Data Privacy: The sensitive nature of health and biometric data requires stringent security measures and transparent policies.
Battery Life: Advanced AI processing demands significant power, pushing the need for innovations in battery technology.
Accuracy and Bias: AI models must be rigorously tested to ensure unbiased and precise outputs, particularly in healthcare applications.
Future Outlook
The next generation of healthcare wearables powered by AI is no longer a distant vision; it's on the horizon—and it’s going to change the way we approach healthcare app development forever. The convergence of AI and wearables is poised to redefine how humans interact with technology, transforming them into indispensable tools for health, productivity, and well-being. As technology advances, the integration of wearables with AI will likely expand into augmented reality (AR), virtual reality (VR), and neural interfaces, unlocking unprecedented possibilities.
0 notes
Video
youtube
Arduino Based Vehicle Accident
#youtube#Arduino Based Vehicle Accident & Alcohol Detection Alert System Using | GPS🛰️| GSM📱SMS Notification Alert | Design & Development of Arduin
0 notes
Text
Jasne, oto kod dla Arduino, który odczytuje dane z modułu GPS i wyświetla szerokość i długość geograficzną na ekranie LCD:
Potrzebne biblioteki:
* SoftwareSerial.h: Do komunikacji z modułem GPS po serialu (jeśli używasz pinów innych niż sprzętowe TX/RX).
* LiquidCrystal.h: Do obsługi ekranu LCD.
* TinyGPS++.h: Do parsowania danych NMEA z modułu GPS.
Podłączenie:
* Moduł GPS:
* VCC -> 5V Arduino
* GND -> GND Arduino
* TX -> Pin cyfrowy Arduino (np. 2)
* RX -> Pin cyfrowy Arduino (np. 3)
* Ekran LCD:
* Zasilanie i masa zgodnie z instrukcją ekranu LCD
* Piny danych LCD do pinów cyfrowych Arduino (np. 4, 5, 6, 7, 8, 9)
* Pin RS LCD do pinu cyfrowego Arduino (np. 10)
* Pin E LCD do pinu cyfrowego Arduino (np. 11)
Kod:
#include <SoftwareSerial.h>
#include <LiquidCrystal.h>
#include <TinyGPS++.h>
// Piny dla modułu GPS (zmień, jeśli używasz innych)
#define GPS_RX 2
#define GPS_TX 3
// Piny dla ekranu LCD (zmień, jeśli używasz innych)
const int rs = 10, en = 11, d4 = 4, d5 = 5, d6 = 6, d7 = 7;
LiquidCrystal lcd(rs, en, d4, d5, d6, d7);
// Obiekt dla modułu GPS
SoftwareSerial gpsSerial(GPS_RX, GPS_TX);
TinyGPSPlus gps;
void setup() {
// Inicjalizacja komunikacji szeregowej
Serial.begin(9600);
gpsSerial.begin(9600);
// Inicjalizacja ekranu LCD
lcd.begin(16, 2);
lcd.print("Czekam na GPS...");
}
void loop() {
// Odczyt danych z modułu GPS
while (gpsSerial.available() > 0) {
if (gps.encode(gpsSerial.read())) {
if (gps.location.isValid()) {
// Wyświetlanie szerokości i długości geograficznej na ekranie LCD
lcd.clear();
lcd.print("Szerokosc: ");
lcd.println(gps.location.lat(), 6);
lcd.print("Dlugosc: ");
lcd.println(gps.location.lng(), 6);
} else {
lcd.clear();
lcd.print("Brak sygnalu GPS");
}
}
}
}
Wyjaśnienie kodu:
* Inicjalizacja:
* Dołączenie potrzebnych bibliotek.
* Definicja pinów dla modułu GPS i ekranu LCD.
* Utworzenie obiektów dla komunikacji serialowej, ekranu LCD i modułu GPS.
* Setup:
* Inicjalizacja komunikacji szeregowej z modułem GPS i monitorem szeregowym.
* Inicjalizacja ekranu LCD i wyświetlenie początkowego komunikatu.
* Loop:
* Odczyt danych z modułu GPS za pomocą gpsSerial.available() i gps.encode().
* Sprawdzenie, czy dane GPS są poprawne za pomocą gps.location.isValid().
* Wyświetlenie szerokości i długości geograficznej na ekranie LCD za pomocą lcd.print() i lcd.println().
* Jeśli brak sygnału GPS, wyświetlenie odpowiedniego komunikatu.
Uwagi:
* Upewnij się, że masz zainstalowane potrzebne biblioteki (TinyGPS++ i LiquidCrystal).
* Zmień numery pinów w kodzie, jeśli podłączyłeś moduł GPS i ekran LCD do innych pinów Arduino.
* Kod wyświetla szerokość i długość geograficzną z dokładnością do 6 miejsc po przecinku.
* Czasami moduł GPS potrzebuje chwili, aby złapać sygnał. Upewnij się, że jesteś na otwartej przestrzeni, aby moduł mógł odebrać sygnał z satelitów.
1 note
·
View note
Text
Top success stories emerging from Atal Tinkering Labs
Atal Tinkering Labs (ATLs), an initiative by the Government of India under the Atal Innovation Mission, have transformed the educational landscape by fostering innovation and creativity among school students. These labs, equipped with state-of-the-art tools and technologies, empower young minds to explore, experiment, and innovate. Over the years, several inspiring success stories have emerged from these labs, showcasing the potential of young innovators to solve real-world problems. Let’s explore some of the most outstanding innovations:
1. Affordable Braille Printer by a Teen Innovator
A young student from an ATL in Maharashtra developed an affordable Braille printer using simple, cost-effective materials. Inspired by the challenges faced by visually impaired individuals in accessing printed content, the innovator utilized 3D printing and Arduino programming to create a solution that costs a fraction of traditional Braille printers. This project not only garnered national recognition but also opened avenues for mass production and accessibility.
2. Water Purification System by Rural Students
In a small village in Rajasthan, students from an ATL tackled the problem of contaminated drinking water. Using basic science and technology, they created a portable water purification system powered by solar energy. Their innovative approach combined affordability with sustainability, making clean drinking water accessible to their community. This project has been lauded as a model for addressing rural challenges through STEM.
3. IoT-Enabled Smart Farming Solution
A team of students from an ATL in Punjab developed an IoT-based smart farming system to assist local farmers. The system monitors soil moisture, temperature, and humidity, providing real-time data to optimize irrigation and crop yield. By integrating mobile alerts, the project offered a user-friendly solution for resource optimization, earning accolades at various innovation fairs.
4. Low-Cost Prosthetic Arm
A high school student from an ATL in Karnataka designed a low-cost prosthetic arm using 3D printing and robotics. The prosthetic was aimed at helping underprivileged individuals who couldn’t afford expensive medical solutions. With a focus on functionality and affordability, this project showcased how young minds could bridge the gap between technology and societal needs.
5. Traffic Management App
Students from an ATL in Delhi created a traffic management app to tackle congestion in their city. By using GPS and data analytics, the app provided real-time traffic updates and suggested alternative routes. This project highlighted the potential of technology in solving urban challenges and was appreciated by local authorities.
Why ATLs Matter
The success stories from Atal Tinkering Labs underline the importance of early exposure to STEM (Science, Technology, Engineering, and Mathematics) education. These labs cultivate critical thinking, problem-solving skills, and creativity, enabling students to become future-ready innovators. They also emphasize the power of collaborative learning, as students work together to tackle pressing issues.
Join the innovation movement
Atal Tinkering Labs have become breeding grounds for young innovators who dare to dream big and take action. From addressing social challenges to creating cutting-edge technologies, these students are shaping a brighter, more sustainable future. Join Us Today! As we honor these achievements, let’s keep encouraging and empowering the next generation of innovators and leaders. Who knows? The next big innovation might just come from an ATL near you!
Are you inspired by these stories? Encourage the young learners around you to explore STEM opportunities. Share this blog and help spread the spirit of innovation! Call us today to discover how our programs can help unlock the potential in young minds and ignite their passion for learning!
0 notes
Text
Robotic Invention Ideas
Robotics has completely changed industries around the world, spurring innovation in everything from agriculture to healthcare. Ideas for robotics inventions lead to countless opportunities, enabling developers to create solutions that solve practical issues and boost productivity.
Personal Assistant Robots
Imagine a robot that can make your coffee in the morning, remind you of critical duties, and handle your daily schedule with ease. Robotic personal assistants are growing in popularity because they can help with household management, senior care, and busy professionals. Voice recognition, artificial intelligence (AI), and Internet of Things (IoT) technology can all be combined by inventors to produce a very customized and engaging experience.
Autonomous Delivery Robots
Autonomous delivery robots offer a novel approach to effective and frictionless distribution in light of the growth of e-commerce and online meal delivery. With GPS systems, obstacle recognition, and temperature-controlled compartments to guarantee the safe delivery of goods or meals, these robots can maneuver through streets or offices.
Agricultural Robotics
Significant progress has been made in agricultural robotics, which has helped to solve the labor crisis and boost output. Autonomous drones for crop monitoring, robotic harvesters, and precision weeding robots are some examples of invention concepts in this field. These methods can guarantee higher yields, limit waste, and need less human labor.
Healthcare Assistance Robots
By helping with surgery, rehabilitation, and elder care, healthcare robots are revolutionizing patient care. An AI-powered diagnostic bot, a surgical robot with precise movements, and a robot made to assist patients with mobility issues are examples of robotic inventions in this field. These innovations can provide high-quality care while reducing the workload for medical personnel.
Educational Robots for Kids
Children are increasingly being taught STEM (science, technology, engineering, and mathematics) principles through the use of educational robots. Interactive bots that gamify education, AI-powered tutors for individualized learning, and programmable kits that let children construct and program their own robots are some examples of educational robot concepts.
Tips for Turning Robotic Ideas into Reality
Research is the first step. Learn about the needs of your target audience and look into current technology to find any holes that can be filled.
Learn the Basics of Robotics: Arm yourself with an understanding of AI, mechanics, and code. For novices, platforms such as Arduino and Raspberry Pi are great.
Prototype Your Idea: To make a functional prototype, use open-source software, inexpensive hardware, and 3D printing.
Work Together with Experts: To improve your idea and launch it, join forces with engineers, designers, and marketers.
Seek Funding: To finance your robotic device, seek innovation awards or use crowdfunding websites.
Ideas for robotic inventions aim to solve issues, enhance lives, and make the world wiser and more sustainable, not only to build futuristic devices. You may contribute to the next significant advancement in robotics by fusing technical know-how, creativity, and a forward-looking outlook. Begin your exploration now to bring your creative concepts to life!
To know more, click here.
0 notes
Text
The Rise of Arduino Compatible Boards - An Exploration of the Expanding Ecosystem
The Genesis of an Open Source Movement When Arduino was launched in 2005, it helped spawn the age of accessible, affordable microcontroller boards and platforms. By providing a common hardware and software standard that was simple to use but still powerful, Arduino opened the door for non-engineers and electronic hobbyists to easily create interactive projects and prototypes. This drastically lowered the barrier to entry for physical computing and embedded systems. Within a few years, the Arduino platform had grown into a thriving global community with developers of all skill levels sharing code, tutorials, and ideas. The Growing Demand Inspires New Options As Arduino gained popularity and demand increased, companies recognized an opportunity to expand the ecosystem. Rather than competing directly with Arduino, many started releasing boards that were compatible with the Arduino software and libraries. These clones and derivatives allowed users to benefit from Arduino's openness while also having alternative hardware options at lower price points or with additional features. Some boards were nearly identical clones while others incorporated unique enhancements. Regardless, their compatibility with the Arduino IDE gave users the flexibility to choose a board that best fit their specific needs and budgets. A Proliferation of Board Types and Form Factors Today, the variety of Arduino Compatible boards available is staggering. In addition to the classic Uno and Nano form factors, there are boards shaped as mini PCs, single-board computers, wearables, educational kits, drones, robots, and more. Each brings something new while still maintaining the foundational principles that make Arduino great. For example, some focus on size and portability while others emphasize power, connectivity, or cost. Educational boards make learning to code more interactive and hands-on. Industrial boards enable Arduino to be used in professional contexts that require certifications or rigorous testing. A World of Enhancements Beyond the Original Spec Many Arduino compatible boards one-up the original Arduino specs by including features like WiFi, Bluetooth, GPS, high-speed microprocessors, more memory and flash storage, additional input/output pins, and specialized sensors. Some push processing power to the level of Raspberry Pi while shrinking the board size. Others add compatibility for new languages beyond just C/C++. Interfaces like Ethernet, USB, and add-on shields expand what these boards can interface with. Many also supply dev kits with components, sensors, motors and displays to simplify prototyping of specific project types. Get more insights on Arduino Compatible
Unlock More Insights—Explore the Report in the Language You Prefer
French
German
Italian
Russian
Japanese
Chinese
Korean
Portuguese
Vaagisha brings over three years of expertise as a content editor in the market research domain. Originally a creative writer, she discovered her passion for editing, combining her flair for writing with a meticulous eye for detail. Her ability to craft and refine compelling content makes her an invaluable asset in delivering polished and engaging write-ups.
(LinkedIn: https://www.linkedin.com/in/vaagisha-singh-8080b91)

#Arduino Compatible#Microcontroller#Open-Source Hardware#Electronics#Prototyping#DIY#Hobbyist#Maker#Microcontroller Board#Arduino Uno
0 notes
Text
Vehicle Accident Alert System Using Accelerometer GPS and GSM
Vehicle Accident Alert System Using Accelerometer GPS and GSM | Arduino UNO School & EEE Project Introduction Overview of the Vehicle Accident Alert System Components Required Working Principle System Design and Implementation Advantages of the Accident Alert System Project Applications and Use Cases Conclusion External Resources Introduction In the modern world, safety on the road is a…
0 notes