#Arduino Compatible
Explore tagged Tumblr posts
Visit Tumblr Blog
Explore Tumblr blogs with no restrictions, modern design and the best experience.
Last Seen Tumblr Blogs


Fun Fact
Tumblr.com is the 103rd most visited website in the world.
Text
The Rise of Arduino Compatible Boards - An Exploration of the Expanding Ecosystem
The Genesis of an Open Source Movement When Arduino was launched in 2005, it helped spawn the age of accessible, affordable microcontroller boards and platforms. By providing a common hardware and software standard that was simple to use but still powerful, Arduino opened the door for non-engineers and electronic hobbyists to easily create interactive projects and prototypes. This drastically lowered the barrier to entry for physical computing and embedded systems. Within a few years, the Arduino platform had grown into a thriving global community with developers of all skill levels sharing code, tutorials, and ideas. The Growing Demand Inspires New Options As Arduino gained popularity and demand increased, companies recognized an opportunity to expand the ecosystem. Rather than competing directly with Arduino, many started releasing boards that were compatible with the Arduino software and libraries. These clones and derivatives allowed users to benefit from Arduino's openness while also having alternative hardware options at lower price points or with additional features. Some boards were nearly identical clones while others incorporated unique enhancements. Regardless, their compatibility with the Arduino IDE gave users the flexibility to choose a board that best fit their specific needs and budgets. A Proliferation of Board Types and Form Factors Today, the variety of Arduino Compatible boards available is staggering. In addition to the classic Uno and Nano form factors, there are boards shaped as mini PCs, single-board computers, wearables, educational kits, drones, robots, and more. Each brings something new while still maintaining the foundational principles that make Arduino great. For example, some focus on size and portability while others emphasize power, connectivity, or cost. Educational boards make learning to code more interactive and hands-on. Industrial boards enable Arduino to be used in professional contexts that require certifications or rigorous testing. A World of Enhancements Beyond the Original Spec Many Arduino compatible boards one-up the original Arduino specs by including features like WiFi, Bluetooth, GPS, high-speed microprocessors, more memory and flash storage, additional input/output pins, and specialized sensors. Some push processing power to the level of Raspberry Pi while shrinking the board size. Others add compatibility for new languages beyond just C/C++. Interfaces like Ethernet, USB, and add-on shields expand what these boards can interface with. Many also supply dev kits with components, sensors, motors and displays to simplify prototyping of specific project types. Get more insights on Arduino Compatible
Unlock More Insights—Explore the Report in the Language You Prefer
French
German
Italian
Russian
Japanese
Chinese
Korean
Portuguese
Vaagisha brings over three years of expertise as a content editor in the market research domain. Originally a creative writer, she discovered her passion for editing, combining her flair for writing with a meticulous eye for detail. Her ability to craft and refine compelling content makes her an invaluable asset in delivering polished and engaging write-ups.
(LinkedIn: https://www.linkedin.com/in/vaagisha-singh-8080b91)

#Arduino Compatible#Microcontroller#Open-Source Hardware#Electronics#Prototyping#DIY#Hobbyist#Maker#Microcontroller Board#Arduino Uno
0 notes
Text
Unleash Your Creativity with Arduino DIY Kits from Diykit Solutions
Are you ready to dive into the exciting world of electronics and robotics? At Diykit Solutions, we offer a diverse range of DIY kits that empower you to unleash your creativity. Our kits feature high-quality materials sourced from trusted suppliers, ensuring that you can build innovative projects with confidence. Whether you’re a hobbyist, educator, or professional, our Arduino-compatible products will help you turn your ideas into reality.
Explore Arduino-Compatible Sensors and Modules
The world of Arduino opens up a universe of possibilities, especially when you explore the extensive range of Arduino-compatible sensors and modules available at Diykit Solutions. These components are essential for anyone looking to enhance their projects with sensory feedback, interactivity, and automation.
What are Arduino-Compatible Sensors?
Arduino-compatible sensors allow you to collect data from the environment. Whether you’re working on a weather station, a smart home project, or a robotic system, these sensors can help you gather crucial information such as temperature, humidity, light levels, and motion detection. Our collection of sensors is designed to seamlessly integrate with various Arduino boards, making them an ideal choice for your projects.
Enhance Your Projects
By incorporating Arduino-compatible sensors and modules, you can create projects that respond to real-world conditions. For instance, you can use a temperature sensor to trigger an action when the temperature exceeds a certain threshold or a motion sensor to activate lights when someone enters a room. The possibilities are endless!
Build with the Arduino UNO R3 Board ATmega328P DIY Kit
The Arduino UNO R3 Board ATmega328P DIY Kit is a fantastic entry point for anyone interested in electronics and programming. This versatile board is one of the most popular Arduino models and serves as the backbone for countless projects.
Key Features of the Arduino UNO R3
User-Friendly: The Arduino UNO R3 is easy to use, even for beginners. With its straightforward design and compatibility with the Arduino IDE, you can quickly write, upload, and run your programs.
Versatile Connectivity: The board features a variety of input and output pins, allowing you to connect a wide range of sensors, actuators, and other devices.
ATmega328P Microcontroller: The powerful ATmega328P microcontroller ensures that your projects run smoothly and efficiently, enabling complex functionalities without compromising performance.
Ideal for Beginners and Experts
Whether you’re just starting your journey in electronics or looking to create more advanced projects, the Arduino UNO R3 Board ATmega328P DIY Kit has something to offer everyone. With the right resources, you can learn programming, circuit design, and the basics of robotics.
Discover the Arduino-Based Robotics DIY Kit
Robotics is an exciting field that combines engineering, technology, and creativity. With our Arduino-Based Robotics DIY Kit, you can embark on your robotics journey and build your own robots from scratch.

What’s Included in the Kit?
Our robotics kit includes everything you need to create functional robots, including:
Arduino Board: The core of your robot, responsible for processing and controlling its functions.
Motors and Wheels: For movement and mobility, allowing you to create wheeled robots that can navigate their surroundings.
Sensors: To enable your robot to interact with its environment. Use ultrasonic sensors for obstacle avoidance or line-following sensors for navigation.
Learn and Experiment
This kit not only helps you build robots but also teaches you the principles of robotics and programming. By experimenting with different configurations and programming techniques, you can develop your skills and gain a deeper understanding of how robots work.
Explore the Arduino R3 SMD Micro Controller Board Kit
The Arduino R3 SMD Micro Controller Board Kit is another excellent option for those looking to create innovative electronics projects. This compact board offers a range of features that make it suitable for various applications.
Key Benefits of the R3 SMD Board
Compact Size: The SMD (Surface-Mount Device) design allows for a smaller footprint, making it ideal for projects with space constraints.
Integrated Features: This board comes equipped with essential features such as built-in USB connectivity, allowing for easy programming and communication with your computer.
Robust Performance: Designed for reliability and efficiency, the R3 SMD board can handle a variety of tasks, making it suitable for both beginner and advanced projects.
Perfect for Prototyping
Whether you’re prototyping a new idea or creating a final product, the Arduino R3 SMD Micro Controller Board Kit provides the flexibility and functionality you need. Its robust design and compact size make it an excellent choice for any electronics enthusiast.
Why Choose Diykit Solutions?
At Diykit Solutions, we are committed to providing high-quality DIY kits and components that inspire creativity and innovation. Here are some reasons why you should choose us for your Arduino projects:
Diverse Product Range: We offer a wide variety of DIY kits, sensors, and modules to cater to all your electronic and robotic needs.
High-Quality Materials: All our products are sourced from reputable suppliers, ensuring that you receive only the best components for your projects.
Customer Support: Our dedicated team is here to assist you with any questions or concerns you may have. We aim to provide a seamless shopping experience.
Educational Resources: We believe in empowering our customers with knowledge. Our website features tutorials, project ideas, and guides to help you get the most out of your DIY kits.
Start Your Creative Journey Today!
Ready to dive into the world of electronics and robotics? Explore our extensive collection of Arduino-compatible sensors and modules, as well as our Arduino-Based Robotics DIY Kit, Arduino UNO R3 Board ATmega328P DIY Kit, and Arduino R3 SMD Micro Controller Board Kit. At Diykit Solutions, we provide everything you need to unleash your creativity and bring your ideas to life.
Whether you’re a beginner looking to learn or an expert seeking to expand your toolkit, our DIY kits are perfect for anyone passionate about electronics. Don’t wait — start creating innovative projects today!
0 notes
Text
https://electronicsbuzz.in/arduino-shield-simplifies-use-of-fibre-optic-datalink-in-mpu-designs

#OMC#design#compatible with Arduino Uno#transmitter#receiver#drivers#industry#technology#powerelectronics#powersemicondutor#powermanagement
0 notes
Text
TLV320DAC3100 first bops 🔊🎶💃🕺
OK, after many hours spent with Claude on writing a driver for the TLV320DAC3100 (https://www.digikey.com/en/products/detail/texas-instruments/TLV320DAC3100IRHBR/2260591), we finally have it configured using our driver, and playing an MP3 stream on this ESP32. This I2S DAC has a particularly complex PLL and audio-routing system, so it's not one where you can just pipe in I2S data and have it magically play. One nice thing we got working on is the MCLK, which is generated from the BCLK, so it'll work great with anything from an Arduino-compatible to a single-board computer like Raspberry Pi. We're hoping to get the headphone detection working next so that we can turn off the amp when the headphone is plugged in. Also, it should be able to control the volume from the headset buttons. Also, we want to get the internal beep generator going so we can make tones separate from the audio stream for UI notifications.
#tlv320dac3100#dac#esp32#i2s#audioengineering#opensource#mp3streaming#embeddedhardware#hardwarehacking#arduino#raspberrypi#microcontrollers#firmware#coding#electronics#headphones#pll#audioprocessing#dsp#mclk#bclk#headphonemod#techinnovation#audiophile#sounddesign#makercommunity#opensourcehardware#iot#embeddeddev#beepgenerator
36 notes
·
View notes
Text


Piccorobo by Vstone, Osaka (2015). "Piccorobo is an introductory bipedal robot equipped with Freaduino UNO, which is compatible with Arduino UNO. It has a simple configuration with four servo motors, and can perform movements such as walking and swinging its head. … You can have fun learning how to use Arduino and control robots."
11 notes
·
View notes
Text
I'm doing some hardware hacking, which requires me to sniff the CAN bus (a communication protocol from the automotive sector that's also gaining traction elsewhere) of an electric scooter and
Ughhh
The Arduino module I bought supports CAN 2.0
I need CAN FD, which is a different variant and not compatible
Fuck me I guess?
#but eventually i'll run out of ways to fail so ¯\_(ツ)_/¯#hacking#programming#hardware hacking#reverse engineering
15 notes
·
View notes
Text
Sega Genesis Game Pads and the Mode Button


I had a Sega Mega Drive (aka Genesis) as a kid, and also a 6-button game pad. Actually still have, but I haven't used them in forever.
The 6-button controller has shoulder-button labeled "MODE" and I only learned what it's for recently. When you hold it down while starting the console, it will disable the extra buttons and act like an old 3-button controller. Ok, that's pretty boring. The interesting part is why I didn't need to know that.
3-Button Controller


Basically, the 6-button pad Just Works because the 3-button pad already had one button too many. The controller uses a connector with 9 pins. One pin each for power and ground leaves you with 7, but it has 8 inputs: UP, DOWN, LEFT, RIGHT, A, B, C, START.
To solve this, the controller contains a multiplexer. By setting the voltage on one of the pins, the console can select which inputs it wants the controller to report.
When voltage on the select pin is LOW, the controller indicates that it is present (so you can distinguish "no controller connected" from "no buttons pressed") and reports the state of the inputs UP, DOWN, A, START.
When voltage on the select pin is HIGH, the controller reports UP, DOWN (again), LEFT, RIGHT, B, C.
This makes it backwards-compatible with Sega's earlier console Master System, with B and C corresponding to buttons 1 and 2 on the MS controller, and A and START doing nothing.
The way a 3-button game normally interacts with the controller is that for each frame, the game briefly sets the select pin LOW, records the inputs, then sets it back to HIGH and records the rest. These are then the inputs for that frame. This is also called a pulse.
6-Button Controller
Instead of a multiplexer, the 6-button controller has a microcontroller that counts the number of pulses received. For the first two pulses, it behaves like a 3-button controller. Also, the counter resets after not receiving a pulse for 1.5 ms. That way, a 3-button game running at 60 fps that reads the controller once per frame will only see the behavior that it expects. Unfortunately, a small number of 3-button games don't behave this way (Ms Pacman for example), so that's why the MODE button is needed.
A 6-button-aware game interacts with the controller by rapidly pulsing it three times every frame. When the select pin is set LOW for the third time, a 6-button controller will indicate that it is in fact a 6-button controller. If a game isn't 6-button-aware and somehow gets the controller in this state, this looks as if you're pressing UP and DOWN simultaneously, so that's where the problems start.
When the pin is set to HIGH again, the controller reports the X, Y, Z and MODE inputs. So you can also use the MODE button as a normal game button. Only a handful of games do this though, and some of them only for cheat codes. (I actually happen to own one of them: Vectorman)
I just thought this is very hacky and also really cool! I wonder if I could manage to read out my old controllers with an Arduino or something!
Sources
"Sega Six Button Controller Hardware Info" by Charles Rosenberg
"How To Read Sega Controllers" by Jon Thyssel
Sega Retro page
5 notes
·
View notes
Text

Arduino-Compatible Open-Source Dual CAN-FD Network Analyzer
You can now sniff two CANFD busses with SavvyCAN and CANFDuino for less than $150! This cost-effective solution is worth noting. The configurability of the FD settings and messaging in SavvyCAN’s GVRET has not yet been fully baked in. It looks like it’s currently coded for 2 Mb CANFD speeds, which seem to be the most common combination for CANFD automotive networks.
2 notes
·
View notes
Text

November lately, 2023
November has been a ride so far. Here is a detailed overview of my 10 days of November:
Spend most of my days, staring at a code to incorporate a better way to store data in a text file without using an SD card or EEPROM as my arduino board doesnt have that functionality.
Tried out a minimum of 7 data storing methods with the board, only for 1 to work properly
My arduino board becomes fried
Travelled to town to purchase a new board and deliver it to school for further testing
Spent my weekends working on Printed Circuit Boards, checking on designs etc
Coded my weekends away to optimise the codes into functions and tested it with a verification app, at this point, i have added data storage, data retrieval, error handling, data clearing, averaging into the code. All worked with some bugs in place.
Attempted to incorporate with our own app and failed
After group members testing, app is only compatible with old codes and the new script cannot be used. (Illogical as the base code for new script is the exact same and had tested with the old code in this new script and app failed)
PCB board connections had issues, board cannot be powered
Tested and troubleshooted for about 5 hours straight
Found out during dinner that board was not grounded
Went back to solder a connection
Arduino board died before tests cannot be done
Another board used and PCB worked
By the end of tomorrow, this project is over. In the end, we had a working product that can do the functions we have envisioned. It is just unfortunate that my newly coded functions cannot be incorporated with the main code. But at least, it works so my efforts are not all wasted.
But yes, it has been a hectic week and it is mainly from a singular project that requires us ti come up with a product from scratch. Our device is working, and that is the important thing.
My group will be presenting on our product tomorrow morning. Wish us luck! No photos of our product as there is a chance it might be further developed in future.
- gray
#himmelstudies#study#studyblr#engineeringblr#engineering#engineeringstudyblr#engineeringblog#engineer#school#project#update#bioengineeringblr#bioengineeringstudyblr#bioengineer#academic#academia#stem#stemblr#engblr#college#university
6 notes
·
View notes
Text
Arduino Due vs. Mega: A Comprehensive Comparison
What is Arduino Due and Mega?
The Arduino platform has revolutionized the world of DIY electronics, providing hobbyists and professionals alike with versatile and powerful microcontroller boards. Among the myriad of options, the Arduino Due and Arduino Mega stand out for their advanced features and robust performance. The Arduino Due, introduced in 2012, is the first Arduino board based on a 32-bit ARM core microcontroller, the Atmel SAM3X8E. In contrast, the Arduino Mega, built around the 8-bit ATmega2560 microcontroller, is known for its abundant I/O pins and memory. Understanding the differences between these two boards can help in selecting the right one for specific projects, enhancing both functionality and efficiency.
Processing Power and Performance
The processing capabilities of the Arduino Due and Mega are distinctly different, primarily due to their core microcontrollers. The Arduino Due, with its 32-bit ARM Cortex-M3 processor running at 84 MHz, offers significantly higher processing power compared to the Arduino Mega's 8-bit ATmega2560, which operates at 16 MHz. This difference in architecture and clock speed means that the Due can handle more complex calculations and tasks faster and more efficiently than the Mega. For projects requiring high computational power, such as real-time data processing or handling multiple sensors simultaneously, the Due is the superior choice. However, for simpler tasks, the Mega's processing power may suffice.
Memory and Storage Capabilities
Memory is another critical aspect where the Arduino Due and Mega diverge. The Arduino Due is equipped with 512 KB of flash memory for code storage and 96 KB of SRAM for data. On the other hand, the Arduino Mega has 256 KB of flash memory and 8 KB of SRAM. Additionally, the Due features a Direct Memory Access (DMA) controller, which allows for efficient memory operations, freeing up the CPU to handle other tasks. These memory enhancements make the Due more suitable for applications requiring large codebases and significant data handling, such as advanced robotics or sophisticated control systems. The Mega, with its more modest memory, is ideal for less demanding applications.
Input/Output Capabilities and Expansion
Both the Arduino Due and Mega are renowned for their extensive input/output (I/O) capabilities, yet they cater to different needs. The Mega boasts a whopping 54 digital I/O pins, 16 analog inputs, and 4 UARTs, making it ideal for projects that require multiple sensors, actuators, or communication interfaces. The Due, while offering fewer digital I/O pins at 54, includes 12 analog inputs and 4 UARTs, along with additional features like two DAC outputs for analog signal generation and enhanced PWM capabilities. These features provide the Due with superior analog output capabilities, making it suitable for applications like audio processing or advanced signal generation.
Power Consumption and Compatibility
Power consumption and compatibility are practical considerations when choosing between the Arduino Due and Mega. The Due operates at 3.3V logic levels, which makes it more power-efficient than the Mega, which uses 5V logic levels. This lower voltage operation is beneficial for battery-powered projects where energy efficiency is crucial. However, the 3.3V logic also means that the Due is not directly compatible with 5V components without level shifters. The Mega, with its 5V logic, offers broader compatibility with existing Arduino shields and components, making it a versatile choice for a wide range of projects. Understanding these power and compatibility nuances can help in making an informed decision based on the project's specific requirements.
2 notes
·
View notes
Text
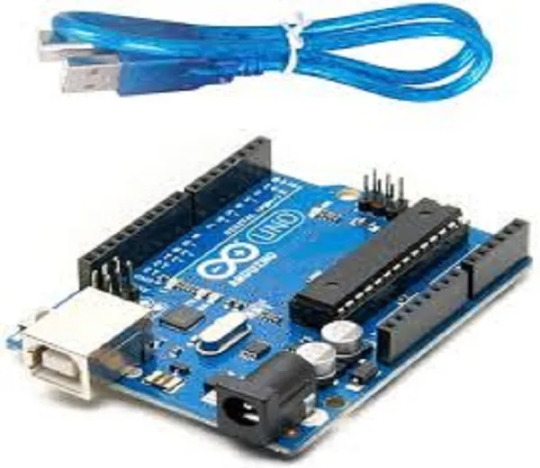
The Arduino Uno R3 is an ATmega328P microcontroller-based development board. This is widely popular in Embedded electronics because of the available resources and easy to use by everybody features. With 14 digital input/output pins where 6 can be configured and used as PWM outputs, 6 as analog inputs is a great addition for I/O related operations. Powered with a 16 MHz ceramic resonator, an USB connection, a power jack, an ICSP header, and a reset button.
2 notes
·
View notes
Text
EXG Synapse — DIY Neuroscience Kit | HCI/BCI & Robotics for Beginners
Neuphony Synapse has comprehensive biopotential signal compatibility, covering ECG, EEG, EOG, and EMG, ensures a versatile solution for various physiological monitoring applications. It seamlessly pairs with any MCU featuring ADC, expanding compatibility across platforms like Arduino, ESP32, STM32, and more. Enjoy flexibility with an optional bypass of the bandpass filter allowing tailored signal output for diverse analysis.
Technical Specifications:
Input Voltage: 3.3V
Input Impedance: 20⁹ Ω
Compatible Hardware: Any ADC input
Biopotentials: ECG EMG, EOG, or EEG (configurable bandpass) | By default configured for a bandwidth of 1.6Hz to 47Hz and Gain 50
No. of channels: 1
Electrodes: 3
Dimensions: 30.0 x 33.0 mm
Open Source: Hardware
Very Compact and space-utilized EXG Synapse
What’s Inside the Kit?:
We offer three types of packages i.e. Explorer Edition, Innovator Bundle & Pioneer Pro Kit. Based on the package you purchase, you’ll get the following components for your DIY Neuroscience Kit.
EXG Synapse PCB
Medical EXG Sensors
Wet Wipes
Nuprep Gel
Snap Cable
Head Strap
Jumper Cable
Straight Pin Header
Angeled Pin Header
Resistors (1MR, 1.5MR, 1.8MR, 2.1MR)
Capacitors (3nF, 0.1uF, 0.2uF, 0.5uF)
ESP32 (with Micro USB cable)
Dry Sensors
more info:https://neuphony.com/product/exg-synapse/
2 notes
·
View notes
Text
Top 10 Scale Gifts for the Gadget Enthusiast
Finding the ideal present for the gadget lover in your life may be thrilling and difficult at the same time because technology is continuously changing, and gadgets are becoming an essential part of our lives. The appropriate gadget may make their world come alive, whether it's for a birthday, an anniversary, or to express gratitude. We've put together a list of Top 10 Scale Gifts for the Gadget Enthusiast to aid you in your search for the perfect present.

High-end headphones
There's nothing quite like immersing yourself in music or podcasts with a pair of high-quality headphones. For the audiophile in your life, consider options like the Bose QuietComfort 35 II or Sony WH-1000XM4. These headphones not only offer exceptional sound quality but also come with noise-canceling features, making them perfect for music lovers on the go.
Smartwatch or Fitness Tracker
Smartwatches and fitness trackers have become more than just timekeeping devices; they're personal assistants for tracking health and staying connected. Due to their abundance of health and fitness capabilities, app compatibility, and stylish designs, the Apple Watch Series 7 and Fitbit Versa 3 are both fantastic options.
Drone
Drones have taken the world by storm, offering a unique perspective and endless possibilities for creativity. DJI's Mavic Air 2 and Skydio 2 are top-notch options, equipped with high-resolution cameras, obstacle avoidance, and impressive flight capabilities. A drone is an excellent gift for both tech enthusiasts and photography lovers.
Virtual Reality (VR) Headset
Step into another world with a VR headset. Oculus Quest 2 and Valve Index provide immersive gaming experiences and access to virtual reality applications. VR headsets are perfect for those who crave a new level of entertainment and want to explore virtual realms.
High-Performance Laptop
A powerful laptop is essential for the tech enthusiast who wants power on the run. Choose laptops are notorious for their exceptional speed, stunning defenses, and portability, similar as the MacBook Pro or Dell XPS 15. These laptops work well for a variety of operations, including videotape editing and programming.
Smart Home Devices
Transforming a house into a smart home is a trend that continues to gain momentum. Smart home devices like Amazon Echo, Google Nest, and Philips Hue lights offer convenience and automation. They allow control over lights, music, security, and more with just a voice command or a tap on your smartphone.
Streaming Device
Cutting the cord has never been more accessible with streaming devices like Roku Ultra and Apple TV 4K. These devices offer access to a vast library of streaming services, including Netflix, Disney+, and Hulu, in stunning 4K quality. Streaming devices are perfect for binge-watchers and movie buffs.
High-Resolution Camera
Capture life's moments in stunning detail with a high-resolution camera. The Sony Alpha a7R IV and Canon EOS R5 are recognized for their superb image quality and adaptability. For photographers who want to capture landscapes, portraiture, or wildlife, these cameras are perfect.
Gaming Console or Accessories
Gaming is a passion for many gadget enthusiasts. Consider the latest gaming consoles like the PlayStation 5 or Xbox Series X. Enhance the gaming experience with accessories like gaming chairs, mechanical keyboards, or gaming headsets.
Tech Toolkit or DIY Electronics Kit
For those who love to tinker and build, a tech toolkit or DIY electronics kit is the perfect gift. Arduino Starter Kits and Raspberry Pi Bundles provide endless opportunities for creating gadgets, robots, and electronic projects.
Conclusion
In conclusion, it need not be difficult to select the ideal present for a gadget fanatic. With the top 10 scale gifts we've outlined, you can surprise your loved one with a thoughtful and exciting present that aligns with their passion for technology. Remember, the best gift is one that shows you know their interests and cater to their tech-savvy side.
2 notes
·
View notes
Text
EXPLORING THE 5 COOL PARTNER SELLER ELECTRONICS PRODUCTS-Part1
Exploring the 5 Cool Partner Seller Electronics Products
Prologue
Are you an electronics enthusiast looking to expand your electronics project repertoire? Want to take your skills to the next level by exploring new and exciting products? Look no further than our list of five cool electronics products from partner sellers!
Whether you’re interested in building your own smart home devices, experimenting with sensors, or creating your own robot, these products are sure to inspire you. They cover a lot of application areas, from loop detectors used to monitor vehicle count in parking garages to Arduino CNC shields used in CNC machines, from simple pulse sensors used to detect cardiovascular pulse signals from fingertip to RGB LED panel light used in smart home, these products are unique, compact, and functional. Not only are these products fun to build and use but they’re also designed to help you learn new skills and techniques along the way.
What’s more, these products all come from trusted partner sellers who are committed to developing high-quality products. They’re happy to provide technical support for customers who have questions, so you can be sure you’re getting the best in electronics.
So get ready to dive into the world of electronics and explore these five cool partner seller products. You’re sure to find something that piques your interest and takes your own electronics projects to the next level.
Inductive Loop Vehicle Detector by Elektronika-ba
Whether you need to monitor occupancy and count vehicles in parking garages, control vehicle access at door and barrier controls, or facilitate traffic light installations and traffic controllers, the inductive loop detector is the perfect solution. It can even detect the direction and speed of vehicle traffic, making it an invaluable tool for a variety of traffic-related applications. In addition, this device can function as a stand-alone speed trap and can be easily interfaced with Arduino.
We can also provide a pre-programmed PIC chip to meet your project requirements.
Specifications
Number of operating modes: 4
Tuning: Automatic
Detection type: Presence/Pulse
Presence time: Adjustable in 3 steps
Pulse duration: 250 ms / 500 ms
Signal filtering: Adjustable in 2 steps (NORMAL, HIGH)
Loop inductance: 20 uH — 1000 uH
Frequency range: 20 kHz — 145 kHz
Frequency selection: 2 combinations (LOW, HIGH)
Sensitivity: Maximum 0.0025% Δf/f, adjustable in 8 steps
Detection speed: 10 ms by default, adjustable
Start-up time: ~ 1 second per channel (or longer if the frequency is not stable)
Temperature range: -35°C — 120°C
Sensor protection: Galvanic isolation + gas discharge tube for lightning protection
Don’t settle for less — click here to learn more about the Inductive Loop Vehicle Detector and experience the compact, yet cool detector!
Arduino CNC Shield V3.51 by Protoneer
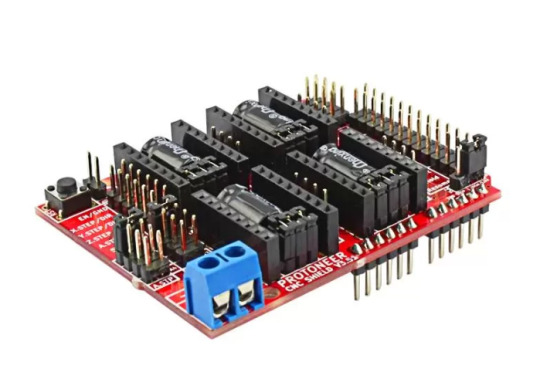
Designed by Protoneer, this kit is packed with features to ensure high precision control of your stepper motors, you can use it to easily build small CNC routers, DIY laser cutters, 3D printers, or any project that requires precise stepper motor control.
Our latest version 3.51 includes several enhancements to make assembly and installation even easier. We’ve added end-stop and probe signal filtering circuitry to eliminate false triggers and allow the use of unshielded cables for end-stops and probes. We’ve also increased the size of the solder pads for easier assembly and updated the probe pin labels to make installation a breeze.
With the Arduino CNC Shield Kit, you’ll have everything you need to build your own CNC router or mill with ease.
Features
Includes Noise Filers on all end stops and the probing pin. (New in V3.51)
GRBL 0.9 compatible. (Open source firmware that runs on an Arduino UNO that turns G-code commands into stepper signals https://github.com/grbl/grbl)
4-Axis support (X, Y, Z, A-Can duplicate X, Y, Z or do a full 4th axis with custom firmware using pins A4 and A3)
2 x End stops for each axis (6 in total)
Coolant enable
Uses removable Pololu A4988 compatible stepper drivers. (A4988, DRV8825 and others)(Not Included)
Jumpers to set the Micro-Stepping for the stepper drivers. (Some drivers like the DRV8825 can do up to 1/32 micro-stepping )
Compact design.
Stepper Motors can be connected with 4-pin molex connectors or soldered in place.
Runs on 12–36V DC. (At the moment only the Pololu DRV8825 drivers can handle up to 36V so please consider the operation voltage when powering the board.)
Don’t wait — click here to see more about the Arduino CNC Shield V3.51 and start your next project today!
Easy Pulse Mikro by Embedded Lab

What’s more, the Easy Pulse Mikro is designed in the convenient Mikro bus form factor, making it easy to integrate with a wide range of mikroElektronika’s development boards. With all necessary instrumentation and amplification built right in, this powerful sensor provides a clean and precise analog PPG waveform output that’s routed to the AN pin of the mikroBus connector.
Whether you’re a hobbyist, student, or professional developer, the Easy Pulse mikro is the perfect tool for monitoring heart rate and other vital signs.
Click here to see more about the Easy Pulse mikro.
Features
Compatible with mikroBus socket.
Filtered and amplified analog PPG signal output
On-board potentiometer for adjusting amplifier gain, if needed (rotate clock-wise for increasing gain)
Onboard LED for indicating heartbeat. It flashes synchronously with the heartbeat on detecting the pulse from the fingertip.
2 notes
·
View notes
Text
youtube
Desk of Ladyada - It's a RISC-V kinda weekend https://youtu.be/aC3vGKHRCBA
MMade progress on two RISC-V projects to finalize PCBs. We optimized the CH32v203g6 chip-based QT Py board by reducing it from a 4-layer to a 2-layer to cut costs, and integrated TinyUSB support for better Arduino IDE compatibility. We also advanced the Feather ESP32-C6 project, enhancing its deep sleep power efficiency and finalizing the USB Key 'Trinkey' for standalone gateways or sensors. Plus, we picked out a clear USB enclosure from Digi-Key for it.
9 notes
·
View notes
Text


youtube
Piccorobo IoT by Vstone (2018). An educational robot for the Internet of Things. "Piccorobo IoT is the successor to the popular two-legged walking robot "Picco Robo" equipped with an Arduino compatible board for beginner learning. … While keeping the simple configuration of the four servo motors, the expansion performance of the robot has been dramatically improved such as Wi-Fi communication and the easy addition of motors and sensors."
5 notes
·
View notes