#Gradient Shadow Text animation in Canva
Explore tagged Tumblr posts
Visit Tumblr Blog
Explore Tumblr blogs with no restrictions, modern design and the best experience.
Last Seen Tumblr Blogs


Fun Fact
Tumblr’s website traffic is steadily declining.
Link
How to create Gradient Shadow Text animation in Canva l Canva tutorial l easy canva
0 notes
Note
hi lovely!! do you have any tips on making cool fun and sexy typography?
hey joanna!! this made me giggle haha, i'm not quiiiite sure how to answer that, but here are some tips i keep in my when i do typography, and some examples:
FONTS
don't be afraid to "shop" for fonts and try funky fonts you've never used/seen. i often try so many before settling. i almost always use at least 2 different font for gifsets, even 3 sometimes. i think a good font pairing can do a lot for a gif. it's usually something like:
serif + cursive/funky fonts (example)
sans serif + cursive/funky fonts (example)
serif + sans serif fonts (example)
two different cursive/funky fonts (example)
or even simply the same font but all caps + all lowercase (example)
in case you're unsure where too start or want inspiration, here's a great resource: usergif's font pairing guide and its fonts page
BLEND MODES & LAYER STYLES
i think playing around with different blend modes and layer styles will always elevate your typography game, in my opinion. it's usually a bit more dynamic than just an opaque color. tho this minimalist typography can also be really good.
when you double click on a text layer, you get all the layer style options, as well as the blend modes. a very popular layer style is setting the layer's blending option to difference, paired with a color and/or gradient overlay (often set to multiply/color dodge). a drop shadow is also important so the text is more easily readable. we often see a black soft drop shadow, but don't hesitate to be creative with it, for example a thick, hard line, colorful drop shadow.
i feel like this step often takes the most time for me because the possibilities are endless. definitely play around with layer styles, especially drop shadow, color overlay, gradient overlay, stroke. and also try different blending modes for these settings.
as for the layer's blend mode, also definitely play around with them. and keep in mind that the text's color will also give a different result, it doesn't have to be white + blend mode set to difference, even tho this is a classic that works well.
TEXT WRAPING & POSITION
a great feature on photoshop is definitely the text warping tool. to access it, right click on a text layer and go "warp text". from there you'll get a few different styles and setting sliders. my favorites are flag and wave (example). you can always go back to edit these settings once they're done by right clicking again. and you can even keyframe/animate these settings!
typography doesn't always have to be centered and straight, i often prefer it on a side and rotated a little. you can easily rotate typography by selecting the layer(s) and hitting ctrl + T. you can also play with the skew and pespective after hitting ctrl + T by right clicking the canvas and clicking on either. these will give different ways to move your text.
SIZING
i love playing around with different font sizes, it makes the typography more interesting in my opinion, and it's a way to emphasize some words.
so for that reason i usually put each word on a different layer so i can edit each word separately. sometimes i will also put each letter on a different layer, because it can be interesting to offset/rotate some letters sometimes (example) (another example).
i often pair a quite small serif or sans serif font with a much bigger funky font (example). and often that bigger font will also have different sized words (example). i play around a lot with this!
ADDED EFFECTS
there are some things than can be done to enhance typography:
adding a colorful rectangle block behind the text (example)
using text symbols such as quotation marks or backets (example)
using lines around the text (example) (another example)
these can definitely bring typography to a different level
MORE RESOURCES
great font website
usergif's typography tag
my fonts tag
this is all i can think of right now, i hope it helps :D if you have any question on a specific text effect let me know, i can definitely make a tutorial!
#alie replies#silversmists#typography#photoshop#*ps help#resource#completeresources#allresources#resourcemarket#usercats#userabs#userpjo
216 notes
·
View notes
Text
Top 10 Flutter Widgets You Should Master for Better UI Design
Flutter has revolutionized the way developers build beautiful, high-performance mobile apps. One of the most powerful features of Flutter is its rich collection of widgets — reusable UI components that allow you to craft stunning interfaces with ease. Whether you're a beginner or an experienced developer, mastering the right widgets can dramatically improve your app's design, usability, and performance.
In this article, we’ll explore the top 10 Flutter widgets you should master to take your UI design skills to the next level.
1. Container
The Container widget is like the Swiss Army knife of Flutter. It’s incredibly versatile, allowing you to customize margins, padding, background colors, borders, and more. Whether you're wrapping text, images, or entire layouts, Container provides the flexibility needed to create structured and visually appealing designs.
Pro Tip: Combine Container with BoxDecoration to add gradients, shadows, and rounded corners for a more polished look.
2. Row and Column
At the core of any UI layout in Flutter are the Row and Column widgets. These essential widgets allow you to arrange your child widgets horizontally (Row) or vertically (Column). Proper mastery of alignment, spacing, and nested Rows/Columns is critical for crafting intuitive and responsive UIs.
Best Practice: Always think about responsiveness and scalability when nesting multiple Rows and Columns.
3. Stack
The Stack widget lets you place widgets on top of each other — perfect for creating complex UI elements like banners, overlays, and card layouts. With Stack, you can control the positioning of elements freely and create dynamic, layered designs.
Use Case: Think about building profile screens where a user's picture overlaps a background cover image.
4. ListView
Handling scrollable content is made easy with ListView. It's a scrollable list of widgets that can be built statically or dynamically with ListView.builder. Mastering ListView allows you to handle data efficiently while providing a seamless scrolling experience for users.
Pro Tip: Use ListView.separated to create list items with custom separators for better UI organization.
5. GestureDetector
GestureDetector brings interactivity to your apps by detecting user gestures like taps, drags, and swipes. This widget is essential for building custom buttons, swipeable cards, and interactive elements without relying solely on prebuilt components.
Example: Implement a swipe-to-delete functionality using GestureDetector with Dismissible widgets.
6. CustomPaint
If you want to create custom designs, animations, or complex UI elements, CustomPaint is your go-to widget. It provides a canvas where you can draw shapes, paths, and other graphic elements, offering ultimate creative freedom.
Best for: Developers who want to build unique visual elements like charts, graphs, or custom backgrounds.
7. AnimatedContainer
Flutter is known for its smooth animations, and AnimatedContainer makes it easy to animate changes in your UI. Whether you’re changing colors, dimensions, or positioning, AnimatedContainer adds fluid transitions without much code.
Tip: Use AnimatedContainer when toggling UI states to make your apps feel more dynamic and alive.
8. Hero
Hero widget enables seamless transition animations between screens by "flying" an element from one page to another. It's incredibly effective for creating visually engaging navigation experiences, particularly for images or product details in ecommerce apps.
Best Use Case: Use Hero animations in onboarding flows or product catalogs to create an immersive experience.
9. Form and TextFormField
Handling user input? The Form widget, combined with TextFormField, is your best friend. These widgets allow you to easily manage user input fields, validations, and form submissions. Mastering these will ensure your apps collect and handle data effectively.
Pro Tip: Always validate user inputs to enhance user experience and prevent errors.
10. SliverAppBar
For advanced scrolling effects, SliverAppBar is a must-learn widget. It allows your app bar to expand, collapse, and even float as you scroll, adding a sophisticated touch to your app’s UI.
Use Case: Create dynamic pages where headers shrink while content scrolls, perfect for news apps or product listings.
Conclusion
Mastering these top Flutter widgets will not only elevate your app's design but also make your development process smoother and more efficient. From layout to animation, these widgets provide the building blocks for creating modern, engaging, and responsive mobile applications.
If you are looking to build a cutting-edge Flutter application that stands out in today’s competitive market, partnering with a Top Flutter App Development Company can make all the difference. With the right expertise, you can bring your vision to life with pixel-perfect design and outstanding performance.
0 notes
Text
Unleashing Creativity with W6 - The WEN Ignite Experience
W6 - WEN Ignite Experience
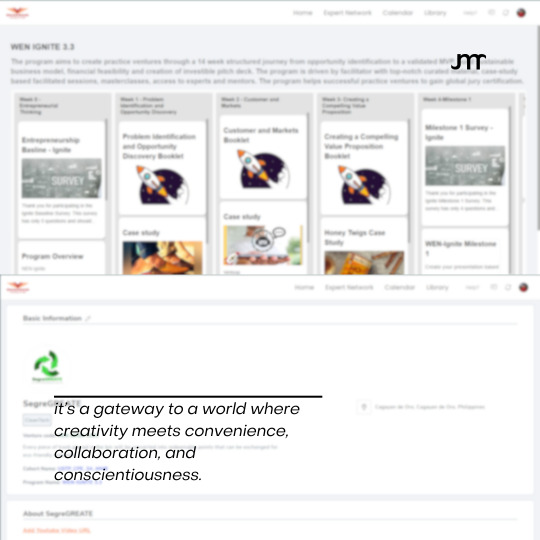
As the digital landscape continues to expand, the need for innovative and intuitive design platforms becomes ever more pressing. Enter W6, the latest addition to the WEN Ignite suite, a tool that promises to revolutionize the way we approach design and creativity.
A Canvas for Your Imagination W6 offers a vast canvas where your ideas can take shape. With its user-friendly interface, you can navigate through your design journey effortlessly. Whether you’re a seasoned designer or a novice exploring the realms of creativity, W6 is your ally in bringing visions to life.
Tools That Empower W6 comes equipped with an array of tools that cater to every aspect of design. From basic shapes like circles and rectangles to more complex elements like gradients and shadows, W6 ensures that your designs stand out. The ‘AI image generator’ is a particularly exciting feature, allowing users to create unique images with simple text prompts like “A cute anime cat in a forest with flowers” or “Gothic castle surrounded by dinosaurs.”
Collaboration and Sharing Made Easy The platform’s seamless sharing capabilities mean that sending your masterpieces to teachers or collaborators is just a click away. The ‘Send to teacher’ feature underscores W6’s commitment to education and collaborative learning.
Sustainability at Its Core Amidst the plethora of features, W6 doesn’t lose sight of the bigger picture. The mention of SegreGREATE on the web page hints at a system that’s not just about aesthetics but also about sustainability. It’s a reminder that our creative pursuits should align with our responsibility towards the planet.
Conclusion W6 - The WEN Ignite Experience is more than just a design tool; It’s a testament to how technology can be harnessed to not only create beautiful designs but also to inspire a better future.
0 notes
Note
Hii, your blog is amazing!! Could I request a tutorial on how to make that text effect in the first gif of your pinned gifset (the one that says “welcome to” ft kanthony in the background)? And also (if it isn’t too much to ask) a tutorial on how to make the purple/black and white effect in the second gif of the same post (the three Spider-Mans)?
hi, thank you so much! I'd be happy to help! the effects from our welcome post are super easy, so this will (hopefully) be very straightforward. tutorials under the cut!
HOW TO CREATE: fade-animated text & color-blocked layouts
for both effects, you'll need to understand the basics of gif-making! check out our resource directory for some helpful tutorials :)
🪄 FADE-ANIMATED TEXT
1. after you finish arranging and coloring your base gif, add a text layer and style it however you like (my font/style details at the end of the tutorial)
2. add a blank (white) layer mask to your text layer and then erase your text using a soft black brush (I just used the default brush with hardness set to 0%!) like so:

(I also did another pass with my brush set to around 30% opacity. that’s the light grey bit on the left. this was just so it looked super smooth and seamless)
3. be sure to toggle off the chain icon shown above ^ this will unlink the mask layer from the text layer. if you leave this on, your animation effect will shift the entire layer, instead of the mask only.
4. with the text now fully erased, create two keyframes (diamond icon) on the line called "layer mask position" (shown below). put one at the start of your gif and wherever you want to end your animation, like this:
5. don't make any changes to the first keyframe. click on the second keyframe (where the animation will end) so we can move the layer mask position.
6. while the second keyframe is selected, go back to the layers panel and click on your layer mask. simply move the layer mask all the way to the right so your text is fully visible again. here's how mine looked:

7. and voila! when you play back the timeline, you should see the magic in action! if you think it's moving too fast or slow, simply move the second keyframe to another spot on the timeline. it'll keep your layer mask settings.
8. the last thing you MUST do is convert your timeline back to frame animation and delete the duplicate frames. when animating with keyframes, photoshop tends to put extra frames (I think as a buffer). if you don't remove these frames, your gif will not look smooth. here's the gif before deleting extra frames:

↳ you’ll notice it’s a little choppy as the animation plays. the base gif looks like it lags a bit or moves slower at the start.
here's the gif after deleting extra frames, ✨nice and smooth✨:

and lastly, here are more details about my typography:
font: lust script
warp transform: "wave" > bend = 50.0
blending mode: difference
gradient overlay: blend mode = hard light; gradient colors = #815dd3 -> #6549df -> #7e39c5; style = linear; angle = 137; scale = 150%
drop shadow: blend mode = multiply; color = #000; opacity = 20%; angle = 145; distance = 2; spread = 100; size = 1

🪄 COLOR-BLOCKED LAYOUT
1. start with your base gif, without coloring. unlike other multi-gif layouts, we’ll be using one gif and simply splitting up the canvas. for an overview, here are my dimensions and my layers panel:

* don’t ask me why it’s 154-225-153 instead of something balanced 🤦🏻♀️ i only just noticed that while doing this tutorial lmao
2. put your base gif in a group (command+G on mac) and add a layer mask. you could start with a blank mask or you can do what I do:
i like to map out my layout first. so I like to use the shapes tool to create rectangles in a new layer and see each section blocked off like this:

with this map in place, I just command+shift+click all the rectangle layers, select my group, and click add layer mask on that group! you should see black filling the spaces that you want to be transparent (see the group in the overview image titled “full gif”)
3. to block off your coloring, we’ll use groups and layer masks again! put your color layer adjustments (my group is called “center coloring”) and black and white layer adjustments (my group is called “outer coloring”) in separate groups
4. add your layer masks! you can use the same guide as your “full gif” mask. but this time, we won’t use all 3 rectangles at the same time. select the center rectangle only (command+click) and add a mask to your color group. your mask should look like a white vertical rectangle with two thinner black rectangles on either side
5. select the outer two rectangles (command+shift+click) and add a mask to your black and white group. (you could also just select the color group’s mask, add that to your bw group, and hit command+i to invert the mask!)
6. that’s it! make sure you have no background layer on your canvas, so your gutter lines stay transparent.
re: my coloring process — i have a process that i haven’t deviated from for years but mainly, i use a lot of levels, curves, selective color, and my fav for vibrant sets: hue/saturation <3 here’s a before and after:
also, the usergif team is filled with creators who are MAGIC with coloring. here are some extra coloring resources from our talented members:
elio’s coloring tutorial by spacedjarin
giffing and coloring tutorial by sashafierce
gradient coloring tutorial by sashafierce
isolating colors by sashafierce
the beginner’s guide to channel mixer by selinakyle
coloring yellow tinted shots by nobodynocrime
I hope this helps! if anything isn’t clear, feel free to send another ask! :) — nik
#ask#anonymous#completeresources#allresources#onlyresources#resourcemarket#gif tutorial#photoshop help#photoshop tutorial#resource#tutorial#animated#layout#typography#request#*usergif#*tutorial#by nik
761 notes
·
View notes
Note
heyo! it's padawin (or wan??) anon again!! thank you for your very kind words ;////; huu, who knows, maybe you'll be able to see them one day! but for now i have another question ~as usual i am dum~ i recently got csp and i have 0 idea how to work it? not asking for a whole tutorial just a basic review on why it's so good since i won't lie i almost deleted it and had a heart attack o(-( thank you! hope ur having a good day!
AH! hello young padawan!
This is ganna be long so I’ll put this under a readmore!
thats great news! honestly from experience once you’ve learnt how to use CSP you can master pretty much adobe (Photoshop and illustrator) The program can be really intimidating at first thats for sure take it easy and stick to the basics and once you’re comfortable with that
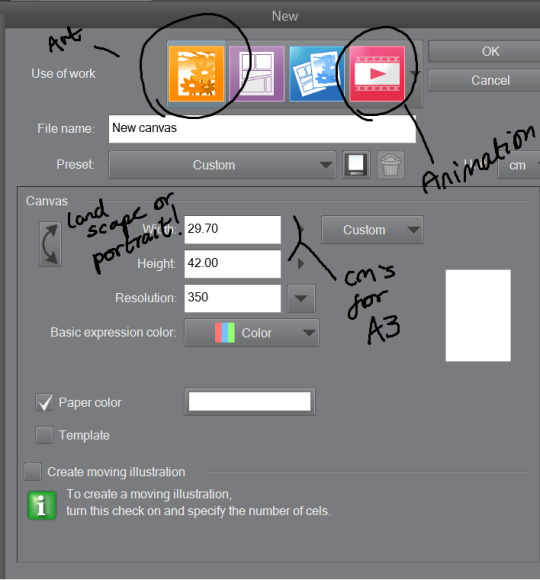
Once you’ve opened the program you’d want to work on an illustration so click on the top bar file > new. You’ll see something like this-
The Illustration one is for drawing and is overall best and easy! The comic ones are little more over whelming with shapes and layout hh and animation is more so timeline (little like flash animation and photoshop sorta)
This tool bar here is mainly useful for layers hhh
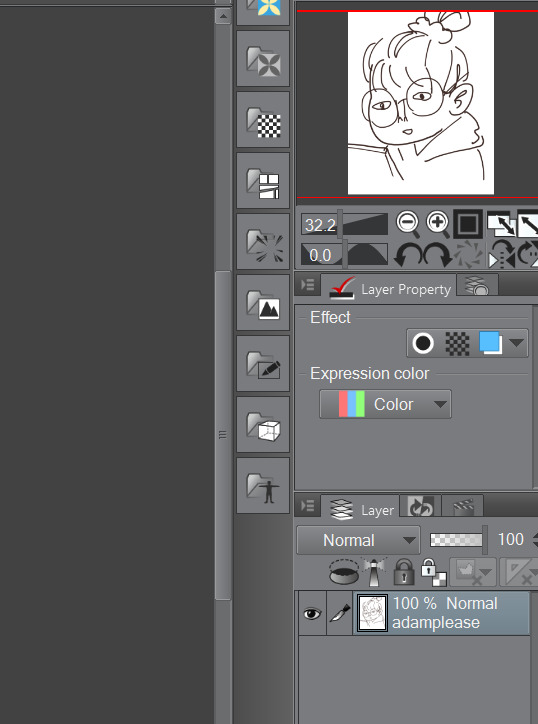
I don’t really touch much from there hhh, I only use expression colour to really look at the work in grayscale!
The three most important tools that’ll help give your work dimensions!
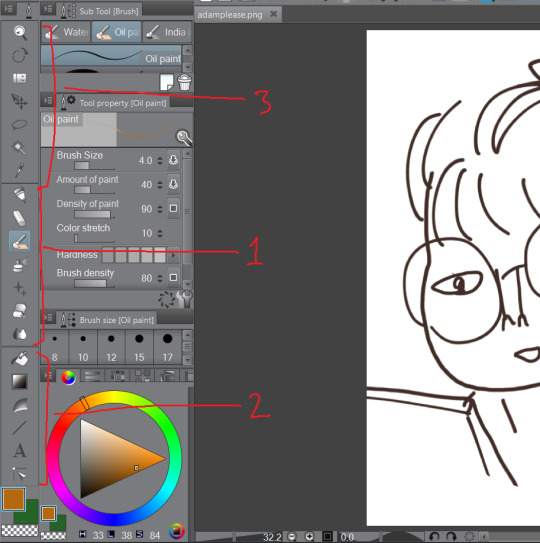
1) These are the tools for drawing, Each tool here represents the mediums they look like/ named after. Listed in order!
The pen - Thick lines, different options mess around to see which one suits you, I mainly use this for lineart or bulky shape work
Chalk - in the name! I use this tool for sketches!
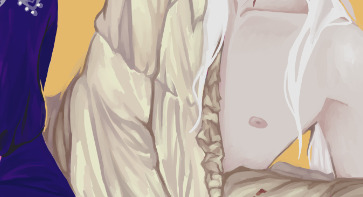
Paint brush - This one is best for colour and for defined work! this is biased but the best is the oil paint brush, it just HMMM it just GLides from One colour to another and helps me create this effect -
The spray - Similar to the chalk but is more so identical to the mspaint spray one hhh from experience so I dont really USe THAT one
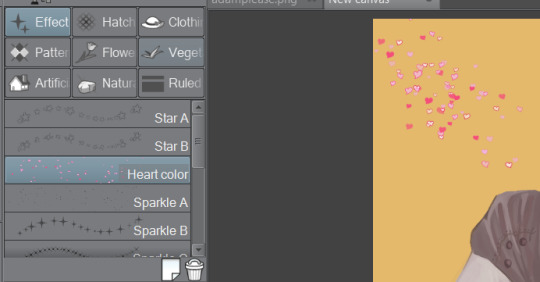
Stars - these are shapes! If you’ve used gimp you’d know how this one works! your brush turns into the pattern and shapes you chose like so -
Eraser - Self explanatory!
Blend tool - alot of people like this hhh but I’d recommend the oil painbrush over this but this basically makes blending alot more smoother and easier!
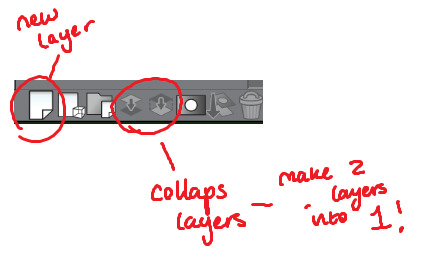
2) this is more so layout, some of these activate a new layer (like text)
fill bucket - my lazy butts fav tool, It fills in the pixilated or selected area, be careful tho if the colour is weak it’ll leak out and fill other areas!
Gradient - This… I dont use this at all hhh
Contour Line paint - This tool I dont use either hh, it basically bucket fills and area that is similar to the line around that area
TYPEEE!! - this is where you add text! the text on this program is kinda annoying but hey you can rotate it! how you rotate it, after you’ve chosen what type face (font) you want and size and colour COLLAPSE IT to a EMPTY LAYER!!! then use the selection tool and rotate it! (I will discuss the rotation took in part three!)
NO idEa WHat THIS tOOL IS IF IM HONEST
3) This is basically cropping and editing!
Zoom - This will help you zoom in and out!
Rotation - helps you turn your canvas around, upside down and so on to make difficult angles easy to reach!
— no clue
Movement - helps you move selected layer around! can be a pain if done by accident but hey what is ctrl + z for!
Selection/ lasso! - THIS TOOL wILL bE yoUR SAVOIR! I use to to fix layout as well as anatomy and perspective. When you select an area this will pop up!. The first one on the left is to cancel selection, 7th from the left is the one where you can move, resize! Those are really the important ones hh

Wand - The iconic select took, that selects an area you click and the same options from the selection/ lasso will pop up!
eyedropper - this tool will basically copy a colour on any canvas that is advisable, helps to reuse a colour! it auto works if you just right click on your mouse or pen so you dont have to keep changing from your pen,painbrush or bucket tool!
I think thats the basics? now I’ll talk about all the aspects CSP has to offer in Edit that makes life a blessing such as colour corrector, change line of drawing and change canvas size (which is a million times easier than photoshop, which makes you use math and NUmBERS)
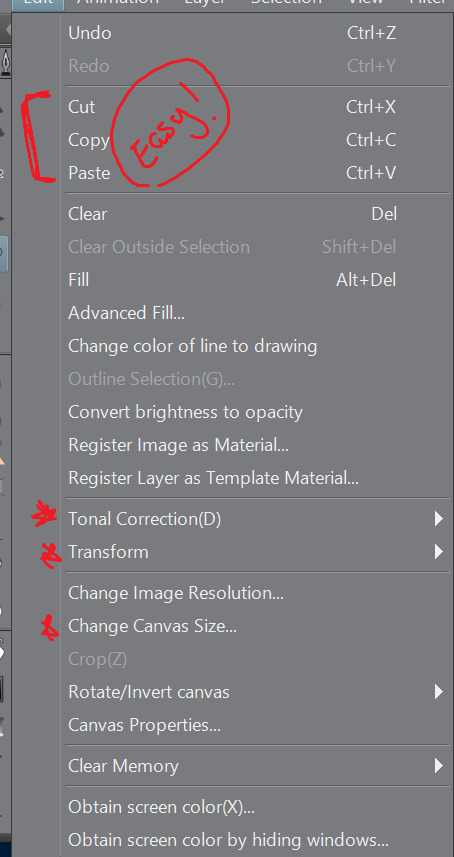
Tonal correction is what I use to basically fix the colours of my artworks, Its easier than redrawing the entire piece hhh, sometimes we all draw a little off colour pallette! so when you click that you’ll get -

Brightness and contrasts - brightness really just makes its more white and black but contrast makes the colour more vibrant and pop, its a scale option so its really fiddling around with the two bars until what you see is something you’re happy with!
Hue, saturation hhhh - This will help you change YOUR ENTIRE hue aka the CMY (the primary colours, magenta cyan yellow) and the saturation tones the contrast making it easier on the eyes! same as the last one it’ll be sliders! so really mess with it and pick which one is pleasing to you!
the rest i dont use hhh but
Colour BALANCE - this helps me hhh basically you change the entire colour layout beyond CMY, it has three effects, the highlight, shadow and halftone! same as before sliders! mess around with until youre happy with how it looks! (It’ll auto preview)
I think that’s really it? any more questions please shoot me up!
OH! CSP is known to crash, its the only downside tbh, it also auto saves alot, so save alot! SAVE ALOT!! i’ve lost whole works like 6 hours from csp crashing as it was overwhelmed from my layers hh
here is how you can look for backup files incase it does crash! -
My documents -> CELSYS -> Clip studio PAINT DATA-> -Document BackUp or -Initial Backup.
5 notes
·
View notes
Text
Price: [price_with_discount] (as of [price_update_date] - Details) [ad_1] The Canvas element is a revolutionary feature of HTML5 that enables powerful graphics for rich Internet applications, and this pocket reference provides the essentials you need to put this element to work. If you have working knowledge of JavaScript, this book will help you create detailed, interactive, and animated graphics -- from charts to animations to video games -- whether you're a web designer or a programmer interested in graphics.Canvas Pocket Reference provides both a tutorial that covers all of the element's features with plenty of examples and a definitive reference to each of the Canvas-related classes, methods, and properties.You'll learn how to:Draw lines, polygons, and curvesApply colors, gradients, patterns, and transparencyUse transformations to smoothly rotate and resize drawingsWork with text in a graphic environmentApply shadows to create a sense of depthIncorporate bitmapped images into vector graphicsPerform image processing operations in JavaScript Publisher : O′Reilly; 1st edition (14 January 2011) Language : English Paperback : 112 pages ISBN-10 : 1449396801 ISBN-13 : 978-1449396800 Item Weight : 86.2 g Dimensions : 10.8 x 0.66 x 17.78 cm Country of Origin : USA [ad_2]
0 notes
Text
Download pixelmator pro free online
Download pixelmator pro free online update#
Download pixelmator pro free online skin#
Download pixelmator pro free online full#
Download pixelmator pro free online pro#
What if we had bigger pointers for larger brush sizes? Maybe a crosshair for more precise sizes? How about a unique pointer shape for the pixel brush tool, which also has pointer snapping to each pixel for even more precision? So many possibilities to make this a really unique experience for the iPad. There’s also some keyboard functionality missing like being able to select multiple layers/objects on the canvas with Shift or Command.Ī nice little bonus would be to have enhanced pointer shapes with brushes, erasers, etc. Would love to have a tool sidebar kind of like the desktop Pixelmator app! The keyboard shortcuts make this a lot easier, but I don’t always have access to a keyboard (like when I’m drawing with Apple Pencil). Thanks for fixing the issues with selection editing with the keyboard too!Īs some of the other reviews mentioned, the UI is definitely a little clunky especially on big iPad screens-especially the two modal screens you have to go through to choose a specific brush or selection type.
Download pixelmator pro free online pro#
Really love the new keyboard and trackpad support-really makes it feel like a pro app.
Download pixelmator pro free online update#
New update is awesome, but still a few missing things
Download pixelmator pro free online full#
Designed to take full advantage of powerful iOS features and technologies and engineered to leverage the full power of 64-bit architecture, Metal, Core Image, and Core Animation, Pixelmator delivers state-of-the-art performance and real-time responsiveness. Pixelmator is meticulously thought through and created from the ground up for iOS 14.
Instantly publish your images to social platforms like Flickr, Twitter, and Facebook.
Share your artwork with friends and family via email.
Create, edit, and keep all your images up to date on all your devices thanks to iCloud support.
Store and access images in iCloud Drive.
Save your images directly to your Photos app.
Open and save images using PSD, JPEG, PNG, and many other popular formats.
Open, edit, and save Photoshop images with layers.
Easily remove image background or cut and paste objects from one image to another.
Crop, arrange, and rotate objects and layers with pixel-perfect precision.
Use precise selection tools to edit areas of an image.
Blend layers, shapes, and text using any of the 32 blending modes.
Easily add, combine, and customize shapes.
Add text and make it look beautiful with a full set of text-styling settings.
Insert, group, merge, and blend layers of an image.
Apply non-destructive layer styles like shadows, outlines, gradient fills, and more.
Combine words, shapes, and images to create breathtaking artwork right on your iPhone.
Enjoy perfectly seamless painting thanks to the Pixelmator Paint Engine.
Paint more naturally than ever with the Apple Pencil on your iPad Pro, featuring palm rejection, pressure, tilt, and acceleration sensitivity.
Use layers to isolate and blend elements of your painting.
Instantly choose colors right from your image with the Eyedropper.
Easily select and fine-tune colors with a full-featured Color Picker.
Vary the speed of your stroke to change brush thickness of some of the brushes.
Smudge colors of an image for smooth color blends.
Paint with incredible detail thanks to the double texture brush technology.
Create stunning pixel art images with the custom-designed Pixel brush.
Paint with near-natural wetness effect of watercolor and crayon brushes.
Choose from more than 100 artist-designed brushes and numerous painting techniques.
Paint stunning images right on your iPhone and iPad.
Open and edit images of up to 100 megapixels.
Choose from dozens of breathtaking effects to subtly improve or completely change the look of an image.
Blur, sharpen, lighten, or darken areas of an image.
Pinch, bump, twirl, or warp areas of an image with powerful, Metal-based Distort tools.
Duplicate areas of your image with the easy-to-use Clone tool.
Download pixelmator pro free online skin#
Wipe away image imperfections, skin blemishes, and unwanted objects with the Repair tool.Easily remove color casts and set the right white balance.Take full control over the tonal range of your image with levels and curves.Instantly improve your photos with single-tap color correction presets.Get started with dozens of beautifully designed templates.Pixelmator has everything you need - whether you’re a mobile photographer, mobile painter, or mobile graphic designer - all in one easy-to-use app.ĭesigned exclusively for iOS, Pixelmator takes full advantage of the latest iOS 14 features and technologies, giving you innovative, fast, and powerful tools. Pixelmator is a powerful, full-featured, layer-based image editor that lets you touch up and enhance images, sketch, and paint, as well as create advanced image compositions on iPad and iPhone alike.
0 notes
Text
Artstudio pro borodante

ARTSTUDIO PRO BORODANTE FULL
ARTSTUDIO PRO BORODANTE PRO
ARTSTUDIO PRO BORODANTE PROFESSIONAL
Images - PNG, JPEG, PSD, HEIC, TIFF, GIF, PDF, most raw formats.
ARTSTUDIO PRO BORODANTE PRO
We have implemented many parsers from the most popular assets/images formats and we are especially proud of our ABR/TPL parser which not only reads brush stamps and patterns, but also most settings which are converted to Artstudio Pro brush engine values.
Export to MP4, HEVC, Animated GIF, Animated PNG.
Scrollable timeline view with Play/Pause.
Retouching tools: Heal, Dodge, Burn, Sponge and moreĬreate animation from layers or groups and finally export it to one of the most popular animation format.
Dozens of filters with realtime preview and the ability to generate seamless patterns.
4 auto adjustments: Auto Contrast, Levels, Lightness, Saturation.
15 adjustments available as non-destructive layer or simple adjustment: Brightness/Contrast, Levels, Curves, Exposure/Gamma, Shadows/Highlights, Vibrance, Hue/Saturation, Color Balance, Temperature/Tint, Black and White, Gradient Map and more.
Each feature was tested in several scenarios and light conditions.
ARTSTUDIO PRO BORODANTE PROFESSIONAL
Photo editing options developed in cooperation with professional photographers.
Over 150 built-in brushes divided into multiple groups: Pens, Pencils, Oil Painting, Inking, Charcoals, Airbrushes, Watercolor and many more.
Brush editor with over 100 customizable settings.
64-bit painting with pattern, double stamp, wet brush, dynamics.
Perfectly optimized, lag free mechanism generating smooth, real looking strokes, making the most of Apple Pencil.
9 layer effects: Bevel/Emboss, Stroke, Inner Shadow, Inner Glow, Outer Glow, Color/Gradient/Pattern Overlay, Drop Shadow.
27 tools: Move, Select, Crop, Eyedropper, Paint, Wet Paint, Eraser, Bucket/Pattern/Gradient Fill, Smudge, Dodge, Burn, Sponge, Text, Heal, Clone, and moreĪrtstudio Pro introduces a new layer system with grouping, non-destructive layer effects, and adjustment layers.
Incredible optimization ensures smooth work even with large canvases. It allows working with multiple documents, supports large canvas sizes and an unlimited number of layers. The powerful GPU accelerated ArtEngine developed by Lucky Clan is 5-10 times faster than the previous engine. It will boost your creativity and help you bring your ideas to life quickly and easily. Hundreds of assets are included and users have the ability to import resources in the most popular formats (ABR, TPL, PAT, GRD, ASE, ACO) giving instant access to millions of brushes, patterns, gradients, color swatches and fonts.
ARTSTUDIO PRO BORODANTE FULL
The successor to our famous ArtStudio app has been redesigned bringing many new features and improvements taking full advantage of the latest technologies Metal, iCloud Drive, Apple Pencil, and optimized for 64-bit multi-core processors to achieve the smoothest possible workflow. Introducing Artstudio Pro, the most powerful painting and photo editing app available for both iOS and macOS.
0 notes
Text
Boxy svg pencil tool

#BOXY SVG PENCIL TOOL FULL#
#BOXY SVG PENCIL TOOL PROFESSIONAL#
#BOXY SVG PENCIL TOOL DOWNLOAD#
View: The interface isn’t as polished as IconDeveloper, not as easy to use as the rest (thats why I haven’t got it at Nu.1), but my god look at the feature list.
#BOXY SVG PENCIL TOOL DOWNLOAD#
↓ 04 – Vectr | Free | macOS | Windows | Linuxįeatures: Easy to use, lightweight, requires no installation (portable) Supports file drag and drop Has multilanguage support (included: English, Chinese, French, German, Hungarian, Italian, Japanese, Korean, Norwegian, Polish, Portuguese (Brazilian), Serbian, Spanish) Help also available in French, separate download Click here to help us by translating the program Sample documents are included Uses dynamic color depth Opens and saves in ICO, CUR, ANI, PNG, XPM, BMP and JPEG formats Can create icons and cursors up to 256×256 32-bit, which can also be PNG-compressed for use in Windows Vista(tm) Can create animated cursors Can handle images up to 1024×1024 and larger Can extract icons and cursors from executable files and icon libraries Can batch convert image files to icons, or to another image format Has advanced selection handling (marquee, lasso and wand tools, saving/loading selections from files) Offers various gradient styles for filling shapes Lots of filters including Remove matte, Drop shadow, Inner/Outer glow and Bevel.
Clones (“live” linked copies of objects), including a tool to create patterns and arrangements of clones.
Embedded bitmaps (with a command to create and embed bitmaps of selected objects).
#BOXY SVG PENCIL TOOL FULL#
Text tool (multiline text, full on-canvas editing).
Shape tools: rectangles (may have rounded corners), ellipses (includes circles, arcs, segments), stars/polygons (can be rounded and/or randomized), spirals.
Drawing: pencil tool (freehand drawing with simple paths), pen tool (creating Bezier curves and straight lines), calligraphy tool (freehand drawing using filled paths representing calligraphic strokes).
#BOXY SVG PENCIL TOOL PROFESSIONAL#
Whether you’re a veteran professional illustrator, a designer building a dazzling website, or a budding artist eagerly experimenting with various styles and techniques, you will find Expression Design an indispensable tool for your creative tasks. The convenience and ease of editing vector graphics in Expression Design can be a cornerstone of your Windows Presentation Foundation (WPF), Microsoft Silverlight, and web images. ↓ 03 – Microsoft Expression Design | Free | Windows Furthermore, with OCIO and OpenEXR support, you can manipulate the view to examine HDR images, and use it in the most cutting edge workflows from the film and visual effects industries.
HDR Support – Krita is the only dedicated painting application that lets you open, save, edit and author HDR and scene-referred images.
Load and save to PSD when you need to take your artwork across different programs.
PSD Support – Open PSD files that even Photoshop cannot open.
The canvas will also look better when zoomed out. With OpenGL enabled, you will see increased canvas rotation and zooming speed.
OpenGL Enhanced – Krita takes advantages of OpenGL for some of its operations.
Or let it be the start of one: Krita comes with a wide variety of icc working space profiles for every need, with a color space browser to visualise and explore them.
Full Color Management – Krita supports full color management through LCMS for ICC and OpenColor IO for EXR, allowing you to incorporate Krita into your existing color management pipeline.
It offers many common and innovative features to help the amateur and professional alike. Krita has been in development for over 10 years and has had an explosion in growth recently. Krita is a complete creative sketching and painting application with advanced, commercial quality features. It is made by artists that want to see affordable art tools for everyone.
1 note
·
View note
Text
Adobe flash cs6 free. download full version mediafire

#ADOBE FLASH CS6 FREE DOWNLOAD FULL VERSION MEDIAFIRE FULL VERSION#
#ADOBE FLASH CS6 FREE DOWNLOAD FULL VERSION MEDIAFIRE 32 BIT#
#ADOBE FLASH CS6 FREE DOWNLOAD FULL VERSION MEDIAFIRE PRO#
#ADOBE FLASH CS6 FREE DOWNLOAD FULL VERSION MEDIAFIRE SOFTWARE#
#ADOBE FLASH CS6 FREE DOWNLOAD FULL VERSION MEDIAFIRE FULL VERSION#
Click Now to download the full version setup for Free. Adobe Flash Professional Download is compatible with Windows 7/8/10.
#ADOBE FLASH CS6 FREE DOWNLOAD FULL VERSION MEDIAFIRE 32 BIT#
Download Adobe Flash CS6 Professional Standalone setup for 32 Bit as well 64 Bit. With broad support for video formats including RAW, HDR, and stereoscopic, apply precise HDR grading to raw content and finished edits.Download Adobe Flash CS6 Professional Standalone setup for 32 Bit as well 64 Bit. Manipulate light and color in your video productions with the powerful Lumetri™ Deep Color Engine in Adobe SpeedGrade™. Get the exact shape you want with the proper degree of softness at any point along the mask edge, resulting in a big boost to creative flexibility. Variable mask feathering in After EffectsĬreate a separate set of splines to precisely control mask feathering. Ray-traced, extruded text and shapes in After EffectsĮxtrude fully ray-traced text and shapes natively and take full advantage of reflections, environment maps, and more. Automatically analyze and place 3D track points onto 2D footage while you work, in the background. Track elements in 3D space with depth of field, shadows, and reflections. Use rolling shutter removal to eliminate skew and wobble without forcing stabilization. Remove unwanted movement from footage using the powerful Warp Stabilizer in Adobe After Effects® and Adobe Premiere Pro. Trim clips directly in the timeline via keyboard entry or in the Program monitor using JKL shortcuts.
#ADOBE FLASH CS6 FREE DOWNLOAD FULL VERSION MEDIAFIRE PRO#
Gradients applied to strokes in IllustratorĪpply gradients to your strokes - along the length, across the width, or within the stroke itself - all with complete control over gradient placement and opacity.Įasily edit 16-plus camera multicam shoots, apply effects that span multiple clips using adjustment layers, and kick-start color correction with the Three-Way Color Corrector in Adobe Premiere® Pro.ĭynamic timeline trimming in Adobe Premiere Proįinesse your edits with precision using advanced trimming tools in Adobe Premiere Pro CS6. Get clean lines, accurate fitting, and reliable results using simple, intuitive controls. Experiment freely with different types of repeating patterns that can be edited at any time for maximum design flexibility.Ĭonfidently convert raster images to editable vectors with a powerful tracing engine in Illustrator. Seamless vector pattern creation in IllustratorĮasily create seamlessly tiled vector patterns in Adobe Illustrator®. Create tilt-shift effects, sharpen one focal point, or vary the blur among many focal points. Quickly create photographic blur effects using a simple interface with on-image controls. Enhance any clip using the full range of familiar tools in Photoshop Extended, and then combine clips and stills with transitions, audio, and effects. Intuitive video creation in Photoshop Extendedīring image-editing power to video. Drag shadows into place, animate 3D objects, and give 3D objects a sketched look.* Simplified 3D design in Photoshop Extendedĭive into 3D artwork creation with intuitive on-canvas and in-context scene editing. Remove or move selected image objects, and Content-Aware technology magically fills, patches, extends, or recomposes your image with stunning results. Retouch images with astonishing ease, control, and precision in Adobe Photoshop® Extended. With exceptional power and precision, you can create inspiring experiences that go anywhere.Ĭontent-aware technologies in Photoshop Extended Groundbreaking new creative tools provide innovative ways to design for the latest devices.
#ADOBE FLASH CS6 FREE DOWNLOAD FULL VERSION MEDIAFIRE SOFTWARE#
Adobe® Creative Suite® 6 Master Collection software delivers unprecedented performance with blazing-fast 64-bit native support and GPU acceleration.
0 notes
Text
EximiousSoft Banner Maker Pro Portable is a great app to block GIF banner ads. web buttons and headers etc. web graphics. It has all the basic vector-based drawing tools and fully supports layer editing. EximiousSoft Banner Maker Pro Portable is a complete tool with good design tools and a quick way to create high-quality banner images, it provides a WYSIWYG interface for vector graphics manipulation, allowing you to express yourself freely. The program offers more than 400 high-quality ready-to-use professional banner templates, 500+ pre-designed clipart images, and 5,000+ amazing vector symbols and rendering filters. For each shape object, including text, it can be filled or traced with solid colors, gradient colors, images, or patterns. Each drawing object can be made with shadow, glow, reflection, 3D bevel visual effects, etc. You can preview the banners in the web browser directly, and the web graphics can be saved as GIF, JPG and PNG images, etc. Features overview: Edit web graphics with full-image painting tools and vector-based drawing tools. Provides more than 60 effects to create attractive animated GIF banners with one click. Provides 500+ pre-designed banner templates and 200+ buttons and 5000+ symbols and many preset styles and textures. It supports layer editing and each object can be rendered with 3D shadow, glow, reflection and bevel effects. Any shape object, including text, can be drawn in a more pre-designed script style. Create stunning banner animations with the effects with just one click. Preview of banner animations that are created with the selected effect. Each effect often offers many options to adjust or customize. Undo and redo anywhere at any time. Supports exporting your banners to JPG, GIF, PNG, BMP, PCX, TGA, TIFF files with custom options. Allow to upload image files of GIF, BMP, PCX, JPG, TIFF, PNG, TGA, PSD, ICO, CUR, ANI ect. files. Supports adding frames, deleting frames, duplicating frames, combining frames, and adjusting the order. Supports uploading frames from the most popular image format file and AVI video file. Resize animation, resize canvas, set loop times, and edit delay for selected frames. Release year: 2021 Version: Pro 3.73 System: Windows® XP / Vista / 7/8 / 8.1 / 10 Interface language: English File size: 33.81 MB Format: Rar Execute as an administrator: There's no need
0 notes
Text
Why Web Design Had Been So Popular Till Now?

Good web design enables users to find and use websites, ensuring that they return again and again to the same site. For this reason, web design is fundamental to the success of any business in the world.
Whether you own a small shop or work for a large corporation, the importance of good web design cannot be overstated. Whether you already have an established business or are just starting out, consider these reasons why good web design will help your company in the long run. Read on to learn more about some of the reasons why good web design matters most.
Clicks Are Not Enough
Remember, users, don’t just visit your website because they like it or want to learn more about your brand. They visit because they are looking for something specific—and in that search for a solution, design is not their main concern. Instead, organization and presentation are far more important than aesthetics.
People don’t come to your site to look at pretty pictures; they come to find information and take action. And a lot of them will leave if you don’t make that process simple and easy.
The Rise of Voice Search
Voice search is rapidly on its way to replacing text search as our go-to method for finding something online. According to projections, by 2020 nearly 20% of all searches will be voice searches and that means a whole new way of thinking about your design.
In order to give your audience a positive experience when they use voice search, you need to create something that people will remember in their minds. It can’t be just a list of links—it needs to be something visual, fun and engaging.
When it comes down to it, well-designed visual elements tend to stand out in people’s minds more than just words alone. If you want them to remember you more easily when they use voice search, spend some time creating an enjoyable visual design for your site.
Web Design is Evolving
The transition from static to dynamic Web design began with JavaScript (released in 1995), which we used to make Websites feel more alive by adding animation and movement. HTML5 introduced us to new elements that make Web pages look much more like applications, like video and canvas graphics.
The CSS3 specification adds a number of different visual effects, including drop shadows, rounded corners, gradients and even 3D transforms. While CSS has evolved over time, it’s never been under active development until recently—when organizations such as Microsoft started working on projects such as Internet Explorer 9’s implementation of Selectors Level 4.
What Does This Mean For Small Businesses?
If your business doesn’t have a website, you are at a serious disadvantage. If your business has an outdated or missing site, you are at an even greater disadvantage. This is why web design had been so popular till now!
Small businesses need to make sure that they have a strong web presence as well as offline marketing strategies in place and don’t let them fall behind their competition just because they don’t know what works.
There are many tools and resources available today to help small businesses do just that! And here we present some of them to you today.
How Should Small Businesses React to Changes in SEO and Web Development?
It’s important to realize that search engine algorithms are always evolving and changing. A company that focuses on SEO today may not be effective tomorrow because search engines continue to adapt.
While it’s impossible to predict exactly how these changes will affect your business, you should always take a proactive approach when responding to technology shifts.
Doing so can help small businesses plan for changes in their design, development, and marketing strategies in order to maintain a competitive edge over larger competitors.
The Importance of Mobile-Friendly Websites
In recent years, a lot of thought has been given to making websites more compatible with mobile devices. Users are using their smartphones and tablets more often than ever before; they are taking them everywhere they go and using them at every opportunity.
It’s no wonder, then, that web designers have become much more attuned to giving users an engaging experience on their phones as well as on their desktops.
All major browsers now have tools for testing whether or not your website is mobile-friendly; it’s in your best interest to make sure that you aren’t losing any potential clients due to a cumbersome site or slow load times.
Is Responsive Web Development Outdated?
In case you’re not aware, responsive web development is an approach to creating and presenting your website using flexible grid-based design techniques and CSS3 media queries. And in case you are, you’ll know that it has taken on a life of its own; pretty much every popular CMS worth its salt comes with responsive capabilities baked right in.
The point I am making here is that we live in a world where responsive web development isn’t new news anymore. If anything, it has become increasingly overhyped—and rightfully so. In fact, many believe we have moved beyond responsive web development and are now living in a device-agnostic era.
Is web design is a better career option for you?
Web development is a fast-growing career, and there’s plenty of demand for qualified talent. Whether you want to go freelance or become a full-time employee, web design is a competitive field.
There are tons of variables to consider when making your decision: How much money do designers make? What skills are in demand? What kind of training can you get if you need it?
We’ve compiled all that information into one post—and also included an awesome list of 25 websites where you can learn from experienced professionals.
I hope these above points helped you on Why Web Design Had Been So Popular Till Now?
If you have any doubt or query related to it then comment down below I will try to help you out to get rid of this problem.
If you liked this article, then please follow me on Instagram for WordPress tips and tricks. You can also find us on Twitter, Facebook and LinkedIn.
0 notes
Text
Display For Mac

Display For Mac Pro
Display For Mac Mini
Display For Mac Pro
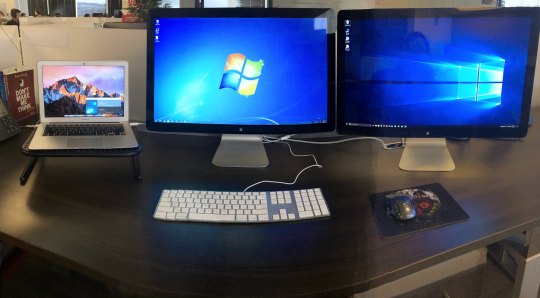
If you’re considering an external display for your Mac, there’s a few important decisions to make. Apple doesn’t sell external displays any more, so you can’t just default to their wisdom. That’s an issue, because not all displays are well suited for Macs.
The Displays preference pane acts the same way with your Mac’s built-in Retina display, too, except that “Default for display” automatically chooses the Retina mode. Share this: Facebook.
Which size? #
I can’t really help you with this one. It’ll likely be set by your budget, desk space and personal preference. The factors below will play a role, too.
Until Apple makes a stand-alone monitor option to replace the now-defunct Cinema Display monitor discontinued in 2014, finding an external monitor to increase the real estate of your MacBook Pro means heading out of the Apple universe. Luckily, quite a few monitors are offering USB-C connectivity to make it easy to hook your MacBook Pro to an alternate monitor. We’ve compiled a list of.
The most advanced display for your Mac. Built for professionals. Built For Professionals. Duet is built by ex-Apple engineers, delivering a retina display at 60 frames per second with zero lag. Using an additional display can double your productivity by reducing time to switch contexts.
Both the Mac and all displays in the chain must support DisplayPort 1.2, except for the last display which can be DisplayPort 1.1. In the image to the top right from StarTech, for example, Screen.
Retina or non-Retina? #
Thunderbolt 2 and DisplayPort 1.2 have a maximum resolution of 3840×2160 at 60FPS, which means non-Retina resolutions up to about 40-inch are supported by most current Macs. But, that only covers Retina displays up to 20-inch. Thunderbolt 3 equiped Macs, like the 2016 MacBook Pros, can run 27-inch Retina displays though.
There is another issue to contend with. Apple’s interface design in macOS is set up so it is comfortable for most people at a density of about 110 pixels per inch for non-Retina, and about 220 pixels per inch for Retina — text is readable and button targets are easy to hit at a normal viewing distance. Using a display that isn’t close to 110PPI or 220PPI means text and interface elements will either be too big, or too small.
The Display pane in System Preferences includes “larger text” and “more space” options. These can be used as a solution, but if you do, macOS will render the entire screen to a virtual canvas, then bitmap scale it up or down to the desired size. The result is blurry pixels, higher memory usage, more work for the GPU to do, and shorter battery life for laptops. You want to use the “default for this display” setting, if you can. It’s better quality, faster, and gives longer battery life.
Blurry pixels and a scaled display make it very difficult for designers and developers to see if elements are where they need to be. Elements that animate will appear to shimmer as they move. For me, “default for this display” is the only way to go.
The divider above shows the shimmering — it’s a 1pt or 2 Retina pixel line, but when the display is scaled down by a fractional amount (72%), those pixels don’t map directly to pixels on the display. As the list scrolls, the divider shimmers as the scaling represents the line differently.
You won’t need to choose a display that is exactly 110PPI or 220PPI. A slightly lower value will mean text and interface elements are larger. A slightly higher value will mean text and interface elements are smaller. You can use Sven Neuhaus’s PPI calculator to work out the pixel density of any display you’re interested in. Here’s a list of common external displays, with the 110PPI and 220PPI zones indicated.
Buying a display with a pixel density in the red zone usually isn’t a good choice, if you want to run “default for this display”. For example, 160PPI will show non-Retina UI too small, but Retina UI too large (it’s worth noting this can be used to buy a display that shows larger text and UI for those who need or prefer it).
The 4K iMac, 5K iMac and Surface Studio are listed as points of comparison, and can’t really be used as external displays. The Surface Studio’s 193PPI display is actually perfect for Windows, where the non-Retina (1×) UI scale is 96PPI, and the Retina (2×) UI scale is 192PPI. If I could buy a Surface Studio as an external display for my Mac, I think I would.
Wide gamut support? #
Wide colour gamut support — displays that use the Adobe RGB, Display P3, or DCI-P3 colour spaces — are great for photo editing, if your source material is created in those colour spaces.
But, the majority of web design, iOS apps, Android apps and game design is in the sRGB colour space. If that’s your line of work, you probably only need and want sRGB support (and an IPS LED display). Incorrectly set up, a wide gamut display used with non-colour managed software will produce overly saturated colours, and those colours won’t match how the final product is seen.
Xenu's Link Sleuth is spidering software that checks Web sites for broken links. It performs verification on normal links, images, frames, backgrounds, and local image maps. It also displays a. The Screaming Frog SEO Spider is a small desktop program (PC or Mac) which crawls websites’ links, images, CSS, script and apps from an SEO perspective. Commercial Mac Windows Linux Scheduled Data Crawling Seo Website testing Add a feature 23 Like. Xenu's Link Sleuth is not available for Mac but there are plenty of alternatives that runs on macOS with similar functionality. The most popular Mac alternative is Screaming Frog SEO Spider. It's not free, so if you're looking for a free alternative, you could try Integrity or Beam Us Up. If that doesn't suit you, our users have ranked 46 alternatives to Xenu's Link Sleuth and 12 are available for Mac so hopefully you. Xenu sleuth for mac.
It’s often possible to put wide gamut displays into an sRGB emulation mode, or to calibrate them to sRGB. But, not always. I am unaware of a way to calibrate an 5K iMac to use sRGB (if you know, please get in touch). “99% coverage of the sRGB spectrum” or similar message in the marketing text is usually a good sign, and what you’ll want to look for if buying a display for web or app development.
There is another significant issue with wide colour gamut support — wider colour gamut stretches the same value range, 0-255 for 8bit per channel colour, over a larger range of absolute colours. The number of available steps is the same, and each step becomes bigger. Using a wide gamut display with colour management aware software also typically requires conversion to and from the display’s profile once, twice or more times for everything displayed. Doing so can result in rounding errors, which are presented as gradient banding or noise.
That’s all fixable by using more colour precision. The 5K iMac uses 16bit per channel for the macOS window manager and it sends 10bit per channel to the display. That’s a great fix, but it requires double the GPU memory, double the GPU memory bandwidth, and 25% more port bandwidth. That’s the likely future, but we’re just not there yet for the majority of displays.
In short, if you only need sRGB, buy an sRGB only display.
Published 12 December 2016.
If you bought Displays on the Mac App Store, you’re eligible to a free license. Read more
Migration from the Mac App Store
Displays was previously available on the Mac App Store, but for technical reason, the app could not live anymore on this store without breaking support for Retina resolutions.
Instead, we’re now selling license keys directly from our webstore. All people having bought Displays on the Mac App Store are eligible to a free license key.
Download our Migration Assistant to request your key
Click on Displays icon in the upper-right corner of your screen and choose your monitor resolution among all supported resolutions. Displays is listing even resolutions hidden by macOS.
Displays supports all active monitors attached to your Mac, including AirPlay monitor. With one click, you can enable or disable mirroring mode.
To easily identify a resolution, you can set a custom label instead of resolution width/height and you may choose or not to group Retina resolutions, and even hide too-small resolutions.
Light at night is part of the reason so many people don’t get enough sleep. When night is coming, you can enable a night mode to rest your eyes and avoid unwanted effects of lights, especially blue light.
With just one click, or with a keyboard shortcut, you can switch to macOS Dark theme (10.9 or later), lower screen brightness, reduce blue light emitted by your display, enable grayscale mode or even set another wallpaper. If your screen does not support brightness control, Displays will simulate screen dimming.
And night mode can be scheduled, either in a user-defined period or based on sunset/sunrise. You can even automatically switch to night mode when you launch any app of your choice!
Display For Mac Pro
With Displays, you can take screenshots easily, either entire screen, specific area or a window. Many options are offered like timer, presets, mouse pointer, window shadow…
Divx for mac codec pack. Put the mouse over the video thumbnail, there will be a Play icon over it. Or you can click on the Add Files to browse videos on your Mac. There are more than 500 video formats supported.02 Click the Play iconYou can see your videos have been displayed in the program.
Use our various tools to annotate your screenshot: free drawing, rectangle, polygon, star, arrow, speech bubble, text… Another useful tool allows you to pixellate or blur some sensitive part of your screenshot.
Sharing screenshots has never been easier. Displays supports many cloud services where you can upload your screenshot and obtain a share link: Dropbox, Google Drive, OneDrive, Box, CloudApp, pCloud, FTP and SFTP.
You’re doing presentations like app demonstration or Powerpoint? Displays can act like a virtual laser pointer to grab your audience’s attention on what you’re doing.
Entire screen will be dimmed, except the part where your mouse cursor sits and mouse clicks will also be visually highlighted. Everything is customizable: circle or rectangular shape, screen color, opacity, highlight radius, play sound, differentiate left and right mouse clicks…
When one of your external monitor is in another room or not directly visible, it’s hard to see what is displayed on it. The same happened when you’re doing a Powerpoint presentation and the slides are behind you. That’s why we implemented Picture-in-Picture (PiP) for monitors.
Displays can enable a PiP overlay, that reflects the secondary screen content in real-time. And for sure, PiP can be enabled for more than one monitor at a time.
Do you need to hide temporarily the mess on your desktop? With one click or through a customizable keyboard shortcut, you can quickly hide all your desktop icons, without loosing essential features of your desktop like drag & drop or contextual menu.
French
Spanish
ALL FEATURES
Displays is not just a resolution switcher for macOS, as it comes with a lot more features for people managing multiple monitors and developers.
List all resolutions supported by your monitor, even those usually hidden by macOS.
Click on Displays icon in the macOS menu bar and choose the desired resolution. That’s it.
Replace default resolution name like “1680 x 1900 (60 Hz)” by any other text.
Resolutions can be grouped or not by Retina, and you can filter/hide any resolution.
Enabling or disabling macOS screen mirroring is actually just two clicks.
Display For Mac Mini
Rotate your monitor display to 90°, 180° or 270° (only if monitor supports rotation).
Get detailed information, like serial number, manufacturing date, active graphic card…
Rest your eyes in one click by reducing blue light and/or switching to Dark theme.
I would point out that Macs and Windows both support FAT32 file systems though so this may be why it was successful. Acronis true image for pc and mac os. I'm not so sure how things would go using an OS X journaled drive and restoring somethign to an NTFS one, but if it is just files/folders, I don't see why it wouldn't work either. Hello everyone!I can totally understand the importance of this feature, however, due to different archive formats and different platforms, it is quite hard to implement it.We are not planning to implement it for image recovery but we are - for file recovery, however, there is no ETA for this feature.As a current workaround I would suggest using Cloud backups. I Then went to my Windows machine and restored that image to another USB flash drive in Windows and the result was a working USB flash drive.
Easily take a screenshot of a window, area or entire screen, with options like timer.
Easily annotate, crop or resize your screenshot, with 12 different tools.
Upload your screenshot to Dropbox, Google Drive, Box, OneDrive, FTP/SFTP server…
With one click or keyboard shortcut, quickly hide all your desktop icons.
Grab your audience’s attention by highlighting mouse pointer and mouse clicks.
Engadget is part of Verizon Media. Logitech s530 mac software.
Show secondary monitor live preview in an overlay window on your main screen.
Show a Test Card to help in monitor calibration, whatever screen ratio (4:3, 16:10…).
Get notifications for many events like monitor plug-in or video card change.
Set customizable shortcuts for all functions, like switching resolution or night mode.
Quickly enable or disable True Tone mode of macOS, if your Mac supports this feature.
Displays entirely supports the new Dark mode introduced in macOS Mojave.
Displays is fully optimized for the latest release 10.15 of macOS, called “Catalina”.
Displays is using all modern technologies offered by Apple for the best performance.
If bought Displays on the Mac App Store, you’re eligible to a free licence key (please check Support section).
SCREENSHOTS
WHY DISPLAYS?
Easy to use Only two clicks are necessary to change your monitor resolution
Customizable Will adapt to your needs with full customisation for every function
Reliable Every function has been deeply tested on every macOS version
Full-featured Comes with many advanced tools, no need to buy some other apps
Display For Mac Pro
Free DownloadBuy Now Version 1.9.5 – 14/08/2020 Requires macOS 10.9 or later, 64-bit processor, ready for macOS Catalina 15 days Free Trial with time limit Release notes
1 note
·
View note
Text
Motion 5.3 2

Involuntary dismissal based upon certain defects or defenses. (a) Defendant may, within the time for pleading, file a motion for dismissal of the action or for other appropriate relief upon any of the following grounds. If the grounds do not appear on the face of the pleading attacked the motion shall be supported by affidavit. Apr 26, 2020 Apple Motion 5.3.2 Free Download Apple Motion 5.3.2 for MacOS, Motion is the powerful motion graphics tool that makes it easy to create cinematic 2D, 3D, and 360° titles, fluid transitions, and realistic effects in real time. Overview of Apple Motion 5.3.2 Benefits.
Before installing a Motion update, verify that your system still meets Motion system requirements. Then make sure to back up your important files, including projects, media, and the version of Motion that you’re updating.
New in Motion 5.5
Released November 12, 2020
Improves performance and efficiency on Mac computers with Apple silicon.
Export HLG high-dynamic-range projects with Dolby Vision 8.4 metadata for optimized playback on Apple devices.
Improves stability when clicking in an empty canvas on on a Mac Pro with two AMD Radeon Pro Vega II Duo GPUs and a Blackmagic eGPU Pro.
Improves stability when manipulating groups of keyframes selected across multiple parameters.
Improves stability using the Stroke filter when selecting a stroke type in the HUD.
Fixes an issue in which the Poke filter center is offset from the onscreen control.
Improves stability when deleting layers after removing a marker.
Includes built-in support for Avid DNxHR® and Avid DNxHD® decoding and playback.
Get complete step-by-step how-to instructions and information on all features in Motion. For a list of recent enhancements in Motion, refer to What's New in Motion.
Previous versions
Motion 5.4.7
Released September 24, 2020
Fixes an issue in which XAVC media from the Sony PXW-FX9 camera is not recognized.
Motion 5.4.6
Released August 25, 2020
3D object support
Add 3D objects as elements in Title, Generator, Effect and Transition templates.
Animate a 3D object’s position, rotation, and scale using keyframes.
Use behaviors to easily add realistic and complex animations to 3D objects.
Use 3D objects with tools like replicators, emitters, lights or cameras.
Use a collection of 60 premade 3D objects in the Motion library.
Import USDZ objects from third-party websites and developers.
Adjust 3D object environment lighting in the project inspector.
Stroke filter
Create a solid or gradient color outline around the edge of an object or clip based on its alpha channel.
Use the filter’s gradient tools to create multiple colored strokes.
Animate the stroke’s offset or apply multiple stroke filters to the same object to create stunning effects.

Motion 5.4.6 also includes the following:
Adds square and vertical presets to the Display Aspect Ratio Snapshots in the Project Inspector.
Fixes an issue that prevented image masks from responding to opacity changes made to a source object.
Improves performance when working with particle emitters.
Fixes an issue with the Align To behavior and scrolling text.
Fixes a stability issue after switching to Cinema Layout.
Fixes a stability issue during playback with Dynamics turned on in the Advanced Pane of the Shape Inspector.
Fixes an issue in which still images might be exported with the incorrect color space.
Fixes an issue in which the Spirals Generator rendered incorrectly.
Motion 5.4.5
Released December 10, 2019
Fixes an issue in which the HUD would not appear when using the Grow/Shrink behavior.
Fixes an issue in which the Color Space Override menu option was not available when working in Wide Gamut HDR.
Fixes an issue in which 3D text with transparency could display artifacts.
Prevents an issue that could lead to visual artifacts appearing on a Mac with an Nvidia graphic cards that has the Reduce Transparency accessibility preference turned on.
Improves stability when sharing.
Improves reliability when entering Korean text.
Motion 5.4.4
Released October 7, 2019
New Metal-based processing engine improves playback and accelerates graphics tasks, including rendering, compositing, real-time effects, exporting, and more.
Enhances graphics performance with support for multiple GPUs, including Radeon Pro Vega II and Radeon Pro Vega II Duo on Mac Pro.
Optimizes CPU performance with support for up to 28 CPU cores on Mac Pro.
Accelerates ProRes and ProRes RAW playback when using the Afterburner card on Mac Pro.
Lets you view, composite, grade, and deliver stunning High Dynamic Range (HDR) video on Apple Pro Display XDR.
Tone maps HDR video to compatible Standard Dynamic Range (SDR) displays when using Motion on macOS Catalina.
Improves load balancing of graphics processing across multiple GPUs.
Retains custom window layouts when Motion is opened.
Improves performance when using multiple behaviors on a camera.
Fixes an issue in which flickering may occur when changing cameras during playback.
Properly labels Zoom In/Zoom Out in the Timeline and Keyframe Editor.
Eyedropper now works with the Color Curves and Hue/Saturation Curves filters in 360° projects.
Properly displays MPEG-4 files in the Library preview area.
Removes the retiming limit of 800% (Property Inspector > Timing > Speed).
Updates Action Safe and Title Safe zones to allow correct EU standards.
Fixes an issue in which undoing a 3D text font change could corrupt characters in the canvas.
Updates Text tool keyboard shortcuts.
Fixes instability caused by copying and pasting of a Match Move behavior.
Fixes an issue in which objects in the canvas could not be selected after opening a project from the Finder.
Motion 5.4.3
Released March 21, 2019
Detects media files that may be incompatible with future versions of macOS after Mojave.
Improves reliability when sharing video to YouTube.
Motion 5.4.2
Released November 15, 2018
Advanced color grading
Use color wheels in 1-up or 4-up layouts to quickly adjust hue, saturation, and brightness.
Apply professional color curves to make ultra-fine adjustments to color and contrast.
Hue/saturation curves let you select and change a specific hue or brightness level while leaving other parts of the image unchanged.
Use the eye dropper with the color and hue/saturation curves to quickly sample parts of an image for adjustment.
Apply custom LUTs from popular color grading apps and sites.
Adjust color corrections over time with precise keyframe controls.
Comic filter
Instantly turn any photo or video into a comic book illustration.
Choose from a variety of styles to create color, monochrome, or grayscale artwork.
Refine the comic book look with simple controls to adjust ink edges, fill, and smoothness.
Tiny Planet filter
Add the Tiny Planet filter when adding 360º video to a non-360° project to create interesting spherical looks.
Use the Z and X Rotation parameters to wrap your tiny planet effect into an infinite cylinder.
Adjust the Y Rotation parameter to move your subject horizontally within the tiny planet.
Animate the field of view to transition from a close up to a satellite view flying high above your footage.
Give generators and titles a powerfully warped look by applying the Tiny Planet filter.
Core Text engine

Core Text engine ensures accurate display of Arabic letters, Indic vowel signs in Devanagari, and Thai diacritics.
Correct rendering and animation of emoji, thin glyphs, capital letters in various point sizes, and vertical text are joined and tracked correctly.
Motion 5.4.2 also includes the following:
360°
Fixes an issue in which cameras created after the first camera in a 360° project didn’t match the settings of the first camera.
Fixes an issue in which a clone layer in a 360° project caused unexpected results.
3D
Fixes an issue in which lighting and shadow controls appeared on objects which do not support those properties.
Behaviors
Improves performance of camera controls when an object with an Align To behavior is selected.
Improves stability when working with multiple Align To behaviors on the same object.
Stability and Reliability
Fixes an issue where deleting a keyframe would disrupt the animation of the parameter.
Improves reliability of the Link behavior.
Improves stability when option-dragging a keyframe.
Improves stability when adding Motion Library content to a project.
Improves stability when closing a project using a Focus behavior on text.
Improves stability when turning off audio tracks during playback.
Improves stability when managing curve sets.
Improves stability when turning the Audio behavior on and off.
Improves stability when reordering items in the Audio Pane.
Improves stability of copying media to a folder when saving a project.
RAM preview
Improves overall stability and performance of RAM preview playback.
Improves RAM preview reliability.
Improves stability of the RAM preview indicator.
RAM preview updates when changes are made to the project background color.
Fixes an issue when performing a RAM preview caused the FPS to be faster the smaller the canvas size.
Fixes an issue where playing a RAM preview would have missing frames and an unexpected high frame rate when using the Play from Start button.
Text
Fixes an issue in which the text kerning parameter does not reset.
Improves reliability when clicking Replace in the Find and Replace window.
Improves stability when copying and pasting from a text document.
Kerning is preserved when copying and pasting from a text document.
Improves animation smoothness when animating text size.
Navigate in the font pop-up menu by typing the font name.
User Interface
Track size parameter now includes a pixels (px) unit of measure label.
Fixes an issue where the Paste Special window could inadvertently be closed.
Correctly displays behavior parameters in Japanese and Chinese.
Improves reliability of the “At Startup” preference.
Improves reliability of keyframing using the Transform Tool and the Adjust 3D Transform Tool.
Improves reliability of the Library’s preview of movies.
Motion 5.4.1
ProRes RAW
Support for ProRes RAW files lets you design motion graphics using pristine RAW image data from the camera sensor
Enjoy smooth playback and real-time graphics creation on laptop and desktop Mac computers
Work natively with ProRes RAW or ProRes RAW HQ files created by ATOMOS recorders and DJI Inspire 2 drone
Motion 5.4.1 also includes the following:
360°
Glyphs no longer clip at the cube faces in a 360° project when a font size is increased using Font Size, Face:Blur, Outline:Blur, Glow: Blur, Drop Shadow: Blur, and Drop Shadow: Scale
Moving filters from a layer to an environment in a 360° projects produces consistent results
Reorient filter applied to the 360° environment displays correctly
Fixes an issue in which the output of a 360° reorient filter applied to a 360° environment sourced from a clone could appear tiled
Drop Zone
Fixes an issue in which drop zone dimensions could change after undo/redo actions
Fixes an issue in which crop parameters persist after a drop zone is unchecked
Empty drop zone pan and scale parameters are saved
Duplicate drop zones automatically publish image wells
Stability and Reliability
Improves stability when loading a plain text file into a file text generator
Fixes an issue in which changing transform using onscreen controls could cause a jump in scale after the pivot has been altered
Fixes an issue in which the tracker could stop working after performing analysis on a stabilize behavior
Fixes an issue in which generators could become clipped when rotated on Y axis
Fixes an issue in which Align To occasionally disconnected from a target object
Fixes an issue in which pan does not reset after each drop of a new source
Text
Text style pop-up no longer appears blank when clicking between a text object and Inspector tabs
Fixes an application hang when using rotation on screen controls after a Sequence Text is applied
User Interface
Frame rates of 100fps or 120fps display three digits for frames
Heads Up Display color well settings load correctly
Fixes an issue in which moving onscreen controls go beyond the Viewer boundary when working with non-square aspect ratio media
Lighter canvas background makes the canvas edges more visible
Fixes an issue where Tooltips persisted after upgrading to High Sierra
Motion 5.4
360 VR motion graphics
Import 360° video and design 360° titles, generators, and effects
Output 360° video to a connected VR headset1
Apply 360° effects including blurs, glows, and more
Save any 360° motion graphic and access it immediately from the effects browser in Final Cut Pro
Share 360° video directly to YouTube, Facebook, and Vimeo
Apply the Reorient filter to easily change the orientation of 360° video
Create 3D scenes within a 360° project for ultra-realistic 360° environments
Use the 360° Look Around view to preview your 360° scene without a VR headset
Edit 360° video into a non-360° project and animate the pan, tilt, and zoom
Place any graphic, still, or video into a 360° project, then reposition and resize to fit perfectly into the 360° scene
Additional features
Easily convert between a Motion project, Final Cut Pro generator, Final Cut Pro title, Final Cut Pro effect, or Final Cut Pro transition at any time
New Overshoot behavior creates realistic spring-loaded animations without the need for keyframes
New Looks filters offer a variety of photographic-inspired looks
Faster, higher quality Optical Flow analysis using Metal
Import, playback, and editing of High Efficiency Video Coding (HEVC, also known as H.265) video clips and High Efficiency Image Format (HEIF) photos from Apple devices2
Send to Compressor to export motion graphics projects in the HEVC format
1 Requires compatible VR headset, macOS High Sierra, and SteamVR. Video output to VR headset requires a Mac computer with discrete graphics running macOS High Sierra. 27-inch iMac with Radeon Pro 580 graphics recommended.
2 HEVC and HEIF support requires macOS High Sierra.
Issues addressed in Motion 5.4
Improves performance when using multiple Align To behaviors
Improves stability when using the Link and Align-To behaviors
Resolves issues with the Time Date Text Generator 24hr clock
Numbers and Time Date generators display localized languages correctly even if English is not set as secondary language
Trailing punctuation in a text sequence animates correctly
Improves stability when sharing audio
Improves stability while selecting 3D text presets in the Inspector
Link: Apply Mode parameter is saved correctly with the project
Shape colors selected using pencils are exported correctly
Multiple parameters can be activated and deactivated in the Keyframe editor
Timing parameters are correctly displayed in the Keyframe editor
Fixes an issue in which Shift-dragging keyframes in the timeline could cause unexpected results in the curve of the Keyframe editor
Improves stability when offsetting an individual text glyph in Z
Improves stability of Audio Behavior analysis
Improves stability when retiming a keyframed clip in the timeline
Improves stability when removing a gradient editor tag after using the Location Field
Motion 5.3.2
A Fill filter lets you quickly fill an entire layer without requiring separate layer and mask
Missing plug-ins are identified correctly when opening a project
Midtones are represented accurately when using the Color Balance filter
Improves stability when scaling shapes from or to zero
Improves stability when working with duplicated rigged filters and behaviors
Fixes a stability issue that could occur when using keyboard shortcuts while a keyframe is selected in the Keyframe Editor
Improves stability when moving the cursor across markers during playback
Motion 5.3.1
Improves stability when using multiple camera behaviors
Improves performance when exporting H.264 files and changing frame rate
Fixes a stability issue when using the Timecode text generator
Fixes a stability issue when the cursor rolls over markers during playback
Fixes a stability issue when using the nudge keyframe shortcut
Motion 5.3
New in Motion 5.3
Redesigned dark interface puts the focus on your motion graphics
Updated arrangement of icons streamlines the Motion interface
Window layouts are now optimized for portable Mac computers and desktop displays
Images are now viewable in wide color on supported Mac computers and external displays
Import, edit, and deliver video in standard Rec. 709 or in wide Rec. 2020 color spaces
Improved Link behavior lets you link attributes such as width and height to drive animation automatically
New Align To behavior lets you easily connect and animate multiple objects without keyframing
Improved environment reflection controls allow for more realistic 3D text rendering with anisotropy, which changes the appearance of an object based on angle of view
More realistic brushed metal surfaces enhance 3D text
Improved performance when playing and adjusting 3D text
New arrow cursor shape
Support for Stickers format when exporting image sequences
Additional Stickers project templates
Support for Live Photos
Play Selection command
Issues addressed in Motion 5.3:
Graphics maintain high image quality after scaling to smaller template sizes
Slider widget snapshot tags now allow for numeric entry of precise position
EXR images dropped into image wells appear correctly
Installed third-party plug-ins are checked for compatibility on initial launch
3D text materials that contain gradients render correctly
Improved rendering of opacity and depth with layers in 3D text
Improved support for rendering third-party fonts in 3D text
Tab stops in a saved Motion project load and export correctly
Material presets are maintained when copying 3D text from one project to another
Filters applied to 3D text no longer clip the base of a shadow when rotated
Saving projects correctly collects media for previously saved templates
Improved performance when working with shapes
Panorama photos from iPhone appear correctly in the canvas
Videos recorded with iPhone import correctly
Fixed a crash when applying a sequence behavior to a text generator
Affinity Photo PSD images load correctly
Fixed an issue where PSD layers could become merged when loading projects
Autosave Vault naming now supports 2-byte languages including Japanese, Chinese, and Korean
Missing media reconnection menu is fixed
Improved 3D title rendering on Intel 5000 systems
Fixed an issue that could cause incorrect rendering of the Concentric Circles generator on systems with Intel integrated graphics
Improved stability of the Match Move behavior
Resolved an issue in the Motion Path behavior when setting the X or Y radius of circle to 0
Motion 5.2.3
Improves stability when adding Photoshop files to a project
Improves stability when searching in iTunes and photo libraries
Improves stability when using the Undo command after ungrouping a parent group
Correctly saves percentage-based parameters in the Checkerboard generator after closing and reopening a project
Correctly saves the preview movie for Motion templates created in German, Japanese, and Chinese
Fixes an issue in which points on a Bezier shape could incorrectly switch from Linear to Smooth
Fixes an issue in which some objects within Motion templates could render with soft edges
Adds iPhone 6s, iPhone 6s Plus, iPad Pro, and Apple TV HD to the Apple Devices compatibility list in the Share window
Motion 5.2.2
Fixes render errors that might occur when using reflective materials with 3D text
Improves stability when swapping materials on 3D text with published parameters
Improves performance when loading text styles
Motion Title templates with published text layout parameters now export correctly
Fixes an issue that could cause 3D text to appear dark when rendered
Motion 5.2.1
Fixes an issue in which Photoshop files could be imported with an incorrect color profile
Fixes an issue that could cause Motion to quit on launch

Motion 5.2
Before installing an update to Motion from the Mac App Store, be sure to backup your important files, including projects, media, and the version of Motion that you’re updating.
Introducing 3D titles
Beautifully animated and easily customizable 3D text
Simple templates to get started quickly
Cinematic templates with built-in backgrounds and animations
Save any 3D title and access it instantly in Final Cut Pro X
Large collection of text styles to create stunning looks in one click
Customize your titles with hundreds of combinations of materials, lighting, and edges
Additional controls adjust environments, shadows, and more
Instantly convert 2D titles to 3D
Create advanced 3D looks with multiple materials and edges on each character
Flexible surface shading with options for texture maps, diffuse and specular reflection, and bump mapping
Cast shadows from 3D text onto itself and other objects in a 3D scene
Add multiple lights, cameras, and tracking to any 3D title
In-camera glint effects
Support for sequencing 3D text animations
Over 90 built-in materials including metals, woods, plastics, and more
Combine layers of materials to create unique looks
Customize any material and save as a new preset
Easily add real-world attributes including paints, finishes, distress, and more
Camera formats
Panasonic AVC-Ultra codec family
Sony XAVC S
JVC H.264 Long GOP
Additional features
12 new generators, including Manga Lines, Sunburst, and Spiral Graphics
Improved keyframing, including copy and paste in the Timeline
Improved mask and shape creation for rectangles and circles, plus conversion to bezier shape for more control
Easily monitor background Share operations from within Motion
Improved performance on Intel-based GPUs
Better performance of FxPlug plug-ins and built-in effects that use multiple frames, such as Echo and Trails
Motion 5.2 also includes the following:
Improved stability when loading projects with missing filters or fonts
Choosing a smooth option on an already smooth point no longer changes the curve
Checkbox parameters display in the curve editor
Double-clicking to add a new keyframe in the Curve Editor no longer changes interpolation of subsequent keyframes
The Keyframe Editor vertical scroll bar displays the entire graph
Keyframe Editor time scale is consistent
Motion 5.1.2
Motion 5.1.2 fixes reliability issues when burning a Blu-ray Disc or creating a Blu-ray disk image
Motion 5.1.1
Support for Apple ProRes 4444 XQ
Improved Sequence Text behavior for animating characters, words, and lines
Enhanced Contrast filter parameters for refined adjustments
This update also includes the following:
Updated preset text styles
General stability improvements
Motion 5.1
Optimized playback and rendering using dual GPUs in the new Mac Pro
FxPlug 3 with custom plug-in interfaces and dual-GPU support
Faster project loading, especially for complex projects
Share directly to YouTube at 4K resolution
Spanish language localization
This update improves overall stability and performance including:
Fixes a stability issue with splitting clips on the timeline
Fixes a stability issue when dragging media to a layer that is being edited
Fixes a stability issue when adding a point to an animated shape
Fixes a stability issue when quitting Motion while copying a text character
Fixes an issue where objects could appear to be missing in the Layers List
Fixes an issue with rendering XAVC media
For information on the security content of this update, please visit Apple security updates.
Motion 5.0.7
Resolves an issue where some third-party effects generated green frames during render
Resolves performance issues that could occur with certain titles and effects
Fixes a stability issue when splitting layers in the timeline
Fixes an issue where launching a plug-in with a check box could require multiple clicks
Fixes a stability issue with CoreMelt plug-ins
Motion 5.0.6
Fixes an issue with Image Units being removed when you saved a project
Fixes issues that occurred when working with multiple documents on dual displays
Fixes an issue with uploading clips that are larger than 1 GB to Vimeo
Cam Motion 5.3 Stage 2
Motion 5.0.5
Improved anti-aliasing increases text sharpness for enhanced legibility, especially with small fonts and animated text
Open multiple projects simultaneously to easily switch, copy, and paste between them
Accelerated loading of complex projects
Ability to edit and export audio files with sample rates above 44kHz
Resolves a stability issue that could occur when applying the Keyer filter with the Inspector open
Resolves a stability issue that could occur when pressing Escape after accessing the Colors window in the Text Inspector
Motion 5.0.4
Motion version 5.0.4 improves overall stability and is enhanced for the MacBook Pro (Retina, Mid 2012).
This update also resolves issues in FxPlug 2 where some images were returned at half height or upside down.
Motion 5.0.3
Improves loading time for projects
Improves performance of text editing in the Canvas
Fixes issues with Fill Opaque enabled in images converted to Drop Zones
Resolves a stability issue that occurred when deleting all characters with the Transform Glyph tool
Corrects the pixel aspect ratio display of Anamorphic clips
Improves speed of Save Current Frame
Resolves a stability issue when adjusting motion blur controls in the Project Properties Inspector
Resolves a stability issue when modifying media files while Motion is running in the background
Motion 5.0.2
Improves the speed and responsiveness of text editing
Ability to automatically add animation keyframes when recording is disabled
Keyboard shortcut for repositioning animation curves or paths
Ability to adjust the pan and scale of an image in a drop zone
Improves the look of the Keyframe Editor for easier keyframe viewing and editing
Improves support for timing-related FxPlug effects
Improves stability and performance when working with drop zones
Resolves a stability issue caused by clicking in the Canvas outside an object after repositioning the object
Resolves a stability issue that could result from clicking on the Photos folder in the Library pane
Keyframe Editor shows only animated parameters when the Animated display option is selected
Motion 5.0.1
Motion 5.3.2 Torrent
Adds support for dual displays
Fixes an issue with the import and playback of multichannel audio
Resolves a stability issue when navigating to keyframes at a negative time
Fixes an issue with incorrect text positioning when the Inspector is open
Provides for correct kerning between characters when applying adjustments
Resolves stability issues when entering an empty string in a title while in Draft Mode
Back up the Motion application
To back up the currently installed Motion application:
Motion 5.3.2
Create a new folder in the Applications folder, and name it after the application (for example, 'Motion 5.2.3'). To check your version of Motion, open the application and choose About Motion from the Motion menu.
Select the Motion application in the Applications folder. Choose File > Compress 'Motion.' It will take a few minutes to compress.
Move the resulting 'Motion.zip' file into the folder you created in step 1.
Move the folder containing the .zip file to a backup drive.
0 notes
Text
10 Ways to Design for the Web in 2020

Like a fine wine, the web industry continues to mature with each passing day, month and year. The next question inevitably becomes: what’s next? The year 2020 will bring with it new growth, new trends, and inevitable change. We’re seeing designers ceaselessly experiment with new techniques and reinvent current styles. Although techniques evolve, many styles, such as white space and minimalism, will remain for the foreseeable future but we’ll also see styles emerge and become futuristic. Here are 10 trends that await us this year!
1. Wide framed white space.
Full bleed layouts have been the go-to when designing for the web in recent years, but this trend is shifting to clean framing around web elements. By allowing more white space, visuals stand out more and give designs a clean canvas to shine. Wide frames also give priority to different sections of the website and create a sense of order. When elements fight for attention, none of them is getting enough. Surrounding the idea with empty space is a way to make the idea stand out.
2. Dark mode.
Despite the continuing trend of white space and minimalism, we are now seeing a new style emerging: dark mode. When designing for the web, UI designers will give users an option to enable dark mode on their browsers. Not only is dark mode modern, but like a clean white canvas, dark mode allows design elements to stand out. It also improves the visibility of accent colors through contrast ratio. It also reduces eye strain and can save power on OLED screens.
3. From 2D to 3D design.
Designers now have many options to include all our senses in user experience. Technology is now in a place where it's possible to design in 3D without heavy equipment. Interactive 3D design isn’t just fascinating for the eye, it draws users in and encourages them to stay longer. Before VR becomes mainstream and affordable, we expect to see more 3D elements taking up screens on websites.
4. Personalized, hand-drawn design.
After seeing users crave hand drawn design on the web in the past year, web-designers will add imperfections purposefully to websites to add emotion and personality. In 2020, we will see hand drawn icons that are unique and stylized, allowing designers to stand out from their competitors. This trend is leaving flat designs behind as it gives more humanity to web elements.
5. Growing importance on accessibility.
Accessibility is growing in importance on websites and apps. Ensuring that everyone has access to your website- regardless of their disabilities or abilities- is vital especially as compliance with the Americans with Disabilities Act (ADA) is a legal requirement. Soon enough, every website will have to meet all the ADA requirements therefore it is essential that every web professional on your team become familiar with how they can make your site accessible (check out these accessibility guidelines). Despite how helpful it can be to have guidelines and automatic software checks scanning your website, there are still many blind spots that can’t be checked by a plugin. We must always be cognizant that when we design for the web, our published content, videos and images are accessible to those who are impaired.
6. The up and coming visual developer.
With the development of low-code, comes the rise of the visual developer. They are masters of turning designs for the web into functional code. For example, they can automate tasks that used to take tedious hours of manual work, transforming static wireframes into functional web experiences and then translating user data into email campaigns, lead nurturing and eventually ROI for their company. As low-code becomes more mainstream, we may even start seeing job postings for “visual developers” showing up alongside web developers!
7. Soft gradients, shadows and layering.
A trend that is hopping on the less-is-more train is a subtlety and reduction in colors. In 2020 we should see even more dilution in colors that brings on a dreamy feel for the user. Additionally, soft shadows and layering elements add a 3D look to your website. Layering is also trending in the area of text and photos for even more extended depth. As I mentioned earlier, the layering effect is moving the design world away from flat designs.
8. Retro-style art and cyberpunk color schemes.
In addition to the soft gradients, we will see futuristic color schemes giving users a surreal experience. Hot pink, neons, blues and purples will be used against dark backgrounds to make otherwise dark websites more friendly. Additionally, we will see street art making a comeback, giving us a futuristic feel as it pushes the boundaries and elicits feelings of freedom.
9. Thin geometric lines.
In 2020, we will see web designers merging geometric and curvy lines to achieve unique shapes. We will still be able to discern the shape however it will seem more ethereal and otherworldly. This trend speaks to the future in the special way as these shapes and abstract lines are impossible to create with new technology. It begs us to ask the question, “what awaits us in the future?”
10. Animations.
We will see animations in logos, graphics and small user interactions. Animated, moving elements are believed to reach the user faster than written content and stay longer in their memory. In 2020, micro-interactions will make a big difference in which website stands out and which one doesn’t.
In Conclusion
In 2020, we will see amazing color combinations, retro-style art and designers pushing the line with doodles and adding their own personality into graphic elements. Without a doubt, it will be an amazing year for reaching new heights and defining the era.
Interested in working with ADMS?
If you decide that it is valuable and profitable for your business to have custom software, Web Designing Company Clearwater, FL can develop solutions that centralize workflows, optimize processes, and enable decision-making through real-time data and business intelligence.
0 notes