#TP Link Router Setup
Explore tagged Tumblr posts
Visit Tumblr Blog
Explore Tumblr blogs with no restrictions, modern design and the best experience.
Last Seen Tumblr Blogs


Fun Fact
The most popular pages on Tumblr are about Minecraft, GIFs, and David J. Peterson.
Video
youtube
TP Link Archer NX200 5G AX1800 WiFi 6 Router Setup
0 notes
Text
TP-Link Archer AX10000 Gaming Router Setup. A Complete Guide Here!
TP-Link Archer AX10000 Gaming Router Setup is a straightforward process. Connect it to your modem via Ethernet, power it on, and use a web browser to access the router's web interface (usually "http://tplinkwifi.net"). Follow the on-screen instructions to create a log in password, set up your Wi-Fi network, and configure advanced settings if needed. Ensure your gaming devices are connected to the high-speed 5GHz band for optimal performance. The Archer AX10000 is designed for gaming with its fast speeds and customizable settings to enhance your gaming experience.
0 notes
Text

Start with a reliable TP-Link wifi extender setup if you're having trouble with poor WiFi coverage. By extending your current signal, this procedure can assist in removing dead zones. To get quick TP Link setup instructions, plug your device close to the router and then use your browser. To connect it to your network, go to the setup page and follow the instructions. You can relocate the device to a more convenient spot after it has been configured. For best results, make sure the placement is within range of your primary signal.
#tp link setup#tplinkrepeater#Tp link repeater login#tp-link wifi extender setup#tp link wifi extender setup#tp-link extender setup through mobile
0 notes
Text
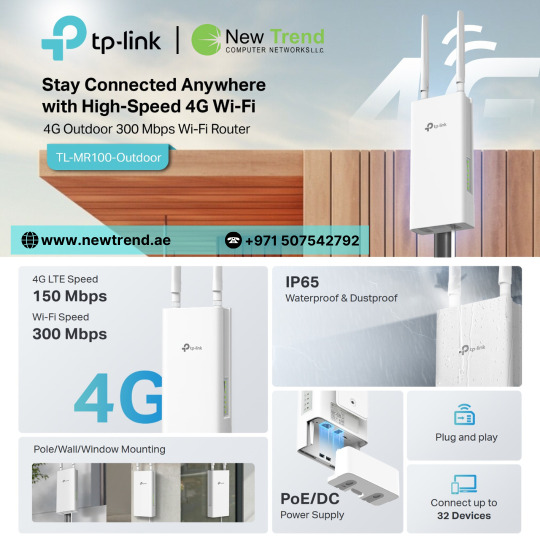
Experience seamless 4G LTE connectivity with the TL-MR100-OUTDOOR – built for reliable performance in harsh outdoor environments. Ideal for remote areas, this rugged router ensures stable internet with weatherproof design, powerful antennas, and plug-and-play setup. Stay connected anywhere, anytime with TP-Link’s trusted outdoor networking solution.
For more information, Visit:https://newtrend.ae/product-category/tplink/ Live chat: +971 507542792
#TPLINK#OutdoorRouter#4GLTE#RuggedConnectivity#RemoteAccess#WeatherproofWiFi#StayConnected#NetworkingSolutions#InternetAnywhere#NewTrendTech
0 notes
Text
Getting Started with Network Design 🧠🌐
#coding#programming#orhanergun#webdev
Are you building a scalable and secure network for the first time? Here's a beginner-friendly guide to get you started with network design fundamentals.
🧩 What Is Network Design? Network design is the process of planning the structure of a computer network—whether it's for a small office, a campus, or a global enterprise. It involves identifying business needs, selecting hardware/software, and defining how devices will communicate.
Think of it as an architect’s blueprint—only for data, not buildings.
🧱 Core Components of a Network Before diving into design, it’s important to know what makes up a network:
Routers: Connect different networks together.
Switches: Connect devices within the same network.
Firewalls: Protect your network from unauthorized access.
Access Points: Allow wireless devices to connect to the network.
Cabling or Wireless Links: Physical or radio-based communication paths.
🗺️ Step-by-Step: Designing a Basic Network Here’s a simplified roadmap to start designing a small to medium-sized network:
Define Requirements Ask:
How many users or devices will connect?
What are the performance needs? (e.g., speed, uptime)
Are there remote or mobile users?
What applications will run on this network?
Create a Network Topology Choose a logical layout:
Star topology: Common and simple (e.g., one central switch).
Mesh topology: High redundancy (used in critical systems).
Hybrid: A mix of both, which is common in larger setups.
Tip: Use tools like draw.io or Cisco Packet Tracer to visualize your design.
Select Hardware and IP Schema Choose devices based on your budget and needs:
Cisco, Juniper, MikroTik (enterprise)
TP-Link, Ubiquiti (SMBs)
Plan IP addressing:
Use private IP ranges (e.g., 192.168.1.0/24)
Avoid IP conflicts using DHCP or static planning.
Add Security Layers Firewalls, VLANs, and ACLs (Access Control Lists)
Enable port security on switches
Use VPNs for remote access
Plan for Scalability and Redundancy Design with future growth in mind
Consider redundant links and failover strategies (e.g., dual routers)
🧪 Test Your Design Use simulation tools:
Cisco Packet Tracer
GNS3
EVE-NG
Before deploying a real network, simulate traffic, check for bottlenecks, and validate security.
🛠️ Tools to Help You Design Tool Purpose Cisco Packet Tracer Network simulation SolarWinds IPAM IP address management Wireshark Network traffic analysis draw.io Network diagrams
📌 Final Thoughts Network design is more than just connecting wires—it's about planning for performance, security, and growth. Whether you’re building a home lab or laying out an enterprise infrastructure, starting with a solid design can save you from major headaches later.
If you're just getting started, experiment, document everything, and stay curious. 💡
0 notes
Text
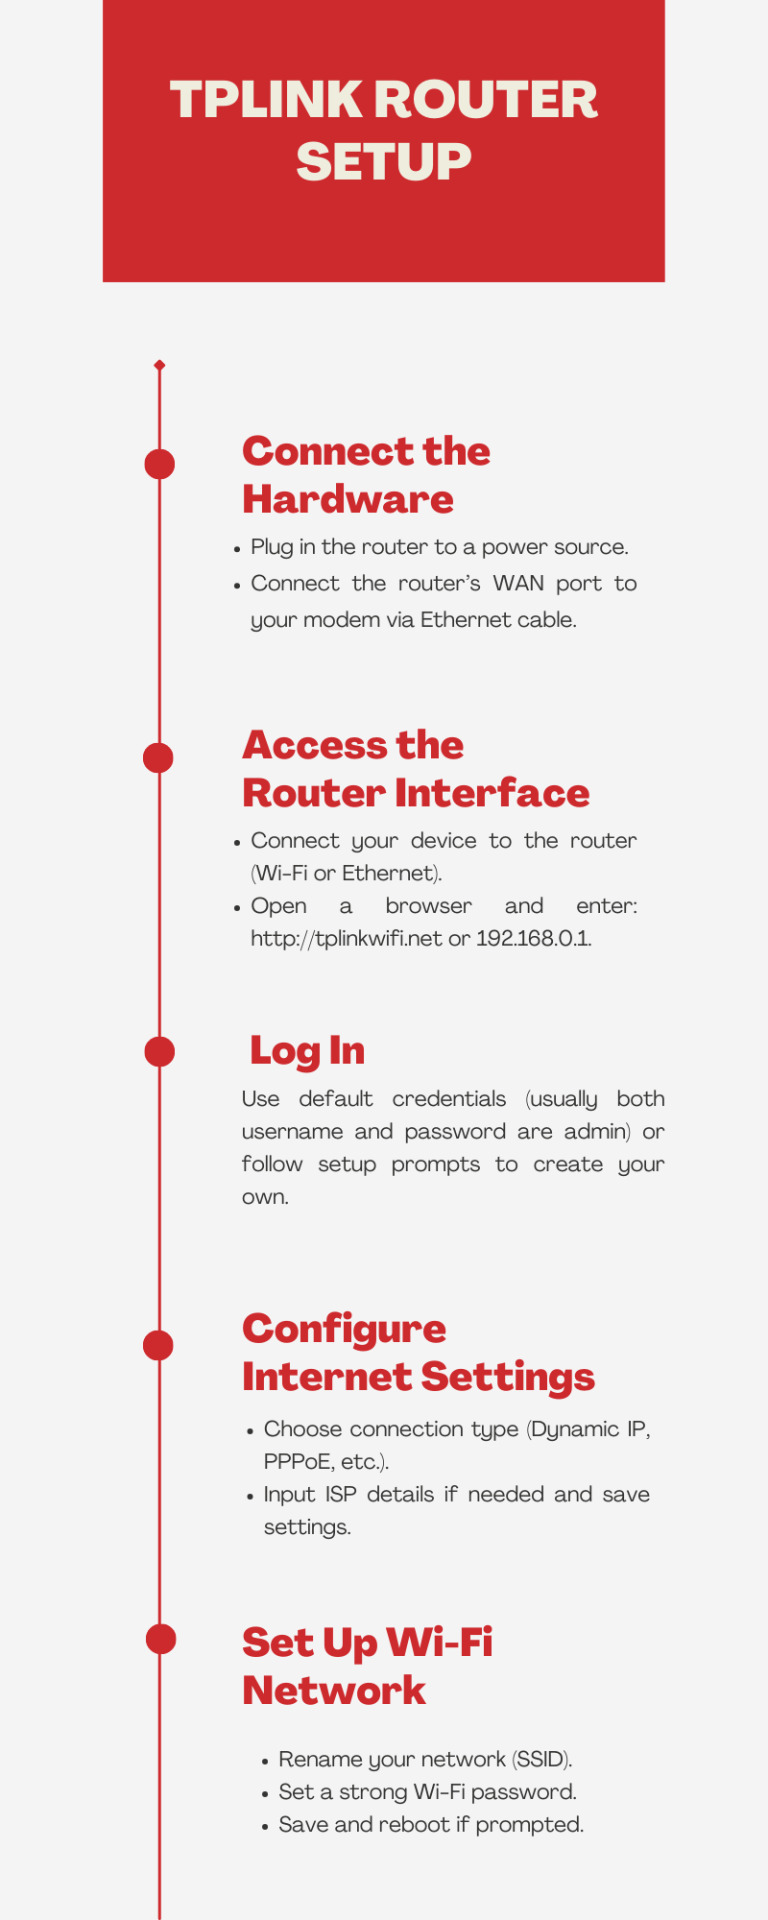
Tplink Router Setup
To perform the tplink router setup, connect the router to your modem and power. Connect your computer or phone to the TP-Link WiFi network and open a web browser. Enter the default IP address (usually 192.168.0.1 or 192.168.1.1) and follow the setup wizard to configure your network.
0 notes
Link
Welcome to TECH LOGICS! In this guide, we’ll walk you through the process of integrating a TP-Link TL-POE10R POE Splitter to power and connect a WiFi router, modem, or access point to a CCTV system’s POE switch. This powerful device simplifies your network setup by delivering both power and data through a single Ethernet cable, making it
0 notes
Photo

🔥 Massive Gaming Week Savings Alert! 🔥 Ready to dazzle your gaming setup without maxing out your budget? Discover unbeatable deals from Amazon and Newegg! Gaming Week has teamed up these retail giants for a whirlwind of discounts on top PC gaming gear. From high-speed routers to all-star gaming PCs, there's something for every budget and tech enthusiast. 🎮 Highlighted Deals: - TP-Link Archer GE800 Router - Nearly half off at $469 CAD. - Corsair K70 Core Keyboard - Now just $94 CAD. - Skytech Chronos Gaming PC - Slash $1,350 CAD! These products feature the latest tech advancements aimed at elevated gaming experiences—making them ideal for competitive gaming or seamless streaming. Leverage these show-stopping discounts to future-proof your gaming station. Why wait when you can upgrade now? What will be your ultimate pick from these incredible offers? Drop it in the comments! 🕹️ #GamingWeek #PCDeals #Amazon #Newegg #PCGamer #TechSavvy #BudgetGaming --- Take advantage of these limited-time offers while they last! Equip yourself with top-tier gaming gear in a flash. Don't let this opportunity pass you by! ⏰
0 notes
Text
Achieve Seamless Coverage With TP Link Extender Setup
Got your hands on TP link range extender and thus want a simplified and straightforward setup steps? If the answer is yes, then you are surely at the right destination. In this guide we'll share two most commonly used TP link extender setup methods. One is extremely quick that just takes less than 10 minutes. It is the WPS method. Whereas if you want a more hands on approach then Web GUI method is for you. Both the setup methods are extremely easy and can be performed without any expert help. So let's not waste any more time and dig straight into the process.
✓ Quick Setup Via WPS
Begin the process of TP Link extender setup by activating the range extender. Make sure you do this activation nearby to the host router. Meanwhile the extender is booting up, check the status of the host router. It should be actively working.
Moving further, first push the WPS key on the TP link range extender. In case the WPS LED didn't blink then push and hold the WPS key until the LED starts blinking.
Now it's time to push the WPS key on the host router. Here also make sure the WPS LED starts to blink. As this is the indication that the WPS function is enabled and the device is looking for its pair. Additionally remember, as soon as you push the WPS key on the TP link extender do not wait. Rather immediately push the WPS key on the router as well.
Now let the gadgets complete the synchronisation. As the TP Link extender setup process completes the wireless signal LED will light up. In case it doesn't light up, then it means the WPS connection has failed. So you need to redo the setup all over again. But in case everything went smooth, then it's time to relocate the extender to its desired location.
For placement select the area which is halfway from the host router and the area where you need coverage. Now as you replug the range extender, you’ll see both WPS LED as well as wireless signal LED light up. This indicates a successful setup.
✓ Manual Setup Using Web Browser
For conducting a smooth TP Link extender setup first collect the basic components and details. You need a smart gadget for initiating the setup. It can be anything like your smartphone, laptop, computer or an iPad. Next for a stable connectivity to the extender you need an Ethernet wire. Additionally, collect the username and password of your existing wifi network whose reach you want to extend. Further we advise you to keep the user manual by your side as it contains every little detail that you might need during the setup process. As you collect all these components and details, feel free to start with the setup steps:
✓ Activate The TP Link Extender
Begin the process by first bringing in the range extender to the same area where your host router is placed. Now avoiding any physical barriers plug in the range extender to activate it properly. Once done, now bring in the smart gadget. For the TP Link extender setup you need to connect this smart gadget to the extender. Now there are two methods for the same.
Either you can connect wirelessly or through ethernet wire. The details for wireless connection are written clearly on the product label which is stuck on the back panel of the extender. Additionally the details are written in the quick user manual as well. Once you build a connection between the TP Link extender and smart gadget, you can move to the next step which is Log In.
✓ Log In
To login first launch a web browser of your choice. You can go with Internet Explorer, Safari, Firefox or Google Chrome as well. Now hop on to the address field of the browser. In it fill up http://tplinkrepeater.net and press Enter. In case the web address doesn't work, then use another alternative which is http://192.168.0.254. As you press the enter key, a window pops up asking you to give in some details. So you need to enter your username and password. By default it is set to admin which you need to use in lower case only.
✓ Follow The Prompts
To complete the TP Link extender setup, now you need to follow the on-screen prompts one by one. So start by selecting the Quick Setup option and hit Next. Moving further, pick your region and hit Next. Now the web interface will automatically start scanning for the available networks. From the list choose your network name and give in its security key (password). Finally review all your settings and tap on Finish if it's appropriate. As you do so the extender will reboot itself. As it applies the changes.
Lastly, check the wireless signal LED to know whether the setup is successful or not.
0 notes
Text
Price: [price_with_discount] (as of [price_update_date] - Details) [ad_1] Product Description Easy Setup under seconds Installation Setup for Mini UPS Our Mini UPS offers a quick and easy 30-second DIY installation. Simply plug it in, and enjoy uninterrupted power for your Router. WiFi Router UPS: Oakter Mini UPS for wifi router provides upto 4 hours of power backup (depends on current consumption of wifi Router) to your 12V WiFi router, Broadband Modem. Mini UPS works as an inverter for WiFi router, Broadband modem which ensures uninterrupted power supply in case of power cuts or switch over to generators Smart UPS for WiFi Router: Mini UPS for WiFi Router having an intelligent battery management system, Mini UPS charges itself when there is electricity. Mini UPS is Online WiFi router UPS thus do not require switching between two paths in case of power failure or switch over to generators. it has inbuilt current, surge and deep discharge protection Plug-N-Play: Take out the power adapter from WiFi router and insert it in the Mini UPS input female socket, connect the "OUT" of Mini UPS to your WiFi router. Note - Use additional connector wherever require. Mini UPS is a consumer grade CE and ROHS certified. It Uses BIS Certified 2 Nos. Lithium-ion Cells (Brand: Sinohan Power Battery, Model: 18650) Supported WiFi Routers: Mini UPS for WiFi Router supports all type of 12V DC WiFi Routers, Broadband modems, Set-top box and CCTV cameras(12V-0.5A, 12V-1A, 12V-1.5A, 12V-2A, 12V-2.5A, 12V-3A). Supported all major routers like D-Link, TP-Link, Jio Fiber, Cisco, Mi, Tenda, Nokia, Asus, Linksys, airtel, BSNL, ACT, Netgear, and more except Jio Air fiber (Before buying please ensure your WiFi router is 12V DC). Post Warranty Assurance: Post 1-year Warranty, When your backup wanes simply contact our dedicated Customer Support via Whatsapp. Replacement available at 1049 INR. [ad_2]
0 notes
Video
youtube
TP LINK BE800 AC19000 TriBand WIFI Router setup
0 notes
Text
TP-Link TL-WA701ND Repeater Setup – Step-by-Step Guide
For your TP-Link TL-WA701ND repeater setup, power on the device and connect it to your computer. Access the web interface by entering tplinkrepeater.net in your browser. Log in with default credentials (admin/admin). Navigate to the setup wizard, select 'Repeater Mode', and follow the prompts to connect to your main router's SSID.Need assistance? Reach out through the chat box below for expert help!
0 notes
Text
Why TP Link Extender Blinks Red Light
Are you wondering why the TP Link extender red light blinking? The extension and router's weak or broken connection is indicated by this blinking. The first thing to do if you see a red light on your TP Link WiFi extender is to move your devices closer together. Because they could interfere, keep the extender away from cordless phones and microwaves. Additionally, make sure the password you entered during setup is accurate. The problem is frequently fixed with a fast reset and fresh configuration, returning the connection to its robust, steady green state.
#tplinkrepeater#tplinkrepeater.net#tp link extender red light#tp link extender red light blinking#red light on tp link wifi extender#firmware update tp link#tp link extender stopped working#tp link extender not working
0 notes
Text

M30 AX3000 WIFI 6 SMART MESH ROUTER AVAILABLE IN 3-PACK
Experience seamless, fast Wi-Fi with the TP-Link M30 AX3000 Smart Mesh Router 3-Pack. Enjoy whole-home coverage, Wi-Fi 6 speed, and easy setup—perfect for streaming, gaming, and connecting all your devices without interruptions. Stay connected effortlessly wherever you are at home!
For more information, Visit:https://newtrend.ae/product-category/dlink/ Live chat: +971 507542792
#WiFi6#SmartMesh#HomeWiFi#TPLink#FastInternet#GamingWiFi#StreamSeamlessly#TechEssentials#StayConnected#WirelessRouter
0 notes
Text
The Best 4G Router for Your Car: Stay Connected on the Road
Description: Discover the best 4G router for your car or outdoor adventures. Stay connected with fast, reliable internet wherever you go. Perfect for road trips, camping, or remote work.
Introduction In today’s fast-paced world, staying connected is no longer a luxury—it’s a necessity. Whether you’re on a road trip, camping in the wilderness, or working remotely from your vehicle, having a reliable internet connection is crucial. This is where the best 4G router for cars and outdoor use comes into play. In this article, we’ll explore the top 4G routers designed for vehicles and outdoor environments, ensuring you stay connected no matter where your journey takes you.
Why You Need a 4G Router for Your Car
Seamless Connectivity on the Go A 4G router for your car ensures you have a stable internet connection while traveling. Whether you’re streaming music, navigating with GPS, or video calling, a reliable router keeps you connected.
Perfect for Remote Work With the rise of remote work, many professionals are turning their cars into mobile offices. A 4G router allows you to work efficiently from anywhere, even in areas with weak Wi-Fi signals.
Ideal for Outdoor Adventures Camping, hiking, or RV trips often take you to remote locations with limited connectivity. A 4G router ensures you stay connected for emergencies, navigation, or entertainment.
Key Features to Look for in the Best 4G Router When choosing a 4G router for your car or outdoor use, consider the following features:
High-Speed Connectivity: Look for routers that support 4G LTE speeds for fast and reliable internet.
Portability: Compact and lightweight designs are ideal for travel.
Battery Life: Long-lasting batteries ensure uninterrupted connectivity.
Durability: Outdoor routers should be weather-resistant and rugged.
Easy Setup: User-friendly interfaces and quick installation are essential.
Top 4G Routers for Cars and Outdoor Use
1. Netgear Nighthawk M1 Mobile Router
The Netgear Nighthawk M1 is widely regarded as one of the best 4G routers for cars and outdoor use. It offers blazing-fast 4G LTE speeds, supports up to 20 devices, and features a long-lasting battery. Its compact design makes it perfect for travel, and the intuitive interface ensures easy setup.
Key Features:
Download speeds up to 1Gbps
5040mAh battery with up to 24 hours of use
Dual-band Wi-Fi for seamless connectivity
2. Huawei E5787 Mobile Wi-Fi Router
The Huawei E5787 is another excellent choice for car and outdoor use. It supports 4G LTE Cat6 speeds, ensuring fast and stable internet. The router is compact, lightweight, and features a user-friendly touchscreen display.
Key Features:
Download speeds up to 300Mbps
3000mAh battery with up to 12 hours of use
Supports up to 10 devices simultaneously
3. TP-Link M7350 4G LTE Mobile Router
The TP-Link M7350 is a budget-friendly option that doesn’t compromise on performance. It offers reliable 4G LTE connectivity, supports up to 10 devices, and features a compact design.
Key Features:
Download speeds up to 150Mbps
2550mAh battery with up to 8 hours of use
Easy-to-use interface
4. Alcatel Linkzone MW41NF 4G LTE Mobile Router
The Alcatel Linkzone MW41NF is a lightweight and portable 4G router ideal for car and outdoor use. It offers reliable connectivity and supports up to 15 devices.
Key Features:
Download speeds up to 150Mbps
2000mAh battery with up to 6 hours of use
Compact and travel-friendly design
How to Choose the Best 4G Router for Your Needs
Assess Your Usage: Determine how many devices you’ll connect and the type of activities you’ll be doing (streaming, gaming, remote work, etc.).
Check Coverage: Ensure the router supports the frequency bands used by your mobile carrier.
Consider Battery Life: If you’ll be using the router for extended periods, opt for a model with a long-lasting battery.
Evaluate Portability: Choose a compact and lightweight router for easy travel.
Tips for Maximizing Your 4G Router’s Performance
Position the Router Properly: Place the router in a central location for optimal signal strength.
Use an External Antenna: For areas with weak signals, consider using an external antenna to boost connectivity.
Monitor Data Usage: Keep track of your data consumption to avoid overage charges.
Secure Your Network: Use strong passwords and encryption to protect your connection from unauthorized access.
Conclusion Investing in the best 4G router for your car or outdoor adventures is a game-changer. Whether you’re working remotely, streaming entertainment, or staying connected during emergencies, a reliable 4G router ensures you’re never left without internet. The Netgear Nighthawk M1, Huawei E5787, TP-Link M7350, and Alcatel Linkzone MW41NF are all excellent options to consider. Choose the one that best fits your needs and enjoy seamless connectivity wherever your journey takes you.
1 note
·
View note
Text
Tplinkwifi.net
Generally, the tplinkwifi.net web address is used to access and set up your TP-Link router. Firstly, connect your PC to your TP-Link router's Wi-Fi. Open a web browser and enter the given web address in the address bar. If that doesn't work, try the IP address 192.168.0.1. Visit our website for setup and login assistance.

0 notes