#How to backup iPhone/iPad to iTunes & iCloud
Explore tagged Tumblr posts
Visit Tumblr Blog
Explore Tumblr blogs with no restrictions, modern design and the best experience.
Last Seen Tumblr Blogs


Fun Fact
Tumblr was created by web developers David Karp and Marco Arment.
Text
With so much happening while we are on the move, being able to have access to our photos, documents, and email through a cloud service can be a blessing. And Apple devices’ users get for free 5GB of storage linked to their Apple ID with their Macs, iPhone, iPads or iPods. This tool called iCloud make possible not only to have an updated backup but also to keep all devices in sync. But how to make the best of it? To help you out on it, you will find below 15 tips and tricks to get more out of your iCloud service Make sure it will work One of the biggest mistakes of those using iCloud is to think that it will set itself up on all your devices as soon as you turn them on. Unfortunately, this isn’t how it works. You will need to active the service on your Mac or mobile devices, and ensure that the items you want are synced, just for starters. Turn it into a more friendly virtual folder To make iCloud looks like a more friendly virtual folder, follow these steps: go to iCloud System Preferences and turn on Documents & Data. Then, open the Finder and tap Command + Shift + G. Type ~/Library in the dialogue box. Scroll down the Mobile Documents, where you will be able to drop down your own files and folders from now on. Make sure your Reading List works To make sure that your Reading Lists feature is functioning properly, ensure that Safari is checked in your iCloud settings on your Mac, or that Bookmarks is checked in your iPhone or iPad. It will make them all sync correctly. Free up storage space If your 5G storage space is running low, go to Settings >> iCloud >> Storage >> Manage Storage. There you will be able to see what is taking your space and decide what you might want to delete. And this is just one way to free up storage space in your iCloud. Manual backup If you haven’t been away from a power source or of a Wi-Fi connection for a while, you might want to backup your files manually. In this scenario, tap Back Up Now (located below your toggle switch) and your backup will be started as soon as you are connected to a Wi-Fi connection. Understand what is on your backup Not everything that you have in your devices will be backed up, as you can imagine. Here is what will and won't really be saved for you (if you set it correctly): Yes: The most recent 1,000 photos from your Photo Stream, but only for 30 days; No: the music you sync; No: purchased music, movies, TV shows, apps, and books (only a link to them in iTunes Store, App Store, and iBookstore, respectively, is saved) Be also aware that iCloud storage space is used for iCloud Backup, iCloud Drive, iCloud Photo Library beta, iCloud Mail, and data from apps. Remember that there is a limit to the file size It isn’t only on the storage space limit that you need to keep one eye. There is also a limit to the size of the files themselves, which can't be more than 15 GB each. They can be of any kind, though. Use the extra limit to send large files If you are using the Yosemite's version of Mail and need to send an attachment of more than 40 MB that shouldn’t be shrunk (as in a photo that would lose its quality if you do so), now you can do it with iCloud and Mail Drop features. As iCloud can handle files up to 5GB, your attachment will be “temporarily” stored there while you send it. You will get a warning message the first time you do it, but just ignore it, click on Send and you check the Mail Drop button on the display option you will get. Enable two-step verification to increase security Of course, it sounds very concerning that all your precious data is out there in the cloud available to anybody hack it. But it shouldn’t worry you much. Apple has a very secure system, and some of the best security apps for iPhone and iPad in the market, rest assured. Still, the company suggests that you enable a two-step verification process, so you can decrease the chances of having your Apple ID hacked. After following a few steps, every time you try to log in your Apple ID, you will receive a four-digit code on your trusted device for verification.
Managing iCloud Family Sharing Now is possible to link more than one iCloud account to a single payment method and make the app, music or book purchased available to download for the entire family. All you need to do is go to Settings >> iCloud menu, and look for a family section. There, you will be able to manage your family members, so they will all be associated with the main device and payment method. Generating strong passwords with iCloud Keychain If you are running out of ideas for strong passwords and have been unable to do effective research online, you can use iCloud Keychain to get some suggestions. When you are asked to add a password to a website (assuming here that you are navigating on the site with your Safari app), tap on the password field and you will see the option “Suggest a Password” above your keyboard. A pop-up menu will show up with a randomly-generated password for you. How to disable Find My Phone (and Activation Lock) If you need to restore your Apple device, you will need to disable Find My Phone first – it will disable Activation Lock as well. And you still can do it even if you don’t have your iPhone, iPad or iPod on you through iCloud. Just open any web browser and go to icloud.com. Then enter your Apple ID and click on Find My Phone. Now, enter your Apple password again, and click on All devices >> Offline device you want to remove >> Remove from account. Final Thoughts iCloud is a powerful tool offered by Apple for free to their clients. If you learn how to make the best of it, you will have plenty of resources in your hands. And if you feel that 5GB is just not enough, just pay extra space and enjoy the freedom of having access to all your files and data anywhere you go and of syncing all your devices together. Diana Beyer is experienced and self-driven media expert who is passionate about writing. Her purpose is to share values amid those interested. She is always seeking to discover new ways for personal and professional growth. Connect with Diana though Twitter or visit her blog.
0 notes
Text
Price: [price_with_discount] (as of [price_update_date] - Details) [ad_1] Do you want to make your Phone more convenient? Are you tired of your Phone running out of memory? Do you want to keep enough Phone memory during your trip? Plug and Play, No Application Required! Never lose important documents, videos, photos again thanks to large and reliable Phone flash drives. Free up iPhone and iPad Memory Space Immediately If your iPhone or iPad has almost used up all the memory space, this iPhone USB storage flash drive can help alleviate 512GB of storage space. Whether you like to shoot short videos or take selfies, our iPhone memory stick are perfect for you. One-Click Backup You can easily backup with one click and manage files at any time. No need of iTunes, manage files, pictures and videos through the mobile app to quickly backup to iPhone flash drive, save the storage space of the mobile phone, and at the same time, operations such as forwarding files on the USB drive can be performed. Plug and Play Share your photos, videos, songs and other files between iPhone picture stick easily. You don't have to pay extra for additional storage, just insert iPhone external storage and enjoy the extra space of your flash drive. High Transfer Speed Smart and upgraded chip with high efficiency and stability. read speed up to 30MB/s and write speed up to 15MB/s. The upgraded chip provides you with more efficient storage experience. How to transfer in iPhone iPad Requires iOS 13 and higher: Simply insert the flash drive into your iPhone iPad, then go to the "Files" app to find "NoName" and move files to your iPad or iPhone as needed. (Please upgrade your phone version to iOS 13 or higher if necessary) How to transfer in Android Android phones need to support OTG, and flash drives can be found in the “File Manager” of most Android devices. 【Plug and Play, No Application Required, Instantly Increases iPhone and iPad Memory Space】If you almost used up all space on your iPhone or iPad, this photo stick for iPhone helps to expand your memory at full storage with 512GB. And usb memory stick for photos is also a great partner for traveling photographers editing on iPad. Using this memory device for your iPhone, iPad or Computers, no worries with the iPhone storage anymore! 【Universal Compatibility】The USB flash drive is equipped with USB 3.0 Port/USB-L Port/Micro USB Port/USB-C Port (Independent interface), which is convenient for data transmission between different devices and gets rid of the shackles of data cables and iCloud. You can store your favorite videos, photos, movies, and music directly on the memory stick and watch them on your mobile phone at any time. Compatibility iPhone 16/15/14/13/12/11/8/7/6/SE/XR/XS/XS Max/X Series, iPad Air Series/iPad Pro Series/Android smartphones Series. (Tip: For iPhone/iPad System Version Requires iOS 13 or Higher. For Android smartphones Need to open OTG function) 【High Transfer Speed】Transfer photos, videos, and files in seconds with our USB stick. With a write speed of up to 15 MB/s and a read speed of up to 30 MB/s, our flash drive for iphone have higher performance than conventional usb storage flash drive. Save time and get more done with iphone photo storage stick. Enjoy the whole relaxing trip with never stuttering or buffering video play on the go. (Tip: No Third-Party Apps Required, Simply insert the flash drive into the iPhone iPad and go to "Files" app) 【Watch Movies, Photos and Play Music Directly From Phone Flash Drive】Store your favorite videos, audios and music on your iPhone's Photo Stick, then seamlessly plug and play on your iPhone or iPad anytime, anywhere. No more need for Internet or WiFi. This iPhone storage device plays videos in many different formats. Pictures stored on the Phone storage device also support different formats. Great way to store all your pictures and videos on an phone external storage device. 【How to transfer in iPhone iPad】Requires iOS 13 and higher: Simply
insert the flash drive into your iPhone iPad, then go to the "Files" app to find "NoName" and move files to your iPad or iPhone as needed. 【How to transfer in Android Phones】Android phones need to support OTG, and flash drives can be found in the “File Manager” of most Android devices. 【Kindly Note】The phone case may prevent the proper connection between a phone and a USB flash drive, which could result in the phone being unable to recognize the USB flash drive. In this situation, please do not conclude that the usb flash drive cannot be used, remove the phone case and try again. 【Kindly Note】Up to 30MB/s read speed, write speed is lower. Based on internal testing; performance may be lower depending on the host devices and user’s settings and configurations. 【Kindly Note】For Flash Media Devices, 1 megabyte = 1 million bytes; 1 gigabyte = 1 billion bytes. Actual useable capacity may vary. Some of the listed capacity is used for formatting and other functions, and thus is not available for data storage. [ad_2]
0 notes
Text
Unlock Your iPhone with iOS 18.2.1 Jailbreak
Jailbreaking has long been popular for iOS enthusiasts who want to maximize their device's potential. With the release of iOS 18.2.1, the jailbreak community has introduced exciting opportunities for users to customize, tweak, and enhance their iPhones and iPads. This comprehensive guide will walk you through everything you need about the iOS 18.2.1 jailbreak and how to install it safely.
What is Jailbreaking?
Jailbreaking is removing software restrictions imposed by Apple on iOS devices. By jailbreaking your iPhone or iPad, you can access system files and install apps, tweaks, and themes unavailable through the official App Store.
For iOS 18.2.1, jailbreaking means:
Full control over your device’s appearance and functionality.
Access to third-party app stores like Cydia or Sileo.
The ability to install tweaks, themes, and IPA files to enhance your user experience.
Why Jailbreak iOS 18.2.1?
Here are some of the key reasons to jailbreak iOS 18.2.1:
Custom Themes and Tweaks: Personalize your device with unique themes, fonts, and layouts.
Access to Unofficial Apps: Download apps and tools unavailable on the App Store.
Enhanced Features: Add powerful tweaks that improve multitasking, enhance notifications, and provide advanced control over system settings.
Ad-Free Experience: Block ads in apps and games for uninterrupted usage.
Improved Productivity: Optimize your workflow with productivity-focused tweaks.
Features of iOS 18.2.1 Jailbreak
The iOS 18.2.1 jailbreak is packed with features that allow users to:
Install Third-Party Apps: Explore apps and games restricted by Apple’s guidelines.
Customize the Control Center: Add widgets and shortcuts to streamline device navigation.
Unlock Hidden Features: Access features Apple has disabled, such as screen recording with more options or system-wide dark modes.
Use Tweaks for Performance: Enhance your device’s speed, battery life, and overall usability.
How to Jailbreak iOS 18.2.1 Safely
To jailbreak your iPhone or iPad running iOS 18.2.1, follow these steps:
Backup Your Device: Before starting, use iCloud or iTunes to back up all your data.
Download a Trusted Jailbreak Tool: Visit https://www.instantjb.com/ to download the official jailbreak tool for iOS 18.2.1.
Install the Tool: Install the downloaded jailbreak software on your computer.
Connect Your Device: Use a USB cable to connect your iPhone or iPad to the computer.
Run the Jailbreak Process: Launch the jailbreak tool and follow the instructions. The tool will guide you through the process step by step.
Reboot and Explore: After the process completes, your device will reboot, and you’ll notice apps like Cydia or Sileo installed. These are your gateways to tweaks, themes, and customizations.
Is Jailbreaking Safe?
Jailbreaking is generally safe if you use reputable tools and follow best practices. However, keep the following points in mind:
Security Risks: Jailbreaking removes Apple’s security restrictions, which could make your device more vulnerable to malware. Only download tweaks from trusted sources.
Warranty Void: Jailbreaking may void your device’s warranty, so proceed cautiously.
Software Updates: Jailbroken devices often require special steps to update to new iOS versions.
Benefits of Jailbreaking
Jailbreaking your iOS 18.2.1 device offers a wide range of benefits, such as:
Unlimited Customization: Modify every aspect of your device, from icons to system sounds.
Improved Functionality: Add features like call recording, advanced multitasking, and more.
Access to Tweaks: Explore powerful tweaks that enhance performance, usability, and accessibility.
Third-Party App Stores: Gain access to app stores like Cydia and Sileo for exclusive apps and games.
Frequently Asked Questions (FAQs)
1. Is Jailbreaking Legal?
Yes, jailbreaking is legal in most countries. However, it may void your warranty, so proceed at your own risk.
2. Can I Undo a Jailbreak?
You can restore your device to its original state by performing a factory reset through iTunes or Finder.
3. Does Jailbreaking Affect Performance?
Jailbreaking doesn’t slow down your device; installing too many tweaks or incompatible ones can impact performance.
4. Will I Lose My Data?
No, jailbreaking doesn’t erase your data. However, it’s always a good idea to back up your device before starting.
5. Are Jailbreak Tweaks Free?
Many tweaks are free, but some premium tweaks may require a small payment.
Tips for a Smooth Jailbreaking Experience
Backup Your Data: Always create a backup before jailbreaking.
Use Trusted Tools: Only download jailbreak tools from reputable sources like https://www.instantjb.com/.
Install Compatible Tweaks: Ensure that tweaks and apps are compatible with iOS 18.2.1 to avoid issues.
Stay Updated: Keep your jailbreak tool and tweaks updated for optimal performance.
Conclusion
Jailbreaking iOS 18.2.1 is a fantastic way to unlock your device’s full potential. From custom themes and tweaks to exclusive apps, the possibilities are endless. Following the steps outlined in this guide and using trusted tools, you can safely and effectively jailbreak your iPhone or iPad.
Ready to enhance your iOS experience? Download the iOS 18.2.1 jailbreak tool from https://www.instantjb.com/ and start exploring the limitless potential of your device today!
0 notes
Text
iOS 18.0.1 Jailbreak
If you're looking to unlock the full potential of your iPhone or iPad running iOS 18.0.1, you're in the right place. Jailbreaking your device opens up a world of possibilities, allowing you to install apps and tweaks unavailable on the official App Store. One of the best tools to achieve an iOS 18.0.1 Jailbreak is the InstantJB Tool, which simplifies the process and enables users to download Cydia effortlessly.
What is iOS 18.0.1 Jailbreak?
iOS 18.0.1 Jailbreak refers to removing Apple's software restrictions on devices running iOS 18.0.1. When you jailbreak your iPhone or iPad, you gain complete control over its operating system, allowing you to modify system files, install third-party applications, and customize your device in ways that are impossible with a standard iOS setup.
The main benefit of an iOS 18.0.1 Jailbreak is the ability to download and install Cydia, the go-to platform for downloading apps and tweaks unavailable on the App Store. With Cydia, users can personalize their devices to suit their unique preferences, from changing icons to installing advanced features that enhance their functionality.
Why Jailbreak iOS 18.0.1?
Apple's operating system is highly secure, which is excellent for protecting your data, but it also limits what you can do with your device. Here are a few key reasons why people choose to jailbreak their iPhones and iPads:
Custom Themes: iOS 18.0.1 Jailbreak allows you to apply custom themes that completely change the look of your device. You can replace the standard icons with your designs or download custom themes from Cydia.
Exclusive Apps: Jailbreaking enables you to install unavailable apps in the official App Store. These apps can add new features to your device that Apple's restrictions would typically block.
System Tweaks: From changing how your lock screen looks to adding new functionality to your control center, iOS 18.0.1 Jailbreak gives you complete control over your device's interface.
Removing Bloatware: Apple pre-installs apps that you may never use. Jailbreaking allows you to remove unwanted apps and free up storage space on your device.
iOS 18.0.1 Jailbreak: Is It Safe?
Jailbreaking has come a long way in terms of safety. The process used to be complex, but thanks to tools like InstantJB, it's now straightforward and safe. However, there are still risks involved. Here are a few considerations:
Security Risks: When you jailbreak your device, you bypass some of Apple's security features. This can make your device more vulnerable to malware or other security threats. Always download trusted tweaks and apps from reputable sources like Cydia.
Warranty: Jailbreaking your device can void your warranty. However, the jailbreak process is reversible. You can restore your device to its original state by updating it through iTunes or Finder, which reinstalls Apple's original software and removes the Jailbreak.
System Stability: Some users report that jailbreaking can cause their devices to run slower or encounter bugs. It's essential to install only the tweaks and apps that are necessary to avoid overloading the system.
How to Jailbreak iOS 18.0.1 with InstantJB
The InstantJB Tool is one of the easiest and most reliable ways to perform an iOS 18.0.1 Jailbreak. Here's a step-by-step guide on how you can jailbreak your device and download Cydia using InstantJB:
Backup Your Device: Before you begin, it's always a good idea to back up your device using iCloud or iTunes. This ensures that your data is safe in case something goes wrong during the process.
Visit the Official InstantJB Website: Head to the official InstantJB website at https://www.instantjb.com/cydia-ios-18-1-2-3-4-5-6-7-8-9-jailbreak.html. This is where you'll find the latest version of the tool for iOS 18.0.1 Jailbreak.
Download InstantJB: Follow the instructions on the website to download the InstantJB Tool. The process is simple and doesn't require any technical knowledge.
Install InstantJB on Your Device: Once downloaded, you can install the tool on your iPhone or iPad. InstantJB is compatible with a wide range of iOS devices, so this tool should work seamlessly whether you're using the latest iPhone or an older model.
Run the Jailbreak Process: After installing InstantJB, follow the on-screen instructions to start the jailbreak process. The tool will automatically take you through the steps needed to complete the iOS 18.0.1 Jailbreak.
Download Cydia: Once your device is successfully jailbroken, the InstantJB Tool will allow you to download and install Cydia. Cydia will open the door to thousands of third-party apps, tweaks, and themes.
The Benefits of Using InstantJB for iOS 18.0.1 Jailbreak
InstantJB is one of the most reliable tools for jailbreaking iOS 18.0.1. Here are some reasons why InstantJB is a top choice:
User-Friendly: The interface is simple and straightforward, making it easy for first-time jailbreakers to use.
Regular Updates: InstantJB is consistently updated to ensure it works with the latest iOS versions, including iOS 18.0.1. You don't have to worry about compatibility issues.
Safe and Reliable: InstantJB is trusted by thousands of users worldwide. The tool has been tested extensively to ensure it is safe and reliable.
Cydia Installation: One of the best features of InstantJB is that it automatically installs Cydia after the jailbreak process. This means you don't need to go through additional steps to enjoy the benefits of a jailbroken device.
What to Do After Jailbreaking iOS 18.0.1
The possibilities are endless once you've jailbroken your device using InstantJB and installed Cydia. Here are some things you can do to make the most out of your iOS 18.0.1 Jailbreak:
Install Custom Themes: Personalize your device by installing custom themes from Cydia. You can change the icons, wallpapers, and even the overall appearance of your iPhone or iPad.
Add New Features: Many tweaks available on Cydia allow you to add new features to your device, such as multitasking enhancements, battery-saving tweaks, and much more.
Improve Performance: Jailbreaking can also help improve the performance of your device. For example, you can install tweaks that free up RAM, reduce battery drain, and enhance the speed of your iPhone or iPad.
Explore Third-Party Apps: The App Store has limitations on what developers can offer, but Cydia does not. You'll find apps that provide a wide range of functionality, from file management to advanced photo editing tools.
Final Thoughts on iOS 18.0.1 Jailbreak
The iOS 18.0.1 Jailbreak opens up a new world of customization and control for your device. Whether you're looking to apply custom themes, download exclusive apps, or improve system performance, jailbreaking is the key to unlocking these features. With tools like InstantJB, the process has become more straightforward and safer.
0 notes
Text
iOS 17.3 Jailbreak
The world of iOS jailbreaking is constantly evolving, and with the release of iOS 17.3, the community has been eagerly waiting for a new jailbreak solution. The wait is finally over! A new jailbreak for iOS 17.3 is now available, allowing it to customize your device beyond Apple's restrictions. In this guide, we'll dive into jailbreaking, the benefits of jailbreaking your iOS 17.3 device, and how you can do it through instantjb.com.
What is Jailbreaking?
Jailbreaking is removing the restrictions imposed by Apple on iOS devices. It allows users to gain root access to the operating system, enabling installing apps, extensions, and themes unavailable through the Apple App Store. This opens up a world of customization and functionality that can enhance your device's performance and usability.
Why Jailbreak iOS 17.3?
iOS 17.3 brings several new features and improvements to your iPhone or iPad, but jailbreaking it can take your device to the next level. Here are a few reasons why you might consider jailbreaking your iOS 17.3 device:
Customization: Jailbreaking allows you to change the look and feel of your device with themes and tweaks. You can customize the control center, lock screen, icons, and more.
Extended Functionality: Jailbreak apps and tweaks can offer features that are not available on un-jailbroken devices, such as improved multitasking, better file management, and enhanced privacy settings.
Access to Banned Apps: Some apps are not allowed on the App Store due to Apple's policies. Jailbreaking gives you access to these apps.

Jailbreaking iOS 17.3 with Instantjb.com
Instantjb.com offers a reliable and straightforward way to jailbreak iOS 17.3. Here's a step-by-step guide on how to use their service:
Backup Your Device: Before you begin, it's crucial to back up your device using iCloud or iTunes. This ensures your data is safe if anything goes wrong during the jailbreak.
Visit Instantjb.com: Open the browser on your iOS 17.3 device and navigate to https://www.instantjb.com/cydia-ios-17-1-2-3-4-5-6-7-8-9-jailbreak.html. This website is designed to be user-friendly, making the jailbreak process accessible to everyone, regardless of technical expertise.
Initiate the Jailbreak Process: On instantjb.com, you'll find detailed instructions on how to start the jailbreak process. Typically, this involves downloading a jailbreak tool directly to your device. Follow the website's instructions carefully.
Install the Jailbreak: Once the jailbreak tool is downloaded, install it on your device. This process may vary depending on the tool, but instantjb.com provides clear, step-by-step guidance.
Enjoy Your Jailbroken Device: After the installation, your device will be jailbroken. You can now explore and install apps, tweaks, and previously unavailable themes.
Risks and Precautions
While jailbreaking can unlock many possibilities for your iOS device, it's not without its risks. Some risks include voiding your warranty, potential security vulnerabilities, and possibly bricking your device. However, you can minimize these risks by following instructions carefully and using reputable jailbreak tools like the one from instantjb.com.
Conclusion
Jailbreaking iOS 17.3 opens up a new world of customization and functionality for your iPhone or iPad. With the help of instantjb.com, the process is easier and more accessible than ever. Remember to back up your device before proceeding and to follow all instructions carefully. Enjoy the freedom and new possibilities of a jailbroken iOS 17.3 device!
0 notes
Text
Why Is My Apple Pencil Not Charging? 1st or 2ndGeneration| How to fix it?

(Apple pencil not charging when ipad locked, apple pencil not charging to 100, apple pencil stuck at 99,98, reddit, with adapter, apple pencil not charging ipad pro)
Why Is My Apple Pencil Not Charging? 1st or 2ndGeneration| How to fix it?
Apple Pencil may not be charging. It can be a Bluetooth problem if your Apple Pencil isn't charging or connecting to your iPad. You have two options: either re-pair your Apple Pencil to your device or toggle Bluetooth on and off. Make sure you have the most recent version of iPad installed. You might need to order a new Apple Pencil if everything else fails. This will demonstrate how to resolve the issue where your iPad, iPad Air, or iPad Pro won't charge your first- or second-generation Apple Pencil.
After turning off your Bluetooth, switch it once on.
Open the iPad's Settings app.
Select "Bluetooth" from the menu
Verify that Bluetooth is enabled.
Tap the information (i) icon next to the Apple Pencil connection.
Choose "Forget This Device" after that.
Press "Forget Device" when prompted to erase your Apple Pencil.
Now turn your iPad Restart
Reconnect your Apple Pencil when the iPad boots up. Place the first-generation Apple Pencil into the Lightning port on the iPad. Attach the Apple Pencil for the second generation to the right edge of the iPad.
To connect the Apple Pencil, tap the "Pair" button on the iPad screen.
In case the Pair option isn't visible, give it a few minutes. After roughly two minutes, if it still isn't there, disconnect or unplug it and reconnect it.
Understanding Apple Pencil Charging Mechanism
The Apple Pencil charging mechanism is quite straightforward. To charge the pencil, simply remove the cap at the end of the pencil to reveal the lightning connector. Then, connect the pencil to the lightning port on your iPad or iPhone using the lightning cable that came with the pencil. The pencil will begin charging automatically and the LED indicator light on the pencil will turn on. Once fully charged, the LED indicator light will turn off and you can replace the cap to protect the pencil tip.
Common Reasons for Apple Pencil Not Charging
Insufficient Power Source: Make sure the connected device, or your iPad, has enough power. Low battery levels could make charging more difficult.
Broken Charging cable: Look for any indications of damage on the charging cord. Problems with charging may result from a broken cable.
Dirty Connectors: that are dirty or defective can prevent an Apple Pencil from charging. Debris can become caught in the charging port or on the connector. Thoroughly clean both and inspect for flaws.
Verifying Apple Pencil Battery Level: Make sure the iPad's widgets or Bluetooth settings indicate the Apple Pencil's battery level is not empty.
Adjusting iPad Power Settings: Review your iPad's power settings to ensure they aren't causing the Apple Pencil charging problem.
How to Resetting Apple Pencil and iPad?
Restarting the iPad- Small software issues that interfere with the charging process may be fixed with a simple restart of your iPad.
Resetting Apple Pencil- Sometimes charging problems with the Apple Pencil can be resolved by doing a reset. Refer to the manufacturer's instructions for the particular model you own.
How to upgrade iOS and Pencil Firmware?
Follow these steps for Update iOS: -
Connect to Wi-Fi: Because iOS upgrades are important and may require an uninterrupted connectivity to the internet, make sure your device is connected to a Wi-Fi network.
Check Battery Level: To prevent interruptions during the update, make sure your device is powered on or has enough battery life left.
Make a Device Backup: Before applying any updates, it's a good idea to make a device backup. This can be accomplished on your computer via iTunes or iCloud.
Go to Settings: Open the "Settings" app on your iOS device.
General: Scroll down and tap on "General"
Software Update: Choose "Software Update." You'll receive a notification if there is an update available. Select "Download and Install."
Install: Enter your passcode and accept the terms and conditions if prompted. It will download and install the update. A restart of your device will occur throughout this process.
Update Your Apple Pencil Firmware:
Ensure Compatibility: Verify if firmware updates are compatible with the model of Apple Pencil you own. Firmware updates are not supported by all models.
Pair with iPad: Make sure your iPad and Apple Pencil are paired. You can accomplish this by either utilizing the Pencil's pairing button or by attaching it to the iPad.
Check for Updates: Verify that the most recent version of iOS is installed on your iPad. Take the previously specified steps to update iOS.
Check Pencil Battery: Make sure the battery on your Apple Pencil is fully charged. You may check the battery level by connecting it to your iPad.
Bluetooth Settings: Go to "Settings" - "Bluetooth" on your iPad. Find your Apple Pencil in the list of devices and tap the “info” icon next to it.
Firmware Update: You will see an update option if there is a firmware update available. To finish the update, adhere to the instructions displayed on screen.
Restart iPad: Restarting your iPad is a good idea after updating the Pencil firmware.
You should be able to upgrade the firmware on your iOS smartphone and Apple Pencil to the most recent versions by following these steps.
Visiting an Apple Store - If troubleshooting steps fail than you need to visit an Apple Store can provide professional assistance.
Contacting Apple Support - For remote support and assistance, get in touch with Apple Support.
Tips and tricks for Maintaining Apple Pencil Charging
To keep your Apple Pencil from charging poorly and to extend its lifespan, do routine maintenance.
Conclusion
Fixing charging problems with the Apple Pencil requires a methodical approach that includes examining power sources and, if required, contacting a specialist. You may use your iPad to explore your creativity and have a flawless experience with your Apple Pencil by using these troubleshooting techniques.
FAQs
How often should I charge my Apple Pencil?
Every time the battery on your Apple Pencil becomes low, it is advised that you charge it. Regular top-ups support the preservation of peak performance.
Can my Apple Pencil be harmed by using third-party charging accessories?
It is true that utilizing uncertified accessories may harm your Apple Pencil and cause problems with charging. For optimal results, only use accessories made by Apple officially.
How should I proceed if my Apple Pencil unexpectedly stops charging?
Check for software updates, reset the Apple Pencil, and restart your iPad. If problems continue, get help from a specialist.
Does Apple Pencil typically take a long time to charge?
While charging times might vary, you might want to test an alternative power source and check for software updates if it takes a lengthy time every time.
Can Apple Pencil's charging problems be resolved by a software update?
Yes, software upgrades frequently come with bug patches for issues with charging. Ensure that the most recent software is installed on both your iPad and Apple Pencil.
Apple Pencil Not Charging article will help you for solving your problem if you love this please share to others
Also Read:-
iPhone 13 Not Charging Here are 9 Way to Fix It 2024Source link:- https://fixnotcharging.com/why-is-my-apple-pencil-not-charging-1st-or-2nd-generation-how-to-fix-it-2024
1 note
·
View note
Text
How to Remove iOS 17 Beta from iPhone? [Simple Steps]
If you are looking forward to learning about the process of removing the iOS 17 Beta from your iPhone device, then you are in luck. Here we will provide simple guidelines and methods that will help you downgrade to iOS 16 from 17 Beta easily. Get through the whole content without skipping any method.
Apple has released the iOS 17 Beta for iPhone and iPad users. And the official release is planned to be soon. This version contains various new features and many more. However, many users face some issues after installing the Beta version of the software. If you are also one of those people who are using iOS 17 Beta on their iPhone and planning to downgrade, then we are here to help you. So, let’s get started without any further delay.
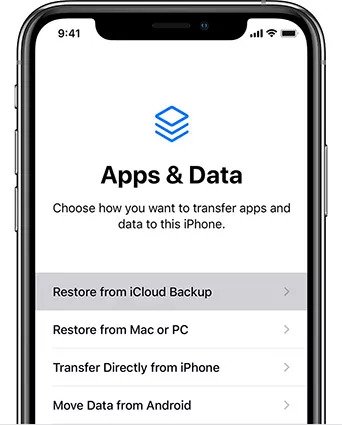
Backup the Data of Your iPhone via iCloud
You need to back up your data first before you downgrade the device. Otherwise, you will lose all of your data. Thus, follow the below guide to back up your iPhone device via iCloud.
Method 1:
First, make sure that the cellular data of your device is ON, or the device is connected to Wi-Fi.
After that, tap on the Settings option on your home screen.
Next, tap on your Name option.
Now, select the iCloud option.
Afterward, you are required to choose the Backup Now option.

Method 2:
Turn on the iCloud Backup on your device.
To do that, you are required to go to the Settings option first.
Then tap on your name option.
Choose iCloud and make sure that the iCloud Backup toggle is on.
Next, ensure that your device is connected to a power source.
Turn on the mobile data or connect to a wireless network.
Uninstall the iOS 17 Beta from iPhone With iTunes
You can downgrade from iOS 17 Beta to 16 with the help of your iTunes. Here are the steps you can follow to remove it.
Firstly, you need to connect the iOS device to a Mac device.
Then, open your iTunes.
After that, choose the iPhone device name you are using to open the summary of the device.
Now, choose the Summary tab and then look for the Restore iPhone or Restore iPad option.
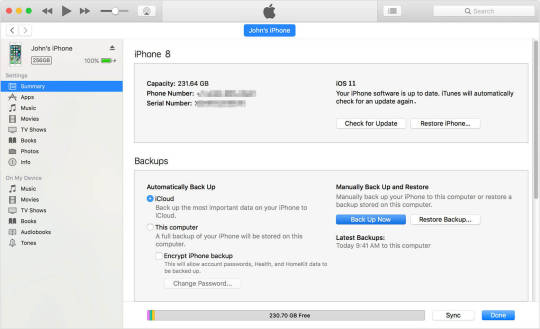
Then, you need to verify your selection by choosing Restore and agreeing with the open prompt.
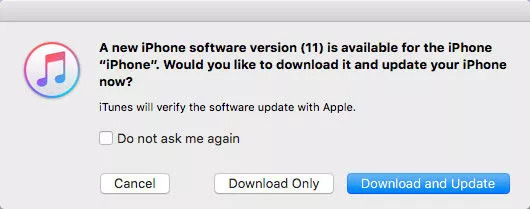
Now, iTunes will try to download the current stable iOS version for your device. Once the download is complete, it will be installed automatically.
After completing the restoration, the iPhone device will start automatically, and the iOS 17 Beta will be gone. Now, restore the data from the original backup.
Uninstall the iOS 17 Beta from Your iPhone Without a Computer
You can install the iOS 17 Beta version from your device even if you do not have a computer system. So, let’s learn how to Uninstall the iOS 17 Beta from your iPhone without a computer.
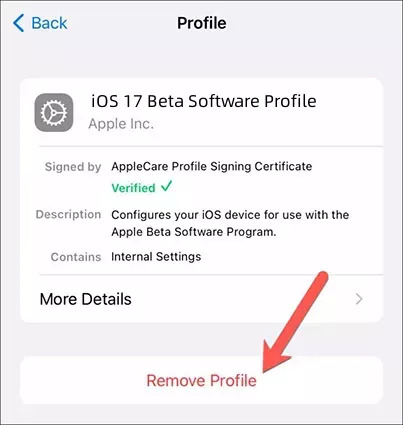
On the home screen of your iPhone, tap on the Settings option to launch it.
In Settings, select the General option.
From there, you need to select the option Profile or Device Management.
Now, look for the iOS 17 Beta profile and click on it.
After that, select the Remove Profile option.
(FAQs)
How do I uninstall iOS 17 beta from my iPhone without a computer?
Here are the steps you need to follow in order to uninstall iOS 17 beta from my iPhone without a computer.
First of all, tap on the Settings option on your iPhone’s home screen.
After that, scroll down to the General option and tap on it.
Search for the VPN & Device Management and select it.
Next, tap on the option of iOS 17 Beta Software Profile.
Now, choose Remove Profile and confirm your action by selecting the appropriate option.
Lastly, restart your iPhone to apply the changes.
What is new in iOS 17?
The recently released beta version of iOS 17 has ample new features to offer. It focuses on providing updates to various apps such as Phones, Messages, Facetime, etc. This iOS 17 gives users the ability to share the sticker in a new way and set the Contact Posters. Also, the new version allows you to share contacts effortlessly with NameDrop. Apart from that, numerous other new things are also included in the new version.
How do I uninstall iOS Update?
Here are the steps to uninstall the iOS update.
First, you need to open Settings on your iOS device.
Then tap on the General option.
After that, select the [Device Name] storage option.
Look for the Update in the list of apps and tap on it.
Select Update and then tap on the Delete Update option.
Visit – Cricut.com/setup
design.cricut.com
www.cricut.com/setup
Cricut Design Space
#iOS 17 Beta from iPhone#Cricut.com/setup#cricut design space#cricut explore air 2#cricut new machine setup#cricut design space login#design.cricut.com#cricut.com/setup windows
0 notes
Video
youtube
Copy Your iPhone Photos & Videos IN SECONDS (Without iCloud or iTunes)
Easily backup/copy, store, and transfer all your iPhone Files without iCloud or iTunes by using this simple method with a USB Drive, External Hard Drive, or SSD you have laying around the house. iCloud Maxes out at 2TB but you can have virtually unlimited storage using any SSD, Hard Drive, or USB Drive you have laying around. Sure you lose the benefits of cloud storage, but at least your data is completely yours, offline, and ready whenever you need it 🤷🏾♂️.
All you need is a Lightning to USB 3.0 camera adapter. In this video, I show you how to use this cheap dongle to extend your iPhone storage, transfer all you pictures, music, documents and videos and backup your life. It's so versatile it can even be used for Professional USB microphones and cameras with your iPhone. It can even be used to quickly transfer all your iPhone files back and forth between a Windows PC or Mac. A true life saver! It also works with older iPhones & iPads.
Here's where you can get yours: 1. Affordable Lightning to USB 3.0 adapter: https://amzn.to/3Dexzbb 2. OEM Apple Lightning to USB 3.0 adapter: https://amzn.to/3WxtN3j
#youtube#Copy Your iPhone Photos & Videos IN SECONDS#icloud#backup your iCloud photos#apple#iphone tutorials#itunes
0 notes
Link
In this article, you will learn how to backup iPhone/iPad to iTunes and iCloud. It is very essential to backup your data, especially when you want to change your iPhone/iPad, format your iPhone/iPad for certain reasons, or if you want to install a beta iOS version on your iPhone/iPad. So, there are two simple ways to back up your iPhone/iPad, the first from iCloud and the second by iTunes.
2 notes
·
View notes
Text
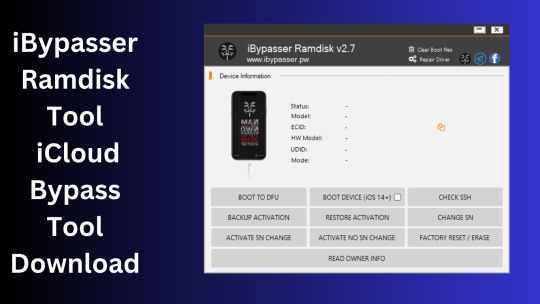
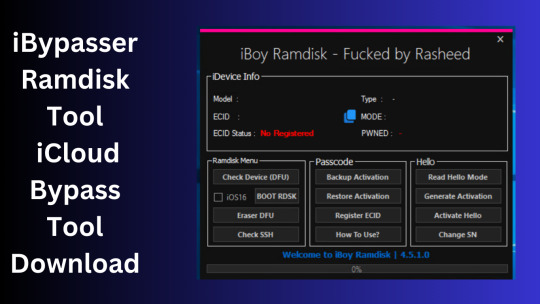
iBypasser Ramdisk Tool V2.7 iCloud Bypass Tool Download
iBypasser Ramdisk Tool V2.7 iCloud Bypass Windows Tool
iBypasser Ramdisk Tool is a powerful application designed to bypass iCloud activation on iOS devices running iOS 11-15 without the need for jailbreaking. It provides various functionalities to disable the passcode, back up files, disable the iCloud account by opening the menu, and retrieve the Apple ID and phone number associated with the device. Additionally, it offers the capability to disable the “Hello” screen using the MEID/GSM signal. Please note that bypassing iCloud activation is not endorsed by Apple and may violate their terms of service.
What is iBypasser Ramdisk Tool V2.7?
The iBypasser Ramdisk Tool V2.7 software program was created especially to get around the iCloud activation lock on the iOS device. Customers may use it to give a speedy fix if they find themselves locked out of their devices and unable to access all of the features on their iPhones, iPads, or iPods.
Features iBypasser Ramdisk tool:
Boot Device for iOS 15. x and earlier
Verify SSH
Restore/Backup Activation
Alter SN
Switch on the Hello Device
Go To Owner Info
iOS 15+ (DFU) Data Erasure
Remove Boot File
Changelog!!!
Update: iBypasser Ramdisk AIO v2.0
Resolving boot problems.
DFU Helper was added.
Driver problems were resolved.
Performance augmentation.
How To Use?
You will initially need to register the device’s ECID.
Your MAC notebook should have iBypasser RAMDISK installed. Next, unzip it.
Start your RAMDISK tool after that. then adhere to the directions below.
Enter DFU mode on the iPhone. When you successfully connect your device to DFU mode, the iBypasser RAMDISK Tool will provide you with further alternatives. Activate, Backup Files, Open SSH, Open Proxy, etc.
To open the proxy, type one and press the Enter key. Start SSH by pressing 2; then press 3 to access the backup files.
You may examine the data you successfully backed up on your device in the backup directory.
Second, flash your device with the 3u Tool or iTunes.
Connect your device to DFU mode once you’ve finished flashing it.
Open the proxy after switching the device to DFU mode Type 1. Press 4 again to turn on your gadget.
Readme:
Windows XP, Windows Vista, Windows 7, Windows 8, Windows 8.1, and Windows 10 (32-bit and 64-bit) are all fully compatible with the program.
Create a Backup: If you want to try the tool described above, create a backup of the personal information stored on the Android smartphone or tablet you intend to utilize. Considering that flashing any recovery or firmware has the potential to harm the device.
iBypasser Ramdisk Tool V2.7 iCloud Bypass Tool Download
Click Her
5 notes
·
View notes
Text
Price: [price_with_discount] (as of [price_update_date] - Details) [ad_1] Do you want to make your Phone more convenient? Are you tired of your Phone running out of memory? Do you want to keep enough Phone memory during your trip? Plug and Play, No Application Required! Never lose important documents, videos, photos again thanks to large and reliable Phone flash drives. Free up iPhone and iPad Memory Space Immediately If your iPhone or iPad has almost used up all the memory space, this iPhone USB storage flash drive can help alleviate 512GB of storage space. Whether you like to shoot short videos or take selfies, our iPhone memory stick are perfect for you. Quickly Backup Without Using iTunes or Cloud You can easily backup and manage files at any time. No need of iTunes or Cloud, manage files, pictures and videos through the mobile app to quickly backup to iPhone flash drive, save the storage space of the mobile phone, and at the same time, operations such as forwarding files on the USB drive can be performed. Plug and Play Share your photos, videos, songs and other files between iPhone picture stick easily. You don't have to pay extra for additional storage, just insert iPhone external storage and enjoy the extra space of your flash drive. High Transfer Speed Smart and upgraded chip with high efficiency and stability. read speed up to 30MB/s and write speed up to 15MB/s. The upgraded chip provides you with more efficient storage experience. How to Transfer for iPhone iPad Requires iOS 13 and higher: Simply insert the flash drive into your iPhone iPad, then go to the "Files" app to find "Untitled" and move files to your iPad or iPhone as needed. How to Transfer for Android Android phones need to support OTG, and flash drives can be found in the “File Manager” of most Android devices. 【Plug and Play, No Application Required, Instantly Increases iPhone and iPad Memory Space】If you almost used up all space on your iPhone or iPad, with 512GB of additional storage, this iPhone flash drive perfectly addresses memory shortages on your phone or iPad. Whether you're capturing short videos or selfies, simply plug the memory stick in your device, easily back up your photos, videos, and files, share your special moment with your friends and family on your social media with just one-click. No worries with the iPhone storage anymore! 【MFi Certified Flash Drive, Multi Port Design】Equipped with USB/USB-L/USB-C (with independent adapter), the phone storage flash drive supports a variety of devices for effortless plug and play operation. Quickly transfer data between different devices, significantly enhancing convenience. Allows you to get rid of the data cable and iTunes, iCloud, so you can easily organize your phone's storage space. Widely Compatible: iPhone 16/15/14/13/12/11/8/7/6S/SE/XR/XS/XS Max/X Series/iPad Air/Pro Series. Also support Android smartphones/Computers and other devices with USB-C Ports.(Tip: For iPhone system version requires iOS 13 or higher, For Android smartphones need to open OTG function) 【High Speed Transfer, Save Your Time】With read speeds up to 30MB/s and write speeds up to 20MB/s, this thumb drive is more efficient than traditional USB drive. Allowing you to quickly transfer files, photos, and videos, which help you save time and focus on the things you like. Enjoy the whole relaxing trip with never stuttering or buffering video play on the go. (Tip: No Third-Party Apps Required, Simply insert the flash drive into the iPhone iPad and go to "Files" app, while Android only needs to open your OTG function) 【Watch Movies, Photos and Play Music Directly From Phone Flash Drive】Store your favorite videos, audios and music on your iPhone's Photo Stick, then seamlessly plug and play on your iPhone or iPad anytime, anywhere. No more need for Internet or WiFi. This iPhone storage device plays videos in many different formats.Pictures stored on the Phone storage device also support different formats. Great way to store all your pictures and videos on an phone external storage device.
【How to transfer in iPhone iPad】Requires iOS 13 and higher: Simply insert the flash drive into your iPhone iPad, then go to the "Files" app to find "Untitled" and move files to your iPad or iPhone as needed. 【How to transfer in Android Phones】Android phones need to support OTG, and flash drives can be found in the “File Manager” of most Android devices. 【Kindly Note】1) For Flash Media Devices, 1 megabyte = 1 million bytes; 1 gigabyte = 1 billion bytes. Actual useable capacity may vary. Some of the listed capacity is used for formatting and other functions, and thus is not available for data storage. 2) Up to 30MB/s read speed, write speed is lower. Based on internal testing; performance may be lower depending on the host devices and user’s settings and configurations. 【Reliable After-Sales Service】Experience the convenience of high-quality USB memory stick and enjoy our premium customer service at the same time. For the phone flash drive, if you have any questions, we are willing to provide help. (Note: The phone case may prevent the proper connection between a phone and a usb flash drive, which could result in the phone being unable to recognize the usb flash drive. In this situation, please do not conclude that the usb flash drive cannot be used, remove the phone case and try again) [ad_2]
0 notes
Text
What to Do If You Forgot Your Apple ID or Password?
Forgetting your Apple ID or password can be a frustrating experience, especially considering how essential these credentials are for accessing a range of Apple services. Whether you're locked out of your iPhone, unable to download apps from the App Store, or can’t sync your iCloud data, not having your Apple ID or password on hand can cause a lot of inconvenience. Fortunately, Apple provides a simple and secure process to help you recover your Apple ID and reset your password. In this blog, we’ll walk you through the steps to recover your Apple ID and reset your password, including using the iforgot.apple.com website, and offer additional tips to prevent these issues in the future.
Understanding Apple ID and Its Importance
Your Apple ID is the gateway to accessing a wide array of Apple services, including:
iCloud for data storage and backup
App Store and iTunes Store for app downloads and media purchases
iMessage and FaceTime for communication
Apple Music and Apple TV+ for entertainment
Apple Pay for secure payments
Given the central role your Apple ID plays, it’s crucial to keep it secure and to remember your password. However, it's not uncommon to forget your Apple ID or password, especially if you haven't needed to log in for a while.
What to Do If You Forgot Your Apple ID?
If you’ve forgotten your Apple ID (the email address associated with your Apple account), there are a few ways to recover it.
Step 1: Check Your Devices
Before trying to recover your Apple ID through Apple’s website, check your devices. If you're logged into any Apple services (iCloud, App Store, iMessage, etc.), you might be able to locate your Apple ID through your device settings.
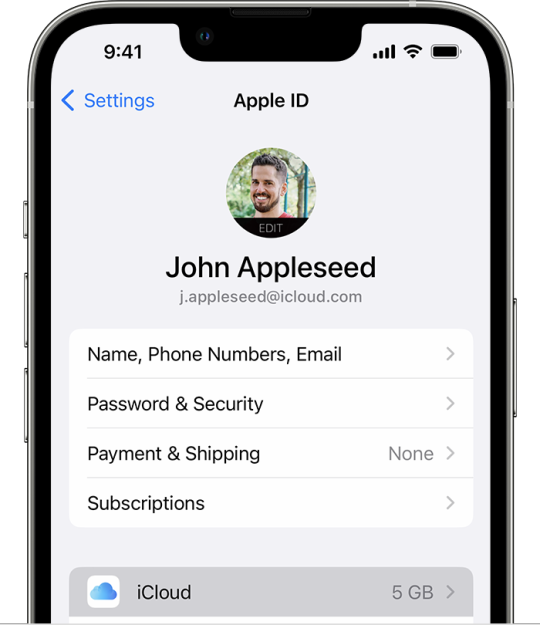
On iPhone, iPad, or iPod Touch:
Go to Settings.
Tap on [Your Name] at the top.
Your Apple ID should be listed at the top of the screen, just under your name.
On a Mac:
Open System Preferences.
Click on Apple ID.
Your Apple ID (email address) will be displayed at the top of the window.
If you’re still unable to find your Apple ID, don’t worry. Apple has a straightforward recovery process via the iforgot.apple.com website.
Step 2: Use iforgot.apple.com to Recover Your Apple ID
The iforgot.apple.com website is an official Apple portal designed to help you recover both your Apple ID and password. Here’s how to use it:
Open a web browser on your computer or mobile device and go to iforgot.apple.com.
Enter the email address you think might be associated with your Apple ID.
If Apple recognizes the email address, you’ll be asked to answer security questions, verify via two-factor authentication (if set up), or check your email for recovery instructions.
Follow the prompts to confirm your identity and retrieve your Apple ID.
If you don’t remember the email address, or if it’s not accepted, Apple may guide you through additional steps to help you locate your Apple ID.
What to Do If You Forgot Your Apple ID Password?
If you’ve forgotten your Apple ID password, the process to reset it is straightforward. There are multiple methods to reset your password, depending on the recovery options you've set up.
Method 1: Reset Your Password Using iforgot.apple.com
The iforgot.apple.com website is also used for resetting your Apple ID password. Follow these steps:
Visit iforgot.apple.com.
Enter your Apple ID (email address associated with your account).
If you’ve set up security questions or a two-step verification method, you’ll be asked to answer these or verify your identity.
If successful, you’ll be able to create a new password for your Apple ID.
Be sure to choose a password that’s both secure and easy for you to remember. It’s best to use a combination of letters, numbers, and special characters.
Method 2: Use Two-Factor Authentication to Reset Your Password
If you’ve set up two-factor authentication for your Apple ID, you can reset your password directly from your iPhone, iPad, or Mac.
On an iPhone or iPad:
Go to Settings > [Your Name] > Password & Security.
Tap Change Password.
Follow the instructions to reset your password using your device passcode.
On a Mac:
Go to the Apple Menu > System Preferences > Apple ID > Password & Security.
Click Change Password.
Follow the prompts to reset your password.
Method 3: Use Account Recovery
If you can’t reset your password using the above methods, you can use Apple’s account recovery process. This process might take a few days, depending on the information you can provide to verify your identity.
Go to iforgot.apple.com.
Enter your Apple ID and follow the prompts.
Apple will guide you through the recovery process. You may be asked to provide a trusted phone number or email to verify your identity.
Once your identity is confirmed, you’ll be able to reset your password and regain access to your account.
Method 4: Contact Apple Support
If all else fails and you’re still unable to reset your password, you can contact Apple Support. They will help guide you through the process and verify your identity, so you can regain access to your Apple account.
Additional Tips to Prevent Forgetting Your Apple ID or Password
While recovering your Apple ID or password is usually a straightforward process, it’s always best to take preventative steps to avoid these issues in the first place.
1. Enable Two-Factor Authentication
Two-factor authentication (2FA) adds an extra layer of security to your Apple ID. With 2FA enabled, you’ll need both your password and a trusted device or phone number to access your account. This can help you recover your Apple ID or password more easily if you ever forget them.
2. Use a Password Manager
A password manager is a secure tool that stores all of your passwords, including your Apple ID password, in an encrypted format. Using a password manager can help ensure you never forget your credentials again.
3. Update Your Recovery Information
Make sure your recovery email and phone number are up to date. Apple will use this information to send you recovery links or codes if you forget your password. You can update these details in your Apple ID account settings.
4. Write It Down Securely
While it’s not recommended to store your passwords in plain text, writing down your Apple ID credentials in a secure place (such as a locked drawer or safe) can be a last resort for avoiding password-related issues.
5. Remember Security Questions
If you use security questions to recover your Apple ID, make sure the answers are easy for you to remember but difficult for others to guess. Avoid using information that’s easily accessible on social media or public databases.
6. Regularly Back Up Your Data
Using iCloud or another backup service can help ensure that even if you forget your Apple ID or password, your data is safe and easy to recover. Regular backups are essential for peace of mind.
Conclusion
Forgetting your Apple ID or password doesn’t have to be the end of the world. With the iforgot.apple.com website, you can quickly recover your account and reset your password. Whether you’re locked out of your iPhone, iCloud, or another Apple service, the recovery process is designed to be as simple and secure as possible. By following the steps outlined in this guide, you can regain access to your account in no time.
To prevent future login issues, consider enabling two-factor authentication, using a password manager, and keeping your recovery details up to date. Apple has designed a robust system to ensure that you can always recover your account if needed, so there’s no need to worry too much about forgetting your Apple ID or password.
In the end, it’s all about staying proactive with your account’s security and keeping your credentials safe.
0 notes
Text
Jailbreak iOS 18.4.1
With every new iOS release, Apple introduces new features and improvements. However, a whole world of customization and freedom remains locked behind the standard restrictions of iOS. If you want to break free from these limitations, Jailbreak iOS 18.4.1 is the key. Jailbreaking allows you to fully control your device and enjoy various features unavailable on a regular, non-jailbroken iPhone or iPad. This article’ll guide you through everything you need about jailbreaking iOS 18.4.1.

What Is Jailbreaking iOS 18.4.1?
Jailbreaking iOS 18.4.1 is the process of removing Apple’s built-in restrictions on iOS devices. This enables you to install apps and tweaks that Apple doesn’t allow through the App Store. You’ll gain access to system-level settings, advanced customization options, and the ability to download apps from third-party sources. Jailbreaking your device opens up a new world of possibilities, from customizing the interface to installing apps that enhance your device’s functionality.
Why Should You Jailbreak iOS 18.4.1?
Here are the top reasons to consider jailbreaking iOS 18.4.1:
Customization: Jailbreaking lets you change the look and feel of your device. You can customize the icons, install custom themes, and modify the layout to suit your preferences.
Access Unofficial Apps: By jailbreaking iOS 18.4.1, you can install apps unavailable on the App Store, including popular apps like emulators, streaming services, and system utilities.
Enhance Functionality: Jailbreaking your device allows you to add powerful features like custom gestures, widgets, and shortcuts to improve your overall ios experience.
Control System Files: You can access the file system and manage your device’s storage, uninstall pre-installed apps, and gain deeper control over system settings.
Install Tweaks and Mods: The jailbreak community offers many tweaks and mods that can add new functionality to your device, enhance performance, or improve battery life.
How to Jailbreak iOS 18.4.1
Jailbreaking iOS 18.4.1 is a straightforward process. Here’s how you can do it:
Backup Your Device: Always back up your device to iCloud or iTunes before proceeding with the jailbreak. This ensures that your data is safe if anything goes wrong during the process.
Download iNstantJB: The best way to jailbreak iOS 18.4.1 is by using iNstantJB. This easy-to-use app makes the process simple and quick. You can download the iNstantJB app from the official website https://www.instantjb.com/cydia-ios-18-1-2-3-4-5-6-7-8-9-jailbreak.html.
Install iNstantJB: After downloading the app, open it and follow the on-screen instructions to begin the jailbreaking process. The app will guide you through every step, ensuring a smooth experience.
Start the Jailbreaking Process: After installation, iNstantJB will jailbreak your device. The entire process only takes a few minutes, so be patient.
Reboot Your Device: Your device will automatically reboot once the jailbreak is complete. This ensures that all the changes take effect.
Install Cydia: After rebooting, open Cydia, the most popular package manager for jailbroken devices. Cydia will allow you to install apps, tweaks, and themes you can’t get from the App Store.
Why Choose iNstantJB for Jailbreak iOS 18.4.1?
When it comes to jailbreaking iOS 18.4.1, iNstantJB is the best tool. Here’s why:
Easy to Use: iNstantJB has an intuitive interface, making the jailbreak process accessible even for beginners.
No PC Required: Unlike other methods, iNstantJB doesn’t require a computer. Everything is done directly on your device.
Safe and Secure: iNstantJB is constantly updated to ensure compatibility with the latest iOS versions, so you can jailbreak with confidence.
No Risk of Bricking: iNstantJB is designed to be safe and reliable, minimizing the risk of errors or issues during the jailbreak.
Instant Results: With iNstantJB, you can jailbreak iOS 18.4.1 quickly and efficiently, without waiting long.
What to Do After Jailbreaking iOS 18.4.1
Once your device is jailbroken, you can start exploring all the exciting features and options available to you. Some of the most popular tools and features you can install include:
Cydia: Cydia is the go-to app for installing third-party apps, tweaks, and themes. It’s the most widely used package manager for jailbroken devices and opens up many possibilities.
WinterBoard: WinterBoard lets you change the look and feel of your device with custom themes, icons, and UI elements.
SBSettings: This powerful tool allows you to toggle various settings (Wi-Fi, Bluetooth, etc.) directly from the home screen.
Activator: A handy tool that lets you assign custom gestures to control different functions on your device.
Filza File Manager: Gain full access to the file system with Filza, which allows you to manage system files, apps, and much more.
Is Jailbreaking iOS 18.4.1 Safe?
Jailbreaking, when done properly, is generally safe. However, it can void your device’s warranty, and you might run into issues if you use unreliable tools. That’s why it’s important to use trusted tools like iNstantJB, which is regularly updated to ensure compatibility and safety.
The risk is minimal as long as you follow the correct procedure and use a reliable jailbreak method. Remember to back up your device before starting the jailbreak process to avoid any data loss.
Conclusion
If you want to take full control of your iPhone or iPad, Jailbreak iOS 18.4.1 is the way to go. It allows you to install third-party apps, customize your device, and unlock hidden features that Apple restricts. Using iNstantJB, you can easily and safely jailbreak your device without needing a computer or advanced technical knowledge.
Ready to explore the full potential of your device? Download the Jailbreak iOS 18.4.1 app from iNstantJB today and enjoy all the customization and freedom of a jailbroken iPhone or iPad.
0 notes
Text
Cydia iOS 17.5.1
Cydia is the most popular app store for iOS users who want to customize their devices beyond what Apple allows. With the release of iOS 17.5.1, the Cydia community is buzzing with excitement. This article will guide you through everything you need to know about Cydia iOS 17.5.1, how to download it, and why it's the best choice for iOS customization.
What is Cydia?
Cydia is an alternative app store for iOS devices, offering apps, tweaks, and themes unavailable on the official Apple App Store. Developed by Jay Freeman (Saurik), Cydia allows users to unlock the full potential of their iPhones and iPads.
Why Use Cydia?
Customization: Cydia offers a wide range of tweaks that let you change the look and feel of your device. You can customize everything from the icons to the system fonts.
Exclusive Apps: Some apps are only available on Cydia. These apps provide functionalities not permitted by Apple, such as screen recorders, advanced file managers, and more.
Enhanced Features: With Cydia, you can add new features to your device. For example, you can enable multi-touch gestures, improve battery performance, and strengthen camera quality.
iOS 17.5.1: What's New?
The latest iOS 17.5.1 update brings several improvements and new features. It focuses on performance enhancements, bug fixes, and security patches. Users will notice smoother animations, quicker app launches, and better stability.
Is Cydia Safe?
Yes, Cydia is safe when used responsibly. Always download tweaks and apps from reputable sources. Review user reviews and check for compatibility with your device and iOS version. Avoid pirated content and only use trusted repositories.
How to Download Cydia iOS 17.5.1
Downloading Cydia on your iOS 17.5.1 device is straightforward. Follow these steps:
Backup Your Device: Before making any changes, back up your device using iCloud or iTunes.
Jailbreak Your Device: To install Cydia, you must jailbreak your iOS device. Several tools, such as Checkra1n, Unc0ver, and Taurine, are available for this purpose. Choose the one compatible with iOS 17.5.1.
Download and Install Cydia: The jailbreak tool will typically install Cydia automatically after jailbreaking. If not, you can manually download it from the https://www.cydiafree.com/cydia-download-ios-17-1-2-3-4-5-6.html official Cydia website.
Top Cydia Tweaks for iOS 17.5.1
Activator: Customize gestures and button actions.
iFile: A powerful file manager for iOS.
Barrel: Add cool animations to your home screen icons.
Springtomize: Customize various aspects of the SpringBoard.
BiteSMS: An enhanced messaging app with additional features.
How to Use Cydia
Using Cydia is similar to using the App Store. Open Cydia, browse the available tweaks and apps and install the ones you like. You can also add new repositories to access more content. Here's how:
Open Cydia: Launch the Cydia app from your home screen.
Navigate to Sources: Tap the 'Sources' tab at the bottom.
Add a Repository: Tap 'Edit' then 'Add' and enter the repository URL you want to add.
Browse and Install: After adding the repository, you can browse and install apps and tweaks.
Updating Cydia and Tweaks
Regular updates ensure your device runs smoothly and securely. Cydia itself, as well as the tweaks and apps you install, may receive updates. Here's how to update:
Open Cydia: Launch the app and go to the 'Changes' tab.
Refresh: Pull down to refresh the list of available updates.
Update: Tap 'Upgrade' to update all the available tweaks and apps.
Troubleshooting Common Issues
You might encounter some issues while using Cydia. Here are common problems and their solutions:
Cydia Crashing: This can be fixed by rebooting your device or reinstalling Cydia.
Tweaks Not Working: Ensure the tweak is compatible with your iOS version. You should update the tweak or find an alternative.
Device Boot Loop: If your device gets stuck in a boot loop after installing a tweak, enter safe mode by holding the volume up button during boot. Uninstall the problematic tweak in Cydia.
Removing Cydia and Restoring iOS
If you decide to remove Cydia and return to the stock iOS, you can do so by restoring your device. Here's how:
Backup Your Data: Use iCloud or iTunes to back up your data.
Restore via iTunes: Connect your device to your computer and open iTunes. Click on 'Restore iPhone' and follow the prompts.
Set Up Your Device: After the restore process, set up your device as new or restore from the backup.
Conclusion
Cydia iOS 17.5.1 opens up a world of customization and enhanced functionality for your iOS device. Following the steps and tips in this guide, you can safely download and enjoy the best that Cydia offers. Remember, you can download Cydia iOS 17.5.1 from cydiafree.com.
0 notes
Text
Anyfix downgrade unsigned

#Anyfix downgrade unsigned how to
#Anyfix downgrade unsigned pdf
The installation and operating protocol are very simple it also comes with a long list of features. This is one of the best programs in the market with excellent capabilities and state of the art recovery process. Well, the best IPSW/iOS downgrade software tool is Tenorshare ReiBoot. Part 1: The Best IPSW Downgrade Software Tool
#Anyfix downgrade unsigned how to
Part 3: How to Downgrade iOS Firmware without Using Software.
Part 2: Other Useful iOS Firmware Downgrade Tool.
Part 1: The Best IPSW Downgrade Software Tool.
But there are different IPSW tool downgrade available you can check out our selection below. This happens frequently due to an incomplete upgrade or the version of iOS users have installed, has issues.Ī large number of users try to downgrade after the release of an iOS beta, due to the fact the iOS beta was a glitch. Well, which iPhone downgrade tool do users use to downgrade their OS? iOS users do that very frequently. The downgrade has always been an important part of using iOS devices.
How to Take a Scrolling Screenshot iPhone.
Everything about iPhone Flashlight Shortcut.
How to Turn on Noise Canceling on AirPods.
How to Hide Notifications on Lock Screen iPhone.
Upload Video from Google Photos to Youtube.
How to Fix Delayed Notifications on iPhone.
Does Find My Work If SIM Card is Removed.
Control iPhone from PC without Jailbreak.
You Don't Have Permission to Delete This Item iPhone.
How to Turn off Shutter Sound on iPhone.
How to Download App Not Available in Your Country.
Change Background Color on Instagram Story.
How to Share Screen on Facetime on iPhone.
What Does the Hourglass Mean on Snapchat.
Why Can't I See Comments on My Facebook Live Video.
Everything about Significant Locations iPhone.
Recover Deleted Notes iPad without Backup.
Set Up as New iPhone or Restore from Backup.
What does restore iPhone mean in iTunes.
How Long Does It Take to Restore iPhone.
Why Are My Phone Contacts Linked to Another iPhone.
#Anyfix downgrade unsigned pdf
How to Convert Picture to PDF on iPhone.Delete Photos from iCloud and iPhone at the Same Time.How to Remove Synced Photos from iPhone.Photos Disappeared/Missing from iPhone X After Update.Recover Permanently Deleted Photos from iPhone 8/7/6.Fix iMessage Indexing Glitch on iOS 13.2.2.SMS Not Working on iPhone after Upgrade to iOS 13.An Error Occurred During Activation iMessage.
2 notes
·
View notes
