#I might need to be kept away from etsy cause the stuff i find there is good
Text
... sooooo
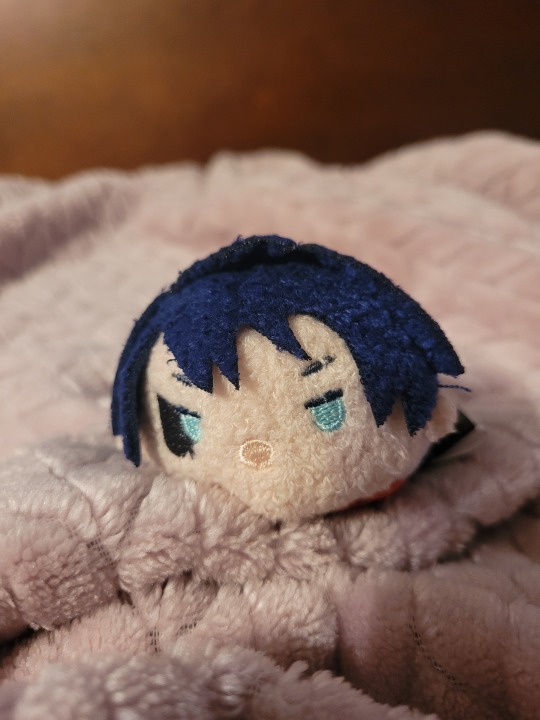
Meet the new smollest baby? Hahaha...
There was only 1 from the etsy seller, i had to
LOOK AT HIS LIL FACE!!!
#twisted wonderland#twst wonderland#disney twisted wonderland#deuce spade#I got another deuce plush again!#I might need to be kept away from etsy cause the stuff i find there is good#And tempted#No blind0raven! Use your money responsiple#By buying deuce stuff- /le smacked#Homemade deuce tsum~
12 notes
·
View notes
Text
Heart-shaped herb flower display build
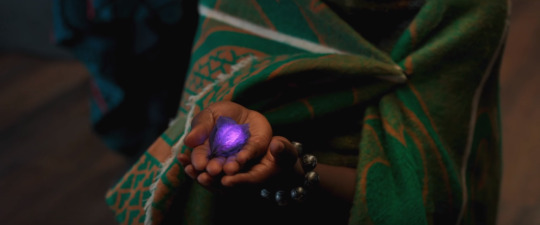
When I’m in an emotional rut, I often find the best way to distract myself is to throw my entire soul into some kind of project, ideally one with a bit of external motivation. And fortunately for me, just such a project suddenly fell into my lap. Some friends of mine were having a party that was part birthday, part LGBT community celebration. It was also Black Panther-themed, and the event name was “Queerkanda”. My task: design and build a punch bowl display based on the glowing purple flower of the Wakandan heart-shaped herb, so that party guests might imbibe and obtain De Strenkt of De Bleck Pentha™. I was only too happy to take up the challenge.
This whole project took 7 days, though only about half this time was spent actually building anything. The rest of the time was spent conceptualising, sketching, finding references, and toting feels.
Step 1: Site visit
I had a little walk around the area where my installation was going to be placed on the night. The spot was a hedge approximately 2.5 – 3 feet high. The bowl itself was going to be placed in the mouth of a large acrylic cylinder, which would then sit in the middle of the hedge, giving the impression of the flower rising out of the foliage. Sounded simple enough.
Step 2: PINspiration
A bit of research showed that the heart-shaped herb flower from the Black Panther movie is not bowl- or cup-shaped like a lotus or a poppy, but actually more trumpet-shaped, like a datura. In fact to me it looks like nothing so much as ruellia tuberosa, a blue-purple flower that grows wild all over the place here in Trinidad and goes by the amusing local name of ‘monkey gun’.

(JM Garg under Creative Commons licence)
Then I started to have a think about glowing flowers. Immediately I thought of those lamps made of silk (or occasionally wool) with solid black edges that look almost like stained glass once lit up. You know, these things:
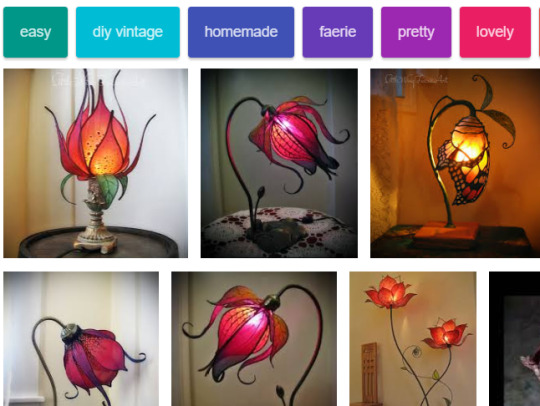
So I assembled a Pinterest board with pictures of purple trumpet-shaped flowers like monkey gun and morning glory, and pictures of lamps like these from Etsy. I’d refer to these images for inspiration throughout the project.
Step 3: Preliminary sketching
Having seen the site and the acrylic base I’d be using, and having acquired some reference images, I was now able to start imagining how I might actually build this thing. And what better way to do that than to get a pencil and start drawing stuff?
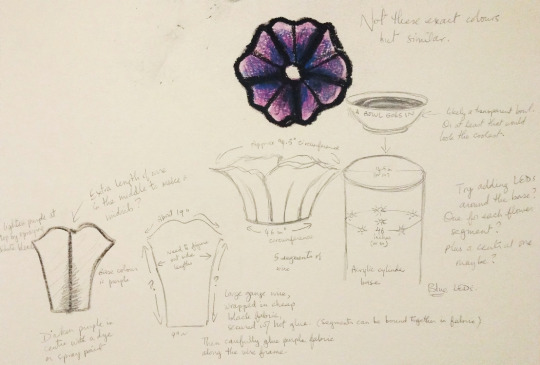
The basic idea was to make five separate flower segments to then be combined into the full trumpet shape around the cylindrical base. They’d be made of purple fabric with black fabric borders, over a skeleton of large-gauge wire. Each of these wire-and-fabric segments would then be illuminated from the bottom by a carefully-angled blue LED bulb, with another LED to be placed right below the bowl. My initial idea was also to add some different tints and tones to the purple by using bleach solution and blue fabric dye, if I could get my hands on it. This was because
a) using paint would affect how the fabric would look under the LED light, and I didn’t want it becoming opaque; and
b) bleaching and dyeing the fabric would allow me to add colour variation without the risk of colours running.
Now I had a much more concrete idea of how to proceed, which meant it was time to go…
Step 4: SHOPPING!
This was going to be an outdoor installation, and currently in Trinidad it’s the rainy season. And if you don’t know what tropical rain is like… well, it can be pretty merciless. So the key phrase in my design philosophy here was “all seasons”. This is why I elected to make the flower out of fabric instead of paper; I needed something that could stand up to the elements if— heaven forbid— it had to, without falling apart.
Luckily, Trinidad is the land of Carnival, so I was able to get pretty much everything I needed in the same store. However, Trinidad is also the land of public holidays, so I had to wait out the long weekend before I could buy stuff. By the time I got everything it was already Wednesday.

For the base fabric I chose a purple candy floss, which is a translucent material that’s quite shiny on its own. While in the store I used my phone flashlight to test how the candy floss would react to light; I found it had a soft glowing, almost frosted look to it, which I liked.
For the borders I picked out a length of black suedette, which just devours light like nobody’s business, so I figured it would make a very nice contrast with the more luminous candy floss.
Finally, for the wire bones I got a coil of heavy 12-gauge aluminium wire, the kind that’s usually used in the construction of Carnival costumes or large puppets or any other kind of sculptural armature of a certain size. It was a good weight, sturdy, pliable but not excessively pliable. All good qualities, but boy, did this wire cause me some pain. More on that in a moment…
Step 5: Construction begins
Aluminium wire of a certain thickness, when repeatedly bent at the same point, becomes hot to the touch.
Just a cool bit of science I happened to notice.
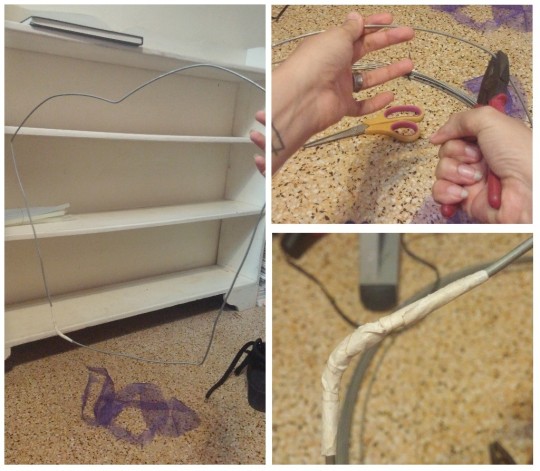
How did I come to notice this, you ask? Well, you see, as the picture shows, the only wire cutters in my house strong enough to take on the task of cutting through semi-hard 12-gauge aluminium wire were old and rusty and dull and horrible. So I ended up using them as a vice, clamping down one end of the wire while repeatedly bending it back and forth until it just broke. That is how I had to cut every. Length. Of wire.
Raw ends of wire like that are also sharp, and will cut skin when they swing around. I managed to slice open my cuticles twice just trying to get the wire cut. Somehow I was able to keep my eyes intact, though I found myself really missing my safety glasses, which are still in Toronto.

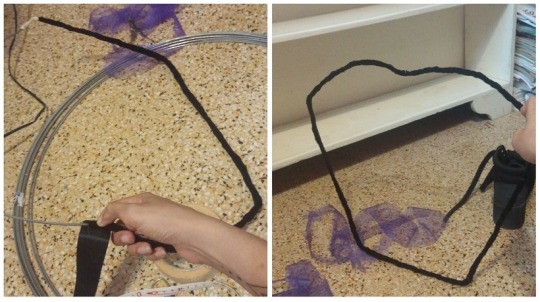
I would shape a single length of wire with the rusty pliers and my hands, leaving the two open ends at the bottom corner. I then bound those ends together with masking tape to give myself a closed fan-like shape. This process I repeated five times. Then I cut the suedette into long strips about an inch wide, and starting at the tape-covered join for a bit of extra stability, I glued the fabric strip in place with a hot glue gun before proceeding to wrap the suedette around the wire, which gave me a heavy black outline.
Finally, I cut the purple candy floss into squares and used hot glue to glue three squares of candy floss to the back of each covered wire outline, before trimming away the excess with scissors. It was an arduous bloody process, and I kept having to take long breaks to be an emotional wreck of a human being, so it did take quite a while.
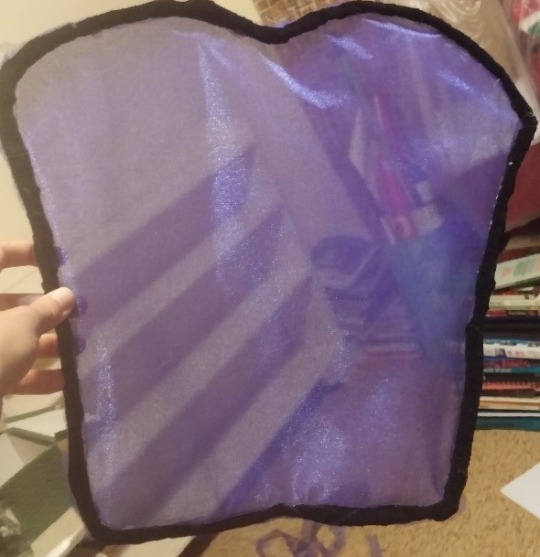
But one square of fabric would have been way too diaphanous, and in the end it actually turned out to be a pretty good decision to use three sheets, for reasons I will explain later.
Step 6: Lighting tests
LED lights are great because they don’t tend to give off a lot of heat. This is good for my purposes, because any light that gets too hot would melt everything I’d made. That’s why black light bulbs were not an option. Those things get DAMN hot. I know because I burned my fingers on one. Between that, the hot glue gun and the wires, I’m essentially impervious to pain at this point.
Now here’s the fun part.
I could not find blue LED lights no matter where I went. Originally I wanted battery-powered bulbs, but then I relaxed my standards to mains-powered rope lights. Nothing doing. Couldn’t even find them in white.
So I had a poke around at home. I found a large bag full of close to 100 tiny battery-powered LED mini-bulbs in bright white, left over from previous birthday parties here. They weren’t very powerful, but I used them to test out how light would look on the flower segments.
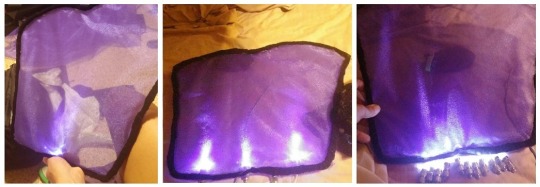
How many bulbs will give enough light? One bulb? Three? ELEVEN?
The number of bulbs needed to satisfactorily light one segment was just prohibitively high (not all the bulbs in the bag worked), so I needed to try something else. I eventually settled on a spool of bright white LED Christmas lights. Using the coil of leftover aluminium wire and two large books, I set up an improvised frame that I could use to arrange the flower segments around the light string.
Hmm, looking pretty damn good if I do say so myself. But there’s something missing.
Step 8: Last-minute detailing
It became apparent to me fairly early on that the candy floss seemed to be completely immune to bleach. I don’t know what I was doing wrong, but I decided to jettison that idea. I also couldn’t get my hands on any fabric dye. But I still wanted to add a bit more black fabric to the flower segments, so that the finished flower would more closely resemble the silk lamps that were my original inspiration. So I got out the sketchbook again and drew out a few ideas.
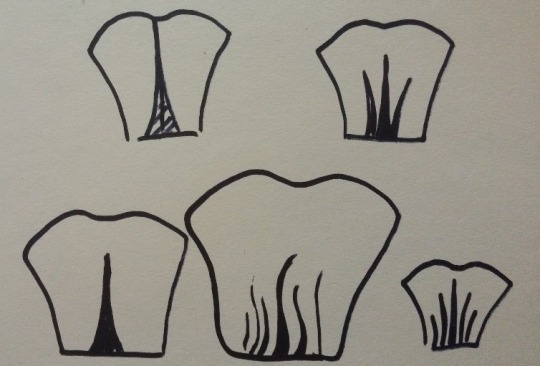
Eventually I settled on the pattern of thin points of graduating lengths in the lower right corner; I cut them out of suedette and arranged them on top of a segment with straight pins. However, there was a problem: the black suedette absorbed way too much light, and pretty seriously affected the way the light hit the candy floss.

Solution: apply the detailing to the *back* of the segment instead, allowing the dark strips to be visible on the other side while still being covered by a layer of light-diffusing candy floss. I applied the strips of suedette very, very gingerly, using only small dots of hot glue. This is where it became apparent that it had been smart to use three layers of candy floss: the glue adhered only to the first layer of candy floss, so I avoided having spots of dried glue showing up on the surface of the flower and getting thrown into horrible relief by the light. Unintentional win! Now time to go to sleep and await--
Step 9: Installation
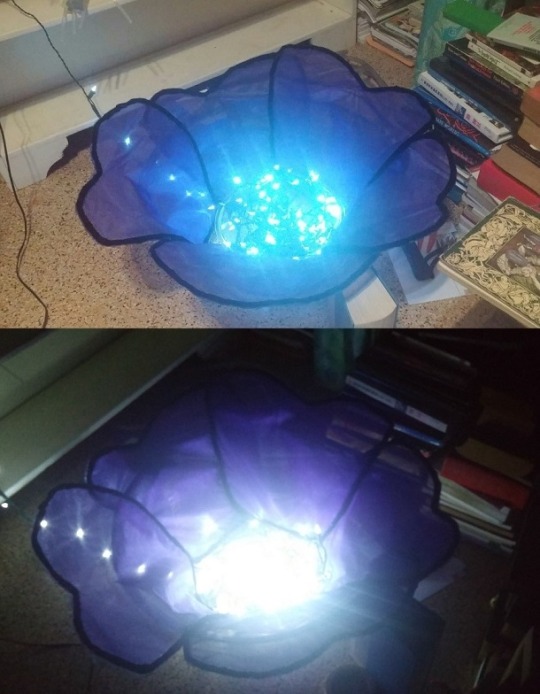
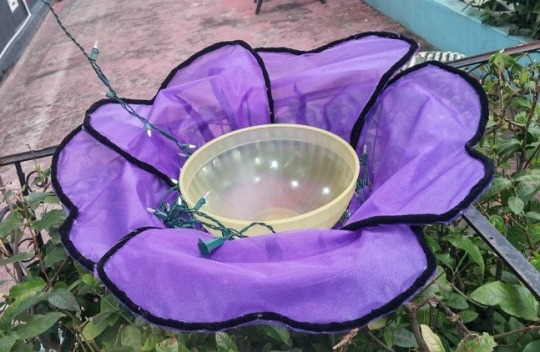
I arrived at the location with about an hour and a half of sunlight remaining. Borrowing two extra pairs of hands, I bound the five segments tightly together around the cylindrical base using a length of 14-gauge soft wire, which felt like freaking silk in my hands after everything I’d been through. Then I used some good old-fashioned elbow-grease to shape each segment convincingly and help create the trumpet shape I’d been after. Finally I stuffed the remaining purple candy-floss into the cylinder and arranged the lights before sticking a bowl on top.
Then it began to positively piss down rain. Luckily the outlet where the lights were plugged in had been wrapped up with a piece of a black bin bag, and the whole flower being soaked now meant it wouldn’t catch on fire! Can’t burn this one, Killmonger.
The rain turned out to just be a passing rain (though a heavy, almost hurricane-like one), so once the spot of bad weather was over, all we had to do was wait for sundown.

And there it is!
Queerkanda forever <3
#long post#image heavy#arts and crafts#flower#punch bowl#heart shaped herb#black panther#wakanda#glowing flower#led lights#wire sculpture#party decor#selfie#mrs beef's weird face#creative process#purple#purple flower#so tired#distraction
8 notes
·
View notes
Last Seen Blogs


tatipousaaa
Tati


paulruddical
you got it, joben

icklefluff
I'm not putting effort into decorating a sideblog