#Install xcode for mac
Explore tagged Tumblr posts
Visit Tumblr Blog
Explore Tumblr blogs with no restrictions, modern design and the best experience.
Last Seen Tumblr Blogs


Fun Fact
Average visit duration of Tumblr.com is 10 mins and 25 secs.
Text
You know what's worse than software by Apple?
Having to develop the code for iOS apps using said software.
It was supposed to be simple: port my work's native Android app onto iOS like we do for many of our apps. This one in particular delt with combining videos and overlaying chosen music over it. Our lead iOS developer had left and found a different job several months back, in retrospect that should've been a warning.
I'm the main Android app developer at our work and got assigned to get better at iOS development for this. But Apple, my fucking god Apple. It's not even a matter of different coding language, this is 100% an abusive relationship.
In the past two weeks Apple's own coding software, xCode, has suddenly crashed on me more times than I can count. Like one second it works and a split second later it just closes and I lose my progress.
When it came to video mixing Android had spoiled me. If I wanted to add a still image between videos it'd only take five lines. And iOS? It doesn't have that functionality at all. I have to take a still fucking image, save it as a video, and then use it. Absolutely wasteful.
I needed a place to save the created videos and there's a directory available called NSMovieDirectory or some shit. Sweet, that's a perfect place to save the videos to! Right?

Turns out although the NSMovieDirectory is in there, you can call it, it's not implemented for iOS devices, only Macs. A fucking variable you can call in iOS development doesn't even work for iOS devices. This is not a one off experience I've seen this happen with methods and variables multiple times.
Out of the blue xCode suddenly decided to stop auto predicting as I typed. This also included no longer showing any typos or other errors.
For whatever god forsaken reason if xCode detects several physical devices that it can run debug on, it will always pick a wireless device and NEVER the device you have literally plugged into your computer! The number of times I've started a debug build and waited for the app to start only to realize it's running on some unknown device elsewhere in the office is too damn high.
I felt my computer slowly dying installing all the needed files to run xCode. Forty. Fucking. Gigabytes. That's what's needed to merely use the damn thing. If you don't have physical devices and have to use simulators that gets even higher.
Designing UI layouts while dealing with different screen sizes and orientation changes is a whole circle of hell. I'd go into further detail why but that would make this post several pages long. Just know that it is far more convoluted and buggy than it has any right to.
TLDR: If you're using an iOS app and wonder why it's buggy, more than likely it's because the developers were being dragged into programming hell by Apple.
TLDR2: For the love of all that is holy and good in this world don't be like my workplace: use something to make iOS apps that isn't native iOS.
2 notes
·
View notes
Text
WWDC 2025 Thoughts
Liquid Glass: Shiny things always look great at the store, and this looks like it was designed to look sexy at the Apple Store. It's an obvious artifact of the Alan Dye UI design factory, with an obsession for how things look (in UI mockups) rather than how they work (in the real world).
A small positive of this design change is that buttons, toolbars and other clickable elements are more prominent than in the flat and border-less iOS 7 design language.
The superfluous animations and reflective glass effects seem ok, even if they’re slightly overdone at first glance. I’m more concerned about recent Apple’s tendency to make animations too slow, such that users have to sit through them, which is especially bad with commonly performed actions. Also, wouldn’t this consume too much resources and battery?
What’s terrible is the legibility. It really needs to be looked at and the opacity dialed back a few notches, especially for the whiter near-translucent elements, Control Center and notifications. Or at least give us a slider to control this aspect.
We’re already at a low bar when it comes to the HIG, so I don’t think Tim Apple has the capacity to fix this significantly before release. What I fear about this design change is that Apple customers would be shoved into at least a decade of low key illegibility and unproductiveness, with content behind bleeding through UI elements and affecting how quickly they can grok the interface.
After some time, users would be desensitized to its terrible-ness. Once this gets out, it would be nice to see objective studies that measure task completion rates across a broad demographic.
Finder: Nice feature updates, but for the love of god don’t mess with the Finder icon, which is literally iconic. The dark blue side of the smiley should be on the left. Fix it!
Spotlight: Finally given some attention. Nice to see new features, the App Library integrated, and wow, a clipboard manager! However, the caveat with this feature has always been that it has been a buggy and flaky mess (suddenly stops working, prolonged reindexing), so it remains to be seen how well this whole thing works in the real world, especially after Apple shoved more stuff in it.
System Settings: Still an unfixed train wreck since macOS Ventura in 2022. My condolences to Xcode, which got hit with the ugly stick too.
iPadOS Multitasking: This got tons of “finally”. Just adopt what’s great about the Mac, duh! But still, it took way too many years of multitasking stagnation, hand-wringing and media shaming to get here.
How well this works remains to be seen in actual use. At first glance, it does seem less restrictive than Stage Manager with freeform window sizing and positioning. An actual mouse pointer instead of a stupid round nubbin. Permitting background processing of long running tasks. I sure hope Apple did not forget to remove the single-tasking relic of allowing only a single app to play audio or video.
Came across some people who installed the first build mention that Stage Manager is also available on all iPads, not only recent iPad Pros. So much for Federighi pretending back in 2022 that this feature required a M1 and 8GB RAM, when it was merely Apple’s greed calling the shots, especially when this new multitasking can handle tons of windows open at the same time on all iPads that support iPadOS 26.
iOS Camera: Nice to see the camera app get a clean and more straightforward redesign, after years of new iPhone camera functionality cluttering up the UI. This is one area that lacks fundamental UI design thinking, so expect this to get copied by Android manufacturers pronto. Oh, and the app icon looks kinda… skeuomorphic?
Stability: Given the huge redesign across all platforms and early feedback, expect a shit show on the stability front, with rendering glitches taken up another notch, as if the current notch isn’t bad enough. Remember the iOS 7 glitches? Apple’s track record is not great.
Continuity: A little disappointed that there’s no big splash here to further tighten the ecosystem lock-in. Given the buzz about iPadOS 26 turning iPads into "real computers", it would be nice to see the iPhone-to-Mac Continuity features (mirroring, notifications, widgets) appear on iPad.
AirPods: These products are some of the best executed ones in the Cook era, and after featuring them prominently in the WWDC 2023 (Adaptive Audio) and WWDC 2024 (Voice Isolation, gestures) keynotes, it was disappointing that this was left out.
1 note
·
View note
Photo

#純靠北工程師8mx
----------
因為某個愛用Mac跟CommandLine 的Linux信徒搞不定GITLAB的SSL憑證 現在東西在他最愛用的Mac平台Clone不下來 SOURCETREE 驗半天驗不出來有效URL, 姑且當Sourcetree的問題好了,去裝git。 結果誰知道2025年想在mac上面裝個git也是困難重重, 九彎十八拐。 brew裝到當機,command line 在那邊跑半天也不知道在跑甚麼。 binary installer 是三年前版本, 現在要用最新版得去找xcode...
----------
💖 純靠北工程師 官方 Discord 歡迎在這找到你的同溫層!
👉 https://discord.gg/tPhnrs2
----------
💖 全平台留言、文章詳細內容
👉 https://init.engineer/cards/show/11193
0 notes
Text
What to Do If You Can’t Find Your UDID on Your iPhone

The Unique Device Identifier (UDID) is a crucial component for developers and those who need to manage apps or configurations on their iPhones. It acts as a distinctive identifier for your device, allowing developers to test and manage apps or even register for certain services. However, if you're having trouble finding your UDID on your iPhone, you're not alone. Many users often find themselves asking, “How to find your iPhone UDID?” especially when they need it for app development or troubleshooting. In this blog, we’ll walk you through several methods to retrieve your UDID, as well as discuss why it's important and what to do if you can’t find it.
Why Do You Need Your UDID?
The UDID is essential for a variety of reasons. For developers, it’s crucial for testing and deploying apps that aren’t yet available in the App Store. This is especially true for those using services like TestFlight, where you need to register your device's UDID to get access to beta versions of apps. Additionally, if you're setting up a device for enterprise management, your UDID may be required to install specific profiles or configurations.
Even if you're not a developer, you might need your UDID for support purposes, or if you're dealing with a technical issue that requires you to share this identifier with Apple Support. Therefore, knowing how to locate your UDID can be incredibly useful.
Common Ways to Find Your iPhone UDID
If you’re wondering “How to find your iPhone UDID?” here are some straightforward methods you can use.
1. Using iTunes (or Finder on macOS Catalina and later)
One of the easiest ways to find your UDID is by using iTunes (or Finder for macOS Catalina and later versions). Follow these steps:
Connect your iPhone to your computer using a USB cable.
Open iTunes (or Finder on macOS Catalina or newer).
Click on the device icon when it appears in iTunes/Finder.
Under the Summary tab, you should see information about your iPhone.
Click on the Serial Number to toggle between various identifiers (e.g., IMEI, ICCID, UDID). Your UDID will now be displayed.
Right-click on the UDID to copy it.
This is the most direct and reliable method to find your UDID.
2. Using Xcode (for Developers)
If you’re a developer, you may also find your UDID through Xcode, which is Apple’s integrated development environment (IDE). Here’s how to do it:
Install Xcode from the Mac App Store if you haven’t already.
Open Xcode and connect your iPhone to the computer.
Go to the Devices and Simulators window (accessible from the Window menu).
Select your device from the list.
Your UDID will appear on the right side of the screen, and you can easily copy it.
This method is particularly useful for developers who need to manage multiple devices and are already familiar with the Xcode environment.
3. Using Third-Party Websites
If you prefer an alternative method or don't have access to iTunes or Xcode, there are third-party websites that can retrieve your UDID for you. Here’s how:
Visit a trusted site that allows you to get your UDID (such as get.udid.io).
Follow the on-screen instructions, which typically require you to install a configuration profile on your iPhone.
Once the profile is installed, visit the site again on your iPhone, and it will display your UDID.
While this method can be convenient, be sure to use reputable websites to avoid any security risks.
4. Using a Mobile Device Management (MDM) Profile
If you’re managing multiple devices or configuring settings for an organization, you might already have an MDM profile installed on your iPhone. Many MDM solutions allow users to easily find their UDID as part of the configuration process.
What If You Can't Find Your UDID?
If you’ve tried the methods above and still can’t locate your UDID, there are a few steps you can take.
1. Check for Connection Issues
Sometimes, the issue may be related to your iPhone’s connection to your computer. Ensure that your iPhone is properly connected via USB and that your computer is recognizing the device. If you're using Finder on macOS Catalina or later, check that Finder is showing your iPhone in the left sidebar. If your device is not recognized, try restarting your iPhone or using a different USB port or cable.
2. Ensure Software is Updated
If you’re using older versions of iTunes or macOS, it might be causing issues in finding your UDID. Make sure that both your iPhone and your computer are running the latest software updates. For instance, macOS Catalina and later versions no longer use iTunes; they use Finder to manage iPhones, and keeping your system up to date will ensure smoother operation.
3. Contact Apple Support
If all else fails, you can always reach out to Apple Support. They can guide you through the process of retrieving your UDID or assist you with any technical difficulties you may be encountering.
Use a Mobile App Cost Calculator to Plan Your Development Budget
If you are a developer and are managing multiple devices or building an app that requires UDID registration, it's essential to plan for the costs associated with iOS development. The use of a mobile app cost calculator can be incredibly helpful. This tool allows you to estimate the cost of building, testing, and maintaining your app based on its features, design, and scope. By using a mobile app cost calculator, you can ensure your project stays within budget while also factoring in the costs of device management and UDID registration.
If you're interested in exploring the benefits of iphone application development services for your business, we encourage you to book an appointment with our team of experts. Book an Appointment
Wrapping Up: The Importance of UDID in iPhone Application Development
In conclusion, finding your UDID may seem like a small task, but it’s an essential part of the app development and management process. Whether you're a developer testing a new app, or you need it for troubleshooting, knowing how to locate your UDID can save you time and effort.
If you’re in need of professional help for your iPhone application, our team offers expert iPhone application development services. We specialize in everything from app design to testing, and we can ensure your UDID management is streamlined and efficient. Our services help ensure that your app is not only functional but also optimized for performance across all devices. Let us help you bring your iOS app to life!
0 notes
Text
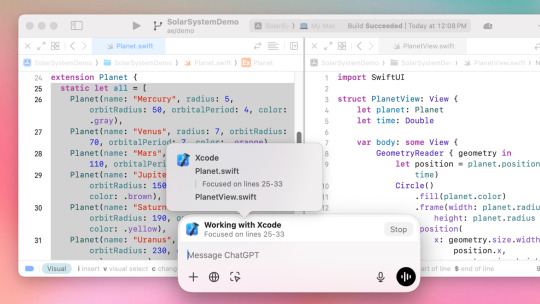
ChatGPT for Mac Can Now Work with Apps on Your Desktop
Enhance your coding workflow with ChatGPT's new feature, integrating directly with Xcode, VS Code, and more.
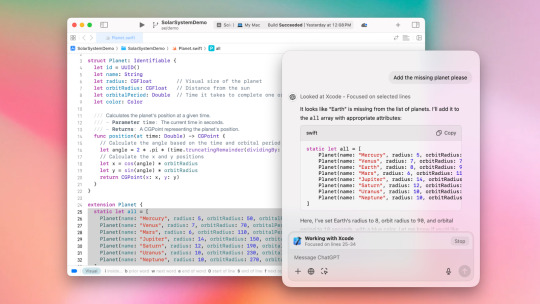
The ChatGPT desktop app for Mac has introduced a new integration feature aimed at enhancing developer productivity by providing direct access to content from popular coding environments such as Xcode, VS Code, and TextEdit. This integration enables ChatGPT to read and utilize context from open files, thereby improving responses with pertinent coding information.
How It Works
Developers can enable this feature by clicking on “Work With Apps” in the ChatGPT chat bar and selecting a compatible coding application. A banner will show when an app is connected, indicating the types of content that are accessible. For text editors, ChatGPT incorporates the content from the open pane or selected text, while for terminal applications like Terminal and iTerm, it captures the last 200 lines of activity. All accessed information is recorded in the chat history, which users can manage and delete as necessary.
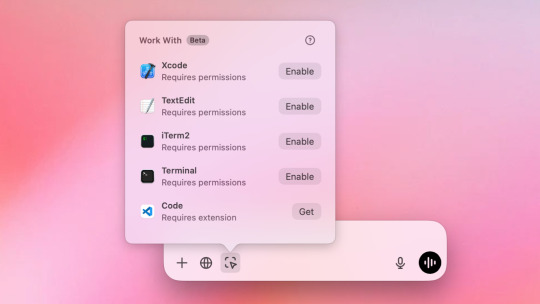
Configuration and Compatibility
Users can configure this feature under Settings > Work with Apps, allowing them to manage compatible applications and set up the integration. Some applications may require additional steps, such as installing extensions for VS Code.
Privacy and Control
For those concerned about data privacy, users have the option to disable the feature completely. OpenAI highlights the importance of data control: users can prevent their interactions from being used to train the model by adjusting specific settings. The temporary Chat mode ensures that conversations are not saved. OpenAI also assures that enterprise data remains secure and isolated, with no involvement in model training.
This integration represents a significant advancement toward a more seamless, context-aware experience for Mac developers utilizing ChatGPT in their coding tasks.
For more news like this: thenextaitool.com/news
0 notes
Text
Building Cross-Platform Apps with Swift and Kotlin
In today's tech-driven world, the demand for mobile applications that run seamlessly across different platforms is ever-increasing. Businesses and developers are constantly seeking efficient ways to reach a broader audience without duplicating efforts for multiple operating systems. Enter Swift and Kotlin, two powerful programming languages that, when combined, can streamline the process of building cross-platform apps. In this blog post, we'll explore how Swift and Kotlin can be used together to create high-performance, cross-platform applications.
Why Choose Swift and Kotlin?
Before diving into the technicalities, let's understand why Swift and Kotlin are the go-to choices for cross-platform app development.
Swift: Developed by Apple, Swift is a powerful and intuitive programming language designed for iOS, macOS, watchOS, and tvOS. It offers a robust set of features and is known for its performance and safety.
Kotlin: Created by JetBrains, Kotlin is a modern language that runs on the Java Virtual Machine (JVM) and can be used for Android development. Kotlin is concise, expressive, and interoperable with Java, making it a favorite among Android developers.
Both languages have gained immense popularity in their respective domains, and their capabilities make them ideal for cross-platform development.
Cross-Platform Development Approaches
There are several approaches to cross-platform development, each with its own set of advantages and trade-offs. Here are the main ones:
Native Development: Writing separate codebases for iOS (Swift) and Android (Kotlin). This approach ensures the best performance and user experience but requires maintaining two codebases.
Cross-Platform Frameworks: Using frameworks like Flutter, React Native, or Xamarin to write a single codebase that runs on both iOS and Android. While this saves time and effort, it may not fully leverage the native capabilities of each platform.
Kotlin Multiplatform: This approach allows you to write shared code in Kotlin for logic and business rules, while the platform-specific code is written in Swift for iOS and Kotlin for Android. This balances code reuse with native performance and experience.
Setting Up Your Development Environment
To get started with Swift and Kotlin for cross-platform development, you need to set up your development environment.
Swift Setup:
Install Xcode from the Mac App Store.
Create a new Xcode project and select the appropriate template for your app.
Kotlin Setup:
Install Android Studio from the official website.
Create a new Android project and configure it to use Kotlin.
Kotlin Multiplatform Setup:
Install the Kotlin Multiplatform plugin in Android Studio.
Create a new Kotlin Multiplatform project and configure the shared code module.
Writing Shared Code
With Kotlin Multiplatform, you can write shared code that can be used by both iOS and Android apps. This includes business logic, data models, and networking code.
Creating Shared Modules:
In your Kotlin Multiplatform project, create a shared module where you'll write your shared code.
Use Kotlin to write business logic and other shared functionalities.
Using Shared Code in Swift:
In your Xcode project, add a dependency on the shared module.
Use the shared code written in Kotlin within your Swift codebase.
Example: Networking Code
Let's look at an example of how you can write shared networking code in Kotlin and use it in both Swift and Kotlin.
Shared Networking Code in Kotlin:kotlinCopy codeimport io.ktor.client.HttpClient import io.ktor.client.request.get class ApiService { private val client = HttpClient() suspend fun fetchData(url: String): String { return client.get(url) } }
Using Shared Code in Swift:swiftCopy codeimport shared class DataFetcher { let apiService = ApiService() func fetchData(url: String, completion: @escaping (String) -> Void) { apiService.fetchData(url: url) { data, error in if let data = data { completion(data) } else if let error = error { print("Error fetching data: \(error)") } } } }
Conclusion
Building cross-platform apps with Swift and Kotlin offers a powerful combination of performance, efficiency, and code reuse. By leveraging the strengths of both languages and using Kotlin Multiplatform, developers can create high-quality applications that provide a native experience on both iOS and Android. As the mobile landscape continues to evolve, mastering these tools and techniques will be essential for staying ahead in the world of app development.
Embrace the power of Swift and Kotlin and start building cross-platform apps that deliver the best of both worlds!
For More Info - Best Software Development Company in India
1 note
·
View note
Text
How To Create Safari Web Apps In MacOS Sonoma
To create Safari web apps in macOS Sonoma, you can follow these steps:
Set Up Your Development Environment: Ensure you have Xcode installed on your Mac. You’ll use Xcode to create and manage your Safari web apps.
Create a New Safari Web App Project: Open Xcode and choose “Create a new Xcode project”. Select the “Safari Web Extension” template under the “macOS” section.
Configure Your Project: Give your project a name and specify its location on your filesystem.
Design Your Interface: In Xcode, you can design the interface of your Safari web app using Interface Builder. This includes creating the user interface elements and defining their functionality.
Write Your Code: Implement the functionality of your Safari web app using Swift or Objective-C. You can add event handlers, make network requests, and interact with the Safari browser using the Safari App Extensions API.
Test Your App: Use the Xcode simulator or deploy your Safari web app to a real device for testing. Ensure that your app behaves as expected and handles different scenarios gracefully.
Publish Your App: Once you’re satisfied with your Safari web app, you can distribute it through the Mac App Store or other distribution channels. Make sure to follow Apple’s guidelines for app distribution and submission.
Update and Maintain Your App: Regularly update your Safari web app to fix bugs, add new features, and ensure compatibility with the latest macOS and Safari versions.
By following these steps, you can create Safari web apps in macOS Sonoma and provide users with a seamless browsing experience tailored to their needs.
#create#safari#webapps#macOS#macOSSonoma#Macbook#foryou#trendingnow#viralpage#imacgeeks#ShareMyPost#SharePost#trendingtopic#foryourpage#viralfb#viralpost#viral
0 notes
Text
Essential Share for HBuilder Developers! Uploading IPA Files on Windows
Abstract: HBuilder is currently the most popular mobile app development framework in the market. However, many users encounter difficulties uploading IPA files to the App Store due to the lack of a Mac computer for using Xcode or Application Loader. This blog post introduces a simple and convenient method of uploading IPA files through a web platform, without the need to install any software.
Introduction:
HBuilder is a powerful and convenient development framework for creating mobile applications. However, Windows-based developers often face challenges when trying to directly upload IPA files to the official Apple App Store, as Apple does not provide a Windows version of the upload tool. Is there a solution for uploading IPA files on Windows computers? This article will introduce a user-friendly approach to help HBuilder developers overcome this problem.
1. Uploading through a Web Platform
The method we will introduce involves using a dedicated web platform for uploading IPA files. You can access this platform through the appuploader - Windows version of Application Loader, which supports uploading and viewing iOS app IPA files.
Firstly, open the website and enter the developer center's dedicated password. Then, select the corresponding IPA file to begin the upload process.

2. Monitoring the Upload Progress
During the upload process, you can monitor the progress to stay informed about the current status. If there are no issues with the IPA file, the upload will be completed successfully.
3. Pros and Cons Comparison
This upload method offers several advantages, including its simplicity, ease of use, no software installation requirement, and fast upload speed. However, it is worth noting that it requires entering the developer center's dedicated password, which may present a certain level of risk.
Conclusion:
For HBuilder developers without access to a Mac computer, utilizing a web platform for uploading IPA files proves to be a simple and effective approach. This method eliminates the need for software installation and can significantly enhance development efficiency by using a web browser.
References:
Official Yunedit Website: appuploader - Windows version of Application Loader
HBuilder Official Website: HBuilderX - Efficient Geek Techniques
0 notes
Text
How to develop an iOS Application?

In this digital era, mobile applications have become an integral part of our lives, and iOS apps, in particular, have gained significant popularity due to their sleek design, robust performance, and strong security features. If you’re looking to dive into the world of app development, this comprehensive guide will walk you through the essential steps to build a successful iOS app.
Understanding iOS App Development
iOS app development refers to the process of creating applications that run on Apple’s iOS platform, used by millions of users worldwide. As an aspiring iOS developer, understanding the core concepts and steps involved is crucial for building a functional and user-friendly app.
1. Ideation and Planning
The first step in creating an iOS app is to brainstorm ideas for the app’s purpose and features. Identify a problem your app will solve or a need it will fulfill. Conduct market research to gauge the demand and competition for similar apps. Once you have a clear vision, outline the app’s functionalities, features, and user experience.
2. Learning Swift Programming Language
Swift is Apple’s programming language specifically designed for iOS app development. It’s essential to learn Swift to build native iOS apps. Resources like Apple’s Swift Playgrounds and online tutorials can help you get started with Swift programming.
3. Setting Up Xcode
Xcode is the integrated development environment (IDE) provided by Apple for iOS app development. Download and install Xcode from the Mac App Store. This powerful tool includes a code editor, interface builder, and simulator to test your app on various devices.
4. Designing the User Interface (UI)
As an iOS developer, crafting an engaging and intuitive user interface is crucial for the success of your iOS app. Use Interface Builder in Xcode to design screens, arrange elements, and create a visually appealing layout. Focus on user-friendly navigation and a clean design that aligns with Apple’s design guidelines.
5. Writing Code
This is the heart of iOS app development. Write Swift code to implement the functionalities outlined in your app’s plan. Break down the app’s features into smaller modules, making it easier to manage and debug. Utilize Swift’s features like optionals, protocols, and extensions for efficient coding.
6. Integrating APIs
Application Programming Interfaces (APIs) allow your app to interact with external services, data sources, or hardware components. Whether it’s integrating social media sharing, payment gateways, or location services, APIs enhance the functionality of your app. As an iOS developer, understanding and effectively utilizing APIs is crucial for creating feature-rich and interconnected applications that provide a seamless user experience.
7. Testing and Debugging
Thorough testing is vital to ensure your app works flawlessly. Use the Xcode simulator to test your app on different iOS devices and screen sizes. Identify and fix bugs, crashes, and performance issues. Additionally, consider beta testing with a small group of users to gather feedback.
8. Optimizing Performance
Optimize your app’s performance to provide a smooth user experience. This involves reducing memory usage, minimizing loading times, and optimizing graphics. Keep your code clean and follow best practices to avoid common performance bottlenecks.
9. App Submission
Before submitting your app to the App Store, ensure it meets Apple’s guidelines and policies. Create an Apple Developer account, after that prepare promotional materials, screenshots, and app descriptions. Follow the submission process in Xcode to package and upload your app.
10. Marketing Your iOS App
Once your app is on the App Store, effective marketing is essential for its success. Utilize social media, app review websites, and online advertisements to increase visibility. Engage with your users, gather feedback, and continuously improve your app based on their suggestions.
How Whiten App Solutions Can Be Your Perfect Choice?

When considering a custom software development partner, Whiten App Solution’s expertise shines through. Our team of experienced professionals excels in translating complex business requirements into seamless and user-friendly iOS applications. By leveraging the latest technologies and adhering to industry best practices, We ensure that the applications we develop are not only robust and reliable but also scalable to meet future needs.
Furthermore, Whiten App Solution’s commitment to client satisfaction is evident in its collaborative approach. We prioritize clear communication, regular updates, and iterative development cycles, ensuring that the client’s vision is brought to life while maintaining flexibility to accommodate any changes or enhancements along the way.
In conclusion, if you’re seeking a partner to develop a top-notch iOS application that aligns with your business objectives, look no further than Whiten App Solutions. Our proven expertise, dedication to excellence, and passion for innovation make us an ideal choice for businesses aiming to succeed in the competitive digital landscape.
Partner with Whiten App Solutions today and unlock the potential of custom iOS application development for your business’s growth and success.
1 note
·
View note
Text
How to develop IOS apps?

Developing iOS apps involves several steps, from conceptualization and design to coding and deployment on the App Store. Here's a high-level overview of the process:
Learn the Basics:
Familiarize yourself with the Swift programming language, the primary language for iOS app development. You'll also need to understand iOS development concepts and tools.
Get a Mac and Install Xcode:
iOS development requires a Mac computer. Install Xcode, Apple's integrated development environment (IDE), for creating iOS apps. Xcode includes everything you need, including the Swift compiler, Interface Builder, and debugging tools.
Conceptualize and Design:
Define your app's purpose, target audience, and features.
Create wireframes or mockups to visualize your app's user interface (UI).
Design the app's user interface using Xcode's Interface Builder or SwiftUI.
Coding Your App:
Write the app's code using Swift within Xcode.
Implement app logic, user interactions, and data handling.
Use Apple's frameworks and APIs to integrate functionality like camera access, location services, and more.
Test Your App:
Use the iOS Simulator in Xcode to test your app on different device configurations.
Perform real-world testing on physical iOS devices to ensure functionality and performance.
Debug and Refine:
Use Xcode's debugging tools to identify and fix bugs in your code.
Optimize your app's performance, responsiveness, and user experience.
Add App Icons and Launch Screens:
Design and implement app icons and launch screens to enhance the app's branding and user experience.
Prepare for App Store Submission:
Create an Apple Developer account and enroll in the Apple Developer Program.
Configure app details, metadata, and screenshots on App Store Connect.
Generate and assign provisioning profiles and certificates to your app.
App Store Guidelines and Review:
Ensure your app follows Apple's App Store Review Guidelines, which include design, functionality, and content requirements.
Submit your app for review on the App Store.
Deployment:
Once your app is approved, it can be published on the App Store for users to download and install.
Maintenance and Updates:
Regularly update your app to fix bugs, introduce new features, and keep it compatible with the latest iOS versions.
Resources to Learn iOS App Development:
Apple's Official Documentation: Its official website provides extensive documentation, guides, and tutorials for iOS development.
Online Courses and Tutorials: Various online platforms offer courses and tutorials for iOS app development, such as Udemy, Coursera, and RayWenderlich.
Books: Numerous books are available that cover iOS app development using Swift.
Developer Communities: Engage with communities like Stack Overflow and Reddit's r/iOSProgramming for support and guidance.
iOS app development can be complex, especially if you're new to programming, but plenty of resources are available to help you learn and succeed.
Written By Smiligence
0 notes
Text
i don't think you guys realize how hard this is to do. in order to do this i need to:
-acquire an apple tv with a tvos version that is compatible with trollstore (i'll get to that)
-acquire a Steelseries Nimbus wireless controller so that i can play the game if i get it running
-borrow someone's mac and connect the apple tv to it
-transfer over mikasa via xcode to jailbreak the apple tv
-do whatever fuckery mikasa requires
-install trollstore (app store replacement that allows you to install apps from a url)
-install minecraft apple tv edition
-sign in with my icloud account (required for saving worlds) and hope it doesn't get banned
-sign in with my microsoft account and hope it doesn't get banned
im not doing all of that. or i wont be if this post doesn't get 10 notes
10 notes and i will buy a preowned apple tv and try to hack it to play minecraft apple tv edition
12 notes
·
View notes
Text
Building Your First iPhone App: Step-by-Step Tutorial
In today’s rapidly evolving tech landscape, mobile apps are at the heart of how businesses and individuals engage with users. If you've ever wondered how to develop an app for iPhone, you're not alone. Developing your first iPhone app can seem like a daunting task, but with the right guidance and tools, it’s completely achievable. Whether you’re an aspiring entrepreneur, a startup, or someone with a great idea, the steps to building your first iPhone app are relatively straightforward. In this blog post, we will walk you through the entire process, from idea conception to launching your app on the App Store.
Step 1: Define Your Idea
Before diving into the development process, it’s crucial to have a clear idea of the app you want to build. Is your app solving a specific problem? Is it for entertainment, productivity, or e-commerce? The more defined your concept is, the easier it will be to develop. Think about your target audience and the features your app will have. Create a simple wireframe or sketch of your app's layout and functionality to visualize its flow.
Step 2: Set Up Your Development Environment
The next step in how to develop an app for iPhone is to set up your development environment. To build iOS apps, you'll need a Mac computer with macOS installed. Apple’s Integrated Development Environment (IDE), Xcode, is the primary tool used for building iOS apps. Xcode provides everything you need to design, develop, and debug your app.
Download Xcode from the Mac App Store, and once it's installed, you can begin setting up a new project. Xcode uses a programming language called Swift, which is specifically designed for iOS app development. If you're unfamiliar with Swift, there are plenty of tutorials available to get you started.
Step 3: Learn Swift and Basic iOS Concepts
If you’re new to programming or Swift, it’s a good idea to spend some time learning the basics of the language and the key iOS concepts such as Views, ViewControllers, and Navigation Controllers. Swift is beginner-friendly but still powerful enough to create fully functional apps.
There are many online resources like Apple's official Swift documentation, tutorials on YouTube, or even free coding boot camps to help you learn how to develop your iPhone app.
Step 4: Build the App's User Interface (UI)
Once you’re familiar with Swift and the iOS development concepts, it’s time to start building your app’s user interface. iOS apps follow the Human Interface Guidelines set by Apple, which ensures your app is intuitive and user-friendly.
In Xcode, you can use Interface Builder, a drag-and-drop tool, to lay out your app’s UI. Create buttons, labels, and other elements and arrange them on the screen. You can also customize the look and feel of each component, including colors, fonts, and animations. Make sure that the design of your app is responsive, meaning it should adapt to different screen sizes like those of iPhones and iPads.
For a more complex app, you might want to hire a designer to help with the aesthetics. A well-designed app will not only look great but will also improve user engagement and retention. Keep your app’s interface simple, elegant, and easy to navigate to create a seamless user experience.
Step 5: Write the Code for App Functionality
At this stage, you’ll begin implementing the actual functionality of your app by writing Swift code. This includes defining what happens when a user clicks a button, how data is stored, and how the app interacts with external services like APIs. Depending on the complexity of your app, this part of the development process can take some time.
Start by focusing on smaller features first, and test them individually before integrating them into the app. Remember to test your app regularly to catch bugs early and ensure everything works as intended. Xcode includes built-in simulators for testing, so you can see how your app behaves on various iPhone models without needing the physical devices.
Step 6: Test Your App
Testing is one of the most critical phases of app development. Even after writing the code, you need to ensure that your app is bug-free, functional, and works across different devices and iOS versions.
Use Xcode's testing tools to run your app on an iPhone simulator. You should also test your app on a real iPhone to identify any issues related to performance, touch gestures, and real-world usage scenarios. You can invite users to participate in beta testing using TestFlight, a platform provided by Apple to distribute pre-release versions of your app to testers.
Step 7: Optimize and Debug
Once your app is functional, it’s time to optimize it for performance. This includes making sure it loads quickly, responds smoothly to user interactions, and doesn’t drain battery life unnecessarily. You’ll want to monitor the app’s performance using Xcode’s profiler to track memory usage, CPU usage, and network activity.
At this stage, debugging is essential. Test the app under various conditions to see how it behaves and fix any bugs you encounter. Even small issues, such as crashes or slow performance, can affect the user experience and lead to bad reviews.
If you're interested in exploring the benefits of how to develop an app for iPhone services for your business, we encourage you to book an appointment with our team of experts.
Book an Appointment
Step 8: Submit to the App Store
After successfully developing and testing your app, it’s time to submit it to the App Store. To do this, you’ll need an Apple Developer account, which costs $99 per year. Once your account is set up, use Xcode to submit your app for review. Make sure to follow Apple’s guidelines for submitting apps, including providing accurate descriptions, keywords, and screenshots.
Apple’s review process can take anywhere from a few days to a couple of weeks. If your app meets all of Apple’s guidelines, it will be published on the App Store, ready for download by millions of users around the world.
Step 9: Market Your App
Once your app is live, the next step is to market it. Use social media, blogs, and email newsletters to spread the word. You can also use paid ads or collaborate with influencers to reach a larger audience.
App Store optimization (ASO) is also important for getting your app noticed in the App Store. Optimize your app's title, keywords, and description to ensure it ranks high for relevant search queries.
Step 10: Maintain and Update
Building an app doesn't stop after it’s been launched. You’ll need to maintain and update your app regularly to fix bugs, add new features, and ensure compatibility with future iOS versions. Pay attention to user feedback and make updates based on their suggestions to improve your app and keep users engaged. Considering expanding your app to iPad? Explore our expertise in iPad app development for a seamless experience across all devices.
Conclusion
Building your first iPhone app is an exciting journey that requires patience, learning, and attention to detail. By following these step-by-step guidelines, you can turn your app idea into a fully functional product that’s ready for launch. Remember that, depending on the complexity of your app, the development process can be time-consuming and costly, so it’s always wise to use tools like a mobile app cost calculator to estimate the budget.
0 notes
Text
Blog post
YouTube channel
0 notes
Text
Install xcode for mac

Install xcode for mac how to#
Install xcode for mac mac os x#
Install xcode for mac install#
Install xcode for mac software#
Install xcode for mac code#
This time it will launch without the “Can’t find Xcode” error and start to compile various parts of the app, which will take a moment or two.You’ll be prompted to enter your password before the command will execute.Sudo xcode-select -s /Applications/Xcode.app/Contents/Developer Now open a Terminal from your Applications -> Utilities folder and issue the command:.Xcode is the editor we use in iOS to build and.
Install xcode for mac install#
Once the installation has completed, launch Xcode and accept the terms of the License Agreement. Once youve confirmed your Mac has Catalina installed, you are ready to install Xcode.
Once you find it, click the Get button to start the installation process. If applicable, this section should have a brief.
Install xcode for mac mac os x#
Open the macOS App Store and search for Xcode. This module helps you manage your installed versions of Xcode on your Mac OS X system.
Install xcode for mac software#
It is used by software engineers to develop applications for the iPhone, iPad, Apple Watch, Apple TV and Mac. Next delete the old Xcode.app first before trying to drag the new one to /Applications. When you open it, you will be asked if you want to install more components. What is Xcode Xcode is an IDE (Integrated Development Environment) created by Apple. Once you are in the App Store, click the Install link to start downloading the latest version of Xcode on your Mac computer via the Launchpad application. Please install Xcode and run Xcode.app to accept license or ensure active developer directory is set to current Xcode installation using xcode-select” when trying to install Unreal Engine on your Mac.įortunately the fix is very easy, although it does involve a fairly large download (12+GB). Once you have the Xcode.xip file, pop open a Terminal and decompress it (instead of double-clicking with Finder.app, which is slower): xip -x Xcode.xip. You wont need another developer tool once you install Xcode.
Install xcode for mac how to#
There might be another way, but this is how I did it.This short guide explains how to resolve the error “ Can’t find Xcode install for Metal compiler. At the Mac App Store, download Xcode for free. First make sure that the Mac App Store is installed by making sure. On your Mac OS X Install DVD, under Optional Installs, double-click Xcode.mpkg to install Xcode on your system.
Once downloaded, install it as any other .dmg package. The easiest way to get Xcode and the development tools installed is via that Mac App Store.
Press the link on the right side and wait for download to complete Depending on the version of Xcode and your version of OS X, this installation may automatically include the command line tools.
Search for the command line package you want to download (I'm going to use the latest stable Command Line tools for Xcode 10 and macOS Mojave).
Sign in with your Apple ID if you need to.
It is a small package of ~183Mb which I think it's enough to be downloaded via your browser.
Install xcode for mac code#
And quickly compare any two versions of your code files. See your teammates’ comments right inside your code. Initiate, review, comment, and merge pull requests directly within Xcode. Did you know : Using Xcode app leaves behind a lot of junk files a.k.a. This just happened to me and I'm writing this as a note-to-self but also to share this with others who might be facing a similar situation. Xcode 13 adds powerful new team development features, perfect for working with Xcode Cloud as well as with GitHub, Bitbucket, and GitLab collaboration features. Today, Mac users with new operating systems in place can now install Command Line Tools from the Xcode IDE without needing to install the entire Xcode package, or opening an Apple developers account. xip file while using a browser, regardless of which one it is, can be a pain when your connection is not as stable and fast as others' and when the download can be interrupted at any time and you're most likely going to have to restart the whole download. Downloading Xcode from the App Store, or even the. In going through the macOS computer setup instructions in the biostar handbook, the XCode version in the App Store requires macOS version 10.15.2 or later.
1 note
·
View note
Text
Install xcode for mac

#Install xcode for mac how to
#Install xcode for mac software
#Install xcode for mac code
#Install xcode for mac Pc
#Install xcode for mac mac
The first How-To section contains links to a number of great tutorials for building your own Hackintosh and installing High Sierra. This requires the most effort out of all the options presented so far but it can work for someone who wants a separate physical computer running MacOS.Ī great resource for all things Hackintosh.
#Install xcode for mac Pc
You can also build a “Hackintosh” which is a PC that has been customized to run MacOS.
#Install xcode for mac mac
I would recommend you try VirtualBox first or try to buy a used Mac Mini.
#Install xcode for mac software
Unfortunately you’ll have to pay for this piece of software and at the time of this writing, a license costs about half the price of a brand new Mac Mini which is perfectly suitable for iOS app development. That probably explains why it’s a lot more popular than VMWare Workstation when it comes to running MacOS on your Windows machine! VirtualBox is open source software which means that it’s free. This is as close as you’ll get to running actual Xcode on Windows!
#Install xcode for mac how to
You can download them below and then use Google to find a guide on how to install the latest MacOS (Mojave) with either VirtualBox or VMWare Workstation.Īfter that, spin up your new virtual Mac and download Xcode. The two most popular pieces of software to do virtualization are VirtualBox and VMWare Workstation. Unfortunately it does take a little bit of technical know-how to get this up and running. The services above are essentially doing the same thing on their servers and then they charge you a fee to access the virtual machine.īy setting it up yourself on your own PC, you essentially cut the middle man out of the equation. If you’re a little more technically savvy, you can use virtualization software and run a “virtual Mac” on your PC. The pricing is less flexible than MacInCloud and you’ll have to commit to at least a month. From the reviews I see, the service is fast and friendly. XcodeClub is run by Daniel who is a passionate developer himself. Some people complain that it’s slow but you can try it out for yourself since it’s only about a buck an hour! You can also do pay-as-you-go so it’s a pretty low commitment. You won’t have to install Xcode because it comes preinstalled. This is the most well known service out of the three. There are a couple other companies that provide this service: If you go down this route for iOS app development, make sure you get my Xcode cheatsheet with references and keyboard shortcuts for Windows users. I’ll get a small kick back at no extra expense to you so thank you for supporting my site!) If you do, please let me know in the comments below.
#Install xcode for mac code
(Use coupon code “CODEWITHCHRIS” for 50% off your first month. These guys were featured in the recent Apple keynote when they introduced the updated Mac Mini! They have the newest Macs available. If you decide that app development isn’t for you, you just cancel your plan. The really nice thing about this option is that the cost is really low and it’s the fastest option to get up and running. It’ll be like having the Mac desktop in a window on your Windows Desktop. You’ll remotely access the Mac and Xcode through your PC. Had I known about running Xcode on Windows or about the solutions below, I might’ve started building iPhone apps much earlier!īefore committing to buying a new Mac, you can actually “rent” one for development. I wish I had known this when I first started because I delayed myself for 3 years before biting the bullet and buying a Mac.
On the Downloads for Apple Developer list, select the Command Line Tools entry that you want.You can make an app for iOS even if you’re on a PC running Windows 10.
On your Mac, to download the Xcode command line tools directly from the developer portal as a.
To install the necessary Xcode tools from the Web:
You are asked for your Apple Developer login during the install process.
Click the Install button next to Command Line Tools.
On the Downloads window, choose the Components tab.
To install the necessary Xcode tools using Xcode on the Mac: You can install the Xcode command-line tools in either of two ways: In this case the Command Line Tools option does not show the Xcode version. If the Xcode Command Line Tools are not installed: This means that the Xcode Command Line Tools are already installed and you do not need to install them.
On the Location window, check that the Command Line Tools option shows the Xcode version (with which the Command Line Tools were installed).
In the General window, click the Locations tab.
Choose Preferences from the Xcode menu.
Note: Beginning from the Xcode version 6.1, the Xcode Command Line Tools are automatically installed during Xcode installation.Ĭheck whether the Xcode command line tools are installed on your Mac:
0 notes
Text
Install xcode for mac os 10.0.6

#INSTALL XCODE FOR MAC OS 10.0.6 FOR MAC OS#
#INSTALL XCODE FOR MAC OS 10.0.6 MAC OS X#
#INSTALL XCODE FOR MAC OS 10.0.6 INSTALL#
But in embedXCode I get a “swapPS3NavControllers was not declared in this scope” error. Snow Leopard was publicly unveiled on Jat the Apple Worldwide Developers Conference.
#INSTALL XCODE FOR MAC OS 10.0.6 MAC OS X#
I should be able to declare a function at the end of the file that gets called from the main loop without getting a build error.įor example, using the Arduino IDE this code works and compiles just fine. For those that may want to download Xcode for MacOS X 10.4 (Tiger), you may opt for a 'side-channel' solution of downloading the disk image from other sites (e.g., like via torrent sites), since it is quite likely that Apple breaks any of the URLs given above at any point in time and/or puts it so buried down their site that it is virtually 'unfindable'. Mac OS X Snow Leopard (version 10.6) is the seventh major release of Mac OS X (now named macOS), Apples desktop and server operating system for Macintosh computers. I was able to reorder the code to get the sketch to compile. However, I cannot get the basic Arduino commands to use code sense (such as Serial.println(“Gripper Arm DeActivated”) ).Īdditionally, it doesn’t seem to recognize procedures if they are defined after the procedure that calls them. The code sense works fine for all of these libraries. I have several libraries to run servos and LEDs in real time. I just installed embedXCode and have it successfully uploading my Star Wars Astromech control program to an Arduino Mega 2560. I went to app store but it won't let me download because it's the latest version which not compatible with lion 10.7.
#INSTALL XCODE FOR MAC OS 10.0.6 INSTALL#
I recall I downloaded the standard edition a while ago. I want to install xcode on vmware image mac os x lion 10.7. Recently, I started using the arduino-cli and vscode "tasks" to do the build instead of using the plugin. I've got my linting set up to point to the same gcc compiler that Arduino uses. This is one of the things you need to do with vscode to set it up properly. Thus, my interest in using Xcode instead.ĭoes Xcode support linting using the a third party gnu compiler? I could not find a setting anywhere that let me specify the compiler. Unfortunately, you cannot turn this "feature" off so it is a headache because if often uses the wrong header. Unfortunately, someone responsible for the plugin broke it a few months ago by adding a "feature" that "auto" includes some recursive include paths. I've pretty much figured out what you need to do to get IntelliSense to work properly. Moreover, it doesn't work well with IntelliSense so the code checking can be problematic. It's significantly slower on Mac Intel over a slow Internet connection. I have all the OS X install disks Ive ever received.
#INSTALL XCODE FOR MAC OS 10.0.6 FOR MAC OS#
Installation takes 8 minutes on a 2021 Mac M1 Mini, with a 100Mbps Internet connection. External Storage For Mac Os Yosemite Sentinel One Threat For Slack App Detected On Macos. I ran 10.0.6 because I needed Office plus enough Unix to do my job and loved having it all in. Click 'Install' to begin the download and installation process. You'll see a panel that asks you to install Xcode Command Line Tools. Yeah, the Arduino plugin for vscode is pretty weird. You can also enter the command xcode-select -install in the terminal to begin the installation process.
0 notes