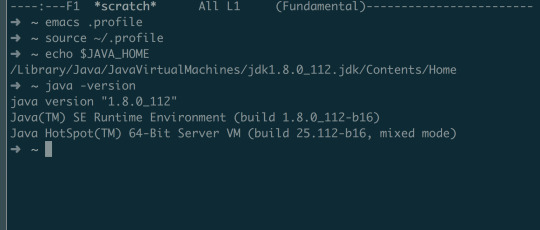
#JAVA_HOME
Explore tagged Tumblr posts
Visit Tumblr Blog
Explore Tumblr blogs with no restrictions, modern design and the best experience.
Last Seen Tumblr Blogs


Fun Fact
Tumblr has been banned in Indonesia for providing people with access to pornographic content.
Text
Guia completo de instalação e configuração do Spring: Spring Core, MVC, Security e mais
O Spring é um framework de desenvolvimento de aplicativos Java que oferece um conjunto abrangente de recursos e ferramentas para criar aplicativos empresariais escaláveis e robustos. Ele foi desenvolvido com o objetivo de simplificar o desenvolvimento de aplicativos Java e promover uma arquitetura limpa e modular. O Spring foi lançado pela primeira vez em 2003 e desde então se tornou um dos…

View On WordPress
#ambiente de desenvolvimento#automação de construção#compilação#configuração#dependências#desenvolvimento de software#empacotamento#execução de aplicativos#framework#gerenciamento de projetos#Gradle#instalação#Java#JAVA_HOME#JDK#Maven#PATH#projeto Gradle#projeto Maven#sistema de construção#Spring#Spring Core#Spring Data#Spring MVC#Spring Security#variáveis de ambiente#variáveis de ambiente no Linux#variáveis de ambiente no Windows
1 note
·
View note
Text
i'll give it this: chatgpt has been consistently way more helpful with silly troubleshooting/debugging issues than googling and scanning the same 3 or 4 semi-related stackoverflow questions with passive aggressive/unhelpful answers
#spent like 30 minutes trying to figure out why git bash wasn't picking up the new JAVA_HOME variable even tho i was 100% sure it should#turns out i needed chatgpt to tell me 'did you restart your command shell after setting your JAVA_HOME variable? :)' lmao#like i'm as concerned as anyone about people just copying code from chatgpt and throwing it in their projects w/o reviewing it but tbf#the people who do that are probably the same people copypasting code from stackoverflow answers w/o reviewing it first#but if it can save me from wasting time on goofy snags i will absolutely take it
2 notes
·
View notes
Text
Hướng Dẫn Cài Đặt JDK, Visual Studio Code & NetBeans
Lập trình Java là một trong những kỹ năng quan trọng trong ngành công nghệ thông tin. Để bắt đầu hành trình lập trình, bạn cần chuẩn bị môi trường phát triển phù hợp với các công cụ như JDK, Visual Studio Code, và NetBeans. Bài viết này sẽ hướng dẫn chi tiết cách cài đặt các công cụ trên, đảm bảo bạn có một môi trường làm việc hiệu quả.
JDK Là Gì?
JDK (Java Development Kit) là bộ công cụ phát triển phần mềm cần thiết để viết, biên dịch và chạy các chương trình Java. Nó bao gồm JRE (Java Runtime Environment) và các công cụ như trình biên dịch javac. Việc cài đặt JDK là bước đầu tiên để lập trình Java.
Các Bước Cài Đặt JDK
Tải JDK từ trang chủ Oracle Truy cập trang web chính thức của Oracle (www.oracle.com) và tìm phiên bản JDK mới nhất (ví dụ: JDK 17 hoặc JDK 21). Chọn phiên bản phù hợp với hệ điều hành (Windows, macOS, hoặc Linux).

Giao diện tải JDK
2. Cài đặt JDK Sau khi tải, chạy file cài đặt và làm theo hướng dẫn. Đảm bảo bạn ghi nhớ thư mục cài đặt (thường là C:\Program Files\Java\jdk-... trên Windows).
3. Cấu hình biến môi trường
Trên Windows, vào System Properties > Environment Variables.
Thêm biến JAVA_HOME với giá trị là đường dẫn đến thư mục JDK.
Cập nhật biến Path bằng cách thêm %JAVA_HOME%\bin.
Mở Command Prompt và gõ java -version để kiểm tra.

Màn hình cấu hình biến môi trường
Visual Studio Code - Công Cụ Lập Trình Linh Hoạt
Visual Studio Code (VS Code) là một trình soạn thảo mã nguồn mạnh mẽ, hỗ trợ lập trình Java thông qua các tiện ích mở rộng. Với giao diện thân thiện và tính năng tùy chỉnh, VS Code là lựa chọn lý tưởng cho người mới bắt đầu.
Hướng Dẫn Cài Đặt Visual Studio Code
Tải VS Code Truy cập code.visualstudio.com và tải phiên bản phù hợp với hệ điều hành của bạn.

Giao diện tải Vs Code
2. Cài đặt và cấu hình Java trong VS Code
Sau khi cài đặt, mở VS Code và vào mục Extensions (Ctrl+Shift+X).
Tìm và cài đặt Extension Pack for Java từ Microsoft.
Đảm bảo JDK đã được cài đặt và cấu hình đúng để VS Code nhận diện.
3. Tạo dự án Java đầu tiên
Mở một thư mục mới trong VS Code.
Tạo file HelloWorld.java và viết mã mẫu.
Sử dụng terminal tích hợp để biên dịch và chạy chương trình bằng lệnh javac và java.

Giao diện VS Code
NetBeans - IDE Chuyên Nghiệp Cho Lập Trình Java
NetBeans là một môi trường phát triển tích hợp (IDE) mạnh mẽ, được thiết kế đặc biệt cho lập trình Java. Với các tính năng như gợi ý mã, quản lý dự án, và tích hợp Git, NetBeans là lựa chọn tuyệt vời cho các dự án lớn.
Hướng Dẫn Cài Đặt NetBeans
Tải NetBeans Truy cập netbeans.apache.org và tải phiên bản mới nhất (ví dụ: NetBeans 21). Chọn bản cài đặt hỗ trợ Java SE.

Giao diện trang tải NetBeans
2. Cài đặt NetBeans Chạy file cài đặt và làm theo hướng dẫn. Đảm bảo JDK đã được cài đặt, vì NetBeans sẽ yêu cầu chọn đường dẫn JDK trong quá trình cài đặt.
3. Khởi động và cấu hình
Mở NetBeans và tạo một dự án Java mới (File > New Project > Java Application).
Kiểm tra các công cụ như trình gỡ lỗi và tích hợp Maven.

Giao diện NetBeans
Mẹo Tối Ưu Hóa Môi Trường Lập Trình
Cập nhật thường xuyên: Đảm bảo JDK, VS Code, và NetBeans luôn ở phiên bản mới nhất để tận dụng các tính năng và bản vá bảo mật.
Sử dụng plugin: Với VS Code, cài thêm các tiện ích như Prettier hoặc GitLens để tăng hiệu suất. Với NetBeans, tận dụng các plugin tích hợp Maven hoặc Gradle.
Kiểm tra cấu hình: Luôn kiểm tra biến môi trường và đường dẫn JDK để tránh lỗi khi biên dịch.
Lý Do Nên Chọn JDK, VS Code, và NetBeans
JDK: Là nền tảng cốt lõi, không thể thiếu cho mọi dự án Java.
VS Code: Linh hoạt, nhẹ, phù hợp cho người mới học hoặc các dự án nhỏ.
NetBeans: Chuyên sâu, lý tưởng cho các dự án lớn với nhiều tính năng tích hợp.
Kết Luận
Việc cài đặt JDK, Visual Studio Code, và NetBeans là bước khởi đầu quan trọng để xây dựng môi trường lập trình Java hiệu quả. Bằng cách làm theo các bước chi tiết trên, bạn sẽ dễ dàng thiết lập và bắt đầu viết mã. Đừng quên cập nhật công cụ thường xuyên và tận dụng các tiện ích mở rộng để tối ưu hóa quy trình làm việc.

JDK, VS Code, NetBeans
Hy vọng bài viết này giúp bạn thiết lập môi trường lập trình Java một cách dễ dàng và hiệu quả! Nếu bạn cần thêm thông tin, hãy để lại câu hỏi nhé!
🔧 Hướng Dẫn Cài Đặt JDK, Visual Studio Code & NetBeans Từng bước chi tiết giúp bạn thiết lập môi trường lập trình Java hiệu quả với JDK, VS Code và NetBeans. 🌐 Website: Java Highlight
#JavaHighlight#JDKlagi#VisualStudioCode#NetBeans#HuongDanJava#CaiDatJDK#JavaSetup#LapTrinhJava#JavaDevelopment#JavaTools#JavaForBeginners
0 notes
Text
Guide readers through writing, compiling, and running their first Java application.
Writing, Compiling, and Running Your First Java Application: A Beginner’s Guide
Java is a versatile and widely-used programming language, known for its “write once, run anywhere” principle.
If you’re new to Java and eager to create your first application, this guide will walk you through writing, compiling, and running your first Java program.
Step 1: Setting Up Your Environment
Before you start coding, you need the right tools in place.
Install the Java Development Kit (JDK):
Download and install the latest JDK from the Oracle website or OpenJDK.
Set the JAVA_HOME environment variable and add the bin directory to your system's PATH.
Choose an Editor or IDE:
For beginners, a simple text editor like Notepad++ or Visual Studio Code works.
IDEs like IntelliJ IDEA, Eclipse, or NetBeans offer advanced features like code suggestions and debugging.
Step 2: Writing Your First Java Program
Create a simple Java program in a file named HelloWorld.java.
Code Example:// HelloWorld.java public class HelloWorld { public static void main(String[] args) { System.out.println("Hello, World!"); } }
Explanation:
public class HelloWorld: Defines a class named HelloWorld.
public static void main(String[] args): The main method is the entry point for the program.
System.out.println("Hello, World!");: Prints "Hello, World!" to the console.
Step 3: Compiling Your Java Program
Java code needs to be compiled into bytecode before it can run on the Java Virtual Machine (JVM).
Open a terminal or command prompt.
Navigate to the directory where HelloWorld.java is saved.
Run the following command to compile your code:
javac HelloWorld.java
This creates a HelloWorld.class file, which contains the bytecode.
Step 4: Running Your Java Program
To execute your program:
Ensure the compiled .class file is in the same directory.
Run the following command:
java HelloWorld
Output: Hello, World!
Note: Do not include the .class extension when running the program.
Step 5: Troubleshooting Common Errors
Error: javac or java not recognized:
Ensure the JDK is installed and the bin directory is added to your system's PATH.
Error: HelloWorld.java not found:
Double-check the file name and directory.
Error: NoClassDefFoundError:
Verify that you’re running the correct class file name.
Optional Step: Using an IDE
An Integrated Development Environment (IDE) simplifies the process:
Create a new project and add a Java file.
Write your code in the editor.
Use the IDE’s built-in tools to compile and run the program with a single click.
Conclusion
Writing, compiling, and running a Java application is a straightforward process once your environment is set up. By mastering these basics, you lay the foundation for exploring more advanced Java concepts and building larger applications.

0 notes
Text
Setting Up the Java Environment: A Complete Guide for Beginners
Java is a powerful, widely-used programming language known for its platform independence, object-oriented principles, and robustness. One of the key reasons for its popularity is the fact that it can run on any machine equipped with a Java Virtual Machine (JVM), making it truly “write once, run anywhere.” However, before you can start writing and executing Java code, you need to properly set up the Java development environment on your system.
This guide will walk you through the entire process of setting up the Java environment, including downloading and installing the necessary tools, configuring environment variables, and writing your first Java program. By the end of this tutorial, you’ll be ready to start coding in Java.
Step 1: Understanding the Components of the Java Environment
Before diving into the installation process, it’s essential to understand the core components involved in the Java ecosystem. These include:
1. JDK (Java Development Kit): This is the complete suite needed to develop and run Java applications. It includes the Java compiler (javac), standard libraries, and other tools required to build and execute Java programs.
2. JRE (Java Runtime Environment): The JRE provides the libraries and the JVM necessary to run Java applications. It’s a part of the JDK but can also be installed separately if you’re only running (not developing) Java programs.
3. JVM (Java Virtual Machine): This is the heart of Java’s platform independence. It interprets the compiled Java bytecode and allows it to run on any operating system that has a compatible JVM.
For development, you’ll primarily need the JDK, which includes the JRE and JVM.
Step 2: Downloading and Installing the Java Development Kit (JDK)
To begin coding in Java, you need to download the JDK. Here’s how to do it:
1. Go to the Official Oracle Website:
Visit the official Oracle Java SE Downloads page.
You’ll see multiple versions of Java. For most use cases, it’s best to download the latest Long-Term Support (LTS) version, which is currently Java SE 17.
2. Choose the Right Version for Your Operating System:
Select the appropriate version based on your operating system (Windows, macOS, or Linux).
Download the installer (.exe for Windows, .dmg for macOS, or a compressed package for Linux).
3. Run the Installer:
For Windows:
Double-click the .exe file and follow the installation prompts. The default installation directory is usually C:\Program Files\Java\jdk-<version>.
For macOS:
Open the .dmg file, and drag the JDK into your Applications folder.
For Linux:
Extract the downloaded .tar.gz file into a directory, and follow the system-specific instructions for installation.
Step 3: Configuring Environment Variables
Once the JDK is installed, you need to configure the PATH and JAVA_HOME environment variables on your system. This allows your terminal or command prompt to access Java’s tools from any directory.
Windows
1. Open Environment Variables:
Right-click on This PC or My Computer and choose Properties.
Click on Advanced System Settings, then click Environment Variables.
2. Set JAVA_HOME:
In the System Variables section, click New.
Set the variable name as JAVA_HOME and the variable value as the path to your JDK installation (e.g., C:\Program Files\Java\jdk-17).
3. Update PATH Variable:
In the System Variables section, find the Path variable, select it, and click Edit.
Click New and add %JAVA_HOME%\bin.
Click OK to close all dialogs.
macOS
1. Open the Terminal and edit your shell profile (e.g., .bash_profile or .zshrc for Zsh) by typing:
nano ~/.bash_profile
2. Set JAVA_HOME and Update PATH: Add the following lines:
export JAVA_HOME=$(/usr/libexec/java_home) export PATH=$JAVA_HOME/bin:$PATH
3. Save and Exit:
Press Ctrl+X to exit, then Y to save changes.
Apply the changes with:
source ~/.bash_profile
Linux
1. Open Terminal and edit your shell profile (e.g., .bashrc or .zshrc) by typing:
nano ~/.bashrc
2. Set JAVA_HOME and Update PATH: Add the following lines:
export JAVA_HOME=/usr/lib/jvm/jdk-17 export PATH=$JAVA_HOME/bin:$PATH
3. Save and Exit:
Press Ctrl+X to exit, then Y to save.
Apply the changes:
source ~/.bashrc
Step 4: Verifying the Installation
Once you’ve installed the JDK and configured the environment variables, verify that everything is set up correctly.
1. Open a Terminal or Command Prompt:
On Windows, press Windows + R, type cmd, and press Enter.
On macOS and Linux, open the Terminal from your applications or press Ctrl+Alt+T (for Linux).
2. Check the Java Version: Type the following command:
java -version
You should see output similar to:
java version “17.0.2” 2022-01-18 LTS Java(TM) SE Runtime Environment (build 17.0.2+8-86) Java HotSpot(TM) 64-Bit Server VM (build 17.0.2+8-86, mixed mode)
3. Check the Java Compiler: Similarly, check if the Java compiler (javac) is working by typing:
javac -version
The output should be something like:
javac 17.0.2
Step 5: Writing and Running Your First Java Program
With the Java environment properly set up, it’s time to write your first Java program. Follow these steps:
1. Open a Text Editor: You can use any text editor like Notepad (Windows), TextEdit (macOS), or Vim/Nano (Linux). Alternatively, you can use an Integrated Development Environment (IDE) like Eclipse, IntelliJ IDEA, or NetBeans for a more user-friendly experience.
2. Write the Program: Here’s a simple “Hello, World!” program:
public class HelloWorld { public static void main(String[] args) { System.out.println(“Hello, World!”); } }
3. Save the File: Save the file as HelloWorld.java in a directory of your choice.
4. Compile the Program: Open the terminal or command prompt and navigate to the directory where you saved the file. Use the following command to compile the program:
javac HelloWorld.java
If there are no errors, this will generate a file called HelloWorld.class.
5. Run the Program: Now, run the compiled program by typing:
java HelloWorld
You should see the following output:
Hello, World!
Step 6: Installing an IDE (Optional)
While it’s possible to write and run Java programs using just a text editor and the terminal, using an Integrated Development Environment (IDE) can make the process much easier, especially as your programs become more complex.
Some popular IDEs for Java development are:
Eclipse: A widely-used IDE with many plugins to enhance functionality.
IntelliJ IDEA: A powerful IDE with smart coding assistance, refactoring tools, and an intuitive interface.
NetBeans: A free and open-source IDE with support for various programming languages, including Java.
You can download these IDEs from their official websites and install them by following the provided instructions.
Conclusion
Setting up the Java environment may seem complicated at first, but once you’ve gone through these steps, you’ll be ready to dive into Java development. From here, you can start writing basic programs, experimenting with object-oriented concepts, and eventually tackling larger projects. Whether you’re developing desktop applications, web services, or Android apps, learning Java will give you a solid foundation in programming.
1 note
·
View note
Text
Selenium Webdriver with Java & TestNG Testing Framework: The Complete Guide

In today's rapidly evolving world of software development, automation testing plays a crucial role in delivering high-quality software products. As organizations shift toward Agile and DevOps methodologies, the demand for automation testers has grown exponentially. One of the most in-demand skills in the automation space is mastering Selenium Webdriver with Java & TestNG Testing Framework. In this comprehensive guide, we'll dive deep into how to use these tools, why they're essential, and how you can leverage them to excel in your automation testing career.
What is Selenium Webdriver?
Selenium Webdriver is one of the most popular automation testing tools in the world. It enables testers to automate web applications for various browsers, providing a common interface for writing test scripts. Selenium Webdriver supports multiple programming languages, including Java, Python, C#, Ruby, and more. However, Java is the most commonly used language for Selenium Webdriver due to its robustness and ease of integration with various testing frameworks like TestNG.
Key Features of Selenium Webdriver:
Cross-browser compatibility: Automate tests across multiple browsers like Chrome, Firefox, Safari, and Edge.
Open-source: It's free to use and has a strong community support.
Supports multiple languages: Selenium supports many programming languages, with Java being the most preferred.
Integration with frameworks: It integrates seamlessly with TestNG, JUnit, and other frameworks.
Real browser interaction: Unlike other automation tools, Selenium Webdriver interacts directly with the browser, mimicking human-like actions.
Why Choose Java with Selenium Webdriver?
Among the supported programming languages, Java is often chosen by developers and testers alike for its simplicity and wide usage in automation. The reasons to choose Java with Selenium Webdriver are numerous:
Ease of learning: Java is easy to learn, especially if you are just getting started with programming.
Robust libraries: Java has a vast library ecosystem, which helps in handling complex automation tasks.
Community support: Since Java is widely used, there is strong community support for solving issues and discussing automation challenges.
Speed and reliability: Java-based Selenium tests run faster and are more reliable due to the strong type system and mature ecosystem.
Introduction to TestNG
TestNG (Test Next Generation) is a powerful testing framework inspired by JUnit and NUnit. It is designed to make test configurations easier and provide more powerful functionalities for test automation. While JUnit is older, TestNG has emerged as the go-to choice for Selenium testers due to its additional features like parallel execution, grouping, and data-driven testing.
Key Features of TestNG:
Annotations: TestNG provides a variety of annotations such as @Test, @BeforeMethod, @AfterMethod, etc., which help in managing test flows.
Parallel execution: TestNG allows tests to be run in parallel, saving time in large test suites.
Grouping: Tests can be grouped for better organization and execution.
Data-driven testing: With the help of DataProviders, TestNG allows the execution of tests with different sets of data.
Reporting: TestNG generates rich reports after test execution, which help in analyzing the test results.
Setting Up Selenium Webdriver with Java & TestNG Testing Framework
1. Environment Setup for Selenium Webdriver
Before writing test scripts, you need to set up your environment. Follow these steps to get started:
Step 1: Install Java JDK
You need to have the Java Development Kit (JDK) installed on your machine. Download and install it from the official Oracle website. Once installed, set the JAVA_HOME environment variable.
Step 2: Install Eclipse IDE
While there are many Integrated Development Environments (IDEs) available, Eclipse IDE is the most popular for writing Java-based Selenium scripts. Download and install it from the Eclipse website.
Step 3: Install Selenium Webdriver
Download the Selenium Webdriver Java bindings from the official Selenium website. Add the JAR files to your project's build path in Eclipse.
Step 4: Install TestNG
TestNG can be easily integrated into Eclipse. You can install the TestNG plugin through the Eclipse Marketplace or download the TestNG JAR file and add it to your project.
2. Writing Your First Test Script with Selenium Webdriver and Java
Let’s look at how to write a simple test script using Selenium Webdriver with Java & TestNG Testing Framework:
java
Copy code
import org.openqa.selenium.WebDriver;
import org.openqa.selenium.chrome.ChromeDriver;
import org.testng.annotations.AfterMethod;
import org.testng.annotations.BeforeMethod;
import org.testng.annotations.Test;
public class SeleniumTest {
WebDriver driver;
@BeforeMethod
public void setUp() {
System.setProperty("webdriver.chrome.driver", "path/to/chromedriver");
driver = new ChromeDriver();
driver.manage().window().maximize();
}
@Test
public void openGoogle() {
driver.get("https://www.google.com");
String pageTitle = driver.getTitle();
System.out.println("The page title is: " + pageTitle);
}
@AfterMethod
public void tearDown() {
driver.quit();
}
}
In this test script:
The @BeforeMethod annotation ensures the browser is set up before each test.
The @Test annotation marks the actual test case that will be executed.
The @AfterMethod annotation ensures the browser is closed after each test.
Advanced Selenium Webdriver Features
1. Handling Web Elements
Selenium allows you to interact with web elements like buttons, text boxes, dropdowns, and checkboxes. Here are some essential commands for web element interaction:
Clicking on elements: element.click()
Entering text: element.sendKeys("text")
Selecting from dropdowns: Select select = new Select(element); select.selectByVisibleText("Option");
2. Implicit and Explicit Waits
Handling synchronization in Selenium Webdriver is crucial for stable test automation. There are two main types of waits:
Implicit Wait: Defines a maximum time Selenium will wait for an element to appear on the page.
java
Copy code
driver.manage().timeouts().implicitlyWait(10, TimeUnit.SECONDS);
Explicit Wait: Allows you to wait for a specific condition to be met before proceeding with test execution.
java
Copy code
WebDriverWait wait = new WebDriverWait(driver, 20);
wait.until(ExpectedConditions.visibilityOfElementLocated(By.id("elementId")));
Best Practices for Using Selenium Webdriver with Java & TestNG
Page Object Model (POM): This design pattern helps in separating the test scripts from the logic of the web elements. Each page in the application is represented by a class in POM, and the methods in the class correspond to actions on the web elements.
Data-Driven Testing: TestNG provides DataProviders, which allow passing multiple sets of data to a single test method. This enhances the reusability of test scripts.
Logging and Reporting: Integrate Log4j or Extent Reports for detailed logging and reporting of your test execution results.
Continuous Integration: Tools like Jenkins can be used for setting up continuous integration pipelines to automate the execution of Selenium test suites.
Parallel Execution in TestNG
One of the significant advantages of TestNG is the ability to execute tests in parallel. You can run multiple tests simultaneously by configuring the testng.xml file.
xml
Copy code
<suite name="Suite" parallel="tests" thread-count="2">
<test name="Test1">
<classes>
<class name="com.test.SeleniumTest1"/>
</classes>
</test>
<test name="Test2">
<classes>
<class name="com.test.SeleniumTest2"/>
</classes>
</test>
</suite>
This feature helps save a lot of time, especially when working with large test suites.
Conclusion
Mastering Selenium Webdriver with Java & TestNG Testing Framework is an essential skill for anyone aspiring to excel in automation testing. The combination of Selenium's powerful web automation capabilities, Java's ease of use, and TestNG's advanced testing features makes it a winning strategy for testers. By following best practices like Page Object Model, data-driven testing, and integrating with continuous integration tools, you can build a highly efficient test automation framework.
As the demand for automation testing grows, being proficient in Selenium Webdriver with Java & TestNG Testing Framework will undoubtedly place you ahead of the competition. Now, it's time to dive into real-world testing projects and refine your skills further.
0 notes
Text
Mastering Hadoop Installation on Ubuntu Server: A Step-by-Step Guide
Are you ready to dive into big data processing with Hadoop on Ubuntu Server? Look no further! In this comprehensive guide, we’ll walk you through the installation process step-by-step, ensuring you have everything you need to get started. Whether you’re a Linux aficionado or a Windows RDP enthusiast looking to buy RDP and install Ubuntu on RDP, this guide has you covered.
Understanding Ubuntu Server: Before we delve into the installation process, let’s take a moment to understand Ubuntu Server. Ubuntu is one of the most popular Linux distributions, known for its stability, security, and ease of use. Ubuntu Server is specifically designed for server environments, making it an ideal choice for hosting Hadoop clusters.

2. Setting Up Your Environment: If you’re using Ubuntu Server on a physical machine or a virtual environment like VMware or VirtualBox, ensure that it meets the minimum system requirements for running Hadoop. This includes having sufficient RAM, disk space, and processing power. Alternatively, if you’re considering using Windows RDP, you can buy RDP and install Ubuntu on it, providing a flexible and scalable environment for Hadoop deployment.
3. Installing Ubuntu Server: Begin by downloading the latest version of Ubuntu Server from the official website. Once downloaded, follow the on-screen instructions to create a bootable USB drive or DVD. Boot your system from the installation media and follow the prompts to install Ubuntu Server. Make sure to allocate disk space for the operating system and any additional storage required for Hadoop data.
4. Configuring Network Settings: After installing Ubuntu Server, configure the network settings to ensure connectivity within your environment. This includes assigning a static IP address, configuring DNS servers, and setting up network interfaces. Proper network configuration is essential for communication between Hadoop nodes in a distributed environment.
5. Updating System Packages: Before installing Hadoop, it’s essential to update the system packages to ensure you have the latest security patches and software updates. Use the following commands to update the package repository and upgrade installed packages:bashCopy codesudo apt update sudo apt upgrade
6. Installing Java Development Kit (JDK): Hadoop is built on Java, so you must install the Java Development Kit (JDK) to run Hadoop applications. Ubuntu repositories provide OpenJDK, an open-source implementation of the Java Platform. Install OpenJDK using the following command:bashCopy codesudo apt install openjdk-11-jdk
7. Downloading and Installing Hadoop: Next, download the latest stable release of Hadoop from the official Apache Hadoop website. Once downloaded, extract the Hadoop archive to a directory of your choice. For example, you can use the following commands to download and extract Hadoop:bashCopy codewget https://www.apache.org/dist/hadoop/common/hadoop-3.3.1/hadoop-3.3.1.tar.gz tar -xvf hadoop-3.3.1.tar.gz
8. Configuring Hadoop Environment: After installing Hadoop, you’ll need to configure its environment variables to specify the Java runtime environment and other settings. Edit the hadoop-env.sh file located in the etc/hadoop directory and set the JAVA_HOME variable to the path of your JDK installation:bashCopy codeexport JAVA_HOME=/usr/lib/jvm/java-11-openjdk-amd64
9. Setting Up Hadoop Cluster: Once Hadoop is installed and configured on your Ubuntu Server, you can proceed to set up a Hadoop cluster. This involves configuring Hadoop’s core-site.xml, hdfs-site.xml, and mapred-site.xml configuration files and starting the Hadoop daemons on each node in the cluster.
10. Testing Hadoop Installation: To ensure that Hadoop is installed and configured correctly, you can run some basic tests. Start by formatting the Hadoop Distributed File System (HDFS) using the following command:bashCopy codehdfs namenode -format
Then, start the Hadoop daemons and verify their status using the following commands:bashCopy codestart-dfs.sh start-yarn.sh
Finally, run a sample MapReduce job to confirm that Hadoop is functioning correctly:bashCopy codehadoop jar $HADOOP_HOME/share/hadoop/mapreduce/hadoop-mapreduce-examples-3.3.1.jar pi 16 10000
Congratulations! You’ve successfully installed Hadoop on the Ubuntu Server, ready to tackle big data processing tasks with ease.
In conclusion, setting up Hadoop on the Ubuntu Server is a straightforward process that anyone can accomplish with the right guidance. Whether you’re a Linux enthusiast or prefer the flexibility of Windows RDP, you can buy RDP and install Ubuntu on it to create a robust Hadoop environment. With Hadoop up and running, you’re well-equipped to handle the challenges of big data processing and analysis.
0 notes
Text
解決 VSCode Flutter 專案對於 build.gradle 的 Java 11 錯誤
常用外掛 Language Support for Java(TM) by Red Hat 在分析專案中 Java 程式碼的時候,可能會出現 android/app/build.gradle 檔案使用的 Java 版本錯誤的錯誤訊息,即便已經有安裝最新版本的 Oracle Java 1.8 仍然會報錯。 解決方法就是在 Java 版本,只要安裝最新版的 OpenJDK 即可。下載 Microsoft 編譯的 OpenJDK,並在安裝的時候勾選”Set JAVA_HOME variable”,讓其成為預設的 Java 版本。(不需要移除已經安裝的 Oracle Java) android/app/build.gradle 的錯誤訊息 Could not run phased build action using connection to Gradle distribution…

View On WordPress
0 notes
Text
Practice 3 Solution
In this practice, we’ll be using Java’s I/O utilities to explore the source code and byte code of Java core APIs. Java Source Code The src.zip in your $JAVA_HOME ( $JAVA_HOME refers to JDK installation directory) contains the Java programming language source files for all classes that make up the Java Core API (that is, sources files for the java.* , javax.* and some org.* packages, ). This…

View On WordPress
0 notes
Text
How to Decompile Java Class Files

Decompiling Java class files is an invaluable skill for Java developers. It allows one to delve into the source code of open-source or proprietary libraries used in a project. While it's always beneficial to attach source files in development environments like Eclipse for commonly used libraries, it's not always feasible. This is where Java decompilers come into play. With these tools, developers can easily retrieve the source of any .class file. sequenceDiagram participant Developer participant Eclipse IDE participant JD-Eclipse participant javap Developer->>Eclipse IDE: Opens Java project Eclipse IDE->>JD-Eclipse: Uses JD-Eclipse for decompilation Developer->>javap: Uses javap command javap->>Developer: Returns decompiled code or bytecode
Advantages of Using Java Decompilers in Eclipse
Eclipse IDE has revolutionized the way Java developers work. With a plethora of free plugins available, developers can arm themselves with powerful decompilation tools. One such tool was JadEclipse, an Eclipse plugin that integrated seamlessly with the JAD decompiler. However, with JAD's lack of support for Java 1.5 source, the hunt for a more versatile plugin began. Enter JD-Eclipse, a free Eclipse plugin designed for non-commercial and personal use. JD-Eclipse offers a straightforward installation process, and its website provides a step-by-step guide for those unfamiliar with Eclipse plugin installations. Decompiling Class Files in Eclipse IDE After installing JD-Eclipse and restarting Eclipse, you're all set to decompile Java class files. To do this: - Open any Java project in Eclipse. - Navigate to Maven dependencies or libraries to view the jar files included in your project. - Expand any jar file without an attached source in Eclipse. - Click on any .class file. The source code will be displayed in the Java editor. While decompiled code offers a glimpse into the workings of a class file, it's always recommended to attach the original source code for frequently used libraries. This ensures better code visibility and access to original comments.
Using the javap Command for Decompilation
For those who often work on command prompts, especially on Linux development servers, the javap command offers a quick way to decompile .class files. Bundled with the JDK installation, javap resides in the JAVA_HOME/bin directory and works directly with .class files. To use javap, ensure that JAVA_HOME is set in your system path. Once set up, javap can provide detailed information about a class file, including its methods and constructors. By using the -private option with javap, you can even view private members of a class. Viewing Bytecode from .class Files For a deeper dive into the workings of a class file, javap can display the bytecode of compiled class files. By running javap with the -c option, developers can view the bytecode, offering insights into the low-level operations of the Java Virtual Machine (JVM). sequenceDiagram participant Developer participant Decompiler participant Build Tool Developer->>Decompiler: Initiates decompilation Decompiler->>Developer: Returns initial decompiled code Developer->>Build Tool: Integrates decompiler for automated decompilation Build Tool->>Developer: Decompiles dependencies during build Developer->>Decompiler: Handles obfuscated code with advanced decompilers
Advanced Decompilation Techniques
Enhancing Code Readability While decompilers can retrieve the source code from a .class file, the output might not always be as readable as the original source code. Variable names might be obfuscated or replaced with generic names, and original comments will be absent. To enhance the readability: - Code Beautifiers: Use code beautifiers or formatters to structure the decompiled code. Tools like Eclipse's built-in formatter can automatically format the code to make it more readable. - Variable Renaming: Manually rename obfuscated or generic variable names to more meaningful ones. This can make the code easier to understand and maintain. - Comments: Add comments to the decompiled code, especially in complex sections. This will help in understanding the logic and purpose of the code. Handling Obfuscated Code Some Java class files might be obfuscated to protect intellectual property and prevent easy decompilation. Obfuscation tools rename classes, methods, and variables to nonsensical names, making the decompiled code hard to understand. In such cases: - Use Advanced Decompilers: Some decompilers are designed to handle obfuscated code better than others. Research and find a decompiler that's known for handling obfuscated code well. - Manual Analysis: It might require a combination of manual analysis and testing to understand the functionality of obfuscated code. Be patient and break down the code section by section. Integrating Decompilers with Build Tools For projects with multiple dependencies, integrating decompilers with build tools can streamline the decompilation process. Tools like Maven and Gradle can be configured to automatically decompile certain dependencies during the build process.
Best Practices for Decompilation
- Legal Considerations: Before decompiling any code, ensure you have the legal right to do so. Decompiling proprietary software without permission can lead to legal consequences. - Backup: Always backup your original .class files before attempting any decompilation. This ensures you can revert to the original state if needed. - Documentation: Maintain documentation of the decompilation process, especially if manual modifications are made to the decompiled code. This will be helpful for future reference and for other developers working on the project.
Conclusion
Decompiling Java class files provides a wealth of information for developers, whether they're working in an IDE like Eclipse or directly from the command line. Tools like JD-Eclipse and javap make the process seamless, ensuring that developers always have access to the source code they need. For those still using JDK versions below Java 5, the JAD decompiler and JADEclipse plugin remain viable options. The Eclipse marketplace also offers a myriad of other decompilation tools worth exploring. Read the full article
1 note
·
View note
Text
active java version not showing in cmd
check that there are no prior java paths before JAVA HOME

if found like above, either delete or move it down and JAVA HOME should be before it
0 notes
Text
Instalar Apache Maven en Debian 10
Instalar Apache Maven en Debian 10. Apache Maven es una herramienta especializada en la creación y gestión de proyectos Maven es una herramienta de software para la gestión y construcción de proyectos Java. Su principal beneficio es que estandariza la configuración de nuestro proyecto en todas sus fases, desde la compilación y empaquetado hasta la instalación y administración de las librerías necesarias. Maven fue creado en el 2002 por Jason van Zyl, y es la base de los compiladores IDES actuales, como Eclipse, NetBeans, etc. Antes de comenzar su instalación vemos sus principales características. Excelente sistema de gestión dependencias. Mecanismo de distribución de librerías desde el repositorio local de Maven, hacia los repositorios publicados en Internet o red local. Permite la creación de plugins customizables. Es multi-plataforma. Open Source, el código está disponible para que lo modifiques si es necesario. Los repositorios oficiales y públicos de software libre, ofrecen librerías que toda la comunidad de desarrolladores pueden utilizar. Es compatible con muchos IDEs.
Instalar Apache Maven en Debian 10
Actualizamos el sistema. apt upgrade apt upgrade -y Necesitamos instalar el paquete de desarrollo de java (OpenJDK 11), la herramienta wget y GIT. apt install -y default-jdk apt install -y wget git Apache Maven necesita la variable de entorno $JAVA_HOME, la incluimos en nuestro sistema. echo "export JAVA_HOME=/lib/jvm/default-java" >> /etc/profile
Instalar Apache Maven Bien, ya tenemos nuestro sistema listo para la instalación, comenzamos importando las keys publicas. cd /tmp wget https://www.apache.org/dist/maven/KEYS gpg --import KEYS && rm KEYS Ahora descargamos el archivo binario de la aplicación y el de la firma. Actualmente la ultima versión estable es la 3.6.3, puedes comprobar si existe alguna actualización en su pagina oficial. wget -O maven.tgz https://www-eu.apache.org/dist/maven/maven-3/3.6.3/binaries/apache-maven-3.6.3-bin.tar.gz wget -O maven.tgz.asc https://www.apache.org/dist/maven/maven-3/3.6.3/binaries/apache-maven-3.6.3-bin.tar.gz.asc Verificamos el paquete con el archivo de firmas. gpg --verify maven.tgz.asc maven.tgz Descomprimimos el archivo y lo movemos a su directorio final. tar -xzf maven.tgz rm maven.tgz* mv apache-maven* /opt/maven Agregamos /opt/maven/bin a la variable de entorno. echo "export PATH=$PATH:/opt/maven/bin" >> /etc/profile Como punto final debes recargar las variables de entorno. ./etc/profile Verifica que la instalación es correcta. mvn -v ejemplo de salida... Apache Maven 3.6.3 (81f7586969310zs1dc0d5t7yc0dc55gtrd0p519; 2019-12-05T19:17:21+01:00) Maven home: /opt/maven Java version: 11.0.5, vendor: Debian, runtime: /usr/lib/jvm/java-11-openjdk-amd64 Default locale: en_US, platform encoding: UTF-8 OS name: "linux", version: "4.19.0-6-amd64", arch: "amd64", family: "unix" Ya puedes ejecutar Maven. Si tienes dudas te recomiendo revisar su guía oficial, es muy buena. Espero que este articulo te sea de utilidad, puedes ayudarnos a mantener el servidor con una donación (paypal), o también colaborar con el simple gesto de compartir nuestros artículos en tu sitio web, blog, foro o redes sociales. Read the full article
#/opt/maven/bin#ApacheMaven#Debian10#Eclipse#git#InstalarApacheMaven#JasonvanZyl#java_home#maven#netbeans#opensource#OpenJDK11#wget
0 notes
Text
Mulesoft AnyPoint Studio Setup Scripted
Mulesoft AnyPoint Studio Setup Scripted
Problem
You’re all excited to get started using Anypoint Studio 7. Then this little monster rears it’s ugly head.

Solution
Save the below to a file named Mulesoft_Setup.ps1
You will need to modify $javaDir to be your java install directory
You will need to modify $anypointStudioDir to be your Anypoint Studio 7 install directory
Run it with powershell -ExecutionPolicy ByPass -File…
View On WordPress
#anypoint#anypoint studio#anypoint studio 7#environment variable#java#java_home#jdk_home#mulesoft#path#powershell#powershell script#studio
0 notes
Text
Jumpstart iOS automation using Appium
So how do we automate using Appium?Before we jump ahead, let us read a little bit about Selenium Webdriver. What is Selenium Webdriver?Selenium (not the chemical compound :-)) is a tool to automate UI on a browser. Simple, isn’t it? It is also a portable testing framework for web applications. It has a fairly good set of libraries that provides APIs that can be used to test UI on a browser or a headless browser using a client programming language of your choice. Selenium WebDriver succeeds Selenium-RC which was initially used to run browser-based automation. Selenium WebDriver is designed to provide a simpler, more concise programming interface in addition to addressing some limitations in the Selenium-RC API.It also rules out the use of the Selenium server which was handicap-ed for running automation with RC. We will have to remember that the WebDriver requires browser support which is provided by default in Firefox, however for Chrome and headless browsers like PhantomJS you would require a client. For further reading:
http://www.seleniumhq.org/docs/03_webdriver.jsp
What is Xcode tool?For those who are unfamiliar with XCode, it is Apple’s IDE to develop Mac and iOS applications. From automation, perspective iOS requires Xcode to be installed on the system for us to run XCUITest. For further reading:
https://developer.apple.com/xcode/
What is TestNG?TestNG is a testing framework that binds the best of both worlds from JUnit and NUnit, making automation easier and more powerful as well. For further reading:
http://testng.org/doc/
Steps to Install Appium , Xcode, Intellij :
Install Appium on your desktop
Download Appium desktop version (.dmg file for MacBook)
Install guide.
Install Xcode on your desktop
Go to App store or Download xcode (we need to be signed in to AppStore to download the xcode latest version. If do not have an Apple id then here you can create one to proceed further.)
Download Xcode and follow the instruction to install it.
Install Intellij in your desktop
Before install intellij, install java and set JAVA_HOME.
Download Intellij editor. Choose a community version for suitable OS Resource : https://www.pimonk.com/post/jumpstart-ios-automation-using-appium-part-2
1 note
·
View note
Text
Mac Set Environment Variable For Java

Details
Written by Nam Ha Minh
Last Updated on 27 April 2019 | Print Email
Mac Set Environment Variable For Java Programming
How To Set Environment Variable For Java In Mac Os X
Java Environment Variables Windows 10
In this article, you will understand the details about JAVA_HOME
Mkyong.com: How to set JAVAHOME variable in Mac OSX. YouTube: How to set environment variables on mac, linux, solaris, rhel. YouTube: How to Set Environment Variables in Mac. I was able to locate the terminal and I think I created some multiple files. I'm getting messages like this. Installing the JDK Software and Setting JAVAHOME. If you do not already have the JDK software installed or if the JAVAHOME environment variable is not set, the GlassFish ESB installation will not be successful. The following tasks provide the information you need to install the JDK software and set JAVAHOME on UNIX or Windows systems. To find out which JDK versions are supported for the. Trying to run a Java application on your Mac and need to set your JAVAHOME? Follow the instructions below to quickly and easily do it: Open Terminal Confirm you have JDK by typing “which java”. It should show something like /usr/bin/java. Check you have the needed version of Java, by typing “java -version”.
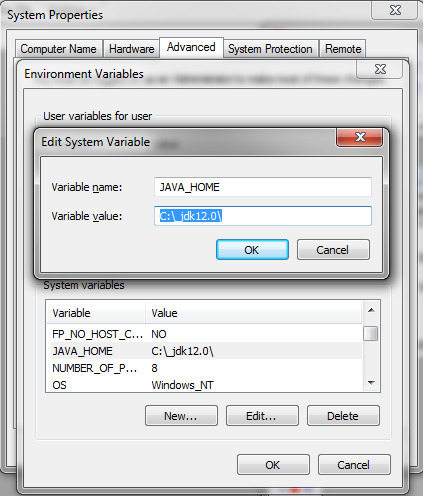
environment variable and how to set it on Windows 10. What is JAVA_HOME?By convention, JAVA_HOME

is the name of an environment variable on the operating system that points to the installation directory of JDK (Java Development Kit) or JRE (Java Runtime Environment) – thus the name Java Home. For example:Why is JAVA_HOME needed?To develop Java applications, you need to update the PATH environment variable of the operating system so development tools like Eclipse, NetBeans, Tomcat… can be executed because these programs need JDK/JRE to function. So the PATH environment variable should include JAVA_HOME:Other paths are set by various programs installed in the operating system. If the PATH environment variable doesn’t contain a path to JRE/JDK, a Java-based program might not be able to run. For example, typing java in the command prompt showing this error:Or Eclipse will fail to launch:How to set JAVA_HOME on Windows 10Here are the visual steps to properly set value for the JAVA_HOME and update the PATH environment variables in order to setup Java development environment on your computer:1. Firstly, you need to identify the Java home directory, which is typically under C:Program FilesJavadirectory. Open My Computer and navigate to this directory, you will see:
Here, the home of JDK is under C:Program FilesJavajdk1.80_201. The version number may vary, depending on the JDK you installed.
2. Open the System Environment Variables dialog by typing environment in the search area on Start menu. Click the suggested item Edit the system environment variables:
The System Properties dialog appears, click the button Environment Variables.
Then you will see this dialog:
3.Create the JAVA_HOME environment variable by clicking the New button at the bottom. In the New System Variable form, enter the name and value as follows:Click OK, and you will see the JAVA_HOME variable is added to the list.4.Update the PATH system variable. In the Environment Variables dialog, select the Path variable and click
Mac Set Environment Variable For Java Programming
Edit
How To Set Environment Variable For Java In Mac Os X
:Then in the Edit environment variable dialog, double click on the empty row just below the last text line, and enter %JAVA_HOME%bin as follows:The percent signs tell Windows that it refers to a variable – JAVA_HOME, and the bin specifies the location of java.exe and javac.exe programs which are used to run and compile Java programs, as well as other tools in the JDK.Click OK button to close all the dialogs, and you’re all set. Now you can open Eclipse or NetBeans to verify. Or open a command prompt and type in javac –version, you should see:NOTES:You can add the path to the
bin
directory of Java home directly into the PATH variable. But it’s strongly recommend to follow the above steps to setup a JAVA_HOME variable because many Java programs depend on it.When you installed a JDK, you might not need to update the system variable because the installer already did it for you.Learn more:
Java Environment Variables Windows 10
About the Author:
Nam Ha Minh is certified Java programmer (SCJP and SCWCD). He started programming with Java in the time of Java 1.4 and has been falling in love with Java since then. Make friend with him on Facebook and watch his Java videos you YouTube.
1 note
·
View note
Text
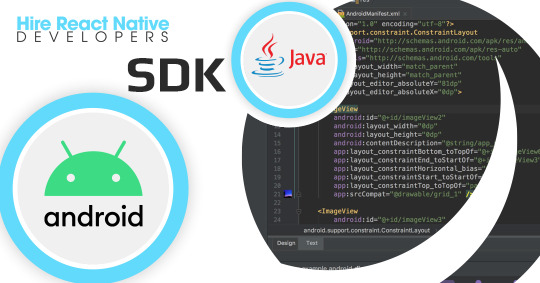
Dive into React Native for Android Development

If you’re new to mobile development, Expo CLI is the best place to start. Expo is a suite of tools centered on React Native, and while it has many capabilities, the most important one for us right now is that it can start developing React Native App Development Services in minutes. All you’ll need is a current version of Node.js and a phone or emulator. Snack may be used to test React Native straight in your web browser before installing any tools.
If you’re already experienced with mobile programming, React Native CLI can be a good choice. Hire Dedicated React Native Developers to get started, with Xcode or Android Studio. If you already have one of these tools installed, you should be up and running in a matter of minutes. You should anticipate spending around an hour installing and configuring them if they are not already installed.
Let’s take a look at the things we should keep in mind:
Animations
Performance
React Native styling
Use CSS-in-JS wrapper library
Use Expo-Kit only when needed
Choose the right navigation library
Convert any web project into mobile easily
The purpose of developing React Native Apps
Scaling your software to work on a variety of devices and screen sizes
Years passed, and React Native talents were in high demand. Since it had been a long time since I had learned something new, I figured why not give it a shot?

Install the necessary tools to get started with React Native
Setup Visual Studio Code (or your code editor of choice)
Download and install Android Studio for Windows. By default, Android Studio installs the most recent Android SDK. React Native requires the Android SDK 6.0 (Marshmallow) or later. We recommend that you use the most recent SDK.
Make the following environment variables for the Java SDK and Android SDK:
Enter “Edit the system environment variables” in the Windows search bar to launch the System Properties window.
Select Environment Variables…, then New… under User Variables.
Fill in the Variable name and value (path). The following are the default directories for the Java and Android SDKs. If you’ve decided to install the Java and Android SDKs in a specified place, be sure to edit the variable paths properly.
JAVA_HOME: C:\Program Files\Android\Android Studio\jre\jre
ANDROID_HOME: C:\Users\username\AppData\Local\Android\Sdk
Download and install NodeJS for Windows. If you will be dealing with various projects and versions of NodeJS, you should consider utilizing Node Version Manager (nvm) for Windows. For new projects, we recommend installing the most recent LTS version.
Make a new React Native project.
To build a new React Native project, use npx, the package runner tool included with npm. from Windows Command Prompt, PowerShell, Windows Terminal, or VS Code’s integrated terminal (View > Integrated Terminal).
PowerShellCopy
npx react-native init MyReactNativeApp
Open your new “MyReactNativeApp” directory:
PowerShellCopy
cd MyReactNativeApp
Connect a USB cord to your computer if you want to run your project on a physical Android device.
If you wish to run your project on an Android emulator, you shouldn’t have to do anything because Android Studio comes with a built-in emulator. If you wish to execute your software on a certain device’s emulator. In the toolbar, choose the AVD Manager button.
Enter the following command to start your project. This will launch Node Metro Bundler in a new console window.
PowerShellCopy
npx react-native run-android
PowerShellCopy
C:\Users\[User Name]\AppData\Local\Android\Sdk\tools\bin\sdkmanager –licenses
To make changes to the app, enter the My React Native App project directory in your preferred IDE. We prefer Visual Studio Code or Android Studio.
The react-native init project template includes a primary page called App.js. This page is pre-populated with a plethora of relevant links to React Native development resources. Fill the first Text element with text, such as the “HELLO WORLD!” string seen below.
JavaScriptCopy
<Text style={styles.sectionDescription}>
Edit <Text style={styles.highlight}>App.js</Text> to change this screen, and then return to check your changes.
“HELLO WORLD!”
</Text>
To see the changes you made, reload the app. There are various approaches to this.
Enter “r” in the Metro Bundler console window.
Double-tap “r” on your keyboard in the Android device emulator.
Shake the device to bring up the React Native debug menu and select ‘Reload’ on a hardware Android device.
Here are the Benefits of React Native for Android app development :
Easy to learn
Constantly improving
Huge number of libraries
Actively growing community
Native components for both platforms
Expo eliminates the need to possess a Mac in order to build for iOS.
There will be no longer limitless construction times with live and hot reloading.
A code-base shared between Android and iOS apps, with just small changes necessary to match platform experiences.
Reduction in labor resources while some Android/iOS native development may still be required, it will be rare.
Final Thoughts:
One of the main reasons why React Native is one of the greatest cross-platform frameworks for mobile applications is its superb UI rendering. Hire React Native Developers to provide React Native mobile app development services for both Android and iOS devices.
#hire react native app developers#hire dedicated react native developers#hire react native developer
1 note
·
View note