#JDK 17
Explore tagged Tumblr posts
Visit Tumblr Blog
Explore Tumblr blogs with no restrictions, modern design and the best experience.
Last Seen Tumblr Blogs


Fun Fact
70% of Tumblr users say the Dashboard is their favorite place to spend time online.
Text
A Comprehensive Guide to Java 17 New Features
Java 17, the latest long-term support (LTS) release, has arrived with a plethora of exciting new features and enhancements. In this blog post, we’ll take an in-depth look at all the noteworthy additions to the Java ecosystem in this groundbreaking release. 1. Sealed Classes Sealed classes provide a new way to restrict the inheritance hierarchy, allowing developers to define a limited set of…

View On WordPress
1 note
·
View note
Text
fucking finally wrangled VLC into submission and now it plays blu-ray w/ menus :)
1 note
·
View note
Note
honestly jdk just tim drake x reader where one/or multiple of the batfam walks in?? i just find them entertaining, or they are continually being interrupted through the day!
Warning: eventual smut and Tim is done with everyone’s shit. If it’s not the end of the world, don’t call me- level done. And you can tell it’s fanfic because Tim is actually an adult.
Tim didn’t get into shows very often. He’s busy and he has a terrible habit of falling asleep after the first 10 minutes. He didn’t want to watch the show but he was tinkering with some of his tech while sitting on the couch and you put it on. And that’s how he got sucked in.
“And Daphne said yes to that? Drew is not good enough to lie to her friends over,” he said and you started telling him the backstory.
You binge watch the next few episodes to catch up to the new season. It was a fun and scandalous show, nothing like Tim’s usual picks. And he thought it was cute how animated you were when talking about the show.
“Trevor needs to get his shit together or not only is Naomi going to leave him, he’ll go to jail,” Tim said.
“Yeah but he owes the local crime boss money and he said he’d kill his family otherwise,” you countered.
“Sounds like Gotham,” Tim quipped. You lightly smacked his arm before laying your head on his shoulder and entangling your arm in his.
“That is not comforting,” you said. “Oo they’re going to tell us who took the diamonds!”
The bat phone started ringing almost off the coffee table. You groaned and let Tim go to sit up to answer that.
“The corner of 17 and Parkway? How many combatants?” He said in Bat speak. And that’s when you knew your date night was over. He hung up and turned to you looking apologetic.
“I have to go,” he said. You sighed but pulled him into a hug.
“Be safe. I’ll be here,” you said with practices familiarity. He kissed you before grabbing his stuff and leaving. He didn’t get back until hours later with some fresh bruises and a girlfriend asleep on the couch.
It was 2 days later that you tried to continue the show. Tim had told Bruce to call someone else first. The door was locked and his phone was on silence. You’d even given him some pretty good incentives if you were uninterrupted and alone after the show.
It was all of ten minutes into the continued episode with pho takeout on the way that the fire escape window opened. In flopped Nightwing covered in mud.
“No,” Tim groaned. You huffed before pausing the show. “Do you need help?”
“Only a bit,” Dick said as the understatement of the year. He let Tim look at him to find that he was leaking blood all over the carpet from a bullet wound in his thigh. “Only a graze. Do you have a bandaid?”
“Good lord,” you replied as Tim called Alfred. You quickly grabbed a towel to stop the bleeding.
It was a few hours later and a carpet cleaner before Nightwing and your carpet were patched up. By that time it was the middle of the night and you couldn’t concentrate on anything. Tim promised a date night another day.
This one was a whole week later. All of the Robins had been warned under pain of torture to not talk to Tim for that evening. Because Tim was to put it mildly, frustrated. You two hadn’t had alone time in over a week.
You started the show back up with all entrances locked and phones off. You were able to watch the next 15 minutes before you heard broken glass.
“Hey did you know your window was locked,” Superboy said standing in front of the window. Tim practically growled before pausing the show to shove Kon out the window.
“I don’t know what you need but the other members of Young Justice are available. Call them,” Tim said but it was already too late. The wind had blown into the room and it was starting to snow outside so he couldn’t exactly ignore the window. Once again date night was canceled.
Tim was so frustrated that he had dreams about you in his bed. It was almost a week later and now 3 episodes behind on the show that you had another date night. He was almost willing to skip the show entirely at this point just to have alone time.
Tim had practically threatened everyone he knew with death threats to leave you both alone.
“Someone is feeling the mode,” Bart joked.
“You mean, someone needs to get laid,” Kon added.
“At this point, yes! I don’t want to see, hear, or think of either of you tonight. Unless it’s the  apocalypse, then I don’t want to even know about it,” he growled. The two other heroes howled with laughter as he left.
You could tell Tim was distracted and preoccupied by the way his hand gripped and squeezed your thigh. He gave you frequent kisses between scenes. As the episode ended, Tim pounced.
“Tim!” You gasped as he pushed you to lay on the couch before the credits were even done. It turned to a moan as his hand slid between your thighs to rub you through your panties.
“It’s been way too long,” he groaned as he kissed down your throat. He was almost never this aggressive and it was dizzying. He pushed your panties to the side to finger you.
“Oh fuck,” you gasped as he hit deep inside you. His hips rubbed his hard cock against you. He pulled at your shirt with one hand.
“Take it off,” he groaned with impatience. Before you had even gotten the fabric over your head, he had attacked your chest. Pulling a nipple into his mouth and sucking hard while fingering you thoroughly had you whimpering.
You shoved down his pants to grasp him in a loose fist. Tim rutted into your hand while sloppily kissing across your chest.
“Please, want you,” you whined and he wasted no time sliding in. Your back arched with a gasp. His arm reached behind your back and Tim took his time with long deep strokes.
This pleasure cycle couldn’t last forever and you both finished far too soon. Tim kissed you softly and gently.
“We can continue this later. I think the food is here,” he said.
“Sounds good,” you said adjusting your clothes and sitting up. “I’ll be right back,” you added as you went to clean up.
Tim answered the door in his messied hair and haphazardly placed clothes. Instead of the food delivery guy, it was Jason standing with his food box. Tim frowned.
“What do you want?”
“Pizza anyone?”
“Leave,” tim growled, taking the box. Jason laughed.
“Interrupting something?” Tim almost slammed the door in his face. “Hey, I just need keys to the Robin motorbike,” Jason added. “Oh I didn’t know you watched that show. Can you believe that in last week’s episode, it was the mom all along. Wild hu?”
Tim sighed before throwing the keys at Jason. “Go away.” He slammed the door.
“Well that sucks,” you said across the room.
Tim locked the door and sat the pizza box on the table. “I’m gonna be honest, and that is that I really just want to finish what we started before pizza. I’m not picky where.”
You laughed before letting him grab you fireman style over his shoulder to drag you into the bedroom. There was no way you were answering the door after that.
1K notes
·
View notes
Note
HAPPY BIRTHDAY GOOD JOB ON 17 YEARS OF LIVING IM SO GLAD I MET YOU DSKLFHFKHFSJD<JDK LOVE YOU YOU TALENTED SWEET CLEVER HARD-WORKING HUMAN HAVE A WONDERFUL DAY <33333333
NO THAT'S SO SWEET UR SO SWEET WANNA KISS U ON BOTH CHEEKS
or is that illegal??? because ur 18??? idk anymore
THANK YOU SO MUCH JUNE UR THE CUTEST
3 notes
·
View notes
Text
Make sure to send Overwolf feedback saying you’ve uninstalled because of their company politics and genocide funding. I don’t think it’ll change anything, but hey, why not.
I’ve personally downloaded Prism Launcher as an alternative - didn’t take me long at all, the only thing that gave me a bit of trouble was having to manually update my JDK.
🤲 have some links:
^^ Prism Launcher
^^ JDK (Java) 17 (i got 17 cause it’s the one my mods needed)
Overwolf (Who owns Curseforge) is an israeli company which is supporting the genocide in palestine and funding the IDF

Dont use curseforge anymore.
For downloading game mods: If it's Minecraft, use Modrinth instead, for any other games use gamebanana or nexusmods.
The original tweet appears to have been deleted. and im unable to find it on Archive.org, but the tweets are still indexed by google.


They're still openly raising money for Israel, though instead of the IDF in specific its just general "those affected by the Hamas attacks"
#shut up jack#AND HEY!!! BE VERY CAREFUL TO CHECK YOU EXPORTED EVERYTHING YOU NEEDED BEFORE DELETING#<< lost my worlds bc i trusted curseforge export profile function orz#tbf this is good bc i’ve been meaning to uninstall that shitty launcher for a while it’s so buggy
35K notes
·
View notes
Text
Full Stack Developer (.Net, C#, React.Js)
potential. Title and Summary Full Stack Developer (.Net, C#, React.Js) Overview We are the global technology company… following is a plus: – Proficiency with .NET/C#, React, Redux, Typescript, Java JDK 11-17, Spring Boot, Spring Security, Maven… Apply Now
0 notes
Text
Hướng Dẫn Viết Chương Trình Java Đầu Tiên Trên Windows
Viết chương trình Java đầu tiên là bước khởi đầu quan trọng cho những ai muốn học lập trình. Với hệ điều hành Windows, việc thiết lập môi trường và viết mã Java trở nên dễ dàng hơn bao giờ hết. Bài viết này sẽ hướng dẫn bạn từng bước để tạo chương trình Java đầu tiên một cách chi tiết, đảm bảo bạn có thể bắt đầu hành trình lập trình mà không gặp khó khăn.
1. Java Là Gì?
Java là một ngôn ngữ lập trình phổ biến, được sử dụng rộng rãi trong phát triển ứng dụng web, ứng dụng di động, và phần mềm doanh nghiệp. Với tính năng "viết một lần, chạy mọi nơi" (Write Once, Run Anywhere), Java phù hợp cho cả người mới bắt đầu và lập trình viên chuyên nghiệp.
Tại Sao Nên Học Java Trên Windows?
Windows là hệ điều hành phổ biến, dễ sử dụng.
Hỗ trợ đầy đủ các công cụ lập trình như JDK (Java Development Kit) và IDE (Integrated Development Environment).
Cộng đồng người dùng Java lớn, dễ dàng tìm kiếm tài liệu và hỗ trợ.
2. Chuẩn Bị Môi Trường Lập Trình Java Trên Windows
Để viết chương trình Java đầu tiên, bạn cần cài đặt một s ố công cụ cần thiết. Dưới đây là các bước chi tiết:
Bước 1: Cài Đặt JDK
JDK là bộ công cụ phát triển Java, bao gồm trình biên dịch và thư viện cần thiết. Để cài đặt:
Truy cập trang chủ Oracle (www.oracle.com) và tải phiên bản JDK mới nhất.
Chạy file cài đặt và làm theo hướng dẫn.
Sau khi cài đặt, thiết lập biến môi trường PATH:
Nhấn chuột phải vào "This PC" > "Properties" > "Advanced system settings" > "Environment Variables".
Trong "System Variables", tìm "Path" và thêm đường dẫn tới thư mục bin của JDK (ví dụ: C:\Program Files\Java\jdk-17\bin).
Bước 2: Cài Đặt IDE Hoặc Trình Soạn Thảo
Để viết mã Java, bạn có thể sử dụng:
Notepad: Đơn giản, phù hợp cho người mới.
IntelliJ IDEA hoặc Eclipse: Các IDE mạnh mẽ với tính năng gợi ý mã, debug, và quản lý dự án.
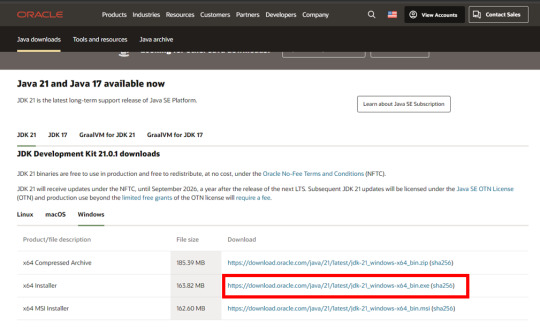
Giao diện tải JDK từ trang Oracle
3. Viết Chương Trình Java Đầu Tiên
Sau khi chuẩn bị môi trường, bạn đã sẵn sàng để viết chương trình Java đầu tiên. Chúng ta sẽ tạo một chương trình đơn giản in ra dòng chữ "Hello, World!".
Bước 1: Tạo File Java
Mở Notepad hoặc IDE bạn đã cài.
Viết đoạn mã sau:
public class HelloWorld { public static void main(String[] args) { System.out.println("Hello, World!"); }}
Lưu file với tên HelloWorld.java (tên file phải trùng với tên class và có đuôi .java).
Giải thích mã:
public class HelloWorld: Khai báo một lớp tên HelloWorld.
public static void main: Hàm chính, điểm bắt đầu của chương trình.
System.out.println: In dòng chữ "Hello, World!" ra màn hình.
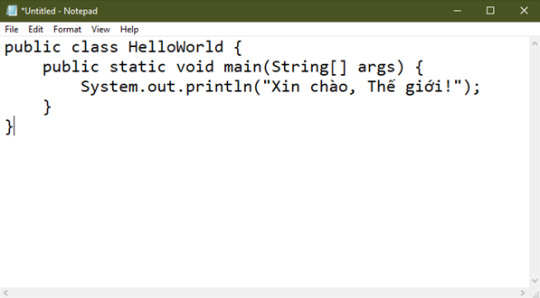
Đoạn mã trong notepad
Bước 2: Biên Dịch Chương Trình
Mở Command Prompt (nhấn Win + R, gõ cmd).
Điều hướng đến thư mục chứa file HelloWorld.java bằng lệnh cd (ví dụ: cd C:\Users\YourName\Documents).
Biên dịch mã bằng lệnh:javac HelloWorld.java Lệnh này tạo file HelloWorld.class.
Bước 3: Chạy Chương Trình
Trong Command Prompt, gõ:java HelloWorld
Kết quả: Màn hình hiển thị dòng chữ Hello, World!.
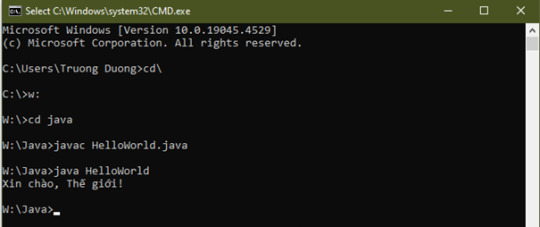
Các dòng lệnh để chạy chương trình java trong Command Prompt
4. Một Số Lỗi Thường Gặp Khi Viết Chương Trình Java Đầu Tiên
Người mới bắt đầu thường gặp một số lỗi cơ bản. Dưới đây là cách khắc phục:
Lỗi "javac is not recognized": Kiểm tra lại biến môi trường PATH đã được thiết lập đúng chưa.
Lỗi tên file không khớp: Đảm bảo tên file và tên class giống nhau (ví dụ: HelloWorld.java cho class HelloWorld).
Lỗi cú pháp: Kiểm tra kỹ dấu ngoặc, dấu chấm phẩy trong mã.
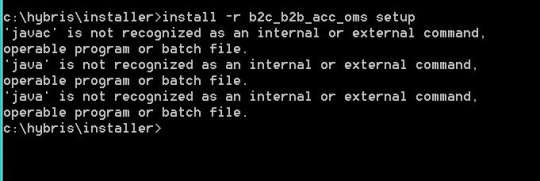
Lỗi "javac is not recognized"
5. Mẹo Để Học Java Hiệu Quả Trên Windows
Thực hành thường xuyên: Viết các chương trình nhỏ như máy tính đơn giản, in bảng cửu chương.
Sử dụng IDE: Chuyển sang IntelliJ IDEA hoặc Eclipse khi bạn quen với cú pháp để tăng hiệu suất.
Tham gia cộng đồng: Các diễn đàn như Stack Overflow, Reddit có nhiều tài liệu và câu trả lời hữu ích.
Học qua video: Xem các hướng dẫn trên YouTube để hình dung rõ hơn cách thiết lập và lập trình.
6. Kết Luận
Viết chương trình Java đầu tiên trên Windows là một bước khởi đầu thú vị trong hành trình học lập trình. Với các bước cài đặt JDK, thiết lập môi trường, và viết mã đơn giản như "Hello, World!", bạn đã đặt nền tảng vững chắc để khám phá thêm về Java. Hãy kiên trì thực hành và tìm hiểu các thư viện, framework như Spring hoặc JavaFX để phát triển kỹ năng.

Hy vọng bài viết này giúp bạn dễ dàng bắt đầu với Java trên Windows! Nếu bạn có câu hỏi, hãy để lại bình luận để được hỗ trợ.
💡 Hướng Dẫn Viết Chương Trình Java Đầu Tiên Trên Windows
Bắt đầu hành trình lập trình với Java! Hướng dẫn từng bước cách cài đặt JDK, viết code đơn giản và chạy chương trình Java đầu tiên bằng Command Prompt.
🌍 Website: Java Highlight
#JavaHighlight#JavaCoBan#JavaChoNguoiMoiBatDau#JavaFirstProgram#JDK#JavaTutorial#LapTrinhJava#JavaDevelopment#HelloWorldJava#JavaWindows#CodeJava#JavaTips
0 notes
Text
VR Project: Week 4 Blog 7;
Compiling the final apk files
So after the scene was done I followed a tutorial titled "How to package your unreal engine 5.4 projects - ANDROID/VR project" by Unreal Engine VR to package the VR project for Android using Unreal Engine 5.4.
youtube
Vid; Unreal Engine VR (2024) How to package your unreal engine 5.4 projects - ANDROID/VR project. YouTube, 25 April. Available at: https://www.youtube.com/watch?v=NfI_WlKFUak (Accessed: 13 March 2025).
I started by launching a VR template in UE 5.4. While that was loading, I checked what SDK, NDK, and JDK versions were needed. According to the official documentation, SDK 33 was recommended, with 30 being the minimum. NDK had to be version 25.1, and JDK needed to be version 17. Android Studio Flamingo 2022.2.1 Patch 2 was required too. Found it in the archives and downloaded it.
I already had Android Studio 4.0 on my system, but the tutorial recommended a clean install without importing previous settings. Uninstalled the old one and installed the new version as suggested.
After setting up Android Studio, I went into the SDK Manager. Selected SDK 33, and under SDK Tools, enabled "Show Package Details" to pick the specific build tools version 33.0.1. Also made sure to download NDK 25.1, CMake 3.10 and 3.22, and the command line tools.
Next step was downloading JDK 17 from the Java archives. Installed it and checked in the command prompt using java -version, which showed 17.0.1. That was good enough according to the tutorial.
With everything installed, I moved back into Unreal Engine to set up the packaging settings. Went into Project Settings, enabled full rebuild, switched to Android platform, set the SDK level to 33, and made sure APK packaging was checked. Then pointed Unreal to the correct paths for SDK, NDK, and JDK based on what I had just installed.
Everything looked good on paper.
But when I hit package… it didn’t work.
I ran into a bunch of errors. Unreal kept throwing issues even though the paths and versions matched what the tutorial asked for. I spent hours trying to troubleshoot but couldn’t get past the errors.
youtube
Vid; Andicox Studio (2024) Fixing Packaging and Cooking Issues in Unreal Engine 5 (UE5). YouTube, 2024. Available at: https://www.youtube.com/watch?v=IdTXHZ0Azqg (Accessed: 13 March 2025).
To resolve these errors, I followed a tutorial that recommended addressing each red error code individually and cleaning them manually. Although it was a time-consuming process, after nearly four hours of debugging, I managed to narrow the issues down to just a few problematic texture maps. These textures were directly imported from Fab, which seemed to be the root cause. I reached out to Ong Jian Wei, who opened the texture files in Photoshop and exported them in a different format. Surprisingly, that simple step fixed the issue ��� the engine finally accepted them without throwing any more errors.
0 notes
Text
Unlock Java 17: New Features & Enhancements Guide
1. Introduction Java 17, also known as Java Development Kit (JDK) 17, is the latest long-term support (LTS) release of the Java programming language. Released in September 2021, it brings exciting new features and improvements to the platform. This release is significant because it includes several features that were previously incubating or in preview, making them now official and ready for…
0 notes
Text
Enhance Your Programming Skills with Core Java Classes at Sunbeam Institute, Pune
Elevate your programming expertise with our comprehensive Core Java classes at Sunbeam Institute of Information Technology in Pune. Designed for students, freshers, and working professionals, our course offers in-depth knowledge of Java, from fundamental concepts to advanced techniques.
Course Highlights:
Batch Schedule: January 25, 2025 – February 17, 2025
Duration: 80 hours
Timings: 9:00 AM to 1:00 PM (Monday to Saturday)
Mode: Online and Offline options available
Fees: ₹7,500 (Online) | ₹8,000 (Offline) (Including 18% GST)
Course Syllabus:
Java Language Fundamentals: Understand Java language features, JDK, JRE, JVM, data types, and more.
Object-Oriented Programming Concepts: Learn about classes, inheritance, polymorphism, and interfaces.
Exception Handling: Master error handling, custom exceptions, and chained exceptions.
Functional Programming Fundamentals: Explore lambda expressions, functional interfaces, and method references.
Generics: Delve into parameterized types, bounded type parameters, and generic methods.
String Handling: Work with String, StringBuffer, StringBuilder, and regular expressions.
Collection Framework: Study lists, sets, maps, and Java 8 streams.
Multithreading: Understand thread life cycle, synchronization, and concurrency issues.
File I/O: Learn about file processing, serialization, and deserialization.
Reflection: Gain insights into metadata, dynamic method invocation, and reflection classes.
Why Choose Sunbeam Institute?
Sunbeam Institute is renowned for its experienced instructors and practical approach to learning. Our Core Java course is tailored to equip you with the skills necessary to excel in the software development industry. Whether you're beginning your programming journey or aiming to enhance your existing skills, our structured curriculum and hands-on training will support your career growth.
Enroll Now:
Don't miss this opportunity to advance your programming skills. Enroll in our Core Java classes today and take the next step in your career.
For more details and registration, visit our https://sunbeaminfo.in/modular-courses/core-java-classes Note: Limited seats are available. Early registration is recommended to secure your spot.
#Core Java classes#Java programming course#Sunbeam Institute Pune#Java training Pune#advanced Java course
0 notes
Text
Sonarqube Setup with Postgresql
sonarqube installation along with java 17 Postgresql Database Prerequisites Need an AWS EC2 instance (min t2.small) Install Java 17 (openjdk-17) apt-get update apt list | grep openjdk-17 apt-get install openjdk-17-jdk -y Install & Setup Postgres Database for SonarQube Source: https://www.postgresql.org/download/linux/ubuntu/ Install Postgresql database Import the repository signing…
0 notes
Text
Setting Up the Java Environment: A Complete Guide for Beginners
Java is a powerful, widely-used programming language known for its platform independence, object-oriented principles, and robustness. One of the key reasons for its popularity is the fact that it can run on any machine equipped with a Java Virtual Machine (JVM), making it truly “write once, run anywhere.” However, before you can start writing and executing Java code, you need to properly set up the Java development environment on your system.
This guide will walk you through the entire process of setting up the Java environment, including downloading and installing the necessary tools, configuring environment variables, and writing your first Java program. By the end of this tutorial, you’ll be ready to start coding in Java.
Step 1: Understanding the Components of the Java Environment
Before diving into the installation process, it’s essential to understand the core components involved in the Java ecosystem. These include:
1. JDK (Java Development Kit): This is the complete suite needed to develop and run Java applications. It includes the Java compiler (javac), standard libraries, and other tools required to build and execute Java programs.
2. JRE (Java Runtime Environment): The JRE provides the libraries and the JVM necessary to run Java applications. It’s a part of the JDK but can also be installed separately if you’re only running (not developing) Java programs.
3. JVM (Java Virtual Machine): This is the heart of Java’s platform independence. It interprets the compiled Java bytecode and allows it to run on any operating system that has a compatible JVM.
For development, you’ll primarily need the JDK, which includes the JRE and JVM.
Step 2: Downloading and Installing the Java Development Kit (JDK)
To begin coding in Java, you need to download the JDK. Here’s how to do it:
1. Go to the Official Oracle Website:
Visit the official Oracle Java SE Downloads page.
You’ll see multiple versions of Java. For most use cases, it’s best to download the latest Long-Term Support (LTS) version, which is currently Java SE 17.
2. Choose the Right Version for Your Operating System:
Select the appropriate version based on your operating system (Windows, macOS, or Linux).
Download the installer (.exe for Windows, .dmg for macOS, or a compressed package for Linux).
3. Run the Installer:
For Windows:
Double-click the .exe file and follow the installation prompts. The default installation directory is usually C:\Program Files\Java\jdk-<version>.
For macOS:
Open the .dmg file, and drag the JDK into your Applications folder.
For Linux:
Extract the downloaded .tar.gz file into a directory, and follow the system-specific instructions for installation.
Step 3: Configuring Environment Variables
Once the JDK is installed, you need to configure the PATH and JAVA_HOME environment variables on your system. This allows your terminal or command prompt to access Java’s tools from any directory.
Windows
1. Open Environment Variables:
Right-click on This PC or My Computer and choose Properties.
Click on Advanced System Settings, then click Environment Variables.
2. Set JAVA_HOME:
In the System Variables section, click New.
Set the variable name as JAVA_HOME and the variable value as the path to your JDK installation (e.g., C:\Program Files\Java\jdk-17).
3. Update PATH Variable:
In the System Variables section, find the Path variable, select it, and click Edit.
Click New and add %JAVA_HOME%\bin.
Click OK to close all dialogs.
macOS
1. Open the Terminal and edit your shell profile (e.g., .bash_profile or .zshrc for Zsh) by typing:
nano ~/.bash_profile
2. Set JAVA_HOME and Update PATH: Add the following lines:
export JAVA_HOME=$(/usr/libexec/java_home) export PATH=$JAVA_HOME/bin:$PATH
3. Save and Exit:
Press Ctrl+X to exit, then Y to save changes.
Apply the changes with:
source ~/.bash_profile
Linux
1. Open Terminal and edit your shell profile (e.g., .bashrc or .zshrc) by typing:
nano ~/.bashrc
2. Set JAVA_HOME and Update PATH: Add the following lines:
export JAVA_HOME=/usr/lib/jvm/jdk-17 export PATH=$JAVA_HOME/bin:$PATH
3. Save and Exit:
Press Ctrl+X to exit, then Y to save.
Apply the changes:
source ~/.bashrc
Step 4: Verifying the Installation
Once you’ve installed the JDK and configured the environment variables, verify that everything is set up correctly.
1. Open a Terminal or Command Prompt:
On Windows, press Windows + R, type cmd, and press Enter.
On macOS and Linux, open the Terminal from your applications or press Ctrl+Alt+T (for Linux).
2. Check the Java Version: Type the following command:
java -version
You should see output similar to:
java version “17.0.2” 2022-01-18 LTS Java(TM) SE Runtime Environment (build 17.0.2+8-86) Java HotSpot(TM) 64-Bit Server VM (build 17.0.2+8-86, mixed mode)
3. Check the Java Compiler: Similarly, check if the Java compiler (javac) is working by typing:
javac -version
The output should be something like:
javac 17.0.2
Step 5: Writing and Running Your First Java Program
With the Java environment properly set up, it’s time to write your first Java program. Follow these steps:
1. Open a Text Editor: You can use any text editor like Notepad (Windows), TextEdit (macOS), or Vim/Nano (Linux). Alternatively, you can use an Integrated Development Environment (IDE) like Eclipse, IntelliJ IDEA, or NetBeans for a more user-friendly experience.
2. Write the Program: Here’s a simple “Hello, World!” program:
public class HelloWorld { public static void main(String[] args) { System.out.println(“Hello, World!”); } }
3. Save the File: Save the file as HelloWorld.java in a directory of your choice.
4. Compile the Program: Open the terminal or command prompt and navigate to the directory where you saved the file. Use the following command to compile the program:
javac HelloWorld.java
If there are no errors, this will generate a file called HelloWorld.class.
5. Run the Program: Now, run the compiled program by typing:
java HelloWorld
You should see the following output:
Hello, World!
Step 6: Installing an IDE (Optional)
While it’s possible to write and run Java programs using just a text editor and the terminal, using an Integrated Development Environment (IDE) can make the process much easier, especially as your programs become more complex.
Some popular IDEs for Java development are:
Eclipse: A widely-used IDE with many plugins to enhance functionality.
IntelliJ IDEA: A powerful IDE with smart coding assistance, refactoring tools, and an intuitive interface.
NetBeans: A free and open-source IDE with support for various programming languages, including Java.
You can download these IDEs from their official websites and install them by following the provided instructions.
Conclusion
Setting up the Java environment may seem complicated at first, but once you’ve gone through these steps, you’ll be ready to dive into Java development. From here, you can start writing basic programs, experimenting with object-oriented concepts, and eventually tackling larger projects. Whether you’re developing desktop applications, web services, or Android apps, learning Java will give you a solid foundation in programming.
1 note
·
View note
Video
youtube
DESCARGA E INSTALACION DE NETBEANS 17 Y JDK 17 RECOMENDADO POR VERSIONES...
0 notes
Text
こまごま、いろいろ
・clojure で生成した .class ファイルを実行するのに、macOS のほうの jdk のバージョンが古いのでダメ、と言われる ・jdk のバージョンを上げようとすると、macOS のバージョンが古いのでダメ、と言われる ・macOS をアップデートする(Catalina -> Monterey) ・jdk をアップデートする(8 -> 17) ・あらためて .class ファイルを実行するも、ダメ ・新しい jdk は、それまで参照していた「/Library/Java/Extensions」配下の .jar を読まなくなっているな ・CLASSPATH を指定すると、repl 起動時に「CLASSPATH 設定しようとしてるけど、間違いじゃない?」("WARNING: You have $CLASSPATH set, probably by accident.It is strongly recommended to unset this before proceeding.")などと文句言われてたが? ・「export CLASSPATH="/Library/Java/Extensions/*:."」と明示する必要がありそう ・動作確認できました。 以上、備忘録として記す。
0 notes
Text
#Vaadin Flow Quick Start Requirements Add Code Run the Application Vaadin Flow helps you quickly to build web applications in pure Java — without writing any HTML or JavaScript. This guide shows how to build a small, but fully functional ToDo application using Vaadin Flow. Requirements To start, you’ll need JDK 17 or higher (e.g., Eclipse Temurin JDK). Next, you’ll need to download the…

View On WordPress
0 notes
Text
https://ift.tt/klMzPqR https://ift.tt/d9gXGc2 January 17, 2024 This Week: We beat Wild Arms 5! Next Week: We watch Doctor Who (1996)! Visit rpgbook.club to pitch in and unlock cool rewards, including a weekly bonus episode! Check out https://linktr.ee/rpgbookclub for our Discord server and our socials! Year 5's Intro/Outro Music is "The Beginning of the Legend" from The Legend of Xanadu J.D.K. SPECIAL, by Falcom jdk. Copyright © Nihon Falcom Corporation
0 notes