#JSON To Golang Structs
Explore tagged Tumblr posts
Visit Tumblr Blog
Explore Tumblr blogs with no restrictions, modern design and the best experience.
Last Seen Tumblr Blogs


Fun Fact
The Tumblr office adopted Tommy, an 11-year-old Pomeranian.
Text
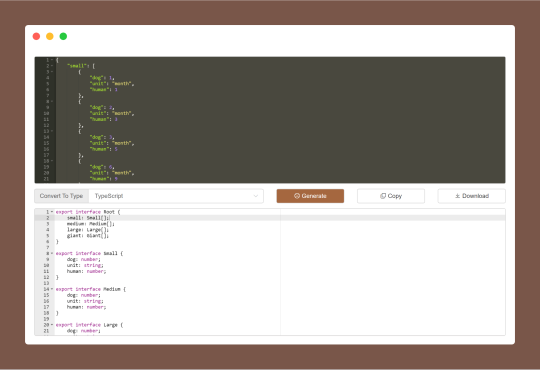
JSON To Type Generator is a code convert tool for generating types from JSON data for Golang, Rust, Kotlin and TypeScript. I.e. you just give it some JSON data, and it gives you the type definitions necessary to use that JSON in a program.
#JSON To Type Generator#JSON To TypeScript Interfaces#JSON To Golang Structs#JSON To Rust Structs#JSON to JSON Schema#JSON To Type Definitions Code#free online tools#online tools#web tools#online web tools#free web tools#online tool
0 notes
Text
Use Anonymous Structs For JSON Marshalling in Go

Go is a language built for the web. The Go standard library comes with everything we need to stand up a production web server. Today we are going to explore marshaling JSON using anonymous structs. Anonymous structs can help keep API handlers clean and simple.
What Is A Struct? Go’s structs are typed collections of fields. They’re useful for grouping data together to form records.https://go…
View On WordPress
0 notes
Link
14 notes
·
View notes
Text
Top Five Golang Module Developers Should Know In 2023
In the world of programming language GO is an incredibly powerful language that is used for multiple purposes. Golang is a fast, reliable, and easy-to-use language that gains rapid popularity due to its booming features.
Golang is easy to scale as it has fantastic documentation so, we look at the top 5 Golang modules that make work easier with Go. so, before moving to the Golang module, let me clear the definition of the go module.
A module is a group of Go packages that store in a file tree with Go. Moreover, the module path defines the mod file that can import a path that uses the root directory with its dependency requirement so other modules can be successfully built.
Top 5 Golang Module For Developer
Goose Database Migration
If you are dealing with modifying the DB schema then Goose is providing the best solution. With goose packages, developers can make schema change and data migration easily. Moreover managing the schema changes the primary task when you are working with relational databases so, let’s see how to use and install.
Installation
Run This command
$ go get github.com/pressly/goose
You can also use its lightweight Version by this code
$ go build -tags=‘nopostgres nomysql nosqlite3’ -i -o goose ./cmd/goose
Use Goose
You can use Goose by creating new SQL migration by the following command
$ goose create newcolumn SQL
GO KIT
The Go Kit is a Github standardized library that is used for Go-related Microservice. Go Kit is popular for addressing the gap between function like infrastructure integration, RPF safety, program design, and system observability so, let’s see its use and installation
Installation
You can install the Go kit by following this command
$ go get github.com/go-kit/kit
Use Go Kit
Create a new project and new model by the following code
package article
import (
���time”
)
type Article struct {
ID string json:"id"
Username string json:"username"
Content string json:"content"
Text string json:"title"
CreatedOn time.Time json:"createdon"
}
Ginkgo
Ginkgo is BDD behavior-driven development framework for testing. It permits you to write tests in syntax that resembles a language like English. This makes it easy for people to understand tests or output that match their business requirements. Ginkgo has stylish test specifications that integrate with Go and its inbuilt testing package.
Installation
You can install this package with this command
$ go get github.com/onsi/ginkgo/ginkgo
Use Ginkgo
$ ginkgo bootstrap
Authboss
Authboss is the modular web authentication system of Go. Authboss is the time-saver as it integrates easily, without a framework, and is also used for fixing bugs. Moreover, authboss has many authentication and authorization modules that give many choices to developers.
Installation
To Install Authboss You can use the following Command
$ go get -u github.com/volatiletech/authboss/v3
Use Of Authbuss
Authboss is a different module than other modules so, I recommend you to look at its documentation for proper understanding.
NSQ
NSQ is mostly used as a building block for the big scale distributed systems. It’s a robust distributed queue. It’s an easy TCP protocol that helps client libraries in different languages. Moreover, it did not require the client library to publish an HTTP interface for stats.
Installation
You can use the following command for installing NSQ
$ git clone https://github.com/nsqio/nsq
$ cd nsq
$ make
**Use **
NSQ is hard to understand so, I recommend you to check out its documentation for a better understanding and use of NSQ.
Take Away
Golang offers numerous libraries and packages to work with and if we talk about Golang modules that are awesome to work with. Its module helps the developer in the development of applications as above we have introduced the top 5 modules that you can use as per your requirement in application development. If you have to need any helping hand in your application you can contact one top-notch Golang development services.
0 notes
Text
Inserting, reading, and updating JSON data in postgres using Golang GORM
Inserting, reading, and updating JSON data in postgres using Golang GORM
This is a “Frankenstein” approach which worked well using a combination of methods found online (see references). On their own, each approach had a limitation, but together they ticked all the boxes. Assuming you have the following table defined as a struct within you Go program: type User struct { Name string Email string Attributes JSONB `gorm:"type:jsonb"` } Note the “attributes” field,…
View On WordPress
0 notes
Text
Golang だけでやる機械学習と画像分類
gobrain という Golang だけで実装されたニューラルネットワークを見つけたので遊んでみました。
GitHub - goml/gobrain: Neural Networks written in go https://ift.tt/1WF8SZd
作りもシンプルですし、扱い方も簡単なのでちょっとしたサンプルを書くのには向いてると思います。例えば FizzBuzz であればこんな感じ。
package main import ( "math/rand" "github.com/goml/gobrain" ) type FizzBuzz []float64 func (fizzbuzz FizzBuzz) Type() int { for i := 0; i < len(fizzbuzz); i++ { if fizzbuzz[i] > 0.4 { return i } } panic("Sorry, I'm wrong") } func teacher(n int) []float64 { switch { case n%15 == 0: return []float64{1, 0, 0, 0} case n%3 == 0: return []float64{0, 1, 0, 0} case n%5 == 0: return []float64{0, 0, 1, 0} default: return []float64{0, 0, 0, 1} } } func bin(n int) []float64 { f := [8]float64{} for i := uint(0); i < 8; i++ { f[i] = float64((n >> i) & 1) } return f[:] } func main() { rand.Seed(0) // make patterns patterns := [][][]float64{} for i := 1; i <= 100; i++ { patterns = append(patterns, [][]float64{ bin(i), teacher(i), }) } ff := &gobrain.FeedForward{} // 8 inputs, 100 hidden nodes, 4 outputs ff.Init(8, 100, 4) // epochs: 1000 // learning rate: 0.6 // momentum factor: to 0.4 ff.Train(patterns, 1000, 0.6, 0.4, false) for i := 1; i < 100; i++ { switch FizzBuzz(ff.Update(bin(i))).Type() { case 0: println("FizzBuzz") case 1: println("Fizz") case 2: println("Buzz") case 3: println(i) } } }
今日はこの gobrain を使って画像分類を作ってみました。特徴抽出やノーマライズはやってないので実用的ではない事に注意下さい。
まず flickr 等から薔薇とユリと向日葵の画像を貰ってきて下さい。
薔薇

ユリ

刺青混じってませんか...
向日葵

各20毎程度で構いません。次に画像を読み込んで3チャネルに分割します。
func decodeImage(fname string) ([]float64, error) { f, err := os.Open(fname) if err != nil { return nil, err } defer f.Close() src, _, err := image.Decode(f) if err != nil { return nil, err } bounds := src.Bounds() w, h := bounds.Dx(), bounds.Dy() if w < h { w = h } else { h = w } bb := make([]float64, w*h*3) for y := 0; y < h; y++ { for x := 0; x < w; x++ { r, g, b, _ := src.At(x, y).RGBA() bb[y*w*3+x*3] = float64(r) / 255.0 bb[y*w*3+x*3+1] = float64(g) / 255.0 bb[y*w*3+x*3+2] = float64(b) / 255.0 } } return bb, nil }
これで画像データが1次元の float64 配列になりこれが入力となります。これに薔薇やユリや向日葵のラベルを紐づけるためにラベルの添え字番号を使い同じ様に float64 配列にする関数を作ります。
func bin(n int) []float64 { f := [8]float64{} for i := uint(0); i < 8; i++ { f[i] = float64((n >> i) & 1) } return f[:] } func dec(d []float64) int { n := 0 for i, v := range d { if v > 0.9 { n += 1 << uint(i) } } return n }
あと�� gobrain を初期化して学習させれば推論器が出来上がるのですが
ff.Init(len(patterns[0][0]), 40, len(patterns[0][1])) ff.Train(patterns, 1000, 0.6, 0.4, false)
gobrain は Pure Go という���もあり struct をそのまま JSON にエンコードしてやればこれがモデルファイルになる事に気付きました。
func loadModel() (*gobrain.FeedForward, []string, error) { f, err := os.Open("labels.txt") if err != nil { return nil, nil, err } defer f.Close() labels := []string{} scanner := bufio.NewScanner(f) for scanner.Scan() { labels = append(labels, scanner.Text()) } if scanner.Err() != nil { return nil, nil, err } if len(labels) == 0 { return nil, nil, errors.New("No labels found") } f, err = os.Open("model.json") if err != nil { return nil, labels, nil } defer f.Close() ff := &gobrain.FeedForward{} err = json.NewDecoder(f).Decode(ff) if err != nil { return nil, labels, err } return ff, labels, nil } func makeModel(labels []string) (*gobrain.FeedForward, error) { ff := &gobrain.FeedForward{} patterns := [][][]float64{} for i, category := range labels { bset, err := loadImageSet(category) if err != nil { return nil, err } for _, b := range bset { patterns = append(patterns, [][]float64{b, bin(i)}) } } if len(patterns) == 0 || len(patterns[0][0]) == 0 { return nil, errors.New("No images found") } ff.Init(len(patterns[0][0]), 40, len(patterns[0][1])) ff.Train(patterns, 1000, 0.6, 0.4, false) return ff, nil } func saveModel(ff *gobrain.FeedForward) error { f, err := os.Create("model.json") if err != nil { return err } defer f.Close() return json.NewEncoder(f).Encode(ff) }
全体のソースは GitHub に置いてあります。
GitHub - mattn/flower-detect https://ift.tt/2RJvycW
実際に試してみます。

結果は「sunflower」。そうだよ向日葵だよ。

結果は「rose」。そうだよ薔薇だよ。

結果は「lilium」。そうだよユリだよ。
gobrain を JSON で出力してモデル扱いにするというこの方法を使えば、簡単な画像分類であればインストールが難しい TensorFlow を使わずともポータブルに実行出来ます。特に GPU を使う程ではないといった場合にも便利かなと思います。一応 smartcrop というパッケージを使って画像内で注目される部分で crop する様にしてありますが、いくらかの画像では失敗します。これは画像をノーマライズしていないのでしょうがないですね。学習には10分くらい掛かると思います。
尚 Golang で TensorFlow やりたい人は以前書いた記事の方を参照下さい。
Big Sky :: golang で tensorflow のススメ
tensorflow といえば Python と思っておられる方も多いのではないでしょうか。間違いではないのですが、これは初期に作られた Python 向けのバインディングに研究者達が多く食いついた結...
https://ift.tt/2P3CTme

Go言語による並行処理 Katherine Cox-Buday オライリージャパン / ¥ 3,024 (2018-10-26) 発送可能時間:在庫あり。
from Big Sky https://ift.tt/2DswyyR
1 note
·
View note
Text
golangでGCP Secret Managerにアクセスする
やったことのめも
Secret Managerとは
Secret Manager は、API キー、パスワード、証明書、その他の機密データを保存するための安全で便利なストレージシステムです。
超簡単にまとめると、機密データを保存するDBのようなものです。JSON形式とかで値を保存できるので便利。
sample
ローカルからSecret Managerの値にアクセスしてみます。
まずはsecretを作成し��す。 コンソールよりぽちぽちしていきましょう。
今回は以下のような、jsonの値を管理してみます。
{ "secret": "secret", "var": "hoge" }
Secret Manager APIを有効化
https://console.cloud.google.com/marketplace/product/google/secretmanager.googleapis.com
シークレットを作成
名前: sample-secret
ファイルをアップロードでjsonファイルを上げる or 値を入力します
サービスアカウントの作成
名前などはなんでもおっけー
roleにsecret manager > シークレットアクセサーを追加
鍵(JSON)を作成し、ダウンロード
次に、goからアクセスするコードを作ってみます。
func getSecret() { ctx := context.Background() // TODO: replace projectID := "GCP_PROJECT_ID" secretID := "SECRET_ID" // get client // GCP内の通信で、デフォルトのサービスアカウントを使用する際は、optionは使用しなくておっけー opt := option.WithCredentialsFile("/path/your/key/file.json") client, err := secretmanager.NewClient(ctx, opt) if err != nil { log.Fatalf("failed to new client: %v", err) } // create request accessRequest := &secretmanagerpb.AccessSecretVersionRequest{ Name: fmt.Sprintf("projects/%s/secrets/%s/versions/latest", projectID, secretID), } // access secret result, err := client.AccessSecretVersion(ctx, accessRequest) if err != nil { log.Fatalf("failed to access secret version: %v", err) } // decode var config myConfig err = json.Unmarshal(result.Payload.Data, &mysqlConfig) if err != nil { log.Fatalf("failed to marshal json: %v", err) } log.Println("success: %v", config) } type myConfig struct { Secret string `json:"secret"` Var string `json:"var"` }
余談ですが、terraformでSecret Managerのリソースを作ると以下な感じになります。
# ##################################### # Secret Manager # # required to enable "secret manager api" # ##################################### resource "google_secret_manager_secret" "secret_manager" { secret_id = "sample-secret" replication { user_managed { replicas { location = "asia-northeast1" } } } } resource "google_secret_manager_secret_version" "secret-version-basic" { secret = "${google_secret_manager_secret.secret_manager.id}" secret_data = <<EOF { "secret": "secret", "var": "hoge" } EOF }
secret_dataの値とかsecret_idとかの部分は、*.tfvarsとかで管理してファイルには載せない、公開しないって感じにするといい感じだと思う。
ref
Secret Manager
Secret Manager -doc
terraform Secret Manager
0 notes
Text
Integrating Amazon ElastiCache with other AWS services: The serverless way
Amazon ElastiCache for Redis is a great way to accelerate cloud applications through caching and other use cases such as session storage, leaderboards, and messaging. Developers use Redis to store application data using in-memory data structures like hashes, lists, and sorted sets. This data can be useful downstream for other purposes such as reporting and data analysis. Because Redis stores data in-memory to provide low latency and high throughput, long-term data storage is impractical due to the high cost of RAM. Therefore, it’s ideal to transfer data from Redis to other AWS purpose-built databases such as Amazon DynamoDB or Amazon Aurora MySQL. In this post, I describe a simple way to transfer data from ElastiCache for Redis clusters to other AWS database services using AWS Lambda functions. Use case Developers use the hash data type to represent objects or property bags that can be mapped to a DynamoDB or relational table row, such as a website shopping cart. For our use case, we use Redis to store customer selections, helping provide a fast and interactive experience. When the customer decides to make a purchase, the selected items are sent to the billing system for processing, where they are persisted. One way to enable business analysis is to have a record of the items the customer saved in their cart during their time on the site. You can later use the data to analyze customer purchasing patterns and product selection trends. Solution requirements Redis has a rich API that enables efficient reading and writing of data. For example, adding a new field to a Redis hash is as easy as providing a new field name and value with the HSET command. Redis also allows for diverse data structures (strings, hashes, sets, lists), which you can map to different entities in other databases. Therefore, our solution must be: Flexible – Because the incoming data can vary so much, we need to call different backends for different data types. For example, we may want to map the data from Redis hashes that include user information to one table and their product preferences to another. Scalable – We use Redis to make sure our customer-facing application is highly responsive and can handle fluctuations in traffic. Our solution needs to handle changes in traffic without creating lags or impacting the responsiveness of your Redis-powered front end. Reliable – Uptime is critical for retaining the responsive user experience we’re looking for. Our solution needs to allow for redundancy and limit the “blast radius” in cases of failure. Solution overview We use several technologies to address our requirements. To keep our solution flexible, we use Lambda functions. You can deploy Lambda functions quickly and easily integrate them with other AWS solutions. To make our data feed scalable, we use Redis keyspace notifications. Keyspace notifications are provided through pub-sub events and can be configured to only emit a subset of commands (for example, only hash-based operations) as well as a subset of keys. With the pub-sub architecture, it’s easy to add nodes that act as subscribers for Redis data changes and scale out the solution so we can handle more incoming traffic. Redis pub-sub messages are generated in real time and aren’t persisted in Redis. This means messages are lost unless an active client is listening on the right channel. To make a more fault-tolerant version of this solution, you can write data to Redis streams and consume them in a similar manner to pub-sub. Because Lambda doesn’t support the Redis pub-sub trigger type, we use a simple executable hosted on an Amazon Elastic Compute Cloud (Amazon EC2) instance to subscribe to the Redis keyspace notification events and invoke Lambda functions. We don’t cover it in this post, but it’s easy to containerize the subscriber piece and have it scale out with services like Amazon Elastic Container Service (Amazon ECS). Solution architecture For our use case, we use two Lambda functions to push data to DynamoDB. A Golang application hosted on an EC2 instance is used as a listener for Redis data changes and to invoke the Lambda functions. The following diagram illustrates the solution data flow and components. Solution code The solution contains surprisingly few lines of code, which we discuss further in this section. Redis listener The source code for this component is located on the Redis Listener GitHub repo. It’s a Golang executable that uses Redis pub-sub to subscribe to keyspace notifications. We do that by connecting to Redis and subscribing to the appropriate channel. The PubSubListen() function is called after some initiation work when the Redis listener executable is loaded. See the following code: func PubSubListen() { //Connect to Redis rdb := getRedisClient() //Register to listen to the keyspace notification channel pubsub := rdb.PSubscribe(ctx, os.Getenv("REDIS_SUB_CHANNEL")) //Error handling _, err := pubsub.Receive(ctx) if err != nil { panic(err) } //Declare the channel variable ch := pubsub.Channel() //Iterate over messages in the channel for msg := range ch { fmt.Println(msg.Channel, msg.Payload) //Check whether the key name in the message is a map of Redis data to Lambda functions if strings.HasPrefix(msg.Payload, os.Getenv("META_MAP_SUFFIX")) { //support adding mappings "on the fly" (additional to functionCfg file) LoadMetaMap(msg.Payload) } else { //If not, check if the key is mapped to a Lambda function and produce a list of Lambdas to call checkMap, flag := IsActionable(msg) if flag == true { for _, lmbda := range checkMap { //Invoke the Lambdas on the list go LambdaInvoke(msg.Payload, lmbda) } } } } defer rdb.Close() } LambdaInvoke can be called more than one time for the same Redis hash if you want to send data to more than one destination. The data structure used as an interface between the Redis listener component and the Lambda functions is a very simple JSON object. This iEvent type is shared between the listener component and the Lambda function: type iEvent struct { Id string `json:"id"` Obj_Name string `json:"obj_name"` Body string `json:"body"` } DynamoDB Lambda function The Lambda function code is also very simple; it takes the iEvent object and sends it to DynamoDB. Because DynamoDB requires a unique ID for each row, we use the name of the hash object from Redis to make sure records are added and updated. Delete is not supported but can be added later on. See the following code: func SaveToDynamo(msg iEvent) { sess, err := session.NewSession() svc := dynamodb.New(sess) av, err := dynamodbattribute.MarshalMap(msg) if err != nil { fmt.Println("Got error marshalling map:") fmt.Println(err.Error()) os.Exit(1) } input := &dynamodb.PutItemInput{ Item: av, TableName: aws.String(os.Getenv("DYNAMO_TABLE_NAME")), } _, err = svc.PutItem(input) if err != nil { fmt.Println("Got error calling PutItem:") fmt.Println(err.Error()) os.Exit(1) } fmt.Println("saved to Dynamo " + msg.Id) } Setting up the solution components Our solution includes four different components, as well as security and networking configuration. We use an AWS Serverless Application Model (AWS SAM) template to put it all together. The template included with this post deploys the DynamoDB table, Lambda function, EC2 instance, and the configuration needed to connect them (VPC, subnets, security group, internet gateway, and route table to allow access to the EC2 instance). When the setup process is complete, you set up the Redis listener component on the EC2 instance. Prerequisites AWS SAM makes it easy to create and deploy serverless resources. To get started, you need the following prerequisites on your dev machine: The AWS Command Line Interface (AWS CLI) already configured with administrator permission. For instructions, see Installing, updating, and uninstalling the AWS CLI version 2. Access to your AWS access key and secret. Docker installed. Golang The AWS SAM CLI installed. Git Create or make sure you have access to an Amazon EC2 key pair. You use it to connect to your EC2 instance. For instructions on obtaining a key pair, see Creating or importing a key pair. Deploying your template When everything is installed, open a terminal window to deploy your AWS SAM template. Enter the following code: git clone https://github.com/nirmash/dynamo-lambda-blog.git The following screenshot shows your output. CD into the new Git folder. Enter SAM build. The following screenshot shows your output. Image: build the SAM template Now that the template is built, it’s time to deploy. Enter SAM deploy --guided. Follow the prompts on the screen, using the key pair name you obtained earlier. Write down the stack name (first parameter in AWS SAM deploy process) to use later. The following screenshot shows your output. When the setup process is complete, note the values of the ElastiCache cluster endpoint, ElastiCache instance DNS, and the Lambda function ARN. You need the name of the DynamoDB table to see the data coming in from your Redis cluster. The following screenshot shows your output. Image: SAM template output When your instance is launched, SSH into it. To set up the listener service, we need to install a few components on the new EC2 instance: Git – In the SSH window, enter sudo yum install -y git. Golang – In the SSH window, enter sudo yum install -y. Clone the code repository by entering git clone https://github.com/nirmash/redis-listener-blog. Now you update the service configuration files to point to the Redis cluster and Lambda function. For the environment variables, use an editor to edit the env.sh file in the redis-listener-blog folder. Add the following values per instructions: REDIS_MASTER_HOST – Your Redis cluster primary endpoint AWS_ACCESS_KEY_ID – Your AWS access key ID AWS_SECRET_ACCESS_KEY – Your AWS secret access key AWS_DEFAULT_REGION – The AWS Region where your Lambda function is installed. For function mapping, the functionCfg file contains the mapping between Redis keys and the Lambda function. The data from the file is read into a hash key and used every time a new hash field is added or changed to call a Lambda function. Replace {lambda_arn} with the ARN of the Lambda function you created. Apply the new environment variables from the source env.sh file by entering source env.sh in the terminal window. Building and running the service Now it’s time to build and run the service. Enter go run main.go in the terminal. The following screenshot shows your output. You now add data to Redis and see it copied to DynamoDB. SSH into your EC2 instance again from a new terminal window. Enter cd redis-listener-blog. Connect to Redis by entering ` ./redis-cli -h `. Provide the Redis primary endpoint you saved earlier. You should now be connected to Redis. Add some hash records to Redis by entering the following code: ` hset person1 firstName John lastName Smith` ` hset person2 firstName Jane lastName Doe` The following screenshot shows the output. On the DynamoDB console, select the table that starts with dynamo-go-RedisData. On the Items tab, you can see the hash records data from Redis. Image: Redis data in DynamoDB Cleaning up You now use the AWS CloudFormation CLI to remove the stack: ‘aws cloudformation delete-stack --stack-name This call is asynchronous, so don’t be alarmed when it completes immediately. You can check the AWS CloudFormation console for the stack deletion status. Summary You can unlock a lot of business value by storing your ElastiCache for Redis data in another AWS data store for long-term analysis or reporting. With AWS, it’s easy to put together a flexible, reliable, and scalable solution that you can extend later to support more destinations for Redis data and more Redis data types. About the author Nir Mashkowski is a Principal Product Manager in AWS. Nir has been building software products for the last 25 years and is feeling fortunate to be involved in cloud computing for the last 10. https://aws.amazon.com/blogs/database/the-serverless-way-integrating-amazon-elasticache-with-other-aws-services/
0 notes
Text
Documenting APIs with Swagger
During the last few weeks we have been discussing how to best document the Thingful API and what tools we should use to accomplish the task.
Despite being a necessary step for making the software and APIs usable to both internal and external users, writing and maintaining documentation is not necessarily the most exciting job developers want to do. It is usually more interesting to write code then describing how to use it.
Luckily for us, there are tools we can use to make our life simple and fun, even when it comes to defining API manuals and Swagger is a perfect example of a modern and popular framework that helps accomplish that.
According to its own definition, Swagger is a set of specifications that provides a language agnostic interface for designing, building, testing and publishing documentation about the capabilities of a RESTful web service.
On top of the tools that come with Swagger, which include but are not limited to an online editor and a customisable user interface, there is a wide range of libraries that enable developers to use their programming language of choice to generate OpenAPI compatible swagger documentation.
Since Golang is one of the main languages used at Thingful, I decided to explore the go-swagger package and try to document a little demo application.
One of the key requirements was to be able to generate swagger specifications directly from code annotations in order to keep definitions of actions, routes, response and request bodies as close as possible to the code that generates them. Go Swagger can accomplish this through special tags that can be used as code comments.
Since the demo app I built has only one end point I tagged the handler function in charge or dealing with HTTP requests and response with the swagger:route GET /items item-operation comment. This route tag defines the HTTP method the handler accept (in this case GET), the path where the handler will be invoked (/items) and any ID we want to use to refer to this route. IDs are very useful for associating a route with any other operation, such as responses or requests, with the same tag.
I also specified what responses the route will generate using the Responses: 200: itemResponse 404: errorNotFound tag.

This block of comments specifies that in case of a success the handler will return a 200 status code and an itemResponse object. In case of an error it will return a 404 status code and an errorNotFound object. Again itemResponse and errorNotFound are IDs that are used to associate a type defined somewhere else with the current route.
Since the handler allows for an optional query argument, I defined an object to use to hold the query value and commented it with the special swagger:parameters item-operation tag. Notice that I re used the item-operation labels previously defined in the route tag.

Since responses can be of two types - success or error - I defined a success object (or struct in Go lingo), and labelled it swagger:response itemResponse. Similarly I defined an error object and labelled it as swagger:response errorNotFound.

All these comments and tags can then be parsed by Go Swagger, translated into JSON (or YAML) format and outputted to a spec file that will be consumed by the Swagger UI.
Although not perfect I really liked this approach since it allowed me to quickly and easily generate documentation for my little application. Specifically I found it very useful to be able to describe how to query and render resources at the same time as I was writing the code actually responsible for doing it.
The final documentation can be found online on the swaggerhub and the demo API can be accessed at https://simple-swagger.herokuapp.com/items.
The code used to generate the API and the documentation is available on github at https://github.com/thingful/simpleswagger.
I encourage anyone interested to download and/or play with the demo, as well as sharing any comments or insights about swagger and its usage.
1 note
·
View note
Text
gRPC to AWS Lambda: Is it Possible?
At Coinbase, we have been evaluating gRPC for new services and have had a positive experience so far. We’ve also been closely watching the trends of the industry towards “Serverless” architectures. We’ve been experimenting with the AWS Lambda platform as a location to run various types of workloads, including API endpoints. However, we are curious if there’s a way to unify these.
There are two main ways to invoke a Lambda function synchronously: API Gateway or a direct “invoke” API call to AWS. API Gateway allows for incoming requests to be made over HTTP/2 with HTTP/1 requests bundled and forwarded to Lambda. Direct invocation of Lambdas requires tight coupling with AWS SDKs.
I was curious about whether it was even possible to make a gRPC call through API gateway to a Lambda and have a response return all the way to the client. Turns out, it’s very close to possible for unary request / response gRPC calls.
Prior to diving in here, it can be helpful to read gRPC On HTTP/2: Engineering A Robust, High Performance Protocol to gain a deeper understanding of gRPC itself.
Bootstrapping
To get started, I followed the AWS SAM quick start guide to get Hello World Lambda deployed.
Then I started bootstrapping a very simple gRPC service with a single RPC that accepted and sent a very simple message.
https://medium.com/media/e6b0e1419a70787f876a406c855e7f30/href
To build the proto into compiled Golang, I installed the protoc compiler for Golang and compiled the hello protobuf file into a Golang package.
https://medium.com/media/7dbc9c5dfe3f4eba879e2194e014470b/href
I created a very simple gRPC Golang client for the RPC API.
https://medium.com/media/7e17cf2a17f1f5560ecebdf63629e16d/href
First Attempt: Send out a gRPC Request
The first error that comes up is related to the content-type of the response.
err making request: rpc error: code = Internal desc = transport: received the unexpected content-type “application/json”
This makes sense as the default lambda is sending back JSON to the gRPC client, which won’t work because of a mismatch. gRPC clients expect “application/grpc+proto” back. The first fix involves setting the correct content-type in the API response from Lambda. This can be done in the Headers field of the APIGatewayProxyResponse struct as below.
https://medium.com/media/cc7d377b8d55c552ef734d64615c018a/href
Second Attempt: Protobuf Response
After returning the correct content type, the next error is absolutely bizarre.
err making request: rpc error: code = ResourceExhausted desc = grpc: received message larger than max (1701604463 vs. 4194304)
gRPC has a max-size of 16 MB returned in a response, and our function was clearly not returning that much data. However, we are simply returning a string, so it seems now is the time to return a protobuf.
The next handler looks like this:
https://medium.com/media/454434f27c2399da826c866ec1ae70cb/href
First, we construct a protobuf struct, then serialize to a byte array, then base64 encode into the final response body. Base64 encoding is required in order for API Gateway to return a binary response.
There’s also two incantations required to actually get API gateway to convert the response to binary. First, we need to set the integration response type to “CONVERT_TO_BINARY”.
This can be done in the CLI below:
aws apigateway update-integration-response \ -rest-api-id XXX \ -resource-id YYY \ -http-method GET \ -status-code 200 \ -patch-operations ‘[{“op” : “replace”, “path” : “/contentHandling”, “value” : “CONVERT_TO_BINARY”}]’
In addition, the “Binary Media Types” setting needs to be set to “*/*”

Note: AWS Console Screenshot
Third Attempt: Length-prefixed Response
However, we still get the same ResourceExhausted error. Let’s double check that API Gateway is properly sending back a binary protobuf response.
To debug more, we can set:
export GODEBUG=http2debug=2
This will give us output about what is going back and forth over the wire for the HTTP/2 requests.
https://medium.com/media/540ad4fdd82b5132f2c8348f2f548994/href
We see that as our request goes up, it writes a DATA frame with the content “\x00\x00\x00\x00\a\n\x05Hello”. However, what we get back is “\n\rHello, world.”. What are all those \x00 values in the request? This turns out to be a special serialization format that gRPC uses called “Length Prefixed Messages”. On the wire, this looks like:

See the gRPC HTTP/2 protocol mapping for more detail.
Here’s a quick and dirty implementation of the prefix construction with an updated handler.
https://medium.com/media/6abc871c40b73d657f39e6ebec4c62f8/href
Final Attempt: Missing trailing headers
After returning the correct prefix, we run into the final error.
err making request: rpc error: code = Internal desc = server closed the stream without sending trailers
This error is saying that API gateway closed the stream without returning trailing headers. Turns out that gRPC clients make a fundamental assumption that the response contains trailing headers with the stream closed. For example, here is what a proper response looks like:
HEADERS (flags = END_HEADERS) :status = 200 grpc-encoding = gzip content-type = application/grpc+proto
DATA <Length-Prefixed Message>
HEADERS (flags = END_STREAM, END_HEADERS) grpc-status = 0 # OK
This is helpful for streaming, but may not be needed for unary request / response RPC invocations. In fact, there is an entire effort within the gRPC community to build compatibility with HTTP/1.1 or browsers with gRPC-Web.
Next Steps
To recap, our goal through this exercise was to see how closely we could get to a Lambda successfully responding to a gRPC client’s request, without modifying the client. We were able to make it almost all the way, but ran into a fundamental assumption that gRPC clients make about trailing headers.
There’s two possible paths forward. Either API Gateway needs to respond with the proper trailing HEADERS frame or gRPC clients need to relax their constraints around expecting trailing headers for unary request / response calls.
However, is it actually worth communicating with Lambdas over gRPC? Maybe. For us, there would be value to standardizing API interactions with Lambdas and containerized environments. The typed interface of Protobuf behind gRPC ensures a strong contract between the client and server that would be difficult to enforce otherwise
Unfortunately, gRPC behind lambda would not support any of the server, client, or bidi streaming solutions that benefit gRPC in a highly stateful environment.
There are other interesting solutions in the community to this problem, such as Twirp (by Twitch) and gRPC-Web.
If you’re interested in helping us build a modern, scalable platform for the future of crypto markets, we’re hiring in San Francisco and Chicago!
This website may contain links to third-party websites or other content for information purposes only (“Third-Party Sites”). The Third-Party Sites are not under the control of Coinbase, Inc., and its affiliates (“Coinbase”), and Coinbase is not responsible for the content of any Third-Party Site, including without limitation any link contained in a Third-Party Site, or any changes or updates to a Third-Party Site. Coinbase is not responsible for webcasting or any other form of transmission received from any Third-Party Site. Coinbase is providing these links to you only as a convenience, and the inclusion of any link does not imply endorsement, approval or recommendation by Coinbase of the site or any association with its operators.
Unless otherwise noted, all images provided herein are by Coinbase.
gRPC to AWS Lambda: Is it Possible? was originally published in The Coinbase Blog on Medium, where people are continuing the conversation by highlighting and responding to this story.
from Money 101 https://blog.coinbase.com/grpc-to-aws-lambda-is-it-possible-4b29a9171d7f?source=rss----c114225aeaf7---4 via http://www.rssmix.com/
0 notes
Link
Deeply understand and master the Go Programming Language (Golang) from scratch 1000+ hands-on exercises and projects
What you’ll learn
Watch the free videos to see how I teach Go programming in depth.
Practice with 1000+ Exercises (with included solutions)
Pass Interviews: Master Go Internals In-Depth
Master Interfaces and Internals
Master Slice Internals: Slice Header and Memory Allocations
Master Map Internals: Map Header
Encode and Decode JSON
Create a log file parser, spam masker, retro led clock, console animations, dictionary programs and so on.
Requirements
Access to a computer with an internet connection.
Description
Get a Real In-Depth Understanding of Go and its Internal Mechanisms by:
Ultra-detailed, entertaining, intuitive, and easy to understand animations.
Learn by doing:
Write a log parser, file scanner, spam masker and more.
Solve 1000+ hands-on exercises.
Learn a lot of tips and tricks that you can’t find easily anywhere else.
What’s included?
Go OOP: Interfaces and Methods
Internals of Methods and Interfaces
Functions and Pointers: Program design, pass by value, and addressability.
Implicit interface satisfaction
Type assertion and Type Switch
Empty interface: []interface{} vs interface{}
Value, Pointer, and Nil Receivers
Promoted Methods
Famous Interfaces
Tips about when to use interfaces
fmt.Stringer, sort.Sort, json.Marshaler, json.Unmarshaler, and so on.
Composite Types: Arrays, Slices, Maps, and Structs
Internals of Slices and Maps
Backing array, slice header, capacity, and map header
JSON encoding and decoding, field tags, embedding
Make, copy, full Slice expressions and append mechanics
UTF-8 encoding and decoding
Go Type System Mechanics
Type inference, underlying, predeclared, and unnamed types.
Untyped constants and iota.
Blank Identifier, short declaration, redeclaration, scopes, naming conventions
I/O
Process Command-Line Arguments, printf, working with files, bufio.Scanner, …
How to create your own Go packages
How to run multiple Go files, and how to use third-party packages
Go tools
Debugging Go code, go doc, and others.
…and more.
Why Go?
Go is one of the most desired, easy to learn, and the highest paying programming languages. There are 1+ million Go programmers around the world, and the number is increasing each day exponentially. It’s been used by Google, Facebook, Twitter, Uber, Docker, Kubernetes, Heroku, and many others.
Go is Efficient like C, C++, and Java, and Easy to use like Python and Javascript. It’s Open-Source, Simple, Powerful, Efficient, Cross-Platform (OS X, Windows, Linux, …), Compiled, Garbage-Collected, and Concurrent.
Go is best for Command-line Tools, Web APIs, Distributed Network Applications like Microservices, Database Engines, Big-Data Processing Pipelines, and so on.
Go has been designed by one of the most influential people in the industry:
Unix: Ken Thompson
UTF-8, Plan 9: Rob Pike
Hotspot JVM (Java Virtual Machine): Robert Griesemer
Who this course is for:
Beginners who have never programmed before.
Programmers switching languages to Go.
Intermediate Go programmers who want to level up their skills!
Intermediate Go programmers who want to learn the internals of slices, maps, interfaces, and so on.
Created by Jose Portilla, Inanc Gumus Last updated 10/2019 English English [Auto-generated]
Size: 8.94 GB
Download Now
https://ift.tt/2Oq2Puz.
The post Go (Golang): The Complete Bootcamp appeared first on Free Course Lab.
0 notes
Text
JSON Golang Example
Description:
JSON Golang Example
package main import ( "encoding/json" "fmt" "os" ) type response1 struct { Page int Fruits []string } type response2 struct { Page int `json:"page"` Fruits []string `json:"fruits"` } func main() { bolB, _ := json.Marshal(true) fmt.Println(string(bolB)) intB, _ := json.Marshal(1) fmt.Println(string(intB)) fltB, _ :=…
View On WordPress
0 notes
Photo

しばらく書かないと忘れそうなGoのインターフェースについて、未来の自分へのメモ https://ift.tt/2MZ0Nyl
Go始めた時に「ん?」って思ったインターフェースについての私的です。 未来の僕が困らないためにここに記しておきます。
golangのインターフェース
馴染みのあるインターフェース
type Unk interface{ out() call() } type MyUnk struct { name string } func (u *MyUnk) out() { fmt.Println(name + "ちゃん出た") } func (u *MyUnk) call() { fmt.Println("虫を呼ぶよ") } // A Tour of Go: https://go-tour-jp.appspot.com/methods/9 // interface(インタフェース)型は、メソッドのシグニチャの集まりで定義します。 // そのメソッドの集まりを実装した値を、interface型の変数へ持たせることができます。
個人的に「ん?」となったインターフェース型
var i interface{} i = 20 // reflect.TypeOf(i) String i = "unk" // reflect.TypeOf(i) int i = []byte("unk") // reflect.TypeOf(i) []uint8 i = map[string]interface{}{ "Type": "unk", "State": "oops", } // reflect.TypeOf(i) map[string]interface {} // A Tour of Go: https://go-tour-jp.appspot.com/methods/14 // 空のインターフェースは、任意の型の値を保持��きます。 (全ての型は、少なくともゼロ個のメソッドを実装しています。)
interface型はなんでもおkらしい 全ての型は、0個のメソッドを持っているので、との事。
type Empty interface{ }
試しに
func main() { var i interface{} i = 20 Otamesi(i) // int } func Otamesi(v interface{}) { fmt.Println(v) fmt.Println(reflect.TypeOf(v)) } // なんでもおk!
型アサーションで良い感じに出来る
vendor以下に潜っていて構造体でinterfaceの値を持っているものなど、必要な値を抽出したい時によくお世話になりました。
// assertion str, ok := interface.(string) int, ok := interface.(int) map, ok := interface.(map[string]interface{})
interfaceはキャスト出来ない。
// cast str := string(int) // ok str := string(interface) // panic
型判定
多言語でのswitch文とちょっと違う。
switch v := i.(type) { case int: fmt.Printf("Twice %v is %v\n", v, v*2) case string: fmt.Printf("%q is %v bytes long\n", v, len(v)) default: fmt.Printf("I don't know about type %T!\n", } // A Tour of Go: https://go-tour-jp.appspot.com/methods/16
Goのswitchは条件にヒットした場合、そのスコープ内の処理を終えた後、自動でbreakします。
記事中に何度も出てきてるけどよくお世話になった連想配列シリーズ
unk := map[string]interface{}{ "name": "smith", }
jsonの取り扱い
toJson
unk := &Unk{ Type: "secret", State: "new", } unkBlob, _ := json.Marshal(unk) fmt.Println(unkBlob) fmt.Println(string(unkBlob)) // { // "Type": "secret", // "State": "new" // } //
toStructType
blob := []byte(`{"Type": "secret", "State": "new"}`) var unk Unk err := json.Unmarshal(blob, &unk) if err != nil { fmt.Println(err) } fmt.Println(&unk) // // &{secret new} //
toInterface
blob := []byte(`{"Type": "secret", "State": "new"}`) var unk interface{} err := json.Unmarshal(blob, &unk) if err != nil { fmt.Println(err) } fmt.Printf("%#v\n", &unk) // (*interface {})(0xc42000e220) fmt.Printf("%#v\n", unk) // map[string]interface {}{"Type":"secret", "State":"new"} fmt.Println(unk["Type"]) // panic // ここでアサーション fmt.Println(unk.(map[string]interface{})["Type"]) // "secret"
参考
A Tour of Go golang.jp
元記事はこちら
「��ばらく書かないと忘れそうなGoのインターフェースについて、未来の自分へのメモ」
August 20, 2018 at 12:00PM
0 notes
Video
youtube
(via https://www.youtube.com/watch?v=FoHEIqTkksw)
Algumas dicas rápidas para usar json.Marshal
Os campos da struct que você quer colocar dentro do JSON, ou seja, "fazer o Marshal", precisam ser declarados com a primeira letra maiúscula tornando esses campos públicos, caso contrário a função Marshal não consegue encontrar os campos.
O retorno de json.Marshal é um array de bytes, para converter para stringbasta fazer cast (forçar a conversão) usando string(nomeDoVetor).
É uma boa prática usar os nomes dos campos quando for popular a struct.
Um exemplo de código "fazendo Marshal" de um struct para JSON:
package main
import ( "encoding/json" "fmt" )
type Bla struct { Nome string Idade int }
func main() { jess := Bla{ Nome: "temps", Idade: 22, } ret, err := json.Marshal(jess) if err != nil { fmt.Println("errroouuu") } fmt.Println(string(ret)) }
Você pode testar esse exemplo no Go Playground.
Links úteis
Blog da Jessica Temporal onde você pode encontrar mais exemplos e posts interessantes
Repositório do nosso grupo
Página do grupo de estudos de Golang
E você encontra mais exemplos no repositório do grupo de estudos no GitHub
0 notes
Photo

JSON Serialization With Golang
Overview
JSON is one of the most popular serialization formats. It is human readable, reasonably concise, and can be parsed easily by any web application using JavaScript. Go as a modern programming language has first-class support for JSON serialization in its standard library.
But there are some nooks and crannies. In this tutorial you'll learn how to effectively serialize and deserialize arbitrary as well as structured data to/from JSON. You will also learn how to deal with advanced scenarios such as serialization enums.
The json Package
Go supports several serialization formats in the encoding package of its standard library. One of these is the popular JSON format. You serialize Golang values using the Marshal() function into a slice of bytes. You deserialize a slice of bytes into a Golang value using the Unmarshal() function. It's that simple. The following terms are equivalent in the context of this article:
Serialization/Encoding/Marshalling
Deserialization/Decoding/Unmarshalling
I prefer serialization because it reflects the fact that you convert a potentially hierarchical data structure to/from a stream of bytes.
Marshal
The Marshal() function can take anything, which in Go means the empty interface and return a slice of bytes and error. Here is the signature:
func Marshal(v interface{}) ([]byte, error)
If Marshal() fails to serialize the input value, it will return a non-nil error. Marshal() has some strict limitations (we'll see later how to overcome them with custom marshallers):
Map keys must be strings.
Map values must be types serializable by the json package.
The following types are not supported: Channel, complex, and function.
Cyclic data structures are not supported.
Pointers will be encoded (and later decoded) as the values they point to (or 'null' if the pointer is nil).
Unmarshal
The Unmarshal() function takes a byte slice that hopefully represents valid JSON and a destination interface, which is typically a pointer to a struct or basic type. It deserializes the JSON into the interface in a generic way. If the serialization failed, it will return an error. Here is the signature:
func Unmarshal(data []byte, v interface{}) error
Serializing Simple Types
You can easily serialize simple types like using the json package. The result will not be a full-fledged JSON object, but a simple string. Here the int 5 is serialized to the byte array [53], which corresponds to the string "5".
// Serialize int var x = 5 bytes, err := json.Marshal(x) if err != nil { fmt.Println("Can't serislize", x) } fmt.Printf("%v => %v, '%v'\n", x, bytes, string(bytes)) // Deserialize int var r int err = json.Unmarshal(bytes, &r) if err != nil { fmt.Println("Can't deserislize", bytes) } fmt.Printf("%v => %v\n", bytes, r) Output: - 5 => [53], '5' - [53] => 5
If you try to serialize unsupported types like a function, you'll get an error:
// Trying to serialize a function foo := func() { fmt.Println("foo() here") } bytes, err = json.Marshal(foo) if err != nil { fmt.Println(err) } Output: json: unsupported type: func()
Serializing Arbitrary Data With Maps
The power of JSON is that it can represent arbitrary hierarchical data very well. The JSON package supports it and utilizes the generic empty interface (interface{}) to represent any JSON hierarchy. Here is an example of deserializing and later serializing a binary tree where each node has an int value and two branches, left and right, which may contain another node or be null.
The JSON null is equivalent to the Go nil. As you can see in the output, the json.Unmarshal() function successfully converted the JSON blob to a Go data structure consisting of a nested map of interfaces and preserved the value type as int. The json.Marshal() function successfully serialized the resulting nested object to the same JSON representation.
// Arbitrary nested JSON dd := ` { "value": 3, "left": { "value": 1, "left": null, "right": { "value": 2, "left": null, "right": null } }, "right": { "value": 4, "left": null, "right": null } }` var obj interface{} err = json.Unmarshal([]byte(dd), &obj) if err != nil { fmt.Println(err) } else { fmt.Println("--------\n", obj) } data, err = json.Marshal(obj) if err != nil { fmt.Println(err) } else { fmt.Println("--------\n", string(data)) } } Output: -------- map[right:map[value:4 left:<nil> right:<nil>] value:3 left:map[left:<nil> right:map[value:2 left:<nil> right:<nil>] value:1]] -------- {"left":{ "left":null, "right":{"left":null,"right":null,"value":2}, "value":1}, "right":{"left":null, "right":null, "value":4}, "value":3}
To traverse the generic maps of interfaces, you'll need to use type assertions. For example:
func dump(obj interface{}) error { if obj == nil { fmt.Println("nil") return nil } switch obj.(type) { case bool: fmt.Println(obj.(bool)) case int: fmt.Println(obj.(int)) case float64: fmt.Println(obj.(float64)) case string: fmt.Println(obj.(string)) case map[string]interface{}: for k, v := range(obj.(map[string]interface{})) { fmt.Printf("%s: ", k) err := dump(v) if err != nil { return err } } default: return errors.New( fmt.Sprintf("Unsupported type: %v", obj)) } return nil }
Serializing Structured Data
Working with structured data is often the better choice. Go provides excellent support for serializing JSON to/from structs via its struct tags. Let's create a struct that corresponds to our JSON tree and a smarter Dump() function that prints it:
type Tree struct { value int left *Tree right *Tree } func (t *Tree) Dump(indent string) { fmt.Println(indent + "value:", t.value) fmt.Print(indent + "left: ") if t.left == nil { fmt.Println(nil) } else { fmt.Println() t.left.Dump(indent + " ") } fmt.Print(indent + "right: ") if t.right == nil { fmt.Println(nil) } else { fmt.Println() t.right.Dump(indent + " ") } }
This is great and much cleaner than the arbitrary JSON approach. But does it work? Not really. There is no error, but our tree object is not getting populated by the JSON.
jsonTree := ` { "value": 3, "left": { "value": 1, "left": null, "right": { "value": 2, "left": null, "right": null } }, "right": { "value": 4, "left": null, "right": null } }` var tree Tree err = json.Unmarshal([]byte(dd), &tree) if err != nil { fmt.Printf("- Can't deserislize tree, error: %v\n", err) } else { tree.Dump("") } Output: value: 0 left: <nil> right: <nil>
The problem is that the Tree fields are private. JSON serialization works on public fields only. So we can make the struct fields public. The json package is smart enough to transparently convert the lowercase keys "value", "left", and "right" to their corresponding uppercase field names.
type Tree struct { Value int `json:"value"` Left *Tree `json:"left"` Right *Tree `json:"right"` } Output: value: 3 left: value: 1 left: <nil> right: value: 2 left: <nil> right: <nil> right: value: 4 left: <nil> right: <nil>
The json package will silently ignore unmapped fields in the JSON as well as private fields in your struct. But sometimes you may want to map specific keys in the JSON to a field with a different name in your struct. You can use struct tags for that. For example, suppose we add another field called "label" to the JSON, but we need to map it to a field called "Tag" in our struct.
type Tree struct { Value int Tag string `json:"label"` Left *Tree Right *Tree } func (t *Tree) Dump(indent string) { fmt.Println(indent + "value:", t.Value) if t.Tag != "" { fmt.Println(indent + "tag:", t.Tag) } fmt.Print(indent + "left: ") if t.Left == nil { fmt.Println(nil) } else { fmt.Println() t.Left.Dump(indent + " ") } fmt.Print(indent + "right: ") if t.Right == nil { fmt.Println(nil) } else { fmt.Println() t.Right.Dump(indent + " ") } }
Here is the new JSON with the root node of the tree labeled as "root", serialized properly into the Tag field and printed in the output:
dd := ` { "label": "root", "value": 3, "left": { "value": 1, "left": null, "right": { "value": 2, "left": null, "right": null } }, "right": { "value": 4, "left": null, "right": null } }` var tree Tree err = json.Unmarshal([]byte(dd), &tree) if err != nil { fmt.Printf("- Can't deserislize tree, error: %v\n", err) } else { tree.Dump("") } Output: value: 3 tag: root left: value: 1 left: <nil> right: value: 2 left: <nil> right: <nil> right: value: 4 left: <nil> right: <nil>
Writing a Custom Marshaller
You will often want to serialize objects that don't conform to the strict requirements of the Marshal() function. For example, you may want to serialize a map with int keys. In these cases, you can write a custom marshaller/unmarshaller by implementing the Marshaler and Unmarshaler interfaces.
A note about spelling: In Go, the convention is to name an interface with a single method by appending the "er" suffix to the method name. So, even though the more common spelling is "Marshaller" (with double L), the interface name is just "Marshaler" (single L).
Here are the Marshaler and Unmarshaler interfaces:
type Marshaler interface { MarshalJSON() ([]byte, error) } type Unmarshaler interface { UnmarshalJSON([]byte) error }
You must create a type when doing custom serialization, even if you want to serialize a built-in type or composition of built-in types like map[int]string. Here I define a type called IntStringMap and implement the Marshaler and Unmarshaler interfaces for this type.
The MarshalJSON() method creates a map[string]string, converts each of its own int keys to a string, and serializes the map with string keys using the standard json.Marshal() function.
type IntStringMap map[int]string func (m *IntStringMap) MarshalJSON() ([]byte, error) { ss := map[string]string{} for k, v := range *m { i := strconv.Itoa(k) ss[i] = v } return json.Marshal(ss) }
The UnmarshalJSON() method does the exact opposite. It deserializes the data byte array into a map[string]string and then converts each string key to an int and populates itself.
func (m *IntStringMap) UnmarshalJSON(data []byte ) error { ss := map[string]string{} err := json.Unmarshal(data, &ss) if err != nil { return err } for k, v := range ss { i, err := strconv.Atoi(k) if err != nil { return err } (*m)[i] = v } return nil }
Here is how to use it in a program:
m := IntStringMap{4: "four", 5: "five"} data, err := m.MarshalJSON() if err != nil { fmt.Println(err) } fmt.Println("IntStringMap to JSON: ", string(data)) m = IntStringMap{} jsonString := []byte("{\"1\": \"one\", \"2\": \"two\"}") m.UnmarshalJSON(jsonString) fmt.Printf("IntStringMap from JSON: %v\n", m) fmt.Println("m[1]:", m[1], "m[2]:", m[2]) Output: IntStringMap to JSON: {"4":"four","5":"five"} IntStringMap from JSON: map[2:two 1:one] m[1]: one m[2]: two
Serializing Enums
Go enums can be pretty vexing to serialize. The idea to write an article about Go json serialization came out of a question a colleague asked me about how to serialize enums. Here is a Go enum. The constants Zero and One are equal to the ints 0 and 1.
type EnumType int const ( Zero EnumType = iota One )
While you may think it's an int, and in many respects it is, you can't serialize it directly. You must write a custom marshaler/unmarshaler. That's not a problem after the last section. The following MarshalJSON() and UnmarshalJSON() will serialize/deserialize the constants ZERO and ONE to/from the corresponding strings "Zero" and "One".
func (e *EnumType) UnmarshalJSON(data []byte) error { var s string err := json.Unmarshal(data, &s) if err != nil { return err } value, ok := map[string]EnumType{"Zero": Zero, "One": One}[s] if !ok { return errors.New("Invalid EnumType value") } *e = value return nil } func (e *EnumType) MarshalJSON() ([]byte, error) { value, ok := map[EnumType]string{Zero: "Zero", One:"One"}[*e] if !ok { return nil, errors.New("Invalid EnumType value") } return json.Marshal(value) }
Let's try to embed this EnumType in a struct and serialize it. The main function creates an EnumContainer and initializes it with a name of "Uno" and a value of our enum constant ONE, which is equal to the int 1.
type EnumContainer struct { Name string Value EnumType } func main() { x := One ec := EnumContainer{ "Uno", x, } s, err := json.Marshal(ec) if err != nil { fmt.Printf("fail!") } var ec2 EnumContainer err = json.Unmarshal(s, &ec2) fmt.Println(ec2.Name, ":", ec2.Value) } Output: Uno : 0
The expected output is "Uno : 1", but instead it's "Uno : 0". What happened? There is no bug in the marshal/unmarshal code. It turns out that you can't embed enums by value if you want to serialize them. You must embed a pointer to the enum. Here is a modified version where that works as expected:
type EnumContainer struct { Name string Value *EnumType } func main() { x := One ec := EnumContainer{ "Uno", &x, } s, err := json.Marshal(ec) if err != nil { fmt.Printf("fail!") } var ec2 EnumContainer err = json.Unmarshal(s, &ec2) fmt.Println(ec2.Name, ":", *ec2.Value) } Output: Uno : 1
Conclusion
Go provides many options for serializing and deserializing JSON. It's important to understand the ins and outs of the encoding/json package to take advantage of the power.
This tutorial put all the power in your hands, including how to serialize the elusive Go enums.
Go serialize some objects!
by Gigi Sayfan via Envato Tuts+ Code http://ift.tt/2EVaSf7
0 notes
Text
【实践】docker+go搭建RESTful服务
近几年, golang在业界越来越火热。在服务端开发中, Goroutine 和 channel 使得编写高并发的服务端软件变得相当容易, go 应用也能更有效的利用多个 CPU 核。同时,golang在微服务领域也有了很多优秀的实践。今日头条和阿里云等公司最近也发表了使用go语言构建微服务的经验。
今天,我们就来介绍一下,如何用go语言搭建一个简单的RESTful服务。
环境准备
安装最新的go 官方文档
安装最新的docker 官方地址
搭建APP
首先, 让我们创建工程目录people-demo
$ mkdir people-demo $ cd people-demo
Go有很多优秀的开源框架可以用于构建REST服务,这里我们不过多站看,选择使用mux来构建一个RESTFul的APP。为了使用mux,我们需要安装依赖包
people-demo$ go get github.com/gorilla/mux
现在我们可以准备我们的源码了, 下面是一个非常简单的人员管理系统,我们将其保存在main.go中
//main.go package main import ( "encoding/json" "github.com/gorilla/mux" "log" "net/http" ) // The person Type (more like an object) type Person struct { ID string `json:"id,omitempty"` Firstname string `json:"firstname,omitempty"` Lastname string `json:"lastname,omitempty"` Address *Address `json:"address,omitempty"` } type Address struct { City string `json:"city,omitempty"` State string `json:"state,omitempty"` } var people []Person // Display all from the people var func GetPeople(w http.ResponseWriter, r *http.Request) { json.NewEncoder(w).Encode(people) } // Display a single data func GetPerson(w http.ResponseWriter, r *http.Request) { params := mux.Vars(r) for _, item := range people { if item.ID == params["id"] { json.NewEncoder(w).Encode(item) return } } json.NewEncoder(w).Encode(&Person{}) } // create a new item func CreatePerson(w http.ResponseWriter, r *http.Request) { params := mux.Vars(r) var person Person _ = json.NewDecoder(r.Body).Decode(&person) person.ID = params["id"] people = append(people, person) json.NewEncoder(w).Encode(people) } // Delete an item func DeletePerson(w http.ResponseWriter, r *http.Request) { params := mux.Vars(r) for index, item := range people { if item.ID == params["id"] { people = append(people[:index], people[index+1:]...) break } json.NewEncoder(w).Encode(people) } } // main function to boot up everything func main() { router := mux.NewRouter() people = append(people, Person{ID: "1", Firstname: "John", Lastname: "Doe", Address: &Address{City: "City X", State: "State X"}}) people = append(people, Person{ID: "2", Firstname: "Koko", Lastname: "Doe", Address: &Address{City: "City Z", State: "State Y"}}) router.HandleFunc("/people", GetPeople).Methods("GET") router.HandleFunc("/people/{id}", GetPerson).Methods("GET") router.HandleFunc("/people/{id}", CreatePerson).Methods("POST") router.HandleFunc("/people/{id}", DeletePerson).Methods("DELETE") log.Fatal(http.ListenAndServe(":8000", router)) }
我们试着来运行一下
people-demo$ go build people-demo$ ./people-demo
运行成功后, 我们在浏览器访问http://127.0.0.1:8000/people就能看到所有员工的列表John和Koko
我们试着删除Jhon的人事信息
curl -X DELETE http://127.0.0.1:8000/people/1
刷新浏览器后,我们会发现只剩下Koko了
这样我们就用go完成了一个非常简单的RESTful的服务
构建镜像
构建镜像的第一步是创建dockerfile(关于dockerfile的介绍,参见官方文档)
FROM golang:latest WORKDIR /go/src/app COPY . . RUN go-wrapper download RUN go-wrapper install EXPOSE 8000 CMD ["go-wrapper", "run"]
这里我们选择使用golang:latest而不是golang:onbuild,自己来控制dockerfile的内容。 然后我们使用docker build命令构建image
people-demo$ docker build -t people-demo-local .
在build过程中, docker会下载image相关的资源,并执行dockerfile中定义的执行步骤。根据当前的环境,build会持续几到十几分钟的时间。构建完成后,我们可以通过docker image ls命令查看image的情况
people-demo$ docker image ls REPOSITORY TAG IMAGE ID CREATED SIZE people-demo-local latest 30e6c76987f6 2 hours ago 741MB
最后我们在本地启动docker容器,检查服务是否正确
people-demo$ docker run -p 8000:8000 people-demo-local
精简镜像
在构建镜像时,我们会发现build过程比较长, 同时也能通过docker image ls命令看到,所生成的image有700MB左右。我们可以通过以下命令来查看golang镜像本身的大小
people-demo$ docker images | grep -e golang -e people people-demo-local latest eca457920b00 2 minutes ago 741MB golang latest 138bd936fa29 3 weeks ago 733MB
可以看到,实际上我们所生成的镜像只是在基础镜像上增加了不到10MB的空间。这是为什么呢?因为我们使用的基础镜像是通用镜像,他包含了go依赖的所有东西,类似于一个完整的linux系统。
所以接下来我们介绍第二种操作方法:利用scratch镜像构建最小的go程序镜像。
scratch镜像其实是一个特殊的镜像,为什么特殊呢?因为它是一个空镜像。但是它却是非常重要的。我们知道Dockerfile文件必须以FROM开头,但如果我们的镜像真的是不依赖任何其他东西的时候,我们就可以使用FROM scratch 相关文档
我们来修改一下我们的dockerfile
FROM scratch WORKDIR /go/src/app COPY . . EXPOSE 8000 ENTRYPOINT ["./people-demo"]
由于我们现在使用的镜像不包含go的依赖,所以我们要预先进行编译,只把可执行程序放入镜像。 关于交叉编译的相关知识,可以参考这个文档
people-demo$ GOOS=linux go build -o people-demo .
如果你使用的go版本低于1.5或者使用了cgo相关的特性,可能需要使用下面的语句
CGO_ENABLED=0 GOOS=linux go build -a -installsuffix cgo -o people-demo .
这里CGO_ENABLED=0表示静态编译cgo, -a的含义是重新编译所有包, -installsuffix cgo是为了规避这里提到的一个bug。
当我们编译镜像后,我们会发现其空间大大减少
people-demo$ docker build -t people-demo-scratch . people-demo$ docker images | grep -e golang -e people people-demo-scratch latest 3a7538208b77 19 minutes ago 13.4MB people-demo-local latest eca457920b00 35 minutes ago 741MB golang latest 138bd936fa29 3 weeks ago 733MB
最后, 我们可以再一次启动容器,检查服务是否正常。
people-demo$ docker run -p 8000:8000 people-demo-scratch
Reference
https://blog.codeship.com/building-minimal-docker-containers-for-go-applications/
https://hakaselabs.github.io/2017-06-23/rest-api-with-golang
0 notes