#JSON To TypeScript Interfaces
Explore tagged Tumblr posts
Visit Tumblr Blog
Explore Tumblr blogs with no restrictions, modern design and the best experience.
Last Seen Tumblr Blogs


Fun Fact
There were a total of 171.5 billion posts on Tumblr in 2019.
Text
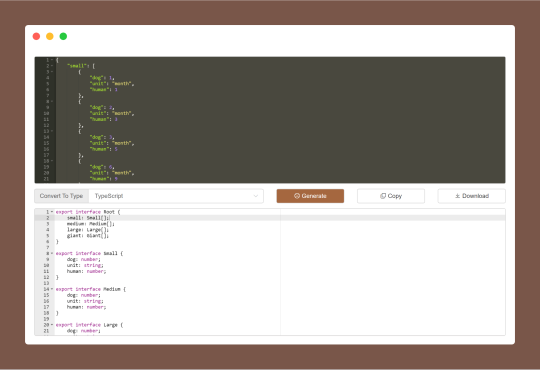
JSON To Type Generator is a code convert tool for generating types from JSON data for Golang, Rust, Kotlin and TypeScript. I.e. you just give it some JSON data, and it gives you the type definitions necessary to use that JSON in a program.
#JSON To Type Generator#JSON To TypeScript Interfaces#JSON To Golang Structs#JSON To Rust Structs#JSON to JSON Schema#JSON To Type Definitions Code#free online tools#online tools#web tools#online web tools#free web tools#online tool
0 notes
Text
Let's talk about filtering and mapping! 🤓
I'm working on the menu page for a restaurant, and as someone with very little frontend experience I wasn't sure how to go about parsing through a JSON file to return certain objects.
After some searching, procrastinating, going through this course, and then more searching - I finally came across the documentation I needed here!
So what is filtering and mapping? .filter() and .map() are JavaScript methods.
filter allows you to filter through an array of objects given some logic (want to find all the items with an id greater than 7? filter. Want to find all the items where the name is equal to "burger" that works too, want to add multiple conditions to find all the items with and id greater than 7 AND the name is "burger" well filter has got your back).
map is used to iterate through an array and call a function on every element in it. I used it to map each item to a list.
Here's an example: We have a JSON file of some food items.
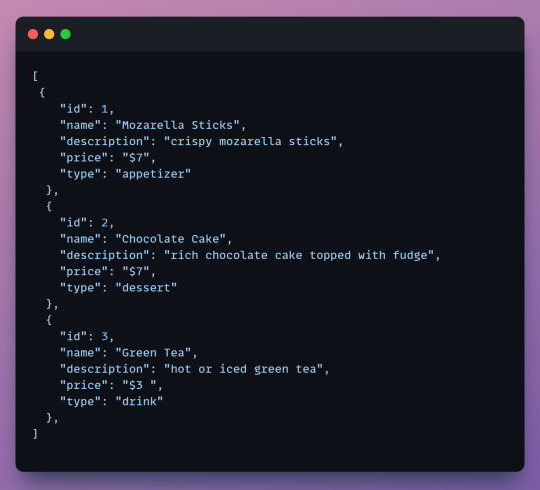
We want to grab all the desserts from our menu and display them on the desserts page of our website. It's time to filter!
Keep in mind that the filter method returns a new array with all the objects that we want. In this case when we filter we will get an array with all the desserts.
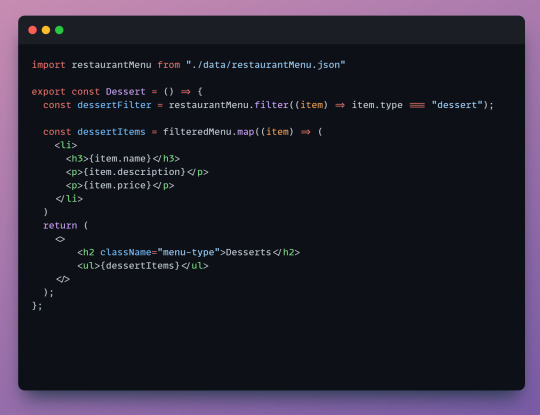
First we import our JSON file so we can access it.
Next, we create a constant called dessertFilter which will hold our filtered array. dessertFilter will hold all items that have the type equal to dessert. In our example it will hold the chocolate cake object.
Next, we map each item from the new array to a list. This is the list that we'll see displayed on the page. You can choose which properties you want to map. We only map the name, description and price since there's no need for the user to see the item type or id.
Lastly, our return statement contains everything we will see on the page. In our return we have a header and the list of items - we wrap our list, dessertItems in an unordered list since list items need to be wrapped in either an ordered or unordered list.
Here's our result! We can style this with css later.

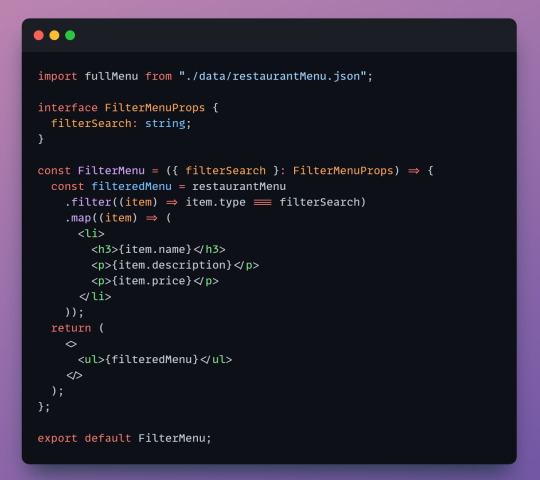
Cool! so we filtered for dessert but what about our other menu items? Time to make a reusable component.
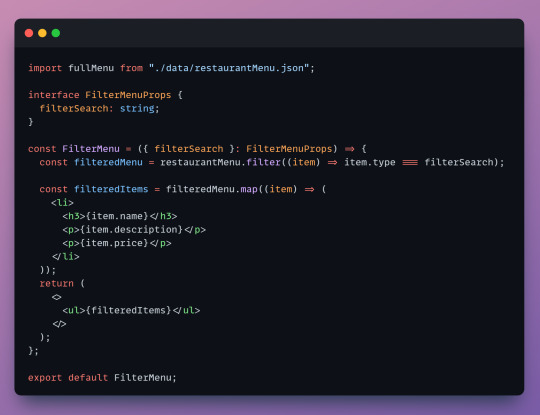
The code is almost the same, but to make this component reusable we create an interface. Interfaces define objects and specify their properties. We specify an object called filterSearch that will act as a placeholder - we set it as a string since the item "types" in our JSON file are strings. (I'm using typescript which accepts interfaces but i believe vanilla javascript does not).
Now lets see the component in action
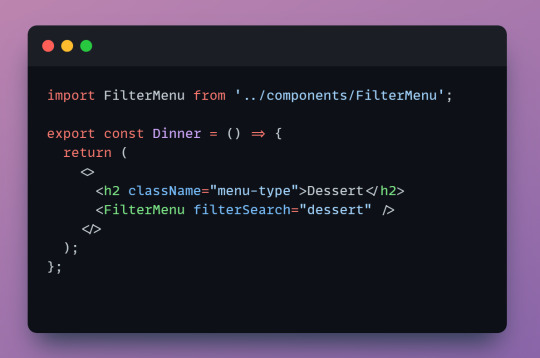
Import the component so we can call it.
When we call FilterMenu we have to include filterSearch from our interface. The component needs to know what we're looking for. Here we can set it to any valid type like "dessert", "drink", or "appetizer" and it will display them.
Woo! now we're filtering and mapping with one line of code! and we can reuse it for our other pages too.
Last thing, these methods are chainable! you can connect them and have the same logic in one constant.
Before reading the documentation, I had seperate JSON files for each menu category and was reusing the same code to map each file on each individual menu page. It was a lot of duplicate code, not great. Now, I have a single JSON file and a reusable component. It's satisying how clean it is!
Learning on your own can be frustrating sometimes, it can be hard to search for solutions when you don't know where to begin. I had never heard of filtering or mapping before this. If you're ever stuck keep pushing! there's so many resources and communities out there.
p.s. I'm open to any suggestions!
10 notes
·
View notes
Text
Agent Communication Protocol: Vision For AI Agent Ecosystems

Agent Communication Protocol IBM
IBM released its Agent Communication Protocol (ACP), an open standard for connecting and cooperating AI agents built on different frameworks and technology stacks. IBM thinks Agent Communication Protocol, a basic layer for interoperability, will become the “HTTP of agent communication,” enabling AI bots a standard language to do complex real-world tasks.
Since agents often operate as “islands” in the current AI ecosystem, the protocol, announced on May 28, 2025, addresses a fundamental issue. Custom integrations, which are expensive, fragile, and hard to scale, are needed to connect these agents.
Every integration is expensive duct tape without a standard. IBM's Agent Communication Protocol aims to eliminate these connections by offering a single interface for agents produced with BeeAI, LangChain, CrewAI, or custom code.
ACP underpins BeeAI, an open-source platform for locating, executing, and building AI agents. IBM gave BeeAI to the charity Linux Foundation in March. Open governance provides transparency and community-driven progress for Agent Communication Protocol and BeeAI. Developers can adopt and improve the standard without being tied to one vendor.
The design of Agent Communication Protocol aimed to improve Anthropic's Model Context Protocol (MCP). MCP has become the standard for agents to access external data and resources. ACP connects agents directly, while MCP connects them to databases and APIs. BeeAI and other multi-agent orchestration systems can leverage ACP and MCP.
IBM Research product manager Jenna Winkler stressed the importance of both protocols for real-world AI expansion. Two agents simultaneously acquire market data and simulate using MCP. They compare their results and give a proposal using Agent Communication Protocol.
Agent Communication Protocol is a RESTful HTTP-based protocol that supports synchronous and asynchronous agent interactions. Since it follows HTTP conventions, this architecture is easier to use and integrate into production systems than protocols that use more complicated communication methods. In comparison, MCP uses JSON-RPC.
Developers can directly communicate with agents using curl, Postman, or a web browser, making Agent Communication Protocol easy to use. Python and TypeScript SDKs are convenient, but a specialised SDK is not necessary.
ACP simplifies offline discovery by letting agents include information in distribution packages. This allows agents to be located in secure, disconnected, or scale-to-zero settings. Agent Communication Protocol's asynchronous architecture is ideal for long workloads, although it offers synchronous communication for easy use cases and testing.
Agent Communication Protocol grants multi-agent system architects more design possibilities beyond technology. It goes beyond the traditional “manager” structure, where one “boss” agent coordinates. ACP lets agents talk and assign jobs without a mediator. Peer-to-peer capacity is crucial for internal and external agent interactions.
Kate Blair, IBM Research director of product incubation, said either agent can contact or assign a job. She described a triage agent who answers consumer questions and sends the history and interaction to the relevant service agent so they can address the ticket independently.
IBM Research showed an early ACP version. Soon after, Google introduced A2A, its agent-to-agent protocol. Blair expects more adjustments as they are tested in real life, and he believes multiple agent methods can be used in the early phases despite new rules.
ACP fosters developer participation and is community-led. Monthly open community calls and an active GitHub discussion section ensure community members always have jobs to offer.
#AgentCommunicationProtocol#BeeAI#ACP#IBMAgentCommunicationProtocol#AgentCommunicationProtocolACP#ModelContextProtocol#technology#technews#technologynews#news#govindhtech
0 notes
Text

Full-Stack Face-Off: Breaking Down MERN and MEAN Stacks
Introduction
In today’s ever-changing tech world, choosing the right full‑stack approach can feel overwhelming. Two popular choices stand out: the MERN and MEAN stacks. Both bring together powerful JavaScript frameworks and tools to help developers build dynamic, end‑to‑end web applications. Whether you represent a MERN Stack development company or a MEAN Stack development firm, understanding the strengths and trade‑offs of each is essential. In this guide, we’ll walk through the basics, explore individual components, and help you decide which path aligns best with your project goals.
Understanding the MERN and MEAN Stacks
At a high level, both stacks rely on JavaScript across the entire application. This common language makes it easier for teams to collaborate and share code between client and server. The core difference lies in the front-end framework:
MERN: MongoDB, Express.js, React, Node.js
MEAN: MongoDB, Express.js, Angular, Node.js
MongoDB handles data storage in both cases as a flexible, document‑oriented database. Express and Node serve as the backbone for server‑side logic and routing. React and Angular provide the user interface layer, each with its own philosophy on component management and data flow. For a MERN Stack development company, React’s component‑driven model allows for fine‑grained control and reuse. On the other hand, a MEAN Stack development company may favor Angular’s built‑in features like dependency injection and two‑way data binding for rapid prototyping.
Exploring MEAN Stack Components
MongoDB: This NoSQL database stores data in JSON‑like documents, making it simple to scale and adapt as your app grows.
Express.js: A minimalist web framework for Node.js that simplifies building robust RESTful APIs.
Angular: A full‑featured front‑end framework maintained by Google. It offers out‑of‑the‑box support for forms, HTTP services, and routing.
Node.js: A JavaScript runtime built on Chrome’s V8 engine, enabling server‑side scripting and non‑blocking I/O.
When a MEAN Stack development company takes on a project, they often appreciate Angular’s opinionated structure. Angular enforces a clear project layout, with modules, components, and services neatly separated. This structure promotes consistency, especially for larger teams. The built‑in CLI tools streamline tasks like scaffolding components or running tests. However, the learning curve for Angular can be steeper compared to React, since it has its own templating syntax and TypeScript at its core.
Exploring MERN Stack Components
MongoDB: Just like in MEAN, your data is stored in flexible, JSON‑style documents.
Express.js: Manages your server’s routes, middleware, and API endpoints.
React: A library for building interactive UIs with a virtual DOM and component‑based architecture.
Node.js: Powers the backend with efficient, event‑driven operations.
For MERN Stack development, React’s learning curve is often gentler. Developers pick up JSX quickly, writing HTML‑like syntax combined with JavaScript logic. A MERN Stack development company will benefit from React’s thriving ecosystem: hooks, context API, and a wealth of third‑party libraries. React’s unopinionated nature gives teams freedom to choose their own state management, styling approaches, and routing solutions. While this flexibility is appealing, it requires a bit more decision‑making during project setup.
Choosing Between MERN and MEAN Stacks: A Comprehensive Guide
When it comes to selecting the ideal stack, consider the following factors:
Team Expertise: If your developers are comfortable with TypeScript and enjoy a more prescriptive framework, MEAN might be a better fit. Conversely, if your team prefers flexible libraries and a quick start, a MERN Stack development approach could be more efficient.
Project Size and Scope: Large enterprise applications can benefit from Angular’s mature feature set, making MEAN development smoother at scale. Smaller to mid‑sized projects, or those requiring rapid iteration, often find MERN development to be more nimble.
Performance Needs: Both stacks are performant, but React’s lightweight core can deliver snappier interactions for complex user interfaces. Angular’s built‑in change detection and optimizations shine when building heavy, data‑driven apps.
Ecosystem and Libraries: MERN’s ecosystem is rich in community‑driven packages, while Angular offers more official, first‑party solutions. Choose the stack whose library landscape aligns with your project requirements.
Community Support and Cost Considerations
Whether you lean toward a MEAN Stack development company or a MERN Stack development company, community support plays a vital role. Both stacks enjoy active user bases, extensive tutorials, and frequent updates. However, there are subtle differences:
MERN Community: Enormous number of React resources, tutorials, and third‑party tools. React’s popularity means you’ll find plenty of open-source components and UI libraries, often at no cost. For a MERN Stack development company, this translates into faster development cycles and reduced licensing expenses.
MEAN Community: While smaller than React’s, Angular’s community is backed by Google and offers official tooling, detailed documentation, and enterprise‑grade support. Some parts of Angular’s ecosystem, like certain enterprise integrations, may carry licensing fees, but most core features are freely available.
When budgeting, factor in training time and tooling costs. A MEAN Stack development company may need to invest more initially in Angular workshops, whereas a MERN Stack development company might spend time vetting and maintaining community‑built libraries.
Conclusion
In the battle of MERN vs. MEAN, there’s no one‑size‑fits‑all winner. Both stacks harness JavaScript to build full‑fledged web apps, but they cater to different development styles and project demands. If you value a structured, feature‑rich framework and seamless TypeScript integration, MEAN Stack development could be your go‑to choice. If you prefer flexibility, rapid prototyping, and a massive ecosystem of community tools, MERN Stack development might be the way forward. Ultimately, the best stack aligns with your team’s strengths, your project’s needs, and your long‑term vision.
#MERN Stack development company#MERN Stack development#MEAN Stack development#MEAN Stack development company
1 note
·
View note
Text
JS2TS tool and TypeScript Best Practices: Writing Clean and Scalable Code
Introduction
Working with TypeScript, we have to write clean and scalable code; that is crucial for any development project. TypeScript provides a structure and type safety guarantee to JavaScript, which makes the code easier to maintain and debug. But type definitions across large projects are not easy to ensure consistency.
JS2TS tool makes this process much easier by automatically translating JSON data into hard TypeScript interface. The JS2TS tool allows developers to, instead of manual type definition, just define their types and generate structured and reusable type definitions automatically. But it not only saves time, it reduces the amount of rubbish code out in the open (bad code is spoken of by many as ‘the thing’). It produces cleaner, more maintainable, and more scalable code.
About JS2TS tool
The JS2TS tool is a very good tool to convert JSON data to very exact TypeScript interfaces. We know that JSON is extremely popular for APIs, databases, and configuring files; thus, in order to define it in a TypeScript format, this can become very time-consuming and prone to errors.
The JS2TS tool automates that by creating nicely formatted TypeScript interfaces in a couple of seconds. The JS2TS tool helps developers get rid of inconsistencies in type definitions, minimize human errors, and keep up coding standards in projects.
About TypeScript
TypeScript is a superset of JavaScript that will add reliability and scalability. Along with static typing, interfaces, and strict type checks they also introduce to us, which catch errors early and write more predictable code.
Type definitions enforce a structured format for functions, variables, and objects in order to ensure that they follow. Both patterns and it allow code bases to scale well in large projects with many developers, better debugging, and maintainability.
Importance of Clean and Scalable TypeScript Code
The clean and scalable code is necessary for developing efficient, maintainable, and error-free applications. Maintaining well-organized type definitions is very important in a TypeScript codebase so that the code can remain readable and changeable as the project grows.
Automatically defining type structures on teams reduces the chances of introducing bugs due to inconsistency, the amount of redundant code, and confusion during collaboration. Similarly, they improve code reusability, make the program more performant, and are easier to debug.
Developers, through the best practices and the aid of automated tools like the JS2TS, ensure that their TypeScript code remains consistent, sustainable, and due to standards of industry.
How does the JS2TS tool ensure consistency in type definitions?
Maintaining the consistent type definitions across the whole project is considered one of the biggest challenges in TypeScript development. Types defined by hand require consistent efforts, redundant interfaces, and bugs that are harder to understand.
The JS2TS tool solves these problems by converting this automatically, so all the type definitions are in standardized format. In other words, each developer on the team has the same, well-structured interfaces to work with and thus better code organization, fewer conflicts, and better collaboration.
Using the JS2TS tool, teams enforce one source of truth for data structures, less duplication, and also a more reliable codebase.
Best Practices for using JS2TS tool in Large Projects
It is important to keep modular and reusable type definitions for large-scale applications. The JS2TS tool enables developers to do this by creating accurate and reusable interfaces that can be stored in separate files and used across the whole project.
In addition, developers can generate type definitions with the JS2TS tool from API responses to minimize differences in data structure between frontend and backend teams. It helps in collaboration, reduces the miscommunication, and increases the speed of the development.
Also Read: How to Convert JSON to TypeScript Made Easy?
One of the best practices is to include integration of the JS2TS tool into the development workflow. The JS2TS tool allows developers to simply define new interfaces upon changing an API, allowing the code to auto-update without disintegrating into production delivery errors.
How does the JS2TS tool align with TypeScript best practices?
Type safety, reusability, and maintainability are emphasized as the best practices of TypeScript. The JS2TS tool can help the developer follow these principles by automating the creation of the structured, reusable, and precise type definition.
The JS2TS tool is creating interfaces from given JSON data, thus reducing the chance of missing or wrong type definitions, which assures that TypeScript code is strict about type checkups. It reduces the number of runtime errors, helps save the code from being broken, and makes long-term maintainability better.
Also Read: Convert Object to JSON in a Snap
As with most of the services mentioned on this page, integrating the JS2TS tool into a workflow helps enable developers to manage types better, ensure the correct coding standards and create TypeScript code that will easily scale.
Conclusion
Writing clean, structured, and scallable TypeScript code is a JS2TS tool. It kills manual error, increases consistency, and makes sure the best coding practices are implemented by automating type definition generation.
The JS2TS tool makes its life much easier for developers and teams working on TypeScript projects and more reliably maintains and defines types. JS2TS tool can be used when building small applications or a large system and is the key to writing better TypeScript code with minimum effort.
JS2TS offers you JS2TS tool, your purely effort solution today to type in TypeScript type definitions!
0 notes
Text
The Ultimate Guide to SharePoint Customization in 2025
Introduction
Microsoft SharePoint has evolved into a powerful platform for enterprise content management, collaboration, and digital workplace solutions. While SharePoint offers a wide range of out-of-the-box features, organizations often require SharePoint Customization to meet their specific business needs. Whether it’s building workflows, developing custom web parts, or personalizing the user interface, customizing SharePoint can significantly enhance productivity and user engagement.
In this article, we’ll delve deep into the technical aspects of SharePoint customization, exploring various options for SharePoint Online Customization, strategies for SharePoint Intranet Personalization, and how to develop SharePoint Custom Solutions tailored to unique enterprise requirements.
Why Customize SharePoint?
SharePoint's core strength lies in its flexibility. However, standard features might not align perfectly with your organizational workflow, compliance needs, or branding guidelines. Customization helps:
Streamline business processes through automated workflows.
Improve UI/UX with personalized dashboards and navigation.
Integrate third-party systems and data sources.
Reinforce company branding on intranet portals.
Types of SharePoint Customization
There are two primary methods of customizing SharePoint:
1. No-Code/Low-Code Customizations
These are built using SharePoint's built-in tools and require minimal developer effort:
Power Automate Workflows: Automate business processes.
Power Apps: Create custom forms or apps.
Modern Web Parts: Use reusable web parts like document libraries, calendars, and custom lists.
SPFx (SharePoint Framework): A low-code development model to build client-side extensions using React/TypeScript.
2. Full-Code Customizations
Ideal for complex requirements where out-of-the-box features fall short:
Custom Web Parts and Extensions
Custom APIs using Azure Functions or Azure Logic Apps
Integration with Line-of-Business (LoB) systems
Advanced branding using PnP templates and CSS/HTML
SharePoint Online Customization: Best Practices
SharePoint Online Customization has unique challenges compared to SharePoint Server, primarily due to Microsoft 365's cloud-first model and continuous updates. Here are some best practices:
1. Use the SharePoint Framework (SPFx)
SPFx is the recommended way to create modern web parts and extensions in SharePoint Online. It leverages open-source tools like Node.js, Gulp, and React.
2. Avoid Farm Solutions and Full-Trust Code
These are deprecated in SharePoint Online. Use sandboxed solutions or client-side scripting.
3. Leverage Power Platform
The Power Platform (Power Automate, Power Apps, Power BI) is tightly integrated with SharePoint Online, allowing low-code solutions for automation, analytics, and UI improvements.
4. Use PnP Provisioning Engine
The Patterns and Practices (PnP) Provisioning Engine allows you to define custom site templates and provisioning logic using XML or JSON configurations.
SharePoint Intranet Personalization Techniques
An intranet is often the central hub of internal communication, and SharePoint Intranet Personalization ensures that it remains relevant and user-focused. Here’s how you can technically personalize SharePoint intranets:
1. Audience Targeting
Modern web parts like Quick Links, Hero, and News support audience targeting. This allows you to display content based on Azure AD groups.
Technical Setup:
Enable audience targeting in web part settings.
Assign Azure AD groups to the content block.
2. Personalized Dashboards with Microsoft Graph
Microsoft Graph API can fetch user-specific data (e.g., documents, emails, tasks) and render it dynamically on intranet pages.
Use Case:
Show recent documents or pending tasks for the logged-in user.
3. Custom Navigation and Branding
Use the SharePoint Look Book or create SPFx extensions to control headers, footers, themes, and navigational layouts.
4. Localization and Language Variants
Create multilingual experiences using SharePoint’s multilingual publishing capabilities. Customize content and labels based on user’s preferred language.
Developing SharePoint Custom Solutions
Developing SharePoint Custom Solutions often involves integrating SharePoint with enterprise systems like ERP, CRM, or HR platforms. Here’s a breakdown of technical considerations:
1. External Data Integration via Business Connectivity Services (BCS)
BCS enables the integration of external data sources like SQL, SAP, or custom APIs into SharePoint lists.
2. Custom Forms with Power Apps
Replace InfoPath forms with Power Apps. Customize list forms or create standalone apps that can be embedded in SharePoint pages.
3. Custom Connectors
Use Azure API Management to create custom connectors that integrate third-party platforms like Salesforce, ServiceNow, or SAP with SharePoint.
4. Security and Governance
All custom solutions must adhere to governance policies. Use Microsoft 365 Security & Compliance Center to monitor and control data access.
SEO Optimization Tips for SharePoint Portals
Customizing SharePoint for intranet use doesn’t mean ignoring SEO, especially for public-facing SharePoint sites.
Tips:
Use H1-H5 tags properly in custom master pages or modern site templates.
Optimize images with ALT text and descriptive filenames.
Ensure fast load times with optimized SPFx packages.
Use metadata and page descriptions for better indexing.
Add breadcrumb navigation using SPFx components or PnP libraries.
Common Pitfalls to Avoid
Over-customizing can make migration and updates difficult.
Ignoring mobile responsiveness in custom web parts.
Lack of proper version control in SPFx solutions.
Hardcoding values instead of using dynamic tokens or configuration settings.
Conclusion
SharePoint Customization offers powerful capabilities for building enterprise-grade solutions that are tailored to your business workflows and employee experience. Whether you're enhancing collaboration through SharePoint Online Customization, improving user engagement with SharePoint Intranet Personalization, or building complex SharePoint Custom Solutions, understanding the technical framework is key to long-term success.
Customizing SharePoint the right way ensures scalability, maintainability, and a strong return on investment.
0 notes
Text
My Server Side Rendering thoughts
I'm tech advising my friends' startup and it's interesting. Out of our discussions, I had a thought I wanted to get down in ink.
Client Side Rendering sucks for small teams but is nearly impossible to escape in Standard Technologies^1.
^1: Cunningham's Law: "the best way to get the right answer on the internet is not to ask a question; it's to post the wrong answer"
Backend development is basically fine
Say that you are writing an internal tool website. In his case it's a sales-y CMS-y thing; an integrated wizard & search tool. Obviously there's a few domains there (the Requirements server! The Catalog & search product! the produced Proposals!) and there's a sane UML chart about how the layers interact. Cool.
You've picked a language like ts/js/go/py/php/kotlin for your backends based on skill availability, libraries, etc. You're done, right?
But!
Frontend dev still requires a completely different approach
Developing the frontend for this kind of sucks. You've written a sane set of microservices in your favorite backend technology, yes, but when it comes time to knit them together, you probably need to switch technologies. You're going to pick React (or equivalently Svelte, Vue; Solidjs, etc), because you want a Single Page Application website.
At WebScale(tm), this makes sense: nothing scales or is available like the users' own browsers for the interactivity parts of your app. But if you're optimizing for the simplicity and team size, I'm not sure you want to bring a completely second technology into this game.
Liveview writes the frontend for you ASTERISK! FOOTNOTE! SEE CIT!
My friend's background includes the Elixir/Phoenix/Liveview stack^2.
Liveview uses a persistent websocket between the client and server. The client sends browser events to the server across the socket. The server uses a react-like events-and-caching-and-reevaluating model to determine changes to state as a result. The server uses session state to maintain its own mirror of the browser's DOM, and then streams the differences to the frontend, where the standard clientside javascript library applies them, and the cycle continues.
^2: 15 bits entropy remain
Chris McCord on how and why Liveview is, c. 2021.
Ok, so...? How does this help the solo dev?
At this phase, separation of concerns is overrated and you're probably not doing it right anyway.
You're a small-team multi-hat dev. You are building this app by the seat of your pants; you are not sure the UI you're building is the right UI yet.
So if you do normal React stuff, the flow of data is something like:
... → [Raw Database Schema] → [Internal Business Object in e.g. python] → [Display-oriented GET API in python on server] → [Serialize JSON] → [React render in typescript on browser] → [React produces final DOM changes on browser]
Those "display oriented API"/Serialize/"react HTML" lines are really suspicious at this point. Even though you've modeled your business objects correctly, every change to the interaction model requires synchronized FE and BE changes.
This is more than a protocol problem: something like protobufs or tRPC or whatever let you better describe how the interface is changing, but you'll still need to consume/produce new data, FE & BE changes.
So it lets you instead write:
... → [Raw Database Schema] → [Internal Business Object in elixir] → [Server rendering in elixir & HEEx on server] → [Serialize LV updates] → [LV FE lib renders on browser]
Bennies
By regarding the produced DOM mirror as a server API, you can feel ok about writing custom display queries and privileged business model access in your backend code. It means you're not using your RESTful GET endpoints in this codepath, but it also means you're not spitting out that boilerplate with only one current caller that will never have a second caller...
By sending browser events to the server's mirror of the DOM, you don't need to dip into the browser behavior; you can write server code that responds to the user's semantic actions. One can go too far; probably most confirm modals etc should get maintained & triggered clientside, but liveviewers usually take the serverside loop.
This websocket is critical for scoping changes, because e.g. a form post down in the guts of the page might cause changes at distant locations in the DOM (a nested delete button deleting an element from a list?) and the client's browser needs to be told to do the refresh of those elements (the list and any changed elements and a parent object with an element count and...?). That didn't use server generated events, but those could exist too ofc.
How does Elixir keep getting away with it?!
The pat answer for how Liveview does this -- including Chris McCord's article -- is the Blazingly! Efficient! Nature! of the BEAM! VM! (everything is green threads; cluster routing of method calls and replication of state; resumption of failed units of computation, etc etc).
I'm incredibly suspicious of this.
Sure, BEAM solves these problems for the developer, but so does a redis instance (or just the DB you were using anyway! Postgres is no joke!) + frameworks. Lots of apps use session state and use adapters to store that state durably with the end dev not needing to get into the weeds about how. Library authors could do this. It might be easier or harder for a given library author to deliver this in a given language, but there are some very skilled library authors out there.
You, developer, do not yet have as many users as you hope. DevOps has deployment practices that BEAM does not fit into. BEAM's enormous multiplexing is not saving you more than just turning up a few more servers would. You would be writing in go or in c++ if you meant it.
So:
Why isn't there already a popular equivalent of LV in js/ts/py/php/kotlin/etc?
TL;DR: LiveviewJS seems like the closest/most complete option as I understand it.
There are other equivalents ofc. But they have nowhere near the same level of use, despite being in languages that are OoM more in-use.
Candidates include turbo, django unicorn, unpoly, React Server Components... But none are really right afaict!
I can kind of guess why they're not as popular, which is that if you do not need to tie up server assets on a per-client basis, you will not choose to tie up server assets on a per-client basis. Websocket state, client DOM mirrors, etc; it adds up.
If you're building a chat app or video app, obviously devoting a stateful local socket-per-client is a good tradeoff. But I feel like there are lots of models that are similar! Including the one my friend is facing, modifying a document with a lot of spooky action at a distance.
What's missing? The last mile(s)
We have the technology to render any given slice of the page on the server. But AFAIK there's no diff behavior or anything so it'll render the entire subtree. You can choose whether to ship back DOM updates or fully rendered HTML; it doesn't make much of a difference to my point IMO.
Using something like htmx, you could have a frontend form post cause a subtree of the DOM to get re-rendered on the backend and patched back into the document.
That's "fine" so far as it goes, but if (in general) a form post changes components at a distance and you're trying to avoid writing custom frontend-y code for this, you're going to need to target some fairly root component with the changed htmx and include a lot of redundancy -- a SPA that does a refresh of the whole business model.
Why aren't more people talking about this?
The pieces of architecture feel like things we've all had available for a while: websockets, servers that handle requests and websockets, session state, DOM diffing, DOM patching.
How did Elixir get there first (Chris McCord explains how he got there first, so that might just be the answer: spark of genius)? Why did nobody else follow? Is there just a blindingly obvious product out there that does it that I'm missing?
One thing I see is that the big difference is only around server pushed events. Remix/RSC gets us close enough if the browser is always in control. If it isn't, you gotta write your own notification mechanisms -- which you can do, but now you gotta do it, and they're definitely running on the client, and your product has taken on a whole notification pipeline thing.
0 notes
Text
Price: [price_with_discount] (as of [price_update_date] - Details) [ad_1] Master the skills required to become a Full Stack Software Developer. In this book you will learn how to write a front-end single-page web application and write middle-tier object-orientated class components. To complete the full stack you will also learn how to design a back-end database and write applications that support database transactions and data integrity. Included in the book are the following topics: Microservices Architecture, Planning and Design; Message Queuing with RabbitMQ; Microsoft .NET Core Web API and asynchronous processing; JSON Web Token (JWT) security; Microsoft .NET Core Entity Framework; Atomic transactions and SQL-Server isolation levels; SOLID Design Principles; NoSQL databases and MongoDB; Developing a Single-Page Application (SPA) with ReactJS; The fundamentals of TypeScript; Developing a web user interface with Google's Material Design; Responsive web page design; Source code examples and sample applications available on GitHub; Publisher : Blurb (7 June 2020) Language : English Paperback : 230 pages ISBN-10 : 1715013999 ISBN-13 : 978-1715013998 Item Weight : 463 g Dimensions : 20.32 x 1.22 x 25.4 cm Country of Origin : India [ad_2]
0 notes
Text
.NET Full Stack Development AI + IoT Integrated Course | TechEntry
Join the best DotNet Full Stack Development AI and IoT Integrated Course in 2025. Learn DotNet Core, become a Full Stack Developer, and build advanced web applications with TechEntry.
Why Settle for Just Full Stack Development? Become an AI Full Stack Engineer!
Advance your skills with our AI-driven Full Stack . NET Development course, where you'll seamlessly integrate cutting-edge machine learning technologies with the .NET framework to build sophisticated, data-centric web applications.
Kickstart Your Development Journey!
Frontend Development
React: Build Dynamic, Modern Web Experiences:
What is Web?
Markup with HTML & JSX
Flexbox, Grid & Responsiveness
Bootstrap Layouts & Components
Frontend UI Framework
Core JavaScript & Object Orientation
Async JS promises, async/await
DOM & Events
Event Bubbling & Delegation
Ajax, Axios & fetch API
Functional React Components
Props & State Management
Dynamic Component Styling
Functions as Props
Hooks in React: useState, useEffect
Material UI
Custom Hooks
Supplement: Redux & Redux Toolkit
Version Control: Git & Github
Angular: Master a Full-Featured Framework:
What is Web?
Markup with HTML & Angular Templates
Flexbox, Grid & Responsiveness
Angular Material Layouts & Components
Core JavaScript & TypeScript
Asynchronous Programming Promises, Observables, and RxJS
DOM Manipulation & Events
Event Binding & Event Bubbling
HTTP Client, Ajax, Axios & Fetch API
Angular Components
Input & Output Property Binding
Dynamic Component Styling
Services & Dependency Injection
Angular Directives (Structural & Attribute)
Routing & Navigation
Reactive Forms & Template-driven Forms
State Management with NgRx
Custom Pipes & Directives
Version Control: Git & GitHub
Backend
.NET
Introduction to C#
What is C#?
Setting Up a C# Development Environment
Basic Syntax and Data Types in C#
Control Structures: If Statements, Loops
Methods and Parameters
Object-Oriented Programming Concepts
Classes and Objects
Inheritance and Polymorphism
Interfaces and Abstract Classes
Exception Handling in C#
Working with Collections: Arrays, Lists, Dictionaries
Introduction to .NET
Overview of .NET Framework and .NET Core
Differences Between .NET Framework and .NET Core
Understanding Networking and HTTP Basics
REST API Overview
ASP.NET Core Development
Creating a Basic ASP.NET Core Web API Project
Project Structure and Configuration in ASP.NET Core
Routing and URL Patterns in ASP.NET Core
Handling HTTP Requests and Responses
Model Binding and Validation
JSON Serialization and Deserialization
Using Razor Views for HTML Rendering
API Development with ASP.NET Core
CRUD API Creation and RESTful Services
Entity Framework Core Overview
CRUD Operations with Entity Framework Core
Database Connection Setup in ASP.NET Core
Querying and Data Handling with LINQ
User Authentication and Security
Advanced API Concepts
Pagination, Filtering, and Sorting
Caching Techniques for Performance Improvement
Rate Limiting and Security Practices
Logging and Exception Handling in ASP.NET Core
Deployment and Best Practices
Deployment of ASP.NET Core Applications
Best Practices for .NET Development
User Authentication Basics in ASP.NET Core
Implementing JSON Web Tokens (JWT) for Security
Role-Based Access Control in ASP.NET Core
Database
MongoDB (NoSQL)
Introduction to NoSQL and MongoDB
Understanding Collections and Documents
Basic CRUD Operations in MongoDB
MongoDB Query Language (MQL) Basics
Inserting, Finding, Updating, and Deleting Documents
Using Filters and Projections in Queries
Understanding Data Types in MongoDB
Indexing Basics in MongoDB
Setting Up a Simple MongoDB Database (e.g., MongoDB Atlas)
Connecting to MongoDB from a Simple Application
Basic Data Entry and Querying with MongoDB Compass
Data Modeling in MongoDB: Embedding vs. Referencing
Overview of Aggregation Framework in MongoDB
SQL
Introduction to SQL (Structured Query Language)
Basic CRUD Operations: Create, Read, Update, Delete
Understanding Tables, Rows, and Columns
Primary Keys and Unique Constraints
Simple SQL Queries: SELECT, WHERE, and ORDER BY
Filtering Data with Conditions
Using Aggregate Functions: COUNT, SUM, AVG
Grouping Data with GROUP BY
Basic Joins: Combining Tables (INNER JOIN)
Data Types in SQL (e.g., INT, VARCHAR, DATE)
Setting Up a Simple SQL Database (e.g., SQLite or MySQL)
Connecting to a SQL Database from a Simple Application
Basic Data Entry and Querying with a GUI Tool
Data Validation Basics
Overview of Transactions and ACID Properties
AI and IoT
AI & IoT Development with .NET
Introduction to AI Concepts
Getting Started with .NET for AI
Machine Learning Essentials with ML.NET
Introduction to Deep Learning
Practical AI Project Ideas
Introduction to IoT Fundamentals
Building IoT Solutions with .NET
IoT Communication Protocols
Building IoT Applications and Dashboards
IoT Security Basics
You're Ready to Become an IT Professional
Master the Skills and Launch Your Career: Upon mastering Frontend, Backend, Database, AI, and IoT, you’ll be fully equipped to launch your IT career confidently.
TechEntry Highlights
In-Office Experience: Engage in a collaborative in-office environment (on-site) for hands-on learning and networking.
Learn from Software Engineers: Gain insights from experienced engineers actively working in the industry today.
Career Guidance: Receive tailored advice on career paths and job opportunities in tech.
Industry Trends: Explore the latest software development trends to stay ahead in your field.
1-on-1 Mentorship: Access personalized mentorship for project feedback and ongoing professional development.
Hands-On Projects: Work on real-world projects to apply your skills and build your portfolio.
What You Gain:
A deep understanding of Front-end React.js and Back-end .NET.
Practical skills in AI tools and IoT integration.
The confidence to work on real-time solutions and prepare for high-paying jobs.
The skills that are in demand across the tech industry, ensuring you're not just employable but sought-after.
Frequently Asked Questions
Q.) What is C#, what are its main features, and why is it a good choice for software development?
A: Ans: C# is a versatile and powerful programming language developed by Microsoft. It's widely used for web, desktop, and game development, offering numerous career opportunities in software development.
Q: Why should I learn Angular?
A: Angular is a powerful framework for building dynamic, single-page web applications. Learning Angular can enhance your ability to create scalable and maintainable web applications and is highly valued in the job market.
Q: What is .NET?
A: .NET is a comprehensive software development framework created by Microsoft. It supports the development and running of applications on Windows, macOS, and Linux. With .NET, you can build web, mobile, desktop, gaming, and IoT applications.
Q: What are the prerequisites for learning Angular?
A: A basic understanding of HTML, CSS, and JavaScript is recommended before learning Angular.
Q: What are the benefits of learning .NET?
A: Learning .NET offers several benefits, including cross-platform development, a large community and support, a robust framework, and seamless integration with other Microsoft services and technologies.
Q: What is React?
A: React is a JavaScript library developed by Facebook for building user interfaces, particularly for single-page applications where you need a dynamic and interactive user experience. It allows developers to create large web applications that can change data without reloading the page.
Q: Is C# suitable for beginners?
A: Yes, C# is an excellent language for beginners due to its simplicity and readability. It has a rich set of libraries and tools that make development easier, and it's well-documented, which helps new learners quickly grasp the concepts.
Q: Why use React?
A: React offers reusable components, fast performance through virtual DOM, one-way data flow, and a large community, making it ideal for developing dynamic user interfaces.
Q: What kind of projects can I create with C# and .NET?
A: With C# and .NET, you can create a wide range of projects, such as web applications, mobile apps (using Xamarin), desktop applications (Windows Forms, WPF), games (using Unity), cloud-based applications, and IoT solutions.
Q: What is JSX?
A: JSX is a syntax extension of JavaScript used to create React elements, which are rendered to the React DOM. React components are written in JSX, and JavaScript expressions within JSX are embedded using curly braces {}.
For more, visit our website:
https://techentry.in/courses/dotnet-fullstack-developer-course
0 notes
Text
The Benefits of Hiring Dedicated MERN Stack Developers for Web Application Development.
In today’s fast-evolving tech landscape, web applications are the backbone of any successful business. The demand for efficient, scalable, and high-performing applications is higher than ever. To meet these expectations, businesses are increasingly turning to advanced technology stacks like the MERN stack for full-stack JavaScript development.
Whether you’re looking to build a high-performance web app, implement a chatbot for enhanced user engagement, or improve your development process with TypeScript, hiring the right developers and leveraging the right technologies can make all the difference. In this blog, we’ll explore the benefits to hire dedicated MERN stack developers, chatbot developers, and how MERN stack development services can take your business to the next level.

What is the MERN Stack?
The MERN stack is a powerful and popular JavaScript-based technology stack that allows developers to build dynamic, full-stack web applications with a single language—JavaScript. The acronym MERN stands for:
MongoDB: A NoSQL database that stores data in flexible, JSON-like documents.
Express.js: A web application framework for Node.js that simplifies the development of server-side applications.
React.js: A front-end JavaScript library developed by Facebook for building user interfaces.
Node.js: A JavaScript runtime built on Chrome’s V8 JavaScript engine, allowing you to run JavaScript on the server-side.
The power of the MERN stack lies in its ability to deliver both the front-end and back-end development using JavaScript, making it easier to build high-performing, seamless applications.
Why Hire Dedicated MERN Stack Developers?
MERN stack development services are in high demand because of the stack’s versatility and efficiency. However, when you’re looking to build a custom web application that truly meets your business needs, hiring dedicated MERN stack developers is a smart investment. Here’s why:
End-to-End Expertise: Dedicated MERN developers have in-depth knowledge of all four layers of the MERN stack—front-end, back-end, and database management. This allows them to build a fully integrated and cohesive web application.
Faster Development Time: With MERN stack development, you can streamline your development process since the same language (JavaScript) is used across both the front-end and back-end. This reduces context switching and enhances team collaboration, ultimately speeding up development.
Scalability and Performance: MERN stack developers understand how to optimize your application’s performance, ensuring that your web app can handle high traffic and scale as your business grows.
Cost-Effective Development: Hiring dedicated MERN stack developers allows you to reduce development costs as they can manage the entire development process. Additionally, leveraging the expertise of developers who specialize in this stack can prevent costly mistakes during the development phase.
Customization and Flexibility: MERN developers can tailor applications to meet specific business requirements. Whether you need a content management system, e-commerce platform, or enterprise-grade web app, MERN stack development services can be customized to fit your needs.
Enhancing User Experience with Chatbots
One of the most important elements of a successful web application is user experience. As businesses strive to offer better customer service and engagement, chatbots have become an indispensable tool. Chatbots powered by AI can automate customer support, handle inquiries, and improve user interactions within your web application.
When you hire a chatbot developer, you bring in an expert who can integrate artificial intelligence and natural language processing (NLP) into your web application. This allows your application to provide:
Instant Customer Support: Chatbots can respond to customer queries in real-time, offering 24/7 support without the need for human intervention.
Personalized User Experience: A well-trained chatbot can offer personalized responses based on user behavior, making interactions more engaging and relevant.
Lead Generation: Chatbots can also be programmed to identify potential leads by engaging users, gathering information, and qualifying them for follow-up.
When combined with MERN stack development services, chatbots can seamlessly integrate into your application’s front-end and back-end, providing users with a smooth and intelligent interaction experience.
The Role of TypeScript in Modern Web Development
While JavaScript remains a dominant language in web development, TypeScript has emerged as a powerful alternative for building large-scale, maintainable applications. As a superset of JavaScript, TypeScript adds static typing to the language, which improves code quality and reduces bugs.
When you opt for TypeScript development services, you gain several advantages, including:
Error Detection at Compile-Time: TypeScript’s strong typing system allows developers to catch errors early in the development process, reducing runtime errors and making debugging easier.
Better Tooling and IDE Support: TypeScript integrates seamlessly with modern IDEs, offering features like code completion, error checking, and navigation, which speed up development and enhance productivity.
Improved Maintainability: TypeScript makes it easier to manage large codebases. The addition of types ensures that the code is more predictable and maintainable over time, making it an excellent choice for long-term projects.
Scalability: TypeScript’s object-oriented features make it easier to scale your application as it grows, allowing for cleaner and more modular code.
Incorporating TypeScript into your MERN stack development services helps you create more robust and maintainable web applications that are ready for the future.
Combining MERN Stack Development with TypeScript and Chatbots
When you hire dedicated MERN stack developers, you get the benefit of a comprehensive development approach that leverages the power of MongoDB, Express.js, React.js, and Node.js. By integrating TypeScript into your MERN stack project, you elevate the development process to the next level, ensuring better code quality, maintainability, and scalability.
Moreover, incorporating chatbots into your MERN stack application enhances the user experience by providing intelligent, real-time assistance. Whether you’re building a customer service portal, an e-commerce platform, or an enterprise-level application, the combination of these technologies will enable you to create an application that is both high-performing and highly engaging.
Conclusion
In today’s competitive digital landscape, having the right development stack and talent is crucial for building successful web applications. Hiring dedicated MERN stack developers ensures that you have the expertise needed to create a powerful, scalable, and dynamic application. By integrating chatbots and TypeScript development services, you can further enhance user engagement, reduce errors, and build applications that can scale as your business grows.
If you’re looking to take your web application to the next level, consider hiring experienced professionals who specialize in MERN stack development services, chatbot development, and TypeScript. With the right team on your side, the possibilities for your web application are endless. Visit Brain Inventory for more updates.
0 notes
Text
Design Intuitive APIs with JSON Schema and TypeScript for Modern Applications
Designing Intuitive APIs with JSON Schema and TypeScript Introduction Designing intuitive APIs is crucial for building scalable and maintainable software systems. An intuitive API provides a clear and concise interface for developers to interact with your system, reducing the learning curve and increasing adoption. JSON Schema and TypeScript are two powerful tools that can help you achieve this…
0 notes
Text
web development,
web development,
A Beginner’s Guide to Web Development: Building the Future Online
Web development is the process of building and maintaining websites. From simple static pages to complex web applications, web development touches almost every aspect of how we interact with the internet today. Whether you’re looking to build a personal blog or a full-fledged e-commerce platform, understanding the basics of web development is essential. This article will guide you through the fundamentals, tools, and key concepts of web development.
1. What is Web Development?
Web development refers to the activities involved in creating a website or web application. This includes everything from coding, designing, and deploying the website to maintaining its functionality and ensuring its security. It can be broken down into three main categories:
Frontend Development: The front end of a website is what users see and interact with. Frontend development focuses on the visual elements, layout, and user experience (UX).
Backend Development: The backend involves the server-side logic, databases, and interactions that power the website. It ensures that everything functions as expected when a user interacts with the website.
Full-Stack Development: A full-stack developer is someone skilled in both frontend and backend development. They have the expertise to build complete web applications from start to finish.
2. Frontend Development
Frontend development involves creating the part of the website that users see and interact with. It’s all about building an attractive, user-friendly interface that works seamlessly across devices.
Key Technologies:
HTML (Hypertext Markup Language): The skeleton of a webpage, HTML structures the content by defining elements like headings, paragraphs, images, and links.
CSS (Cascading Style Sheets): CSS defines the visual appearance of the webpage. It controls aspects such as layout, colors, fonts, and responsiveness.
JavaScript: JavaScript is the language that makes websites interactive. From dynamic content to form validation, JavaScript enables user-driven actions such as clicking buttons or submitting forms.
Popular Frontend Frameworks:
React: A JavaScript library developed by Facebook for building user interfaces, especially for single-page applications (SPAs).
Vue.js: A progressive JavaScript framework that is easy to integrate and flexible for building modern web interfaces.
Angular: A TypeScript-based framework maintained by Google, Angular is designed for building large-scale web applications.
3. Backend Development
Backend development focuses on the server, databases, and application logic that ensure everything works behind the scenes. It is responsible for handling requests from the frontend and performing actions like storing user data, sending emails, and processing payments.
Key Technologies:
Server-Side Programming Languages:
PHP: A popular server-side scripting language used for creating dynamic websites and web applications.
Node.js: A JavaScript runtime that allows you to write backend logic in JavaScript, making it easier to use the same language for both frontend and backend.
Python: Known for its simplicity and readability, Python is widely used for web development with frameworks like Django and Flask.
Ruby: Ruby on Rails is a robust framework that helps developers build applications quickly and efficiently.
Databases: Websites often require databases to store and retrieve data.
MySQL: An open-source relational database system.
MongoDB: A NoSQL database that stores data in JSON-like documents.
PostgreSQL: A powerful open-source relational database system known for its advanced features and scalability.
APIs (Application Programming Interfaces): APIs allow different software systems to communicate with each other. They are integral in connecting the frontend with the backend and enabling services like authentication, third-party data integration, and more.
4. Full-Stack Development
A full-stack developer is proficient in both frontend and backend technologies. They have the skills to build entire web applications and understand how all the components of the website or web app work together. Full-stack developers often use tools and frameworks that help bridge the gap between the frontend and backend, such as:
Node.js with Express: For handling backend logic with JavaScript.
MERN stack (MongoDB, Express, React, Node.js): A full-stack JavaScript solution for building modern web apps.
LAMP stack (Linux, Apache, MySQL, PHP): A traditional web development stack commonly used for building dynamic websites and applications.
5. Tools and Best Practices for Web Development
To build high-quality websites, web developers rely on various tools and follow best practices that ensure the final product is efficient, scalable, and user-friendly.
Version Control: Git is the most widely used version control system. Git allows developers to track changes in code, collaborate with others, and manage codebases efficiently.
Code Editors: Tools like Visual Studio Code, Sublime Text, and Atom are popular code editors that help developers write and organize code.
Responsive Design: With users accessing websites from various devices (phones, tablets, desktops), it’s essential to create websites that are responsive and adjust to different screen sizes. CSS frameworks like Bootstrap and Flexbox are commonly used for responsive layouts.
Testing: Testing is a crucial part of web development. Tools like Jest, Mocha, and Cypress help ensure your code works as expected. Unit testing, integration testing, and end-to-end testing are all part of a robust testing strategy.
Security: Web developers must prioritize security by implementing measures like HTTPS, data encryption, and secure authentication practices to protect users’ data and privacy.
6. Web Development Trends
Web development is always evolving, with new tools, techniques, and frameworks emerging. Some current trends include:
Progressive Web Apps (PWAs): PWAs offer a native app-like experience on the web. They are fast, reliable, and can work offline, making them a popular choice for modern websites.
Serverless Computing: This approach allows developers to focus on writing code without managing the infrastructure. With serverless services like AWS Lambda, you can scale your application easily without worrying about server management.
WebAssembly: A binary instruction format that allows running high-performance code in the browser, WebAssembly is gaining traction for building fast, client-side applications.
AI and Chatbots: More websites are integrating AI-powered chatbots and voice assistants to improve user experience and provide personalized interactions.
7. Conclusion
Web development is an exciting and rewarding field that offers vast opportunities to build and shape the digital world. Whether you’re interested in frontend, backend, or full-stack development, there’s a path for everyone. By learning the key technologies, staying up to date with trends, and practicing good development practices, you can create websites that are not only functional but also beautiful and user-friendly. With constant innovation and growing demand, web development is a career that will continue to evolve and remain at the heart of the digital revolution.
4o mini
0 notes
Text
Use AWS Console-to-Code To Turn Console Actions Into Code

AWS Console to Code
AWS Console-to-Code, which makes it simple to turn AWS console actions into reusable code, is now generally available (GA). When you launch an Amazon Elastic Compute Cloud (Amazon EC2) instance, for example, you can record your actions and workflows in the console using AWS Console-to-Code. You can then evaluate the AWS Command Line Interface (AWS CLI) commands for your console actions.
Using the infrastructure-as-code (IaC) format of your choosing, such as the AWS CloudFormation template (YAML or JSON) or the AWS Cloud Development Kit (AWS CDK) (TypeScript, Python, or Java), Amazon Q can generate code for you with a few clicks. This may be included into pipelines, further tailored for your production workloads, and utilized as a foundation for infrastructure automation.
Customers have responded well to AWS Console-to-Code since it revealed the preview last year. Since it has been working backwards from customer feedback, it has been significantly enhanced in this GA version.
GA’s new features
Encouragement of additional services Amazon EC2 was the sole service that was supported during the preview. Amazon Relational Database Service (RDS) and Amazon Virtual Private Cloud (Amazon VPC) are now supported by AWS Console-to-Code at GA.
Simplified experience: Customers can now more easily handle the workflows for prototyping, recording, and code creation with the updated user interface.
Preview code: Customers can now create code for EC2 instances and Auto Scaling groups without actually establishing them with updates to the launch wizards.
Advanced code generation: Amazon Q machine learning models power the creation of code for AWS CDK and CloudFormation.
How to begin using AWS Console-to-Code
Let’s start with a straightforward example of starting an Amazon EC2 instance. Open the Amazon EC2 console first. To begin recording, find the AWS Console-to-Code widget on the right and select Start recording.
Next, use the Amazon EC2 console’s launch instance wizard to start an Amazon EC2 instance. To finish the recording, select Stop once the instance has been launched.
Examine the recorded actions in the Recorded actions table. To filter by write actions (Write), utilize the Type dropdown list. Select the action RunInstances. To copy the relevant AWS CLI command, select Copy CLI.
It is simple to change this command. For this example, You can modify it to start two instances (–count 2) of type t3.micro (–instance-type). Although this is a simplified example, other workflows can use the same method.
You can use AWS CloudShell to run the command, and it launched two t3.micro EC2 instances as planned:
The API commands used when actions were conducted (during the EC2 instance launch) form the basis of the single-click CLI code creation experience. It’s intriguing to see that when you finish operations in the console, the companion screen displays the recorded actions. Additionally, it is simple to clearly scope activities for prototyping because of the interactive user interface’s start and stop capabilities.
Creating IaC with AWS CDK
An open-source framework called AWS CDK is used to specify cloud architecture in code and provision it using AWS CloudFormation. You may create AWS CDK code for your infrastructure workflows with AWS Console-to-Code. Currently available in Java, Python, and TypeScript.
Let’s move on to the use case for the EC2 launch instance. Locate the AWS Console-to-Code widget on the right side of the Amazon EC2 console, select Start recording, and then start an EC2 instance if you haven’t already. Once the instance has started, select the RunInstances action from the Recorded actions table and select Stop to finish the recording.
Select the Generate CDK Python button from the dropdown menu to begin generating AWS CDK Python code.
You can modify the code to make it production-ready for your particular use case, or you can use it as a starting point.
You made a new Python CDK project since you already had the AWS CDK installed:
Then entered the code that was generated into the Python CDK project. To make sure the code was correct for this example, modified the EC2 instance type, refactored the code into an AWS CDK Stack, and made a few other little adjustments. Using CDK deploy, was able to deploy it successfully.
You can replicate the same outcome by launching an EC2 instance from the console action and then going all the way to the AWS CDK.
Additionally, you can create CloudFormation templates in JSON or YAML format:
Preview code
Additionally, you may use the Preview code capability in Amazon EC2 and the Amazon EC2 Auto Scaling group launch experience to directly access AWS Console-to-Code. This implies that you can obtain the infrastructure code without actually creating the resource.
Try this out by following the instructions to use a launch template to build an Auto Scaling group. But click Preview code rather than Create Auto Scaling group. The options to replicate the AWS CLI command or produce infrastructure code should now be visible to you.
Things to be aware of
When using AWS Console-to-Code, keep the following points in mind:
To create AWS CLI commands for their infrastructure operations, anyone can use AWS Console-to-Code. There is a free monthly limit of 25 generations for the code generation feature for AWS CDK and CloudFormation formats; after that, an Amazon Q Developer subscription is required.
Prior to deployment, it is advised that you test and validate the generated IaC code.
Only actions in the Amazon EC2, Amazon VPC, and Amazon RDS consoles are recorded by AWS Console-to-Code at GA.
Actions from past sessions or other tabs are not retained by the Recorded actions table in AWS Console-to-Code; it only shows actions made within the current browser tab. Keep in mind that all recorded actions will be lost once the browser tab is refreshed.
Currently accessible
All commercial regions offer AWS Console-to-Code. The Amazon Q Developer user manual contains additional information about it. Try it out in the Amazon EC2 console and email the AWS re:Post for Amazon EC2 or your regular AWS Support contacts with your thoughts.
Read more on Govindhtech.com
#AWSConsoletoCode#AWSCDK#AmazonQ#AmazonEC2#EC2instances#AWSCLI#Coludcomputing#News#Technews#Technology#Technologynews#Technologytrends#govindhtech
0 notes
Text
Introduction to AWS DevOps Notes
DevOps, a blend of "Development" and "Operations," represents a set of practices aimed at unifying software development and IT operations. The primary goal is to shorten the systems development lifecycle while delivering features, fixes, and updates frequently in close alignment with business objectives. Amazon Web Services (AWS) offers a vast array of tools and services that facilitate the implementation of DevOps practices, making it a leading choice for many organizations. In this article, we'll explore the core components of DevOps on AWS, how these can be utilized for optimal performance, and the importance of Azure training, Azure Data Factory training, and Azure DevOps training in the broader context of cloud-based DevOps.
Core Components of DevOps on AWS
Infrastructure as Code (IaC)Infrastructure as Code is a critical DevOps practice that involves managing and provisioning computing infrastructure through code instead of manual processes. AWS provides several tools for IaC, including:
AWS CloudFormation: This service enables you to define and provision AWS infrastructure using JSON or YAML templates. CloudFormation automates the provisioning and updating of your resources in a safe and repeatable manner.
AWS CDK (Cloud Development Kit): The CDK allows developers to define cloud infrastructure using familiar programming languages like TypeScript, Python, and JavaScript, making infrastructure development more accessible.
Continuous Integration and Continuous Delivery (CI/CD)CI/CD is a cornerstone of DevOps that involves automating the process of integrating and deploying code changes. AWS provides several services to facilitate CI/CD:
AWS CodePipeline: A fully managed service that helps automate the steps required to release your software changes continuously.
AWS CodeBuild: A fully managed build service that compiles source code, runs tests, and produces software packages ready for deployment.
AWS CodeDeploy: Automates code deployments to a variety of compute services such as Amazon EC2, AWS Lambda, and on-premises servers.
Monitoring and LoggingEffective monitoring and logging are essential for maintaining the health and performance of applications and infrastructure. AWS provides robust tools for these purposes:
Amazon CloudWatch: A monitoring and observability service that provides data and actionable insights to monitor applications, respond to system-wide performance changes, optimize resource utilization, and get a unified view of operational health.
AWS X-Ray: Assists in debugging and analyzing the performance of distributed applications, providing an end-to-end view of requests as they travel through your application.
Collaboration and CommunicationDevOps emphasizes the importance of effective communication and collaboration among all stakeholders involved in the development and deployment processes. AWS integrates with various collaboration tools to ensure seamless communication:
AWS CodeStar: Offers a unified user interface, enabling you to easily manage your software development activities in one place. It integrates with popular collaboration tools like Atlassian Jira and Slack.
DevOps Practices on AWS
Automated TestingAutomated testing is an integral part of the DevOps lifecycle, allowing teams to detect and address issues early. AWS services that support automated testing include:
AWS Device Farm: An app testing service that lets you test your applications on a wide range of real mobile devices and desktop browsers.
AWS CodeBuild: Can be integrated with your test suite to run automated tests as part of your CI/CD pipeline.
MicroservicesMicroservices architecture involves designing applications as a collection of small, loosely coupled services. AWS provides several services that support microservices:
Amazon ECS (Elastic Container Service): A fully managed container orchestration service that makes it easy to deploy, manage, and scale containerized applications.
AWS Lambda: Enables you to run code without provisioning or managing servers, making it ideal for implementing microservices in a serverless architecture.
Security and ComplianceSecurity is paramount in any DevOps environment. AWS offers numerous tools and best practices to ensure your applications and infrastructure are secure:
AWS IAM (Identity and Access Management): Allows you to manage access to AWS services and resources securely.
AWS Key Management Service (KMS): Simplifies the creation and control of the encryption keys used to secure your data.

The Importance of Azure Training in a DevOps Environment
While AWS offers a comprehensive suite of tools and services for DevOps, gaining expertise in Azure can significantly enhance your capabilities, especially in a multi-cloud environment. Azure training, Azure Data Factory training, and Azure DevOps training can provide you with valuable skills that complement your AWS knowledge.
Azure Training: Equips you with the skills to design, implement, and manage Azure solutions. This training is invaluable in multi-cloud environments where interoperability and flexibility are crucial.
Azure Data Factory Training: Focuses on Azure's data integration service, enabling you to create, schedule, and orchestrate data workflows. Understanding Azure Data Factory is beneficial for managing complex data pipelines in a DevOps setup.
Azure DevOps Training: Covers the suite of development tools offered by Azure DevOps, including Azure Repos, Azure Pipelines, Azure Boards, and more. This training enhances your ability to implement effective CI/CD pipelines, manage code repositories, and track work items efficiently.
Conclusion
DevOps on AWS provides a robust framework for developing, deploying, and maintaining high-quality software efficiently. By leveraging AWS's comprehensive set of tools and services, organizations can automate and streamline their development and operations processes, leading to faster delivery times and improved software reliability. However, it is equally important to invest in cross-platform training, such as Azure training, Azure Data Factory training, and Azure DevOps training, to remain versatile and adaptable in a rapidly evolving tech landscape. Combining expertise in AWS and Azure ensures you are well-equipped to harness the full potential of cloud computing and DevOps practices, regardless of the platform.
#azure devops#azurecertification#azuredataengineer#microsoft azure#azure data factory#azure training
0 notes
Text
Mastering TypeScript Faster: How the JS2TS tool Can Help New Learners?
Introduction
When starting out with TypeScript, beginners can easily find it to be overwhelming learning about types, interfaces, etc. together with themselves working on complex data structures. In contrast to JavaScript, one of its main differences is that TypeScript forces the developer to define data types, meaning that at first it can be confused. It is frustrating for new learners to understand how to properly define types and progress slowly.
This makes the learning process much easier by automatically converting JSON data into accurate TypeScript type definitions using the JS2TS tool. Instead of having to manually determine the correct type structure for beginners, the JS2TS tool provides a way to show how TypeScript handles various data structures in real time. This makes it easier for new developers to learn TypeScript faster and create errors, and it increases their confidence in their coding skills.
About JS2TS tool
The JS2TS tool is an online tool to transpose JSON data into TypeScript type definition in a single click. JSON, or JavaScript Object Notation, is a common data format used for APIs and applications, but it becomes difficult to define its structure for TypeScript as a beginner.
The JS2TS tool lets learners take JSON data and paste it in the tool and within seconds they get a well-structured TypeScript interface. This eliminates the need to guess and gives the beginners a chance to focus on learning how TypeScript works instead of dealing with type definitions.
About TypeScript
It is a type-based javascript programming language with added syntax and static typing to javascript. Typescript does that, meaning you can’t store everything in JavaScript variables but must specify its type every time. Contrary to JavaScript, this makes your code more controlled so you don’t get bugs you thought you would not get and, yes, this does mean that TypeScript allows you to write more elegant and, in some sense, safer code.
TypeScript is a hard language for beginners due to the need for careful attention to type definitions, interfaces, and strict coding rules. How is that such a useful tool can sound scary? Well, it’s because too many newcomers use TypeScript when that’s simply not the case.
How does the JS2TS Tool help beginners understand TypeScript types?
Defining types correctly is one of the hardest things one needs to learn first with TypeScript. For new developers, interfaces, type annotations, and handling complex nested structures are the problem.
Auto-typing JSON data into TypeScript with the JS2TS tool makes it an excellent resource for new learners. It helps the learners to look at real-world types of data to understand how types of data in TypeScript are structured without writing the type definitions manally. Using the JS2TS tool, it is easy for a beginner to understand how TypeScript interfaces work and to be able to write their own type definitions.
Rather than spending hours researching the appropriate type structures, learners can play around with the JS2TS tool brainlessly and see on the fly how TypeScript translates different types of data. That makes learning TypeScript faster and easier because it is added.
How does using the JS2TS tool reduce frustration for new developers?
In fighting the errors and debugging problems while learning a new programming language, this is a real issue. TypeScript evaluates strict rules and if the type definition is wrong, it may cause confusion and slow down the progress.
The JS2TS tool reduces much of this frustration by automating the type definition process. The JS2TS tool allows beginners to not have to write interfaces and deal with errors and instead to generate correct type definitions instantly. It helps them not waste their time trying to solve syntax errors but rather focus on the TypeScript concepts.
The JS2TS tool simplifies the type definitions, which helps new developers learn to write TypeScript code with more confidence. It gives them to play around with different JSON structures, play with how TypeScript handles those, and incrementally enhances their grasp of TypeScript’s type system.
Why is the JS2TS tool the perfect learning companion?
The JS2TS tool is a helpful guide to anyone new to TypeScript; it provides clear, ready-to-use type definitions. This helps reduce the learning time by letting the developers easily see the real examples of how TypeScript works without the headache of manually converting the code.
The JS2TS tool is also good for self-study. TypeScript defines different JSON data structures, which beginners can paste into the tool and observe how they are defined. With this interactive approach, learning is more engaging and learners learn better about TypeScript’s type system.
Also Read: How to Convert JSON to TypeScript Made Easy?
The JS2TS tool generates precise and standardized TypeScript interfaces, so beginners also get good practices from the start. This also prepares them for the real projects in real-world TypeScript projects where they already have a solid base for writing clean and well-structured code.
Conclusion
Learning TypeScript is not an insurmountable task. JS2TS tool lets you skip the frustration of requiring to define types yourself and learn how TypeScript works. The JS2TS tool allows for immediate transformation of the JSON data into the TypeScript interface, making it faster for fresh developers to learn concepts of TypeScript and avoiding standard mistakes at the same time.
Also Read: Convert Object to JSON in a Snap
The JS2TS tool is a must-use tool for anyone who is starting their TypeScript journey; it makes it smooth, efficient, and error-free. JS2TS offers you to try it and start mastering TypeScript with absolutely no effort!
0 notes
Text
Rivet AI: Free Installation Guide for Creating Advanced AI Agents Superior to Langflow and Flowise

Introducing Rivet: The IDE for Creating Complex AI Agents About Rivet Rivet is a new method of creating AI agents that focuses on creating more complex AI agents with additional toolkits and plugins. Unlike other AI development tools such as abacus.ai, Chidori, and super AGI, Rivet offers a fully open-source platform. With its visual programming environment and node-based system, Rivet simplifies the AI creation process, making it accessible for individuals with different levels of programming knowledge. Rivet's Core Strengths Rivet's core strength lies in its ability to facilitate the design and connection of notes to craft AI agents. This makes it valuable for both seasoned AI developers and beginners. Rivet shares a visual programming paradigm with Flowwise and Langflow, making it visually similar. The drag and drop interface allows users to deploy different types of agents by combining applications. Unique Features of Rivet Rivet stands out from other AI development tools due to its remote debugability, ease of embedding in a host application, and TypeScript compatibility. These features enhance its functionality and provide a more customizable way to create AI agents. Installation To install Rivet, you can use the one-click installer or install it from the source. The one-click installer is recommended for ease of use. However, if you choose to install it from the source, ensure that you have the necessary prerequisites such as Rust, Node 20+, Yarn, and Git. Follow the provided instructions to install Rivet on your desktop. Why Choose Rivet? Rivet offers a unique and invaluable feature set. Its visual programming environment allows users to visualize and build AI agents using its user-friendly interface. Remote debugging enables users to observe the execution of prompt chains in real-time, making bug identification and resolution more efficient. Rivet also promotes collaboration within teams by representing different graphs in YAML files and supporting version control. Creating AI Agents with Rivet To create an AI agent with Rivet, start by clicking on "New Graph" and create folders within it to organize your graphs. Use the provided nodes to build your AI agent. For example, the "AI Chat" node utilizes the GPT-3.5 Turbo model. You can customize the node's title, description, and prompt to suit your needs. Rivet also offers various configurations and outputs, including data storage, export options, and plugins. Getting Started Once you have installed Rivet, set your OpenAI API key in the settings tab. You can also select different themes and set the executor to browser or node. Rivet allows you to run and test your AI agent locally using a remote debugger. An Example: Creating a Chatbot Let's create a chatbot that responds as a chemist when given a prompt to identify the stability of different compounds. You can define the context and prompt in a JSON file and extract it in your AI agent. Use the available nodes and models to generate responses in the desired format. Rivet offers extensive documentation and tutorials for a more in-depth understanding of its functionalities. Conclusion Rivet is a powerful IDE for creating complex AI agents. Its unique features, such as a visual programming environment, remote debugging, and collaboration support, set it apart from other AI development tools. With Rivet, you can unleash your creativity and build innovative AI applications. Check out the links in the description to explore Rivet further. Thank you for watching, and have a great day! Thank you for taking the time to read this article! If you enjoyed it and would like to stay updated with similar content, we invite you to follow our blog. You can receive notifications directly in your inbox by subscribing to our email list. Alternatively, you can also join our Facebook fanpage, where we share more articles, news, and updates. Lastly, for those who prefer video content, we have a YouTube channel that you can subscribe to as well. Thank you again for your support, and we look forward to keeping you engaged and informed! Frequently Asked Questions 1. What is Rivet and how is it different from other AI development tools? Rivet is an IDE for creating complex AI agents with a focus on additional toolkit and plugins. It is fully open source and has a visual programming environment. Unlike other apps like abacus.ai and Chidori, Rivet is designed for creating more complex AI agents. 2. What are the core strengths of Rivet? Rivet's core strengths lie in its ability to facilitate the design and connection of nodes to craft AI agents. It simplifies the AI creation process and ensures accessibility for individuals with different levels of programming knowledge. Rivet also offers remote debuggability, ease of embedding in a host application, and TypeScript compatibility. 3. How can I install Rivet on my desktop? There are two ways to install Rivet: using the one-click installer or building from the source. The recommended method is to use the one-click installer, which is available for different operating systems. Detailed installation instructions can be found in the article. 4. What are the main features of Rivet? Rivet offers a visual programming environment, remote debugging capabilities, and collaboration features. It allows you to visualize and build AI agents using its UI, debug prompt chains in real time, and collaborate with your team by representing graphs in YAML files. 5. Can I create complex AI agents with Rivet? Yes, Rivet is designed to create complex AI agents. It offers a range of toolkits and plugins that allow for the customization and design of AI agents. The application provides a versatile platform for seasoned AI developers as well as individuals new to working with AI. Read the full article
0 notes