#Jetson CUDA Fastvideo SDK NVIDIA XIMEA
Explore tagged Tumblr posts
Visit Tumblr Blog
Explore Tumblr blogs with no restrictions, modern design and the best experience.
Last Seen Tumblr Blogs


Fun Fact
The Tumblr app for Google Glass was released on May 16, 2013.
Text
Jetson image processing: ISP libargus and Fastvideo SDK
Jetson image processing for camera applications
Jetson hardware is absolutely unique solution from NVIDIA. This is essentially a mini PC with extremely powerful and versatile hardware. Apart from ARM processor it has a sophisticated high performance GPU with CUDA cores, Tensor cores (on AGX Xavier), software for CPU/GPU and AI.
Below you can see an example of how to build a camera system on Jetson. This is an important task if you want to create realtime solution for mobile imaging application. With a thoughtful design, one can even implement a multicamera system on just a single Jetson, and some NVIDIA partners showcase that this is in fact achievable.
How image processing could be done on NVIDIA Jetson
ISP inside Jetson (libargus library on the top of hardware solution)
V4L2 framework instead of argus/nvcamerasrc to get bayer data like v4l2-ctl
Image processing on CUDA (NPP library, Fastvideo SDK)
Image processing on ARM (C++, Python, OpenCV)
Hardware-based encoding and decoding with NVENC
AI on CUDA and/or Tensor cores
Here we consider just ISP and CUDA-based image processing pipelines to describe how the task could be solved, which image processing algorithms could be utilized, etc. For the beginning we consider NVIDIA camera architecture.
Camera Architecture Stack
The NVIDIA camera software architecture includes NVIDIA components for ease of development and customization:

Fig.1. Diagram from Development Guide for NVIDIA Tegra Linux Driver Package (31.1 Release, Nov.2018)
NVIDIA Components of the camera architecture
libargus - provides low-level API based on the camera core stack
nvarguscamerasrc - NVIDIA camera GStreamer plugin that provides options to control ISP properties using the ARGUS API
v4l2src - standard Linux V4L2 application that uses direct kernel IOCTL calls to access V4L2 functionality
NVIDIA provides OV5693 Bayer sensor as a sample and tunes this sensor for the Jetson platform. The drive code, based on the media controller framework, is available at ./kernel/nvidia/drivers/media/i2c/ov5693.c, NVIDIA further offers additional sensor support for BSP software releases. Developers must work with NVIDIA certified camera partners for any Bayer sensor and tuning support.
The work involved includes:
Sensor driver development
Custom tools for sensor characterization
Image quality tuning
These tools and operating mechanisms are NOT part of the public Jetson Embedded Platform (JEP) Board Support Package release. For more information on sensor driver development, see the NVIDIA V4L2 Sensor Driver Programming Guide.
Jetson includes internal hardware-based solution (ISP) which was created for realtime camera applications. To control these features on Jetson hardware, there is libargus library.
Camera application API libargus offers:
low-level frame-synchronous API for camera applications, with per frame camera parameter control
multiple (including synchronized) camera support
EGL stream outputs
RAW output CSI cameras needing ISP can be used with either libargus or GStreamer plugin. In either case, the V4L2 media-controller sensor driver API is used.
Sensor driver API (V4L2 API) enables:
video decode
encode
format conversion
scaling functionality
V4L2 for encode opens up many features like bit rate control, quality presets, low latency encode, temporal tradeoff, motion vector maps, and more.
Libargus library features for Jetson ISP
Bad pixel correction
Bayer domain hardware noise reduction
Per-channel black-level compensation
High-order lens-shading compensation
3A: AF/AE/AWB
Demosaic
3x3 color transform
Color artifact suppression
Downscaling
Edge enhancement (sharp)
To summarize, ISP is a fixed-function processing block which can be configured through the Argus API, Linux drivers, or the Technical Reference Manual which contains register information for particular Jetson.
All information about utilized algorithms (AF, AE, demosaicing, resizing) is closed and user needs to test them to evaluate quality and performance.
ISP is a hardware-based solution for image processing on Jetson and it was done for mobile camera applications with high performance and low latency.
How to choose the right camera
To be able to utilize ISP, we need a camera with CSI interface. NVIDIA partner - Leopard Imaging company is manufacturing many cameras with that interface and you can choose according to requirements. CSI interface is the key feature to send data from a camera to Jetson with a possibility to utilize ISP for image processing.
If we have a camera without CSI support (for example, GigE, USB-3.x, CameraLink, Coax, 10-GigE, PCIE camera), we need to create CSI driver to be able to work with Jetson ISP.
Even if we don't have CSI driver, there is still a way to connect your camera to Jetson.
You just need to utilize proper carrier board with correct hardware output. Usually this is either USB-3.x or PCIE. There is a wide choice of USB3 cameras on the market and one can easily choose any camera or carrier board you need. For example, from NVIDIA partner - XIMEA GmbH.

Fig.2. XIMEA carrier board for NVIDIA Jetson TX1/TX2
To work further with the camera, you need camera driver for L4T and ARM processor - this is minimum requirement to connect your camera to Jetson via carrier board.
However, keep in mind that in this case ISP is not available. Next part deals with such situation.
How to work with non-CSI cameras on Jetson
Let's assume that we've already connected non-CSI camera to Jetson and we can send data from the camera to system memory on Jetson.
Now we can't access Jetson ISP and we need to consider other ways of image processing. The fastest solution is to utilize Fastvideo SDK for Jetson GPUs.
That SDK actually exists for Jetson TK1, TX1, TX2, TX2i and AGX Xavier.
You just need to send data to GPU memory and to create full image processing pipeline on CUDA. This is the way to keep CPU free and to ensure fast processing due to excellent performance of mobile Jetson GPU on CUDA. Based on that approach you can create multicamera systems on Jetson with Fastvideo SDK together with USB-3.x or PCIE cameras.
For more info about realtime Jetson applications with multiple cameras you can have a look the site of NVIDIA partner XIMEA, which is manufacturing high quality cameras for machine vision, industrial and scientific applications.

Fig.3. NVIDIA Jetson with multiple cameras on TX1/TX2 carrier board from XIMEA
Image processing on Jetson with Fastvideo SDK
Fastvideo SDK is intended for camera applications and it has wide choice of features for realtime raw image processing on GPU. That SDK also exists for NVIDIA GeForce/Quadro/Tesla GPUs and consists of high quality algorithms which require significant computational power.
This is the key difference in comparison with any hardware-based solution. Usually ISP/FPGA/ASIC image processing modules offer low latency and high performance, but because of hardware restrictions, utilized algorithms are relatively simple and have moderate image quality.
Apart from image processing modules, Fastvideo SDK has high speed compression solutions: JPEG (8/12 bits), JPEG2000 (8-16 bits), Bayer (8/12 bits) codecs which are implemented on GPU. These codecs are working on CUDA and they were heavily tested, so they are reliable and very fast.
For majority of camera applications, 12 bits per pixel is a standard bit depth and it makes sense to store compressed images at least in 12-bit format or even at 16-bit.
Full image processing pipeline on Fastvideo SDK is done at 16-bit precision, but some modules that require better precision are implemented with float.

Fig.4. Image processing workflow on CUDA at Fastvideo SDK for camera applications
To check quality and performance of raw image processing with Fastvideo SDK, user can download GUI application which is called Fast CinemaDNG Processor. The software is fully based on Fastvideo SDK and it could be downloaded from www.fastcinemadng.com together with sample image series in DNG format.
That application has benchmarks window to check time measurements for each stage of image processing pipeline on GPU.
High-resolution multicamera system for UAV Aerial Mapping
Application: 5K vision system for Long Distance Remote UAV
Manufacturer: MRTech company
Cameras
One XIMEA 20 MPix PCIe camera MX200CG-CM
Two XIMEA 3.1 MPix PCIe cameras MX031CG-SY
Hardware
NVIDIA Jetson TX2 or TX2i module with custom carrier board
NVMe SSD 960 PRO M.2 onboard
Jetson GPU image processing
Full processing workflow on CUDA: acquisition, black level, white balance, LUT, high quality demosaicing, etc.
H.264/265 encoding, RTSP streaming via radio channel
Streaming of 4K images at 25 fps and 2× Full HD 1080p (1920 × 1080) images at 30 fps simultaneously
Save high resolution snapshot images to SSD
Power usage 35W (including all cameras)

Fig.5. NVIDIA Jetson TX2 with XIMEA MX200CG-CM (20 MPix) and two MX031CG-SY (3.1 MPix) cameras.
More information about MRTech solutions for Jetson image processing you can find here.
AI imaging applications on Jetson
With the arrival of AI solutions, the following task needs to be solved: how to prepare high quality input data for such systems?
Usually we get images from cameras in realtime and if we need high quality images, then choosing a high resolution color camera with bayer pattern is justified.
Next we need to implement fast raw processing and after that we will be able to feed our AI solution with good pictures in realtime.
The latest Jetson AGX Xavier has high performance Tensor cores for AI applications and these cores are ready to receive images from CUDA software. Thus we can send data directly from CUDA cores to Tensor cores to solve the whole task very fast.
Links:
XIMEA cameras for Jetson applications
MRTech software solutions for Jetson imaging systems
Fastvideo Image & Video Processing SDK for NVIDIA Jetson
Low latency H.264 streaming on Jetson TX2
Original article see here: https://www.fastcompression.com/blog/jetson-image-processing.htm
0 notes
Text
Benchmark comparison for Jetson Nano, TX2, Xavier NX and AGX
Author: Fyodor Serzhenko
NVIDIA has released a series of Jetson hardware modules for embedded applications. NVIDIA® Jetson is the world's leading embedded platform for image processing and DL/AI tasks. Its high-performance, low-power computing for deep learning and computer vision makes it the ideal platform for mobile compute-intensive projects.
We've developed an Image & Video Processing SDK for NVIDIA Jetson hardware. Here we present performance benchmarks for the available Jetson modules. As an image processing pipeline, we consider a basic camera application as a good example for benchmarking.
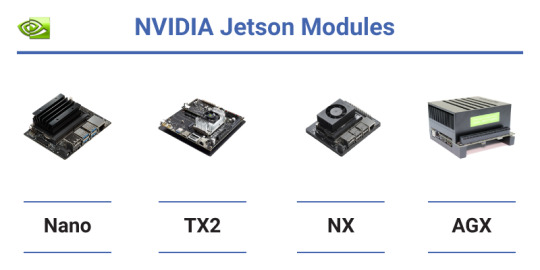
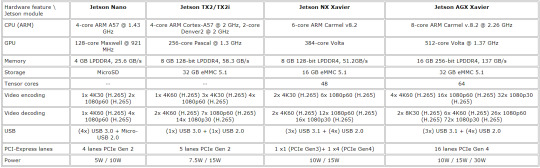
Hardware features for Jetson Nano, TX2, Xavier NX and AGX Xavier
Here we present a brief comparison for Jetsons hardware features to see the progress and variety of mobile solutions from NVIDIA. These units are aimed at different markets and tasks
Table 1. Hardware comparison for Jetson modules
In camera applications, we can usually hide Host-to-Device transfers by implementing GPU Zero Copy or by overlapping GPU copy/compute. Device-to-Host transfers can be hidden via copy/compute overlap.
Hardware and software for benchmarking
CPU/GPU NVIDIA Jetson Nano, TX2, Xavier NX and AGX Xavier
OS L4T (Ubuntu 18.04)
CUDA Toolkit 10.2 for Jetson Nano, TX2, Xavier NX and AGX Xavier
Fastvideo SDK 0.16.4
NVIDIA Jetson Comparison: Nano vs TX2 vs Xavier NX vs AGX Xavier
For these NVIDIA Jetson modules, we've done performance benchmarking for the following standard image processing tasks which are specific for camera applications: white balance, demosaic (debayer), color correction, resize, JPEG encoding, etc. That's not the full set of Fastvideo SDK features, but it's just an example to see what kind of performance we could get from each Jetson. You can also choose a particular debayer algorithm and output compression (JPEG or JPEG2000) for your pipeline.

Table 2. GPU kernel times for 2K image processing (1920×1080, 16 bits per channel, milliseconds)

Total processing time is calculated for the values from the gray rows of the table. This is done to show the maximum performance benchmarks for a specified set of image processing modules which correspond to real-life camera applications.
Each Jetson module was run with maximum performance
MAX-N mode for Jetson AGX Xavier
15W for Jetson Xavier NX and Jetson TX2
10W for Jetson Nano
Here we've compared just the basic set of image processing modules from Fastvideo SDK to let Jetson developers evaluate the expected performance before building their imaging applications. Image processing from RAW to RGB or RAW to JPEG are standard tasks, and now developers can get detailed info about expected performance for the chosen pipeline according to the table above. We haven't tested Jetson H.264 and H.265 encoders and decoders in that pipeline. As soon as H.264 and H.265 encoders are working at the hardware level, encoding can be done in parallel with CUDA code, so we should be able to get even better performance.
We've done the same kernel time measurements for NVIDIA GeForce and Quadro GPUs. Here you can get the document with the benchmarks.
Software for Jetson performance comparison
We've released the software for a GPU-based camera application on GitHub, and it's available to download both binaries and source codes for our gpu camera sample project. It's implemented for Windows 7/10, Linux Ubuntu 18.04 and L4T. Apart from a full image processing pipeline on GPU for still images from SSD and for live camera output, there are options for streaming and for glass-to-glass (G2G) measurements to evaluate real latency for camera systems on Jetson. The software currently works with machine vision cameras from XIMEA, Basler, JAI, Matrix Vision, Daheng Imaging, etc.
To check the performance of Fastvideo SDK on a laptop/desktop/server GPU without any programming, you can download Fast CinemaDNG Processor software with GUI for Windows or Linux. That software has a Performance Benchmarks window, and there you can see timing for each stage of image processing. This is a more sofisticated method of performance testing, because the image processing pipeline in that software can be quite advanced, and you can test any module you need. You can also perform various tests on images with different resolutions to see how much the performance depends on image size, content and other parameters.
Other blog posts from Fastvideo about Jetson hardware and software
Jetson Image Processing
Jetson Zero Copy
Jetson Nano Benchmarks on Fastvideo SDK
Jetson AGX Xavier performance benchmarks
JPEG2000 performance benchmarks on Jetson TX2
Remotely operated walking excavator on Jetson
Low latency H.264 streaming on Jetson TX2
Performance speedup for Jetson TX2 vs AGX Xavier
Source codes for GPU-Camera-Sample software on GitHub to connect USB3 and other cameras to Jetson
Original article see at: https://www.fastcompression.com/blog/jetson-benchmark-comparison.htm
Subscribe to our mail list: https://mailchi.mp/fb5491a63dff/fastcompression
0 notes
Text
Low latency H.264 streaming on Jetson TX2
Low latency H.264 streaming from Jetson TX2 to PC
Realtime remote control for any vision system is very important task which has a huge number of applications. People need to control remotely almost everything. To make it possible, we need to create a solution with minimum latency to ensure smooth video and instant feedback.
There are a lot of imaging systems which rely on small feedback time, like autonomous cars, hexacopters or drones, mobile robots that should be remotely controlled via wireless network, etc. Quite often these are multicamera systems, because just one camera can't be enough to get full info from controlling objects.

Fig.1. Multicamera system on Jetson TX2
So the task gets more complicated and we will consider a vision system which is based on Jetson TX2 with several cameras, connected directly to Jetson. That scenario is widespread and it can offer remote control over wireless connection.
Glass to Glass Video Latency Test for H264 RTSP Streaming
Low delay video streaming is a common task in many applications. Among these applications there are teleoperation scenarios such as controlling drones or telesurgery, virtual or augmented reality, autonomous control of dynamic processes using computer vision algorithms and neural networks which are applied to video in realtime. To evaluate the latency and the performance in such systems, it is important to be able to measure the glass-to-glass (G2G) delay for video acquisition and video transmission.
In general, standard glass to glass video latency test is important to evaluate real performance and latency of imaging system. This is actually the answer to the question about how fast it could be in real life in terms of latency. Glass-to-glass video latency, which is also called end-to-end (E2E) video delay, means the amount of time between the moment when the frame was captured and when it was displayed on the monitor. To be more precise, G2G is describing the time from when the photons of a visible event pass through the lens of the camera till the moment when that image is delivered to the glass of the monitor.
The G2G measurements are usually non-intrusive and they can be applied to a wide range of imaging systems. Furthermore, each video camera has a fixed frame rate, producing new images in constant time intervals. As we know, real world events are never synchronized to the camera frame rate and this is the way to make live realtime measurements, because real world events have to be triggered. That's why obtained G2G delay values are non-deterministic.

Fig.2. Low latency video processing
The idea of a simple glass-to-glass test is to show on the monitor two times: the current time and the capture time. This is how we can do that:
Get the current time on PC and output it to the monitor
Capture the image with displayed current time via camera
Send captured frame from the camera to Jetson
Image and Video processing on Jetson TX2
Video encoding to H.264 via NVENC
Video streaming over wireless network
Video acquisition on external PC
Video decoding on NVIDIA GPU via NVDEC
Video output to the monitor via OpenGL
Compare the current time and the capture time
Finally, we will see at the same monitor two images: one with the current time and the other with the capture time. The difference between them is the latency of the imaging system.
Here there are several issues at that simple approach that can influence on the final result:
OS and software timer latency on PC
Refresh rate of the monitor
Camera frame rate and exposure time
OS latency at Jetson L4T
Frame content and compression ratio
B-frames in H.264 are turned off
G2G video latency could be evaluated this way, though for some cases such an accuracy could not be sufficient. In these cases more sofisticated hardware could be utilized, but here we consider the current approach to be viable. Due to the above restrictions, we expect to get pretty wide timing interval for video latency.
All our tests will be based on NVIDIA Jetson TX2 System-on-Module
256 CUDA cores
Dual Denver Quad ARM® A57 CPU
To connect a camera to Jetson TX2, we need a carrier board. Here you can see a carrier board for NVIDIA Jetson TX2 module, specially designed by XIMEA to connect their PCIe and USB3 cameras of xiX / xiC / xiQ series.
xEC2 carrier board interfaces
4x PCIe X2G2 connectors for ribbon camera interfaces
1x PCIe X4G2 connectors for ribbon camera interfaces
2x USB3 connectors for ribbon camera interfaces
GPIO connector and GPIO DIP switches
Ethernet
HDMI
M.2 interface
USB3 Type-A connector
USB2 Micro-B connector
Jetson pinout
Power connector
Fan power connector
Wi-Fi antenna connectors are located on Jetson TX2 module

Fig.3. Jetson carrier board from XIMEA
Finally, up to eight XIMEA cameras can be connected to just one Jetson TX2
4x PCIe X2G2 cameras with ribbon camera interfaces
1x PCIe X4G2 camera with ribbon camera interfaces
2x USB 3.1 Gen1 cameras with ribbon camera interfaces
1x USB 3.1 Gen1 camera with standard USB Type A cable
The main idea is the following: one could create a multicamera system on Jetson by utilizing that XIMEA carrier board together with up to eight XIMEA cameras and software from MRTech. These are reliable solutions which have already been working in many imaging systems.
Software package
Linux for Tegra (L4T) operating system
CUDA-9
Fastvideo SDK for Jetson
XIMEA xiAPI with CamTool demo application
MRTech runtime application with implemented pipelines for all connected cameras
Application to control aperture and exposure for each camera

Fig.4. Fastvideo SDK for realtime image and video processing on NVIDIA GPU
Receiving station
RTSP streams from all cameras can be received by using VLC application on one of the devices such as MacBook with Mac OS, desktop or laptop with Windows or Linux OS, Apple devices such as iPhone, iPad, etc.
Full image processing pipeline on Jetson TX2 and Quadro P2000
Image acquisition from both cameras and zero-copy to Jetson TX2
Black level
White Balance
HQLI Demosaicing (the simplest one to get better performancce)
Export to YUV
H.264 encoding via NVENC
RTSP streaming to the external PC via wireless network
Video acquisition at external PC
H.264 video decoding via NVDEC on desktop GPU for both video streams
Show video streams at the same monitor via OpenGL
Benchmarks for one and two-camera systems
These are benchmarks for two XIMEA MX031CG cameras and desktop receiving station with NVIDIA Quadro P2000 GPU over Wi-Fi
Image sensor: Sony IMX252, 1/1.8", 2064×1544 resolution (3.2 MPix), 8-bit, global shutter, up to 218 fps
Camera frame rate 70 fps; 14 ms between frames for each camera
Exposure time: 1 ms
PCIe data transfer: 4 ms
Processing pipeline: 10 ms for one camera, 15 ms for two cameras
Network: 1 ms average
Display: 144 fps; 7 ms between frames
Measured glass-to-glass video latency
Full resolution, 1 camera: 35–66 ms, average/median 50 ms
Full resolution, 2 cameras: 50–68 ms, average/median 60 ms
1080p/720p ROI: decrease of ~5 ms, which is not measurable in the test because it's less than accuracy
The above method for G2G evaluation gives us reasonable, though approximate values for the latency of that imaging system. That latency also depends on complexity of video processing pipeline. The above benchmarks for G2G include video processing and video transmission. If you need to compare these results with any other setup, please take that into account.
There are more sofisticated methods for latency measurements which are utilizing light-emitting diode (LED) as a light source and a phototransistor as a light detector. Such a setup for latency measurements includes the blinking LED in the field of view of the camera as signal generator, and tape a photoelectric sensor to where the LED is shown on the display. The LED triggers an oscilloscope which also records the signals from the photoelectric sensor. This allows to extract the G2G delay. The analysis of the data could be done automatically with a microcontroller board. That method could allow to get G2G delay with better precision.
Original article see at: https://www.fastcompression.com/blog/low-latency-h264-streaming-from-jetson-tx2.htm
0 notes
Text
GPU software for camera applications
GPU Software for Camera Applications
Most of software for camera applications are working without intensive usage of GPU because quite often CPU performance is high enough to solve the task of image processing, especially for relatively small resolutions of image sensors. Contemporary CPUs are very powerful and they have many cores, so multithreaded application is the key for realtime processing for camera applications.
Now there are many machine vision and industrial cameras with high resolution image sensors and they generate a lot of data for processing. The following high resolution image sensors are very popular nowadays:

AMS CMV20000 (5120 × 3840, 20 MPix, global shutter)
On-Semi VITA 25K (5120 × 5120, 26 MPix, global shutter)
Kodak KAI-47051 CCD (8856 × 5280, 47 MPix, global shutter)
AMS CMV50000 (7920 × 6004, 48 MPix, global shutter)
Gpixel GMAX4651 (8424 × 6032, 51 MPix, global shutter)
Gpixel GMAX3265 (9344 × 7000, 65 MPix, global shutter)
Sony IMX461 (11656 × 8742, 101 MPix, rolling shutter)
Canon 120MXS (13272 × 9176, 122 MPix, rolling shutter)
Sony IMX411 (14192 × 10640, 151 MPix, rolling shutter)
If we try to process output stream at maximum frame rate and minimum latency from such image sensors, we can see that even very powerful multicore CPUs just can't meet realtime requirements and resulted latency is too big. To create CPU-based software for realtime image processing, software developers usually utilize simplified algorithms to be on time. Almost all high quality algorithms are slow even at multicore CPUs. The slowest algorithms for CPU are demosaicing, denoising, color grading, undistortion, resize, compression, etc.
There are quite a lot of different external interfaces at modern cameras: GigE, USB3, CameraLink, CoaXPress, 10G, 25G, Thunderbolt, PCIE, etc. Some of them have impressive bandwidth and it's done exactly to match data rate from high performance image sensors. New generations of image sensors offer higher resolutions and bigger frame rates, so the task of realtime processing is getting more complicated.
The same problem is even more hard to solve for realtime image processing at multiple camera systems. Image sensors may have not very high resolution, fps could be moderate or high, but total output stream from all these cameras could be significant. Multiple-PC hardware is not a good solution for such a task, though it could be a way out. Fast image processing is vitally important to cope with such streams in realtime.
Image Processing on FPGA
The first method to solve that problem is to use internal FPGA for realtime image processing. This is the solution for camera manufacturers, but not for system integrators, software developers or end users. In that case latency could be kept low, image processing performance is high, but usually FPGA-based algorithms offer low/middle image quality, the cost of development is high. That could be acceptable for some applications, especially for embedded vision solutions, but not always. The case with FPGA is hardware-based solution. It has many advantages, apart from image quality and ease/cost of development.
Realtime Image Processing on GPU
The second case is GPU-based image processing. NVIDIA company is offering full line of GPUs starting from mobile Jetson GPU to professional high performance Quadro/Tesla hardware. Image processing on GPU is very fast because such algorithms could be processed in parallel, which is a must to get high performance results. Usually different parts of an image could be considered as independent, so they could be processed at the same time. Such an approach gives significant acceleration for most of imaging algorithms and it's applicable to any camera.
As an example of high performance and high quality raw image processing we could consider Fast CinemaDNG Processor software which is doing all computations on NVIDIA GPU and its core is based on Fastvideo SDK engine. With that software we can get high quality image processing according to digital cinema workflow. One should note that Fast CinemaDNG Processor is offering image quality which is comparable to the results of raw processing at Raw Therapee or Adobe Camera Raw software, but much faster.

Below we consider the case of image processing on GPU with Fastvideo SDK on NVIDIA GPU. Usually the task of software development for machine vision or industrial camera is quite complicated. Nevertheless, there is interesting approach which could combine GPU-based SDK with standard camera application to implement fast and high quality image processing. These are two constituent parts for the solution:
Standard CPU-based camera SDK
Fast CinemaDNG Processor software on GPU (PRO version)
One could use standard capture application which is supplied with any camera SDK. That application is capturing images from the camera and writing these frames to a ring buffer in system memory. Then we can take each frame from that ring buffer and send it to GPU for further processing with Fast CinemaDNG Processor software. This is the way to combine two available solutions to get camera application with full image processing pipeline in realtime.
This is infographics for data flow in the application. Camera captures frames and sends them via external interface to PC. Then the software copies frames to GPU for image processing and later on collects processed frames, outputs them to monitor and stores them on SSD.

GPU-based image processing can be very fast and it could offer very high quality at the same time. On a good GPU the total performane could reach 1.5–2 GPix/s, though it strongly depends on complexity of image processing pipeline. Multiple GPU solutions could significanly improve the performance. This is actually the way to create the software for realtime processing at multicamera systems.
Which threads do we need at camera application?
CPU-based image processing software for any camera application is usually multithreaded. Different threads are working on specific tasks and such a parallelism allows us to meet realtime requirements at multicore CPU. For GPU-based software we can perform most of image processing tasks on GPU and finally we can get the following CPU threads at the software:
Image acquisition from the camera
CUDA thread which controls GPU-based image processing
Additional thread to run NVENC codec (h.264 compression) on GPU
Optional thread for AI on GPU Tensor cores
Display processed frames on the monitor via OpenGL
Several CPU threads to store raw or compressed images or video to SSD
Several CPU threads for reading and parsing RAW frames from SSD for offline processing
As soon as we have implemented most of the above threads in the Fast CinemaDNG Processor software, we can use it with any machine vision or industrial camera. We just need to take camera SDK and to build sample application which is capable of frame capture and data copy to external application. We've already done that for XIMEA high performance cameras and the solution is working well.
References
Ximea SDK
Fastvideo SDK for Image & Video Processing
Fast CinemaDNG Processor software (PRO version)
Original article see here: https://www.fastcompression.com/blog/gpu-software-for-camera-applications.htm
0 notes
Text
Jetson zero-copy for embedded applications
Jetson Zero-Copy for Embedded Applications
Jetson hardware platform from NVIDIA opens new opportunities for embedded applications. That mini supercomputer has just unbelievable set of hardware features together with stunning performance results. Powerful ARM processor, high performance internal GPU with CUDA and Tensor cores, various software libraries make it indispensable in embedded vision solutions.
What is Zero-Copy at NVIDIA Jetson?
Image acquisition stage is fundamental in every camera application. Usually, camera sends captured frames to system memory via external interface (GigE, USB3, CameraLink, CoaXPress, 10-GigE, Thunderbolt, PCIE, etc.). In high performance solutions we use GPU for further image processing, so we should copy these frames to GPU DRAM memory. This is the case for the conventional discrete GPU architecture (see Fig. 1). However, NVIDIA Jetson has integrated architecture. In Jetson hardware, CPU and GPU are placed on a single die, and they physically share the same system memory. Such architecture offers new opportunities for CPU-GPU communications, which are absent in discrete GPUs.

Fig.1. Discrete and Integrated GPU architectures
With integrated GPU the copy is obviously superfluous, since GPU use the same pool of physical memory as CPU. Still, we cannot simply ignore the copy in the general case, because software developers expect that writing to the source buffer on CPU will not affect data processing on GPU after that copy. That’s why we need a separate zero-copy scenario, when redundant copy can be avoided. In such scenario a data transfer over PCIE would only be used on systems with discrete GPU.
Zero-copy means that we don't need to spend any time to copy data from host to device over PCIE, as we always have to do on any discrete laptop/desktop/server GPU. Basically, this is the way of how integrated GPUcan take an advantage of DMA, shared memory and caches.
That idea about eliminating extra data copy in camera applications appears promising, but in order to discuss the underlying methods, we first need to understand the concept of pinned memory in CUDA.
What is Pinned Memory?
Pinned (page-locked) memory is allocated for the CPU and prevents OS to move or swap it out to disk. It can be allocated by using cudaMallocHost function instead of the conventional malloc. Pinned memory provides higher transfer speed for GPU and allows asynchronous copying. Once pinned, that part of memory becomes unavailable to the concurrent processes, effectively reducing the memory pool available to the other programs and OS.
CPU-GPU transfers via PCIE only occur using the DMA, which requires pinned buffers. But host (CPU) data allocations are pageable by default. So, when a data transfer from pageable host memory to device memory is invoked, the GPU driver must copy the host data to the pre-allocated pinned buffer and pass it to the DMA. We can avoid the excessive transfer between pageable and pinned host buffers by directly allocating our host arrays in pinned memory (see Fig. 2).

Fig.2. Copy from pageable memory and from pinned memory
To achieve zero-copy access in CUDA we always have to use “mapped” pinned buffers that are page-locked and also mapped into the CUDA address space.
Mapped, pinned memory (zero-copy) is useful in the following cases:
GPU is integrated with the host
GPU has not enough of its own DRAM memory for all the data
The data is loaded to GPU exactly once, but a kernel has a lot of other operations, and you want to hide memory transfer latencies through them
Communication between host and GPU, while kernel is still running
You want to get a cleaner code by avoiding explicit data transfer between host and device
Mapped, pinned memory (zero-copy) is not useful:
Excessive allocation of pinned memory could degrade host system performance
Data is read (or is read/written) multiple times, since zero-copy memory is not cached on GPU and data will be passed through PCIE multiple times, so the latency of access will be much worse compared to the global memory
What is Unified Memory?
Unified Memory in CUDA is a single memory address space accessible from any processor in a system (see Fig. 3). It is a hardware and software technology that allows allocating buffers that can be accessed from either CPU or GPU code without explicit memory copies.
While traditional (not unified) memory model has been able to give the best performance, it requires very careful management of GPU resources and predictable access patterns. Zero-copy model has provided fine-grained access to the system memory, but in discrete GPU systems the performance is limited by the PCIE, and that model doesn’t allow to take advantage of data locality. Unified memory combines the advantages of explicit copies and zero-copy access: it gives to each processor access to the system memory and automatically migrates the data on-demand so that all data accesses are fast. For Jetson it means avoiding of excessive copies as in the case of zero-copy memory.
In order to use Unified Memory you just need to replace malloc() calls with cudaMallocManaged(), which returns universal pointer accessible from either CPU or GPU. On Pascal GPUs (or newer) you’ll also get support of hardware page faulting (which ensures migration of only those memory pages, which are actually accessed) and concurrent access from multiple processors.

Fig.3. Unified memory (picture from https://devblogs.nvidia.com/unified-memory-cuda-beginners/)
On a 64-bit OS, where CUDA Unified Virtual Addressing (UVA) is in effect, there is no difference between pinned memory and zero-copy memory (i.e. pinned and mapped). This is because the UVA feature in CUDA causes all pinned allocations to be mapped by default.
Zero-Copy in Jetson Image Processing Applications
If we connect USB3 or PCIE camera to Jetson TX2 via USB/PCIE interface, we need to take into account that bandwidth of USB3 or PCIE interface is limited. Moreover, when using traditional memory access, a delay due to copy of captured images from CPU to GPU memory is unavoidable. But if we use zero-copy, that time is eventually hidden, so we get better performance and lower latency.
We have to admit that zero-copy is not the only way to hide host-to-device copy time and to improve the total latency of the system. Another possible approach is overlapping image copy and image processing in different threads or processes. It will boost the throughput, but it will not improve the latency. Moreover, that approach is feasible only in concurrent CUDA Streams, which means that we have to create at least two independent pipelines in two CPU threads or processes. Unfortunately, it's not always possible, because of the limited size of GPU DRAM memory.
One more way of reducing the cost of host-to-device transfer is the so-called Direct-GPU method, where data is sent directly from a camera driver to GPU via DMA. That approach requires driver modification, so this is the task for camera manufacturers, not for system integrators or third-party software developers.
To summarize, zero-copy approach is very useful for integrated GPU, and it makes sense to use it in the image processing workflow, particularly for embedded camera applications on Jetson. This is easy and efficient way to improve the performance and to decrease the latency. Below we consider a real camera application, which is quite popular.
Low-latency Jetson TX2 processing with live h264 RTSP streaming
Since Jetson is so small and so powerful, it seems natural to use it for remote control in various applications. We can connect camera to Jetson, perform all processing on it, and send the processed data over wireless connection to another PC. There are fair chances to do that really fast and with low latency on Jetson.
That solution has been implemented by MRTech company which is developing software for XIMEA cameras and NVIDIA Jetson. These are the key components of the solution:
MRTech software for low latency Jetson imaging system
XIMEA camera with carrier board
Fastvideo Image & Video Processing SDK for Jetson
Hardware features
Image sensor resolution: 1024×768, 8-bit bayer
Camera frame rate: 180 fps
Monitor refresh rate: 144 fps
Wireless network bandwidth: 10 Mbit/s
Jetson TX2 power consumption: 21 W
Image processing pipeline on Jetson TX2 and Quadro P2000
Image acquisition from camera and zero-copy to Jetson GPU
Black level
White Balance
HQLI Debayer
Export to YUV
H.264 encoding via NVENC
RTSP streaming to the main PC via wireless network
Stream acquisition at the main PC
Stream decoding via NVDEC on desktop GPU
Show image on the monitor via OpenGL
Glass-to-glass video latency
To check the latency of that solution, we performed so-called glass-to-glass (G2G) latency test. The idea is to get the current time with high precision, to show it on a monitor with high refresh rate and to capture monitor picture with external camera, which sends data to Jetson for processing and streaming. Finally, we need to show on the same monitor the time when the new processed frame is exposed. We will see on the same monitor those two time values, so that their difference corresponds to a real latency of the system.
Systematic error for such a method could be evaluated as half of camera exposure time plus half of monitor refresh time. In that case it's around (5 ms + 7 ms)/2 = 6 ms.
On that video you can see the setup and live view of that solution. Originally, Jetson was connected to the main PC via cable, but later on it was switched to a wireless connection with the main PC. You can stop video to check the time difference between frames and evaluate the latency. On that video the averaged latency was about 60 ms, and we can consider that as great result. It means that the idea of remote control is viable, so we will proceed with its further development.
P.S. Please note that this is just a sample application to show what could be done on NVIDIA Jetson and to evaluate actual latency in glass-to-glass test. Real use cases for two and more cameras could utilize any other image processing pipeline for your particular application. That solution could also be implemented for multi-camera systems.
youtube
Original article see here: https://www.fastcompression.com/blog/jetson-zero-copy.htm
0 notes