#JsonConvert.DeserializeObject
Explore tagged Tumblr posts
Visit Tumblr Blog
Explore Tumblr blogs with no restrictions, modern design and the best experience.
Last Seen Tumblr Blogs


Fun Fact
Tumblr has been providing a Korean-language service since 2013.
Text
How to convert base64 string format of excel file into DataTable form of data type using C#
How to convert base64 string format of excel file into DataTable form of data type using C#
In this article, We learn how to convert base64 string format of excel file into Data Table form of data type using C#. I will show how to do it, and just follow the steps clearly. For more updates please do Subscribe via Email: Type your email… Subscribe I encounter this task and make me sleepless during night because I can’t see any reference in other blog resources. Basically the logic…

View On WordPress
#Aspose#Aspose.Cells#Aspose.Cells.LoadOptions#Aspose.Cells.Worksheet#base46stringToDataTable#base64#C#Conversion of Base64String to Bytes#Conversion of JSON to Model object#Conversion of worksheet to datatable#Convert.FromBase64String#DataTable#JsonConvert.DeserializeObject#worksheet.Cells
0 notes
Text
Test our code with json
Test Driven Development (TDD) helps you to validate our code but something you need to check some result as json and it is not easy to find an easy way. After a couple of post on Stackoverflow, here I want to show my solution. Here some examples of TDD.
For my company I’m creating an Azure Functions with .NET Core 3.x to generate the invoices. I have to consider different scenarios and I want to create a test for that.
Scenario
I thought to create a function where I pass a list of lines for the invoice. In this function I have to check if there is any refund for the user. If so, I have to deduct the amount from the current invoice. If some money to refund are left, I have to create a new refund invoice.
public class InvoiceGeneratorResponse { public List<InvoiceGeneratorDetailResponse> Details { get; set; } public List<InvoiceGeneratorErrorResponse> Errors { get; set; } public List<InvoiceGeneratorNextInvoiceResponse> NextInvoice { get; set; } }
InvoiceGeneratorResponse is the result of my class where Details is the invoice list, Errors is the list of incomplete invoices and NextInvoice is the list of refund invoices I have to create.
Now, I want to create a bunch of tests to check every scenario. For that, I have to pass the list of rows to this function and check the result.
So, I was thinking to read the list of rows from a json file and convert it in a list to pass into the function. For the result I want to read another file, convert it in a list and compare the list from the file with the result from the function.
My implementation
In my solution, I created a new test project with NUnit test framework.
Visual Studio – Add new project – Test our code with json
After that, I want to test my code reading data from json files and check the result of a function with json. For that, I think I have to create a generic class in T to convert the json in a specific model. Pretty easy.
using Newtonsoft.Json; using System.IO; namespace PSC.Tests.Code { /// <summary> /// Class FileService. /// </summary> /// <typeparam name="T"></typeparam> public class FileService<T> where T : class { /// <summary> /// Gets the data. /// </summary> /// <param name="filename">The filename.</param> /// <returns>T.</returns> public T GetData(string filename) { var datasetJson = File.ReadAllText(filename); var dataset = JsonConvert.DeserializeObject<T>(datasetJson); return dataset; } } }
Compare json
First of all, I want to understand how to check the result of a function. Each function returns an object (model) and I want to compare this object with the result I expected.
To do this, I thought the easy way was to compare the result as a json with an object that I read from a file. So, I can test our code with json.
With FileService I read a json file and convert it in an object. I’m using the same function to read the input for a function.
But how to compare two jsons? I tried to create a new annotation for my test link in this post but I found quite difficult to change the logic with a complex object like a list of invoices. Also, I considered to use Microsoft Test because it is easy to pass some values as DataAnnotation. The problem with MSTest is that it is impossible to pass a complex object.
Then, standard approach. Code. The problem remains: how test our code with json? How to compare two jsons?
To easy solution I found is called FluentAssertions.Json. With this Nuget package, it is easy to compare to jsons and, in case of errors, having a nice idea where the errors is.

Test our code with json – FluentAssertions.Json
Now, my simple class to test my GenerateAndSaveInvoices function. In my project I created a folder called Data where I save all json files.
using FluentAssertions; using Newtonsoft.Json; using Newtonsoft.Json.Linq; using NUnit.Framework; using System; using System.Collections.Generic; using System.Linq; namespace PSC.Tests { public class MonthPaymentTests { private InvoiceMonthlyService _service; [SetUp] public void Setup() { _service = new InvoiceMonthlyService(null, null, null, null, null); } [Test] public void Check_Result_With_One_Organization_Simple() { List<Organisation> invoice = new FileService<List<Organisation>>().GetData("Data\\invoice-in-1.json"); InvoiceGeneratorResponse expected = new FileService<InvoiceGeneratorResponse>().GetData("Data\\invoice-out-1.json"); InvoiceGeneratorResponse response = _service.GenerateAndSaveInvoices(invoice.AsQueryable(), 3, Convert.ToDecimal(0.2), false); JToken jExpected = JToken.Parse(JsonConvert.SerializeObject(expected)); JToken jResponse = JToken.Parse(JsonConvert.SerializeObject(response)); jResponse.Should().BeEquivalentTo(jExpected); Assert.AreEqual(expected.NumberOfErrors, response.NumberOfErrors); Assert.AreEqual(expected.NumberOfInvoices, response.NumberOfInvoices); Assert.AreEqual(expected.NumberOfOrganisations, response.NumberOfOrganisations); Assert.AreEqual(expected.Total, response.Total); Assert.AreEqual(expected.TotalAmount, response.TotalAmount); Assert.AreEqual(expected.TotalTaxes, response.TotalTaxes); } }
The magic is in the line 29-32. Basically, the test reads 2 json files, one for the input and another for the output to compare. Then it calls the function to test and I pass the list of values from the first file.
Now, I have to create a JToken and for that I serialize the object and parse it. So, I can use FluentAssertions to check the difference in the json objects.
Happy coding!
The post Test our code with json appeared first on PureSourceCode.
from WordPress https://www.puresourcecode.com/dotnet/test-our-code-with-json/
0 notes
Text
Updating my ASP.NET podcast site to System.Text.Json from Newtonsoft.Json
Now that .NET Core 3.1 is LTS (Long Term Support) and will be supported for 3 years, it's the right time for me to update all my .NET Core 2.x sites to 3.1. It hasn't take long at all and the piece of mind is worth it. It's nice to get all these sites (in the Hanselman ecosystem LOL) onto the .NET Core 3.1 mainline.
While most of my sites working and running just fine - the upgrade was easy - there was an opportunity with the podcast site to move off the venerable Newtonsoft.Json library and move (upgrade?) to System.Text.Json. It's blessed by (and worked on by) James Newton-King so I don't feel bad. It's only a good thing. Json.NET has a lot of history and existed before .NET Standard, Span<T>, and existed in a world where .NET thought more about XML than JSON.
Now that JSON is essential, it was time that JSON be built into .NET itself and System.Text.Json also allows ASP.NET Core to existed without any compatibility issues given its historical dependency on Json.NET. (Although for back-compat reasons you can add Json.NET back with one like using AddJsonOptions if you like).
Everyone's usage of JSON is different so your mileage will depend on how much of Json.NET you used, how much custom code you wrote, and how deep your solution goes. My podcast site uses it to access a number of JSON files I have stored in Azure Storage, as well as to access 3rd party RESTful APIs that return JSON. My podcast site's "in memory database" is effectively a de-serialized JSON file.
I start by bringing in two namespaces, and removing Json.NET's reference and seeing if it compiles! Just rip that Band-Aid off fast and see if it hurts.
using System.Text.Json; using System.Text.Json.Serialization;
I use Json Serialization in Newtonsoft.Json and have talked before about how much I like C# Type Aliases. Since I used J as an alias for all my Attributes, that made this code easy to convert, and easy to read. Fortunately things like JsonIgnore didn't have their names changed so the namespace was all that was needed there.
NOTE: The commented out part in these snippets is the Newtonsoft bit so you can see Before and After
//using J = Newtonsoft.Json.JsonPropertyAttribute; using J = System.Text.Json.Serialization.JsonPropertyNameAttribute; /* SNIP */ public partial class Sponsor { [J("id")] public int Id { get; set; } [J("name")] public string Name { get; set; } [J("url")] public Uri Url { get; set; } [J("image")] public Uri Image { get; set; } }
I was using Newtonsoft's JsonConvert, so I changed that DeserializeObject call like this:
//public static v2ShowsAPIResult FromJson(string json) => JsonConvert.DeserializeObject<v2ShowsAPIResult>(json, Converter.Settings); public static v2ShowsAPIResult FromJson(string json) => JsonSerializer.Deserialize<v2ShowsAPIResult>(json);
In other classes some of the changes weren't stylistically the way I'd like them (as an SDK designer) but these things are all arguable either way.
For example, ReadAsAsync<T> is a super useful extension method that has hung off of HttpContent for many years, and it's gone in .NET 3.x. It was an extension that came along for the write inside Microsoft.AspNet.WebApi.Client, but it would bring Newtonsoft.Json back along for the ride.
In short, this Before becomes this After which isn't super pretty.
return await JsonSerializer.DeserializeAsync<List<Sponsor>>(await res.Content.ReadAsStreamAsync()); //return await res.Content.ReadAsAsync<List<Sponsor>>();
But one way to fix this (if this kind of use of ReadAsAsync is spread all over your app) is to make your own extension class:
public static class HttpContentExtensions { public static async Task<T> ReadAsAsync<T>(this HttpContent content) => await JsonSerializer.DeserializeAsync<T>(await content.ReadAsStreamAsync()); }
My calls to JsonConvert.Serialize turned into JsonSerializer.Serialize:
//public static string ToJson(this List<Sponsor> self) => JsonConvert.SerializeObject(self); public static string ToJson(this List<Sponsor> self) => JsonSerializer.Serialize(self);
And the reverse of course with JsonSerializer.Deserialize:
//public static Dictionary<string, Shows2Sponsor> FromJson(string json) => JsonConvert.DeserializeObject<Dictionary<string, Shows2Sponsor>>(json); public static Dictionary<string, Shows2Sponsor> FromJson(string json) => JsonSerializer.Deserialize<Dictionary<string, Shows2Sponsor>>(json);
All in all, far easier than I thought. How have YOU found System.Text.Json to work in your apps?
Sponsor: When DevOps teams focus on fixing new flaws first, they can add to mounting security debt. Veracode’s 2019 SOSS X report spotlights how developers can reduce fix rate times by 72% with frequent scans.
© 2019 Scott Hanselman. All rights reserved.


Updating my ASP.NET podcast site to System.Text.Json from Newtonsoft.Json published first on https://deskbysnafu.tumblr.com/
0 notes
Text
Updating my ASP.NET podcast site to System.Text.Json from Newtonsoft.Json
Now that .NET Core 3.1 is LTS (Long Term Support) and will be supported for 3 years, it's the right time for me to update all my .NET Core 2.x sites to 3.1. It hasn't take long at all and the piece of mind is worth it. It's nice to get all these sites (in the Hanselman ecosystem LOL) onto the .NET Core 3.1 mainline.
While most of my sites working and running just fine - the upgrade was easy - there was an opportunity with the podcast site to move off the venerable Newtonsoft.Json library and move (upgrade?) to System.Text.Json. It's blessed by (and worked on by) James Newton-King so I don't feel bad. It's only a good thing. Json.NET has a lot of history and existed before .NET Standard, Span<T>, and existed in a world where .NET thought more about XML than JSON.
Now that JSON is essential, it was time that JSON be built into .NET itself and System.Text.Json also allows ASP.NET Core to existed without any compatibility issues given its historical dependency on Json.NET. (Although for back-compat reasons you can add Json.NET back with one like using AddJsonOptions if you like).
Everyone's usage of JSON is different so your mileage will depend on how much of Json.NET you used, how much custom code you wrote, and how deep your solution goes. My podcast site uses it to access a number of JSON files I have stored in Azure Storage, as well as to access 3rd party RESTful APIs that return JSON. My podcast site's "in memory database" is effectively a de-serialized JSON file.
I start by bringing in two namespaces, and removing Json.NET's reference and seeing if it compiles! Just rip that Band-Aid off fast and see if it hurts.
using System.Text.Json; using System.Text.Json.Serialization;
I use Json Serialization in Newtonsoft.Json and have talked before about how much I like C# Type Aliases. Since I used J as an alias for all my Attributes, that made this code easy to convert, and easy to read. Fortunately things like JsonIgnore didn't have their names changed so the namespace was all that was needed there.
NOTE: The commented out part in these snippets is the Newtonsoft bit so you can see Before and After
//using J = Newtonsoft.Json.JsonPropertyAttribute; using J = System.Text.Json.Serialization.JsonPropertyNameAttribute; /* SNIP */ public partial class Sponsor { [J("id")] public int Id { get; set; } [J("name")] public string Name { get; set; } [J("url")] public Uri Url { get; set; } [J("image")] public Uri Image { get; set; } }
I was using Newtonsoft's JsonConvert, so I changed that DeserializeObject call like this:
//public static v2ShowsAPIResult FromJson(string json) => JsonConvert.DeserializeObject<v2ShowsAPIResult>(json, Converter.Settings); public static v2ShowsAPIResult FromJson(string json) => JsonSerializer.Deserialize<v2ShowsAPIResult>(json);
In other classes some of the changes weren't stylistically the way I'd like them (as an SDK designer) but these things are all arguable either way.
For example, ReadAsAsync<T> is a super useful extension method that has hung off of HttpContent for many years, and it's gone in .NET 3.x. It was an extension that came along for the write inside Microsoft.AspNet.WebApi.Client, but it would bring Newtonsoft.Json back along for the ride.
In short, this Before becomes this After which isn't super pretty.
return await JsonSerializer.DeserializeAsync<List<Sponsor>>(await res.Content.ReadAsStreamAsync()); //return await res.Content.ReadAsAsync<List<Sponsor>>();
But one way to fix this (if this kind of use of ReadAsAsync is spread all over your app) is to make your own extension class:
public static class HttpContentExtensions { public static async Task<T> ReadAsAsync<T>(this HttpContent content) => await JsonSerializer.DeserializeAsync<T>(await content.ReadAsStreamAsync()); }
My calls to JsonConvert.Serialize turned into JsonSerializer.Serialize:
//public static string ToJson(this List<Sponsor> self) => JsonConvert.SerializeObject(self); public static string ToJson(this List<Sponsor> self) => JsonSerializer.Serialize(self);
And the reverse of course with JsonSerializer.Deserialize:
//public static Dictionary<string, Shows2Sponsor> FromJson(string json) => JsonConvert.DeserializeObject<Dictionary<string, Shows2Sponsor>>(json); public static Dictionary<string, Shows2Sponsor> FromJson(string json) => JsonSerializer.Deserialize<Dictionary<string, Shows2Sponsor>>(json);
All in all, far easier than I thought. How have YOU found System.Text.Json to work in your apps?
Sponsor: When DevOps teams focus on fixing new flaws first, they can add to mounting security debt. Veracode’s 2019 SOSS X report spotlights how developers can reduce fix rate times by 72% with frequent scans.
© 2019 Scott Hanselman. All rights reserved.


Updating my ASP.NET podcast site to System.Text.Json from Newtonsoft.Json published first on http://7elementswd.tumblr.com/
0 notes
Text
Headless CMS and Decoupled CMS in .NET Core
I'm sure I'll miss some, so if I do, please sound off in the comments and I'll update this post over the next week or so!
Lately I've been noticing a lot of "Headless" CMSs (Content Management System). A ton, in fact. I wanted to explore this concept and see if it's a fad or if it's really something useful.
Given the rise of clean RESTful APIs has come the rise of Headless CMS systems. We've all evaluated CMS systems (ones that included both front- and back-ends) and found the front-end wanting. Perhaps it lacks flexibility OR it's way too flexible and overwhelming. In fact, when I wrote my podcast website I considered a CMS but decided it felt too heavy for just a small site.
A Headless CMS is a back-end only content management system (CMS) built from the ground up as a content repository that makes content accessible via a RESTful API for display on any device.
I could start with a database but what if I started with a CMS that was just a backend - a headless CMS. I'll handle the front end, and it'll handle the persistence.
Here's what I found when exploring .NET Core-based Headless CMSs. One thing worth noting, is that given Docker containers and the ease with which we can deploy hybrid systems, some of these solutions have .NET Core front-ends and "who cares, it returns JSON" for the back-end!
Lynicon
Lyncicon is literally implemented as a NuGet Library! It stores its data as structured JSON. It's built on top of ASP.NET Core and uses MVC concepts and architecture.
It does include a front-end for administration but it's not required. It will return HTML or JSON depending on what HTTP headers are sent in. This means you can easily use it as the back-end for your Angular or existing SPA apps.
Lyncion is largely open source at https://github.com/jamesej/lyniconanc. If you want to take it to the next level there's a small fee that gives you updated searching, publishing, and caching modules.
ButterCMS
ButterCMS is an API-based CMS that seamlessly integrates with ASP.NET applications. It has an SDK that drops into ASP.NET Core and also returns data as JSON. Pulling the data out and showing it in a few is easy.
public class CaseStudyController : Controller { private ButterCMSClient Client; private static string _apiToken = ""; public CaseStudyController() { Client = new ButterCMSClient(_apiToken); } [Route("customers/{slug}")] public async Task<ActionResult> ShowCaseStudy(string slug) { butterClient.ListPageAsync() var json = await Client.ListPageAsync("customer_case_study", slug) dynamic page = ((dynamic)JsonConvert.DeserializeObject(json)).data.fields; ViewBag.SeoTitle = page.seo_title; ViewBag.FacebookTitle = page.facebook_open_graph_title; ViewBag.Headline = page.headline; ViewBag.CustomerLogo = page.customer_logo; ViewBag.Testimonial = page.testimonial; return View("Location"); } }
Then of course output into Razor (or putting all of this into a RazorPage) is simple:
<html> <head> <title>@ViewBag.SeoTitle</title> <meta property="og:title" content="@ViewBag.FacebookTitle" /> </head> <body> <h1>@ViewBag.Headline</h1> <img width="100%" src="@ViewBag.CustomerLogo"> <p>@ViewBag.Testimonial</p> </body> </html>
Butter is a little different (and somewhat unusual) in that their backend API is a SaaS (Software as a Service) and they host it. They then have SDKs for lots of platforms including .NET Core. The backend is not open source while the front-end is https://github.com/ButterCMS/buttercms-csharp.
Piranha CMS
Piranha CMS is built on ASP.NET Core and is open source on GitHub. It's also totally package-based using NuGet and can be easily started up with a dotnet new template like this:
dotnet new -i Piranha.BasicWeb.CSharp dotnet new piranha dotnet restore dotnet run
It even includes a new Blog template that includes Bootstrap 4.0 and is all set for customization. It does include optional lightweight front-end but you can use those as guidelines to create your own client code. One nice touch is that Piranha also images image resizing and cropping.
Umbraco Headless
The main ASP.NET website currently uses Umbraco as its CMS. Umbraco is a well-known open source CMS that will soon include a Headless option for more flexibility. The open source code for Umbraco is up here https://github.com/umbraco.
Orchard Core
Orchard is a CMS with a very strong community and fantastic documentation. Orchard Core is a redevelopment of Orchard using open source ASP.NET Core. While it's not "headless" it is using a Decoupled Architecture. Nothing would prevent you from removing the UI and presenting the content with your own front-end. It's also cross-platform and container friendly.
Squidex
"Squidex is an open source headless CMS and content management hub. In contrast to a traditional CMS Squidex provides a rich API with OData filter and Swagger definitions." Squidex is build with ASP.NET Core and the CQRS pattern and works with both Windows and Linux on today's browsers.
Squidex is open source with excellent docs at https://docs.squidex.io. Docs are at https://docs.squidex.io. They are also working on a hosted version you can play with here https://cloud.squidex.io. Samples on how to consume it are here https://github.com/Squidex/squidex-samples.
The consumption is super clean:
[Route("/{slug},{id}/")] public async Task<IActionResult> Post(string slug, string id) { var post = await apiClient.GetBlogPostAsync(id); var vm = new PostVM { Post = post }; return View(vm); }
And then the View:
@model PostVM @{ ViewData["Title"] = Model.Post.Data.Title; } <div> <h2>@Model.Post.Data.Title</h2> @Html.Raw(Model.Post.Data.Text) </div>
What .NET Core Headless CMSs did I miss? Let me know.
*Photo "headless" by Wendy used under CC https://flic.kr/p/HkESxW
Sponsor: Telerik DevCraftTelerik DevCraft is the comprehensive suite of .NET and JavaScript components and productivity tools developers use to build high-performant, modern web, mobile, desktop apps and chatbots. Try it!
© 2018 Scott Hanselman. All rights reserved.


0 notes
Text
Cognitive Services APIs: Language
In the last post, you saw how AI is used to turn speech into text through the Cognitive Services Speech APIs. Once sounds have been converted into written text, they still have to be distilled for their meaning. Human language, however, is rich in ambiguities and understanding a sentence correctly can sometimes be extremely difficult, even for experienced humans. We have multiple ways to say the same thing (morning star and evening star both denote the planet Venus), while the same sentence can have multiple meanings (‘I just shot an elephant in my pajamas’).
The Language APIs attack the problem of meaning from many different angles. There isn’t enough time at the moment to go into all of them in depth, but here’s a quick overview so know what is possible when using the six Cognitive Services Language APIs …
Bing Spell Check cleans up not only misspellings, but also recognizes slang, understands homonyms and fixes bad word breaks.
Microsoft Translator API, built on Deep Neural Networks, can do speech translation for 9 supported languages and text translations between 60 languages.
Web Language Model API uses a large reservoir of data about language usage on the web to make predictions like: how to insert word breaks in a run-on sentence (or a hashtag or URL), the likelihood that a sequence of words would appear together and the word most likely to follow after a given word sequence (sentence completion).
Linguistic Analysis basically parses text for you into sentences, then into parts-of-speech (nouns, verbs, adverbs, etc.), and finally into phrases (meaningful groupings of words such as prepositional phrases, relative clauses, subordinate clauses).
Text Analytics will sift through a block of text to determine the language it is written in (it recognizes 160), key phrases and overall sentiment (pure negative is 0 and absolutely positive is 1).
Language Understanding Intelligent Service (LUIS) provides a quick and easy way to determine what your users want by parsing sentences for entities (nouns) and intents (verbs), which can then be passed to appropriate services for fulfillment. For instance, “I want to hear a little night music” could open up a preferred music streaming service and commence playing Mozart. LUIS can be used with bots and speech-driven applications.
That’s the mile-high overview. Let’s now take a closer look at the last two Language APIs in this list.
Digging into Text Analytics
The Cognitive Services Text Analytics API is designed to do certain things very well, like evaluating web page reviews and comments. Many possibilities are opened up by this simple scenario. For instance, you could use this basic functionality to evaluate opening passages of famous novels. The REST interface is straight-forward. You pass a block of text to the service and request that Text Analytics return either the key phrases, the language the block of text is written in, or a sentiment score from 0 to 1 indicating whether the passage is negative in tone or positive.
The user interface for this app is going to be pretty simple. You want a TextBox for the text you need to have analyzed, a ListBox to hold the key phrases and two TextBlocks to display the language and sentiment score. And, of course, you need a Button to fire the whole thing off with a call to the Text Analytics service endpoint.
When the Analyze button is clicked, the app will use the HttpClient class to build a REST call to the service and retrieve, one at a time, the key phrases, the language and the sentiment. The sample code below uses a helper method, CallEndpoint, to construct the request. You’ll want to have a good JSON deserializer like Newtonsoft’s Json.NET (which is available as a NuGet package) to make it easier to parse the returned messages. Also, be sure to request your own subscription key to use Text Analytics.
readonly string _subscriptionKey = "xxxxxx1a89554dd493177b8f64xxxxxx"; readonly string _baseUrl = "http://ift.tt/2lRrc3j;; static async Task<String> CallEndpoint(HttpClient client, string uri, byte[] byteData) { using (var content = new ByteArrayContent(byteData)) { content.Headers.ContentType = new MediaTypeHeaderValue("application/json"); var response = await client.PostAsync(uri, content); return await response.Content.ReadAsStringAsync(); } } private async void btnAnalyze_Click(object sender, RoutedEventArgs e) { using (var client = new HttpClient()) { client.BaseAddress = new Uri(_baseUrl); // Request headers client.DefaultRequestHeaders.Add("Ocp-Apim-Subscription-Key", _subscriptionKey); client.DefaultRequestHeaders.Accept.Add(new MediaTypeWithQualityHeaderValue("application/json")); // Build request body string textToAnalyze = myTextBox.Text; byte[] byteData = Encoding.UTF8.GetBytes("{"documents":[" + "{"id":"1","text":"" + textToAnalyze + ""},]}"); // Detect key phrases: var uri = "text/analytics/v2.0/keyPhrases"; var response = await CallEndpoint(client, uri, byteData); var keyPhrases = JsonConvert.DeserializeObject<KeyPhrases>(response); // Detect just one language: var queryString = "numberOfLanguagesToDetect=1"; uri = "text/analytics/v2.0/languages?" + queryString; response = await CallEndpoint(client, uri, byteData); var detectedLanguages = JsonConvert.DeserializeObject<LanguageArray>(response); // Detect sentiment: uri = "text/analytics/v2.0/sentiment"; response = await CallEndpoint(client, uri, byteData); var sentiment = JsonConvert.DeserializeObject<Sentiments>(response); DisplayReturnValues(keyPhrases, detectedLanguages, sentiment); } }
Remarkably, this is all the code you really need to access the rich functionality of the Text Analytics API. The only things left out are the class definitions for KeyPhrases, LanguageArray and Sentiment to economize on space, and you should be able to reconstruct these yourself from the returned JSON strings.
According to Text Analytics, the opening to James Joyce’s Ulysses (0.93 sentiment) is much more positive than the opening to Charles Dickens’ A Tale of Two Cities (0.67). You don’t have to use this just for evaluating the mood of famous opening passages, however. You could also paste in posts from your favorite social network. In fact, you can search for social media related to a certain topic of interest and find out what the average sentiment is regarding it.
You can probably see where we’re going with this. If you are running a social media campaign, you could use Text Analytics to do a qualitative evaluation of the campaign based on how the audience responds. You could even run tests to see if changes to the campaign will cause the audience’s mood to shift.
Using LUIS to figure out what your user wants
LUIS lets you build language intelligence into your speech driven apps. Based on things that your user might say, LUIS attempts to parse its statements to figure out the Intents behind the statement (what your user wants to do) and also the Entities involved in your user’s desire. For instance, if your app is for making travel arrangements, the Intents you are interested in are booking and cancellation, while the Entities you care about are travel dates and number of passengers. For a music playing app, the Intents you should be interested in are playing and pausing while the Entities you care about are particular songs.
In order to use LUIS, you first need to sign in through the LUIS website and either use a Cortana pre-built app or build a new app of your own. The pre-built apps are pretty extensive and for a simple language understanding task like evaluating the phrase “Play me some Mozart,” it has no problem identifying both the intent and the entity involved.
{ "query": "play me some mozart", "intents": [ { "intent": "builtin.intent.ondevice.play_music" } ], "entities": [ { "entity": "mozart", "type": "builtin.ondevice.music_artist_name" } ] }
If your app does music streaming, this quick call to Cognitive Services provides all the information you need to fulfill your user’s wish. A full list of pre-built applications is available in the LUIS.ai documentation. To learn more about building applications with custom Intents and Entities, follow through these training videos.
Wrapping Up
Cognitive Services provides some remarkable machine learning-based tools to help you determine meaning and intent based on human utterances, whether these utterances come from an app user talking into his or her device or someone providing feedback on social media. The following links will help you discover more about the capabilities the Cognitive Services Language APIs put at your disposal.
LUIS tutorial
Understanding natural language with LUIS
Speech driven application with LUIS
Text analytics quick start
Microsoft Translator samples
from DIYS http://ift.tt/2lReuBP
0 notes
Text
Create Azure Function in C# Script and Service Bus
Azure Function are very popular now. I explain how to create Azure Function with F# with Visual Studio. Now, I want to explain how to use the Azure Portal and create inline an Azure Function with C# Script and reading and writing a Service Bus Queue.
With this post, I want to cover a simple scenario: I want to create an Azure Function that it is triggered with a message in a Service Bus Queue, convert the body of the message in another object and send to another queue the result.
Service Bus Queue
This part is quite straightforward. In your Azure Portal, create a new Service Bus. In this example, my bad, the name of the bus is enricobus. Then, create two queues: message-in and message-out.
In message-in I send the message to trigger the function whereas in message-out the function will put a message in the queue after changing the original message.
Now, the Service Bus and the Queues are ready to use. Azure shows an overview of the Service Bus like in the following image.

An example of Service Bus Queue
To explore this brand-new Service Bus, I download Service Bus Explorer from Github, a really good project. If you don’t want to source code, the installer is here.

Service Bus Explorer
Then I have to connect Service Bus Explorer with the Service Bus. For the Service Bus page, on the left, there is an option called “Shared access policies“: click there and click on “RootManageSharedAccessKey“. Now, copy the “Primary Connection String“.
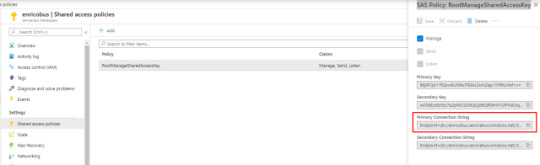
Service Bus: SAS Policy: RootManageSharedAccessKey
In Service Bus Explore, click on File > Connect. Paste the “Primary Connection String” in the connection string textbox and then press Ok.

Service Bus Explorer: connect
Finally, I find my queues and I browse them.
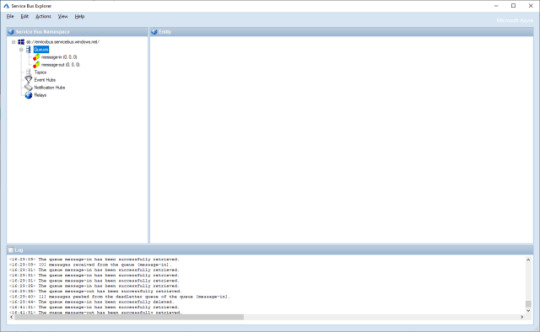
Service Bus Explorer
First thing to do is to send a message to the message-in in Service Bus to test later the Azure Function with C# Script. Right click on message-in under Queues and click “Send Messages“.

Send Messages with Service Bus Explorer
Definitely, I’m a bit lazy and I use a very easy json. Copy this json and paste it in the Message Text and press Send.
{ "PersonName": "Enrico", "Title": "Mr" }

Send a message with Service Bus
In the Log I see the message is posted successfully in the queue. As a double check for me, I see there is one message in the message-in queue. First step done!
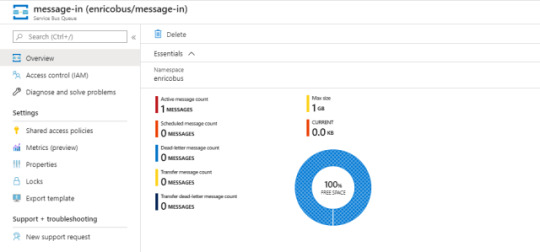
There is a message in the queue
Add a new Azure Function
I can start to create a new Azure Function in the portal. Nothing really exciting in this part: follow the wizard. I created a function called fnzinout2020. Now, what I see is the following screen:

Create a new Azure Function
Finally, I can start to create the Azure Function I wanted with C# Script and Service Bus. Click on the + on the right of Functions option. In the next screen, choose “Azure Service Bus Queue trigger“.

New function with Azure Service Bus Queue trigger
So, I can define some parameters for this function:
name of the function
Azure Service Bus Trigger
Service Bus Connection (select one from the dropdown list)
Queue name replace the default one with message-in
Then, click Create. Function create and, probably, it already has consumed the message in the queue.

Monitor
It is easy to verify if the function started already, I expand the function details and I find Monitor. Ok, in the following image I cheat a bit just because I want to show you that here there are all runs of your function and a bit more (I’ll tell you in a moment).

Azure Function Monitor
Integrate
It is the moment to add the output to out function. Now, click on Integrate on the same menu than before. As in the following screenshot, Integrate page has 3 sections:
Trigger
Inputs
Outputs
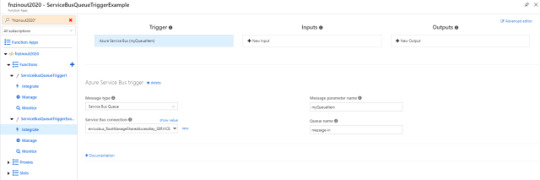
Integrate in Azure Function: Trigger
Trigger is the Service Bus as I selected before. Input is to select other source for your data but I don’t need it now. Output is what I look for. Click on + New Output and then select Azure Service Bus. Click Select.
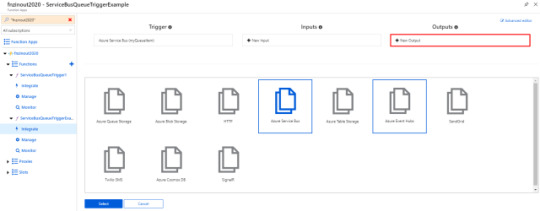
Integrate Output in Azure Function
In the new screen I have to choose:
Message type: type of Service Bus message, either Queues or Topics
Message parameter name: the name used to identify this binding in your code
Service Bus connection: the name of the app setting containing your Service Bus connection string. The connection string must have Send rights. Select one connection from the dropdown list.
Queue name: The queue to which the message will be sent
For this example, I use the following data:
Message type: I choose Service Bus Queue.
Message parameter name: I use outputSbMsg.
Queue name: I type message-out.
Double check and press Save.

Azure Service Bus output
Inspect Azure Function files
I inspect the files for this function with the tab on the right. I see two files:
function.json
fun.csx
It is possible to add more files such as HOST.json but I won’t explain how, look this post.
In a script function directory, there should be a companion function.json file that contains the configuration metadata for the function. A function can only have a single trigger binding, and can have multiple input/output bindings. The file looks like:
function.json
{ "bindings": [ { "name": "myQueueItem", "type": "serviceBusTrigger", "direction": "in", "queueName": "message-in", "connection": "enricobus_RootManageSharedAccessKey_SERVICEBUS" }, { "type": "serviceBus", "connection": "enricobus_RootManageSharedAccessKey_SERVICEBUS", "name": "outputSbMsg", "queueName": "message-out", "direction": "out" } ], "disabled": false }
For more details about this file and its schema, take a look to the Microsoft documentation. I notice the json file is easy to understand. What I care more now is the name of the bindings, myQueueItem and outputSbMsg.
I have to use those names in the signature of the function if I want to receive and send messages from and to the Service Bus. myQueueItem is already in the signature because the wizard put it there.

Azure Function View files
Finally, this code
Just for test, in my Azure Function with C# script I want to read the body of the message on message-in from Service Bus, read and convert this body and push a new json in the message-out.
First, I have to define the class for the incoming json and the result. User is the class of the message in the message-in, NewUser is the class for the message I want to send.
public class User { public string PersonName { get; set; } public string Title { get; set; } } public class NewUser { public string Name { get; set; } public string Title { get; set; } }
After that, I have to change the signature of the Azure Function adding the outputSbMsg for using the output Service Bus.
public static void Run(string myQueueItem, ILogger log, ICollector<string> outputSbMsg) { }
In ILogger the Azure Function injects the logger that we can use. What I added is ICollector<string> outputSbMsg. This represents the output in my function. So, I can use the Service Bus to send messages.
Next, I need to import in some way Newtonsoft.Json for converting the string in a json. At the very top of the function, I add this code:
#r "Newtonsoft.Json" using Newtonsoft.Json;
With NewtonSoft I can deserialize the message in a json and, also, I want to show in the log what the function has received from the Service Bus. I add the following code for that:
var user = JsonConvert.DeserializeObject<User>(myQueueItem); log.LogInformation($"Body: {user}");
Nothing particular exciting: I convert the body of the message in myQueueItem in a User object. Then, I’m going to create a NewUser with the User object and convert it in a string.
var newBody = new NewUser() { Name = user.PersonName, Title = user.Title }; var json = JsonConvert.SerializeObject(newBody);
Finally, I have to send a message to the message-out queue with the NewUser in the body. For this reason, I create a small function called SendMessages.
static void SendMessages(string message, ILogger log, ICollector<string> outputSbQueue) { log.LogInformation("About to iterate messages"); outputSbQueue.Add(message.ToString()); log.LogInformation($"Send to the queue: {message}"); }
Now I can run the function. And it is working!
run.csx
#r "Newtonsoft.Json" using System; using System.Threading.Tasks; using Newtonsoft.Json; public static void Run(string myQueueItem, ILogger log, ICollector<string> outputSbMsg) { log.LogInformation($"C# ServiceBus queue trigger function processed message: {myQueueItem}"); var user = JsonConvert.DeserializeObject<User>(myQueueItem); log.LogInformation($"Body: {user}"); var newBody = new NewUser() { Name = user.PersonName, Title = user.Title }; var json = JsonConvert.SerializeObject(newBody); log.LogInformation($"New body: {json}"); SendMessages(json, log, outputSbMsg); } static void SendMessages(string message, ILogger log, ICollector<string> outputSbQueue) { log.LogInformation("About to iterate messages"); outputSbQueue.Add(message.ToString()); log.LogInformation($"Send to the queue: {message}"); } public class User { public string PersonName { get; set; } public string Title { get; set; } } public class NewUser { public string Name { get; set; } public string Title { get; set; } }
One last look at the Monitor. If I click on a line, I have all details step by step: this is a mix between my log and Azure Function own log.
Important note: the log is not always in a chronological order. If the execution of the Azure Function is fast, the log is mixed up because it is sorted by date time.
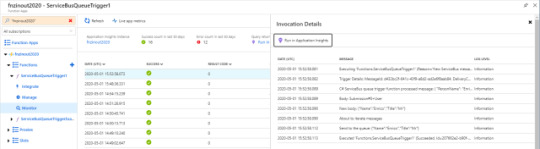
Azure Function Invocation Details
The post Create Azure Function in C# Script and Service Bus appeared first on PureSourceCode.
from WordPress https://www.puresourcecode.com/dotnet/azure/azure-function-csharp-script-service-bus/
0 notes