#csharp-script
Explore tagged Tumblr posts
Visit Tumblr Blog
Explore Tumblr blogs with no restrictions, modern design and the best experience.
Last Seen Tumblr Blogs


Fun Fact
If you dial 1-866-584-6757, you can leave an audio post for your followers.
Text
when i got into csharp i remember being so hateful towards cpp for having all those '>>'-s and '->'-s and '#'-s but now ??? this is fucking magic isnt it ??? idk we had to write a little cpp script just to use assembler inserts, they're not bringing it back and damn i missed this quirky syntax. fuck dots i want to use runes in my code like a wizard !
6 notes
·
View notes
Text
Unity Game Development: A Beginner's Guide to Building Your First Game
Introduction
Unity is one of the most popular game engines in the world, and for good reason. It’s versatile, powerful, and accessible to both beginners and seasoned developers. Whether you’re dreaming of creating the next indie hit or just want to dive into game development as a hobby, Unity is an excellent place to start. In this blog, we’ll walk you through the basics of Unity game development, share tips for getting started, and explore why Unity is such a beloved tool for game creators.

Why Choose Unity?
Before diving into the technical aspects, let’s talk about why Unity is such a great choice for game development:
1. Cross-Platform Support: Unity allows you to build games for multiple platforms, including PC, consoles, mobile devices, and even AR/VR. Write once, deploy everywhere! 2. User-Friendly Interface: Unity’s drag-and-drop interface and visual editor make it easy for beginners to get started. 3. Strong Community: With millions of users, Unity has a vast community of developers who share tutorials, assets, and solutions to common problems. 4. Asset Store: Unity’s Asset Store is a treasure trove of pre-made assets, scripts, and tools that can save you time and effort. 5. Powerful Scripting: Unity uses C#, a beginner-friendly programming language, for scripting. It’s both powerful and easy to learn.
Getting Started with Unity
1.Download and Install Unity Head over to [Unity’s official website](https://unity.com) and download Unity Hub. Use Unity Hub to install the latest version of the Unity Editor. You can also install specific versions if needed.
2.Learn the Interface Familiarize yourself with Unity’s interface. Key panels include: Scene View: Where you design and build your game world. Game View: A preview of what your game will look like when played. Hierarchy: A list of all objects in your current scene. Inspector: Displays properties of selected objects. Project Window: Where all your assets (scripts, textures, models, etc.) are stored.
3. Create Your First Project — Open Unity Hub and create a new project. Choose a template (e.g., 3D, 2D, or VR) based on the type of game you want to make. Name your project and click “Create.”
Building Your First Game
Let’s create a simple 2D platformer to get you started:
1. Set Up the Scene Import 2D assets (like a character sprite and platforms) into your project. Drag and drop your character sprite into the Scene View to create a GameObject. Add a Rigidbody2D component to your character to enable physics.
2. Add Movement Script Create a new C# script (e.g., `PlayerController`) and attach it to your character. Write a simple script to handle movement: ```csharp using UnityEngine;
public class PlayerController : MonoBehaviour { public float speed = 5f;
void Update() { float move = Input.GetAxis(“Horizontal”) * speed * Time.deltaTime; transform.Translate(move, 0, 0); } } ``` This script allows the player to move left and right using the arrow keys.
3. Add Platforms Create platforms using sprites and position them in the Scene View. Add BoxCollider2D components to the platforms to enable collisions.
4. Add a Camera Ensure the Main Camera is following the player. You can write a simple script to make the camera follow the player’s position.
5. Test Your Game Click the Play button in the Unity Editor to test your game. Make adjustments as needed.
Tips for Success in Unity Game Development
1. Start Small : Don’t try to build a massive game right away. Start with small projects to learn the basics. 2. Use the Asset Store : Leverage free and paid assets to speed up development. 3. Learn C# : While Unity’s visual tools are powerful, knowing C# will unlock the full potential of the engine. 4. Follow Tutorials: Unity Learn and YouTube are great resources for step-by-step tutorials. 5. Iterate and Test : Game development is an iterative process. Test often and refine your game based on feedback.
Advanced Unity Features to Explore
Once you’re comfortable with the basics, dive into Unity’s more advanced features: Animation : Use Unity’s Animator to create complex animations for characters and objects. Lighting and Post-Processing : Enhance your game’s visuals with realistic lighting and effects. Physics : Experiment with Unity’s physics engine to create realistic interactions. Multiplayer : Explore Unity’s networking tools to build multiplayer games. AR/VR: Unity is a leading engine for augmented and virtual reality development.
Conclusion
Unity game development is an exciting journey that combines creativity, problem-solving, and technical skills. Whether you’re building a simple 2D platformer or a complex 3D world, Unity provides the tools and resources you need to bring your vision to life. Remember, every great game starts with a single line of code — so start small, keep learning, and most importantly, have fun!
For more information
0 notes
Text
Split SQL script tool
I have created a simple #CSharp console application as a tool to split big #SQL scripts. For example, I had a problem with data seed scripts.
I have created a simple C# console application a split SQL script tool to split big scripts. For example, I had a problem with data seed scripts. Those scripts are huge because the database has more than a million records. These records need to be added to a new database. Each script is roughly 400Mb and I can’t upload it in the repository in Azure DevOps for example. Example of big SQL to…
0 notes
Text
How Can Selenium Tutorials Enhance Your Automation Skills?
Selenium is one of the most used frameworks in web application testing. It supports multiple programming languages, ensuring that the testers can write the scripts in languages that they understand best. There are a lot of tutorials for you, whether you are new to automation, have already been automated for some time, or are even a professional. For instance, a Selenium Java Tutorial is crucial to recruits who go for Java, whereas there is a Selenium csharp tutorial, which is ideal for testers who operate in C#.

Learning Selenium with Java
If you are a Java user, this would greatly help the Selenium Java Tutorial. This tutorial takes the Selenium novice through the installation of the versatile tool and writing complex scripts. The development approach details are also explained to the testers, and they learn how to work with web elements, work with pop-ups, and include JavaScript in their tests. A Selenium Java Tutorial also covers frameworks such as TestNG and JUnit and the organization and execution of test suites.
Automating with Python and Selenium
Python is another language that fits well with Selenium automation because of its readability. A Python Selenium tutorial explains perfectly how to install Selenium with Python. This involves code to install the required packages, configuration of the WebDriver, and simple and complex tests. The Python Selenium tutorial cares about such practices as, for example, creating a Page Object Model (POM) in order to have appropriate test scripts.

Exploring Selenium with SpecFlow
Any person who wants to explore Behavior-Driven Development (BDD) will find a selenium specflow tutorial handy. SpecFlow is the. TestCafe is the NET equivalent of Cucumber and lets testers write the tests in the Gherkin language. Selenium specflow tutorial shows the testers how to work with Selenium alongside SpecFlow, write feature files, and create step definitions. This approach simplifies the test scenarios to a reusable form that is readily understandable by a business analyst so that he can collaborate more effectively with other team members.
Learning Selenium with C#
A selenium csharp tutorial is more relevant to testers because C# is the language they use mostly. It is a step-by-step guide to using Selenium WebDriver, from configuring the environment to finding elements and writing scripts. Some more complex scenarios that may be covered in a Selenium csharp tutorial are dealing with dynamic elements, handling frames and Iframes, and using testing frameworks such as NUnit or MSTest. In particular, with the help of Selenium combined with C#, testers receive a powerful tool to implement and test practical approaches to robotic web applications.
Introduction to Robot Framework
For those searching, the Robot framework tutorial is handy for those with a keyword-oriented approach to testing. The Robot framework tutorial allows and teaches the testers how to install the framework, create test cases, and use keywords when working with web elements. It works in perfect harmony with Selenium: empowered with this tool, even relative novices in coding will be able to write more sophisticated and detailed testing programs. This makes it easy to be understood even by non-technical staff members in the team.
Combining Python and Selenium
The Selenium Python tutorial is analogous to the Python Selenium tutorial and aims to teach the usage of Selenium WebDriver in Python. In this tutorial, the author discussed pragmatic topics of writing a test script, exception handling, and various actions such as clicking, typing, and others. When performing the Selenium Python tutorial, the use of libraries such as pytest is often demonstrated for test organization and test execution, as well as methods of data-driven testing.
Enhancing Skills Through Tutorials
Through the Selenium Java Tutorial, Selenium Csharp tutorial, Python Selenium tutorial, Selenium spec flow tutorial, and Robot framework tutorial, testers can develop a set of knowledge of Selenium automation. Each tutorial offers perspectives and useful tips, helping testers make the right choice of strategies for their work. These tutorials enable continuous learning to guarantee that skill degeneration and rendering obsolete do not affect the testers.
0 notes
Text
Start your programming journey today with books on Python, Rust, C#, and more!
Start your programming journey today with books on Python, Rust, C#, and more! #sale #programming #coding #developer #book #books #python #rust #csharp #physics #perl #gnu #scripts
Use this link to check out the four bundle options with up to 18 books! Whether you’re looking to change careers or pick-up a lifelong hobby or vocation, there’s never been a better time to learn to code. This bundle of books will take you all the way from the basics to advanced concepts in languages like Python, Rust, C#, and more! Get a thorough intro to one of the world’s most versatile…

View On WordPress
#book#books#c sharp#coding#ebook#ebooks#education#functional programming#humble bundle#perl#physics#programming#python#ruby#rust#sale#scripts
0 notes
Text
C# Programming (Unity)
Back in university, there wasn’t really enough time for me to go over everything within the beginner/intermediate level of games programming properly. The nature of university life meant that I had to focus on fulfilling the specific requirements of my assessments and getting them done quickly.
In my opinion there is no such thing as understanding your fundamentals too well, so I plan on writing up blogs to thoroughly go over the basics of C# programming for Unity and make my way up. That way, although I’ll be going over things I already know, if I have missed anything I’m bound to come across it along the way (and extend past where I got up to with time).
My ‘C# Unity Revision�� Blogs:
+ C# Unity Revision Notes - Part 1: Variables & Functions
+ C# Unity Revision Notes - Part 2: Different Types of Operators
--------------------------------------------------------------
<–BACK
#gamesdev#games development#gamesprogramming#c#csharp#programming#scripting#unity#unitygameengine#heather.r.g.norman#roselollipop#roselollipop.artist#revisionnotes
2 notes
·
View notes
Text
Jesus christ
I am trying to learn how to cope with unity rn tutorial links or maybe yt channels, some websites everything is most welcome and I would actually be very thankful for it
Pls send some links
21 notes
·
View notes
Photo

Making a voxelmesh out of any given mesh, live generation version~
it’s procedural and should work on any mesh, it’s a bit slow atm but has room for improvement.
#indiedev#gamedev#game#indie#indiegamedev#madewithunity#unity#mesh#voxel#voxelmesh#script#programming#csharp#procedural
13 notes
·
View notes
Photo

Received recently this great book behind the scene of one of the ost complex project I’ve ever worked on, #morpheushotel in #macau #zahahadidarchitects #zahahadidarchitecture #complexgeometry #facade #design #structure #grasshopper3d #rhino3d #shopdrawings #bimmodel #bimarchitecture #exoskeleton #vbscript #pythonscript #csharp #scripting #architecture #computationaldesign #parametricdesign #parametricism #parametric #complexfacade #complexstructure #complexity #archilovers #dezeen #designboom #archdaily (at London Borough of Islington) https://www.instagram.com/p/BolyiBrAzk4/?utm_source=ig_tumblr_share&igshid=irpech2s5lfq
#morpheushotel#macau#zahahadidarchitects#zahahadidarchitecture#complexgeometry#facade#design#structure#grasshopper3d#rhino3d#shopdrawings#bimmodel#bimarchitecture#exoskeleton#vbscript#pythonscript#csharp#scripting#architecture#computationaldesign#parametricdesign#parametricism#parametric#complexfacade#complexstructure#complexity#archilovers#dezeen#designboom#archdaily
1 note
·
View note
Text
Create Azure Function in C# Script and Service Bus
Azure Function are very popular now. I explain how to create Azure Function with F# with Visual Studio. Now, I want to explain how to use the Azure Portal and create inline an Azure Function with C# Script and reading and writing a Service Bus Queue.
With this post, I want to cover a simple scenario: I want to create an Azure Function that it is triggered with a message in a Service Bus Queue, convert the body of the message in another object and send to another queue the result.
Service Bus Queue
This part is quite straightforward. In your Azure Portal, create a new Service Bus. In this example, my bad, the name of the bus is enricobus. Then, create two queues: message-in and message-out.
In message-in I send the message to trigger the function whereas in message-out the function will put a message in the queue after changing the original message.
Now, the Service Bus and the Queues are ready to use. Azure shows an overview of the Service Bus like in the following image.
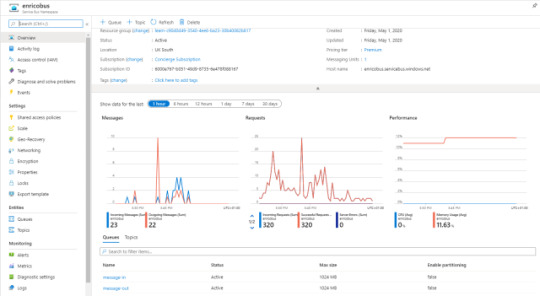
An example of Service Bus Queue
To explore this brand-new Service Bus, I download Service Bus Explorer from Github, a really good project. If you don’t want to source code, the installer is here.

Service Bus Explorer
Then I have to connect Service Bus Explorer with the Service Bus. For the Service Bus page, on the left, there is an option called “Shared access policies“: click there and click on “RootManageSharedAccessKey“. Now, copy the “Primary Connection String“.
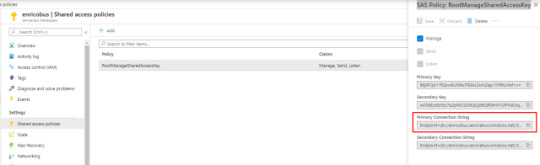
Service Bus: SAS Policy: RootManageSharedAccessKey
In Service Bus Explore, click on File > Connect. Paste the “Primary Connection String” in the connection string textbox and then press Ok.

Service Bus Explorer: connect
Finally, I find my queues and I browse them.
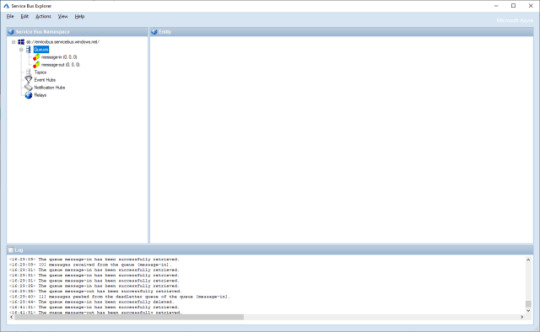
Service Bus Explorer
First thing to do is to send a message to the message-in in Service Bus to test later the Azure Function with C# Script. Right click on message-in under Queues and click “Send Messages“.

Send Messages with Service Bus Explorer
Definitely, I’m a bit lazy and I use a very easy json. Copy this json and paste it in the Message Text and press Send.
{ "PersonName": "Enrico", "Title": "Mr" }

Send a message with Service Bus
In the Log I see the message is posted successfully in the queue. As a double check for me, I see there is one message in the message-in queue. First step done!
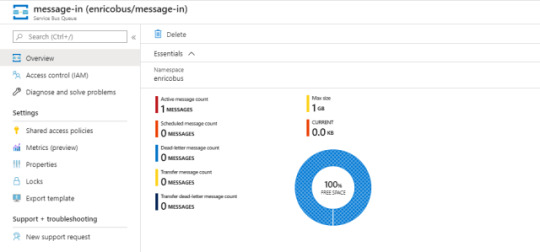
There is a message in the queue
Add a new Azure Function
I can start to create a new Azure Function in the portal. Nothing really exciting in this part: follow the wizard. I created a function called fnzinout2020. Now, what I see is the following screen:

Create a new Azure Function
Finally, I can start to create the Azure Function I wanted with C# Script and Service Bus. Click on the + on the right of Functions option. In the next screen, choose “Azure Service Bus Queue trigger“.

New function with Azure Service Bus Queue trigger
So, I can define some parameters for this function:
name of the function
Azure Service Bus Trigger
Service Bus Connection (select one from the dropdown list)
Queue name replace the default one with message-in
Then, click Create. Function create and, probably, it already has consumed the message in the queue.

Monitor
It is easy to verify if the function started already, I expand the function details and I find Monitor. Ok, in the following image I cheat a bit just because I want to show you that here there are all runs of your function and a bit more (I’ll tell you in a moment).

Azure Function Monitor
Integrate
It is the moment to add the output to out function. Now, click on Integrate on the same menu than before. As in the following screenshot, Integrate page has 3 sections:
Trigger
Inputs
Outputs
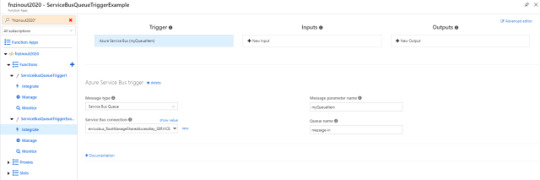
Integrate in Azure Function: Trigger
Trigger is the Service Bus as I selected before. Input is to select other source for your data but I don’t need it now. Output is what I look for. Click on + New Output and then select Azure Service Bus. Click Select.
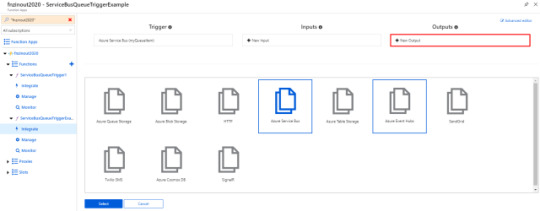
Integrate Output in Azure Function
In the new screen I have to choose:
Message type: type of Service Bus message, either Queues or Topics
Message parameter name: the name used to identify this binding in your code
Service Bus connection: the name of the app setting containing your Service Bus connection string. The connection string must have Send rights. Select one connection from the dropdown list.
Queue name: The queue to which the message will be sent
For this example, I use the following data:
Message type: I choose Service Bus Queue.
Message parameter name: I use outputSbMsg.
Queue name: I type message-out.
Double check and press Save.

Azure Service Bus output
Inspect Azure Function files
I inspect the files for this function with the tab on the right. I see two files:
function.json
fun.csx
It is possible to add more files such as HOST.json but I won’t explain how, look this post.
In a script function directory, there should be a companion function.json file that contains the configuration metadata for the function. A function can only have a single trigger binding, and can have multiple input/output bindings. The file looks like:
function.json
{ "bindings": [ { "name": "myQueueItem", "type": "serviceBusTrigger", "direction": "in", "queueName": "message-in", "connection": "enricobus_RootManageSharedAccessKey_SERVICEBUS" }, { "type": "serviceBus", "connection": "enricobus_RootManageSharedAccessKey_SERVICEBUS", "name": "outputSbMsg", "queueName": "message-out", "direction": "out" } ], "disabled": false }
For more details about this file and its schema, take a look to the Microsoft documentation. I notice the json file is easy to understand. What I care more now is the name of the bindings, myQueueItem and outputSbMsg.
I have to use those names in the signature of the function if I want to receive and send messages from and to the Service Bus. myQueueItem is already in the signature because the wizard put it there.

Azure Function View files
Finally, this code
Just for test, in my Azure Function with C# script I want to read the body of the message on message-in from Service Bus, read and convert this body and push a new json in the message-out.
First, I have to define the class for the incoming json and the result. User is the class of the message in the message-in, NewUser is the class for the message I want to send.
public class User { public string PersonName { get; set; } public string Title { get; set; } } public class NewUser { public string Name { get; set; } public string Title { get; set; } }
After that, I have to change the signature of the Azure Function adding the outputSbMsg for using the output Service Bus.
public static void Run(string myQueueItem, ILogger log, ICollector<string> outputSbMsg) { }
In ILogger the Azure Function injects the logger that we can use. What I added is ICollector<string> outputSbMsg. This represents the output in my function. So, I can use the Service Bus to send messages.
Next, I need to import in some way Newtonsoft.Json for converting the string in a json. At the very top of the function, I add this code:
#r "Newtonsoft.Json" using Newtonsoft.Json;
With NewtonSoft I can deserialize the message in a json and, also, I want to show in the log what the function has received from the Service Bus. I add the following code for that:
var user = JsonConvert.DeserializeObject<User>(myQueueItem); log.LogInformation($"Body: {user}");
Nothing particular exciting: I convert the body of the message in myQueueItem in a User object. Then, I’m going to create a NewUser with the User object and convert it in a string.
var newBody = new NewUser() { Name = user.PersonName, Title = user.Title }; var json = JsonConvert.SerializeObject(newBody);
Finally, I have to send a message to the message-out queue with the NewUser in the body. For this reason, I create a small function called SendMessages.
static void SendMessages(string message, ILogger log, ICollector<string> outputSbQueue) { log.LogInformation("About to iterate messages"); outputSbQueue.Add(message.ToString()); log.LogInformation($"Send to the queue: {message}"); }
Now I can run the function. And it is working!
run.csx
#r "Newtonsoft.Json" using System; using System.Threading.Tasks; using Newtonsoft.Json; public static void Run(string myQueueItem, ILogger log, ICollector<string> outputSbMsg) { log.LogInformation($"C# ServiceBus queue trigger function processed message: {myQueueItem}"); var user = JsonConvert.DeserializeObject<User>(myQueueItem); log.LogInformation($"Body: {user}"); var newBody = new NewUser() { Name = user.PersonName, Title = user.Title }; var json = JsonConvert.SerializeObject(newBody); log.LogInformation($"New body: {json}"); SendMessages(json, log, outputSbMsg); } static void SendMessages(string message, ILogger log, ICollector<string> outputSbQueue) { log.LogInformation("About to iterate messages"); outputSbQueue.Add(message.ToString()); log.LogInformation($"Send to the queue: {message}"); } public class User { public string PersonName { get; set; } public string Title { get; set; } } public class NewUser { public string Name { get; set; } public string Title { get; set; } }
One last look at the Monitor. If I click on a line, I have all details step by step: this is a mix between my log and Azure Function own log.
Important note: the log is not always in a chronological order. If the execution of the Azure Function is fast, the log is mixed up because it is sorted by date time.
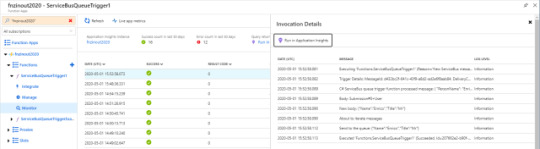
Azure Function Invocation Details
The post Create Azure Function in C# Script and Service Bus appeared first on PureSourceCode.
from WordPress https://www.puresourcecode.com/dotnet/azure/azure-function-csharp-script-service-bus/
0 notes
Text
Post Mortem - Programming
I have reached the end of another module and I have been learning about programming in CSharp. This has been an interesting experience because you have to think like a programmer to solve some problems.
There will be at times where you will type up the code and it will not work. There are certain types of problems that will not show up in the console. The console is where unity displays errors with your code. It doesn't show up in the console because it follows all the rules of the programming language but it just means that you have maybe not added a capital letter or you may have misspelled something or maybe there was a word missing.
Either way it is your job to try and find where it went wrong and this can take a while if the code is long and this was a new experience for me. Not because I don't get stuck with anything but because I have not done much coding in the past so sometimes it can get confusing and it can take hours to find what went wrong.
The game that I prototyped is called Zombie Slayer and it is a zombie survival game where the objective is to survive for as long as possible and if you die then retry and try to get to a higher round the next time.
I really enjoyed this module because programming is a very useful skill to have. It is also can be a very frustrating thing to do but when you spend hours trying to fix a bug (problem) and you finally figure it out, it is very satisfying and I think that getting stuck and overcoming it and seeing everything work is an amazing feeling.

2 notes
·
View notes
Photo

Added zombie enemy with patrol,chase and attack behaviour. #zombiegame #gamedeveloper #indiegame #mobile #game #zombiegames #madewithunity #unitycollege #scripting #artificialintelligence #ai #ajaygamedeveloper #indie #programmer #csharp (at Indore, India) https://www.instagram.com/p/B83N4OjnCtt/?igshid=1j0talwjfk15j
#zombiegame#gamedeveloper#indiegame#mobile#game#zombiegames#madewithunity#unitycollege#scripting#artificialintelligence#ai#ajaygamedeveloper#indie#programmer#csharp
0 notes
Video
instagram
Powerful Easy to use custom programming language generating tool. Exports compiler with ease. Check link in my profile! #program #coding #robot #technology #business #language #scripting #c #csharp #net
2 notes
·
View notes
Text
C# Unity Revision Notes - Part 2: Different Types of Operators
Operator [Programming] - A symbol that tells the compiler to perform specific mathematical or logical manipulations
Compiler - Converts high-level programming languages [The last tab (4): ‘Assem/Interp/Compiler‘ has the most relevant information] (That use human words) to low-level programming languages/machine code [E.g.: C# down to Binary Code (Uses 0′s & 1′s)]
--------------------------------------------------------------
The Main Operator Types are:
Arithmetic Operators [Maths]:
+ (Plus) - (Minus)
* (Times) / (Divide)
% (Modulus)
++ (Add 1 each Time) -- (Minus 1 each Time)
Relational Operators [Comparisons]:
== (Are they equal?) != (Are they NOT equal?)
> (Is the left value greater than?) < (Is the right value greater than?)
>= (Is the left value greater than or equal to?) <= (Is the right value greater than or equal to?)
Logical Operators:
&& (And - If both are true...)
|| (Or - If either are true...)
! (Not - If the opposite is true...)
Assignment Operators:
= (Assign value)
+= (Adds the two variables then assigns to the left variable)
-= (Subtracts the right variable from the left, then assigns to the left variable)
etc.
--------------------------------------------------------------
A programmer can access components within Unity using the ‘Dot Operator’ (’.’) and can control these components through scripts. Using the ‘Dot Operator’ is the equivalent of typing up an address (E.g.: ‘Country.State.Suburb’) - or opening up files to access files within.
For example, in the line of code below (Figure.1), the programmer asks Unity to find the renderer of the GameObject the script is attached to, access the ‘material’ of the GameObject within the renderer, then access the ‘color’ sub-category within the material. Once the color of the GameObject is found, the programmer can change the color of the material on the GameObject to red using the ‘Assignment Operator’: ’=‘.

Figure.1 (Change-Material-Color.jpg, 2020).
Extra Notes:
Boolean Values: 1 = True, 0 = False
Use ‘Debug.Log’ to get the Unity console to display any variable/result - for testing purposes
Leaving comments within scripts is a way for programmers to quickly communicate with one another about how each script works
Use ‘//’ to leave a one-line comment within the script, or use ‘/’ + ‘*’ before a comment & ‘*’ + ‘/’ at the end of a comment if it takes up multiple lines
The below screenshot shows an example of the two different ways comments can be written within a script [Comments in the image = green text]:
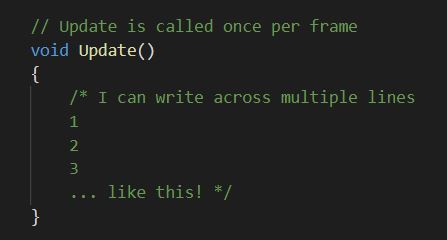
Figure.2 (CommentsExample.jpg, 2021).
--------------------------------------------------------------
References:
Change-Material-Color.jpg [Screenshot] (2020). Norman, H. Perth, Australia
CommentsExample.jpg [Screenshot] (2021). Norman, H. Perth, Australia
--------------------------------------------------------------
<– BACK
#gamesdev#gamesdevelopment#gamesprogramming#C#csharp#programming#scripting#unity#unitygameengine#heather.r.g.norman#roselollipop#roselollipop.artist#revisionnotes
0 notes
Photo

All systems go~ now we have custom escape characters that allow you change the textcolor inside the same textblock for special keywords!
Now i know it may look easy but there’s a lot to it ^^’ anyway it should be mostly ready now.. unless.. i c yes.. that might work hmm
1 note
·
View note
Photo

Fin ⠀ . ⠀ . ⠀ . ⠀ . ⠀ . ⠀ #grasshopper #grasshopper3d #rhinoceros #rhino #makehuman #blender #fabrication #scripting #csharp #3dprinting #parametric #vray #architecture #building #architexture #design #minimal #art #arts #instagood #archilovers #architectureporn #style #archidaily #composition #geometry #perspective #parametricism #blackandwhite #glitch (at Athens, Greece)
#rhino#parametricism#perspective#style#design#archidaily#composition#building#3dprinting#minimal#fabrication#scripting#archilovers#art#parametric#architexture#arts#makehuman#csharp#grasshopper#geometry#glitch#blender#architecture#rhinoceros#instagood#architectureporn#grasshopper3d#blackandwhite#vray
1 note
·
View note