#Kdump
Explore tagged Tumblr posts
Visit Tumblr Blog
Explore Tumblr blogs with no restrictions, modern design and the best experience.
Last Seen Tumblr Blogs


Fun Fact
When “GIF” was named word of the year in 2012, Oxford Dictionaries U.S.A. credited Tumblr for pushing the word.
Text
New Post has been published on 나만의 세상~!
New Post has been published on https://blog.seabow.pe.kr/?p=8406
kdump with ssh (remote)
vmcore 를 ssh 를 통하여 원격지 서버에 전송하기 ( RHEL, CentOS)
file : /etc/kdump.conf
ssh root@$(remote ip)
sshkey /root/.ssh/id_rsa
# ssh-keygen -t rsa
# ssh-copy-id root@$(remote ip)
아래와 같은 메시지가 발생됨.
/etc/kdump.conf
Rebuilding /boot/initramfs-3.10.0-229.11.1.el7.x86_64kdump.img
The specified dump target needs makedumpfile “-F” option.
mkdumprd: failed to make kdump initrd
core_collector makedumpfile -F -l –message-level 1 -d 31
위와 같이 “-F” 옵션을 추가하면됨.
Link : https://access.redhat.com/solutions/2106681
0 notes
Text
How to install CentOS 7 Server and Desktop

This tutorial will show you how to install the latest version of CentOS Linux 7 on a dedicated server or desktop machine. The same steps will work on private or public cloud virtual machines too. CentOS is a stable Open Source Linux distribution and one of the most popular Linux platforms based on Red Hat Enterprise Linux (rhel) sources.
The typical installation of CentOS as performed in this tutorial will be based on the CentOS 7 DVD ISO image. You can burn the image to a DVD or copy it to a bootable USB drive. The installation covers the process of installing CentOS 7 on UEFI based machine. The same installation procedure can be successfully applied on old BIOS motherboards or on UEFI systems with Legacy Mode or CSM (Compatibility Support Module) option enabled.
REQUIREMENTS
The latest CentOS 7 ISO Image obtained from the following official CentOS download mirrors: http://isoredirect.centos.org/centos/7/isos/x86_64/CentOS-7-x86_64-DVD-1708.iso
Initial Preparation
After you’ve downloaded the CentOS DVD ISO image by following the download link presented above, use a DVD burning software to place the bootable image to a DVD or prepare a bootable USB stick that contains the CentOS image.
Bootable USB Drive
A bootable USB drive can be created with the Rufus program in order to be fully compatible with UEFI based motherboards. If you don’t have an UEFI motherboard machine, then you can use any other software to create a bootable CentOS 7 USB stick. Some of the most popular software to create bootable USB flash memory drives can be found at the https://www.pendrivelinux.com/ website.
Configure Bios
Another important aspect which must be followed in order to properly install CentOS 7 on UEFI based motherboards is to open your machine motherboard UEFI settings (pressing a special key, such as F1, F2, F11, F12, Del, Esc) and disable QuickBoot or FastBoot and Secure Boot options. The BIOS/EFI keys you need to press during hardware initialization or machine power on phase in order to enter BIOS/UEFI settings highly depend on the motherboard vendor specifications and should be included in the motherboard’s manual. Another important aspect is to change the machine boot order and instruct the BIOS/EFI to use the proper drive for booting (DVD drive or USB). On some machines, the boot order or the boot drive can be selected by pressing a special key at hardware power on.
Install CentOS 7
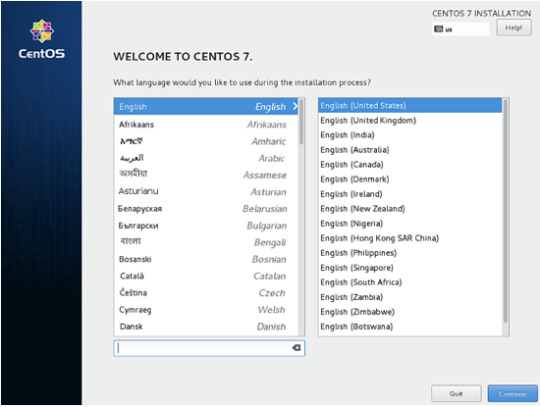
After you’ve made the above settings to your machine motherboard UEFI/BIOS, place the DVD ISO image of CentOS 7.4 or the bootable USB flash stick in the appropriate motherboard drive. Then reboot or power-on the machine. Hit the appropriate bootable key from the keyboard and instruct the BIOS or UEFI software to boot the machine from the appropriate DVD or USB drive. The CentOS 7 bootable ISO image should load and it will present you the first installation image on your monitor screen. Select Install CentOS 7 from that menu and hit the Enter key to start the installation process, as illustrated in the following screenshot :

After a few seconds, the CentOS graphical installer will be loaded into your machine RAM and will present you the ”Welcome to CentOS 7” screen. Select the appropriate language for your system installation process and press hit on Continue button.
On the next screen, you will see the Installation Summary menu. Here, first select the Date and Time menu to open this menu. Use the map to select your geographical location. Also, below the map, you have the option to configure the date and time settings. If the time is correctly configured just hit on the upper left Done button to complete this stage and return to the initial menu
Next, hit the Language Support menu and setup your system language support. Again, when you finish this step, hit Done to return to the main menu.

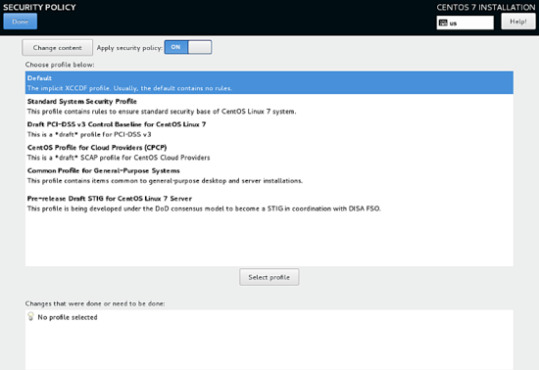
Next, hit the system Security Policy menu and select a security profile from the list. You’re safe to choose the Default security profile. Hit the Select profile button and switch Apply security policy button to ON. When you finish, hit the Done button to return to the main screen.
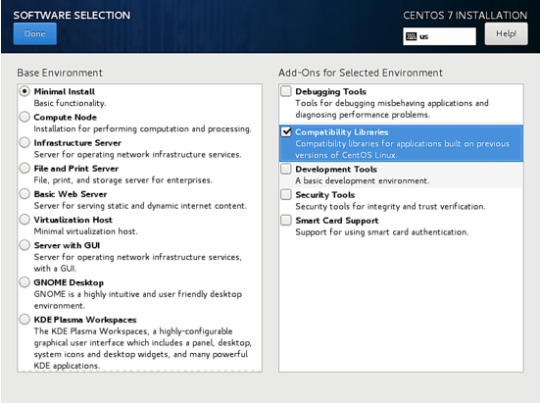
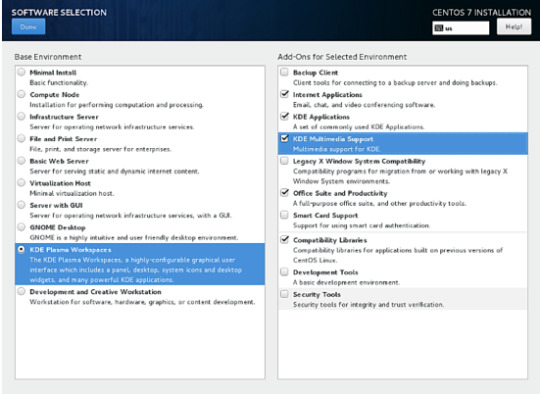
In the next step, go to Software Selection menu. There, you will find a list of some predefined base environments for your system. You can choose to install a graphical desktop environment, such as Gnome, KDE Plasma or Creative Workstation, or you can choose to install a custom server installation, such as Web server, Compute Node, Virtualization host, Infrastructure server, Server with a graphical interface or File and Print Server.
The most suitable environment for a server is the Minimal Install option because it is the most flexible and has a small disk footprint. Select Minimal Install base environment, select Compatibility Libraries add-ons from the left pane and hit on the Done button to finish this setting and return to main menu.
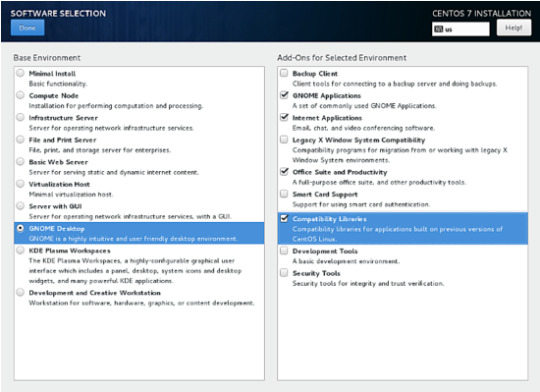
In case you want to install a full Gnome or KDE Desktop environment, select the proper environments as shown in the below screenshots and hit on Done button. However, you cannot choose to install more the one environment per installation.
Next, go to the Installation Source menu and select Auto-detected installation media as default. You also have the options to perform the installation from other network locations such as HTTP, HTTPS, FTP or NFS server or add additional repositories. When you finish, hit Done to return to the main menu.

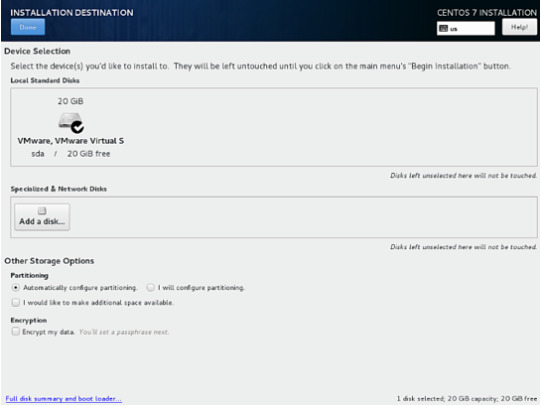
Next, hit on the Installation Destination menu to open storage partition settings. In Device Selection, check the local machine hard disk. Then, in Other Storage Options, check Automatically configure partitioning. This option ensures that the machine hard disk will be automatically partitioned with the /(root), /home and swap partitions. When you finish, hit the Done button to activate the machine drive partition layout and return to the main menu screen.
In the next installation screen, hit the KDUMP menu and disable KDUMP kernel crash mechanism in order to free system RAM. Hit on the Done button to apply this setting and return to the main menu.

Next, hit the Network & Hostname menu and configure your machine FQDN hostname. Also activate and enable the network service by switching the Ethernet button from OFF to ON. You can manually configure the network interface in this step if that’s the case. When you finish, hit the Done button to return to the main installation menu.
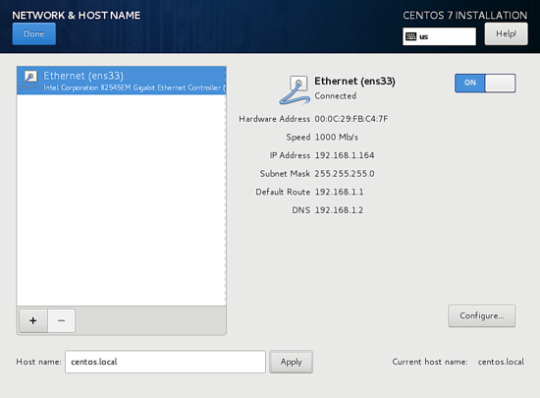
Next, hit the Network & Hostname menu and configure your machine FQDN hostname. Also activate and enable the network service by switching the Ethernet button from OFF to ON. You can manually configure the network interface in this step if that’s the case. When you finish, hit the Done button to return to the main installation menu.
Finally, before starting the installation process, make sure you review all settings you’ve made. When you finish, hit the Begin Installation button to start installing CentOS 7.

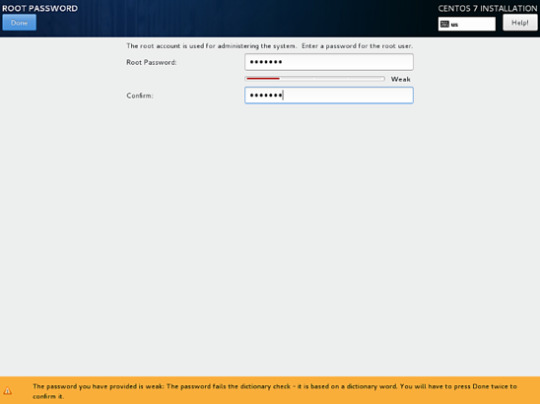
After the installer starts hit on the ROOT PASSWORD menu in Configuration screen and setup a strong password for the root account. When you finish, hit the Done button to return to user settings screen.

Next, hit the User Creation menu and add a new system account and a strong password for this account. Check Make this user administrator and Require a password to use the account options in order to grant this user root privileges. This avoids that you have to manually enter the password each time you log in to the system. When you finish setting up the user, hit on the Done button to return to the initial menu and wait for the installation process to complete.
After a few minutes, the installer will report that CentOS has been successfully installed on your machine. In order to use the system you just have to remove the installation media and reboot the machine.
After the installation process completes, hit on Reboot button and the machine will reboot. After the restart, log in to the CentOS console with the credentials configured while installing the system. Then issue the following command with root privileges to update the system.
That’s all! You’ve successfully installed the latest version of CentOS 7 on your machine.
1 note
·
View note
Text
Oracle Linux 8.0 發布

此版本主要亮點包括:
Application Streams
Oracle Linux 8 引入了 Application Streams 的概念,它可以比核心操作系統包更頻繁地交付和更新多個版本的用戶空間組件。 Application Streams 包含必要的系統組件和一系列以往分發在軟件集中的應用,以及其它產品和程序。
系統管理
引入 Dandified Yum 軟件包管理器,它是基於 DNF 技術的 yum 工具的新版本,可在基於 RPM 的 Linux 發行版上安裝、更新和刪除軟件包。
引入 Cockpit 服務器遠程管理器,這是一個簡單、輕量級但功能強大的交互式 GNU/Linux 服務器遠程管理器,可通過 Web 瀏覽器提供實時 Linux 會話。
內核
modinfo 命令已更新,可識別和顯示使用 CMS 和 PKCS#7 格式簽名的模塊簽名信息。
一組內核模塊移動到 kernel-modules-extra 包中,這意味著默認情況下這些模塊都不安裝,非 root 用戶也無法加載這些組件,因為默認情況下它們也被列入黑名單。
內存總線限制已擴展到 128 PiB 的虛擬地址空間和 4 PB 的物理內存容量。 Linux 內核中的 I/O 內存管理單元(IOMMU)代碼也會更新以啟用 5 級分頁表。
kdump 特性可以使崩潰內核和 initramfs 儘早加載,以便它可以捕獲 vmcore 信息,包括早期內核崩潰。
容器與虛擬化
新的容器工具:Podman、Buildah 與 skopeo 現在在 Oracle Linux 8 上可用:
Podman:Podman 是 Libpod 的一部分,它的定義可以簡單用這個命令表示:`alias docker=podman`。
Buildah:Buildah 是一個用於構建 OCI(Open Container Initiative)鏡像的工具。
skopeo:skopeo 是一個命令行工具,用於對容器鏡像和鏡像庫執行各種操作,支持使用 OCI 鏡像與原始的 Docker v2 鏡像。
Q35 機型是一種更現代的 PCI Express-based 機器類型,現在可用於 KVM。
KVM 訪客崩潰報告中添加其它信息,這使得在使用 KVM 虛擬化時更容易診斷和修復問題。
文件系統與存儲
增強 Device Mapper Multipathing
SCSI Multiqueue 驅動使塊層可以通過 SSD 和多核系統很好地擴展性能
Stratis,一種管理本地存儲的簡單解決方案
XFS 支持共享寫時復制(COW)數據擴展區功能,因此兩個或多個文件可以共享一組公共數據塊。
此外還有關於網絡、身份認證管理與安全等方面的內容,詳情查看發布說明:
https://blogs.oracle.com/linux/announcing-the-release-of-oracle-linux-8
.
from Oracle Linux 8.0 發布 via KKNEWS
0 notes
Text
Something Awesome: 1.4-2.5
1.4 System Call Modules

1.4.1 The System Call Function

1.4.2 The sysent structure

1.4.3 The Offset value

1.4.4 The SYSCALL_MODULE Macro

1.5 Kernel/User Space Transitions

1.5.1 The Functions
1.6 Character Device Modules

1.6.1 cdevsw Structure

1.6.2 Character Device Functions

1.6.3 The Device Registration Routine

1.7 Linker Files and Modules

2. Hooking
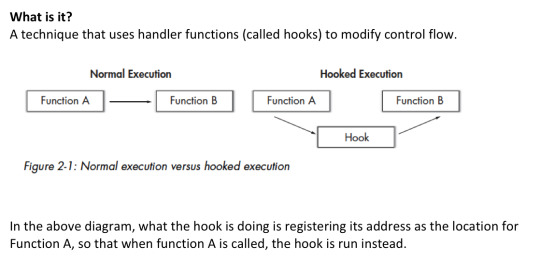
2.1 Hooking a System Call

2.2 Keystroke logging
Need to do sys_read when you want to use read
2.3 Kernel Process Tracing
ktrace command:
ktrace.out is unreadable.
This file is found in /usr
kdump command:
Reads the ktrace.out file in a readable format for humans
What's the point of these?
Well, if you don't know shit about the kernel, how do you figure out what syscall functions to hook? Well, since ktrace will follow the assembly, it'll find all the system calls before executing them to perform the kernel operation called e.g. ls. Then you can just hook one of these calls
2.4 Common System Call Hooks

2.5 Communication Protocols

0 notes
Text
RedHat Enterprise Linux 7

Step 1: Enter RedHat Enterprise Linux DVD into DVD Drive and adjust BIOS to Boot with DVD. Select "Install Red Hat Enterprise Linux 7.5" then Press Enter.

Step2: Select your Language , Here i am selecting "English (United States)" then click on Contnue

Step 3: Click on DATE & TIME from LOCALIZATION Section.

Step 4: Select your Region and City by Clicking on your Country or Select Region using the Drop Down Menu and City using Drop Down Menu. Ex: Region=Americas, City=New York. Then Click on "Done".

Step 5: Click on "KEYBOARD" from LOCALIZATION Section.

Step 6: Select your Keyboard type "English (US) " in the KEYBOARD LAYOUT Section then click on "Done"

Step 7: Click on "LANGUAGE SUPPORT" from LOCALIZATION Section.

Step8: Select your Language from the list of languages to be installed. English (United States) selected here. Click on "Done".

Step 9: Click on "INSTALLATION SOURCE" from "SOFTWARE" Section.

Step 10: Select your "INSTALLATION SOURCE". We can install using DVD / ISO File / Network ( HTTP/FTP/NFS/KICKSTART etc...). Select DVD media and click on "Done".

Step 11: Click on "SOFTWARE SELECTION" from SOFTWARE Section.

Step 12: Select your Required Base Environments and Add-On Packages. Select "Server with GUI" and Click on "Done".

Step 13: Click on "INSTALLATION DESTINATION" from SYSTEM Section.

Step 14: Select your Devices for installation and select your partitioning method based on your requirements. Select "Automatically configure partitioning". Click on "Done"

Step 15: Click on "KDUMP" from SYSTEM Section.

Step 16: Enable/Disable KDUMP. Enable KDUMP by selecting checkbox "Enable kdump". Select Automatic/Manual for Kdump Memory Reservation and click on "Done".

Step 17: Click on "NETWORK & HOST NAME" from "SYSTEM" Section.

Step 18: Select your Network Interface and click on "Configure".

Step 19: Configure IPv4/IPv6 Address by clicking on the desired tab. Click on "IPv4 Settings" tab and Select Method DHCP then Click on "Save".

Step 20: Click on ON/OFF Button to enable/disable Network Interface. Click "ON" to Enable Network and Click on "Done".

Step 21: Click on "SECURITY POLICY" from SYSTEM Section.

Step 22: Select your Security profile and click on "Done".

Step 23: Click on "Begin Installation".

Step 24: Installation Started.Click on "ROOT PASSWORD" to set Root Password.

Step 25: Enter Root Passowrd and Confirm the same password. then click on "Done" (If you are setting weak password click twice on "Done" ).

Step 26: Click on "USER CREATION" to create user.

Step 27: Enter Full name, User name, Password and Confirm Password then click on "Done". (if you are setting weak password then click twice on "Done").
Step 28: Installation is in progress....

Step 29: Red Hat Enterprise Linux 7 is now successfully installed and ready for you to use! Go ahead and reboot to start using it! Click on Reboot.

Step 30: Red Hat Enterprise Linux 7 Booting Screen.

Step 31: Red Hat Enterprise Linux 7 Booting Screen.

Step 32: This is an INITIAL SETUP. Click on "LICENSE INFORMATION" from LICENSING Section.

Step 33: Read the License Agreement and Select "I accept the license agreement" option. Click on "Done".

Step 34: Click on "Subscription Manager" from SYSTEM Section.

Step 35: Check the box "I will use an Activation Key" and Click on "Next".
Step 36: Once your Subscription Activated then Click on "Done"

Step 37: Click on "FINISH CONFIGURATION"

Step 38: Red Hat Enterprise Linux 7 Login Screen. Login with your username.

Step 39: Enter your Password and Click on "Sing In".

Step 40: After first login you will get "Welcome Screen" and Select your Language then click on "Next".

Step 41: Select your keyboard layout ("Typing") and click on "Next".

Step 42: Select your Privacy (Location Services Enable/Disable) and click on "Next".

Step 43: You can connect your Online Accounts like Google, Windows Live and ownCloud. Otherwise click on "Skip".

Step 44: Red Hat Enterprise Linux 7 Desktop Environment is ready to go. Click on "Start using Red Hat Enterprise Linux Server"

Step 46: Red Hat Enterprise Linux 7 Graphical User Interface Firstlook.

This is an eloborated Red Hat Enterprise Linux 7 installation document to understand every step in the installation for the newbies. Please visit https://www.redhat.com for further information. Read the full article
0 notes
Text
Saving random seed failed. / No kdump initial ramdisk found. / Failed to run mkdumprd
Saving random seed failed. / No kdump initial ramdisk found. / Failed to run mkdumprd
Kdump doesn't start? [root@mbpc-pc grub]# service kdump restart Memory for crashkernel is not reserved Please reserve memory by passing "crashkernel=X@Y" parameter to the kernel Stopping kdump: [FAILED] No kdump initial ramdisk found. [WARNING] Rebuilding /boot/initrd-4.8.4kdump.img Saving random seed failed. Failed to run…
View On WordPress
0 notes
Text
2017/04/10-15
*「BIND 9」にまたDoS脆弱性、最新バージョンへの更新を~IIJでは乗り換えを推奨 http://internet.watch.impress.co.jp/docs/news/1054770.html >3件の脆弱性はいずれも、namedが異常終了を起こし、DNSサービスが停止 >する可能性があるもの。
>ほかのソフトウェア(権威DNSのnsdやキャッシュDNSのunboundなど)や >アプライアンス、サービスに乗りかえるべき」としている。
*性能強化に加えて実験的機能が多数加わった「HHVM 3.19」が公開 https://mag.osdn.jp/17/04/14/170000
*Webサーバー「Nginx 1.12」リリース、動的なモジュールの組み込みなどをサポート https://mag.osdn.jp/17/04/14/163000 >W3techsの最新の調査によるとNGINXのシェアは33%となっているという。
>また、リバースプロキシとして利用する際、Nginxはデフォルトで独自IP >アドレスをソースのIPアドレスとして使ってアップストリームのサーバー >と接続するが、新たにクライアントのIPアドレスをソースIPアドレスと >して使うように保存するIP Transparency機能が加わった。 > >また、Direct Server Return(DSR)として、アップストリームサーバーが >元の遠隔にあるクライアントからのパケットを受け取って直接レスポンス >する機能も導入した。
*第4回 [サーバ・インフラ・ネットワーク編]サポート観点から見た―トラブル時の情報収集法 http://gihyo.jp/admin/feature/01/trouble-shooting/0004 >情報収集の初期段階では,メッセージ,ログは,必ず一度に網羅的に >収集することを心がけてください。これは,時間が経過するにつれて >消失する情報があることや,さま���まな情報を簡単に確認できることが >調査を進めるうえで非常に有効であるためです。 > >Red Hat Enterprise Linux(以下,RHEL)では,一度に幅広い情報を >手軽に収集を行うことを実現するツールとしてsosreportがあります。
>sosreportは,RHELの基本的なコマンドの結果や,サービスのログを収集 >するツールです。sosパッケージにて提供されており,ツールそのものは >Pythonで記述され,収集する情報の種類ごとにスクリプトがわかれています。
>サービスの自動起動設定は,「?sos_commands/startup/chkconfig_--list」 >から確認できます。
>sysstatパッケージに含まれるsarは,広い範囲に渡るシステムの稼働情報を >取得し記録します。
>システムハングの場合,ログやシステムの稼働情報なども正常に取得できて >いないことが多く,事象が発��している状況で取得されたvmcore以外で >調査できないためです。
>注意する点としては,kdumpサービスを起動しただけでは,カーネル >パニックには対処できますが,システムがハングしたという事象には >対応できないことです。よってほかの方法でシステムがハングしている >最中に意図的にカーネルパニックさせる必要があります。
>筆者のお勧めは,④と⑤~⑦の中から利用できるものを設定することです。 >理由は,任意のタイミングで手動でパニックさせられるためです。紹介した >カーネルパラメータの設定は,/etc/sysctl.confで行います。
*第5回 [サーバ・インフラ・ネットワーク編]こんなときどうする!?―ネットワークやサーバのチェックポイント http://gihyo.jp/admin/feature/01/trouble-shooting/0005
*第6回 [クラウド編]振り返り・言語化・体系化―MSP直伝のトラブル対策マニュアル http://gihyo.jp/admin/feature/01/trouble-shooting/0006 >また,営業さんはこのシステム・お客さんについて詳しいはずなので, >どのような対処を優先すべきか確認しましょう。具体的には,ユーザへの >告知,データの保護,システムの復旧,再発防止のいずれを優先すべきか >を確認します。 > >たとえばユーザ告知を優先すべきであれば,システム復旧よりもメンテ >ナンス画面への切り替えを最優先で実施すべきです。またデータの保護 >や再発防止を優先すべきであれば「とりあえず再起動」などの対応はし >ないほうが良いでしょう。
>まずは自分の手元でも問題が再現するか確認しましょう。再現しない場合 >は接続元の問題の可能性が高いと考えられます。
>リアルタイムに情報が欲しい場合は,問い合わせと並行してTwitterなど >で同じように困っている人がいないかリアルタイム検索してみると良い >でしょう。
*第7回 [クラウド編]低レイヤから行う原因調査―AWS上に構築されたシステムのトラブルに遭ったときに http://gihyo.jp/admin/feature/01/trouble-shooting/0007 >EC2インスタンスが正常に稼働しているか確認するためには次のような >情報をAPIやManagement Consoleでチェックすると判断がつくかと思います。 > > - Instance Stateがrunning状態にあること > - System status ckecksがpassed(0)状態であること > >また,EC2インスタンスのパブリックIPを固定化する機能であるElastic IP >の状態もチェックしてみてください。
>Security Groupについてチェックしたいポイントは次の2点となります。 > > - EC2インスタンスに正しいSecurity Groupが割り当てられているか > - 割り当てられているSecurity Groupにメンテナンス拠点からのアクセスが > 許可されているか > >この段階で「メンテナンス拠点のアクセス許可ルールを誤って削除して >しまったためトラブルへとつながった」ことがわかりました。
>また,AWS Configを利用することでAWSリソースの変更を追跡をすることや, >CloudTrailを利用することでAWSリソースの操作などをログとして保管する >ことも可能となります。
>HAProxyは起動時に設定ファイルで指定された接続先を名前解決して, >結果をキャッシュするようになっています。RDSは稼働するホストに障害が >発生した場合にホストの自動交換機能で,ハードウェアが自動的に交換され >ますが,そのとき内部的にローカルIPアドレスが変更されてしまうのです。
>RDSのローカルIPアドレスが変更されるようなイベントが発生した場合に, >HAProxyを再起動して名前解決をしなおすようなしくみが必要となります。
*第8回 [クラウド編]SoftLayerの運用でわかったこと―クラウド環境でとくに必要な複数視点 http://gihyo.jp/admin/feature/01/trouble-shooting/0008 >実は今回のトラブルの原因は,「?負荷分散装置を『低リソース』で契約 >していたこと」だったのです。筆者が勤める会社でも,昨年から利用して >いるパブリッククラウドのSoftLayerではLoad Balancerが「同時接続数」 >で契約されます。
>クラウドというのは実はプロプライエタリな環境であったりします。した >がってトラブルが発生した際には,まず「クラウドサービス側で問題が >発生していないか,原因はどこにあると推測できるのか」をサポートに >確認してみることをお勧めします。
>クラウドになったのでインフラの知識が不要になるわけではなく,逆に >どのような仮想化技術が使われているのだろうと想像力を働かせて利用 >していく必要があります。
>また「正常」である状態とはどのような状態なのかを正しく把握しておく >ことが大切です。
>こういったサービスを利用して日々状況を把握しておくことが,問題が発生 >したときに「正しい異常」であるかを確認する手助けになります。
>なかなか実現するのは難しいですが「停止しても良い作り」にしておくこと >が一番重要になってきます。運用の現場としては,障害解決を優先させる >のか,現状復帰を優先させるのかをあらかじめ業務レベルに応じて定義して >おくことが必要です。
>最後に「運用でカバー」せずにシステム・デザインの段階で運用上の問題や >課題をきちんと網羅したインフラ設計が必要になってきます。またインフラ >については「壊れても大丈夫」な環境を目標としてデザインを作っていき >たいですね。
>誰が一番最初に障害を認識したかによって,そのあとの動きが非常に変わ >ってくるということです。とくに,「?動かない」「?遅い」などのキー >ワードは「主語」「?述語」などを明確にしていく必要があります。
0 notes
Text
Preguntas a un Sysadmin

Preguntas a un Sysadmin. Ya tratamos las funciones principales de un Sysadmin (administrador de sistemas) en un articulo anterior, En este articulo veremos otro aspecto sobre su vida cotidiana, las consultas. Es común, incluso llega a ser agotador que un sysadmin reciba cientos de consultas, pueden ser de sus compañeros de oficina, de relaciones personales, amigos, etc... Que levante la mano quien nunca hizo una pregunta a alguien con más conocimientos que el (por lo menos aparentemente), nadie verdad, pues imagínate que te relacionas con un buen sysadmin, y te quieres introducir en ese mundo. Lo vas a bombardear a preguntas, seguro, ja. Hoy hacemos una recopilación de las consultas más frecuentes que recibe un sysadmin, unas son simples, otras no tanto. Comenzamos, no sin antes recordar un articulo donde se exponían los scripts más comunes para un sysadmin. Preguntas a un sysadmin.
Preguntas a un Sysadmin
1- Como forzar la ejecución de fsck al reiniciar el sistema? Para ejecutar fsck de manera forzada en un sistema de archivos (en el próximo reinicio), en el sistema de archivos creamos un nuevo archivo que se llamara 'forcefsck'. Supongamos que queremos ejecutar fsck en el /home. cd /home ; touch forcefsck ; reboot 2- Cambiar la fecha de caducidad de la contraseña de una cuenta, sin modificar la contraseña? Usando el comando "chage" podemos prolongar la fecha de vencimiento sin ningún problema. La sintaxis es la siguiente... chage -d yy-mm-dd Usuario 3- Verificar la última vez que se escaneó un sistema de archivos. Con la herramienta tune2fs, podemos averiguar cuándo se realizó por ultima vez un análisis del sistema de archivos en busca de errores. Su sintaxis es la siguiente. tune2fs -l | grep “Last checked” 4- Qué es Kdump y por qué es tan necesario? Kdump es una herramienta del propio kernel, que captura los volcados de memoria cuando se produce un fallo grave, o un kernel panic. Su beneficio es que puedes analizar esos archivos, y localizar la causa. 5- Qué aplicación se utiliza para analizar los volcado de memoria (o el vmcore) en CentOS? La aplicación para poder analizar los volcados es crash. 6- Como instalar todas actualizaciones y parches del sistema, en un servidor CentOS, excepto el kernel? En este caso tan solo debes utilizar el parámetro exclude de yum o dnf. yum update –exclude=kernel* 7- Como puedo saber si mi servidor es virtual o físico? Para poder identificar y salir de dudas, nos ayudamos de dmidecode. dmidecode -t system | grep “Product Name” 8- Qué es el automounter y por qué es tan necesario? Automounter es un servicio del sistema que se utiliza para montar un sistema de archivos (ya sea local o remoto), al acceder al dispositivo. Cuando el sistema de archivos está inactivo, el servicio (autofs) desmontará automáticamente el sistema de archivos. El beneficio de los autofs es que el sistema no necesita montar el sistema de archivos continuamente, solo montará cuando sea necesario. 9- Como verificar si el ultimo comando se ejecuta correctamente, o no? Es muy fácil, por ejemplo del comando ls. ls -l /var/ echo $? 10- Como puedo forzar a un usuario a cambiar su contraseña? Ayudándonos del comando "chage", lo que haremos es caducar la password del usuario. Así, cada vez que inicie sesión en el sistema recibirá el siguiente aviso, ”Su contraseña ha caducado. Debe cambiar su contraseña ahora e iniciar sesión de nuevo”. chage -d 0 Usuario 11- Como obtener información sobre un paquete rpm con yum? En nuestro ejemplo sobre postfix. yum history package postfix 12- Como modificar el nombre del host de manera permanente en CentOS? Ya tratamos este tema de manera más extensa en otro articulo, de todas maneras es tan simple como ejecutar lo siguiente: hostnamectl set-hostname Nuevo-hostname 13- Como saber que módulos del kernel están instalados? El comando lsmod te dará un completo listado. lsmod 14- Como puedo comprobar la I/O en linux? Existen multitud de herramientas, pero sin dudarlo las más utilizadas son las siguientes (ejecútalas tal cual en tu sistema): sar iostat vmstat 15- Para que sirven ‘/etc/lvm/backup’ y ‘/etc/lvm/archive’? Cuando creamos o actualizamos una partición basada en lvm, la copia de seguridad de los metadatos se guarda en '/etc/ lvm/backup', los nuevos metadatos se almacenan en '/etc/lvm/archive'. Como ves son archivos importantes, ademas si tienes algún problema con el comando vgcfgrestore puedes restaurar los metadatos del volumen. 16- Como listar las tablas de enrutamiento en linux? Para enumerar las tablas tenemos dos comandos ideales, son: netstat -nr #y route -n 17- Como puedo modificar el puerto SSH predeterminado en linux? Este tema también lo tratamos en profundidad en un articulo anterior, de todas maneras es así de fácil... nano /etc/ssh/sshd_config Edita donde pone "22", guarda el archivo y cierra el editor. No te olvides de conceder permisos al nuevo puerto. 18- Como puedo ver las marcas de tiempo en linux? En la mayoría de distribuciones linux puedes utilizar el comando dmesg (mensajes de diagnostico), con su correspondiente parámetro. dmesg -T 19- Como puedo saber la marca (fabricante) y el modelo de un servidor o estación de trabajo? Con el comando dmidecode, podemos averiguar la marca y el modelo del servidor. dmidecode -t system 20- Como identificar la bios del sistema? Para esto, también nos ayudamos del comando demidecode. dmidecode -t bios 21- Como extender un grupo de volúmenes ya creado? Lo primero que tenemos que hacer es crear el volumen físico (pv) en el nuevo disco (sin formato), en este caso /dev/sdb. pvcreate /dev/sdb Ahora ejecutamos vgextend. vgextend nombre-del-grupo-volumen /dev/sdb Esta es la ultima de la serie de preguntas a un sysadmin más comunes, evidentemente son muchas más, pero he seleccionado las que considero más útiles para los usuarios en general. Espero que este articulo te sea de utilidad, puedes ayudarnos a mantener el servidor con una donación (paypal), o también colaborar con el simple gesto de compartir nuestros artículos en tu sitio web, blog, foro o redes sociales. Preguntas a un sysadmin. Read the full article
#/etc/lvm/archive#/etc/lvm/backup#autofs#Automounter#chage#comandols#dmesg#dmidecode#forcefsck#fsck#iostat#Kdump#lsmod#postfix#Preguntas#PreguntasaunSysadmin#sar#sysadmin#tune2fs#vgextend#vmstat
0 notes
Text
Cómo instalar CentOS 7 con KDE
CentOS (Community ENTerprise Operating System) es una bifurcación a nivel binario de la distribución Linux Red Hat Enterprise Linux RHEL, compilado por voluntarios a partir del código fuente liberado por Red Hat. Red Hat Enterprise Linux se compone de software libre y código abierto, pero se publica en formato binario usable (CD-ROM o DVD-ROM) solamente a suscriptores pagados. Como es requerido, Red Hat libera todo el código fuente del producto de forma pública bajo los términos de la Licencia pública general de GNU y otras licencias. Los desarrolladores de CentOS usan ese código fuente para crear un producto final que es muy similar al Red Hat Enterprise Linux y está libremente disponible para ser bajado y usado por el público, pero no es mantenido ni asistido por Red Hat. Existen otras distribuciones también derivadas de los fuentes de Red Hat.El creador de de CentOS fue Lance Davis. Es una distribución de Linux basada en código fuente libre disponible de Red Hat Enterprise Linux. Cada versión de CentOS es mantenida durante 7 años con actualizaciones de seguridad. Las versiones nuevas son liberadas cada 2 años y actualizadas regularmente para dar soporte al hardware nuevo.Para descargar la última versión de CentOS 7 acceder al sifio oficial de descargas centos.org/download/, y descargar la imagen ISO del DVD (isoredirect.centos.org/centos/7/isos/x86_64/CentOS-7.0-1406-x86_64-DVD.iso) desde uno de los mirrors.
Instalación
El instalador de CentOS ha cambiado mucho desde la versión anterior. A mí personalmente no me gustó, ya que no es el clásico instalador secuencial donde las tareas se realizan de a una por vez, sino que trata de realizar tareas en paralelo para acelerar el proceso. Aunque esta forma de trabajar puede inducirnos accidentalmente a saltearnos pasos de configuración .
Luego de bootear el sistema con el DVD de instalación, seleccionar la opción "Install CentOS 7":

Seleccionar el idioma durante la instalación:

Lo primero que observamos al iniciar el instalador es un panel de tareas de instalación. Estas tareas se pueden realizar en cualquier orden, y algunas no son obligatorias, por lo que es posible olvidarse o saltearse alguna accidentalmente.
Se realizan cada una de las tareas de configuración, comenzando por la configuración regional, accediendo al botón "DATE & TIME":

Seleccionar la ubicación geográfica (por ejemplo Mexico) y presionar "Done" para volver al panel. Luego, configurar la disposición de teclado accediendo a "KEYBOARD":

Con el botón "más" (+) agregar el teclado, por ejemplo "Spanish; Castillian (Spanish)":

Presionar "Add" y eliminar la configuración de teclado por defecto ("English") con el botón "menos" (-):

Presionar "Done" para confirmar los cambios y acceder al botón "LANGUAGUE SUPPORT" para instalar los idiomas:

Además del idioma inglés por defecto, agregar cualquier otro idioma necesario, por ejemplo "Español (España)" y "Español (Mexico)":
A continuación, acceder al botón "SOFTWARE SELECTION", para seleccionar el software a instalar. CentOS posee diferentes "sabores" de acuerdo al uso que se le vaya a dar al sistema, como por ejemplo servidor Web, host de máquinas virtuales, estación de trabajo, etc. En este caso voy a seleccionar "KDE Plasma Workspaces". Si se instala cualquier tipo de versión para servidores, siguiendo la filosofía de CentOS y GNU/Linux en general, muy seguramente no se instalará ningún entorno gráfico. Cabe destacar que el entorno de escritorio por defecto de las versiones "desktop" de CentOS es GNOME 3. Como ya ex-usuario de GNOME 2, decidí cambiarme a KDE, pues el nuevo diseño de GNOME no me agrada. Aunque esto es cuestión de gustos.

Seleccionar "KDE Plasma Workspaces" para instalar CentOS con entorno de escritorio KDE.
Al finalizar, presionar "Done" para volver al panel.
En la parte final de la configuración de la instalación se debe especificar el medio donde instalar el sistema, accediendo al botón "INSTALLATION DESTINATION":

Seleccionar un medio y un método de particionado. En este punto se puede optar por diferentes métodos de particionado automáticos y guiados. En este artículo voy a explicar cómo utilizar un particionado manual. Para ello se debe especificar la opción "I will configure partitioning" y seleccionar un medio. Inmediatamente se abre una herramienta de particionado muy diferente al anterior GParted. En la parte inferior se observa el espacio disponible, y el espacio total. Con los botones '+' y '-' se agregan y eliminan particiones. A modo de ejemplo voy a crear dos particiones, una para todo el sistema, y otra para la memoria de intercambio (swap):

Presionar el botón '+' y especificar el punto de montaje y el tamaño (agregar una letra 'g' al final para indicar Gigabytes):

Luego indicar el formato del sistema de archivos, por ejemplo "ext4":

Repetir los pasos para el resto de las particiones:

En el panel de la izquierda se muestra cómo quedará la tabla de particiones:

Por supuesto, el esquema de particionado dependerá del uso de cada sistema. Siempre se recomienda separar en filesystems diferentes los directorios /var, /usr y /home, como mínimo. Dependiendo de cada tipo de sistema existirán más o menos particiones.
Para crear la tabla de particiones, presionar "Done". El sistema advierte todos los cambios que se producirán a nivel filesystem:

Aceptar los cambios para volver al panel. En este punto sólo esta configurar la red, pero la ansiedad me jugó una mala pasada y me olvidé ese paso accidentalmente. Aunque es algo muy sencillo, ya que CentOS utiliza la herramienta NetworkManager.
Luego de configurar la red, presionar el botón "Begin Installation" para comenzar la instalación:

Aquí es donde se nota el paralelismo del instalador. Mientras el mismo comienza con sus tareas, es posible configurar la contraseña de root y crear un usuario adicional. Presionar "ROOT PASSWORD" para indicar la contraseña de superusuario:

Escoger una contraseña fuerte (se observa en la captura que he elegido una contraseña débil, por ello la advertencia) y volver al menú anterior para crear un usuario ("USER CREATION"):

Como en todo sistema GNU/Linux, por seguridad es altamente recomendable iniciar sesión con un usuario non-root (no administrador), sobre todo si se trata de un sistema de escritorio. Esto evita la mayoría de los problemas de seguridad que existen con otros sistemas, notablemente Windows. Indicar un nombre completo, nombre de usuario, y contraseña. Presionando el botón "Advanced" es posible indicar parámetros adicionales como membresía de grupo, directorio home (por defecto crea uno dentro de /home, cuyo nombre coincide con el del usuario):

Si se desea que el usuario pueda ejecutar tareas con permisos elevados mediante sudo, agregarlo al grupo "wheel". Volver y esperar que finalice la instalación de software:

Al finalizar la instalación, presionar el botón "Reboot" para reiniciar:

Una vez que reinicia, lo primero que se debe hacer es aceptar la licencia (me olvidé esta captura).
Respecto a este tema hay mucha tela para cortar. CentOS es ahora "propiedad" de Red Hat, ergo tiene que respetar la ley de regulación de exportaciones, puntualmente todo lo referente al soporte a naciones embargadas:
By downloading CentOS software, you acknowledge that you understand all of the following: CentOS software and technical information may be subject to the U.S. Export Administration Regulations (the "EAR") and other U.S. and foreign laws and may not be exported, re-exported or transferred (a) to any country listed in Country Group E:1 in Supplement No. 1 to part 740 of the EAR (currently, Cuba, Iran, North Korea, Sudan & Syria); (b) to any prohibited destination or to any end user who has been prohibited from participating in U.S. export transactions by any federal agency of the U.S. government; or (c) for use in connection with the design, development or production of nuclear, chemical or biological weapons, or rocket systems, space launch vehicles, or sounding rockets, or unmanned air vehicle systems. You may not download CentOS software or technical information if you are located in one of these countries or otherwise subject to these restrictions. You may not provide CentOS software or technical information to individuals or entities located in one of these countries or otherwise subject to these restrictions. You are also responsible for compliance with foreign law requirements applicable to the import, export and use of CentOS software and technical information.
http://centos.org/legal/#export-regulations
Digamos que si un norteamericano hace esta misma guía y un cubano la lee, a los ojos del gobierno yankee es un terrorista. Afortunadamente yo soy mexicano y soy libre para escribir esta guía, y que la lea quien quiera.
Ya lo sé, da asco, no queda otra que comérsela o abandonar CentOS (¿por qué no Scientific Linux?).
La misma controversia que se generó alrededor de Fedora.
Luego de aceptar la, nefasta, licencia, es hora de configurar Kdump, una herramienta que recopila información útil en caso de un kernel crash. Como confío en que nunca va a suceder un crash del kernel, y no me gusta desperdiciar memoria, desactivo Kdump:
Si se hacen cambios en Kdump es necesario reiniciar el sistema:
Al iniciar nuevamente, se accede por primera vez a la pantalla de login, muy bonita para mi gusto:
Y por primera vez, el escritorio de KDE:

Para mayor información sobre CentOS acceder a la documentación oficial en la Wiki del proyecto: wiki.centos.org.
Referencia:
https://www.linuxito.com/gnu-linux/nivel-basico/406-como-instalar-centos-7-con-kde
0 notes
Text
New Post has been published on 나만의 세상~!
New Post has been published on http://blog.seabow.pe.kr/?p=6763
RHEL6 의 kdump 에서 raw 사용 하기
RHEL 환경에서 kdump 를 사용할때 file system 이나 path 가 아닌 raw device 를 사용 할 수가 있다.
보통 이 경우는 raw 에 vmcore 를 담아 두었다가 임의적인 상황에 file 로 저장하기 위함으로 생각되며 사용 방법은 아래와 같다.
file : /etc/kdump.conf raw $(device name) ex) raw /dev/vda1
위 설정을 하고 꼭 kdump 용 initrd 파일을 갱신 해 줘야 한다. ex) # rm -f /boot/initrd-xxxkdump.img # service kdump restart >> kdump 용 initrd 를 생성함.
그리고 kdump 서비스가 활성화 되어 있어야 함. ( 당연히 /etc/grub.conf 에 crashkernel=$(size) 는 설정되어 있다는 전재 )
그럼? raw device 로 설정되어 있는데? vmcore file 로는 어떻게 받을 수 있나? 방법은 간단 하다. # service kdump start 를 이용하여 vmcore 를 file 로 생성하는 함수를 호출해 주면 된다. /etc/init.d/kdump 내용을 찾아 보면 됨.
This work is licensed under a Creative Commons Attribution 4.0 International License.
0 notes
Text
kdump? On the host.
kdump is one of those technologies which are a bit tricky in the container world. Well, what does tricky mean, it wsa tricky to mean how all the involved components interact. After all it turns out to be simple: kdump is on the host (atomic) and can be triggered by privileged containers. That's it.
0 notes
Text
Oracle Linux: Insufficient memory to auto-enable kdump
Oracle Linux: Insufficient memory to auto-enable kdump
Remember how I said “you should be all set”, last week? Turns out, I was only partially right. After creating a local user account, Linux also configures kdump, the kernel crash dumping mechanism. When attempting to do so, it returned this error message:
As problems go, this one is fairly minor. Kdump does not need to be enabled or configured for everything else to work. I made a note of the…
View On WordPress
0 notes
Link
下記、サイトより抜粋
■説明 カーネルパニックや原因不明のハングアップなどでサーバが停止してしまった場合、多くの場合は原因特定にまで至らないものが多数だと思います。 そこで、Kdumpの設定を入れておくことでカーネルパニックが発生するとdumpを取得し保存します。 取得したdumpを解析することで原因が特定できるかもしれない!と言う事なので入れてみることにしました。
0 notes