#dmidecode
Explore tagged Tumblr posts
Visit Tumblr Blog
Explore Tumblr blogs with no restrictions, modern design and the best experience.
Last Seen Tumblr Blogs


Fun Fact
25% of US internet users with an annual income of $80-100K use Tumblr.
Text
apparently knockoff crucial DIMMs are rampant
just got one courtesy of brazillian ebay
notice the crooked label, poor printing and glue slathered all over the neighboring DRAM chips

classic mark of the beast on the back, knockoff makers/refurbishers love putting these shitty mfg date stickers and ink stamps on shit

dmidecode shows no part number, all generic information, and an unknown manufacturer

so yeah. needless to say I returned it lol
you gotta keep an eye out on this stuff, I ran memtest and it made it through a pass but who knows how long it would last
3 notes
·
View notes
Text
How to Identify Dell PowerEdge Server Generation
Dell PowerEdge servers with common design components are be grouped into generations, This article provides general guidance for PowerEdge server model naming conventions to help identify the generation and key components.
To identify the generation of a Dell PowerEdge server, follow these steps:
1. Check the Model Number
Locate the Model Number: Found on the server’s front bezel, rear label, or within system information (BIOS/iDRAC).
Decode the Model Number:
Format: [Series][Generation][Design] (e.g., R740 = Rack (R), 7 Series, 14th Generation).
Key Rule: The second digit in the model number indicates the generation when added to 10.
Example: R740 → Second digit = 4 → Generation = 14 (10 + 4).
2. Use Dell’s Support Site
Enter the Service Tag (found on the server’s label) at Dell Support. The site will display the generation and full specifications.
3. Check BIOS or iDRAC
BIOS: Boot into BIOS; the main screen often lists the model and generation.
iDRAC: Access the iDRAC web interface (via IP) to view detailed system info, including generation.
4. Command-Line Tools
Linux: Run sudo dmidecode -s system-product-name to get the model number.
Windows: Use msinfo32 or PowerShell: Get-WmiObject Win32_ComputerSystem | Select-Object Model
5. Physical Indicators (Less Reliable)
LCD Bezel Color:
12th Gen (Rx20): Blue
13th Gen (Rx30): Green
14th Gen (Rx40): Orange
CPU Architecture:
12th Gen (2012): Intel Ivy Bridge
13th Gen (2014): Intel Haswell
14th Gen (2017): Intel Broadwell/Skylake
15th Gen (2020): Intel Cascade Lake/AMD Milan
Reference Chart
Model Number ExampleSecond DigitGenerationRelease Era R710, R610 1 11th ~2010 R720, R620 2 12th ~2012 R730, R630 3 13th ~2014 R740, R640 4 14th ~2017 R750, R650 5 15th ~2020 R760, R660 6 16th ~2023
Example Workflow
Model Number: R740 → Second digit = 4 → 14th Generation.
Service Tag: Enter at Dell Support → Confirms "PowerEdge R740 (14th Gen)".
iDRAC/BIOS: System Info → "PowerEdge R740, Generation 14".
This method ensures accurate identification regardless of server configuration or age.
0 notes
Text
Debugging Hetzner: Uncovering failures with powerstat, sensors, and dmidecode
https://www.ubicloud.com/blog/debugging-hetzner-uncovering-failures-with-powerstat-sensors-and-dmidecode
0 notes
Text
wait why does dmidecode say that there are 2 hdd bays
does it mean like theres a slot for a hdd or is it misinterpreting the ssd as it
0 notes
Text
كيفية استخراج الرقم التسلسلي على أي كمبيوتر بنظام Linux

في بعض الأحيان ، سيلزمك العث��ر على الرقم التسلسلي للكمبيوتر المحمول من أجل الحصول على الدعم اللازم من الشركة المُصنِّعة أو تحديد خصائصه التقنية. يحت��ي كل جهاز على رقم فريد يتكون من عدد مُختلف من الأحرف ، والذي يتم تحديده من قبل الشركة المصنعة. يُشير هذا الرمز إلى الكمبيوتر المحمول الذي ينتمي إلى سلسلة مُحددة من الأجهزة ذات الخصائص المُتشابهة. أصبح العثور على الرقم التسلسلي للكمبيوتر الذي يعمل بنظام Linux أمرًا ضروريًا للعديد من الأغراض، سواء كنت تقوم بصيانة الجهاز أو تحتاج إلى تنفيذ ترقيات للنظام. حيث يُعد تحديد الرقم التسلسلي للكمبيوتر الخاص بك أمرًا بسيطًا بشكل عام مثل التحقق من الملصق الموجود على الصندوق. ولكن في بعض الأحيان، ستحتاج إلى طريقة أخرى لاكتشاف الرقم التسلسلي، ويُمكن أن تساعدك أوامر مثل dmidecode. تحقق من إصلاح مشكلات خادم Linux باستخدام خطوات استكشاف الأخطاء المثالية. Read the full article
0 notes
Text
Preguntas a un Sysadmin

Preguntas a un Sysadmin. Ya tratamos las funciones principales de un Sysadmin (administrador de sistemas) en un articulo anterior, En este articulo veremos otro aspecto sobre su vida cotidiana, las consultas. Es común, incluso llega a ser agotador que un sysadmin reciba cientos de consultas, pueden ser de sus compañeros de oficina, de relaciones personales, amigos, etc... Que levante la mano quien nunca hizo una pregunta a alguien con más conocimientos que el (por lo menos aparentemente), nadie verdad, pues imagínate que te relacionas con un buen sysadmin, y te quieres introducir en ese mundo. Lo vas a bombardear a preguntas, seguro, ja. Hoy hacemos una recopilación de las consultas más frecuentes que recibe un sysadmin, unas son simples, otras no tanto. Comenzamos, no sin antes recordar un articulo donde se exponían los scripts más comunes para un sysadmin. Preguntas a un sysadmin.
Preguntas a un Sysadmin
1- Como forzar la ejecución de fsck al reiniciar el sistema? Para ejecutar fsck de manera forzada en un sistema de archivos (en el próximo reinicio), en el sistema de archivos creamos un nuevo archivo que se llamara 'forcefsck'. Supongamos que queremos ejecutar fsck en el /home. cd /home ; touch forcefsck ; reboot 2- Cambiar la fecha de caducidad de la contraseña de una cuenta, sin modificar la contraseña? Usando el comando "chage" podemos prolongar la fecha de vencimiento sin ningún problema. La sintaxis es la siguiente... chage -d yy-mm-dd Usuario 3- Verificar la última vez que se escaneó un sistema de archivos. Con la herramienta tune2fs, podemos averiguar cuándo se realizó por ultima vez un análisis del sistema de archivos en busca de errores. Su sintaxis es la siguiente. tune2fs -l | grep “Last checked” 4- Qué es Kdump y por qué es tan necesario? Kdump es una herramienta del propio kernel, que captura los volcados de memoria cuando se produce un fallo grave, o un kernel panic. Su beneficio es que puedes analizar esos archivos, y localizar la causa. 5- Qué aplicación se utiliza para analizar los volcado de memoria (o el vmcore) en CentOS? La aplicación para poder analizar los volcados es crash. 6- Como instalar todas actualizaciones y parches del sistema, en un servidor CentOS, excepto el kernel? En este caso tan solo debes utilizar el parámetro exclude de yum o dnf. yum update –exclude=kernel* 7- Como puedo saber si mi servidor es virtual o físico? Para poder identificar y salir de dudas, nos ayudamos de dmidecode. dmidecode -t system | grep “Product Name” 8- Qué es el automounter y por qué es tan necesario? Automounter es un servicio del sistema que se utiliza para montar un sistema de archivos (ya sea local o remoto), al acceder al dispositivo. Cuando el sistema de archivos está inactivo, el servicio (autofs) desmontará automáticamente el sistema de archivos. El beneficio de los autofs es que el sistema no necesita montar el sistema de archivos continuamente, solo montará cuando sea necesario. 9- Como verificar si el ultimo comando se ejecuta correctamente, o no? Es muy fácil, por ejemplo del comando ls. ls -l /var/ echo $? 10- Como puedo forzar a un usuario a cambiar su contraseña? Ayudándonos del comando "chage", lo que haremos es caducar la password del usuario. Así, cada vez que inicie sesión en el sistema recibirá el siguiente aviso, ”Su contraseña ha caducado. Debe cambiar su contraseña ahora e iniciar sesión de nuevo”. chage -d 0 Usuario 11- Como obtener información sobre un paquete rpm con yum? En nuestro ejemplo sobre postfix. yum history package postfix 12- Como modificar el nombre del host de manera permanente en CentOS? Ya tratamos este tema de manera más extensa en otro articulo, de todas maneras es tan simple como ejecutar lo siguiente: hostnamectl set-hostname Nuevo-hostname 13- Como saber que módulos del kernel están instalados? El comando lsmod te dará un completo listado. lsmod 14- Como puedo comprobar la I/O en linux? Existen multitud de herramientas, pero sin dudarlo las más utilizadas son las siguientes (ejecútalas tal cual en tu sistema): sar iostat vmstat 15- Para que sirven ‘/etc/lvm/backup’ y ‘/etc/lvm/archive’? Cuando creamos o actualizamos una partición basada en lvm, la copia de seguridad de los metadatos se guarda en '/etc/ lvm/backup', los nuevos metadatos se almacenan en '/etc/lvm/archive'. Como ves son archivos importantes, ademas si tienes algún problema con el comando vgcfgrestore puedes restaurar los metadatos del volumen. 16- Como listar las tablas de enrutamiento en linux? Para enumerar las tablas tenemos dos comandos ideales, son: netstat -nr #y route -n 17- Como puedo modificar el puerto SSH predeterminado en linux? Este tema también lo tratamos en profundidad en un articulo anterior, de todas maneras es así de fácil... nano /etc/ssh/sshd_config Edita donde pone "22", guarda el archivo y cierra el editor. No te olvides de conceder permisos al nuevo puerto. 18- Como puedo ver las marcas de tiempo en linux? En la mayoría de distribuciones linux puedes utilizar el comando dmesg (mensajes de diagnostico), con su correspondiente parámetro. dmesg -T 19- Como puedo saber la marca (fabricante) y el modelo de un servidor o estación de trabajo? Con el comando dmidecode, podemos averiguar la marca y el modelo del servidor. dmidecode -t system 20- Como identificar la bios del sistema? Para esto, también nos ayudamos del comando demidecode. dmidecode -t bios 21- Como extender un grupo de volúmenes ya creado? Lo primero que tenemos que hacer es crear el volumen físico (pv) en el nuevo disco (sin formato), en este caso /dev/sdb. pvcreate /dev/sdb Ahora ejecutamos vgextend. vgextend nombre-del-grupo-volumen /dev/sdb Esta es la ultima de la serie de preguntas a un sysadmin más comunes, evidentemente son muchas más, pero he seleccionado las que considero más útiles para los usuarios en general. Espero que este articulo te sea de utilidad, puedes ayudarnos a mantener el servidor con una donación (paypal), o también colaborar con el simple gesto de compartir nuestros artículos en tu sitio web, blog, foro o redes sociales. Preguntas a un sysadmin. Read the full article
#/etc/lvm/archive#/etc/lvm/backup#autofs#Automounter#chage#comandols#dmesg#dmidecode#forcefsck#fsck#iostat#Kdump#lsmod#postfix#Preguntas#PreguntasaunSysadmin#sar#sysadmin#tune2fs#vgextend#vmstat
0 notes
Link
Want to find out your Intel NUC bios version, make, model and other information on Linux? Try these simple tips.
4 notes
·
View notes
Text
This guide will help you understand how ... https://www.computingpost.com/how-to-check-hardware-information-on-linux-with-dmidecode/?feed_id=18626&_unique_id=63702931461ef
0 notes
Text
Macbook air doc launchap insalling

Macbook air doc launchap insalling mac os x#
Macbook air doc launchap insalling install#
Macbook air doc launchap insalling iso#
Macbook air doc launchap insalling series#
On installation, Debian sets GRUB as the default boot manager and boot loader. If you are planning on dual booting OS X and Debian, this is the easiest way to manage this process.
Macbook air doc launchap insalling mac os x#
Debian also configures the computer's firmware to open the GRUB boot manager instead of entering directly into the Mac OS X boot loader.Ī boot manager, on computer start-up, lets the user decide which operating system to load.
Macbook air doc launchap insalling install#
In Software Selection screen, you should select a desktop environment, which will be the windowing, graphical user interface for interacting with the operating system.Ĭontinue through the install until complete.ĭebian installs GRUB, a boot manager and loader, on the hard drive's EFI partition. ext4 is a good default for filesystem.Īlso consider creating a partition for exchanging data between Linux and Mac OS X, see Section ''Cross-mount file systems'' below. The Debian OS partition should mount as the system partition in the / location on the filesystem, and the swap space partition should be configured as well. When asked to Partition Disks, configure Debian to use the partitions created previously. The Expert Install provides more options, but are unnecessary for most users.įollow along through the installation screens. When asked, install Debian via the Graphical Install. This will bring up the OS X Startup Manager. Insert the Debian install volume into your computer and hold down the Option key while booting.
Macbook air doc launchap insalling iso#
Here are instructions for mounting an ISO image onto a USB stick. Mount the image onto a mountable physical volume (CD, DVD or USB stick). Get the amd64 image which works with Macbook 2007+ architecture. As new Macs don't have an on-board ethernet port, an ethernet-to-thunderbolt adapter will be required and will work during the Debian install process. This works well if you have a wired ethernet connection. Other packages are downloaded as needed from the internet. The network install is a minimal image containing few packages. Get an installer image: To install Debian, you will need an installer image to boot from, either on a CD, DVD, or USB stick.ĭebian offers various installer images. If you experience errors like "you can't perform this resize unless it has a booter" when attempting to resize the OS X partition, change the volume from CoreStorage to HFS+ Shrink the OS X partition (by default named "Macintosh HD") and create the Debian OS and Debian swap partitions. Select the hard drive entry, and enter the Partition tab. In the File Menu, select Utilities > Disk Utility. Reboot your computer, holding down Command+R to enter Recovery Mode. Also see the ''Cross-mount file systems'' below. If you would like a shared partition between OS X and Debian, consider creating a partition now. See this table on deciding swap space size. You will shrink the OS X partition, so decide how much space you want to give your OS X and Debian partitions. To run Debian, you will want two partitions: one for the Debian OS, and one for swap space for Debian. Recovery HD: A 600 MB recovery partition that includes the OS X installer and basic utilities.OS X: an HFS+ partition that includes OS X and user space.EFI: a 200 MB partition at the beginning of the disk.This requires you to set up system with EFI bootloader.Ī clean install of Mac OS X will create three drive partitions: It is advisable to leave OS X installed, as the computer's firmware can only be updated from OS X. Post-install Debian configuration specific for ?MacBooks. It's always good to start from a clean, backed-up and up-to-date install of OS X. You can find the version of a MacBook in the "About this Mac" menu in OSX, or dmidecode output from Linux. There are several different models with different internal hardwares.
Macbook air doc launchap insalling series#
MacBook is a series of laptop PCs sold by Apple Inc. CPU frequency scaling in kernel (customization).CPU frequency scaling in kernel (basics).Mount Linux filesystems (ext3) under Mac OS X.Mount Mac OS X filesystems (HFS+) under Linux.
0 notes
Photo

https://linuxtechlab.com/system-hardware-information-dmidecode-command-in-linux/
0 notes
Text
Get System Hardware information using 'dmidecode' command in Linux
Get System Hardware information using ‘dmidecode’ command in Linux
DMIDECODE command in Linux is used fetch the complete system hardware information. It can information like Serial Numbers, Part number etc for all the hardware components like CPU, RAM, HDD etc. We can also get information related to system BIOS. DMIDECODE command in Linux is actually fetched data from DMI table or Desktop Management Interface Table & produced it in human-readable format, hence…

View On WordPress
0 notes
Text
Uso del comando dmidecode con ejemplos

Uso del comando dmidecode con ejemplos. Existen muchas herramientas para identificar el hardware del sistema, pero sin duda alguna una de las más completas es "dmidecode". dmidecode es una herramienta que descarga el contenido de la tabla DMI (también conocida como SMBIOS) en un formato legible para humanos. Esta tabla contiene la descripción detallada de los componentes de hardware del sistema, así como números de serie y el nombre y versión de la BIOS. La tabla DMI no solo describe el hardware del sistema actual, también puede informar de sus posibles actualizaciones (la CPU más potente admitida o la cantidad máxima de memoria admitida por el sistema). En el articulo de hoy vemos como utilizar el comando dmidecode correctamente.
Uso del comando dmidecode
Si quieres ver toda la información posible de tu sistema de forma predeterminada, la puedes obtener ejecutando el comando "dmidecode" en tu sistema. NO te lo recomiendo, mucho mejor lo vemos paginado y vamos bajando linea por linea (para salir pulsas la tecla "q"). dmidecode | less ejemplo de salida... # dmidecode 3.1 Getting SMBIOS data from sysfs. SMBIOS 2.8 present. 82 structures occupying 2698 bytes. Table at 0xB7FCB000. Handle 0x0000, DMI type 0, 24 bytes BIOS Information Vendor: HP Version: P80 Release Date: 03/28/2014 Address: 0xF0000 Runtime Size: 64 kB ROM Size: 8192 kB Characteristics: PCI is supported PNP is supported BIOS is upgradeable BIOS shadowing is allowed ESCD support is available Boot from CD is supported Selectable boot is supported EDD is supported 5.25"/360 kB floppy services are supported (int 13h) 5.25"/1.2 MB floppy services are supported (int 13h) 3.5"/720 kB floppy services are supported (int 13h) Print screen service is supported (int 5h) 8042 keyboard services are supported (int 9h) Serial services are supported (int 14h) Printer services are supported (int 17h) CGA/mono video services are supported (int 10h) ACPI is supported USB legacy is supported BIOS boot specification is supported Function key-initiated network boot is supported Targeted content distribution is supported Firmware Revision: 2.70 Handle 0x0100, DMI type 1, 27 bytes System Information Manufacturer: HP Product Name: ProLiant DL320e Gen8 v2 Version: Not Specified Serial Number: CZ3350WLNB UUID: 33323237-3431-5a43-3333-3530574c4e42 Wake-up Type: Power Switch SKU Number: 722314-B21 Family: ProLiant .................... ...................... Aun paginado y linea por linea sigue siendo bastante engorroso, la herramienta "dmidecode" admite opciones para poder especificar exactamente lo que queremos averiguar, mira que fácil. Identificar el fabricante real del sistema. dmidecode | grep Vendor Identificar el nombre y modelo. dmidecode | grep Product Imprimir en pantalla el numero de serie de nuestra maquina. dmidecode | grep Serial ejemplo...

Ejemplos de uso del comando dmidecode Las opciones vistas anteriormente son las más básicas, y por suerte "dmidecode" admite los tipos que se dividen en "palabras" genéricas y en números donde puedes especificar mucho más. Para ver las palabras admitidas en tu sistema ejecuta el siguiente comando: dmidecode -t ejemplo de salida... Type number or keyword expected Valid type keywords are: bios system baseboard chassis processor memory cache connector slot Como ejemplo de uso del comando con palabras, intentamos averiguar los datos del chasis de nuestro sistema. dmidecode -t chassis ejemplo de salida...

Datos del chasis del sistema con dmidecode Una vez visto el uso de palabras con la herramienta, vamos a profundizar un poco más en nuestro sistema gracias a los tipos por números de "dmidecode". Lista de números tipo y su uso: Conociendo los números revisamos de nuevo el chasis, pero esta vez su numero (el 3). Con numero: dmidecode -t 3 Con palabra: dmidecode -t chassis En los dos casos el resultado es el mismo. # dmidecode 3.1 Getting SMBIOS data from sysfs. SMBIOS 2.8 present. Handle 0x0300, DMI type 3, 21 bytes Chassis Information Manufacturer: HP Type: Rack Mount Chassis Lock: Not Present Version: Not Specified Serial Number: CZ3350WLNB Asset Tag: Boot-up State: Safe Power Supply State: Safe Thermal State: Safe Security Status: Unknown OEM Information: 0x00000000 Height: 1 U Number Of Power Cords: 1 Contained Elements: 0 Como has podido comprobar el uso del "comando dmidecode" es muy sencillo, y nos aporta muchísima información. Espero que este articulo sea de utilidad, puedes colaborar con nosotros con una donación (paypal), o con el simple gesto de compartir los manuales en tu sitio web, blog, foro o redes sociales. Read the full article
0 notes
Text
Open terminal and type the following on Linux to print your BIOS version and other info:
for d in system-manufacturer system-product-name bios-release-date bios-version do echo "${d^} : " $(sudo dmidecode -s ${d}) done
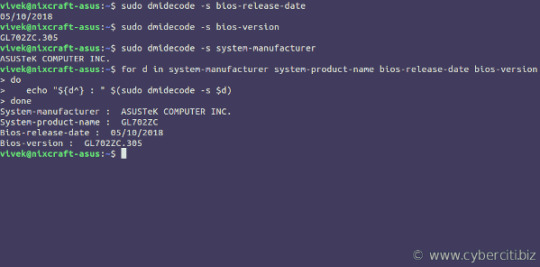
-> For more info see: Linux Find Out BIOS Version Using a Command Line Option
17 notes
·
View notes
Link
Today you will learn about a command which will help you to get information related to hardware and operating system.
In Linux, there are many commands, with the help of which we can extract information about hardware and software.
Here I have listed some of them:
uname
lshw
lscpu
lsblk
lsusb
dmidecode etc..
In this guide, I will explain to you about uname command.
Let’s get started.
uname is a very basic but useful command that helps you get some key information’s like:
Operating System Name
Kernel Name and Version
Kernel Release Information
Network node Hostname/System Hostname
System Hardware Name
Processor Information
Hardware Platform/Architecture details
0 notes