#Automounter
Explore tagged Tumblr posts
Visit Tumblr Blog
Explore Tumblr blogs with no restrictions, modern design and the best experience.
Last Seen Tumblr Blogs


Fun Fact
Tumblr has been banned in Indonesia for providing people with access to pornographic content.
Text
three different daemon status checking entries on my work laptop status bar for 1) Endpoint security proxy 2) Work VPN 3) 2006 iPod Video automounted as music library.
7 notes
·
View notes
Text
How to install xfs and create xfs file system on Debian/Ubuntu Linux
11 notes
·
View notes
Text
honestly, if adguard on pi is mentioned here, you might as well mention pivpn and how you can use that to block ads by accessing your adguard via vpn connection (i found pivpn way easier to set up than pihole or adguard)
plus, you're already running a raspberry pi, from there it's not that difficult to plug in an external drive, set up an automount via fstab (there are a lot of tutorials on that) and to expose it on the local network via samba
boom, personal cloud that's running on your machine at home
(i will say that that requires that you can access your network from WAN, but that's usually not too big a deal)
genuinely wild to me when I go to someone's house and we watch TV or listen to music or something and there are ads. I haven't seen an ad in my home since 2005. what do you mean you haven't set up multiple layers of digital infrastructure to banish corporate messaging to oblivion before it manifests? listen, this is important. this is the 21st century version of carving sigils on the wall to deny entry to demons or wearing bells to ward off the Unseelie. come on give me your router admin password and I'll show you how to cast a protective spell of Get Thee Tae Fuck, Capital
67K notes
·
View notes
Text
I've got a working SMB share, yay. Three more to go, and a personal git repo.
I've gotta still figure out the right way to get the Pi to automount the LVs though so whenever I need to reboot the Pi I don't have to manually remount the shares. But progress is progress.
0 notes
Text
FreeBSD 12.2 在 AWS 的 Amazon EFS 整合 (autofs)
FreeBSD 12.2 在 AWS 的 Amazon EFS 整合 (autofs)
Colin Percival 提到了 FreeBSD 12.2 上 autofs 會整合 Amazon EFS,讓掛載進來變得更方便:「Some new FreeBSD/EC2 features: EFS automount and ebsnvme-id」。
用法是先設定 autofs,然後啟用 autofs:
# echo '/efs -efs' > /etc/auto_master # sysrc autofs_enable="YES"
然後重開機後就可以直接切到 /efs/FSID 把 EFS 掛起來了:
Having done this, any access to the path /efs/FSID (e.g., /efs/fs-01234567) will automatically and transparently mount that filesystem.
另外…
View On WordPress
0 notes
Text
Tempo hari, diminta kampus untuk mindah salah satu server yang dari workstation biasa ke server kampus. Karena pakai infrastruktur nya virtual-machine, walhasil tinggal pindah virtual-harddisk (VHD) settingan ikut, tinggal disesuaikan dikit.
Hari pertama setelah selesai pindah, masih ada kendala bahwa server tidak dapat diakses di jaringan lokal. Walaupun dari hoating sudah diarahkan ke alamat IP public terkait dan di reverse proxy ke alamat IP sesungguhnya. Masalah teratasi keesokan harinya setelah network engineer saya minta untuk tambahkan IP static atau ganti IP DNS (DHCP) dengan public DNS.
Namun sangat disayangkan, catu daya mati di siang hari sesaat saya konfirmasi bahwa jaringan lokal sudah dapat mengakses server dengan domain terkait. Masalah selanjutnya datang, yakni setelah dinyalakan server tidak otomatis mem-booting VM. Namun hal tersebut dapat teratasi karena sudah diantisipasi dengan melakukan setting pada BIOS supaya mainboard dapat menyala sesaat setelah mendapat catu daya.
Tinggal masalah terakhir bahwa dari VM sendiri tidak dapat menjalankan cronjob maupun booting otomatis melalui VBoxManage. Hingga akhirnya jalan terakhir adalah menjadikan action tersebut sebuat service yang berjalan sesaat setelah booting hypervisor selesai.
Dan benar, Hari ini terjadi pemadaman listrik. Setelah pemadaman, hypervisor dan VM booting kembali secara normal.
Baru saja, saya menambahkan auto-mount ke harddisk bawaan servernya. Mungkin besok saat restart server akan dicoba dan dilihat hasilnya.
Fin.
Surakarta, Jumat, 31 Maret 2023
Rhesa
Referensi :
[1] https://kifarunix.com/autostart-virtualbox-vms-on-system-boot-on-linux/
[2] https://www.linuxbabe.com/desktop-linux/how-to-automount-file-systems-on-linux
3 notes
·
View notes
Text
Get chmod to work properly in Ubuntu Shell Windows 10
Create /etc/wsl.conf with the following:
[automount] enabled = true
root = /mnt/
options = "metadata,umask=22,fmask=11"
Don't forget to Close terminals and reboot your computer
References :
https://superuser.com/questions/1323645/unable-to-change-file-permissions-on-ubuntu-bash-for-windows-10
2 notes
·
View notes
Text
Installing AmigaOS 3.2 - First Impressions!
So, AmigaOS 3.2 is available, at the moment as a physical installation from selected resellers. No matter your opinion of Hyperion, I hope people are at least in favour of supporting the resellers who keep the Amiga dream alive by purchasing the CD (yes, CD!) and any rom chips needed.

It arrived fresh from my chosen reseller this morning. Let's boot it up and see what it's like to install! I'll be using WinUAE today because my physical Amigas are all currently in bits, and none have a CD drive. More on that in a bit...
WinUAE Config:
Basic A1200 + 8Mb Z2 RAM
3.1 KS ROM (from the Amiga Forever package) - I could have used the 3.2 ROM straight from the CD but as I've not purchased any physical ROMs for my 'real' Amigas, this is how I'm going to do it.
100 MiB Hardfile, with boot priority set to -128 and controller set to 'UAE (uaehf.device)', in 'full RDB mode'
CD image mounted as an .iso image, that I'd created from my CD.
Make sure the 'CDFS automount CD/DVD drives' box is ticked!
Why mounted as an .iso? As none of my Amigas have CD drives, I'll be able to pop this on a CD card and mount it using something like ImageMount, and then install from there. The boot priority of the hard disk has been set to -128 so it should boot up from the .iso straight into the 'Amiga PE'.

Opening up the AmigaOS3.2CD icon, we find an 'Install' folder, and under that a likely-lookin icon with a snappy name:
Because we selected the HD controller to be the UAE device, HDToolBox can't find the drive. Go into the RAM disk, right click the icon, and go to the Information menu. Edit SCSI_DEVICE_NAME to be uaehf.device, press return, then click save.
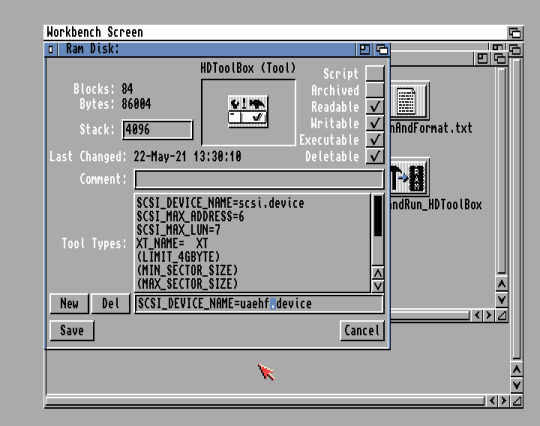
Click the icon again and it will this time find our hard disk. Change drive type => Define New and add the drive
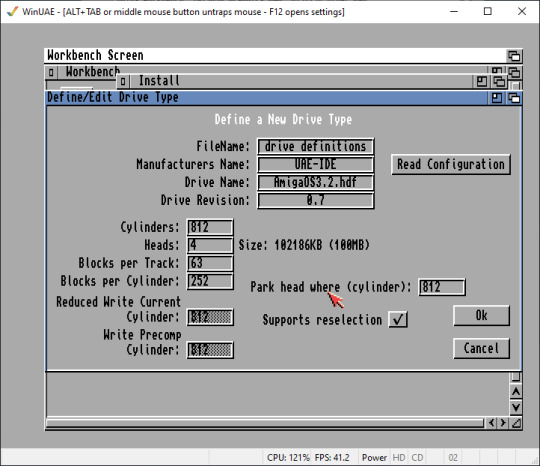
Create a new drive type and partition it.
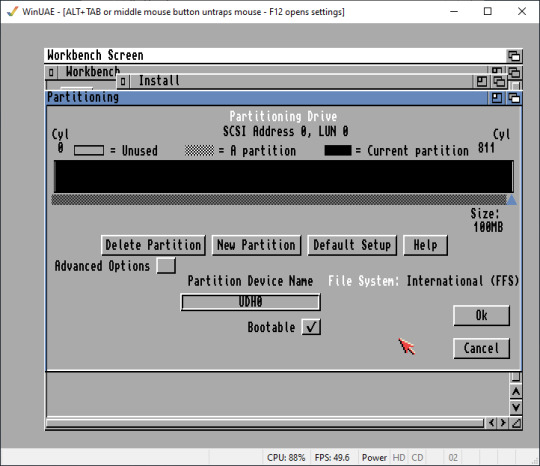
Click "OK", then "Save to device" then exit; it will reboot, and when it restarts go to AmigaOS3.2CD/Install, click on “format” and do a quick format, giving the volume a name. Finally we can begin the installation!
Click the “Start Here” icon, which will mount the Install3.2 disk; open that and click Install. Chose your language and click that. Eventually you’ll get to the installer:

Proceed! It will ask questions about where you want things installed (choose our freshly formatted drive) and some other options. I chose the defaults and selected “yes” to the GlowIcons.
It will start copying files. This takes a while, auto-mounting all of the various ADF files as virtual floppies as it goes. It certainly is easier than doing a lot of disk swapping, virtual or real.

And it’s done!
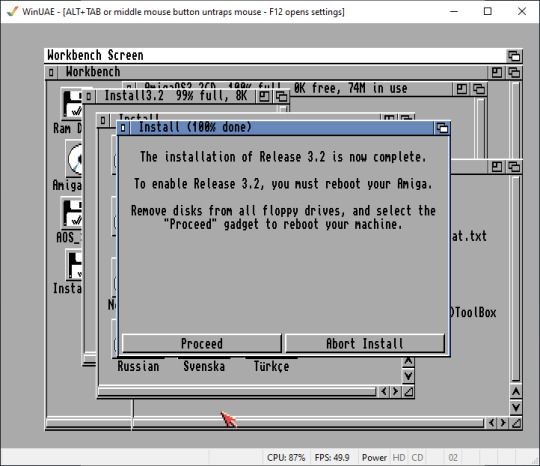
Press F12 in WinUAE to get back to the configuration menu and eject the CD image. Go back into the emulation, click Proceed, let it reboot, and boom!
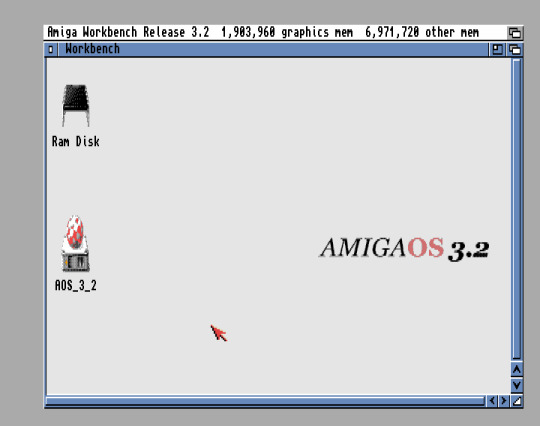
Well, there you are. I think it could benefit from a higher resolution and more colours. For now I’ve put it into high-res laced mode and turned up the colours to 256. On my real Amigas with RTG cards I imagine this would look lovely; on the ones without maybe better off without the GlowIcons unless you have something like an Indivision to allow you to use HighGFX to give better resolutions.

I’m sure there’s a lot of customisation still to be done - I can’t move windows off-screen at the moment. Probably there are instructions on the CD I should read. Still, the installation was straight forward enough and boots happily on the 3.1 ROM, updating via the LoadModule approach, seemingly transparently.
I look forward to installing in on the real Amigas!
------------------------
Update: It turns out that the off-screen windows is activated under Prefs/IControl and clicking a button. I should really RTFM ;)
5 notes
·
View notes
Text
Bypass Android Lock screen in Recovery mode
This method requires access to the Android System folder. And for that, you may need to root your Android device if not already rooted. The below guide will help you to reset the password on your rooted Android device without the help of your Google Account:
For this workaround, we need to use a file manager app called Aroma File Manager. Download Aroma File Manager (ZIP) and copy the file to the /sdcard location of your Android device.
Boot your Android device in Recovery mode. To do this, power it off and restart it by holding the Power and Volume Down keys together. But the method may vary slightly from device to device. Perform a web search to know the exact procedure for booting into recovery on your Android device. Once in Recovery mode, use the Volume Up and Down keys to navigate through the options and use the Home key or Power button to select a particular option.
Go to “mounts and storage” from the recovery menu and select the following options in sequence: “mount /system” >> “mount /data” >> “mount /efs” >> “mount /preload” >> “mount /sdcard” >> “mount /external_sd” (if available). After all the volumes have been mounted, scroll down through the options and select “Go Back”.
Next, you need to install the Aroma File Manager app from the ZIP file. To do this, select “install zip from sdcard” >> “choose zip from sdcard”. From the list of files, select the zip file that you have copied earlier to the /sdcard directory, and choose the Install option.
Android will now install and launch the app directly from Recovery mode. In the app, select Menu >> Settings and scroll down to choose the option “Automount all devices on start”. Tap on Done to save the changes. Exit the app to go back to recovery mode.
You need to run Aroma File Manager one more time in Recovery mode. So select the zip file again and choose the Install option. This time, Aroma will launch having access to all the mounted locations.
In Aroma app, go to data >> system and look for the “password.key” or “gesture.key” file in this folder. If you have a password lock, the file will be password.key; if you have a pattern lock, it will be gesture.key. Tap and hold the file to reveal associated options and select Delete option. Select Yes in the confirmation dialog.
Once your password or pattern file has been deleted, you can restart your device in normal mode. The device may ask for a pattern or password, but it will accept any input you provide. Thus, you can now access the contents of your Android phone or tablet without any loss of data.
Note: The above recovery mode options apply to Clockwork Recovery Mod. If you have any other Recovery installed on your device, the options might be slightly different.
Factory Reset Android without password
If you’re still unable to access your Android device or don’t want to root it, you may perform a Factory Reset to wipe off your password. But be warned, performing Factory Reset will in fact erase all data on your device. The steps below will guide you to perform factory reset when you cant unlock your phone in any way:
If you have an external SD card, remove it from the device. Data on the SD card will remain intact.
Connect your Android to your computer via USB and backup any accessible data that is important to you.
After the backup has been taken, turn off your Android and restart in Recovery mode. Usually, recovery mode is accessed by holding the Power button and Volume Down keys together, but the sequence may vary according to the device. Perform a web search with your device name if you don’t know how to boot into Recovery.
Once in Recovery mode, use the Volume up and down keys to navigate through the options and use the Home key or Power button to select a particular option.
Select “wipe data/factory reset” from the main menu. In the confirmation prompt, select Yes.
Wait for the process to complete. Once done, just restart the device. Your Android would now be required to be set up for first time use.
1 note
·
View note
Text
Last Monday of the Week 2021-12-06
First week at the software factory but my work laptop is trapped in customs so I've just been tooling around in the company slack. Finally did some embroidery again after several months. Significant improvements all around.
Listening: Spotify Top 100 was out this week, so let's put in my #1 from there: Boy With A Coin from Iron and Wine, which is funny because I actually don't like most of the things I've heard from Iron and Wine. This one is good though.
youtube
Watching: Tenet (2020) was on TV and I had heard good things. Love a story with Time Bullshit. Excellent classical spy thriller vibes, I am a slut for organizations with seemingly limitless resources. I wouldn't necessarily say it's "good" but it has very many moments that feel good and the action is competently shot which is frustratingly uncommon.
The Time Bullshit only really gets good in the back half, but with a sharp transition from "oh this is vaguely interesting" to "we are using this all the time to do very interesting things." starting with a point where two groups of people who are moving mutually backwards in each other's time flow try to get information out of each other.
Reading: Closing in on the end of Children of Dune, which is so good but so very ridiculous. I know a tiny amount about the reign of Leto II which means that I have this horrible shadow hanging over how the remaining chapters of this book have to end. God I fuckin hope that Dune (2021) is somehow so successful they have to do this book. As a treat. I was already robbed of Insane Sci-Fi Sequel Movies once when they fucked up Ender's Game.
Making: Embroidery! Finally! The Big Fuckin Project I started last year stares directly through my soul so I figured that rather than working on it I should do something I can finish in a day or two, so Hollow Knight.

Not so happy with that fill, I've done better satin stitch and the cloak is a little weird looking, but I can live with it. Hollow Knight is also in our
Playing: Video games! I've had Hollow Knight for a while but the first time I played it I got lost, wandered around aimlessly, and gave up. Started over this time and set some goals. I've never played a Metroidvania before so it is a little overwhelming in scale. Gorgeous art, the hand-drawn video game style is fantastic, love it when Supergiant does it and I love it here.
Computer Stuff: udisksctl! If you are the type of person who doesn't want disks to automatically mount on Linux, but you also want to be able to mount them quickly without generating your own paths, udisks is what powers automounting. I have aliases hooked up to the mount and unmount commands so I can just pass through block device paths and it'll mount and unmount them, exceedingly useful.
12 notes
·
View notes
Text
How to automount a drive in Linux the GUI way with GNOME
Tim Kitchen/Getty Images First things first. Automounting is an important step in Linux because it makes it such that when you reboot your machine, those attached drives are automatically mounted. That way you don’t have to worry about doing it manually. This is important because you might have applications (such as backups) that save files to those drives. Should an application attempt to write…

View On WordPress
0 notes
Text
no hd in commander no iso to usb and with wine doesn see the usb when using rufus
How To Solve Disk Mount Error in Ubuntu
ByAbhishek Prakash Updated onNovember 9, 2019
2 Comments
Reading Time: 2 minutes
I have several partition on the hard disk of my laptop. Some of them are NTFS and some Ext4. I prefer to auto-mount all the partitions at startup. It saves me trouble and time. I prefer to auto-mount the partition by editing the fstab. This was the first time I was trying to automount an Ext4 partition by editing the fstab. But it gave me the following error when I tried to mount the partition:
When I tried to mount the partition via GUI, it gave me the following error:
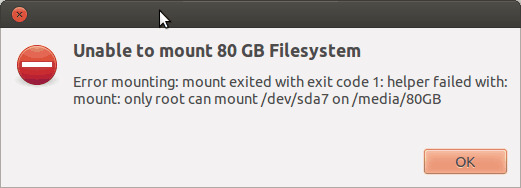
dmesg | tail command showed me the following result:
[ 2123.530257] [] ? ieee80211_scan_rx+0x190/0x190 [mac80211] [ 2123.530264] [] worker_thread+0x124/0x2d0 [ 2123.530270] [<c1075280>] ? manage_workers.isra.27+0x110/0x110 [ 2123.530278] [] kthread+0x6d/0x80 [ 2123.530285] [<c1079130>] ? flush_kthread_worker+0x80/0x80 [ 2123.530292] [<c15acd7e>] kernel_thread_helper+0x6/0x10 [ 2123.530297] —[ end trace befde56ba3820bed ]— [ 2675.446643] EXT4-fs (sda7): mounted filesystem with ordered data mode. Opts: (null) [ 4831.528024] EXT4-fs (sda7): Unrecognized mount option “uid=1000” or missing value [ 5441.695588] EXT4-fs (sda7): Unrecognized mount option “uid=1000” or missing value
Fixing disk mount error
The problematic part was pointed by dmesg. It had trouble with uid=1000. Actually I had edited the /etc/fstab file to include the following line to auto-mount the Ext4 partition:UUID=f920adf0-6038-4145-8214-4e1b79ca2d9b /media/80GB ext4 defaults,uid=1000 0 0
I changed it with the line given below to remove the troublesome “uid=1000”:UUID=f920adf0-6018-4145-8314-4e1b79ca2d6b /media/80GB ext4 defaults 0 0
The automount of the partition worked fine afterwards. Cheers :)
0 notes
Text
Preguntas a un Sysadmin

Preguntas a un Sysadmin. Ya tratamos las funciones principales de un Sysadmin (administrador de sistemas) en un articulo anterior, En este articulo veremos otro aspecto sobre su vida cotidiana, las consultas. Es común, incluso llega a ser agotador que un sysadmin reciba cientos de consultas, pueden ser de sus compañeros de oficina, de relaciones personales, amigos, etc... Que levante la mano quien nunca hizo una pregunta a alguien con más conocimientos que el (por lo menos aparentemente), nadie verdad, pues imagínate que te relacionas con un buen sysadmin, y te quieres introducir en ese mundo. Lo vas a bombardear a preguntas, seguro, ja. Hoy hacemos una recopilación de las consultas más frecuentes que recibe un sysadmin, unas son simples, otras no tanto. Comenzamos, no sin antes recordar un articulo donde se exponían los scripts más comunes para un sysadmin. Preguntas a un sysadmin.
Preguntas a un Sysadmin
1- Como forzar la ejecución de fsck al reiniciar el sistema? Para ejecutar fsck de manera forzada en un sistema de archivos (en el próximo reinicio), en el sistema de archivos creamos un nuevo archivo que se llamara 'forcefsck'. Supongamos que queremos ejecutar fsck en el /home. cd /home ; touch forcefsck ; reboot 2- Cambiar la fecha de caducidad de la contraseña de una cuenta, sin modificar la contraseña? Usando el comando "chage" podemos prolongar la fecha de vencimiento sin ningún problema. La sintaxis es la siguiente... chage -d yy-mm-dd Usuario 3- Verificar la última vez que se escaneó un sistema de archivos. Con la herramienta tune2fs, podemos averiguar cuándo se realizó por ultima vez un análisis del sistema de archivos en busca de errores. Su sintaxis es la siguiente. tune2fs -l | grep “Last checked” 4- Qué es Kdump y por qué es tan necesario? Kdump es una herramienta del propio kernel, que captura los volcados de memoria cuando se produce un fallo grave, o un kernel panic. Su beneficio es que puedes analizar esos archivos, y localizar la causa. 5- Qué aplicación se utiliza para analizar los volcado de memoria (o el vmcore) en CentOS? La aplicación para poder analizar los volcados es crash. 6- Como instalar todas actualizaciones y parches del sistema, en un servidor CentOS, excepto el kernel? En este caso tan solo debes utilizar el parámetro exclude de yum o dnf. yum update –exclude=kernel* 7- Como puedo saber si mi servidor es virtual o físico? Para poder identificar y salir de dudas, nos ayudamos de dmidecode. dmidecode -t system | grep “Product Name” 8- Qué es el automounter y por qué es tan necesario? Automounter es un servicio del sistema que se utiliza para montar un sistema de archivos (ya sea local o remoto), al acceder al dispositivo. Cuando el sistema de archivos está inactivo, el servicio (autofs) desmontará automáticamente el sistema de archivos. El beneficio de los autofs es que el sistema no necesita montar el sistema de archivos continuamente, solo montará cuando sea necesario. 9- Como verificar si el ultimo comando se ejecuta correctamente, o no? Es muy fácil, por ejemplo del comando ls. ls -l /var/ echo $? 10- Como puedo forzar a un usuario a cambiar su contraseña? Ayudándonos del comando "chage", lo que haremos es caducar la password del usuario. Así, cada vez que inicie sesión en el sistema recibirá el siguiente aviso, ”Su contraseña ha caducado. Debe cambiar su contraseña ahora e iniciar sesión de nuevo”. chage -d 0 Usuario 11- Como obtener información sobre un paquete rpm con yum? En nuestro ejemplo sobre postfix. yum history package postfix 12- Como modificar el nombre del host de manera permanente en CentOS? Ya tratamos este tema de manera más extensa en otro articulo, de todas maneras es tan simple como ejecutar lo siguiente: hostnamectl set-hostname Nuevo-hostname 13- Como saber que módulos del kernel están instalados? El comando lsmod te dará un completo listado. lsmod 14- Como puedo comprobar la I/O en linux? Existen multitud de herramientas, pero sin dudarlo las más utilizadas son las siguientes (ejecútalas tal cual en tu sistema): sar iostat vmstat 15- Para que sirven ‘/etc/lvm/backup’ y ‘/etc/lvm/archive’? Cuando creamos o actualizamos una partición basada en lvm, la copia de seguridad de los metadatos se guarda en '/etc/ lvm/backup', los nuevos metadatos se almacenan en '/etc/lvm/archive'. Como ves son archivos importantes, ademas si tienes algún problema con el comando vgcfgrestore puedes restaurar los metadatos del volumen. 16- Como listar las tablas de enrutamiento en linux? Para enumerar las tablas tenemos dos comandos ideales, son: netstat -nr #y route -n 17- Como puedo modificar el puerto SSH predeterminado en linux? Este tema también lo tratamos en profundidad en un articulo anterior, de todas maneras es así de fácil... nano /etc/ssh/sshd_config Edita donde pone "22", guarda el archivo y cierra el editor. No te olvides de conceder permisos al nuevo puerto. 18- Como puedo ver las marcas de tiempo en linux? En la mayoría de distribuciones linux puedes utilizar el comando dmesg (mensajes de diagnostico), con su correspondiente parámetro. dmesg -T 19- Como puedo saber la marca (fabricante) y el modelo de un servidor o estación de trabajo? Con el comando dmidecode, podemos averiguar la marca y el modelo del servidor. dmidecode -t system 20- Como identificar la bios del sistema? Para esto, también nos ayudamos del comando demidecode. dmidecode -t bios 21- Como extender un grupo de volúmenes ya creado? Lo primero que tenemos que hacer es crear el volumen físico (pv) en el nuevo disco (sin formato), en este caso /dev/sdb. pvcreate /dev/sdb Ahora ejecutamos vgextend. vgextend nombre-del-grupo-volumen /dev/sdb Esta es la ultima de la serie de preguntas a un sysadmin más comunes, evidentemente son muchas más, pero he seleccionado las que considero más útiles para los usuarios en general. Espero que este articulo te sea de utilidad, puedes ayudarnos a mantener el servidor con una donación (paypal), o también colaborar con el simple gesto de compartir nuestros artículos en tu sitio web, blog, foro o redes sociales. Preguntas a un sysadmin. Read the full article
#/etc/lvm/archive#/etc/lvm/backup#autofs#Automounter#chage#comandols#dmesg#dmidecode#forcefsck#fsck#iostat#Kdump#lsmod#postfix#Preguntas#PreguntasaunSysadmin#sar#sysadmin#tune2fs#vgextend#vmstat
0 notes
Text
This guide will demonstrate a simple way... https://www.computingpost.com/add-extra-hard-disk-to-virtualbox-vm-and-set-automount/?feed_id=17890&_unique_id=636512cc0c2c4
0 notes
Text
Neofinder export

NEOFINDER EXPORT FULL VERSION
NEOFINDER EXPORT MOVIE
NEOFINDER EXPORT SERIAL NUMBER
NEOFINDER EXPORT ZIP FILE
NEOFINDER EXPORT ARCHIVE
Power: Handle really large amounts of data With extensive metadata support, you can find your files quickly.Ĭatalog: any hard disk, data folder, CD-ROM, DVD-ROM, BlueRay, HD-DVD, iPod, Server Volume, Audio-CD, USB-Stick, FTP-Server, and more
NEOFINDER EXPORT ARCHIVE
It catalogs all your data, so you stay in control of your data archive or disk library. NeoFinder rapidly organizes your data, either on external or internal disks, or any other volumes.
ProFind 1.14.NeoFinder Business 7.4 Multilingual macOS | 17.8 MB.
NEOFINDER EXPORT SERIAL NUMBER
Pagico 10 Crack + Serial Number freeload 2022.
QuickBooks Pro Crack v5.1.0 + Keygen 2023.
Now run the software and it will be done.
Copy the patch file and paste it to the main file.
Now open the files and not run the program.
NEOFINDER EXPORT ZIP FILE
Extract the RAR or Zip file to your desired location.
First of all download NeoFinder 8.1.2 Crack 2022 from the link given at the end.
OS You will Need To Run this App: macOS 10.13/ macOS 10.14/ macOS 10.15/ macOS 11.
Central Processing Unit : Intel Pentium 4 or later.
You will Need HDD Space: 80 MB of free space is required.
Random Access Memory : 1 GB of RAM is required.
Free Email Support Languages: User interface in eight languages, all in one application: English, German, Japanese, French, Italian, Swedish, Spanish and Dutch.
Cross-Grade: I’ve already bought another disc catalog or media management app, too much to ask!.
QuickLook: Open the QuickLook window for any file selected online in NeoFinder Mac Patch.
And of course, you can ask it to mount the volume at any time via the context menu.
AutoMount: It automatically mounts any server volumes cataloged or updated as needed!.
File Verification: Only NeoFinder can generate an industry-grade MD5 checksum for any cataloged file.
Extend your NeoFinder Serial Number Mac database catalog with five custom fields for all the content you need.
AppleScript: Integrate it with FileMaker Pro or any other application or extend its capabilities.
Unicode: You can use NeoFinder Crack Latest Mac to catalog file names in any language.
International: User interface in English, German, French, Italian, Swedish, Spanish, and Dutch in one application.
sitx) and more, including disk image content.
More information: View archives: ZIP, TAR.
Quick and easy to use, check out the screenshots.
NeoFinder can search photos were taken anywhere (GeoFinder) and export GPS data to KMZ files.
GPS support for geotagging: NeoFinder Free Mac Download catalogs and displays EXIF GPS tags from photos and provides direct links to Google Earth, Flickr, Panoramio, Google Maps, and MapQuest.
NEOFINDER EXPORT MOVIE
Meta Movie Metadata: Get thumbnails, size, duration, codec, and movie files in frame rate, AVI, MOV, MP4, FLV, MPG, MKV, M4V, and more.
Photo metadata: XMP metadata (used by Adobe Bridge), EXIFand IPTC (including GPS geotags), and JPG, TIFF, PICT, and BMP image details.
It also catalogs complete audio CDs and Apple iPhone ringtone files.
Audio metadata: MP3, AAC (iTunes), FLAC (Lossless), ALAC (Apple Lossless), and AIFF metadata: author, album, title, composer, lyrics, album cover, song number, duration, bitrate, genre, year, comment.
Photo Preview: Create beautiful thumbnails for a variety of photo and image formats, including JPG, TIFF, EPS, RAW, PDF, PSD, BMP, GIF, PNG, TGA, and IFF (Maya).
Performance: processing large amounts of data.
Catalog: any hard drive, data folder, CD-ROM, DVD-ROM, BlueRay, HD-DVD, iPod, server volume, audio CD, USB flash drive, FTP server, and more.
With extensive metadata support, you can quickly find your files. NeoFinder Crack Torrent Mac catalogs all your data so you can manage your data warehouse or disk library. NeoFinder Full Mac quickly organizes your data, whether on external or internal drives or other volumes. Catalog all data so that you can keep track of the data file or disk folder. NeoFinder Key Mac quickly organizes your data whether it be on external or internal drives or any other volume. NeoFinder is your digital treasure chest! Catalog everything: hard drives (internal, external, USB, FireWire, Thunderbolt), server drives, DVD-ROM, CD-ROM, iPod, Blu-ray, USB The NeoFinder Mac Crack keeps track of your documents, photos, music, movies, and where they are stored. NeoFinder Crack (formerly known as CDFinder) quickly catalogs your entire disk and media library and backs up your files.
NEOFINDER EXPORT FULL VERSION
NeoFinder 8.1.2 Crack Mac Full Version Download With Patch 2022 Latest
0 notes