#MAKEMKV
Text
Blu-ray DRM is really devilish. I use a program called makemkv to rip them, because there is no other way to play them on my laptop, and there are no legit linux options for blu-ray playback, you have to crack the drm to play them. The easiest solution is makemkv to rip the movies into files, it works out of the box.
But if the level of drm (aacs) on a particular blu-ray is higher than what Makemkv can handle, the disk will update the firmware on your drive to revoke access to makemkv, so it can't access any blu-rays.
"One famous “feature” of AACS is a so-called host revocation. It was designed to ensure that only “approved” software can use your drive. Every Blu-ray disc contains a file that has a list of host keys known to be used by "unauthorized" software. This list has a version number. The moment you insert the disc into your drive, the drive checks if the list is newer than the one it knows about, and if it is, the drive re-flashes itself (updates firmware)."
And that happened to me. It was a blu-ray of the 1972 Hammer horror movie Fear in the Night that did it. The one program that works with my blu-ray player now couldn't access any discs, including ones it had ripped before. And there are absolutely zero linux programs that are authorized to playback blu-ray discs.
I had to flash my drive's firmware to allow something called libredrive, which allows direct access to files and bypasses the aacs drm firmware.
And that was quite the journey. I had makemkv installed as a flatpak via my distro's software manager. and I needed to use the command line. Flatpaks are a great packaging format. but they are primarily for gui apps. So i had to build makemkv from source. And then I had to figure out the commandline for the firmware flashing tool included with makemkv, which was hard because the instructions linked flat out lie. There is no "flash" command for sdftools, there is only "rawflash", you have to read the thread carefully to find that out. This page helped. I had to download new patched libredrive firmware.
And finally i figured out the command I needed ""sdftool -d [drive name] rawflash main,enc -i [new firmware file name].bin. And now I can use my blu-ray drive again. It's now libredrive.
So much work to finally be able to use the drive I paid for, and the blu-ray discs I also paid for. I'm not running some major piracy operation, I just want to be able to watch movies I legally own on my laptop. And drm stopped me, and I had to break it.
This is why DRM is so bad, and anyone who uses it deserves all the piracy they are trying to stop with it. It's scummy to take someone's money and then interfere with their ability to use the copy of the products they own and paid for. It's such atrocious treatment of the customer that anyone who does it deserves to have their stuff pirated.
370 notes
·
View notes
Text
I'm totally not making a post telling you guys that you should download MakeMKV so you can rip your DVDs and Blurays and watch them with subtitles no problem. I'm also totally not telling you to download VLC Media Player since it's able to play MKV files.
10 notes
·
View notes
Text
Got an external drive to watch things on my laptop BECAUSE DISC DRIVES AREN'T STANDARD ANYMORE but the process of getting the drive to actually read a BluRay was
Stupid.
So let me share the video that helped me!
youtube
It's very easy to follow and takes just a few minutes depending on your internet I suppose.
So yeah, get yourselves an external player and archive that media and watch your silly little animes like I'm doing.
That's all!
2 notes
·
View notes
Text
everyone cross their fingers with me and hope this blu-ray of master and commander rips properly. this is my fourth attempt.
#makemkv is giving me difficulties#i also have a DVD which would probably rip fine but obviously i'd rather have the higher-quality version#i need it so i can join everyone in making fun little edits
10 notes
·
View notes
Text
you guys know you can get USB connectable CD, dvd, and blu-ray players right. and you can buy external hard drives with crazy amounts of space for an amount of money that would make the average person from 2009’s head explode bc of how cheap it is. and if you do this and get ripping software such as handbrake for CDs and DVDs and makeMKV for blurays you can both own a physical copy of whatever media you want and make it accessible to yourself no matter where you are. do you guys know this
#i was watching wwdits special features on a 13h flight then switched over to invasion of the body snatchers then nausicaä#cricket chirps#5k#10k#20k#50k#75k
101K notes
·
View notes
Text
https://miraclecrack.net/makemkv-with-crack/
#akeMKV serial key MakeMKV torrent MakeMKV version history MakeMKV zippyshare xMakeMKV serial number
1 note
·
View note
Text
Dvdfab vs makemkv

Dvdfab vs makemkv how to#
I have heard the rumors but have no proof either way. Perhaps this is due to underhanded collaboration (reverse engineering) with SlySoft, perhaps not. I have yet to have MakeMKV not process a disc. Are there really new DVD copy protection methods? I thought it was almost all covered a while ago.Įven before SlySoft ran into trouble, I had already purchased a license to MakeMKV. I think because of price, DVDFab Passkey would seem a reasonable alternative.Īnd I have a question about DVDs. It happily backed up Scorch Trials, but the video files had no content. AnyDVD now had no trouble backing up Bridge of Spies region B.Īnd I also had tried a program called Ideal Media Solution which is best described as garbage.
Dvdfab vs makemkv how to#
I hope I'm joking.īut you should go to the thread with instructions on how to get the AnyDVD online database connected again. Without AnyDVD, I would try to have both these programs going, maybe with the free beta version of MakeMKV combined with the free version of DVDFab to fix the backups made by MakeMKV. I found MakeMKV which could back up this disc, but the created files would not work in a bluray player, and I used DVDFab to copy those to a new structure which did work. for now', which at first looked as much as a policy problem as much as a technical error. The bluray, Maze Runner The Scorch Trials region B, DVDFab could not copy it, it gives a message in a pop up window about 'BD+. From my limited web research, AnyDVD, DVDFab and MakeMKV are the only programs worth bothering with. This is a subject I have become interested in the past few days.
0 notes
Text
Dvdfab vs makemkv

#DVDFAB VS MAKEMKV WINDOWS 7#
This will grab your audience's attention, generate valuable feedback, and make your emails stand out. You can add rich visual elements to your emails with a simple drag and drop wizard. Proze is a robust internal communications platform that allows for employee messaging and content management. Proze combines deep personalization, real time interactivity, and a drag-and drop interface for Internal Employee Communications.
#DVDFAB VS MAKEMKV WINDOWS 7#
It works on desktop versions of MacOS X 10.11 and later, Ubuntu 16.04 and later, and Windows 7 and later. Opera browser is available for MacOS, Linux, and Windows devices. Toggle the integrated ad blocker on and off. Send encrypted content and links (articles, images, and videos) between devices using My Flow Search with Google and use the auto-fill prediction function Opera browser offers you to easily connect with your social life through the most famous social network integrated directly in the sidebar (Facebook, Instagram, Telegram, Whatsapp, Twitter, VKontakte) and listen your favourite music with the music players built-in (Spotify, Youtube and Apple Music). Opera's integrated virtual privacy network protects your privacy and reduces tracking. These are just a few of the essential features that Opera offers to make browsing easier, more enjoyable, and less distracting thanks to the Ad blocker built-in. Built on Chromium it take advantage of most of Google Chrome's extension library, including the best VPN completely free for users. Opera is a free internet browser that comes with enormous benefits and strong customization options.
0 notes
Text
Makemkv solo a star wars story

MAKEMKV SOLO A STAR WARS STORY MOVIE
MAKEMKV SOLO A STAR WARS STORY SERIES
Luckily, there is more specific answer, according to the movie's writers, father and son team Lawrence and Jonathan Kasdan. Han is a young adult and the ending leaves things vague enough that it's not easy to tell how much time passes between Solo's ending and A New Hope. That can make it hard to tell, while you're watching, when exactly Solo is set. But is it possible to pinpoint it even more precisely than that?Īctor Alden Ehrenreich's version of Han Solo is relatively young, but he's not a little kid, and he doesn't age visibly during the movie. Solo, it turns out, takes place in between Star Wars Episode III: Revenge of the Sith and Star Wars Episode IV: A New Hope. Now Playing: Solo: A Star Wars Story Review - A Well-Crafted Side Story
MAKEMKV SOLO A STAR WARS STORY SERIES
Through a series of daring escapades deep within a dark and dangerous criminal underworld, Han Solo meets his mighty future copilot Chewbacca and encounters the notorious gambler Lando Calrissian, in a journey that will set the course of one of the Star Wars saga's most unlikely heroes.By clicking 'enter', you agree to GameSpot's Han Solo gets a good (but not great) origin taleīoard the Millennium Falcon and journey to a galaxy far, far away in Solo: A Star Wars Story, an all-new adventure with the most beloved scoundrel in the galaxy. It doesn’t shake up the mythology or offer any real emotional investment, yet at the same time it’s funny, fairly fast-moving and at times enjoyable It gets its protagonist from point A to point B efficiently enough, but it doesn’t tell us anything we need to know that we didn’t already glean from our first meeting with Han in a cantina 40 years ago. Solo is not a bad film, just a relentlessly average one that has no reason to exist except as a money machine. At times, working with a small army of digital wizards, he seems to be channeling the spirit of the car-crash pileups of “Grand Theft Auto.” Only this time, the vehicles really move. Howard’s efficient, confident, slightly square direction does the job. ‘Solo: A Star Wars Story’ Answers Questions You Might Not Have Asked
MAKEMKV SOLO A STAR WARS STORY MOVIE
'Solo' gambles (and wins) by not being just another 'Star Wars' movie Solo: A Star Wars Story defied the odds to become a cohesive, cool blockbuster I’ll let you decide if that’s a compliment or a criticism. I enjoyed Solo: A Star Wars Story more than I expected to, but it’s also the first live-action theatrical Star Wars film that doesn’t feel like an event. "Solo" is a straightforward piece of pulpy entertainment with some very agreeable performances from Ehrenreich and Glover, who seems to be having the most fun of all the actors in playing up Lando's suave demeanor, and fun classic Western flourishes, despite the excessively big action sequences. While a solid effort, ‘Solo: A Star Wars Story’ doesn’t do much of great interest when it’s not dramatizing everything we’ve previously heard about Han. ‘Solo: A Star Wars Story’ is a long, boring space slog After a Bumpy Ride, Troubled Star Wars Spin-off Mostly Sticks the Landing Alden Ehrenreich makes for a roguish Han Solo in the second ‘Star Wars’ spin-off Alden Ehrenreich is enduringly watchable in “Solo: A Star Wars Story.” Variety - Andrew Barker spoiler ^^warning Ron Howard’s Energetic Prequel Will Get You Excited For a Brand-New Series. So-So Prequel Says Nothing New About Beloved Characters It’s just too bad its script never fully committed to seeing through Han’s arc - and those characters who are supposed to have shaped him into being the iconic version we all know and love - to its preordained end. Solo: A Star Wars Story commits to being a charming and fun exercise in repackaging nostalgia and pre-owned protagonists. Despite the strong performance from Ehrenreich and the hint of future adventures to come, I can only hope that this young Solo gets better stories and better direction that play into the character’s personality. And sadly, Solo: A Star Wars Story is just another Star Wars movie. Solo: A Star Wars Story is classic Star Wars, and if it ends up being the last time Lawrence Kasdan writes a movie in this universe, it’s one incredibly entertaining, instructive swan song. Alden Ehrenreich engagingly conveys young Harrison Ford in this throwback origins story directed by Ron Howard. The Hollywood Reporter - Michael Rechtshaffen Rotten Tomatoes' Consensus: "A flawed yet fun and fast-paced space adventure, Solo: A Star Wars Story should satisfy newcomers to the saga as well as longtime fans who check their expectations at the theater door." Rotten Tomatoes: 72% - 6.4 Average Rating Looks like nobody really hates it, but nobody really loves it either.
0 notes
Text
Dvdfab vs makemkv

DVDFAB VS MAKEMKV HOW TO
mkv Video: H.264/MPEG-4 AVC, VC-1, MPEG pass-through H.264, Xvid, MPEG, VC-1 encoded Audio: Dolby Digital, Dolby Digital Plus, Dolby TrueHD, DTS Digital, DTS-HD high-def, DTS-HD MA pass-through Dolby Digital 5.1, DTS, AAC, MP3 encoded. srt subtitles from Blu-ray Disc/BDMV/BD ISO. What’s more, the windows version can extract. When it trans-codes and shrinks Blu-ray contents, CUDA acceleration is employed by default when possible. sub without hurting video and audio quality. At this moment ByteCopy plays an irreplaceable role- it is the exclusive Blu-ray Ripper that converts Blu-ray. When a BD movie is packed into MKV, WD TV Live can not read the Blu-ray subtitles inlaid. This feature is a lifesaver for HD media players, as not a HDD player plays 100% of Blu-ray features. However, this app does not only everything (selection of forced subtitles is excluded from the “everything” ) MakeMKV does, but also converts/encodes Blu-ray contents. So what can it do for you? Basically, the ByteCopy is similar to MakeMKV when it cracks and copied Blu-ray Disc and DVD movie to MKV. You might have heard Pavtube ByteCopy – It is absolutely a top choice for those who wanna backup DVD to NAS or like putting Blu-ray ISO to WD TV for playback.
DVDFAB VS MAKEMKV HOW TO
Hello, the Blu-ray Ripper Review will show you on how to lossless convert/backup hundreds of Blu-ray/DVD movies to MKV, keep exactly same video and audio quality with original disks, moreover, retain multiple audio tracks and subtitles…For a beginners, The following passages take a brief review of 3 top Blu-ray Rippers: MakeMKV, DVDfab and Pavtube ByteCopy.
0 notes
Text
Makemkv 1.10.4 key

#MAKEMKV 1.10.4 KEY MAC OS X#
#MAKEMKV 1.10.4 KEY PORTABLE#
#MAKEMKV 1.10.4 KEY SOFTWARE#
#MAKEMKV 1.10.4 KEY PORTABLE#
Machete Video Editor Lite Portable was updated to version 4.1 Build 22 on 7. To cut AVI or WMV videos, simply set the beginning and end of a selection and save the selection as a separate file. Machete Lite or Machete Video Editor Lite a freeware video editor.Īs a free video splitter, Machete Lite could import AVI and WMV files and then delete unnecessary part, copy, move, mix or and save individual clips. Fixed various build issues for OSS code.Support for some BDAV discs was accidentally broken in 1.10.3.Opening HD-DVD disc with AC3/E-AC3 audio caused program to hang.Program could crash randomly at the end of conversion.Better track AV sync management, especially for badly mastered discs.Improved handling for DVD discs with mastering errors.All features (including Blu-ray decryption and processing) are free during BETA.Functionality to open DVD discs is free and will always stay free.
#MAKEMKV 1.10.4 KEY MAC OS X#
Available for Windows, Mac OS X and Linux.
#MAKEMKV 1.10.4 KEY SOFTWARE#
No additional software is required for conversion or decryption.Fast conversion - converts as fast as your drive can read data.Preserves all meta-information (track language, audio type).Preserves all video and audio tracks, including HD audio.Reads Blu-ray discs protected with latest versions of AACS and BD+.Note: Run MakeMKVPortable.exe to launch MakeMKV Portable. MakeMKV could open and convert ISO files (*.iso), DVD-Videos files (VIDEO_TS.IFO), Blu-ray files (index.bdmv, INDEX.BDM, MovieObject.bdmv, MOVIEOBJ.BDM, MKB_RO.inf, discatt.dat), HD-DVD files (DISCID.DATA, HVA00001.VTI, MKBROM.AACS, discatt.dat) and also MKV files (*.mkv) to MKV. Then you could play MKV videos everywhere. MakeMKV is a free DVD and Blu-ray converter that could simply convert DVD or Blu-ray videos to MKV files. Passthru now supports E-AC-3, FLAC, and TrueHD audio formats.Opus audio encoding/decoding via libopus.Additional standard frame rate selections in the graphical interfaces.Ultra HD / 4K color pass through (support for BT.2020).Intel QuickSync Video H.265/HEVC encoder.Improvements to audio/video sync engine to better handle difficult sources.New JSON-based API for interacting with libhb.New JSON-based preset system including command line support.Completely overhauled the official presets.Audio Codecs: AAC, MP3, AC3, DTS, DTS-HD, Vorbis, Flac, Auto Passthru.Video Codecs: H.264 (x264), MPEG-4 (FFmpeg), MPEG-2 (FFmpeg), VP3 (Theora) using Constant Quality or Average Bitrate Video Encoding.Video Filters: Detelecine, Decomb, Deinterlace, Denoise and Deblock.HandBrake Portable was updated to version 1.0.3 on. Note: Run HandBrakePortable.exe to launch HandBrake Portable. You can also easily resize or crop video with HandBrake. HandBrake has many advanced encoding options and bulit-in presets. VIDEO_TS folder or DVD ISO image is also supported by HandBrake. It could load most libavformat and libavcodec multimedia files, then ranscode them to MP4, M4V or MKV files. HandBrake is free open-source video transcoder.
0 notes
Text
useful information: How to get a USB Blu-Ray player to work on your computer
Not a post about vintage technology, just an explanation of what you think might be simple to do but isn't: There are Blu-Ray players that plug into your computer by USB, and you discover that just plugging it in doesn't make it work* in the same manner that CD-RWs or DVD-RWs are automatically recognised and function. You will see "BR Drive" in My Computer and the name of whatever movie you have inserted, but that's as far as you're able to go.
*There is software you can buy to make a Blu-Ray (internal or external) function, sure, and if an internal came with your computer it's likely already installed -- but if you're like me you don't have that software, you're cheap and won't pay for software, and you want to use what you have installed already or find free solutions.
Looking in the Blu-Ray drive's package, there's not a lot of info about what you're supposed to do. The above no-name Blu-Ray player cost $40 from a popular website; name-brand ones can set you back $120 or so. Looking around online for those instructions, I never saw the whole set of directions in one place, I had to cobble them together from 2 or 3 sites. And so here I share that list. To keep out of trouble, I'm not linking any files -- Google will help you.
Get VLC, the free video player available for pretty much any operating system. Thing is, it doesn't come with the internals to make it work with Blu-Ray even if when you go to the Play Media menu there is a radio button for selecting Blu-Ray.
Get MakeMKV, a decoder for reading Blu-Ray disks. This had been totally free during the beta testing period but it's come out and has a month or two trial period you can work in.
Get Java if you don't already have it. Reason for this is, the menu systems on Blu-Ray disks uses this... technically it's not required, however it does mean you don't have options such as special features, language and sound changes, or scene selection if you don't have Java installed; insert a disk, it can only play the movie.
Get the file libaacs.dll online so you have AACS decoding. I am told it hasn't been updated in awhile so there may be disks produced after 2013 that won't work right, but you won't know until you try.
There's a set of keys you will also want to have so that the player knows how to work with specific disks, and so do a search online for the "FindVUK Online Database". There will be a regularly-updated keydb.cfg archive file on that page to pick up.
Got those three programs installed and the other two files obtained? Okay, here are your instructions for assembly...
In VLC: go to Tools, Prefs, click "show all"… under the Input/Codecs heading is Access Modules then Blu-Ray: Select your region, A through C. You can change this if you need to for foreign disks. Next related action: go to My Computer and C:, click into Program Files and VLC, and this is where you copy the libaacs.dll file to.
In MakeMKV: click View, then Preferences, and under Integration - add VLC.
Confirm that Java is set up to work with VLC by going to the computer's Control Panel, going to System Properties, and into Environment Variables. Click System Variables, and click New to create this key if it doesn't already exist:
… Name: Java
… Value: [the location of the Java 'jre#.##' folder... use Browse to find it in C:\Program Files\Java]
Let's go back into My Computer and C:, this time go to Program Data, and then do a right-click in the window and select New and Folder. Rename this folder "aacs" (without the quotes), and then you click into it and copy the keydb.cfg file here.
REBOOT.
And now you should be able to recognise Blu-Ray disks in your player and play them. Three troubleshooting notes to offer in VLC:
"Disk corrupt" -- this means MakeMKV has not decoded and parsed the disk yet, or that you don't have the libaacs.dll in place so that it can decode the disk.
...After checking the VLC folder for the DLL to make sure, launch MakeMKV, then go to File, Play Disk, and select the Blu-Ray drive. Now it will grind a bit and figure out the disk's contents.
A note appears when a movie starts saying there will be no menus, but the movie plays fine -- Java isn't running.
...Invoke Java by going to the Java Settings in Start: Programs. You don't have to change anything here, so Exit, then eject the disk and put it back in to see if the movie's menu now appears.
Buffering between chapters, making the movie pause for a few seconds? There is a setting for this but I need to find that info page again for where that is. (If you find it, tell me where it is!)
I don't claim to know a lot but if you have any questions I might have some answers or suggestions. So far I've watched "Office Space" and Disney's "Coco" without any issues beside occasional buffering.
82 notes
·
View notes
Text
@vmprsm replied to your post “Raw MKV rip of Mission Impossible: Fallout:...”:
Theoretically, if one wanted their own copies of the MI movies safely on a hard drive....where would one go?
I mean, there is a site where you can acquire a lot of movies via torrent. I tend to use (rot13) 1337k.gb and I got a heavily discounted Windscribe VPN subscription that I use on almost all of my devices.
But my thing is that... I want commentary reels and special features, and sometimes you'll download a movie but the fucking subtitles are either bad or they become desynced over time and I haaaaate it.
So I've been gathering bits and pieces over the past year to get a Plex system going in my house and it works like a fucking DREAM. But it requires some investment. If you just want to have a few local copies of your favorite movies, this is way overkill. But me, I am canceling all of my family's streaming services and pivoting to our Plex.
So what I have for actually getting the files:
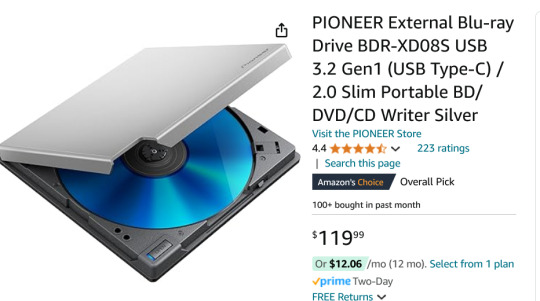
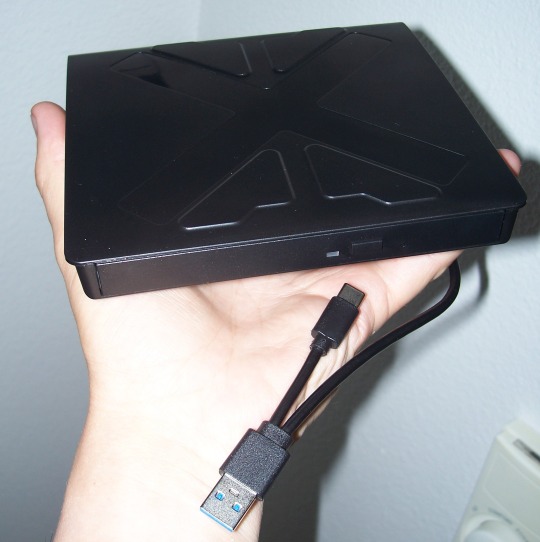
I don't have this model but it's similar to this, a Pioneer External Blu-ray Reader. It sits on a little shelf and is connected to my PC by a USB cable. (I think I got mine for around 68 bucks so you can wait for a sale.)
I use MakeMKV which will rip the big honking raw files from a Blu-ray and leave them as matroshka (.mkv) files.
Because these raw files are ENORMOUS, I compress them in Handbrake. Handbrake is wildly powerful, can convert file formats and make them super small. I have my Handbrake set up special to dump all the non-English language subtitles and audio tracks to save space.
(SUPER BONUS TIP FOR HANDBRAKE: If you have a dedicated GPU, you can give Handbrake permission to use it, and it'll compress shit literally 10x faster, love it.)
At the moment, I am using a Western Digital portable 5TB external harddrive because it was one sale and I couldn't beat the price. Eventually, I want to upgrade to two 10TB HDDs so I can keep a full backup of everything I'm ripping. Because this is a bit of a time and energy commitment and I don't wanna lose all my progress here!
At first I was running Plex off my desktop PC and that worked totally fine, but my family hates having to touch my desktop to wake it up every time, so I very recently grabbed one of these guys:
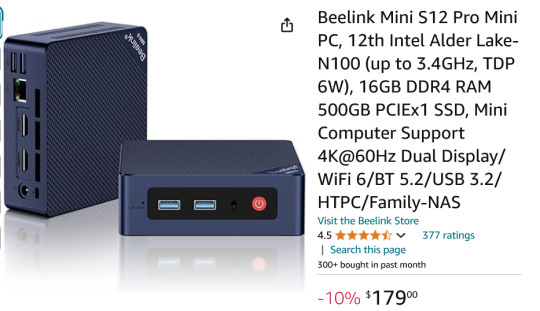
This is a Beelink Mini PC S12 Pro. It is small enough to fit in my hand but it is a speedy little demon that runs Windows 11. (And eventually I am gonna use it to firewall out ads from our entire home network, I'm pumped for that project but ANYWAY.)
The upside of these mini boys is that instead of being a hefty workhorse like my main computer, this is small and has a low-power draw.
So I moved my Plex Media Server to the mini PC, plugged in my 5TB drive of movies, and now everyone in the house can easily stream anything I have added to the library.

This is what it looks like, if you're curious. Any device in the house that runs Plex and is signed in can select any movie or TV show I have and just watch it like it was Netflix or something.
A month ago, I has like.... 65 movies? Now I'm ripping a few and we're gonna break 100 soon.
"But Arc, where do you get so many blurays!"
My local library.
When I lived in Broward County, FL, I had an extravagantly wonderful library system. Tax dollars at fucking WORK, y'all. Now I live in Georgia and the library system is not nearly as good, but I have still gotten my hands on a frankly ridiculous amount of blurays. Every week I'm picking up 3 to 10 movies or shows, taking them home, making good copies, and returning them.
All of this is an investment and it is work. But as someone who built my computer, built my keyboard, cracked my 3DS and PS Vita-- this is fun to me! This is what I love to do. And through doing it, I've seen more movies in the past year than the last ten years put together.
So yeah, I can't recommend this to everyone, but if you wanna get out of your subscriptions and to just have high quality shit on demand, this is what I'm doing.
Cannot stress this enough tho, if this seems interesting to you: wait for sales. All the components here go on steep sale if you wait patiently. Take your time assembling the parts and keep in mind that shit is modular, you can upgrade parts later.
72 notes
·
View notes
Text
If you're someone who's interested in collecting physical media, especially DVDs and blu-rays, I cannot overstate how good an investment a blu-ray drive for your computer is.
There are copious free resources that will allow you to digitize your collection for additional preservation and convenience... and I've placed them beneath this break!
MakeMKV: https://www.makemkv.com/
MakeMKV is the program I use for backing up blu-rays and DVD. It’s “free while in beta”, and as far as I can tell it’s going to continue to be in beta forever. You just need to register the program with the beta code, which can be found here: https://forum.makemkv.com/forum/viewtopic.php?t=1053. If your registration ever expires, you can just go to that post and they’ll have it updated with a new one.
“MKV” is “Matroska Video”, which is a container format (named after the Russian nesting doll) that collects the video track, audio track(s), and subtitle track(s) all into one file, which is super convenient for anime, because that means you don’t need to worry about making separate files for different combinations of dubs and subs. My understanding is that this is, essentially, a lossless video copy, and I’ve done comparisons comparing screenshots taken from video playing off the disc and from the .mkv, and I haven’t been able to notice a difference. As for playing .mkv files…
VLC Media Player: https://www.videolan.org/vlc/
The Combined Community Codec Pack (CCCP): https://download.cnet.com/Combined-Community-Codec-Pack/3000-2139_4-10966585.html
VLC is my media player of choice for watching back the stuff I back up. I’m not 100% sure if you need to download the CCCP for this- my backups play fine on my tablet just using the VLC app, and I recently found out they even work off a USB stick plugged into a Samsung Smart TV- but it doesn’t hurt to have.
MakeMKV can also be directly integrated with VLC Media Player to play blu-rays right from the drive, which is tremendously valuable if you're not interest in/don't have the hard drive space for digitization. I think I’ve encountered maybe one thing that couldn’t be played off the disc with this solution, and that was fixed in a subsequent update to MakeMKV. The full breakdown of how to do that can be found here: https://stolafcarleton.teamdynamix.com/TDClient/1893/StOlaf/KB/ArticleDet?ID=128854.
MKVToolNix: https://mkvtoolnix.download/downloads.html
Different companies author discs differently, and I like to keep my stuff organized the same way, which is where this tool comes in. I won’t go into too much detail on this here, but if you ever need to split one large file into smaller files (for example, a disc has 9 episodes of a show to a single title/file, and you want to split them into individual episodes), edit or remove chapter information, or rename audio/subtitle tracks, this is the tool to do it. There's a lot to this, so I would suggest reading the official documentation, but I could also whip up a guide if people are interested.
HandBrake: https://handbrake.fr/
The video encoder for shrinking those backups down to size- my favorite example was getting all 49 episodes of G Gundam down from almost 300gb off-the-discs to just under 50gb. This is also going to be heavily dependent on how powerful your computer is, because encoding takes up a lot of resources. On my computer, which is by no means top-of-the-line, I’d say on average it takes about 50 minutes to encode a 24 minute episode of anime, and that increases exponentially the longer the source material is.
I got the settings I use in HandBrake from this incredibly detailed breakdown of how video encoding works: https://kokomins.wordpress.com/2019/10/10/anime-encoding-guide-for-x265-and-why-to-never-use-flac/#tldr-summary-for-x265-encode-settings. There's a lot of information there, too, but it also provides generic settings to plug in to HandBrake if you don't care to manually adjust the settings for each project you're doing.
And that’s everything I use for my process! A lot of this was trial and error with other programs that cost money, performed worse, and were generally aggravating to use. It's a bit of elbow grease, but the reward is that once something is digitized, you have it forever, exactly the way you want it.
33 notes
·
View notes
Text
i have learned everything i know about computers purely out of spite. fuck you bluray distributors for not wanting me to watch my own damn discs on my own damn computer. i will teach myself how to use makeMKV and VLC media player simultaneously to get around your bullshit AACS codes. fuck you
#shoutout to forum posters for fueling my spite-induced bouts of wanting to be a hacker#cricket chirps
13 notes
·
View notes
Text
My Gif-Making Process
Hello! I'm Gilli and I've been making gifs for a very long time and have recently been asked a few times about my process. So I've decided to go into detail on that. Probably too much detail. But this should help out anyone that wants to make gifs of their own whether it's of video game footage they've recorded or movies/shows that they own physical copies of.
Below the cut is a step-by-step process that I go through, plus information on how to record their game/rip blu-rays to a PC for those that don't know how to do such. There are screenshots showing the entire process of me making a single gif and the end results of that.
I hope everyone finds at least one thing in this they find useful. 💖
Programs Used:
OBS Studio
KMPlayer
Photoshop
MakeMKV
I wanted to start with how to record your game footage and how to rip blu-rays to your PC for those that aren't too sure about how to do that.
To record your own game footage, you'll need a program that records your screen as you play. For that, I use OBS Studio.
To set it up to record your screen, go down to the sources section and click add display capture. From there it'll have you pick which display it will be capturing, it should automatically have your primary monitor selected but if that isn't the case click the drop-down menu and pick the one that you'd be using to play games on. And make uncheck the box for capture cursor, as no one wants a flying cursor to ruin their footage.

You may need to resize the capture window to fit, but all that takes is hovering your mouse over it, clicking, and dragging it to fit.
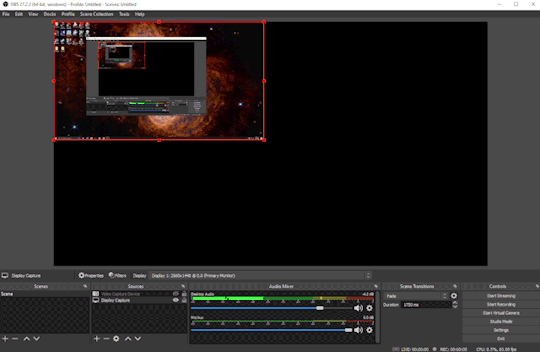
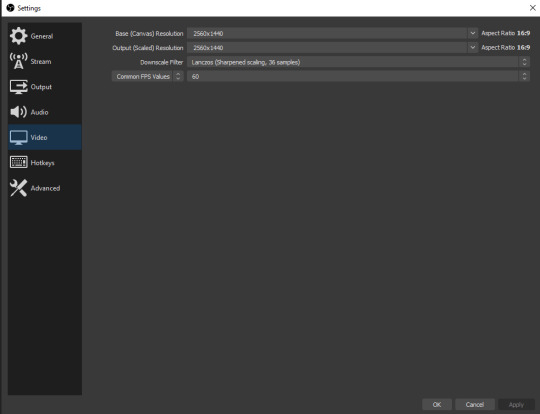
Next, you should go into the settings set up a few things. Mostly to make sure it'll be capturing at the right FPS and the folder the videos will save to when you record.
These are the settings I use. I don't mess with the audio portions since that doesn't matter for gifs.

If you're using a capture card for a console, you can add that source to OBS, as well. This is what that looks like (you'll need to drag the window to fit here, as well.).

I don’t mess with the settings, as I’ve never needed to.
And now may be good to note that with older consoles the default FPS is 30. If you want to record footage of that you'll want to switch the number that's captured down to 30 as well so your gifs don't have extra frames.
With that all set up, you'll need to open up the game you're wanting to record. Sometimes recording is simple and other times it's a bit of a pain in the ass. When it's simple, you'll be able to alt+tab out of the game and start recording with OBS whenever you wish, so you won't have to make a huge video file for only a minute or two of footage that you want.
When it’s difficult, however, the game doesn't like being alt+tabbed out of and starts running sluggishly when you do that. When that happens, save and close out altogether. Then start recording with OBS before opening the game and go from there. It's a little bit of a process to find out which game is which, but it isn't a difficult one.
And to record a video in OBS, simply hit the Start Recording button and you're good to go. When you’re finished, click it again. And that’s it.
As for ripping blu-rays to your PC, you'll need to have either an external or internal drive that's able to read blu-rays and MakeMKV. And you should make sure you have enough space on your PC for it. I've found single episodes of a show can be anywhere from 5 GB to 20, and movies are larger the longer they are. The average I've run into is about 30 GB.
If you have all that set up and ready to use, start MakeMKV and click to open the blu-ray disk.
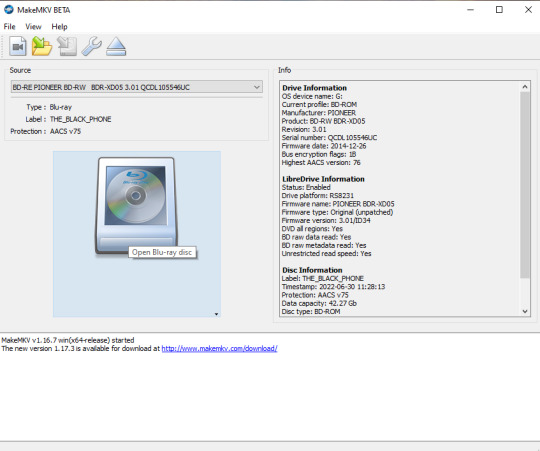
The movie (or episode) file tends to be the largest on the disk. Uncheck everything else and choose your output folder.
Then hit Make MKV and wait until it's done. The ensuing file should easily play in KMPlayer, or your program of choice.
________________________________________________________
Now, with all of that out of the way, we can get to the actual gif-making of this gif-making tutorial.
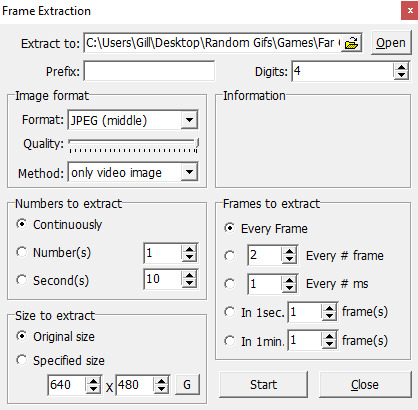
When you've got the video you want to capture frames of, open it up in your program of choice and capture away. These are the settings I tend to use.
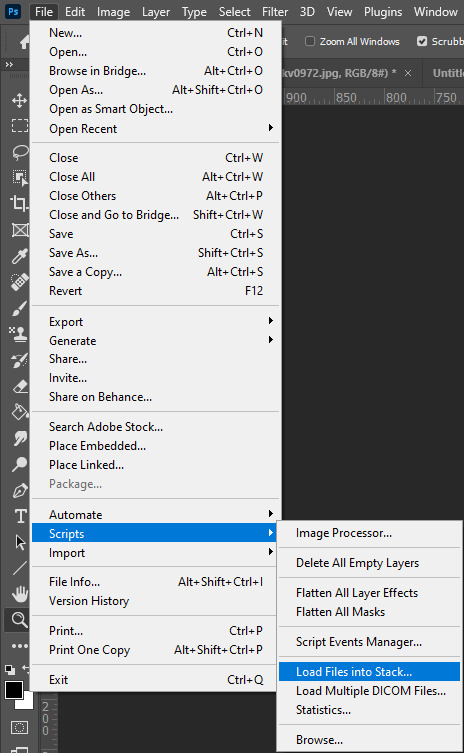
To open the frames in Photoshop, click File and go down to Scripts > Load Files into Stack.
In the Use dropdown menu, click on Folder. Then click Browse and find the folder you loaded your frames into. If you want to make sure the files load in order, go ahead and click Sort By Name. It’s usually not necessary, but it could cut out the time it’ll take to reload the frames again if something goes wrong.
It should be noted that the process of loading frames will take longer the bigger they are, hence why I use the JPEG setting instead of PNG. I've not noticed a change in quality between PNG and JPEG, but if you wish to make sure you're using the best quality possible, go ahead and use PNGs, just know that this part might take some extra time if you do.
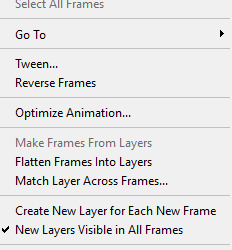
With everything loaded, click the Create Frame Animation button in the timeline window. Then, find the three small lines near the X that closes the Timeline window, and click on that then select Make Frames From Layers.

After this, you might need to highlight all the frames and, in the same menu, click reverse frames. It’s not actually reversing the gif, but making it so it plays correctly. For some reason, this happens a lot for me in Photoshop. I cannot explain why it does, just how to fix it. And it takes all of .5 seconds to do that.
Next comes the more tedious step in this whole process. You’ll want to go through each frame and make sure there’s no doubles. If there is, it’ll mess with the timing of the finished product. Double frames can make a gif seem slower than it should be overall, or just in certain parts. If you’re making a gif with a lot of frames it can be annoying, but it’s worth it in the end.
My next step is always to crop the canvas down with the crop tool. For simple scenery gifs that I save at 540x480 pixels, I use a preset that I made. 6:5. Then I'll drag and/or shrink it down to exactly what part of the canvas that I want to gif. In this case, I moved it a smidge to the right and hit crop.
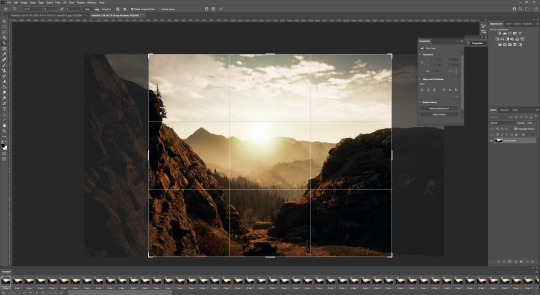
Then I resize it. Since I've noticed that sometimes there's a small line around some gifs, I resize it down to 582x485 pixels so there's some extra I can crop out around the edges. It's a personal preference, you don't need to do this. It’s just something I’ve done for years.
From here, I start coloring/lighting. Most of the time, I use five layers for this. But every so often the gifs will need a bit extra to get them where I want them and I can end up with 10. It all depends on whatever it is I’m making gifs of. For the gif in this example, I'll be using my usual five layers. Levels, Curves, Select Color, Exposure, and Vibrance. I don't believe the order of the layers matters, but I always start with lighting and move on to the color.
This part is all personal taste. The way I choose to color things might not be how you like it. If that's the case, switch things up. Experiment. If you want things brighter, with the colors more saturated, try upping the levels on those layers. Hell, you might not even want to mess with the colors at all, just brighten things up which is totally fine. But these are the settings I've decided to use for this particular gif, for those that might be curious.
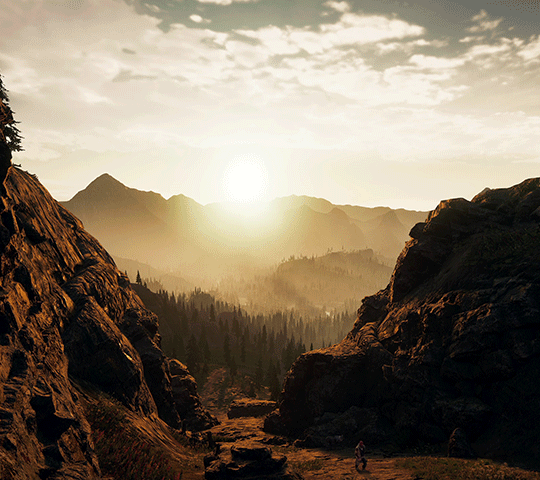
This is what the gif looks like before any coloring, sharpening, and without tweaking the frame delay.
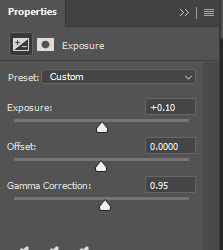
First, I use a Levels layer. Most of the time I use it to start brightening things up, but sometimes I only use it to darken the shadows a bit. This time, I’m doing a little of both.

Then it's onto Curves for a little more brightening and some contrast. I use these sparingly. It's very easy to wash everything out.

And one last brightening layer, Exposure. I've never touched the Offset option. I don't know what it does and at this point, I'm too afraid to ask.
Next is Vibrance. So that I know exactly how much I need to fix/change the coloring. I don't like to make my gifs too saturated, so I don't mess with these settings very much.

And now comes the fun part. Actually coloring the gifs. I tend to situate my Selective Color layer between the Curves and Exposure layers, but I don't think it matters where it goes.
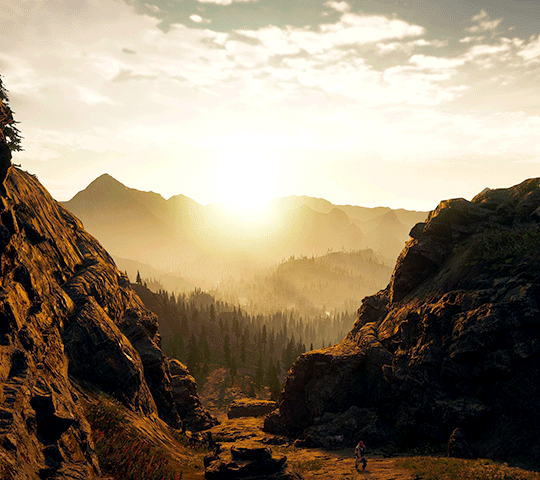
Here’s what it looks like before coloring.
This is another super subjective and personal series of settings. For this gif, I want to bring out more of the warm orange and yellow shades without washing out the green of the conifers in the background, but you might want to bring out cool tones instead. There's no wrong way to color gifs.


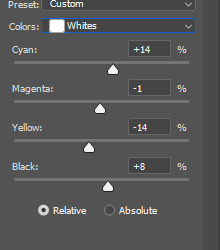
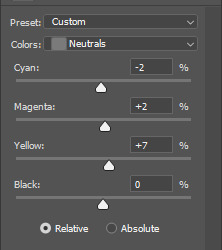
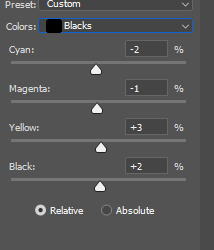
As I’m sure you noticed, with this gif I’m not messing with the Cyan, Blue, or Magenta modifiers. Not every gif needs to use every single modifier, and that’s fine.
This is the end result of all those steps.

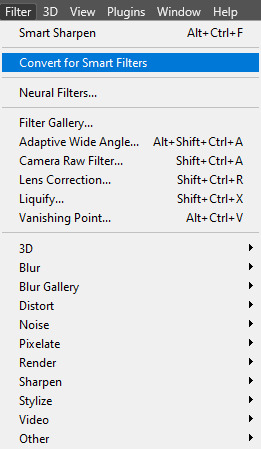
And next is the sharpening. Select all the frames in the Timeline and the Layers window, head on over to those three little lines in the right corner of the Timeline window, and select Convert to Video Timeline.
Then click Filter > Convert for Smart Filters.
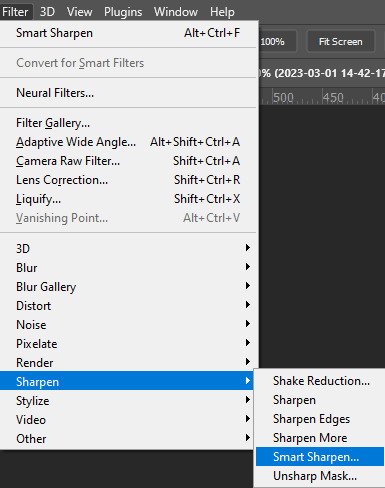
And then Filter > Sharpen > Smart Sharpen.
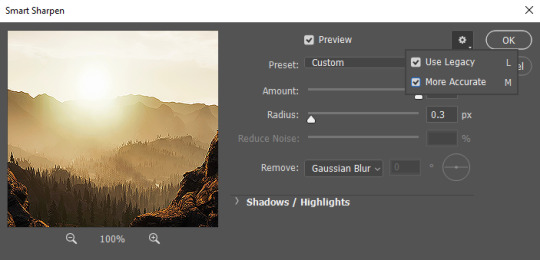
I use two sharpening layers and these settings aren't set in stone. Sometimes this is too much, sometimes it's not enough and I need to up some settings. It's just another one of those things you can to tweak as you work.

On the second layer, I hit the gear next to the OK button and selected both Use Legacy and More Accurate, then adjust as I wish.

Then I save it. I do not understand these settings. One might think that I would after using them for so long, but I do not. Please don't ask me about them or I might cry.
We’re not done quite yet. As I'm sure you noticed, the gif is a bit too large a file for Tumblr's 10 MB limit and I haven't even touched the frame delay settings. That's because I do it once the coloring and everything else is done.
Go to whatever folder you've saved your work in and drag the gif/s into Photoshop. Once they’re loaded, select all the frames in the timeline and click on any of the small arrows pointing down in the right-hand corner of each frame in the timeline, then select Other, then you'll need to set your frame delay.

For 30 FPS (console games and live action, usually) I use .05 and for 60 I use .04.

Next, I delete frames as needed to fit under Tumblr's limits. And with that done, this is the final result next to where I started out, so you can see the differences more clearly.
Before:
After:

I’m pretty sure I’ve gone over everything, but since I’ve been doing this for so long that I easily could have missed something since I’m so used to seeing it all the time. If anyone has questions, I’m more than happy to answer them. ❤️
86 notes
·
View notes
Last Seen Blogs

brunoonlinegym
Untitled

quarall
Bez tytułu

ppyro
im so real im so normal its like breathing

certaincopoperatorjudge
제목 없음

dberg1215
My stuff