#Memory Card Connectors
Explore tagged Tumblr posts
Visit Tumblr Blog
Explore Tumblr blogs with no restrictions, modern design and the best experience.
Last Seen Tumblr Blogs


Fun Fact
When “GIF” was named word of the year in 2012, Oxford Dictionaries U.S.A. credited Tumblr for pushing the word.
Text
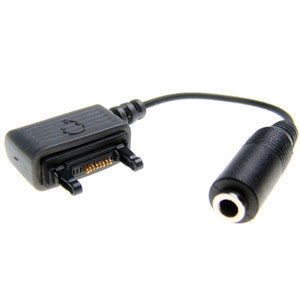
#Nano SIM Card Connector#Memory Card Connectors#Nano SIM Connectors#NANO SIM CARD HOLDER#SIM Card Connector Products#Memory and Sim Connectors#Buy Nano Sim Card Connector#Nano SIM Card Holder#6 pin sim card connector#Memory & SIM Card Connectors#Sim Card Connector at Best Price in India#NANO SIM Card Connector 6 Pin#Nano SIM Memory & SIM Card Connectors
0 notes
Text
Think about the experience of time as a robot girl, through the metaphor of how we use laptops.
You wake up for the first time with your young master, a college present. You're with them every day, powering off each night to charge. Being powered off is just dreamless sleep: a discontinuity. Every morning you wake up, your click syncs, and you know it's the next day. Maybe you miss a day or two: your master went out partying and ended up sleeping on a couch, until they rushedly wake you up before Monday classes begin. You even missed a whole week once when they went on a hiking trip with a new boyfriend.
You help them research upgrades when your specs get outdated. You place the order and a couple days later they power you off, and you wake up feeling like your head got bigger, on the inside. You can think of more things at once.
They repair you. They swap a new hand in when you accidentally crush it in a door, but when your left leg's servos go out, they send you to a repair shop. They power you off as you look up at them, and you wake up hours later. A strange man tells you to extend your left leg, then contract it. He frowns and re-oils some inner mechanism. You do it again, quieter and smoother this time. He nods, and reaches for your switch. The last thing you see before powering down is your own chest cavity with a series of wires hooked into your diagnostic ports, and your missing right leg sitting on a side table. You wake up again back at the dorms, your clock jumping forward a day, an asset tag still looped around your neck. Your master is happy to see you again.
This goes on, but the upgrades slow. There's only so much you can do to keep an old unit working. Eventually you develop more issues: one of your ocular sensors glitches and they don't make that model anymore, so your master just disables it. You spend a while searching ebay for replacement CND batteries and finally get a refurbished model from South England, but it turns out the EU models run on a different frequency, so it won't work. You're limited to fewer and fewer hours a day, and you start skipping more days.
The last time you remember waking up with your master there, there's also someone else in the room. Another robot girl. A newer model, with the new chassis and the Substrate energy packs. They asks you to copy your memories together onto a memory card, and you do. You want to say goodbye, but apparently your vocal synthesizer has been unplugged. You hand them the card, and they hand it to the new robot. Your master tells them to load the memories into her core bank, and she's says "yes sir!" in your voice. Ahh. That's where your voice synth went.
They power you off, and you don't dream.
You wake in a strange place. You're on a shelf, and there's other things scattered around you. An unknown voice days "yep, it seems it powers on. 400 credits, though? Without a voice and only one working eye? Man, value bin doesn't know how to price anything!" and before the blackness falls your clock finishes synching: it's been 7 months since you last were awake.
It happens a few more times. Different voices, different times, different piles of junk piled around and sometimes on you.
You awake again in a warehouse and someone tells you to smile. Your other ocular sensor went out so you can't really see them, just their vague shape from the lidar. The freestanding shelves around you seem to stretch into infinity. You hear a bitcrushed shutter sound sample a few times, and they pull a connector out of your chest as a diagnostic completes. It's been three years, five months, eight days, two hours, 27 minutes and 14 seconds since you last saw your master. Your GPS says you're a few cities over. They hit your power switch, and you sleep.
You wake up in a cluttered room, sitting on a bench. You look into the eyes of a person with frizzled hair and large glasses. She couldn't look happier. Your new ocular sensors are mismatched in color but you're happy to see again, in more than shapes and distant silhouettes. Your battery alerts as... Missing? You spot it on the desk next to a soldering iron and some electronic tool you can't identify.
Your voice synth is still missing, but this new woman is digging around in a large plastic bin, and comes up with one. She goes to insert it, and it can't connect. She slaps her hand and goes rooting around another bin and comes back with an adapter. She slots it into your chest and your voice returns. You thank her, and there's that moment of dissociation as your voice doesn't sound like "you". Too deep, and the accent is for a different dialect entirely. But you can talk again. She tells you to call her Cara, not Mistress. She's almost got your battery working again, she had to rebuild it nearly from scratch, but she's excited to get you working again. You're a rare model, and she doesn't see units like you in working order very often. Your clock syncs. It's been 17 years.
Your mistr-- Cara is soldering next to you, attaching a controller to the battery. She says she's got a new set of servos on the way, and she's excited to get you back to full working condition. You smile, knowing what it is to be loved, once again.
5K notes
·
View notes
Text
On Recovering From Disaster

Just before disaster struck with my 68030 homebrew, I had a plan to fork the project and take it in two directions in parallel.
The first would be my minimal Multibasic setup which was running great and was something I would be proud to exhibit at VCFSW '25.
Since that was working well, I didn't want to do anything that might make it not ready for the show. So I had assembled a second main board that I could use with other peripheral cards to continue development. My plan was to rework the memory map to move ROM and I/O addresses to the upper half of the 32-bit address space, which would allow me to use a DRAM card for up to 16MB of contiguous memory starting at address 0 — a perfect setup for running a proper OS
And then I burned up my good mainboard.
I had a spare CPLD on-hand, and I was able to get another 40MHz 68EC040 for cheap. But the 4Mbit SRAM chips are expensive, and I thought that if I was going to be paying for more SRAM, I should get the 12ns parts that would allow me to run RAM with no wait states at 50MHz. Which would require adapter boards, and more pin headers, and would have just driven the cost up even more.
Paralyzed by indecision and the rising cost, I decided to switch gears. I already have the DRAM board I built years ago, I just needed to get it working. And if I'm doing that, I may as well do the work on reorganizing my memory map.
So that's what I did. I made a new branch on my newly cleaned up repository, and set to work. I updated the mainboard bus controller logic to remove the no-longer-needed SRAM control, adjust the ROM address to start at 0x8000,0000, and move the 6850 UART address to 0x8008,0000. This freed up the entire 2GB space between 0x0000,0000 and 0x7FFF,FFFF for the DRAM card to use for main memory (my bus connector layout only allows for up to 16MB main memory, but that's plenty for my purpose).
Next, I needed to build the control logic for my DRAM board. I've done this once before on my Wrap030-ATX project a couple years ago, so I used that logic as a starting point. It … kind-of worked. Sometimes. Maybe.

I was getting random errors all over the place. Sometimes it was able to copy all of ROM into RAM and verify the copy without error, but it would fail when running code from RAM. Sometimes it wouldn't even pass the first two simple tests of writing a longword to RAM and reading it back.
Back to the data sheets to plan out the logic. I drew out a new timing diagram down to 1ns resolution, accounting for the specified propagation time for my CPLDs, and the measured signal delays for my CPU. This gave me the information I needed to build out a new state machine for the DRAM controller. In the process I also caught a few other bugs in my original logic, such as not ensuring the DRAM Write Enable strobe did not get asserted during refresh cycles.

The new state machine worked much better, but I got my timing off a bit. It worked reliably at 16MHz, but not at the intended 25MHz. At least it was working though; I can move forward with 16MHz.
The next thing to do was get my 8-port serial card working with this new setup. Every time the computer tried to access one of the 8 serial ports, it would get a bus error. This was a tough one that had me stuck for a while.
It looked like the serial card was getting addressed and asserting DSACK0# as expected, but I couldn't confirm the signal was making it back to the CPU. Every time I tried to measure the DSACK signals, the probes would increase the line capacitance (I think) too much and cause the whole computer to fail before it even got to the point of trying to address the serial ports.


I have the DSACK signals in a wired-or configuration. The logic on each card connects to the proper DSACK signal via an open-collector buffer, and is able to pull the signal low to signal that card acknowledging the bus cycle. The signal is then pulled back up to +5V by a 1kΩ resistor. This works well enough for small, slow systems, but with long bus wires or lots of chips on the bus, the extra capacitance means it can take a long time for that pull-up resistor to get the signal back up to +5V.
I made a change to my DRAM controller to actively drive the DSACK signals to +5V briefly at the end of a bus cycle before setting the pin to high-impedance. This helps ensure a fast rise time at the end of the cycle so it doesn't disrupt the next bus cycle.
It didn't fix the problem with the serial card, but it did allow me to actual probe the signals live to see what was happening — the Bus Error signal was getting asserted immediately after the CPU addressed the serial card. This didn't make much sense to me. My main board logic will assert Bus Error if no peripherals acknowledge a bus transaction within 64 clock cycles. Nothing should be asserting Bus Error so quickly.
Except … the main board bus controller. My original memory map used the lower half of the address space for the main board, and peripheral cards used the upper half. So my original main board logic was built to assert Bus Error immediately for an unused address in the lower half of the address space. I hadn't properly removed that bit of logic, so it was now asserting Bus Error for any accesses to the upper half of the address space that weren't used by the main board.
The challenges of working on a project after six years. I had forgotten that bit of logic was even there.
With that erroneous Bus Error assertation removed, the machine was finally able to properly load my Multibasic kernel and run BASIC for 8 users again.


At the moment it is running stable at 24MHz on my 25MHz-rated full 68030. It may not be the 50MHz high I was at, but after the frustration and disappointment of the past few weeks, I'm absolutely taking that as a win. 24MHz is incredible.
#mc68030#motorola 68k#motorola 68030#vcfsw#wrap030#retrotech#debugging#troubleshooting#homebrew computing#homebrew computer#retro computing
23 notes
·
View notes
Text
Your memory card is sticking out dude. Hold on let me [licks paw then pushes the memory card in so hard it shatters the motherboard connector and sends silicone shards flying through your chassis like shrapnel]
24 notes
·
View notes
Text
Why Your Water-Damaged Phone Won’t Charge – And How to Fix It
Accidentally dropped your phone in water? Before you panic, know that water damage doesn't always mean the end. However, one common issue post-exposure is the phone refusing to charge. Understanding the reasons behind this can help you take the right steps to revive your device.
⚠️ Common Causes of Charging Issues After Water Exposure
Short Circuits in the Charging Circuit Water can create unintended connections between components, leading to short circuits that disrupt the charging process.
Damaged Charging IC (Integrated Circuit) The charging IC regulates power flow. If compromised by moisture, it can prevent the battery from charging.
Corroded Charging Port Exposure to water can corrode the metal contacts in the charging port, hindering proper connection.
Battery Issues Water can damage the battery or its connectors, leading to charging failures.
Mainboard Damage The mainboard houses critical components. Water-induced corrosion here can disrupt multiple functions, including charging.
Moisture Detection Sensors Some smartphones have sensors that detect moisture in the charging port and disable charging to prevent further damage.
Internal Component Corrosion Over time, moisture can corrode internal components, leading to various malfunctions.
🛠️ Immediate Steps to Take After Water Exposure
Power Off Immediately: Prevent further damage by turning off the device.
Remove External Components: Take out the SIM card, memory card, and, if possible, the battery.
Dry the Device: Gently wipe the exterior with a lint-free cloth. Avoid using heat sources like hairdryers.
Use Desiccants: Place the device in a sealed container with silica gel packets to absorb moisture. Leave it for at least 24-48 hours.
Avoid Charging: Do not attempt to charge the phone until you're certain it's completely dry.
🔧 When to Seek Professional Help
If, after thorough drying, your phone still won't charge, it's time to consult a professional technician. They can assess and repair internal damages that aren't visible externally.
🛡️ Preventive Measures
Use Waterproof Cases: Invest in cases that offer water resistance.
Avoid Using Phones Near Water: Be cautious in environments where your phone might get wet.
Regular Maintenance: Periodically check and clean your charging port to prevent corrosion.
Water damage is a common yet preventable issue. By understanding the causes and taking immediate action, you can increase the chances of saving your device. Always prioritize safety and consult professionals when in doubt.
2 notes
·
View notes
Photo

MSI H610M-E PRO Intel LGA1700 M-ATX Motherboard MSI PRO series motherboards help users work smarter by delivering an efficient and productive experience. Featuring stable functionality and high-quality assembly, PRO series motherboards provide not only optimized professional workflows but also less troubleshooting and longevity. MSI motherboards feature tons of convenient and smart designs for DIY users, and countless system tuning and troubleshooting tools are at your disposal to push your system to new heights and satisfy even the most demanding tweaker. This makes it so easy to install your own motherboard without any issues. MSI motherboards let you manage speeds and temperatures for all your system and CPU fans. Total Fan Control allows you to check your primary system characteristics in a simplified graphical interface. You can also set up to 4 temperature targets for CPU and motherboard, which will adjust the fan speeds automatically. Detecting CPU & GPU temperatures and automatically adjusting fan duty of system fans to a proper value by adopting MSI AI ENGINE. The most important thing about DIY is expandability. MSI PRO series motherboards feature plenty of possibilities for prosumers’ needs. Stable LAN, faster storage and USB transfer speeds and other expandable connectors are ready to enlarge your flexibility. Stay connected with Intel® LAN, optimized for stable internet throughput and ideal for championship-level online playing. MSI PRO series motherboards are designed to satisfy any professional workflow. Elevate your listening pleasure and enjoy the extreme sound quality. Moreover, with years of experience in creating performance-enhancing tools that are easy to use, only the highest quality applications are at your disposal. The extensive features let you fine-tune your system to deliver reliable maximum performance. MSI lightning Gen 4 PCI-E is the latest and the fastest PCI-E data transfer solution with 64GB/s of transfer bandwidth that has doubled compared to its previous generation. PCIe 4.0 maintains both backward and forward compatibility with older and newer specifications. Optimized by steel armor design, your motherboards can support the weight of heavy graphics cards. MSI conducts thorough memory testing with the most popular memory brands under extreme conditions to ensure your system runs stable no matter what. Our memory partners include brands like Corsair, Crucial, Kingston, G.Skill and many more to optimize memory modules and configurations. Core Boost technology combines MSI’s premium layout and optimized power design which allows for faster and undistorted current delivery to the CPU at pin-point precision. Not only supporting multi-core CPU, also creating the perfect conditions for your CPU overclocking. FEATURES: Supports 12th Gen Intel® Core™, Pentium® Gold and Celeron® processors for LGA 1700 socket Supports DDR4 Memory, up to 3200(MAX) MHz Core Boost : With premium layout and digital power design to support more cores and provide better performance Memory Boost: Advanced technology to deliver pure data signals for the best performance, stability and compatibility Lightning Fast Experience: PCIe 4.0 Audio Boost: Reward your ears with studio grade sound quality Steel Armor: Protecting VGA cards against bending and EMI for better performance, stability and strength. SPECIFICATIONS: Socket: 1700 CPU Support: Supports 12th Gen Intel® Core™ Processors, Pentium® Gold and Celeron® Processors up to i9 Chipset: Intel® H610 Chipset DDR4 Memory: 3200(MAX) / 3000 / 2933 / 2800 / 2666 / 2400 / 2133 MHz Memory Channel: Dual Channel DIMM Slots: 2 Max Memory (GB): 64 PCI-E x16: 1 PCI-E x1: 1 SATAIII: 4 M.2 Slot: 1 TPM (Header): 1 LAN: 1x Realtek® RTL8111H Gigabit LAN controller USB 3.2 ports (Front): 2(Gen 1, Type A) USB 3.2 ports (Rear): 2(Gen 1, Type A) USB 2.0 ports (Front): 4 USB 2.0 ports (Rear): 4 Audio ports (Rear): Realtek® ALC897 Codec VGA: 1 HDMI: 1 DirectX: 12 Form Factor: mATX Operating System: Support for Windows® 11 64-bit and Windows® 10 64-bit WHAT’S IN THE BOX: MSI PRO H610M-E DDR4 Intel 1700 mATX Motherboard – Black x1 SATA Cables x2 EZ M.2 Clip x1 I/O Shield x1 Quick Install Guide x1
2 notes
·
View notes
Text
Crazy Caryn & Ticci Toby (rescue mission) part 2
Written by MaggotFurby
The silence between them broke as Caryn lifted up the square shaped microphone to her face and spoke first. This was how the conversation went…
Caryn: Hi…you must be Toby?
Toby: …
Caryn: I-its alright, take your time, I'm patient.
Toby stared at her name tag that was given by the desk clerk. Then he focused back on her and replied in a flat tone, nearly stuttered.
Toby: … Caryn? That's a unique way to spell that…
Caryn: Y-yeah, of course. My…mother named me with that type of spelling.
Toby: Where is your mom…?
Caryn: …She's no longer around. It's complicated. But I've met your mother, Connie?
Toby's half-lidded eyes widened and almost commented in a defensive expression as he stepped closer.
Toby: …She talked with you…?
Caryn: Yes, Toby. And she's such a nice lady. Timid but very polite. She gave me permission to visit you…
Toby: …? How? Do I know you from somewhere?
Caryn: I think I remember you…you used to attend my old school, I believed you were in the 5th grade and I was in kindergarten. But my mind often makes up faulty memories…
Toby: …Well, I don't think I remember someone like you… I did in fact moved when I was a kid.
Caryn: Your mother did remember me though, clear as day…perhaps you must've been through so much, your mind tends to forget.
Not long after Caryn finished her sentence, Toby Rogers instantly spoke in a sudden stern, and sincere voice.
Toby: Why are you here for…?
Caryn: I am sent from my master, Tim and Brian are also here making a diversion so you can leave here.
Toby brought up a menacing smile as he chuckled in an insane tone.
Toby: Y-you’re letting me go? That's perfect…!
Caryn failed to recognize his demented reaction as she mistook it as genuine happiness.
Caryn: Of course, Toby! So glad you're excited about it.
She warmly smiled back until she heard her earpiece turned on again and heard Hoodie's voice. “Caryn, I've disabled the cameras and edited the footages, over…”.
Caryn placed back the microphone to the wall underneath the mirror and continued listening to Hoodie while keeping eye contact with Toby.
“Tim struggled with the last remaining suspected person but he was able to push forward…” Hoodie said before his call switched over to Masky’s.
“Caryn…! Hello? It's me, Tim. The coast is clear *exhausted heavy breathing* any feedback from Brian yet, over?”.
“Yes, sir. Brian managed to take over the controls and all security systems shut down, over…” Caryn said back.
“Wonderful…! Now listen closely, Brian will be with you shortly, he'll be crawling through the lower shafts and slip you the key card through one of the air vents above you…, stay safe and on guard, over” The call ceased.
Toby: You have no idea how long I have been stuck here… those fuckers will pay…
His voice spoken through the speaker, Caryn picked up the microphone again before placing it back to the wall connector.
Caryn: you're welcome, Rogers…
She lifted her head up to the metal banging sound above her and saw a thin plastic object pushing through the vent from the ceiling. Brian made it to Caryn's current location, passed her the key card as it fell and landed in front of her. She went down and picked up the card, and swiped into the card activated cell lock.
Beeped twice…and the lock opened with a loud metallic screech. Before she opened the door, she took off her sticker from her chest and placed it inside her pants pocket so she wouldn't leave evidence behind.
She carefully opened the heavy cell door as bitter cold air flooded out when she exposed an opening for Rogers to exit from. Toby stepped back at first but then started walking towards the now opened door, he exited out while still having that demented grin.
“Thank you…so m-much…” Toby tilted his head at Caryn's direction before walking up to her and gesturing to her to unveil his straight jacket… She did exactly that and his arms were set free, he was wearing a gray shirt underneath when the jacket was removed. It paired well with his dark gray pants and white medical style shoes. His arms were covered with deep scars of stab wounds and bite marks that were clearly self inflicted.
Some wounds barely healed as they were still dark red. Since Toby was born with a rare condition to never feel pain, he never felt any agony from the countless injuries.
“Oh…it's nothing… can't feel it anyway” Toby remarked about his arms.
“C'mon, let's go…our master is waiting for us. But we gotta leave quickly.” Caryn stated as she grabbed one of Toby's bandaged hands and led him to follow behind her.
Toby ticked as his hand was grasped by hers but he felt a sense of safety when they were about to head to the elevator shaft from the end of the hall.
The elevator door opened and behold a recovering staff member standing there with a taser gun in his hands, aimed towards Caryn and Toby.
“FREEZE…! STEP AWAY FROM THE FUGITIVE OR YOU WILL BE PROSECUTED”
Caryn raised her arms up in the air, being caught in the act as she took a step back away from Toby. Though she did what she was told, the person pressed the trigger and electrocuted her without warning. The pain pierced through, inflicting major exertion as she fell on the ground unconscious with a loud thud while screamed in torture.
Toby did not like what he had witnessed and went into primal mode, he ran towards the merciless staff member, pinned him down to the icy frozen floor and began driving his fists onto the dude's unguarded face. Gush of thick blood and broken teeth splattered onto the floor as he rapidly pummeled his now mangled, gore infested complexion. His bandaged hands covered in blood and pieces of brain matter as he slowed down and slowly got back on his feet, gazed down at the now deceased man.
The elevator door opened again; Masky stumbled out and witnessed the grotesque scene that Toby created. He ran to Caryn and picked up her unconscious body and carried her over his shoulder while ushering Toby to go along with him.
Masky didn't speak for the majority of the way back to the back entrance of the institution while holding Caryn carefully. While Toby did the same and often looked at Caryn, still passed out. As the two men left the building, Hoodie exited out through the outside vent and landed on the ground with his legs while holding his stance, preventing himself from falling forwards.
The paper sticker fell out from Caryn's pocket and Toby picked it off from the ground, tore it to shreds and made it impossible for someone else to read the name tag. Hoodie brought out a lighter, flicked it on and threw it inside the opened vent and the interior started to catch flame. They all left before the entire building was caught in a raging inferno as they walked straight back into the woods. Hoodie had brought along a miniature gas tank and leaked the remains throughout the vents of the mental institution. Hoodie still had Caryn's mask and machete, they were inside of his black cargo backpack he had all along with him.
The firetruck and ambulance sirens blurted out in the distance, but Masky, Hoodie, Toby and Caryn were deep inside the woods, free from ever being caught in the act.
Breaking News:
Local mental hospital caught in hellfire:
At 11:45pm, there was a terrible fire that happened in an instant at Denver's mental institution. Police could not find such evidence of who or what caused this tragedy. 7 late night staff members died from the incident as firemen tried to escort as many survivors as possible, only 16 of the mental patients survived and made it out alive.
Records show from the security footages, there were no signs of any break-ins or hostile activity, making the case hard to solve at the moment. The fire likely was caused by faulty wiring and no sign of fingerprints.
If any witnesses know about this, please contact the local news station and we'll get an update immediately.
There was never an update since…
5 notes
·
View notes
Text
Building a Computer: The Essential Components You Need to Know
A pc gadget is made of numerous additives that work together to carry out obligations and execute applications. These additives may be extensively labeled into hardware and software, however in this article, we can attention at the critical hardware additives of a computer. Hardware refers to the physical components of a laptop that you can contact, including the valuable processing unit (CPU), reminiscence, garage devices, and input/output peripherals.
Essential computer components for assembling a custom desktop
1. Central Processing Unit (CPU)
The CPU, regularly referred to as the "mind" of the computer, is one of the maximum important components in any system. It carries out instructions from programs via acting fundamental arithmetic, logic, manipulate, and enter/output operations distinct via the instructions. The CPU is typically housed on a single chip, that is known as a microprocessor. It is composed of more than one cores, which allow it to deal with more than one responsibilities concurrently.
The CPU operates primarily based on a clock speed measured in Hertz (Hz), which defines what number of cycles it is able to carry out per second. Modern CPUs function inside the gigahertz (GHz) range, allowing them to technique billions of commands in keeping with second.
2. Motherboard
The motherboard serves as the critical platform that connects all of the laptop components. It is a large circuit board that homes the CPU, reminiscence, and various other key components. The motherboard lets in verbal exchange among all components of the computer and ensures that facts can tour correctly through the system.
It also consists of diverse growth slots, ports, and connectors for additional components, which include pix cards, community cards, storage gadgets, and peripherals. The motherboard is crucial for the general functioning of a pc and serves as the muse for different components.
3. Random Access Memory (RAM)
RAM is a form of risky reminiscence that briefly stores facts that the CPU is presently the use of or processing. When you open a software in your laptop, it receives loaded into RAM for quicker get right of entry to. The extra RAM a laptop has, the extra packages and records it can cope with simultaneously, resulting in higher average overall performance.
However, RAM is volatile, meaning that it loses all its information whilst the laptop is turned off. Therefore, it isn't always used for long-time period storage of documents or facts. Common styles of RAM consist of DDR4 and DDR5, every presenting upgrades in pace and efficiency over previous generations.
Four. Storage Devices
Storage devices are used to shop data on an extended-time period foundation. The most common forms of garage gadgets in modern-day computers are:
Hard Disk Drive (HDD): An HDD is a traditional garage tool that makes use of mechanical spinning disks to read and write records. While it offers high garage ability at a decrease cost, it's miles pretty slower as compared to more recent technology.
Solid State Drive (SSD): An SSD makes use of flash memory to keep information, supplying lots quicker examine and write speeds than an HDD. SSDs are extra reliable because they haven't any transferring parts, and that they consume much less power.
Hybrid Drives (SSHD): Hybrid drives combine the benefits of both SSDs and HDDs. These drives provide huge storage capacities even as imparting some of the speed benefits of SSD generation by way of the use of a small amount of flash memory.
Optical Drives (DVD, Blu-ray): Although less common in current computer systems, optical drives are used to study and write optical discs. These drives are normally slower and have lower storage capacities than tough drives and solid-country drives.
5. Graphics Processing Unit (GPU)
The GPU, or pictures card, is liable for rendering photos, motion pictures, and animations in a pc system. GPUs have grow to be more and more essential as computing has developed, particularly for obligations such as gaming, video editing, 3D rendering, and synthetic intelligence (AI) packages.
The GPU includes thousands of cores designed to address parallel duties, making it far more efficient than the CPU on the subject of graphic-extensive operations. High-performance GPUs are utilized in gaming computers and workstations that require heavy computational strength, which includes the ones utilized in deep getting to know.
6. Power Supply Unit (PSU)
The PSU is responsible for converting electric strength from an outlet into the ideal voltage and current required by using the laptop's inner additives. The PSU regulates the strength to make sure the laptop operates accurately without overloading any parts. The size and electricity ability of the PSU are critical factors while constructing or upgrading a pc, especially if high-performance components like a effective GPU are being used.
Power resources come with exceptional wattage rankings, and it is essential to choose one that offers enough electricity for all additives, including any destiny upgrades.
7. Cooling System
Modern pc components generate heat, in particular excessive-performance processors and pictures cards. Without an effective cooling device, the additives could overheat, leading to decreased overall performance or even harm.
Cooling structures can take the form of:
Air Cooling: The most common and best shape of cooling, in which fanatics are used to dissipate warmth away from additives which includes the CPU and GPU. These lovers are commonly connected to warmness sinks to enhance warmth dissipation.
Liquid Cooling: A more superior cooling solution that makes use of water to transfer warmness faraway from components. Liquid cooling is frequently utilized in high-performance structures wherein air cooling might not suffice.
Passive Cooling: Involves warmness sinks that passively burn up warmness thru physical contact with the thing. Passive cooling is quieter and commonly utilized in less demanding systems.
Eight. Input Devices
Input gadgets are used to have interaction with the computer and provide information. Some of the most commonplace input devices are:
Keyboard: Allows the consumer to enter textual content and instructions into the laptop.
Mouse: A pointing tool used to have interaction with the graphical consumer interface (GUI) of the computer.
Touchscreen: Found in many cutting-edge laptops, drugs, and smartphones, a touchscreen lets in customers to engage directly with the show with the aid of touching it.
Microphone, Webcam, and Others: Other input devices include microphones for voice instructions and webcams for video recording or communication.
Nine. Output Devices
Output gadgets allow the pc to speak information to the person. Common output gadgets encompass:
Monitor: The most common output device for showing the pc's graphical person interface, videos, and images.
Speakers/Headphones: Allow audio output from the laptop, useful for looking motion pictures, paying attention to tune, or taking part in voice calls.
Printers: Convert digital documents into physical form, such as paper copies.
10. Expansion Cards
An expansion card is a further aspect inserted into an expansion slot at the motherboard to feature new competencies to the computer. Common growth playing cards encompass:
Sound Card: Enhances the audio abilities of a computer.
Network Interface Card (NIC): Allows a pc to connect with a community, including Ethernet or Wi-Fi.
TV Tuner Card: Enables a laptop to receive tv signals and display them at the display.
11. Networking Components
In a related world, networking components are important for ensuring that a computer can speak with different gadgets. These components consist of:
Network Interface Cards (NIC): Allows a pc to connect with a stressed (Ethernet) or wireless (Wi-Fi) community.
Routers/Switches: Devices that control visitors among computer systems and devices in a community, making sure records is routed to an appropriate destinations.
Modems: Devices that join a computer or network to the net, normally via broadband services like cable or DSL.
2 notes
·
View notes
Text
IT Cleaning Requirements
In IT cleaning, lint-free cotton swabs, lint-free wipes, and lint-free gloves are essential tools, especially when dealing with precision electronic devices and sensitive components. They effectively prevent contamination that could impact device performance due to residual particles or pollutants. Below is an overview of the specific applications and benefits of these tools in IT cleaning.
1. Applications of Lint-Free Cotton Swabs in IT Cleaning
Lint-free cotton swabs are primarily used for cleaning small components in IT equipment, especially hard-to-reach corners and connection points.
Application Scenarios:
Cleaning Circuit Boards and Motherboards: Dust, oil, or other particles can accumulate on circuit boards. Lint-free cotton swabs can reach these tight spaces to clean without leaving residues.
Cleaning Ports and Connectors: USB ports, HDMI ports, audio interfaces, and other connection points tend to collect dust and cause corrosion. Lint-free cotton swabs effectively clean these areas, ensuring no interference with signal transmission.
Cleaning Displays and Touchscreens: Touchscreens and displays require careful cleaning, and lint-free cotton swabs can gently remove fingerprints, dust, and oil stains.
Benefits:
Excellent Absorption: Lint-free cotton swabs effectively absorb dust, oil, and dirt, leaving no fibers or particles behind.
Precise Cleaning: Their small size allows for detailed cleaning in hard-to-reach areas, making them ideal for intricate tasks.

2. Applications of Lint-Free Wipes in IT Cleaning
Lint-free wipes are high-quality materials designed for cleanroom environments, typically used for wiping down device surfaces and cleaning larger areas.
Application Scenarios:
Cleaning Displays: Lint-free wipes are ideal for cleaning computer monitors, TVs, touchscreens, and other screens, removing fingerprints, oil stains, and dust.
Cleaning External Devices: These wipes can also be used to clean the surface of external devices like keyboards, mice, and printers, preventing dust and stains from affecting performance.
Cleaning Casings and Surfaces: Lint-free wipes quickly remove dust and oil from casings, laptop shells, and server exteriors, keeping devices looking clean and free from contaminants.
Benefits:
Low Particle Release: Lint-free wipes are designed to prevent shedding of dust or fibers, reducing contamination risks.
Soft and Surface-Safe: These wipes are gentle on sensitive surfaces, preventing scratches or damage to the equipment.

3. Applications of Lint-Free Gloves in IT Cleaning
Wearing lint-free gloves during IT cleaning is crucial, especially when handling small components, precision devices, or high-end electronics.
Application Scenarios:
Handling Computer Hardware: When replacing hardware such as hard drives, graphics cards, or memory modules, lint-free gloves prevent oils, sweat, dust, and other contaminants from transferring to the device.
Assembling or Repairing Computers: Lint-free gloves are essential during computer assembly or repairs to prevent electrostatic discharge (ESD) that could damage electronic components.
Handling Precision Equipment: Lint-free gloves protect sensitive components like sensors or optical devices from contamination by dirt or oil.
Benefits:
Prevent Contamination: Lint-free gloves help keep oils, dirt, and microorganisms from coming into contact with sensitive IT equipment.
ESD Protection: Many lint-free gloves come with anti-static properties, protecting IT devices from static discharge damage.
Comfortable Wear: The powder-free design ensures no residue or dust is left behind, making them comfortable for prolonged use.

4. Integrated Use: The Combined Role of Lint-Free Cotton Swabs, Wipes, and Gloves in IT Cleaning
In comprehensive IT cleaning, lint-free cotton swabs, lint-free wipes, and lint-free gloves work together to achieve the best results:
Step 1: Wear Lint-Free Gloves: Start by wearing lint-free gloves to prevent contamination from your hands—oil, sweat, or dust—during the cleaning process.
Step 2: Use Lint-Free Wipes for Larger Surface Areas: Clean large areas, such as screens and external device casings, with lint-free wipes to remove dust and stains quickly.
Step 3: Use Lint-Free Cotton Swabs for Small Components: Use cotton swabs to clean connectors, ports, circuit boards, or other small components to ensure no contaminants are left in hard-to-reach areas.
#cleanroom#cleanroomwipes#ipawipes#alcohol cloth#alcohol wipes#cleanroomswabs#cleanroomkits#cleanroomgloves#clean
2 notes
·
View notes
Text
ASUS ROG Ally X vs ROG Ally: Latest ROG handheld tweaks

The newest portable in the ROG family, the ASUS ROG Ally X, is improved over its predecessor in almost every way.
ASUS ROG Ally
AMD Ryzen Z1 Extreme Processor
With its remarkable performance, you may play demanding games at fluid frame rates with this state-of-the-art processor.
Integrated AMD Radeon RDNA 3 GPU
For a wide range of games, the integrated graphics card guarantees excellent graphics and fluid gameplay.
120Hz IPS panel
The 120Hz refresh rate panel offers remarkable responsiveness and smoothness. The ROG ALLY keeps up with the action whether you’re racing around an open environment or taking on opponents in fast-paced shooters.
Extra Elements
Versatile connectivity
Use the USB-C 3.2 Gen 2 connector and the 3.5mm headphone jack to connect to external displays, controllers, or peripherals.
Expandable Storage
A microSD card can be used to increase the ROG ALLY’s storage capacity.
Xbox Game Pass Integration
Get a free three-month subscription to Xbox Game Pass Ultimate and enjoy a huge selection of games.
If you want to play high-performance games while on the road, the ROG ALLY is a great option. Whether you’re searching for an efficient way to play your favourite indie games or a potent handheld device for AAA titles, the ROG ALLY offers an alluring blend of mobility, performance, and immersive features.
The ASUS ROG Ally X is not just a straightforward update with a single or double the specs. In order to incorporate as many of the user’s suggestions as possible into the hardware build of this device, ROG even went so far as to entirely restructure the internals to accommodate all of the upgrades you requested from ROG Ally. This is a comparison between the ROG Ally X and the original Ally.
Upgrades for ROG Ally X
The ASUS ROG Ally X, first and foremost, offers notable specifications improvements, beginning with a larger battery. With its 80Wh battery, the ROG Ally X can play for longer periods of time in handheld mode than ever before, all without the need to recharge in the middle of a session. Furthermore, a compatible Type-C charger, like as their new ROG 140W GaN Charger, is the way to go if you want to charge that large battery even faster. The ASUS ROG Ally X now supports chargers up to 100W.
The 1TB of storage and 24GB of LPDDR5X-7500 RAM in the ASUS ROG Ally X continue the ROG Ally enhancements, giving you more space for your games and quicker memory to dedicate to the AMD Ryzen Z1 Extreme processor’s visuals.
However, there are other plans besides spec increases. Almost everything has been modified in some manner, even the chassis, which now boasts rounded grips for far greater ergonomic comfort. The ASUS ROG Ally X feels perfect in your hands and will control better than ever with to upgraded D-Pad and stronger, more resilient joysticks. The back macro buttons have been resized to lessen inadvertent presses, and the face buttons are slightly more tactile than on the original Ally.
Additionally, ROG included a second USB Type-C connector that supports Thunderbolt devices and can operate at USB 4 speeds. This port is ideal for connecting an external GPU or other accessories. In order to keep the internal components and touch screen cooler than before, the new cooling system offers additional ventilation and uses dual 77-blade fans, an increase from the original Ally’s 47-bade fans. The speakers have also been updated, including larger chambers for a deeper, louder sound.
Unrestrained Power
Unmatched Performance
The AMD Ryzen Z1 Extreme Processor, which powers the ASUS ROG Ally X, ensures fluid gameplay for demanding games.
Graphics Boost
Never skimp on style or quality. Stunning graphics are produced by the inbuilt AMD Radeon RDNA 3 GPU, so you can enjoy your favourite games in all their glory.
Memory Upgrade
Increasing memory to 24GB LPDDR5 makes it possible to multitask and guarantees a smooth gaming experience.
For hardcore gamers, the ASUS ROG Ally X is the best portable gaming companion. Its outstanding performance, long-lasting battery, and elegant design enable you to conquer the competition and take your favourite games with you wherever you go. The ASUS ROG Ally X is a compelling option whether you’re an experienced gamer on the road or searching for a strong and portable entry point into the world of premium mobile gaming.
Read more on govindhtech.com
#asusrog#allyx#rogally#Latestrog#rand#randegpu#xbox#gamepass#rogallyx#amd#amdryzenz1#technology#technews#news#govindhtech
2 notes
·
View notes
Text
#Micro Sim Card Holder 8 Pin#Micro-SIM Card Sockets#Micro SIM Card Socket - 6 pins#Micro SIM Connectors#MicroSIM Memory Card Connectors#MUP-C792 6 Pin Sim Card Holder#manufacturers of micro sim card slot#Micro SIM Card Connector 9 Pin Push Type#Push Pull SIM Connector#Push-Push SIM Card
0 notes
Text
WHAT YOU NEED TO BUILD PC?
Title: Building a High-Performance PC: A Comprehensive Guide
Are you a tech enthusiast looking to embark on the journey of building your own high-performance PC? Whether you're a gamer, content creator, or simply seeking a custom computing experience, building your PC can be both rewarding and empowering. In this guide, we'll take you through the step-by-step process of assembling a powerful PC from scratch. Let's dive in!
1. Planning Your Build:
Before you dive into the build process, take some time to plan out your PC build. Define your use case – gaming, video editing, programming, etc. Set a budget, consider compatibility between components, and make a list of parts you'll need.
2. Selecting Components:
a. CPU (Central Processing Unit): Choose a CPU that matches your needs. Consider factors like core count, clock speed, and compatibility with your chosen motherboard.
b. Motherboard: Your motherboard choice affects compatibility and expansion options. Ensure it supports your CPU, has enough RAM slots, and the necessary connectors.
c. GPU (Graphics Processing Unit): For gaming or graphics-intensive tasks, invest in a powerful GPU. Research benchmarks and choose a card that meets your performance expectations.
d. RAM (Random Access Memory): Opt for sufficient RAM for multitasking and running applications smoothly. 16GB is a good starting point for most users.
e. Storage: Decide between SSDs (faster) and HDDs (more storage). Consider an SSD for your OS and frequently used software.
f. Power Supply: Choose a reliable PSU that provides enough power for your components. Ensure it's from a reputable brand and offers some headroom for future upgrades.
g. Cooling: Depending on your CPU choice, you may need an aftermarket cooler for efficient heat dissipation.
h. Case: Select a case that accommodates your components, offers good airflow, and has space for cable management.
3. Building Process:
a. Prepare Your Workspace: Clear a clean, well-lit area to assemble your PC. Have tools like screwdrivers ready.
b. Install CPU and Cooler: Follow your CPU manufacturer's instructions to install the CPU onto the motherboard. Apply thermal paste and attach the cooler.
c. Install RAM: Insert your RAM sticks into the designated slots on the motherboard.
d. Mount Motherboard: Secure the motherboard in the case, ensuring standoffs are correctly aligned.
e. Install Storage and GPU: Install your storage drives and GPU into their respective slots.
f. Connect Cables: Connect power cables, SATA cables, and data cables as needed. Route cables neatly to ensure good airflow.
g. Connect Case Fans: If your case includes case fans, connect them to appropriate headers on the motherboard.
h. Power Supply Connections: Connect the PSU cables to the motherboard, CPU, GPU, and storage drives.
4. First Boot and Testing:
a. Double-Check Connections: Before powering on, double-check all connections to ensure everything is properly connected.
b. Power On: Press the power button and check if all components light up and fans spin. If not, troubleshoot connections.
c. BIOS Setup: Enter the BIOS to configure boot order, RAM settings, and other necessary adjustments.
5. Software Installation:
a. Operating System: Install your chosen operating system using a USB drive or optical disc.
b. Drivers: Install motherboard, GPU, and other hardware drivers to ensure proper functionality.
c. Software and Updates: Install essential software and update your OS to the latest version.
6. Final Touches:
a. Cable Management: Neatly organize cables for better airflow and aesthetics.
b. System Monitoring: Install monitoring software to keep an eye on temperatures, performance, and other metrics.
c. Benchmarking: Run benchmark tests to ensure your PC is performing as expected.
Congratulations! You've successfully built your own high-performance PC. Remember that building a PC is a continuous learning experience. Stay updated on hardware trends, software updates, and potential upgrades to keep your system running smoothly and efficiently. Enjoy your custom-built powerhouse for years to come!
2 notes
·
View notes
Text
2004 was a bit too early for standardized 3.5mm jack in phones, that would be closer to 2010 when smartphones with large touch screens took hold. 3.5mm jack was simply too big for most phones. Notable exceptions include Nokia N95 (2007) with a whooping 2.6" screen.


Most phones had a shitty dongle (eww) like for example Sony Ericsson W800i (2005) which was branded "Walkman", clearly in attempt to demonstrate that a phone is capable of having music playing functionality:

This is analogous to the situation we have right now with the USB-C -> 3.5mm jack dongles except worse because each phone company has its own.
Better phones had a 2.5mm jack which was a simple mechanical converter, like Nokia E51 (2007) I bought in mid-2008 and replaced my MP3 player with. It was fairly annoying and it took me several dongles to find one that I was sort of okay with.


There's also a problem with storage. Nokia 5510 (2001), which, btw, also had a 2.5mm jack, was the first Nokia phone with the capability to play music


but it only had 64MB with no way of extending it, allowing to store 16-40 songs depending on quality, according to discussions on gsmarena back in 2006.
The aforementioned W800i had Memory Stick Duo as its storage

which is notably larger than a microSD card.
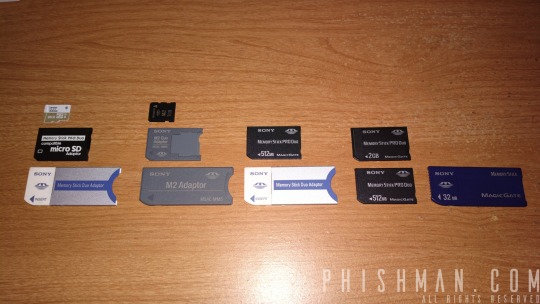
and of course these were the times where the war of different kinds of memory card standards was still waging and was not over until 2010

so Sony Ericsson, which was still insistent on using its own Memory Stick standard, would not be fine with using microSD (2004), but its own Memory Stick Micro (M2) was introduced in 2006 so that W800i from 2005 could not use it.
Both the issue of storage and connectors made phones in 2004 to not be practical yet for purpose of playing music, but it was theoretically possible.
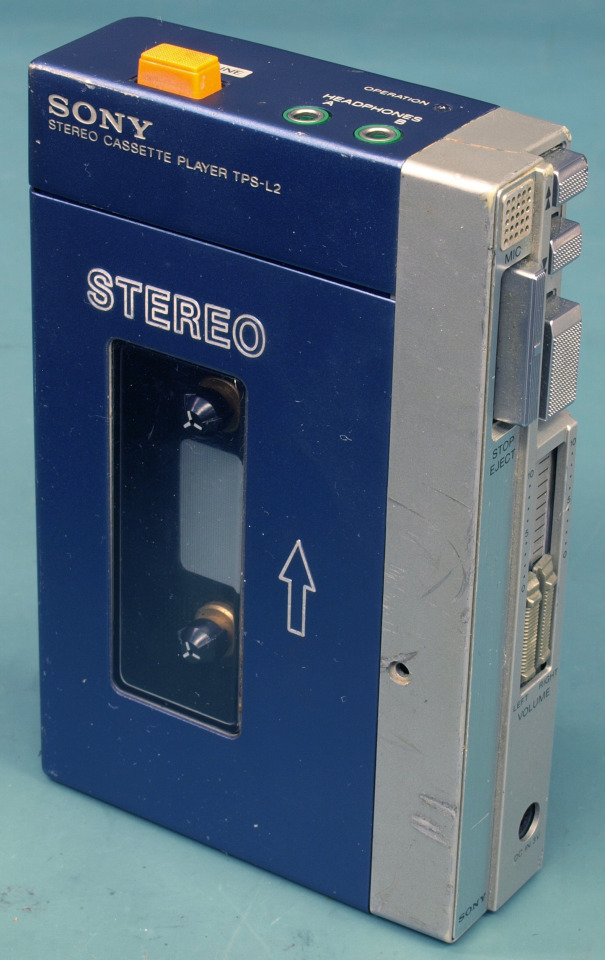
And of course the original post does not mention using 20 year old phones to play music, but merely using the 3.5mm jack to connect to a music playing device, and the 3.5mm jack has been used in this context since way longer than that, most notably, mostly thanks to Sony Walkman TPS-L2 (1979), the first device from the "Walkman" brand that had not only a headphone jack, but two headphone jacks.

Then there's also the fact that we ended up with 3.5mm jack is also not a given, since 3.5mm jack is itself an improvement on the 6.3mm jack (the following photo demonstrates a 6.3mm jack to 3.5mm jack cable)

Now here for my personal opinion: it's kinda sad we switched from needing the dongle, to not needing the dongle, to needing the dongle again. And yes, bluetooth audio exists, which I even use, but even now it is notoriously unreliable.
Furthermore whoever removed the audio jack from phones should be grilled in front of congress. The fact that I need a dongle to listen to music on a modern telephone while 20 years ago I could have simply plugged a universally standardized cord into the audio jack everyone knew how to use is an anti-human move that should be punished.
82K notes
·
View notes
Text
Price: [price_with_discount] (as of [price_update_date] - Details) [ad_1] Product Description: Easily connect and expand your device's capabilities with our 8 Pin to USB OTG Adapter. Designed for Apple devices, this compact and lightweight adapter is perfect for transferring data, accessing external storage, or connecting USB peripherals. Key Features: Seamless Compatibility: Works with iPhones and iPads equipped with a 8 Pin port. Supports iOS 9.2 and later. Versatile Functionality: Connect USB flash drives, keyboards, cameras, card readers, and more directly to your device. High-Speed Data Transfer: Enjoy fast and reliable transfer speeds for photos, videos, and documents. Plug & Play: No app installation required—simply plug it in and get started. Compact & Durable Design: Portable and built to last, making it ideal for travel or everyday use. Specifications: Connector 1: 8 Pin Connector 2: USB-A Material: FineWoven cable and aluminum alloy casing for a sleek finish and enhanced durability. Dimensions: Lightweight and pocket-sized for convenience. Elevate your productivity and streamline your data transfer process with the Lightning to USB OTG Adapter. Perfect for students, professionals, and travelers alike. HOW TO USE: Connect the 8 pin USB Camera Adapter to iPhone/iPad, open the Photos app, which let you choose photos and videos to import, then organizes them into albums. for iOS13+, is the two-way transmite. You can transsfer picture, video, MP3 files, MP4 files, Excel, Word, PPT, PDF on Files App. PLUG AND PLAY: Easy to use, No need to take out the memory card from the camera, fast and stable connection. With the Lightning to USB Camera Adapter, you can transfer photos & videos from your high-resolution digital camera to your Phone and Pad directly. You can also share the human scenery along the way with your family or friends anytime, anywhere, and share the unforgettable moments you encounter. Peripherals Supported: Digital camera, SLR Camera, USB Flash Drive, Card reader, USB Headphone, guitar, MIDI keyboard, etc.(The maximum current of the peripherals does not exceed 500 mAh). Do NOT support the printer, hard disk drive. Partial support with Ethernet, DAC. With USB 2.0 speed, 14MB/S - 16MB/S. Compatible Device: This adapter compatible with multiple devices, such as iPhone 14, 13, 12, 11/Xs/Xs Max/X/8/8 Plus/7/7Plus/6/6 Plus/5/5S/SE and iPad Air /Mini /Pro (under folder:DCIM. The iPhone 7 and later models can read 4K video.) Support iOS 9.2- iOS18 and before - No APP Needed. [ad_2]
0 notes
Photo

Discover the vibrant new COLORFUL RTX 5080 DOOM Edition, Neptune Liquid-Cooled RTX 5090, DDR5 Memory, and a Monster 3200W PSU with 8x 16-Pin Connectors and BTF GPU! This lineup showcases COLORFUL’s bold creativity at Computex 2025. The DOOM-themed graphics cards feature eye-catching green acrylic shrouds, triple-fan cooling, and limited-edition designs inspired by the Dark Ages. Coupled with a premium 3200W PSU rated at 80 Plus Titanium, these components set a new standard in gaming and high-performance hardware. The Neptune RTX 5080 iteration blends sleek aluminum with liquid cooling, powered by fast DDR5 memory with Neptune branding. Plus, BTF ecosystem products such as modular GPUs, motherboards, and PSUs showcase cutting-edge tech that’s perfect for enthusiasts seeking customization and top-tier power delivery. This showcases how innovation and design come together to push gaming and computing to new heights. Are you excited to see how these advanced components will revolutionize gaming setups? Drop your thoughts below! Keep an eye out for pricing updates as these incredible products hit the market soon. #GamingHardware #RTX5080 #Computex2025 #HighPerformancePC #LiquidCooling #CustomBuilds #GamingTech #PowerSupply #NVIDIA #DDR5Memory #PCEnthusiasts #TechInnovation
0 notes